#192.168.1.1 setup tp link
Explore tagged Tumblr posts
Visit Tumblr Blog
Explore Tumblr blogs with no restrictions, modern design and the best experience.
Last Seen Tumblr Blogs


Fun Fact
The most popular pages on Tumblr are about Minecraft, GIFs, and David J. Peterson.
Text
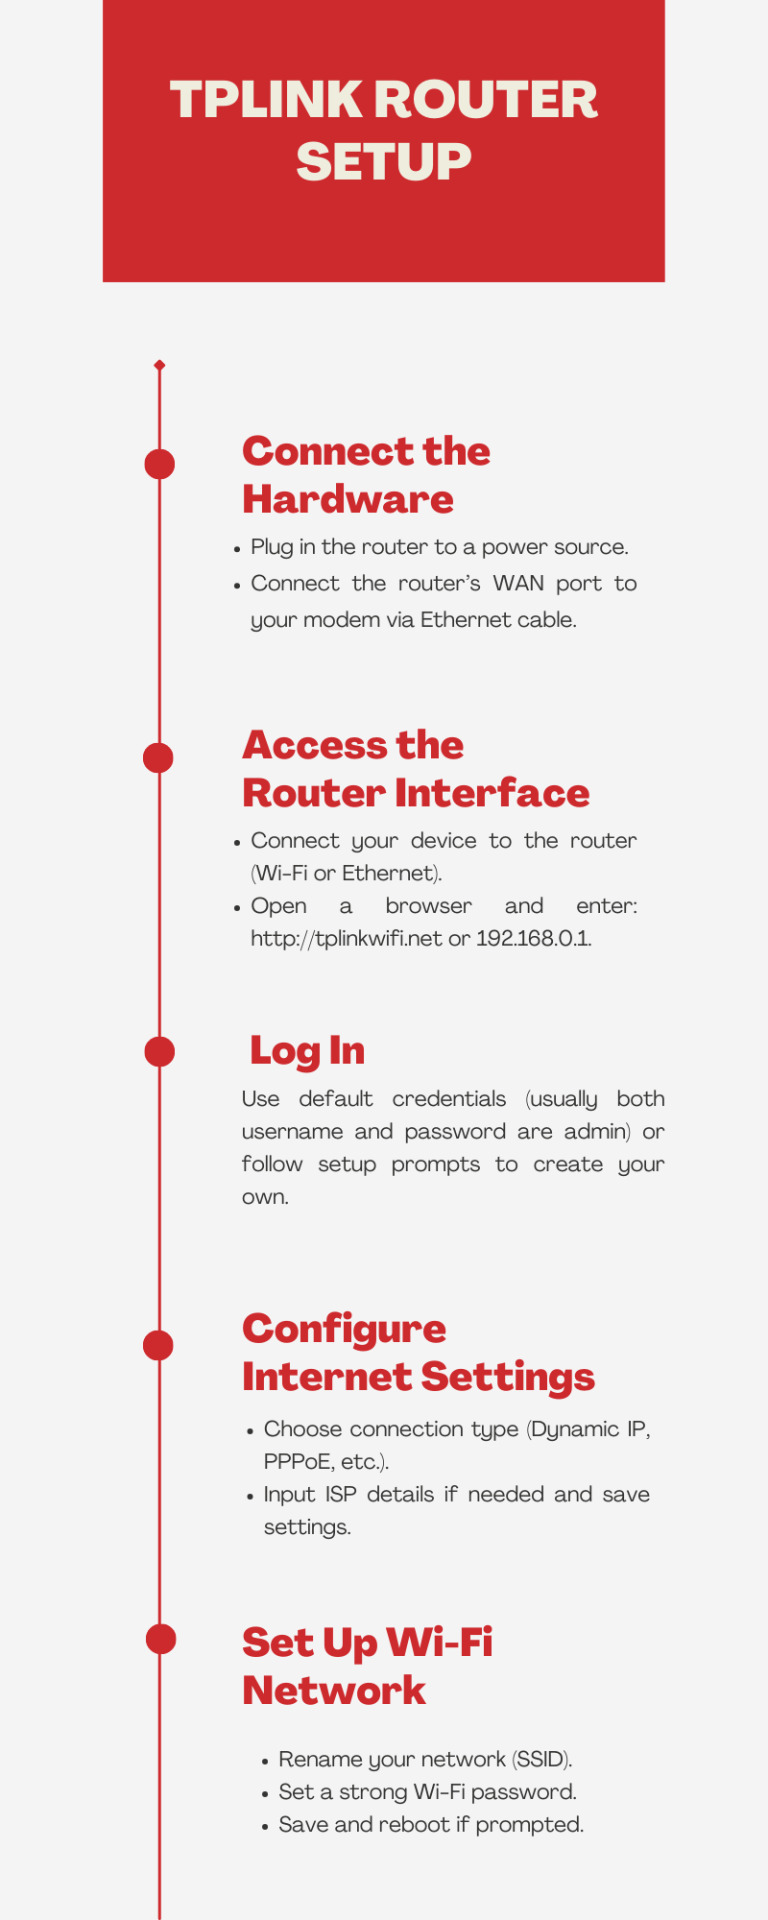
Tplink Router Setup
To perform the tplink router setup, connect the router to your modem and power. Connect your computer or phone to the TP-Link WiFi network and open a web browser. Enter the default IP address (usually 192.168.0.1 or 192.168.1.1) and follow the setup wizard to configure your network.
0 notes
Text
Truy cập Router từ xa qua Internet: Lợi ích và Hướng dẫn chi tiết
Trong thời đại công nghệ số, việc quản lý mạng từ xa ngày càng trở nên quan trọng, đặc biệt đối với những người thường xuyên di chuyển hoặc quản trị nhiều hệ thống mạng khác nhau. Truy cập từ xa vào router qua Internet là giải pháp hiệu quả giúp bạn kiểm soát và điều chỉnh mạng dễ dàng mọi lúc mọi nơi, chỉ với một thiết bị kết nối Internet.

Lợi ích của việc truy cập từ xa vào router
Truy cập router từ xa mang lại nhiều lợi ích thiết thực, bao gồm:
Quản lý và cấu hình router từ xa: Bạn có thể dễ dàng kiểm tra, cấu hình và điều chỉnh các thiết lập trên router như mở port, thay đổi cài đặt NAT, cấu hình VPN,... mà không cần phải có mặt trực tiếp tại nơi đặt thiết bị.
Khắc phục sự cố nhanh chóng: Khi gặp sự cố mạng, bạn có thể truy cập router từ xa để xác định nguyên nhân và xử lý kịp thời, giảm thiểu thời gian gián đoạn kết nối.
Giám sát hoạt động của router: Theo dõi thông số kỹ thuật, tình trạng hoạt động, hiệu suất của router, băng thông sử dụng và phát hiện các dấu hiệu bất thường.
Thay đổi cài đặt modem: Điều chỉnh các thiết lập Wi-Fi, mật khẩu, cập nhật firmware một cách thuận tiện.
Hướng dẫn truy cập từ xa vào router qua Internet
Để truy cập router từ xa, bạn cần thực hiện các bước sau:
Bước 1: Truy cập vào giao diện quản lý của router
Kết nối máy tính hoặc thiết bị di động với mạng của router.
Mở trình duyệt web và nhập địa chỉ IP của router (thường là 192.168.1.1 hoặc 192.168.0.1).
Đăng nhập bằng tên người dùng và mật khẩu admin.
Bước 2: Thiết lập truy cập từ xa
Tùy thuộc vào loại router bạn đang sử dụng, các bước thiết lập có thể khác nhau. Dưới đây là hướng dẫn chung cho một số loại router phổ biến:
Đối với router Draytek:
Vào "System Maintenance" > "Management" > "IPv4 Management Setup".
Tích chọn "Allow management from the Internet".
Chọn giao thức truy cập HTTP hoặc HTTPS (khuyến nghị HTTPS).
Cân nhắc tắt "Disable ping from the internet" để tránh bị quét IP.
Thay đổi cổng quản lý mặc định (80 hoặc 443) sang cổng khác.
Bật bảo vệ chống tấn công brute force và "HTTPS Server".
Thiết lập danh sách địa chỉ IP được phép truy cập router từ xa.
Đối với router TP-Link:
Tìm mục cài đặt truy cập từ xa trong menu quản lý.
Thay đổi cổng quản lý web sang cổng tùy chỉnh.
Nhập địa chỉ IP quản lý từ xa (không để mặc định 0.0.0.0).
Cập nhật mật khẩu admin mạnh hơn.
Bước 3: Thử kết nối từ xa
Sử dụng thiết bị di động hoặc máy tính không kết nối vào mạng nội bộ.
Mở trình duyệt web và nhập địa chỉ IP WAN của router kèm theo cổng đã thiết lập (ví dụ: http://<địa_chỉ_IP_WAN>:4433).
Đăng nhập bằng thông tin admin để truy cập giao diện quản lý từ xa.
Một số lưu ý khi truy cập từ xa vào router
Bảo mật:
Tránh sử dụng các cổng dễ bị tấn công (21, 25, 110, 119, 139, 145, 445).
Thay đổi mật khẩu mặc định của router bằng mật khẩu mạnh, kết hợp chữ hoa, chữ thường, số và ký tự đặc biệt.
Xung đột cổng: Kiểm tra kỹ cấu hình cổng để tránh xung đột với các dịch vụ khác như máy chủ ảo.
Bằng cách làm theo hướng dẫn và lưu ý những điểm quan trọng trên, bạn có thể dễ dàng truy cập và quản lý router từ xa qua Internet một cách an toàn và hiệu quả.
Tìm hiểu thêm: https://vohoang.vn/truy-cap-tu-xa-vao-router-qua-internet
1 note
·
View note
Text
how to setup surfshark on vpn tp-link router you tube
🔒🌍✨ Obtén 3 Meses GRATIS de VPN - Acceso a Internet Seguro y Privado en Todo el Mundo! Haz Clic Aquí ✨🌍🔒
how to setup surfshark on vpn tp-link router you tube
Configuración Surfshark en enrutador TP-Link
Con la creciente preocupación por la privacidad en línea, cada vez más personas recurren a servicios de VPN como Surfshark para proteger su conexión a Internet. Una forma conveniente de garantizar que todos los dispositivos de tu red estén protegidos es configurar Surfshark en tu enrutador TP-Link.
El primer paso para configurar Surfshark en tu enrutador TP-Link es asegurarse de que tu enrutador sea compatible con VPN. Una vez que hayas verificado la compatibilidad, deberás acceder a la configuración de tu enrutador a través de tu navegador web e ingresar tus credenciales de inicio de sesión.
Luego, deberás encontrar la sección de configuración de VPN en tu enrutador TP-Link y seguir las instrucciones proporcionadas por Surfshark para completar la configuración. Esto generalmente implicará ingresar la dirección del servidor VPN, tu nombre de usuario y contraseña proporcionados por Surfshark.
Una vez que hayas completado la configuración, todos los dispositivos conectados a tu red a través de ese enrutador estarán protegidos por Surfshark. Esto significa que tu información personal estará encriptada y tu actividad en línea será anónima.
Configurar Surfshark en tu enrutador TP-Link es una excelente manera de proteger toda tu red doméstica con facilidad. No solo te brinda tranquilidad en términos de seguridad en línea, sino que también te permite aprovechar al máximo los beneficios de una VPN en todos tus dispositivos conectados a la red. ¡Asegúrate de seguir los pasos correctamente para disfrutar de una experiencia en línea segura y privada!
Tutorial Surfshark en router TP-Link
¡Bienvenidos al tutorial de Surfshark en un router TP-Link! En este artículo te enseñaremos cómo configurar la VPN de Surfshark en tu router TP-Link para proteger tu privacidad y seguridad en línea.
Antes que nada, es importante asegurarse de que tu router TP-Link sea compatible con la configuración de una VPN. Una vez verificado esto, simplemente sigue estos sencillos pasos:
Accede a la configuración de tu router ingresando la dirección IP en tu navegador web. Por lo general, la dirección es 192.168.0.1 o 192.168.1.1.
Inicia sesión con tus credenciales de administrador. Si nunca has cambiado la contraseña, puedes encontrarla en la etiqueta en la parte inferior del router.
Busca la sección de VPN en la configuración del router y selecciona la opción para agregar una nueva conexión VPN.
Ingresa los datos de configuración proporcionados por Surfshark, que incluyen el servidor al que deseas conectarte y tus credenciales de inicio de sesión.
Guarda la configuración y reinicia tu router TP-Link para aplicar los cambios.
Una vez completados estos pasos, tu router TP-Link estará protegido por la VPN de Surfshark, lo que garantiza que todas tus actividades en línea estén cifradas y seguras.
¡Disfruta de una navegación segura y privada con Surfshark en tu router TP-Link!
Instalación Surfshark en router TP-Link
Si estás buscando agregar una capa adicional de seguridad a todas las conexiones de tu red doméstica, instalar Surfshark en tu router TP-Link puede ser la solución perfecta. Al hacerlo, todas tus actividades en línea estarán protegidas por una sólida encriptación, lo que garantiza la privacidad y seguridad de tus datos.
El proceso de instalación de Surfshark en un router TP-Link es relativamente sencillo y puede llevarse a cabo en unos pocos pasos. En primer lugar, asegúrate de que tu router sea compatible con la configuración de VPN. Luego, accede a la configuración de tu router a través de un navegador web e inicia sesión con tus credenciales.
Una vez dentro de la configuración, busca la sección de VPN o configuración de red y selecciona la opción para agregar una nueva conexión VPN. Introduce la información de servidor proporcionada por Surfshark, junto con tus credenciales de inicio de sesión.
Guarda la configuración, reinicia tu router y ¡listo! Ahora todas las conexiones a través de tu red doméstica estarán protegidas por Surfshark. Puedes conectar dispositivos ilimitados a tu red y disfrutar de una navegación segura y privada en todo momento.
Instalar Surfshark en tu router TP-Link es una excelente manera de proteger todos tus dispositivos conectados a Internet y garantizar la máxima seguridad en línea. ¡No esperes más y mejora tu privacidad digital hoy mismo!
Pasos para conectar Surfshark en enrutador TP-Link
Para aquellos que deseen disfrutar de una navegación segura y privada en todos los dispositivos conectados a su red doméstica, conectar Surfshark a un enrutador TP-Link es una excelente opción. Con esta configuración, todos los dispositivos que se conecten a la red Wi-Fi estarán protegidos por los servicios de VPN ofrecidos por Surfshark, garantizando la privacidad de la información transmitida a través de la red.
Los pasos para conectar Surfshark en un enrutador TP-Link son sencillos y pueden realizarse siguiendo estos pasos:
Accede a la configuración de tu enrutador TP-Link a través de tu navegador web, introduciendo la dirección IP del enrutador en la barra de direcciones.
Inicia sesión en la interfaz de administración del enrutador con tu nombre de usuario y contraseña.
Busca la sección de configuración de VPN en el menú del enrutador y selecciona la opción para agregar una nueva conexión VPN.
Introduce la información de configuración proporcionada por Surfshark, incluyendo el servidor al que deseas conectarte, el nombre de usuario y la contraseña.
Guarda la configuración y reinicia el enrutador para aplicar los cambios.
Una vez completados estos pasos, todos los dispositivos conectados a tu red Wi-Fi a través del enrutador TP-Link estarán protegidos por la VPN de Surfshark, garantizando una navegación segura y privada en todo momento. ¡Disfruta de una mayor tranquilidad y privacidad en línea con esta sencilla configuración!
Tutorial completo Surfshark en enrutador TP-Link
Un tutorial completo de Surfshark en un enrutador TP-Link te brinda la posibilidad de proteger tu red doméstica y disfrutar de una conexión segura mientras navegas por internet. Configurar una VPN como Surfshark en tu enrutador TP-Link es una forma eficaz de cifrar tus datos y proteger tu privacidad en línea.
Para empezar, asegúrate de tener una cuenta activa de Surfshark. Luego, accede a la configuración de tu enrutador TP-Link utilizando tu navegador web e inicia sesión con tus credenciales. Busca la sección de configuración de red o VPN en la interfaz de administración del enrutador.
Dentro de la configuración de VPN, selecciona la opción de agregar una nueva conexión VPN y elige el protocolo OpenVPN. Ingresa la dirección del servidor VPN proporcionada por Surfshark, así como tus credenciales de inicio de sesión. Guarda la configuración y reinicia tu enrutador para aplicar los cambios.
Una vez que tu enrutador TP-Link esté configurado con Surfshark, todos los dispositivos conectados a tu red doméstica estarán protegidos por la VPN. Podrás navegar por internet de forma segura, acceder a contenido restringido geográficamente y proteger tus datos privados.
En resumen, configurar Surfshark en un enrutador TP-Link es una forma conveniente y efectiva de garantizar la seguridad de tu red doméstica y proteger tu privacidad en línea. Sigue este tutorial completo para disfrutar de una experiencia de navegación segura y sin restricciones. ¡Protege tus datos y disfruta de internet de forma segura con Surfshark y TP-Link!
0 notes
Text
como configurar roteador tp link servidor vpn
🔒🌍✨ Ganhe 3 Meses de VPN GRÁTIS - Acesso à Internet Seguro e Privado em Todo o Mundo! Clique Aqui ✨🌍🔒
como configurar roteador tp link servidor vpn
Configuração roteador TP-Link VPN
A configuração de um roteador TP-Link com suporte a VPN é uma tarefa importante para garantir a segurança e privacidade da rede. As redes privadas virtuais (VPNs) criptografam o tráfego de dados, protegendo as informações transmitidas pela rede. Para configurar a VPN em um roteador TP-Link, siga as etapas abaixo:
Acesse o painel de administração do roteador digitando o endereço de IP padrão (geralmente 192.168.0.1 ou 192.168.1.1) no navegador da web e faça login com as credenciais corretas.
Navegue até a seção de VPN nas configurações do roteador. Aqui, você poderá escolher o tipo de protocolo VPN a ser utilizado, como PPTP, L2TP ou OpenVPN.
Insira as informações do servidor VPN fornecidas pelo provedor de serviços VPN, como endereço do servidor, nome de usu��rio e senha.
Configure as opções de segurança desejadas, que incluem a escolha do tipo de criptografia e autenticação.
Salve as configurações e reinicie o roteador para aplicar as alterações.
É importante lembrar que nem todos os modelos de roteadores TP-Link suportam a configuração de VPN, portanto, verifique a compatibilidade do seu dispositivo antes de prosseguir com as etapas acima. Além disso, recomendamos que você escolha um provedor de serviços VPN confiável para garantir uma conexão segura e estável.
Seguindo essas orientações, você poderá configurar facilmente a VPN em seu roteador TP-Link e desfrutar de uma conexão segura e protegida para suas atividades online.
Servidor VPN roteador
Um servidor VPN roteador é uma solução tecnológica que combina as funcionalidades de um servidor VPN e de um roteador em um único dispositivo. Esse equipamento é especialmente útil para empresas e usuários que desejam melhorar a segurança das suas redes e proteger a privacidade dos dados transmitidos pela internet.
Ao utilizar um servidor VPN roteador, é possível criar uma rede privada virtual (VPN) que criptografa todas as informações transmitidas entre os dispositivos conectados. Isso garante que mesmo em redes públicas ou compartilhadas, como em hotéis, aeroportos ou cafés, os dados permaneçam seguros e protegidos de possíveis ataques cibernéticos.
Além disso, o servidor VPN roteador permite o acesso remoto à rede da empresa de forma segura, possibilitando que os funcionários trabalhem de casa ou em trânsito sem comprometer a integridade dos dados da empresa.
Com a crescente preocupação com a privacidade online, o servidor VPN roteador se torna uma ferramenta essencial para garantir a proteção dos dados pessoais e profissionais. É importante escolher um equipamento de qualidade e seguir boas práticas de segurança cibernética para garantir a eficácia dessa solução.
Em resumo, o servidor VPN roteador é uma excelente opção para quem busca uma conexão segura e privada na internet, seja em âmbito pessoal ou empresarial. Invista em tecnologias que protejam suas informações e desfrute de uma navegação mais segura e tranquila.
Setup VPN no TP-Link
Hoje em dia, proteger a nossa privacidade online é essencial. Uma maneira eficaz de manter os nossos dados seguros enquanto navegamos na internet é através do uso de uma VPN (Virtual Private Network). Neste artigo, vamos falar sobre como configurar uma VPN no seu roteador TP-Link para proteger a sua conexão e manter os seus dados seguros.
Configurar uma VPN no seu roteador TP-Link é relativamente simples e pode ser feito seguindo alguns passos. Primeiro, é importante escolher um fornecedor de serviços VPN confiável e estabelecer uma conta com eles. Em seguida, certifique-se de que o seu roteador suporta VPN e tem a funcionalidade adequada para configurar uma conexão segura.
Depois de escolher o seu provedor de VPN e garantir que o seu roteador seja compatível, o próximo passo é acessar as configurações do roteador e inserir as informações fornecidas pelo seu provedor de VPN, como o endereço do servidor, o nome de usuário e a senha. Uma vez que todas as informações tenham sido inseridas corretamente, a sua conexão estará protegida e os seus dados serão criptografados.
Ao configurar uma VPN no seu roteador TP-Link, você pode garantir que todos os dispositivos conectados à sua rede doméstica estejam protegidos e desfrutar de uma navegação mais segura e privada. Não se esqueça de verificar periodicamente as configurações da sua VPN para garantir que a sua conexão esteja sempre protegida e os seus dados seguros.
Segurança rede roteador TP-Link
Os roteadores TP-Link são amplamente utilizados em residências e escritórios devido à sua confiabilidade e facilidade de uso. No entanto, assim como qualquer dispositivo de rede, é importante garantir a segurança do roteador TP-Link para proteger sua conexão à Internet e dados pessoais.
Uma das primeiras medidas para garantir a segurança da rede do seu roteador TP-Link é alterar a senha padrão de fábrica. Muitos roteadores vêm com senhas padrão pré-definidas, o que os torna vulneráveis a ataques de hackers. Ao alterar a senha para uma combinação forte e única, você cria uma camada adicional de segurança para sua rede.
Além disso, é recomendável atualizar regularmente o firmware do roteador TP-Link. As atualizações de firmware frequentes geralmente corrigem vulnerabilidades de segurança conhecidas e melhoram o desempenho do dispositivo. Verifique o site oficial da TP-Link regularmente em busca de atualizações de firmware e siga as instruções fornecidas para garantir que seu roteador esteja sempre protegido.
Outra dica importante é ativar a criptografia WPA2 em sua rede Wi-Fi. A criptografia WPA2 é uma das formas mais seguras de proteger sua conexão sem fio contra invasores. Acesse as configurações do seu roteador TP-Link e ative a criptografia WPA2, configurando uma senha forte para garantir a segurança da sua rede.
Seguindo essas dicas simples, você pode aumentar significativamente a segurança da rede do seu roteador TP-Link e proteger seus dispositivos e dados contra ameaças online. Lembre-se sempre de manter seu roteador e todos os dispositivos conectados atualizados e protegidos para desfrutar de uma experiência online segura e tranquila.
Tutorial configurar VPN roteador
Para garantir a segurança dos seus dados e a privacidade da sua conexão de internet, configurar uma VPN no seu roteador é uma excelente opção. Com uma VPN (Virtual Private Network), você pode navegar na internet de forma mais segura e anônima, protegendo os seus dados de hackers e de empresas que monitoram a sua atividade online.
A configuração de uma VPN no seu roteador pode variar de acordo com o modelo e marca do dispositivo, mas geralmente envolve alguns passos básicos. Primeiramente, é necessário escolher um provedor de VPN confiável e assinar um plano de serviço. Em seguida, você deve acessar o painel de administração do seu roteador digitando o endereço de IP na barra de navegação do seu navegador.
Dentro do painel de administração, procure pela seção de configurações de VPN. Aqui, você deve inserir as informações fornecidas pelo provedor de VPN, como o endereço do servidor, o tipo de protocolo e as credenciais de login. Após salvar as configurações, reinicie o roteador para aplicar as mudanças.
É importante ressaltar que nem todos os roteadores suportam a configuração de VPN, por isso verifique se o seu aparelho é compatível antes de iniciar o processo. Ao configurar uma VPN no roteador, você protege todos os dispositivos conectados à sua rede, garantindo uma camada adicional de segurança e privacidade online.
0 notes
Text
does tp link work with express vpn
🔒🌍✨ Get 3 Months FREE VPN - Secure & Private Internet Access Worldwide! Click Here ✨🌍🔒
does tp link work with express vpn
TP-Link compatibility with ExpressVPN
Title: Ensuring Seamless Integration: TP-Link Compatibility with ExpressVPN
In the ever-expanding realm of online security and privacy, the integration between routers and virtual private networks (VPNs) plays a pivotal role. TP-Link, a renowned name in networking hardware, has garnered attention for its compatibility with leading VPN providers. Among these, ExpressVPN stands out as a reliable choice for safeguarding internet connections.
ExpressVPN's compatibility with TP-Link routers offers users a seamless experience in setting up and maintaining secure networks. Whether it's protecting sensitive data, bypassing geo-restrictions, or ensuring anonymity online, this partnership delivers on multiple fronts.
Setting up ExpressVPN on TP-Link routers is straightforward, thanks to comprehensive guides provided by both parties. Users can choose from a range of TP-Link router models, ensuring flexibility to match their specific requirements. Once configured, the VPN encrypts all internet traffic passing through the router, shielding it from prying eyes and potential cyber threats.
One notable advantage of using ExpressVPN with TP-Link routers is the ability to secure multiple devices simultaneously. Whether it's smartphones, laptops, gaming consoles, or smart home devices, all can benefit from the VPN's protection when connected to the router.
Moreover, ExpressVPN's vast server network ensures high-speed connections and reliable performance, even when streaming HD content or engaging in bandwidth-intensive activities. This ensures that users can enjoy a smooth online experience without compromising on security or speed.
In conclusion, the compatibility between TP-Link routers and ExpressVPN underscores a commitment to providing users with robust security and privacy solutions. By harnessing the strengths of both platforms, individuals and businesses alike can navigate the digital landscape with confidence, knowing their online activities remain shielded from external threats.
TP-Link router ExpressVPN setup
Setting up ExpressVPN on your TP-Link router can significantly enhance your online security and privacy. With ExpressVPN's robust encryption and global server network, you can browse the internet anonymously and access geo-restricted content with ease. Follow these simple steps to configure ExpressVPN on your TP-Link router:
Subscribe to ExpressVPN: Before you begin, ensure you have an active subscription to ExpressVPN. If not, visit their website and choose a plan that suits your needs.
Access Your TP-Link Router Settings: Open your web browser and enter your router's IP address into the address bar. Typically, this is either "192.168.0.1" or "192.168.1.1". Log in using your administrator credentials.
Navigate to VPN Settings: Once logged in, locate the VPN settings section within your router's dashboard. This can usually be found under the "Advanced" or "Security" tab.
Configure ExpressVPN Settings: Enter the necessary ExpressVPN configuration details provided by the service. This includes the server address, username, password, and any other required information.
Connect to ExpressVPN: After inputting the configuration details, save the settings and initiate the connection to ExpressVPN. Your router will establish a secure VPN tunnel to the selected server.
Verify Connection: To ensure everything is set up correctly, visit a website to confirm that your connection is now routed through ExpressVPN. You can also use online tools to check your IP address and confirm that it matches the server location you selected.
Enjoy Secure Browsing: Congratulations! Your TP-Link router is now configured to use ExpressVPN, providing you with enhanced privacy, security, and unrestricted access to the internet.
By following these steps, you can enjoy the benefits of ExpressVPN across all devices connected to your TP-Link router, ensuring a secure and private online experience for you and your family.
ExpressVPN on TP-Link devices
Using ExpressVPN on TP-Link devices offers a seamless and secure way to protect your online activities. TP-Link routers are known for their reliability and performance, and when combined with the robust features of ExpressVPN, users can enjoy enhanced privacy and anonymity while browsing the internet.
One of the primary benefits of using ExpressVPN on TP-Link devices is the ease of setup. ExpressVPN provides user-friendly setup guides specifically tailored for TP-Link routers, making it simple for even novice users to configure their devices. With step-by-step instructions and intuitive interfaces, the setup process can be completed in just a few minutes.
Once configured, ExpressVPN encrypts all internet traffic passing through the TP-Link router, ensuring that sensitive information remains secure from prying eyes. This encryption is especially crucial when using public Wi-Fi networks, as it prevents hackers and cybercriminals from intercepting data transmissions.
Additionally, ExpressVPN offers a vast network of servers located in numerous countries around the world. This allows users to bypass geo-restrictions and access content that may be blocked in their region. Whether streaming their favorite movies and TV shows or accessing websites and services that are unavailable locally, users can enjoy unrestricted internet access with ExpressVPN on TP-Link devices.
Furthermore, ExpressVPN employs advanced security protocols such as OpenVPN and AES-256 encryption to safeguard user data. Combined with features like a kill switch and DNS leak protection, users can browse the internet with confidence, knowing that their privacy is protected at all times.
In conclusion, utilizing ExpressVPN on TP-Link devices offers a reliable and effective solution for enhancing online security and privacy. With easy setup, robust encryption, and access to a global network of servers, users can enjoy a safer and more unrestricted internet experience.
ExpressVPN router compatibility
Title: Ensuring Seamless Connectivity: ExpressVPN Router Compatibility
In today's interconnected world, internet security and privacy have become paramount concerns. ExpressVPN stands out as a leading provider of virtual private network (VPN) services, offering users the ability to safeguard their online activities. However, for individuals seeking comprehensive protection for all devices within their network, the compatibility of ExpressVPN with routers becomes a crucial consideration.
ExpressVPN is renowned for its extensive compatibility with various devices and platforms, including routers. By configuring ExpressVPN on a router, users can protect all internet-connected devices in their home or office, such as computers, smartphones, smart TVs, gaming consoles, and IoT devices. This comprehensive approach ensures that every device benefits from encrypted data transmission and enhanced online anonymity.
The compatibility of ExpressVPN with routers extends to a wide range of router models and brands, catering to diverse user preferences and requirements. Whether users possess a basic home router or a high-performance enterprise-grade router, ExpressVPN offers detailed setup guides and support to facilitate smooth integration. This versatility enables users to enjoy the benefits of ExpressVPN across all their devices without compromising on speed or security.
Moreover, configuring ExpressVPN on a router streamlines the VPN usage experience by eliminating the need to install and manage VPN applications on individual devices. This centralized approach simplifies the setup process and ensures consistent protection across all devices without requiring manual intervention.
In conclusion, ExpressVPN's compatibility with routers enhances its appeal as a comprehensive solution for safeguarding online privacy and security. By extending VPN protection to all devices within a network, ExpressVPN empowers users to enjoy a safer and more secure internet experience without compromising on performance or convenience. Whether at home or in the office, ExpressVPN router compatibility ensures seamless connectivity and peace of mind.
TP-Link VPN setup
Setting up a VPN (Virtual Private Network) on your TP-Link router offers enhanced security and privacy for your internet connection. With a VPN, your online activities are encrypted and your IP address is masked, providing anonymity and protecting your sensitive data from prying eyes.
To begin the TP-Link VPN setup process, you'll first need to subscribe to a reliable VPN service. Once you have chosen a provider, follow these steps:
Access your TP-Link router's admin panel by typing its IP address into your web browser. Typically, the default IP address is "192.168.0.1" or "192.168.1.1". Enter your username and password when prompted.
Navigate to the "VPN" or "VPN Client" section in the router's settings menu. This location may vary depending on your TP-Link model.
Select the option to add a new VPN profile or configuration. Here, you will need to input the details provided by your VPN service, including the server address, username, password, and any additional authentication settings.
Choose the appropriate VPN protocol. Most VPN providers offer a choice between protocols such as PPTP, L2TP/IPsec, and OpenVPN. Select the one recommended by your VPN service for optimal performance and security.
Save your settings and then activate the VPN connection. Your TP-Link router should now be configured to route all internet traffic through the VPN tunnel.
To ensure that your VPN is working correctly, you can perform a quick test by visiting a website that displays your IP address. If the displayed IP address matches the one provided by your VPN service, then your setup is successful.
By following these steps, you can enjoy the benefits of a secure and private internet connection across all devices connected to your TP-Link router. Remember to periodically check for firmware updates and adjust your VPN settings as needed to maintain optimal performance.
0 notes
Text
does a archer c8 v4 support vpn
🔒🌍✨ Get 3 Months FREE VPN - Secure & Private Internet Access Worldwide! Click Here ✨🌍🔒
does a archer c8 v4 support vpn
Archer C8 V4 VPN compatibility
The Archer C8 V4 router from TP-Link is a popular choice among users seeking reliable and high-performance networking solutions. One important aspect that many users consider when purchasing a router is its compatibility with Virtual Private Network (VPN) services. VPNs are essential tools for ensuring online privacy, security, and anonymity by encrypting internet traffic and routing it through remote servers.
Fortunately, the Archer C8 V4 router is compatible with VPN services, allowing users to easily set up and configure VPN connections for their devices. Whether you're looking to protect your personal data while browsing the web or access geo-restricted content from anywhere in the world, the Archer C8 V4 router has you covered.
Setting up a VPN connection on the Archer C8 V4 router is straightforward and can be done through the router's web interface. Users have the option to manually configure their VPN settings or use the router's built-in VPN client feature, which supports popular VPN protocols such as PPTP, L2TP/IPsec, and OpenVPN.
By enabling VPN compatibility on the Archer C8 V4 router, users can enjoy a secure and private internet experience across all their connected devices, including smartphones, tablets, and computers. Whether you're at home or on the go, you can rest assured knowing that your online activities are protected from prying eyes and potential threats.
In conclusion, if you're in the market for a reliable router that supports VPN connections, the Archer C8 V4 router from TP-Link is an excellent choice. With its robust features and easy-to-use interface, it provides users with the peace of mind they need to browse the web safely and securely.
Setting up VPN on Archer C8 V4
Setting up a VPN (Virtual Private Network) on your Archer C8 V4 router is a smart way to enhance your online privacy and security. By encrypting your internet connection, a VPN ensures that your data remains private and protected from prying eyes. Fortunately, setting up a VPN on the Archer C8 V4 is a straightforward process that can be accomplished in just a few simple steps.
Firstly, you need to choose a VPN service provider that supports router configurations. Look for a provider that offers detailed instructions or guides specifically for setting up VPNs on routers.
Once you've chosen a VPN provider, log in to your Archer C8 V4 router's admin panel using a web browser. This can usually be done by typing the router's IP address (often 192.168.0.1 or 192.168.1.1) into the address bar.
Next, navigate to the VPN section of the router settings. This is typically found under the "Advanced" or "Security" tab. Look for an option like "VPN Client" or "VPN Setup."
Now, you'll need to enter the VPN connection details provided by your VPN service provider. This usually includes the VPN server address, your username, and password.
Once you've entered the VPN connection details, save your settings and restart your router to apply the changes.
After the router has restarted, your VPN should be up and running. You can verify that the VPN is active by checking your router's status page or by visiting a website that displays your IP address to confirm that it has changed to the VPN server's IP address.
Setting up a VPN on your Archer C8 V4 router is a simple yet effective way to protect your online privacy and security. With just a few easy steps, you can enjoy a more secure internet browsing experience for all devices connected to your network.
VPN protocols on Archer C8 V4
When it comes to securing your online activities, using a VPN (Virtual Private Network) is a wise choice. However, not all VPNs are created equal, and understanding the different protocols available on routers like the Archer C8 V4 can help you make an informed decision.
The Archer C8 V4 router supports various VPN protocols, each with its own strengths and weaknesses. One common protocol is PPTP (Point-to-Point Tunneling Protocol), known for its ease of setup and compatibility with older devices. However, PPTP is considered less secure compared to other protocols, as it lacks strong encryption.
Another protocol supported by the Archer C8 V4 is L2TP/IPsec (Layer 2 Tunneling Protocol with IPsec). L2TP provides better security than PPTP by encapsulating data twice, but it can be slower due to the added encryption overhead.
For higher security, users can opt for OpenVPN, a versatile and highly configurable protocol supported by the Archer C8 V4. OpenVPN uses SSL/TLS protocols for encryption and authentication, making it one of the most secure options available. It also boasts cross-platform compatibility and robust encryption standards.
Lastly, IKEv2/IPsec (Internet Key Exchange version 2 with IPsec) is another protocol supported by the Archer C8 V4. IKEv2/IPsec is known for its stability and ability to quickly reconnect in case of network disruptions, making it ideal for mobile devices.
In conclusion, the Archer C8 V4 offers a range of VPN protocols to cater to different security needs and preferences. Whether you prioritize ease of use, speed, or maximum security, there's a protocol available to suit your requirements. It's essential to weigh the trade-offs between security and performance when selecting the right VPN protocol for your Archer C8 V4 router.
Benefits of using VPN on Archer C8 V4
Using a Virtual Private Network (VPN) on the Archer C8 V4 router offers a myriad of benefits that enhance online security, privacy, and accessibility. A VPN encrypts internet traffic, shielding sensitive data from potential threats such as hackers, identity thieves, and surveillance. By encrypting data, VPNs ensure that confidential information remains protected, reducing the risk of data breaches and unauthorized access.
One of the primary advantages of using a VPN on the Archer C8 V4 router is enhanced privacy. With the ability to mask IP addresses and hide online activities, users can browse the internet anonymously, safeguarding their digital footprint from prying eyes. This level of anonymity is particularly valuable for individuals concerned about their online privacy or those residing in countries with strict censorship laws.
Moreover, VPNs enable users to bypass geographic restrictions and access region-locked content. By connecting to servers located in different countries, users can unlock streaming services, websites, and online platforms that may be restricted in their region. This not only expands entertainment options but also facilitates access to valuable resources such as educational content, news websites, and research materials.
Additionally, utilizing a VPN on the Archer C8 V4 router enhances security when using public Wi-Fi networks. Public Wi-Fi networks are notoriously vulnerable to cyber threats, making them prime targets for hackers seeking to intercept sensitive information. By encrypting internet traffic, VPNs mitigate the risk of data interception and ensure secure browsing, even on unsecured networks.
In conclusion, integrating a VPN with the Archer C8 V4 router offers numerous benefits, including enhanced privacy, access to geo-restricted content, and improved security on public Wi-Fi networks. By prioritizing online security and privacy, users can enjoy a safer and more unrestricted internet experience.
Troubleshooting VPN on Archer C8 V4
When troubleshooting VPN connectivity on the Archer C8 V4 router, there are several steps you can take to identify and resolve the issue. A Virtual Private Network (VPN) allows you to securely connect to a private network from a remote location, ensuring your data is encrypted and your online activity is private. Here are some troubleshooting tips for resolving VPN issues on the Archer C8 V4:
Check VPN Settings: Ensure that the VPN settings on both the router and the device you are connecting from are configured correctly. Check for any typos or incorrect settings that may be causing the connection problem.
Restart Router and Device: Sometimes, a simple restart of the router and the device can help resolve connectivity issues. Power off both devices, wait for a few seconds, and then power them back on.
Update Firmware: Make sure that your Archer C8 V4 router has the latest firmware installed. Firmware updates often include bug fixes and improvements that can help resolve VPN connectivity issues.
Disable Firewalls and Antivirus: Temporary disable any firewalls or antivirus software on your device to rule out any potential conflicts that may be blocking the VPN connection.
Contact Your VPN Provider: If you are still experiencing connectivity issues, reach out to your VPN provider for assistance. They may be able to provide specific troubleshooting steps based on their server configurations.
By following these troubleshooting tips, you can work towards resolving VPN connectivity issues on the Archer C8 V4 router and enjoy a secure and private online browsing experience.
0 notes
Text
can you install a vpn on your rotter
🔒🌍✨ Get 3 Months FREE VPN - Secure & Private Internet Access Worldwide! Click Here ✨🌍🔒
can you install a vpn on your rotter
VPN installation on router
Title: Streamline Your Security: A Guide to VPN Installation on Your Router
In today's digital landscape, ensuring online privacy and security is paramount. Virtual Private Networks (VPNs) offer a powerful solution, encrypting your internet connection and masking your IP address. While installing a VPN on individual devices is common practice, configuring it at the router level can provide comprehensive protection for all devices connected to your network. Here's a step-by-step guide on how to set up a VPN on your router:
Choose a VPN Provider: Select a reputable VPN service provider that offers router compatibility and robust security features. Look for providers with user-friendly interfaces and excellent customer support.
Verify Router Compatibility: Not all routers support VPN installations. Check your router's specifications or contact the manufacturer to ensure compatibility. Popular router brands like Asus, Netgear, and Linksys often have models that support VPN configurations.
Access Router Settings: Log in to your router's admin panel using a web browser and the router's IP address. This information is typically found on the router itself or in the user manual. Enter your username and password to access the settings.
Install VPN Firmware: Some VPN providers offer custom firmware for certain router models, simplifying the installation process. Follow the instructions provided by your VPN provider to flash your router with the custom firmware.
Configure VPN Settings: Once the firmware is installed, navigate to the VPN settings section on your router's admin panel. Enter the VPN server information provided by your VPN provider, including the server address, username, and password.
Test the Connection: After configuring the VPN settings, save the changes and restart your router. Connect a device to your network and verify that the VPN is working correctly by checking your IP address and running a DNS leak test.
By installing a VPN on your router, you can safeguard your entire network, including smartphones, tablets, smart TVs, and IoT devices, with just a single setup. Take control of your online privacy and security today with a VPN-enabled router.
Router VPN setup guide
Title: A Comprehensive Router VPN Setup Guide: Safeguarding Your Online Privacy
In an age where cybersecurity threats loom large and privacy concerns are paramount, setting up a VPN (Virtual Private Network) on your router is a smart move to ensure your online activities remain secure and private. By encrypting your internet connection, a VPN shields your data from prying eyes, whether you're browsing, streaming, or conducting sensitive transactions. Below is a step-by-step guide to help you set up a VPN on your router effectively.
Choose a Compatible Router: Not all routers support VPN configurations. Check if your router model is compatible with VPN services. Popular options include Asus, Linksys, Netgear, and TP-Link routers, among others.
Select a VPN Provider: Research and choose a reliable VPN provider that offers router compatibility. Ensure they provide detailed setup instructions and robust security features.
Access Router Settings: Log in to your router's admin panel using a web browser. Typically, you'll enter the router's IP address (e.g., 192.168.1.1) in the address bar and log in with your credentials.
Enable VPN Client Support: Navigate to the VPN or WAN settings section in your router's dashboard. Enable VPN client support and enter the VPN provider's details, including server addresses, protocols (e.g., OpenVPN), and login credentials.
Configure VPN Settings: Customize VPN settings according to your preferences, such as encryption levels and VPN protocols. These settings may vary depending on your VPN provider's recommendations.
Test Your Connection: After configuring the VPN settings, test your connection to ensure everything is working correctly. Verify your IP address and check for any DNS leaks using online tools.
Connect Devices to VPN: Once the setup is complete, connect your devices to the VPN-enabled router. All internet traffic from these devices will now be encrypted and routed through the VPN server.
By following these steps, you can establish a secure VPN connection on your router, safeguarding your online privacy and enhancing your digital security. Remember to regularly update your router firmware and VPN software for optimal performance and protection against emerging threats.
Installing VPN on router tutorial
A VPN (Virtual Private Network) is a tool that helps secure and encrypt your internet connection, providing you with online privacy and anonymity. By installing a VPN on your router, you can protect all devices connected to your network, including smartphones, laptops, smart TVs, and more.
To install a VPN on your router, follow these steps:
Choose a compatible VPN service that offers router support. Not all VPN providers support router installations, so make sure to select one that does.
Access your router's settings by typing its IP address into your web browser. The IP address is typically found on the back of your router or in the user manual.
Log in to your router using the administrator credentials. This information is also usually located on the router or in the manual.
Locate the VPN section in your router settings. This can vary depending on the router model, but it is often found under the "Advanced" or "Security" tab.
Enter the VPN configuration details provided by your VPN service, including the server address, username, and password.
Save the settings and connect to the VPN server. Your router is now configured to use the VPN, encrypting all incoming and outgoing internet traffic.
By installing a VPN on your router, you can protect your entire network from cyber threats and enjoy a secure and private internet experience on all your devices.
How to set up VPN on router
Setting up a VPN on your router can provide secure and encrypted internet access for all devices connected to your home network. This added layer of security protects your online privacy and data from potential cyber threats. Here's a step-by-step guide on how to set up a VPN on your router:
Choose a VPN service: First, you need to select a reliable VPN service provider that offers router support. Ensure the VPN service is compatible with your router model.
Access your router settings: Open a web browser on a device connected to your router and type in the router's IP address to access its settings. You may need to enter a username and password to log in.
Install VPN firmware: Some routers support VPN installation using custom firmware such as DD-WRT or Tomato. Follow the instructions provided by your VPN service on how to install the firmware on your router.
Configure VPN settings: Once the firmware is installed, access the VPN settings on your router and enter the connection details provided by your VPN service, including server address, username, and password.
Connect to the VPN: Save the settings on your router and establish a connection to the VPN server. Once connected, all devices on your home network will be protected by the VPN.
Test the connection: Verify the VPN connection by visiting a website that shows your IP address. It should display the VPN server's IP address instead of your actual IP.
Setting up a VPN on your router enhances your online security and privacy, ensuring a safe browsing experience for all devices connected to your network.
VPN configuration for router
Title: Secure Your Entire Network: A Guide to VPN Configuration for Your Router
In today's digital landscape, safeguarding your online privacy and security is paramount. With cyber threats on the rise, individuals and businesses alike are turning to Virtual Private Networks (VPNs) as a crucial tool for protecting their sensitive data. While VPNs are commonly used on individual devices, configuring your router to use a VPN extends those benefits to your entire network, ensuring comprehensive protection for all connected devices.
Setting up a VPN on your router offers several advantages. Firstly, it encrypts all data traffic passing through your network, shielding it from prying eyes and potential hackers. This encryption is particularly vital when accessing public Wi-Fi networks, which are notorious for their lack of security. Additionally, a router-level VPN setup enables you to bypass geographical restrictions and access region-locked content on all devices connected to your network.
The process of configuring a VPN on your router may vary depending on the make and model of your device. However, the general steps remain consistent. Begin by selecting a reputable VPN service provider that offers router support and follow their instructions for setting up your router. This typically involves accessing your router's admin panel, entering the VPN credentials provided by your provider, and configuring the appropriate settings.
Once your VPN is successfully configured on your router, all devices connected to your network will benefit from its protection automatically. This includes smartphones, tablets, computers, smart TVs, and any other internet-enabled devices. You can rest assured knowing that your entire network is secured against online threats and your privacy remains intact.
In conclusion, configuring a VPN on your router is a proactive measure to safeguard your digital life. By encrypting all data traffic and providing access to region-restricted content, a router-level VPN setup ensures comprehensive protection for your entire network. Take control of your online security today by implementing a VPN configuration for your router.
0 notes
Text
can my router use a vpn
🔒🌍✨ Get 3 Months FREE VPN - Secure & Private Internet Access Worldwide! Click Here ✨🌍🔒
can my router use a vpn
Router VPN compatibility
Title: Understanding Router VPN Compatibility: A Guide for Secure Internet Connections
In the realm of cybersecurity, Virtual Private Networks (VPNs) have become indispensable tools for safeguarding online privacy and enhancing security. By encrypting internet traffic and masking IP addresses, VPNs provide users with anonymity and protection against cyber threats. However, to ensure seamless integration and optimal performance, it's crucial to consider router VPN compatibility.
Router VPN compatibility refers to the ability of a router to support VPN connections either through built-in features or firmware support. While many modern routers come with VPN capabilities, not all models are created equal. Understanding router VPN compatibility involves assessing several key factors:
VPN Protocols: Routers must support the VPN protocols used by your chosen VPN service. Common protocols include OpenVPN, L2TP/IPsec, and PPTP. Compatibility ensures smooth communication between the router and VPN servers.
Hardware Specifications: The processing power and memory of a router influence its VPN performance. High-end routers with multi-core processors and ample RAM tend to handle VPN encryption more efficiently, resulting in faster speeds and stable connections.
Firmware Support: Some routers allow users to install custom firmware like DD-WRT or Tomato, which offer advanced VPN features and compatibility with a wider range of VPN services. Checking for firmware compatibility expands the options for configuring VPN connections.
VPN Client Integration: Certain routers have dedicated VPN client software or mobile apps that simplify the setup process and offer additional features like automatic server selection and kill switches for enhanced security.
Manufacturer Recommendations: VPN providers often recommend specific router models that are known for their compatibility and performance with their services. Consulting these recommendations can streamline the selection process.
By considering these factors, users can ensure that their routers are compatible with their chosen VPN service, enabling them to enjoy secure and private internet access across all connected devices. Whether it's for protecting sensitive data or bypassing geo-restrictions, router VPN compatibility plays a crucial role in maintaining online privacy and security in today's digital landscape.
VPN setup on router
Title: Streamline Your Online Security: A Step-by-Step Guide to Setting Up a VPN on Your Router
In an era where cyber threats loom large, safeguarding your online activities has become paramount. One of the most effective ways to bolster your digital privacy and security is by using a Virtual Private Network (VPN). While installing a VPN client on individual devices is common practice, setting up a VPN directly on your router offers comprehensive protection for all devices connected to your network.
Here’s a step-by-step guide to setting up a VPN on your router:
Choose a Compatible Router: Not all routers support VPN configurations. Ensure that your router model is compatible with VPN installations. Popular brands like Asus, TP-Link, and Netgear often offer models with built-in VPN support.
Select a VPN Service: Subscribe to a reputable VPN service provider. Consider factors such as server locations, encryption protocols, and speed when choosing a VPN that aligns with your needs.
Access Router Settings: Open your router’s admin panel by typing its IP address into your web browser. Typically, the address is something like 192.168.1.1 or 192.168.0.1. Log in using your credentials.
Configure VPN Settings: Locate the VPN settings section within your router’s admin panel. Enter the VPN details provided by your service provider, including server address, username, and password.
Enable VPN Connection: Once you’ve entered the VPN details, save the settings and enable the VPN connection on your router.
Test the Connection: Confirm that the VPN connection is active by checking your router’s status or using online tools to verify your IP address.
Connect Devices: With the VPN set up on your router, all devices connected to your network, such as smartphones, laptops, and smart TVs, will automatically benefit from enhanced security and anonymity.
By setting up a VPN on your router, you fortify your entire network against potential cyber threats, ensuring peace of mind as you browse the internet and access online services. Take control of your digital privacy today with this simple yet powerful security measure.
Router secure VPN connection
A secure VPN connection on your router is essential for safeguarding your online activities and protecting your personal information from potential threats. By setting up a VPN on your router, you can encrypt your internet traffic and ensure that your data remains private and secure.
To establish a secure VPN connection on your router, you first need to choose a reputable VPN service provider that offers router compatibility. Once you have selected a VPN service, you can follow the provider's instructions to configure the VPN settings on your router.
Setting up a VPN on your router offers several advantages. Firstly, it enables you to protect multiple devices connected to the same network, such as smartphones, laptops, and smart home devices, with just one VPN connection. This simplifies the process and ensures consistent security across all your devices.
Additionally, a VPN on your router allows you to bypass geo-restrictions and access region-locked content, enhancing your online experience. Whether you want to stream your favorite shows or access websites that are blocked in your region, a VPN connection on your router can help you achieve this.
Overall, establishing a secure VPN connection on your router is a proactive step towards enhancing your online privacy and security. By encrypting your internet traffic and masking your IP address, a VPN on your router offers peace of mind and a safer browsing experience for you and your family.
Router VPN configuration
A VPN (Virtual Private Network) is a powerful tool that enhances online security and privacy by encrypting internet connections. By setting up a VPN on your router, you can protect all devices in your network without the need to install the VPN app on each device separately. This ensures that all data transmitted through the router is secured and anonymous.
Configuring a VPN on your router can vary depending on the brand and model you own. Generally, the process involves accessing the router's settings through a web browser, locating the VPN section, and entering the VPN configuration details provided by your VPN service provider. These details typically include the VPN server address, username, password, and encryption protocols.
Once the VPN is set up on the router, all connected devices, such as smartphones, laptops, smart TVs, and gaming consoles, will automatically benefit from the VPN protection. This is particularly useful for devices that do not support native VPN apps or when you want to secure the entire network without individual setup on each device.
It is important to choose a reliable VPN service provider with fast servers and strong encryption to ensure optimal security and performance. Additionally, regular maintenance and updates of the router firmware and VPN configuration are recommended to avoid any vulnerabilities and ensure smooth operation.
In conclusion, configuring a VPN on your router is a convenient way to protect all devices within your network with a single setup. It provides enhanced security, privacy, and anonymity for your online activities, making it a valuable tool for both personal and business use.
VPN-enabled router options
Title: Exploring VPN-Enabled Router Options: Enhancing Your Online Privacy and Security
In an era where online privacy and security are paramount concerns, utilizing a VPN (Virtual Private Network) has become essential for safeguarding sensitive information and ensuring anonymity while browsing the internet. While VPN software installed on individual devices offers protection, opting for a VPN-enabled router takes security to the next level by encrypting all internet-connected devices within a household or office network.
VPN-enabled routers function as intermediaries between devices and the internet, encrypting data transmitted from connected devices before it reaches the web. This encryption shields information from potential cyber threats and prying eyes, providing users with peace of mind knowing their online activities remain private.
When considering VPN-enabled router options, several factors come into play:
Compatibility: Ensure the router supports VPN protocols such as OpenVPN, PPTP, or L2TP/IPsec, allowing for seamless integration with VPN services.
Speed and Performance: Opt for routers equipped with robust processors and sufficient RAM to handle VPN encryption without compromising internet speeds.
VPN Service Compatibility: Verify compatibility with your preferred VPN service provider, ensuring easy setup and configuration.
Security Features: Look for routers with advanced security features such as built-in firewalls, intrusion prevention systems, and regular firmware updates to mitigate potential vulnerabilities.
Ease of Use: Choose routers with user-friendly interfaces and intuitive setup processes, facilitating hassle-free installation and configuration.
Some popular VPN-enabled router options include brands like ASUS, Linksys, Netgear, and TP-Link, each offering a range of models catering to different budgets and requirements.
In conclusion, investing in a VPN-enabled router is a proactive step towards enhancing online privacy and security for both personal and professional use. By encrypting all internet traffic at the router level, users can enjoy seamless protection across all connected devices, ensuring a safer and more secure online experience.
0 notes
Text
can you put a vpn on a tplink router
🔒🌍✨ Get 3 Months FREE VPN - Secure & Private Internet Access Worldwide! Click Here ✨🌍🔒
can you put a vpn on a tplink router
VPN setup on TP-Link router
Setting up a VPN on your TP-Link router can enhance your online security and privacy, allowing you to browse the internet anonymously and securely. Follow these steps to configure your TP-Link router with a VPN:
Choose a VPN Provider: Start by selecting a VPN provider that offers router support. Make sure the provider offers detailed instructions for setting up their service on TP-Link routers.
Gather Required Information: Before proceeding, gather the necessary information from your VPN provider, including the server address, username, password, and any encryption settings.
Access Router Settings: Open a web browser on a device connected to your TP-Link router and enter the router's IP address in the address bar. Log in to the router's admin panel using your username and password.
Navigate to VPN Settings: Once logged in, locate the VPN settings section within your router's configuration interface. This may vary depending on the router model, but it's typically found under the "Advanced" or "Security" tab.
Enter VPN Configuration Details: Enter the VPN configuration details provided by your VPN provider into the appropriate fields. This usually includes the server address, username, password, and any additional settings required by your VPN service.
Apply Settings and Reboot Router: After entering the VPN configuration details, apply the settings and reboot your TP-Link router to activate the VPN connection.
Test the VPN Connection: Once the router has rebooted, test the VPN connection to ensure it's working correctly. You can do this by visiting a website that displays your IP address and verifying that it matches the IP address provided by your VPN provider.
Optional: Configure Additional Settings: Depending on your preferences and the features offered by your VPN provider, you may want to explore and configure additional settings such as split tunneling, port forwarding, or DNS settings.
By following these steps, you can easily set up a VPN on your TP-Link router and enjoy the benefits of enhanced online security and privacy for all devices connected to your home network.
TP-Link router VPN configuration
Title: Simplifying Your Online Security: A Guide to TP-Link Router VPN Configuration
In an era where online privacy and security are of paramount importance, setting up a Virtual Private Network (VPN) on your TP-Link router can provide an additional layer of protection for your internet connection. By encrypting your internet traffic and masking your IP address, a VPN ensures that your online activities remain private and secure from prying eyes, whether you're browsing the web, streaming content, or accessing sensitive information.
Configuring a VPN on your TP-Link router is a straightforward process that can be completed in just a few steps. Here's a simple guide to help you get started:
Choose a VPN Service: Before you begin, you'll need to subscribe to a reputable VPN service provider. Make sure to choose a service that offers compatibility with TP-Link routers and provides robust security features.
Access Router Settings: Using a web browser on a device connected to your TP-Link router, access the router's admin panel by entering the router's IP address (typically 192.168.0.1 or 192.168.1.1) into the address bar.
Login and Navigate to VPN Settings: Enter your router's username and password to access the admin panel. Once logged in, navigate to the VPN section in the router settings menu.
Enter VPN Configuration Details: Here, you'll need to enter the configuration details provided by your VPN service provider. This usually includes the VPN server address, VPN protocol (such as OpenVPN or PPTP), and your VPN username and password.
Save Settings and Connect: After entering the VPN configuration details, save the settings and initiate the connection. Your TP-Link router will now establish a secure VPN connection, encrypting all internet traffic passing through it.
Verify Connection: Once connected, verify that your VPN connection is active by checking your IP address using an online tool or the settings in your router's admin panel.
By following these steps, you can enhance your online security and privacy by configuring a VPN on your TP-Link router. Enjoy the peace of mind knowing that your internet connection is encrypted and your data is safe from prying eyes.
Installing VPN on TP-Link router
When it comes to ensuring your online privacy and security, installing a VPN on your TP-Link router can be a great solution. A VPN, or Virtual Private Network, encrypts your internet connection and routes it through a remote server, making it difficult for anyone to track your online activities. By setting up a VPN directly on your router, you can protect all the devices connected to your network, including smartphones, laptops, smart TVs, and more.
To install a VPN on your TP-Link router, you first need to choose a VPN service provider that supports router configurations. Once you have signed up for a VPN service, follow the provider's instructions to configure your TP-Link router. Typically, this involves accessing your router's settings through a web browser, entering the VPN connection details provided by your provider, and saving the settings.
After successfully setting up the VPN on your TP-Link router, all the devices connected to your network will automatically benefit from the VPN protection. This means that your internet traffic will be encrypted, your IP address will be hidden, and your online activities will be secure from prying eyes.
Installing a VPN on your TP-Link router is a straightforward process that can significantly enhance your online security and privacy. By taking this simple step, you can enjoy a safer and more private internet browsing experience for all your connected devices.
TP-Link router VPN compatibility
When it comes to ensuring online privacy and security, using a Virtual Private Network (VPN) is a popular choice among users. VPNs encrypt the internet connection, providing anonymity and protection from potential cyber threats. However, not all routers are compatible with VPN services, which is why it's essential to choose a router that supports VPN setups.
TP-Link routers are known for their reliability and performance, but not all models are VPN-compatible. It's crucial to verify if a TP-Link router supports VPN services before purchasing one.
Some TP-Link routers come with built-in VPN capabilities, allowing users to easily set up and configure VPN connections. These routers offer various VPN protocols, such as PPTP, L2TP, and OpenVPN, making it convenient for users to choose one that best fits their needs.
For routers that do not have built-in VPN support, users can still utilize VPN services by manually configuring the connection settings on the router. This process may vary depending on the router model and the VPN service provider, so it's essential to follow specific instructions provided by both parties.
By using a VPN-compatible TP-Link router, users can secure their internet traffic and protect their online activities from prying eyes. Whether for personal privacy or business security, having a VPN-enabled router adds an extra layer of protection to any network.
Overall, ensuring VPN compatibility when selecting a TP-Link router is crucial for those looking to enhance their online security and privacy effortlessly.
VPN client for TP-Link router
A VPN client for TP-Link routers can enhance your online security and privacy by encrypting your internet connection. With the increasing importance of protecting personal data online, using a VPN client on your TP-Link router is a smart choice.
Setting up a VPN client on a TP-Link router enables all devices connected to the network to benefit from the encrypted connection without needing to install a separate VPN app on each device. This means that your smart TV, gaming console, and even smart home devices can all enjoy the added security and privacy that a VPN provides.
There are various VPN services that offer support for TP-Link routers, making it easy to find one that suits your needs. Once you have chosen a VPN service provider, you can follow the step-by-step instructions provided by the service to set up the VPN client on your TP-Link router.
By using a VPN client on your TP-Link router, you can also bypass geo-restrictions and access content that may be blocked in your region. Additionally, a VPN can help prevent your Internet Service Provider from tracking your online activities and browsing history.
Overall, adding a VPN client to your TP-Link router is a practical way to enhance your online security, privacy, and freedom while ensuring that all devices connected to your network benefit from the added layer of protection.
0 notes
Text
A brief tutorial to Tp-link wifi extender setup
Tp-Link extenders are one of the top-mentioned range boosters that increase the network coverage of your router and eliminate dead zones in your living space. Similarly, if you buy a new extender, it is necessary to access the repeater's admin panel and perform the Tp-link wifi extender setup to utilize all of its functions.
In addition, the primary methods to set a repeater up are through the web address or the app. Likewise, both methods are convenient to use but you need to follow the steps carefully. In this brief tutorial, we explore the TP-Link repeater setup using the web address and also explain the suitable troubleshooting methods to fix the configuration errors.
Prerequisites for the Tp-link wifi extender setup
While you begin with the process of extender setup ensure you have all the necessary equipment, such as:
TP-Link WiFi extender
Stable network connection
Ethernet cable
Web address
Admin credentials
Computer/Laptop
Steps to setup the TP-Link extender
In this section, we briefly explore the steps to begin and complete the setup procedure. All you need is a stable internet connection, for this, you can also opt for a wired connection using an Ethernet cable. Now, let’s move towards the steps to configure your range extender:
First and foremost, plug your range extender and power it on.
Now, ensure that your computer is connected to the extender network.
Next, open the web browser and type the tplinkextender.net web address or 192.168.1.1 IP address.
Hereon, a login window appears to you on the screen.
Further, mention the username and password here.
After that, click on Quick Set Up> Next> Select your Region> Next.
Here, your extender scans for the available networks, so wait patiently.
After scanning, you have to check the list of available networks and select the one you want to go ahead with.
After that, tap on Next and another window displays the password of your selected network.
After typing the password, click on the Copy from the main router to continue with the single network or click on Customize to create a different network.
Further, tap on Next> Finish.
Lastly, you have completed the TP-link extender setup successfully, now continue error-free browsing.
How to troubleshoot the TP-Link extender setup issues?
Additionally, the setup issues are common when a non-tech person configures his repeater for the first time. These can be due to incorrect IP addresses, login details, unstable networks, or faulty hardware. So, the primary thing is to fix these issues but how? No worries! We explain here:
Check the admin details you enter to access the web interface of the extender.
Also, enter the correct web or IP address to continue with the setup process.
Examine the network cables you use for a wired connection. Replace if there is any damaged cable preset.
Ensure your internet connection is stable.
Look at the extender network that is connected to your smart device is active properly.
Fix the browser issues and update if needed.
Ensure an adequate power supply on your range booster.
All in all, the information we share with you will assist you in carrying out the Tp-link wifi extender setup process easily. Similarly, if you have issues with the configuration process of your range booster, then walk through our troubleshooting section. If need more info, then stay tuned to our website.
#Tp-link wifi extender setup#Troubleshooting tp-link setup issues#tp-link extender setup#tplinkextender
0 notes
Text
What steps are required for L2PT client settings for Tenda devices?
The routers that are coming these days are quite advanced and loaded with a wide range of features that are helpful in the overall functionality of the router and keep the network secured. The dated router that was provided by the ISPs will never be able to handle heavy loads and as you will increase the number of connected devices, the connection will become highly unstable.
If you are little aware about the technicality of the networking setup, you must have heard of two terms, PPTP and L2TP. Both the features are basically used to connect to an IP network. PPTP is the abbreviated form of point-to-point tunneling protocol and it is also used in multiple office networks or creating a secure tunnel in more than one local networks. You will get to set it up through the Tenda admin login that offers quite an intuitive interface to navigate through the features.
On the other hand, L2TP is the abbreviation for layer 2 tunneling protocol and it doesn’t offer any sort of data encryption. However, there is no difference in the setup process for both the protocols. On the security front, Tenda is offering the latest standards along with features like MAC address filtering, guest network, and many more. The guest network will let you create a separate SSID for the guests and will keep the main network safe.
Read Here: Gaming Settings are used for Tenda Routers?
Set up the L2TP client settings
In this section, we are going to jot down the steps that you will need to follow to do a successful L2TP client setup. Let’s dive in without any further adieu.
1. Launch a browser and enter Tenda admin login through the router’s IP address.
2. Go to the VPN tab and select the PPTP/L2TP option. Enable the toggle and select L2TP in client mode.
3. Provide the login credentials and hit Connect.
#192.168.0.254 tp link#tp link wifi setup#192.168.1.1 setup tp link#http 192.168 o 0.1 tp link#www tplinkwifi net login
0 notes
Link
It has two antennas for wider and seamless coverage and you will never see any network distraction. If you have big house or office then this is the best router for you. You will get a parental control feature in this router as well to restrict access to certain websites. It is good for home and office where you will never like your children or employees to waste time on useless stuff. As it supports IPv6, so this device is ready for the next generation of the internet.
#tp link access point login#tp link router setup#http tplinkwifi net access#www tp link com admin login#www tplinkwifi net login#http 192.168 o 0.1 tp link#192.168.1.1 setup tp link#tp link wifi setup access#tplinkwifi.net TP-Link router login#http //tplinkwifi.net login
2 notes
·
View notes
Link
192.168.1.1 setup tp link is used to manage the advance settings for TP-Link wireless routers. doesn’t matter you want to manage advance settings for your TP-Link WiFi router if you want to make sure the bandwidth for the devices, you will need to make login access for 192.168.1.1 setup tp link web based utility.
0 notes
Text
Changing the login user name and password for tplink
Any type of tplink devices has default login details and you can use these devices login details for accessing dashboard for tplink devices. In this article, we are explaining steps for changing these default login details for your tplink device. Using http //tplinkwifi.net admin page you can change settings and configurations for your tplink device. This is not required to change your device login details but if change password for your device login then you can secure your device login.
Here are Steps to Change your TP-Link Device User Name and Password
How to Change TP-Link Modem Login Details?
1. Access your tplink modem login from a computer.tp-link router setup using unfil utility

2. Fill tplink modem login user name and password.
3. Click on “Maintenance” button.
4. After that click on “Administration” button.
5. Change your login user name and password and click on “Save” button.
How to Change Default Login Details for TP-Link Access Point?
1. From a computer access http //tplinkwifi.net admin page.
2. Type current login user name and password,
3. Click on “Access Controls” button under the “Management” tab.
4. Change the “Password” for your tplink access point device.

5. Click on “Save” button and then close the setup page.
How to Change User Name and Password for TP-Link Cloud Camera
1. If you want to change tplink camera login details, access tplink camera login page.
2. After that click on “System” button.
3. Select “Account” button.
4. From there you can change password for accessing tplink cloud camera dashboard.
5. Click on “Apply” button once again.
These are simple steps for changing default login details for tplink wifi devices. If you want to change login user name and password for tplink extender device then you can read other articles from this website.
#http //tplinkwifi.net/192.168.0.1#192.168.0.254 http //tplinkwifi.net. net#192.168.1.1 setup tp link#192.168 www.tplinklogin.net router login
0 notes
Link
Here is the right method steps that can help you in configuring the TL-WR802N device.
0 notes
Link
Have a brief look at the various parental control for the tplink wifi router device.
0 notes