#3D Animation Process
Explore tagged Tumblr posts
Visit Tumblr Blog
Explore Tumblr blogs with no restrictions, modern design and the best experience.
Last Seen Tumblr Blogs


Fun Fact
70% of Tumblr users say the Dashboard is their favorite place to spend time online.
Text
What Is 3D Animation | Dezpad Designs

Industrial 3D Animation refers to animations that closely resemble the real world and are often used in various industries like manufacturing, engineering, and marketing. In 3D Animation Malaysia, animators create characters and objects that mimic real-world movements within a three-dimensional space. Contact Us:- https://dezpad.com/contact-us/
#3d animation#3d-animation#3d animation basics#3d animation process#3 d animation#3d animation technology#3d animating#process of 3d animation#uses of 3d animation#3d animators
0 notes
Text
3d Animation Process – What You Need to know!
3D animation process has a greater and superior capability to expose movement.3D animation is much more attractive as well as realistic. You can use 3D models made for a meticulous project for future. Sliced Bread Animation is one of the best Animation service provider! :-https://sbanimation.com/3d-animation-production-process/
0 notes
Text

moments
#gif#processing#digital art#artists on tumblr#art#perfect loop#trippy#generative#3d#animation#gifartistscollective
174 notes
·
View notes
Text
I'm extremely busy at the moment with work, but since the demo is out and you've all seen her, I wanted to share some of my creative process on building my favourite Lasrian enemy. One thing I found is that when it comes to pitching more complex animations is that i waste a lot less time drawing it out first. It's not always part of my workflow, but it helps immensely.

My animatic is very clearly not polished in the ways you see with others online, but it serves its purpose of selling an idea to myself, as well as my directors. The polish needs to go into the final animation, as seen below.

I'll try to show more in the future.
#warframe 1999#warframe spoilers#warframe#gameplay animation#3d animation#storyboard#creative process#warframe lasria#Lasria#animatic
142 notes
·
View notes
Text
makin............ something..........
experimenting with sequential, story-based art. I have a lot of ideas I wanna explore.
#artists on tumblr#3d art#art video#video#art process#process video#ar#augmented reality#vr#virtual reality#figmin xr#loving the streams so far#since youtube doesn't auto-embed like twitch did it's a ghost town#5 people max#no one talking#took an animal crossing break in the middle#introvert's stream paradise
58 notes
·
View notes
Text


kilika sprites
371 notes
·
View notes
Text
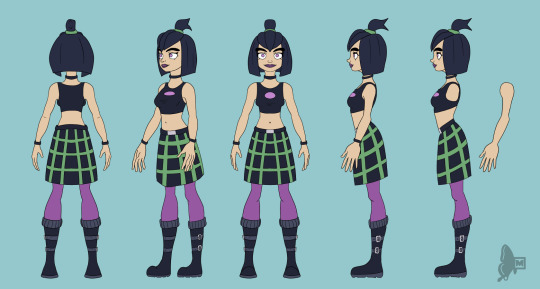
Road to 3D- Sam Manson (Part 2):
Character Modeling


Part 1: Model Sheet
Welcome to the second and final part of this project. Since people have asked how I do my models, I decided to make a write-up on how I approach these things using the example of a model of Sam Manson. The first part focused on how I make a model sheet fo a 3d model the second part focus just on the modeling. There are many more things about how to create a fully realized 3d character that I could make whole other chapters for, like UV unwrapping, texturing, shading and rigging, but I don't have enough knowledge past the fundamentals on these topics that could warrant their own seperate posts.
Additional stuff before I continue:
I use Blender for all my model
This not a beginners guide or something similar, it would be helpful to already know the general workflow of a modeling, how to use Blender and know different terminology like edgeflow, retopology etc.
If you are a beginner and want to learn more about character modeling I recommend the videoseries "Modeling for Animation" by Dikko on Youtube
Maybe I make some reference some tricks from this videoseries
That's it, let's go!


My first step is always the block-out phase. The block-out phase is what the construction lines and the first sketch in a drawing are. I align the frontview and sideview from the model sheet I made in part 1 with the z-axis (the blue line in the images above) and roughly shape out the forms with primitive forms. For this I mostly use a cube with a subdivide modifier.
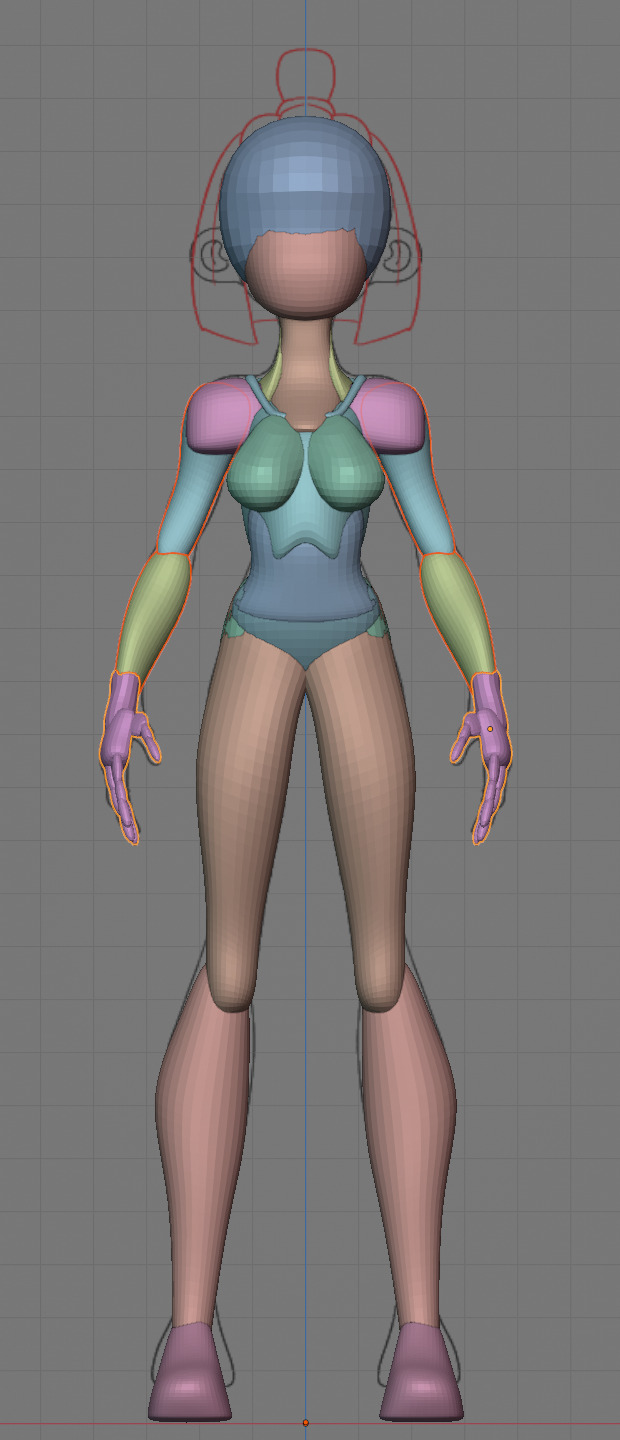


Having a modelsheet without the clothes obscuring the body makes it much easier the get the form right. The block-out phase is one of the most important steps, if it looks good than I have practically half the work done. This is also a good opportunity to practice anatomy.
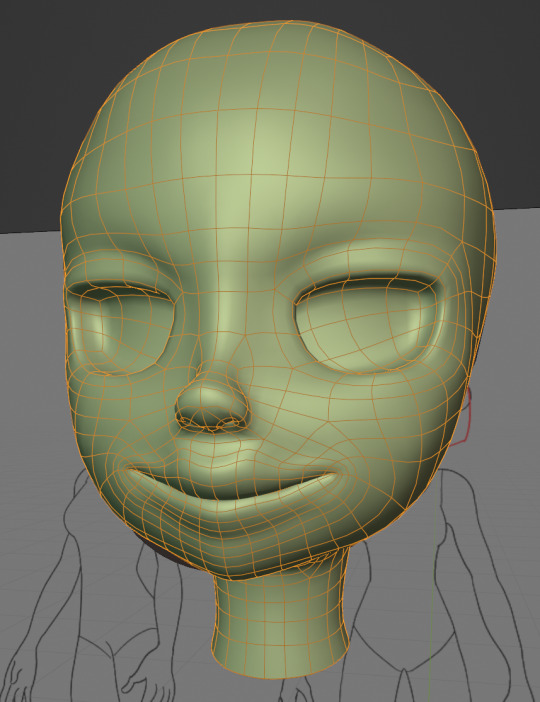

After this stage I continue with the head. First of all, don't forget to add the mirror modifier so I just need to model half of the model. There are different methods to approach modeling the head, like sculpt the head first, retopologize and than bake all the deatails onto the retopologized head. I actually prefer to polymodel the head especially when I have a good model sheet. I practially trace the lineart from the model sheet by extruding vertices, once from the frontview and once from the sideview. The most important points are the form of the eyes, the mouth, the form of the face and the jawline. The head block-out is used as an anchor point for the shrinkwrap modifier so that the traced forms actually look like they belong to a 3d form and not 2d lines floating space. From this point on it's just connecting everything, pull and push vertices so it looks like a 3d head and make sure the edgeflow is good. (It's also helpful to know how the planes of the head look like) After that I add the eyelashes, eyebrow, eyes and the ears, now it looks like something!
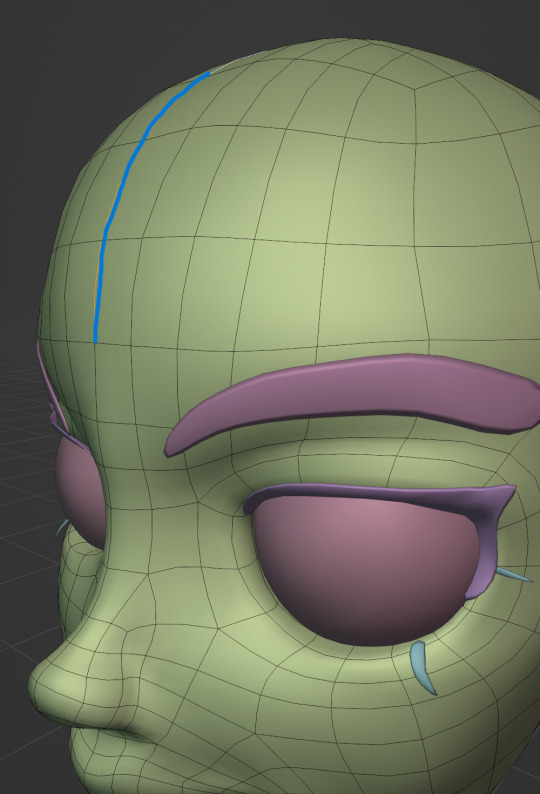
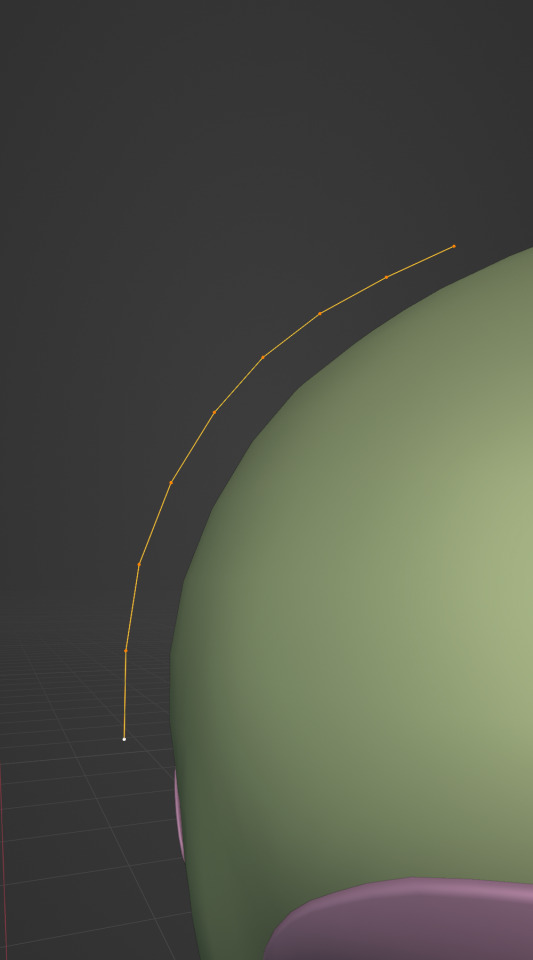
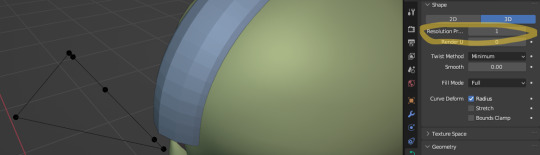
Now comes the hair. For the hair I used the "curve trick" like mentioned in the video series I recommended. Here is a tip to save time: I choose some edges from the head, duplicate and seperate it from the mesh. I convert this seperated line into a curve and choose a beziercircle as a bevel geometry. This is now the perfect foundation to model the hair further. One thing I needed a long time to notice: To get the beziercircle to a perfect square or in this case a triangle lower the Resolution U to 1 in the shape options. Now I just convert the curves into a mesh and add details and the head is done!
With the head finished I continue with the body. Remember how I wrote with a good block-out half of the work ist finished? Well, for this step I practically just use the smooth brush in sculpt mode and smooth everything out so everything looks connected. Then I retopologize the body and that's it. Well, ok there is a little bit more to it: Before smoothing things out I join the block-out part to a single mesh and remesh it with the remash modifier expept for the hands. I prefer to polymodel the hands seperatly without worrying about the rest of the body because they are difficult to model. I reattach them later. Speaking of reattaching, I make sure that the connection points have the same number of vertices while I retopologize/polymodel. To ensure that, I often use the following trick visualized with a simple example ( which is also described in the video series):
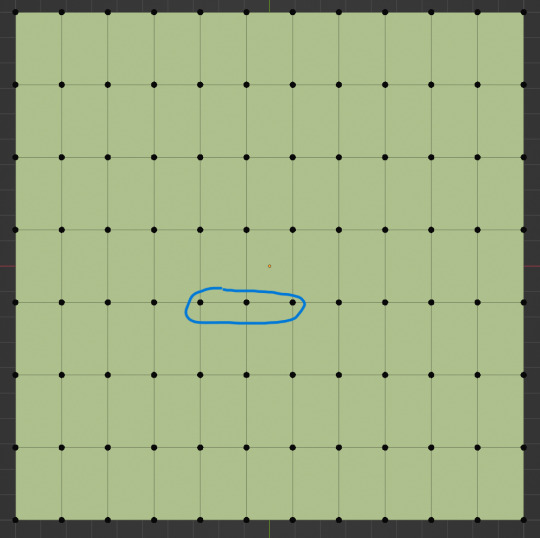
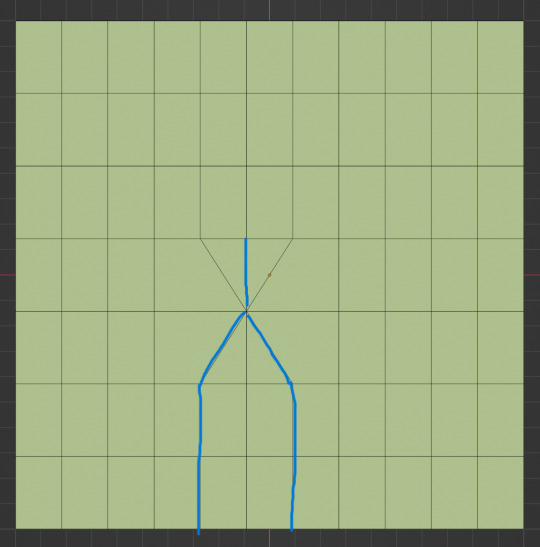

I want to reduce the amount of edges at the bottom of this plane, for this I merge 3 vertices from the middle into 1 vertice seen in the left image. After that I can select the blue marked edges from the center image and dissolve them. The result, which you can see on the right, is a nice clean edgeflow with a reduction in the number of edges.

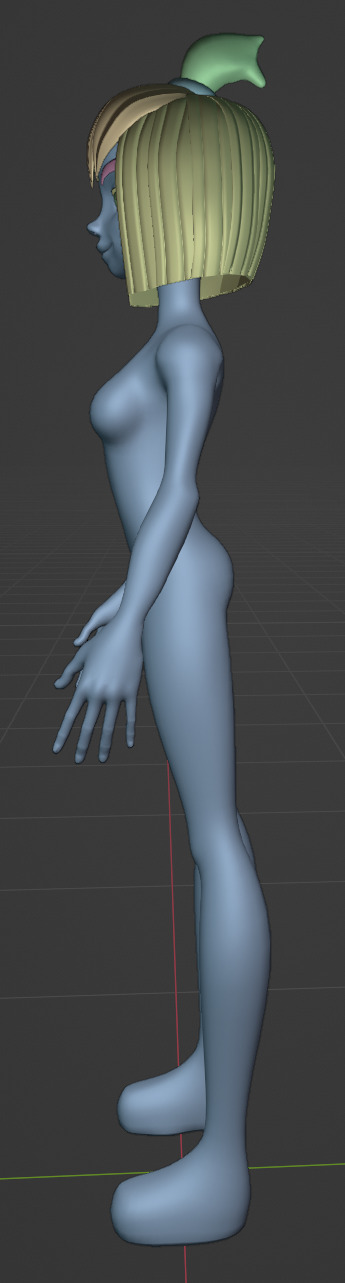
After modeling every part I attach them together and I have a finished bodymesh the work with.

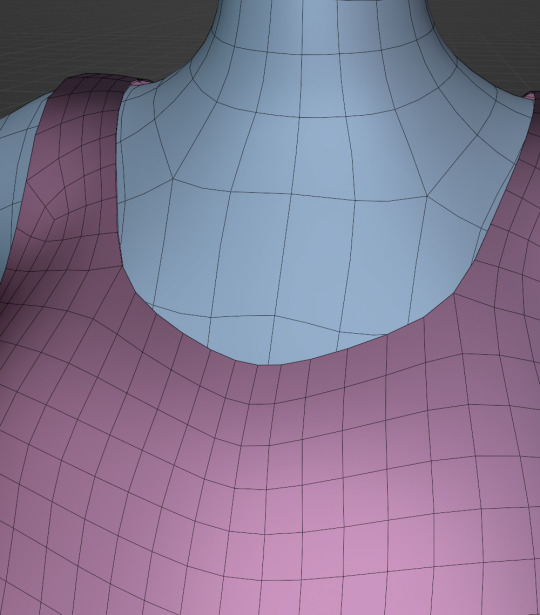
Now onto the clothes, for this I use the model sheet with clothes as reference. Having a retopologized body makes it easier to model simple stuff like e.g. Sam's shirt. On the left image the marked faces of the the bodymesh already looks like a shirt. I just need to duplicate and seperate this area, clean it up a little and the shirt is basically finished. The more complex stuff like the boots I need to polymodel around the bodymesh.
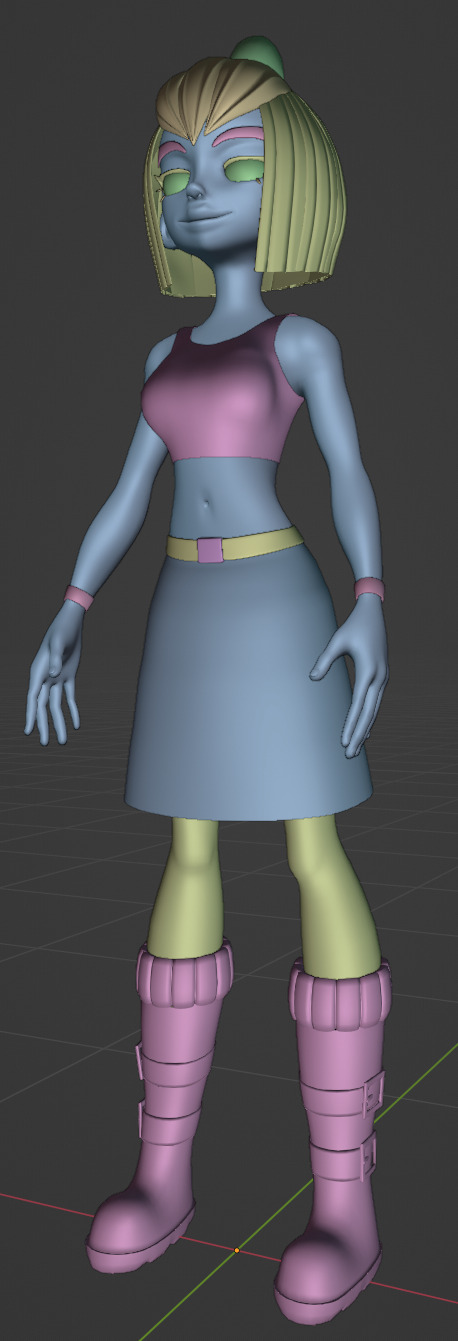

With that the modeling part is done! Now comes the things I said above: uv unwrapping, texture painting, rigging and shading. These are whole other topics I cannot go deeper because I'm still learning how to do these things but I hope my little write-up about how I appoach character modeling was enough to learn one thing or two.
Thank you for your time and thank for reading!
#3d modeling process#3d model#blender#danny phantom#sam manson#long post#my animation#my art#art resources
239 notes
·
View notes
Text
April GIF Theme: Mirror
The April 2025 GIF Theme is here! You have until the evening of April 30th to submit your ‘Mirror’ themed GIF. Your only limits are Tumblr’s GIF file size limit, and the theme.
Once you’ve made your GIF, post it to your blog and send the link to us via our submission box. We’ll reblog it to keep a collection of all the GIFs that have been made.
Good luck and have fun!
- pi-slices
#GIF#Artists on Tumblr#Art#Animation#Abstract#Design#April#April 2025#Mirror#GIF Artists Collective#gifartistscollective#GIF Theme#GIF Challenge#3d#2d#Cinema 4d#Blender#Maya#Houdini#Processing#Loop
25 notes
·
View notes
Note
can I see your verison of, Bishop Lamb?
beloved beheaded :>
#cotl#cult of the lamb#doodles#animation#legitimately i got moho like a few weeks ago in a huge sale and never used it#thank you for the learning opportunity#my background is NOT in puppet animation lmao#thankfully a lot of the process feels the same as rigging something in 3D#but with lines and whatnot#so yeah apologies for the super simple mechanical lookin movements here i am Learning like a toddler with shape blocks
472 notes
·
View notes
Text
Expressions!
#mollys future mishaps#my animation#3d animation#(3d molly has been very kind to me during this process lol. this is my first attempt at using shape keys and it turned out cool!)
93 notes
·
View notes
Text
Chos 3d model!!!


What's this? The coolest thing I've made???
So, I've been working on this for a while now. It started as just a "that'd be neat" and turned into an entire project spanning MONTHS! I started in October last year
I have A LOT of progress screenshots and stuff, and I'm not sure if I can really do it justice in a post but I'll try. Forgive me if this is kinda bad lol


We got expressions, woah :0 They're kinda jank but so is the entire thing lmao
Here it is in vrchat! I just think the physbone thing vrchat has is super cool with this model :)
Anyway, progress stuff time!


Like I mentioned before, this started out as me just making his head for perspective stuff but then spiraled from there.


Of course this didn't come without... issues


Eventually I got it figured out... kinda. I ended up downloading a base body model off sketchfab and building off of that


Skipping forward a bit for the sake of brevity, it's looking pretty good! created textures in illustrator using a SUPER jank process that's definitely not how you're supposed to do it lol


Now is when I started having fun with it, put it through mixamo for a quick and easy rig and started making him do funny dances because of course


Skipping the hell that was learning how to make a vrchat avatar and here we are! Very happy with this project and am looking forward to whatever I do next. I have no clue what it'll be lmao.

#cotl#cult of the lamb#cotl oc#cotl au#my art#digital art#art#3d art#3d artwork#3d model#3d animation#vrc model#vrchat#vrc avatar#vrc shenanigans#chos#oc#oc art#original character#dmau#divine mortals au#art process#odddoodles#Chosposting
24 notes
·
View notes
Text

Millennium Ring from YuGiOh
A Realistic Render
Before I created the Millennium Necklace, I created this realistic version of the Millennium Ring.
The ring is positioned on a basic male model from the Sims 4 using soft body and rigid body simulations and rendered in Blender Cycles.

I redesigned the ring with material construction in mind, soldering joints and using rivets and screw eye pins.

In Ancient Egypt, gold was alloyed with silver and copper in a combination known as electrum. This means the item is likely to tarnish over time.

I created a texture brush to paint tarnished material in the crevasses not easily accessed by polishing implements.
For the rope, I chose a reference of 5mm macrame twisted cotton and developed a procedural texture.

My goal was to create a unit of rope which I could seamlessly duplicate around the neck.
I started by modeling each strand of rope, which was a great exercise in Blender Geometry Nodes, but the twisting of the strands caused a problem with seamless duplication which I could only solve by simplifying the geometry.

Eventually, I developed a seamless procedural texture for this simplified, repeatable geometry.

Tying knots is much easier in real life than it is in Blender where objects can move through each other.

This is a nice level of detail for a close up image, but at a distance, how much of our attention is really going to be on the rope?
By baking the texture and normals to even simpler geometry, I sped up the movement simulations.

I used Rigid Body Physics to produce the secondary motion of the pointers on the ring. Compound Parent was useful in keeping the pointers from clipping through and flying off the ring during quick motions.

This project was much more challenging to animate because of the way the item is suspended from a knotted rope.
I used Soft Body Physics to produce the primary motion of the rope and ring.

As I transform the world of my fanfiction into one that is more original, I end up redesigning ideas from the YuGiOh universe.
The violet gemstone set within the iris of the Eye of Anubis is a flourish of my own. Crystals play an important role in the magic system of my story where the Millennium Items were forged as instruments to wield the magic of a crystal that was so dangerous it was split into fragments.
See more of my work: Check out my archive.
Join me on my journey: Follow me on tumblr.
Keep me creating: Support me on KoFi.
#yugioh fanart#yugioh#ygo#millennium items#sennen items#ring#pendant#ancient egypt#3d art#blender#art process#digital art#3d model#3d animation#animated#gif#3d artist#blender3d#story art#story in progress
19 notes
·
View notes
Text


How not to draw Grunkle Stan
#guy was hired to do a how to draw video#only to turn into a cartoon character by a demon in the process#sign me up lol#the animation is INSANE#fluid and appealing#though I don’t think I wanted to see a 3D Bill#gravity falls#bill cipher
25 notes
·
View notes
Text
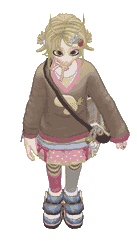
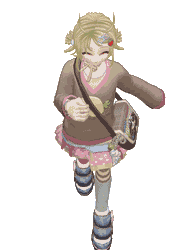
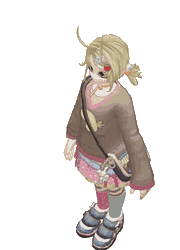
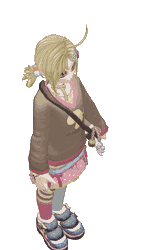
I want to eat the accessories 🌟 Fun project done on Friday, for a challenge where the prompt was "backpack". Had to dazzle it up, darling-style, of course :)
#artists on tumblr#art#3d#little guys#mp4#art process#3d model#cute#adorable#animal art#cute animals#digital art#animals#character design#oc artist#womp3d#3d art#3d artwork#cat#rat#panda#lion#dog#bunny#raccoon#digital#my original characters#my original art#original character#my art
24 notes
·
View notes
Text

Process with making low poly Warwick!
7 notes
·
View notes
Text
Here's another video showing the process of animation. I used simple 3D models (made in Blender) as a reference for 2D animation (made in Clip Studio Paint). 2D animation was then imported back into Blender as a sequence on a plane. Other effects were added using different material nodes + post-processing in Blender.
I also used SpriteIlluminator to make normal maps, which were used to add a bit of 3D effect to 2D animated parts.
#art#artists on tumblr#digital art#original art#my art#oc art#original character#animation#2d animation#3d animation#blender#hybrid animation#animation experiment#art process
20 notes
·
View notes