#3d modeling process
Explore tagged Tumblr posts
Visit Tumblr Blog
Explore Tumblr blogs with no restrictions, modern design and the best experience.
Last Seen Tumblr Blogs


Fun Fact
After the announcement of the deal with Yahoo!, there were 170K signatures of unhappy Tumblr users petitioning to prevent the sale in 2013.
Text
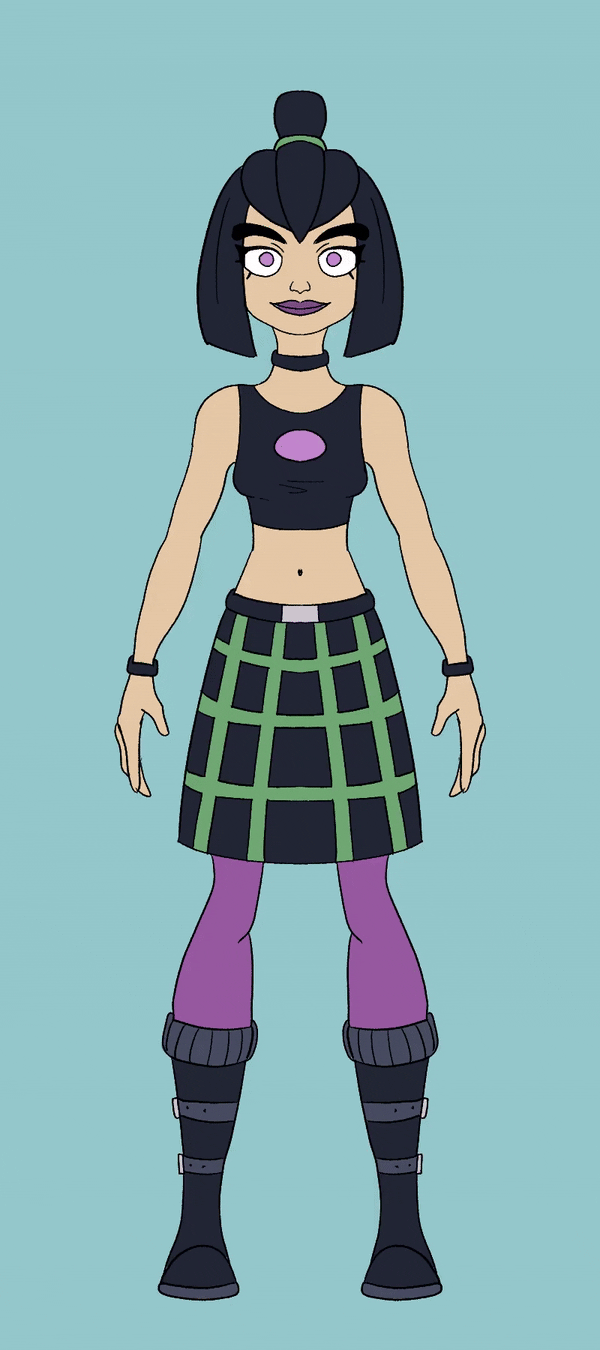
Road to 3D- Sam Manson (Part 2):
Character Modeling


Part 1: Model Sheet
Welcome to the second and final part of this project. Since people have asked how I do my models, I decided to make a write-up on how I approach these things using the example of a model of Sam Manson. The first part focused on how I make a model sheet fo a 3d model the second part focus just on the modeling. There are many more things about how to create a fully realized 3d character that I could make whole other chapters for, like UV unwrapping, texturing, shading and rigging, but I don't have enough knowledge past the fundamentals on these topics that could warrant their own seperate posts.
Additional stuff before I continue:
I use Blender for all my model
This not a beginners guide or something similar, it would be helpful to already know the general workflow of a modeling, how to use Blender and know different terminology like edgeflow, retopology etc.
If you are a beginner and want to learn more about character modeling I recommend the videoseries "Modeling for Animation" by Dikko on Youtube
Maybe I make some reference some tricks from this videoseries
That's it, let's go!


My first step is always the block-out phase. The block-out phase is what the construction lines and the first sketch in a drawing are. I align the frontview and sideview from the model sheet I made in part 1 with the z-axis (the blue line in the images above) and roughly shape out the forms with primitive forms. For this I mostly use a cube with a subdivide modifier.


Having a modelsheet without the clothes obscuring the body makes it much easier the get the form right. The block-out phase is one of the most important steps, if it looks good than I have practically half the work done. This is also a good opportunity to practice anatomy.
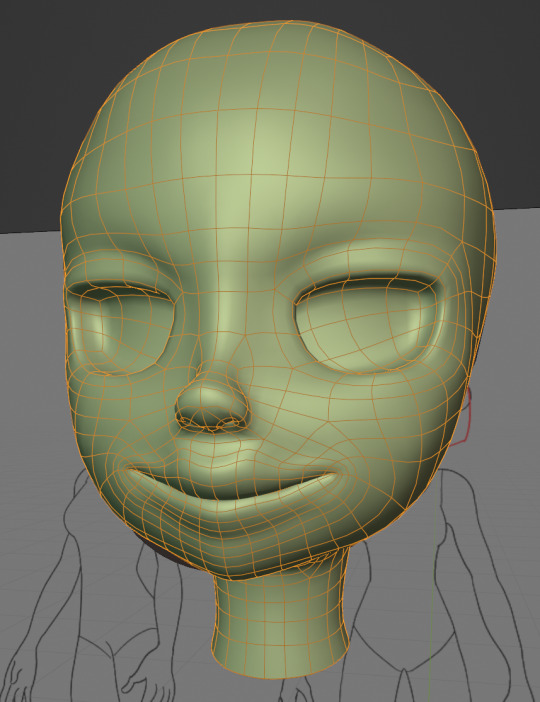

After this stage I continue with the head. First of all, don't forget to add the mirror modifier so I just need to model half of the model. There are different methods to approach modeling the head, like sculpt the head first, retopologize and than bake all the deatails onto the retopologized head. I actually prefer to polymodel the head especially when I have a good model sheet. I practially trace the lineart from the model sheet by extruding vertices, once from the frontview and once from the sideview. The most important points are the form of the eyes, the mouth, the form of the face and the jawline. The head block-out is used as an anchor point for the shrinkwrap modifier so that the traced forms actually look like they belong to a 3d form and not 2d lines floating space. From this point on it's just connecting everything, pull and push vertices so it looks like a 3d head and make sure the edgeflow is good. (It's also helpful to know how the planes of the head look like) After that I add the eyelashes, eyebrow, eyes and the ears, now it looks like something!
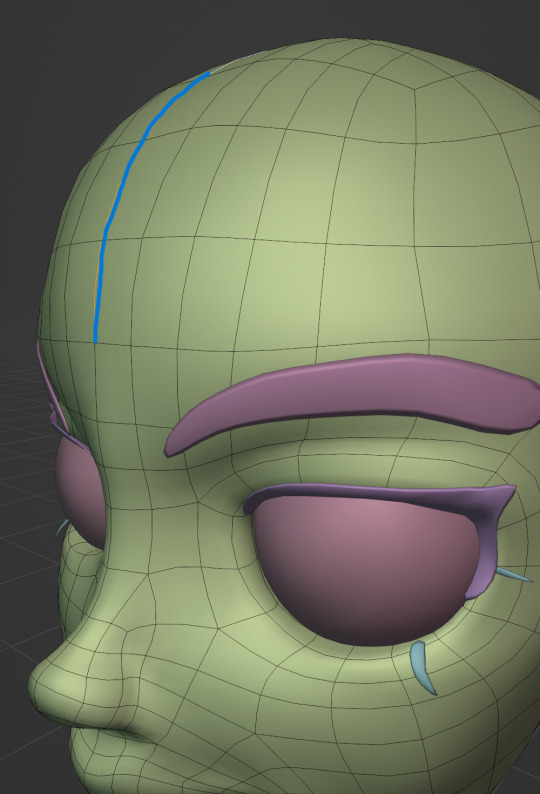
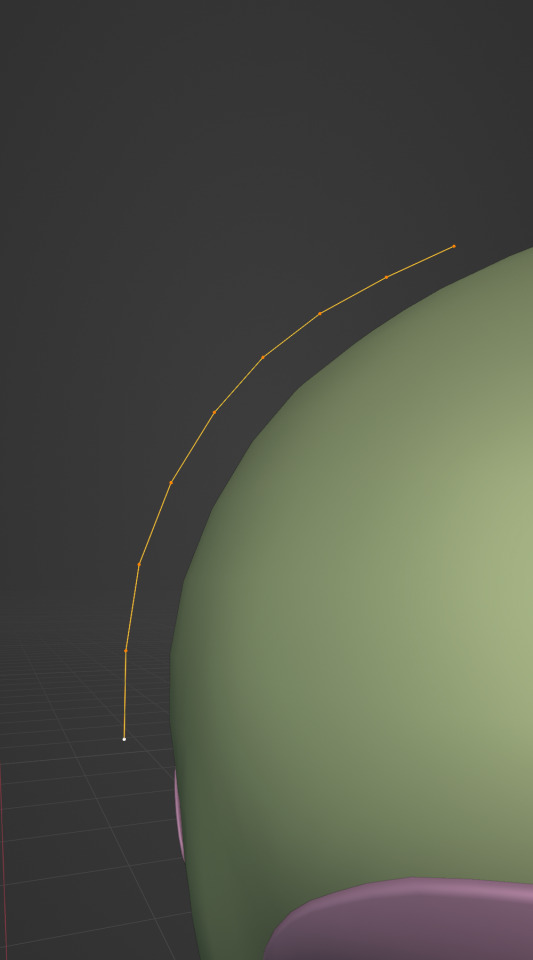
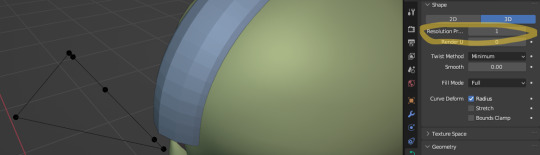
Now comes the hair. For the hair I used the "curve trick" like mentioned in the video series I recommended. Here is a tip to save time: I choose some edges from the head, duplicate and seperate it from the mesh. I convert this seperated line into a curve and choose a beziercircle as a bevel geometry. This is now the perfect foundation to model the hair further. One thing I needed a long time to notice: To get the beziercircle to a perfect square or in this case a triangle lower the Resolution U to 1 in the shape options. Now I just convert the curves into a mesh and add details and the head is done!
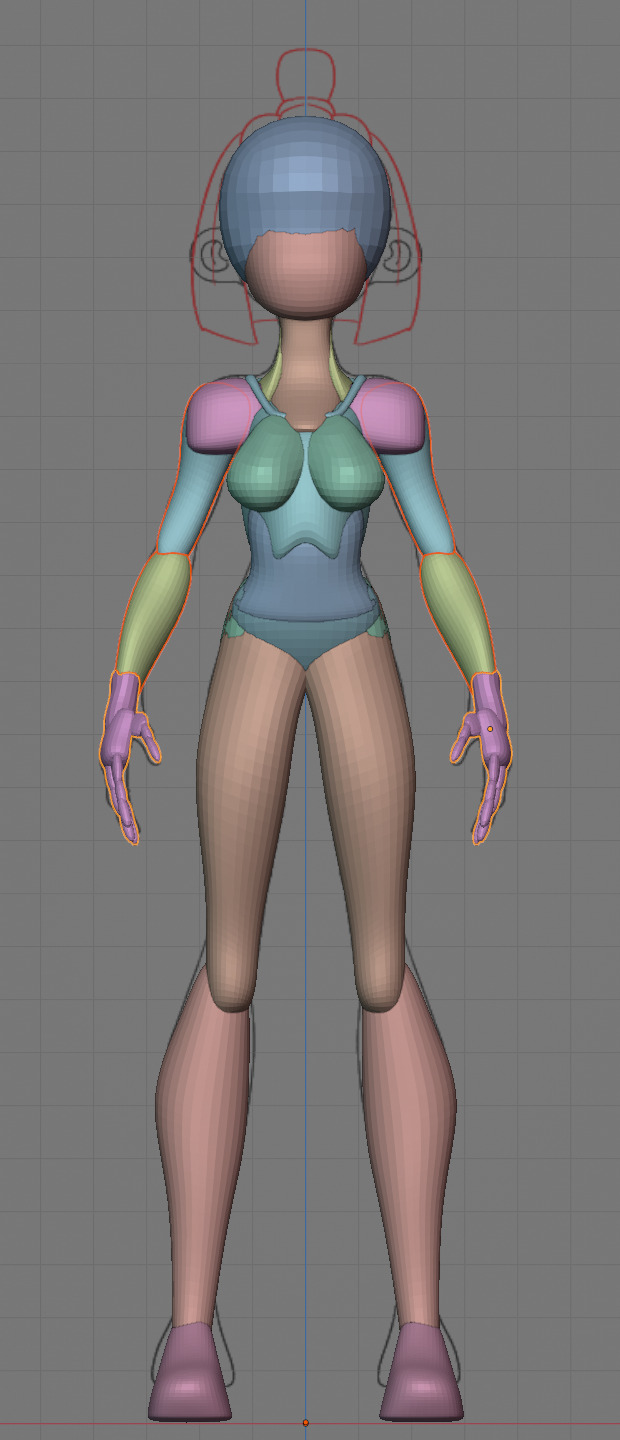
With the head finished I continue with the body. Remember how I wrote with a good block-out half of the work ist finished? Well, for this step I practically just use the smooth brush in sculpt mode and smooth everything out so everything looks connected. Then I retopologize the body and that's it. Well, ok there is a little bit more to it: Before smoothing things out I join the block-out part to a single mesh and remesh it with the remash modifier expept for the hands. I prefer to polymodel the hands seperatly without worrying about the rest of the body because they are difficult to model. I reattach them later. Speaking of reattaching, I make sure that the connection points have the same number of vertices while I retopologize/polymodel. To ensure that, I often use the following trick visualized with a simple example ( which is also described in the video series):
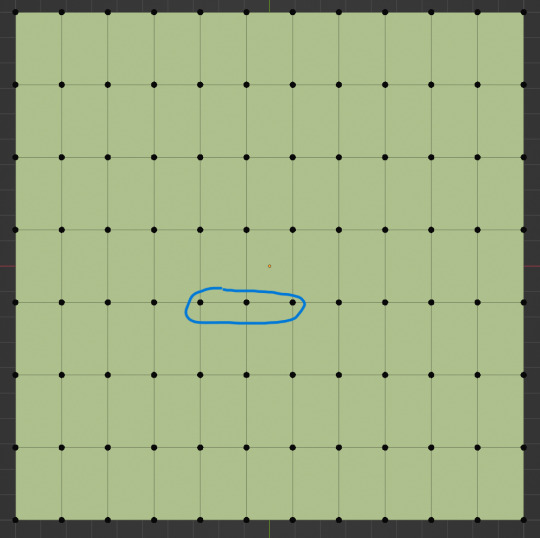
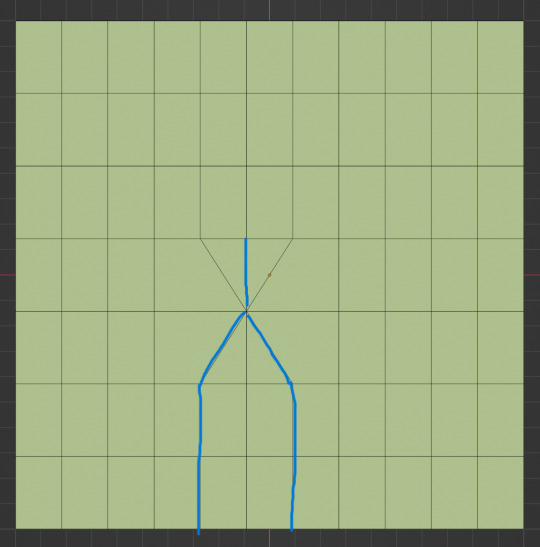

I want to reduce the amount of edges at the bottom of this plane, for this I merge 3 vertices from the middle into 1 vertice seen in the left image. After that I can select the blue marked edges from the center image and dissolve them. The result, which you can see on the right, is a nice clean edgeflow with a reduction in the number of edges.

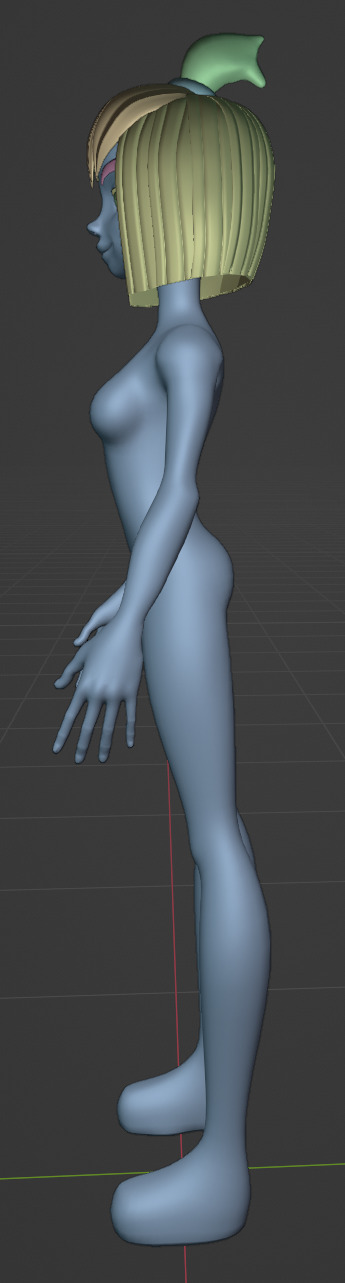
After modeling every part I attach them together and I have a finished bodymesh the work with.


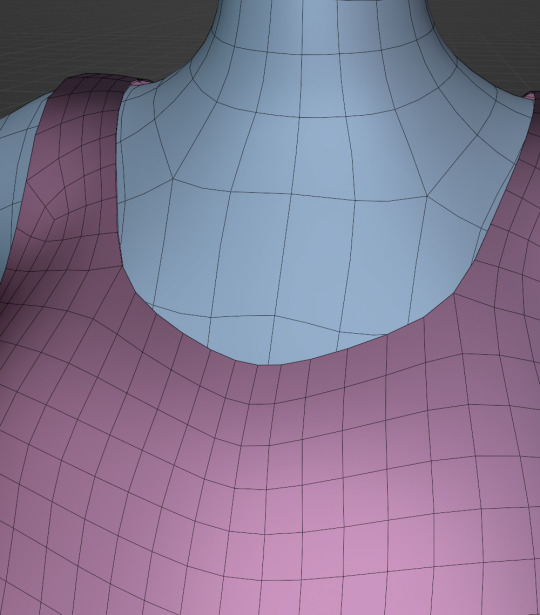
Now onto the clothes, for this I use the model sheet with clothes as reference. Having a retopologized body makes it easier to model simple stuff like e.g. Sam's shirt. On the left image the marked faces of the the bodymesh already looks like a shirt. I just need to duplicate and seperate this area, clean it up a little and the shirt is basically finished. The more complex stuff like the boots I need to polymodel around the bodymesh.
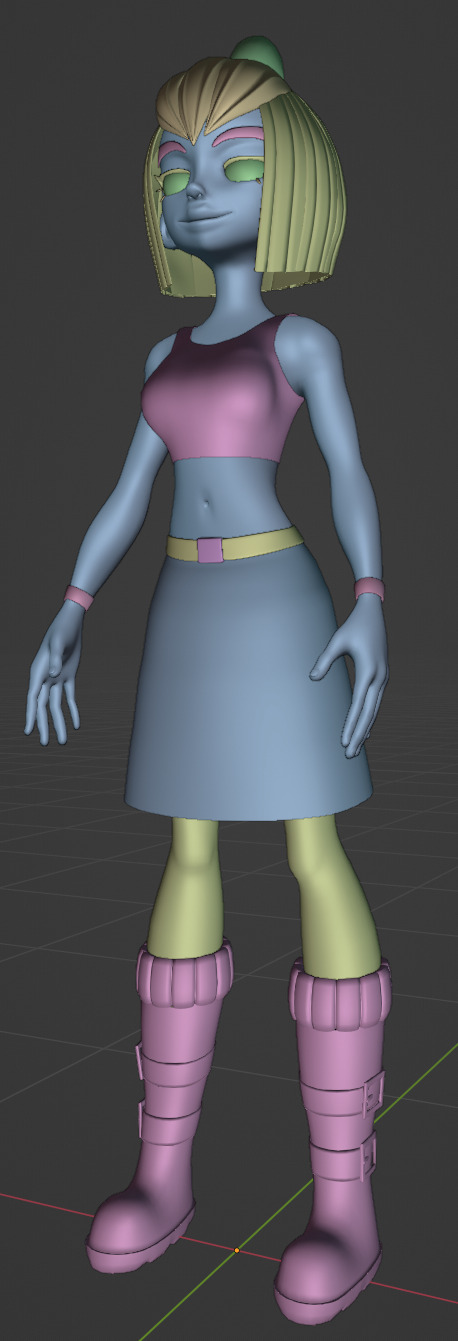

With that the modeling part is done! Now comes the things I said above: uv unwrapping, texture painting, rigging and shading. These are whole other topics I cannot go deeper because I'm still learning how to do these things but I hope my little write-up about how I appoach character modeling was enough to learn one thing or two.
Thank you for your time and thank for reading!
#3d modeling process#3d model#blender#danny phantom#sam manson#long post#my animation#my art#art resources
239 notes
·
View notes
Text


#art of mine#psx#blender#3d model#anthro#dragon#furry#scalie#t4t#fuck me sidways why is it a whole process to compress gifs to 10 mb#😭
2K notes
·
View notes
Text
So I've made it an VRchat avatar...
cause why not... Character by @wolfertinger666
#3d art#3d model#vrchat avatar#Honestly not a hard a process as I thought it would be#Like wow#You can make anything
701 notes
·
View notes
Text


Full body sculpt and pose test for Minos prime from Ultrakill. Inspired by and referenced JDGreed's artwork of Minos.
EDIT: THANKS FOR OVER A 100 NOTES EVERYONE!! Next time i'm gonna do my best to do better.
#artwork#3d printing#3d sculpting#art#3d model#zbrush#3d art#artists on tumblr#digital art#original art#my art#illustration#art process#ultrakill#ultrakill fanart#minos prime#ultrakill minos#king minos#game fanart
186 notes
·
View notes
Text
#tldr my greatest passion is telling people how to do art. i am extremely autistic about processes and styles and very good at cracking them#I want to make a post explaining the arcane style fundamentals (ie how you make a 2d drawing look like those 3d models)#and i need a test subject bc the type up i was going to srop in this randos inbox got way too long
80 notes
·
View notes
Photo


blame! (2021) by yann souetre (yann-s on artstation)
wip - pipe assets from ian hubert’s patreon
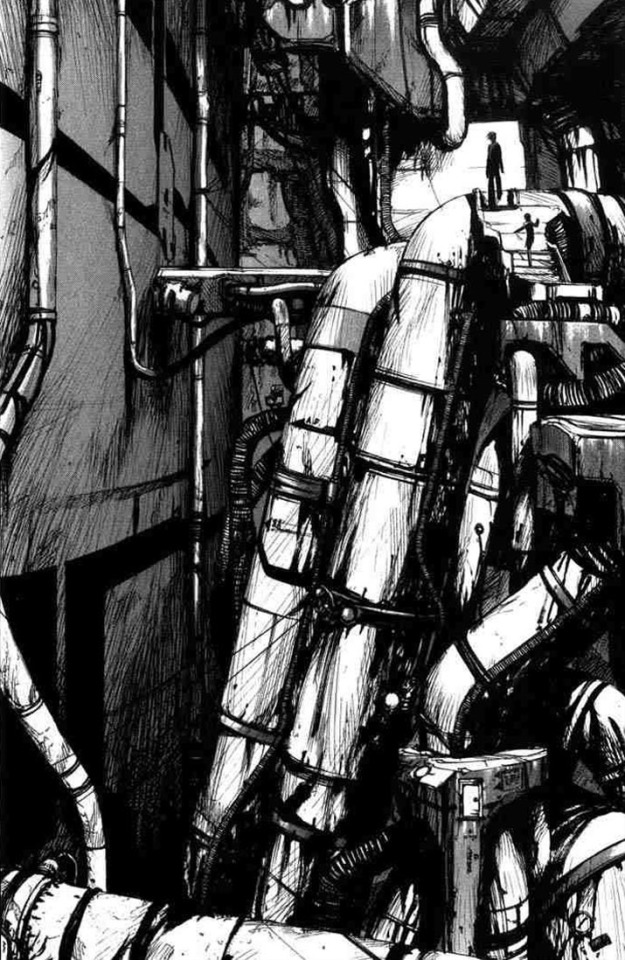
based off this manga panel from BLAME! by tsutomu nihei
#yann-s#yann souetre#blame!#blame#buramu#ブラム!#ブラム#fanart#yann s#yann.stro#3d art#artstation#artists on artstation#cyber dungeon#cyberpunk#scifi#tsutomu nihei#goth#silicon life#ian hubert#art#3d modelling#cg art#manga#render#detail#process#wip#long post#blame2021yannsouetre
161 notes
·
View notes
Text
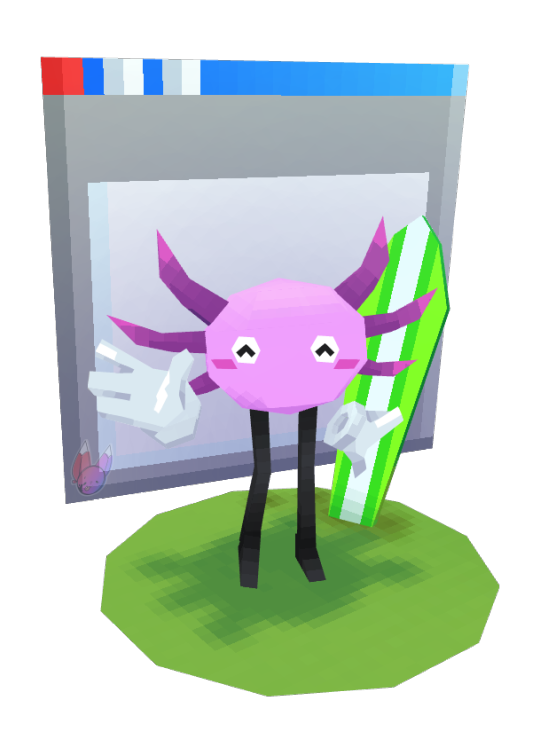
No way!!! It's Kinito!!! No way!!!
(Wips/Model proof under the cut)


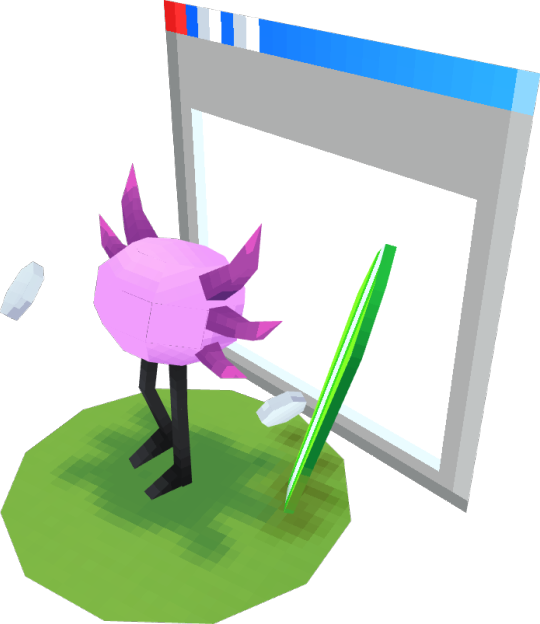
Silly guy, silly board!
#kinitopet#kinito fanart#kinito the axolotl#3d model#edited picture#This is actually my own model#I made it from the ground up#A very fun process :3
169 notes
·
View notes
Text
stylized fingernails in ZBrush for my current 3D character project
#art#artists on tumblr#wip#art process#3D#3D model#ZBrush#3D character#character art#gonna have to start making these as offerings bc each project takes so damn long to finish
29 notes
·
View notes
Text


Have some yuri, happy pride month y’all.
I find it funny how easy it is to tell who my favorite is. Idk if Mako would have short or long hair, so I just tied that shit up.
#it’s pride month bitches#i love drawing women#and i love wuko#im surprised its taken me this long to hit em with the good ol genderbend#ill tell yall a little secret#i cheated a bit and used a 3d model#but shhhhh#im still gonna learn anatomy#its a slow process#my art#wuko#prince wu#mako lok
22 notes
·
View notes
Text
Road to 3D- Sam Manson (Part 1):
Model sheet
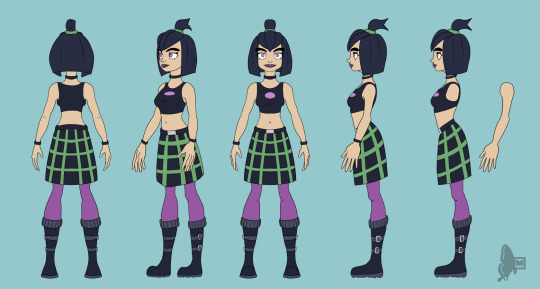
Part 2: Character Modeling
Hi! On my recent posts of my 3d models I got many asking questions about how I made them. I'm currently working on a 3d Sam model from scratch and so I thought I can document my process here and add some thoughts through my process.
Before I can model anything in 3d I need a reference and a plan. For characters this means I need to create a model sheet, so here we are.
Some disclaimer first before I continue:
I'm just a self-taught hobby artist not a professional or proper art student. The infos I write here down are just the things I do and can be completly wrong or different in a professional setting.
This is not a tutorial or a step-by-step-guide for character design or how to make character sheets in general. Just additional things that I pay attention to when I make a model sheet for my 3d models.
As someone who just does 3d modeling in my freetime for 2 1/2 years I see myself still as a beginner. I'm still in a experimenting with different techniques and artstyle. This and the following posts describes just stuff I do for this model, it could be some other method next if I feel this didn't work out that well. Nothing is set in stone.
I do the 3d models just for myself for practice and for fun, you cannot download them anywhere. I just post screenshots and do sometime animations to archive my progress.
Under the cut are my thoughts of how I approach a model sheet for a 3d character:
First things first I search for references and make some rough sketches to decide how I want the character to look like. I found this image of a character on pinterest ( anyone knows who the artist is? I cannot find the original source) and use this as a reference for my Sam model.
After the inital phase I first draw the front side of the character. For a 3d model I need a symmetrical neutral character in a T-pose, an A-pose or a standing pose in which the arms doesn't obscure the body. This makes it easier to model and rig them late on.
Speaking of obscuring the body it's also better to have a character without their clothes on and in multiple angles. It is easier to model the character's full body first and then model the clothes around it as an anchor point.
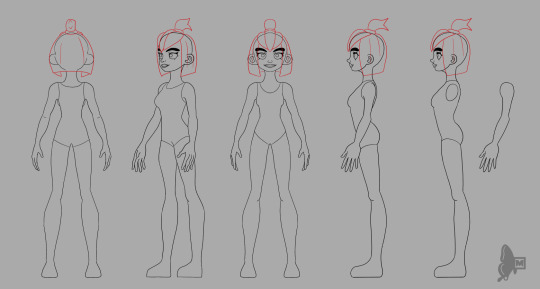
The most import angles for me are the front and side view. The other angles are more for the details to get the likeness right. I try to model the front view most accurately and the sideview is more for the proportions. I don't often see people only from the side view so whatever I draw from the side cannot 100% be accurately be modeled like that. I also made a different side view on the right with the arm seperated from the body, this makes it easier block in the form of the body and it's easier to model the arm and hand seperatly because hands are not only difficult to draw but also difficult to model.
For the different angles I use a mannequin model in blender as a guide and reference. Clip studio paint (the painting program I use) has also 3d mannequins but I personally find them difficult to move around so I prefer to use blender for this.
When I'm finished with the model sheet I also make a quick turnaround animation to see if anything looks consistent enough.
Yeah that's it. Now onto the modelling process!
41 notes
·
View notes
Text


Back at it again on my 3d modeling shit
I wanted to try something a little more complex with the shapes I use in my model; and who better than to do that with than Astro....
He's likely not proportionate to my other toon models, but I plan to remake them once I've improved anyway.
He's not completely done; I'd like to add some stuff extra to his model to give him more expressions, and a blanket he can swap between.

Tpose progress shot
#also I'm pretty sure some parts of the texture aren't finished pff#dandy's world#dw astro#xylocope#3d model#blockbench#astro novalite#he was sort of a nightmare during the texturing process? I enjoyed coloring him but also for some reason my texture brushes stopped working#and parts of the model just. wouldn't color#it was interesting working with a character with so many arms#also i found the gradient tool. lol
39 notes
·
View notes
Text


baby;s first crappy blockbench thing idk
#3d#3d model#blockbench#the hardest part of the whole process was lining up the timing for the turntable because it just wouldn't agree with me#figuring out the bones took me longer than i'd like to admit though#gif
26 notes
·
View notes
Text
New art in process

Yes, initially I made this heart to draw art with it xD By the way, arcane makes me learn how to render well..
#art#arcane#digital art#arcane s2#arcane season 2#arcane season 2 spoilers#digital#arcane viktor#viktor arcane#jayce x viktor#viktor league of legends#viktor#3d art#3d model#heart#anatomy#art process
28 notes
·
View notes
Photo


brandon gobey - debt collectors (2020)
a regional hub for government activity, one of the first buildings to experiment with anti-gravity manipulation.
process stages:

#brandon gobey#debt collectors#concept art#digital painting#art#illustration#painting#digital art#3dcg#process#3d model#paintover#sci-fi#cityscape#sprawl#cyberpunk#architecture#superstructures#sci fi#artstation#artists on artstation#2020#blender#photoshop#3d render
355 notes
·
View notes
Text
Process video for the Dune storybook 3D model 🪱
Made in Maya, Zbrush, Substance Painter, and UE5
#art#artists on tumblr#dune#frank herbert#maya#zbrush#substance painter#unreal engine#ue5#3D art#3D model#3D process#3D#artist#digital art#sandworm
32 notes
·
View notes
Text
Chos 3d model!!!


What's this? The coolest thing I've made???
So, I've been working on this for a while now. It started as just a "that'd be neat" and turned into an entire project spanning MONTHS! I started in October last year
I have A LOT of progress screenshots and stuff, and I'm not sure if I can really do it justice in a post but I'll try. Forgive me if this is kinda bad lol


We got expressions, woah :0 They're kinda jank but so is the entire thing lmao
Here it is in vrchat! I just think the physbone thing vrchat has is super cool with this model :)
Anyway, progress stuff time!


Like I mentioned before, this started out as me just making his head for perspective stuff but then spiraled from there.


Of course this didn't come without... issues


Eventually I got it figured out... kinda. I ended up downloading a base body model off sketchfab and building off of that


Skipping forward a bit for the sake of brevity, it's looking pretty good! created textures in illustrator using a SUPER jank process that's definitely not how you're supposed to do it lol


Now is when I started having fun with it, put it through mixamo for a quick and easy rig and started making him do funny dances because of course


Skipping the hell that was learning how to make a vrchat avatar and here we are! Very happy with this project and am looking forward to whatever I do next. I have no clue what it'll be lmao.

#cotl#cult of the lamb#cotl oc#cotl au#my art#digital art#art#3d art#3d artwork#3d model#3d animation#vrc model#vrchat#vrc avatar#vrc shenanigans#chos#oc#oc art#original character#dmau#divine mortals au#art process#odddoodles#Chosposting
24 notes
·
View notes