#3WD Cooks
Text

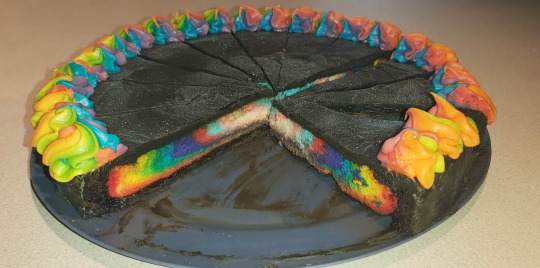
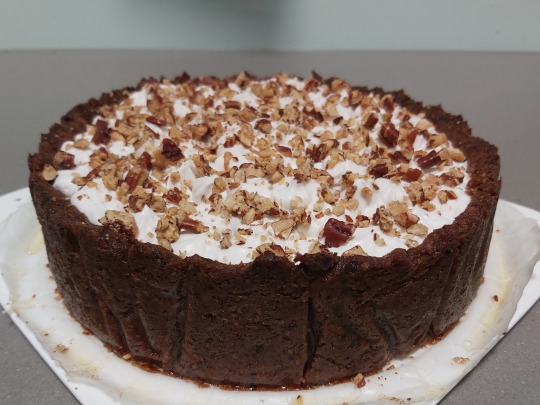
Rainbow-core galaxy-cake
Originally planned for IDAHOBIT 2023 but then a bunch of life nonsense happened that pushed it back to today.
Rainbow-dyed baked vanilla cheesecake, covered in black-tinted dark chocolate ganache and decorated with rainbow-dyed cream cheese frosting and silver luster-dust.
Process shots under the cut:
Step 1: Prepare a standard baked vanilla cheesecake recipe. Line two greased and papered cake tins with a crushed Oreo + butter crumb base.
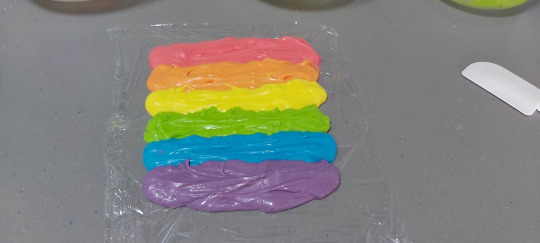
Step 2: Split the cheesecake batter to make 9 colours (6 rainbow bands + the trans flag) using gel food dyes. Pour into the center of the cake one after the other to create rings.
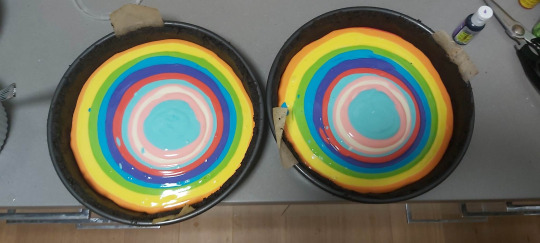
Step 3: Bake. Allow to cool completely in the oven (to prevent cracking or splitting between the rings), then transfer to the fridge until chilled.

Step 3.5: Regret using Oreos since they behaved weirdly in the oven. Resolve to use regular chocolate cookies + blue food gel for a dark base next time.
Step 4: Trim crust and top until roughly level.
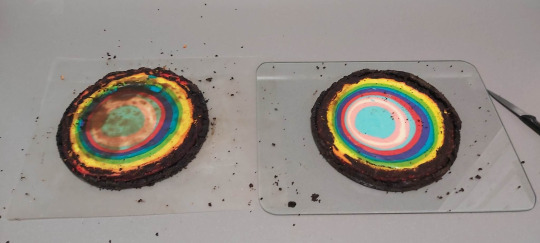
Step 4.5: Continue to regret using Oreos as the weird crumb crust made a mess. Do some repair work on the crusts.
Step 5: Create a black tinted dark chocolate ganache by mixing 450g dark chocolate + 125mL cream + 5-8 drops of blue gel food dye. Place some ganache on the serving plates to hold the cakes in place. Ice the cakes, using alternating treatment with a cake spatula + knife + hot spoon + the fridge to level out and shape neat sides + edges.
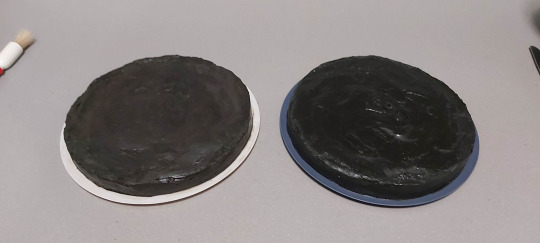
Step 6: Spray chilled cakes with silver luster dust. Use a pastry brush to spread out any clumps.

Step 7: Make vanilla cream-cheese frosting. Split and dye into 6 rainbow bands using gel colours, then spread out on clingwrap and roll up into a sausage. Chill.
Step 8: Cut the clingwrap off one end of the frosting-sausage and insert cut-end-down into a piping bag with a big star nozzle. Do some design tests on the less-attractive backup cake before piping around the edge of the main cake.
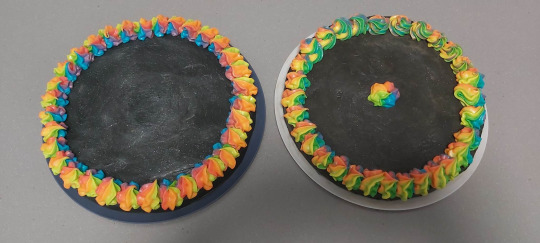
Step 9: More luster-dust as needed.
Step 10: Serve your theatrical cake using a clean, very sharp knife. Wipe the knife between each slice to help prevent colour-smearing.

#3WD cooks#rainbow cake#cake#cheesecake#baking#food#my most theatrical cake yet#sadly I didn't have black or brown gel colour else I would have done the full modern pride flag#Queer#IDAHOBIT#something something joke about Asexual person supporting their queer comrades by making cakes
70 notes
·
View notes
Note
trick or treat!
(send a "trick-or-treat" ask to get a snack, a prank or a cursed fact)

Have my favourite recipe for chocolate chip zucchini muffins!
You will need:
Oven
Muffin tins (makes 24 regular sized muffins) + lining papers
Mixing bowl
Spoon/spatula
Measuring cup(s)
Box grater
Knife
Food processor or immersion blender
Ingredients
2-3 large zucchini, washed
2 large eggs
2 blocks (approx 300g/ 10.58 Oz) milk or medium-dark chocolate
1 cup (250 mL/ 8.45 Fl Oz) rolled oats
3/4 cup (188 mL/ 6.35 Fl Oz) wholemeal flour
2/3 cup (166 mL/ 5.61 Fl Oz) brown sugar, firmly packed
1/2 cup (125 mL/ 4.23 Fl Oz) cocoa powder
1/3 cup (83 mL/ 2.8 Fl Oz) buttermilk (or regular milk)
1/4 cup (62.5 mL/ 2.11 Fl Oz) vegetable oil
1 1/2 tbsp white vinegar
1 tsp baking powder
1 tsp baking soda
1 tsp vanilla extract
1 tsp fine instant coffee (or espresso) powder
1/2 tsp salt
Method
Preheat oven to 180°C (350°F). Line muffin tins with patty papers.
Place rolled oats in the jar of your food processor/immersion blender.
Grate your zucchini. Squeeze the juice out and set aside. Place the strained zucchinis into your mixing bowl.
Add the zucchini juice, oil and milk to the oats. Stir to combine. Allow to sit for 2-3 minutes so the oats can soak up some of the liquid.
Add the brown sugar, salt, vanilla and coffee powder to the grated zucchini. Stir to combine and allow to sit for 2-3 minutes to draw more moisture from the zucchini.
Add eggs to the zucchini mixture, beating through until completely combined.
Blend the oat mixture into a paste. Transfer oat mixture to the zucchini bowl, stirring through thoroughly.
Add vanilla and cocoa powder to the batter, stirring until completely combined.
Chop chocolate into chunks of your preferred size (for this recipe, I prefer small bits).
Add chocolate, flour, baking powder and baking soda to the batter. Stir until completely combined. (The batter should be quite thick - if your zucchinis were very large or watery, you may need to add a bit of extra flour).
Stir through vinegar to activate the baking soda.
Spoon batter into muffin tins.
Bake for 25-35 minutes, until springy to the touch and a toothpick comes out with moist crumbs clinging.
Cool completely on a wire rack before serving.
#Trick or treat#Trick or treat ask game#This treat is a little bit tricky because it tricks you into eating vegetables#This is one of my favourite uses for zucchini and my go to chocolate muffin recipe#Also it's cheaper than making brownies while being better for you!#3WD cooks#3WD Answers#Strawberrycamel#Recipe
7 notes
·
View notes
Text
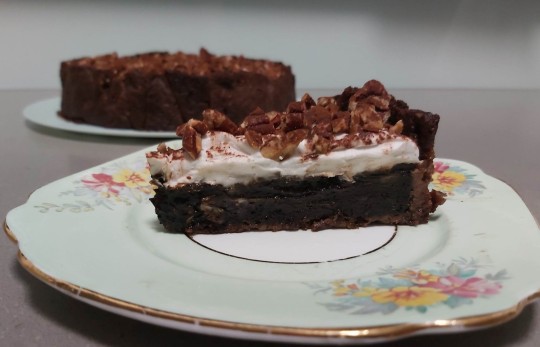
Chocolate Sapote Pie
Hey 3WD, why are you making a vegan, gluten-free, no-processed-sugar dessert? Well, you see, I have friends with many, many allergies and felt like a challenge.
This recipe is an experiment with Black Sapote (also called Chocolate Pudding Fruit) – a seasonal persimmon relative that’s high in Vitamin C and has a pudding-like flesh with mild chocolate and caramel notes. While limited availability of Sapotes means it’s not as accessible as something like Chocolate Avocado Pie, it’s a fun thing to play with if you like poking around with the weird fruit section of produce markets (as a bonus, Black Sapotes were selling for $1-2 per fruit both times I visited).
Let's get cooking:
Kitchen equipment
Blender/food processor
Beaters (hand-crank or electric)
20cm (8 inch) springform cake tin
Baking/ Greaseproof paper
Fridge & Oven
Fine mesh sieve (or tea strainer)
Mixing bowls, spatula, knives, spoons etc.
Prep-time
Bench work: approx. 40 minutes
Oven time: approx. 30 minutes
Cooling time: approx. 2-3 hours (minimum)
Coconut cream chill time: 12 hours (minimum)*
*Coconut cream needs to be refrigerated for 12 hours in order to separate properly before whipping. Put your cream in the fridge the night before.
Ingredients
Pie crust
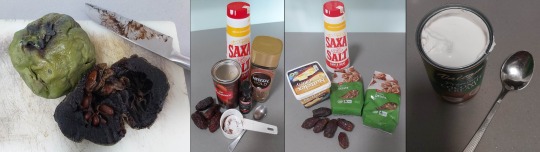
300g (10.5 Oz) pecans
4 large medjool dates (seeds removed, roughly chopped)
1 tsp salt
4 tbsp (approx. 60g/ 2 Oz) margarine, melted
Filling
2 large, ripe Black Sapotes*
1/2 cup (125mL) cocoa powder
4 large medjool dates (seeds removed, roughly chopped)
1/2 tsp salt
1 tsp espresso powder
1 tsp vanilla extract
*Black Sapotes are ripe when the skin has darkened to a dull green-brown and the fruit is very soft to the touch (it will look and feel over-ripe).
Topping
One 400mL (13.5 Fl Oz) can high-quality full-fat coconut cream*
1/2 tsp salt
1 tsp vanilla extract
Approx. 80g (3 Oz) pecans, toasted** and crumbled
Cocoa powder for dusting
*Use a premium quality coconut cream – the difference in price is very small and cheaper creams may not separate properly, which will stop them from whipping up.
**Toast pecans by baking in a preheated 140°C/248°F (fan forced) oven for 15-30 minutes until done to your liking.
Instructions
Pie crust
(Inspiration recipe)
Preheat oven to 180°C/350°F (fan forced).
Line the base and sides of the spring form pan with baking paper. (Try to minimise wrinkles/folds in the paper lining – this will make it easier to remove the crust later.)
Place chopped dates, pecans and salt into a blender. Blend until the mixture has the texture of breadcrumbs/ almond meal.
Stream in melted margarine and blend until completely combined (crumbs should stick together when pressed)
Press mixture into a firm, even layer across the base and up the sides of the spring form tin, using clean hands or the back of a spoon to smooth down.
Bake for 10-12 minutes or until the crust begins to brown. (Watch closely after the 8-minute mark to prevent burning).
Remove from oven. If the crust has puffed up, press back down using the back of a spoon. (Tip: use a toothpick or fork to gently pop any large air-pockets in the base.)
Cool on a wire rack or heat-safe cutting board until the crust reaches room temperature.
Filling
(Inspiration recipe)
Preheat oven to 180°C/350°F (fan forced).
Cut open the Black Sapotes. Remove the seeds and scoop/scrape the flesh out with a spoon. (Note: because Black Sapote skin is very thin and soft when ripe, it cannot be traditionally peeled.)
Transfer one quarter of the fruit flesh to a blender, along with the chopped dates. Process until completely smooth.
Transfer the sweetened sapote mixture into a bowl alongside the remaining sapote flesh. Mix until completely combined (use your spoon or spatula to break down any lumps or fibers in the fruit flesh).
Fold in the cocoa powder, expresso powder, vanilla and salt until completely combined. Taste for flavouring and adjust with more cocoa/vanilla/espresso/salt as desired. (Note: adding cocoa will increase the bitterness of the filling alongside the chocolate-y flavour. This can be hard to counteract without adding sugar or blending in more dates so be careful how much you add at once.)
Transfer filling into your pre-prepared pecan crust. Smooth the top with a spoon or spatula.
Bake for 20 minutes or until the filling is lightly firm to the touch.
Cool completely on a wire rack or heat-safe cutting board, then cover and transfer to the fridge until chilled through.
Cream Topping
(Inspiration recipe)
Chill coconut cream for at least 12 hours.
Remove coconut cream from the fridge (Note: DO NOT Shake).
Use a spoon to scoop out the thick cream that has risen to the top, leaving the watery parts behind. (The more water is in your cream, the less firmly it will whip). Transfer the thick cream to a bowl. (Tip: have an extra jar of chilled cream on hand in case the cream yield from the first tin is low)
Add the vanilla and salt to the cream. Stir through, then taste test and adjust the vanilla/salt as needed. (Note: Like with plain dairy cream, this should taste more neutral than sweet).
Beat your cream, starting on a slow speed. Gradually increase speed until whipped to thick, semi-stiff peaks. (Tip: if your cream is very soft to start with, try covering and chilling in the refrigerator to help it firm up.)
Remove the chilled sapote tart from the spring form pan. (Optional: If the sides of your pecan crust are much taller than your filling, you can use a pair of clean, sharp kitchen scissors to trim it down. Use a clean hand to shield the pie filling from any falling crust-crumbs).
Spoon the whipped cream onto the sapote filling, using the back of the spoon to make decorative swirls. (Optional: use a piping bag with a decorative nozzle for a fancier top).
Sprinkle the cream with crumbled pecans. Dust with cocoa powder using a fine sieve or tea-strainer. (Note: Add the nuts first - otherwise the cocoa powder will prevent them from sticking to the cream, causing them to roll everywhere when the pie is cut).
Return to the fridge until the coconut cream is completely chilled.
Serve.
#Chocolate pie#Black Sapote#Baking#Vegan#Gluten Free#Low Sugar Baking#Keto/Raw Baking#(kind of)#citrus free#for my friends#(you know who you are 😉)#this is a test recipe so feel free to make adjustments#I documented my process and adjustments while baking it - this recipe is based on the refined end-notes#I know some people object to putting salt in dessert bakes but it *is* important here#both to balance and enhance the chocolate-y-ness of the filling#AND to keep the coconut cream under control so it doesn't completely dominate every other flavour in the pie#Don't skimp on the salt#3WD Cooks
4 notes
·
View notes
Text


Infused-ganache Chocolate Truffles
Made a batch of these on the weekend (and then tormented my international friends on discord with them) so in penance by popular demand, let’s talk chocolate-making.
Okay, well, making things out of chocolate. Actually making chocolate from scratch is a long and specialised process that’s well out of scope for the average casual home-cook. See these videos from H2CT and Babish if you want to learn what’s involved there.
I’ve made a few versions of these truffles with different moulds, chocolate types and infused flavours, so this isn’t going to be a prescriptive recipe as much as the key steps/principles that you can tweak to fit what you’re working with.
Working With Chocolate
A lot of what I’ve learned about working with chocolate comes from Anne Reardon’s How to Cook That channel. If you have time, this video is a great introduction to some of the food-science behind how chocolate works:
youtube
Let’s do a summary of some key principles:
WATER IS THE ENEMY
Solid chocolate does not contain water. When water (or other water-based moisture, like milk) comes into contact with chocolate, it starts to dissolve the sugar, changing the chemical structure – which can change the texture and taste.
If the surface of the chocolate gets damp/wet (e.g. because of water on your fingers or condensation in your mould/storage container) it can cause what’s called a ‘sugar bloom’, leaving white streaks or other discolouration. You can actually see a bit of this in my photos; I was making these on a humid day and I think some condensation formed on the chilled moulds as I was pouring the chocolate in. This is the best case scenario for water – it’ll damage your chocolate aesthetically but you can wipe any away remaining moisture to stop it from getting worse and keep going.
If water mixes into your melted chocolate, your chocolate will ‘seize’; the sugar-water forming a solution that the cocoa sticks to, turning it thick, dry/sludgy/lumpy and resistant to melting. At this point your chocolate is texturally ruined (unless you’re making Flake) and can’t be used for moulding or shaping. You can use it for other things, by slowly adding more hot liquid until it melts into a chocolate sauce or ganache, but seizing can’t be reversed so this will be the end of the line for using that batch in truffle shells. You’ll have to start over.
The best way to prevent this is to keep everything dry. Wipe down your bowls/ knives/ spoons/ moulds/ surfaces well with a clean cloth or paper towel to ensure there’s no water left from washing or condensation build-up from the fridge/ freezer, dry your hands thoroughly, keep exposed wet ingredients on a different part of your work surface (or use them before/ after handing your chocolate so they’re not out at the same time) and try to limit the chance of condensation (e.g. from stovetop- or kettle-steam) dripping into your melted chocolate as much as possible.
COCOA BUTTER OR COMPOUND?
There are two main types of chocolate that you’ll find in the baking aisle: ‘real’ chocolate, which uses cocoa butter as the main fat, and ‘compound’ chocolate, which uses vegetable fat instead. For this you really need to read the ingredients list on the chocolate you’re buying since different brands can use either for different products (e.g. Cadbury Baking Melts are real chocolate while Nestle Baking Melts are compound chocolate, but other Cadbury products use compound chocolate and vice versa). The only way to guarantee what you’re getting is to check whether cocoa butter or vegetable fat is listed on the packet.
This makes a difference because the fats used change the stability and texture. The vegetable fat in compound chocolate has a higher melting point and is fully solid at room temperature. This means it holds its shape more easily and doesn’t need special treatment to set firm (which can be very forgiving to beginners and good for making thin decorations) but the trade-off is that those harder fats give it a tougher texture and a waxier/ oilier mouth-feel, as well as a less glossy sheen. Meanwhile, the cocoa butter in real chocolate has a lower melting point – closer to room temperature – which means that the heat from your hands (or even just a warm day) can be enough to melt the thinner pieces. Those softer fats are what give real chocolate that nicer melt-in-your-mouth feel, and the crystalline structures that the cocoa butter arranges itself into gives real chocolate its crisp snap and glossy surface. The trade-off is that, in order to keep the fats in that crystal structure, real chocolate has to be handled more carefully, and ‘tempered’ after fully melting; otherwise the melted fat resolidifies into an unstable, unstructured form that won’t set at room temperature.
Basically compound chocolate is more forgiving to work with (especially for thin pieces) but has a worse texture and appearance, while real chocolate looks and tastes better but requires an extra step and a little more care to work with.
TEMPERING
Tempering is that extra step I mentioned, which you need to do if you want real chocolate (the cocoa butter stuff) to set back into that nice crisp, room-temperature-stable, glossy state. When you buy real chocolate it is ‘in temper’, which means that the cocoa butter fat-molecules are arranged in a crystalline configuration that shimmers when the light hits it and breaks with a nice crack.
As you heat chocolate up the fat starts to soften and then melt, until it reaches a point where that crystal arrangement of fat molecules completely liquifies into unstructured particles: called going out of temper. Once out of temper, chocolate won’t reset into temper on its own – leaving you with squidgy, dull chocolate. The maximum temperature you can take chocolate to before it goes out of temper depends on the darkness of the chocolate:
White Chocolate < 29°C / 84°F
Milk Chocolate < 30°C / 86°F
Dark Chocolate < 32°C / 86°F
You can always try to thread the needle of heating chocolate up enough to make it workable but not so far as to send it out of temper, but that can take a lot of precision and be easy to overshoot (especially if you don’t have a candy thermometer). Instead, the simpler thing to do is to completely melt your chocolate, and then work the melted chocolate as it cools down so that you bring it back into temper. You can melt your chocolate by microwaving in 15-30 second bursts (stirring well in between to ensure it heats evenly) or over a double-boiler (stirring constantly).
Tempering chocolate is a lot less hard or scary than it may seem. I think chocolate is one of those things that has suffered a sort of “reverse CSI effect” thanks to cooking shows. These shows often like to feature the most technically complex/ specialised methods/ tools for food prep’ because it looks chef-y/ impressive/ spectacular, which can create the impression that these are the only methods available when there are actually simpler, more reliable, more accessible methods out there.
The method I find most accessible is the seeding method. To do this you need to reserve a couple of handfuls of your chocolate and chop it finely, then periodically add those reserved chocolate chips into your melted chocolate (biggest bits to smallest bits) as it cools. What you’re doing here is taking chocolate which still has its fat crystals in-temper and introducing it to your out-of-temper melted chocolate; providing a ‘seed’ template that helps the melted fats fall back into that crystalised structure. It also helps cool your chocolate down as the seed chocolate melts in. When doing this you have to be careful not to add the seed chocolate while things are too hot: otherwise it’s just going to melt out of temper as well, which could leave you in a mess unless you have extra chocolate on hand to sacrifice to the process.
A lifehack for this if you don’t have a food-thermometer is that the average core temperature of the human body is around 37°C / 99°F (with your extremities being colder) and chocolate will go into/out of temper between 29°C to 32°C (84°F to 86°F), so you can test whether it’s time to start tempering by getting your (clean and thoroughly dried) fingers involved. Dip a finger in to touch-test the temperature (stir your cooling chocolate to ensure the temperature is even throughout). Once it feels lukewarmyou can start melting in your bigger chips. Slowly add more, stirring to melt each addition through completely, until your chocolate mix feels slightly cooler than your hands while still being liquid enough to spoon and pour. If you have particularly warm hands, have recently exercised or it’s a hot day then you might want to shoot for a little cooler again. Just remember: the lighter your chocolate, the cooler the temperature it needs to go down to, so pay close attention when working with white chocolates in particular. I’ve done this every time with different chocolate types and it’s consistently got me into the tempering zone (even the first time I did it, which is rare because I usually muck things up on the first pass).
As you can see, it doesn’t actually take that much more work or time to temper real chocolate for truffles. But if you’re in a hurry (or don’t feel like it) you can just go with compound chocolate to skip this step.
Infusing Ganache
Ganache is a mixture of chocolate and cream, used for sauces, frostings, fillings or (in our case) truffle centres. It’s made by melting chocolate and cream together (either by heating both at the same time or pouring hot cream over chocolate) with the thickness of the ganache depending on the ratio of chocolate to cream, the lightness/darkness of the chocolate and its current temperature. Because ganache is a chocolate-cream mix that can’t be tempered you should use real chocolate when making it since the only thing you’ll get from compound chocolate here is a flavour downgrade.
Now you can just use ganache straight for a creamy chocolate-filled truffle but one of the fun things I like to do is add extra flavours to make them more interesting.
FLAVOURING THE CREAM
This depends on your flavouring. If you’re using a smooth dissolving powder (e.g. espresso powder, freeze-dried berry) or liquid essence/extract (e.g. vanilla, almond) then you can directly stir it through the warm cream to flavour your ganache. One thing to be careful of here is that adding acidic liquids to hot cream can make it split and curdle (that’s actually how you get cottage cheese), so if you’re looking for a citrus flavour I’d suggest infusing the cream with the rind not the juice. (If you want to make something like a wine ganache, you’ll need a recipe with extra ingredients to compensate for the added liquid and acid.)
Speaking of infusion, you may want to add flavouring from things that won’t dissolve smoothly; like vanilla pods, fresh herbs (e.g. rosemary or mint), fruit peel, culinary lavender or (as pictured) chillies. In this case what you want to do is infuse the flavour into the cream. To do this, soak your flavouring of choice in the heated cream to extract the essential oils and aromatics. For some flavours you can boil the cream with the flavouring to get the most out of it, but for more delicate flavours you might want to just steep the pieces in warm cream to avoid cooking away/ burning the taste. It’s a good idea to cut/ grate your flavour source fairly finely to release as much as possible. Once the cream is infused to your liking (the longer it sits the stronger the taste will be) you can strain the mix through a tea-strainer or mesh sieve to catch the chunky bits.
A quick note on infusing chilli
The main thing that makes chillies ‘spicy’ is a chemical called capsaicin, which triggers the body’s pain and temperature receptors (making it feel like it’s burning you). Milk-based products (such as cream in our case) contain a protein called casein, which binds to and inhibits capsaicin – neutralising some of the heat. Capsaicin can also be dissolved and washed away by oils and sugars. Basically when you infuse chilli into a cream-ganache you’re surrounding it with things that either neutralise some of the heat or help it pass along faster, which means the end-product will be less spicy than the same amount of chilli used in other dishes. If you want a hot truffle you’ll need to use stronger chillies or add slightly more. (See this video to learn more about chilli and chocolate.)
Can you infuse pure chocolate?
You can, but be careful. Make sure that your flavouring ingredient is completely dry and not something that would release any juice (again, water is your enemy). I would also avoid attempting any liquid or powdered additions since that could cause seizing. The things that I find have worked best are sitting whole woody herbs or spice pods in the chocolate as it melts (I’ve done this with rosemary). I’d recommend tying your flavouring into a bundle with some kitchen twine (or making a ‘teabag’ with some mesh cloth) to make it easier to remove; pure melted chocolate is harder to strain than cream. You can also salt your melted chocolate if you like. If you’re using real chocolate, remember to temper it once you’ve removed your ‘flavour bundle’ from the melt.
Once your cream is flavoured you can pour it over the chocolate to make ganache as normal – if needed warm it over a double boiler or microwave in short bursts until the chocolate is completely melted through. You can also colour white-chocolate-based ganache with a few drops of gel food dye for visual effect.
WHIPPED GANACHE
Let’s say you don’t want a very chocolate-heavy ganache as your filling (perhaps because it would be too rich). Or maybe you added too much cream while making your ganache and now you’re worried that your filling will be too runny at serving temperature.
What you can do here is whip your ganache to thicken it in the same way that you would whip cream. Any liquid that contains at least 30% fat can be whipped – the fat globules forming a stabilised network that traps tiny air bubbles. Meanwhile when you whip egg white/ gelatine/ aquafaba what you’re doing is stretching out proteins to create the air-trapping network. Since pure cream is typically 40% fat and chocolate typically contains 20-40% fat, a cream-chocolate ganache mixture has enough fat to whip up. Ganache whipped to stiff peaks will give you a thickness and structure similar to a cooled, chocolate-heavy ganache while being substantially lighter in richness and texture.
Whether you whip your ganache just to thicken it or all the way to peaks will depend on your starting thickness and personal preference for filling texture – how runny your original mix was and whether you prefer the filling gooier or fluffier. While you can whip ganache through enthusiastic application of a balloon-whisk, I would recommend using an electric beater (or at least a hand-crank) to save yourself the exertion.
Putting it all together: Truffle time
This type of truffle is made by pouring pure melted chocolate into a mould to a create chocolate shell, which you then fill with your flavoured ganache before sealing everything shut with more chocolate and allowing to set.
MOULDS & MOULD MATERIALS
In theory you could make chocolate in any kind of mould, but the thing to keep in mind is whether you’ll be able to get it out at the end without breaking the mould or shattering the chocolate. For example, you don’t want a shape that would hook into/ fold over the chocolate, because that part would just get trapped and break off. Ideally you want a mould with a bit of flex, so that you can pop the solidified truffles from the case more easily.
My recommendation is silicon moulds. These have enough heat resistance to handle warm chocolate while keeping their shape, while also being non-stick and pliable, which makes them easier to peel off your completed truffles. You can also use plastic ice-cube trays but there is a risk, since you need to apply more force to pop the truffle out, which can transfer to the shell and crack it – especially if you’re using a gooier filling that might shift around and press against the shell from the inside.
HOW MUCH CHOCOLATE DO YOU NEED FOR SHELLS?
This will depend heavily on both the volume of filling you make, and the size of the moulds. The smaller your moulds, the more chocolate you need relative to filling. That might seem backwards, but think about it this way: the smaller your mould is, the smaller the amount of filling that can fit inside, which means you’ll need more shells to use all that filling up (it’s a surface area thing). As a general rule of thumb, you need about 300 grams of chocolate per ‘ice-cube tray’ of moulds.
You can guesstimate the number of moulds you’ll need by comparing the volume of filling you expect your chocolate + cream to make (remembering that whipped ganache will expand) to the volume you expect each mould to take. It’s a good idea to overestimate the amount of shell chocolate you think you’ll need. If you end up with too many shells you can always fill them with other things, like buttercream/cream-cheese frosting, caramel, jam/jelly, peanut butter, citrus curd, wasabi (for prank truffles) or any leftover melted chocolate (which you could also press candy pieces into).
MAKING AND FILLING SHELLS
Okay, now that we’ve covered the theory, let’s make some truffles:
Step 1:
Chill your chocolate moulds (making sure they’re clean and well-dried first). Either put them in the fridge overnight or in the freezer for a few hours. This will give your chocolate shells a head start on setting.
Step 2:
Make your flavoured ganache and set aside. This gives your filling time to cool down while you prepare and chill the shells. If you add a warm filling to your thin chocolate casings, the heat will melt them. (Note: You will need to let your ganache cool to room temperature if you want it to whip properly.).
Step 3:
Melt the chocolate, and temper it if needed. I would recommend using a heat-safe glass or pyrex bowl since those will hold heat for longer and you want to keep your chocolate warm enough to be workable throughout this process.
Step 4:
Make your shell moulds:
Pour your chocolate into your first tray of chilled moulds. Using a spatula or the back of a knife, level the tops until they are flush with the moulds, scraping the excess chocolate back into the bowl for reuse.
Return the filled moulds to the refrigerator for 2-4 minutes to allow the outer layer to cool and harden into a shell – the longer you cool it for, the thicker the truffle shell will be.
Once chilled, invert the moulds back over the bowl to pour out the remaining chocolate ( you can gently tap or shake the tray to help encourage the liquid out).
Scrape the tops flush again, returning the excess to the bowl. Place the shells back in the fridge to harden completely.
Repeat with the next mould-tray, reducing the shell-chilling time each round since your chocolate will be cooler and set faster/thicker.
If you’re starting with lots of chocolate you can do two trays at a time, but since you need to completely fill each mould while the outer layer sets, a lot of the chocolate for the later shells is going to come from the excess poured out of the first moulds. You will not have enough to fill all your moulds at once. The chocolate poured from the last 1-2 moulds will be used to seal the filling inside later.
Step 5:
Add your filling(s). If possible use a piping bag with a narrow tip to give you good control and help avoid spills or overfilling (if you don’t have a piping bag, you can improvise one by reinforcing the corner of a Ziploc bag with some tape and then snipping the tip off). You want to leave at least 3mm (1/9th inch) of headspace between the top of your filling and the top of the mould (this is to fit the chocolate cap). If needed, gently tap or jiggle your mould to even out the filling. For very thick fillings, you can use a toothpick/skewer to spread the filling into any gaps/air pockets. Return your moulds to the fridge for 5-10 minutes to help set the top of the filling.
Step 6:
Seal your truffles. Check that the remaining melted chocolate is still liquid enough to be workable - if it has become too thick, microwave for no more than 10 seconds or briefly place it over a bowl of hot water, just enough to get it loose again. Spoon the chocolate to fill each truffle until it’s flush with the top of the mould – scraping any excess back into the bowl to use again. Here you need to be careful not to agitate the fillings or let them mix with the chocolate, otherwise your caps may not set.
Step 7:
Chill your truffles for at least 2 hours (longer for larger moulds) or ideally overnight until the chocolate and filling have fully set. Once fully set, pop your truffles out of the moulds.
Step 8 (OPTIONAL):
If you like, you can accessorise your truffles by drizzling with extra chocolate (remember to temper if using the real stuff) or topping with whipped cream, extra whipped ganache or other decorations (if you wanted, you could use a small amount of chocolate to stick on sprinkles or sugar flowers) . This is an especially good idea if you’re making truffles with different fillings inside the same type of shell and want to be able to tell them apart.
The ones in the picture
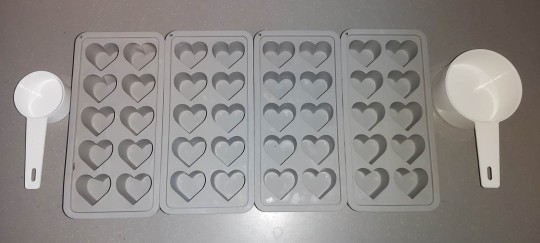
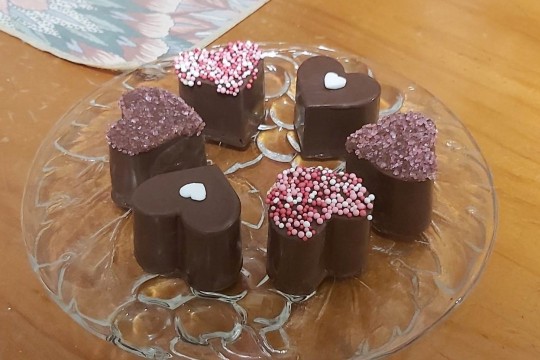
For the chilli-truffles in the picture, I infused three chopped fresh red chillies (with seeds) by boiling in approximately 200mL of pure cream, then strained and combined it with 225g each of White and Milk Chocolate to make slightly more than 2 cups of runny ganache. (You can absolutely use darker chocolates to make the ganache but be aware that darker chocolates have a stronger cocoa taste that can drown out/ mask more delicate flavours. Pick the sweetness/darkness of chocolate that plays well with the profile of your chosen flavour.) Since the ganache was runny, I let it cool and whipped it to semi-stiff peaks. For these truffle shells and caps I used 900g of tempered dark chocolate, set in my supermarket’s home-brand heart moulds:
This recipe made 24 (with some of the ganache reserved for decorating the tops) plus some extra chocolate shells which I filled with peanut butter.
Have fun with it!
The reason I wrote this post the way I did is that I don’t really stick to a precise recipe when making this kind of truffle anymore. Once you have the basics down, feel free to play around. Try out other combinations of chocolates and flavours, different moulds and different fillings.
Here are some variants I’ve personally made:
Salted White Chocolate shell + Rosemary White-Chocolate Ganache Filling
Dark Chocolate shell + Orange Curd filling
Dark Chocolate shell + Peanut Butter filling
Dark Chocolate shell + Habanero White Chocolate filling
You could also look at this playlist of chocolate videos if you want some extra inspiration.
Have fun experimenting!
#chocolate#chocolate making#chocolate truffles#recipe#I want to make lavender infused ones one day (when my big spice kit is no longer sealed in storage)#chilli chocolate#chili chocolate#food science#3WD cooks
8 notes
·
View notes
Text


Sourdough starter shenanigans, experiment #5: Babka
Fumbled the cinnamon one a little trying to figure out how to roll such a sticky dough on a wet day but it was worth the trial-run to get that interior on the chocolate loaf. That's a good cross-section.
(Based on this recipe with some tips and filling mods taken from this video.)
#Baking#Sourdough#Sourdough baking#Babka#Sourdough Babka#dessert#chocolate babka#cinnamon babka#food#3WD cooks#that cross-section tho#I was very sure I'd completely BEEFED the cinnamon one so it turning out that good was a nice surprise#usually I bollocks up complex baking recipes on attempt one#also somewhat surprised to learn that Babka is almost entirely not present in my own country as a known food#(which isn't a real surprise since I only discovered it from the Babish videos)#(but it's bizarre the degree to which it's a complete unknown here)#(Even some friends who are European expats had no idea what it was by name or by sight)
5 notes
·
View notes
Photo


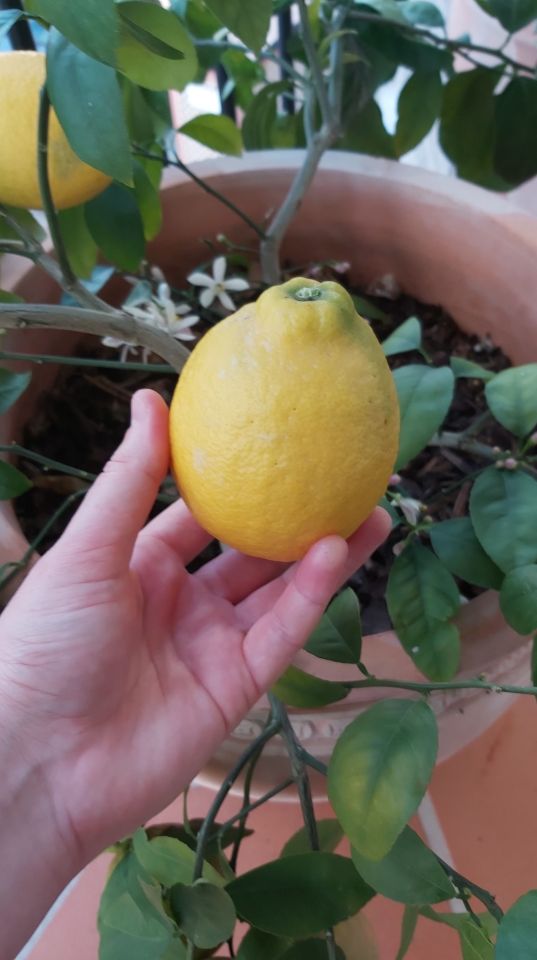


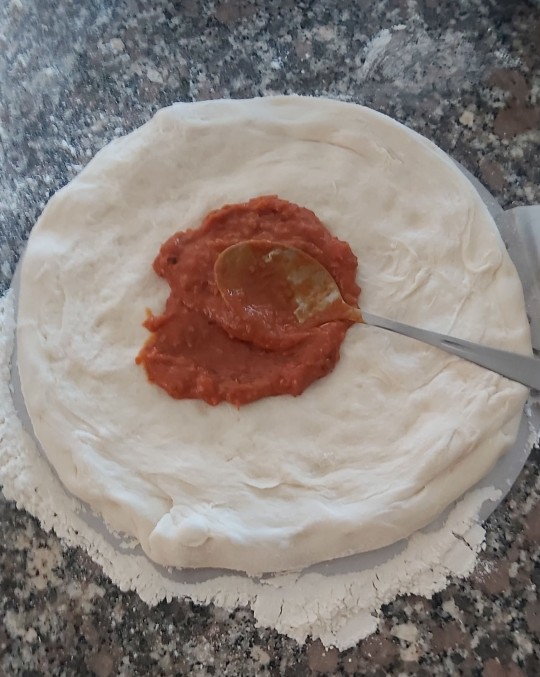


Accidental cottage-core weekend brought to you by sourdough starter and a pocket vegetable garden.
#baking#3WD Cooks#food#Pumpkin bread#Sourdough pizza#lemon slice#lemons#tomatoes#sourdough starter#guess who bought a pizza stone and made a HUGE mess in the kitchen
7 notes
·
View notes
Note
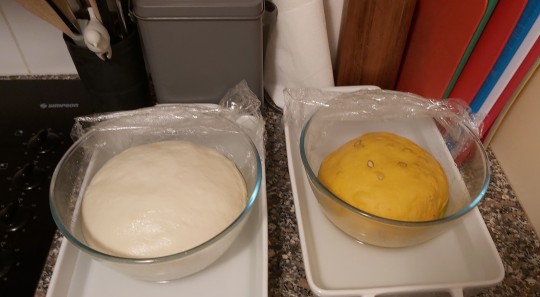
Did your bread rise okay?
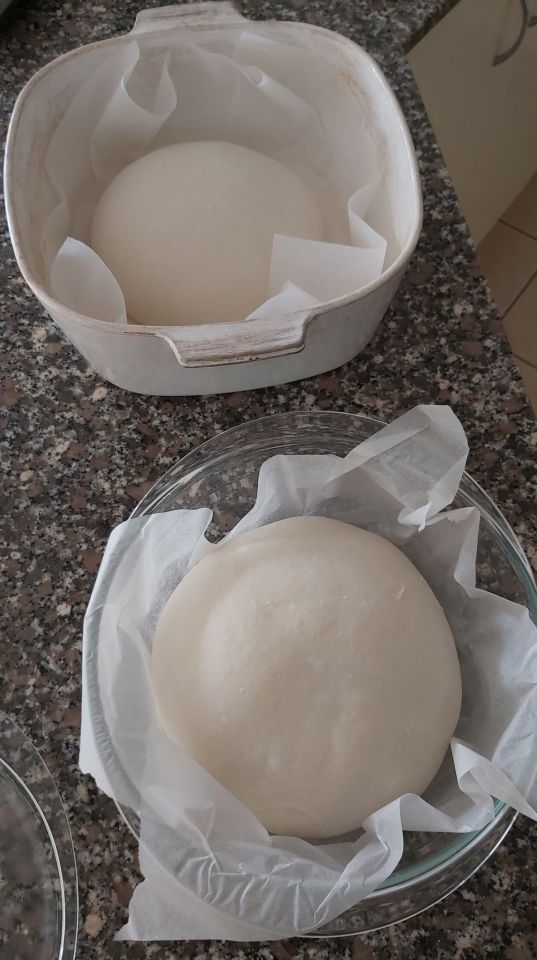
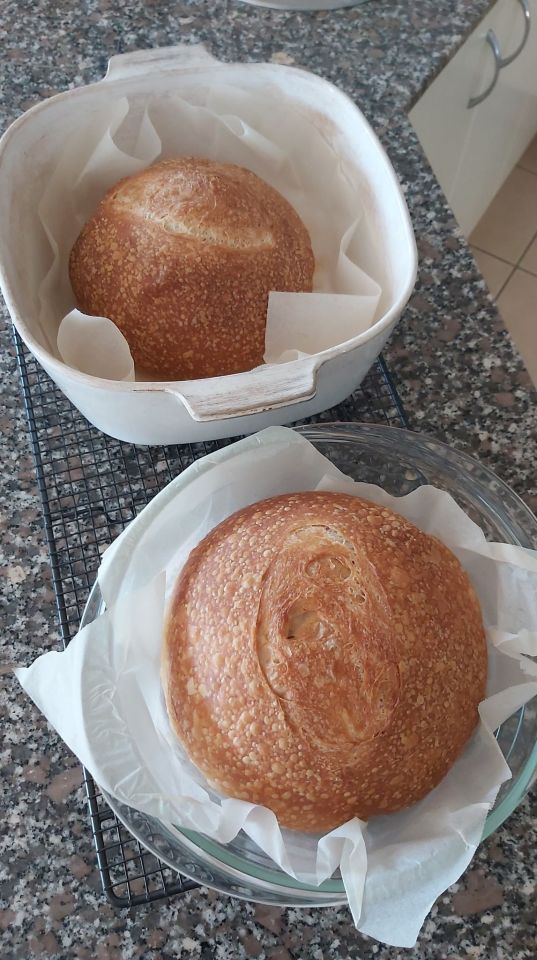
It did! There's been some cold weather recently so the second rise took 6 hours but they rose really nicely.
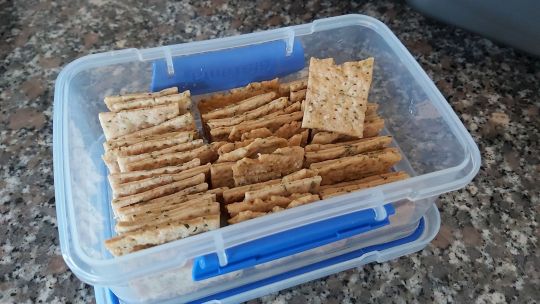
Also made bread rolls and crackers:

#my starter is very slow#took a nap during the second rise#there's probably going to be a lot of bubbles in the crumb once I cut them open#rosemary sourdough crackers my beloved#food#baking#breadmaking#sourdough#sourdough bread#doing my monthly Big Bread Bake#the great thing about sourdough is that it's a really low-moisture bread so all of this will freeze really well#3WD Cooks#3WD Answers#youmaycallmeyourhigness
4 notes
·
View notes
Text
Nut-free vegan-safe compound chocolate is hideously finnicky to work with but I would be remiss in my duties as Grandma-friend if I didn't make something for my tragically-allergic friends to partake in.
Flavours:
Chilli-Coconut cream ganache (white sugar hearts),
Vegan orange curd (pink glitter sprinkles),
Vegan raspberry "cheese"cake (pink and white sprinkles)
(Masterpost on truffle-making principles)
#3WD Cooks#chocolate#chocolate truffles#food#hooray that so many cake-topper sprinkles no longer use egg/milk powder as a stabilizer#even non-compound vegan chocolate behaves in a super weird way compared to the standard stuff#whatever the alternate stabilizers are they have very unexpected heat stability#goes from water-thin liquid to modelling clay consistency in able 5 seconds#also I think I finally did it#made food that has NO nutritional value#No gluten. no dairy. no nuts. most of it is soy-free too#What is it made of? Heck if I know#but if it won't kill my friends then the questionably food-analogous substitutes can stay#I don't know how I managed to befriend Allergies Georg TWICE but apparently I'm magnetically drawn to people with all the intolerances
0 notes
Note
🌾
Positivity Ask Game
🌾 Share a food you enjoy
Cornish-style Pasties are a really tasty lunch and comfort food.
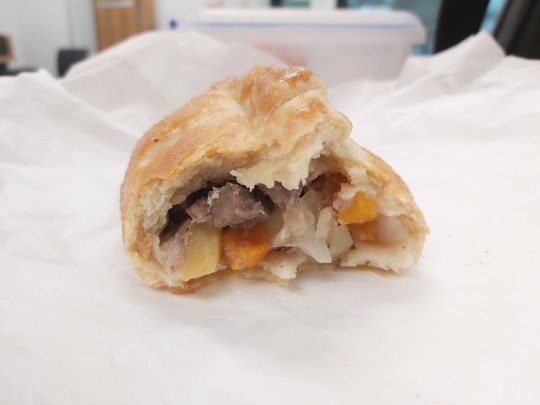
Some of the bakeries around my area used to sell them but they're also pretty easy to make at home. I use a modded version of this recipe - the dough needs a fair bit of fridge-time but other than that they come together very fast and you can make a lot of them for not much money.
#Positivity ask game#positivity ask game: the sequel#anonymous#3WD answers#food#baking#cornish pasty#they're hard to find in stores these days#but the good thing about basic baking/cooking skills is that this becomes a solvable problem if you're willing to bust out the flour
1 note
·
View note
Photo

Made some snacks to share and the sweets plate ended up looking extremely pretty.
#it's a nice arrangement of colours and shapes#food#3WD cooks#everything on the plate (except for the cream and grapes) is home-grown/made which was a lot of fun to do#even if it made the kitchen super messy#and I have to shoo off a small horde of birds to get my handful of strawberries#scones#macarons#(pistachio & chocolate)#strawberry jam#dessert
4 notes
·
View notes
Photo

Starting off Saturday with some homemade no-churn ice-cream
Left: Apple Pie
Right: Lemon-blueberry ripple
No churn ice-cream base (makes approximately 3 Litres/ 2 tubs):
900ml thickened cream
395g (1 tin) sweetened condensed milk
Beat cream until peaks start to go from soft to stiff.
Add sweetened condensed milk. Beat for a few seconds until evenly combined. NB: do not overbeat or the mixture will liquify and you will get hard, sad, milky ice instead.
Fold through flavouring and mix-ins of your choice.
Freeze for 4 hours (a metal bread tin is good if you don’t have an ice-cream container).
#icecream#no churn icecream#apple pie#lemon#blueberry#3WD Cooks#because it's based on cream rather than custard no-churn is slightly firmer and less smooth that 'standard' icecream#but considering you can make it really easily without having to buy a churner it's actually really nice#Best practice is to let it sit out for 10 min to soften to make scooping easier#3WD
9 notes
·
View notes
Photo

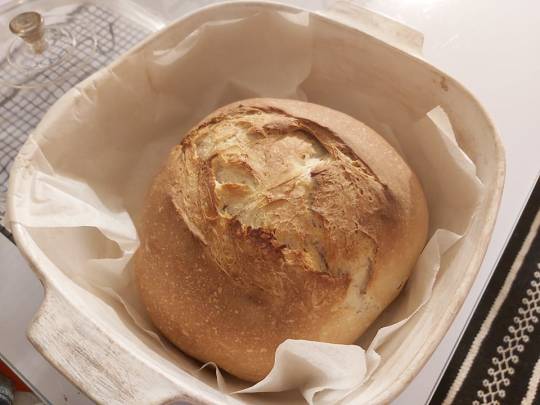
Is it after midnight? Yes. Do I have work in the morning? Yes.
Is this the best plain sourdough loaf I have ever baked? Also yes.
(Using this recipe)
#I had planned to finish this 2-3 hours earlier#but sourdough takes however much time the starter decides it needs#and I was using my bread bowls for chocolate-chicanery in the morning so I started late#sourdough#sourdough bread#bread#baking#3WD Cooks
4 notes
·
View notes
Photo
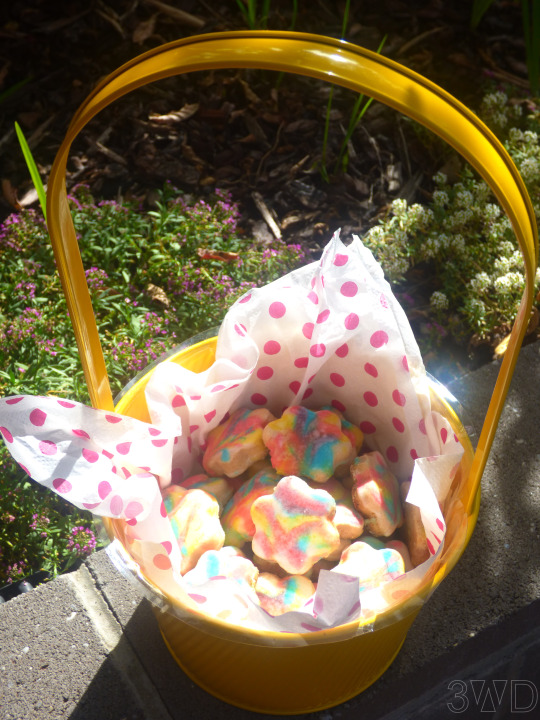

Colour-drizzle glazed lemon shortbreads
9 notes
·
View notes
Photo
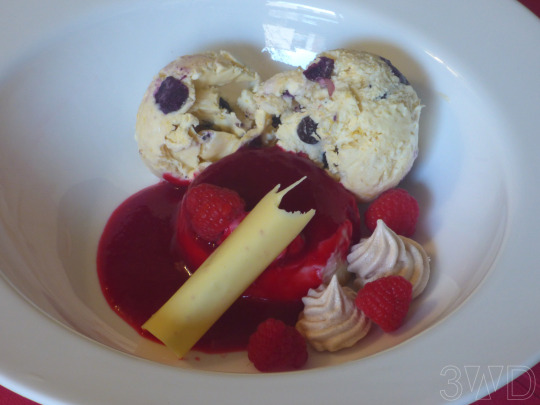
Probably the most complex and arguably pretentious dessert I’ve ever made but it sure does look (and taste) good.
Vanilla panna cotta with raspberry coulis, meringue, lemon & blueberry icecream, and rosemary-&-rock-salt infused white chocolate curls.
#dessert#panna cotta#coulis#no churn icecream#meringue#each of the components is very simple to make this seems way more impressive than it is#really this was an elaborate excuse to use up a bunch of pre-existing desert elements and ingredients I had left from other project#my friends told me to 'surprise them' with the dessert I brought#somehow I don't think they'll be expecting this#TFW you realise that listening to cooking videos as background noise while working means you already know methods for tempering chocolate#3WD cooks
4 notes
·
View notes
Photo


Citrus served 4 ½ ways. Feat. the huge bag of lemons a friend gave me from their tree, plus two very large grapefruit that turned out to be mostly pith when cut open (not pictured).
Lemon curd + Vegan lemon curd
Salt-preserved lemons
Lemon and Grapefruit marmalade
Lemon-zest shortbreads with lemon juice glaze
#lemons#lemon curd#marmalade#shortbread#baking#preserves#marmalade was a complete homebrew I have no idea how it's going to turn out#shortbread was a homebrew modification of the linked recipe#3WD cooks
4 notes
·
View notes
Photo


My friend taught me how to make buttercream flowers 🌹 🌷 💗
#you need special tips and piping pins to make them but with the right tools it's suprisingly simple#they're dairy-free chocolate cupcakes underneath#Baking#Cake Decoration#Buttercream#icing roses#3WD#3WD Cooks
23 notes
·
View notes
Last Seen Blogs

nowheresposts-blog
No Mans land

jaybotography
Jaybotography

krusperichard
Tanta Roba

labellerose-acheron
a beauty but a funny girl

real-afkpro
AFKpro's Insane Ramblings