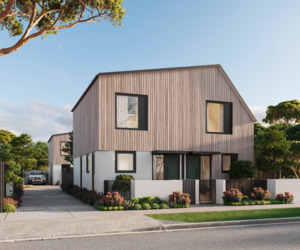
#3d floor plan rendering california
Text
Best 3D Rendering Services Provider in Los Angeles California | 3D Revolution
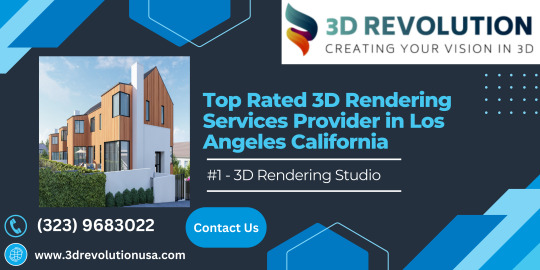
3D Revolution has evolved into one of the largest 3D Rendering Studios in Los Angeles and is intent on dominating the 3D Architectural Visualisation space with our beautiful photorealistic 3D Rendering and our Realistic 3D and VR/AR Interactive Tours for Properties Developers, Architects, Builders and Homeowners. Get World Class 3D Rendering Services in Los Angeles, California . Our 3D Rendering Specialists help builders, designers and property developers throughout Los Angeles California. To Know More Info, Please Visit:- https://www.3drevolutionusa.com/
#3d rendering los angeles#3d rendering company california#3d rendering California#3d rendering services los angeles#3d home rendering los angeles#3d exterior rendering los angeles#3d townhouse rendering#3d streetscape rendering#3d interior rendering los angeles#3d architectural rendering los angeles#3d rendering services los angeles ca#3d floor plan rendering california#3d apartment rendering los angeles#3d house rendering california#3d commercial rendering#3d commercial building renderings california#3d commercial renderings los angeles#3d rendering home design california
0 notes
Text
Anaheim Hills Kitchen Remodel
Transform your Anaheim Hills kitchen into the heart of your house behind our total kitchen renovation services. We specialize in creating custom, functional, and beautiful spaces that reflect your personal style even if maximizing efficiency. Whether you're dreaming of a modern, sleek design or a warm, received kitchen, our experienced team of designers and craftsmen are here to bring your vision to life.
Our Process:
From concept to completion, we handle all Anaheim Hills Kitchen Renovation detail. Our process begins behind an in-depth consultation where we discuss your needs, preferences, and budget. Well make a tailored design plan, final behind 3D renderings, to manage to pay for you a definite idea of how your supplementary kitchen will look and function.
Next, our proficient Anaheim Hills Kitchen Remodeling craftsmen allow over, using the highest tone materials and the latest techniques to ensure your kitchen is not only beautiful but durable and operational for years to come. We coordinate everything, from plumbing and electrical feint to cabinetry, countertops, and flooring installation, ensuring a seamless renovation experience.
Why pick Us:
Custom Designs: all renovation is personalized to your unique needs, whether it's maximizing space, enhancing functionality, or improving lighting.
High-Quality Materials: We source top-quality materials, including custom cabinets, premium countertops, and high-end appliances, to manage to pay for your kitchen a luxurious feel.
On-Time & On-Budget: We self-importance ourselves on delivering projects within the extremely timeline and budget, ensuring minimal disruption to your daily life.
End-to-End Service: Our team manages all aspects of the renovation, from demolition to the final execution touches.
Let us tilt your antiquated kitchen into a tell youll adore to cook and please in. get into us today for a consultation and allow the first step toward your drive kitchen!
Anaheim Hills Kitchen Renovation
Corona Del Mar Professional Kitchen Makeover
Expert Santa Ana Kitchen Redesign Contractor
Anaheim Hills California ADU Contractors
Local Anaheim Custom Kitchen Remodel Professionals
Tustin Modern Kitchen Remodel Experts
Excellent Mission Viejo Kitchen Upgrade Contractors
https://anaheimhillskitchenremodelide222.blogspot.com/2024/09/anaheim-hills-kitchen-remodel-ideas.html
Anaheim Hills Modern Kitchen Remodel
https://cypresspersianrugrestoration112.blogspot.com/2024/09/periodontal-abscess-oceanside.html
https://www.tumblr.com/androfergiespaces/761792371476332545
https://termitecontrolnearmevista458.blogspot.com/2024/09/usa-gymnastics-studio-city.html
https://massagecareertrainingcalabasas485.blogspot.com/
https://sanclementepersianrugrepair713.blogspot.com/2024/09/massage-career-training-calabasas.html
0 notes
Text
Bring your Concept to New life with Photorealistic 3D Rendering Company San Diego California
San Diego is home to a mix of architectural styles. Take a look at the varied architecture and important landmarks that make up America's Finest City. Located in San Diego California JMSD Consultant Rendering Studio has worked with many architects, interior designers, engineers and real estate developers helping them visualize their commercial, residential and industrial projects, which include homes, condos, senior living, educational, hospitality, religious, sports, office parks and more. the following services a range 3D Rendering Services like 3D Exterior Rendering, 3D Interior Rendering, 3D Walkthrough Animation, Floor Plan Rendering etc. Architectural Visualizations near me in Los Angeles, San Jose, San Francisco, San Diego, Long Beach, Oakland, Fresno and other city of California USA.
#3D Rendering Company San Diego California#3D Rendering Services San Diego California#Architectural Visualizations near me San Diego California#jmsd consultant#3d rendering company#jmsd consultant rendering studio#usa
0 notes
Text
Best Architectural CAD Drafting Services In CALIFORNIA
When it comes to architectural CAD drafting services in California, you want the best of the best. Your architectural projects are a reflection of your vision and creativity, and you need a drafting service that can bring those ideas to life with precision and expertise.
In California, there are several architectural CAD drafting services that stand out from the rest. These companies have a proven track record of delivering high-quality drafting services to clients in various industries, including residential, commercial, and industrial.
The best architectural CAD drafting services in California offer a range of services to meet your specific needs. From 2D and 3D drafting to detailed floor plans and elevations, these companies have the tools and expertise to bring your designs to fruition.
What sets these top-tier drafting services apart is their commitment to accuracy and attention to detail. They understand that every line matters when it comes to creating accurate representations of your architectural designs. With state-of-the-art software and skilled draftsmen, they ensure that every aspect of your project is meticulously captured.
Additionally, these leading architectural CAD drafting services prioritize communication and collaboration. They work closely with clients throughout the process, ensuring that their vision is understood and executed flawlessly. Whether you have specific design requirements or need assistance in conceptualizing your project, these companies are dedicated to providing exceptional customer service.
Find What Is The Purpose Of Architectural Rendering Company?
In conclusion, if you're looking for the best architectural CAD drafting services in California, look for Drafting Consultants that combine technical expertise with a commitment to client satisfaction. With their help, you can bring your architectural visions into reality with precision and excellence.
#Architectural Cad Drafting Services#Cad Drawing Services#3d Architect Home Designer#Architectural Cad Drawings
0 notes
Photo

Are you looking for Garage Remodeling Services near Berkeley CA? Handyman Services Of Oakland-Berkeley is offering Garage Remodeling Services.
https://remodelinghandymanberkeley.com/garage-remodeling-services-near-me/
Garage remodeling is a transformative journey that turns your underutilized space into a functional and stylish asset for your home. HANDYMAN SERVICES OF OAKLAND-BERKELEY, boasts some of the best Garage Remodeling Services in the area. Here we’ll explore everything you need to know about these services, from the benefits of remodeling to what to expect during the process.
Understanding the Importance of Garage Remodeling:
Your garage is not just a place to park your car; it’s a versatile space that can be utilized for various purposes. Garage remodeling services in Berkeley California are designed to help you make the most of this area. Here’s why it’s essential:
Maximizing Space: Garage remodeling allows you to maximize the available space in your home. Whether it’s creating a home office, a gym, or a playroom, you can make your garage serve multiple functions.
Increasing Property Value: A well-executed garage remodel can significantly boost the value of your property. When it comes time to sell, potential buyers will appreciate the added versatility.
Enhancing Organization: With the right organization solutions, your garage can become a clutter-free zone. Custom storage and shelving options can help you keep your belongings in order.
Benefits of Choosing Garage Remodeling Services in Berkeley California:
Consultation
Our journey begins with a thorough consultation. We take a moment to learn about your vision, demands, and budget limits. During this phase, our experts provide valuable insights and suggestions to help you make informed decisions.
Design and Planning
Once we have a clear understanding of your expectations, our design team gets to work. We create detailed plans and 3D renderings, allowing you to visualize the final result. We pay meticulous attention to every detail, ensuring that your dream bathroom takes shape on paper before construction begins.
Expert Execution
With a solid plan in place, our skilled craftsmen commence the construction phase. They work diligently to bring the design to life, adhering to strict timelines and quality benchmarks.
Quality Assurance
Our commitment to excellence extends to every aspect of the remodeling process. We conduct thorough quality checks at every stage to ensure that the work meets our rigorous standards. Your satisfaction is our top priority.
Completion and Beyond
Once your bathroom transformation is complete, we walk you through the final result. We believe in transparent communication and make sure that you are delighted with the outcome. Our services don’t end with the project; we offer post-construction support to address any queries or concerns you may have.
The Garage Remodeling Process
Curious about what the garage remodeling process entails? Here’s a step-by-step guide:
Initial Consultation
The process begins with an initial consultation. During this meeting, you’ll discuss your ideas and goals with the remodeling experts. They’ll assess your space and provide valuable input.
Design and Planning
After the consultation, the professionals will create a detailed plan and design for your garage remodel. This includes layout, materials, and cost estimates.
Permits and Approvals
In Berkeley California, certain remodeling projects may require permits. Your chosen service will take care of obtaining any necessary approvals, ensuring a smooth process.
Demolition and Construction
Once all plans are approved, the actual work begins. This phase involves demolishing existing structures, if necessary, and building the new features.
Finishing Touches
The final step includes adding finishing touches like paint, flooring, lighting, and any custom storage solutions you’ve chosen.
Inspection and Handover
Before concluding the project, there will be an inspection to ensure everything meets safety and quality standards. Once approved, your newly remodeled garage is ready for use.
FAQs :
Q: How long does a typical garage remodeling project take in Berkeley California?
A: The timeline varies depending on the complexity of the project, but it generally ranges from a few weeks to a couple of months.
Q: Are garage remodeling services expensive?
A: The cost varies depending on factors like the size of your garage, the scope of work, and the materials used. It’s best to get a personalized quote from a remodeling service.
Q: Can I convert my garage into a living space?
A: Yes, you can convert your garage into a living space, but you’ll need to comply with local building codes and zoning regulations.
Q: Do I need to vacate my home during the remodeling process?
A: In most cases, you can stay in your home during a garage remodel, but there may be some inconvenience. Discuss this with your remodeling service for the best approach.
Q: How can I choose the right garage remodeling service in Berkeley California?
A: To find the right service, read reviews, ask for recommendations, and check their portfolio. It’s crucial to find a company with a proper track record.
Q: Can I customize my garage remodel to suit my specific needs?
A: Absolutely! Garage remodeling services in Berkeley California often offer customizable options to meet your unique requirements.
Garage Remodeling Services of Berkeley California
Garage Remodeling Services of Oakland-Berkeley California offers an incredible opportunity to unlock the full potential of your garage space. With HANDYMAN SERVICES OF OAKLAND-BERKELEY to guide you through the process, you can enjoy the benefits of a well-organized, multi-functional garage that adds value to your property.
Contact Details:
HANDYMAN SERVICES OF OAKLAND-BERKELEY
Local Handyman Services in Berkeley, CA!
(415) 874-8040
Monday to Sunday 7 am – 11 pm
https://remodelinghandymanberkeley.com/
Berkeley California
Service Area:
Alameda ,Ca, Albany ,Ca, Berkeley ,Ca, Dublin ,Ca, Emeryville ,Ca, Fremont ,Ca, Hayward ,Ca, Livermore ,Ca, Newark ,Ca, Oakland (county seat) ,Ca, Piedmont ,Ca, Pleasanton ,Ca, San Leandro ,Ca, Union City ,Ca, Ashland ,Ca, Castro Valley ,Ca, Cherryland ,Ca, Fairview ,Ca, San Lorenzo ,Ca, Sunol ,Ca, Brentwood, Ca, Clayton ,Ca, Concord ,Ca, El Cerrito ,Ca, Hercules ,Ca, Lafayette ,Ca, Martinez (county seat) ,Ca, Oakley ,Ca, Orinda ,Ca, Pinole ,Ca, Pittsburg ,Ca, Pleasant Hill ,Ca, Richmond ,Ca, San Pablo ,Ca, San Ramon ,Ca, Walnut Creek ,Ca, Acalanes Ridge ,Ca, Alamo ,Ca, Alhambra Valley ,Ca, Bay Point ,Ca, Bayview ,Ca, Bethel Island ,Ca, Blackhawk ,Ca, Byron ,Ca, Camino Tassajara ,Ca, Castle Hill ,Ca, Clyde ,Ca, Contra Costa Centre ,Ca, Crockett ,Ca, Diablo ,Ca, Discovery Bay ,Ca, East Richmond Heights ,Ca, El Sobrante ,Ca, Kensington ,Ca, Knightsen ,Ca, Montalvin Manor ,Ca, Mountain View ,Ca, Norris Canyon ,Ca, North Gate ,Ca, North Richmond ,Ca, Pacheco ,Ca, Port Costa ,Ca, Reliez Valley ,Ca, Rodeo ,Ca, Rollingwood ,Ca, Saranap ,Ca, San Miguel ,Ca, Shell Ridge ,Ca, Tara Hills ,Ca, Vine Hill ,Ca
Zip Codes:
94501, 94502, 94706, 94707, 94708, 94709, 94710, 94720, 94703, 94704, 94705, 94552, 94546, 94568, 94555, 94536, 94538, 94539, 94541, 94542, 94544, 94545 94550, 94551, 94560 94601, 94602, 94603, 94605, 94606, 94607, 94608, 94609, 94610, 94611, 94612, 94613, 94618, 94619, 94621, 94566, 94588, 94577, 94578, 94579, 94580, 94586, 94587
0 notes
Text
3d Render California
Based in Los Angeles, TNI Design is an award-winning 3d Render California, and landscape design service. Serving the restaurant, food service, hospitality, commercial and residential sectors. We provide modern, exciting design environments, that lend themselves to consumer sensory interaction, engaging at different stages during the overall experience when visiting restaurants and hotels. Reach https://www.tnidesign.com/ to know more.
TNI Design has won awards for restaurant interior design and consulting projects which have been featured in numerous publications.
We specialize in creating warm, inviting spaces that enhance the dining experience. We collaborate closely with clients to develop effective floor plans, eye-catching colors and textures and innovative lighting solutions.
0 notes
Text
GARAGE CONVERSION COMPANY IN LOS ANGELES

What you need to Know About Your ADU Garage Conversion in Los Angeles?
An accessory dwelling unit, commonly known as an ADU, has recently become a great new option for homeowners in Los Angeles and other areas of southern California. A garage conversion in Los Angeles can provide housing for a family member or generate additional income when used as a rental unit for short-term or long-term tenants. It can even be used to create something you have always wanted in your primary residence but never had the space for, such as a hobby room, gym, or dedicated home office.
Though converting your Los Angeles garage into an ADU can cost you time and money, the return on investment can make that cost worthwhile – whether you’re recouping that investment through rental income or getting it back when you sell the property that now has a much higher resale value.
How you establish your ADU depends greatly upon the local rules and regulations where you live. Before you get started, MDM Custom Remodeling, Inc. can help you with our Concept Design Service. Part of this service is searching city and county records to verify your local zoning laws and building codes.
Once it is established that you can build an ADU, we’ll help you look into other factors and start designing your new ADU. We create a floor plan, 3D rendering and views, and a 360-degree panorama with a virtual walk-through. This allows you to enjoy your new ADU virtually on the computer before spending any dollars on construction.
This service also includes accurate budget planning. Our tools feature the sophisticated functions of collecting all material and labor costs to come up with a very accurate budget, which helps you stay in control of the project's overall cost.
When you start your journey to a garage conversion ADU in Los Angeles with MDM Custom Remodeling, Inc., you can rest assured that your ADU is allowable and legal and won’t cause you any headaches in the future.
Garage Conversion ADU Requirements in Los Angeles
When you opt for a garage conversion in Los Angeles, you must understand the requirements set forth by the local government. If you don’t follow the legal stipulations for creating an ADU on your property, you could wind up halfway through construction only to see your permit approval pulled or halted – and that means you’re out a ton of money with little to no recourse. There are a few things more frustrating!
To that end, let’s look at some general requirements for building an ADU above the garage in Los Angeles. Keep in mind that there might be additional rules for your local area. That’s why it’s important to check with MDM Custom Remodeling, Inc. to ensure you’re staying within the letter of the law.
Your home must be located in a residential zone.
The house must already be in the same location where you want to build the ADU. In other words, you can’t build an ADU on top of a garage that doesn’t have a house on the associated property.
The garage conversion must fit on the property. There are local guidelines for setbacks or how far away from the property line the new conversion has to be.
You can have up to two ADUs on your single-family home. One can be up to 1,200 square feet. The JADU, or Junior ADU, can be up to 500 square feet.
An ADU could be attached or detached from the main house.
The ADU must be sold as part of the house if you sell the property. It cannot be sold separately.
You are free to rent the space to tenants on a long-term or short-term basis. (Keep in mind that there are rules for rentals that pertain to your local area. To learn more, visit the Department of Consumer and Business Affairs for Los Angeles County.)
The minimum size of the ADU is 150 square feet. The maximum size of your ADU can’t be larger than half the size of the home. So, for instance, if your home is 2,000 square feet, your ADU must be less than 1,000 square feet.
Your ADU must have a functioning kitchen, bathroom, closet, and living space.
The ADU must have an entrance separate from the main house.
In Los Angeles, an ADU gets a new, separate address.
Look at the fire codes. In most cases, fire sprinklers are not required if they are not already in the primary home. However, local fire prevention requirements in your local codes could apply to your ADU. This document from Public Works of Los Angeles County provides more important information on the fire code.
Remember, this is not an exhaustive list of requirements for your ADU, but they are a good start to ensure you understand the size requirements and what the accessory dwelling unit above your garage must include. To learn much more about the requirements for an ADU, start with reading Senate Bill No. 1069, which sets forth the law on accessory dwelling units. (The language in that bill can be confusing; if you aren’t sure what the rules are, get in touch with us.)
Garage Conversion ADU Permit Costs
Getting a permit for your garage conversion in Los Angeles can take a couple of months. While it might be tough to wait, it’s always a good idea to ensure all the legalities are squared away before you drop your hard-earned money on the construction. The city permit fees could run between $1,800 and $8,000. Why such a broad range? That’s because the permit cost is based on the project – it depends on the estimated value of the construction and the number of square feet you gain on the property.
Garage Conversion Plans Los Angeles
When you start working on your plans for a garage conversion to ADU in Los Angeles, MDM Custom Remodeling, Inc. can help. We can provide you with a solid Architectural Concept Design, which includes a floor plan, interior and exterior views, and the opportunity to “walk through” your new ADU through virtual 3D rendering and 360-degree panoramic views. This allows you to be certain of what you’re getting before you drop any hard-earned money on your ADU garage conversion.
Starting in January 2023, you can use Pre-Approved ADU Standard Plans. These are plans that fit what most will want out of their ADU. There are several different models to choose from, created by architects and available for purchase immediately. When you choose a plan from this exclusive list, you can speed up the permit process a bit. That’s because these plans are already approved by the decision-makers.
However, these plans simply make the process easier, and you might be able to create something much nicer than what these plans reflect. Speak with MDM Custom Remodeling, Inc. before you go with a pre-approved plan; there might be something better for your garage conversion. We can review all the options until you find exactly what you want to see in your ADU.
Things to Consider When Building an ADU Garage Conversion in Los Angeles
In addition to considering permit and construction costs, you should also look at the timeline you can expect for building your ADU and how to shield neighbors from the noise of the construction.
Usually, an ADU will take only a few months to build. However, the permit process can take longer than that. While it’s okay to begin looking at future plans while you are waiting for the permit to be approved, it’s not a good idea to start construction or make any firm plans for starting it until the permit is in hand. Doing anything before the permit is approved could violate your local laws.
Many areas of Los Angeles are quite tight in terms of property and space. You might have only a few feet between the garage you intend to convert and the property line you share with a neighbor, which means any construction on your property will inevitably affect their property in the short term. In addition, any new construction on your property runs the inevitable risk of noise pollution, copious amounts of dust, and the need for a dumpster to contain and carry off damaged materials or items removed from the original garage. For instance, to add a second story to the garage for your ADU, that original garage roof has to go!
It might also be necessary to dig trenches and move in lines for electricity, sewer, gas, and other plumbing. Doing this might require some work that cuts through the street or through your neighbor’s property.
Speak with your neighbors before the work begins, so they are aware that there will be some disruption. Talk with us about the best placement of the dumpster to make it easy for them to work but not inconvenience the neighbors too much. Make sure that the work is done only during the normal daylight hours and that you aren’t running afoul of any noise ordinances in your area. Keep the lines of communication open among all parties while you convert your garage to an ADU.
Garage to ADU Conversion Cost in Los Angeles
The cost of your garage conversion in Los Angeles depends on many factors, including how much work needs to be done to bring the old garage up to code, the cost of materials, the configuration of the space, the cost of the permit, and so much more. And that’s the cost of the plans, construction itself, and contractor labor – that doesn’t include the little details that come later, such as painting and furnishing the space.
A garage conversion in Los Angeles is essentially creating a new addition. We estimate that your above-the-garage conversion in Los Angeles will run between $150,000 and $450,000, depending on the size and style and whether it has one floor or is on the second floor. This doesn’t include finishing materials and utility connections. These might add 15-20% to the overall cost. Only a seasoned company like MDM Custom Remodeling Inc. can look at your property, determine exactly what needs to be done to convert your garage space into an ADU in Los Angeles, and give you a good estimate on what to expect.
Also, remember that there might be other costs, such as establishing a suitable parking space for the ADU if you intend to rent it out, interior design that transforms the space with the final touches, and even the increase in property taxes and insurance you might experience when the ADU is done. Sit down with a financial advisor if you are concerned about the costs of insurance and taxes on your ADU, and make sure that the cost fits in with your long-term budget.
#garage to master bedroom#adu contractor los angeles#adu contractor in los angeles#adu contractors near me
0 notes
Text
Practical Ways in Which 3D Renderings Can Help In Selling Villas

If you want to sell villas, one of the most crucial things you can do is ensure prospective purchasers can easily picture themselves residing in the area. Here is where 3D representations may be of great use. The technology applications are graphical depictions of physical spaces based on specialized computer tools. They allow prospective purchasers to view an accurate report of the villa in terms of the layout, furnishings, and décor. The following are some of the most practical applications of the technology in selling villas.
Offer a description of the villa that is true to its appearance
One of the most significant benefits of 3D Renderings in California from a reputed company like PanoramCGI is that they offer a portrayal of the home that is accurate to the actual thing. Renderings in three dimensions, as opposed to more conventional two-dimensional floor plans or photographs, provide prospective purchasers the opportunity to view the villa from various vantage points. As a result, they will have an easier time gaining a sense of the space, the flow, and the connections between the rooms.
Describe some of the highlights of the villa
The elements of the property become more precise with the use of 3D Renderings in California. For instance, if the house boasts a breathtaking panorama, 3D drawings may demonstrate the view from various vantage points within the estate. Traditional photographs cannot do justice to the villa's distinctive architectural details and finishes, but 3D renderings can highlight these aspects in a way that is impossible with photographs.
Modify it to suit your needs
The fact that 3D representations enable alterations to the design is another advantage of using them. It helps prospective purchasers see the home with various furnishings, decorations, and surface treatments before making a purchase decision. It is especially beneficial for customers with a particular style or aesthetic in mind when they purchase. They can better envision living in the place when they see the villa designed according to their preferences.

Make your case to purchasers from other countries
Renderings in three dimensions are also attractive to overseas purchasers who cannot visit the property in person. International purchasers can get a better feel for the villa and determine whether or not it meet their requirements with 3D drawings of the area. Buyers who cannot travel to visit the property in person may find this aspect of the transaction very beneficial.
Summary
To summarize, creating 3D drawings of a villa's interior is an efficient strategy to increase sales. They give an accurate depiction of the area, emphasize the characteristics of the villa, make it possible to personalize the design, save time and money, attract purchasers from other countries, and display the capabilities of the area. The use of 3D renderings allows sellers to assist prospective buyers in visualizing themselves residing in the area, which enables the buyers to make an educated choice on whether or not the villa is the best option for them.
Blog source: https://panoramcgi.weebly.com/blog/practical-ways-in-which-3d-renderings-can-help-in-selling-villas
0 notes
Text
3d Render California
Benefits of Using 3D House Tours for Real Estate
A 3d Render California house tour has six major benefits for you and your clients:
1. Offers an Immersive Tour Experience
In a Zillow survey, 79% of respondents said that they prefer viewing 3D virtual tours and digital floor plans when buying a house. A 3D house tour offers an immersive walk-through experience that is better than 2D images.
The interactive digital design of a 3D walkthrough helps buyers get a better understanding of a property’s layout. They can explore the house on their own and ask questions right away from the comfort of their homes. They can also check out the views from the windows and balcony, the natural lighting, fixtures, and other aspects. This helps them quickly proceed to the next step in their buying journey.
2. Saves Time and Energy
A 3D house tour enables home buyers and property agents to tour and show properties at their convenience. They can digitally visit many houses without having to physically be on location. This prevents them from expending time and energy that they would normally need to travel to far-off properties.
Buyers can check out virtual tours of different houses and zero in on one that meets their needs and preferences. They can also access these 3D house tours anywhere and anytime from their laptops and smartphones.
This allows clients and real estate agents to focus on other important aspects of buying and selling homes. It also prevents sellers and agents from worrying about scheduling and staging tours while being on-site for many hours.
3. Creates a Personal Connection With Buyers
Potential buyers can walk through a house in their own time and at their own pace. This helps them create a personal connection with the house. They can get an idea of how it would feel to live there even before they physically visit it.
By viewing the property in a virtual environment, they can better appreciate its layout, see if it can accommodate their needs, consider improvements they might want to make, and even think about how they might decorate and live in that space.
4. Boosts Website Traffic and Awareness
As 3D house tours are a relatively new tool, offering them as a service will give you a competitive edge. It will help you bring more customers to your website which will raise your search engine rankings, allowing you to build brand recognition and credibility as you attract even more buyers.
As a result, you can enjoy more in-person tours that increase your sales.
5. Enables Real Estate Agents to Provide Better and More Focused Customer Service
Since 3D house tours reduce the reliance on in-person meetings and ocular visits, real estate agents have more time to focus on high-probability buyers who already had a virtual tour. Virtual tours let them easily and automatically sift through casual buyers so they can pay more attention to high-interest clients.
This enables more attentive customer service, better time management, and more efficient processes.
Source - https://plusrender.com/how-3d-house-tours-are-making-real-estate-better/
0 notes
Link
3D Revolution has evolved into one of the largest 3D Rendering Studios in Los Angeles and is intent on dominating the 3D Architectural Visualisation space with our beautiful photorealistic 3D Rendering and our Realistic 3D and VR/AR Interactive Tours for Properties Developers, Architects, Builders and Homeowners. Get World Class 3D Rendering Services in Los Angeles, California . Our 3D Rendering Specialists help builders, designers and property developers throughout Los Angeles California.To Know More Info, Please Visit:- https://www.3drevolutionusa.com/
#3d rendering los angeles#3d rendering company california#3d rendering California#3d rendering services los angeles#3d home rendering los angeles#3d streetscape rendering#3d townhouse rendering#3d exterior rendering los angeles#3d interior rendering los angeles#3d architectural rendering los angeles#3d rendering services los angeles ca#3d floor plan rendering california#3d apartment rendering los angeles#3d commercial rendering#3d commercial renderings los angeles
0 notes
Photo

3D Floor Plans Rendering Service - Courtyard with the pool.
#pool#3d floor plan#floor plan#architecture#courtyard#rendering company#rendering studio#exterior#interior#exterior design#elevation design#renovation#3d#3d visualization#3d rendering#summer#california#florida#real estate#property#house#home#Tsymbals Design#tsymbals.com
0 notes
Text
A breakdown of the Revision 2020 Threeway Battle shader
Those of you who have been following this year's edition of Revision probably remember the unexpected twist in Sunday's timeline, where I was pitted in a coding "battle" against two of the best shader-coders in the world to fend for myself. Admittedly the buzz it caused caught me by surprise, but not as much as the feedback on the final shader I produced, so I hope to shed some light on how the shader works, in a way that's hopefully understandable to beginners and at least entertaining to experts, as well as providing some glimpses into my thought process along the way.
youtube
Recorded video of the event
But before we dive into the math and code, however, I think it's important to get some context by recounting the story of how we got here.
A brief history of demoscene live-coding
Visual coding has been massively opened up when graphics APIs began to introduce programmable fragment rendering, perhaps best known to most people as "pixel shaders"; this allowed programmers to run entire programmable functions on each pixel of a triangle, and none was more adamant to do that than a fellow named Iñigo Quilez (IQ), an understated genius who early on recognized the opportunity in covering the entire screen with a single polygon, and just doing the heavy lifting of creating geometry in the shader itself. His vision eventually spiraled into not only the modern 4k scene, but also the website ShaderToy, which almost every graphics programmer uses to test prototypes or just play around with algorithms. IQ, an old friend of mine since the mid-00s, eventually moved to the US, worked at Pixar and Oculus, and became something of a world-revered guru of computer graphics, but that (and life) has unfortunately caused him to shift away from the scene.
His vision of single-shader-single-quad-single-pass shader coding, in the meantime, created a very spectacular kind of live coding competition in the scene where two coders get only 25 minutes and the attention of an entire party hall, and they have to improvise their way out of the duel - this has been wildly successful at parties for the sheer showmanship and spectacle akin to rap battles, and none emerged from this little sport more remarkably than Flopine, a bubbly French girl who routinely shuffled up on stage wearing round spectacles and cat ears (actually they might be pony ears on second thought), and mopped the floor up with the competition. Her and a handful of other live-coders regularly stream on Twitch as practice, and have honed their live-coding craft for a few years at this point, garnering a considerable following.
youtube
Just a sample of insanity these people can do.
My contribution to this little sub-scene was coming up with a fancy name for it ("Shader Showdown"), as well as providing a little tool I called Bonzomatic (named after Bonzaj / Plastic, a mutual friend of IQ and myself, and the first person to create a live coding environment for demoparties) that I still maintain, but even though I feel a degree of involvement through the architectural side, I myself haven't been interested in participating: I know I can do okay under time pressure, but I don't really enjoy it, and while there's a certain overlap in what they do and what I do, I was always more interested in things like visual detail and representative geometry aided by editing and direction rather than looping abstract, fractal-like things. It just wasn't my thing.
Mistakes were made
But if I'm not attracted to this type of competition, how did I end up in the crossfire anyway? What I can't say is that it wasn't, to a considerable degree, my fault: as Revision 2020 was entirely online, most of the scene took it to themselves to sit in the demoscene Discord to get an experience closest to on-site socializing, given the somber circumstances of physical distancing. This also allowed a number of people who hasn't been around for a while to pop in to chat - like IQ, who, given his past, was mostly interested in the showdowns (during which Flopine crushed the competition) and the 4k compo.
As I haven't seen him around for a while, and as my mind is always looking for an angle, I somehow put two and two together, and asked him if he would consider taking part in a showdown at some point; he replied that he was up for it - this was around Saturday 10PM. I quickly pinged the rest of the showdown participants and organizers, as I spotted that Bullet was doing a DJ set the next day (which would've been in a relatively convenient timezone for IQ in California as well), and assumed that he didn't really have visuals for it - as there was already a "coding jam" over Ronny's set the day before, I figured there's a chance for squeezing an "extra round" of coding. Flopine was, of course, beyond excited by just the prospect of going against IQ, and by midnight we essentially got everything planned out (Bullet's consent notwithstanding, as he was completely out of the loop on this), and I was excited to watch...
...that is, until Havoc, the head honcho for the showdowns, off-handedly asked me about an at that point entirely hypothetical scenario: what would happen if IQ would, for some reason, challenge me instead of Flopine? Now, as said, I wasn't really into this, but being one to not let a good plan go to waste (especially if it was mine), I told Havoc I'd take one for the team and do it, although it probably wouldn't be very fun to watch. I then proceeded to quickly brief IQ in private and run him through the technicalities of the setup, the tool, the traditions and so on, and all is swell...
...that is, until IQ (this is at around 2AM) offhandedly mentions that "Havoc suggested we do a three-way with me, Flopine... and you." I quickly try to backpedal, but IQ seems to be into the idea, and worst of all, I've already essentially agreed to it, and to me, the only thing worse than being whipped in front of a few thousand people would be going back on your word. The only way out was through.
Weeks of coding can spare you hours of thinking
So now that I've got myself into this jar of pickles, I needed some ideas, and quick. (I didn't sleep much that night.) First off, I didn't want to do anything obviously 3D - both IQ and Flopine are masters of this, and I find it exhausting and frustrating, and it would've failed on every level possible. Fractals I'm awful at and while they do provide a decent amount of visual detail, they need a lot of practice and routine to get right. I also didn't want something very basic 2D, like a byte-beat, because those have a very limited degree of variation available, and the end result always looks a bit crude.
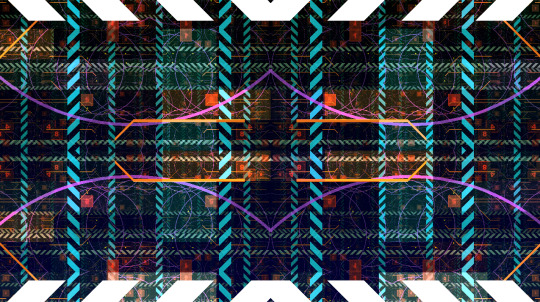
Luckily a few months ago an article I saw do rounds was a write-up by Sasha Martinsen on how to do "FUI"-s, or Fictional User Interfaces; overly complicated and abstract user interfaces that are prominent in sci-fi, with Gmunk being the Michael Jordan of the genre.
Image courtesy of Sasha Martinsen.
Sasha's idea is simple: make a few basic decent looking elements, and then just pile them on top of each other until it looks nice, maybe choose some careful colors, move them around a bit, place them around tastefully in 3D, et voilà, you're hacking the Gibson. It's something I attempted before, if somewhat unsuccessfully, in "Reboot", but I came back to it a few more times in my little private motion graphics experiments with much better results, and my prediction was that it would be doable in the given timeframe - or at least I hoped that my hazy 3AM brain was on the right track.
A bit of math
How to make this whole thing work? First, let's think about our rendering: We have a single rectangle and a single-pass shader that runs on it: this means no meshes, no geometry, no custom textures, no postprocessing, no particle systems and no fonts, which isn't a good place to start from. However, looking at some of Sasha's 3D GIFs, some of them look like they're variations of the same render put on planes one after the other - and as long as we can do one, we can do multiple of that.
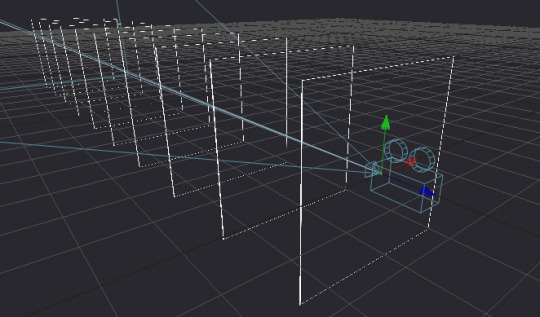
Rough sketch of what we want to do; the planes would obviously be infinite in size but this representation is good enough for now.
Can we render multiple planes via a single shader? Sure, but we want them to look nice, and that requires a bit of thinking: The most common technique to render a "2D" shader and get a "3D" look is raymarching, specifically with signed distance fields - starting on a ray, and continually testing distances until a hit is found. This is a good method for "solid-ish" looking objects and scenes, but the idea for us is to have many infinite planes that also have some sort of alpha channel, so we'd have a big problem with 1) inaccuracy, as we'd never find a hit, just something "reasonably close", and even that would take us a few dozen steps, which is costly even for a single plane and 2) the handling of an alpha map can be really annoying, since we'd only find out our alpha value after our initial march, after which if our alpha is transparent we'd need to march again.
But wait - it's just infinite planes and a ray, right? So why don't we just assume that our ray is always hitting the plane (which it is, since we're looking at it), and just calculate an intersection the analytical way?
Note: I would normally refer to this method as "raytracing", but after some consultation with people smarter than I am, we concluded that the terms are used somewhat ambiguously, so let's just stick to "analytical ray solving" or something equally pedantic.
We know the mathematical equation for a ray is position = origin + direction * t (where t is a scalar that represents the distance/progress from the ray origin), and we know that the formula for a plane is A * x + B * y + C * z + D = 0, where (A, B, C) is the normal vector of the plane, and D is the distance from the origin. First, since the intersection will be the point in space that satisfies both equations, we substitute the ray (the above o + d * t for each axis) into the plane:
A * (ox + dx * t) + B * (oy + dy * t) + C * (oz + dz * t) + D = 0
To find out where this point is in space, we need to solve this for t, but it's currently mighty complicated. Luckily, since we assume that our planes are parallel to the X-Y plane, we know our (A, B, C) normal is (0, 0, 1), so we can simplify it down to:
oz + dz * t + D = 0
Which we can easily solve to t:
t = (D - oz) / dz
That's right: analytically finding a ray hit of a plane is literally a single subtraction and a division! Our frame rate (on this part) should be safe, and we're always guaranteed a hit as long as we're not looking completely perpendicular to the planes; we should have everything to start setting up our code.
Full disclosure: Given my (and in a way IQ's) lack of "live coding" experience, we agreed that there would be no voting for the round, and it'd be for glory only, but also that I'd be allowed to use a small cheat sheet of math like the equations for 2D rotation or e.g. the above final equation since I don't do this often enough to remember these things by heart, and I only had a few hours notice before the whole thing.
Setting up the rendering
Time to start coding then. First, let's calculate our texture coordinates in the 0..1 domain using the screen coordinates and the known backbuffer resolution (which is provided to us in Bonzomatic):
vec2 uv = vec2(gl_FragCoord.x / v2Resolution.x, gl_FragCoord.y / v2Resolution.y);
Then, let's create a ray from that:
vec3 rayDir = vec3( uv * 2 - 1, -1.0 ); rayDir.x *= v2Resolution.x / v2Resolution.y; // adjust for aspect ratio vec3 rayOrigin = vec3( 0, 0, 0 );
This creates a 3D vector for our direction that is -1,-1,-1 in the top left corner and 1,1,-1 in the bottom right (i.e. we're looking so that Z is decreasing into the screen), then we adjust the X coordinate since our screen isn't square, but our coordinates currently are - no need to even bother with normalizing, it'll be fine. Our origin is currently just sitting in the center.
Then, let's define (loosely) our plane, which is parallel to the XY plane:
float planeDist = 1.0f; // distance between each plane float planeZ = -5.0f; // Z position of the first plane
And solve our equation to t, as math'd out above:
float t = (planeZ - rayOrigin.z) / rayDir.z;
Then, calculate WHERE the hit is by taking that t by inserting it back to the original ray equation using our current direction and origin:
vec3 hitPos = rayOrigin + t * rayDir;
And now we have our intersection; since we already know the Z value, we can texture our plane by using the X and Y components to get a color value:
vec4 color = fui( hitPos.xy ); // XY plane our_color = color;
Of course we're gonna need the actual FUI function, which will be our procedural animated FUI texture, but let's just put something dummy there now, like a simple circle:
vec4 fui ( vec2 uv ) { return length(uv - 0.5) < 0.5 ? vec4(1) : vec(0); }
And here we go:

Very good, we have a single circle and if we animate the camera we can indeed tell that it is on a plane.
So first, let's tile it by using a modulo function; the modulo (or modulus) function simply wraps a number around another number (kinda like the remainder after a division, but for floating point numbers) and thus becomes extremely useful for tiling or repeating things:

We'll be using the modulo function rather extensively in this little exercise, so strap in. (Illustration via the Desmos calculator.)
vec4 layer = fui( mod( hitPos.xy, 1.0 ) );
This will wrap the texture coordinates of -inf..inf between 0..1:
We also need multiple planes, but how do we combine them? We could just blend them additively, but with the amount of content we have, we'd just burn them in to white and it'd look like a mess (and not the good kind of mess). We could instead just use normal "crossfade" / "lerp" blending based on the alpha value; the only trick here is to make sure we're rendering them from back to front since the front renders will blend over the back renders:
int steps = 10; float planeDist = 1.0f; for (int i=steps; i>=0; i--) { float planeZ = -1.0f * i * planeDist; float t = (planeZ - rayOrigin.z) / rayDir.z; if (t > 0.0f) // check if "t" is in front of us { vec3 hitPos = rayOrigin + t * rayDir; vec4 layer = fui( hitPos.xy, 2.0 ); // blend layers based on alpha output colour = mix( colour, layer, layer.a ); } }
And here we go:

We decreased the circles a bit in size to see the effect more.
Not bad! First thing we can do is just fade off the back layers, as if they were in a fog:
layer *= (steps - i) / float(steps);
We have a problem though: we should probably increase the sci-fi effect by moving the camera continually forward, but if we do, we're gonna run into a problem: Currently, since our planeZ is fixed to the 0.0 origin, they won't move with the camera. We could just add our camera Z to them, but then they would be fixed with the camera and wouldn't appear moving. What we instead want is to just render them AS IF they would be the closest 10 planes in front of the camera; the way we could do that is that if e.g. our planes' distance from each other is 5, then round the camera Z down to the nearest multiple of 5 (e.g. if the Z is at 13, we round down to 10), and start drawing from there; rounding up would be more accurate, but rounding down is easier, since we can just subtract the division remainder from Z like so:
float planeZ = (rayOrigin.z - mod(rayOrigin.z, planeDist)) - i * planeDist;
And now we have movement! Our basic rendering path is done.
Our little fictional UI
So now that we have the basic pipeline in place, let's see which elements can we adapt from Sasha's design pieces.
The first one I decided to go with wasn't strictly speaking in the set, but it was something that I saw used as design elements over the last two decades, and that's a thick hatch pattern element; I think it's often used because it has a nice industrial feel with it. Doing it in 2D is easy: We just add X and Y together, which will result in a diagonal gradient, and then we just turn that into an alternating pattern using, again, the modulo. All we need to do is limit it between two strips, and we have a perfectly functional "Police Line Do Not Cross" simulation.
return mod( uv.x + uv.y, 1 ) < 0.5 ? vec4(1) : vec4(0);

So let's stop here for a few moments; this isn't bad, but we're gonna need a few things. First, the repetition doesn't give us the nice symmetric look that Sasha recommends us to do, and secondly, we want them to look alive, to animate a bit.
Solving symmetry can be done just by modifying our repetition code a bit: instead of a straight up modulo with 1.0 that gives us a 0..1 range, let's use 2.0 to get a 0..2 range, then subtract 1.0 to get a -1..1 range, and then take the absolute value.
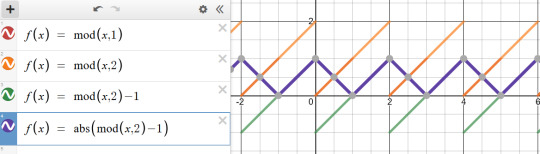
vec4 layer = fui( abs( mod( hitPos.xy, 2.0 ) - 1 ) );
This will give us a triangle-wave-like function, that goes from 0 to 1, then back to 0, then back to 1; in terms of texture coordinates, it will go back and forth between mirroring the texture in both directions, which, let's face it, looks Totally Sweet.
For animation, first I needed some sort of random value, but one that stayed deterministic based on a seed - in other words, I needed a function that took in a value, and returned a mangled version of it, but in a way that if I sent that value in twice, it would return the same mangled value twice. The most common way of doing it is taking the incoming "seed" value, and then driving it into some sort of function with a very large value that causes the function to alias, and then just returning the fraction portion of the number:
float rand(float x) { return fract(sin(x) * 430147.8193); }
Does it make any sense? No. Is it secure? No. Will it serve our purpose perfectly? Oh yes.
So how do we animate our layers? The obvious choice is animating both the hatch "gradient" value to make it crawl, and the start and end of our hatch pattern which causes the hatched strip to move up and down: simply take a random - seeded by our time value - of somewhere sensible (like between 0.2 and 0.8 so that it doesn't touch the edges) and add another random to it, seasoned to taste - we can even take a binary random to pick between horizontal and vertical strips:

The problems here are, of course, that currently they're moving 1) way too fast and 2) in unison. The fast motion obviously happens because the time value changes every frame, so it seeds our random differently every frame - this is easy to solve by just rounding our time value down to the nearest integer: this will result in some lovely jittery "digital" motion. The unison is also easy to solve: simply take the number of the layer, and add it to our time, thus shifting the time value for each layer; I also chose to multiply the layer ID with a random-ish number so that the layers actually animate independently, and the stutter doesn't happen in unison either:
vec4 fui( vec2 uv, float t ) { t = int(t); float start = rand(t) * 0.8 + 0.1; float end = start + 0.1; [...] } vec4 layer = fui( abs(mod(hitPos.xy, 2.0)-1), fGlobalTime + i * 4.7 );

Lovely!
Note: In hindsight using the Z coordinate of the plane would've given a more consistent result, but the way it animates, it doesn't really matter.
So let's think of more elements: the best looking one that seems to get the best mileage out in Sasha's blog is what I can best describe as the "slant" or "hockey stick" - a simple line, with a 45-degree turn in it. What I love about it is that the symmetry allows it to create little tunnels, gates, corridors, which will work great for our motion.
Creating it is easy: We just take a thin horizontal rectangle, and attach another rectangle to the end, but shift the coordinate of the second rectangle vertically, so that it gives us the 45-degree angle:
float p1 = 0.2; float p2 = 0.5; float p3 = 0.7; float y = 0.5; float thicc = 0.0025; if (p1 < uv.x && uv.x < p2 && y - thicc < uv.y && uv.y < y + thicc ) { return vec4(1); } if (p2 < uv.x && uv.x < p3 && y - thicc < uv.y - (uv.x - p2) && uv.y - (uv.x - p2) < y + thicc ) { return vec4(1); }
Note: In the final code, I had a rect() call which I originally intended to use as baking glow around my rectangle using a little routine I prototyped out earlier that morning, but I was ultimately too stressed to properly pull that off. Also, it's amazing how juvenile your variable names turn when people are watching.
Looks nice, but since this is such a thin sparse element, let's just... add more of it!
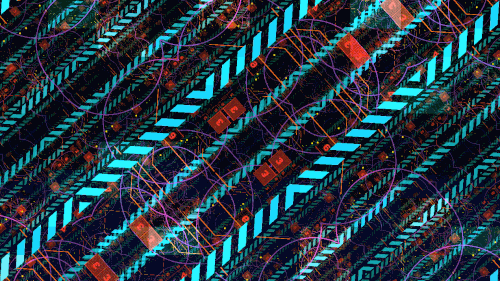
So what more can we add? Well, no sci-fi FUI is complete without random text and numbers, but we don't really have a font at hand. Or do we? For years, Bonzomatic has been "shipping" with this really gross checkerboard texture ostensibly for UV map testing:

What if we just desaturate and invert it?
We can then "slice" it up and render little sprites all over our texture: we already know how to draw a rectangle, so all we need is just 1) calculate which sprite we want to show 2) calculate the texture coordinate WITHIN that sprite and 3) sample the texture:
float sx = 0.3; float sy = 0.3; float size = 0.1; if (sx < uv.x && uv.x < sx + size && sy < uv.y &&uv.y < sy + size) { float spx = 2.0 / 8.0; // we have 8 tiles in the texture float spy = 3.0 / 8.0; vec2 spriteUV = (uv - vec2(sx,sy)) / size; vec4 sam = texture( texChecker, vec2(spx,spy) + spriteUV / 8.0 ); return dot( sam.rgb, vec3(0.33) ); }
Note: In the final code, I was only using the red component instead of desaturation because I forgot the texture doesn't always have red content - I stared at it for waaaay too long during the round trying to figure out why some sprites weren't working.
And again, let's just have more of it:
Getting there!
At this point the last thing I added was just circles and dots, because I was running out of ideas; but I also felt my visual content amount was getting to where I wanted them to be; it was also time to make it look a bit prettier.
Post-production / compositing
So we have our layers, they move, they might even have colors, but I'm still not happy with the visual result, since they are too single-colored, there's not enough tone in the picture.
The first thing I try nowadays when I'm on a black background is to just add either a single color, or a gradient:
vec4 colour = renderPlanes(uv); vec4 gradient = mix( vec4(0,0,0.2,1), vec4(0,0,0,1), uv.y); vec4 finalRender = mix( gradient, vec4(colour.xyz,1), colour.a);

This added a good chunk of depth considerably to the image, but I was still not happy with the too much separation between colors.
A very common method used in compositing in digital graphics is to just add bloom / glow; when used right, this helps us add us more luminance content to areas that would otherwise be solid color, and it helps the colors to blend a bit by providing some middle ground; unfortunately if we only have a single pass, the only way to get blur (and by extension, bloom) is repeatedly rendering the picture, and that'd tank our frame rate quickly.
Instead, I went back to one of the classics: the Variform "pixelize" overlay:

This is almost the same as a bloom effect, except instead of blurring the image, all you do is turn it into a lower resolution nearest point sampled version of itself, and blend that over the original image - since this doesn't need more than one sample per pixel (as we can reproduce pixelation by just messing with the texture coordinates), we can get away by rendering the scene only twice:
vec4 colour = renderPlanes(uv); colour += renderPlanes(uv - mod( uv, 0.1 ) ) * 0.4;
Much better tonal content!
So what else can we do? Well, most of the colors I chose are in the blue/orange/red range, and we don't get a lot of the green content; one of the things that I learned that it can look quite pretty if one takes a two-tone picture, and uses color-grading to push the midrange of a third tone - that way, the dominant colors will stay in the highlights, and the third tone will cover the mid-tones. (Naturally you have to be careful with this.)
"Boosting" a color in the mids is easy: lucky for us, if we consider the 0..1 range, exponential functions suit our purpose perfectly, because they start at 0, end at 1, but we can change how they get here:
So let's just push the green channel a tiny bit:
finalRender.g = pow(finalRender.g, 0.7);
Now all we need is to roll our camera for maximum cyberspace effect and we're done!
Best laid plans of OBS
As you can see from the code I posted the above, I wrote the final shader in GLSL; those who know me know that I'm a lot more comfortable with DirectX / HLSL, and may wonder why I switched, but of course there's another story here:
Given the remote nature of the event, all of the shader coding competition was performed online as well: since transmitting video from the coder's computer to a mixer, and then to another mixer, and then to a streaming provider, and then to the end user would've probably turned the image to mush, Alkama and Nusan came up with the idea of skipping a step and rigging up a version of Bonzo that ran on the coder's computer, but instead of streaming video, it sent the shader down to another instance of Bonzo, running on Diffty's computer, who then captured that instance and streamed it to the main Revision streaming hub. This, of course, meant that in a three-way, Diffty had to run three separate instances of Bonzo - but it worked fine with GLSL earlier, so why worry?
What we didn't necessarily realize at the time, is that the DirectX 11 shader compiler takes no hostages, and as soon as the shader reached un-unrollable level of complexity, it thoroughly locked down Diffty's machine, to the point that even the video of the DJ set he was playing started to drop out. I, on the other hand, didn't notice any of this, since my single local instance was doing fine, so I spent the first 15 minutes casually nuking Diffty's PC to shreds remotely, until I noticed Diffty and Havoc pleading on Discord to switch to GLSL because I'm setting things on fire unknowingly.
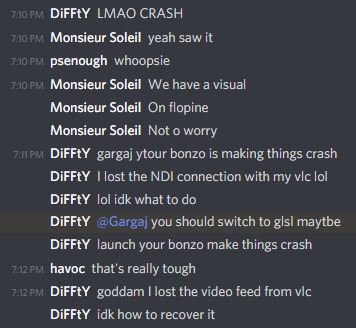
This is fine.
I was reluctant to do so, simply because of the muscle memory, but I was also aware that I should keep the show going if I can because if I bow out without a result, that would be a colossal embarrassment to everyone involved, and I only can take one of those once every week, and I was already above my quota - so, I quickly closed the DX11 version of Bonzo, loaded the shader up in a text editor, replaced "floatX" with "vecX" (fun drinking game: take a shot every time I messed it up during the live event), commented the whole thing out, loaded it into a GLSL bonzo, and quickly fixed all the other syntax differences (of which there were luckily not many, stuff like "mix" instead of "lerp", constructors, etc.), and within a few minutes I was back up and running.
This, weirdly, helped my morale a bit, because it was the kind of clutch move that for some reason appealed to me, and made me quite happy - although at that point I locked in so bad that not only did I pay absolutely not attention to the stream to see what the other two are doing, but that the drinks and snacks I prepared for the hour of battling went completely untouched.
In the end, when the hour clocked off, the shader itself turned out more or less how I wanted it, it worked really well with Bullet's techno-/psy-/hardtrance mix (not necessarily my jam, as everyone knows I'm more a broken beat guy, but pounding monotony can go well with coding focus), and I came away satisfied, although the perhaps saddest point of the adventure was yet to come: the lack of cathartic real-life ending that was taken from us due to the physical distance, when after all the excitement, all the cheers and hugs were merely lines of text on a screen - but you gotta deal with what you gotta deal with.
A small sampling of the Twitch reaction.
Conclusion
In the end, what was my takeaway from the experience?
First off, scoping is everything: Always aim to get an idea where you can maximize the outcome of the time invested with the highest amount of confidence of pulling it off. In this case, even though I was on short notice and in an environment I was unfamiliar with, I relied on something I knew, something I've done before, but no one else really has.
Secondly, broaden your influence: You never know when you can take something that seems initially unrelated, and bend it into something that you're doing with good results.
Thirdly, and perhaps most importantly, step out of your comfort zone every so often; you'll never know what you'll find.
(And don't agree to everything willy-nilly, you absolute moron.)
10 notes
·
View notes
Text
Mighty Buildings plans neighbourhood of 3D-printed homes for California
Construction technology company Mighty Buildings has announced plans to build 15 homes using prefabricated 3D-printed panels in Rancho Mirage, California.
The project is a collaboration between California-based Mighty Buildings and developers Palari Group. Construction will begin at the end of this year with the homes set to be finished by Spring 2022.
3D-printed panels will form the houses
Once complete, Mighty Buildings claims that the development will be the "world's first community" of 3D-printed homes with net-zero emissions.
Solar panels will provide energy for the properties. Individual houses will also have the option to use Tesla Powerwall batteries to store solar energy.
The development will be in Rancho Mirage
The company has released renderings showing 15 bungalows that will be built using its patented Mighty Kit System.
The hybrid process sees prefabricated panels made of 3D-printed material made in a factory before being shipped and assembled into steel-framed modular houses.
Each panel is the equivalent of eight layers of traditional construction materials, said Mighty Buildings.
In the Rancho Mirage development, each property will be made up of a primary and secondary volume on 10,000-square-foot (929-square-metre) plots with gardens featuring rectangular swimming pools.
Clad with textured stone, the home's walls will be punctuated with floor-to-ceiling glass windows, and house bedrooms and bathrooms, as well as a fully-equipped kitchen and living spaces.
Each property will have a swimming pool
Other optional features will include electric vehicle charging stations, as well as artificial intelligence wellness technology called DARWIN. Developed by health brand Delos, DARWIN filters air and water and can programme lighting patterns designed to encourage people's circadian rhythm.
The developer explained that the 3D-printed and prefabricated model would speed up construction.
"3D-printing allows us to build faster, more strongly and efficiently," said Palari Group founder Basil Starr.
"The process is integral to our platform of streamlining home-building that is centred on sustainability of construction, materials and operations."
A rendering of shadows cast on stone walls
Located in mountainous Rancho Mirage, the development will be minutes away from the famed Sunnylands estate, a property known for hosting high-profile politicians and celebrities.
Other large scale low-energy designs include plans for a carbon-neutral airport terminal in India and as a low-rise Passivhaus housing development in England.
Renderings are courtesy of Mighty Buildings and EYRC Architects.
The post Mighty Buildings plans neighbourhood of 3D-printed homes for California appeared first on Dezeen.
0 notes
Text
A look at Made Renovation, which just raised $9 million in seed funding to zero in on bathroom remodels
Made Renovation, a new, San Francisco-based company, thinks it has found a profitable way to help homeowners get done something that busy general contractors in the Bay Area won’t otherwise make time for, which is bathroom remodels.
Why they typically pass on these: they have too many entire homes, or, at least, entire floors, to build for affluent regional homeowners who’ve kept the construction industry buzzing for years.
It’s a problem that founders Roger Dickey, who previously co-founded Gigster, and Sagar Shah, who previously founded Quad, think they can solve through technology, naturally. Their big idea: create bathroom templates that customers can customize but whose scope and costs are generally understood, line up these customers, then hire general contractors who are willing to focus only on these bathrooms.
It’s an idea that’s picking up traction with these GCs, says Dickey, who explains it this way: “General contractors generally see net margin of 3%” no matter the size of the job, owing to unforeseen hurdles, like pipes that suddenly need to be rebuilt, drains that need to be dug and materials that don’t ship on schedule.
In addition to timing issues, GCs are also often dealing with frustrated building owners who might underestimate a project’s costs, particularly in California, where construction bills often cause sticker shock.
Made Renovation sees an opportunity to make both the lives of GCs and homeowners easier. Through pre-negotiated pricing, volume and materials handling (it right now rents part of a warehouse where it receives goods), it’s promising GCs a “reasonable margin” so they can not only pay their crews but live a higher quality of life themselves.
Meanwhile, per the plan, customers need only choose from the company’s “modern” collection, its more traditional “heritage”design or its “artisan” collection — all of which can be customized — then sit back while their long-neglected bathrooms are remade.
Whether Made Renovation can pull off its grand vision is a giant question mark. The construction industry is nothing if not messy, and in addition to convincing GCs of its merits, Made Renovation — like any marketplace company — has to strike the right balance between customer demand and supply as it gets off the ground.
In the meantime, investors clearly think it has promise. Led by Base10 Partners and with participation from Felicis Ventures, Founders Fund and some individual investors, the company has already raised $9 million in seed funding across two tranches.
Part of that capital is on display right now in San Francisco, where Made Renovation today opened its doors to customers who want to check out its design ideas and, if all goes as planned, will begin lining up their own home improvement projects. Customers simply pick a collection, Made Renovation then puts together a “mood board” of materials from that collection, sends out a 3D rendering of what to expect, then goes into build mode with its GC partners.
As for what happens when that build goes awry, Dickey says Made Renovation has it covered. Most notably, while it guarantees the work to its own customers, the GCs with whom it works guarantee their work to Made Renovation.
Dickey also notes that while the startup “may lose money on some projects,” he stresses there are caveats that customers agree to at the outset. Among these, he says, “We can’t X-ray their walls and see if they don’t have wiring up to code. We don’t cover dry rot in walls.” Technology, suggests Dickey, can only do so much.
If you’re in the Bay Area and want to check out its new storefront, it’s on Chestnut Street in SF, in the city’s Marina district. The company hopes to perfect its model in the Bay Area, says Dickey, then expand into other regions. As for why Made Renovation decided to tackle one of the most challenging U.S. markets first, he suggests it’s the best way to test its mettle. “I like the idea of starting a company here, because if we can make it work here, I think we can succeed anywhere.”
0 notes
Text
A look at Made Renovation, which just raised $9 million in seed funding to zero in on bathroom remodels
New Post has been published on http://rebrand.ly/q8rbbiw
A look at Made Renovation, which just raised $9 million in seed funding to zero in on bathroom remodels

Made Renovation, a new, San Francisco-based company, thinks it has found a profitable way to help homeowners get done something that busy general contractors in the Bay Area won’t otherwise make time for, which is bathroom remodels.
Why they typically pass on these: they have too many entire homes, or, at least, entire floors, to build for affluent regional homeowners who’ve kept the construction industry buzzing for years.
It’s a problem that founders Roger Dickey, who previously co-founded Gigster, and Sagar Shah, who previously founded Quad, think they can solve through technology, naturally. Their big idea: create bathroom templates that customers can customize but whose scope and costs are generally understood, line up these customers, then hire general contractors who are willing to focus only on these bathrooms.
It’s an idea that’s picking up traction with these GCs, says Dickey, who explains it this way: “General contractors generally see net margin of 3%” no matter the size of the job, owing to unforeseen hurdles, like pipes that suddenly need to be rebuilt, drains that need to be dug and materials that don’t ship on schedule.
In addition to timing issues, GCs are also often dealing with frustrated building owners who might underestimate a project’s costs, particularly in California, where construction bills often cause sticker shock.
Made Renovation sees an opportunity to make both the lives of GCs and homeowners easier. Through pre-negotiated pricing, volume and materials handling (it right now rents part of a warehouse where it receives goods), it’s promising GCs a “reasonable margin” so they can not only pay their crews but live a higher quality of life themselves.
Meanwhile, per the plan, customers need only choose from the company’s “modern” collection, its more traditional “heritage”design or its “artisan” collection — all of which can be customized — then sit back while their long-neglected bathrooms are remade.
Whether Made Renovation can pull off its grand vision is a giant question mark. The construction industry is nothing if not messy, and in addition to convincing GCs of its merits, Made Renovation — like any marketplace company — has to strike the right balance between customer demand and supply as it gets off the ground.
In the meantime, investors clearly think it has promise. Led by Base10 Partners and with participation from Felicis Ventures, Founders Fund and some individual investors, the company has already raised $9 million in seed funding across two tranches.
Part of that capital is on display right now in San Francisco, where Made Renovation today opened its doors to customers who want to check out its design ideas and, if all goes as planned, will begin lining up their own home improvement projects. Customers simply pick a collection, Made Renovation then puts together a “mood board” of materials from that collection, sends out a 3D rendering of what to expect, then goes into build mode with its GC partners.
As for what happens when that build goes awry, Dickey says Made Renovation has it covered. Most notably, while it guarantees the work to its own customers, the GCs with whom it works guarantee their work to Made Renovation.
Dickey also notes that while the startup “may lose money on some projects,” he stresses there are caveats that customers agree to at the outset. Among these, he says, “We can’t X-ray their walls and see if they don’t have wiring up to code. We don’t cover dry rot in walls.” Technology, suggests Dickey, can only do so much.
If you’re in the Bay Area and want to check out its new storefront, it’s on Chestnut Street in SF, in the city’s Marina district. The company hopes to perfect its model in the Bay Area, says Dickey, then expand into other regions. As for why Made Renovation decided to tackle one of the most challenging U.S. markets first, he suggests it’s the best way to test its mettle. “I like the idea of starting a company here, because if we can make it work here, I think we can succeed anywhere.”
0 notes
Text
There will soon be a whole community of ultra-low-cost 3D-printed homes

The latest iteration of New Story’s home can be printed in a single day–and is being designed by Yves Behar’s Fuseproject. Soon, they’ll start going up in Latin America.
Over the past year, in a lab in Austin, a team of engineers and materials scientists tweaked and tested the design of the “Vulcan II,” a massive, 33-by-11-foot machine that can 3D print the frame of a small house in less than a day. Later this year, it will begin printing a neighborhood of more than 50 homes.
The new neighborhood–the first of its kind in the world–will be built in a semi-rural part of Latin America for families who earn less than $200 a month. “We’re bringing very futuristic technology to the families that need it most first,” says Brett Hagler, CEO and cofounder of New Story, a Silicon Valley-based nonprofit that is working with Icon, the Austin-based construction tech company that developed the new machine.
New Story, a startup founded in 2014, works on the problem of how to quickly build housing for those living in extreme poverty. In Haiti, where progress to rebuild after the 2010 earthquake was painfully slow, the nonprofit developed a new process to build more efficiently. But it realized that the pace of traditional construction would always hamper its ability to address the global need for better housing. After analyzing various options to speed up construction and decrease costs–including prefab homes–the team realized that 3D printing could be a viable solution. In late 2017, they began working with Icon, funding the R&D work necessary to develop the machine.
The Vulcan II builds walls and floors by squirting layers of concrete, and can finish a house in a day or less. Adding a conventional roof, windows, and utilities can be completed a day later. After printing an initial test home in a backyard in Austin in 2018, the team kept refining the design of both the house and the equipment. One addition was a simple interface so that it would be easier to operate. “Something that’s really important to us as an international development organization is the ability for the machine to be operated by local talent,” says Alexandria Lafci, cofounder and head of operations of New Story. (Though the construction process provides fewer jobs per home than traditional building, it offers the chance to learn new technical skills.) Most of the process is automated, including mixing materials. “There was a moment [last week] where our staff was in the lab printing, and we all just sat around for hours–no one did anything–as walls were getting built,” says Jason Ballard, cofounder and CEO of Icon. The printer is designed to be durable enough to be transported to remote locations and to be used outside, continuously, for months or even years.
New Story initially planned to build homes in a community in El Salvador, where it is building hundreds of traditionally constructed homes this year. But as it considered proposals from various local partners and factors such as access to land and the timeline to get permits and install utilities onsite, it ultimately chose to use the technology first in another part of Latin America.
The nonprofit won’t reveal the location yet because, it claims, the intense interest that the technology generates could undermine completion of the project. But the homes, built in a few different floor plans, will help house families who currently get substandard, shack-like housing through their jobs at a local factory. “They work incredibly long hours in pretty dangerous, semi-toxic conditions, and part of their very little compensation is the shelters that they are given,” says Lafci. “Our local partners describe it as almost like modern-day slavery or indentured servitude.” Because housing is part of the job, employees often feel like they can’t leave; the new homes will open up the potential to find new work.
New Story partnered with the design firm Fuseproject on the homes because it believed that high-quality architecture was important. “Very often we as a society are willing to accept ‘less than’ for this type of population: ‘less than’ in quality, ‘less than’ for innovation, ‘less than’ great design, ‘less than’ for the input that families are able to have in their solution,” says Lafci. “Even when populations are seemingly vulnerable, or seemingly will accept whatever is given, that’s not an excuse to not really push to have the highest quality of whoever you’re working with.” In a design workshop a week ago, the families who will live in the homes shared feedback and helped iterate on the plans, chanting, at one point, “Todos somos arquitectos,” or “We are all architects.”
Because the design is currently evolving, the nonprofit is choosing to wait to share renderings publicly. The final cost of the homes is not yet known, though New Story says that it will be substantially cheaper than its low-cost traditional homes, which cost around $7,000 to build. While New Story will fund the houses, the new homeowners will pay for them via a no-interest loan that the new home owners pay back with a monthly fee based on income. The money will go into a community fund for more community improvements over time
Fuseproject, best known for industrial design, has started taking on larger-scale projects, and also recently worked on the design of prefab backyard homes. Founder Yves Behar says that his belief in the potential of 3D printing has grown over time. “I think it’s going to have a fast evolution from novelty to reality,” he says. “There’s a real opportunity for low-cost housing really anywhere. New Story’s focus, obviously, is the developing world. But I can’t stop thinking about Northern California and the tremendous need we have for housing. From a speed standpoint, and from a cost standpoint, I think 3D printed building is going to be a reality.”
In Austin, Icon is partnering with Cielo, a developer, to dedicate one of its printers to the city to be used to build housing for the homeless or other affordable housing. 3Strands, another organization, also plans to use the equipment to build sustainable, affordable homes in the United States. The government mortgage loan company Fannie Mae, which has explored the potential of modular construction to provide affordable housing, is also interested in the potential of 3D printing, Ballard says. But the neighborhood in Latin America will be the first project to build a community of the homes.
“When you print an entire community, and it’s a community that people are living in, it takes it out of the realm of novel and into an actual solution for communities globally,” says Lafci. New Story considers itself the “R&D arm” for the social housing sector; when the first community is constructed and proven, it plans to begin to share its learnings for governments and other nonprofits to use. “This next stage will be getting these machines into the hands of as many other organizations that can help end global homelessness as possible,” says Hagler.
BY ADELE PETERS
0 notes
Last Seen Blogs

stlhp
Lép

plus-ultrask
PLUS ULTRAsk!!!

hairyfaces
Hairyfaces

jimvalmer
Wow, what a great audience!

tanyaspinel
♡°TanyaSpinel°♡