#3d_modeling_101
Explore tagged Tumblr posts
Visit Tumblr Blog
Explore Tumblr blogs with no restrictions, modern design and the best experience.
Last Seen Tumblr Blogs


Fun Fact
Women make up for the other 50% of Tumblr’s audience.
Text
0 notes
Text
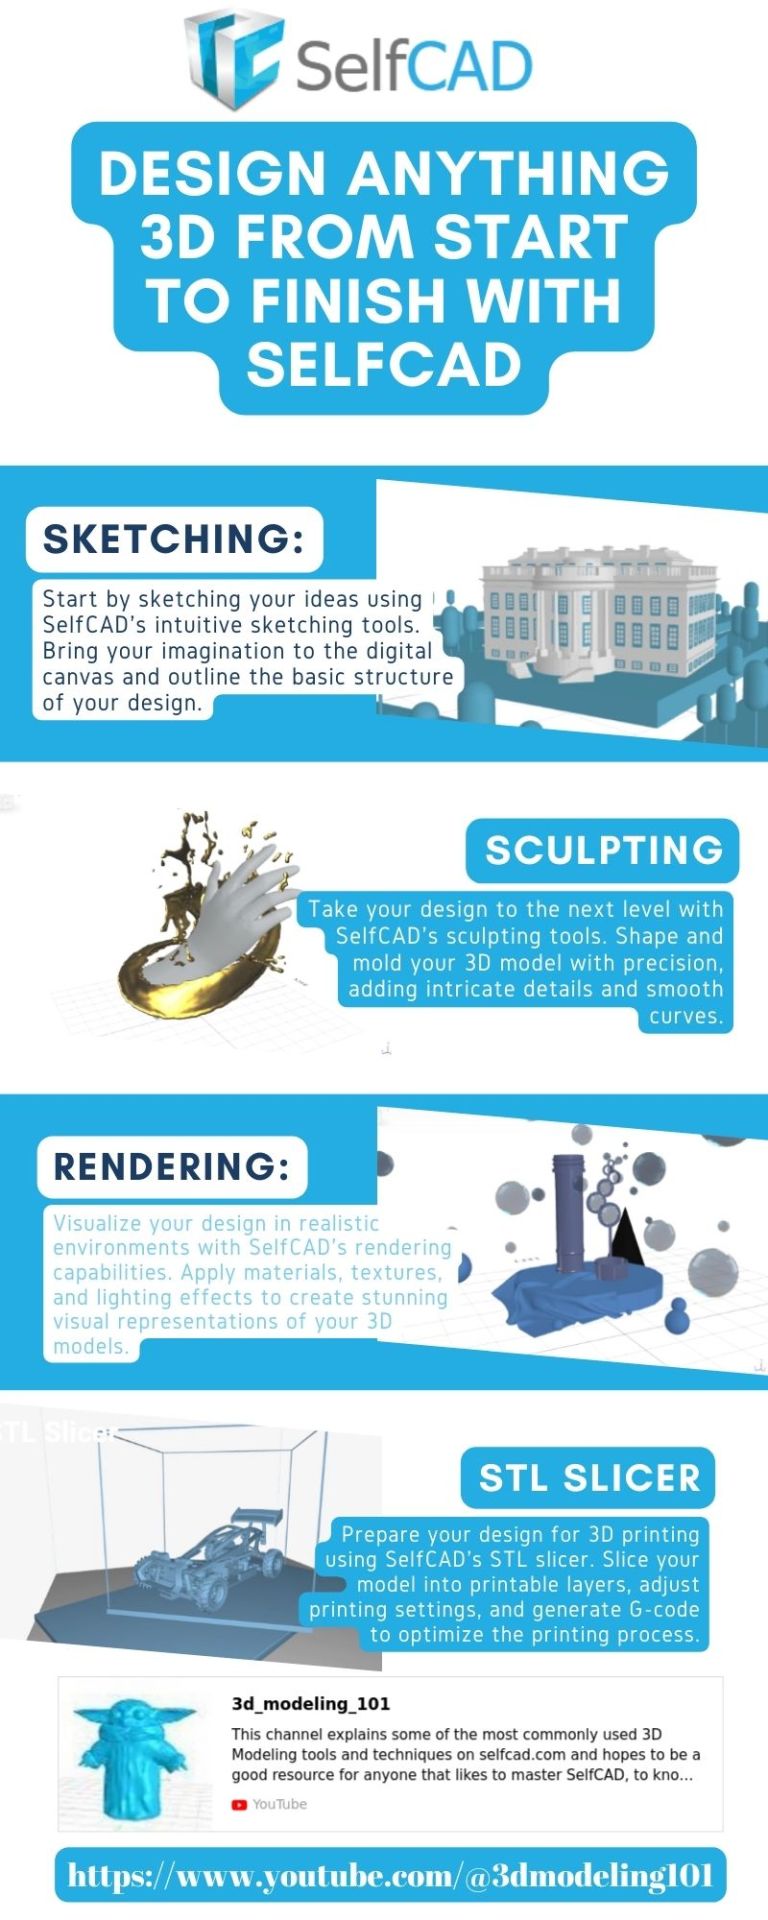
How to customize shapes with loops | A box modeling tutorial for beginners
Box modeling is a fundamental technique in 3D modeling that allows you to create complex shapes by manipulating simple geometric primitives. In this tutorial, we will explore how to customize shapes using loops, a technique that adds additional edge loops to control the shape and add detail. By following this step-by-step guide, beginners will learn the basics of box modeling and how to effectively use loops to create more intricate and customized shapes using SelfCAD, a user-friendly 3D modeling software. Let's get started on this exciting journey!
youtube
What is Box Modeling?
Box modeling is a technique where you start with a basic geometric shape, such as a cube or a cylinder, and gradually refine and modify it to create more complex forms. By adding edge loops, you can control the shape, smooth out surfaces, and add detail to your model. It's a versatile technique used in various industries, including game development, product design, and animation.
Step 1: Setting up the Project
To begin, make sure you have SelfCAD installed on your computer. If you haven't already, visit the SelfCAD website (www.selfcad.com) and download the software. Once installed, launch the application and create an account or log in if you already have one.
Step 2: Creating the Base Shape
Now that we have the software set up, let's create a simple base shape that we can customize using loops. Follow these steps:
Launch SelfCAD: Open SelfCAD and familiarize yourself with the interface. You'll find the main toolbar on the left-hand side, various editing tools on the right-hand side, and the canvas in the center.
Create a primitive shape: On the left-hand toolbar, click on the "Primitives" menu. Choose a basic shape, such as a cube or a cylinder, to serve as the starting point for your model.
Customize the shape: Use the transformation tools in SelfCAD to adjust the size, rotation, and position of the shape. This will serve as the foundation for your customization.
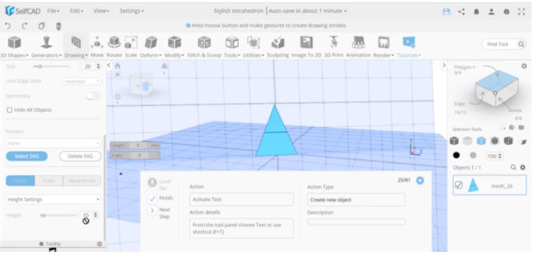
Step 3: Adding Edge Loops
Now, let's add edge loops to the shape to create more control and detail. Follow these steps:
Select the shape: Click on the shape to select it. You can use SelfCAD's selection tools to ensure precise selection.
Access the Loop Cut tool: On the right-hand side toolbar, click on the "Edit" tab. Locate the "Loop Cut" tool and select it.
Add edge loops: Hover your cursor over an edge of the shape. Left-click to add an edge loop. Move your cursor along the edge to adjust the position of the loop. Left-click again to finalize the position. Repeat this step to add multiple edge loops as needed.
Customize the edge loops: Select the edge loops individually and use the transformation tools to adjust their position, scale, or rotation. This will help you control the shape and add desired detail.
Step 4: Refining and Customizing the Shape
With the added edge loops, you now have more control over the shape. Use SelfCAD's editing tools to refine and customize the model further. Here are some suggestions:
Extrude and bevel: Select faces, edges, or vertices of the shape and use the extrusion and bevel tools to create additional geometry and add depth to the model.
Smooth the surface: Apply a smoothing modifier to the model to create a more organic and polished appearance. Experiment with different levels of smoothing to achieve the desired result.
Sculpt and detail: Use SelfCAD's sculpting tools to add fine details and refine the shape further. Sculpt
ing tools allow you to manipulate the surface of the model, adding texture and intricacy.
Conclusion
Congratulations! You've successfully learned how to customize shapes using loops in SelfCAD. By following this box modeling tutorial for beginners, you've gained the basic skills needed to create more complex and customized 3D models. Remember to experiment with different shapes, edge loops, and editing tools to further enhance your skills and unleash your creativity.
For more in-depth tutorials and inspiration, consider subscribing to the 3D_Modeling_101 YouTube channel and exploring the features and capabilities of SelfCAD. Happy modeling!
#selfcad#youtube#3d modeling software#3ddesignsoftware#box modeling tutorial for beginners#3dprinting#how to customize shapes with loops#3d_modeling_101#Youtube
0 notes
Text
From concept to creation: The journey of designing a 3D model
Designing a 3D model can be a fascinating journey, but it requires patience, creativity, and the right tools. With the advent of 3D modeling software, like SelfCAD, the journey from concept to creation has become smoother than ever before.
The first step in designing a 3D model is to conceptualize it. This involves brainstorming ideas, sketching rough drafts, and creating a blueprint. Once the concept is finalized, the next step is to bring it to life using 3D modeling software.
SelfCAD is a popular 3D modeling software that has revolutionized the process of creating 3D models. Its feature-rich platform includes the "3D_modeling_101" feature that allows users to create complex models with ease. With its intuitive user interface and advanced tools, users can start designing 3D models from scratch, or they can import existing models and modify them.
The software offers a range of tools that simplify the process of designing a 3D model. From basic shapes to complex designs, SelfCAD has got you covered. You can create precise measurements, adjust angles and dimensions, and add colors and textures to give your model a unique and realistic look.
Another advantage of SelfCAD is its ability to allow users to edit and modify their 3D models at any time. This is particularly useful when you need to make changes to an existing design or when collaborating with others.
The final step in designing a 3D model is to export it to a 3D printer or share it with others. SelfCAD offers a range of export options, including STL, OBJ, and 3MF, which are compatible with most 3D printers.
In conclusion, designing a 3D model can be a fun and rewarding journey with the right tools and software. SelfCAD's 3D modeling software and "3D_modeling_101" feature simplifies the process of designing 3D models and offers a range of features that cater to all levels of users. Whether you're a professional designer or a novice enthusiast, SelfCAD is the perfect tool for bringing your ideas to life.
#designinga3Dmodel #3Dmodelingsoftware #SelfCAD #3D_modeling_101 #creativity #technology #digitaldesign #3Dprinting #productdesign #engineering #prototyping #visualizationtools #3Dvisualization #concepttocreations #innovativetechnology
0 notes
Text
youtube
If you're interested in learning more about 3D modeling, you may want to check out the YouTube channel "3D_Modeling_101". This channel offers a wealth of information on the subject, including tutorials, tips and tricks, and reviews of various software packages.
Whether you're interested in creating your own 3D models or simply want to learn more about the process, "3D_Modeling_101" is a great resource. So why not check it out today and see what you can learn?
0 notes
Text
3D Modeling Software | 3d_modeling_101
youtube
If you're interested in 3D modeling, you may be wondering what software to use. In this video, we'll be discussing the most popular 3D modeling software on the market.
0 notes
Text
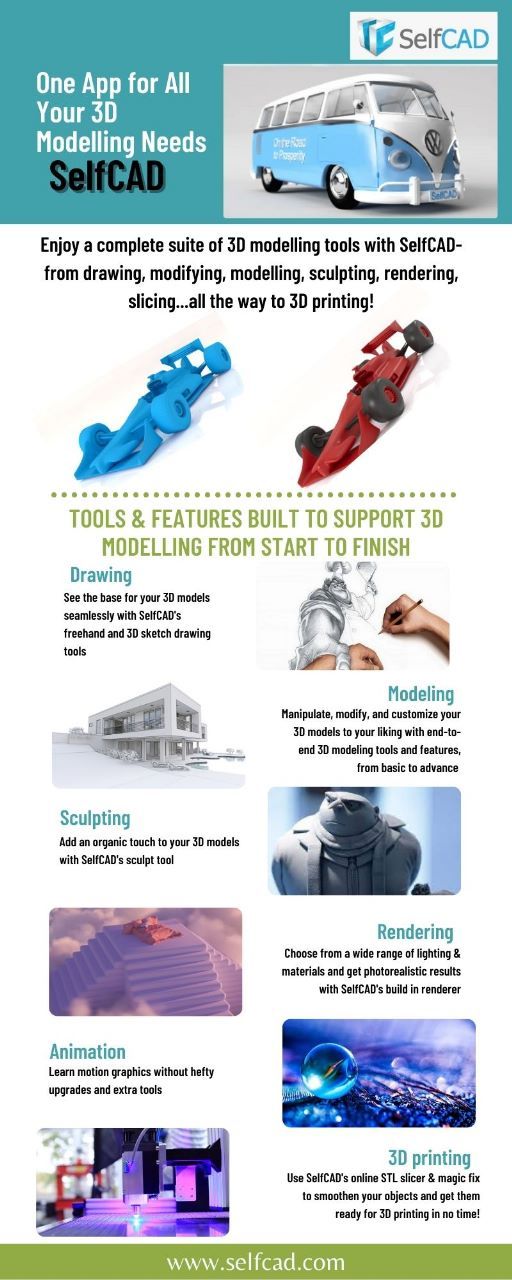
SelfCAD is an all-in-one 3D modeling software that provides a range of tools and features to support the entire 3D modeling process from start to finish. From basic shapes to intricate designs, SelfCAD has everything you need to bring your ideas to life.
The software features an intuitive drag-and-drop interface that allows you to easily create and manipulate shapes. You can also use the software's advanced tools to add intricate textures and details to your models, making them truly unique and lifelike.
One of the standout features of SelfCAD is its built-in slicer, which allows you to prepare your models for 3D printing with ease. The slicer provides a range of customization options, allowing you to fine-tune your models for optimal printing results.
To help you get the most out of SelfCAD, the 3D_Modeling_101 tutorial provides a comprehensive guide to the software's features and functions. The tutorial covers everything from basic modeling techniques to advanced design concepts, making it the perfect resource for beginners and experienced designers alike.
Whether you are looking to create 3D models for personal or professional use, SelfCAD is the ideal solution. With its intuitive interface, powerful tools, and built-in slicer, it provides everything you need to take your designs from concept to reality. So why wait? Start exploring the world of 3D modeling today with SelfCAD and the 3D_Modeling_101 tutorial!
#SelfCAD#3DModeling#AllInOneSoftware#Slicer#DragAndDrop#DesignConcepts#Tutorial#3DPrinting#OptimalResults#IntuitiveInterface#PowerfulTools#BringIdeasToLife#Explore3DModeling
0 notes
Text

From Concept to Creation: The 4 Steps of 3D Modeling and Printing
Transform Your Ideas into Reality: Master the Art of 3D Modeling with 3d_modeling_101
Introducing our versatile 3D modeling software, 3d_modeling_101, which offers a comprehensive suite of tools to help you build, smoothen, slice, and 3D print your projects in one place. With 3d_modeling_101, you can create a range of designs and bring them to life in a variety of materials.
One of the many projects that you can create using 3d_modeling_101 is a tumbler. Our software provides an intuitive interface that enables you to design a tumbler from scratch, or you can import and modify existing designs. Once you have your design, you can use our powerful smoothening tools to refine the surface of the tumbler and achieve a polished finish.
Next, 3d_modeling_101 allows you to slice your design, which is essential for 3D printing. Our software has advanced slicing capabilities that enable you to optimize your print settings and minimize material usage while achieving high-quality prints.
Finally, with 3d_modeling_101, you can 3D print your tumbler directly from the software. Our software supports a range of 3D printers, so you can choose the one that is right for you. You can also choose from a variety of materials, including plastic, metal, and more.
Overall, 3d_modeling_101 is an all-in-one solution for 3D modeling and printing, and it is perfect for anyone looking to bring their designs to life. With our software, you can create complex designs, smooth surfaces, slice with ease, and 3D print your projects all in one place.
0 notes