#box modeling tutorial for beginners
Explore tagged Tumblr posts
Visit Tumblr Blog
Explore Tumblr blogs with no restrictions, modern design and the best experience.
Last Seen Tumblr Blogs


Fun Fact
Women make up for the other 50% of Tumblr’s audience.
Text
How to customize shapes with loops | A box modeling tutorial for beginners
Box modeling is a fundamental technique in 3D modeling that allows you to create complex shapes by manipulating simple geometric primitives. In this tutorial, we will explore how to customize shapes using loops, a technique that adds additional edge loops to control the shape and add detail. By following this step-by-step guide, beginners will learn the basics of box modeling and how to effectively use loops to create more intricate and customized shapes using SelfCAD, a user-friendly 3D modeling software. Let's get started on this exciting journey!
youtube
What is Box Modeling?
Box modeling is a technique where you start with a basic geometric shape, such as a cube or a cylinder, and gradually refine and modify it to create more complex forms. By adding edge loops, you can control the shape, smooth out surfaces, and add detail to your model. It's a versatile technique used in various industries, including game development, product design, and animation.
Step 1: Setting up the Project
To begin, make sure you have SelfCAD installed on your computer. If you haven't already, visit the SelfCAD website (www.selfcad.com) and download the software. Once installed, launch the application and create an account or log in if you already have one.
Step 2: Creating the Base Shape
Now that we have the software set up, let's create a simple base shape that we can customize using loops. Follow these steps:
Launch SelfCAD: Open SelfCAD and familiarize yourself with the interface. You'll find the main toolbar on the left-hand side, various editing tools on the right-hand side, and the canvas in the center.
Create a primitive shape: On the left-hand toolbar, click on the "Primitives" menu. Choose a basic shape, such as a cube or a cylinder, to serve as the starting point for your model.
Customize the shape: Use the transformation tools in SelfCAD to adjust the size, rotation, and position of the shape. This will serve as the foundation for your customization.
Step 3: Adding Edge Loops
Now, let's add edge loops to the shape to create more control and detail. Follow these steps:
Select the shape: Click on the shape to select it. You can use SelfCAD's selection tools to ensure precise selection.
Access the Loop Cut tool: On the right-hand side toolbar, click on the "Edit" tab. Locate the "Loop Cut" tool and select it.
Add edge loops: Hover your cursor over an edge of the shape. Left-click to add an edge loop. Move your cursor along the edge to adjust the position of the loop. Left-click again to finalize the position. Repeat this step to add multiple edge loops as needed.
Customize the edge loops: Select the edge loops individually and use the transformation tools to adjust their position, scale, or rotation. This will help you control the shape and add desired detail.
Step 4: Refining and Customizing the Shape
With the added edge loops, you now have more control over the shape. Use SelfCAD's editing tools to refine and customize the model further. Here are some suggestions:
Extrude and bevel: Select faces, edges, or vertices of the shape and use the extrusion and bevel tools to create additional geometry and add depth to the model.
Smooth the surface: Apply a smoothing modifier to the model to create a more organic and polished appearance. Experiment with different levels of smoothing to achieve the desired result.
Sculpt and detail: Use SelfCAD's sculpting tools to add fine details and refine the shape further. Sculpt
ing tools allow you to manipulate the surface of the model, adding texture and intricacy.
Conclusion
Congratulations! You've successfully learned how to customize shapes using loops in SelfCAD. By following this box modeling tutorial for beginners, you've gained the basic skills needed to create more complex and customized 3D models. Remember to experiment with different shapes, edge loops, and editing tools to further enhance your skills and unleash your creativity.
For more in-depth tutorials and inspiration, consider subscribing to the 3D_Modeling_101 YouTube channel and exploring the features and capabilities of SelfCAD. Happy modeling!
#selfcad#youtube#3d modeling software#3ddesignsoftware#box modeling tutorial for beginners#3dprinting#how to customize shapes with loops#3d_modeling_101#Youtube
0 notes
Video
youtube
How to Start a Successful Affiliate Marketing Business: Generate 💲520K i...
#youtube#how to start a successful affiliate marketing business#how to build a successful affiliate marketing business#build a successful affiliate marketing business#how do you do affiliate marketing correctly#how do you do affiliate marketing correctly for beginners#how to do affiliate marketing correctly#how to do affiliate marketing successfully#how to do affiliate marketing properly#secret affiliate model#affiliate business#affiliate business system#affiliate business ideas#affiliate business model#turnkey business in a box#turnkey business#turnkey business ideas#affiliate marketing#affiliate marketing for beginners#affiliate marketing for beginners step by step#affiliate marketing course#affiliate marketing explained#affiliate marketing tutorial#affiliate marketing results#affiliate marketing full course#affiliate marketing 2024#vick strizheus
1 note
·
View note
Text
The Care Package II
Got your first, shiny new gacha character you were working oh-so-hard to get? That's great! Don't know how to care for it? No worries! This guide will have you covered!
-
Summary: not doing this, its in part 1 here, this post has Aventurine and Sunday. The previous one has Dr. Ratio and Argenti. Have fun reading !
-
The Gem-Deluxe Package
You receive a lavishly decorated box at your mail! It is covered in jewels and black ribbon, and similarly to the Red Rose Package, users may experience difficulty in unboxing Aventurine from his gift box. Please watch this tutorial in case you are unable to do so aswell.
The gift box is lined with a soft material, and several, smaller layers that act as a makeshift bed for your sleeping Aventurine. Please let your Aventurine wake up on his own accord, or you may halt his growth process from Beginner to Intermediate by communicating urgency if you wake him up too soon. When Aventurine wakes up, he will make his presence known very well, and he will naturally call out to you regardless of wherever you are and whatever you are doing.
Aventurine comes with a unique combination of accessories that are specific to each model – thus a specific user manual is provided for each of his items. You may receive either one of the following SSR items; Gold Coin [I], Pack of gold Cards [I], Small Aventurine Stone [II], Teal Peacock Earring [I]. Please note you may only be able to request another copy with your specific user manual when you open the package - if you are unable to find it, search Aventurine's pillow or ask him about it. Some users express their delight at Aventurine's tricks of hiding certain things, but it is advisable to warn him of certain valuable items before he hides them to entertain his user.
Aventurine may seem as though he does not mind being picked up in any way, however, he wishes to be held with great care. Please hold out both of your hands so he may feel cared for, and wait for him to feel comfortable enough to climb onto your hands. Aventurine may tell you it doesn't matter, but it is advisable to take great care and consideration of his emotional and mental wellbeing regarding your actions towards him.
Beginner Aventurine enjoys enclosures that are bright with natural light and open, but also safe and guarded well. You may keep him near your windows, on your bed, or any designated spot where he is free to explore that is well-illuminated. However, if he is picked up in the middle of his exploration process, he may whine and sarcastically compliment your furniture.
Beginner Aventurine is more personally closed off, so users are advised to be patient. He is, however, comforted by the sight of beautiful jewels, a comfortable bed, and warm food [Please refer to Care Package for accessories, especially regarding jewels. You do not need to buy real diamonds to impress Aventurine.].
The longest stage is the Beginner stage, so users may not be pleased with the delay in level up when it comes to Aventurine. He is not comfortably accustomed to change. It is advised he grows according to the rate he deems fit. However, the new Companion Feature allows Aventurine to interact with Dr. Veritas Ratio, and Aventurine's level up may be encouraged further if he witnesses Veritas Ratio level up, or receive his advice and help. Users are advised to supervise their interactions closely, as Intermediate Aventurine and Advanced Veritas Ratio are prone to petty arguments.
Intermediate Aventurine shows not much difference with the later stages of Beginner Aventurine, however, he may start interacting more openly with his user. He will frequent your personal space, initiate more friendly conversations and become inquisitive about your personal life – please tell him all about your Friends and Family. Aventurine feels closer to people the more he knows about their personal relationships. Users are also encouraged to compliment Aventurine whenever he decides to explore an area he tends to avoid – this will level up Aventurine's premature skill “Lost and Found [I]” to “Observe and Retrieve [II]”. Aventurine may find objects of precious value to user that may have been lost before, and will help the user find misplaced items with greater ease. It also supports the continual growth until he reaches Advanced level.
At the Advanced Level, Aventurine finds it very easy to accustom to User's routine. His skill may also level up from “Observe and Retrieve [II]” to “Initiate and Succeed [III]”. Advanced Aventurine will be more open to user and relay his personal feelings without hesitance. He may also choose to be called Kakavasha at this stage [Our users are informed that Kakavasha was the name of the previous model Aventurine is currently based upon,and to not fear any errors]. Aventurine at this stage may grow exponentially overnight depending on how deep the bond between him and his user is. If you reach a close bond level, Aventurine grows up to a size of 5’6-5’7 overnight, and delight in his own growth. Users are advised to prepare in advance once Aventurine reaches Intermediate stage.
Congratulations! You now have a full grown Aventurine, who may choose to go by Kakavasha in private. Aventurine is extremely skilful in managing the user's finances and personal relationships, offering advice and deciphering actions of others around his user. However, Aventurine is prone to safeguarding seemingly invaluable things, such as handwritten notes, old jewelry the user may have wanted to discard, and frequently visits the user's personal space. Aventurine, however open he may be, still hides some of his personal feelings. Users are advised to be comforting and patient with Aventurine, and oblige with his unsure nature regarding trust and belongings. Aventurine is prone to Neglect [IV], and users are heavily warned to never ignore Aventurine, especially in times of need or when quarrels occur. You may comfort him during your busy schedule by offering him handwritten notes of small reassurance, or provide him with the Gold Card Pack provided within the Care Package.
-
The Raven Package
The box is very fragile, and contains many pieces of accessories, so please do not shake it. It is light blue in colour, and is adorned with a small golden brooch the user may keep as a decorative piece. Inside, you receive a transparent box encasing a sleeping Sunday, and a plethora of neatly arranged accessories beside him. Please handle it with great care.
Sunday does not mind being woken up, but he will be displeased if you let him sleep too much. You may use the clockie accessory to wake Sunday up at an appointed time.
Handle Sunday with dignity! Users are advised to not haphazardly hold Sunday, he holds himself in high regard and does not like being carried with impropriety. However, users may occasionally hold Sunday by the back of his collar like the scrunch of a kitten, for short durations of time.
Beginner Sunday requires a well-organised area with neat schedules and planners. He prefers yellow-lighting and if the user has a study lamp, Sunday may occasionally nap under it. He is open to talking but will maintain an ample distance with his user; but do not be discouraged. Beginner Sunday may become more open if the user manages to help him to their haircare products and share tips on preening his wings.
Intermediate Sunday is a bit difficult to deal with, according to user experiences. Sunday may demand more attention and become more meticulous with manner and speech. He may advise the user in their appearance and presentation. However, Sunday does not mean ill. He is simply trying to help his user. If the user becomes agitated due to his constant advice and expresses their feelings, Sunday may enter Sulking [II], and hide in his gift box. You may comfort your Sunday by arranging his accessories Conference Table Prop 2, Office Chair (8), and Sandpit Prop 1, Musical Instrument Violin Prop 2 and Documents Prop, and asking him to check the current layout which will lure Sunday out of Sulking and into Curiosity.
Intermediate Sunday may experience difficulty reaching the Advanced level, so we advise users to be more supportive during this stage. Sunday may act irrationally or out of character, and pace around in a space, supervise you constantly, meticulously manage seemingly insignificant things, and try to manage things by himself, which will leave him prone to Overworking [II] and Exhaustion [I]. You may comfort Sunday by offering reassurances and feeding him small, sliced strawberries, or sweets.
Advanced Sunday becomes much easier to handle. Sunday will become self-sufficient and engage in many conversations, mainly pertaining to your duties and responsibilities and help you become more efficient at them. Sunday specialises in Planning [II] which greatly supports the skill Initiate and Succeed [I]. He will also greatly help the user form connections and relationships, giving them social advice. However, at this stage, Sunday is also prone to Overworking [III] and Loneliness [I], which affects him in a greater degree than Intermediate Sunday. The user has to directly engage with Sunday and lure him out of work actively, and provide long hours of company.
Congratulations! You now have a full-grown Sunday. He may grow up to 5’6-5’7, and does not require much maintenance. You may request a copy of accustomed accessories with the appropriate specific manual provided in the care package. Sunday's Companion Feature works greatly with Robin, and it creates more resistance to Overworking [II], [III] and Loneliness [I], and helps him feel less lonely. However, users are warned to not use this Companion feature with Aventurine or Dr. Veritas Ratio, as it may create animosity between them and stunt Sunday's growth, along with weakening his resistance to Overworking [III] and deleveling his skill, Planning [II] to Planning [I].
#moonink#hsr#honkai star rail#hsr x gender neutral reader#hsr x y/n#hsr x you#hsr x male reader#hsr x reader#honkai star rail x you#honkai star rail x gender neutral reader#honkai star rail x reader#hsr aventurine#hsr kakavasha#sunday hsr#hsr sunday#honkai star rail aventurine#honkai star rail Kakavasha#honkai star rail sunday#hsr aventurine x reader#hsr aventurine x you#honkai aventurine#aventurine x reader#aventurine honkai star rail#star rail aventurine#hsr sunday x reader#sunday x y/n#sunday x you#sunday x reader#aventurine x you#aventurine x y/n
514 notes
·
View notes
Text
Tutorial: How to adjust joint position (in TS2 object skeleton)
This tut is NOT meant for beginners because I don't explain how to use SimPe or Milkshape. But actual process is very basic: you change joint coordinates and do GMDC model rebuild. The tricky part is to get coordinates right.
If you don't know much about joint assignments, start with this tutorial: "Retaining object animations in your new package" by Bluetexasbonnie @ MTS2, which explains how to add joint assignments to custom stuff cloned from functional objects (to make parts of the mesh move when Sims interact with it).
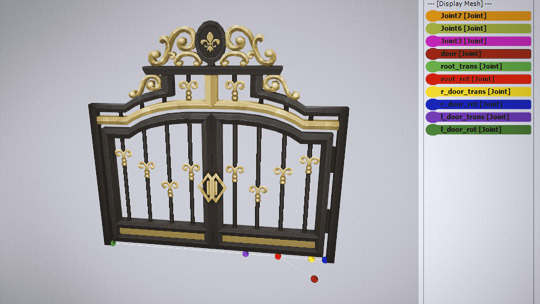
The pic above: SimPe GMDC skeleton preview. You can click on each joint name to see which part is assigned to it. Gate is here.
This will work for simple object skeletons without IK Bones.
There are no plugins that would allow us to properly import TS2 CRES skeleton data with IK bones - like sims, pets and more - to any 3D program
If object has IK Bones - you'll find out when importing CRES to Milkshape. If it displays a notification "joints with rotation values found...", IK Bones are present and there's a high risk that skeleton: A. will not be imported. B. if it's imported, it will get mangled. C. will be mangled after using model rebuild option.
I've experimented with car skeletons (those have IK Bones), managed to edit car door joints but it required removing wheel bone assignments - because wheel movement becomes wonky after doing model rebuild
/FYI: steps 1 - 5 are optional, you can edit CRES joint coordinates right away if you know the right values - which is usually not the case/.
Export GMDC with your custom mesh
Export CRES (if you wish to preview entire skeleton and/or joint names)
Import GMDC to Milkshape
Import CRES (if you need it. Plugin is called: Sims2 AniMesh CRES Skeleton Import. Click 'yes' to 'replace all bones?'). You should be able to see entire skeleton imported. Note that Milkshape won't let you export a GMDC after you imported CRES skeleton unless you change joint comments (point 7.)
Measure how much you need to move the joint. You can create a box as ruler substitute, then check the distance with extended manual edit plugin. If you're not sure where to place your joint, you can move it and test if object animations look alright (import CRES again to reset joint position).

tip: when working on GMDC in Milkshape you can rename the model parts in model list (door right, door left etc). Only names inside the model comments actually get exported.
6. Go back to SimPe, open CRES resource. Remember TS2 is using flipped coordinates: X = -X, -X = X, Y = Z, Z = Y. Edit joint Translation data, commit, save.
Optional: you can export CRES skeleton again and import to Milkshape to test if joint has moved to the right position.
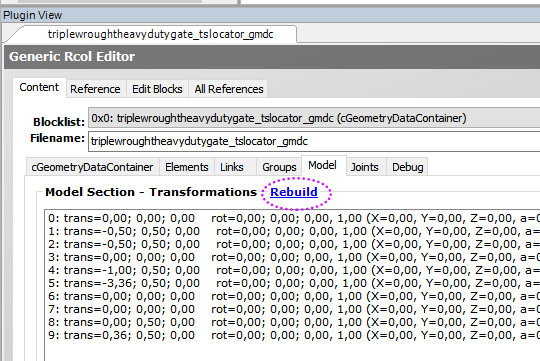
7. Go to GMDC, Model tab - hit rebuild, commit, save.
if you have the edited object placed on a lot, it's gonna look weird when you load the game. You need to re-buy it from catalogue to see results.
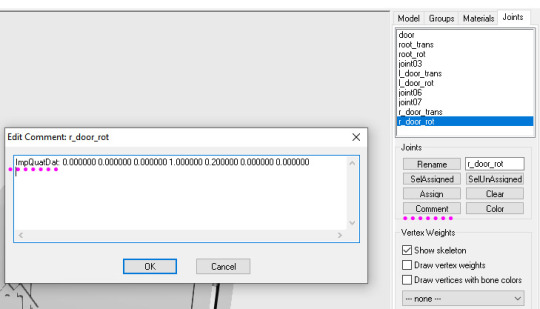
If for some reason you'd like to export entire GMDC with your imported CRES skeleton, Milkshape won't let you do that. You'll get "ERR: No quaternion values stored" error. You need to go to Joints tab and edit each Joint comment to ImpQuatDat: (that's imp, with capital i )
Notes:
if you go to GMDC Joints tab, there's also a rebuild option to update single joint - but I've tried it on car door joints and it didn't work.
If you edit joint coordinates in CRES, for example- move the car door forward, and preview skeleton in GMDC viewer, your model is gonna look fine. But in the game every vertex assigned to that joint will also be moved forward. That's why you need to use model rebuild option. In theory, if you'd like to skip rebuild, you could import GMDC to milkshape and move the door backwards to compensate for joint adjustments? I haven't tried that (yet).
74 notes
·
View notes
Text

THE SIMS 3 TUTORIAL
HOW TO CREATE DEFAULT REPLACEMENT MOD USING CUSTOM MESH & TEXTURE FOR SIMPLE OBJECT
⚠️ Tumblr has 30 pictures limit, so I cannot include too many pictures. If you want to zoom in the pictures, click the pictures to enlarge, or save the pictures into your PC, zoom the pictures on picture viewer or zoom in the pictures on your mobile phone. ⚠️
----------------------------------------------------
I create this tutorial to make easier to follow because there are older tutorials available before but scattered on internet and usually only say "Export to replace s3asc" without explaining how to export the edited object properly.
My method is using TSR Workshop instead of exporting the object using Sims 3 Object Export/Import plug in because exporting to replace the s3asc using that plug in always giving error notification "ERR: Model has 1 groups; original had 0" and cannot be exported.
For beginners who are very new using s3pe and haven't created default replacement mod before, better start from simple object first.
Simple objects I mean in-game object that has single MODL and single texture with no morphs, no GeoStates, no presets, no CAS colour channels, and easily cloned from OBJD on catalogue. Usually as utensils that Sims holding in their hand, not buy/build objects. For example: Pencil, pan, fork, spoon.
----------------------------------------------------
Tools to prepare:
s3oc
s3pe
Milkshape 3D for bone assignment (Version I use 1.8.5 beta, discontinued by its developer, therefore feel free to download the full version with its license key provided).
Sims 3 Object Export/Import 1.01 by Wesley Howe (Milkshape plug-in. Download msS3ObjPluginsV101.rar )
TSR Workshop (Older version for TS3 only version 2.0.88)
TSR Workshop plug-ins for export.import TSRW Object.
3D Program (Blender/Maya/3dsMax)
Editing images software (Photoshop, make sure you have to install .dds plugin by Nvidia. For free software alternative, you can use GIMP with its .dds plugin)
This tutorial will not teach you how to:
Meshing object ❌
Create alpha texture ❌
Change thumbnails in-game ❌
Install programs and plug-ins ❌
This is how I created Chinese chopsticks replacement mod using custom mesh and texture.
In summary, this tutorial has 10 steps:
Step 1. Clone the Object using s3oc
Step 2. Open S3PE to Copy the Original Resource Code and Export the Files
Step 3. Export the Original Mesh as Base Mesh to .obj format
Step 4. Create Your Custom Mesh
Step 5. Bone Assignment & Create Group
Step 6. Create custom Texture
Step 7. Import the .wso of Edited Mesh on TSR Workshop & Export the package
Step 8. Export MODL file from Package saved from TSR Workshop
Step 9. Finalizing in s3pe & Replacing the Original file with Edited File & Correcting the Code As Same As Default Code
Step 10. Test the CC in your game.
-----------------------------------
✳️ Step 1. Clone the Object using s3oc
Before cloning the object, check the Game Folder for in-game object file location. Settings > Game Folders...
Take a look if the Base Game or Expansion Pack for object file you want to clone is in the right folder. For example, my The Sims 3 game are all bought from Steam, so the location is D:\SteamLibrary\steamapps\common\The Sims 3
If you want to clone object from Expansion Pack, make sure input the folder location. For example, the location for World Adventures EP is D:\SteamLibrary\steamapps\common\The Sims 3\EP1

If you are done, close the pop-up box. You can continue click Cloning then choose Normal Object...
Wait until you get the whole catalogue. Click Search...

For example, I clone object from World Adventures Expansion Pack. You can clone object from Base Game or other Expansion Packs as long it is considered as "utensil" that Sim holding on hand. For example: "Pencil" or "Pan"
Search for text: chopsticks
or if you want to clone object from Base Game, search: utensil
Tick check marks for Resource Name, Object Name, Object Desc then click "Search button"
Search result gives you results with name "chopsticks". Here is the object we are looking for: UtensilChopsticks
We need the OBJD file to clone. OBJD = Object Data.

Click "Clone or Fix" at the right bottom. Then you see the next page to determine if you want to clone with renumber or not. If you want to make default replacement, then do not check the Renumber box. Keep it blank.
Tick check box means the s3oc will generate new resource code for new item. Not tick the check means the s3oc will overwrite the same resource code, it is to replace object you cloned in-game.
I am personally a detailed person, so I usually tick as many as I want: tick "Deep clone" "Missing String Tables" and "Include Thumbnail" to include more details. Then click "Start" to proceed.

It will give you file name [CreatorName]_ObjectName_Number
Then save your package file in "DBPF Package" format in your project folder. Always make folder for any file to make everything organized.
✳️ Step 2. Open S3PE to Copy the Original Resource Code and Export the Files
Open S3pe, locate your package file you cloned from s3oc. Find the MODL of Utensil Chopsticks, Right-Click, "Details..."

On Resource Details, click "Copy TGI" to copy the Resource Code. Type, Group, and Instance will automatically be copied on clipboard. Then open Notepad, Right-Click to "Paste".
Click GRID on bottom of the s3pe (I mark it red on picture), it will give you pop-up box with Data Grid. Click "Resources", it will be highlight blue and there's 3 dots button appeared on the right side. Click the 3 dots button. It will give you TGI Block List Editor.
Inside MODL's TGI Block List Editor only has IMG. You may wondering why, but that's how the game coded. Type, Group, Instance of _IMG inside TGI Block List Editor should be the same as _IMG on the package.
Copy the TGI, Group, Instance to your Notepad.

After you copied code of MODL, do the same for the texture image (_IMG), but only copy the code from Resource Details. You cannot edit TGI Block List Editor for _IMG as the Grid button for _IMG is greyed out.
The main task is the code of your edited mesh and texture should be the same as the code you copied now from original package you cloned with s3oc.
Keep the code on notepad. You will need this code later.
Export the MODL file. Right-Click, "Export to s3asc". The file appears in long string such with name for example: S3_01661233_08000001_B619DB2238C3430B%%+MODL_filebase
Do not rename the file. Save.

Export the texture file. Right-Click "Export > To File..." The file will be saved in .dds format. Do not rename the file. Save.

✳️ Step 3. Export the Original Mesh as Base Mesh to .obj format
Open Milkshape. Import the s3asc file you saved before.
More steps click spoiler tag "Read More / Keep Reading" below
File > Import > Sims 3 Object Import v 1.01 by Wesley Howe

Locate the s3asc file, then the original chopsticks mesh appears.
Click the "Joints" tab. It has 4 codes. Check box "Draw vertices with bone colors" It will show Bone Assignment colors on the original mesh. Yellow on top chopstick and light blue on bottom chopstick. The colours are to make the object has rig and movement following the Sim's interaction.

Take a look at the 4 codes on Joints Tab. You can play around to see which colour of the code will appear, after that copy paste the code to Notepad to make it easier to comprehend.
Click Select from Tools menu, Select Options: Face. On "Right/Left/Top/Bottom 2D View", Left-click make selection of one part of chopsticks. While the part of object being selected (Red), click Joints then Choose "Assign".
0x96239247 --> Yellow 0xFEAE6981 --> Purple 0xCD68F001 --> Light Blue 0xD0DECA8E --> Red
Your edited mesh must have the exact same Bone Assignment colour later. Check again if the code and colour are correct.

You can save object mesh as .obj to other 3D software such as Blender or any other 3D software.
✳️ Step 4. Create Your Custom Mesh
Use the original .obj as base model. While you can create longer mesh or any edited version as you wish.
Make sure the scale and position of the edited mesh is same as base original mesh, because the edited mesh will be used on Sim's hand.

If you are done editing the mesh, export the UVmap.
You can export the uvmap in higher resolution, as long as it is Power of 2. 64x64, 128x128, 256x256, 512x512, 1024x1024, 2048x2048, 4096x4096. I export in 1024x1024 pixels to make the size of texture larger and have more details.
Then export the mesh object in .obj format.
✳️ Step 5. Bone Assignment & Create Group
Open Milkshape. Import the original mesh.
Check the Groups Tab. Original mesh has 1 group, "group 00". Group 00 means it is the main mesh. There is no shadow beneath the object.

Import the edited mesh as .obj file.

My edited mesh has one single name "default" name on the Group Tab. While edited mesh may have a lot of file name scattered on Group Tab. Regroup the file name to simplify your edited mesh into one single name. Select > Regroup.
The main task is replacing the EA's original mesh with your edited mesh.
Before you delete anything, you must do Bone Assignment first to the edited mesh you created.
Your edited mesh does not have Bone Assignment, so it appears white.
Remember the 4 codes you copied earlier in Notepad.

Copy Bone Assignment from original mesh to your edited mesh.
This case, your want to Bone Assign Yellow colour.
Select > Face to select one part of chopsticks of your edited mesh. On Joints Tab, double click the appropriate code 0x96239247 in blue highlight then the code box on the right side of "Rename" will appear 0x96239247. Make sure the code is correct. Then you can click "Assign".

Your edited mesh will appear in Yellow colour. Then do the same for another part of chopsticks.
Select another part of chopsticks of your edited mesh. On Joints Tab, double click the appropriate code 0xCD68F001 in blue highlight then the code box on the right side of "Rename" will appear 0xCD68F001. Click "Assign".

Your edited mesh will appear in Light Blue colour.
Then what's the other code for? With colour purple and red?
Leave them. Let the codes have the same exact codes as appear in original mesh and let the colours only assigned Yellow and Light Blue. The colours are to determine rig for interaction in-game, which only use Yellow as upper part of chopstick and Light Blue as bottom part of chopstick.
You can safely delete the original mesh with name group00 until it remains your only your edited mesh.

Rename your edited mesh to group00. Type group00 on the box then click "Rename" on the left side.

Export to TSRW Object in .wso format. .wso is format with bone assignment on object attached.

Save your .wso in your project folder.
✳️ Step 6. Create custom Texture
Import original texture you exported from s3pe to your editing image software.
Look at the original texture made by EA. 32x64 pixels. It is very low resolution, blurry and stretched, because the texture should be compressed as low as possible by game designer. As player you want it has higher detail to look realistic as possible and your PC of course can handle high resolution content, sure you can make the resolution much higher than EA's.

Import the UVMap you saved from 3D software. For example, UVmap I imported has 1024x1024 resolution. Add your custom texture. Then save it to .dds format in the same name as original texture. Save in separate folder, name it "Edited Texture" to keep it separated from original texture.
✳️ Step 7. Import the .wso of Edited Mesh on TSR Workshop & Export the package
Open your TSR Workshop.
Create New Project > New Import >Next...

Then Browse original mesh by EA in package format in your project folder.
On Open file box, you cannot see .package file because the filter is .wrk (TSR Workshop Project). Choose the .package dropdown.

Then you can see .package file.
Open the .package. After the file is located, then Next. On Project Details I usually skip without giving name of Project Name and Title. Next.
You must have seen green land with white blank sky.
Where's the mesh? It is actually there... just being zoomed in too close. You need to zoom out by scrolling down mouse.
You can see the original chopsticks mesh by EA. You can save the project file in .wrk format. After you save the file, import the .wso of your edited mesh. Mesh tab > High Level detail. Click green arrow folder icon to import. Then your edited mesh will appear replacing the original EA mesh.

As you see, the texture is messed up because the texture is still using original EA's texture. But then you check Textures tab and it has blank dropdown...
I cannot change the texture on this TSR Workshop!
Don't worry, we can replace the texture on s3pe later.
No need to change anything other than importing mesh. Click Edit > Project Contents to save as package.
You will see pop up box with number or files DDS, FTPT, LITE, MODL, OBJD, OBJK, etc. Export > To. package. Give name such as "EditedChopsticks_TSRW"

✳️ Step 8. Export MODL file from Package saved from TSR Workshop
Open S3PE, File > Open package "EditedChopticks_TSRW" that you saved from TSR Workshop.
Export MODL. Right-Click, export. It gives you file name with [StringOfNumber] .model .
Save it on project folder. Keep it organized and separated from original MODL. Name the folder "Edited MODL". Do not rename the file.
✳️ Step 9. Finalizing in s3pe & Replacing the Original file with Edited File & Correcting the Code As Same As Default Code
Open s3pe, File > Open original package that you cloned from s3oc. [CreatorName]_ObjectName_Number
Find the MODL. Right-Click > Replace...
Locate to your edited MODL with filename .model .
Then click Open.
The original MODL of the package should be replaced with your edited mesh.
Do the same for the texture.
Locate to your edited texture with filename .dds
Then click Open.
The original texture of the package should be replaced with your edited texture.
Take a look at MODL's Type, Group, Instance. It has the same code as original MODL in the original package cloned with s3oc (because it has been replaced)
Don't forget to see the code inside TGI Block List Editor.
Repeat step 2 how to check the code. Right-Click on MODL/IMG > Details... and click GRID > Resources > TGI Block List Editor.
The Type, Group, Instance of the _IMG are different compared from IMG from original package clone, which means that is the evidence of edited mesh replaced the original.
Rename the Instance with default/original Instance you copied on notepad from Step 2. Type, Group, Instance should be the same as default/original Type, Group, Instance.

Open notepad with resource code you copied from Step 2. Make sure the Type, Group, and Instance are all the same.
If the codes are the same, then your edited mesh and texture will overwrite the default mesh and texture with the same code in the game. Save, Commit, Save the package.
Check again if the texture is replaced properly. Right-Click on _IMG > ViewDDS.
ALTERNATIVES!
Yes, you can delete unwanted files in your edited package, to keep the package clean. Simply Right-Click>Deleted.
The only files needed in package are: MODL, _IMG, _KEY
They are the only files with your edited mesh/texture including codes to overwrite the default codes.
You can Start new fresh blank s3pe. Right-Click>Import from file...
Locate your edited MODL and _IMG (texture) file.
On Resource Details box, tick mark "Use resource name" > OK.
Make sure all the Type, Group, and Instance of MODL and _IMG including in the TGI Block List Editor are all the same as the code in original package.

Save the package.
✳️ Step 10. Test the CC in your game.
Put the package to your CC folder in your The Sims 3 document folder to see if the CC is working or not.
If the CC is working as your intended, with your custom mesh and texture, then test the animation. Are the chopsticks animation working as the same as original EA's? If the animation are working well too, then congratulations!

Your default replacement are working. Give applause to yourself. 👏
-------------------------------------
QUESTIONS!
Q:
Can I use this tutorial for making default replacement for buy/build object?
A: This tutorial covers basic method of using TSR Workshop and replacing the default codes (Type, Group, Instance), so you will understand the basic principle of doing default replacement mod.
Keep in mind that different object has different case. Buy / build object has MLOD (not just MODL) more than one, texture images more than one, has presets, and CAStable colour channels.
The TGI Block List Editor for buy/build object has a lot of codes, so have to spend a lot of time to do trial-and-error to make the default replacement working properly, because a lot of times the texture doesn't work (still using default EA's texture), or when the object appears right with your edited mesh and texture, after you choose the presets, the object reverts back to your edited mesh with default EA's texture.
Q:
Help! The texture is black! / still using same EA's texture when tested in the game!
A: The texture codes must be not the same. Check the Type, Group, Instance of _IMG. Do the codes are the same like codes in original package? Check the TGI Block List Editor for MODL, is the _IMG inside has the same Type, Group, Instance as in original package.
Q:
Help! The object disappears when tested in the game!
A: You must be replacing OBJD in your package. Do not replace OBJD. Just MODL and texture only.
#tutorial#the sims 3#the sims 3 tutorial#thebleedingwoodland#the sims 3 default replacement mod#modding#s3pe#s30c#TSR Workshop
118 notes
·
View notes
Note
hello user hinamie ik it's a cliche question and idk if you've already answered that but how do you learnt to draw people??? im struggling very much and i want to learn and everybody says practice but idk how? your style seems so effortless and i also love the way you draw clothes very much. thanks already for answering, have a good day :)
hello anonymous tumblr user im very flattered you like my art !! gna let u in on a lil secret, it is the farthest thing from effortless and has in fact taken years and years of work. honestly i feel a bit unfit 2 offer advice a lot of the time because i’ve never been classically trained so i don’t really . have a good frame of reference fr how to approach art from a beginner’s perspective anymore,,,when youve been drawing fr 2 decades u kind of forget what it feels like to be starting out and what advice would be helpful
to start i guess i cn recommend that u start with armature gestures n build up from there? once you’re comfortable with how 2 position a body maybe then start saving a bunch of pictures of the human body or of models in different poses and practice tracing over them to break them down into their basic shapes, like this or this. stripped down 2 the fundamentals, the human body is a bunch of boxes, prisms, n spheres. pay attention to proportions and perspective and the more comfortable you get with the basics, the easier it will be to move onto the details
thing is tho, i really Can’t tell you how to practice, you have to stumble around a bit before u find what works for you. we’re lucky 2 live in a time where art advice from professionals and tutorials are easily accessible but at the end of the day u can only get so much based off of what other people tell you ; improvement comes from Doing. it’s intimidating starting out and ik it’s hard to let yourself be a beginner n suck a little but it genuinely does get easier . i can’t say how quickly bc everyone learns n improves at different rates but trust me, as long as you stick with it you /will/ improve
#Anonymous#art advice#nothing makes me feel more like a fraud than trying 2 give ppl advice#'how do you draw x' IM SORRY I DONT KNOWWWWW
19 notes
·
View notes
Note
Hii ! I’m in a bit of a problem rn and I’m wondering if you could help ( sorry for bothering you )
So school just finished and I’m on vacation for like 3 months so I really want to learn how to code ( I mainly want to make cool websites and stuff ). So I started to learn html and css but it just seems so overwhelming especially seeing all the ressources and tutorials online, could you please help me know what to learn first ? 💖

Hiya! 💗
Yeah, I can help! It can be overwhelming at first, but it's best to break it down into chunks and tackle them bit by bit.
For now, as a complete beginner, use these 3 resources:
HTML and CSS course video - LINK
W3School (for extra help) - HTML LINK | CSS LINK
MDN (for even extra help) - HTML LINK | CSS LINK
After that, work on projects to test your knowledge:
List of 11 projects to tackle - LINK
Here is the list of things you want to cover in HTML:
Basic structure
Tags and elements
Attributes
Forms
Semantic markup
Tables
The same but for CSS:
Selectors
Box model (margin, padding, border)
Typography (fonts, text properties)
Colours and backgrounds
Layout and positioning (floats, flexbox, grid)
Responsive design (media queries)
Transitions and animations
Now that you have a list of what you need to cover, tackle them one by one, making sure you understand the topic before you head over to the next. The video tutorial covers all of this and more. If you don't understand a bit in the video, stop and look on W3School and MDN for further understanding and then continue on with the video. Also, tackle the video slowing. Don't rush, don't do it, it'll just make the learning process even longer if you getting not understand things.
The resources I listed are my complete go-to. After that, as you've noticed, there are hundreds more. Go through the ones you need for the specific project you're working on or the topic you're studying only.
Hope this helps and good luck! 💻💗
#reources#coding#codeblr#programming#progblr#studying#studyblr#comp sci#tech#html#css#html css#coding resources
100 notes
·
View notes
Note
how would u recommend a beginner get into blender? Ima 2D art student but want to fill out my portfolio and it looks super fun and cool!
Yay I'm so glad you want to learn Blender!
Since you're studying 2D, you probably have a lot to learn and practice already. So I'll try to answer in a way that could benefit you the most in both practices.
You probably already heard Blender has a tool called "grease pencil" - it's a 3d object, but they also built it so that if you want to do regular 2D illustration or animation, you can do that too.
Learning grease pencil first could be a good way to familiarize yourself with Blender's interface. And because a lot of the toolsets share how they operate (for instance, adding modifiers to the stack is the same no matter if you're using a grease pencil object, curve, or 3D mesh), you can more easily move to different parts of the program later, like poly modeling or sculpting.
One really great tutorial for 2D Blender is this one by Kevandram - https://www.youtube.com/watch?v=nZyB30-xZFs
From there you can move into tutorials that combine 3D and 2D - or just start with this if you're really excited to learn 3D modeling. Again Kevandram has a really great tutorial for that - https://www.youtube.com/watch?v=ftBFjGy5z08
Something you'll wanna watch out for with Blender tutorials is the version they're using. If your version of Blender is newer, then maybe a button or menu a tutorial tells you to use might have moved. Or some functionality may have changed. Luckily since Blender is open source, they make all versions available to you here: https://download.blender.org/release/
Once you get more familiar with Blender, jumping between versions is easier. But for the sake of learning, if you find a really great tutorial that's using an older version, you can just use that version. You can have multiple Blender versions installed - right now I have 4.4, 4.1, 4.0, and 2.79. So for instance in Kevandram's Bakery Shop tutorial, he's using Blender 3.0 which you can get here - https://download.blender.org/release/Blender3.0/
If you're not interested in grease pencil, or just want to jump straight to 3d, this is a great beginner modeling tutorial from SouthernShotty - https://www.youtube.com/watch?v=C1CFWDWTamo
It mostly sticks to modeling and then gets into basic material stuff. A simplified order to learn things in 3d would be:
Poly/mesh modeling
Modeling with curves
Adding materials/using the shader editor
Unwrapping 3d objects / learning the UV Editor
Texture painting / Painting texture maps (using that unwrapped map from 4) in Blender or some other program (Krita if you want to paint on the 2d map itself. Procreate if you want to paint directly on the model although that'll require a tablet).
A lot of beginner tutorials will take you through steps 1-3 usually, and maybe throw in some basic animation, camera setup, lighting, and rendering. More intermediate/advanced topics would be rigging, animating rigged models, physics simulations, and geometry nodes.
To bring it back to how this could benefit you the most as a 2d artist - something I see a lot of people do is prototype in 3d, and use that 3d render as a base to paint over. Some people strictly use grey boxes, and some people actually model/texture/light certain things and then render that out in layers to use in their painting program later. You can use as much or as little 3d as you want to help 2d painting.
Here's a couple videos showcasing that type of workflow: https://www.youtube.com/watch?v=CHIZtZ2JU3A https://www.youtube.com/watch?v=W5GSyytbABo https://www.youtube.com/watch?v=r5ZyW7K_yP8
Those use Blender's cameras and lights, which you'll pick up as you do modeling/texturing tutorials. Later you can get more advanced with those as well as the different rendering engines within Blender.
This was a lot, but I hope it helps clarify where you can start, and ultimately what you could get out of using 3d!
3 notes
·
View notes
Note
Hey do you have any tutorials on how we can do model swap cutscenes?
I haven't personally made any model swap tutorials, but @flame2ashes has a great beginners tutorial to get started here.
You can also find resources over on the Legendary Explorer Wiki.
However, every scene is different, and I have no idea how to swap in character creator shepards, as Regis is a custom sculpt much like the default sheps. For example, Jack's scene worked right out of the box and had mostly no janky animations, save for a few expressions that looked "off." Miranda's scene... you can see my trials and tribulations here.
If you wish to make an NPC as Shepard mod, you can use this framework and tutorial.
6 notes
·
View notes
Text
From novice to master
Hey folks, this blog is my attempt at documenting my journey as a mini painter. From (almost) total beginner, to a competent painter.
This is born from the admittedly gut feeling that there isn't much content online about beginners in the hobby, and that people are turned off from painting because their models don't look as good as the box or what they have seen on a tutorial video.
In this blog you'll find the steps I take to increase my skill and technique, miniatures painted to a standard a beginner might achieve, and hopefully an increase in painting quality with every post.
Along the way, I'll explore various techniques, tools and resources that I find helpful.
Whether you're just starting out or you've been painting for a while, I hope this blog serves as both inspiration and guidance, showing that with dedication and practice, anyone can improve their painting skills and create miniatures that they are happy with.
3 notes
·
View notes
Text
Front end web developer skills you need to know
To become a successful front-end web developer, you’ll need a solid foundation in key skills. Mastering HTML & CSS is essential for creating the structure and style of websites.
JavaScript and ES6 add interactivity and modern functionality, while CSS & JS frameworks like Bootstrap and React streamline development.
Understanding GIT & GITHUB for version control and implementing responsive design ensures your projects work seamlessly across all devices.
In this article, we will review some of the key skills required for expert front web development.

Download Infographic
HTML & CSS
HTML (HyperText Markup Language) and CSS (Cascading Style Sheets) are the backbone of front-end web development. HTML structures the content of a web page, using elements like headings, paragraphs, links, and images.
CSS styles that content, controlling layout, colours, fonts, spacing, and responsiveness. Together, they allow developers to create visually engaging and well-structured websites.
Mastering HTML & CSS is crucial before moving on to more advanced topics like JavaScript or frameworks. You’ll need to understand concepts such as semantic HTML, CSS selectors, the box model, and media queries.
There are plenty of free and paid resources to help you learn. Great starting points include MDN Web Docs, W3Schools, and freeCodeCamp’s Responsive Web Design certification.
Platforms like Codecademy and Coursera also offer beginner-friendly courses. Practising by building small projects is one of the most effective ways to reinforce your learning.
JavaScript
JavaScript is a core technology of front-end web development, used alongside HTML and CSS to create dynamic, interactive websites. While HTML provides the structure and CSS handles styling, JavaScript enables user interaction by manipulating elements on the page in real-time.
It’s responsible for features such as form validation, image sliders, dropdown menus, modal windows, and dynamic content updates without reloading the page (using AJAX). JavaScript interacts with the Document Object Model (DOM), allowing developers to modify HTML and CSS based on user actions like clicks, scrolls, or keystrokes.
Modern front-end development often uses JavaScript libraries and frameworks such as React, Vue.js, or jQuery to streamline development and enhance functionality. Understanding JavaScript fundamentals is essential before diving into these tools.
There are excellent resources to learn JavaScript, whether you’re a beginner or looking to advance your skills. Top recommendations include JavaScript.info, MDN Web Docs, and freeCodeCamp. You can also find interactive tutorials on Codecademy, as well as comprehensive courses on platforms like Udemy and Coursera.
For in-depth understanding, the book Eloquent JavaScript is highly regarded in the developer community. Practising through small projects and coding challenges will solidify your knowledge.
ES6
ES6 (ECMAScript 2015) is a major update to the JavaScript language, introducing powerful new features that make coding more efficient and maintainable. It brought significant improvements to JavaScript syntax and functionality, including let and const for block-scoped variable declarations, arrow functions for cleaner, more concise function expressions, template literals for easier string formatting, and destructuring for simplifying data extraction from arrays and objects.
ES6 also introduced promises for better handling of asynchronous operations, modules for organising code into reusable components, and classes for a more structured, object-oriented approach to JavaScript development.
ES6 has become a standard in front-end web development, forming the backbone of modern frameworks like React, Vue.js, and Angular, where these features are heavily utilised to create fast, scalable, and maintainable web applications. It also improves code readability and reduces common bugs, making it an essential skill for front-end developers.
To learn ES6, great resources include MDN Web Docs, JavaScript.info, freeCodeCamp’s JavaScript course, and Codecademy’s interactive tutorials. The book Eloquent JavaScript also covers ES6 in depth, while platforms like Udemy and Coursera offer structured courses for more in-depth learning. Practising with real-world projects is the best way to master ES6.
CSS & JS Frameworks
CSS and JavaScript frameworks play a vital role in front-end web development by streamlining the coding process and reducing development time.
CSS frameworks like Bootstrap, Tailwind CSS, and Foundation provide pre-written CSS classes and components for creating responsive layouts, navigation menus, buttons, and more. They help ensure consistent design and save developers from writing repetitive code.
JavaScript frameworks such as React, Vue.js, and Angular offer structured approaches to building interactive user interfaces and managing complex application states. These frameworks simplify DOM manipulation, improve performance, and enable the creation of reusable components.
By using these frameworks, developers can build modern, responsive, and scalable web applications more efficiently.
To learn CSS frameworks, explore the official documentation for Bootstrap or Tailwind CSS, as well as tutorials on freeCodeCamp and W3Schools. For JS frameworks, the React and Vue.js official docs, MDN Web Docs, Codecademy, and Scrimba offer excellent learning paths.
GIT & GITHUB
GIT and GitHub are essential tools for front-end web developers, enabling efficient version control and collaboration. GIT is a distributed version control system that tracks code changes, allowing developers to manage project history, revert to earlier versions, and work on multiple features simultaneously using branches.
GitHub is a cloud-based platform that hosts GIT repositories, making it easy for developers to collaborate, share code, and contribute to open-source projects. It also offers features like pull requests, code reviews, and issue tracking to streamline development workflows.
In front-end web development, GIT and GitHub are used to manage code for websites and applications, ensuring version control and seamless collaboration. They also make it easy to showcase projects in a professional portfolio.
To learn GIT and GitHub, consider GitHub Learning Lab, freeCodeCamp, Codecademy, and MDN Web Docs. Platforms like GitHub Docs and GitKraken also provide excellent guides and tutorials for beginners.
Responsive Design
Responsive design is a crucial aspect of front-end web development, ensuring that websites look and function well across a wide range of devices, from mobile phones to large desktop screens.
It focuses on creating flexible layouts, images, and components that automatically adjust to different screen sizes and orientations. This approach enhances user experience, boosts SEO, and reduces bounce rates by delivering a consistent browsing experience, regardless of the device.
Responsive design relies on key techniques like media queries, flexbox, and CSS grid to control the layout and structure of a website. Fluid grids and responsive images ensure content scales appropriately, while mobile-first design prioritises smaller screens before scaling up to larger devices.
Many front-end frameworks, like Bootstrap and Tailwind CSS, include built-in responsive design features, making it easier to create flexible layouts.
In modern front-end development, responsive design is essential, as mobile traffic continues to grow. It’s a core requirement for building professional websites and web applications.
To learn responsive design, consider resources like MDN Web Docs, W3Schools, and freeCodeCamp’s Responsive Web Design certification.
Books like Responsive Web Design with HTML5 and CSS by Ben Frain and platforms like Codecademy also offer comprehensive tutorials.
Building small projects and experimenting with media queries is a practical way to master this vital skill, ensuring your web pages deliver a seamless experience across all devices.
Conclusion
Mastering front-end web development skills like HTML & CSS, JavaScript, ES6, CSS & JS frameworks, GIT & GitHub, and responsive design is essential for building modern, high-performing websites.
These skills form the foundation of interactive, responsive, and visually appealing web pages. By leveraging powerful frameworks and adopting best practices, you can streamline your workflow and create exceptional user experiences.
With countless online resources available, from MDN Web Docs to freeCodeCamp, there’s never been a better time to start your front-end development journey. Keep practising, stay curious, and continue expanding your skill set to become a proficient developer.
Article first published: https://dcpweb.co.uk/blog/front-end-web-developer-skills-you-need-to-know
0 notes
Text
What Weekend Campers Should Know About Choosing the Right Tent

Spending a weekend under the stars sounds perfect—until you’re stuck in a leaky tent or wrestling with poles at midnight. If you've had that experience, you know how vital it is to pick the right camping gear. One essential? A reliable tent. That’s where the Camping Tent by Himmaleh comes in with exactly what weekend campers need—practical features without the fluff.
Why a Weekend Camper Needs a Special Kind of Tent
Not all tents are made equal. If you're camping for just a couple of nights, you want gear that’s easy to handle, quick to set up, and built to take whatever the weather throws at you. The Camping Tent by Himmaleh checks all those boxes.
No Time? No Problem.
Most weekend campers are packing their gear on a Friday night and setting up at dusk. You don’t want a tent that takes half your evening to pitch. With a quick setup design, the Camping Tent by Himmaleh is perfect for late arrivals and last-minute getaways.
Lightweight Without Sacrificing Strength
Even if you’re car camping, a heavy, bulky tent is still a hassle. This model is lightweight and compact, which makes carrying, packing, and setting it up much easier. Yet it’s strong enough to hold firm during windy nights or unexpected rain.
Handles the Weather—Even If You Don’t Plan For It
Let’s face it: most weekend campers don’t always check the forecast down to the hour. You might get sunshine one minute and rain the next. That’s why the Camping Tent by Himmaleh includes a waterproof rainfly, sealed seams, and a durable base to keep you dry through it all.
Designed With Comfort in Mind
After a day of hiking, cooking, and relaxing around the fire, you want a tent that’s cozy, not cramped. The Camping Tent by Himmaleh offers enough space to stretch out and stash your stuff—without turning your sleeping area into a storage closet.
Ventilation That Doesn’t Let You Down
Good airflow in a tent makes a huge difference. It helps prevent that muggy, sticky feeling in the morning and cuts down on condensation. Mesh panels and built-in vents allow the Camping Tent by Himmaleh to breathe, even if you're zipped in for the night.
Built for Quick Getaways
Packing up should be just as easy as setting up. This tent folds neatly into its storage bag without needing a full tutorial. The compact size means it won’t eat up trunk space—leaving room for your cooler, chairs, and sleeping bags.
Great for Solo Trips or Plus-One Adventures
Whether you’re flying solo or camping with a friend, this tent adjusts to your needs. It offers room for one or two campers and even has space for your gear to stay dry and organized outside your sleeping area.
Durable Construction That Lasts Beyond One Trip
The worst thing? Buying a tent that’s only good for one use. This isn’t that kind of tent. With strong stitching, quality zippers, and sturdy poles, the Camping Tent by Himmaleh is built to last through many weekends of camping fun.
Setup Instructions That Actually Make Sense

Ever get a tent with instructions that might as well be written in a secret code? This one’s different. Clear instructions, simple components, and a user-friendly layout make setup a breeze—even for beginners.
Looks Good, Too
Okay, it’s not the most important thing—but we all appreciate gear that doesn’t look like a leftover from the ’90s. The sleek design and muted colors of the Camping Tent by Himmaleh blend well with natural surroundings and don’t scream “newbie camper.”
Conclusion
Weekend camping should be fun, not frustrating. Whether you’re heading to a national park or setting up in your backyard, the right tent can make all the difference. The Camping Tent by Himmaleh brings together ease, comfort, and reliability—making it a perfect pick for your next quick escape into nature.
FAQs
1. Is this tent suitable for winter camping? Not ideal for heavy snow or freezing conditions, but great for spring through fall.
2. How long does setup usually take? You can pitch it in under 10 minutes with no help.
3. Can I use it for solo camping? Absolutely. It’s lightweight and compact, perfect for one camper.
4. What size sleeping bag fits inside? It fits standard and large sleeping bags comfortably for two people.
5. Does it include a storage bag? Yes, it comes with a compact, easy-to-carry storage bag.
1 note
·
View note
Text
Why Python is the Go-To Language for Data Science (And How You Can Start Learning It Today)
If you’ve been exploring the world of data science, you’ve probably come across one name over and over again: Python.
But why does Python hold such a dominant place in the data science ecosystem? And more importantly — how can you start learning it today, even if you’ve never written a line of code before?
Let’s break it down.
The Power of Python in Data Science
Python isn’t just popular by chance. It has specific qualities that make it the perfect match for data science:
1. Easy to Learn, Easy to Read
Python is designed to be readable and beginner-friendly. Even people with zero programming background can start understanding basic Python code within a few days. This simplicity makes it ideal for people transitioning into data science from non-tech backgrounds.
2. Massive Libraries for Data Work
Python has a rich ecosystem of libraries that are tailor-made for data science tasks:
Pandas: for data manipulation
NumPy: for numerical computing
Matplotlib/Seaborn: for data visualization
Scikit-learn: for machine learning
TensorFlow & PyTorch: for deep learning
You don’t have to build everything from scratch — Python gives you powerful tools right out of the box.
3. Strong Community Support
Python has one of the largest programming communities in the world. That means no matter what problem you’re facing, someone else has likely faced it too — and shared the solution online. You’ll never feel lost.
4. Flexibility Across Domains
Python isn’t just used in data science. It’s also big in web development, automation, AI, cybersecurity, fintech, and more. So learning Python doesn’t limit your career — it expands it.
Real-World Data Science Tasks You Can Do with Python
Once you pick up the basics of Python, you’ll be amazed at the kind of projects you can build:
Analyze customer purchase data to identify trends
Build a machine learning model to predict house prices
Visualize COVID-19 trends using live data
Automate Excel reports for your company
It’s like giving your career a superpower.
How to Start Learning Python (the Smart Way)
The key to learning Python for data science isn’t to memorize syntax. Instead, learn by doing.
Start with:
Writing small scripts
Working on mini data analysis projects
Playing with real datasets
Watching hands-on tutorials
The good news? You don’t need to pay anything to get started.
🎥 Watch This Free YouTube Course on Data Science with Python This beginner-friendly course will walk you through:
Python basics
Data analysis with Pandas
Data visualization
Real-world projects and use cases
👉 Click here to watch it now
Whether you're a student, working professional, or just someone curious about data — this course is a perfect launchpad into the world of Python and data science.
0 notes
Text
Agile Scrum Tutorial: Beginner's Step-by-Step Guide
With the speedy nature of the contemporary digital age, creating quality products timely and effectively is one of the top priorities of organizations. Agile Scrum is one of the most favored models of managing intricate projects, especially software development. This beginner's step-by-step guide is meant for those who wish to learn about Agile Scrum, how it operates, and how it can be utilized. What is Agile? Agile is a philosophy of project management that focuses on people and interactions, working software, customer collaboration, and responding to change rather than to strict processes and documentation. It's all about adapting, being flexible and co-operative in an attempt to produce better outcomes. The Agile Manifesto (2001) focuses on: • Early and continuous delivery to achieve customer satisfaction. • Embracing change, even at a late development stage. • Regular delivery, from a number of weeks to a number of months. • Collaboration closely with cross-functional groups. What is Scrum? Scrum is a light-weight process under Agile that enables groups to collaborate on complex problems. It offers an organized way to plan, do, and review work in short, manageable bits known as sprints. Scrum assists teams to: • Remain productive and on-target • Communicate effectively • Deliver value in increments • Improve their process continually
Core Scrum Roles Scrum defines three fundamental roles, which have varying roles: 1. Product Owner (PO) • Voice of the customer/stakeholder • Prioritizes the work through the Product Backlog • Ensures that the team develops the right product 2. Scrum Master • Coach and facilitator • Removes obstacles that stand in their way • Ensures that Scrum practices are being performed correctly
3. Development Team • Cross-functional members (developers, testers, designers, etc.) • Offers working increments at the end of sprint Scrum Artifacts There are three substantial artifacts in Scrum that allow for structure and coordination of work: 1. Product Backlog • An ordered list of improvements, fixes, features, and tasks • Controlled and managed by the Product Owner • Constantly updated and refined 2. Sprint Backlog • A small portion of the Product Backlog • Selected by the team at Sprint Planning • A work representation to be done for the current sprint 3. Increment • The sum of all finished Product Backlog items at the end of a sprint. • Must be potentially shippable and meet the Definition of Done.
Scrum Events (Ceremonies) There are five principal Scrum events that structure the workflow: 1. Sprint • Time-boxed iteration, typically 1–4 weeks • Work is planned, executed, and inspected • Heartbeat of Scrum 2. Sprint Planning • Held at the start of every sprint • Team decides what to do (from the backlog) and how to do it • Driven by the Sprint Goal 3. Daily Scrum (Stand-up) • Short (15-minute) daily meeting • Team members answer: o What did I do yesterday? o What am I doing today? o Are blockers there? 4. Sprint Review • Performed at the conclusion of the sprint • Increment is showcased by the team to stakeholders • Feedback is gathered and resolved in the Product Backlog 5. Sprint Retrospective • Followed right after the Sprint Review • Meeting with the team only to review the sprint • What was working, what was not, and how it could be enhanced
Step-by-Step Guide to Getting Started with Scrum Let's break it down into actionable steps: Step 1: Define the Problem Before you adopt Scrum, define exactly what problem you're solving, your product vision, and who your stakeholders are. Step 2: Develop Your Scrum Team Build a small, cross-functional team with: • A Product Owner • A Scrum Master • Developers, designers, testers, or others necessary to bring the product to market Step 3: Develop a Product Backlog The Product Owner works with stakeholders to: • List all required features or tasks • Express them as User Stories (e.g., "As a user, I want to log in securely") • Prioritize by value, risk, and dependency Step 4: Plan the First Sprint During Sprint Planning: • Select a decent amount of work (not excessive) • Define a Sprint Goal • Split stories into lesser tasks Step 5: Execute the Sprint • Begin the sprint and conduct daily stand-up meetings • Refresh the Sprint Board (physical or electronic such as Jira, Trello, or Azure DevOps) • frequent communication Step 6: Inspect the Work At the end of the sprint: • Show the finished increment in the Sprint Review • Collect feedback from stakeholders Step 7: Reflect and Improve Conduct a Retrospective with the team: • What went well? • What can we improve? • What shall we attempt next time? Step 8: Repeat Begin the next sprint based on lessons and feedback learned from the previous one. As time passes, your team is more efficient, responsive, and attuned to customer requirements.
Scrum in Action: A Simple Example Assume that you are creating a food delivery smartphone app. • Product Owner develops a backlog: login system, restaurant listings, order tracking, payment integration. • For the first sprint, the group chooses "restaurant browsing" and "user registration." The team reviews daily progress during stand-ups. • They show an operational prototype of these features at the end of the sprint. • Feedback is added to the review in the backlog. • The team discusses and decides to improve communication throughout the next sprint.
• Incremental development of every sprint is done until the application is finished. Scrum Best Practices for Beginners • Keep your sprints short and focused • Highlight value delivery over task achievement. • Use computer software (e.g., Jira, Trello, ClickUp) to monitor work • Make retrospectives pay off — they are the secret to ongoing improvement • Maintain the Product Backlog clean and up-to-date • Emphasize cooperation and transparency Common Errors to Evite • Bypassing retrospectives or glossing over them • Scheduling too much in sprints • Micromanaging subordinates • Lack of stakeholder involvement • Misunderstanding of the role of Scrum Master (no, not a project manager!) Conclusion Agile Scrum is not a process—It's an attitude. It encourages collaboration, swift feedback, and ongoing improvement. It seems process-oriented to new people, but it becomes second nature once you dive in. By starting small, staying focused, and accepting change, your team can leverage the strength of Agile Scrum to deliver higher-quality products faster and with more satisfaction. Whether you're creating a mobile app, running a software product, or leading a creative project, Scrum can help you stay on track and in sync with what's most important: creating value for your users.
Website: https://www.icertglobal.com/course/agile-certified-practitioner-certification-training/Classroom/47/3614

0 notes
Text
Python Programming & Machine Learning: Must-Take Courses in 2025
If you’ve been thinking about learning to code or diving into the world of artificial intelligence, there’s one language you’re bound to come across: Python. It’s clean, powerful, and incredibly beginner-friendly. Pair that with machine learning, and you’ve got one of the most future-proof skillsets out there.
Whether you're a student planning your next career step or a professional looking to stay ahead of the curve, now’s the perfect time to explore the world of Python programming and machine learning—especially with 2025 shaping up to be another big year for AI and automation.
Why Python Is Still the Best Starting Point
Let’s keep it simple: Python is easy to learn and powerful enough to build complex systems. It’s used in everything from web development and automation to data analysis and machine learning.
Here’s why Python is a great first language:
Readable syntax: No weird symbols or confusing punctuation
Huge community support: Forums, tutorials, and libraries galore
In-demand skill: Companies are hiring Python developers across industries
Foundation for ML & AI: Most machine learning libraries are built for Python
And if you're completely new, starting with basic Python programs for beginners helps you build a solid foundation without feeling overwhelmed.
Why Pair Python with Machine Learning?
Python and machine learning are a natural match. Once you’re comfortable writing code, you can start using it to train models, analyze data, and even predict outcomes.
Here’s why it’s a powerful combo:
Machine learning needs data. Python helps you collect, clean, and analyze it.
Libraries like scikit-learn, TensorFlow, and Keras make it easier to build ML models
Real-world applications: Fraud detection, recommendation engines, sentiment analysis, and more
Career options: ML engineers, data scientists, AI specialists—all rely on Python
So if you’re serious about future-proofing your career, finding a python machine learning course should be at the top of your list.
What to Look for in a Python & ML Course
There are tons of online courses out there—but not all of them deliver real, practical knowledge. A good course should take you from basics to building projects with confidence.
Here’s what to look for:
Beginner-friendly modules: Especially if you're new to coding
Hands-on coding exercises: You should write actual code, not just watch lectures
Machine learning fundamentals: Supervised/unsupervised learning, model evaluation, etc.
Real-world projects: Build something you can showcase on GitHub or your portfolio
Tool training: Exposure to Jupyter Notebooks, Pandas, NumPy, and ML libraries
Mentor support + certification: Helpful for job seekers and career changers
Why NIIT Digital is a Top Pick for 2025
If you’re looking for a program that balances basic Python programs for beginners with in-depth machine learning content, NIIT Digital checks all the boxes.
Here’s what makes it a great option:
Step-by-step learning: Starts from Python basics and gradually builds up to machine learning
Live instructor-led sessions: Get real-time guidance from experienced professionals
Hands-on projects: Apply what you learn with practical use-cases and datasets
Industry-aligned curriculum: Learn tools and techniques used by professionals
Certification: Stand out with a certificate that validates your skills
Career support: From resume help to job connections, they’ve got your back
👉 Check out NIIT Digital’s Python & Machine Learning Programs
Whether you’re aiming for your first tech job or adding skills to your current role, this course is built to help you grow.
Who Should Take These Courses?
Here’s the best part—you don’t need to be a math wizard or a seasoned developer.
You’re a great fit if you’re:
A college student interested in AI or software development
A working professional looking to switch to a tech career
A curious learner who wants to understand how smart tech works
If you’re open to learning and willing to practice, Python and ML are 100% learnable—and super rewarding.
Final Thoughts
With AI continuing to dominate tech trends, the demand for professionals skilled in Python and machine learning is only going up. If you’re serious about riding this wave in 2025, now is the time to start learning.
Look for a course that doesn’t just “teach”—it guides you, supports you, and prepares you for the real world. Platforms like NIIT Digital do exactly that with their blend of structure, support, and career-focused content.
So go ahead—start small with basic Python programs for beginners, then level up to a full-blown python machine learning course. Your future self will thank you.
0 notes
Text
Exploring Webflow’s Pros and Cons
Did you know that 68% of website visitors will leave a site if it’s not mobile-friendly or loads too slowly? With Webflow, you can easily create a site that’s fast, responsive, and visually stunning.
But is it the right choice for you? Let’s dive into what Webflow developers have to say regarding the pros and cons of Webflow to help you decide.
What is Webflow?
Design, functionality, and… No code at all. Webflow is a versatile tool. It combines all it takes to make modern websites without any programming expertise.
Here's a more specific breakdown of what it has to offer:

Clean code, hosting, and other technical complexities are handled by Webflow — you can focus on creative freedom. A business website, a personal portfolio, or a full-scale ecommerce store — the tool of this kind has it all.
Weighing the Benefits and Drawbacks of Webflow CMS
Below, I’ll explore its main pros and cons through examples and insights to help you decide whether it’s the right choice for your next project.
Pros of Webflow CMS
Clean Code and SEO Optimization
Benefit: Webflow generates clean code. That results in perfect page loading speed and SEO-friendly structures like meta tags and meta descriptions.
Fact: Websites built with Webflow score high on Google Lighthouse for performance and accessibility.
Design Flexibility & Custom Animations
Benefit: Webflow’s design tool offers unmatched flexibility. That means creators can craft custom animations and interactive animations.
Example: A SaaS company can use Webflow to showcase their features through scroll-based animations to improve user engagement.
No-code Platform for Custom Websites
Benefit: Webflow allows you to build websites with a drag-and-drop interface. It’s perfect for those without coding knowledge.
Example: A freelance graphic designer without HTML skills can easily create a portfolio with interactive elements like animations and galleries.
Fact: Over 3.5 million designers and teams use Webflow platforms for diverse projects.
Ecommerce and Scalability
Benefit: Webflow’s e-commerce plan allows businesses to create scalable online stores. Enterprise plans cater to larger organizations that might need some advanced features.
Example: A small retail shop can start with Webflow Ecommerce and scale as sales grow.
Integrated Hosting and Free SSL Certificate
Benefit: Hosting is built-in. Besides, Webflow offers a free SSL certificate for secure connections and seamless live site management.
Example: An entrepreneur launching a business website can go live without the hassle of external hosting.
Responsive Designs for All Devices
Benefit: Webflow offers responsive layouts for desktop, tablet, and mobile without extra effort.
Example: A blog post or landing page designed in Webflow looks great on any screen size.
Cons of Webflow CMS
Costly for Smaller Projects
Challenge: Compared to other platforms, Webflow’s pricing is higher. Its free plan is limited. Features like form submissions require paid plans.
Example: A hobby blogger might find it expensive to upgrade for custom domains and more storage.
Dependence on Webflow Hosting
Challenge: Sites built with Webflow can only be hosted on its platform. That limits flexibility for developers wanting external hosting options.
Example: Businesses looking for unique server configurations might find this restrictive.
Limited Plugins and Third-party Integrations
Challenge: Unlike WordPress, Webflow lacks an extensive plugin ecosystem.
Example: Integrating advanced marketing tools often requires custom code or third-party services.
Steep Learning Curve
Challenge: While the platform is a no-code tool, mastering its advanced features like custom animations or CMS setup requires a basic understanding of design principles.
Example: Beginners may struggle to understand Webflow’s box model or advanced CSS capabilities.
Insight: Webflow provides extensive tutorials, but time investment is necessary.
No Backend User Roles
Challenge: Managing multiple sites with varying access levels for editors and admins is more complex compared to traditional content management systems.
Example: A team working on a business website might face challenges in assigning granular permissions.
Table: Pros and Cons at a Glance

Conclusion
Webflow CMS offers powerful tools for content management systems and website creation, but it comes with trade-offs like pricing and a steeper learning curve.
Use this checklist to evaluate if Webflow CMS aligns with your needs and goals.
1. Your Technical Skills and Team Setup
Do you have a basic understanding of HTML, CSS, and design tools, or a team with coding knowledge?
Are you comfortable working with a drag-and-drop interface for design?
Will your team benefit from a no-code platform to streamline development?
2. Your Project Requirements
Are you creating a business website, landing pages, or a blog post series?
Do you need advanced features like custom animations, interactive elements, or an e-commerce plan?
Does your project involve managing multiple sites or an enterprise-level solution?
3. Budget and Scalability
Does your budget allow for Webflow's pricing tiers, including free plans and enterprise plans?
Do you require features like form submissions or a free SSL certificate included in paid plans?
Will your site grow to need custom code integration or scalable content management?
4. Your Design and Branding Needs
Are you looking for a design tool that prioritizes flexibility and visual control?
Do you plan to create interactive animations or custom animations that enhance user experience?
Is maintaining a clean code output important for performance and SEO?
5. Your Time and Learning Curve
Do you have the time to overcome Webflow’s learning curve?
Are you seeking a platform that allows you to create websites faster than traditional coding?
Will you benefit from Webflow’s templates for a quick start on your next project?
If most of your answers align with Webflow’s features, it might be your perfect match. No? Explore other content management systems.
0 notes