#60st
Note
Indica seus tumblr's favoritos?
@desonestos @eastsid-e @sexands @seufaixa @sr-theofilos @horizonteador @excorpiano @putassu @neuroxtic @zonaurbanz @coturnos @serginnoobreserva @ccaloree @fuckless @babestxx @thurgis @shwnty @erotyc @1he4rt @periigozo @maleficariun @omeumundo-07 @fs10101-3 @rapaizee @eai-peu @acerv-0 @rapaziou @sintoso @pqpgaroto @malan-dra @clandestin00 @madeinvila @bevsff @orlarap @cortejador @paul1st4-011 @lleft @g4bdo100 @arianoperdido @intensidade-carioca @teu-negro @lasciviusblog @60st
E tem muitos outros. Mas esses são os que estou acompanhando
55 notes
·
View notes
Note
Hi! I've been following you for a while and I hoped you could help with a knitting problem I have
I'm trying to make the Goya wristwarmers by Alexandra Brinck. The pattern says to cast on 58 stitches but later on when the leaf motif starts it seems like 2 more stitches are needed. At first I thought I kept messing up the stitch count (not unlikely at all) but now I don't know what I'm missing
So the pattern says to (k1tbl, p1)x6, k1tbl, k6, work 19 stitches with the leaf motif, k6, (k1tbl, p1)x7
Here's the chart
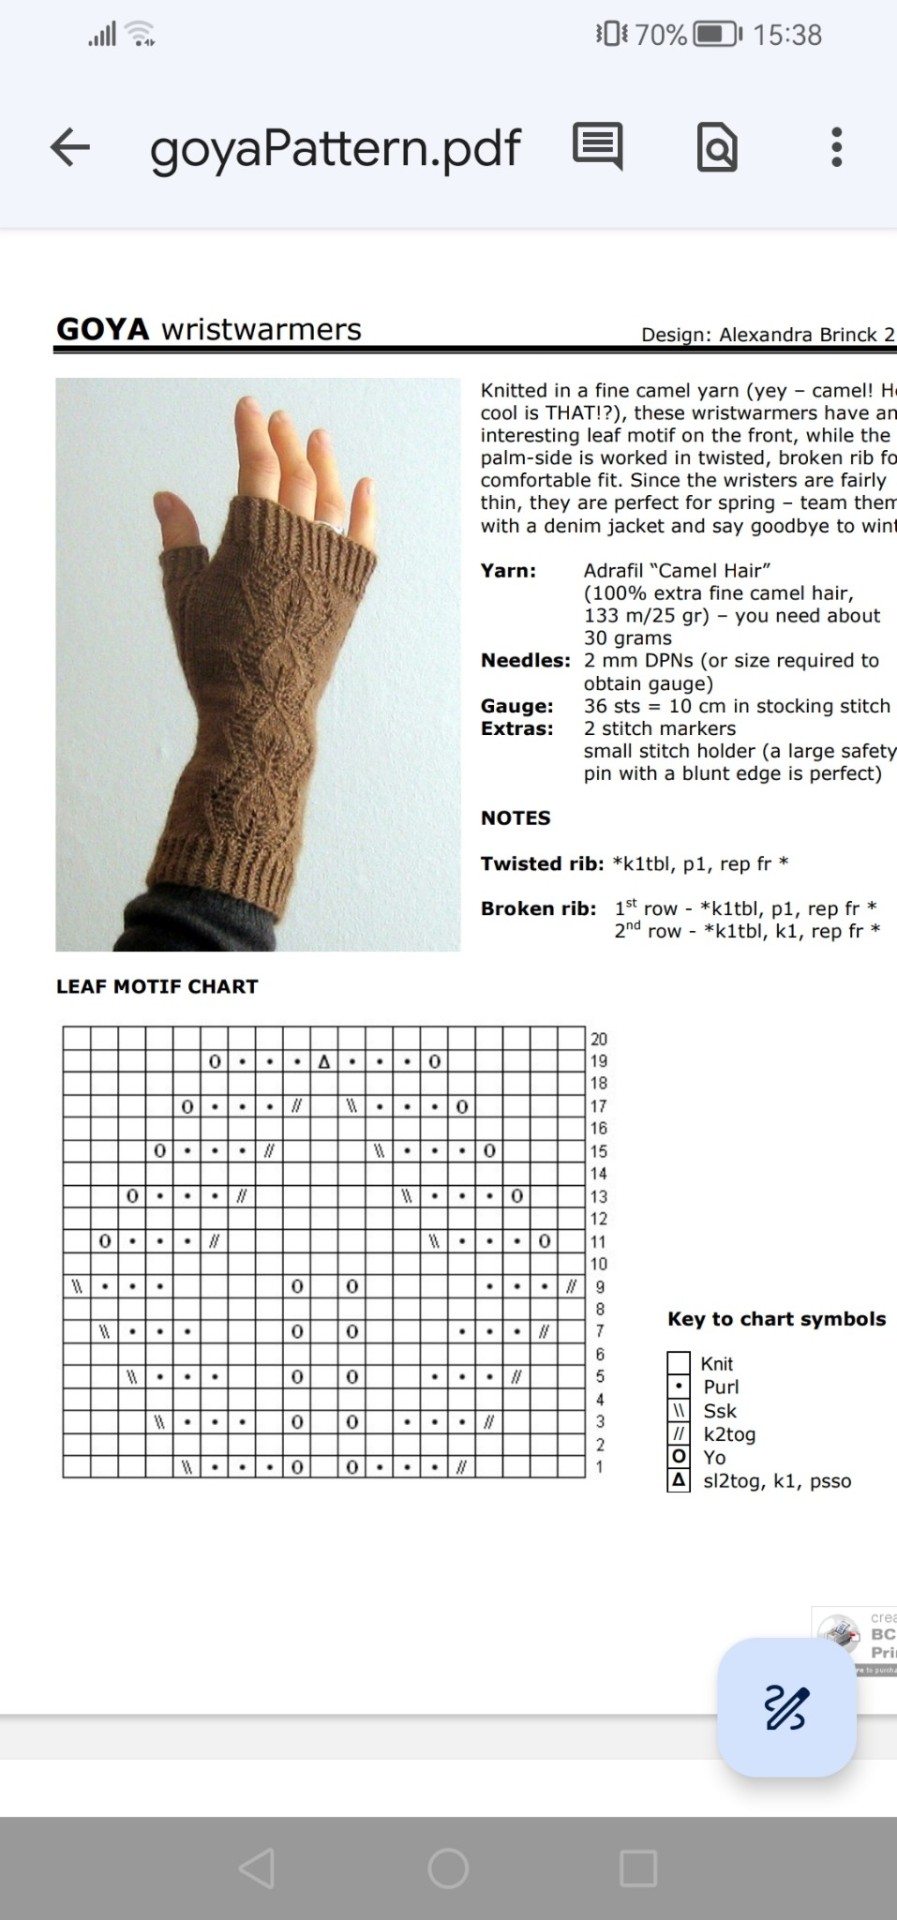
Now since there are a k2tog and a ssk wouldn't that be 21 stitches in total? If I add those two extra stitches I get a total of 60 around. Am I missing something?
I'm sorry for the random ask, you're one of the most active knitting blogs I follow and I hoped you or someone who follows you might be able to help
(also I love the reference in your blog description)
Hiii I would love to!
So looking at this: 'So the pattern says to (k1tbl, p1)x6, k1tbl, k6, work 19 stitches with the leaf motif, k6, (k1tbl, p1)x7'
Total = 58 stitches, with 19 for the leaf, but as you noted the leaf motif is 21 stitches wide, not 19
I havent read through the pattern myself so dont know if it's been tech edited or how much you trust the designer, but it could be a flub
Personally what I'd do would be
Step 1: is it a flub?
Check the gauge, does the pattern say what the circumference of the wristwarmer should be? 3.6sts/cm would mean that
58sts = 16.11cm
60sts = 16.67cm
Step 2: how many to cast on?
If the gauge tells you it should be 16.67cm, I'd change the '(k1tbl, p1)x6' to '(k1tbl, p1)x7' to have a total of 60sts
If it should be 16.11cm, it would be an easy fix. On either side of the leaf motif you have k6 with presumably nothing exciting going on (it doesnt look like they're involved in the thumb gusset), so you can change them to a pair of k5's instead (sacrifice one on either side to give to the leaf motif) and have 58sts total
(Alternatively, you can measure your hand and see what measurement's closest to what you want, then adjust the ribbing accordingly)
Step 3 (after taking a closer look at the chart and photo):
I straight up think the chart's wrong lol. I'm assuming you can have a better look than I can, but count the yarn overs in the photo! I can only see four increase rows per leaf! The chart says there are *five*. That would explain why the cast on would ask for 19 stitches - if there are only four yarn overs per leaf, you can cut out the 9th - 12th rows and you'll have a 19 stitch wide chart because the k2tog/ssk won't be there
Either way you go, you're definitely not counting wrong!
(also ty that tweet lives in my head rent-free lol)
22 notes
·
View notes
Text
Skapa en hållbar trädgård med pimpsten | Thujor.se
Förvandla din trädgård med kraften i pimpsten! Denna naturliga sten är en trädgårdsmästares bäst bevarade hemlighet, förbättrar markstrukturen, förbättrar dräneringen och främjar sund rottillväxt. Införliva pimpsten i dina trädgårdssängar för att skapa en optimal miljö för växter att trivas naturligt. Upptäck pimpstens underverk för hållbar trädgårdsskötsel idag!
Besök nu: https://thujor.se/products/hasselfors-pimpsten-4-liter-60st-helpall-fraktfritt
0 notes
Text
Selbstständiger Elektriker ist frei. Elektriker sucht Aufträge Ganz DE
Guten Tag.
Ich bin Elektriker (Elektrofachkraft) fur Gebaude aus Tschechien, mit professionelle Erfahrung mehr als 22 Jahre, arbeite als Subunternehmer in Deutschland, Österreich und Tschechien , suche eine langfristige Arbeit bei einem Elektroinstallationsunternehmen.
Ich gut verstehe Tschechisch, Slowakisch, Russisch, Ukrainisch.
Polnisch und Deutsch verstehe schlecht.
In Tschechien ich arbeitete als Bauleiter-Elektriker bei Developer.
https://www.youtube.com/watch?v=vDm2IjBd-1k
Wohnungen, Geschäfte, Häuser, Büros, Schulen...
Ich habe Auto, Führerschein Kategorie B, Steuernummer in Deutschland und Tschechien.
Steuern, Versicherung, Reisekosten, Unterkunft, Hand - und Akkuwerkzeug bezahle ich selbst.
Nur offiziell.
Gehalt jeder Woche.
60St./Wo. - 260St./Mon.
Ich habe alles Dokumenten fur Arbeit in Deutschland als selbständiger Elektriker.
https://elektromontazniprace.info/cz/galerie/dokoncene
--
Mit freundlichen Grüßen
Herr Oleg Smit
(DE)Steuernummer 214 195 26 182
(CZ) IČ: 274 53 120
Tel.: CZ +420 608 662 897
www.elektromontazniprace.info
Read the full article
0 notes
Text

Socks!
The main yarn is West Yorkshire Spinners Signature 4ply in Passion Fruit Cooler, with Regia 4ply in Yellow as the contrast yarn. I managed to perfectly match up the stripes which is so pleasing and I think they look great!
This time I decided to make the socks a bit snugger by reducing the number of stitches and used the Rye Light on Ravelry, as it has quite a few different stitch quantities.

I went down to 60 stitches for the foot, with gauge 9st/inch on 2.75mm needles, and made the foot 22.5cm long with worked out to 63 rows + 17 toe.
Now the weirdness on these socks is that 60st cast on is too small to fit over my heel, so I actually cast on 70st, then decreased 1st per row on the cuff. It looks kinda weird, but it works. I was really struggling to find any information online about how people deal with this issue, because with Old Norwegian cast on it simply isn't stretchy enough.


After wearing these for a day, I think these feel a bit better in terms of fit, although I feel like it's still not quite right... but quite frankly I'm almost tearing my hair out trying to figure out exactly the right method to get the fit just right. These socks seem to fall down off my heel slightly, which I've read means they are too short, but they are actually longer than recommended (which is 10% less than foot length).
The funny thing for me with my sock knitting is that I seem to use such a tiny amount of yarn. I've made 2 pairs out of this WYS yarn (admittedly using contrast yarn for cuff & toe for both and the leg is quite short) and I STILL have about 30g of yarn left (that's about enough for another pair!). What is going on here??

Hey where tf did that HOLE in the side of my sock come from???
#knitting#sock knitting#knitblr#I think soon i'll make a start on some winter socks... currently seeking advice on how to make those#I'm thinking either two 4ply yarns held together or getting some 6ply or DK... possible pattern hacking imminent
6 notes
·
View notes
Note
Indica Tumblr ?
Sim @belpar @kitty @barbiemarola @zzonna @enphanty @5tn @05h55 @musazona @rolenabarra @centroesth @malandrona @tripx @staflawless @ofmaluhia @baforando @eladosul @9tnt @svpremer @chillx @coracao-granada @cofanie @uibrava @lpgangx @ilhanorte @owchefia @apontepralua @alteradona @drouxer @esgotada @thurgis @meliantte @bonequei @zonadrp @caralhizada @155k @lokinha @mamix @mamiboss @laricaforeverr @luadrop @fodiadora @60st @ohlibriana @um-pudim @julyabrg @soufadinha @venerais @swlfxx @portodecalma @quebadbabe
67 notes
·
View notes
Note
oiii, indica tumblr por favor kkkkkk só tem mulher nesse cabaré
a gente que domina a porra toda mexxxmo KKKKK vou te indicar uns que segui recentemente e os que curto bastante, vou esquecer um monte de gente então já peço perdão
@xslowly @lleft @zoneurbans @caralhouss @sheputa @o-malvadao @neuroxtic @shwnty @legnd @microsaia @thurgis @thorturado @transflorecer @puteiradin @tuadiaba @mamix @droppex @drouxer @marfioso @larcarioca @vibemalandro @portodecalma @baltt @waither @e-s-g-o-t-a-d-o @d-anada @babbesx @opatrulheiro @zonalast @zonadsossego @apontepralua @srsagaz @enfezada @litoralizei @sereiaax @17it @staflawless @uai-mineira @lokinha @rapaziou @surrtadinha @uscocain @luadrop @domfudedor @caozatico @pazdorio @pdpx @partedoluar @innsan-o @eudonjuan @maredrop @ousadaz @brizar @alcoolattra @27d10 @srpescador @mansafuria @xavozo @jovemcarioca @ondasdvibe @prepositarei @aricina @donadluar @donadabocca @fodiadora @wildngoldx @goldvibez @versaccy @ujsz @60st @lovdy @usfleck eeee cansei
149 notes
·
View notes
Photo


hey guys! Here’s that pattern for the fingerless plaid gloves I said I would post!
if anyone makes these or uses my pattern, send pics! I wanna see!
These gloves have a main body of reversible plaid in 5x6 squares (aka 10x6 if you consider the purls that make the reverse side).
I assume you know how to knit reversible with two colors (In which you knit with the color you want to appear towards you and purl with the color you want on the opposite side, bringing both strands of yarn across with every switch). These gloves are small, and they were snug on me when I first finished them. They will loosen up, but I cannot guarantee them fitting larger hands nor can I guarantee the pattern still working with a greater amount of stitches.
Things might get confusing up in here
Worsted weight yarn
US3 knitting needles
k1=knit one
p1=purl one
r=red
b=black
Main Body:
0. Cast on 60st red (60)
1. (k1 with both colors ONLY AT BEGINNING OF ROW/k1 red, p1 black, k1 red, p1 black, k1 red, p1 black, k1 red, p1 black, k1 red, p1 black; k1 red, p1 black, k1 black, p1 red, k1 red, p1 black, k1 black, p1 red, k1 red, p1 black) x3 finish with purl in both colors. Turn work(60)
2. (k1 with both colors ONLY AT BEGINNING OF ROW/k1r,p1b,k1b,p1r,k1r,p1b,k1b,p1r,k1r,p1b; k1b,p1r,k1b,p1r,k1b,p1r,k1b,p1r,k1b,p1r) x3 finish with purl in both colors, turn work (60)
3-6. Repeat rows 2-3. this completes one “row” of color. (60)
7. (k1 both colors/k1b,p1r,k1r,p1b,k1b,p1r,k1r,p1b,k1b,p1r; k1b,p1r,k1b,p1r,k1b,p1r,k1b,p1r,k1b,p1r) x3 finish with purl in both colors, turn work (60)
8. (k1 both colors/k1r,p1b,k1r,p1b,k1r,p1b,k1r,p1b,k1r,p1b; k1b,p1r,k1r,p1b,k1b,p1r,k1r,p1b,k1b,p1r) x3 finish with purl in both colors, turn work (60)
9-12. repeat rows 7-8. This completes the second “row” of color. (60)
13-24. Repeat rows 1-12. There will be four “rows” of plaid. (60)
25. knit with both colors/k1r,p1b,k2togr,p2togb,k1r,p1b,k1r,p1b; k1r,p1b,k1b,p1r,k1r,p1b,k1b,p1r,k1r,p1b; k1r,p1b,k1r,p1b,k1r,p1b,k1r,p1b,k1r,p1b; k1r,p1b,k1togb,p2togr,k1r,p1b,k1b,p1r; k1r,p1b,k1r,p1b,k1r,p1b,k1r,p1b,k1r,p1b; k1r,p1b,k1b,p1r,k1r,p1b,k1b,p1r,k1r,p1 both colors (56)
26. replace needle with US3 DPNs to join in the round. k1r,p1b,k1r,p1b,k1r,p1b,k1r,p1b; k1b,p1r,k1r,p1b,k1b,p1r,k1r,p1b,k1b,p1r; k1r,p1b,k1r,p1b,k1r,p1b,k1r,p1b,k1r,p1b; k1b,p1r,k1r,p1b,k1b,p1r,k1r,p1b; k1r,p1b,k1r,p1b,k1r,p1b,k1r,p1b,k1r,p1b; k1b,p1r,k1r,p1b,k1b,p1r,k1r,p1b,k1b,p1r (56)
27. k1r,p1b,k1r,p1b,k1r,p1b,k1r,p1b; k1r,p1b,k1b,p1r,k1r,p1b,k1b,p1r,k1r,p1b; k1r,p1b,k1r,p1b,k1r,p1b,k1r,p1b,k1r,p1b; k1r,p1b,k1b,p1r,k1r,p1b,k1b,p1r; k1r,p1b,k1r,p1b,k1r,p1b,k1r,p1b,k1r,p1b; k1r,p1b,k1b,p1r,k1r,p1b,k1b,p1r,k1r,p1b (56)
28. k1r,p1b,k1r,p1b,k1r,p1b,k1r,p1b; k1b,p1r,k1r,p1b,k1b,p1r,k1r,p1b,k1b,p1r; k1r,p1b,k1r,p1b,k1r,p1b,k1r,p1b,k1r,p1b; k1b,p1r,k1r,p1b,k1b,p1r,k1r,p1b; k1r,p1b,k1r,p1b,k1r,p1b,k1r,p1b,k1r,p1b; k1b,p1r,k1r,p1b,k1b,p1r,k1r,p1b,k1b,p1r (56)
Here we begin the wrist portion. cut red yarn with enough tail to weave in later. The wrist will be 2x2 ribbing in black.
29. (k2,p2 black)x7 all the way around while decreasing every stitch. Every purl stitch will go away leaving only ever other stitch, which were originally the knit stitches (28)
30-63. (k2,p2)x7 (28)
There should be 35 rows of this ribbing. The wrist part can be longer or shorter to taste.
Finish with icelandic bindoff!
next, you’ll close up the hand part. Use black yarn and a tapestry needle to whipstitch the open part from the top of the glove down the span of two color chunks. You can make the thumbhole bigger or smaller this way if you want.
Weave in all lose ends.

-----
Finger cup: this is the part that folds over your fingers or snaps to the back
start at finger tips
0. cast on 12st
1. k,p all (12)
2. (kfb,pfb) all around (24)
3. k,p all (24)
4. (kfb,pfb,k,p) all around (36)
5. k,p all (36)
6. (kfb,pfb,k,p,k,p) all around (48)
7-28. k,p for x22 rows (1x1 ribbing)
cast off with jenys surprisingly stretchy bind off, except instead of knitting and purling with the pattern, knit every knit/purl pair together as if they are one stitch.
Use loose end to close hole at the fingers.
Sew most of the back half of the cup to the back of the glove, right at the seam of the finger holes (see below) and the main part. Use your own discretion.
----
Finger Holes:
Stockinette stitch in the round
US0 or 1 DPN
Index:
18st around
Insert needles into top of glove surrounding where the index finger should come through as best you can.
I used the little V's that show up where I casted on.
Leave enough yarn at the beginning to sew with later
There should be 4st on side needles (in between fingers) and 5 on front(palm side) and back needles.
For the needle that goes between fingers, I slid it through two stitches and then kfb both of them to make four.
k all the way around for 8 rows
cast off
weave in top thread
After the first finger I put stitch markers to show where each finger hole would be placed.
I marked the next available stitch, skipped five, marked two stitches, skipped 5, and marked another 2.
There ended up being 12 spaces remaining total for the pinky finger.
The skipped stitches will end up on the front/back needles, and the marked stitches will end up on the side needles.

Middle:
20st around
5 on all needles (for the sides between fingers, I kfb, backwards yo, kfb to make 5st)
k all around for 8 rows
cast off
weave in top thread
Ring:
20st around
5 on all needles
k all for 8 rows
cast off
weave in top thread
Pinky:
16st around
4 on all needles
k for 5 rows
cast off
weave in top thread
Use the yarn from the start of each finger to sew in the gaps between fingers.
----
Thumb Hole:
Insert size 0 or 1 needles into the sides of the stitches that make the thumb hole. The 2 lowest center stitches should start on a separate needle.
These are the stitches you will be working first. There are 24 st total, assuming you did not increase or decrease the size of the thumb hole when originally whipstitching the hand closed.
1. knit both (2)
2. turn work, purl them both (2)
Transfer two more stitches (one on each side) from the other needles to the working needle (4). Make sure the yarn is on the proper side before moving the new stitches. For now it should be in the back in preparation for the next row.
3. knit them (4)
4. turn work and purl them (4)
Transfer two more stitches to working needle (6)
5. knit them (6)
6. turn work and purl them (6)
Now, start 2x2 ribbing instead of stockinette.
Transfer 2 more st (8)
7-8. 2x2 rib for two rows (8)
Transfer 2 more st (10)
9-10. 2x2 rib two rows (10)
Transfer 2 more (12)
11-12. 2x2 rib two rows (12)
Transfer 2 (14)
13-14. 2x2 rib two rows (14)
Transfer 2 more (16)
15-16. 2x2 rib two rows (16)
Stop adding more stitches now. Instead, 2x2 rib all the way around (including the stitches that have been sitting on the other needles waiting).
17-25. rib all around x9 (24)
26. rib 16st, then k2tog, k2tog, p2tog, p2tog (20)
27-28. rib all around x2 (20)
cast off with jenys surprisingly stretchy bind off, but knit/purl 2tog every stitch.


Sew snaps or buttons on to the back of the glove and the finger cup, and that's it!
#knitblr#knitting#gloves#fingerless gloves#plaid#buffalo plaid#knitting pattern#pattern#free pattern#mine
461 notes
·
View notes
Note
Poderia falar uns tumblr bom aí?
@esgotada @s-edutora @d-anada @libertinadosul @uai-mineira @microsaia @centtury @swlfxx @27d10 @eternismo @amorisou @tricksx @motoshima @inrotular @lokinha @localsca @dwassaa @imaconhou @controlaria @coezoiudinha @mamiboss @multisenso21 @soufadinha @salsurfista @reliquiou @litoralus @donadetodabeleza @awdaz @coegangster @flordoamor @60st @lualeste @apreciarmos @uimanhosa @possibilit-ar @poetasdogueto muito bons, desculpinha se esqueci alguém ♥️😔
69 notes
·
View notes
Note
Me indica uns tumblrs legais aí. Tô precisando seguir um pouco de gente kkk
Indicoooo simm!! 💕
@sol-teropolitano @donadabocca @d-anada @amorportodaparte @sensualizada @caralhizada @des-serena @jovemcarioca @alteradona @gangrl @malan-dra @enfezada @caralhouss @fuckles @lovdy @luadrop @luamarga @perolar @luadinha @owchefia @mamix @misscatuaba @soufadinha @swexs @ubrisadin @srpescador @zonaurbanz @uai-mineira @27d10 @damadooriente @xavozo @apontepralua @staflawless @60st @aniquilou @litoralicons @litoralnordestino @neuroxtic @bronzepraiano @ousadaz @farolbaiano @ujsz @luzdgratidao @rabiolla @afetocomluz @diasdverao @putiarei @mansafuria @seumozao @p4tra0
Esses são os que lembro no momento!! 🥰
60 notes
·
View notes
Text
Selbstständiger Elektriker ist frei. Elektriker sucht Aufträge Ganz DE
Guten Tag.
Ich bin Elektriker (Elektrofachkraft) fur Gebaude aus Tschechien, mit professionelle Erfahrung mehr als 22 Jahre, arbeite als Subunternehmer in Deutschland, Österreich und Tschechien , suche eine langfristige Arbeit bei einem Elektroinstallationsunternehmen.
Ich gut verstehe Tschechisch, Slowakisch, Russisch, Ukrainisch.
Polnisch und Deutsch verstehe schlecht.
In Tschechien ich arbeitete als Bauleiter-Elektriker bei Developer.
https://www.youtube.com/watch?v=vDm2IjBd-1k
Wohnungen, Geschäfte, Häuser, Büros, Schulen...
Ich habe Auto, Führerschein Kategorie B, Steuernummer in Deutschland und Tschechien.
Steuern, Versicherung, Reisekosten, Unterkunft, Hand - und Akkuwerkzeug bezahle ich selbst.
Nur offiziell.
Gehalt jeder Woche.
60St./Wo. - 260St./Mon.
Ich habe alles Dokumenten fur Arbeit in Deutschland als selbständiger Elektriker.
https://elektromontazniprace.info/cz/galerie/dokoncene
--
Mit freundlichen Grüßen
Herr Oleg Smit
(DE)Steuernummer 214 195 26 182
(CZ) IČ: 274 53 120
Tel.: CZ +420 608 662 897
www.elektromontazniprace.info
Read the full article
0 notes
Photo

Getting EASY quality traffic is the #1 roadblock that newbies and even pros alike face in reaching their online income goals.
And now, finally, we hold the rights to the ultimate solution…
YOUR solution.
So don't delay. Click 60ST to grab now for a small one time fee.
1 note
·
View note
Text

Finished socks!
Main yarn: Rico Superba Bamboo "blue mix" (16g per sock)
Contrast yarn: Regia 4ply "royal blue" (10g per sock)
Pattern: Rye Light
Gauge: 36st to 10cm on 2.75mm needles

Gone for a bit of a longer leg this time (4in), hoping that will help some of my fit issue. Went for a cast on/cuff of 70st, decreasing to 60st for the leg and foot.


2 notes
·
View notes
Note
indica uns tumblr ai
@mandonaz @mamiboss @likecocain @luadrop @lualeste @donadabocca @donadluar @xslowly @lillith-louquinha @thurgis @ow-loiriinha @oxebaianna @marebruta @marebrava @exbrisa @borleja @apontepralua @fodiadora @fodiei @fodalizar @mamiboss @gozadoxx @gomamy @beaconvibbe @11h15pm @tuadiaba @jovemcarioca @butecado @budwaiserr @delvishh @debochadoo @des-andado @desaverbeis @desculpa-jayz @ousadaz @perigou @s-e-x-t-o-u @swlfxx @meigalizei @ocidenteoeste @60st @uimanhosa @lokinha @dropei @ofguria @ofthug @exbrisa
Perdão se esqueci de alguém, segue esses que são fodas ❤️✨
55 notes
·
View notes
Note
Indica tumblrs
Pela primeira vez e última...
@xslowly @morenasurtada @shwnty @afrodty @salsurfista @a-crybabyy @libertinadosul @imaloca @beckdapaz @goiianinha @thurgis @dwassaa @g0malandr4 @misspeitei @ser-nomundo @ourschaos @04st @g4bdo100 @itsmami @wodca @donadluar @lordphoeni-x @xavoso @60st @pegando-viagem @suficient-e @uimanhosa @meigalizei @mardluar @sckbaby @deeliri-o @qq-dengosa @6xybaby @swlfxx @buttkl @toointensee @ofguria @vibeexs @uibrava @tequiladaa @someone-to-trust @fockte @prettyproud @zonalast @baladerinha @strongr @backto-live @transflorecer 📍
Só isso, eu acho. Não tem como marcar mais mesmo kkkkkkkk
101 notes
·
View notes
Last Seen Blogs

martin-frost
Martin Frost

emreserr-blog1
İsimsiz

tulipanroto-blog1
TulipánRoto🌷

luizguilherme413
Deus é a minha força

konietzko-sylvoran
Konietzko