#6to4
Text
6to4 在 2015 年就 deprecated 了...
找資料才發現 RFC 7526 廢掉 6to4 了:「Deprecating the Anycast Prefix for 6to4 Relay Routers」。
看起來像是無法解決的技術問題:
While this makes the forward path more controlled, it does not guarantee a functional reverse path.
去程的部份比較沒問題,但回程的部份就不一定會動。
不過目前看起來 HE 的 192.88.99.1 還有在運作就是了,也許之後會慢慢退役…
View On WordPress
0 notes
Text
what does a vpn tunnel do
🔒🌍✨ Get 3 Months FREE VPN - Secure & Private Internet Access Worldwide! Click Here ✨🌍🔒
what does a vpn tunnel do
VPN Encryption
VPN Encryption, or Virtual Private Network Encryption, refers to the process of encoding internet traffic as it travels between a user's device and a VPN server. This encryption makes the data unreadable to anyone trying to intercept it, providing users with privacy and security online.
There are several encryption protocols used by VPN services to secure data transmissions. The most common protocols include OpenVPN, L2TP/IPsec, and IKEv2/IPsec. OpenVPN is known for being highly secure and versatile, while L2TP/IPsec and IKEv2/IPsec are valued for their stability and speed.
When a user connects to a VPN server, their device creates a secure tunnel through which all internet traffic is routed. The data passing through this tunnel is encrypted using complex algorithms that can only be decoded by the VPN server and the user's device. This ensures that sensitive information such as passwords, financial data, and personal messages remain protected from cyber threats like hackers and surveillance.
VPN encryption is essential for maintaining privacy and security online, especially when using unsecured public Wi-Fi networks. By encrypting data transmissions, VPNs prevent third parties from monitoring or intercepting online activities, safeguarding sensitive information from potential misuse.
In conclusion, VPN encryption plays a crucial role in ensuring the confidentiality and integrity of internet communications. By encrypting data transmissions, VPN services provide users with a secure and private online experience, protecting them from various cyber threats and vulnerabilities.
Tunneling Protocol
Tunneling Protocol: Enhancing Network Communication
Tunneling protocol plays a crucial role in modern networking by enabling the secure and efficient transfer of data between networks. Essentially, tunneling involves encapsulating one type of network protocol within the packets of another protocol, creating a "tunnel" through which data can travel securely over a public network such as the internet.
One of the most common uses of tunneling protocols is in virtual private networks (VPNs). VPNs create a secure connection between a user's device and a remote server, allowing for encrypted communication over an otherwise unsecured network. Protocols like Point-to-Point Tunneling Protocol (PPTP), Layer 2 Tunneling Protocol (L2TP), and Secure Socket Tunneling Protocol (SSTP) are widely used for VPN connections, each offering its own advantages in terms of security, compatibility, and performance.
Another important application of tunneling protocols is in IPv6 transition mechanisms. With the exhaustion of IPv4 addresses, the transition to IPv6 has become imperative. However, many networks still rely on IPv4 infrastructure. Tunneling protocols such as 6to4, Teredo, and ISATAP facilitate the coexistence of IPv4 and IPv6 networks by encapsulating IPv6 packets within IPv4 packets, enabling communication between devices using different IP versions.
Moreover, tunneling protocols are utilized in secure remote access solutions, allowing users to access corporate networks from remote locations securely. By encapsulating data within encrypted tunnels, these protocols safeguard sensitive information from unauthorized access or interception.
In conclusion, tunneling protocols are essential tools for modern network communication, enabling secure and efficient data transfer across heterogeneous networks. Whether used for VPNs, IPv6 transition, or remote access, tunneling protocols play a vital role in ensuring the integrity and confidentiality of data transmission.
Secure Data Transmission
Secure data transmission is a critical aspect of modern digital communication to ensure the confidentiality and integrity of sensitive information being sent over networks. By employing encryption techniques, data can be scrambled in such a way that only authorized parties with the decryption key can make sense of the transmitted information.
One of the most common methods used to secure data transmission is the Secure Sockets Layer (SSL) protocol, now succeeded by the Transport Layer Security (TLS) protocol. TLS encrypts data as it travels between servers and clients, preventing unauthorized access and tampering by malicious actors. Websites that utilize SSL/TLS encryption display a padlock icon in the address bar, indicating a secure connection.
Another essential tool for secure data transmission is virtual private networks (VPNs), which establish encrypted tunnels between devices and remote servers, safeguarding data from potential eavesdropping. By routing data through secure channels, VPNs offer an additional layer of protection for sensitive communications.
In addition to encryption technologies, organizations must implement robust security measures such as firewalls, intrusion detection systems, and regular security audits to ensure the safety of transmitted data. Employee training on cybersecurity best practices can also help mitigate risks associated with data transmission.
Overall, secure data transmission plays a vital role in safeguarding confidential information in an increasingly interconnected world. By leveraging encryption technologies and adopting comprehensive security measures, individuals and businesses can protect sensitive data from unauthorized access and maintain the trust of their clients and partners.
IP Address Concealment
In the digital age, where privacy concerns loom large and cyber threats abound, the concept of IP address concealment has gained significant traction. An IP (Internet Protocol) address is a numerical label assigned to each device connected to a computer network that uses the Internet Protocol for communication. It serves as a unique identifier for locating and identifying devices online. However, this identifier can also expose users to various risks, including tracking, surveillance, and hacking attempts.
IP address concealment refers to the practice of hiding one's IP address from prying eyes, thereby enhancing online anonymity and security. There are several methods through which individuals and organizations can conceal their IP addresses:
Virtual Private Networks (VPNs): VPNs encrypt internet traffic and route it through remote servers, masking the user's IP address in the process. This not only conceals the user's location but also enhances security by preventing unauthorized access to sensitive data.
Proxy Servers: Proxy servers act as intermediaries between a user's device and the internet. By routing internet traffic through a proxy server, users can effectively conceal their IP addresses from websites and online services.
Tor Network: The Tor network, also known as The Onion Router, routes internet traffic through a series of volunteer-operated servers, encrypting it multiple times in the process. This obfuscates the user's IP address and enhances privacy and anonymity online.
IP Address Masking Software: There are various software applications available that allow users to mask their IP addresses effectively. These tools often provide additional features such as ad-blocking and malware protection.
In conclusion, IP address concealment plays a crucial role in safeguarding online privacy and security in an increasingly interconnected world. By employing the right tools and techniques, individuals and organizations can mitigate the risks associated with online tracking and surveillance, ensuring a safer and more anonymous browsing experience.
Private Network Access
Private Network Access: Ensuring Secure and Reliable Connectivity
Private Network Access, also known as VPN (Virtual Private Network), plays a critical role in ensuring secure and reliable connectivity for individuals and organizations alike. By creating a secure and encrypted connection over a less secure network, such as the internet, VPN enables users to access private networks and securely transmit data.
One of the key benefits of using Private Network Access is enhanced security. By encrypting data that is transmitted over the network, VPN protects sensitive information from being intercepted by hackers or malicious actors. This is particularly important for businesses that need to ensure the integrity and confidentiality of their data, especially when accessing sensitive company resources remotely.
In addition to security, Private Network Access also offers users the ability to bypass geographical restrictions and internet censorship. By connecting to a VPN server located in a different country, users can mask their IP address and access content that may be restricted in their region. This not only ensures freedom of information but also enables users to maintain their privacy and anonymity online.
Moreover, Private Network Access can improve network performance by reducing latency and optimizing bandwidth usage. By routing traffic through VPN servers, users can experience faster and more reliable connections, particularly when accessing resources over long distances or unreliable networks.
In conclusion, Private Network Access provides a secure, reliable, and versatile solution for individuals and organizations seeking to safeguard their data, bypass internet restrictions, and enhance network performance. By leveraging VPN technology, users can enjoy peace of mind knowing that their online activities are protected and their connectivity is optimized.
0 notes
Text
wann kommt vpn mit ip6
🔒🌍✨ Erhalten Sie 3 Monate GRATIS VPN - Sicherer und privater Internetzugang weltweit! Hier klicken ✨🌍🔒
wann kommt vpn mit ip6
Einführung von VPN für IPv6
Eine Einführung von VPN für IPv6 kann eine effektive Möglichkeit sein, um die Sicherheit und Privatsphäre im Internet zu verbessern. Mit der steigenden Verbreitung von IPv6-Adressen und der Notwendigkeit, sensible Daten vor Cyberkriminellen zu schützen, wird die Verwendung eines VPN-Dienstes immer wichtiger.
VPN steht für Virtual Private Network und ermöglicht es, eine sichere Verbindung zwischen Ihrem Gerät und dem Internet herzustellen. Durch die Verschlüsselung des Datenverkehrs wird verhindert, dass Dritte auf Ihre persönlichen Informationen zugreifen können. Dies ist besonders wichtig, wenn Sie über öffentliche WLAN-Netzwerke surfen, da diese oft unsicher sind und ein Einfallstor für Hacker darstellen können.
Die Integration von VPN mit IPv6 bedeutet, dass Sie auch von den verbesserten Sicherheitsfunktionen profitieren können, die diese neue Technologie bietet. Da IPv6 ein größeres Adressraum bietet und die Vergabe von eindeutigen IP-Adressen ermöglicht, wird die Identifizierung und Verfolgung von Benutzern im Netz erschwert.
Darüber hinaus kann die Verwendung eines VPN-Dienstes unter IPv6 dabei helfen, geografische Beschränkungen zu umgehen und auf Online-Inhalte zuzugreifen, die normalerweise in Ihrem Land gesperrt sind. Dies macht VPN für IPv6 nicht nur zu einem wichtigen Werkzeug für die Sicherheit, sondern auch für die Freiheit im Internet.
Insgesamt kann die Einführung von VPN für IPv6 dazu beitragen, Ihre Online-Aktivitäten sicherer und privater zu gestalten. Es ist ratsam, einen vertrauenswürdigen VPN-Anbieter zu wählen, der Ihre Daten zuverlässig schützt und eine hohe Geschwindigkeit für eine reibungslose Online-Erfahrung bietet.
Technologien für die Implementierung von VPN mit IPv6
Technologien für die Implementierung von VPN mit IPv6
Virtual Private Networks (VPN) sind für Unternehmen und Privatpersonen zu wichtigen Werkzeugen geworden, um eine sichere und verschlüsselte Internetverbindung herzustellen. Mit der Umstellung auf das Internetprotokoll IPv6 ergeben sich neue Anforderungen und Möglichkeiten für die Implementierung von VPN-Verbindungen.
Eine der Technologien, die für die Implementierung von VPN mit IPv6 verwendet werden können, ist das IPv6-Protokoll selbst. Da IPv6 von Natur aus sicherer als sein Vorgänger IPv4 ist, bietet es eine bessere Grundlage für die Erstellung von verschlüsselten VPN-Tunneln. Durch die Verwendung von IPv6 können VPN-Dienste effizienter betrieben und Sicherheitslücken minimiert werden.
Ein weiterer wichtiger Ansatz für die Implementierung von VPN mit IPv6 ist die Verwendung von Protokollen wie IPsec (Internet Protocol Security). IPsec bietet eine Reihe von Mechanismen, um die Integrität, Vertraulichkeit und Authentizität von Daten zu gewährleisten, die über das Internet übertragen werden. Durch die Kombination von IPv6 und IPsec können sichere VPN-Verbindungen aufgebaut werden, die den höchsten Sicherheitsstandards entsprechen.
Darüber hinaus ist die Nutzung von Tunneling-Technologien wie 6to4 oder Teredo eine effektive Methode, um VPN mit IPv6 zu implementieren. Diese Technologien ermöglichen die Übertragung von IPv6-Daten über IPv4-Netzwerke, was besonders hilfreich ist, wenn die Infrastruktur noch nicht vollständig auf IPv6 umgestellt wurde.
Insgesamt bieten die verschiedenen Technologien vielfältige Möglichkeiten zur Implementierung von VPN mit IPv6 und tragen dazu bei, die Sicherheit und Effizienz von VPN-Diensten in einer zunehmend vernetzten Welt zu verbessern.
Sicherheit von VPN in Verbindung mit IPv6
Die Sicherheit von VPN in Verbindung mit IPv6 ist eine wichtige Frage für alle, die ihre Online-Privatsphäre schützen möchten. VPNs (Virtual Private Networks) werden oft verwendet, um eine sichere und verschlüsselte Verbindung zum Internet herzustellen. Mit der Verbreitung von IPv6, dem neuesten Internetprotokoll, ergeben sich jedoch neue Herausforderungen und Risiken für die Sicherheit von VPNs.
Eines der Hauptprobleme bei der Nutzung von VPNs mit IPv6 ist die mögliche Offenlegung von IP-Adressen. Da IPv6 eine deutlich größere Anzahl von IP-Adressen bietet als das ältere IPv4-Protokoll, können VPN-Nutzer versehentlich IPv6-Verbindungen herstellen und dabei ihre tatsächliche IP-Adresse preisgeben. Dies könnte dazu führen, dass die Anonymität und Sicherheit des VPNs kompromittiert werden.
Um dieses Risiko zu minimieren, ist es wichtig, sicherzustellen, dass das VPN IPv6-Adressen effektiv blockiert oder deaktiviert. Viele VPN-Anbieter bieten mittlerweile Unterstützung für IPv6 an und implementieren Mechanismen, um Benutzer vor ungewollten IP-Lecks zu schützen. Es ist ratsam, einen VPN-Anbieter zu wählen, der IPv6-Unterstützung und entsprechende Sicherheitsfunktionen anbietet.
Zusammenfassend lässt sich sagen, dass die Sicherheit von VPNs in Verbindung mit IPv6 gewährleistet werden kann, sofern geeignete Vorkehrungen getroffen werden. Indem man einen vertrauenswürdigen VPN-Anbieter wählt und sich über die potenziellen Risiken informiert, kann man ein hohes Maß an Privatsphäre und Sicherheit im Internet erreichen.
Vorteile von VPN in Bezug auf IPv6
Mit der steigenden Verbreitung von IPv6-Adressen wird die Verwendung eines VPNs immer wichtiger. Ein VPN bietet zahlreiche Vorteile im Zusammenhang mit IPv6, die sowohl die Sicherheit als auch die Privatsphäre der Benutzer verbessern.
Einer der Hauptvorteile eines VPNs in Bezug auf IPv6 ist die Verbesserung der Sicherheit. Durch die Nutzung eines VPNs werden alle Daten, die über das Internet gesendet und empfangen werden, verschlüsselt. Dies schützt vor potenziellen Bedrohungen und Angriffen, insbesondere wenn IPv6 verwendet wird, da IPv6-Adressen aufgrund ihrer Länge anfälliger für Angriffe sind.
Darüber hinaus bietet ein VPN auch die Möglichkeit, geografische Beschränkungen zu umgehen. Viele Websites und Online-Dienste beschränken den Zugriff auf Benutzer basierend auf deren Standort. Durch die Verwendung eines VPNs können Benutzer ihre virtuelle Position ändern und auf regionale Inhalte zugreifen, die ihnen sonst nicht zur Verfügung stünden.
Ein weiterer wichtiger Vorteil von VPNs in Verbindung mit IPv6 ist die Wahrung der Privatsphäre. Da VPNs den gesamten Datenverkehr verschlüsseln, wird verhindert, dass Internetdienstanbieter und andere Dritte Benutzeraktivitäten überwachen oder aufzeichnen können.
Insgesamt bietet die Verwendung eines VPNs in Bezug auf IPv6 eine erhöhte Sicherheit, Privatsphäre und die Möglichkeit, geografische Einschränkungen zu umgehen. Es ist daher ratsam, ein VPN in Betracht zu ziehen, um die Vorteile von IPv6 vollständig nutzen zu können.
Herausforderungen bei der Nutzung von VPN und IPv6
Bei der Nutzung von VPN und IPv6 können verschiedene Herausforderungen auftreten, die es zu bewältigen gilt. VPN steht für Virtual Private Network und wird verwendet, um eine sichere Verbindung zwischen einem Nutzer und dem Internet herzustellen. IPv6 ist ein Internetprotokoll, das die stetig wachsende Anzahl von internetfähigen Geräten unterstützt.
Eine der Herausforderungen bei der Nutzung von VPN und IPv6 ist die Kompatibilität. Nicht alle VPN-Dienste unterstützen IPv6, was zu Konflikten führen kann. Es ist wichtig sicherzustellen, dass sowohl der VPN-Anbieter als auch das verwendete Netzwerk IPv6-kompatibel sind, um eine reibungslose Verbindung zu gewährleisten.
Ein weiteres Problem kann die Leistung sein. Da IPv6 eine größere Adressmenge ermöglicht, kann es zu Engpässen oder Verzögerungen kommen, insbesondere wenn das VPN nicht effizient konfiguriert ist. Es ist ratsam, die Einstellungen des VPN-Dienstes anzupassen, um die Leistung bei der Verwendung von IPv6 zu optimieren.
Datenschutz ist ebenfalls eine wichtige Herausforderung. Obwohl VPNs die Sicherheit erhöhen sollen, kann die Verwendung von IPv6 die Anonymität beeinträchtigen, da IPv6-Adressen eindeutiger sind als ihre IPv4-Äquivalente. Es ist ratsam, zusätzliche Maßnahmen zu ergreifen, um die Privatsphäre zu schützen, insbesondere wenn IPv6 im VPN genutzt wird.
Insgesamt erfordert die Nutzung von VPN und IPv6 ein gründliches Verständnis der Technologien sowie geeignete Maßnahmen, um mögliche Herausforderungen zu bewältigen. Mit der richtigen Konfiguration und Vorsichtsmaßnahmen können diese Technologien jedoch sicher und effektiv genutzt werden.
0 notes
Text
do you need ipv6 tunnel in vpn settings
🔒🌍✨ Get 3 Months FREE VPN - Secure & Private Internet Access Worldwide! Click Here ✨🌍🔒
do you need ipv6 tunnel in vpn settings
IPv6 Tunneling in VPN Settings
IPv6 Tunneling in VPN Settings
As the internet continues to evolve, the adoption of IPv6 becomes increasingly critical due to the depletion of IPv4 addresses. However, transitioning from IPv4 to IPv6 can present challenges, particularly when integrating with Virtual Private Networks (VPNs). This is where IPv6 tunneling in VPN settings becomes indispensable.
IPv6 tunneling enables the encapsulation of IPv6 packets within IPv4 packets, allowing them to traverse IPv4 networks. In the context of VPNs, this facilitates the transmission of IPv6 traffic over VPN connections established over IPv4 infrastructure.
One common method of IPv6 tunneling in VPN settings is through the use of tunneling protocols such as 6to4, 6in4, or Teredo. These protocols encapsulate IPv6 packets within IPv4 packets, enabling communication between IPv6-enabled devices across IPv4 networks. Additionally, VPN protocols such as IPsec can be configured to support IPv6 traffic, ensuring secure transmission over VPN connections.
Implementing IPv6 tunneling in VPN settings requires careful configuration and compatibility checks. VPN providers must ensure that their infrastructure supports IPv6 tunneling protocols and that clients have the necessary software and configurations to establish IPv6-over-IPv4 tunnels securely. Furthermore, network administrators must consider factors such as tunnel overhead, latency, and potential interoperability issues when deploying IPv6 tunneling in VPN settings.
Despite the challenges, IPv6 tunneling in VPN settings offers a viable solution for organizations looking to transition to IPv6 while maintaining compatibility with existing IPv4 infrastructure. By leveraging tunneling protocols and VPN technologies, organizations can ensure seamless communication between IPv6-enabled devices over VPN connections, paving the way for a smooth transition to the next generation of the internet protocol.
Necessity of IPv6 Tunnel in VPN
In the world of Virtual Private Networks (VPNs), the necessity of IPv6 tunnels is becoming more crucial than ever before. IPv6, the next generation Internet Protocol address standard, provides a significantly larger address space compared to its predecessor, IPv4. As the number of devices connected to the internet continues to grow exponentially, the exhaustion of IPv4 addresses has prompted the widespread adoption of IPv6.
When it comes to VPNs, ensuring compatibility with IPv6 is essential for future-proofing network infrastructure. IPv6 tunnels within VPNs enable the encapsulation of IPv6 packets within IPv4 networks, ensuring seamless communication between devices using different IP address versions. This functionality is particularly important for businesses and organizations that operate on a global scale, as it allows for the transparent transmission of data across disparate networks.
Additionally, IPv6 tunnels in VPNs offer enhanced security and privacy features. By utilizing IPv6 addresses, which are more secure and less susceptible to hacking and intrusion, VPN users can enjoy a higher level of data protection. This is especially crucial for sensitive information and confidential communications that need to be safeguarded from unauthorized access.
In conclusion, the incorporation of IPv6 tunnels within VPNs is no longer just an option but a necessity in the modern digital landscape. With the seamless integration of IPv6 addressing and tunneling capabilities, VPN users can experience improved performance, enhanced security, and future-proof connectivity for their online activities.
Configuring IPv6 Tunnel for VPN
Configuring an IPv6 Tunnel for VPN
Setting up an IPv6 tunnel for a VPN connection can be a beneficial way to ensure secure communication over the internet. With the growing importance of IPv6 in the networking world, understanding how to configure a tunnel for VPN purposes is essential for network administrators and IT professionals.
To configure an IPv6 tunnel for VPN, you first need to select a tunneling protocol that supports IPv6, such as 6to4, Teredo, or GRE. Once you have chosen the appropriate protocol, you will need to configure the tunnel endpoints on both the client and server side. This involves setting up the tunnel interface, assigning IPv6 addresses, and configuring routing protocols to ensure proper communication between the two endpoints.
Next, you will need to configure the VPN settings on both ends of the tunnel. This includes setting up encryption protocols, authentication methods, and other security parameters to secure the communication over the tunnel. It is important to use strong encryption algorithms and secure authentication mechanisms to prevent unauthorized access to the VPN traffic.
After configuring the tunnel and VPN settings, you can test the connection to ensure that the IPv6 traffic is properly routed through the tunnel and that the VPN connection is established successfully. Regular testing and monitoring of the tunnel are important to detect and resolve any potential issues that may arise.
In conclusion, configuring an IPv6 tunnel for VPN is a crucial aspect of network security and connectivity in today's IPv6-enabled world. By following the necessary steps and best practices, network administrators can ensure a secure and reliable VPN connection over IPv6.
IPv6 Tunnel vs IPv4 in VPN Setup
In the world of virtual private networks (VPNs), the choice between using an IPv6 tunnel or an IPv4 connection can have a significant impact on your online experience.
IPv6 tunnels are designed to carry IPv6 packets over an IPv4 network infrastructure. This allows for the transmission of data between IPv6 hosts over an IPv4 network, which can be beneficial for users who need to access websites or services that are only available via an IPv6 connection. However, setting up and maintaining an IPv6 tunnel can be more complex compared to using an IPv4 connection, as it requires additional configuration and support.
On the other hand, IPv4 connections are the traditional method of connecting devices to the internet. While IPv4 addresses are becoming scarce due to the increasing number of internet-connected devices, many VPN providers still rely on IPv4 connections. This can make it easier for users to set up and use VPN services without having to worry about compatibility issues or additional configuration steps.
When deciding between an IPv6 tunnel and an IPv4 connection in a VPN setup, it is essential to consider factors such as network compatibility, ease of configuration, and the specific requirements of the websites or services you need to access. Ultimately, both options have their advantages and disadvantages, so choosing the right one will depend on your individual needs and preferences.
Benefits of Using IPv6 Tunnel in VPN
Using an IPv6 tunnel in a VPN offers several significant benefits, making it a favorable choice for many users. IPv6, the latest version of the Internet Protocol, brings advancements over its predecessor, IPv4, particularly in terms of addressing capabilities and security features. Here are some key advantages of utilizing an IPv6 tunnel within a VPN:
Expanded Address Space: One of the primary advantages of IPv6 is its vastly expanded address space, which allows for trillions of unique addresses. This abundance of addresses ensures that every device can have its unique identifier, facilitating the growth of the Internet of Things (IoT) and accommodating the increasing number of connected devices worldwide.
Enhanced Security: IPv6 incorporates built-in security features, such as IPsec (Internet Protocol Security), which offers authentication and encryption services for data packets. By utilizing IPv6 within a VPN, users can benefit from enhanced privacy and confidentiality, as well as protection against various cyber threats, including eavesdropping and data tampering.
Improved Performance: IPv6 is designed to optimize network performance, resulting in faster data transmission and reduced latency compared to IPv4. This improvement in performance is particularly beneficial for bandwidth-intensive activities like streaming high-definition video, online gaming, and real-time communication applications.
Future-Proofing: As the Internet continues to evolve and the demand for IP addresses grows, IPv6 provides a scalable solution that can accommodate the expanding needs of the digital landscape. By incorporating IPv6 tunnels into VPN infrastructure, organizations can future-proof their networks and ensure compatibility with emerging technologies and protocols.
Global Connectivity: IPv6 enables seamless global connectivity by eliminating the need for complex network address translation (NAT) mechanisms, which are often required in IPv4 networks. This simplification of network configurations promotes interoperability and fosters a more connected and accessible internet experience for users worldwide.
In conclusion, leveraging an IPv6 tunnel within a VPN offers numerous benefits, including expanded address space, enhanced security, improved performance, future-proofing, and global connectivity. As organizations and individuals increasingly rely on VPNs to secure their online activities, integrating IPv6 support can contribute to a more efficient, secure, and resilient internet infrastructure.
0 notes
Text
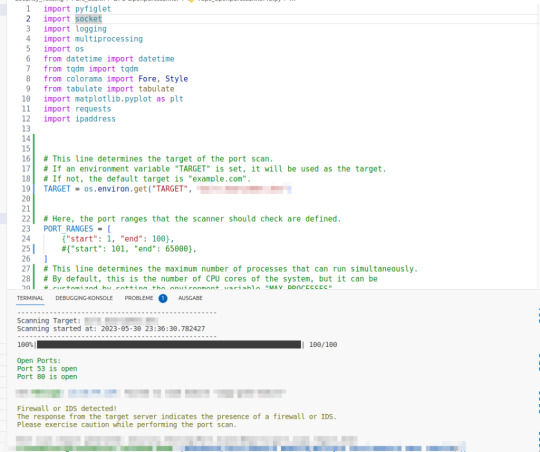
Python: Einfacher und flexibler Portscanner zum Schwachstellentesten (Version 0.1)

Klar man hätte auch einen der schon recht bekannten Port Scanner nutzten können, aber mich treibt es immer wieder zu einer Selbstentwicklung. Für mich ist es extrem wichtig hier Python zu nutzen, da ich es für extrem flexibel halte auch durch die Erweiterung in alle möglichen Richtungen da will ich mich schlichtweg nicht eingrenzen lassen.
Dieses Skript ist ein einfacher Port-Scanner in Python. Es scannt ein angegebenes Ziel (eine IP-Adresse oder einen Hostnamen) auf offene Ports innerhalb eines definierten Bereichs, protokolliert die Aktivitäten und erstellt einen Bericht über den Scan. Hier ist, was jeder Teil des Skripts macht:
- Konfiguration: Das Skript enthält verschiedene Konfigurationsvariablen, die entweder standardmäßig festgelegt sind oder über Umgebungsvariablen angepasst werden können. Diese Konfigurationen umfassen das Ziel des Portscans, die zu überprüfenden Portbereiche, die maximale Anzahl von Prozessen, die gleichzeitig ausgeführt werden können, die Timeout-Zeit für Socket-Operationen sowie die Namen und Pfade von Log- und Berichtsdateien.
- Logging-Konfiguration: Hier wird die Konfiguration für das Protokollieren von Ereignissen festgelegt. Es wird ein Protokollierungslevel festgelegt (standardmäßig INFO), ein Dateiname für das Protokoll (standardmäßig "port_scan.log") und ein Format für die Protokolleinträge.
- Hilfsfunktionen: Das Skript enthält mehrere Hilfsfunktionen, die für verschiedene Aufgaben verwendet werden, z. B. das Drucken eines ASCII-Banners, das Überprüfen der Gültigkeit einer IPv6-Adresse, das Überprüfen eines bestimmten Ports, das Abrufen der IP-Adresse eines Ziels, das Generieren eines Berichts und das Generieren eines Diagramms für die Portbereiche.
- Firewall-Erkennung: Es gibt eine Funktion zum Erkennen einer Firewall oder eines IDS (Intrusion Detection System) auf dem Zielhost. Es wird eine HTTP-Anfrage an den Zielserver gesendet, und basierend auf der Antwort wird überprüft, ob eine Firewall oder ein IDS vorhanden ist.
- Portscan-Funktion: Die Hauptfunktion des Skripts ist die "scan_ports"-Funktion. Diese Funktion ruft die anderen Funktionen auf, um den Portscan durchzuführen. Sie erstellt ein ASCII-Banner, gibt Informationen zum Scan aus, erstellt eine Liste aller zu überprüfenden Ports, ruft die Funktion zum Überprüfen der Ports mithilfe von Multiprocessing auf, generiert einen Bericht, erstellt ein Diagramm für die Portbereiche und ruft die Firewall-Erkennungsfunktion auf. Der Bericht wird in einer HTML-Datei gespeichert.
Hauptprogramm: Der Code am Ende des Skripts überprüft, ob das Skript direkt ausgeführt wird (statt importiert zu werden). Wenn ja, wird die "scan_ports"-Funktion aufgerufen, um den Portscan durchzuführen.
Was in der Version 0.1 schon enthalten ist?
# Todo:
# 1. Add support for UDP ports
# 2. Add support for port ranges - Done
# 3. Add support for port lists - Done
# 4. Add support for CIDR notation - Done
# 5. Add support for hostnames - Done - Use socket.gethostbyname()
# 6. Add support for IPv6 - Done - Use socket.getaddrinfo()
# 7. Add support for IPv6 ranges - Done
# 8. Add support for IPv6 lists - Done
# 9. Add support for IPv6 CIDR notation - Done
# 10. Add support for IPv6 hostnames - Done
# 11. Add support for IPv6 link-local addresses - Done
# 12. Add support for IPv6 site-local addresses - Done
# 13. Add support for IPv6 multicast addresses - Done
# 14. Add support for IPv6 loopback addresses - Done
# 15. Add support for IPv6 unspecified addresses - Done
# 16. Add support for IPv6 IPv4-mapped addresses - Done
# 17. Add support for IPv6 IPv4-translated addresses - Done
# 18. Add support for IPv6 6to4 addresses
# 19. Add support for IPv6 Teredo addresses
# 20. Add support for IPv6 6bone addresses - Done
# 21. Add support for IPv6 documentation addresses - Testing
# 22. Add support for IPv6 global unicast addresses- Testing
# 23. Add support for IPv6 unique local addresses - Testing
# 24. Add support for IPv6 link-local unicast addresses - Testing
# 25. Add support for IPv6 site-local unicast addresses - Testing
# 26. Add support for IPv6 multicast addresses - Testing
# 27. Add support for IPv6 loopback addresses - Testing
# 28. Add support for IPv6 unspecified addresses
# 29. Add support for IPv6 addresses with zone indices
# 30. Add support for IPv6 addresses with scope IDs
# 31. Add support for IPv6 addresses with embedded IPv4 addresses
# 32. Add support for IPv6 addresses with embedded IPv4 addresses and zone indices
# 33. Add support for IPv6 addresses with embedded IPv4 addresses and scope IDs
# 34. Add support for IPv6 addresses with embedded IPv4-mapped addresses
# 35. Add support for IPv6 addresses with embedded IPv4-mapped addresses and zone indices - Done
# 36. Add support for IPv6 addresses with embedded IPv4-mapped addresses and scope IDs
# Done:
# 1. Add support for IPv6 addresses with embedded IPv4-mapped addresses and scope IDs
# 2. Add support for IPv6 addresses with embedded IPv4-mapped addresses and zone indices
# 3. Add support for IPv6 addresses with embedded IPv4 addresses and scope IDs
# 4. Add support for IPv6 addresses with embedded IPv4 addresses and zone indices
# 5. Add support for IPv6 addresses with zone indices
# 6. Add support for IPv6 unspecified addresses
# 7. Add support for IPv6 loopback addresses
# 8. Add support for IPv6 multicast addresses
# 9. Add support for IPv6 site-local unicast addresses
# 10. Add support for IPv6 link-local unicast addresses
Hier das komplette Skript
import pyfiglet
import socket
import logging
import multiprocessing
import os
from datetime import datetime
from tqdm import tqdm
from colorama import Fore, Style
from tabulate import tabulate
import matplotlib.pyplot as plt
import requests
import ipaddress
# This line determines the target of the port scan.
# If an environment variable "TARGET" is set, it will be used as the target.
# If not, the default target is "example.com".
TARGET = os.environ.get("TARGET", "example.com")
# Here, the port ranges that the scanner should check are defined.
PORT_RANGES =
# This line determines the maximum number of processes that can run simultaneously.
# By default, this is the number of CPU cores of the system, but it can be
# customized by setting the environment variable "MAX_PROCESSES".
MAX_PROCESSES = int(os.environ.get("MAX_PROCESSES", multiprocessing.cpu_count()))
# This sets the timeout for socket operations. The default timeout is one second,
# but it can be customized by setting the environment variable "SOCKET_TIMEOUT".
SOCKET_TIMEOUT = int(os.environ.get("SOCKET_TIMEOUT", 1))
# This determines the name of the log file. By default, it's "port_scan.log",
# but it can be changed by setting the environment variable "LOG_FILENAME".
LOG_FILENAME = os.environ.get("LOG_FILENAME", "port_scan.log")
# This determines the path and name of the report file. By default, it's "Security_Testing/Port_Scann/Reports/port_scan_report.html",
# but it can be changed by setting the environment variable "REPORT_FILENAME".
REPORT_FILENAME = os.environ.get("REPORT_FILENAME", "Security_Testing/Port_Scann/Reports/port_scan_report.html")
# This determines the directory where the report is saved.
REPORT_DIRECTORY = os.path.dirname(REPORT_FILENAME)
os.makedirs(REPORT_DIRECTORY, exist_ok=True)
# This creates the directory where the report is saved, if it doesn't already exist.
# The exist_ok=True parameter prevents an error if the directory already exists.
# Logging configuration
logging.basicConfig(filename=LOG_FILENAME, level=logging.INFO, format='%(asctime)s - %(levelname)s - %(message)s')
## filename=LOG_FILENAME: This specifies that the logs should be written to a file,
# and the name of the file is the value of the LOG_FILENAME variable.
## level=logging.INFO: This sets the root logger level to INFO. This means that only events of this level and above will be tracked,
# unless the logging package is configured differently elsewhere.
# Levels you can specify include DEBUG, INFO, WARNING, ERROR, and CRITICAL.
## format='%(asctime)s - %(levelname)s - %(message)s': This is a string that specifies the layout of the log entries.
# Each "%(name)s" is a placeholder that will be replaced with the corresponding "name" from each log record.
# In this case, asctime will be replaced with the time the log record was created, levelname will be replaced with the level
# name of the log record (INFO, ERROR, etc.), and message will be replaced with the log message.
def print_banner():
ascii_banner = pyfiglet.figlet_format("OPS - Open Port Scanner")
print(ascii_banner)
def print_scan_info():
print("-" * 50)
print("Scanning Target: " + TARGET)
global start_time
start_time = datetime.now()
print("Scanning started at: " + str(start_time))
print("-" * 50)
def validate_ipv6_address(ip):
"""Prüft, ob die gegebene IP-Adresse eine gültige IPv6-Adresse ist."""
try:
ipaddress.IPv6Address(ip)
return True
except ipaddress.AddressValueError:
return False
def check_port(port_info):
ip, port = port_info
try:
if validate_ipv6_address(ip):
with socket.socket(socket.AF_INET6, socket.SOCK_STREAM) as s:
s.settimeout(SOCKET_TIMEOUT)
# Add the scope id if it is a link-local address
if ipaddress.IPv6Address(ip).is_link_local:
s.connect((ip, port, 0, YOUR_NETWORK_INTERFACE_INDEX))
else:
s.connect((ip, port))
else:
with socket.socket(socket.AF_INET, socket.SOCK_STREAM) as s:
s.settimeout(SOCKET_TIMEOUT)
result = s.connect_ex((ip, port))
except OSError:
return {"port": port, "status": "error"}
if result == 0:
logging.info("Port {} is open".format(port))
return {"port": port, "status": "open"}
else:
return {"port": port, "status": "closed"}
def get_ip_address(target):
addresses = socket.getaddrinfo(target, None)
for address in addresses:
if address == socket.AF_INET6:
# Detect if it's an IPv4-mapped IPv6 address
ip = ipaddress.IPv6Address(address)
if ip.ipv4_mapped:
return str(ip.ipv4_mapped)
else:
return address
return addresses
def generate_report(results):
headers =
data = , port) for port in results]
table = tabulate(data, headers=headers, tablefmt="pretty")
report = f'''
Port Scan Report
Port Scan Report
Target: {TARGET}
Scan started at: {str(start_time)}
Scan finished at: {str(datetime.now())}
Time taken: {str(datetime.now() - start_time)}
Ports:
{table}
'''
return report
def generate_port_range_chart(results):
open_ports = len( == "open"])
closed_ports = len( == "closed"])
labels =
values =
colors =
explode = (0.1, 0)
plt.pie(values, explode=explode, labels=labels, colors=colors, autopct='%1.1f%%', startangle=90)
plt.axis('equal')
plt.title("Port Range Chart")
plt.show()
def detect_firewall(target):
try:
response = requests.get(f"http://{target}")
if response.status_code == 200:
print(Fore.YELLOW + "nFirewall or IDS detected!")
print("The response from the target server indicates the presence of a firewall or IDS.")
print("Please exercise caution while performing the port scan.")
print(Style.RESET_ALL)
logging.warning("Firewall or IDS detected")
except requests.exceptions.RequestException as e:
print(Fore.YELLOW + "nWarning: " + str(e))
print(Style.RESET_ALL)
logging.warning(str(e))
raise e
def scan_ports():
print_banner()
print_scan_info()
try:
port_ranges = , range_info) for range_info in PORT_RANGES]
all_ports =
for start, end in port_ranges:
all_ports.extend(range(start, end + 1))
if '/' in TARGET:
if ':' in TARGET:
ip_network = ipaddress.IPv6Network(TARGET, strict=False)
else:
ip_network = ipaddress.IPv4Network(TARGET, strict=False)
target_ips =
elif ',' in TARGET:
target_ips =
else:
target_ips = ]
'''Finally, you will need to adjust your code to handle IPv6 link-local addresses correctly when you are resolving the TARGET:
In this line, I have changed socket.AF_UNSPEC to socket.AF_INET6 to ensure that it will resolve to an IPv6 address.'''
#else:
#target_ips = ]
with multiprocessing.Pool(processes=MAX_PROCESSES) as pool:
total_ports = len(all_ports) * len(target_ips)
results = list(tqdm(pool.imap(check_port, ), total=total_ports, ncols=80, bar_format='{l_bar}{bar}| {n_fmt}/{total_fmt}'))
open_ports = for port in results if port == "open"]
if open_ports:
print(Fore.GREEN + "nOpen Ports:")
for port in open_ports:
print("Port {} is open".format(port))
print(Style.RESET_ALL)
logging.info("Open ports: {}".format(open_ports))
else:
print(Fore.RED + "nNo open ports found." + Style.RESET_ALL)
logging.info("No open ports found.")
report = generate_report(results)
with open(REPORT_FILENAME, 'w') as report_file:
report_file.write(report)
generate_port_range_chart(results)
detect_firewall(TARGET)
print("Port scan report generated: {}".format(REPORT_FILENAME))
except KeyboardInterrupt:
print("nExiting Program !!!!")
logging.info("Program interrupted by the user")
except socket.error as e:
print("nServer not responding !!!!")
print(Fore.RED + "nError: " + str(e))
logging.error(str(e))
raise e
except requests.exceptions.RequestException as e:
print(Fore.YELLOW + "nWarning: " + str(e))
logging.warning(str(e))
raise e
if __name__ == '__main__':
scan_ports()
Read the full article
0 notes
Text
Update teredo tunneling adapter driver

UPDATE TEREDO TUNNELING ADAPTER DRIVER HOW TO
UPDATE TEREDO TUNNELING ADAPTER DRIVER INSTALL
UPDATE TEREDO TUNNELING ADAPTER DRIVER DRIVERS
UPDATE TEREDO TUNNELING ADAPTER DRIVER UPDATE
Pick out Network adapter from Common hardware types and then hit Next.ĩ. Click Next again to select a device driver from the list.Ĩ.
UPDATE TEREDO TUNNELING ADAPTER DRIVER INSTALL
Choose to Search for and install the hardware automatically and then click Next.ħ. Here you can see why you are supposed to add legacy hardware since it is used to install the driver software which cannot be automatically recognized by Windows 10.Ħ. Click Next in Welcome to the Add Hardware Wizard. Then In Device Manager, under Action, click Add legacy hardware.ĥ. Hit Uninstall to confirm the uninstallation for the Teredo tunneling adapter.Ĥ. After that, Teredo Tunneling Pseudo-Interface shows up under Network adapters.ģ. Tips: If you are unable to find out the Microsoft Teredo Tunneling Pseudo-Interface, you are to click View and then choose Show hidden devices. Here maybe yours is Microsoft Teredo Tunneling adapter or Microsoft Teredo Tunneling interface. Expand Network adapters and then right-click the Teredo Tunneling Pseudo-Interface to Uninstall.
UPDATE TEREDO TUNNELING ADAPTER DRIVER DRIVERS
Under this circumstance, the first thing you are recommended to do is remove or uninstall the teredo tunneling drivers from Windows 10 to see if it can fix the code 10 error.Ģ.
UPDATE TEREDO TUNNELING ADAPTER DRIVER UPDATE
You need to fix this teredo tunneling pseudo-interface not working or not starting problem as soon as possible.ġ: Uninstall the Teredo Tunneling Pseudo-Interface AdapterĢ: Update the Teredo Tunneling Pseudo-Interface Adapterģ: Set Teredo Qualified State in Command PromptĤ: Change Registry value for Teredo Tunneling Pseudo-Interface Solution 1: Uninstall the Teredo Tunneling Pseudo-Interface AdapterĪ considerable of users have reported to us that the teredo tunneling pseudo-interface cannot start or work on Windows 10 can be mainly caused by the corrupted teredo tunneling adapters and interfaces. While if Windows 10 failed to recognize your teredo tunneling pseudo-interface, the error code 10 that this device cannot start would appear on your computer. Having been familiar with what the teredo tunneling pseudo-interface is on Windows 10, you may have known about how vital it is in networking. 4 Ways to Fix Teredo Tunneling Pseudo-Interface Code 10 Error Teredo tunneling is widely used during the transition period from IPv4 to IPv6, and it is a temporary method used to “repackage” data packets and permit communication between IPv4 and IPv6 devices.īut why the Teredo Tunneling is accompanied by Pseudo-Interface in security history messages?Īs discussed before, the Teredo tunneling is using the 6to4 protocol for tunneling IPv6 data to a device with an IPv4 address, you can see why it is called the pseudo-interface on Windows 10.Īll in all, to put it in simple words, Teredo Tunneling is used to connect to IPv4 devices in the compatibility mode while you are using IPv6 yourself. What is the Teredo Tunneling Pseudo-Interface? That is why this post comes to your hand. Is there a yellow exclamation below the Teredo Tunneling Pseudo-Interface in device manager? Have Windows 10 prompted you the code 10 error that This device cannot start in Microsoft teredo tunneling pseudo-interface properties?
UPDATE TEREDO TUNNELING ADAPTER DRIVER HOW TO
What is the Teredo Tunneling Pseudo-Interface?Ĥ Ways to Fix Teredo Tunneling Pseudo-Interface Code 10 Error Teredo Tunneling Pseudo-Interface Driver Overviewįew people have some ideas about what the Teredo tunneling pseudo-interface is and how to do to solve the issues about it on Windows 10. Teredo Tunneling Psdudo-Interface Driver Overview
0 notes
Text
IPv6 basics in ccna
In the CCNA curriculum, understanding IPv6 (Internet Protocol version 6) is essential due to the depletion of IPv4 addresses and the transition to the next-generation protocol. IPv6 introduces significant improvements in addressing, security, and network efficiency.
IPv6 Addressing: IPv6 addresses are 128 bits long, represented in hexadecimal notation with colons separating segments. The larger address space allows for trillions of unique addresses, addressing the address exhaustion problem of IPv4. IPv6 addresses have various types, including unicast, multicast, and anycast.
Address Types:
Unicast: One-to-one communication between a sender and a specific receiver.
Multicast: One-to-many communication to a specific group of devices.
Anycast: One-to-the-nearest communication, where multiple devices share the same anycast address, and the data is sent to the closest one.
Address Notation: IPv6 addresses can be written in different notations:
Colon-Hexadecimal Notation: Eight 4-digit hexadecimal blocks separated by colons.
Zero Compression: Consecutive blocks of zeros can be replaced by "::" once in an address.
Loopback Address: The loopback address is "::1," equivalent to IPv4's "127.0.0.1."
IPv6 Features:
Larger Address Space: IPv6's 128-bit address space allows for a vast number of unique addresses.
Simplified Header: IPv6 header is streamlined for efficiency, reducing processing overhead.
Autoconfiguration: IPv6 supports stateless autoconfiguration, enabling devices to configure addresses and other parameters without external configuration servers.
Security: IPSec (Internet Protocol Security) is a mandatory part of IPv6, providing enhanced security for communication.
Transition Mechanisms: CCNA candidates learn about techniques to transition from IPv4 to IPv6, such as dual-stack, tunneling (including 6to4 and Teredo), and NAT64/DNS64.
Understanding IPv6 basics is essential for network professionals as the internet continues to migrate to the new protocol. CCNA training provides hands-on experience configuring and working with IPv6 addresses, allowing candidates to be proficient in managing both IPv4 and IPv6 networks, ensuring seamless communication in the evolving networking landscape.
0 notes
Text
CCNP問題集
CCNP 300-410 問題集
認定試験早期合格の問題集サイト
7777exam.com
出題のサンプル
出題3
ネットワークエンジニアは、TCPトラフィックの送信者の伝送速度が輻輳時に急激に増加および減少することに気付きます。どの状態がこれを引き起こしますか?
A.グローバル同期
B.テールドロップ
C.ランダム早期検出
D.キュー管理アルゴリズム
解答A
出題4
QoSを使用せずにネットワーク内でUDPストリームとTCPストリームを混合するアプリケーションから生じる3つの問題はどれですか?(3つ選択してください。)
A.飢star
ジッタ
C.レイテンシー
D.ウィンドウイング
E.スループットの低下
解答ACE
出題5
移行プロセス中に単一の接続に両方を使用する必要なく、IPv4とIPv6を一緒に使用できる方法はどれですか?
A.デュアルスタック方式
B. 6to4トンネリング
C. GREトンネリング
D. NAT-PT
解答A
出題6
トンネリングを使用してIPv6に移行することに関する説明は正しいですか?
A.トンネリングは、デュアルスタックまたは変換より安全性が低くなります。
B.トンネルは、デュアルスタックまたは変換よりも構成が困難です。
C.トンネリングでは、新しいプロトコルのユーザーはデュアルスタックホストなしで古いプロトコルのユーザーと通信できません。
D.トンネリングの宛先は、IPv4互換IPv6アドレスの下位32ビットのIPv4アドレスによって手動で決定されます。
解答C
出題7
ネットワーク管理者がコマンドclear ip routeを実行します。このコマンドはどの2つのテーブルをクリアして再構築しますか?
(2つ選択してください。)
A. IPルーティング
B. FIB
C. ARPキャッシュ
D. MACアドレステーブル
E.シスコエクスプレスフォワーディングテーブル
F.トポロジテーブル
解答AB
出題8
コマンドshow ip cacheの出力にエントリが存在する場合、どのスイッチング方法が使用されますか?
A.高速スイッチング
B.プロセスの切り替え
C.シスコエクスプレスフォワーディングスイッチング
D.カットスルーパケットスイッチング
解答A
出題9
ルーターでウィンドウスケーリングを有効にして使用するには、どの2つのアクションを実行する必要がありますか?(2つ選択してください。)
A.コマンドip tcp window-size 65536を実行します。
B.リモートホストで使用するウィンドウスケーリングを設定します。
C.コマンドip tcp queuemaxを実行します。
D.リモートホストでTCPオプションを「有効」に設定します。
E.コマンドip tcp adjust-mssを実行します。
解答AB
1 note
·
View note
Text
Как настроить IPv6 на роутере ZyXEL
Как настроить IPv6 на роутере ZyXEL
Не так давно я приобщился к “новому” интернету. В общем настроил и протестировал работу интернет протокола 6 версии на разных устройствах. Конкретно сейчас опишу как настроить работу IPv6 на роутере ZyXEL NBG-418N v2. Для того, что бы настроить 6 протокол, не обязательно, что бы ваш интернет провайдер выдавал IP адреса 6 версии, достаточно иметь реальный и постоянный IP адрес. Хотя, я подозреваю,…
View On WordPress
0 notes
Text
DirectAccess Manage Out and System Center Configuration Manager (SCCM)
DirectAccess Manage Out and System Center Configuration Manager (SCCM)
The seamless and transparent nature of DirectAccess makes it wonderfully easy to use. In most cases, it requires no user interaction at all to access internal corporate resources while away from the office. This enables users to be more productive. At the same time, it offers important connectivity benefits for IT administrators and systems management engineers as well.
Always Managed
DirectAcces…
View On WordPress
#6to4#DirectAccess#DNS64#geographic redundancy#intrasite automatic tunnel addressing protocol#IP-HTTPS#IPv6#IPv6 transition technology#ISATAP#load balancing#malware#Manage Out#multisite#NAT64#NLB#PowerShell#PowerShell remoting#ransomware#RDC#Remote Access#remote desktop#remote desktop connection#remote PowerShell#SCCM#SCCM remote control#System Center Configuration Manager#Teredo#transition technology#VNC#Windows Server Update Services
0 notes
Text
Python: Einfacher und flexibler Portscanner zum Schwachstellentesten (Version 0.1)

Klar man hätte auch einen der schon recht bekannten Port Scanner nutzten können, aber mich treibt es immer wieder zu einer Selbstentwicklung. Für mich ist es extrem wichtig hier Python zu nutzten, da ich es für extrem flexibel halte auch durch die Erweiterung in alle möglichen Richtungen da will ich mich schlichtweg nicht eingrenzen lassen.
Dieses Skript ist ein einfacher Port-Scanner in Python. Es scannt ein angegebenes Ziel (eine IP-Adresse oder einen Hostnamen) auf offene Ports innerhalb eines definierten Bereichs, protokolliert die Aktivitäten und erstellt einen Bericht über den Scan. Hier ist, was jeder Teil des Skripts macht:
- Konfiguration: Das Skript enthält verschiedene Konfigurationsvariablen, die entweder standardmäßig festgelegt sind oder über Umgebungsvariablen angepasst werden können. Diese Konfigurationen umfassen das Ziel des Portscans, die zu überprüfenden Portbereiche, die maximale Anzahl von Prozessen, die gleichzeitig ausgeführt werden können, die Timeout-Zeit für Socket-Operationen sowie die Namen und Pfade von Log- und Berichtsdateien.
- Logging-Konfiguration: Hier wird die Konfiguration für das Protokollieren von Ereignissen festgelegt. Es wird ein Protokollierungslevel festgelegt (standardmäßig INFO), ein Dateiname für das Protokoll (standardmäßig "port_scan.log") und ein Format für die Protokolleinträge.
- Hilfsfunktionen: Das Skript enthält mehrere Hilfsfunktionen, die für verschiedene Aufgaben verwendet werden, z. B. das Drucken eines ASCII-Banners, das Überprüfen der Gültigkeit einer IPv6-Adresse, das Überprüfen eines bestimmten Ports, das Abrufen der IP-Adresse eines Ziels, das Generieren eines Berichts und das Generieren eines Diagramms für die Portbereiche.
- Firewall-Erkennung: Es gibt eine Funktion zum Erkennen einer Firewall oder eines IDS (Intrusion Detection System) auf dem Zielhost. Es wird eine HTTP-Anfrage an den Zielserver gesendet, und basierend auf der Antwort wird überprüft, ob eine Firewall oder ein IDS vorhanden ist.
- Portscan-Funktion: Die Hauptfunktion des Skripts ist die "scan_ports"-Funktion. Diese Funktion ruft die anderen Funktionen auf, um den Portscan durchzuführen. Sie erstellt ein ASCII-Banner, gibt Informationen zum Scan aus, erstellt eine Liste aller zu überprüfenden Ports, ruft die Funktion zum Überprüfen der Ports mithilfe von Multiprocessing auf, generiert einen Bericht, erstellt ein Diagramm für die Portbereiche und ruft die Firewall-Erkennungsfunktion auf. Der Bericht wird in einer HTML-Datei gespeichert.
Hauptprogramm: Der Code am Ende des Skripts überprüft, ob das Skript direkt ausgeführt wird (statt importiert zu werden). Wenn ja, wird die "scan_ports"-Funktion aufgerufen, um den Portscan durchzuführen.

Was in der Version 0.1 schon enthalten ist?
# Todo:
# 1. Add support for UDP ports
# 2. Add support for port ranges - Done
# 3. Add support for port lists - Done
# 4. Add support for CIDR notation - Done
# 5. Add support for hostnames - Done - Use socket.gethostbyname()
# 6. Add support for IPv6 - Done - Use socket.getaddrinfo()
# 7. Add support for IPv6 ranges - Done
# 8. Add support for IPv6 lists - Done
# 9. Add support for IPv6 CIDR notation - Done
# 10. Add support for IPv6 hostnames - Done
# 11. Add support for IPv6 link-local addresses - Done
# 12. Add support for IPv6 site-local addresses - Done
# 13. Add support for IPv6 multicast addresses - Done
# 14. Add support for IPv6 loopback addresses - Done
# 15. Add support for IPv6 unspecified addresses - Done
# 16. Add support for IPv6 IPv4-mapped addresses - Done
# 17. Add support for IPv6 IPv4-translated addresses - Done
# 18. Add support for IPv6 6to4 addresses
# 19. Add support for IPv6 Teredo addresses
# 20. Add support for IPv6 6bone addresses - Done
# 21. Add support for IPv6 documentation addresses - Testing
# 22. Add support for IPv6 global unicast addresses- Testing
# 23. Add support for IPv6 unique local addresses - Testing
# 24. Add support for IPv6 link-local unicast addresses - Testing
# 25. Add support for IPv6 site-local unicast addresses - Testing
# 26. Add support for IPv6 multicast addresses - Testing
# 27. Add support for IPv6 loopback addresses - Testing
# 28. Add support for IPv6 unspecified addresses
# 29. Add support for IPv6 addresses with zone indices
# 30. Add support for IPv6 addresses with scope IDs
# 31. Add support for IPv6 addresses with embedded IPv4 addresses
# 32. Add support for IPv6 addresses with embedded IPv4 addresses and zone indices
# 33. Add support for IPv6 addresses with embedded IPv4 addresses and scope IDs
# 34. Add support for IPv6 addresses with embedded IPv4-mapped addresses
# 35. Add support for IPv6 addresses with embedded IPv4-mapped addresses and zone indices - Done
# 36. Add support for IPv6 addresses with embedded IPv4-mapped addresses and scope IDs
# Done:
# 1. Add support for IPv6 addresses with embedded IPv4-mapped addresses and scope IDs
# 2. Add support for IPv6 addresses with embedded IPv4-mapped addresses and zone indices
# 3. Add support for IPv6 addresses with embedded IPv4 addresses and scope IDs
# 4. Add support for IPv6 addresses with embedded IPv4 addresses and zone indices
# 5. Add support for IPv6 addresses with zone indices
# 6. Add support for IPv6 unspecified addresses
# 7. Add support for IPv6 loopback addresses
# 8. Add support for IPv6 multicast addresses
# 9. Add support for IPv6 site-local unicast addresses
# 10. Add support for IPv6 link-local unicast addresses
Hier das komplette Skript
import pyfiglet
import socket
import logging
import multiprocessing
import os
from datetime import datetime
from tqdm import tqdm
from colorama import Fore, Style
from tabulate import tabulate
import matplotlib.pyplot as plt
import requests
import ipaddress
# This line determines the target of the port scan.
# If an environment variable "TARGET" is set, it will be used as the target.
# If not, the default target is "example.com".
TARGET = os.environ.get("TARGET", "example.com")
# Here, the port ranges that the scanner should check are defined.
PORT_RANGES =
# This line determines the maximum number of processes that can run simultaneously.
# By default, this is the number of CPU cores of the system, but it can be
# customized by setting the environment variable "MAX_PROCESSES".
MAX_PROCESSES = int(os.environ.get("MAX_PROCESSES", multiprocessing.cpu_count()))
# This sets the timeout for socket operations. The default timeout is one second,
# but it can be customized by setting the environment variable "SOCKET_TIMEOUT".
SOCKET_TIMEOUT = int(os.environ.get("SOCKET_TIMEOUT", 1))
# This determines the name of the log file. By default, it's "port_scan.log",
# but it can be changed by setting the environment variable "LOG_FILENAME".
LOG_FILENAME = os.environ.get("LOG_FILENAME", "port_scan.log")
# This determines the path and name of the report file. By default, it's "Security_Testing/Port_Scann/Reports/port_scan_report.html",
# but it can be changed by setting the environment variable "REPORT_FILENAME".
REPORT_FILENAME = os.environ.get("REPORT_FILENAME", "Security_Testing/Port_Scann/Reports/port_scan_report.html")
# This determines the directory where the report is saved.
REPORT_DIRECTORY = os.path.dirname(REPORT_FILENAME)
os.makedirs(REPORT_DIRECTORY, exist_ok=True)
# This creates the directory where the report is saved, if it doesn't already exist.
# The exist_ok=True parameter prevents an error if the directory already exists.
# Logging configuration
logging.basicConfig(filename=LOG_FILENAME, level=logging.INFO, format='%(asctime)s - %(levelname)s - %(message)s')
## filename=LOG_FILENAME: This specifies that the logs should be written to a file,
# and the name of the file is the value of the LOG_FILENAME variable.
## level=logging.INFO: This sets the root logger level to INFO. This means that only events of this level and above will be tracked,
# unless the logging package is configured differently elsewhere.
# Levels you can specify include DEBUG, INFO, WARNING, ERROR, and CRITICAL.
## format='%(asctime)s - %(levelname)s - %(message)s': This is a string that specifies the layout of the log entries.
# Each "%(name)s" is a placeholder that will be replaced with the corresponding "name" from each log record.
# In this case, asctime will be replaced with the time the log record was created, levelname will be replaced with the level
# name of the log record (INFO, ERROR, etc.), and message will be replaced with the log message.
def print_banner():
ascii_banner = pyfiglet.figlet_format("OPS - Open Port Scanner")
print(ascii_banner)
def print_scan_info():
print("-" * 50)
print("Scanning Target: " + TARGET)
global start_time
start_time = datetime.now()
print("Scanning started at: " + str(start_time))
print("-" * 50)
def validate_ipv6_address(ip):
"""Prüft, ob die gegebene IP-Adresse eine gültige IPv6-Adresse ist."""
try:
ipaddress.IPv6Address(ip)
return True
except ipaddress.AddressValueError:
return False
def check_port(port_info):
ip, port = port_info
try:
if validate_ipv6_address(ip):
with socket.socket(socket.AF_INET6, socket.SOCK_STREAM) as s:
s.settimeout(SOCKET_TIMEOUT)
# Add the scope id if it is a link-local address
if ipaddress.IPv6Address(ip).is_link_local:
s.connect((ip, port, 0, YOUR_NETWORK_INTERFACE_INDEX))
else:
s.connect((ip, port))
else:
with socket.socket(socket.AF_INET, socket.SOCK_STREAM) as s:
s.settimeout(SOCKET_TIMEOUT)
result = s.connect_ex((ip, port))
except OSError:
return {"port": port, "status": "error"}
if result == 0:
logging.info("Port {} is open".format(port))
return {"port": port, "status": "open"}
else:
return {"port": port, "status": "closed"}
def get_ip_address(target):
addresses = socket.getaddrinfo(target, None)
for address in addresses:
if address == socket.AF_INET6:
# Detect if it's an IPv4-mapped IPv6 address
ip = ipaddress.IPv6Address(address)
if ip.ipv4_mapped:
return str(ip.ipv4_mapped)
else:
return address
return addresses
def generate_report(results):
headers =
data = , port) for port in results]
table = tabulate(data, headers=headers, tablefmt="pretty")
report = f'''
Port Scan Report
Port Scan Report
Target: {TARGET}
Scan started at: {str(start_time)}
Scan finished at: {str(datetime.now())}
Time taken: {str(datetime.now() - start_time)}
Ports:
{table}
'''
return report
def generate_port_range_chart(results):
open_ports = len( == "open"])
closed_ports = len( == "closed"])
labels =
values =
colors =
explode = (0.1, 0)
plt.pie(values, explode=explode, labels=labels, colors=colors, autopct='%1.1f%%', startangle=90)
plt.axis('equal')
plt.title("Port Range Chart")
plt.show()
def detect_firewall(target):
try:
response = requests.get(f"http://{target}")
if response.status_code == 200:
print(Fore.YELLOW + "nFirewall or IDS detected!")
print("The response from the target server indicates the presence of a firewall or IDS.")
print("Please exercise caution while performing the port scan.")
print(Style.RESET_ALL)
logging.warning("Firewall or IDS detected")
except requests.exceptions.RequestException as e:
print(Fore.YELLOW + "nWarning: " + str(e))
print(Style.RESET_ALL)
logging.warning(str(e))
raise e
def scan_ports():
print_banner()
print_scan_info()
try:
port_ranges = , range_info) for range_info in PORT_RANGES]
all_ports =
for start, end in port_ranges:
all_ports.extend(range(start, end + 1))
if '/' in TARGET:
if ':' in TARGET:
ip_network = ipaddress.IPv6Network(TARGET, strict=False)
else:
ip_network = ipaddress.IPv4Network(TARGET, strict=False)
target_ips =
elif ',' in TARGET:
target_ips =
else:
target_ips = ]
'''Finally, you will need to adjust your code to handle IPv6 link-local addresses correctly when you are resolving the TARGET:
In this line, I have changed socket.AF_UNSPEC to socket.AF_INET6 to ensure that it will resolve to an IPv6 address.'''
#else:
#target_ips = ]
with multiprocessing.Pool(processes=MAX_PROCESSES) as pool:
total_ports = len(all_ports) * len(target_ips)
results = list(tqdm(pool.imap(check_port, ), total=total_ports, ncols=80, bar_format='{l_bar}{bar}| {n_fmt}/{total_fmt}'))
open_ports = for port in results if port == "open"]
if open_ports:
print(Fore.GREEN + "nOpen Ports:")
for port in open_ports:
print("Port {} is open".format(port))
print(Style.RESET_ALL)
logging.info("Open ports: {}".format(open_ports))
else:
print(Fore.RED + "nNo open ports found." + Style.RESET_ALL)
logging.info("No open ports found.")
report = generate_report(results)
with open(REPORT_FILENAME, 'w') as report_file:
report_file.write(report)
generate_port_range_chart(results)
detect_firewall(TARGET)
print("Port scan report generated: {}".format(REPORT_FILENAME))
except KeyboardInterrupt:
print("nExiting Program !!!!")
logging.info("Program interrupted by the user")
except socket.error as e:
print("nServer not responding !!!!")
print(Fore.RED + "nError: " + str(e))
logging.error(str(e))
raise e
except requests.exceptions.RequestException as e:
print(Fore.YELLOW + "nWarning: " + str(e))
logging.warning(str(e))
raise e
if __name__ == '__main__':
scan_ports()
Read the full article
0 notes
Text
Vmware workstation 6.5 1 download 無料ダウンロード.Windows用のVMware Workstation Pro
Vmware workstation 6.5 1 download 無料ダウンロード.VMware Player

VMware Playerは通常ホストと呼ばれる別のオペレーティングシステム内で、選択した任意のオペレーティングシステムを起動させます.旧バージョン VMware Workstation Player Windows -
VMware vSphere Hypervisor ダウンロード センター. このダウンロード センターには、技術資料、インストール デモ、および vSphere Hypervisor のトレーニングが用意されています。 Jul 02, · Download VMware Workstation Player | VMware. リンク先でfor Windowsをクリックするとダウンロードが始まります。 私のときはVMware-playerexeをダウンロードしました。 他のバージョンがどこにあるのかとかはすいませんわかりません。 Jul 23, · VMware Customer Connectにログインします。 [製品とアカウント] > [すべての製品] の順に移動します。 VMware vSphere を見つけて、 [ダウンロード コンポーネントの表示] をクリックします。 [バージョンの選択] ドロップダウンから VMware vSphere のバージョンを選択します。 VMware vSphere Hypervisor (ESXi) の
Vmware workstation 6.5 1 download 無料ダウンロード.Windows用のVMware Workstation Player をダウンロード -
7/10 (11 点) - 無料でVMware Playerをダウンロード VMware Playerは通常ホストと呼ばれる別のオペレーティングシステム内で、選択した任意のオペレーティングシステムを起動させます. システムの仮想化のおかげでそのシミュレーションによって、通常ホストと呼ばれる別のオペレーティングシステム内 Jan 01, · VMware Workstation Player 公開日: 24日 11月 (数秒前) VMware Workstation Player 公開日: 24日 11月 (数秒前) VMware Workstation Player 公開日: 24日 11月 (数秒前) VMware Workstation Player は、Windows または Linux PC 上で 1 台の仮想マシンを実行するための最適なユーティリティです。 Workstation Player は、管理対象の企業デスクトップの配信、教育機関での学習やトレーニングなどの用途に使用できます。
VMware トライアル版. ユーザー評価 User Rating 7. There are numerous virtual environment provides on the market today, some put ease of use above functionality, other place integration above stability. VMware Workstation Pro is the easiest to use, the fastest and the most reliable app when it comes to evaluating a new OS, or new software apps and patches, in an isolated and safe virtualized environment. VMware Compatibility - Create one; Run anywhere on VMware software.
vSphere and vCloud Air Support - Drag and drop VMs between environments. Restricted and Encrypted VMs - Protection and performance enhancements. Expiring Virtual Machines - Time-limited virtual machines. Latest Hardware Support - Broadwell and Haswell CPU support. Enterprise Quality Virtual Machines - 16 vCPUs, 8TB virtual disks, and 64GB memory. Enhanced IPv6 Support - IPv6-to-IPv4 NAT 6to4 and 4to6. Virtual Machine Video Memory - Up to 2GB.
Enhanced Connectivity - USB 3. VMware Workstation Pro is a perfect choice for those of you who are a little skeptical about making the leap over to Windows By utilizing an app like this, you'll get to try out all of Windows 10's new features in a safe sandboxed environment, without the need to install the OS natively. VMware Workstation Pro doesn't just support Microsofts OS, you can also install Linux VMs, including Ubuntu, Red Hat, Fedora, and lots of other distributions as well.
Overall, Workstation Pro offers high performance, strong reliability, and cutting edge features that make it stand out from the crowd. The full version is a little pricey, but you do get what you pay for. VMware Workstation Proのバージョン 変更ログ情報に変更があった場合には、お客様からの連絡をお待ちしております!次に進みます。 お問い合わせページ 当社にご連絡ください。.
仮想マシンは、ソフトウェアで定義されたコンピューターです。 PCでPCを実行するようなものです。 この無料のデスクトップ仮想化ソフトウェアアプリケーションにより、VMware Workstation、VMware Fusion、VMware Server、またはVMware ESXで作成された仮想マシンを簡単に操作できます。 主な機能は次のとおりです。 1台のPCで複数のオペレーティングシステム. AOMEI Backupper Standardは、システムの増分および差分バックアップを適用することによりデータを保護します。このアプリケーションには、スケジュールされたバックアップ、バックアップの暗号化と圧縮機能など、��くの便利な機能があります。 AOMEI Backupper Standardを使用すると、ハードディスク全体または指定されたパーティションをバックアップし、システムイメージを.
Adobe Document Cloudを搭載したAdobe Acrobat Pro DCは、「重要なビジネスドキュメントの処理方法を永遠に変える」と宣伝されています。 Adobe Acrobat Pro DCを使用すると、好きな場所で作業できます。新しいAcrobat DCモバイルアプリを使用してPDFを作成、編集、および署名できます。また、モバイルリンクを使用して、デスクトップ、Web、およ. Reaper Audio Workstationには、フル装備のデジタルオーディオスタジオが付属しています。オーディオとMIDIのインポート、合成、サンプリング、作成、アレンジ、編集、ミックス、マスター。 Reaper Audio Workstationは、ソリストからオーケストラまで、あらゆるサイズの録音に適しています。 64ビットの内部オーディオ処理。ほとんどすべてのビット深度とサンプルレ.
Windows Server R2オペレーティングシステム用Intel Workstation System PCRファミリ用のデバイスドライバーインストーラー。 次のデバイスもサポートされています。 IntelワークステーションシステムSCSCWS IntelワークステーションシステムPCRファミリー IntelワークステーションボードWCRファミリ. このドライバーパックは、Windows XP Bit Editionオペレーティングシステム用のIntel Workstation System PCRファミリーのドライバーをインストールします。 このドライバーは、次の製品とも互換性があります。 IntelワークステーションシステムSCSCWS IntelワークステーションシステムPCRファミリー Intelワー. Driver pack for Windows Server R2 for the Intel Integrated RAID Module RMS25CB product family.
The driver pack also applies to the products listed below:Intel Workstation System SCSCWSInte. DivXは、AACオーディオを含むHD H. avi)を再生することもできます。 DivXを使用すると、最大4K解像度のHEVCを. Windows用のVMware Workstation Pro PC用のVMware Workstation Pro VMware Workstation Player 仮想マシンは、ソフトウェアで定義されたコンピューターです。 PCでPCを実行するようなものです。 この無料のデスクトップ仮想化ソフトウェアアプリケーションにより、VMware Workstation、VMware Fusion、VMware Server、またはVMware ESXで作成された仮想マシンを簡単に操作できます。 主な機能は次のとおりです。 1台のPCで複数のオペレーティングシステム.
AOMEI Backupper AOMEI Backupper Standardは、システムの増分および差分バックアップを適用することによりデータを保護します。このアプリケーションには、スケジュールされたバックアップ、バックアップの暗号化と圧縮機能など、多くの便利な機能があります。 AOMEI Backupper Standardを使用すると、ハードディスク全体または指定されたパーティションをバックアップし、システムイメージを. Adobe Acrobat Pro DC Adobe Document Cloudを搭載したAdobe Acrobat Pro DCは、「重要なビジネスドキュメントの処理方法を永遠に変える」と宣伝されています。 Adobe Acrobat Pro DCを使用すると、好きな場所で作業できます。新しいAcrobat DCモバイルアプリを使用してPDFを作成、編集、および署名できます。また、モバイルリンクを使用して、デスクトップ、Web、およ.
Reaper Audio Workstation Reaper Audio Workstationには、フル装備のデジタルオーディオスタジオが付属しています。オーディオとMIDIのインポート、合成、サンプリング、作成、アレンジ、編集、ミックス、マスター。 Reaper Audio Workstationは、ソリストからオーケストラまで、あらゆるサイズの録音に適しています。 64ビットの内部オーディオ処理。ほとんどすべてのビット深度とサンプルレ. Workstation System PCR Family Driver for Windows Server R2 6. Workstation System PCR Family Driver for Windows XP Bit Edition 6. Integrated RAID Module RMS25CB Driver for Windows Server R2 6. DivX DivXは、AACオーディオを含むHD H.
0 notes
Text
Vmware workstation download for windows 8.1 64 bit 無料ダウンロード.Windows用のVMware Workstation Pro
Vmware workstation download for windows 8.1 64 bit 無料ダウンロード.Windows用のVMware Workstation Player

PC用のVMware Workstation Pro.Windows用のVMware Workstation Pro をダウンロード -
Windows用のVMware Workstation Player をダウンロードしてください。 VLC Media Player bit. など、コンピューターで高品質のデジタルビデオを楽しむために必要なすべてを提供する無料ダウンロードです。 VMware Workstation Pro is the easiest to use, the fastest and the most reliable app when it comes to evaluating a new OS, or new software apps and patches, in an isolated and safe virtualized environment. Powerful 3D Graphics - DirectX 10* and OpenGL support. VMware Compatibility - Create one; Run anywhere on VMware software VMware Workstation Player. VMware Workstation Player is an ideal utility for running a single virtual machine on a Windows or Linux PC. Organizations use Workstation Player to deliver managed corporate desktops, while students and educators use it for learning and training. The free version is available for non-commercial, personal and home use
Vmware workstation download for windows 8.1 64 bit 無料ダウンロード.VMware Workstation Player ダウンロードとインストール方法
Windows用のVMware Workstation Player をダウンロードしてください。 VLC Media Player bit. など、コンピューターで高品質のデジタルビデオを楽しむために必要なすべてを提供する無料ダウンロードです。 VMware Workstation Pro is the easiest to use, the fastest and the most reliable app when it comes to evaluating a new OS, or new software apps and patches, in an isolated and safe virtualized environment. Powerful 3D Graphics - DirectX 10* and OpenGL support. VMware Compatibility - Create one; Run anywhere on VMware software VMware Workstation Player. VMware Workstation Player is an ideal utility for running a single virtual machine on a Windows or Linux PC. Organizations use Workstation Player to deliver managed corporate desktops, while students and educators use it for learning and training. The free version is available for non-commercial, personal and home use
VMware トライアル版. ユーザー評価 User Rating 7. There are numerous virtual environment provides on the market today, some put ease of use above functionality, other place integration above stability.
VMware Workstation Pro is the easiest to use, the fastest and the most reliable app when it comes to evaluating a new OS, or new software apps and patches, in an isolated and safe virtualized environment. VMware Compatibility - Create one; Run anywhere on VMware software. vSphere and vCloud Air Support - Drag and drop VMs between environments. Restricted and Encrypted VMs - Protection and performance enhancements. Expiring Virtual Machines - Time-limited virtual machines. Latest Hardware Support - Broadwell and Haswell CPU support.
Enterprise Quality Virtual Machines - 16 vCPUs, 8TB virtual disks, and 64GB memory. Enhanced IPv6 Support - IPv6-to-IPv4 NAT 6to4 and 4to6. Virtual Machine Video Memory - Up to 2GB. Enhanced Connectivity - USB 3. VMware Workstation Pro is a perfect choice for those of you who are a little skeptical about making the leap over to Windows By utilizing an app like this, you'll get to try out all of Windows 10's new features in a safe sandboxed environment, without the need to install the OS natively.
VMware Workstation Pro doesn't just support Microsofts OS, you can also install Linux VMs, including Ubuntu, Red Hat, Fedora, and lots of other distributions as well. Overall, Workstation Pro offers high performance, strong reliability, and cutting edge features that make it stand out from the crowd. The full version is a little pricey, but you do get what you pay for. VMware Workstation Proのバージョン 変更ログ情報に変更があった場合には、お客様からの連絡をお待ちしております!次に進みます。 お問い合わせページ 当社にご連絡ください。. 仮想マシンは、ソフトウェアで定義されたコンピューターです。 PCでPCを実行するようなものです。 この無料のデスクトップ仮想化ソフトウェアアプリケーションにより、VMware Workstation、VMware Fusion、VMware Server、またはVMware ESXで作成された仮想マシンを簡単に操作できます。 主な機能は次のとおりです。 1台のPCで複数のオペレーティングシステム.
AOMEI Backupper Standardは、システムの増分および差分バックアップを適用することによりデータを保護します。このアプリケーションには、スケジュールされたバックアップ、バックアップの暗号化と圧縮機能など、多くの便利な機能があります。 AOMEI Backupper Standardを使用すると、ハードディスク全体または指定されたパーティションをバックアップし、システムイメージを. Adobe Document Cloudを搭載したAdobe Acrobat Pro DCは、「重要なビジネスドキュメントの処理方法を永遠に変える」と宣伝されています。 Adobe Acrobat Pro DCを使用すると、好きな場所で作業できます。新しいAcrobat DCモバイルアプリを使用してPDFを作成、編集、および署名できます。また、モバイルリンクを使用して、デスクトップ、Web、およ.
Reaper Audio Workstationには、フル装備のデジタルオーディオスタジオが付属しています。オーディオとMIDIのインポート、合成、サンプリング、作成、アレンジ、編集、ミックス、マスター。 Reaper Audio Workstationは、ソリストからオーケストラまで、あらゆるサイズの録音に適しています。 64ビットの内部オーディオ処理。ほとんどすべてのビット深度とサンプルレ. Windows Server R2オペレーティングシステム用Intel Workstation System PCRファミリ用のデバイスドライバーインストーラー。 次のデバイスもサポートされています。 IntelワークステーションシステムSCSCWS IntelワークステーションシステムPCRファミリー IntelワークステーションボードWCRファミリ. このドライバーパックは、Windows XP Bit Editionオペレーティングシステム用のIntel Workstation System PCRファミリーのドライバーをインストールします。 このドライバーは、次の製品とも互換性があります。 IntelワークステーションシステムSCSCWS IntelワークステーションシステムPCRファミリー Intelワー.
Driver pack for Windows Server R2 for the Intel Integrated RAID Module RMS25CB product family. The driver pack also applies to the products listed below:Intel Workstation System SCSCWSInte. DivXは、AACオーディオを含むHD H. avi)を再生することもできます。 DivXを使用すると、最大4K解像度のHEVCを.
Windows用のVMware Workstation Pro PC用のVMware Workstation Pro VMware Workstation Player 仮想マシンは、ソフトウェアで定義されたコンピューターです。 PCでPCを実行するようなものです。 この無料のデスクトップ仮想化ソフトウェアアプリケーションにより、VMware Workstation、VMware Fusion、VMware Server、またはVMware ESXで作成された仮想マシンを簡単に操作できます。 主な機能は次のとおりです。 1台のPCで複数のオペレーティングシステム. AOMEI Backupper AOMEI Backupper Standardは、システムの増分および差分バックアップを適用することによりデータを保護します。このアプリケーションには、スケジュールされたバックアップ、バックアップの暗号化と圧縮機能など、多くの便利な機能があります。 AOMEI Backupper Standardを使用すると、ハードディスク全体または指定されたパーティションをバックアップし、システムイメージを.
Adobe Acrobat Pro DC Adobe Document Cloudを搭載したAdobe Acrobat Pro DCは、「重要なビジネスドキュメントの処理方法を永遠に変える」と宣伝されています。 Adobe Acrobat Pro DCを使用すると、好きな場所で作業できます。新しいAcrobat DCモバイルアプリを使用してPDFを作成、編集、および署名できます。また、モバイルリンクを使用して、デスクトップ、Web、およ. Reaper Audio Workstation Reaper Audio Workstationには、フル装備のデジタルオーディオスタジオが付属しています。オーディオとMIDIのインポート、合成、サンプリング、作成、アレンジ、編集、ミックス、マスター。 Reaper Audio Workstationは、ソリストからオーケストラまで、あらゆるサイズの録音に適しています。 64ビットの内部オーディオ処理。ほとんどすべてのビット深度とサンプルレ.
Workstation System PCR Family Driver for Windows Server R2 6. Workstation System PCR Family Driver for Windows XP Bit Edition 6. Integrated RAID Module RMS25CB Driver for Windows Server R2 6. DivX DivXは、AACオーディオを含むHD H.
0 notes
Last Seen Blogs

langkahkiri
Left Foot

hunterhour
HUNTER

suengicom
suengi.com

heromuses
Queen From Outer Space

enchantingtoadzipperoperator
Ma’at⚜️