#Access EC2 Linux Instance
Explore tagged Tumblr posts
Visit Tumblr Blog
Explore Tumblr blogs with no restrictions, modern design and the best experience.
Last Seen Tumblr Blogs


Fun Fact
Tumblr.com is the 103rd most visited website in the world.
Text
Access EC2 Linux Instance via the Password
An Amazon EC2 instance is a virtual server in Amazon’s Elastic Compute Cloud (EC2) for running applications on the Amazon Web Services (AWS) infrastructure. In this article, we will describe how to access EC2 Linux Instance via the Password. Please see Create Folders and Enable File sharing on Windows, How to deploy Ansible AWX on centos 8, and how to setup and configure a Lamp stack on…
#Access EC2 Linux Instance#Add a user as a Sudoer on CentOS#AWS#EC2#EC2 instance#EC2 Instances#Instance#Linux
0 notes
Text
Amazon DCV 2024.0 Supports Ubuntu 24.04 LTS With Security

NICE DCV is a different entity now. Along with improvements and bug fixes, NICE DCV is now known as Amazon DCV with the 2024.0 release.
The DCV protocol that powers Amazon Web Services(AWS) managed services like Amazon AppStream 2.0 and Amazon WorkSpaces is now regularly referred to by its new moniker.
What’s new with version 2024.0?
A number of improvements and updates are included in Amazon DCV 2024.0 for better usability, security, and performance. The most recent Ubuntu 24.04 LTS is now supported by the 2024.0 release, which also offers extended long-term support to ease system maintenance and the most recent security patches. Wayland support is incorporated into the DCV client on Ubuntu 24.04, which improves application isolation and graphical rendering efficiency. Furthermore, DCV 2024.0 now activates the QUIC UDP protocol by default, providing clients with optimal streaming performance. Additionally, when a remote user connects, the update adds the option to wipe the Linux host screen, blocking local access and interaction with the distant session.
What is Amazon DCV?
Customers may securely provide remote desktops and application streaming from any cloud or data center to any device, over a variety of network conditions, with Amazon DCV, a high-performance remote display protocol. Customers can run graphic-intensive programs remotely on EC2 instances and stream their user interface to less complex client PCs, doing away with the requirement for pricey dedicated workstations, thanks to Amazon DCV and Amazon EC2. Customers use Amazon DCV for their remote visualization needs across a wide spectrum of HPC workloads. Moreover, well-known services like Amazon Appstream 2.0, AWS Nimble Studio, and AWS RoboMaker use the Amazon DCV streaming protocol.
Advantages
Elevated Efficiency
You don’t have to pick between responsiveness and visual quality when using Amazon DCV. With no loss of image accuracy, it can respond to your apps almost instantly thanks to the bandwidth-adaptive streaming protocol.
Reduced Costs
Customers may run graphics-intensive apps remotely and avoid spending a lot of money on dedicated workstations or moving big volumes of data from the cloud to client PCs thanks to a very responsive streaming experience. It also allows several sessions to share a single GPU on Linux servers, which further reduces server infrastructure expenses for clients.
Adaptable Implementations
Service providers have access to a reliable and adaptable protocol for streaming apps that supports both on-premises and cloud usage thanks to browser-based access and cross-OS interoperability.
Entire Security
To protect customer data privacy, it sends pixels rather than geometry. To further guarantee the security of client data, it uses TLS protocol to secure end-user inputs as well as pixels.
Features
In addition to native clients for Windows, Linux, and MacOS and an HTML5 client for web browser access, it supports remote environments running both Windows and Linux. Multiple displays, 4K resolution, USB devices, multi-channel audio, smart cards, stylus/touch capabilities, and file redirection are all supported by native clients.
The lifecycle of it session may be easily created and managed programmatically across a fleet of servers with the help of DCV Session Manager. Developers can create personalized Amazon DCV web browser client applications with the help of the Amazon DCV web client SDK.
How to Install DCV on Amazon EC2?
Implement:
Sign up for an AWS account and activate it.
Open the AWS Management Console and log in.
Either download and install the relevant Amazon DCV server on your EC2 instance, or choose the proper Amazon DCV AMI from the Amazon Web Services Marketplace, then create an AMI using your application stack.
After confirming that traffic on port 8443 is permitted by your security group’s inbound rules, deploy EC2 instances with the Amazon DCV server installed.
Link:
On your device, download and install the relevant Amazon DCV native client.
Use the web client or native Amazon DCV client to connect to your distant computer at https://:8443.
Stream:
Use AmazonDCV to stream your graphics apps across several devices.
Use cases
Visualization of 3D Graphics
HPC workloads are becoming more complicated and consuming enormous volumes of data in a variety of industrial verticals, including Oil & Gas, Life Sciences, and Design & Engineering. The streaming protocol offered by Amazon DCV makes it unnecessary to send output files to client devices and offers a seamless, bandwidth-efficient remote streaming experience for HPC 3D graphics.
Application Access via a Browser
The Web Client for Amazon DCV is compatible with all HTML5 browsers and offers a mobile device-portable streaming experience. By removing the need to manage native clients without sacrificing streaming speed, the Web Client significantly lessens the operational pressure on IT departments. With the Amazon DCV Web Client SDK, you can create your own DCV Web Client.
Personalized Remote Apps
The simplicity with which it offers streaming protocol integration might be advantageous for custom remote applications and managed services. With native clients that support up to 4 monitors at 4K resolution each, Amazon DCV uses end-to-end AES-256 encryption to safeguard both pixels and end-user inputs.
Amazon DCV Pricing
Amazon Entire Cloud:
Using Amazon DCV on AWS does not incur any additional fees. Clients only have to pay for the EC2 resources they really utilize.
On-site and third-party cloud computing
Please get in touch with DCV distributors or resellers in your area here for more information about licensing and pricing for Amazon DCV.
Read more on Govindhtech.com
#AmazonDCV#Ubuntu24.04LTS#Ubuntu#DCV#AmazonWebServices#AmazonAppStream#EC2instances#AmazonEC2#News#TechNews#TechnologyNews#Technologytrends#technology#govindhtech
2 notes
·
View notes
Text
How to Use AWS CLI: Automate Cloud Management with Command Line
The AWS Command Line Interface (AWS CLI) is a powerful tool that allows developers and system administrators to interact with AWS services directly from the terminal. It provides automation capabilities, improves workflow efficiency, and enables seamless cloud resource management.
Why Use AWS CLI?
Automation: Automate repetitive tasks using scripts.
Efficiency: Manage AWS services without navigating the AWS Management Console.
Speed: Perform bulk operations faster than using the web interface.
Scripting & Integration: Combine AWS CLI commands with scripts for complex workflows.
1. Installing AWS CLI
Windows
Download the AWS CLI installer from AWS official site.
Run the installer and follow the prompts.
Verify installation:
aws --version
macOS
Install using Homebrew:
brew install awscli
Verify installation:
aws --version
Linux
Install using package manager:
curl "https://awscli.amazonaws.com/AWSCLIV2.pkg" -o "awscliv2.pkg" sudo installer -pkg awscliv2.pkg -target /
Verify installation:
aws --version
2. Configuring AWS CLI
After installation, configure AWS CLI with your credentials:aws configure
You’ll be prompted to enter:
AWS Access Key ID
AWS Secret Access Key
Default Region (e.g., us-east-1)
Default Output Format (json, text, or table)
Example:AWS Access Key ID [****************ABCD]: AWS Secret Access Key [****************XYZ]: Default region name [us-east-1]: Default output format [json]:
To verify credentials:aws sts get-caller-identity
3. Common AWS CLI Commands
Managing EC2 Instances
List EC2 instances:
aws ec2 describe-instances
Start an instance:
aws ec2 start-instances --instance-ids i-1234567890abcdef0
Stop an instance:
aws ec2 stop-instances --instance-ids i-1234567890abcdef0
S3 Bucket Operations
List all S3 buckets:
aws s3 ls
Create a new S3 bucket:
aws s3 mb s3://my-new-bucket
Upload a file to a bucket:
aws s3 cp myfile.txt s3://my-new-bucket/
Download a file from a bucket:
aws s3 cp s3://my-new-bucket/myfile.txt .
IAM User Management
List IAM users:
aws iam list-users
Create a new IAM user:
aws iam create-user --user-name newuser
Attach a policy to a user:
aws iam attach-user-policy --user-name newuser --policy-arn arn:aws:iam::aws:policy/AmazonS3ReadOnlyAccess
Lambda Function Management
List Lambda functions:
aws lambda list-functions
Invoke a Lambda function:
aws lambda invoke --function-name my-function output.json
CloudFormation Deployment
Deploy a stack:
aws cloudformation deploy --stack-name my-stack --template-file template.yaml
Delete a stack:
aws cloudformation delete-stack --stack-name my-stack
4. Automating Tasks with AWS CLI and Bash Scripts
AWS CLI allows users to automate workflows using scripts. Below is an example script to start and stop EC2 instances at scheduled intervals:#!/bin/bash INSTANCE_ID="i-1234567890abcdef0"# Start instance aws ec2 start-instances --instance-ids $INSTANCE_IDecho "EC2 Instance $INSTANCE_ID started."# Wait 60 seconds before stopping sleep 60# Stop instance aws ec2 stop-instances --instance-ids $INSTANCE_IDecho "EC2 Instance $INSTANCE_ID stopped."
Make the script executable:chmod +x manage_ec2.sh
Run the script:./manage_ec2.sh
5. Best Practices for AWS CLI Usage
Use IAM Roles: Avoid storing AWS credentials locally. Use IAM roles for security.
Enable MFA: Add Multi-Factor Authentication for additional security.
Rotate Access Keys Regularly: If using access keys, rotate them periodically.
Use Named Profiles: Manage multiple AWS accounts efficiently using profiles.
aws configure --profile my-profile
Log Command Outputs: Store logs for debugging and monitoring purposes.
aws s3 ls > s3_log.txt
Final Thoughts
AWS CLI is a powerful tool that enhances productivity by automating cloud operations. Whether you’re managing EC2 instances, deploying Lambda functions, or securing IAM users, AWS CLI simplifies interactions with AWS services.
By following best practices and leveraging automation, you can optimize your cloud management and improve efficiency. Start experimenting with AWS CLI today and take full control of your AWS environment!
WEBSITE: https://www.ficusoft.in/aws-training-in-chennai/
0 notes
Text
Deploying Red Hat Linux on AWS, Azure, and Google Cloud
Red Hat Enterprise Linux (RHEL) is a preferred choice for enterprises looking for a stable, secure, and high-performance Linux distribution in the cloud. Whether you're running applications, managing workloads, or setting up a scalable infrastructure, deploying RHEL on public cloud platforms like AWS, Azure, and Google Cloud offers flexibility and efficiency.
In this guide, we will walk you through the process of deploying RHEL on Amazon Web Services (AWS), Microsoft Azure, and Google Cloud Platform (GCP).
Why Deploy Red Hat Linux in the Cloud?
Deploying RHEL on the cloud provides several benefits, including:
Scalability: Easily scale resources based on demand.
Security: Enterprise-grade security with Red Hat’s continuous updates.
Cost-Effectiveness: Pay-as-you-go pricing reduces upfront costs.
High Availability: Cloud providers offer redundancy and failover solutions.
Integration with DevOps: Seamlessly use Red Hat tools like Ansible and OpenShift.
Deploying Red Hat Linux on AWS
Step 1: Subscribe to RHEL on AWS Marketplace
Go to AWS Marketplace and search for "Red Hat Enterprise Linux."
Choose the version that suits your requirements (RHEL 8, RHEL 9, etc.).
Click on "Continue to Subscribe" and accept the terms.
Step 2: Launch an EC2 Instance
Open the AWS Management Console and navigate to EC2 > Instances.
Click Launch Instance and select your subscribed RHEL AMI.
Choose the instance type (e.g., t2.micro for testing, m5.large for production).
Configure networking, security groups, and storage as needed.
Assign an SSH key pair for secure access.
Review and launch the instance.
Step 3: Connect to Your RHEL Instance
Use SSH to connect:ssh -i your-key.pem ec2-user@your-instance-ip
Update your system:sudo yum update -y
Deploying Red Hat Linux on Microsoft Azure
Step 1: Create a Virtual Machine (VM)
Log in to the Azure Portal.
Click on Create a resource > Virtual Machine.
Search for "Red Hat Enterprise Linux" and select the appropriate version.
Click Create and configure the following:
Choose a subscription and resource group.
Select a region.
Choose a VM size (e.g., Standard_B2s for basic use, D-Series for production).
Configure networking and firewall rules.
Step 2: Configure VM Settings and Deploy
Choose authentication type (SSH key is recommended for security).
Configure disk settings and enable monitoring if needed.
Click Review + Create, then click Create to deploy the VM.
Step 3: Connect to Your RHEL VM
Get the public IP from the Azure portal.
SSH into the VM:ssh -i your-key.pem azureuser@your-vm-ip
Run system updates:sudo yum update -y
Deploying Red Hat Linux on Google Cloud (GCP)
Step 1: Create a Virtual Machine Instance
Log in to the Google Cloud Console.
Navigate to Compute Engine > VM Instances.
Click Create Instance and set up the following:
Choose a name and region.
Select a machine type (e.g., e2-medium for small workloads, n1-standard-4 for production).
Under Boot disk, click Change and select Red Hat Enterprise Linux.
Step 2: Configure Firewall and SSH Access
Enable HTTP/HTTPS traffic if needed.
Add your SSH key under Security.
Click Create to launch the instance.
Step 3: Connect to Your RHEL Instance
Use SSH via Google Cloud Console or terminal:gcloud compute ssh --zone your-zone your-instance-name
Run updates and configure your system:sudo yum update -y
Conclusion
Deploying Red Hat Linux on AWS, Azure, and Google Cloud is a seamless process that provides businesses with a powerful, scalable, and secure operating system. By leveraging cloud-native tools, automation, and Red Hat’s enterprise support, you can optimize performance, enhance security, and ensure smooth operations in the cloud.
Are you ready to deploy RHEL in the cloud? Let us know your experiences and any challenges you've faced in the comments below! For more details www.hawkstack.com
0 notes
Text
How to Connect GitHub to Your EC2 Instance: Easy-to-Follow Step-by-Step Guide

Connecting GitHub with AWS EC2 Instance Are you looking to seamlessly integrate your GitHub repository with an Amazon EC2 instance? Connecting GitHub to your EC2 instance allows you to easily deploy your code, automate workflows, and streamline your development process. In this comprehensive guide, we'll walk you through the step-by-step process of setting up this connection, from creating an EC2 instance to configuring webhooks and deploying your code. By the end of this article, you'll have a fully functional GitHub-EC2 integration, enabling you to focus on writing great code and delivering your projects efficiently. Before you begin Before we dive into the process of connecting GitHub to your EC2 instance, make sure you have the following prerequisites in place: View Prerequisites 1️⃣ AWS Account: An AWS account with access to the EC2 service 2️⃣ GitHub Account: A GitHub account with a repository you want to connect to your EC2 instance 3️⃣ Basic KNowledge: Basic knowledge of AWS EC2 and GitHub With these prerequisites in hand, let's get started with the process of creating an EC2 instance. Discover the Benefits of Connecting GitHub to Your EC2 Instance 1. Automation:Connecting your GitHub repository to your EC2 instance enables you to automate code deployments. Changes pushed to your repo can trigger automatic updates on the EC2 instance, making the development and release process much smoother. 2. Centralized Code:GitHub acts as a central hub for your project code. This allows multiple developers to work on the same codebase simultaneously, improving collaboration and code sharing. 3. Controlled Access: pen_spark:GitHub's access control mechanisms let you manage who can view, modify, and deploy your code. This helps in maintaining the security and integrity of your application. Creating an EC2 Instance The first step in connecting GitHub to your EC2 instance is to create an EC2 instance. Follow these steps to create a new instance:- Login to your AWS Management Console. and navigate to the EC2 dashboard. - Click on the "Launch Instance" button to start the instance creation wizard. - Choose an Amazon Machine Image (AMI) that suits your requirements. For this guide, we'll use the Amazon Linux 2 AMI. - Select an instance type based on your computational needs and budget. A t2.micro instance is sufficient for most basic applications. - Configure the instance details, such as the number of instances, network settings, and IAM role (if required). - Add storage to your instance. The default settings are usually sufficient for most use cases. - Add tags to your instance for better organization and management. - Configure the security group to control inbound and outbound traffic to your instance. We'll dive deeper into this in the next section. - Review your instance configuration and click on the "Launch" button. - Choose an existing key pair or create a new one. This key pair will be used to securely connect to your EC2 instance via SSH. - Launch your instance and wait for it to be in the "Running" state.Congratulations! You have successfully created an EC2 instance. Let's move on to configuring the security group to allow necessary traffic. Configuring Security Groups on AWS Security groups act as virtual firewalls for your EC2 instances, controlling inbound and outbound traffic. To connect GitHub to your EC2 instance, you need to configure the security group to allow SSH and HTTP/HTTPS traffic. Follow these steps: Easy Steps for Configuring Security Groups on AWS - In the EC2 dashboard, navigate to the “Security Groups” section under “Network & Security.” - Select the security group associated with your EC2 instance. - In the “Inbound Rules” tab, click on the “Edit inbound rules” button. - Add a new rule for SSH (port 22) and set the source to your IP address or a specific IP range. - Add another rule for HTTP (port 80) and HTTPS (port 443) and set the source to “Anywhere” or a specific IP range, depending on your requirements. - Save the inbound rules. Your security group is now configured to allow the necessary traffic for connecting GitHub to your EC2 instance. Installing Git on the EC2 Instance To clone your GitHub repository and manage version control on your EC2 instance, you need to install Git. Follow these steps to install Git on your Amazon Linux 2 instance:- Connect to your EC2 instance using SSH. Use the key pair you specified during instance creation. - Update the package manager by running the following command:sudo yum update -y - Install Git by running the following command:sudo yum install git -y - Verify the installation by checking the Git version:git --version Git is now installed on your EC2 instance, and you're ready to clone your GitHub repository. Generating SSH Keys To securely connect your EC2 instance to GitHub, you need to generate an SSH key pair. Follow these steps to generate SSH keys on your EC2 instance: - Connect to your EC2 instance using SSH. - Run the following command to generate an SSH key pair:ssh-keygen -t rsa -b 4096 -C "[email protected]" Replace [email protected] with your GitHub email address. - Press Enter to accept the default file location for saving the key pair. - Optionally, enter a passphrase for added security. Press Enter if you don't want to set a passphrase. - The SSH key pair will be generated and saved in the specified location (default: ~/.ssh/id_rsa and ~/.ssh/id_rsa.pub). Add SSH Key to GitHub account To enable your EC2 instance to securely communicate with GitHub, you need to add the public SSH key to your GitHub account. Follow these steps:- On your EC2 instance, run the following command to display the public key:cat ~/.ssh/id_rsa.pub - Copy the entire contents of the public key. - Log in to your GitHub account and navigate to the "Settings" page. - Click on "SSH and GPG keys" in the left sidebar. - Click on the "New SSH key" button. - Enter a title for the key to identify it easily (e.g., "EC2 Instance Key"). - Paste the copied public key into the "Key" field. - Click on the "Add SSH key" button to save the key.Your EC2 instance is now linked to your GitHub account using the SSH key. Let's proceed to cloning your repository. Cloning a Repository To clone your GitHub repository to your EC2 instance, follow these steps:- Connect to your EC2 instance using SSH. - Navigate to the directory where you want to clone the repository. - Run the following command to clone the repository using SSH:git clone [email protected]:your-username/your-repository.git Replace "your-username" with your GitHub username and "your-repository" with the name of your repository. - Enter the passphrase for your SSH key, if prompted. - The repository will be cloned to your EC2 instance.You have successfully cloned your GitHub repository to your EC2 instance. You can now work with the code locally on your instance. Configure a GitHub webhook in 7 easy steps Webhooks allow you to automate actions based on events in your GitHub repository. For example, you can configure a webhook to automatically deploy your code to your EC2 instance whenever a push is made to the repository. Follow these steps to set up a webhook:- In your GitHub repository, navigate to the "Settings" page. - Click on "Webhooks" in the left sidebar. - Click on the "Add webhook" button. - Enter the payload URL, which is the URL of your EC2 instance where you want to receive the webhook events. - Select the content type as "application/json." - Choose the events that should trigger the webhook. For example, you can select "Push events" to trigger the webhook whenever a push is made to the repository. - Click on the "Add webhook" button to save the webhook configuration.Your webhook is now set up, and GitHub will send POST requests to the specified payload URL whenever the selected events occur. Deploying to AWS EC2 from Github With the webhook configured, you can automate the deployment of your code to your EC2 instance whenever changes are pushed to your GitHub repository. Here's a general outline of the deployment process:- Create a deployment script on your EC2 instance that will be triggered by the webhook. - The deployment script should perform the following tasks:- Pull the latest changes from the GitHub repository. - Install any necessary dependencies. - Build and compile your application, if required. - Restart any services or application servers. - Configure your web server (e.g., Apache or Nginx) on the EC2 instance to serve your application. - Ensure that the necessary ports (e.g., 80 for HTTP, 443 for HTTPS) are open in your EC2 instance's security group. - Test your deployment by making a change to your GitHub repository and verifying that the changes are automatically deployed to your EC2 instance.The specific steps for deploying your code will vary depending on your application's requirements and the technologies you are using. You may need to use additional tools like AWS CodeDeploy or a continuous integration/continuous deployment (CI/CD) pipeline to streamline the deployment process. AWS Official Documentation Tips for Troubleshooting Common Technology Issues While Connecting GitHub to your EC2 Instance 1. Secure PortEnsure that your EC2 instance's security group is configured correctly to allow incoming SSH and HTTP/HTTPS traffic. 2. SSH VerificationVerify that your SSH key pair is correctly generated and added to your GitHub account. 3. Payload URL CheckingDouble-check the payload URL and the events selected for your webhook configuration. 4. Logs on EC2 InstanceCheck the logs on your EC2 instance for any error messages related to the deployment process. 5. Necessary Permissions Ensure that your deployment script has the necessary permissions to execute and modify files on your EC2 instance. 6. Check DependenciesVerify that your application's dependencies are correctly installed and configured on the EC2 instance. 7. Test Everything Locally FirstTest your application locally on the EC2 instance to rule out any application-specific issues. If you still face issues, consult the AWS and GitHub documentation (Trobleshotting Conections) or seek assistance from the respective communities or support channels. Conclusion Connecting GitHub to your EC2 instance provides a seamless way to deploy your code and automate your development workflow. By following the steps outlined in this guide, you can create an EC2 instance, configure security groups, install Git, generate SSH keys, clone your repository, set up webhooks, and deploy your code to the instance.Remember to regularly review and update your security settings, keep your EC2 instance and application dependencies up to date, and monitor your application's performance and logs for any issues.With GitHub and EC2 connected, you can focus on writing quality code, collaborating with your team, and delivering your applications efficiently. Read the full article
0 notes
Text
AWS Cloud Practitioner - study notes
Storage > Other Services
------------------------------------------------------
Elastic Compute Cloud Storage:
EC2 supports several storage options for instances.
Amazon Elastic Block Store (EBS):
Storage device (volume) that can be attached to instance.
Data persists when instance is not running
Tied to one Availability Zone
Can be only attached to one instance in the same Availability Zone
Recommended: quickly accessed data, database, long-term-storage
EC2 Instance Store
Local storage that is physically attached to the host computer.
Disks physically attached to an instance
High I/O speeds = Faster
Temporary, data loses when EC2 instance stops
Recommended: temporary storage needs, data replications acros multiple instances
Amazon Elastic File System (EFS)
Serverless network file system for file sharing.
Supports only Linux
Expensive than EBS
Accessible across different Availability Zones in the same region
Recommended: main directories for business-critical apps, lift-and-shift
Storage Gateway
Hybrid storage service.
Connect on-premises and cloud data
Supports hybrid model
Recommended: moving backups to the cloud, cost reducing for hybrid cloud storage, low latency access to data
AWS Backup
Manage data backup across multiple AWS services.
Integrates with: EC2, EBS, EFS, etc..
Create backup plan which includes frequency and retention
0 notes
Text
What are the benefits of Amazon EMR? Drawbacks of AWS EMR

Benefits of Amazon EMR
Amazon EMR has many benefits. These include AWS's flexibility and cost savings over on-premises resource development.
Cost-saving
Amazon EMR costs depend on instance type, number of Amazon EC2 instances, and cluster launch area. On-demand pricing is low, but Reserved or Spot Instances save much more. Spot instances can save up to a tenth of on-demand costs.
Note
Using Amazon S3, Kinesis, or DynamoDB with your EMR cluster incurs expenses irrespective of Amazon EMR usage.
Note
Set up Amazon S3 VPC endpoints when creating an Amazon EMR cluster in a private subnet. If your EMR cluster is on a private subnet without Amazon S3 VPC endpoints, you will be charged extra for S3 traffic NAT gates.
AWS integration
Amazon EMR integrates with other AWS services for cluster networking, storage, security, and more. The following list shows many examples of this integration:
Use Amazon EC2 for cluster nodes.
Amazon VPC creates the virtual network where your instances start.
Amazon S3 input/output data storage
Set alarms and monitor cluster performance with Amazon CloudWatch.
AWS IAM permissions setting
Audit service requests with AWS CloudTrail.
Cluster scheduling and launch with AWS Data Pipeline
AWS Lake Formation searches, categorises, and secures Amazon S3 data lakes.
Its deployment
The EC2 instances in your EMR cluster do the tasks you designate. When you launch your cluster, Amazon EMR configures instances using Spark or Apache Hadoop. Choose the instance size and type that best suits your cluster's processing needs: streaming data, low-latency queries, batch processing, or big data storage.
Amazon EMR cluster software setup has many options. For example, an Amazon EMR version can be loaded with Hive, Pig, Spark, and flexible frameworks like Hadoop. Installing a MapR distribution is another alternative. Since Amazon EMR runs on Amazon Linux, you can manually install software on your cluster using yum or the source code.
Flexibility and scalability
Amazon EMR lets you scale your cluster as your computing needs vary. Resizing your cluster lets you add instances during peak workloads and remove them to cut costs.
Amazon EMR supports multiple instance groups. This lets you employ Spot Instances in one group to perform jobs faster and cheaper and On-Demand Instances in another for guaranteed processing power. Multiple Spot Instance types might be mixed to take advantage of a better price.
Amazon EMR lets you use several file systems for input, output, and intermediate data. HDFS on your cluster's primary and core nodes can handle data you don't need to store beyond its lifecycle.
Amazon S3 can be used as a data layer for EMR File System applications to decouple computation and storage and store data outside of your cluster's lifespan. EMRFS lets you scale up or down to meet storage and processing needs independently. Amazon S3 lets you adjust storage and cluster size to meet growing processing needs.
Reliability
Amazon EMR monitors cluster nodes and shuts down and replaces instances as needed.
Amazon EMR lets you configure automated or manual cluster termination. Automatic cluster termination occurs after all procedures are complete. Transitory cluster. After processing, you can set up the cluster to continue running so you can manually stop it. You can also construct a cluster, use the installed apps, and manually terminate it. These clusters are “long-running clusters.”
Termination prevention can prevent processing errors from terminating cluster instances. With termination protection, you can retrieve data from instances before termination. Whether you activate your cluster by console, CLI, or API changes these features' default settings.
Security
Amazon EMR uses Amazon EC2 key pairs, IAM, and VPC to safeguard data and clusters.
IAM
Amazon EMR uses IAM for permissions. Person or group permissions are set by IAM policies. Users and groups can access resources and activities through policies.
The Amazon EMR service uses IAM roles, while instances use the EC2 instance profile. These roles allow the service and instances to access other AWS services for you. Amazon EMR and EC2 instance profiles have default roles. By default, roles use AWS managed policies generated when you launch an EMR cluster from the console and select default permissions. Additionally, the AWS CLI may construct default IAM roles. Custom service and instance profile roles can be created to govern rights outside of AWS.
Security groups
Amazon EMR employs security groups to control EC2 instance traffic. Amazon EMR shares a security group for your primary instance and core/task instances when your cluster is deployed. Amazon EMR creates security group rules to ensure cluster instance communication. Extra security groups can be added to your primary and core/task instances for more advanced restrictions.
Encryption
Amazon EMR enables optional server-side and client-side encryption using EMRFS to protect Amazon S3 data. After submission, Amazon S3 encrypts data server-side.
The EMRFS client on your EMR cluster encrypts and decrypts client-side encryption. AWS KMS or your key management system can handle client-side encryption root keys.
Amazon VPC
Amazon EMR launches clusters in Amazon VPCs. VPCs in AWS allow you to manage sophisticated network settings and access functionalities.
AWS CloudTrail
Amazon EMR and CloudTrail record AWS account requests. This data shows who accesses your cluster, when, and from what IP.
Amazon EC2 key pairs
A secure link between the primary node and your remote computer lets you monitor and communicate with your cluster. SSH or Kerberos can authenticate this connection. SSH requires an Amazon EC2 key pair.
Monitoring
Debug cluster issues like faults or failures utilising log files and Amazon EMR management interfaces. Amazon EMR can archive log files on Amazon S3 to save records and solve problems after your cluster ends. The Amazon EMR UI also has a task, job, and step-specific debugging tool for log files.
Amazon EMR connects to CloudWatch for cluster and job performance monitoring. Alarms can be set based on cluster idle state and storage use %.
Management interfaces
There are numerous Amazon EMR access methods:
The console provides a graphical interface for cluster launch and management. You may examine, debug, terminate, and describe clusters to launch via online forms. Amazon EMR is easiest to use via the console, requiring no scripting.
Installing the AWS Command Line Interface (AWS CLI) on your computer lets you connect to Amazon EMR and manage clusters. The broad AWS CLI includes Amazon EMR-specific commands. You can automate cluster administration and initialisation with scripts. If you prefer command line operations, utilise the AWS CLI.
SDK allows cluster creation and management for Amazon EMR calls. They enable cluster formation and management automation systems. This SDK is best for customising Amazon EMR. Amazon EMR supports Go, Java,.NET (C# and VB.NET), Node.js, PHP, Python, and Ruby SDKs.
A Web Service API lets you call a web service using JSON. A custom SDK that calls Amazon EMR is best done utilising the API.
Complexity:
EMR cluster setup and maintenance are more involved than with AWS Glue and require framework knowledge.
Learning curve
Setting up and optimising EMR clusters may require adjusting settings and parameters.
Possible Performance Issues:
Incorrect instance types or under-provisioned clusters might slow task execution and other performance.
Depends on AWS:
Due to its deep interaction with AWS infrastructure, EMR is less portable than on-premise solutions despite cloud flexibility.
#AmazonEMR#AmazonEC2#AmazonS3#AmazonVirtualPrivateCloud#EMRFS#AmazonEMRservice#Technology#technews#NEWS#technologynews#govindhtech
0 notes
Text
From Command Line to Cloud: Your Guide to Advanced AWS and Linux Skills
In the ever-evolving IT landscape, mastering both foundational systems and cutting-edge cloud platforms is not just an advantage—it's a necessity. Whether you're a system administrator, DevOps engineer, cloud architect, or aspiring IT professional, bridging your knowledge from traditional Linux systems to modern AWS environments unlocks a world of opportunity. In this blog, we will guide you through the journey from command-line fundamentals to advanced cloud capabilities, highlighting the essential skills, tools, and certifications needed to excel in both Linux and Amazon Web Services (AWS).
Why Learn Both Linux and AWS?
Before diving into the technicalities, it’s essential to understand why Linux and AWS make such a powerful combination. Over 90% of cloud-based applications run on Linux-based operating systems, and AWS is the most widely adopted cloud platform globally. Together, they form the backbone of the digital infrastructure powering major enterprises, startups, and government systems.
Professionals skilled in both these areas are in high demand because:
Most AWS services integrate directly with Linux-based instances.
DevOps workflows rely heavily on scripting and command-line operations.
Secure and scalable deployments often require expertise in both OS and cloud.
Linux system administration knowledge complements AWS architecture and networking.
Linux: The Bedrock of System Administration
Linux remains the operating system of choice for cloud infrastructure, development environments, container platforms (like Docker and Kubernetes), and many enterprise systems. For any IT professional aiming to be proficient in cloud technologies, Linux is the starting point.
Key Linux Skills for IT Professionals:
Shell Scripting & Bash Commands: Automating tasks, managing files, configuring services.
Package Management: Using tools like apt, yum, and dnf to manage software.
User and Permission Management: Essential for security and multi-user environments.
System Monitoring Tools: top, htop, iotop, netstat, etc., for resource and process monitoring.
Log Management: Analyzing system logs (/var/log) for troubleshooting and security audits.
Cron Jobs: Scheduling recurring tasks using the cron daemon.
An in-depth understanding of these areas ensures a seamless transition when working with AWS EC2 instances, which are often Linux-based.
The Leap to AWS: Cloud Proficiency that Scales
Once you're comfortable managing Linux systems, moving into the AWS ecosystem becomes significantly easier. AWS offers a suite of services for computing, storage, networking, databases, and more—all of which benefit from foundational Linux knowledge.
Core AWS Services to Master:
Amazon EC2 (Elastic Compute Cloud): Provision and manage Linux instances in the cloud.
Amazon S3 (Simple Storage Service): Store and retrieve data at any scale.
IAM (Identity and Access Management): Secure cloud access with granular permissions.
Amazon VPC (Virtual Private Cloud): Configure secure network topologies.
AWS Lambda: Build event-driven applications without managing servers.
CloudWatch & CloudTrail: Monitor resources and log user activity.
AWS also supports Infrastructure as Code (IaC) tools like CloudFormation and Terraform, which allow automation of cloud infrastructure—another area where Linux scripting skills are invaluable.
Career Growth and Industry Demand
Combining AWS and Linux expertise opens up a wide range of career roles, such as:
Cloud Engineer
Linux System Administrator
DevOps Engineer
Site Reliability Engineer (SRE)
Cloud Architect
As companies transition to cloud-native infrastructure, they increasingly seek professionals who are adept at managing Linux environments while also designing, deploying, and optimizing cloud solutions on AWS.
According to multiple industry surveys, job roles involving cloud computing and Linux command some of the highest salaries in the tech world. Certifications are an excellent way to showcase your expertise to potential employers.
Earning Your Credentials: Certifications to Consider
Certifications serve as formal validation of your knowledge and skills. They’re highly valued by employers and can significantly boost your career trajectory.
AWS Certifications:
AWS Certified Solutions Architect – Associate: For those designing distributed applications and systems on AWS.
AWS Certified SysOps Administrator – Associate: Focuses on deployment, management, and operations on AWS.
AWS Certified DevOps Engineer – Professional: Designed for advanced users managing distributed systems and automation.
Consider starting with an aws certification course that includes hands-on labs, real-world projects, and exam preparation strategies.
Linux Certifications:
Red Hat Certified System Administrator (RHCSA)
Linux Professional Institute Certification (LPIC)
CompTIA Linux+
Each of these validates core competencies in Linux system administration, security, scripting, and troubleshooting. Enrolling in a hands-on Linux Training program is the best way to build practical experience and confidence before taking certification exams.
Real-World Applications of AWS + Linux Skills
Let's look at a few scenarios where AWS and Linux expertise work in tandem:
1. Web Application Hosting:
You can deploy a full-stack web application on a Linux EC2 instance with an NGINX or Apache server, configured with SSL, and integrate it with RDS, Route 53, and CloudFront.
2. DevOps Automation:
Use Linux shell scripting to create deployment scripts while using AWS CodePipeline and CodeDeploy to automate CI/CD workflows.
3. Security Hardening:
Manage user accounts, apply firewall rules (iptables/ufw), audit system logs, and integrate with AWS GuardDuty or CloudTrail to maintain security compliance.
4. Monitoring and Optimization:
Analyze performance using Linux tools and scale instances using AWS Auto Scaling policies.
Learning Resources and Tips
Here are a few practical tips to structure your learning path:
Start Small: Get comfortable with Linux command-line basics before diving into AWS services.
Use Free Tiers: AWS offers a generous free tier for beginners to practice with EC2, S3, Lambda, and more.
Hands-on Practice: Set up a home lab or use virtual labs provided in structured training programs.
Join Online Communities: Engage in forums like Stack Overflow, Reddit, and GitHub to solve real problems and share knowledge.
Stay Updated: Follow AWS and Linux release notes and updates. The tech world evolves fast!
Conclusion: The Power of Dual Mastery
Mastering Linux and AWS is a strategic decision that will prepare you for high-demand IT roles and future-proof your career. From navigating terminal commands to deploying scalable applications in the cloud, this combined skill set empowers you to solve real-world infrastructure challenges with confidence and agility.
Whether you’re an aspiring professional or a seasoned techie aiming to upskill, investing in a reliable aws certification course and quality Linux Training can be the turning point in your career. The journey from command line to cloud is not just a transition—it’s a transformation.
0 notes
Text
Linux and AWS Essentials: Beginner's Guide to Mastering Linux and AWS

In today's digital era, Linux and Amazon Web Services (AWS) have become instrumental in driving cloud computing and infrastructure management. SkillIQ's beginner's guide to mastering Linux and AWS provides a comprehensive foundation for individuals looking to dive into the world of cloud computing and harness the power of these essential technologies.
Understanding Linux:
The beginner's guide starts by demystifying Linux, covering essential topics such as installation, command line navigation, file management, and user administration. By grasping the basics of Linux, beginners gain a solid understanding of the operating system's capabilities and functionality.
Introduction to AWS:
The guide introduces beginners to Amazon Web Services (AWS), a leading cloud computing platform. It covers core AWS services, including EC2, S3, and IAM, and provides insights into cloud computing architecture. Understanding AWS fundamentals allows beginners to harness the power of cloud computing for their infrastructure needs.
Building and Managing EC2 Instances:
The guide delves into the creation and management of EC2 instances, guiding beginners through the process of launching virtual servers and selecting appropriate instance types. By mastering EC2, beginners gain the ability to build scalable and flexible cloud infrastructures.
Storing Data with S3:
Data storage is a critical aspect of cloud computing, and the guide explores Amazon S3, an object storage service offered by AWS. Beginners learn how to create S3 buckets, store data securely, and manage access controls. This knowledge enables beginners to leverage reliable and scalable storage solutions for their applications and data.
Security and Access Control with IAM:
IAM (Identity and Access Management) plays a vital role in securing AWS resources. The guide covers IAM essentials, including creating users, assigning permissions, and managing security credentials. By understanding IAM, beginners can implement robust security practices and control access to their AWS resources.
Conclusion:
Mastering Linux and AWS is essential for anyone entering the realm of cloud computing and infrastructure management. SkillIQ's beginner's guide to mastering Linux and AWS provides a solid foundation for individuals venturing into cloud computing and infrastructure management. By understanding the essentials of Linux and AWS, beginners gain the knowledge and skills needed to navigate the cloud ecosystem confidently.
0 notes
Link
#aws#aws services#EC2#s3#rds#vpc#Instance#linux#linux administration#interview#ebs#cloud watching#lost root access
0 notes
Text
Introduction to Amazon EC2: Launching Your First Virtual Machine

Introduction:
Amazon Elastic Compute Cloud (EC2) is one of AWS’s most powerful and popular services, providing scalable virtual servers in the cloud. Whether you’re hosting a website, running an application, or performing data analysis, EC2 gives you the flexibility and control to meet your needs. In this blog, we’ll walk you through the basics of EC2 and guide you in launching your first virtual machine.
What is Amazon EC2?
Introduce EC2 and its core features:
Elasticity: Scale up or down based on demand.
Customization: Choose the operating system, storage, and network configuration.
Pay-as-you-go Pricing: Only pay for what you use, whether it’s minutes or hours.
Global Availability: Deploy instances in multiple regions and availability zones for redundancy.
Briefly mention common use cases:
Hosting web applications
Running batch processing jobs
Development and testing environments
Key Concepts to Understand
Instances: Virtual servers in EC2.
AMI (Amazon Machine Image): Pre-configured templates for your instance.
Instance Types: Defines the hardware (CPU, memory, storage) of the instance. Examples: t2.micro (basic), m5.large (medium workload).
Regions and Availability Zones: Geographic locations for deploying your instances.
Key Pairs: Used for secure SSH access to instances.
Elastic IPs: Static IP addresses that can be associated with your instance.
Section 3: Prerequisites
An AWS account (refer to your earlier blog on setting up an AWS account).
Basic understanding of cloud computing and SSH (optional).
Section 4: Step-by-Step Guide to Launch Your First EC2 Instance
1. Open the EC2 Console:
Log in to the AWS Management Console and navigate to the EC2 Dashboard.
2. Choose a Region:
Select a region near your target audience for lower latency.
3. Launch an Instance:
Click on Launch Instance.
Name your instance (e.g., “MyFirstEC2Instance”).
4. Choose an AMI:
Select a pre-configured Amazon Machine Image (e.g., Amazon Linux 2023 or Ubuntu).
For beginners, stick with the Free Tier Eligible options.
5. Choose an Instance Type:
Select t2.micro (Free Tier eligible, suitable for light workloads).
6. Configure Instance Details:
Use the default settings for networking and storage.
Optional: Configure IAM roles or enable termination protection.
7. Add Storage:
Review and adjust storage size if needed (default is 8 GB).
8. Add Tags:
Add tags to organize and identify your instance (e.g., “Environment: Test”).
9. Configure Security Group:
Define inbound rules for accessing the instance:
Allow SSH (port 22) from your IP address.
Allow HTTP (port 80) if hosting a web application.
10. Review and Launch:
Confirm your settings and click Launch.
Select an existing key pair or create a new one for secure access.
Download the key pair file (.pem) and store it securely.
Section 5: Accessing Your EC2 Instance
Connect via SSH:Open a terminal and use the following command:
bash
ssh -i /path/to/key.pem ec2-user@<Public_IP>
Replace /path/to/key.pem with the path to your downloaded key file and <Public_IP> with the instance's public IP address.
Test Your Instance:
Run basic commands like uname -a or df -h to check system information.
Cleaning Up
To avoid unexpected charges, stop or terminate your instance when you’re done:
Navigate to the EC2 Dashboard.
Select your instance.
Choose Instance State > Terminate Instance.
Tips for Beginners
Start with Free Tier Instances:
2.Use t2.micro to explore without incurring costs.
Monitor Instance Usage:
Use the AWS Cost Explorer or Billing Dashboard to track your usage.
Secure Your Instance:
Regularly update your instance and avoid exposing sensitive ports unnecessarily.
Conclusion
Launching an EC2 instance is an essential skill for anyone exploring cloud computing. Amazon EC2 provides the flexibility to run a variety of workloads, and with this guide, you’re now ready to start your journey. In future blogs, we’ll dive deeper into optimizing EC2 instances and exploring advanced features like Auto Scaling and Elastic Load Balancing.
0 notes
Text
EFS(Elastic File System)
What is EFS?
Amazon EFS is a cloud-based file storage service for applications and workloads that run in the Amazon Web Services public cloud.
AWS automatically deploys and manages the infrastructure for Elastic File System (EFS), which is distributed across an unlimited number of servers to avoid performance bottlenecks. Amazon EFS provides flexible storage capacity that scales to accommodate workloads that run on AWS Elastic Compute Cloud (EC2) instances and access files through application programming interface (API) requests.
Amazon EFS features
Amazon EFS comes packed with some great features such as:
Fully Managed
AWS EFS is a fully managed service that provides NFS shared file system storage to Linux workloads
Elastic & Scalable
Highly available and durable
Performance Modes
Security: The following security measures offered by AWS EFS:
Network traffic
File and directory access
Data encryption
Identity and Access Management
4 notes
·
View notes
Text
How to Harden Your Cloud Environment in 5 Steps.
The single biggest existential threat that's out there, I think, is cyber.Michael Mullen
In recent years, with the rapid rise of cloud computing, the virtualization of applications and infrastructure has been replacing traditional in-house deployments of applications and services.
It’s currently more cost-effective for organizations to rent hardware resources from companies like Microsoft, Amazon, and Google and spin up virtual instances of servers with the exact hardware profiles required to run their services. But security in the cloud is just as vital as security in traditional on-premise environments. Just like in physical servers, system hardening is an excellent way to help minimize security vulnerabilities in the cloud.
Learn more about system hardening and what steps you need to take to adopt hardening measures in the cloud:
What is System Hardening?
System Hardening is the process of securing a system’s configuration and settings to reduce IT vulnerability and the possibility of being compromised. The purpose of system hardening is to eliminate as many security risks as possible, and in most cases, this is done by removing all non-essential software programs and utilities from the computer. By removing non-essential programs, account functions, applications, ports, permission and access, attackers and malware have fewer opportunities to gain a foothold into your IT environment.
What Hardening Recommendations Should I Follow?
There are hundreds of security recommendations out there to follow, but the most highly recommended are the CIS Benchmarks – configuration baselines and best practices for securely configuring a system.
In an on-prem environment, security recommendations such as the free CIS Benchmarks are predominantly applied by group policy for Windows and configuration management tools such as Puppet and Chef for Linux. In the cloud, however, organizations can pre-harden their server images using the CIS hardening guidelines ready for use or, in the case of AWS and Microsoft Azure, purchase a CIS hardened image from the respective marketplace.
Once the image is hardened then its security stance can be extended further by baking in your organization’s security software such as your chosen AV and change detection solution such as the NNT Change Tracker agent. These CIS Hardening Images make running secure operations in the cloud fast, simple and affordable. These images are available for all major cloud computing platforms like AWS, Microsoft Azure, Google Cloud Platform, as well as Oracle Cloud Marketplace.
What Can I Do Right Now to Harden Instances?
There is a lot that organizations can do right now to help secure sensitive data in the cloud. Cloud providers have collectively identified a few steps to take to harden your instances, including:
Least Access – Restrict server access from both the network and on the instance, install only the required OS components and applications, and leverage host-based protection software.
Least Privilege – Define the minimum set of privileges each server needs in order to perform its function.
Configuration Management – Create a baseline server configuration and track each server as a configuration item. Assess each server against the currently recorded baseline to identify and flag and deviations. Ensure each server is configured to generate and securely store appropriate log and audit data.
Change Management – Create processes to control changes to server configuration baselines.
Audit Logs – Audit access and all changes to EC2 instances to verify server integrity and ensure that only authorized changes are made.
#nixiebytes
#cybersecurity#EthicalHacking#cloud#gcp#technology#follow if you like#like or reblog#Kali Linux#ubuntu#amazon#india#kerala#but like#fuck covid#microsoft
2 notes
·
View notes
Text
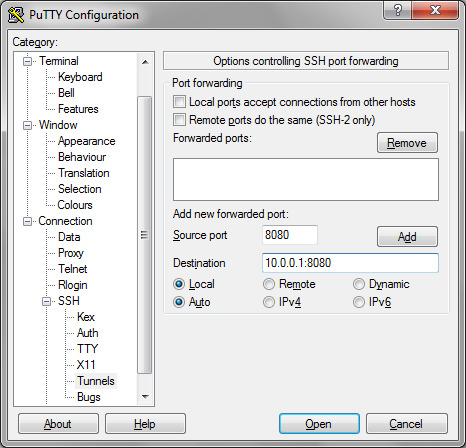
SSH Tunnel Manager

Sponsored Link
Under the Windows, traditional way for keeping SSH tunnels in good shape includes installing Linux tools (starting from SSH itself, Putty, Cygwin, autossh and so on) and street magic with scripts. Now you can forget about this hell, just setup your SSH tunnels. SSH Tunnel Manager SSH Tunnel Manager is a tool to manage SSH Tunnels (commonly invoked with -L and -R arguments in the console). With SSH Tunnel Manager you can set up as many tunnels as. Free is proffered, but please post information about any good windows SSH tunnel manager. Windows ssh vpn. Edited May 9 '09 at 7:44. 17.7k 6 6 gold badges 45 45 silver badges 54 54 bronze badges. Asked May 2 '09 at 5:59. Zoredache Zoredache. After downloading and extracting the zip file (Portable, No installation needed) you can run SSHTunnelManagerGUI.exe The first screen will ask for a location and password for your 'Encrypted. The Session Manager Port Forwarding creates a tunnel similar to SSH tunneling, as illustrated below. Port Forwarding works for Windows and Linux instances. It is available today in all AWS Regions where AWS Systems Manager is available, at no additional cost when connecting to EC2 instances, you will be charged for the outgoing bandwidth from.
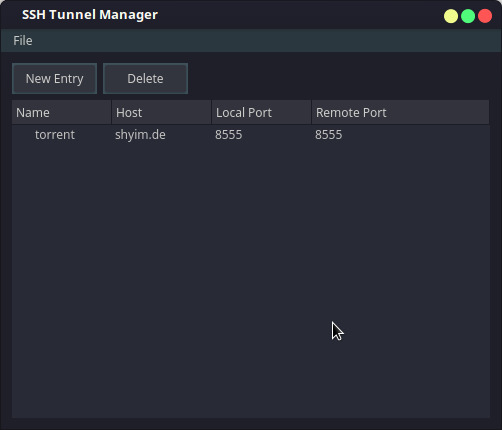
gSTM, the Gnome SSH Tunnel Manager, is a front-end for managing SSH-tunneled port redirects. It stores tunnel configurations in a simple XML format. The tunnels, with local and remote port redirections, can be created, deleted, modified, and individually started and stopped through one simple interface. It is useful for anyone wanting to securely access private services over an encrypted tunnel.
Install Gnome SSH Tunnel Manager in Ubuntu
First you need to download the .deb package from here using the following command
wget http://kent.dl.sourceforge.net/sourceforge/gstm/gstm_1.2_i386.deb
Once you have the gstm_1.2_i386.deb package you need to install this using the following command
sudo dpkg -i gstm_1.2_i386.deb

This will complete the installation.
If you want to open this application go to Applications--->Internet--->gSTM
Double Ssh Tunnel Manager
Once it opens you should see the following screen
If you want to add ssh tunnel you need to click on add now you should see the following screen here you need to enter the name of the tunnel and click ok
Once you click ok you can see the following screen here you need to fill all the required detailed for your host and click ok
If you want to add a port redirection you need to select add under portforwarding in the above screen
Once you click on ok you should see the following screen if you want to connect to SSH tunnel select your host and click on start it should start connecting to your host

Ssh Tunnel Manager Windows
Examples

Remote Desktop
Ssh Tunnel Manager Linux
Remote Desktop to various Windoze servers in the private LAN. Although Remote Desktop supports some degree of encryption itself and you can easily create a port-forward in your firewall. First of all you don’t want to create a port-forward for every desktop you want to reach. Second and most important, you don’t want the Remote Desktop ports open for the world to see… for obvious security reasons.
Ssh Tunnel Manager Ubuntu
Secure POP3
Ssh Tunnel Manager
If you are running a POP3 service on your *nix router/server you are probably aware of the fact POP3 is an unencrypted, plain-text protocol. Hypothetically this means any ‘man-in-the-middle’ is able to read your username, password and e-mail content. Obviously, on your private LAN this isn’t a problem, however you might want to read your mail over the internet one day…
One solution would be to install pop3s or better yet, imaps. However there is another way, without having to install additional services: an SSH tunnel.The way it works is, you connect to your router/firewall through ssh and set up a portredirect over it (ie. a tunnel). You can then connect your e-mail client to your localhost. The connection will then be redirected over the encrypted SSH connection to your POP3 service. Et voila, a secure POP3 connection.
Sponsored Link
Ssh Tunnel Manager Expected Key Exchange
Related posts
Webmin Installation and Configuration in Ubuntu Linux (22)
Upgrade Ubuntu Server 6.10 (Edgy Eft) to 7.04 (Feisty Fawn) (4)
Update IP addresses at dynamic DNS services Using ddclient (17)
Ubuntu 7.04 (Feisty Fawn) LAMP Server Setup (16)
Settingup an FTP Server on Ubuntu with ProFTPD (28)
Securing SSH Using Denyhosts (10)
Mount a Remote Folder using SSH on Ubuntu (19)
1 note
·
View note
Text
In ComputingPost blog post we’ll take you through a step-by-step installation of Apache Tomcat 9 on Amazon Linux 2. Apache Tomcat is a free to use JAVA HTTP web server developed by the Apache Software Foundation. Tomcat is an implementation of the Java Servlet, JavaServer Pages, Java Expression Language and WebSocket technologies. In a nutshell Apache Tomcat runs a HTTP web server environment in which special Java programs known as “Java Servlet” and “Java Server Pages (JSP)” can be executed. Due to its open-source nature Tomcat has been widely adopted by Enterprise customers. It Powers Payment platforms, E-Commerce platforms, Cloud environments among many other use cases. Install Apache Tomcat 9 on Amazon Linux 2 The type of installation of Tomcat that we’ll do is manual. Which means we’ll start from source download, extract and copying files to relevant directories to performing user creation and permissions. Below steps have been organized for easy following to help new users install Apache Tomcat 9 on Amazon Linux 2. Just follow the steps and change the values as instructed where required to have a working Tomcat 9 installation on Amazon Linux 2 instance. The installation can be done in an on-prem virtualization environment or instance running in AWS EC2 environment. Step 1: Install Java on Amazon Linux 2 Ensure Java is installed and working perfectly in the server. Update and reboot the server: sudo yum -y update sudo reboot Install Java 11 from Amazon Linux Extras repository: sudo amazon-linux-extras install java-openjdk11 Hit y key to begin installation: Total download size: 46 M Installed size: 183 M Is this ok [y/d/N]: y Confirm installation: $ java -version openjdk version "11.0.13" 2021-10-19 LTS OpenJDK Runtime Environment 18.9 (build 11.0.13+8-LTS) OpenJDK 64-Bit Server VM 18.9 (build 11.0.13+8-LTS, mixed mode, sharing) Step 2: Create tomcat user and group We’ll be creating a dedicated system tomcat user and group. sudo groupadd --system tomcat sudo useradd -d /usr/share/tomcat -r -s /bin/false -g tomcat tomcat Confirm creation: $ getent passwd tomcat tomcat:x:996:994::/usr/share/tomcat:/bin/false $ getent group tomcat tomcat:x:994: Step 3: Install Tomcat 9 on Amazon Linux 2 Latest releases of Apache Tomcat software can be checked from the Software releases page. Run the following commands to download the latest version of Apache Tomcat 9 as of this article update. sudo yum -y install wget export VER="9.0.63" wget https://archive.apache.org/dist/tomcat/tomcat-9/v$VER/bin/apache-tomcat-$VER.tar.gz Use tar command line tool to extract downloaded archive. sudo tar xvf apache-tomcat-$VER.tar.gz -C /usr/share/ Create Symlink to the folder /usr/share/tomcat. This is for easy updates. sudo ln -s /usr/share/apache-tomcat-$VER/ /usr/share/tomcat Update folder permissions: sudo chown -R tomcat:tomcat /usr/share/tomcat sudo chown -R tomcat:tomcat /usr/share/apache-tomcat-$VER/ The /usr/share/tomcat directory has the following sub-directories: bin: contains the binaries and scripts (e.g startup.sh and shutdown.sh for Unixes and Mac OS X). conf: contains the system-wide configuration files, such as server.xml, web.xml, and context.xml. webapps: contains the webapps to be deployed. You can also place the WAR (Webapp Archive) file for deployment here. lib: contains the Tomcat’s system-wide library JAR files, accessible by all webapps. You could also place external JAR file (such as MySQL JDBC Driver) here. logs: contains Tomcat’s log files. You may need to check for error messages here. work: Tomcat’s working directory used by JSP, for JSP-to-Servlet conversion. Create Tomcat Systemd service: sudo tee /etc/systemd/system/tomcat.service Where: admin is access username TomcatAdminPassw0rd is the password for admin user. Configure Apache web server as a proxy for Tomcat server. First install httpd package. sudo yum -y install httpd Create VirtualHost file for Tomcat Admin web interface:
$ sudo vim /etc/httpd/conf.d/tomcat_manager.conf ServerAdmin root@localhost ServerName tomcat.example.com DefaultType text/html ProxyRequests off ProxyPreserveHost On ProxyPass / http://localhost:8080/ ProxyPassReverse / http://localhost:8080/ Where: hirebestengineers.com is the DNS name of your tomcat server. For AJP connector, it will be configuration like this: ServerName ajp.example.com ProxyRequests Off ProxyPass / ajp://localhost:8009/ ProxyPassReverse / ajp://localhost:8009/ If SELinux is enabled run the following commands: sudo setsebool -P httpd_can_network_connect 1 sudo setsebool -P httpd_can_network_relay 1 sudo setsebool -P httpd_graceful_shutdown 1 sudo setsebool -P nis_enabled 1 Restart httpd service: sudo systemctl restart httpd sudo systemctl enable httpd If access is required from a network external to AWS, you may need to allow port 80 on Security group. Step 5: Access Tomcat Web interface Open your web browser and type the DNS name configured in Apache for Apache Tomcat. You need to authenticate to view server status and manage Tomcat Applications. You’ll then be able to check server status. Deploy and manage Web applications. Tomcat Virtual Host Management. This is the end of our guide on installation of Tomcat 9 on Amazon Linux 2 server. The next article will capture securing Tomcat Server with an SSL Certificate.
0 notes