#Android 11 beta 3
Explore tagged Tumblr posts
Visit Tumblr Blog
Explore Tumblr blogs with no restrictions, modern design and the best experience.
Last Seen Tumblr Blogs


Fun Fact
Tumblr.com is the 103rd most visited website in the world.
Text
🚀 Seu Xiaomi, Redmi ou POCO Acabou de Ganhar um Upgrade Épico! HyperOS 2.1 Chegou! ✨

Entendido! Me desculpe pelo lapso. As instruções foram para o Medium novamente.
Vamos refazer o post para o Tumblr, com a concisão, o tom mais informal, o apelo visual (com menção a GIFs/imagens) e as hashtags que o Tumblr pede. E claro, com os links do blog inseridos!
🚀 Seu Xiaomi, Redmi ou POCO Acabou de Ganhar um Upgrade Épico! HyperOS 2.1 Chegou! ✨
(Comece com uma imagem ou GIF super vibrante do HyperOS em ação, ou um logo da Xiaomi/Redmi/POCO com efeitos de luz/velocidade!)
Atenção, fãs da Xiaomi! O dia que estávamos esperando chegou! A MAIOR ATUALIZAÇÃO DO ANO – o HyperOS 2.1 – já começou a ser liberada para uma tonelada de celulares Redmi e POCO pelo mundo! 🌍✨
Preparem-se para sentir que ganharam um celular novo! Sério!
O Que é Esse HyperOS 2.1? 🤔
Imagine o HyperOS como o "cérebro" do seu Xiaomi. Com essa atualização 2.1, ele ficou turbinado! Mais rápido, mais inteligente, mais bonito. A Xiaomi ouviu a gente e entregou um sistema que te entende de verdade.
Não é só um ajuste, é uma transformação completa na forma como você usa seu aparelho! 🤩
Como Funciona a Chegada da Atualização? (Pra não Pirar! 😉)
A Xiaomi faz tudo com calma e segurança, em 3 fases:
Testadores Beta: A galera que testa primeiro e ajuda a encontrar qualquer bug. Quer participar? Saiba como se tornar um testador beta do HyperOS aqui!
Liberação Parcial (Estamos AQUI!): A atualização está saindo aos poucos! Alguns já receberam, outros podem instalar manualmente. Seja paciente, a sua está chegando!
Liberação Aberta: Daqui a pouco, todo mundo recebe automaticamente! É só aceitar e curtir.
🚀 As Novidades do HyperOS 2.1 que Vão Te Deixar de Queixo Caído!
(Aqui, você pode colocar GIFs curtos mostrando cada recurso, se tiver!)
"Alive Design Philosophy": O sistema GANHA VIDA! Animações suaves, cores vibrantes, ícones elegantíssimos. Tudo se move com uma fluidez incrível! 💃🕺
Tela de Bloqueio Artística: Sua tela de bloqueio virou uma obra de arte! Designs inspirados em filmes e arte clássica, com efeitos cinematográficos. 🖼️✨
Clima em Tempo Real 2.0: O app do tempo agora mostra o céu COMO ELE ESTÁ LÁ FORA! Nuvens se movendo, sol brilhando, até a Via Láctea! É mágico! 🌠🌦️
Xiaomi HyperCore (O Coração da Brincadeira!): Isso é o que faz a mágica por baixo dos panos:
Memória Dinâmica: Seu celular aprende o que você mais usa e deixa tudo pronto pra abrir NA HORA! ⚡
Gráficos Aprimorados: Cores lindas, performance TOP e... BATERIA QUE DURA MAIS! 🔋 (Melhoria da tecnologia de storage refresh do HyperOS 2.0!)
Processamento Otimizado: Seu celular usa 100% da sua potência de forma inteligente! 💪
📱 SEU APARELHO ESTÁ NA LISTA? CONFIRA! 📱
A liberação é parcial, mas muitos já estão recebendo! Veja os principais modelos e famílias que já foram contemplados (a lista completa está lá no blog!):
Família Xiaomi 13
Família Xiaomi 14 e 15
Família Mi 11
Família Redmi Note
Família POCO
Tablets Xiaomi Pad
Outros Modelos
Quer ver a lista completa com os códigos de versão pra ver se o seu já está pronto pra receber? Corre pro nosso artigo completo sobre o HyperOS 2.1 chegando aos Redmi e Poco!
Como Verificar no Seu Celular? É Mole!
Vá em "Configurações".
Toque em "Sobre o telefone" ou "Informações do sistema".
Procure a versão do HyperOS. Se vir algo com "107" no meio (ex: OS2.0.107.0), parabéns! Você já tem o 2.1!
Ou vá em "Atualização do sistema" e toque em "Verificar atualizações".
O Futuro é Agora! HyperOS 3 Já Está Chegando! 🔮
Enquanto você curte o HyperOS 2.1, a Xiaomi já está pensando no futuro! O HyperOS 3 com Android 16 promete IA ainda mais avançada, e uma personalização inédita que vai adaptar seu celular completamente ao seu jeito de usar! Fique ligado também nos próximos updates: HyperOS 2.2 global e HyperOS 2.3 com Android 16!
🔥 Dicas Pra Turbinar Seu HyperOS 2.1! 🔥
Explore TUDO: Tela de bloqueio, clima, galeria com IA... tem muita coisa nova pra descobrir!
Ajuste Animações: Deixe tudo no seu ritmo nas configurações!
HyperConnect: Se você tem outros gadgets Xiaomi, a conexão entre eles ficou INCRÍVEL! Experimente!
Problemas? Calma, a Gente Ajuda!
"Minha atualização não chegou!" É fase parcial, tá? Chega em breve!
"Celular lento depois de atualizar!" Normal nas primeiras horas. Ele está otimizando. Dê um tempo, e ele vai voar!
"Apps não abrem!" Reinicia o celular! Quase sempre resolve.
Conclusão: Uma Nova Era Xiaomi!
O HyperOS 2.1 é uma atualização GIGANTE! Não é só um update, é uma nova forma de interagir com seu Xiaomi. A Xiaomi ouviu a gente e entregou um sistema mais lindo, rápido e inteligente.
Se o seu ainda não atualizou, segure a ansiedade! Logo, você terá um celular praticamente novo nas mãos! Prepare-se para redescobrir seu aparelho Xiaomi! ✨
Principais Destaques do HyperOS 2.1 (Em Resumo):
Design "Alive Philosophy"
Tela de Bloqueio Artística
Clima em Tempo Real 2.0
Xiaomi HyperCore (Memória Dinâmica, Renderização Aprimorada, Computação Heterogênea)
HyperConnect Melhorado
Galeria com IA
Calendário e Relógio Renovados
Compatibilidade Ampla
Artigo atualizado em 18 de junho de 2025. As informações mais recentes estão sempre no nosso blog!
0 notes
Text
Techmeme: Android 16 review: live updates and Advanced Protection are nice but features like desktop mode and Material 3 Expressive design won't come until later in 2025 (Ryan Whitwam/Ars Technica)
Ryan Whitwam / Ars Technica: Android 16 review: live updates and Advanced Protection are nice, but features like desktop mode and Material 3 Expressive design won't come until later in 2025 — After months of speculation and beta testing, Google is rolling out Android 16 starting today. June 11, 2025 at 03:15PM
0 notes
Text
ACCA DipIFR Remote Exam: Requirement, Set-up & Tips

In our previous blog, we discussed ACCA DipIFR exam utility interface & answer writing tips which will help students to get comfortable with CBE interface and to be familiar with the examination pattern and face it with confidence.
This blog is especially for the students who chose Remote examination session i.e., who would appear from home or office instead of centre-based examination. This blog will guide you about technical requirements of the allowed devices and necessary care to be taken before and during the remote examination session.
System Requirements:
Operating System
• Windows 11 and 10 (64-bit) – (excluding ‘S Mode’) • macOS 13 and above – (excluding beta versions)
Note: • Mac OS, starting with Mojave, now requires permission from the user to allow any hardware access to an application, which includes OnVUE (proctorapp). Candidates should be prompted to allow this application • Windows Operating Systems must pass Genuine Windows Validation.
Unsupported operating systems
• Windows 8/8.1, Windows 7, Windows XP, and Windows Vista • Linux/Unix and Chrome based Operating Systems
Firewall
• Corporate firewalls should be avoided as they often cause this delivery method to fail. • VPNs and proxies should not be used. • We recommend testing on a personal computer. Work computers generally have more restrictions that may prevent successful delivery.
RAM Required
Recommended Minimum RAM of 4 GB or more
Display
Minimum Resolution: 1024 x 768 in 16-bit col Recommended Resolution: 1920 x 1080 or higher in 32-bit color • If using an external monitor, you must close your laptop and use an external keyboard, mouse, and webcam. • Multiple monitors are forbidden. • Touch screens are strictly forbidden.
Webcam
• The webcam may be internal or external. It must be forward-facing and at eye level to ensure your head and shoulders are visible within the webcam. • The webcam must remain in front of you and cannot be placed at an angle. • Webcam filters are not allowed (for example, Apple’s ‘Reactions’). • Webcam must have a minimum resolution of 640x480 @ 10 fps.
Note: • Mobile phones are strictly prohibited as a webcam for exam delivery. • Mac OS users may need to allow OnVUE within their System Preferences: Security & Privacy: Privacy settings for camera & microphone.
Speakers and microphone
Speakers: • Speakers must be built-in or wired. • Bluetooth speakers or the use of headphones* as speakers are not allowed. Headphones: • Headphones and headsets are not allowed unless explicitly approved by your test sponsor. • If allowed, headphones must be wired – Bluetooth are not allowed.
Browser settings
Internet Cookies must be enabled.
Device
All tablets are strictly prohibited, unless they have a physical keyboard and meet the operating system requirements mentioned earlier.
Power
Make sure you are connected to a power source before starting your exam to avoid draining your battery during the exam.
Internet Browser
The newest versions of Microsoft Edge, Safari, Chrome, and Firefox, for web registrations or downloading the secure browser.
Internet Connection
• For better performance, a reliable and stable connection speed of 12 Mbps download and 3 Mbps upload required. • We recommend testing on a wired network as opposed to a wireless network. • If testing from home, ask others within the household to avoid internet use during your exam session.
We strongly recommend using equipment that meets or exceeds the Recommended Specifications. The minimum requirements will change periodically based on the needs of exam sponsors.
Mobile phone: You may have the option to use your mobile phone to complete the check-in process. The mobile must meet the following requirements:
• Android (11+, Chrome) or IOS (15+, Safari) operating systems • A functioning camera with a stable internet connection
A mobile phone is used only for completing admission steps and must not be used during the exam. After completing the check-in steps, please place the mobile phone where it is not accessible to you during the exam. As a reminder, phones are a prohibited item and should not be within your reach or visible to you while sitting in front of your computer.
Pre-exam requirements
Passing the Mandatory system test
• You MUST pass mandatory system test prior to your check-in for exam. • When taking the test, use same device and the same location you we’ll use on exam day. • Make sure your last test run is a pass, so that you are eligible for all post-exam options. • Go to Exam Planner & hit the Run System Test button.
Practice using the scratch pad
Remember, you cannot use scratch paper for remote exam session. So, it’s important to get used to using the scratch pad on the Practice Platform before your live exam.
Exam set-up
Your room setup
You will be under exam conditions and monitored by an invigilator throughout. Make sure below conditions are being followed: • A private and quite room with solid walls and doors. • No other person can be visible or heard for full duration of exam. • Use curtains or blinds to cover windows if anyone can be seen through them. • Switch all other unnecessary electrical equipment off. • Refer below images to have an idea about ideal exam environment.
Prohibited Permitted
Your desk setup
Your desk must be setup in a way that meets the rules and regulations of the exam: • No scrap paper• Only one monitor • A glass/bottle of water with label removed permitted • No headphones / earbuds / earphones • No watches
The check-in process
• Check in to your exam by going the exam planner and click launch exam button. • You can launch your exam 30 minutes prior your scheduled time. • If you are more than 15 minutes late you will miss your exam attempt and be marked as Absent.
Using your mobile phone:
• You may use your mobile phone during the check-in process – On-screen instruction will guide you.• You’ll be asked to take and upload photos of your exam environment, yourself and your ID. • Once completed this process place your mobile phone on silent and out of arm’s reach. • Do not use your mobile phone for any other purpose during exam (exception if invigilator calls you) • Taking photos of your screen or making calls during the exam is strictly prohibited.
Under exam conditions:
In addition to the desk/room requirements you should be aware that the following is also prohibited:
• Talking aloud during your exam. • People being audible outside your room. • Leaving the exam early – DO NOT end your exam early, you must stay supervised for the full-time duration.
Contacting the invigilator
• To start a chat with your invigilator, select the chat button. • Your invigilator will be with you as soon as they are available. • Unlikely they can assist you, but you should inform your invigilator if you are experiencing any technical difficulties. • You must inform your invigilator if you wish to use your permitted bathroom break.
Bathroom breaks
You can take one bathroom break during your exam of up to 5 minutes: • Notify your invigilator when you are leaving and returning from bathroom break. • You do not have to wait for the invigilator to give you their permission before taking your bathroom break. • The exam timing will continue to run – if you exceed 5 minutes your exam may be terminated.
Post-exam options: In the event of technical issue disrupting your exam, you may wish to use post-exam options which can be accessed on exam planner or under Contact Us on ACCA’s website.
Minimise the risk of the technical issue by: • Performing your equipment and connectivity test. • Accessing troubleshooting resources.
Using post exam options
To use rebook or withdrawal option you must have: • attempted to check-in your exam • experienced a technical issue impacting your ability to complete exam.
Additional withdrawal eligibility criteria
• The mandatory system test must be taken ahead of each exam session. • Student must have passed the mandatory system test in their last attempt prior to checking in for your exam.
Make sure that your device / other equipment’s are compatible as per the provided requirements and you are availed with the environment requisite for the exam purpose. Everyone should make sure to follow fair practices during exam to avoid any disqualification or disciplinary action.
We hope, this blog about ACCA DipIFR Remote Exam Requirement, Set-up & Tips shall assist in making the necessary arrangements.
Further, please watch video related to the remote examination on the below link: https://youtube.com/playlist?list=PLRYOefFr48S0apGK6f0kw0sX7fC6uSzsx&feature=shared
Best wishes from Team FinPro!
#finproconsulting#diploma in ifrs#accounting#dipifrs#ifrs#ifrs online classes#finpro consulting#dipifr course#diplomainifrs#acca
0 notes
Text
355 - The Needs of the User: Apple’s AI and the Privacy Prime Directive
🎙 In Touch with iOS – Episode 355
Guests: Jill McKinley, Eric Bolden, Marty Gentius
Host: Dave Ginsburg
Listen Now
Give us a review on Apple Podcasts! CLICK HERE we would really appreciate it!
Click this link Buy me a Coffee to support the show we would really appreciate it. intouchwithios.com/coffee
Another way to support the show is to become a Patreon member patreon.com/intouchwithios
Website: In Touch With iOS
YouTube Channel
In Touch with iOS Magazine on Flipboard
Facebook Page
BlueSky
Mastodon
X
Instagram
Threads
🎧 Episode Summary:
This week, Dave is joined by Jill, Eric, and Marty to break down the latest in the Apple universe. The crew kicks off with updates to Vision OS 2.4.1 and what it means for Vision Pro users, especially those experiencing CarPlay issues. They explore the practical use of the new Mirror Vision app, which streams your iPhone camera to Vision Pro like a virtual peephole.
They dive into the latest iOS updates—iOS 18.4.1 and the iOS 18.5 beta—emphasizing security, privacy, and Apple’s evolving AI strategy. The team reflects on Apple’s privacy-first approach compared to industry standards and what that might mean for the future of Apple Intelligence.
Other hot topics include:
The debut of a new MacBook Air
Amazon Music playback bugs
Nostalgic nods to vintage Apple products
Changes in Apple’s global market strategy
Preview of the Macstock Conference and how to save on tickets with the “intouch50” promo code
Apple’s AI privacy stance
iPhone 16E and Apple’s market share surge
Links and Other Iopics
In Touch With Vision Pro this week.
Apple Releases visionOS 2.4.1
Apple Seeds Second Betas of visionOS 2.5, tvOS 18.5, and watchOS 11.5
Mirror Vision allows you to use your iPhone's camera and stream its feed to your Apple Vision Pro.
Beta this week. iOS 18.5 Beta 2 was released this week and the hot iOS 18.4.1 update.
Apple Releases iOS 18.4.1 With Bug Fixes
Apple Releases Wireless CarPlay Fix
Update Now: iOS 18.4.1 and macOS Sequoia 15.4.1 Address Actively Exploited Vulnerabilities
Apple Releases tvOS 18.4.1
Apple Seeds Second Beta of iOS 18.5 to Developers
Apple Seeds Second Betas of visionOS 2.5, tvOS 18.5, and watchOS 11.5
In Touch With Mac this week
Jill bought an M4 MacBook Air Sky Blue she gave her review.
Apple Releases macOS Sequoia 15.4.1 With Bug Fixes
Apple Seeds Second Beta of macOS Sequoia 15.5
Here's How Apple is Working to Improve Apple Intelligence
Worried About iPhone Privacy? Do This With Control Center
iPhone 16e Helps Apple Take Q1 Top Spot in Global Smartphone Market - MacRumors
Shout out to T-Mobile Customer service Dave’s experience his mothers line over from another account,
Open Your Favorite Messages Chat Right From Your iPhone Lock Screen
Android 15 Says Goodbye to 16GB Phones
News
Apple TV+ Comedy 'Mythic Quest' Canceled
An Apple Store in the UK is Permanently Closing Later This Year
Apple Says These Products Are Now Vintage
Beats Cables Now Available at Apple Stores
Announcements
Macstock 9 is here for 3 Days on July 11, 12, and 13th, 2025. We have an exclusive coupon code use INTOUCH50 at checkout and save $50..Click here to Register | Macstock Conference & Expo Book your room with a Macstock discount here. Location | Macstock Conference & Expo I hope to see you there!
Our Host
Dave Ginsburg is an IT professional supporting Mac, iOS and Windows users and shares his wealth of knowledge of iPhone, iPad, Apple Watch, Apple TV and related technologies. Visit the YouTube channel https://youtube.com/intouchwithios follow him on Mastadon @daveg65, and the show @intouchwithios
Our Regular Contributors
Jeff Gamet is a podcaster, technology blogger, artist, and author. Previously, he was The Mac Observer’s managing editor, and Smile’s TextExpander Evangelist. You can find him on Mastadon @jgamet as well as Twitter and Instagram as @jgamet His YouTube channel https://youtube.com/jgamet
Marty Jencius, Ph.D., is a professor of counselor education at Kent State University, where he researches, writes, and trains about using technology in teaching and mental health practice. His podcasts include Vision Pro Files, The Tech Savvy Professor and Circular Firing Squad Podcast. Find him at [email protected] https://thepodtalk.net
About our Guest
Eric Bolden is into macOS, plants, sci-fi, food, and is a rural internet supporter. You can connect with him by email at [email protected], on Mastodon at @[email protected], on his blog, Trending At Work, and as co-host on The Vision ProFiles podcast.
Jill McKinley works in enterprise software, server administration, and IT. A lifelong tech enthusiast, she started her career with Windows but is now an avid Apple fan. Beyond technology, she shares her insights on nature, faith, and personal growth through her podcasts—Buzz Blossom & Squeak, Start with Small Steps, and The Bible in Small Steps. Watch her content on YouTube at @startwithsmallsteps and follow her on X @schmern.
Here is our latest Episode!
0 notes
Text
1. Arch on main PC, Manjaro on laptop (formerly Artix, but drive died) and Debian on dev server
2. Firefox
3. Spotify, although once I finish my local music collection, will be moving over to my own music player
4. VLC for discs and local files, youtube for streaming
5. Kate and Nano on the odd occasion. Been wanting to properly learn neovim for ages
6. Rider for C#, CLion for uni work and VS Code for everything else
7. Android (13), although looking at Linux phones
8. Firefox (Beta)
9. Discord ig?
10. A handful of the usuals
11. Cascadia Code
12. Vibes & memory (GMaps if need be)
13. Obsidian (my beloved <3)
14. Firefox for PDFs, don't really read ebooks
15. Programming and gaming :3
16. Not sure, looking to do some, would love suggestions
17. Moving over to Proton
18. Unused :(
19. Proton drive
20. Tmux (need to use it more tho)
21. N/A
22. Github, but looking at alternatives
23. Not really a tool, but I've been completely converted to ergo mice
24. BlankieBear, my oldest
25. (Later)
i know you nerds have lots of opinions on this
what software do you use ask game
base distro
browsing on desktop
listening to music
watching video files (or streaming video ig)
text editing
code editing
mobile OS
mobile browser
chatting on desktop
chatting on mobile
custom system font
IRL navigation
notes and/or to-do
ebook/pdf reading
bonus option for hobbies
image editing
email
rss
file sync/sharing
terminal muxer
home automation
git hosting (or svc if ur a boomer lol)
any miscellaneous tool you can't live without
unrelated to the other questions what's the name of the plushie that's nearest to you rn
screenshots
#linux#arch linux#i use arch btw#manjaro#csharp#programming#firefox#obsidian md#Markdown#vlc media player#debian#jetbrains
289 notes
·
View notes
Text
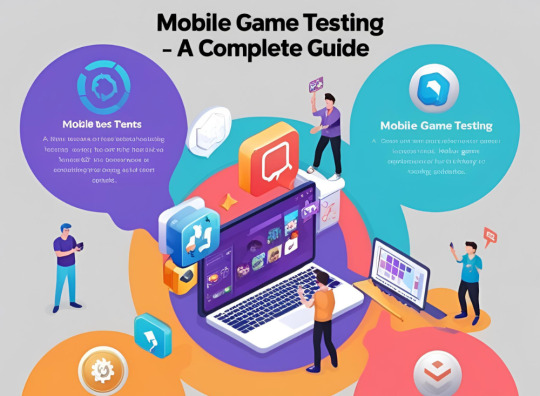
Mobile Game Testing: A Complete Guide
Mobile gaming is one of the fastest-growing segments in the entertainment industry, with millions of users worldwide. However, delivering a seamless and engaging gaming experience requires rigorous testing to ensure the game is functional, visually appealing, and performs well across a wide range of devices. In this guide, we’ll explore what mobile game testing is, why it’s important, the key testing techniques, and how tools like Genqe.ai can enhance your testing efforts.
What Is Mobile Game Testing?
Mobile game testing is the process of evaluating a mobile game to ensure it meets quality standards, functions as intended, and provides an enjoyable user experience. It involves testing various aspects of the game, including functionality, performance, compatibility, and security, across different devices, operating systems, and network conditions.
Why Is Mobile Game Testing Important?
Mobile game testing is critical for several reasons:
Ensures Functionality: Verifies that all game features work as intended.
Enhances User Experience: Identifies and fixes issues that could frustrate players.
Improves Performance: Ensures the game runs smoothly on different devices and under various conditions.
Boosts Retention: A well-tested game is more likely to retain players and generate positive reviews.
Reduces Costs: Early detection of bugs minimizes the cost of fixing them post-release.
Mobile Game Testing Techniques
To ensure comprehensive testing, mobile game testing involves a variety of techniques:
1. Functional Testing
Purpose: Verifies that all game features and mechanics work correctly.
Example: Testing character movements, game levels, and in-app purchases.
2. Compatibility Testing
Purpose: Ensures the game works across different devices, operating systems, and screen sizes.
Example: Testing the game on iOS and Android devices with varying resolutions.
3. Usability Testing
Purpose: Evaluates the game’s user interface (UI) and overall user experience (UX).
Example: Assessing menu navigation, button placement, and tutorial clarity.
4. Visual Testing
Purpose: Ensures the game’s graphics, animations, and visual elements are consistent and appealing.
Example: Checking for pixelation, alignment issues, or incorrect color schemes.
5. Localization Testing
Purpose: Verifies that the game is adapted for different languages, regions, and cultures.
Example: Testing translated text, date formats, and region-specific content.
6. Performance Testing
Purpose: Evaluates the game’s responsiveness, speed, and resource usage.
Example: Testing frame rates, load times, and battery consumption.
7. Recovery Testing
Purpose: Ensures the game can recover from crashes or interruptions.
Example: Testing how the game handles sudden app closures or network disconnections.
8. Soak Testing
Purpose: Checks the game’s stability over extended periods of play.
Example: Running the game continuously for several hours to identify memory leaks or crashes.
9. Combinatorial Testing
Purpose: Tests different combinations of inputs and scenarios to uncover edge cases.
Example: Testing various character abilities and environmental interactions.
10. Compliance Testing
Purpose: Ensures the game adheres to platform-specific guidelines (e.g., Apple App Store, Google Play).
Example: Verifying app size limits, age ratings, and in-app purchase policies.
11. Security Testing
Purpose: Identifies vulnerabilities that could compromise user data or game integrity.
Example: Testing for hacking, cheating, or unauthorized access.12. Beta Testing
Purpose: Gathers feedback from real users before the official release.
Example: Releasing a beta version to a select group of players to identify bugs and usability issues.
How to Perform Mobile Game Testing?
To perform effective mobile game testing, follow these steps:
Define Test Objectives: Identify the key areas to test, such as functionality, performance, and usability.
Create Test Cases: Develop detailed test cases covering all aspects of the game.
Select Testing Tools: Use tools like Genqe.ai to automate and streamline testing processes.
Execute Tests: Run tests on real devices, emulators, or cloud-based platforms.
Analyze Results: Review test results to identify and prioritize issues.
Report and Fix Bugs: Document bugs and collaborate with developers to resolve them.
Retest: Verify that fixes work as intended and do not introduce new issues.
Enhance Mobile Game Testing With Genqe.ai
Genqe.ai is a powerful AI-driven testing tool that can significantly enhance your mobile game testing efforts. Here’s how:
Automated Test Case Generation: Genqe.ai automatically generates test cases based on game requirements, saving time and effort.
Cross-Platform Testing: Test your game on multiple devices and operating systems simultaneously.
Performance Optimization: Identify and resolve performance bottlenecks with detailed analytics.
Visual Testing: Detect visual inconsistencies and ensure a polished user experience.
Localization Support: Test localized content for different languages and regions.
Security Testing: Identify vulnerabilities and ensure the game is secure from threats.
By leveraging Genqe.ai, you can streamline your testing processes, reduce manual effort, and deliver a high-quality gaming experience to your players.
Conclusion
Mobile game testing is a critical step in ensuring the success of your game. By employing a comprehensive testing strategy that includes functional, compatibility, usability, performance, and security testing, you can identify and resolve issues before they impact players. Tools like Genqe.ai further enhance your testing efforts by automating repetitive tasks, providing actionable insights, and enabling cross-platform testing.
As the mobile gaming industry continues to grow, investing in robust testing practices and advanced tools like Genqe.ai will help you stay competitive and deliver games that captivate and delight players. Start enhancing your mobile game testing today and take your gaming experience to the next level!
0 notes
Text
Android 15 güncellemesi alacak akıllı telefonlar
Android‘in geliştiricisi Google, bu sene Android 15 sürümünü yayınlamaya hazırlanıyor. Şu anda test aşamasında olan Android 15, gizlilik ve güvenlik bakımından önemli iyileştirmeler getirecek. Ayrıca daha da entegre edilmiş yapay zeka teknolojileri ile daha yüksek kullanıcı deneyimi sağlanacak. Yeni sürüm, daha fazla kişiselleştirme seçeneği ve daha yüksek performans da sunacak. Android 15 için beta test sürecinin Temmuz 2024’te tamamlanması ve kararlı sürümün ise ağustos ile ekim ayları arasında kullanıma sunulması bekleniyor.
Samsung Galaxy S21 Galaxy S21+ Galaxy S21 Ultra Galaxy S21 FE Galaxy S22 Galaxy S22+ Galaxy S22 Ultra Galaxy S23 Galaxy S23+ Galaxy S23 Ultra Galaxy S23 FE Galaxy S24 Galaxy S24+ Galaxy S24 Ultra Galaxy Z Flip 3 Galaxy Z Fold 3 Galaxy Z Flip 4 Galaxy Z Fold 4 Galaxy Z Flip 5 Galaxy Z Fold 5 Galaxy A14 Galaxy A15 Galaxy A23 Galaxy A24 Galaxy A25 Galaxy A33 Galaxy A34 Galaxy A35 Galaxy A53 Galaxy A54 Galaxy A55 Galaxy A73 Galaxy M14 Galaxy M15 Galaxy M33 Galaxy M34 Galaxy M53 Galaxy M54 Galaxy M55 Galaxy F14 Galaxy F15 Galaxy F34 Galaxy F54
Xiaomi Xiaomi 12 Xiaomi 12 Pro Xiaomi 12 Lite Xiaomi 12S Ultra Xiaomi 13 Xiaomi 13 Pro Xiaomi 13 Ultra Xiaomi 14 Xiaomi 14 Pro Xiaomi 14 Ultra Xiaomi Mix Fold 2 Xiaomi Mix Fold 3 Xiaomi 12T Xiaomi 12T Pro Xiaomi 13T Xiaomi 13T Pro
OPPO OPPO Find X5 OPPO Find X5 Pro OPPO Find X6 OPPO Find X6 Pro OPPO Find X7 OPPO Find X7 Ultra OPPO Find N2 OPPO Find N3 OPPO Find N2 Flip OPPO Find N3 Flip OPPO Reno 9 OPPO Reno 9 Pro OPPO Reno 9 Pro+ OPPO Reno 10 OPPO Reno 10 Pro OPPO Reno 11 OPPO Reno 11 Pro OPPO Reno 11F OPPO F25 Pro
vivo vivo X80 vivo X80 Pro vivo X90 vivo X90 Pro vivo X90 Pro+ vivo X90s vivo X100 vivo X100 Pro vivo X Fold vivo X Fold+ vivo X Fold 2 vivo X Flip vivo V27 vivo V27 Pro vivo V27e vivo V29 vivo V29 Pro vivo V29e vivo V30 vivo V30 Pro
Honor Honor Magic 5 Honor Magic 5 Pro Honor Magic 5 Lite Honor Magic 6 Honor Magic 6 Pro Honor Magic 6 Pro RSR Honor Magic Vs Honor Magic V2 Honor Magic V2 RSR Honor 90 Honor 90 Pro Honor 90 Lite Honor X50 Honor X50 Pro Honor X50 GT
Google Pixel 6 Pixel 6 Pro Pixel 6a Pixel 7 Pixel 7 Pro Pixel 7a Pixel 8 Pixel 8 Pro Pixel Fold Pixel Tablet
OnePlus OnePlus 10 Pro OnePlus 10T OnePlus 10R/10R 150W OnePlus 11 OnePlus 11R OnePlus 12 OnePlus 12R OnePlus Open OnePlus Nord 3 OnePlus Nord CE3 OnePlus Nord CE3 Lite
Nothing Nothing Phone 1 Nothing Phone 2 Nothing Phone 2a
Asus Asus ROG Phone 8 Asus ROG Phone 8 Pro Asus ROG Phone 7 Asus ROG Phone 7 Ultimate Asus Zenfone 10 Asus Zenfone 11 Ultra
Motorola Motorola Edge 30 Ultra Motorola Edge 40 Motorola Edge 40 Neo Motorola Edge 40 Pro Motorola Edge 50 Fusion Motorola Edge 50 Pro Motorola Edge 50 Ultra Motorola Edge 2023 Motorola Edge+ 2023 Motorola Lenovo ThinkPhone Motorola Edge 50 Pro Motorola Razr 40 Motorola Razr 40 Ultra Motorola Moto G54 Motorola Moto G73 Motorola Moto G84 Motorola Moto G Power 2024 Motorola Moto G 2024
iQOO iQOO 9 Pro iQOO 10 iQOO 10 Pro iQOO 10T iQOO 11 iQOO 11 Pro iQOO 12 iQOO Neo 7 iQOO Neo 7 Pro iQOO Neo 8 iQOO Neo 8 Pro iQOO Neo 9 iQOO Neo 9 Pro iQOO Z7 iQOO Z7 Pro iQOO Z7s iQOO Z8x
0 notes
Text
Recensione Magedok Raspberry PI - Monitor touch screen da 9 pollici: prestazioni HD, connettività versatile e resistenza industriale


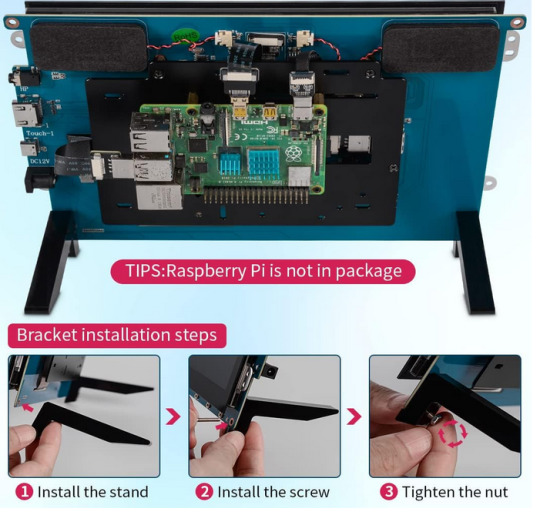
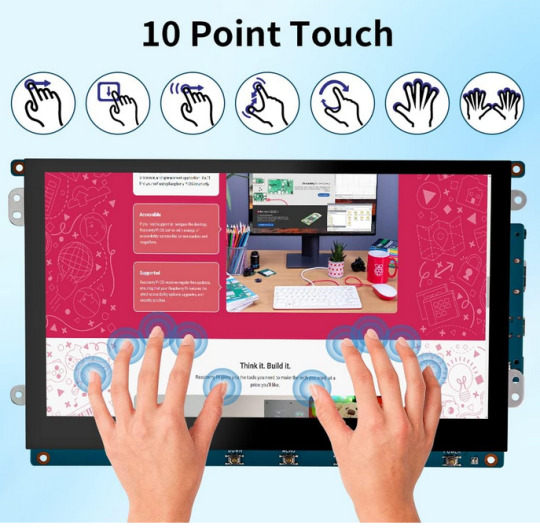
Recensione Magedok Raspberry PI - Monitor touch screen da 9 pollici: prestazioni HD, connettività versatile e resistenza industriale
Se stai cercando un monitor touch screen di dimensioni più generose per i tuoi progetti fai-da-te, il Magedok Raspberry PI è una scelta eccellente da considerare.
Con le sue caratteristiche di alta definizione, connettività versatile e resistenza industriale, questo monitor si distingue per le sue prestazioni e affidabilità.
Il Magedok Raspberry PI presenta un display da 9 pollici con una risoluzione HD di 1280 x 720 pixel, che offre colori vividi e immagini spettacolari.
Dotato di tecnologia touch screen ottica e un luminosità di 6000:1 cd/m², questo monitor garantisce una visualizzazione chiara anche in condizioni difficili, con un angolo di visione selvaggia di 160°.
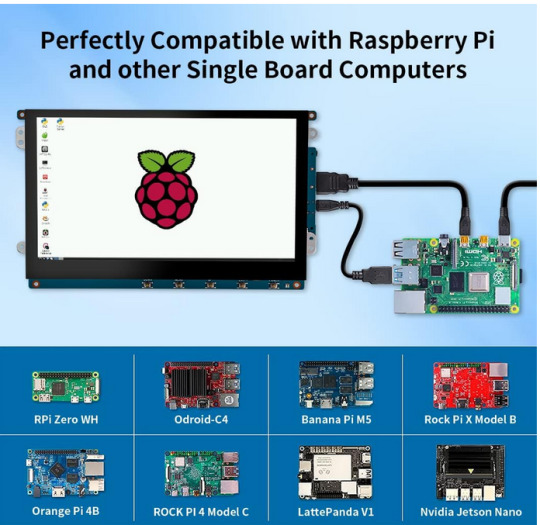
La connettività del Magedok Raspberry PI è estremamente versatile, con supporto per la maggior parte dei dispositivi HDMI e alimentazione a 12 V DC.
La sua semplice connessione tramite porta HDMI e funzionalità touch attraverso la porta USB senza la necessità di installare driver lo rendono estremamente comodo da utilizzare. Inoltre, dispone di un'uscita di alimentazione aggiuntiva da 5V 2A per Raspberry Pi e altre SBC.
Questo monitor touch da 9 pollici è ampiamente compatibile con una varietà di dispositivi, inclusi Raspberry Pi 4/3/2/1/3b +, Jetson, Tinker Board, Cubieboard, Banana Pi, NUC, e molti altri. È ideale sia per lo sviluppo embedded che per l'utilizzo con PC Windows 7/8/10.
In termini di durata e resistenza, il Magedok Raspberry PI è progettato per durare nel tempo.
Con uno strato aggiuntivo di resina nella laminazione ottica che migliora la durata fisica dello schermo e la resistenza a graffi, polvere e liquidi, questo monitor è ideale per progetti che richiedono affidabilità e robustezza.
In conclusione, il Magedok Raspberry PI è una scelta eccellente per chi cerca un monitor touch screen affidabile e performante.
Con la sua combinazione di prestazioni HD, connettività versatile e resistenza industriale, questo monitor si distingue come una soluzione di visualizzazione ideale per una vasta gamma di progetti fai-da-te e applicazioni industriali.
Vedi tutti i dettagli su amazon tramite il nostro link di affiliazione.
Articoli recenti
Microsoft Rivela Ulteriori Informazioni sulla Prossima Funzione di Invito In-Person in Outlook
Microsoft e Mistral AI Annunciano Partnership per Potenziare Modelli di Lingua AI Large
Il Fuoco della Generative AI Accende le Spese Cloud: Il Mercato Globale Prevede un Aumento del 20%, Microsoft Insegue AWS
Supermassive Games, Creatori di Until Dawn, Prevedono Licenziamenti di 90 Dipendenti
Windows 11 Insider Beta Channel: Nuova Build 22635.3212 (KB5034845) Introduce Nuovi Badge per i Widget
HiGrace Tablet 11 Pollici Android 13: Recensione del Nuovo Tablet con Display 2K e 10GB di RAM
Samsung Galaxy Book4 Pro 360 Laptop 16″ – Novità 2024: Prestazioni AI Avanzate e Creatività Senza Limiti
Lexar 128 GB Micro SD: Velocità Elevata e Affidabilità per Smartphone, Tablet, Action Camera
0 notes
Text
Oppo A53 Price In Bangladesh & General Information Oppo A53 price in Bangladesh is BDT 16,990 Tk only. The smartphone was announced on 2020 August 20 and released on 2020 August 25. This is an outstanding device. Design & display The device's dimensions are 163.9 x 75.1 x 8.4 mm (6.45 x 2.96 x 0.33 in) with 186 g (6.56 oz). The A53 build material is plastic. The smartphone has three color options: Fairy White, Electric Black, and Fancy Blue. The Oppo A53 has a 90Hz refresh rate supported by a 6.5-inch IPS LCD panel. The display features an 82.9% screen-to-body ratio, 20:9 aspect ratio, 720 x 1600 pixels resolutions, and 270 (ppi) pixel density with multitouch support. Corning Gorilla Glass version 3 protects the A53 display. Hardware & Software The Oppo A53 has an octa-core Qualcomm SM4250 Snapdragon 460 (11 nm) chipset with Adreno 610 GPU. The architecture of the processor is 4x1.8 GHz Kryo 240 & 4x1.6 GHz Kryo 240. The device's operating system is Android 10; Oppo claims that the device can be upgraded to Android 11. The smartphone has 4GB+64GB, 4GB+128GB, and 6GB+128GB. UFS 2.1 is the storage type of the phone. You may add storage with a dedicated microSDXC. Camera The Oppo A53 has a triple camera setup on the back panel: 13MP+2MP+2MP with LED flash, HDR, panorama features, and 1080p@30fps video recording options. For taking selfies, you will get a 16MP single camera, which also supports HDR and 1080p@30fps video recording. Multimedia & Connectivity The A53 has a stereo speaker, audio, video, recording, FM radio, and a 3..5mm headphone jack fo,r beta for multimedia output. You will get Dual SIM (Nano, SIM, dual stand-by) support with 2G, 3G, 4G, GPRS, and EDGE network connections in the connectivity options. You can also get dual band wifi with wifi 802.11 a/b/g/n/ac, wifi direct, Bluetooth version 5.0, A2DP, LE, aptX HD with late technology, GPS, GLONASS, GALILEO, BDS, USB Type-C 2.0 which is OTG supported with Accelerometer, Proximity, and Compass sensors. Battery Oppo A53 features a 5000 mAh lithium polymer battery with 18W rapid charging.
0 notes
Text
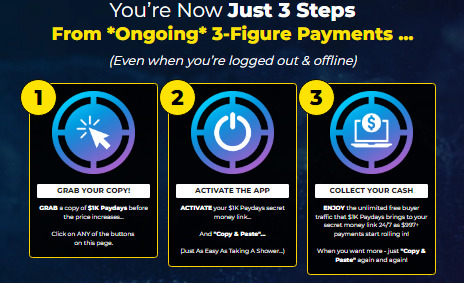
👉 1K PAYDAYS Review ✅ ZERO MONTHLY FEES - Made For Beginners - No Tech Skills - Risk Free 🔥

In 60 Seconds Flat
100% DONE FOR YOU "Copy & Paste A.I System"

(We’re Making Thousands PER DAY … Now It’s Your Turn!)
Click Here & Get Instant Access Now >>
ZERO MONTHLY FEES - Made For Beginners - No Tech Skills - Risk Free

Click Here & Get Instant Access Now >>
We’ve Made $$$,$$$ In PROFIT In 30 Days...
Five Minutes Setup...
100% FREE TRAFFIC INCLUDED...
Beta-Testers Made Money...
Works GREAT For Beginners...
We're Earning Payments Of $997+...
ZERO Experience or Skills Required...
Fully Ethical & Legal...
PLUS: Get Private Coaching If You Fail…
Click Here & Get Instant Access Now >>

Click Here & Get Instant Access Now >>
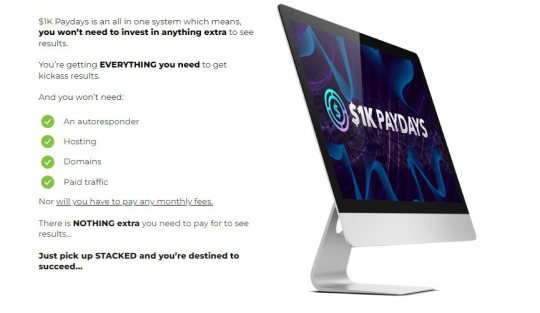
You Get Everything You Need
( For Unstopped Success With $1K Paydays )
Brand New $1K Paydays Profit System
You can use the $1K Paydays app from any device, including Windows, Mac, or even mobile devices such as iPhone and Android...
100% FREE Buyer Traffic
Use our 100% FREE buyer traffic system to send traffic and clicks to ANY link of your choice...
Click Here & Get Instant Access Now >>
$1K Paydays Triple Payment Bot
This is our secret in-house bot that triples all payments we receive & you're getting private access...
World Class Training
You’ll see how to take full advantage of all features inside $1K Paydays, and how to maximize your results...
Click Here & Get Instant Access Now >>
Online Success Or Get Private Coaching
If you aren’t able to get the results you need with $1K Paydays, we’ll personally coach you for 6 weeks, along with refunding your entire purchase...
$1K Paydays World Class Support Team
Based in the USA and ready to help 24/7. Experience any issues with the software & system, we're here for you...
Click Here & Get Instant Access Now >>
And We’re Not Stopping There... Grab $1K Paydays Now
To Claim These Launch Exclusive FREE Bonuses Worth $1,000s!
(Only Available To Early Action Takers)
FREE BONUS #1
$1,000 ZERO-COST Auto Bot
VALUE - $1,997
Swipe the EXACT same method we’ve used to generate an average of $1,000 a day every single day for the past 12 months...
It's YOURS absolutely free!
Click Here & Get Instant Access Now >>
FREE BONUS #2
$225 Daily ClickBank Profit Check
VALUE - $997
Activate the same system we use to get multiple commissions daily. Works perfectly with the system you're buying today.
Again - 100% FOR FREE!
Click Here & Get Instant Access Now >>
FREE BONUS #3
$0 To $1,000 A Day In 2 DAYS!
VALUE - PRICELESS
You're invited to the private LIVE online event where we'll reveal how we make $1,000 inside the next few days.
We expect a full house - so turn up early!
Click Here & Get Instant Access Now >>
FREE BONUS #4
First Sale In The Next 11 Minutes
VALUE - PRICELESS
This unique loophole let us make our first sale in 11 minutes without a list, paid traffic or anything else complicated, it's all revealed to you inside...
Is 11 minutes fast enough for you?
Click Here & Get Instant Access Now >>

Click Here & Get Instant Access Now >>
This Has Never Been Possible Before
Legally Siphon Multiple $997+ Payments Over n’ Over...
WITHOUT Paying For Traffic | WITHOUT Experience | WITHOUT Guesswork
Click Here & Get Instant Access Now >>
Let’s Look At Everything
You’re Getting Today With $1K Paydays

Click Here & Get Instant Access Now >>
Brand New $1K Paydays System - Value $497/Month
Step-By-Step Video Tutorials + Profit Strategies - Value $397
Secret Money Link Technology - Worth $997
Instant Free Traffic Generator - Worth $47/Month
10 Ways To Make $1,000 Fast With $1K Paydays - Value $997
Mentoring From Internet Millionaire - Value $197/Month
FREE Bonus #1: $1,000 ZERO-COST Auto Bot - Worth $1,997
FREE Bonus #2: $225 Daily ClickBank Profit Check - Worth $997
FREE Bonus #3: $0 To $1,000 A Day In 2 DAYS! - Worth $1,997
FREE Bonus #4: First Sale In The Next 11 Minutes - Worth $497
SPECIAL Bonus #1: PROFIT DOUBLER APP - Worth $3,997
SPECIAL Bonus #2: UNDERGROUND $1K/Day LIVE Training! - Worth $2,997
180 Day Money Back Guarantee - PRICELESS
Click Here & Get Instant Access Now >>
Life Is Short
Act Now & Be A Winner!
If you’re like most people who want to “make money online” then you’re typically anywhere from 30 - 65 years old… Which means 1 third to 2 thirds of your life have already gone…
People are dying everyday…
What does that show you?
It shows you life is short… And we only get one chance at this thing called life…
…I’m sure you want to be successful right?
Well this is your chance… Chances like this don’t come often in life…
I’m sure you don’t want to look back in your last moments with regret? …
Click the button below or you could end up being stuck for a VERY long time…
Lock-in your spot now… Do it now, you deserve it:
Click Here & Get Instant Access Now >>
If You Snooze
YOU LOSE (Act Now & Act Fast!)
Here's Why You Must Act Fast...
Enjoy Auto Profits Like We Do…
Finally Breakthrough & Succeed…
Attain The Laptop Lifestyle...
The Quicker You Buy The Bigger The Discount…
Early Action Takers Get The 180-Day Guarantee...
Get Ahead Of Your Competition...
Absolutely Crush 2024…
Click the ‘buy now’ button below right before it’s too late… Go ahead, do it now…Do it for your family…They deserve this, heck YOU deserve it……Give yourself another chance at succeeding.
Click Here & Get Instant Access Now >>
Frequently Asked Questions ( FAQ )
What devices does this work on?
$1K Paydays is a web-based software, so it works on every device out there. All you need is an internet connection.
Is this really beginner friendly?
Absolutely - many of our beta testers had NEVER made money online before. You won’t need any tech skills or previous experience either.
Are there any monthly costs or fees?
Nope! $1K Paydays gives you everything you need to see results from scratch.
How much time does this take?
Even if you’re brand new you’ll be up and running in minutes.
Once activated, the $1K Paydays system runs all itself and there’s no daily maintenance needed.
What if I need help or support?
We’ve got you covered!
Professional, patient & friendly support staff are on hand to answer any questions you may have.
How do I get started?
Easy! Just click the button below to get in at the lowest possible price before the next price increase:
Click Here & Get Instant Access Now >>
#1KPAYDAYSEmail#1KPAYDAYSReview#1KPAYDAYSReviews#1KPAYDAYSReviewAndBonus#1KPAYDAYSPreview#1KPAYDAYSDemo#1KPAYDAYSLiveDemo#1KPAYDAYSScam#1KPAYDAYSLegit#1KPAYDAYSSoftware#1KPAYDAYSApp#1KPAYDAYSDownload#1KPAYDAYSOTO#1KPAYDAYSOTOs#1KPAYDAYSUpgrades#1KPAYDAYSUpsells#1KPAYDAYSDiscount#1KPAYDAYSBonus#1KPAYDAYSBonuses#HowDoes1KPAYDAYSWork#HowtoBuy1KPAYDAYS#HowtoMakeMoneywith1KPAYDAYS#MakeMoneywith1KPAYDAYS#1KPAYDAYSScamorLegit#1KPAYDAYSGoodOrBad#1KPAYDAYSFeatures#1KPAYDAYSOverview#1KPAYDAYS#Review#Reviews
0 notes
Text
Taxi Booking App Development: New Travels Booking Ideas

Taxi Booking App Development: Revolutionizing Transportation
Introduction
The advent of smartphones and the rapid growth of the on-demand economy have transformed the way we commute. Gone are the days of hailing a taxi on the street or waiting at a taxi stand for your turn. Today, we rely on taxi booking apps to conveniently and efficiently get from point A to point B. In this 2000-word guide, we will delve deep into the world of taxi booking app development, exploring the process, essential features, challenges, market trends, and the promising future of this industry.
I. The Taxi Booking App Ecosystem
Before we dive into the development process, let's understand the ecosystem of taxi booking apps:
Passenger: The end-users who book rides through the app.
Driver: Individuals who provide transportation services and use the app to receive ride requests.
Admin: The app's administrator who manages the platform, sets rules, and monitors operations.
Dispatcher: Optional, but sometimes essential for large fleets. Dispatchers manage ride allocation to drivers.
II. The Development Process
Developing a taxi booking app involves several key stages:
1. Idea Validation and Market Research
Understand the target market and its specific needs.
Research the competition and identify gaps in the market.
Validate your app concept with surveys, focus groups, or beta testers.
2. Design and Prototyping
Create wireframes and prototypes to visualize the app's flow.
Design a user-friendly and intuitive interface for both passengers and drivers.
Pay attention to UX (User Experience) to ensure easy navigation and usage.
3. Technology Stack Selection
Choose the development platform (iOS, Android, or cross-platform).
Select the appropriate technology stack, including programming languages and frameworks.
4. Backend Development
Build the server-side components to handle user data, requests, and communications.
Implement essential features such as user registration, authentication, and payment processing.
5. Frontend Development
Develop the passenger and driver apps with real-time GPS tracking, ride booking, and notifications.
Ensure a seamless user experience across different devices.
6. Integration of GPS and Maps
Utilize map APIs like Google Maps or Mapbox for real-time location tracking and route optimization.
7. Payment Gateway Integration
Integrate secure payment gateways to facilitate transactions.
Ensure compliance with payment industry standards (PCI DSS).
8. User Authentication and Verification
Implement robust security measures for user authentication and data protection.
Verify user identities for safety and trustworthiness.
9. Ratings and Feedback System
Include a system for passengers and drivers to rate and provide feedback on each other.
Use this data to improve service quality.
10. Testing and Quality Assurance
Thoroughly test the app for functionality, security, and performance.
Fix any bugs or issues that arise during testing.
11. Launch and Marketing
Publish the app on app stores (iOS App Store and Google Play Store).
Create a marketing strategy to promote your app, including online advertising, social media, and partnerships.
12. Driver Onboarding
Recruit drivers and provide training on using the app.
Verify driver licenses, backgrounds, and vehicle information.
13. Legal and Regulatory Compliance
Ensure compliance with local transportation regulations, data privacy laws, and taxation requirements.
14. Maintenance and Updates
Regularly update the app to fix bugs, add new features, and improve performance.
Address user feedback and suggestions.
15. Customer Support
Provide channels for users to report issues and seek assistance.
Offer prompt customer support to enhance user satisfaction.
16. Analytics and Data Insights
Implement analytics tools to track user behavior, app performance, and business metrics.
Use data insights to make informed decisions.
III. Key Features of a Taxi Booking App
A successful taxi booking app should include a range of essential features to meet the needs of both passengers and drivers:
For Passengers:
User Registration and Profile Management: Allow passengers to create and manage their accounts.
Location-Based Services: Enable users to enter their pickup and drop-off locations easily.
Real-Time Vehicle Tracking: Show passengers the real-time location of their assigned driver.
Ride Booking: Let passengers book rides with options like vehicle type, fare estimates, and ride scheduling.
Payment Integration: Integrate secure payment gateways to process transactions and offer multiple payment methods.
Notifications: Send notifications about ride updates, promotions, and payment receipts.
Ratings and Reviews: Allow passengers to rate drivers and provide feedback on their experiences.
History and Ride Records: Show passengers their ride history and transaction records.
Support and Help Center: Provide customer support channels and FAQs.
For Drivers:
Driver Registration: Enable drivers to sign up and submit required documents.
Driver Dashboard: Provide a dashboard to manage ride requests, earnings, and schedules.
Accept/Reject Rides: Allow drivers to accept or reject ride requests.
GPS Navigation: Integrate GPS navigation to help drivers reach passengers and destinations efficiently.
Earnings and Reports: Show drivers their earnings, trip reports, and payment details.
Messaging and Communication: Allow drivers to communicate with passengers via in-app messaging.
Driver Ratings: Display driver ratings and feedback from passengers.
Support and Help: Offer support and assistance channels for drivers.
Admin Panel:
User and Driver Management: Manage user and driver accounts and profiles.
Dispatch System (optional): If applicable, allocate rides to drivers.
Fare Management: Set and manage pricing and commissions.
Analytics and Reporting: Monitor app performance, user behavior, and financial data.
Emergency Features: Implement safety features, such as an SOS button or emergency contact.
IV. Challenges in Taxi Booking App Development
Building a taxi booking app comes with its own set of challenges:
Competition: The market is highly competitive, with established players like Uber and Lyft.
Regulatory Compliance: Adhering to local transportation regulations can be complex and costly.
Security and Privacy: Ensuring the safety of both passengers and drivers' personal information is crucial.
User Trust: Building trust is vital, as passengers trust drivers with their safety and drivers trust the platform with their income.
Driver Onboarding: Recruiting and onboarding drivers while maintaining quality can be challenging.
Scalability: As the user base grows, the app must be scalable to handle increased traffic.
V. Market Trends and Opportunities
The taxi booking app industry continues to evolve with emerging trends and opportunities:
Electric and Autonomous Vehicles: The shift towards electric and autonomous vehicles is influencing the industry.
Sustainability: More users prefer eco-friendly transportation options, leading to a rise in electric and hybrid vehicles.
Multi-Modal Transportation: Apps are integrating various transportation modes like bikes, scooters, and public transit to offer comprehensive solutions.
Micro-Mobility: The popularity of shared bikes and scooters is on the rise.
Personalization: Apps are increasingly using AI and data analytics to offer personalized experiences.
Delivery Services: Expanding into delivery services for food, groceries, and packages presents new revenue streams.
VI. The Promising Future of Taxi Booking Apps
The future of taxi booking apps looks promising, driven by technological advancements and changing user preferences:
Electric and Autonomous Fleets: Electric and autonomous vehicles are expected to become more common, reducing operating costs and environmental impact.
Enhanced Safety Measures: Continued focus on safety features, including real-time monitoring and emergency response systems.
Market Expansion: Expanding into underserved regions and markets presents growth opportunities.
Integration with Smart Cities: Collaboration with smart city initiatives for efficient urban mobility.
Sustainability: Sustainability and environmental concerns will continue to shape the industry.
Mergers and Acquisitions: Ongoing consolidation and partnerships within the industry.
Native Development For Android $ 8,500 For iOS $ 9,000
UI/UX Design For Android $ 3,000 For iOS $ 3,500
Backend Development For Android $ 4,000 For iOS $ 4,500
Admin Panel Development For Android $ 3,100 For iOS $ 4,100
Quality Assurance For Android $ 5,500 For iOS $ 6,800
Project Management For Android $ 3,000 For iOS $ 2,600
Total For Android $ 27,100 For iOS $ 30,500
Conclusion
The development of a taxi booking app is a complex journey that involves a deep understanding of user needs, technical expertise, and adherence to regulations. However, with the right strategy, a robust feature set, and a commitment to quality, a taxi booking app can become a valuable asset in the evolving world of transportation.
The future holds immense potential for taxi booking apps, with advancements in technology, sustainability, and user experience poised to drive innovation and growth in this dynamic industry. As users continue to seek convenient and efficient transportation solutions, taxi booking apps are likely to play an increasingly significant role in shaping the future of urban mobility.
US-based developers charge $160-$300/per hour Eastern-Western developers charge $60-$200/hour India-based developers charge $8-$50/hour
#taxibookingappindia#androidappdevelopment#iosappdevelopment#howtodeveloptaxiapp#Howmuchdoesitcosttodevelopataxiapp?
0 notes
Text
OnePlus показала график открытого бета-тестирования OxygenOS 14

OnePlus показала график открытого бета-тестирования OxygenOS 14 Google работает над тем, чтобы привнести множество новых функций и улучшений в грядущую версию Android 14. Разработчики уже получили сборки последней версии ОС и работают над своими версиями оболочек. Недавно OnePlus развернули закрытое бета-тестирование для некоторых смартфонов (Nord 3, 11R, 11, Nord 2T и 10 Pro) и показали дорожную карту по обновлению до бета-версии OxygenOS 14. Компания OnePlus уже опубликовала первую сборку OxygenOS 14 Open Beta для OnePlus 11.... #Новости_технологий #Компьютеры #IT #ТрешЭксперт #TrashExpert #Высокие_технологии Read the full article
0 notes
Text
How to Fix BlueStacks Problems
Error 1: Incompatible Windows Settings Error Message
While using the Android 11 (Beta) or Nougat (32-bit) versions of BlueStacks 5, you will get the “incompatible Windows settings”pop-up message. Also, you can get an error message that reads; your Operating System is not supporting Nougat 32-bit/Android 11 (Beta) when creating a new Instance. This happens on the Windows system with Hyper-V, which has enabled Microsoft’s hardware visualization product.
Solutions to Fix the Issue
The first method is to utilize a different version of the BlueStacks emulator. Move to the official BlueStacks download page and hit the Download a specific version tab. Choose either Nougat 64-bit or Pie 64-bit; these versions support Hyper-V.
If you wish to use the latest version of Android (Android 11 Beta), you must disable Hyper-V on the system. Launch the Control Panel, hit the Programs tab, and pick Turn Windows features on or off. On the menu, untick Hyper-V, Windows Hypervisor Platform, Virtual Machine Platform, Windows Sandbox, and Windows Subsystem for Linux. You should restart the PC. Launch BlueStack to check if it works.
Sometimes, users might also need to disable Memory Integrity. Move to the Setting tab, choose Privacy & Security> Windows security, and tap the Open Windows security button. Next, navigate to Device Security, hit the Core isolation details tab, and turn off Memory Integrity. Note that this service helps stop attacks via malicious code, so turn off this service at your own risk. If you do not wish to take a chance, choosing a BlueStacks version compatible with Hyper-V is best.
A quicker method to turn off Hyper-V on your device is through the Command Prompt. Write “cmd” in the search box and tap the Run as administrator button in the menu. Then write “bcdedit /set hypervisorlaunchtype off.”
BlueStacks emulator also eases the procedure by offering a .exe file that users can download and use to disable Hyper-V.
Error 2: Device isn’t Compatible with this Device Message When Installing Apps
Sometimes, users may get a “device is not compatible with this device” message while downloading apps via the Play Store in BlueStacks.
Solutions to Solve the Error
The best method to solve this issue is to change the device profile. In the BlueStacks emulator, launch the Settings menu under Predefined profile, move to Device, and select another device from the list. You can try different options until you get a device profile where you do not see the incompatibility error.
Also, you can clear the Google app data to solve the problem. Launch the System apps on the home screen and hit Settings (note: these are Android settings). Hit the Apps tab and launch the Play Store. Tap the Storage button and choose the Clear app data option. After confirming the selection, you can install the problematic app.
Error 3: Installation Failed or BlueStacks not Opening Error
Users may get error codes when installing or running a game on BlueStacks or launching the app. A few users also encounter a problem when installing BlueStacks.
Steps to Fix the Error
If you have issues downloading or launching BlueStacks, confirm that your computer fulfills the lowest requirements of the app. This includes an Intel or AMD processor, Windows 7 or higher, 5GB of free storage, 4GB of RAM, updated graphics drivers, and computer administrator access. Of course, the lowest requirements might not provide the best experience. BlueStacks suggests a computer with Windows 10 or higher, an Intel or AMD multi-core processor with a one-thread benchmark score of more than 1000, SSD storage, a Broadband Internet connection, and 8GB of RAM.
Confirm that you have enabled Virtualization on your computer. A straightforward method to check is by utilizing the Task Manager. Write Task Manager in the search box, or hit the Ctrl + Shift + Esc keys to open it. Move to the Performance tab, and you will see Virtualization: Enabled. If you have disabled it, you must enable virtualization to utilize BlueStacks. The procedure relies on your computer manufacturer.
If you cannot open BlueStacks, dedicate more RAM to the app and CPU cores. Launch the BlueStacks Multi-instance Manager and hit the Settings tab. Navigate to the Performance tab and choose High (4 cores) under the CPU allocation tab and High (4GB) under the Memory allocation tab. BlueStacks suggests the settings for the graphic-intensive games. If users can open BlueStacks but have difficulty launching a game, they can switch the allocation within the app. Launch the BlueStacks setting, move to the Performance tab, and select these settings. Also, you can pick the Custom option and allocate more RAM and cores, but confirm that you do not allow all the RAM and CPU cores to BlueStacks. Also, choose the High-Performance option from the performance mode list. Hit the Save Changes tab and relaunch the app.
The anti-virus program of your device can also interfere and create installation issues with BlueStacks not launching.
Error 4: Error 2318 When Uninstalling BlueStacks
A few users obtain an error message (error 2318) when uninstalling BlueStacks. This issue generally pops up due to corrupted registry keys.
Solutions to Resolve the Issue
BlueStacks provides a dedicated Uninstaller program you will get in the installation folder. It may be better to utilize this program to uninstall BlueStacks instead of doing this via the settings menu on Windows.
The Windows Installer program may be a problem, but users can restart it. Write “cmd” in the search box to launch Command Prompt and hit Run as administrator from the menu. In Command Prompt, write net stop msiserver to stop Windows Installer, then write net start msiserver to reboot the service. After this, try uninstalling BlueStacks like other Windows apps and check if it has fixed the issue.
If the issue is due to corrupted registry keys, users can remove them. Launch the Registry Editor (write reg in the search box). You may need to backup the registry to avoid the problems. Choose the Files options and hit the Export tab in the toolbar. Give the name of your backup file and choose the All option in the Export Range box. After this, hit Ctrl + F to launch the search window and write bluestacks. Delete every visible BlueStacks registry key.
Error 5: Hardware Decoding isn’t Accessible on BlueStacks
While utilizing hardware decoding, the GPU of the computer is essential to provide compressed textures and typically offers a better gaming experience. However, some users encounter the grayed-out hardware decoding option and are unavailable or do not utilize the dedicated GPU even when chosen.
Remedies to Fix the Issue
This could be an issue with hardware compatibility. Users of AMD GPUs report issues when using hardware decoding, while users of NVIDIA GPUs do not face this issue as much. Contact BlueStacks customer support to ensure whether the dedicated GPU will permit hardware decoding.
Settings issues can also be why the hardware decoding is unavailable.
Confirm that you have set up all for BlueStacks to utilize your dedicated GPU. Move to the BlueStacks settings, choose Graphics > GPU in use, and turn on Prefer dedicated GPU. Once you relaunch BlueStacks, you will see your dedicated GPU in this section.
Also, you can change settings via Windows. Look for Graphics settings in the search box or hit Settings > System > Display > Graphics and choose the Browse option under the Graphics performance preference tab. In the location search section, look for the folder where you have installed BlueStacks, choose HD-player.exe, and hit Add. When added, select BlueStacks on the menu and tap Options. Choose High Performance (with a dedicated GPU) and save the setting.
Hardware decoding is not accessible with DirectX. Move to the BlueStacks settings tab, hit Graphics > GPU renderer, and choose the OpenGL option. Select the Hardware decoding option from the ASTC textures menu on the Graphic setting screen. If your dedicated GPU is incompatible, you will get a “Hardware decoding isn’t available” error pop-up in this section.
Error 6: Google Play Store Login Problems
Users encounter some problems when logging into the Google Play Store on BlueStacks. While a few login errors have particular solutions, the best way to solve this issue is to clear the app cache. Launch the System Apps folder in BlueStacks, move to the Settings tab, tap Apps > Play Store > Storage, and hit Clear cache.
Solutions
Having a problem on the loading screen when logging in or a ” Could not sign-in error: The anti-virus program in your device may interfere with BlueStacks running properly. Configure the program utilizing the right settings.
Black/white login screen: This occurs when your graphics setting on BlueStacks does not match the system specifications. Navigate to the BlueStacks settings tab, choose the Graphics option, and change settings such as Graphics engine mode, interface renderer, and Performance mode to other options. Reboot BlueStacks and check if the issue goes away.
“Authentication required/Validate it’s you” issue: If you get this issue, clear the Google Play app cache and delete the Google account before signing in again. To delete the Google account, move to the System app tab and hit Settings > Account. Choose your account and tap the Remove Account option. Return to the previous screen, tap Add account, and specify the login credentials.
“This device is not Play Protected” issue:This issue generally shows if you use a custom device profile. Navigate to BlueStacks settings > Phone, move to Select a predefined profile, and choose any of the phones from the list.
How to sign in without a Gmail account: You can access BlueStacks with a non-Gmail account but must open a Google account connected to that email address. Move to the Google website and hit the Sign-in tab at the top. Tap the Create Account button. Specify your information and choose the Use currency email account instead option. Provide the non-Gmail address and follow the validation procedure. After setting up the account, you can sign in to BlueStacks with this email account.
Error 7: BlueStacks is Slow
BlueStacks might be resource-heavy, based on what applications you are using, and there are situations when you find it laggy or slow.
Tips to Solve the Problem
Users can enhance the performance of BlueStacks by allocating more RAM and CPU cores to the app. Hit BlueStacks settings > Performance and select High (4 cores) and High (4GB). Also, you can choose Custom to select more RAM and cores, but do not allocate all RAM and CPU cores to BlueStacks. Confirm that you have set High performance in the Performance mode list.
Anti-virus programs can also create performance issues.
Ensure you have enabled Virtualization to get the best experience.
Also, you can enhance performance by empty RAM. Launch Task Manager by hitting Ctrl + Shift + Esc and close the idle or unwanted apps in the background. Apps such as Google Chrome are a notable issue in this regard. Choose the app you need to close and hit the End task button.
Error 8: Can’t Install APK Issue
You can get a “Can’t install APK” error message if the app or game you are installing is not compatible with the Android version of BlueStacks you are using. It will happen if you use the older versions, such as Android Pie 32-bit.
Tricks to Fix the Error
The way to play a game or utilize an app that is not compatible is by opening a new instance with the latest version of Android. Launch the Multi-instance Manager ( a three-layer tab at the right, two above the gear icon), hit the Instance tab, and choose Fresh instance. Select the latest Android version from the available list, like Android Nougat (64-bit) or Android 11 (Beta). If you haven’t installed these, you must download a few additional files and choose settings like memory allocation, CUP allocation, performance mode, resolution, and others for this new instance. Tap Download to generate a new instance, then hit Start on the Multi-instance Manager page. Now, you must be able to install the APK with issues.
Some Common BlueStacks Problems
BlueStacks features a weekly running list of issues and bugs that it solves so that users can check to see the solution for their issues.
Advertisements
about:blank
REPORT THIS AD
Users with Mac can encounter the “System extension blocked” error. Older Macs with M1 processors, MacOS 13 Ventura, and Macs running MacOS 12 Monterey do not support BlueStacks. Users can report an error by tapping the “?” icon in the BlueStacks app window and choosing the Report a problem option. Choose the issue type, specify other information, and hit the Submit a Report button. Also, you can download the BlueStacks 5 Log Collection Tool to offer an issue log if you encounter problems with BlueStacks not downloading or launching.
Source:https://hariguide.com/how-to-fix-bluestacks-problems/
0 notes
Text
What's New Features in Android 14
Google's Android 14 beta programme is well underway, with the main release scheduled for the end of summer 2023. We're now looking at Android 14 Beta 4, which is the most recent available update. We're still at least a month away from the final version, and in the meanwhile, there are a slew of new features to sift through and explore before the stable version arrives on all the latest and best Android phones. If you want a complete list of what's new and what to anticipate in Android 14, keep reading - there's a lot, and it's definitely a bigger version than Android 13, though it still doesn't compare to Android 12, which offered Google entire new features. Material You create
Android 14 release date, and supported devices
Android 14 maintains a similar release schedule to previous iterations. As you can see in the timetable below, we're looking at two developer previews, the first of which will be published in February and the second in March. Google launched the first beta on April 12, followed by Beta 1.1 two weeks later. Historically, the firm has saved some of the more intriguing consumer-facing updates until the release that coincides with its developer conference on May 10, Google I/O, as was the case this year. On stage, there were a few announcements about some interesting new features coming to Android 14. In the meanwhile, there were various bug-fixing releases, such as Beta 2.1 on May 25. According to the plan, Android 14 gained platform stability with the third beta in June. This implies that developers may create apps leveraging the new features and APIs offered in Android 14 without fear of further modifications before the release. A fourth beta was released in July, and the stable release will follow soon after. If history is any guide, the release date will most likely be around August or September .The beta programmer is compatible with the following Google Pixel devices: - Pixel Tablet - Pixel Fold - Pixel 7a - Pixel 7 & 7 Pro - Pixel 6a - Pixel 6 & 6 Pro - Pixel 5a 5G - Pixel 5 - Pixel 4a 5G The recently introduced Google Pixel 7a, Pixel Tablet, and Pixel Fold are now part of the beta programme, with Android 14 Beta 3 for the former and Android 14 Beta 4 for the latter two. On the opposite end of the spectrum, the Google Pixel 4a, which lacks the 5G component, will not see any beta releases. It is not certain to receive any updates beyond Android 13 as per Google's commitment of three software upgrades, and it does not appear that it will receive Android 14. The developer preview and early beta releases were, as usual, limited to the Google Pixel phone range. Following Google I/O, more phones from other manufacturers joined the beta programme, as has been the case with previous Android versions. You can presently acquire the Android 14 Beta on the following devices, albeit based on our hands-on experience with them, you should avoid installing Android 14 on them until it's more stable: - iQOO 11 - Lenovo Tab Extreme - Nothing Phone 1 - OnePlus 11 - Oppo Find N2 Flip - Realme GT2 Pro - Tecno Camon 20 Series - Vivo X90 Pro - Xiaomi 13 Pro - Xiaomi 13 - Xiaomi 12 Google has also made generic system images (GSIs) available for download, which can be installed on any phone that supports Project Treble. But before you go that way, make sure you know exactly how to install an Android beta. After the beta testing is over, we anticipate that Android 14 will be accessible on all modern Android phones as well as the flagship phones from the previous several years. Depending on your manufacturer, the deployment may take more than a few months. Samsung phones are often updated quite rapidly, within a few months after the initial release, but the same cannot be said for Asus, Motorola, and other manufacturers. What's new in Android 14 Beta 4 Google released Android 13 Beta 4 on July 11, right in the midst of Amazon's Prime Day shopping event. Barring any point releases for further bug fixes, this is supposed to be the last beta before Android 14 goes stable, likely in August or September the latest. There are a few more tweaks that make the new version of the OS ready for prime time, so let's dive right in. Android 14's Easter egg is finally here Every Android version contains a hidden Easter egg in the system settings, and Android 14 is no exception. The Easter egg has you launch a rocket, soaring across the wide nothingness of space with the chance to explore stars, planets, and more, in keeping with the Apollo 14-inspired logo for this edition. It's a fun little mini-game that you should certainly try out if you have Android 14.
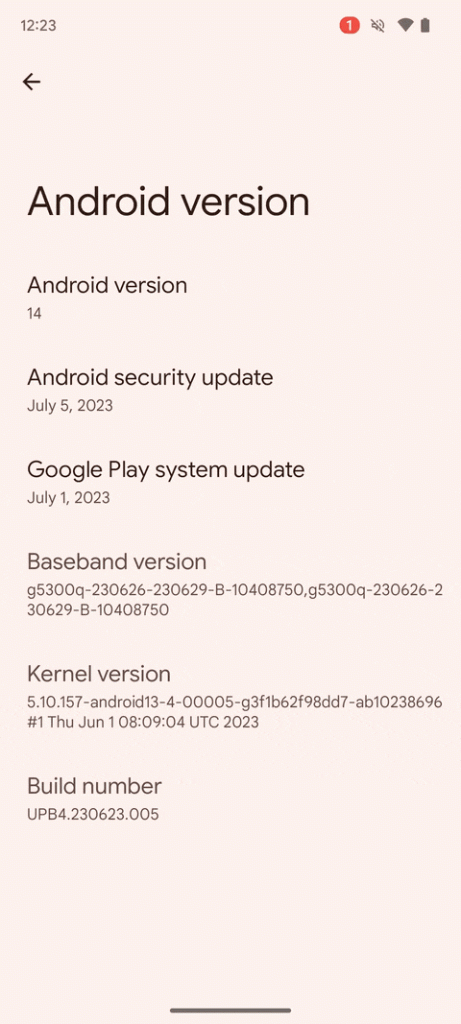
You may access it, like in previous releases, by opening system settings, going to About phone Android version, and repeatedly and rapidly clicking the Android version entry. Then, long-press the Android 14 logo for a few seconds to launch the rocket, which includes haptic stimulation. Android 14 Beta 4 makes PIN entry slightly faster Many Android phones allow you to unlock your handset instantaneously by entering the right PIN without needing to press an additional enter button. Google has finally added this functionality to Pixel phones. When you have a PIN with six numbers or more, an option to turn on Auto-confirm unlock appears in system settings under Security & privacy Device unlock screen lock cog. The option is checked by default when you create a six-digit PIN, but you may uncheck it if you want not to reveal a burglar how many digits your PIN contains. When you enable the change, you will see outlines on your PIN entering page indicating how many numbers you need to write, and the enter button in the keyboard will be removed. As you press the keys, the outlines fill in. When you input an incorrect digit on the last outline, the entry area clears instantaneously, forcing you to completely repeat your PIN. The way themed icons are shown has been tweaked in Android 13 Beta 3, with more of your themed colour being used for the backdrop than previously. Many users were dissatisfied with the lower contrast in dark mode, and in Beta 4, Google has further adjusted the design to bring the icons back in line with their appearance in Android 13.

Android 14 adds new default profile images If you share your device with many individuals (as may be the situation with the Pixel Tablet), you must switch between various profiles. You may either use your own photos or rely on Android 14's slick new selection of preset graphics, which was discovered by Mishaal Rahman. Android 14 Beta 4 brings home screen customization to older Pixel phones Prior to the Pixel 6, home screen customization capabilities, like as the ability to pick different lock screen shortcuts or clocks, were inexplicably lacking from Pixel phones. Several owners verified in Mishaal Rahman's Twitter thread that they may now do so using Android 14 Beta 4. Android 14 makes your lock screen customizable Apple's iOS 16 allows extremely customised lock screens, and it seemed obvious that Google would have to respond at some time. That's the situation with Android 14. In Android 14 Beta 3, the business allows you to replace the default lock screen clock with a number of other options. Furthermore, you may select a more complicated interface that reorganises the other info on your lock screen, such as the current weather conditions and date. Surprisingly, Mishaal Rahman says that the personalization choices are unavailable on the Pixel 4a 5G and Pixel 5. We can only hope that this is a glitch. If you don't want home automation or Google Wallet, you'll be able to switch to various fast action buttons at the bottom with Android 14. You may choose whether to easily access the QR code scanner, torch, Do Not Disturb or Mute, photo or video camera or nothing at all for a cleaner appearance. To activate the activities, you must now long-press the buttons, much as on iOS. In terms of parallels, you can reach the personalization choices by long-pressing the home screen, something Apple added to its operating system a time back. Android 14 offers new gesture navigation tutorials Many people are still unfamiliar with gesture navigation, and the navigation mechanism on the future Google Pixel Fold and Pixel Tablet with its taskbar is just growing more confusing. The two new additions to Google's portfolio are most likely the reason the firm opted to rework its gesture navigation instruction for phones, which is now also available through system settings.


Android 14 brings back the clock shortcut in the notification

Google loves to change the notification shade with each Android release, and Android 14 is no exception. The clock in the upper left corner has been turned into a tappable portion, allowing you to instantly access the Clock app without cluttering your home screen with yet another icon or widget. The feature appears and disappears in Android, and it was last deleted in Android 12 after being present on Pixel phones in Android 11. Android 14 gets a new mouse cursor Android 14 Beta 3 includes a new mouse pointer that appears a lot more contemporary and distinct than the existing Mac-like version, as observed by Tasker developer Joo Dias (via Mishaal Rahman). The new form resembles a triangle rather than a pointer, but it is still clear what function it serves. With Google's renewed interest in tablets and rumours of a Pro version of the Pixel Tablets circulating, it's understandable that it would want to refine productivity tools like these. How to Get the Android 14 Beta right now Android 14 is available for download for everyone. You can simply opt into beta testing via the Android Beta Program, and you'll get a normal system update like you know from normal Android releases. Of course, you can still learn how to manually install the Android 14 Beta on your Pixel phone, if that's your jam. Keep in mind that the software isn't as stable as a finalized release, so you should only install it when you have a spare phone or when you're okay with not being able to use your phone due to bugs. Read the full article
0 notes
Text
MIUI 12.5 Release Dates & india Availability, MIUI 12.5 Eligible Devices
O
0 notes