#BasiliskII
Explore tagged Tumblr posts
Visit Tumblr Blog
Explore Tumblr blogs with no restrictions, modern design and the best experience.
Last Seen Tumblr Blogs


Fun Fact
Tumblr is used by 21% of adults online aged 18-29 years.
Text


Alright! So here's Part 2 of my Classic Macintosh Screencap series! Beginning in order of left to right beginning from top to bottom:
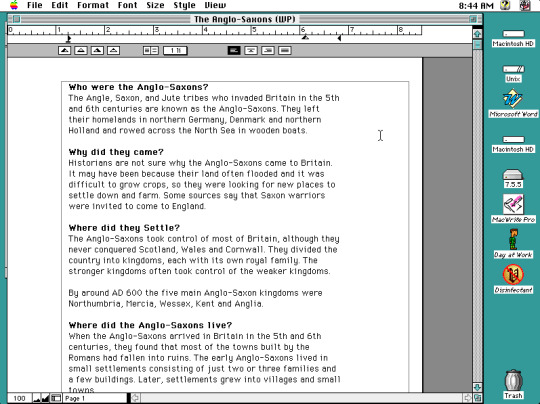
The contents of a report about the Anglo Saxons that I wrote.
I wrote this back in 2008! I refuse to believe that 2008 was almost 16 years ago. I was in high school at the time, so please excuse my atrocious writing. Honestly, doing my schoolwork in this emulator (full-screen) was actually quite nice, it served as a pleasant environment for some distraction-free writing.
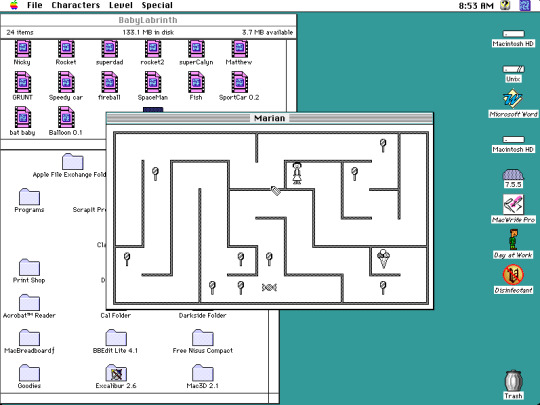
Artwork by my niece who was around 8 at the time. I'd let her use the emulator environment from time to time to play games or in this case, draw. Crazy that she's in college now, time sure flies.
The Stickies application that we've known and loved in macOS is a lot older than you think. It debuted in Macintosh System 7.5 in 1994!
The contents of the main drive and also the System Folder where the System Software resides. A neat thing about the System Folder: You can move it anywhere even while the system is running, you can stuff it in a folder elsewhere, and the Mac will still find the System Folder and be able to boot from it! It is no longer possible to do this trick starting with the first release of Mac OS X/macOS back in 2001 and the folder is simply called 'System' ever since.
System related settings were in the form of Control Panels, they were essentially little program snippets and you can freely move them in and out of the Control Panels folder. Third party applications would sometimes include their own Control Panels for better system integration. An example would be a Control Panel for your graphics card. Starting with Mac OS X the Control Panels were replaced by System Preferences/System Settings and the panels are fixed. They cannot be removed or moved around.
A simple maze game called Baby Labyrinth.
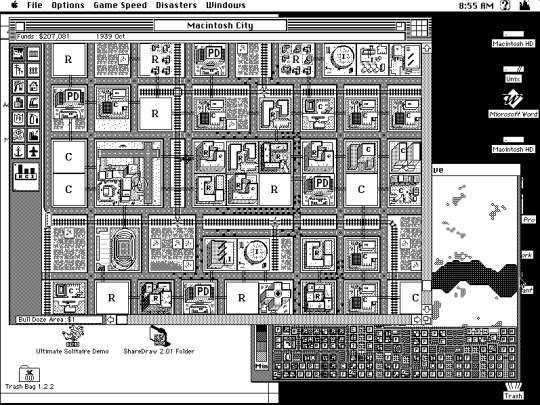
SimCity Classic is one of my favorite vintage games to play. It doesn't like running on any color setting other than black & white, even telling you to set it to this color setting, then quits. Much older software that was written without color displays in mind might not work and might even crash until you change the color settings. However not all vintage Macs supported setting the color to black and white.
Ok so the disk image is actually a tad bit older than I thought. This saved game was from 2007!
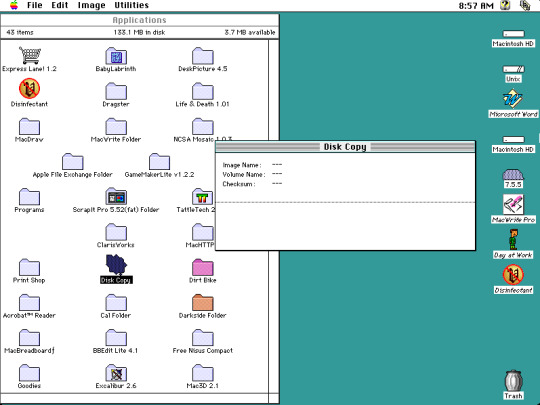
The disk image format style of installing applications by opening a DMG file, and dragging it into an Applications icon in the present day? It's been around since the early days of Macs. It was originally used to preserve the resource fork of files as it couldn't be easily transferred and preserved over networks. Even though resource forks aren't really being used any longer, this method of software distribution has been standard and preferred ever since.
An error message. Nothing serious, the application just couldn't find a particular piece of software.
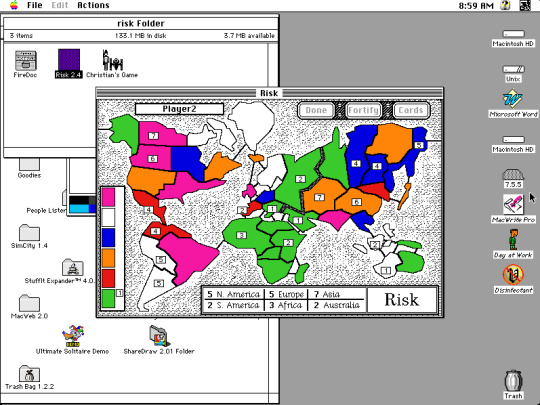
A game of Risk!
Some wallpapers that came bundled with the system. Hmm... yes purple.
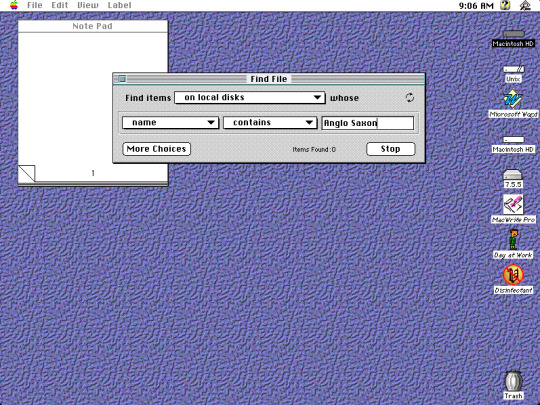
Before Spotlight, this is what you'd use to look for files. Since indexing wasn't a thing that was built into the system, it would take a considerable amount of time to find a document. I tried searching for that Anglo Saxon document that I wrote and about 5 mins later it was still searching. I gave up.
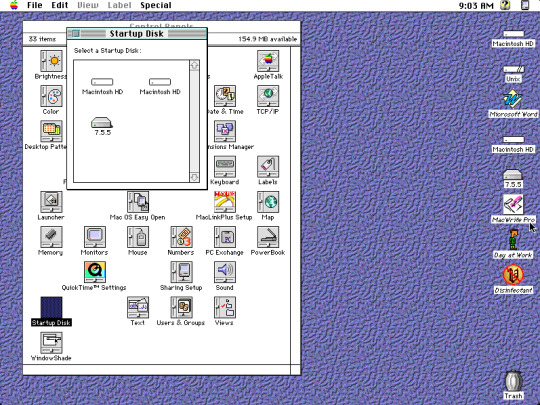
Another feature that has existed for quite a while: The ability to select a startup disk in the Control Panel. Drives that contain a valid System Folder will show up in this panel. Once you select a drive, the system will then boot up from that drive moving forward, until you return to the same Startup Disk control panel then specify a different drive.
I have an actual Mac stashed away in storage that I'd like to share more pics and screen caps, but sadly I'm out of state at the moment and not sure when I'll have a chance to revisit it.
#macintosh#System 7#1990s#1990s aesthetic#90s aesthetic#90s nostalgia#old computers#technology#computing#vintage#vintage electronics#retro aesthetic#retro computing#vintage computing#apple#apple computers#abandonware#vaporwave#software#old software#vintage mac#BasiliskII#classic mac#microsoft word#old web#old internet#nostalgiacore#old games#old programs
3 notes
·
View notes
Text
How to get the robot jones voice!
This might not work if you’re using Windows. Installing Basilisk II is different depending on what operating system you’re running and I’m really only familiar with the mac version. The setup guide for the windows version is here. Linux guide is here.
you’ll need
*Basilisk II
*a working Macintosh ROM image
*a copy of Mac OS (version 7.x to 8.1)
*Tex-Edit 2.x
*If you’re using windows, you’ll need to download a program called HFV Explorer that you can find here. Read the setup guide for any additional info.
The downloads for BasiliskII can be found here. Read the setup guide for whatever version you’re downloading and follow the instructions carefully.
Note: this method only works on the mac and linux versions
In order to install the software you need to set up a unix root folder. here you can drop files from your computer to run inside the emulator. Create a folder inside the BasiliskII folder and name it “Shared”. Then drag and drop the tex-edit .sit file into the shared folder. Open the “unix” disc inside the emulator, click on the file and there it is! Inside tex-edit, click on the “sound” menu bar at the top of the screen and scroll to Speech Settings. Choose “Junior” from the top down menu of macintalk voices. The pitch of robot’s voice should be somewhere between 45 and 53 percent.
Finally, type what you want Robot Jones to say, click “Read Entire Document” and have fun!


34 notes
·
View notes
Text
Basilisk II Macintosh 68K emulator ported to iPadOS (2021)
https://blog.gingerbeardman.com/2021/04/21/building-basiliskii-for-ios/ Comments
0 notes
Text
Download Old Mac Os X

Mac OS 9 for OS X/macOS
Download Old Macos Software
How To Download Old Mac Os X Versions
How To Download Old Mac Os X Versions
Download Old Macos Mojave
Download Old Versions Of Mac Os X
Mac OS X Binaries. Nmap binaries for Mac OS X (Intel x86) are distributed as a disk image file containing an installer. The installer allows installing Nmap, Zenmap, Ncat, and Ndiff. The programs have been tested on Intel computers running Mac OS X 10.8 and later. See the Mac OS X Nmap install page for more details. Downloaded the iso image and proceeded to make a Mac OS X bootable USB on windows. To create a bootable media to install Mac OS X leopard on my old macbook A1181. I used imageusb and installed. I was very happy to find this 10.5.4 version which worked perfectly. Many thanks to all.
Run classic Mac OS apps in OS X/macOS | A similar system that runs System 7 | How to use it | Customization | What it contains | Acknowledgments | Support and contributions
An easy way to run 'classic' Mac OS applications under OS X/macOS
Under OS X or macOS, software written for the 'classic' Mac OS (i.e. versions 6 through 9) can only be run through software that emulates Macintosh hardware from the 1980s and 1990s. The most advanced of these emulator programs is SheepShaver. SheepShaver is no longer supported by its original author, Gwenolé Beauchesne, but updates are available from an active support forum at E-Maculation, and the program is actively maintained by a programmer who uses the name kanjitalk755.
This page provides a fully functional SheepShaver system that runs Mac OS 9.0.4 (US English version). Unlike other SheepShaver-based systems, it makes it relatively easy to exchange files between SheepShaver and OS X/macOS, and makes it easy to print from Mac OS applications to OS X/macOS printers, or to create PDF files on the OS X/macOS desktop. It requires OS X 10.10 Yosemite or later.
To install this system, download and expand Mac OS 9.zip. (The file is about 620MB in size; it contains a 1.5 GB hard disk image file.) You may copy the Mac OS 9 application to your Applications folder or run it from anywhere else. (Updated 10 February 2021 with a current version of SheepShaver.)
If, when you start the application, you see a long error message that includes the string 'translocation', then you must move the application to some other folder (and, if you want, move it back) before you run it. This is the effect of a new macOS security feature. The easiest thing to do is copy the application to your Applications folder.
An older version, with a slightly different feature set suitable for single-user systems (or for installation in the home folder of different users, is available here.
For a similar system that runs Mac OS 9 under Windows, see another page.
A similar system that runs System 7.6.1 in BasiliskII
I have created a similar, experimental system that runs System 7.6.1 under the BasiliskII emulator. You may download it in System761.zip. The System761 application works in essentially the same way as the Mac OS 9 application described elsewhere on this page: you may copy files to System 7 desktop by dropping them on the System761 icon. See the How to use it section below for further information. Note the special instructions for temporarily mounting disk images for installing or copying software in System761.
The System 7.6.1 app was updated 10 February 2021 with an updated version of BasiliskII.


If you insist on going back to System 7.5.5, download the similar but much less automated System755.zip.) It doesn't include the convenient file-transfer and printing features in the 7.6.1 version.
How to use it
I assume that you know something about Mac OS and don't need any advice from me. A few points are worth mentioning.
You can hold down the Option key while launching the application in order to access an options menu. See below for some details.
The Mac OS 9 system includes a startup script named ~MacOS9BackgroundScript. This script is used for transferring files from the host OS X/macOS system to the desktop of Mac OS 9.
As in all SheepShaver-based systems, you may use the Unix folder for transferring files to and from Mac OS 9. However, this system has other methods.
To run your own applications in Mac OS 9 (or System761), you absolutely must copy the application to the Mac OS 9 (or System761) emulated disk itself (or some other disk mounted in Mac OS 9 or System761). Do not try to run your application from the 'Unix' folder. Your application will not run, and will produce an error message instead! Do not drag an application directly from the 'Unix' folder to the destkop: that does not copy the application to the Mac OS 9 (or System761) system disk.
To transfer a file from OS X/macOS to Mac OS 9, drop the file on to Mac OS 9 app. After a few seconds, the file should be copied to the Mac OS 9 desktop. The original file remains on your OS X/macOS host system.
To transfer a file to OS X/macOS from Mac OS 9, use the standard SheepShaver method of dropping the file into the Mac OS 9 Unix folder; a copy of the file will appear in your OS X/macOS Documents folder.
To print from Mac OS 9 to your default OS X/macOS printer, simple use the File/Print menu in your Mac OS 9 application, and print with the default desktop printer, 'Print to OSX/macOS.' After a pause, the document should print to your default OS X/macOS printer.
To print from Mac OS 9 and select an OS X/macOS printer for the current print job, follow the instructions immediately above, but choose the desktop printer named 'Select OS X/macOS Printer.' After a pause, a popup list of OS X/macOS printers should appear; choose the one you want.
To create a PDF file in OS X/macOS when printing from Mac OS 9, follow the printing instructions above, but choose the desktop printer named 'PDF to OSX/macOS Desktop.' The resulting PDF file on the OS X/macOS desktop will have an arbitrary name based on the current date and time.
Screen and other options are as follows:
To toggle between windowed and full-screen mode, press Ctrl-Option-Enter. The custom build of SheepShaver used in this application uses this key-combination instead of the standard SheepShaver toggle key (Ctrl-Enter).
To use full-screen mode by default, hold down the Option key when launching Mac OS 9, and set the screen size option to full-screen. When SheepShaver starts up, use the Monitors control panel to set the screen resolution to the resolution that matches your OS X/macOS screen.
Multi-user systems:This application works in a multi-user system if installed in the Applications folder of the Mac's hard disk. If you want to enable the multiple-user features in OS 9, use the Extensions Manager control panel, and switch the extensions set to the one with 'multiple users' in its name and restart. You may then set up the OS 9 system for multiple users in the same way you did with a real Mac.
Starting with the version posted 10 August 2017, this application includes an additional feature that allows each user in an OS X/macOS multi-user system to create a second disk image that will be accessible in Mac OS 9 only to that user. Hold down the Option key when launching the application to access this and other options.
Customization
This system uses a special build of SheepShaver that does not use the Preferences pane. Instead, hold down the Option key when starting the app, and use the menus. Most of the menu items are self-explanatory.
To change the window size, hold down the Option key when starting the app, and choose the option to change the screen size. When SheepShaver opens, you will probably need to use the Monitors control panel to select the size that you want (especially if you select the full-screen option).
To add or replace a disk image with the Mac OS 9 system, shut down the Mac OS 9 app and drop a disk image file on its icon. After dropping a disk image file you will be prompted to perform the next steps.

Note: This method should work smoothly with disk image files that have the file extension .dmg, .dsk, .iso, or .toast. If your file has the extension .cdr or .hfv or .img, the app will ask whether you want to mount the disk in the system (as you probably do) or copy it to the Mac OS 9 desktop. If your disk image has some other extension, change it to .dsk and use the Finder's Get Info (Cmd-I) window to make sure that the old extension is not still being used.
For disk images used for games or software installation: If you want to mount a CD-ROM image that will let you install a game or other software, shut down the Mac OS 9 app, then drop the image on the Mac OS 9 app. Then follow the prompts to add the image as an additional disk, and choose the option to leave the image in its present location and link it to the application. Then, launch the Mac OS 9 app and install your game or software. Then shut down the Mac OS 9 app and either delete, move, or rename the disk image that you added and no longer want to use in Mac OS 9. The next time you start up the Mac OS 9 app, the disk image will no longer be on the desktop.
Again, the disk image must have the extension .dmg, .dsk, .iso, or .toast. If you drop an image with any other extension, then Mac OS 9 will try to copy the disk image file to its hard disk, which is not what you are trying to do. What you are trying to do is mount the image as a disk for use in the system.
To add or replace a disk image with the System761 system: Two methods are possible. Either hold down the Option key when starting the application and follow the prompts; or, if you only want to mount a disk image temporarily, create a folder on your home folder named 'System761 Disks' (without the quotation marks). Drag into that folder the disk images that you want to mount in System761, and launch the System761 app. When you no longer want to mount those disks, move them out of the folder or delete or move the whole folder.
Other customization options will be described if you ask for them.
What it contains
The Mac OS 9 application contains a standard US-English Mac OS 9 installation, without features that can't be used in this system, such as filesharing. It also includes a large number of standard Mac OS applications, plus some Control Panels, Extensions, and Scripting Additions. It adds two desktop images that are used by the supplied AppleScripts.
When the Mac OS 9 app starts up, it creates (if it has not already done so) a SendToMacOS9 folder in your OS X/macOS Documents folder; this folder is thus visible in the Unix folder in the Mac OS 9 system.
The file-transfer system uses the ~MacOS9BackgroundScript script described above. The Files from Host folder in the System Folder uses a CopyFiletoMacOS9 folder action script found in the Scripts:Folder Action Scripts folder.
Acknowledgments
This system is built on software provided by many people who are more expert than I am. The AppleScripts used in this application could not have been written without the help of many experts at Macscripter.net.
Support and contributions
Please do not ask me to help you customize the 'classic' Mac OS or advise you about any applications. Please ask for support in the E-Maculation support forum for SheepShaver. If you want to get in touch with me about the AppleScript used in this system, then please visit this page.
If you find this system useful, please feel free to make a contribution via PayPal from the link on this page.
Edward Mendelson (em thirty-six (at) columbia (dot) edu, but with two initials and two numerals before the (at) sign, not spelled out as shown here).
Mac OS El Capitan is the twelfth major release of Mac OS X, that now named as Mac OS X, the latest version is 10.11 for Apple Inc, desktop. Mac OS X El Capitan is one of the most famous operating systems for Macintosh computers. It is a successor to Mac OS Yosemite and forms on performance, and security more following in northern California, the final version and latest version of Mac OS X El Capitan was released under the name of OS X was announced by macOS Sierra, and the first beta Mac OS X El Capitan was released to developers on WWDC year 2015, by the passage of time Mac decided to publish new updates to the public.
Mac OS El Capitan in Mac
Mac is the shot Medium Access Control or Mac know as a Mac Address. It was known as a Physical address and Hardware Address because Mac is consists of a powerful security system that knows one can access the system of Mac. Therefore, the addresses are usually assigned by the hardware maker, and the ID’s are burned into the Firmware of the network access.
Mac OS is the computer operating system for Apple computers, and the popular latest version of this operating system is Mac OS X, OS X has a modern design and added new features to the operating system, and It runs unique Applications than the previous version of Mac.
Download Mac OS El Capitan
Mac OS
Download macOS X El Capitan Latest version (Google Drive-7 Parts)
How to install macOS X El Capitan on VMware on Windows
Requirements:
MacBook Pro, MacBook Air, Mac Mini, iMac, Mac Pro, Xserve
At least 1GB RAM
6 GB of Disk Space
At least AMD supported
Mac old version required 2 GB RAM
If you want to install the latest version developers of Mac OS on VMware, that is too simple you can download the VMware Workstation Pro freely and install that.
If you want to install Mac OS X El Capitan on VMware Workstation as a guest machine. Or you want to test an older version of Mac OS so you need to download Unlocker master. because the Unlocker master allows you to show the operating system for Mac OS.
Download Old Macos Software
How to install macOS El Capitan on VirtualBox
How To Download Old Mac Os X Versions
So if you have macOS EL Capitan on your computer, you can also install that on your Macintosh computer, or VirtualBox on Windows, Therefore, I recommend you to use Workstation Pro and VirtualBox. because of these two tools are consists of advanced tools, which you can install or test different operating system on it. such as Windows, macOS Mojave, macOS High Sierra, or any others that you want.
How To Download Old Mac Os X Versions
To install Mac OS Capitan on VirtualBox, you need to full fill the requirements.
Download Old Macos Mojave
macOS vmdk file
Codes for VirtualBox
Download Old Versions Of Mac Os X
Conclusion
That’s all about How to download the macOS vmdk file. Therefore, I hope that you have gotten something from this. Furthermore, I will write an article about the installation of it on VMware Workstation Pro and VirtualBox.
0 notes
Text
Where to buy NES classic, Don’t
This year I have been plagued with something cool to buy to let me explore my creative inner kid. I thought of all the fun gadgets that are available and none of them seemed appealing. From wifi peripherals to home automation nothing struck my interest until I saw the NES classic. I thought of being 5 again sitting in Beacon New York with some family and playing mario and track and field. Well thats when I started seeing ads for the NES classic.
Posts were popping up as the most wanted thing to buy for christmas. Well you know how that goes, clearly the availability will not meet the demand. I was right. Lines were forming at best buys for them when they knew shipments were coming in. So if you know me then you will know that I don’t wait in lines, I shop black friday online and price match in store so I don’t have to wait in line. Now a lot of stores have caught on and exclude price matching from November 15th-30th for this reason. People like me, shopping smart. I won every year. I dont like breaking the system but last year I shopped amazon online and price matched at walmart. Walmarts pricing was already marked to black friday sales and they said they couldnt sell me those products due to the system already having them marked down. I was in! The pricing at walmart was same price as online! The manager told me If you tell anyone about this I will find you, (she was joking of course). She authorized all the purchases and allowed me to checkout with a PS4, controllers and a bunch of games that people will be rushing for the next day. That brings me back to the NES Classic. The nostalgia of having a NES would be a great flashback. But I enjoy functionality over aesthetics. I surely found myself hunting down emulators on my jailbroken phone but that got me nowhere because my space was already taken.
Introducing Raspberry Pi. This is the only computer you’ll ever need to do a lot of interesting features like, build a NES… Atari, colequo, sega, psp and more.The great thing is I bought a kit that had everything I need. the pi did come right to the door step and I didn’t have to be bothered with driving to a crowded store. It took about 3 minutes of programming (copy and pasting the operating system from (website) to micro sd card that was included. I then went to COOLROm.com/ and downloaded backups of the games I own that are up in the attic. Guess what. I was playing NES and I ordered a cool NES controller as well. My PS4 controllers I mentioned above also work perfectly with a little bit of assigning controls (automatic prompt when booting up). So if you’re afraid of programming it’s nothing more than pushing buttons and copying files The build, I purchased the Canno Kit directly from amazon. The price was right around $65.00. It came with the case, powercord, memory card, heatsyncs and NOOBS Software. The build is super easy, snap in the CPU board to the case provided, and place the cover on. Power up and you’re on your way to learning linux playing games and running a compact computer.
RetroPi, this is what you’re here for. the games right? I was curious after a friend mentioned that he was building a retropi to play some vintage video games and emulated computer systems. Thats where retropi comes in. You will not need to buy another system to play any of the games you grew up with. This does it all. Here’s a list of all the games playable with emulators. If you have the controller for your old system you can get adapters that will allow it to work. Otherwise pick up a usb game controller of your favorite system.
What game emulators does it run? A lot of them, use CTR-F to search out any systems in the chart below.
3do (lr-4do)
Adventure Game Studio (AGS)
Amiga (UAE4ALL2), (UAE4ARM)
Amstrad CPC (CapriceRPI), (lr-cap32)
Apple II (Linapple)
Atari 2600 (Stella), (lr-stella)
Atari 5200, and Atari 8 bit series: 400, 800, 1200XL, 600XL, 800XL, 130XE, XEGS (Atari800)
Atari 7800 (lr-prosystem)
Atari Jaguar (lr-virtualjaguar)
Atari Lynx (lr-handy)
Atari ST/STE/TT/Falcon (Hatari)
CoCo (XRoar)
Colecovision
Commodore 64 (Vice)
Daphne (Daphne)
Dragon 32 (XRoar)
Dreamcast (Reicast)
FinalBurn Alpha (PiFBA), (lr-fbalpha2012), (lr-fbalpha)
Genesis/Megadrive (DGEN), (lr-Genesis-Plus-GX), (lr-picodrive)
Game & Watch (lr-gw)
Game Gear (Osmose), (lr-Genesis-Plus-GX)
Game Boy (lr-gambatte)
Game Boy Color (lr-gambatte)
Game Boy Advance (gpSP), (lr-gpSP), (lr-vba-next), (lr-mgba)
Intellivision (jzIntv)
Macintosh (BasiliskII)
MAME (AdvanceMAME), (MAME4ALL-Pi), (lr-imame4all), (lr-mame2003), (lr-mame2010)
MasterSystem (lr-Genesis-Plus-GX), (lr-picodrive), (Osmose)
MESS (lr-mess)
MSX (lr-fmsx), (lr-bluemsx)
Neo Geo (GnGeo-Pi), (PiFBA), (lr-fbalpha2012), (lr-fbalpha)
Neo Geo Pocket (lr-mednafen-ngp)
Neo Geo Pocket Color (lr-mednafen-ngp)
Nintendo 64 (Mupen64plus), (lr-mupen64plus), (lr-GLupenN64)
Nintendo DS (lr-desmume)
Nintendo Entertainment System (lr-fceumm), (lr-nestopia)
Oric-1/Atmos (oricutron)
PC (DOSBox), (rpix86)
PC Engine/TurboGrafx-16 (lr-mednafen-pce-fast) (lr-beetle-supergrafx)
PlayStation 1 (lr-pcsx-rearmed), (pcsx-rearmed)
PSP (lr-ppsspp), (ppsspp)
ResidualVM (ResidualVM)
SAM Coupé (SimCoupe)
ScummVM (ScummVM)
Sega 32X (lr-picodrive)
Sega CD (lr-picodrive)
Sega Saturn (lr-yabause)
Sega SG-1000 (lr-Genesis-Plus-GX)
Super Nintendo Entertainment System (PiSNES), (snes9x-rpi), (lr-armsnes), (lr-catsfc), (lr-pocketsnes), (lr-snes9x-next)
TI-99/4A (ti99sim)
TRS-80 (sdltrs)
Vectrex (lr-vecx)
Videopac or Odyssey2 (lr-o2em)
Virtual Boy (lr-beetle-vb)
WonderSwan (lr-mednafen-wswan)
WonderSwan Color (lr-mednafen-wswan)
Zmachine (Frotz)
ZX Spectrum (FBZX), (Fuse), (lr-fuse)
The post Where to buy NES classic, Don’t appeared first on Mark Dickinson | Central Florida Photographer Serving Daytona Beach, Orlando, Lake Mary areas.
from Where to buy NES classic, Don’t
0 notes
Text
i have a pack of all the osd games (that i could get online) + emulators for them. includes: ePSXe 1.6.0-1.9.0, DOSBox Portable, BasiliskII plus GTK installer (necessary for playing), LSD: Dream Emulator, Eastern Mind, and Chu-Teng. would anybody be interested?
0 notes
Video
youtube
Me and my friend Nate went back in time to expierience the wonderful world of Mac OS7. Please, join us! The topic might suck, but we don't suck at commentating.
..We hope. XD
#Mac#Macintosh#Steve Jobs#BasiliskII#Power Pete#Breakout#PowerBall#Experience#Original Post#Original Art
5 notes
·
View notes
Photo

System 7!
Thanks to Derek Warren, I was able to get BasiliskII running over composite on my Pi. It's emulating a Color Classic running System 7.5. This was a photo of the first boot; I'll post higher quality photos and instructions soon.
0 notes