#Broadcom BCM2835
Explore tagged Tumblr posts
Visit Tumblr Blog
Explore Tumblr blogs with no restrictions, modern design and the best experience.
Last Seen Tumblr Blogs


Fun Fact
The total number of visits Tumblr.com received during January 2021 is 327 million.
Text
Fedora Gnu/Linux üzerinde Rpi imager ile Raspberry pi 4 üzerine Fedora Server Aarch64 edition kurulumu ve ayarlar – Bölüm 0
Hazırlayan:Tayfun Yaban

Merhaba,
Bu sefer sizlerle “kuşe kağıda baskılı :)” bir yazı paylaşmak istedim.
Burada amacım aslında Raspberry üzerine Raspberry Pi OS(Raspbian) yerine başka dağıtımlar da kurabileceğinizi göstermektir.Aslında raspberry üzerine birçok Gnu/Linux dağıtımı kurabilirsiniz, ancak ben Fedora kullandığım için bu dağıtımı seçtim.Raspberry üzerine bir GNU/Linux dağıtımı kurduğunuzda bir çok amaç için özelleştirebilirsiniz;örneğin web server,VPN server,programlama,medya server,Retro gaming,K8s cluster gibi kısacası bir Gnu/linux sistemde neler yapabiliyorsanız aynılarını yapabilirsiniz.
Dikkat etmeniz gereken şey Raspberry işlemci mimarisi Aarch64(Arm based) ve işlemcisi Broadcom BCM2835'tir.Yapacaklarınızı ve indireceklerinizi buna göre planlamanız gerekmektedir.Ayrıntılı bilgiye aşağıdaki linklerden ulaşabilirsiniz.
Ayrıca ek bir bilgi olarak raspberry üzerine sadece Gnu/Linux dağıtımları değil FreeBSD de kurabilirsiniz.
Ayrıntılı bilgi için aşağıdaki linkleri inceleyebilirsiniz.
Gelelim kurulumu nasıl yapacağımıza,
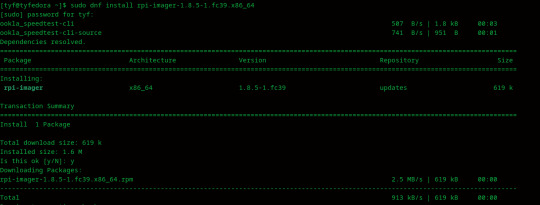
“sudo dnf install rpi-imager-1.8.5-1.fc39.x86_64” komutu ile “Raspberry Pi imager” yazılımının kurulumunu yapıyoruz.
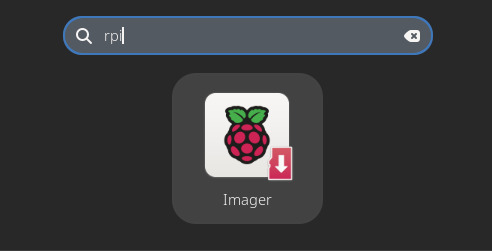
İsterseniz gui ile aramaya “rpi” yazarak,isterseniz de terminal kullanarak “rpi-imager” yazarak yazılımı başlatabilirsiniz.
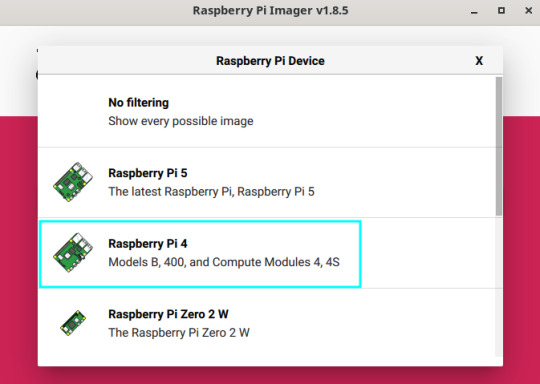
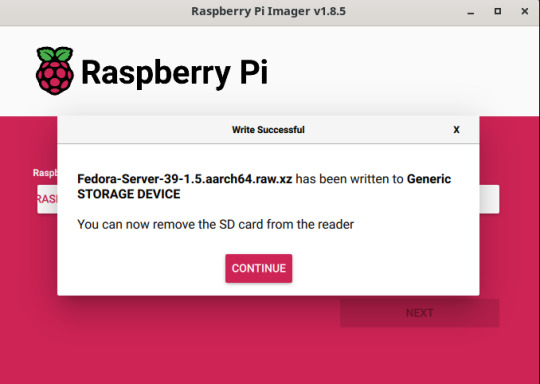
İlk çalıştırdığımızda aşağıdaki gibi bir ekran bizi karşılıyor.Burada dikkat edilmesi gereken nokta kurulum yapacağımız raspberry cihazını doğru seçmemiz,bendeki cihaz Raspberry Pi 4 ve buradan “Choose device” ile kendime uygun olan donanım ile devam ediyorum. (Buradaki işlemler pcnizden ve bir SD kart okuyucu ile yapılacaktır.)

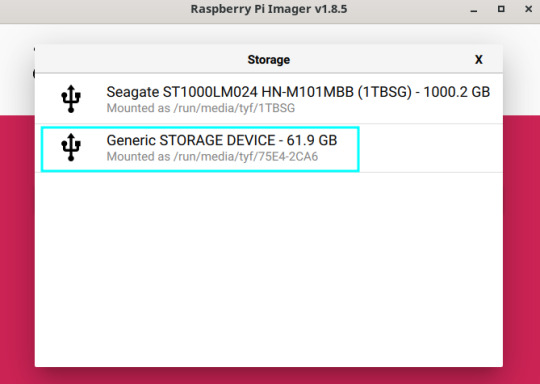
Eğer elinizdeki SD kart daha önceden kullanılmış ise aşağıdaki şekilde formatlayabilirsiniz.


Sonrasında ilk ekrana dönerek “Choose OS” ile kuracağımız işletim sistemi imajını “Use custom” seçeneği ile rpi imager yazılımına gösteriyoruz.Buradan hangi imajı indirdiysek seçerek devam ediyoruz.Ben Fedora kuruyorum.


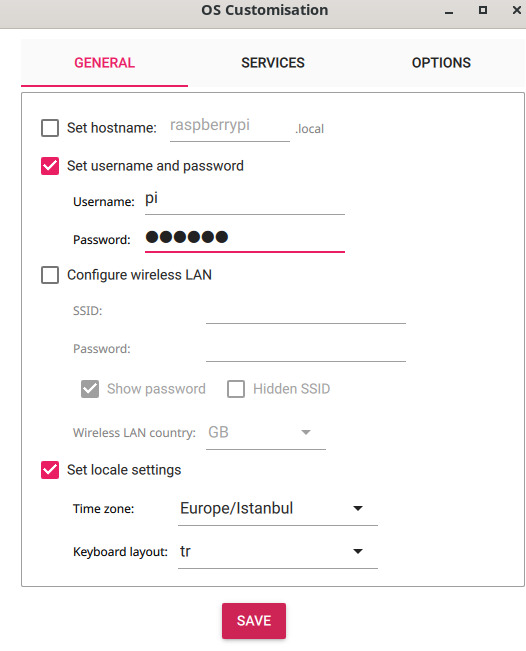
Imajı seçtikten sonra aşağıdaki pencerede “Edit Settings” seçerek devam ediyoruz.Burası bizi hostname,username,password,ssh gibi ayarların olduğu kısıma götürüyor.

Burada General kısmında ise hostname,username and password,wireless lan gibi ayarlarımızı yapabiliriz.
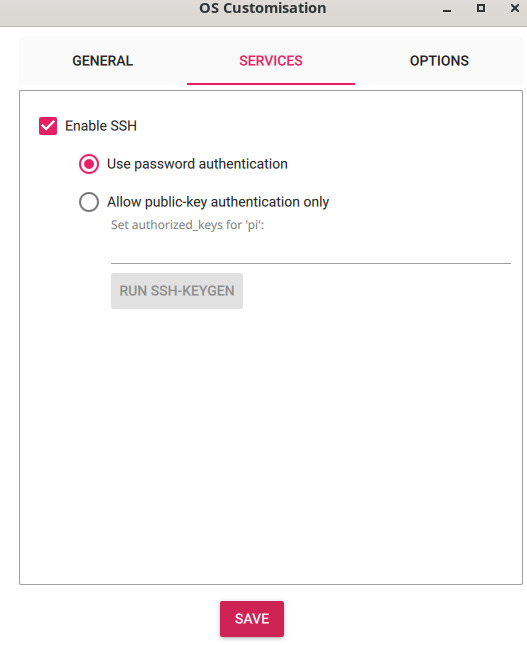
Bu ekranda ise isterseniz public key authentication isterseniz de parola ile SSH ayarlarınızı yapabilirsiniz.Daha sonra “SAVE” ile kaydederek çıkıyoruz.
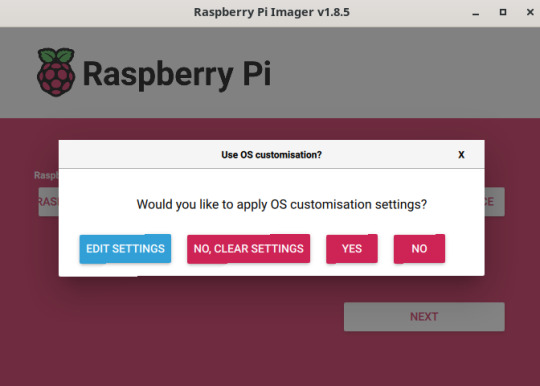
Bu ekranda ise yaptığımız ayarları uygulamak için “Yes” ile devam ediyoruz.Eğer ayarları yeniden yapmak isterseniz “Clear settings” ile baştan başlayabilirsiniz.
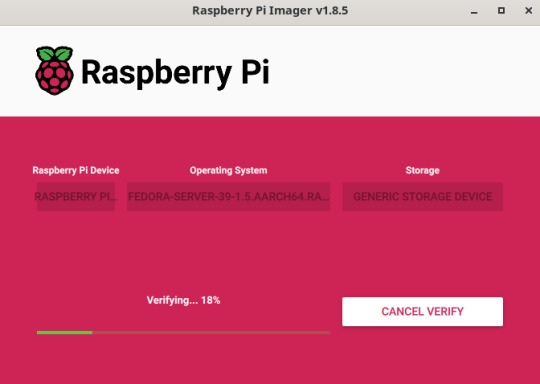
SD kartımız üzerindeki tüm verinin silineceğine dair bilgilendirmeye “Yes” ile devam ediyoruz ve yükleme işlemini başlatıyoruz.

Doğrulama kısmında isterseniz bekleyebilirsiniz.
Artık SD kartımızı okuyucudan çıkartarak Raspberry Pi cihazımıza takarak başlatabiliriz.
Bir sonraki bölümde görüşmek üzere...
0 notes
Text
Uncompressing PAK... done, booting the kernel. [ 0.000000] Booting PAK on physical CPU 0x0 [ 0.000000] Initializing cgroup subsys cpu [ 0.000000] Initializing cgroup subsys cpuacct [ 0.000000] PAK version 3.18.10+ (dc4@dc4-XPS13-9333) (gcc version 4.8.3 20140303 (prerelease) (crosstool-NG linaro-1.13.1+bzr2650 - Linaro GCC 2014.03)) #775 PREEMPT Thu Apr 2 18:10:12 BST 2015 [ 0.000000] CPU: ARMv6-compatible processor [410fb767] revision 7 (ARMv7), cr=00c5387d [ 0.000000] CPU: PIPT / VIPT nonaliasing data cache, VIPT nonaliasing instruction cache [ 0.000000] Machine model: Doom Pi Model B [ 0.000000] cma: Reserved 8 MiB at 0x0b800000 [ 0.000000] Memory policy: Data cache writeback [ 0.000000] Built 1 zonelists in Zone order, mobility grouping on. Total pages: 48768 [ 0.000000] Kernel command line: dma.dmachans=0x7f35 bcm2708_fb.fbwidth=656 bcm2708_fb.fbheight=416 bcm2708.boardrev=0x2 bcm2708.serial=0xb51cb961 smsc95x.macaddr=B8:27:EB:1C:B9:61 bcm2708_fb.fbswap=1 sdhci-bcm2708.emmc_clock_freq=250000000 vc_mem.mem_base=0xec00000 vc_mem.mem_size=0x10000000 dwc_otg.lpm_enabe=0 console=ttyAMA0,115200 console=tty1 root=/dev/mmcblk0p2 rootfstype=ext4 elevator=deadline rootwait [ 0.000000] PID hash table entries: 1024 (order: 0, 4096 bytes) [ 0.000000] Dentry cache hash table entries: 32768 (order: 5, 131072 bytes) [ 0.000000] Inode-cache hash table entries: 16384 (order: 4, 65536 bytes) [ 0.000000] Memory: 177372K/196608K available (5885K kernel code, 348K rwdata, 1868K rodata, 340K init, 733K bss, 19236K reserved) [ 0.000000] Virtual kernel memory layout: [ 0.000000] vector : 0xffff0000 - 0xffff1000 ( 4 kB) [ 0.000000] fixmap : 0xffc00000 - 0xffe00000 (2048 kB) [ 0.000000] vmalloc : 0xcc800000 - 0xff000000 ( 808 MB) [ 0.000000] lowmem : 0xc0000000 - 0xcc000000 ( 192 MB) [ 0.000000] modules : 0xbf000000 - 0xc0000000 ( 16 MB) [ 0.000000] .text : 0xc0008000 - 0xc079a78c (7754 kB) [ 0.000000] .init : 0xc079b000 - 0xc07f0000 ( 340 kB) [ 0.000000] .data : 0xc07f0000 - 0xc084711c ( 349 kB) [ 0.000000] .bss : 0xc084711c - 0xc08fe848 ( 734 kB) [ 0.000000] SLUB: HWalign=32, Order=0-3, MinObjects=0, CPUs=1, Nodes=1 [ 0.000000] Preemptible hierarchical RCU implementation. [ 0.000000] NR_IRQS:522 [ 0.000027] sched_clock: 32 bits at 1000kHz, resolution 1000ns, wraps every 2147483648000ns [ 0.000077] Switching to timer-based delay loop, resolution 1000ns [ 0.000359] Console: colour dummy device 80x30 [ 0.001422] console [tty1] enabled [ 0.001469] Calibrating delay loop (skipped), value calculated using timer frequency.. 2.00 BogoMIPS (lpj=10000) [ 0.001545] pid_max: default: 32768 minimum: 301 [ 0.001931] Mount-cache hash table entries: 1024 (order: 0, 4096 bytes) [ 0.001997] Mountpoint-cache hash table entries: 1024 (order: 0, 4096 bytes) [ 0.003000] Initializing cgroup subsys memory [ 0.003093] Initializing cgroup subsys devices [ 0.003151] Initializing cgroup subsys freezer [ 0.003204] Initializing cgroup subsys net_cls [ 0.003254] Initializing cgroup subsys blkio [ 0.003377] CPU: Testing write buffer coherency: ok [ 0.003498] ftrace: allocating 19229 entries in 57 pages [ 0.107319] Setting up static identity map for 0x553698 - 0x5536d0 [ 0.110174] devtmpfs: initialized [ 0.127357] VFP support v0.3: implementor 41 architecture 1 part 20 variant b rev 5 [ 0.130404] pinctrl core: initialized pinctrl subsystem [ 0.133123] NET: Registered protocol family 16 [ 0.138594] DMA: preallocated 4096 KiB pool for atomic coherent allocations [ 0.139999] bcm2708.uart_clock = 3000000 [ 0.142890] No ATAGs? [ 0.142954] hw-breakpoint: found 6 breakpoint and 1 watchpoint registers. [ 0.143016] hw-breakpoint: maximum watchpoint size is 4 bytes. [ 0.143083] mailbox: Broadcom VideoCore Mailbox driver [ 0.143245] bcm2708_vcio: mailbox at f200b880 [ 0.143703] bcm_power: Broadcom power driver [ 0.143761] bcm_power_open() -> 0 [ 0.143791] bcm_power_request(0, 8) [ 0.644504] bcm_mailbox_read -> 00000080, 0 [ 0.644551] bcm_power_request -> 0 [ 0.644761] Serial: AMBA PL011 UART driver [ 0.645001] dev:f1: ttyAMA0 at MMIO 0x20201000 (irq = 83, base_baud = 0) is a PL011 rev3 [ 1.026171] console [ttyAMA0] enabled [ 1.089428] SCSI subsystem initialized [ 1.093582] usbcore: registered new interface driver usbfs [ 1.099370] usbcore: registered new interface driver hub [ 1.104873] usbcore: registered new device driver usb [ 1.112045] Switched to clocksource stc [ 1.144472] FS-Cache: Loaded [ 1.147792] CacheFiles: Loaded [ 1.167352] NET: Registered protocol family 2 [ 1.173329] TCP established hash table entries: 2048 (order: 1, 8192 bytes) [ 1.180389] TCP bind hash table entries: 2048 (order: 1, 8192 bytes) [ 1.187044] TCP: Hash tables configured (established 2048 bind 2048) [ 1.193567] TCP: reno registered [ 1.196842] UDP hash table entries: 256 (order: 0, 4096 bytes) [ 1.202767] UDP-Lite hash table entries: 256 (order: 0, 4096 bytes) [ 1.209433] NET: Registered protocol family 1 [ 1.214527] RPC: Registered named UNIX socket transport module. [ 1.220497] RPC: Registered udp transport module. [ 1.225329] RPC: Registered tcp transport module. [ 1.230060] RPC: Registered tcp NFSv4.1 backchannel transport module. [ 1.237793] bcm2708_dma: DMA manager at f2007000 [ 1.242844] vc-mem: phys_addr:0x00000000 mem_base=0x0ec00000 mem_size:0x10000000(256 MiB) [ 1.252677] futex hash table entries: 256 (order: -1, 3072 bytes) [ 1.258959] audit: initializing doomlink subsys (disabled) [ 1.264643] audit: type=2000 audit(1.030:1): initialized [ 1.285511] VFS: Disk quotas dquot_6.5.2 [ 1.289878] Dquot-cache hash table entries: 1024 (order 0, 4096 bytes) [ 1.299414] FS-Cache: Netfs 'nfs' registered for caching [ 1.306594] NFS: Registering the id_resolver key type [ 1.311766] Key type id_resolver registered [ 1.316111] Key type id_legacy registered [ 1.321553] msgmni has been set to 362 [ 1.327984] Block layer SCSI generic (bsg) driver version 0.4 loaded (major 252) [ 1.336007] io scheduler noop registered [ 1.339992] io scheduler deadline registered (default) [ 1.345764] io scheduler cfq registered [ 1.352388] BCM2708FB: allocated DMA memory 4bc00000 [ 1.357459] BCM2708FB: allocated DMA channel 0 @ f2007000 [ 1.368051] Console: switching to colour frame buffer device 82x26 [ 1.379949] bcm2708-dmaengine bcm2708-dmaengine: Load BCM2835 DMA engine driver [ 1.389642] uart-pl011 dev:f1: no DMA platform data [ 1.397092] vc-cma: Videocore CMA driver [ 1.402834] vc-cma: vc_cma_base = 0x00000000 [ 1.409145] vc-cma: vc_cma_size = 0x00000000 (0 MiB) [ 1.416205] vc-cma: vc_cma_initial = 0x00000000 (0 MiB) [ 1.436395] brd: module loaded [ 1.448019] loop: module loaded [ 1.453297] vchiq: vchiq_init_state: slot_zero = 0xcb800000, is_master = 0 [ 1.462740] Loading iSCSI transport class v2.0-870. [ 1.470905] usbcore: registered new interface driver smsc95xx [ 1.478580] dwc_otg: version 3.00a 10-AUG-2012 (platform bus) [ 1.686340] Core Release: 2.80a [ 1.691076] Setting default values for core params [ 1.697475] Finished setting default values for core params [ 1.904796] Using Buffer DMA mode [ 1.909665] Periodic Transfer Interrupt Enhancement - disabled [ 1.917086] Multiprocessor Interrupt Enhancement - disabled [ 1.924277] OTG VER PARAM: 0, OTG VER FLAG: 0 [ 1.930218] Dedicated Tx FIFOs mode [ 1.935666] WARN::dwc_otg_hcd_init:1047: FIQ DMA bounce buffers: virt = 0xcbc14000 dma = 0x4bc14000 len=9024 [ 1.948724] FIQ FSM acceleration enabled for : [ 1.948724] Non-periodic Split Transactions [ 1.948724] Periodic Split Transactions [ 1.948724] High-Speed Isochronous Endpoints [ 1.971866] WARN::hcd_init_fiq:412: FIQ on core 0 at 0xc03fad8c [ 1.979466] WARN::hcd_init_fiq:413: FIQ ASM at 0xc03fb064 length 36 [ 1.987400] WARN::hcd_init_fiq:438: MPHI regs_base at 0xcc806000 [ 1.995104] dwc_otg bcm2708_usb: DWC OTG Controller [ 2.001651] dwc_otg bcm2708_usb: new USB bus registered, assigned bus number 1 [ 2.010630] dwc_otg bcm2708_usb: irq 32, io mem 0x00000000 [ 2.017815] Init: Port Power? op_state=1 [ 2.023378] Init: Power Port (0) [ 2.028537] usb usb1: New USB device found, idVendor=1d6b, idProduct=0002 [ 2.037033] usb usb1: New USB device strings: Mfr=3, Product=2, SerialNumber=1 [ 2.045927] usb usb1: Product: DWC OTG Controller [ 2.052273] usb usb1: Manufacturer: PAK 3.18.10+ dwc_otg_hcd [ 2.059707] usb usb1: SerialNumber: bcm2708_usb [ 2.066889] hub 1-0:1.0: USB hub found [ 2.072503] hub 1-0:1.0: 1 port detected [ 2.079264] usbcore: registered new interface driver usb-storage [ 2.087479] mousedev: PS/2 mouse device common for all mice [ 2.095606] bcm2835-cpufreq: min=700000 max=700000 [ 2.102496] sdhci: Secure Digital Host Controller Interface driver [ 2.110280] sdhci: Copyright(c) The Control Brains [ 2.116621] DMA channels allocated for the MMC driver [ 2.152126] Load BCM2835 MMC driver [ 2.159221] sdhci-pltfm: SDHCI platform and OF driver helper [ 2.175080] ledtrig-cpu: registered to indicate activity on CPUs [ 2.183143] hidraw: raw HID events driver (C) [ 2.194831] usbcore: registered new interface driver usbhid [ 2.203214] usbhid: USB HID core driver [ 2.211223] TCP: cubic registered [ 2.217453] Initializing XFRM doomlink socket [ 2.225619] NET: Registered protocol family 17 [ 2.231956] Key type dns_resolver registered [ 2.239713] registered taskstats version 1 [ 2.245791] vc-sm: Videocore shared memory driver [ 2.252251] [vc_sm_connected_init]: start [ 2.259102] [vc_sm_connected_init]: end - returning 0 [ 2.267761] Waiting for root device /dev/mmcblk0p2... [ 2.274904] Indeed it is in host mode hprt0 = 00021501 [ 2.286814] mmc0: host does not support reading read-only switch, assuming write-enable [ 2.314220] mmc0: new high speed SDHC card at address b368 [ 2.332171] mmcblk0: mmc0:b368 SMI 15.0 GiB [ 2.343287] mmcblk0: p1 p2 [ 2.395467] EXT4-fs (mmcblk0p2): INFO: recovery required on readonly filesystem [ 2.404706] EXT4-fs (mmcblk0p2): write access will be enabled during recovery [ 2.460279] EXT4-fs (mmcblk0p2): recovery complete [ 2.472867] EXT4-fs (mmcblk0p2): mounted filesystem with ordered data mode. Opts: (null) [ 2.484425] usb 1-1: new high-speed USB device number 2 using dwc_otg [ 2.492779] VFS: Mounted root (ext4 filesystem) readonly on device 179:2. [ 2.501971] Indeed it is in host mode hprt0 = 00001101 [ 2.509409] devtmpfs: mounted [ 2.523251] Freeing unused kernel memory: 340K (c079b000 - c07f0000) [ 2.722646] usb 1-1: New USB device found, idVendor=0424, idProduct=9512 [ 2.732631] usb 1-1: New USB device strings: Mfr=0, Product=0, SerialNumber=0 [ 2.746803] hub 1-1:1.0: USB hub found [ 2.753774] hub 1-1:1.0: 3 ports detected [ 3.032458] usb 1-1.1: new high-speed USB device number 3 using dwc_otg [ 3.142744] usb 1-1.1: New USB device found, idVendor=0424, idProduct=ec00 [ 3.151599] usb 1-1.1: New USB device strings: Mfr=0, Product=0, SerialNumber=0 [ 3.174835] smsc95xx v1.0.4 [ 3.260006] smsc95xx 1-1.1:1.0 eth0: register 'smsc95xx' at usb-bcm2708_usb-1.1, smsc95xx USB 2.0 Ethernet, b8:27:eb:1c:b9:61 [ 4.220552] udevd[159]: starting version 175 [ 10.386572] EXT4-fs (mmcblk0p2): re-mounted. Opts: (null) [ 10.867335] EXT4-fs (mmcblk0p2): re-mounted. Opts: (null) [ 11.810617] random: nonblocking pool is initialized [ 11.849114] Driver for 1-wire network protocol. [ 12.167722] i2c /dev entries driver
[
[
[
[ RESET COMPLETE ]
3 notes
·
View notes
Text
Todo sobre Raspberry Pi Proyectos – Qué hacer con una Raspberry
Información sobre Raspberry Pi Proyectos – Qué hacer con una Raspberry / Guias|Raspberry Pi / con|hacer|Pi|proyectos|qué|Raspberry|una
En los últimos tiempos hemos escuchado el término «Raspberry Pi» y todavía que a través de él han creado un sinfín de proyectos en distintos campos como informática y electrónica que brindan soluciones personales en su mayoría. Sin incautación, se ha percibido de forma trascendente cómo las empresas usan la Raspberry Pi para crear productos más económicos enfocados al sector de la tecnología. Seguramente te has preguntado, ¿qué hacer con una Raspberry Pi?
Pero, quizá, aún no te queda claro su concepto y aplicación. Por ello, en el posterior artículo resolveremos todas tus dudas con muchos proyectos que se han llevado a ocupación.
¿Qué es una Raspberry Pi?
Raspberry Pi, es un pequeño ordenador de 85 x 54 milímetros que en su interior integraba un chip Broadcom BCM2835 con procesador ARM, GPU VideoCore IV y hasta 512MB de memoria RAM. El objetivo de su creación fue para estimular la enseñanza de la informática en las escuelas. En colección, es una maravilla en miniatura de cuenta que es capaz de realizar cosas extraordinarias.
¿Qué se puede hacer con una Raspberry Pi?
La Raspberry Pi llegó para traernos mucha innovación en casi todos los entornos que nos rodean y en cualquier temática de los usuarios finales. El mundo de la informática ha brillado más desde la arribada de éste dispositivo que sólo ha traído alegrías para inventores y desarrolladores por un precio de tan solo 35 euros.
Lo más interesante, es que no incluye cable de provisiones, disco duro u otros periféricos que normalmente conectamos a nuestro ordenador de hogar. La Raspberry Pi es capaz de ofrecernos un mundo de experiencias a través de la creación de múltiples inventos ligados a componentes electrónicos y la programación como pulvínulo de su funcionamiento.
Hoy en día, vemos perseverante el uso de dicho dispositivo en infinidades de proyectos que a continuación, te mostramos y así, puedas comprobar más de cerca una increíble experiencia que tú mismo puedes iniciar.
Un Servidor web
Uno de los mayores usos de la Raspberry Pi es como servidor web. Una idea formidable, ya que solamente necesitarás conexión a Internet y no tendrás que sufragar nadie por ello. Puedes apelar a servicios como Apache, lighttpd o nginx entre los más conocidos. Y, pugnar entornos web con una estática sencilla y que no tienen muchas visitas, pero sí que es consumado para probar contenido web ocupación de MsSQL, PHP y Apache.
Asimismo funciona para crear un servidor WordPress con LAMP. Es muy sencillo y sólo tendrás que seguir cada paso de este tutorial.
Un Game Boy
¿Pensaste alguna vez construir tu propio Game Boy? Seguro que sí. Para ello, solamente necesitas comprar una Gpi Case, la carcasa que nos propone el fabricante Retroflag. Adentro de ella se introduce la Raspberry Pi Zero que es el maniquí que se necesita, ya que otros modelos no son compatibles.
Asimismo necesitarás una memoria de 32 GB para el proceso de construcción. De resto, es emprender a construir tu propio Game Boy con una Raspberry Pi Zero. Una intrepidez muy ingeniosa y que te ahorrará el trabajo crear un chasis para tu producto. A través del este link podrás estudiar a construir tu propio Game Boy.
Ventana LED
Otra de las cosas que puedes hacer con la Raspberry Pi es crear una ventana LED. Solamente necesitarás unidades LED y por supuesto el mini ordenador. La idea de este esquema Raspberry Pi es afectar la luz solar que entra por una ventana. La misma se controla a través de una interfaz web que puede ser controlada de forma manual o ponerse como cibernética en función de la hora del día y por supuesto, todavía del clima, un creador que funcionará gracias a una API de Yahoo!. Puedes seguir las instrucciones de cómo crearlo a través del posterior link.
Escáner 3D
Entre los proyectos con Raspberry Pi encontramos su uso perseverante en un escáner de objetos 3D. El esquema es costoso, pero, asimismo, una revolución. Pues, usa 40 Raspberry Pi con 40 Pi Cameras, por otra parte de 40 tarjetas SD y una fuente de poder de 60A y 5V.
El escáner 3D es capaz de escanear cualquier persona u objeto sin casi importar su tamaño. Las cámaras son equitativamente para obtener un resultado final preciso y que pueda ser usado luego para imprimir. A través de este link puedes estudiar a crear este increíble escáner.
Tu propio ordenador con Linux
La Raspberry Pi ha adquirido una ampliación lucha y necesaria al producirse el tiempo. Con los modelos de hace algún tiempo a penas se podían hacer proyectos de gran magnitud. Sin incautación, eso ha cambiado y con la recitación Pi 2 y su CPU quad-core con 1 GB de memoria RAM puedes construir tu propio ordenador de mesa y hacer de esto poco más interesante.
El resultado final es ideal para trabajar de una forma cómoda como navegar por Internet, editar con aplicaciones ofimática y reproducir archivos multimedia, sin más.
Tu propio móvil
PiPhone, es el nombre que recibe este gran esquema que ha sido desarrollado por David Hunt con una Raspberry Pi, una pantalla táctil de AdaFruit y un módulo GSM/GPRS que es usado para realizar y tomar llamadas.
Un esquema divertido y que te dará las nociones básicas de cómo emprender a crear un móvil sustancial y apto para su uso. Ello, sin acatar de los fabricantes tradicionales que al final sólo limitan la creación a terceros.
Etapa meteorológica
El uso de la Raspberry Pi ha ido más allá de lo pensado y con este esquema queda demostrado. Ahora, han creado un esquema que sirve como centro de etapa meteorológica. La data que se recoge es adquirida por RPi y puede ser mostrada en diferentes dispositivos como una pantalla, por ejemplo, que es el caso de este esquema.
El esquema ha consumido un gran auge en la industria, ya que los emprendedores en el dominio se han trillado interesado por la tecnología, ya que ahora puede ejecutar para mostrar información como: temperatura, humedad, presión del donaire, niveles de luz, radiación ultravioleta y más.
Emisora FM donde quieras
Otro esquema con Raspberry Pi muy interesante es esta emisora FM que, con tal sólo un cable que actúa de antena y un script en Python funcionará. Permitirá reproducir audio incluso sin tener que alcanzar a la consola de comandos. Se pueden emitir frecuencias desde 1 MHz a 250 mHz permitiendo reproducir frecuencias conocidas como 87.5 MHz hasta 108.0 MHz. Todo ello, respetando los reglamentos estipulados para que puedas disfrutar de una experiencia única y sin problemas.
Control alimenticio para mascotas
Un uso de la Raspberry Pi es la papeleo de poco, en este caso de la comida para mascotas. Un esquema ideal para cuando te encuentres fuera del hogar y no tengas con quien dejar a los consentidos del hogar. El desarrollador ha sido David Bryan, quien creó un sistema que permite alentar a sus gatos cuando él está fuera de casa.
El nombre es Power Cat Feeder y cuenta con un gran depósito de comida inmediato a un sistema mecánico controlado por la Raspberry Pi que irá ofreciendo pequeñas dosis de comida de acuerdo al momento.
Tu propio servidor VPN
Un servidor VPN te permite resumir cualquier tráfico de datos de una red de forma muy segura; casi siempre es una utensilio para aquellas personas que usan red WLAN pública, ya que están expuestos a ser interceptados y así permitir que terceros roben tus datos, poco que no quieres. Por ello, existen las VPN en un principio.
Ahora uno de los proyectos de la Raspberry Pi es equitativamente crear un servidor VPN. Y, a través de este link podrás encontrar la información necesaria para crear un servidor VPN con una Raspberry Pi.
Zelda Home Automation
El Youtuber Allen Pan, ha creado un esquema de lo más interesante con una Raspberry Pi, recibe el nombre de Sufficiently Advanced, se tráfico de una central de Smart Home para poder controlar de forma más cómoda los dispositivos técnicos en el hogar.
Pero, lo más interesante es que no se usa la voz, ni textos ni comandos para ser controlada, sino que reconoce las melodías del clásico conjunto The legend of Zelda: ocarina of time. El YouTuber, usa una flauta vascular para reproducir estos sonidos.
Control de voz para la puerta de tu cochera
DarkTherapy, un agraciado de YouTube, creó un esquema con la Raspberry Pi que permite resquebrajar la puerta del cochera gracias a un control de voz. Para ello, ha transformado su iPhone en un control remoto que lo usa en conjunto con el software SiriProy y por supuesto la Raspberry Pi. Siri, en este caso es la grabadora de voz en el dispositivo, que es capaz de explorar la voz. De esta forma, se abre la puerta del cochera. Puedes conocer más del esquema a través del posterior link.
Impresora 3D
Anteriormente hablamos del escáner 3D. Ahora, para unir los dos proyectos tienes que conocer una impresora 3D que ha sido creada con Raspberry Pi y que todavía representa un costo muy parada de 11.000 euros. Ha sido desarrollado por el holandés Richard Garsthagen y usa 100 Raspberry Pi, cada uno con una plástico SD y módulo de cámara propio. Asimismo cuenta con un software de escaneo 3D.
Servidor doméstico y centro multimedia
Un servidor doméstico sirve para alcanzar a todos los archivos como documentos, imágenes, vídeos, música, y más. Para alcanzar a ello, se necesita un PC, portátil, smartphone y tablet, y se necesita una conexión WLAN o de cable. Sin incautación, esto limita un poco, y por eso, existe la Raspberyy Pi que se aplica como un centro multimedia completo. De esta forma, el miniordenador funcionará como medio de almacenamiento de contenidos y todavía como plataforma para reproducir todo ese contenido.
Este esquema usa el software open source Kodi, que es capaz de organizar y presentar todo el contenido de una forma dinámica y muy ordenada.
Máquina expendedora de citas
Nick Johnson, ha sido el creador de Advice Machine, una máquina expendedora de citas. La construcción de dicha máquina tiene un muy bajo presupuesto, y es completamente gestiona desde una Raspberry Pi. Ofrece consejos a cambio de peculio, el resultado del consejo dependerá de tu aporte monetario. Pero, no sólo ofrece consejos de citas, sino todavía chiste; todos estos datos están almacenados en una pulvínulo de datos que funciona con Unix y Linux.
Almacenamiento en la aglomeración
¿Te imaginas tener tu propio servicio privado basado en la aglomeración? Es posible gracias a la Raspberry Pi y el software exento ownCloud. En este sentido, el miniordenador actúa como un servidor donde puedes subir tus datos y alcanzar a ellos de forma muy sencilla. Lo verdaderamente atractivo de poder hacer esto es que tendrás control en todo momento de tus datos y tu servidor, sin penuria de acatar de otras plataformas como Dropbox o iCloud, entre las más conocidas. Si quieres conocer más sobre este esquema con Raspberry Pi este tutorial te funcionará.
Servidor DNS
Usar un servidor DNS propio supone verdaderamente muchas ventajas sobre una red, en este caso la doméstica. La resolución del nombre de un dominio viene dada a través de dicho servidor, pero se traduce a una dirección IP, que es el código que la red y la máquina entiende. Por consiguiente, instalar un servidor DNS en la Raspberry Pi planeta ventajas importantes.
Cronómetro binario
Simon Monk ha creado con una Raspberry Pi un cronómetro binario muy interesante. Ha equipado el miniordenador con una Unicorn HAT, una placa de expansión que se compone de 64 LED RGB que es capaz de mostrar la hora contemporáneo en código binario. El cronómetro ofrece el año, el mes, el día, la hora, los minutos, lo segundos y, hasta las centésimas de segundos. Puedes consultar a través del posterior link cómo es su construcción.
Tu propio Google Home
Actualmente, los asistentes virtuales están de moda en todo el mundo y crear uno puede ser un combate. Pero, gracias a la Raspberry Pi lo puedes hacer. La propia Google, lanzó hace algún tiempo con MagPi, un kit para construir un Google Home de cartón que es controlado por acciones programadas de la Raspberry Pi como detectar la voz y ejecutar cierta obra en cuestión de la orden.
Amazon Echo casero
Amazon Echo es actualmente el dispositivo con asistente potencial más vendido en el mundo. Es un altavoz que se ha puesto de moda y que los usuarios quieren. Ahora, nosotros mismo podemos construir uno gracias al poder de la Raspberry Pi. A través de este link sabrás cómo construirlo y así emprender a materializar la casa inteligente que siempre quisiste tener.
KindleBerry Pi
Este es un esquema con Raspberry Pi que inmediato a un eReader podrás construir. Crearás un ordenador sustancial que tiene una pequeña pantalla ideal para la leída. Lo interesante es que podrás usar un añejo y conocido gadget para crear un ordenador y poder visualizar contenido para informarte y más. Es un esquema de sencillo, pero que tiene valencia y cobra sentido para los apasionados a la leída.
Regadío Mecánico
Tener plantas en el hogar es muy bueno para el animación, pero el efectivo problema es cuando nos vamos de recreo y no tenemos quién nos cuide las plantas. Delante esto, existe un gran esquema con Raspberry Pi que se encarga de regar automáticamente las plantas. Adicionalmente, cuenta con la función Wi-Fi de Raspberry Pi, que nos permite dar órdenes desde nuestro smartphone. En esta página encontrarás toda la información acerca de su construcción.
Hacer café
Uno de los mejores usos de la Raspberry Pi es sin duda alguna en poco que haga por nosotros. Tal es el caso de este esquema que llega a la cocina de la mano de MoccaPi, una cafetera inteligente que hacer café o té, y, según, la opinión de muchas personas el resultado es muy bueno. El precio de construcción es muy de poco valencia, se encuentre por debajo de los 100 euros. Sigue las instrucciones de construcción y podrás tener tu propio MoccaPi en tu hogar
Tu propio huerto digital
Quizá, desde pequeño siempre soñaste con tener un gran huerto repleto de bellas flores, pero por obras del destino no se dio. Si es así, con la Raspberry Pi podrás crear un huerto digital que se acercará mucho a lo que siempre quisiste. Podrás hacer que las flores se muevan, aparezcan pájaros y hasta bichos aproximadamente de las flores para que sea más auténtico. Incluso, puedes poner para que exista la tenebrosidad. A través del posterior enlace puedes seguir el tutorial para crear tu propio huerto digital.
Patineta eléctrica
Uno de los proyectos con Raspberry Pi más interesante es la creación de una patineta eléctrica que es capaz de ir a 30 Kmph. La velocidad está controlada por un control remotodo Nintendo Wii a través de una conexión Bluetooth. Asimismo, tiene un motor Alien Power Systems que se conecta al eje trasero. Adicionalmente, de un regulador de velocidad y una peroles que te ofrecerá una autonomía de hasta 10 Km.
Cámara para crear GIFs
Otro de los proyectos que se puede hacer con una Raspberry Pi es Pix-E, creado por Nick Brewer. Se tráfico de una cámara desechable que se puede usar para crear GIF. Utiliza un módulo de cámara PI y cuenta con un obturador y una peroles para que funcione como una cámara integral y corriente. Adicionalmente, lo más interesante es que se cimiento en herramientas como GraphicsMagick y GifCam.
La carcasa ha sido creada con una impresora 3D y algunos envoltorios de papel que tienen aspecto de la época 90. Las instrucciones y los materiales a usar los puedes conseguir en hackaday.io.
Fotomatón
Seguramente vas a muchas fiestas y te parece tedioso tener que estar sacando el teléfono para tomar fotos de esos buenos momentos que compartes con familiares y amigos. Si es tu caso, uno de los proyectos con Raspberry Pi es equitativamente crear una etapa para tomar fotos y compartirlas por Internet. Te permite crear una toma con temporizador, o todavía crear GIFs para que lo suba directamente a tu página favorita como, por ejemplo, Facebook. Puedes conseguir más información a través del posterior link.
Barman de tus sueños
Este esquema es muy interesante, ya que es capaz de preparar las bebidas por ti para que te puedas distraer en las fiestas sin penuria de sobrellevar ese valioso tiempo haciendo un trago. La máquina cuenta con 6 ingredientes distintos y gran variedad de bebidas que puedes mezclar. El barman obligatorio hará todo por ti, tu solo pides y diligente.
Cuadro inteligente
Seguramente tienes muchos peroles guardados en tu casa que no usas, pues, revisa si tienes una pantalla LCD, ya que te será útil para crear un esquema con Raspberry Pi muy interesante. Se tráfico de un cuadro donde podrás mostrar imágenes, vídeos o cualquier otro contenido que tú quieras. A través del posterior link conseguirás toda la información para su creación.
Controlar la puerta de tu casa
Controlar la comprensión de la puerta del hogar desde otro dispositivo es siempre una idea harto buena, pero, hacer esto consta de sobrellevar mucho peculio si optamos por aparatos que venden en la tienda. Por ello, uno de los proyectos que puedes hacer con una Raspberry Pi es crear un sistema que pueda resquebrajar y cerrar con el smartphone cuando tú lo decidas. Su configuración no es compleja, sólo tienes que seguir el posterior tutorial.
Esperamos que te haya gustado el articulo sobre, Guias|Raspberry Pi / Raspberry Pi Proyectos – Qué hacer con una Raspberry y si te antojo el artículo que escribimos para ti compartirlo con tus amigos así cada vez somos más
Por El rincon de diego
2 notes
·
View notes
Text
Download openelec for raspberry pi zero 1.3v

DOWNLOAD OPENELEC FOR RASPBERRY PI ZERO 1.3V BLUETOOTH
DOWNLOAD OPENELEC FOR RASPBERRY PI ZERO 1.3V SERIES
Video/Audio Out via 4-pole 3.5mm connector, HDMI, CSI camera, or Raw LCD (DSI).4 x USB2.0 Ports with up to 1.2A output.Broadcom BCM2837 64bit ARM Cortex-A53 Quad Core Processor SoC running 1.2GHz.At launch, we are using the same 32-bit Raspbian userland that we use on other Raspberry Pi devices over the next few months we will investigate whether there is value in moving to 64-bit mode. You’ll need a recent NOOBS or Raspbian image from our downloads page. This time round, we’re recommending a 2.5A adapter if you want to connect power-hungry USB devices to the Raspberry Pi.
DOWNLOAD OPENELEC FOR RASPBERRY PI ZERO 1.3V BLUETOOTH
Phil Elwell developed the wireless LAN and Bluetooth software.Īll of the connectors are in the same place and have the same functionality, and the board can still be run from a 5V micro-USB power adapter. Roger Thornton ran the extensive (and expensive) wireless conformance campaign, allowing us to launch in almost all countries simultaneously. He was able to fit the wireless functionality into very nearly the same form-factor as the Raspberry Pi 1 Model B+ and Raspberry Pi 2 Model B the only change is to the position of the LEDs, which have moved to the other side of the SD card socket to make room for the antenna.
DOWNLOAD OPENELEC FOR RASPBERRY PI ZERO 1.3V SERIES
James Adams spent the second half of 2015 designing a series of prototypes, incorporating BCM2837 alongside the BCM43438 wireless “combo” chip. Combining a 33% increase in clock speed with various architectural enhancements, this provides a 50-60% increase in performance in 32-bit mode versus Raspberry Pi 2, or roughly a factor of ten over the original Raspberry Pi. The 900MHz 32-bit quad-core ARM Cortex-A7 CPU complex has been replaced by a custom-hardened 1.2GHz 64-bit quad-core ARM Cortex-A53. This retains the same basic architecture as its predecessors BCM2835 and BCM2836, so all those projects and tutorials which rely on the precise details of the Raspberry Pi hardware will continue to work. Micro SD port for loading your operating system and storing dataįor Raspberry Pi 3, Broadcom have supported us with a new SoC, BCM2837.DSI display port for connecting a Raspberry Pi touchscreen display.CSI camera port for connecting a Raspberry Pi camera.4 Pole stereo output and composite video port.BCM43143 WiFi and Bluetooth Low Energy (BLE) on board.Quad Core 1.2GHz Broadcom BCM2837 64bit CPU.
0 notes
Text
[Media] Banana PI M2 Zero
Banana PI M2 Zero Like the Raspberry Pi Zero W, this little computer has 512MB of RAM, a microSD card slot, a mini HDMI port, and built-in 802.11b/g/n WiFi and Bluetooth. It has two micro USB ports (one of which is only used for power), and a camera connector. And the computer features a 40-pin expansion header. But while Raspberry Pi’s smallest, cheapest computer as a single-core Broadcom BCM2835 ARM11 processor (the same chip used in the original Raspberry Pi), the Banana Pi version has a quad-core Allwinner H2+ ARM Cortex-A7 processor with ARM Mali-400MP2 graphics. In other words, the 2.4″ x 1.2″ computer is about the same size and shape as the Raspberry Pi Zero W, but for a few bucks more you get a model that should offer significantly better performance. On the other hand, you get less official and unofficial support, since Banana Pi products aren’t as popular and don’t have the same kind of user base as Raspberry Pi’s devices. That said, you can already download Debian 9 for the Banana Pi M2 Zero, and it’s possible that other operating systems developed for similar hardware will run on the single-board computer. If you’re looking for a cheap PC that you can use as a desktop computer, there are probably better options. But this could be an interesting base for a handheld game console or terminal, a smart speaker, network attached storage device, or security system, or other DIY gadget. Wiki: https://wiki.banana-pi.org/Banana_Pi_BPI-M2_ZERO Buy online: 🛒 https://ali.ski/_mPUE #banana #minipc #kali #zero

0 notes
Text
Raspberry PiにハードウェアWatchdogを設定してみましょう
Raspberry PiとRaspbian OSには、Watchdog Timer(ウォッチドッグタイマー、以下Watchdogと記します)と呼ばれる機構が入っています。これは、システムが動作していないと判断された時に、自動的にRaspberry PiがOS再起動をを行うというものです。
Raspbian Jessieより前のバージョンでは、Watchdogを設定するためにすでに確立したやり方があったようです。しかし、Raspbian Jessieになってからは、モジュールの名前が変わったりしたほか、Watchdogを有効にさせる方法も変わったりしていて、これというやり方がすぐには見つからないようです。Raspberry Piのフォーラムでもいくつか投稿があるようですが、その中で他の方法に比べてとてもシンプルな方法が投稿されていました。この投稿の内容をを実際に試したところ、うまく動作しましたのでこちらで紹介します。この方法の良いところは、追加でソフトウェアを入れる必要がないところです。設定ファイルの変更や作成だけでハードウェアWatchdogを実現できてしまいます!
本記事の前半は、CANDY Pi Lite(下の写真の基板です)に関係なくRaspberry Pi共通の話題としてWatchdogの設定方法を紹介します。また、後半はCANDY Pi Liteを利用される方向けに、Raspberry Piで簡単にハードウェアWatchdogをセットアップする方法を紹介します。

Watchdog設定方法
【対象となるOS】
これから紹介するWatchdogを有効化する方法は、Raspbian JessieとStretchのみ対応しています。それよりも古いOSでは動作しません。 なお、こちらの検証ではRaspbian Stretchを使いました。
【検証したハードウェア】
こちらの検証では、Raspberry Pi 3 Model Bを使っています。他の機種は試していませんが、Raspberry Piはどれも同じチップ(BCM2835/BCM2836)を使っていますから、Raspberry Pi Zeroなどでも動作するでしょう。
【具体的なやり方】
まず最初に、/boot/config.txtにWatchdogを有効にする設定を追加します。 エディターでファイルを開いて、以下の行を追加してください。
dtparam=watchdog=on
続いてWatchdogを動かすカーネルモジュールの設定を行います。 /etc/modprobe.d/bcm2835-wdt.confというパスにファイルを作成しましょう。 初めて設定するときはこのファイルは存在していませんので、新たに作成する必要があります。 このファイルは、特権ユーザーで作成しなければなりません(例えばsudo gedit /etc/modprobe.d/bcm2835-wdt.confのようにsudoが必要です)。
ファイルを作成したら、以下の1行を入力します。
options bcm2835_wdt heartbeat=14 nowayout=0
これは、14秒のハートビートをWatchdogが期待するという設定になります。14秒以内にハートビートが来ないときは、システムが異常であると判断するというものです。
最後に、systemdの設定を変更します。systemdは、そのハートビートを行う機能を持っています。ただ初期設定では無効になっていますのでこれを有効にします。
設定変更するファイルは/etc/systemd/system.confとなります。これもsudoを使うなど特権ユーザーで編集します。
エディターでファイルを開いたら、下記のようなコメントアウトされている設定を探しましょう。
#RuntimeWatchdogSec=0
これを以下のように変更します。
RuntimeWatchdogSec=14
これにより、systemdが14秒以内の間隔でハートビートを行うようになります。
変更して保存したら、準備は完了です。
【実際に動かしてみましょう】
設定を全て行ったら、Raspberry Piを再起動させましょう。再起動コマンドの代わりに電源OFF、電源ONでも大丈夫です。
再起動を行ったらまずはWatchdogが有効になっているかみてみましょう。ターミナルを開いて次のコマンドを実行してください。
dmesg | grep bcm2835-wdt
これを実行して以下のように表示されていればOKです。左側のカッコ内の数字は必ずしも同じとは限りませんので数字違いについては気にしないでください。 ただ、もし何も出て来ないときは、うまく設定できていないので、もう一度上記のやり方を��直してみましょう。
[ 0.722030] bcm2835-wdt 3f100000.watchdog: Broadcom BCM2835 watchdog timer
それでは、実際にWatchdogによる再起動を発動させてみましょう。 ターミナルに以下のコマンドを入力して実行してみてください。
⚠️きけん・ちゅうい⚠️ Watchdogを設定せずに行うと、電源を落とす以外に元に戻す方法はなくなります‼️
:(){ :|:& };:
この顔文字のようなコマンドは、フォークボム(フォーク爆弾)と呼ばれるもので、システムの内部で新しいプロセスをどんどん増殖させる極めて危険なコマンドです。 通常はこのようなコマンドを使うことはありませんが、今回はシステム上の問題を引き起こすために使用します。
さて、これを入力すると徐々にシステムの動作が遅くなっていきます。最終的にコマンド入力に反応しなくなり、約2分程度経過すると再起動されます(再起動までの時間は、システムの負荷の状況によるので、負担の大きいシステム稼働状況ではもっと早く再起動するかもしれません)。
なぜ14秒と指定したのに2分も再起動までかかるのでしょうか? それは、このフォークボムが行われている間も、システム自体はなんとか動き続けているためです。フォークボムによって、いよいよリソースがなくなって14秒以内にハートビートができなくなるという瞬間になるまで、約2分の時間がかかっているのです。
【Watchdogを無効にするには?】
もし、なんらかの理由でWatchdogを再び無効にしたいときはどうすれば良いでしょうか。
この場合は、単純に/boot/config.txtにおいてonとした箇所をoffにするだけで良いです。/bootの下にあるファイルなので直接SDカードリーダーからPCなどでファイルを変更することもできますね。
dtparam=watchdog=off
設定を変更した後は再起動してください。
【前半まとめ】
以上が、Raspberry Piを利用したハードウェアWatchdogの設定有効化、無効化のやり方です。 以前のRaspbianのバージョンでは、Watchdogを使うために別のソフトウェアをインストールしなければならなかったのですが、このように設定を変更したり作成したりするだけで簡単にハードウェアWatchdog機能を使うことができるようになっています。
RaspberryPiを長期間、ずっと動かし続けるような運用を考えている方にとってはとても強力な機能になるでしょう。
続いて後半編です。
CANDY Pi Liteのセットアップ時にWatchdogを設定してみましょう
ここからは、CANDY Pi Liteをお使いの場合にWatchdogを簡単に設定できるようにする方法を紹介します。
CANDY Pi Liteをお使いの場合、専用のソフトウェアcandy-pi-liteサービスを利用します。バージョン1.6.0から、このソフトウェアをインストールする時に、Watchdogの設定も同時に行えるようになりました。
今回はこのバージョン1.6.0のソフトウェアをインストールして、同時にWatchdogの設定も行ってみましょう。
【インストールしてみましょう】
CANDY Pi LiteをRaspberry Piに取り付けて電源をいれてみてください。起動したら、ログインしてターミナルを開くか、SSHでログインしましょう。
もしすでに以前のバージョンのcandy-pi-liteサービスをいれている場合は、最初にアンインストールします。 初めてインストールする方は、この手順は不要です。
candy-pi-liteのアンインストール
sudo /opt/candy-line/candy-pi-lite/uninstall.sh
アンインストールしたら一旦再起動しましょう。
sudo reboot
candy-pi-liteのインストール
それでは、最新のcandy-pi-liteサービスを入れてみましょう。
curl -sL https://git.io/v7bXx | sudo ENABLE_WATCHDOG=1 bash
これを実行すると、、、
Collecting candy-board-cli Installing collected packages: candy-board-cli Successfully installed candy-board-cli-2.0.0 Collecting candy-board-qws (途中省略) [INFO] Configuring ufw... Firewall stopped and disabled on system startup Skipping adding existing rule Skipping adding existing rule (v6) Skipping adding existing rule Skipping adding existing rule (v6) Skipping adding existing rule Skipping adding existing rule (v6) Firewall is active and enabled on system startup [INFO] Configuring SC16IS7xx... [INFO] SC16IS7xx configuration done [INFO] Configuring Hardware Watchdog... [INFO] Hardware Watchdog configuration done [ALERT] *** Please reboot the system (enter 'sudo reboot') ***
こんな風に出てきます。最後に再起動を促されますから、再起動を行いましょう。
sudo reboot
Watchdog機能が有効かどうかをチェック!
先ほど記したように、以下のコマンドで有効になっているかどうかを調べることができます。 再起動してターミナルへ入ることができたら、以下のコマンドを実行してみましょう。
dmesg | grep bcm2835-wdt
以下のようなメッセージは見つけられますか?
[ 0.722030] bcm2835-wdt 3f100000.watchdog: Broadcom BCM2835 watchdog timer
見つかれば成功です!
これで、3GやLTEを付けっ放しにしても、不測の事態がRaspberryPiで起きて止まったままになることを避けられるようになります。 SDカードのデータがおかしくなってしまったり、電源が落ちてしまったらどうしようもないんですけど、とは言ってもこれでRaspberryPiがだいぶ頼りになる存在になりますよ!
3 notes
·
View notes
Photo

Seeing great deals on classroom #stem tools and resources in the lead up to @Amazon #PrimeDay https://amzn.to/2lgziHO @raspberrypi Specifications Dimensions: 65mm × 30mm × 5mm SoC: Broadcom BCM2835 CPU: ARM11 running at 1GHz RAM: 512MB Wireless: 2.4GHz 802.11n wireless LAN Bluetooth: Bluetooth Classic 4.1 and Bluetooth LE Power: 5V, supplied via micro USB connector Video & Audio: 1080P HD video & stereo audio via mini-HDMI c.... || See more at Shoestring STEM http://bit.ly/1tszqCY #ShoestringSTEM
0 notes
Photo


Nowe Raspberry Pi Zero W
Model Zero, to płytka o wymiarach 65mm x 30mm x 5mm(o wiele mniejsza niż obecne modele).
Układ Broadcom BCM2835(1GHz ARM11) - Do dyspozycji mamy jednordzeniowy procesor, taktowany na 1GHz. Oznacza to mocniejszy układ niż w modelach A/B/B+(o około 40%), ale słabszy niż w 2B czy Modelu 3B.
512MB Pamięci RAM - Dla zainteresowanych - są to układy LPDDR2 SDRAM.
Wbudowany moduł Bluetooth 4.0 oraz WiFi działające w paśmie 2.4GHz i standardach 802.11b/g/n.
Zero posiada dokładnie to samo 40 pinów GPIO co model A+/B+/2B/3B.
micro-SD - podobnie jak w Modelu A+/B+/2B/3B system instalujemy na karcie pamięci micro-SD.
Dwa złącza micro-USB. Jedno do zasilania, a drugie do podłączenia urządzeń peryferyjnych.
mini-HDMI - mniejsze złącze HDMI, więc będziemy potrzebowali przejściówki na zwykłe.
Dodatkowo pojawi��a się też oficjalna obudowa dla nowego Zero.
Zdjęcie w nagłówku: raspberrypi.org
Jeśli chcesz podyskutować lub wymienić się swoimi spostrzeżeniami i opiniami o Raspberry Pi, albo po prostu szukasz inspiracji w jaki sposób wykorzystać swoją Malinkę, zapraszamy do naszej grupy na FB! - facebook.com/groups/malinowepi i do polubienia naszego profilu na Facebooku - facebook.com/malinowepi oraz zapisania się na Malinowy Newsletter.
2 notes
·
View notes
Text
Raspberry Pi: Qué es, características y precios
De seguro habrás escuchado nombrar o has leído algo acerca de Raspberry Pi. Pues bien, se trata de un pequeño ordenador o micro computadora que está en estos momentos en boga, ya que sus características la convierten en la opción perfecta para estimular la programación en niños y la enseñanza de las ciencias de la informática y hacerla cada vez más masiva, ya que los equipos modernos al automatizar todos los procesos y hacerlos complejos han alejado a los usuarios de este tipo de tareas que deberían ser las principales en un usuario de computadoras. En este artículo, les vamos a describir al Raspberry Pi: Qué es, sus características y precios.
Raspberry Pi: Definición y características
El Raspberry Pi es un micro ordenador o una placa de computadora SBC de bajo costo desarrollada en el Reino Unido por la Fundación Raspberry Pi, de manera que pueda fomentar la enseñanza de la computación y programación en las escuelas y colocarla al alcance de todos, como fue en un pasado cercano, por ejemplo en los años 80 cuando los niños creaban programas y juegos en sus computadoras personales.
En esencia, el Raspberry Pi es una placa de un tamaño minúsculo (cercano al de una tarjeta de crédito). Pero que su diminuto tamaño no te engañe, ya que posee un micro procesador ARM con potencia de hasta 1GHz, integrado en un chip Broadcom BCM2835. Además cuenta con 512 MB de RAM, un GPU Videocore IV, todo lo necesario para poder ejecutar programas básicos, navegar por internet y por supuesto programar.
Para trabajar con un Raspberry Pi se requiere almacenamiento que en este caso específico debe ser una tarjeta de memoria SD o microSD. Al contar con todos estos elementos, sólo debe conectarse a la corriente eléctrica. Las placas más modernas cuentan con hasta 4 puertos USB para conectar teclado y mouse, un conector HDMI con capacidad de reproducir vídeo en 1080p y hasta una conexión Ethernet para poder tener internet vía cable.
Entre los sistemas operativos disponibles para Raspberry Pi se encuentran: Raspbian, Arch Linux, RaspBMC, Pidora u OpenELEC e incluso, se dispone de Windows 10 según la página web de Microsoft.
Precios del Raspberry Pi
El Raspberry Pi es bastante económico. La última placa disponible, el modelo 2 B+ tiene un precio de aproximadamente 30,95€. Las placas anteriores son mucho más económicas e incluso podemos encontrar kits completos de trabajo con varios accesorios por menos de 60€.
Podemos notar que son equipos muy baratos, capaces de realizar una serie de tareas simples y en algunos casos complicados, todo dependerá del ingenio y de la capacidad de los usuarios. Si eres de los que les gusta crear, los Raspberry Pi son una muy buena solución, siendo incluso excelentes obsequios para niños y jóvenes.
Portatilbaterias.com es la tienda online ideal cuando estás buscando una batería para tu portátil, teléfono móvil o tablet. ¡Nuestras baterías harán que tu portátil, teléfono o tablet funcione otra vez como nuevo!
0 notes
Photo


Raspberry Pi é um computador do tamanho de um cartão de crédito, que se conecta a um monitor de computador ou TV, e usa um teclado e um mouse padrão, desenvolvido no Reino Unido pela Fundação Raspberry Pi. Todo o hardware é integrado numa única placa. O principal objetivo é promover o ensino em Ciência da Computação básica em escolas, inclusão e empoderamento social, sendo multiplataforma, considerando as mais consagradas marcas de videogames do mundo é também como parte deste processo uma excelente plataforma, tanto para a indústria quanto para a casa inteligentes e os IOT - Internet das Coisas, marcando e melhorando o nivel de empregabilidade, por tecnologias que nos permitem adentrar na era dos exabytes, da revolucao digital, ad-hoc, promovendo procedimentos únicos, específicos, Inovação tecnológica, que é uma saída resiliente aos entraves sociais, tendo muito mais dados sobre a vida a partir desta fase de nuvens e Big Data, os negócios e as atividades finas, core business, e portanto, com conceitos de qualidade total, competitividade em maior escala, primeiro mundo de um modo mais abrangente, tudo neste fino e poderoso hardware a todas as idades também. A Fundação Raspberry Pi começou a aceitar pedidos do modelo de US$35 a partir de 29 de fevereiro de 2012. O Raspberry Pi 1 é baseado em um system on a chip (SoC) Broadcom BCM2835, que inclui um processador ARM1176JZF-S de 700 MHz, GPU VideoCore IV, e 512 MB de memória RAM em sua última revisão. O projeto não inclui uma memória não-volátil - como um disco rígido - mas possui uma entrada de cartão SD para armazenamento de dados. O Raspberry Pi 3 model B contem um processador 1.2GHz 64-bit quad-core ARMv8 CPU, 1 GB de RAM, Bluetooth 4.1.
0 notes
Text
A $6 Linux computer that plays Doom: Could this tiny Chinese clone challenge the Raspberry Pi Zero? - TechRepublic
See on Scoop.it - Makerspaces, libraries and education
Another day, another would-be Raspberry Pi challenger, this time the tiny LicheePi Zero, which sells for as little as $6. On paper, it has a faster and more modern processor than the Raspberry Pi Zero, the cheapest Raspberry Pi board, as well as offering Wi-Fi connectivity at a lower price. However, there are also several potential drawbacks to this Chinese-made competitor. The LicheePi uses an Allwinner V3s system on a chip (SoC), based on the ARM Cortex-A7 core and capable of running at up to 1.2GHz. That's faster than the Pi Zero's Broadcom BCM2835 SoC, which runs at up to 1GHz and is based on an older ARM11 core.
0 notes
Text
わずか5ドルの格安PC「Raspberry Pi Zero」の販売があきばお~でスタート
1: 海江田三郎 ★ 2017/03/15(水) 13:50:10.38 _USER http://ascii.jp/elem/000/001/451/1451796/ わずか5ドルという超格安価格が話題となったRaspberry Piの��モデル「Raspberry Pi Zero」の販売があきばお~でスタートした。 登場したのは変換アダプターやmicroSDカード、電源アダプターがセットになった「Raspberry Pi Zero Base Kit」だ。 「Raspberry Pi Zero」は、30×65mmのコンパクト基板にBroadcom「BCM2835」(1GHz)やLPDDR2 512MBメモリーを搭載する超小型Linux PC。 インターフェースは、1080p60対応のminiHDMIポートのほか、microSDスロット、microUSB×2(データ×1/データ×1)。…
View On WordPress
0 notes
Text
Compare the New $10 Raspberry Pi Zero W vs Pi 3 Model B
Compare the New $10 Raspberry Pi Zero W vs Pi 3 Model B

Comparison between Raspberry Pi Zero W vs Raspberry Pi 3 Model B The “Raspberry Pi Zero W” is an updated version of the Raspberry Pi Zero. It includes in-build Wi-Fi, Bluetooth connectivity and CSI camera port. It’s $10 in US not available in Indian Market. Raspberry Pi Zero W vs Pi 3 Model B CPU Broadcom BCM2835 1Ghz, Single-core 1.2 GHz 64-bit quad-core ARMv8 CPU Storage Micro SD Micro SD RAM…
View On WordPress
0 notes
Text
Nuevo artículo en Entretenimiento y Noticias de Tecnología en proZesa
Nuevo artículo publicado en http://www.prozesa.com/2017/03/01/raspberry-pi-zero-w-anade-nuevas-prestaciones-por-10-ridiculos-dolares/
Raspberry Pi Zero W añade nuevas prestaciones por 10 ridículos dólares
Las familia Raspberry Pi vuelve a la carga con un nuevo integrante: se trata del diminuto y baratísimo Raspberry Pi Zero W, un dispositivo del tamaño de una tarjeta de crédito que hace hincapié en su oferta de conexiones. Y es que W no viene a representar otra cosa que la "wireless connectivity" (conectividad inalámbrica), ofreciendo una configuración que ya conocemos (procesador Broadcom BCM2835 de un núcleo a 1 GHz, 512 MB de RAM, ristra de 40 pines, ranura para tarjetas microSD y mini-HDMI con salida 1080/60p) pero con soporte ahora para conexión WiFi 802.11n y Bluetooth 4.0. Las nuevas prestaciones del Zero W tienen un coste, claro, y es que a diferencia de su hermano menor, que cuesta 5 dólares, la nueva propuesta de la fundación Raspberry Pi sube el listón hasta los 10 dólares. Encontrarás ahora también nuevas carcasas disponibles, más compactas que nunca, por si quieres resguardar el cuerpo de tu nuevo y pequeño amigo. ¿Con algún proyecto ya en mente? Pues corre a hacerte con tu asequible PC ya. https://youtu.be/nlJ8WGZbPMk Vía: engadget
0 notes
Text
New Post has been published on Attendantdesign
New Post has been published on http://attendantdesign.com/raspberry-pi-0-w-is-a-10-pc-with-wifi-and-bluetooth/
Raspberry Pi 0 W is a $10 pc with Wifi and Bluetooth
Despite the fact that fundamental Raspberry Pi announcements are very few and a long way between, you understand that after there is one, it’s really worth paying attention.
Take as an instance the Raspberry Pi Zero — the $5 (£4) board that apparently came out of nowhere in October 2015 and presented 40 percent more computing strength than the authentic Pi. it is been a year because of the closing essential unveiling, whilst we met the Raspberry Pi 3, but the Foundation is back these days with a modern-day product that nestles smartly among its credit-card sized PC and its flagship board. it is referred to as the Raspberry Pi Zero W.
Within the case of the Raspberry Pi 0 W, the Wifi and Bluetooth signify exactly what’s new: wireless connectivity. It boasts precisely the identical specs (1GHz single-center Broadcom BCM2835 CPU, 512MB of RAM, 40-pin header) as its predecessor, however, the Zero W provides each 802.11n WiWireless and Bluetooth four.zero to the present Zero layout. If you had a cool concept for a low-cost maker mission that turned into scuppered via the Zero’s lack of wireless connectivity, now is probably the time to revisit the concept.
The 0 W’s new features do come at a value, however. The 0 will stay at $5 (£4) however, the 0 W is priced at $10 (£9.60) plus tax. The Raspberry Pi Basis is also offering new injection-molded cases with interchangeable lids that are smaller variations of the professional Raspberry Pi case that went on sale nearly two years in the past.
At $10 (£nine.60), the 0 W continues to be excellent value for money. Makers have already used the DIY board to create self-made safety cameras and construct their personal retro gaming machines, however with WiWi-fi and Bluetooth now onboard, the one’s projects may come to be even easier to construct and hold.
Thrilling Information About Raspberries
Yum, raspberries! So candy and attractive, whether or not you’re eating them undeniable or with ice cream. however how a great deal does you truly realize About raspberries? Statistics like they don’t have any facts, they arrive in 4 extraordinary hues and what states and provinces grow most people of raspberries in Canada and America. Learn this Information, plus read Approximately Exciting minutiae, dietary Facts, what recipes raspberries may be used in and three myths that communicate About raspberries.
Miscellaneous Statistics
Do you believe you studied you know your raspberries? Test your information against those brief Information:
Raspberries may be either crimson, red, gold or black in color. Golden raspberries are sweeter than the opposite types. The distinction between raspberries and blackberries is that raspberries have a hole center Inside the middle even as blackberries do not. Within the United states, Approximately 90% of all raspberries bought come from Washington, California, and Oregon. In Canada, the province of British Colombia produces Approximately eighty% of all raspberries offered in Canada. There are over 200 species of raspberries. when choosing raspberries, search for berries which can be firm and darkish in color. They have to now not be soft or soft. Gently pull on the berry; if it does not come off without problems then leave it on the bush, as the berry is not ripe enough yet. Once raspberries had been picked, they may not ripen any similarly. HealthWireless Records Absolutely everyone desires to eat more healthy, but frequently wholesome is equated with bland or tasteless food. Properly, you may prevent questioning like that due to the fact here is a meal this is tasty and desirable for you as Well! The clinical advantages of raspberries encompass:
They do not have any fat, saturated fats, sodium or cholesterol. They’re excessive in fiber, nutrition C, potassium, and folate. They may be low in calories. They could assist lower excessive blood stress. Raspberries have a property which can assist to lessen the irritation of the joints. meals Statistics Raspberries may be used in a variety of meals dishes. In case you recognize a person who doesn’t like to devour fruit, sincerely add raspberries to the dish. They flavor first-rate and the man or woman won’t even think about the fact that They’re eating fruit. Some of the meals dishes that raspberries may be utilized in consist of:
They can be made into sauces (for fowl or desserts), jams or jellies. They can be eaten clean, both plain or on a pinnacle of meals alternatives including yogurt, ice cream, cereal or salads. They can be baked in pies, desserts, bread or truffles. They may be in drinks, inclusive of smoothies or punches. Myths From Round The sector Raspberries are sold and produced all through The arena, which has given an upward push to myths Approximately why raspberries are red or even one delusion Approximately the mystical qualities of the fruit.
One famous fantasy comes from France, which tells the story About how raspberries use to be only white in coloration. The myth states that at some point, a nymph named Ida become looking after an infant Zeus (also called Jupiter). Zeus becomes crying and to help soothe him, Ida picked some white raspberries. but whilst she went to choose the raspberries, she scratched herself on a thorn and commenced to bleed. Her blood dripped on the white raspberries, immediately turning them crimson and they had been pink ever given that.
Some other myth, which originates from Germany, talks About the mystical traits of raspberries. It states that to tame a bewitched horse, one would have to tie a wild raspberry twig Round the pony’s frame.
Wireless, a modern-day fantasy tells the story of how raspberries grew to become a fox’s fur purple. Inside the Tale of the Raspberry Fox, by Henning Buchhagen, there’s a fox named Ferdinand. At that point, all foxes have been gray in coloration. The Tale tells how Ferdinand didn’t want to devour meat, so at some point, he determined to devour some raspberries and determined that he cherished consuming them. He saved ingesting raspberries and the more he ate, the redder his fur have become. Ever on the grounds that then, all foxes have had pink fur and prefer to consume fruit. Including a WiWireless Get admission to Control List
what’s an Access Manipulate List (ACL)? A Get admission to Control List is a Listing, stored on a community router, of allowed gadgets on a community. This List determines which devices are allowed to hook up with the network and which gadgets aren’t allowed. The use of this type of List, a wifi administrator (or home person) can block unauthorized Get entry to their network.
Get admission to Manipulate Lists are configured The usage of a wi-fi router. A network hub device will no longer paintings. A community hub allows all visitors to bypass both ways; it does now not filter any site visitors. A router filters site visitors, you could block traffic in either path or re-direction site visitors. A router may be a basic router (ie. NetGear, Linksys) from any electronics save, a complicated router (i.E. Cisco Router) or a server/notebook configured as a router. A router shops statistics in its ACL and based on that records direct site visitors inside and outside of a network.
This display screen shot suggests the Access Manage List of a NetGear Router. This List has one tool indexed. If the Access List grew to become on, simplest this device could Access the wireless network. you could build an ACL on a router and chose to not put in force Get admission to filtering, however, If you spent the time to construct the List, might as Nicely use it. There are more devices nowadays, that can Get right of entry to a WiWi-fi community than some years in the past. Such gadgets are Clever Telephones, Gaming Systems, Laptops, Pills, and many others.
Most routers are pre-configured to broadcast their SSID (the call of your wifi network) and permit any site visitors to connect. Most customers are now familiar with securing their wifi networks by using Adding a community Access password. This allows comfortable their community however it’s miles viable that a few hackers could discover your community password. Including a Get right of entry to Manage List will help to in addition lessen unauthorized Get entry to by using Adding a second layer of protection. A Get right of entry to Listing stores the MAC address of the tool. If the laptop trying to Get admission to the network isn’t indexed on this Listing, they will not be allowed to Get right of entry to the community. There are some hackers who are able to hello-jack a valid MAC address, so there aren’t any 100% secured Systems, however, a few protection is higher than none at all. One additional safety degree we ought to add (after implementing ACL), might be to disable SSID broadcast. This may purpose a few troubles with some WIFI gadgets routinely becoming a member of the wifi network, but it’s worth the security.
Evaluation your specific router’s manual for the suitable way to configure your particular router. We can talk SSID broadcast in a future put up, join the weblog for signals on destiny posts.
Records of Bluetooth
Bluetooth is a wireless technology widespread for changing facts over short distances (Using brief-wavelength UHF radio waves In the ISM band from 2.4 to 2.485 GHz) from constant and cell gadgets, and building personal vicinity networks (PANs).
Within the case of the Raspberry Pi 0 W, the Wifi and Bluetooth signify exactly what’s new: wireless connectivity.
Bluetooth changed into advanced by means of Ericcson which is a Danish agency. They named it after a Danish king, whose nickname was Bluetooth because he added the Danish tribes together.
It really is a form of misleading, because it’s no longer totally straightforward. Bluetooth turned into advanced by way of Ericsson (pre-Sony Ericsson) that’s a main Swedish telecommunication corporation. They named if after the Danish Viking king, Harald Blåtand. Harald Blåtand became the king who converted from the perception Within the Historic Norse Gods and Goddesses to the unmarried God of Christianity. Blåtand translated to English, literally manner Bluetooth, so That is how they came up with the call.
In case you look at the Bluetooth symbol, there may be a Runic inscription in it. The two lines sticking out of the lower back of the B surely represent a Runic H. The B is, obviously, a Runic B. Harald Blåtand’s initials shape the symbol of modern-day international’s Bluetooth!
Bluetooth is supervised with the aid of the Bluetooth Special Interest Organization (SIG), which includes more than 25,000 member groups Inside the areas of telecommunication, computing, network, and gadgets.The IEEE standardized Bluetooth as IEEE 802.15.1, but no sustains the standard a bit longer. The Bluetooth SIG oversees improvement of the specification, manages the qualification program, and protects the trademarks. A company has to meet Bluetooth SIG benchmarks to advertise it as a Bluetooth tool. A community of patients hooks up with the era, which can be certified to precise qualifying gadgets.
The Bluetooth middle Specification Running Institution (CSWG) produces in particular four varieties of specs: The Bluetooth core Specification, release cycle is typically a few years in between middle Specification Addendum (CSA), release cycle may be as tight as a few times in step with 12 months middle Specification Supplements (CSS), may be launched very quickly Errata
Bluetooth and Wi-fi
Bluetooth and (the brand for merchandise Using IEEE 802.eleven benchmarks) contain a few comparable packages: establishing Systems, printing, or shifting files. is supposed as an opportunity for broadband cabling for trendy geographic location network benefit Get admission to in paintings regions or home. This Institution of packages can also be referred to as wireless geographic location sites (WLAN). Bluetooth became designed for lightweight equipment and its own applications. The Group of applications is distinct because of the cell non-public area network (WPAN). Bluetooth is an upgraded for cabling in a number of transported applications in without a doubt any setting up in individual, and also works for set place packages such as Smart electricity features In the house (thermostats, and so forth.).
and Bluetooth is truly complementary in their packages and use. is Get right of entry to point-centered commonly, with an asymmetrical purchaser-server connection with all traffic routed via the Get admission to factor, even as Bluetooth is symmetrical commonly, between Bluetooth devices. Bluetooth acts Well in easy programs where devices want to connect with minimal creation much like a button press, as with headsets and far off Manage controls, at the same time as fits higher in programs wherein a few extent of purchaser production is high and feasible fees of speed could be required, in particular for community advantage Access to via and gain Get right of entry to node. but, Bluetooth Get right of entry to points do exist and advert-how connections are feasible with even though much less actually just like Bluetooth. Direct was just lately developed to include far extra Bluetooth-like ad-hoc features too.
Bluetooth versions: Bluetooth v1.zero and v1.0B Bluetooth v2.1 + EDR Bluetooth v3.zero + HS Bluetooth v4.zero Bluetooth v4.1 Bluetooth v4.2 Bluetooth v5
0 notes
Text
Raspberry Pi Zero W is a $10 computer with WiFi and Bluetooth
Although major Raspberry Pi announcements are very few and far between, you know that when there is one, it's worth paying attention. Take for example the Raspberry Pi Zero -- the $5 (£4) board that apparently came out of nowhere in October 2015 and offered 40 percent more computing power than the original Pi. It's been a year since the last major unveiling, when we met the Raspberry Pi 3, but the Foundation is back today with a brand new product that nestles neatly between its credit-card sized computer and its flagship board. It's called the Raspberry Pi Zero W.
In the case of the Raspberry Pi Zero W, the W signifies exactly what is new: wireless connectivity. It boasts exactly the same specifications (1GHz single-core Broadcom BCM2835 CPU, 512MB of RAM, 40-pin header) as its predecessor but the Zero W adds both 802.11n WiFi and Bluetooth 4.0 to the existing Zero design. If you had a cool idea for a low-cost maker project that was scuppered by the Zero's lack of wireless connectivity, now might be the time to revisit the idea.
The Zero W's new features do come at a cost, however. The Zero will stay at $5 (£4) but the Zero W is priced at $10 (£9.60) plus tax. The Raspberry Pi Foundation is also offering new injection-molded cases with interchangeable lids that are smaller versions of the official Raspberry Pi case that went on sale almost two years ago.
At $10 (£9.60), the Zero W is still fantastic value for money. Makers have already used the DIY board to create homemade security cameras and build their own retro gaming machines, but with WiFi and Bluetooth now on-board, those projects might become even easier to build and maintain.
Source: ModMyPi (UK), Pimoroni (UK), Pi Hut (UK), Adafruit (US), CanaKit (US)
Source: http://ift.tt/2mzDQFd
0 notes