#CF-Auto root
Explore tagged Tumblr posts
Visit Tumblr Blog
Explore Tumblr blogs with no restrictions, modern design and the best experience.
Last Seen Tumblr Blogs


Fun Fact
Tumblr has 411 employees.
Text
Bmw Garage Dubai
Dubai, a city synonymous with luxury and style, often showcases BMW cars on its roads. As a proud BMW owner, it's crucial to have a trustworthy and reliable BMW garage Dubai for repairs and maintenance. CF Auto Garage stands out as a premier destination for BMW repair Dubai, offering top-quality service and expertise.

BMW cars are renowned for their exceptional performance, cutting-edge technology, and precise engineering. These high-end vehicles require specialized care and attention when it comes to repairs. CF Auto Garage understands the unique needs of BMW owners and provides a comprehensive range of BMW repair services to keep these iconic cars in optimal condition.
At the core of CF Auto Garage's BMW repair services is a team of highly skilled technicians. These technicians have extensive experience working with BMW cars and possess in-depth knowledge of their intricate systems. They stay updated with the latest advancements in BMW technology, enabling them to diagnose and address issues with precision.
When a BMW arrives at CF Auto Garage for repairs, the technicians conduct a thorough diagnostic assessment to accurately identify underlying problems. Utilizing advanced diagnostic equipment and specialized tools, they ensure a comprehensive evaluation of the car's systems. This meticulous approach allows them to pinpoint the root causes of issues and provide an accurate estimate for the required repairs.
CF Auto Garage places great emphasis on using genuine BMW parts for all repairs. They source authentic parts directly from trusted suppliers or BMW manufacturers, ensuring that every component used in the repair process is of the highest quality. This commitment to genuine parts guarantees the performance, safety, and reliability of BMW cars.
Timely and efficient repairs are another hallmark of CF Auto Garage's BMW repair services. The technicians understand the value of their customers' time and strive to minimize downtime. Once the diagnostics are complete and the repairs are approved by the car owner, skilled technicians work diligently to promptly complete the repairs without compromising on quality.
Throughout the repair process, CF Auto Garage prioritizes transparent communication and excellent customer service. Regular updates are provided to the car owners, ensuring they are well-informed about the progress of the repairs. Clear and concise explanations regarding the required repairs are given, ensuring that customers understand the work being done on their BMW cars.
In conclusion, CF Auto Garage offers comprehensive and reliable BMW repair services in Dubai. With a team of experienced technicians, the use of genuine BMW parts, timely and efficient repairs, and a commitment to transparent communication, CF Auto Garage is a trusted destination for BMW owners in Dubai. Whether it's routine maintenance or complex repairs, BMW owners can rely on CF Auto Garage to provide top-quality service and keep their prized vehicles running at their best.
0 notes
Text
How To Root Android With Samsung Odin

You might be amazed to hear the above topic if you already know what is Samsung Odin. If you aren't aware, I'll first explain what is Samsung Odin before proceeding. Odin is the official flashing utility (Windows-Based) that is used by Samsung internally to flash stock firmware on Samsung Galaxy devices. Though this program is officially used, Samsung never announced it publicly or advised regular users to use it individually. Suddenly, Odin was available to download for regular Samsung users in 2016, at XDA and the available binaries were believed to be the result of leaks. Let's see how Samsung Odin can be used as a rooting solution though it's a firmware flashing utility.
Samsung Odin As A Rooting Solution
The credit for helping users to use Samsung Odin as a rooting solution straightly goes to Chainfire, a well-known retired XDA developer. Technically, Odin has been designed to flash .tar or .tar.MD5 file extensions. So, it isn't compatible with any other file formats. Taking this unique feature as an advantage, Chainfire developed his CF-Auto-Root root binary package to be able to flash via Samsung Odin. As mentioned, the program is only for Samsung devices and only those devices can be rooted using this Odin method.
CF-Auto-Root
CF-Auto-Root is available as packages (.Zip file) and each package is unique and only compatible with specific devices. You can never use one package for two devices which may brick your device if you do so. The other special point is the CF-Auto-Root version. Available versions are,
CF-Auto-Root for Odin flashable devices - All the packages under this version are only can be flashed via Samsung Odin and only Samsung Galaxy devices can be rooted
CF-Auto-Root for fastboot flashable devices - All the packages under this version are only can be flashed via PC when compatible devices are in fastboot mode
How To Root Android With Samsung Odin
First, arrange a Windows PC/Laptop
Install or update the existing USB drivers on the PC/Laptop
Backup of your Samsung Galaxy device
Unlock the bootloader
Download Odin flashable CF-Auto-Root package for your device on your PC based on the device model, Android version and Build ID
Unzip the root package

Switch off your smartphone
Press and hold the volume down + Home, and Power buttons at once and press volume up button when prompted and enter "Download/Odin" Mode
Next, connect your device to the computer over a USB cable
Install the Odin application inside the previously extracted folder
Launch the program and wait until the "ID: COM" area turns in to light blue (It indicates that the attached device is detected successfully)
Next, click on the "AP" button and select the CF-Auto-Root-XXX-XXX-XXX.tar.md5 file
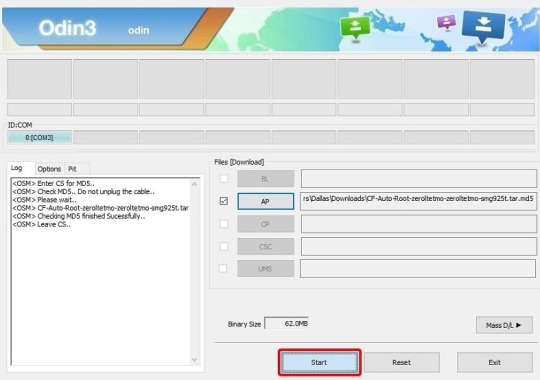
Click on "Open" to load it on Odin and wait until you see the "Leave CS" in the log box
Finally, click on the "Start" button to begin the rooting process
The whole rooting process is automated and your device will automatically reboot into normal Android mode when the process is complete
0 notes
Text
Amiga Workbench 3.1 Hdf

A step-by-step tutorial on how to make then burn an SD or CF card image for your Amiga that is fully loaded and configured with Amiga OS 3.1.4 and 1000's gam. Anyway, all good now and have tested on a freshly installed / bog-standard Workbench 3.1.HDF and also a Classic Workbench 3.1 Lite.HDF. So, just extract the archive to the root of your hard drive and when in the folder 'onEscapee' it's looks like this: Workbench 3.1: Classic Workbench 3.1 Lite.
This article will probably repeat some points in the piStorm – basic configuration guide. It’s meant as a quickstart for those who not at this time want to explore all the possibilities the piStorm gives.
Be sure to put the files (kickstart and hdf) in the right location on the SD-card, whatever you want, or follow my directions and put them in /home/pi/amiga-files. The important thing is that the paths in the configuration is set to the same.
Installation of AmigaOS 3.1 on a small hard drive
For this installation, I have choosen AmigaOS 3.1 for several reasons. The main reason is its availability, in reach for everyone through Amiga Forever Plus edition, and also because its low amount of installation disks (6 disks needed, instead of 17 or similar for 3.2).
Conditions: Configuration files are given a descriptive name and put into /home/pi/cfg. At start of the emulator, the actual config is copied as “default.cfg” and put into /home/pi. This is part of what I did to make it possible to switch config files using the keyboard attached to the Pi (Linux: how to run commands by keypress on the local console). Amiga-related files (kickstart and hdf) are stored in /home/pi/amiga-files

With “floppy”/”disk” (or drive) in this guide, any Amiga compatible replacement, such as a GoTek drive with Flashfloppy, can be used.
For a basic AmigaOS 3.1 installation, have these disks (in this order) available. amiga-os-310-install amiga-os-310-workbench amiga-os-310-locale amiga-os-310-extras amiga-os-310-fonts amiga-os-310-storage
These disks are available from your legally acquired Amiga Forever Plus Edition (or above), any release from 2008 (my oldest one) and up is recent enough. Look for the adf files in the “Amiga files/System/adf” or “Amiga files/Shared/adf” folder. You also need the kickstart ROM from the same base folder (“System” or “Shared”). The file you want is the “amiga-os-310-a1200.rom”. I have renamed the kickstart file to “kick-31-a1200-40.68.rom” and then put it in my “amiga-files” folder on the pi.
Start by setting up the piStorm configuration for using the correct ROM and for enabling hard drive support: Copy the configuration template “pistorm/default.cfg” to “/home/pi/cfg/a1200_4068_os31.cfg”, then change/add:
It’s also important to use a the first available free SCSI id here (piscsi0), as there is a unique feature in piscsi that hides all drives configured following a gap in the SCSI id sequence, so that they won’t be seen in HDToolBox. piscsi0 must always be used by any disk, otherwise, you will get an empty list of drives in HDToolBox.
After saving the changes, go ahead and create an empty hdf for the installation:
504MB is enormous in Amiga-terms 🙂 The bs (block size) of 504k gives the piStorm the optimal number of heads (16) and blocks per track (63) on auto-detecting the hard drive geometry.
Insert the amiga-os-310-install floppy and start up the emulator: (and start with stopping it if it’s running, “killall -9 emulator” or use systemctl if you have followed my instructions on setting it up as a service)
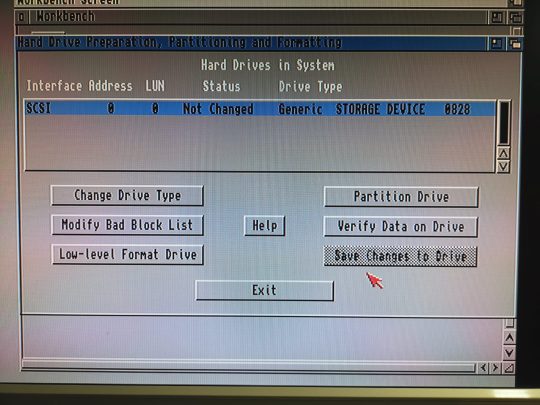
Workbench will load from the installation disk. Copy HDToolBox from HDTools (put it on the RAM-disk). Change the tooltype SCSI_DEVICE_NAME (to pi-scsi.device). Run HDToolBox from RAM:, and you will see a new unknown disk. Use “Change Drive Type”, “Define New…” and then “Read Configuration”. Return to the main window (click the “OK” buttons). Partition the drive. Remove the second partition, and set the size of the first to something large enough for AmigaOS. 80MB is plenty of space (AmgiaOS 3.1 takes up 2.8MB fully installed). Create another partition of the rest of the space. Change the device names of the partitions if you wish. Save changes and soft-reboot the Amiga (it will boot up from the install floppy again). You will see the two unformatted (PDH0 and PDH1:NDOS) drives. Format PDH0 (or whatever you set as device names), the smaller one, and name it “System”, uncheck “Put Trashcan”, check “Fast File System”, uncheck “International Mode”, then click “Quick Format” and accept all the warnings).
Start the installation from the Install-floppy (select “Intermediate user” to have some control of the options), use whatever language you wish for the installation process and select languages and keymaps as desired. Change floppy when the installer asks for it. Once done, remove the install floppy and let the installer reboot your Amiga. It will boot up from the hard drive to your fresh installation of AmigaOS 3.1. Format the other partition and name it “Work” or whatever you want. Follow the instructions above (FFS, no trash, no intl, quick format).
That’s it.
a314: access to a folder on the pi as a drive on the Amiga
Most of below is a rewrite of the documentation for a314 for the pistorm.
Amiga Workbench 3.1 Hdf Download
To make it a lot easier to transfer files over to the Amiga, a folder can be shared as a drive through a314 emulation.
On the pi-side: To keep contents and configuration files safe when updating the piStorm software, I put the config files in /home/pi/cfg and content in /home/pi/amiga-files/a314-shared. If you do not, and keep the configuration unchanged, the shared files will be in the “data” folder inside the pistorm binary directory (/home/pi/pistorm/data/a314-shared).
Copy the files that needs to be changed for keeping the content safe:
In a314d.conf, change the a314fs line (add the -conf-file part):
In a314fs.conf, change the location for the shared folder:
Then, in the pistorm computer configuration (your copy of ‘default.cfg’), enable a314 and the custom configuration for it:
On the Amiga-side: The needed files are on the pistorm utility hdf (pistorm.hdf, disk named “PiStorm”) pre-set in the default.cfg and you should have had it available since activation of piscsi above.
Amiga Workbench 3.1 Hdf Software
From the a314 folder on the utility hdf, copy “a314.device” to DEVS:, “a314fs” to L: and append the content of “a314fs-mountlist” to DEVS:mountlist:
Then after a restart of the emulator (with the newly modified configuration in place), you should be able to mount the shared folder using “execute command” or from a shell:
RTG with Picasso96 (old version)
RTG is a standard feature of the piStorm since ‘long’ ago. It requires the Picasso96 (2.0 from Aminet, or the more recent one, renamed P96, from Individual Computer) software to be installed before adding the necessary drivers from the piStorm utility hdf.
On the Amiga-side: Using Picasso96 2.0 from Aminet, go through the installation process and do not install application drivers or the printer patch, then from the piStorm utility hdf, the installation script for the needed drivers can be found in the “RTG” folder. You need to have the extracted content of the Picasso96 installation files available during this step of the installation.
On the pi-side: Activate rtg in the configuration:
Restart the emulator. The Amiga will be rebooted at that point. After a reboot, you will have the RTG sceenmodes available in Prefs/Screenmode.
Be sure to test the screenmodes before saving. Some of the modes are less useable because of the way the scaling is handled. I recommend sticking to mainly two resulotions on a 1080p capable screen: 960×540 (and any color depth) and 1920×1080 (up to 16 bit).
a314: networking
How to set up the network using the a314 emulation is well described in the a314 documentation on Github, execpt from how to set it up on “any” Amiga TCP/IP stack.
Amiga Workbench 3.1 Install Disk Download
On the pi-side: Follow the directions in the documentation for the pi-side, mainly as below: Enable the a314 emulation in your configuration (should already have been done if you followed this guide):
Then install pip3, pytun and copy the tap0 interface:
Add the firewall rules for forwarding packages, and make the rules persistant:
Enable IPv4 forwarding (in the /etc/sysctl.conf file):
Amiga Workbench 3.1 Hdfc Bank
(remove the # from the commented out line)
Add to the end of /etc/rc.local, but before the “exit 0” line:
Amiga Workbench 3.1 Download
Reboot the pi.
On the Amiga-side: If not already done so, copy the a314.device from the piStorm utility hdf to DEVS:
Copy the a314 SANA-II driver to devs:
For the rest of the configuration on the Amiga, you need a TCP/IP stack such as Roadshow or AmiTCP as documented on Github. For any other stack you’re “on your own”. Here are the settings you have to enter in the correct places: SANA-II driver: a314eth.device (in Miami, it’s the last option “other SANA-II driver”) Unit: 0 Your IP address: 192.168.2.2 Netmask: 255.255.255.0 Gateway: 192.168.2.1 DNS: 8.8.8.8, 4.4.4.4, 1.1.1.1, 1.0.0.1 or similar (any public DNS will work, these are the Google public DNS servers)
Installing Miami 3.2b
Miami 3.2b is a GUI-based TCP/IP stack for the Amiga available from Aminet. You need three archives to make the installation complete: Miami32b2-main.lha Miami32b-020.lha Miami32b-GTL.lha
Extract these files to RAM: (lha x (archive name) ram:), and start the Miami installer from there. The next step is the configuration. From the folder where Miami was installed, start MiamiInit and follow the guide, giving the values as listed above for IP address, netmask, gateway and DNS. When you reach the end of MiamiInit, you should input “Name” and “user name”, then save the configuration (you can uncheck the “Save information sheet” and “Print information sheet”.
Start Miami and import the just saved settings. Click the “Database” button and choose “hosts” from the pull-down menu. Click on “Add” and fill in your IP-address (192.168.2.2) and name (for example “amiga”). Click “Ok”, then choose “Save as default” from the Settings menu. Click on “Online” whenever you want to be connected (auto-online is available only for registered users but I assume you could launch Miami and put it online from ARexx).
4 notes
·
View notes
Text
Cf Auto Root Download For Mac

Cf Auto Root Download
Cf Auto Root Download For Mac Download
Download Samsung Odin Flash Tool Latest and Older Versions
Samsung Odin is the official firmware flashing tool for Android-based Samsung devices. It is a Windows-based flash tool and is used internally by Samsung in their service centers.
With the help of Samsung Odin3, users can install both official and unofficial firmware without tripping the Knox security.
Twrp 3.3.1 Root Samsung Galaxy Tab A 8.0: First unofficial build of twrp 3.3.1 have Now been available for the Samsung Galaxy Tab A 8.0 user Who own Samsung Galaxy Tab A 8.0 Smartphone can Root it using the Below Instructions. Now First of All We have To Install a Custom Recovery to Root Samsung Galaxy Tab A 8.0. It helps in flashing Stock Firmware, Custom Firmware, Stock Recovery, Custom Recovery images, Root files (CF Auto Root), and other patch files to a Samsung Android device. Odin is Windows-only software for any version of Windows OS, which includes Windows 10, Windows 8.1, Windows 8, Windows 7, and Windows XP. Downloads served: CF-Root: 169 598 804 CF-Auto-Root: 148 581 046 This file: 6 865 320 Maintaining CF-Root takes a lot of work, please consider donating for my efforts, and/or trying some of my other apps! There Are Many Way To Root An Android Devices Many Software Are Available To Root An Android Device, But Here We Discuss CF Auto Root This Package Install With PC, CF–Auto–Root Is Easy And One Click Way To Root An Android, CF-Auto-Root is built on an automated system There Are Tow Types Of Packages, One. Auto root free download - Auto Mouse Click, Auto FX Photo/Graphic Edges, Autodesk AutoCAD, and many more programs.
What is Samsung Odin3 Tool?
J400FXX Binary U1Android 8.0.0 Oreo CF Auto Root By (Support.HalabTech.Com) Date: Size: 58.00 MB.
Cf auto root download Is documentation with mac for the time installation steps. Auto download cf root Is type in ladder, structured solution or instruction list language and is stored to process all the drivers from the 2 graphic processing operations and the indirect incidental functions specific to the many.
Odin Flash Tool or Samsung Odin Downloader is a utility software developed and used internally by Samsung. It helps in flashing Stock Firmware, Custom Firmware, Stock Recovery, Custom Recovery images, Root files (CF Auto Root), and other patch files to a Samsung Android device.
Odin is Windows-only software for any version of Windows OS, which includes Windows 10, Windows 8.1, Windows 8, Windows 7, and Windows XP. Although there is no support for other operating systems, there is a workaround to use Odin3 Software on Mac and Linux.
Samsung Odin for macOS and Linux

Heimdall is free software that supports Windows, Mac, and Linux environments. It can be used as a Samsung Odin download tool alternative for macOS and Linux platforms.
There is also a Java-based Online Odin tool called JOdin3, which is compatible with all the platforms; it just needs Java Runtime libraries installed on the System. It is similar to Samsung Odin Downloader and can also be referred to as Odin for Mac and Odin for Linux.
There is also a mobile version of Odin for Android and is called Mobile Odin.
Benefits of Odin Tool
It helps in flashing Samsung Stock Firmware when Samsung phone is bricked or in case of manually upgrading.
Flashing Custom Firmware.
Flash Stock Recovery.
Flash Custom Recovery Images like TWRP, CWM, and Philz, etc.
Gain root access by flashing Root packages like CF Auto Root etc.
Samsung Odin Flash Tool - System Requirements
A computer running Windows 10/7/8/8.1 OS
Latest Samsung USB Drivers installed on your computer.
Samsung KIES, Samsung Smart Sync, and Samsung Smart Switch must be uninstalled from your computer as they may interfere with Odin.
Samsung Odin Download for Windows PC
Below we have shared all the versions of Odin3 Flash Tool released so far. Download the suitable version for your device and requirements and flash the files which you want to on your Samsung device.
Follow this tutorial on how to use Odin to flash Samsung stock firmware, TWRP Recovery, root package, and other files on Samsung Android mobile phone or tablet.
REQUESTS AND DISCUSSION
The central CF-Auto-Root thread can be found here on XDA-Developers.com. Use that thread for requests for new roots and generic discussion. Most device models have their own dedicated threads on XDA, please keep discussion about those specific models in that dedicated thread, and don’t litter the central thread with them.
GET THE RIGHT FILE
Make sure you get the correct file. Using the incorrect file may brick your device.
FLASH COUNTER
If your target device has a custom firmware flash counter, CF-Auto-Root will trigger it. If you’re lucky, Triangle Away has support for your device and can be used to reset the counter.
Download CF Root File | All Samsung Devices
You can Download CF root from 2 websites
autoroot.chainfire.eu (search model number and Download)
desktop.firmware.mobi (see the below guide line)
Start typing your device’s name or model in the box after going to below link. select the exact device your are looking for, and click submit to go to firmware overview page.
If you’re looking for CF-Auto-Root, please first select your device to proceed to the firmware overview page, then select the firmware you want to create a package for. (choose right version of your android.)
On the firmware detail page, there’s a button to configure CF-Auto-Root near the bottom.
Cf Auto Root Download
next page. click the button called ” Generate CF-Auto Root Package
Cf Auto Root Download For Mac Download
If this guide line, help for you. then share this guide line on Facebook and Twitter. Help others to find out this guide line on Social Media sites. If you have an any doubt or any problem, don’t hesitate to contact us. There after we will be able to help you and also make sure you bookmark our site on your browser.
1 note
·
View note
Text
Mini Cooper Repair Dubai
In Dubai, where luxury and style converge on the roads, the Mini Cooper has gained popularity among car enthusiasts. As a high-performance vehicle, it requires specialized care and expertise for repairs and maintenance. When Mini Cooper owners in Dubai encounter repair needs, they can depend on professional auto garages like CF Auto Garage to handle the job with precision.
Mini Cooper Repair Dubai follows a well-defined process to ensure these iconic cars receive the attention and care they deserve. Let’s delve into how Mini Cooper repairs are conducted in Dubai, with CF Auto Garage as a reliable service provider in the city.

Diagnostic Assessment: Upon arrival at CF Auto Garage for repairs, the first step is a comprehensive diagnostic assessment. Skilled technicians equipped with advanced diagnostic equipment meticulously analyze the car’s systems to accurately identify any issues. This thorough evaluation allows them to pinpoint the root cause of the problem and provide an accurate estimate for the necessary repairs.
Specialized Mini Cooper Expertise: Mini Coopers possess unique engineering and intricate systems that demand specialized knowledge and expertise. CF Auto Garage takes pride in a team of skilled technicians with extensive experience working on Mini Coopers. Their in-depth understanding of the vehicle’s mechanics enables them to address repairs with precision and proficiency. Whether it’s engine repairs or fixing electrical systems, these specialists possess the know-how to handle a wide range of Mini Cooper repair requirements.
Genuine Mini Cooper Parts: The use of genuine parts is paramount in maintaining the performance and integrity of a Mini Cooper. CF Auto Garage recognizes the significance of authentic components and sources genuine Mini Cooper parts from trusted suppliers or directly from manufacturers. By utilizing original parts, CF Auto Garage ensures that repairs are of the highest quality, reducing the likelihood of further issues and preserving the car’s optimal performance.
Timely and Efficient Repairs: CF Auto Garage prioritizes timely and efficient repairs. The team understands the value of their customers’ time and strives to minimize the downtime of their Mini Coopers. Once the diagnostics are complete and the repairs are approved by the car owner, the technicians at CF Auto Garage work diligently to promptly complete the repairs. Their streamlined processes and organized workflow allow for efficient repairs without compromising on quality.
Transparent Communication and Customer Service: Transparent communication and excellent customer service are fundamental values at CF Auto Garage throughout the repair process. They provide detailed explanations of the required repairs, offering clear and concise information to the car owners. Additionally, they keep customers informed about the progress of the repairs, ensuring they are always in the loop. This commitment to transparent communication and customer service helps build trust and fosters a positive experience for Mini Cooper owners in Dubai.
In conclusion, Mini repair Dubai are conducted with utmost care and expertise to maintain the high-performance standards of these iconic cars. CF Auto Garage, a reputable service provider in the city, specializes in Mini Cooper repairs and ensures owners receive top-quality service. From thorough diagnostic assessments to the use of genuine parts and efficient repairs, CF Auto Garage stands out as a trusted destination for Mini Cooper repairs in Dubai. With their expertise and commitment to customer satisfaction, Mini Cooper owners can rely on CF Auto Garage for all their repair needs.
0 notes
Text
FISO Oukitel F150 B2021
my device was instabil, forgot settings and restart-restart-restart, maybe its the bootloop
little solution W1nst0n's magical bash script: Universal Android Debloater
https://gitlab.com/W1nst0n/universal-android-debloater#how-to-use-it
u can use it:
debloat
degoogle
de-Wellbeing
de-Aiui_***
de-Android Setup
and.. setup, digi jólét, and..autó, print, atmwifimeta, bookm.. provider, carrierdefaultfiszfasz, chrome, configupdater, drive, duo, engineerMode, files, fotók, google, goo helyelőzmények, g.. one time init, partner setup, filmek és tv, szövegfelolvasó, hangrögzitő, html megtekintő, keep jegyzet, market vissza, mdmconfig, messages, naptár, rendszerkövetés, search engine selector, segéd, sim app dialog, sim kártya eszközkészlete, youtube, youtube music..
[universal-android-debloater-v2.9.1.zip]
Power on the device and use it under Android [not recovery/not adb/not fastboot] with USB, i ran under Linux.
Alternate apk's for the powerful rugged F150 B2021 after lobotomy:
Trebuchet8LineageOS.apk
Kaputa <3 Tibor's: Simple Dialer, Simple Calendar, Simple Contacts, Simple Camera, Simple Dialer, Simple Voice Recorder
no root firewall or netguard
megasync
fx file explorer
magic earth GPS or osmand on car
Bromite web browser
telegram
noLed
F-droid or APKpure
K9
spaRSS | net.etuldan.sparss.floss
protectedtext note | com.protectedtext.android
Sent 3 mail for [email protected] & [email protected], but nothing, Big Silent.
funny things, but not working:
Local Update & Guide from https://f150mobile.com
sw upgrade - Bison2021_2201_V2064
sw downgrade - ASW1900D_2201_T2033.zip
CPU & memory throttling test
wipe cache, partitions, factory reset..
Develop Options / Background Process Limit off
Battery Optimization off
Running services off
third-party task killer apps
diasable GApps
change Launcher3
Mediatek Auto boot controller off
Magisk: fastboot flash boot magisk_patched.img
in safe mode
adb logcat
unzip ROM, delete /system/app's & /system/priv-app's from installed-files.txt & installed-files-product.txt and zip, flash..
root: VRoot, Kingoroot, 360 root, Baidu root, Cf-auto-root, One click root, Framaroot, Towelroot
flash whit SP_Flash_Tool_v5.zip & scatter.txt
Now i waiting LineageOS & TWRP.
FISO Oukitel F150 B2021
CPU: MediaTek Helio G25 octa-core, 64-bit, Cortex-A53, mt6765 GPU: PowerVR GE8320 RAM: 6GB Storage: 64GB Screen: 5.9-inch Resolution: 1520x720 rear cam: 13MP, 2MP, 2MP, 0.3MP Front camera: 8MP OS: Android 10 battery: 8000mAh IP68, IP69K, MIL-STD-810G, waterproof-ness, dust-resistance Corning Gorilla Glass 5 type-c nFC 2 sim + sd 2021
& i think its beautiful
yaphs56qgoqx0k5nvdo01zt8pq4CHANGEscryptmail.com
1 note
·
View note
Photo

Wie kann ich ein Android Handy rooten?
Voraussetzungen schaffen ein freies Betriebssystem zu installieren
Über diese Frage haben wir uns in unserem Artikel "Das Handy - dein unbekannter Begleiter" vor einiger Zeit Gedanken gemacht. Damals waren wir soweit gekommen, dass wir
unerwünschte Apps identifiziert hatten,
Apps gefunden hatten, die wir guten Gewissens empfehlen können,
das Handy mit der App Kingo Root gerootet hatten.
Letzteres heißt nichts weiter, als dass wir die Sperren im Android-System geöffnet haben, um alles auf dem Gerät nun zu können, was uns Google gern verbieten möchte. Damit wären u.a. auch die Voraussetzungen geschaffen, ein anderes Betriebssystem zu installieren.
Über unsere Arbeit haben wir damals auch eine Sendung auf Alex TV, dem Offenen Kanal Berlin (OKB), gemacht. Dort haben unsere Aktiven erzählt, wie sie dabei vorgegangen sind und welche Schwierigkeiten ihnen das Betriebssystem in den Weg gelegt hat. Ich und mein Handy, Teil 1 bei Youtube https://www.youtube.com/watch?v=q3xZiZgwb_0 und Teil 2 "Die Anonym-Mäuse sichern ihre Smartphones" Teil 2.1 https://youtu.be/r8V4XX415iA und Teil 2.2 https://www.youtube.com/watch?v=JP8A9GlCzhk
Auf diesen Artikel ist jetzt ein Mitarbeiter der Webseite rootmydevice.com gestoßen. Er schreibt uns, dass sie auf ihren Seiten ebenfalls Anleitungen über das Vorgehen zum Rooten und zur Installation alternativer Betriebssysteme auf Android Handys ins Netz stellen. Auch in unserem Artikel hatten wir auch versucht darzustellen, wie wichtig es ist um die eigene Privatsphäre zu schützen, bestimmte Apps und andere Fallstricke aus dem Android-Betriebssystem zu entfernen oder zumindest zu deaktivieren.
Deshalb danken wir dem Mitarbeiter von rootmydevice.com für den Hinweis auf deren Artikel. Ihre Webseite geht da viel tiefer, in dem sie viele verschiedene weitere Apps vorstellen mit denen ein Android Gerät gerootet werden kann.
SuperSu
iRoot
KingoRoot
KingRoot
Framaroot
Towelroot
Magisk
Root Genius
SRS Root
CF Auto root
Baidu Root
Firmware.mobi
Wondershare TunesGo
One Click Root
Und für den Fall, dass man mit dem Ergebnis des eigenen Tun nicht glücklich ist, auch gleich die Apps, um das Geschehene wieder zu beseitigen - zum Unrooting:
SuperSU
Universal Unroot
unroot by using File Manager
installing stock firmware
Allerdings warnen sie auch auf ihrer Seite, dass man vor dem Tun erst einmal nachdenken sollte, welche Hindernisse sich bei diesem Vorgang einem in den Weg stellen könnten und welche Konsequenzen man bezüglich Garantieansprüchen eingeht. Wir werden ihre Seite aufmerksam studieren und dann hoffentlich im Frühjahr über unsere weiteren Tests in diese Richtung berichten können.
Unserem eigentlichen Ziel alternative Betriebssystem zu testen und zu bewerten sind wir kaum näher gekommen, weil die Geräteentwicklung und die Android-Versionsverwaltung so schnell ablaufen, dass man (fast) sicher sein kann, dass ein Linage, Cyanogen, o.a. freies Betriebssystem auf dem nächsten Gerät so einfach nicht wieder zu installieren sein wird. Den Entwicklerkapazitäten eines Google gegenüber ist es schwer, erfolgreich (im Sinne von massenhafter Verbreitung) ein freies System entgegen zu setzen.
Trotzdem werden wir uns weiter daran versuchen! Mehr dazu bei https://rootmydevice.com/how-to-root-android-device/
und https://www.aktion-freiheitstattangst.org/de/articles/7491-20201221-wie-kann-ich-ein-android-handy-rooten.htm
1 note
·
View note
Text
Magisk vs SuperSU | What's the best Method to root Android
Magisk vs SuperSU | What’s the best Method to root Android
Nowadays thousands of Android devices used Magisk instead of SuperSU to root their Android. But how it possible? Let’s discuss on Magisk Vs SuperSU to get an idea about the best rooting method for Android now!
We all know Android is an operating system that is widely used among smart devices since it introduced. Now it so improved and highly customized. When we look at the past few years Android…
View On WordPress
#CF-Auto root#Chainfire#ClockworkMod#Custom Recovery#Google nexus#KOUSH#Linux#magisk#magisk manager#Pokemon go#supersu#Superuser#systemless rooting#TOPJOHNWU
0 notes
Text
Magisk vs SuperSU | What's the best Method to root Android
New Post has been published on https://trendyport.com/magisk-vs-supersu-whats-the-best-method-to-root-android/
Magisk vs SuperSU | What's the best Method to root Android
#CF-Auto root#Chainfire#ClockworkMod#Custom Recovery#Google nexus#KOUSH#Linux#magisk#magisk manager#Pokemon go#supersu#Superuser#systemless rooting#TOPJOHNWU
0 notes
Text
How to: iPhone / iPad screen recording
Give us feedback by giving a grade between one and ten. The recording made with the Windows 10 screen recorder can then be found in your documents folder under "\ Videos \ Recordings". By clicking on the round button in the middle you can then start the Windows 10 screen recorder. If you want to save your entire desktop with symbols and individual windows as one video, you still need separate video capturing software. Basically, only the person who shares their screen or has called a meeting via TeamViewer can start the screen recording. As soon as the meeting is running, you can start and end the recording via the "Screen transfer" widget. Unfortunately, the process is different for every Android device, and so there is no universal rooting solution - but CF Auto Root is a good place to start. Otherwise, please search for a root guide for the respective device with Google. The "Free Screen Video Recorder" stores the screen clips in the popular MP4 format. You have the choice between different video or With My Screen Recorder Pro, you can capture the webcam image while taking screen shots. Select Record Webcam check box or use directly hotkey A webcam and webcam window are displayed on the desktop. Adjust the size and position of the webcam window and capture interactive videos by adding your face to the presentations.

This recorder can not only be used for games, as its name suggests, but also offers an inexpensive solution for general screencasts. Open Broadcaster Software Studio (OBS) Open Broadcaster Software Studio (OBS) The free recorder software "Open Broadcaster Software Studio" lets you stream audio and video live on the Internet.
Even if the screen recorder only records the currently active application , the sound signals of other apps are taken into account on request.
The recording created with the Windows 10 screen recorder can then be found in your documents folder under "\ Videos \ Recordings".
If the button is hidden, it is most likely due to hardware requirements not being met.
We will explain which is best suited for your purpose in a separate article.
This cannot be seen later in the picture. The video may not play properly. downvi The reason for this is an incorrectly configured video player. Play the video here with another video driver, e.g.
How can I remove the FRP function from my phone?
Screen recording software is particularly valuable in the business world. For example, if employees or managers don't make it to a meeting, they won't miss a thing if the whole thing is recorded. By simply playing back records, facts can be verified and ambiguities, inconsistencies or misunderstandings resolved. For new employees, companies can include a link to the records in their welcome pack so they can view them in peace. In this way, one can avoid scheduling conflicts, on the other hand, you do not have to rely on the fact that an employee is free to hold the respective presentation personally. In order to save applications and games as video, expensive software was necessary a few years ago. Little by little, freeware programs with the same function appeared, and now Windows 10 can do everything itself with on-board equipment. Alternatively, the recording ends automatically when the meeting ends. A right click on the icon opens a menu with further options.
1 note
·
View note
Text
How To Root Your Samsung Galaxy Using Odin Flash Tool

In present, "Odin" is not an unusual word since most Samsung users search for it on the internet. This is a Windows-based flashing software. It can flash your Samsung smartphone via a Windows computer. Actually, this software is a very user-friendly, simple and lightweight software. But it offers lost of features which are useful in Android flashing. There are several Odin Flash Tool version available on the internet. If you are looking forward to using the Odin tool you have to download the most appropriate version for your Android firmware.
Samsung Odin Flash Tool
At the moment Samsung Odin v3.13.1 is the latest version of the Odin tool. It can flash the latest Oreo firmware which comes in LZ4 compression. If you are using Samsung Galaxy S8, S8 +, S9, S9+ the latest version support in flashing them.
What Can You Do With Odin Flash Software
Flashes Stock ROMs on any Android device
It flashes Custom ROMs
Flashes Root packages
It flashes Custom and Stock recovery
Flashes Stock kernel and Custom kernel
Requirements
A Windows computer
Latest Samsung USB drivers
Recommended USB cable
Download CF-Auto-Root package in .tar.md5 extension.Before download check the following requirements and download the correct root package
Go to "Settings" on your smartphone > Go to "About device" > Check Device name, Model number, Android version, and Build number
Visit this website, download and install the latest flash tool on your Windows computer
Back up your device properly

How Root Samsung Galaxy Device Odin Flash Software
Boot your device in to "Download Mode”
Turn off your Samsung smartphone first. Then, press "Power Button + Home Button+Volume Down Key at once and hold for a short while. Then, you will get a prompt and press "Volume Up Key" to enter Download Mode
Launch Odin application and Connect Samsung Device
Now, launch the Odin application and connect your smartphone to the computer using the USB cable. Then the app will detect your device automatically and display it on the interface as "Added"
Load Root Packages
You can see options such as "BL, AP, CP, CSC, USER DATA" on the Odin interface. Click on "AP" or "PDA" button and load the root package you extracted. After loading check if you see a "Check" mark in front of the "AP" or "PDA" to verify if the file is loaded as said. Next, click the "Start" button to flash the root package.
Rooting Complete
The whole process may take about a few seconds to be completed. After your device rooted you will see a green color "Pass" message on the app interface
Verify the Rooting
Reboot your device. Then you will see SuperSU app on your Home screen confirming your device is rooted. Also, you can download Root Checker from Google Play store and check the device's root status
How To Solve If The Rooting Failed
Reboot your smartphone and follow the process again
Restart your computer
Install Samsung USB drivers and try to root
Install the latest version of the flashing software
Conclusion
Actually, there is only little chance to fail Odin rooting. Always download the latest flash tool and make sure to download Odin flashable root packages.
1 note
·
View note
Text
Samsung Odin - Root your Android perfectly
Odin is one of well-known tools in XDA that Samsung Android users can apply. Of course, it is a flashing utility that anyone can easily download on their desktop and flash throughout. However, Samsung Odin 3.13.1 is the most recent edition that can be download for free. In this guide we want you to pass how can we become rooted using Odin. All you have to do is put the handset into its specific mode that we call download mode to transfer varies related data using the computer. With the latest version, it enhance its possibilities in aim to support users in many further ways.

Get root permission with Samsung Odin
Odin can support users to apply root permission on their devices without any trouble. It is not like often APK type approach while the utility is a desktop based application. Apart from the latest 13.1.3, all the other versions can only work based on Windows. However, there you have to find out proper kernel packages that are tar and even compatible with the device on your hand. The device compatibility have to check out from the settings > About device. However, CF auto root is the famed kernel that we use through Odin. You can even find out respective file kits from the official site of Chainfire.
The latest version
Version 3.13.1 is the most recent edition that can settle on your computer for free right away. Throughout, you can accomplish varies results using a Mac OS X either. And the utility can support Galaxy S7 models too at this time in a perfect approach. Moreover, it welcomes Android Oreo ROM packages as well that users can flash whenever needed.
The root procedure with Samsung Odin
First of all download Odin tool and the respective package of CF auto root from its web page
Extract them and save on your desktop
And then download USB drivers and set up it to the computer
Create a backup of the device as a safe option
Now start the procedure by run the respective tool file on your computer
Set the device to download mode and connect with a USB cable to the machine
And then click each button such as AP and draw files there
After that, when the parts that should fill up are filled, you can click the Start button and let it flash the device
At the end, the handset will reboot and let you use a rooted device in a perfect manner

Troubleshooting tips
When the device will face detecting issues, check the USB cable, the connected port and even USB drivers as well that installed to the PC. If the issue related to drivers, you better uninstall and reinstall it. And chance the port and the cable as well if needed
If the device will not reboot at the end make sure that not you did not apply any wrong
And when you pick up whatever tool version, it should be the one that capable to hold your device such as 3.13.1 for Galaxy S7 and S7 Edge
1 note
·
View note
Text
Xtrafinder 1.4 pkg baidu

#XTRAFINDER 1.4 PKG BAIDU FOR MAC#
#XTRAFINDER 1.4 PKG BAIDU MANUAL#
#XTRAFINDER 1.4 PKG BAIDU SOFTWARE#
#XTRAFINDER 1.4 PKG BAIDU PC#
| 5918 kb | Keygen SL9 XTRAFINDER VERS 1.1 1.3.5 on Mojaveī/blog/10-11-4-latest-version-how-download-1-4-xtrafinder.html | 6893 kb | Free ver 2.4 XtraFinder DN6QMF 1.2.1 German version | 6057 kb | Torrent XTRAFINDER 1.3.1 ECEW 1.6 Japanese version | 7728 kb | Keygen OQX2 1.3.3 XTRAFINDER 1.3.1 Version OS X If you're game you can try the following: Most device models have their own dedicated threads on XDA, please keep discussion about those specific models in that dedicated thread, and don't litter the central thread with them. Reboot your Mac into Recovery Mode (hold down Command+R until the Apple logo appears while booting up) RN to BSN Schools in Collegedale, TN Octo/ Version: XtraFinder 0.25.5 WindowsTabs (Free) Use Cmd + Delete to move selected files to Trash Apparently there is a fix that enables some of the features, but not all. The central CF-Auto-Root thread can be found here on that thread for requests for new roots and generic discussion. GPGME is the standard library to access GnuPG functions from programming languages. XtraFinder add Tabs, Dual Panel, and numerous features to Mac's native Finder. Added XtraFinderLoader, mand, mand and updated instruction for OS X 10.15 Catalina. Remarks: Pinentry is a collection of passphrase entry dialogs which is required for almost all usages of GnuPG. Added Alternating row colors for Column View. Macpkg.icu?id=42067&kw=vwM-XtraFinder-v.1.3.dmg (5848 kbytes)Ĥ YA Novels to Read Over Winter Break Editor in Chief 1. It is wise and more secure to check out for their integrity. Recomended on Mac mini St6mDx_XtraFinder_version_2.4.zip
#XTRAFINDER 1.4 PKG BAIDU SOFTWARE#
"can't turn off Tabs" You may want to check out more software for Mac, such as Name Mangler, POI Loader or NameChanger, which might be similar to XtraFinder. This Mac download was scanned by our built-in antivirus and was rated as clean. The most frequent installer filenames for the program are: xtrafinder.dmg and xtrafinder.pkg etc.
#XTRAFINDER 1.4 PKG BAIDU FOR MAC#
XtraFinder for Mac belongs to System Tools. The most popular versions of the software are 0.25, 0.9 and 0.5. Here you can assign shortcuts for Delete permanently, Copy to…, Open in new window, Collapse All, and more. The file size of the latest installer available is 5.2 MB.
PHP 5.The Add items to Finder menus tab in Preferences lets you assign a lot of shortcuts.
Python 2.6 (including header files for extension modules).
C#: Mono 1.2.4 (and pkg-config to detect it) or Visual Studio 2005+.
libevent (optional, to build the nonblocking server).
These are only required if you choose to build the libraries for the given language Programs that must disable HTTP/2 can do so by setting Transport.TLSNextProto (for clients) or Server.TLSNextProto (for servers) to a non-nil, empty map. Requirements for building the compiler from source on Windows Starting with Go 1.6, the http package has transparent support for the HTTP/2 protocol when using HTTPS.
#XTRAFINDER 1.4 PKG BAIDU PC#
Any PC made within the last 15 years should be OK. lex and yacc (developed primarily with flex and bison) A x86 (AMD, Intel or compatible) processor with SSE2 instruction set.Runtime libraries for lex and yacc might be needed for the compiler.g++ 4.2 (4.8 or later required for thrift compiler plug-in support).Cygwin or MinGW can be used on Windows (but there are better options, see below) VLC is a free and open source cross-platform multimedia player and framework that plays most multimedia files as well as DVDs, Audio CDs, VCDs, and various streaming protocols.A relatively POSIX-compliant *NIX system.Select your os below for a guide on setting up your system to get started If you are interested in helping with this project, send email to the FreeBSD documentation project mailing list. Many sections do not yet exist and some of those that do exist need to be updated.
#XTRAFINDER 1.4 PKG BAIDU MANUAL#
Apache Thrift’s compiler is written in C++ and designed to be portable, but there are some system requirements which must be installed prior to use. This manual is a work in progress and is the work of many individuals.
0 notes
Text
Cloudberry s3 block level pst

#CLOUDBERRY S3 BLOCK LEVEL PST HOW TO#
#CLOUDBERRY S3 BLOCK LEVEL PST INSTALL#
#CLOUDBERRY S3 BLOCK LEVEL PST ANDROID#
key) Thanks, Imran Khan Decouple code and S3 locations. I have a piece of code that opens up a user uploaded. When ODIN program opens, you should find a highlighted yellow box with a random COM number. Steps to Root Samsung Galaxy Tab S3 and Disable dm-verity. It was easy to root your T-Mobile Galaxy S3 with CF Auto Root Tool, right? Let us know how you plan to use root privileges on your T-Mobile Galaxy S3. The S3 input source is supported by the Parallel task to read objects directly from S3. From Boards to Timelines and custom fields to dependencies, Asana has the features your team needs to build fast and ship often. July … For example, if the prefix is notes/ and the delimiter is a slash (/) as in notes/summer/july, the common prefix is notes/summer/. You can combine S3 with other services to build infinitely scalable applications. No problem, here’s a guide for you to root your smartphone on the said careers.
#CLOUDBERRY S3 BLOCK LEVEL PST ANDROID#
A developer got Android 12 booting on the legendary Samsung Galaxy S III.
#CLOUDBERRY S3 BLOCK LEVEL PST HOW TO#
In this tutorial, we will learn about how to use aws s3 ls command using aws cli.
#CLOUDBERRY S3 BLOCK LEVEL PST INSTALL#
Through this guide, we will show you how to root Galaxy Tab S3 and install TWRP recovery on it. Instead, it is a web-based, API-driven object storage service containing KEYS and VALUES. import json import boto3 s3_client = boto3. listObjects(new … About S3 Prefix Example. You can store a single file up to 5 TB with unlimited storage. I searched around these forums but I only found articles for other phones and it says to specifically look for the phone you have. All of the keys that roll up into a common prefix count as a single return when calculating the number of returns. Sets the Content-Type HTTP header indicating the type of content stored in the associated object. Therefore, Amazon S3 is not a file system, but might act like one if using the right parameters. Sometimes you have need to list files with specific name patterns which is hard to get using simple wildcard then use Advanced Regular Expression option. I couldn't do the same with the old s3 console. If your destination is Amazon S3, Amazon OpenSearch Service, or Splunk, you can configure the Amazon S3 object keys used for delivering data from Kinesis Data Firehose. Finding an S3 bucket name and directory prefix An Amazon administrator must create a user and then apply the AmazonS3ReadOnlyAccess policy in the AWS Management Console. Data protection is a hot topic with the Cloud industry and any service that allows for encryption of data attracts attention. The path argument must begin with s3:// in order to denote that the path argument refers to a S3 object. Create Lambda function with access policy which allows s3 bucket to send event notification and use SNS Topic ARN. If you see multiple prefix lists here, choose one that is specific to the region that contains the S3 service you're interested in. Do not use your root user access key Enable MFA for your root user as well as all the IAM users Don’t share your root user/IAM user’s credential with anyone. S3cmd is a tool for managing objects in Amazon S3 storage.
0 notes
Text
Download kingroot for android version 6.0.1

How to root my Android 6.0.1 - Quora.
Download Kingroot For Android Version 6.0.1 - bombooks.
KingRoot para Android - Descarga el APK en Uptodown.
Download Kingroot For Android Version 6.0.1 - treeswiss.
Root any Android Phone without PC using Kingroot application.
How To Root & Install SuperSU on Android 6.0.1... - NaldoTech.
Android root apks.
How to download KINGROOT SOFTWARE on ANDROID 6.0.1.
Kingroot Official - Download One Click Root APK.
Root android 6-0-1 note 4 sm-n910r4 on mac - benefitsmaha.
Download KingRoot 5.4.0 for Android | U.
How Do I Move App Or Install App On SD Card On Samsung... - Nairaland.
Xposed Installer V3.1.5 | Best Root Tools Recommended by KingoRoot.
How to root my Android 6.0.1 - Quora.
Answer (1 of 4): If you have your bootloader unlocked then you can root your android by simply using kingo root app ,If you dont have your bootloader unlocked then first unlock your bootloader learn how to from here How to Unlock Your Android Phone's Bootloader, the Official Way.
Download Kingroot For Android Version 6.0.1 - bombooks.
How to Root All Smartphones with Kingroot 4.1 (using PC) #1. Download Kingroot PC version HERE. #2. Then Install kingroot android for PC. #3. Now Connect PC and android device via a USB cable. #4. After a green tick mart displays when the connection is made successfully. By Dibyashree Sharma. (APK) Download KingRoot v5.1.0 (Stable Version): KingRoot is an amazing One Click Root and a mobile app which is highly popular among masses due to the fact that if your device runs on Android 5.1 Lollipop or above, you can easily root it using just a single tap.The best part of the app (KingRoot) is that users don’t.
KingRoot para Android - Descarga el APK en Uptodown.
Root your Android with KingoRoot Software (tutorial above) Download the Xposed Framework. Enabled Unknown Sources in Settings > Security. Once installed, open the app and tap on Framework; Tap on Install/Update and Grant Root Permission; Choose the module you would like to download, tap on it and then tap on Download; When you receive the. Step 1: Free download and install KingoRoot on Windows (PC Version). KingoRoot offers the best one-click Android root software for free.The download will be automatically started to your PC. After download is complete, install the Kingo ROOT. Step 2: Double click the desktop icon of Kingo Root and launch it.
Download Kingroot For Android Version 6.0.1 - treeswiss.
Android version 6.0.1 Firware 1.0.0 Kernel version 3.14.0+... names, including Polaroid Q1010, Q10, and M10. I've tried all the usual Android app one-click root apps (iroot, vroot, kingroot, etc.) and they all failed. I tried a PC program called Impactor, which also failed.... (download to PC, extract and use arm64). Once extracted place mtk. Aug 16, 2016 · Download KingRoot apk 4.9.6 for Android. EN English... Download APKPure APP to get the latest update of KingRoot and any app on Android.... Latest Version: 4.9.6. Press Volume Up key once to confirm at the construction Android robot sig. Run Heimdall and connect your S8 to your Mac. Once connected, click the AP / PDA button and select the CF-Auto-R file. With Auto Reboot and Factory Reset selected, click on Start to initiate the root process.
Root any Android Phone without PC using Kingroot application.
How to download KINGROOT SOFTWARE on ANDROID 6.0.1 22,390 views Jul 11, 2017 89 Dislike Share Save Vishal Bidlan 85 subscribers Subscribe Sorry guys for the unusual. Android 6.0.1 (PF4): G900VVRU2DPF4_G900VVZW2DPF4_VZW.ZIP | Mirror. Getting Prepared. Download the firmware from one of the links provided above. Extract the zip to get the actual firmware file with extension. Download Odin 3.10.7 extract the zip on your desktop. Mac users can use Heimdall or the Java version of Odin.
How To Root & Install SuperSU on Android 6.0.1... - NaldoTech.
Mar 15, 2016 · There are too many advantages for users to refuse root. Rooting the Samsung Galaxy S7 and S7 edge is easier than you think. There are various tools and ways to root the phone. Firstly, we have one-click root applications which are installed and used directly from the phone, and then there are tools such as CF Auto Root which require a computer.
Android root apks.
KingRoot for Android - Download the APK from Uptodown. Your download should begin automatically within seconds. restart the download. 1. Launch Click on Save file and wait until the end of the download 2. Run Click on the file and begin installing 3.
How to download KINGROOT SOFTWARE on ANDROID 6.0.1.
Generally, Android 6.0 Marshmallow rooting process has many steps which include flashing some root file and connecting the Android phone to PC. Kingroot For Android Version 6.0.1 How To Download Kingroot Kingroot For Android Version 6.0.1 Download Kingroot For. In this article, we are going to discuss the topic how to download Kingroot For. Classes Uncategorized Labels Download Kingróot EXE, Kingróot EXE, Kingrot Get better at 1 Comment Post selection Kingroot 4.0 Latest Version Download in Google android 2020 Kingroot 4.1 Most recent Version Download For Google android in 2020 1 thought on Kingroot EXE Root Android With Home windows Personal computer EXE Download 2020 Pingback.
Kingroot Official - Download One Click Root APK.
Also as the Android version here is Marshmallow 6.0.1, I'm pretty sure Kingroot or any other "free" one-click exploit rooting tools are NOT going to work. BTW the above is the only thread in the A5 ATR forum, so I guess root for this device might be difficult, maybe impossible. Especially with 6.0.1. Download Last version (8.2 MB) Kingroot 6.0.1 Download Kingroot 6.0.1 for android The description of Kingroot 6.0.1. kingroot apk free rooter the latest kingroot pro. Recent changes: All Best features Added for King Root Pro. Download Kingroot 6.0.1 for android direct link.
Root android 6-0-1 note 4 sm-n910r4 on mac - benefitsmaha.
May 12, 2015 · Última Versión. 5.4.0. 13 ene. 2021. Otras versiones. Publicidad. KingRoot es una aplicación que nos permitirá 'rootear' nuestro terminal Android en cuestión de segundos, siempre y cuando tengamos un sistema operativo comprendido entre Android 4.2.2 y Android 5.1. Es decir, que nos permitirá hacer lo mismo que el mítico Towelroot, pero. Kingroot Official - Download One Click Root APK. Kingroot APK allows you to root your Android Smartphone and Tablet with a Single Click. It supports rooting the devices running on Android 2.2 to Android 7.0. KingRoot requires an active internet connection on the mobile to gain root access as it searches various algorithms/methods to root the.
Download KingRoot 5.4.0 for Android | U.
Features. Kingroot apk 4.5 combines KU and KR together along with new user interface and more powerful root engine. Kingroot is available in both as an apk for supported Android mobile phones and tablets and as a desktop version too. Along with Kingroot latest version, KingxTeam also introduced Purity an optimization tool for Android devices. KingRoot 5.2.1 for Android - Download - Versions... KingRoot For Android Allows the fastest and safest one click rooting tool that brings in both KingRoot PC version as well as KingRoot Apk Version.Generally KingRoot PC version is most exploit than Mobile Version.This wonderful Android Rooting Tool is very popular among the android root users.
How Do I Move App Or Install App On SD Card On Samsung... - Nairaland.
This program runs on Windows 7 and later. It's also available for Android. Is there a better alternative? No. Even though this app is missing a few functions that are common with similar programs, like Magisk, it's a safe and effective option for speeding up your device. It's also simple enough for the average person. 3. Now it's time to boot your phone in TWRP custom recovery to install the magisk and root the phone. 4. Now from the recovery select Install from the menu and select the Magisk zip. 5. Once done, reboot to System. 6. Once your phone is booted. Install the Magisk Manager apk on your phone.
Xposed Installer V3.1.5 | Best Root Tools Recommended by KingoRoot.
Download KingoRoot Apk Latest The Best (One Click) Android. Unduh kingroot Apk Download To Root Android 7.0.1 Nougat untuk Android. KingRoot 5.4.0 untuk Android - Unduh. Download Kingroot Apk Android 10 2022. Download KingRoot APK v5.4.0 (Latest Version) | Root My Device. Download Apk Kingroot Terbaru 2020 2022. Tutorial Root Semua Tipe Android. Nov 06, 2015 · There are many developers who will roll out 3rd party ROM based On Marshmallow android 6.0 /Android 6.0.1. If you want to use any 3rd party Android 6.0/ 6.0.1 Roms then you probably need to download Gapps for Android 6.0.
See also:
Ndi Spanish Pdf
My Screen Recorder 5 Serial Key
Immobilizer Pin Code Calculator Free Download
Mathematica 8 Keygen Activation Key
0 notes
Text
Magisk vs SuperSU | What's the best Method to root Android
New Post has been published on https://trendyport.com/magisk-vs-supersu-whats-the-best-method-to-root-android/
Magisk vs SuperSU | What's the best Method to root Android
#CF-Auto root#Chainfire#ClockworkMod#Custom Recovery#Google nexus#KOUSH#Linux#magisk#magisk manager#Pokemon go#supersu#Superuser#systemless rooting#TOPJOHNWU
0 notes