#Callable CD
Explore tagged Tumblr posts
Visit Tumblr Blog
Explore Tumblr blogs with no restrictions, modern design and the best experience.
Last Seen Tumblr Blogs


Fun Fact
Celebrities use Tumblr as well.
Link
Find out the best CD interest rates and choose the best CD account for you from nearly a dozen certificates of deposit to match your goals.
#CD#Certificate of Deposit#certificateofdeposit#savings#investment#investments#low risk investment#CD interest calculator#retirement#retirement savings#ira#Individual Retirement Account#finance#money#Callable CD#High Yield CD#IRA CD#Step-Up CD#Jumbo CD#Certificate of Deposit calculator#cd calculator
0 notes
Text
Simply Certificates Of Deposit

Certificates of Deposit, typically described as CD's, are a cross in between a "financial investment" and a cost savings account. CD's have federal deposit insurance coverage approximately $100,000- which is what sets it apart from the financial investment world, however, they have a much greater rate of interest than the standard cost savings account. A certificate of a deposit enables you to invest a particular quantity of cash over a particular amount of time. There are certificate of deposits for as brief as one year, for 5 years, or longer terms. The longer you keep your loan in a CD, the greater the rate of interest you will get. When your period has actually ended, and you squander your certificate of deposit, you do not just get the initial amount of cash that you invested, however, you'll likewise get the interest that the cash made while invested. While certificates of deposit are fantastic methods to conserve loan at high-interest rates, they're not the very best option for individuals who might need to withdraw loan from their CD's prior to the financial investment amount of time has actually been reached. You can access the cash you've taken into a CD prior to the time is up, nevertheless, you will either quite a few of the made interest or pay an early withdrawal charge. Economically, it's constantly much better to leave cash purchased a certificate of deposit, however, it's definitely a convenience to understand that you might get the cash out if an emergency situation took place or you definitely required that cash prior to the time is up. Certificates of deposit have a range of interest making choices that you should pick from when you transfer your loan. There are set rate interest alternatives, long-lasting CD's, and variable rate CD's, to name a few. If you're not exactly sure how each alternative impacts your cash, ask!
Who Should Use Certificates of Deposit?
While anybody has the ability to acquire and invest their loan in a CD, it makes one of the most sense for a more youthful financier. Since CD's make more interest the longer they are gotten for, a more youthful financier can utilize CD's to diversify their financial investment portfolio and optimize their revenues by taking the Certificate of Deposit for an extended period of time. If a person is quickly approaching retirement, nevertheless, it might not be the very best alternative for investing if she or he is going to require the cash in a brief time period.

https://www.cbtno.com/locations/#map
Understand Certificates of Deposit
Prior to you put your cash into a CD, it's essential that you comprehend a few of the most frequently utilized terms in relation to Certificates of Deposit. Charges: There are charges for early withdrawal. Even if when you are opening a CD you have no prepare for eliminating the cash prior to your financial investment duration is reached, you need to absolutely comprehend the charges in case some unanticipated situations show up that need you to access the cash you've put in your CD. Interest: Always understand whether the rates of interest are repaired or variable, and how frequently the interest is paid on the cash in your CD. Maturity: There is a maturity date on every certificate of deposit, however, there are a lot of possibilities for maturity dates that you must constantly make sure you understand whether your CD develops in 1year or 5 or 20. Call Features: Banks typically put a "call function" on all released certificate of deposits. Callable CD's mean that the bank that provided the CD can end it and offer you the quantity you invested plus any overdue, accumulated interest if the rate of interest fall. CD Holdings: There is a distinction between a conventional bank CD and a brokered CD. If you utilize brokered certificates, it's possible that there are groups of financiers that in fact own little pieces of your CD. No matter the kind of CD you select, make sure that they have FDIC protection as much as $100,000.
What is a Certificate of Deposit?
youtube
1 note
·
View note
Text
Financial Asset
What Is a Financial Asset?
A financial asset may be a liquid asset that gets its value from a contractual right or ownership claim. Cash, stocks, bonds, mutual funds, and bank deposits are all are samples of financial assets. Unlike land, property, commodities, or other tangible physical assets, financial assets don't necessarily have inherent physical worth or maybe a physical form. Rather, their value reflects factors of supply and demand within the marketplace during which they trade, also because of the degree of risk they carry.

Understanding a Financial Asset
Most assets are categorized as either real, financial, or intangible. Real assets are physical assets that draw their value from substances or properties, like precious metals, land, land, and commodities like soybeans, wheat, oil, and iron.
Intangible assets are precious property that's not physical. They include patents, trademarks, and property.
Financial assets are in-between the opposite two assets. Financial assets could seem intangible—non-physical—with only the stated value on a bit of paper like a dollar or an inventory on a display screen. What that paper or listing represents, though, maybe a claim of ownership of an entity, sort of a public company, or contractual rights to payments—say, the interest income from a bond. Financial assets derive their value from a contractual claim on an underlying asset.
This underlying asset could also be either real or intangible. Commodities, for instance, are the important, underlying assets that are pinned to such financial assets as commodity futures, contracts, or some exchange-traded funds(ETFs) Likewise, the land is that the real asset related to shares of land investment trusts (REITs). REITs are financial assets and are publicly traded entities that own a portfolio of properties.
The Internal Revenue Service (IRS) requires businesses to report financial and real assets together as tangible assets for tax purposes. The grouping of tangible assets is broken away intangible assets.
Common sorts of Financial Assets
According to the commonly cited definition from the International Financial Reporting Standards (IFRS), financial assets include:
· Cash
· Equity instruments of an entity—for example a share certificate
· A contractual right to receive a financial asset from another entity—known as a receivable
· The contractual right to exchange financial assets or liabilities with another entity under favorable conditions
· A contract which will settle in an entity's equity instruments
In addition to stocks and receivables, the above definition comprises financial derivatives, bonds, market or other account holdings, and equity stakes. Many of those financial assets don't have a group price until they're converted into cash, especially within the case of stocks where their value and price fluctuate.
Aside from cash, the more common sorts of financial assets that investors encounter are:
· Stocks are financial assets with no set ending or expiration date. An investor buying stocks becomes part-owner of a corporation and shares in its profits and losses. Stocks could also be held indefinitely or sold to other investors.
· Bonds are a method that companies or governments finance short-term projects. The bondholder is that the lender, and therefore the bonds state what proportion money is owed, the rate of interest being paid, and therefore the bond's maturity.
· A certificate of deposit (CD) allows an investor to deposit an amount of cash at a bank for a specified period with a guaranteed rate of interest. A CD pays monthly interest and may typically be held between three months to 5 years counting on the contract.
KEY TAKEAWAYS
· A financial asset may be a liquid asset that represents—and derives value from—a claim of ownership of an entity or contractual rights to future payments from an entity.
· A financial asset's worth could also be supported by an underlying tangible or real asset, but market supply and demand influence its value also.
· Stocks, bonds, cash, CDs, and bank deposits are samples of financial assets.
Pros and Cons of Highly Liquid Financial Assets
The purest sort of financial assets are cash and cash equivalents—checking accounts, savings accounts, and market accounts. Liquid accounts are easily becoming funds for paying bills and covering financial emergencies or pressing demands.
Other sorts of financial assets won't be as liquid. Liquidity is that the ability to vary a financial asset into cash quickly. For stocks, it's the power of an investor to shop for or sell holdings from a ready market. Liquid markets are those where there are many buyers and many sellers and no extended lag-time in trying to execute a trade.
In the case of equities like stocks and bonds, an investor has got to sell and await the settlement date to receive their money—usually two business days. Other financial assets have varying lengths of settlement.
Maintaining funds in liquid financial assets may result in greater preservation of capital. Money in bank checking, savings, and CD accounts are insured against loss of up to $250,000 by the Federal Deposit Insurance Corporation (FDIC) for depository financial institution accounts. If for a few reasons the bank fails, your account has dollar-for-dollar coverage up to $250,000. However, since FDIC covers each financial organization individually, an investor with brokered CDs totaling over $250,000 in one bank faces losses if the bank becomes insolvent.4
Liquid assets like checking and savings accounts have a limited return on investment (ROI) capability. ROI is that the profit you receive from an asset divided by the value of owning that asset. In checking and savings accounts the ROI is minimal. they'll provide modest interest income but, unlike equities, they provide little appreciation. Also, CDs and market accounts restrict withdrawals for months or years. When interest rates fall, callable CDs are often called, and investors find themselves moving their money to potentially lower-income investments.
Pros
Liquid financial assets convert into cash easily.
Some financial assets have the power to understand in value.
The FDIC and NCUA insure accounts up to $250,000.
Cons
Highly liquid financial assets have little appreciation
Illiquid financial assets could also be hard to convert to cash.
The value of a financial asset is merely as strong because of the underlying entity.
Real-World Example of monetary Assets
Businesses, also as individuals, hold financial assets. within the case of an investment or asset management company, the financial assets include the cash within the portfolios firm handles for clients, called assets under management (AUM). for instance, BlackRock Inc. is that the largest investment manager within the U.S. and the world, judging by its $6.84 trillion in AUM (as of June 30, 2019).5 6
In the case of banks, financial assets include the price of the outstanding loans it's made to customers. Capital One, the 10th largest bank within the U.S., reported $373,191 million in total assets on its first-quarter 2019 financial statement; of that, $240,273 million were from real estate-secured, commercial, and industrial loans.
#financial assets stock bond#stock of global financial assets 2020#stocks to buy today#stocks to buy today india#bonds traded today#bonds in india#bonds investment#commodity market#commodity trading#commodity market timing#exchange-traded funds india#exchange traded funds asx#astrologers in indore#astro nifty twitter#astro stock market#stock market astrology 2021
0 notes
Text
Building Your First Serverless Service With AWS Lambda Functions
Many developers are at least marginally familiar with AWS Lambda functions. They’re reasonably straightforward to set up, but the vast AWS landscape can make it hard to see the big picture. With so many different pieces it can be daunting, and frustratingly hard to see how they fit seamlessly into a normal web application.
The Serverless framework is a huge help here. It streamlines the creation, deployment, and most significantly, the integration of Lambda functions into a web app. To be clear, it does much, much more than that, but these are the pieces I’ll be focusing on. Hopefully, this post strikes your interest and encourages you to check out the many other things Serverless supports. If you’re completely new to Lambda you might first want to check out this AWS intro.
There’s no way I can cover the initial installation and setup better than the quick start guide, so start there to get up and running. Assuming you already have an AWS account, you might be up and running in 5–10 minutes; and if you don’t, the guide covers that as well.
Your first Serverless service
Before we get to cool things like file uploads and S3 buckets, let’s create a basic Lambda function, connect it to an HTTP endpoint, and call it from an existing web app. The Lambda won’t do anything useful or interesting, but this will give us a nice opportunity to see how pleasant it is to work with Serverless.
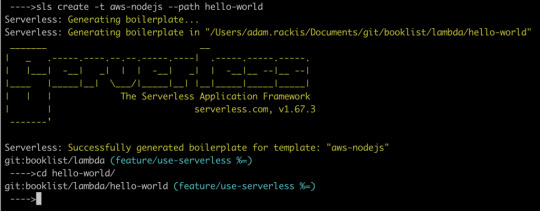
First, let’s create our service. Open any new, or existing web app you might have (create-react-app is a great way to quickly spin up a new one) and find a place to create our services. For me, it’s my lambda folder. Whatever directory you choose, cd into it from terminal and run the following command:
sls create -t aws-nodejs --path hello-world
That creates a new directory called hello-world. Let’s crack it open and see what’s in there.

If you look in handler.js, you should see an async function that returns a message. We could hit sls deploy in our terminal right now, and deploy that Lambda function, which could then be invoked. But before we do that, let’s make it callable over the web.
Working with AWS manually, we’d normally need to go into the AWS API Gateway, create an endpoint, then create a stage, and tell it to proxy to our Lambda. With serverless, all we need is a little bit of config.
Still in the hello-world directory? Open the serverless.yaml file that was created in there.
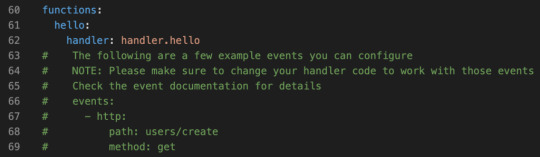
The config file actually comes with boilerplate for the most common setups. Let’s uncomment the http entries, and add a more sensible path. Something like this:
functions: hello: handler: handler.hello # The following are a few example events you can configure # NOTE: Please make sure to change your handler code to work with those events # Check the event documentation for details events: - http: path: msg method: get
That’s it. Serverless does all the grunt work described above.
CORS configuration
Ideally, we want to call this from front-end JavaScript code with the Fetch API, but that unfortunately means we need CORS to be configured. This section will walk you through that.
Below the configuration above, add cors: true, like this
functions: hello: handler: handler.hello events: - http: path: msg method: get cors: true
That’s the section! CORS is now configured on our API endpoint, allowing cross-origin communication.
CORS Lambda tweak
While our HTTP endpoint is configured for CORS, it’s up to our Lambda to return the right headers. That’s just how CORS works. Let’s automate that by heading back into handler.js, and adding this function:
const CorsResponse = obj => ({ statusCode: 200, headers: { "Access-Control-Allow-Origin": "*", "Access-Control-Allow-Headers": "*", "Access-Control-Allow-Methods": "*" }, body: JSON.stringify(obj) });
Before returning from the Lambda, we’ll send the return value through that function. Here’s the entirety of handler.js with everything we’ve done up to this point:
'use strict'; const CorsResponse = obj => ({ statusCode: 200, headers: { "Access-Control-Allow-Origin": "*", "Access-Control-Allow-Headers": "*", "Access-Control-Allow-Methods": "*" }, body: JSON.stringify(obj) });
module.exports.hello = async event => { return CorsResponse("HELLO, WORLD!"); };
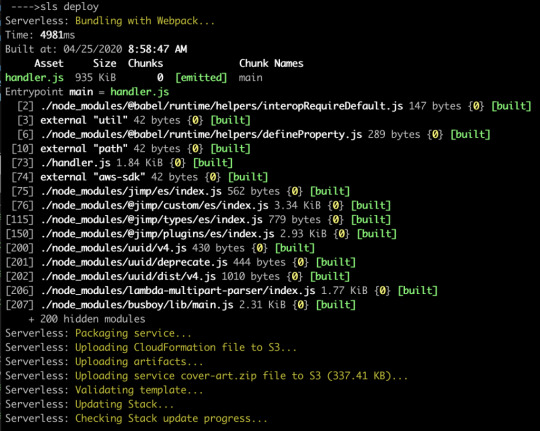
Let’s run it. Type sls deploy into your terminal from the hello-world folder.
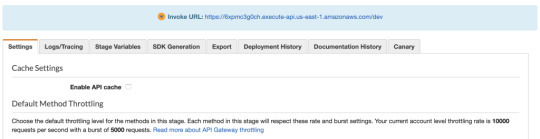
When that runs, we’ll have deployed our Lambda function to an HTTP endpoint that we can call via Fetch. But… where is it? We could crack open our AWS console, find the gateway API that serverless created for us, then find the Invoke URL. It would look something like this.
Fortunately, there is an easier way, which is to type sls info into our terminal:
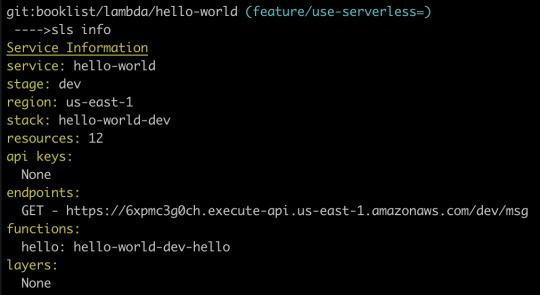
Just like that, we can see that our Lambda function is available at the following path:
https://6xpmc3g0ch.execute-api.us-east-1.amazonaws.com/dev/ms
Woot, now let’s call It!
Now let’s open up a web app and try fetching it. Here’s what our Fetch will look like:
fetch("https://6xpmc3g0ch.execute-api.us-east-1.amazonaws.com/dev/msg") .then(resp => resp.json()) .then(resp => { console.log(resp); });
We should see our message in the dev console.
Now that we’ve gotten our feet wet, let’s repeat this process. This time, though, let’s make a more interesting, useful service. Specifically, let’s make the canonical “resize an image” Lambda, but instead of being triggered by a new S3 bucket upload, let’s let the user upload an image directly to our Lambda. That’ll remove the need to bundle any kind of aws-sdk resources in our client-side bundle.
Building a useful Lambda
OK, from the start! This particular Lambda will take an image, resize it, then upload it to an S3 bucket. First, let’s create a new service. I’m calling it cover-art but it could certainly be anything else.
sls create -t aws-nodejs --path cover-art
As before, we’ll add a path to our HTTP endpoint (which in this case will be a POST, instead of GET, since we’re sending the file instead of receiving it) and enable CORS:
// Same as before events: - http: path: upload method: post cors: true
Next, let’s grant our Lambda access to whatever S3 buckets we’re going to use for the upload. Look in your YAML file — there should be a iamRoleStatements section that contains boilerplate code that’s been commented out. We can leverage some of that by uncommenting it. Here’s the config we’ll use to enable the S3 buckets we want:
iamRoleStatements: - Effect: "Allow" Action: - "s3:*" Resource: ["arn:aws:s3:::your-bucket-name/*"]
Note the /* on the end. We don’t list specific bucket names in isolation, but rather paths to resources; in this case, that’s any resources that happen to exist inside your-bucket-name.
Since we want to upload files directly to our Lambda, we need to make one more tweak. Specifically, we need to configure the API endpoint to accept multipart/form-data as a binary media type. Locate the provider section in the YAML file:
provider: name: aws runtime: nodejs12.x
…and modify if it to:
provider: name: aws runtime: nodejs12.x apiGateway: binaryMediaTypes: - 'multipart/form-data'
For good measure, let’s give our function an intelligent name. Replace handler: handler.hello with handler: handler.upload, then change module.exports.hello to module.exports.upload in handler.js.
Now we get to write some code
First, let’s grab some helpers.
npm i jimp uuid lambda-multipart-parser
Wait, what’s Jimp? It’s the library I’m using to resize uploaded images. uuid will be for creating new, unique file names of the sized resources, before uploading to S3. Oh, and lambda-multipart-parser? That’s for parsing the file info inside our Lambda.
Next, let’s make a convenience helper for S3 uploading:
const uploadToS3 = (fileName, body) => { const s3 = new S3({}); const params = { Bucket: "your-bucket-name", Key: `/${fileName}`, Body: body };
return new Promise(res => { s3.upload(params, function(err, data) { if (err) { return res(CorsResponse({ error: true, message: err })); } res(CorsResponse({ success: true, url: `https://${params.Bucket}.s3.amazonaws.com/${params.Key}` })); }); }); };
Lastly, we’ll plug in some code that reads the upload files, resizes them with Jimp (if needed) and uploads the result to S3. The final result is below.
'use strict'; const AWS = require("aws-sdk"); const { S3 } = AWS; const path = require("path"); const Jimp = require("jimp"); const uuid = require("uuid/v4"); const awsMultiPartParser = require("lambda-multipart-parser");
const CorsResponse = obj => ({ statusCode: 200, headers: { "Access-Control-Allow-Origin": "*", "Access-Control-Allow-Headers": "*", "Access-Control-Allow-Methods": "*" }, body: JSON.stringify(obj) });
const uploadToS3 = (fileName, body) => { const s3 = new S3({}); var params = { Bucket: "your-bucket-name", Key: `/${fileName}`, Body: body }; return new Promise(res => { s3.upload(params, function(err, data) { if (err) { return res(CorsResponse({ error: true, message: err })); } res(CorsResponse({ success: true, url: `https://${params.Bucket}.s3.amazonaws.com/${params.Key}` })); }); }); };
module.exports.upload = async event => { const formPayload = await awsMultiPartParser.parse(event); const MAX_WIDTH = 50; return new Promise(res => { Jimp.read(formPayload.files[0].content, function(err, image) { if (err || !image) { return res(CorsResponse({ error: true, message: err })); } const newName = `${uuid()}${path.extname(formPayload.files[0].filename)}`; if (image.bitmap.width > MAX_WIDTH) { image.resize(MAX_WIDTH, Jimp.AUTO); image.getBuffer(image.getMIME(), (err, body) => { if (err) { return res(CorsResponse({ error: true, message: err })); } return res(uploadToS3(newName, body)); }); } else { image.getBuffer(image.getMIME(), (err, body) => { if (err) { return res(CorsResponse({ error: true, message: err })); } return res(uploadToS3(newName, body)); }); } }); }); };
I’m sorry to dump so much code on you but — this being a post about Amazon Lambda and serverless — I’d rather not belabor the grunt work within the serverless function. Of course, yours might look completely different if you’re using an image library other than Jimp.
Let’s run it by uploading a file from our client. I’m using the react-dropzone library, so my JSX looks like this:
<Dropzone onDrop={files => onDrop(files)} multiple={false} > <div>Click or drag to upload a new cover</div> </Dropzone>
The onDrop function looks like this:
const onDrop = files => { let request = new FormData(); request.append("fileUploaded", files[0]);
fetch("https://yb1ihnzpy8.execute-api.us-east-1.amazonaws.com/dev/upload", { method: "POST", mode: "cors", body: request }) .then(resp => resp.json()) .then(res => { if (res.error) { // handle errors } else { // success - woo hoo - update state as needed } }); };
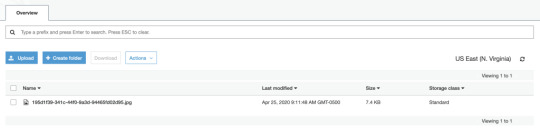
And just like that, we can upload a file and see it appear in our S3 bucket!
An optional detour: bundling
There’s one optional enhancement we could make to our setup. Right now, when we deploy our service, Serverless is zipping up the entire services folder and sending all of it to our Lambda. The content currently weighs in at 10MB, since all of our node_modules are getting dragged along for the ride. We can use a bundler to drastically reduce that size. Not only that, but a bundler will cut deploy time, data usage, cold start performance, etc. In other words, it’s a nice thing to have.
Fortunately for us, there’s a plugin that easily integrates webpack into the serverless build process. Let’s install it with:
npm i serverless-webpack --save-dev
…and add it via our YAML config file. We can drop this in at the very end:
// Same as before plugins: - serverless-webpack
Naturally, we need a webpack.config.js file, so let’s add that to the mix:
const path = require("path"); module.exports = { entry: "./handler.js", output: { libraryTarget: 'commonjs2', path: path.join(__dirname, '.webpack'), filename: 'handler.js', }, target: "node", mode: "production", externals: ["aws-sdk"], resolve: { mainFields: ["main"] } };
Notice that we’re setting target: node so Node-specific assets are treated properly. Also note that you may need to set the output filename to handler.js. I’m also adding aws-sdk to the externals array so webpack doesn’t bundle it at all; instead, it’ll leave the call to const AWS = require("aws-sdk"); alone, allowing it to be handled by our Lamdba, at runtime. This is OK since Lambdas already have the aws-sdk available implicitly, meaning there’s no need for us to send it over the wire. Finally, the mainFields: ["main"] is to tell webpack to ignore any ESM module fields. This is necessary to fix some issues with the Jimp library.
Now let’s re-deploy, and hopefully we’ll see webpack running.

Now our code is bundled nicely into a single file that’s 935K, which zips down further to a mere 337K. That’s a lot of savings!
Odds and ends
If you’re wondering how you’d send other data to the Lambda, you’d add what you want to the request object, of type FormData, from before. For example:
request.append("xyz", "Hi there");
…and then read formPayload.xyz in the Lambda. This can be useful if you need to send a security token, or other file info.
If you’re wondering how you might configure env variables for your Lambda, you might have guessed by now that it’s as simple as adding some fields to your serverless.yaml file. It even supports reading the values from an external file (presumably not committed to git). This blog post by Philipp Müns covers it well.
Wrapping up
Serverless is an incredible framework. I promise, we’ve barely scratched the surface. Hopefully this post has shown you its potential, and motivated you to check it out even further.
If you’re interested in learning more, I’d recommend the learning materials from David Wells, an engineer at Netlify, and former member of the serverless team, as well as the Serverless Handbook by Swizec Teller
Serverless Workshop: A repo to learn the core concepts of serverless
Serverless Auth Strategies: A repo that walks through different strategies for authorizing access to functions.
Netlify Functions Worksop: Netlify lessons on the core concepts of using serverless functions
Serverless Handbook: Getting started with serverless technologies
The post Building Your First Serverless Service With AWS Lambda Functions appeared first on CSS-Tricks.
Building Your First Serverless Service With AWS Lambda Functions published first on https://deskbysnafu.tumblr.com/
0 notes
Text
Building Your First Serverless Service With AWS Lambda Functions
Many developers are at least marginally familiar with AWS Lambda functions. They’re reasonably straightforward to set up, but the vast AWS landscape can make it hard to see the big picture. With so many different pieces it can be daunting, and frustratingly hard to see how they fit seamlessly into a normal web application.
The Serverless framework is a huge help here. It streamlines the creation, deployment, and most significantly, the integration of Lambda functions into a web app. To be clear, it does much, much more than that, but these are the pieces I’ll be focusing on. Hopefully, this post strikes your interest and encourages you to check out the many other things Serverless supports. If you’re completely new to Lambda you might first want to check out this AWS intro.
There’s no way I can cover the initial installation and setup better than the quick start guide, so start there to get up and running. Assuming you already have an AWS account, you might be up and running in 5–10 minutes; and if you don’t, the guide covers that as well.
Your first Serverless service
Before we get to cool things like file uploads and S3 buckets, let’s create a basic Lambda function, connect it to an HTTP endpoint, and call it from an existing web app. The Lambda won’t do anything useful or interesting, but this will give us a nice opportunity to see how pleasant it is to work with Serverless.
First, let’s create our service. Open any new, or existing web app you might have (create-react-app is a great way to quickly spin up a new one) and find a place to create our services. For me, it’s my lambda folder. Whatever directory you choose, cd into it from terminal and run the following command:
sls create -t aws-nodejs --path hello-world
That creates a new directory called hello-world. Let’s crack it open and see what’s in there.
If you look in handler.js, you should see an async function that returns a message. We could hit sls deploy in our terminal right now, and deploy that Lambda function, which could then be invoked. But before we do that, let’s make it callable over the web.
Working with AWS manually, we’d normally need to go into the AWS API Gateway, create an endpoint, then create a stage, and tell it to proxy to our Lambda. With serverless, all we need is a little bit of config.
Still in the hello-world directory? Open the serverless.yaml file that was created in there.

The config file actually comes with boilerplate for the most common setups. Let’s uncomment the http entries, and add a more sensible path. Something like this:
functions: hello: handler: handler.hello # The following are a few example events you can configure # NOTE: Please make sure to change your handler code to work with those events # Check the event documentation for details events: - http: path: msg method: get
That’s it. Serverless does all the grunt work described above.
CORS configuration
Ideally, we want to call this from front-end JavaScript code with the Fetch API, but that unfortunately means we need CORS to be configured. This section will walk you through that.
Below the configuration above, add cors: true, like this
functions: hello: handler: handler.hello events: - http: path: msg method: get cors: true
That’s the section! CORS is now configured on our API endpoint, allowing cross-origin communication.
CORS Lambda tweak
While our HTTP endpoint is configured for CORS, it’s up to our Lambda to return the right headers. That’s just how CORS works. Let’s automate that by heading back into handler.js, and adding this function:
const CorsResponse = obj => ({ statusCode: 200, headers: { "Access-Control-Allow-Origin": "*", "Access-Control-Allow-Headers": "*", "Access-Control-Allow-Methods": "*" }, body: JSON.stringify(obj) });
Before returning from the Lambda, we’ll send the return value through that function. Here’s the entirety of handler.js with everything we’ve done up to this point:
'use strict'; const CorsResponse = obj => ({ statusCode: 200, headers: { "Access-Control-Allow-Origin": "*", "Access-Control-Allow-Headers": "*", "Access-Control-Allow-Methods": "*" }, body: JSON.stringify(obj) });
module.exports.hello = async event => { return CorsResponse("HELLO, WORLD!"); };
Let’s run it. Type sls deploy into your terminal from the hello-world folder.
When that runs, we’ll have deployed our Lambda function to an HTTP endpoint that we can call via Fetch. But… where is it? We could crack open our AWS console, find the gateway API that serverless created for us, then find the Invoke URL. It would look something like this.

Fortunately, there is an easier way, which is to type sls info into our terminal:

Just like that, we can see that our Lambda function is available at the following path:
https://6xpmc3g0ch.execute-api.us-east-1.amazonaws.com/dev/ms
Woot, now let’s call It!
Now let’s open up a web app and try fetching it. Here’s what our Fetch will look like:
fetch("https://6xpmc3g0ch.execute-api.us-east-1.amazonaws.com/dev/msg") .then(resp => resp.json()) .then(resp => { console.log(resp); });
We should see our message in the dev console.
Now that we’ve gotten our feet wet, let’s repeat this process. This time, though, let’s make a more interesting, useful service. Specifically, let’s make the canonical “resize an image” Lambda, but instead of being triggered by a new S3 bucket upload, let’s let the user upload an image directly to our Lambda. That’ll remove the need to bundle any kind of aws-sdk resources in our client-side bundle.
Building a useful Lambda
OK, from the start! This particular Lambda will take an image, resize it, then upload it to an S3 bucket. First, let’s create a new service. I’m calling it cover-art but it could certainly be anything else.
sls create -t aws-nodejs --path cover-art
As before, we’ll add a path to our HTTP endpoint (which in this case will be a POST, instead of GET, since we’re sending the file instead of receiving it) and enable CORS:
// Same as before events: - http: path: upload method: post cors: true
Next, let’s grant our Lambda access to whatever S3 buckets we’re going to use for the upload. Look in your YAML file — there should be a iamRoleStatements section that contains boilerplate code that’s been commented out. We can leverage some of that by uncommenting it. Here’s the config we’ll use to enable the S3 buckets we want:
iamRoleStatements: - Effect: "Allow" Action: - "s3:*" Resource: ["arn:aws:s3:::your-bucket-name/*"]
Note the /* on the end. We don’t list specific bucket names in isolation, but rather paths to resources; in this case, that’s any resources that happen to exist inside your-bucket-name.
Since we want to upload files directly to our Lambda, we need to make one more tweak. Specifically, we need to configure the API endpoint to accept multipart/form-data as a binary media type. Locate the provider section in the YAML file:
provider: name: aws runtime: nodejs12.x
…and modify if it to:
provider: name: aws runtime: nodejs12.x apiGateway: binaryMediaTypes: - 'multipart/form-data'
For good measure, let’s give our function an intelligent name. Replace handler: handler.hello with handler: handler.upload, then change module.exports.hello to module.exports.upload in handler.js.
Now we get to write some code
First, let’s grab some helpers.
npm i jimp uuid lambda-multipart-parser
Wait, what’s Jimp? It’s the library I’m using to resize uploaded images. uuid will be for creating new, unique file names of the sized resources, before uploading to S3. Oh, and lambda-multipart-parser? That’s for parsing the file info inside our Lambda.
Next, let’s make a convenience helper for S3 uploading:
const uploadToS3 = (fileName, body) => { const s3 = new S3({}); const params = { Bucket: "your-bucket-name", Key: `/${fileName}`, Body: body };
return new Promise(res => { s3.upload(params, function(err, data) { if (err) { return res(CorsResponse({ error: true, message: err })); } res(CorsResponse({ success: true, url: `https://${params.Bucket}.s3.amazonaws.com/${params.Key}` })); }); }); };
Lastly, we’ll plug in some code that reads the upload files, resizes them with Jimp (if needed) and uploads the result to S3. The final result is below.
'use strict'; const AWS = require("aws-sdk"); const { S3 } = AWS; const path = require("path"); const Jimp = require("jimp"); const uuid = require("uuid/v4"); const awsMultiPartParser = require("lambda-multipart-parser");
const CorsResponse = obj => ({ statusCode: 200, headers: { "Access-Control-Allow-Origin": "*", "Access-Control-Allow-Headers": "*", "Access-Control-Allow-Methods": "*" }, body: JSON.stringify(obj) });
const uploadToS3 = (fileName, body) => { const s3 = new S3({}); var params = { Bucket: "your-bucket-name", Key: `/${fileName}`, Body: body }; return new Promise(res => { s3.upload(params, function(err, data) { if (err) { return res(CorsResponse({ error: true, message: err })); } res(CorsResponse({ success: true, url: `https://${params.Bucket}.s3.amazonaws.com/${params.Key}` })); }); }); };
module.exports.upload = async event => { const formPayload = await awsMultiPartParser.parse(event); const MAX_WIDTH = 50; return new Promise(res => { Jimp.read(formPayload.files[0].content, function(err, image) { if (err || !image) { return res(CorsResponse({ error: true, message: err })); } const newName = `${uuid()}${path.extname(formPayload.files[0].filename)}`; if (image.bitmap.width > MAX_WIDTH) { image.resize(MAX_WIDTH, Jimp.AUTO); image.getBuffer(image.getMIME(), (err, body) => { if (err) { return res(CorsResponse({ error: true, message: err })); } return res(uploadToS3(newName, body)); }); } else { image.getBuffer(image.getMIME(), (err, body) => { if (err) { return res(CorsResponse({ error: true, message: err })); } return res(uploadToS3(newName, body)); }); } }); }); };
I’m sorry to dump so much code on you but — this being a post about Amazon Lambda and serverless — I’d rather not belabor the grunt work within the serverless function. Of course, yours might look completely different if you’re using an image library other than Jimp.
Let’s run it by uploading a file from our client. I’m using the react-dropzone library, so my JSX looks like this:
<Dropzone onDrop={files => onDrop(files)} multiple={false} > <div>Click or drag to upload a new cover</div> </Dropzone>
The onDrop function looks like this:
const onDrop = files => { let request = new FormData(); request.append("fileUploaded", files[0]);
fetch("https://yb1ihnzpy8.execute-api.us-east-1.amazonaws.com/dev/upload", { method: "POST", mode: "cors", body: request }) .then(resp => resp.json()) .then(res => { if (res.error) { // handle errors } else { // success - woo hoo - update state as needed } }); };
And just like that, we can upload a file and see it appear in our S3 bucket!

An optional detour: bundling
There’s one optional enhancement we could make to our setup. Right now, when we deploy our service, Serverless is zipping up the entire services folder and sending all of it to our Lambda. The content currently weighs in at 10MB, since all of our node_modules are getting dragged along for the ride. We can use a bundler to drastically reduce that size. Not only that, but a bundler will cut deploy time, data usage, cold start performance, etc. In other words, it’s a nice thing to have.
Fortunately for us, there’s a plugin that easily integrates webpack into the serverless build process. Let’s install it with:
npm i serverless-webpack --save-dev
…and add it via our YAML config file. We can drop this in at the very end:
// Same as before plugins: - serverless-webpack
Naturally, we need a webpack.config.js file, so let’s add that to the mix:
const path = require("path"); module.exports = { entry: "./handler.js", output: { libraryTarget: 'commonjs2', path: path.join(__dirname, '.webpack'), filename: 'handler.js', }, target: "node", mode: "production", externals: ["aws-sdk"], resolve: { mainFields: ["main"] } };
Notice that we’re setting target: node so Node-specific assets are treated properly. Also note that you may need to set the output filename to handler.js. I’m also adding aws-sdk to the externals array so webpack doesn’t bundle it at all; instead, it’ll leave the call to const AWS = require("aws-sdk"); alone, allowing it to be handled by our Lamdba, at runtime. This is OK since Lambdas already have the aws-sdk available implicitly, meaning there’s no need for us to send it over the wire. Finally, the mainFields: ["main"] is to tell webpack to ignore any ESM module fields. This is necessary to fix some issues with the Jimp library.
Now let’s re-deploy, and hopefully we’ll see webpack running.
Now our code is bundled nicely into a single file that’s 935K, which zips down further to a mere 337K. That’s a lot of savings!
Odds and ends
If you’re wondering how you’d send other data to the Lambda, you’d add what you want to the request object, of type FormData, from before. For example:
request.append("xyz", "Hi there");
…and then read formPayload.xyz in the Lambda. This can be useful if you need to send a security token, or other file info.
If you’re wondering how you might configure env variables for your Lambda, you might have guessed by now that it’s as simple as adding some fields to your serverless.yaml file. It even supports reading the values from an external file (presumably not committed to git). This blog post by Philipp Müns covers it well.
Wrapping up
Serverless is an incredible framework. I promise, we’ve barely scratched the surface. Hopefully this post has shown you its potential, and motivated you to check it out even further.
If you’re interested in learning more, I’d recommend the learning materials from David Wells, an engineer at Netlify, and former member of the serverless team, as well as the Serverless Handbook by Swizec Teller
Serverless Workshop: A repo to learn the core concepts of serverless
Serverless Auth Strategies: A repo that walks through different strategies for authorizing access to functions.
Netlify Functions Worksop: Netlify lessons on the core concepts of using serverless functions
Serverless Handbook: Getting started with serverless technologies
The post Building Your First Serverless Service With AWS Lambda Functions appeared first on CSS-Tricks.
source https://css-tricks.com/building-your-first-serverless-service-with-aws-lambda-functions/
from WordPress https://ift.tt/2ZPUMO4 via IFTTT
0 notes
Text
Best Interest Rates on Cash – January 2019

Here's my monthly roundup of the best interest rates on cash for January 2019, roughly sorted from shortest to longest maturities. Check out my Ultimate Rate-Chaser Calculator to get an idea of how much extra interest you'd earn if you are moving money between accounts. Rates listed are available to everyone nationwide. Rates checked as of 1/9/18.
High-yield savings accounts While the huge megabanks like to get away with 0.01% APY, getting higher rates is as easy as transferring money electronically from your checking account to an online savings account. The interest rates on savings accounts can drop at any time, so I prioritize banks with a history of competitive rates. Some banks will bait you and then lower the rates in the hopes that you are too lazy to leave.
EBSB Bank offers 2.50% APY with a $5,000 minimum balance. The CIT Bank Savings Builder is now up to 2.45% APY with a $100 minimum to open and a $100 monthly deposit. There are several other established high-yield savings accounts at 2% APY and up.
Short-term guaranteed rates (1 year and under) I am often asked what to do with a big pile of cash that you're waiting to deploy shortly (just sold your house, just sold your business, legal settlement, inheritance). My usual advice is to keep things simple and take your time. If not a savings account, then put it in a flexible short-term CD under the FDIC limits until you have a plan.
No Penalty CDs offer a locked-in rate with no early withdrawal penalty. That means your interest rate can never go down, but you can still take out your money (once) if you want to use it elsewhere. Marcus Bank has 13-month No Penalty CD at 2.35% APY with a $500 minimum deposit, Ally Bank has a 11-month No Penalty CD is at 2.30% APY with a $25k+ minimum, and CIT Bank has a 11-month No Penalty CD at 2.05% APY with a $1,000 minimum deposit. You may wish to open multiple CDs in smaller increments for more flexibility.
First Internet Bank has a 1-year CD at 2.89% APY ($1,000 minimum) with an early withdrawal penalty of 180 days of interest.
Money market mutual funds + Ultra-short bond ETFs If you like to keep cash in a brokerage account, beware that many brokers pay out very little interest on their default cash sweep funds (and keep the money for themselves). The following money market and ultra-short bond funds are not FDIC-insured, but may be a good option if you have idle cash and cheap/free commissions.
Vanguard Prime Money Market Fund currently pays an 2.44% SEC yield. The default sweep option is the Vanguard Federal Money Market Fund, which has an SEC yield of 2.31%. You can manually move the money over to Prime if you meet the $3,000 minimum investment.
Vanguard Ultra-Short-Term Bond Fund currently pays 2.71% SEC Yield ($3,000 min) and 2.81% SEC Yield ($50,000 min). The average duration is ~1 year, so there is more interest rate risk.
The PIMCO Enhanced Short Maturity Active Bond ETF (MINT) has a 2.96% SEC yield and the iShares Short Maturity Bond ETF (NEAR) has a 2.98% SEC yield while holding a portfolio of investment-grade bonds with an average duration of ~6 months.
Treasury Bills and Ultra-short Treasury ETFs Another option is to buy individual Treasury bills which come in a variety of maturities from 4-weeks to 52-weeks. You can also invest in ETFs that hold a rotating basket of short-term Treasury Bills for you, while charging a small management fee for doing so. T-Bill interest is exempt from state and local income taxes.
You can build your own T-Bill ladder at TreasuryDirect.gov or via a brokerage account with a bond desk like Vanguard and Fidelity. Here are the current Treasury Bill rates. As of 1/8/19, a 4-week T-Bill had the equivalent of 2.40% annualized interest and a 52-week T-Bill had the equivalent of 2.60% annualized interest.
The Goldman Sachs Access Treasury 0-1 Year ETF (GBIL) has a 2.24% SEC yield and the SPDR Bloomberg Barclays 1-3 Month T-Bill ETF (BIL) has a 2.16% SEC yield. GBIL appears to have a slightly longer average maturity than BIL.
US Savings Bonds Series I Savings Bonds offer rates that are linked to inflation and backed by the US government. You must hold them for at least a year. There are annual purchase limits. If you redeem them within 5 years there is a penalty of the last 3 months of interest.
“I Bonds” bought between November 2018 and April 2019 will earn a 2.82% rate for the first six months. The rate of the subsequent 6-month period will be based on inflation again. More info here.
In mid-April 2019, the CPI will be announced and you will have a short period where you will have a very close estimate of the rate for the next 12 months. I will have another post up at that time.
Prepaid Cards with Attached Savings Accounts A small subset of prepaid debit cards have an “attached” FDIC-insured savings account with exceptionally high interest rates. The negatives are that balances are capped, and there are many fees that you must be careful to avoid (lest they eat up your interest). Some folks don't mind the extra work and attention required, while others do. There is a long list of previous offers that have already disappeared with little notice. I don't personally recommend or use any of these anymore.
The only notable card left in this category is Mango Money at 6% APY on up to $2,500, but there are many hoops to jump through. Signature purchases of $1,500 or more and a minimum balance of $25.00 at the end of the month is needed to qualify for the 6.00%.
Rewards checking accounts These unique checking accounts pay above-average interest rates, but with unique risks. You have to jump through certain hoops, and if you make a mistake you won't earn any interest for that month. Some folks don't mind the extra work and attention required, while others do. Rates can also drop to near-zero quickly, leaving a “bait-and-switch” feeling. I don't use any of these anymore, either.
The best one left is Consumers Credit Union, which offers 3.09% to 5.09% APY on up to a $10k balance depending on your qualifying activity. The highest tier requires their credit card in addition to their debit card (other credit cards offer $500+ in sign-up bonuses). Keep your 12 debit purchases just above the $100 requirement, as for every $500 in monthly purchases you may be losing out on cash back rewards elsewhere. Find a local rewards checking account at DepositAccounts.
If you're looking for a non-rewards high-yield checking account, MemoryBank has a checking account with no debit card requirements at 1.60% APY.
Certificates of deposit (greater than 1 year) You might have larger balances, either because you are using CDs instead of bonds or you simply want a large cash reserves. By finding a bank CD with a reasonable early withdrawal penalty, you can enjoy higher rates but maintain access in a true emergency. Alternatively, consider building a CD ladder of different maturity lengths (ex. 1/2/3/4/5-years) such that you have access to part of the ladder each year, but your blended interest rate is higher than a savings account. When one CD matures, use that money to buy another 5-year CD.
INOVA Federal CU has a 14-month CD at 3.00% APY and a 20-month at 3.15% APY ($200 minimum). 180 day early withdrawal penalty. Premier America CU has 15-month CD at 3.10% APY ($1,000 minimum). Anyone can join these credit unions with via membership in partner organization (see application).
United States Senate Federal Credit Union has a 5-year Share Certificate at 3.69% APY ($60k min), 3.62% APY ($20k min), or 3.56% APY ($1k min). Note that the early withdrawal penalty is a full year of interest. Anyone can join this credit union via American Consumer Council.
You can buy certificates of deposit via the bond desks of Vanguard and Fidelity. These “brokered CDs” offer FDIC insurance, but they don't come with predictable fixed early withdrawal penalties. As of this writing, Vanguard is showing a 2-year non-callable CD at 2.75% APY and a 5-year non-callable CD at 3.20% APY. Watch out for higher rates from callable CDs listed by Fidelity.
Longer-term Instruments I'd use these with caution due to increased interest rate risk, but I still track them to see the rest of the current yield curve.
Willing to lock up your money for 10+ years? You can buy long-term certificates of deposit via the bond desks of Vanguard and Fidelity. These “brokered CDs” offer FDIC insurance, but they don't come with predictable fixed early withdrawal penalties. As of this writing, Vanguard is showing a 10-year non-callable CD at 3.45% APY. Watch out for higher rates from callable CDs from Fidelity. Matching the overall yield curve, current CD rates do not rise much higher as you extend beyond a 5-year maturity.
How about two decades? Series EE Savings Bonds are not indexed to inflation, but they have a guarantee that the value will double in value in 20 years, which equals a guaranteed return of 3.5% a year. However, if you don't hold for that long, you'll be stuck with the normal rate which is quite low (currently a sad 0.10% rate). I view this as a huge early withdrawal penalty. You could also view it as long-term bond and thus a hedge against deflation, but only if you can hold on for 20 years. As of 1/9/19, the 20-year Treasury Bond rate was 2.86%.
All rates were checked as of 1/9/19.
<!-- function getQueryStringVariable(variable) { var query = window.location.search.substring(1); var vars = query.split('&'); for (var i=0;i<vars.length;i++) { var pair = vars[i].split('='); if (pair[0] == variable) { return pair[1];}}} // --> <!-- var ni_ad_client = "640675"; var ni_rp = "5,7"; var ni_amt = "9999"; var ni_rpt = "15"; var ni_var1 = "TopRatesAug18"; // -->
“The editorial content here is not provided by any of the companies mentioned, and has not been reviewed, approved or otherwise endorsed by any of these entities. Opinions expressed here are the author's alone.”
Best Interest Rates on Cash – January 2019 from My Money Blog.
Copyright © 2018 MyMoneyBlog.com. All Rights Reserved. Do not re-syndicate without permission.
0 notes
Text
Demystifying Django’s Magic
About The Author
Precious Ndubueze is a software developer who spends half of her time in her head when not getting lost in problem-solving or writing. More about Precious …
In this article, we will be taking an in-depth look at what Django brings to the table by understanding what the generated files and folder do, this will give us a better understanding of the Django framework.
According to the official documentation,
Django is a high-level Python Web framework that encourages rapid development and clean, pragmatic design. Built by experienced developers, it takes care of much of the hassle of Web development, so you can focus on writing your app without needing to reinvent the wheel. It’s free and open source.
— DjangoProject.com
It is one of Python’s popular framework for building web applications and is most preferred for its scalability in creating a boilerplate with laid down configurations and files. This wraps up the whole goal of Django for developers;
“…building a great application in little time and less worry over basic settings.”
There are basic configurations, files and styling that cuts across all web application, no matter what you’re building. When using Django, these are generated for you automatically when you run certain commands at different points in the development cycle of your application. With this, you’ll have enough time to focus on the core aspect of your developing your application while Django handles the others for you.
It means that there are a lot of things happening underneath the hood. For someone who does not have a full grasp of the moving parts, this can be overwhelming. In this article we’re going to be learning about the following:
We’ll learn how these all fit together and the role they play. It’s important to know that it will not be possible to take a look at everything happening inside of Django. For cases outside the scope of this tutorial, there will be links to point you to resources that will help with that.
For learning purpose, we will be building an e-commerce platform. This is not a full-blown e-commerce site, our application will have only two basic features; creating products and making orders from the admin’s view.
This article will guide you through understanding Django’s pre-built commands, files and basics. It is targeted at developers who have used Django or intend to use it and want to know what happens under the hood. While it is not compulsory that you must have used Django, having experience with the basics of Django before continuing with this article will give you an advantage. You need to have a working knowledge of Python to fully grasp what will be covered in this piece.
Installing Django
If you do not have Django installed already, here are the steps to do that.
First, create a virtual environment, named djangodev. You need this to isolate your Django workspace and its dependent packages.
python3 -m venv ~/.virtualenvs/djangodev
Now to get into your virtual environment, you need to get it activated;
source ~/.virtualenvs/djangodev/bin/activate
If you get any error running with source you can make use of this alternative command,
. ~/.virtualenvs/djangodev/bin/activate
For Windows users, make use of this instead,
...\> %HOMEPATH%\.virtualenvs\djangodev\Scripts\activate.bat
Note: You need to activate the virtual environment anytime you want to use Django.
Now that you’re in your virtual env, install Django:
python -m pip install Django
To check if Django was properly installed, run;
python -m django --version
Shakaboom! Now you’re set for some magic, get your wands ready!
The method of creating files and folders at the go might be simple and straightforward. However, it is not ideal when you have to create a medium or large project and a deadline to beat. We always have a deadline to beat, even for personal projects.
Following this method when creating a new large project, you’ll have to create multiple files and folders and make multiple settings, which could lead to the creation of avoidable bugs and a lot of wasted time. startproject and startapp commands available to us through Django aim to solve this problem. These two commands create files, folders and carry out lots of configuration for you.
Let’s get started by generating a new application using the startproject command.
Scaffolding An Application
We’ll generate our application and take a look at the files that are generated, as well as few commands we’ll use. Run this command in your terminal to get started;
django-admin startproject ecommerce_site
When installing Django, django-admin is added to your path to give it access to perform its actions. It’s Django’s command-line utility for administrative responsibilities. Learn more django-admin uses here; it is a little beyond the scope of this article.
startproject is a Django command that helps generate the project. Here we pass to it the name of our project ecommerce_site. It then goes on to create the project in a directory called ecommerce_site. The directory should look like this,
Showing folder after running startproject. (Large preview)
We’ll need to navigate into the newly created directory and run the command to generate the app.
cd ecommerce_site python manage.py startapp trading
startapp is a command executed by manage.py in the project directory, it creates multiple files, and a folder named using the name specified in the command, in this case, what’s specified is trading. The app folder consists of simple files that should be needed for creating features of an application. Now your directory should be looking like this:
Showing folder after running startapp. (Large preview)
If you’re wondering the difference between a project and an app. A project is a Django web application, it can consist of one or more apps. It’s the folder holding manage.py and the other module that includes the settings.py and other files. An app is a python package that does a certain feature, includes files like models.py, the migration directory and more. You can check out this answer on Stack Overflow for more.
The startproject will create the main project directory, while the startapp will create the app directory. Both are also been passed a name to be used in generation. The startproject is the first command run when creating a new project, while the startapp is run inside the new project directory.
The current layout is a great mapping you can use for whatever application you are building. It’s scalable and consists of files you will be needing. There is a chance to create, rename, edit and move files within the project.
Django’s Configuration
Django provides different settings and configurations for you, after running the two commands in different files, let’s run through the generated files to learn what each does.
settings.py
Most web applications need configurations like; authentication to verify users, permissions to allow certain users with certain abilities and set security standards. All these are needed to give your users the best experience needed. It will take a long time for you as a developer to begin to roll each of these on your own, for every application you work on.
Django provides you with these needed configurations and more — such that you can opt for the ones you want and plug them in. These are done in settings.py, there are already laid settings created to provide basic functionalities for you.
When Django tries to run a project, there are certain variables it looks for. The settings.py is the file holding those variables that lead to other files or information. Django is directed to this file from the manage.py file and takes information or loads other files it is led to from here.
These configurations include:
DEBUG The DEBUG functionality is set to True to enable reading of errors and debugging code in development, it should be set to False during production (i.e when you are deploying). This setting allows you to be able to debug your code better with the help of Django when it tries running your code.
INSTALLED_APPS This is a list of all apps performing a certain feature in Django. It comes with some defaults apps like the 'django.contrib.auth' which is used for user authentication, django.contrib.admin' for admin functionality, and 'django.contrib.messages' needed in sending notification or info to users. Any other app you create using the startapp command will have to be in here before it can be run by Django.
MIDDLEWARE is a lightweight framework for processing inputs and outputs going through Django requests and responses. Each middleware does a specific function with an app, like the 'django.contrib.auth.middleware.AuthenticationMiddleware' works with the 'django.contrib.sessions' to associate users with requests. You should check out further features of each middleware on the docs.
ROOT_URLCONF is a variable to a path where Django looks for your urlpatterns when a request is passed to your Django application. Whenever a request is made in a Django application, Django searches this variable and loads the leading file and loops though the urlpatterns list in search for the matching path.
TEMPLATES is a setting to allow rendering of HTML files to represent a view. It communicates with the request, auth and messages apps. The 'BACKEND' value and the 'APP_DIRS' set to True enables Django to search for HTML files within /templates folder. The 'context_processors' in the OPTIONS are callables, that take in the request as an argument and merge it with the context when a template is been rendered, these callables work to help with debugging, authentication, and handling of requests generally.
WSGI_APPLICATION is a path leading to the application variable in wsgi.py file.
DATABASE is a dictionary that holds access to an external database(or internal like in the case of the default sqlite) like PostgresSQL, MySQL and MongoDB. Here is an example of a Postgres database I will be using for our example:
DATABASES = { 'default': { 'ENGINE': 'django.db.backends.postgresql_psycopg2', 'NAME': 'db_name', 'USER': 'db_user', 'PASSWORD': 'db_password', 'HOST': 'localhost', 'PORT': '', } }
You can decide to use the default sqlite database, this doesn’t work great for production. You can set up a Postgres database like above, you will have to create the database first and pass the user, password with write permission to the database.
Note: For the purpose of this tutorial you can use the default sqlite database set already. The above is a demonstration on how you can set SQL and NO-SQL database connection in Django.
AUTH_PASSWORD_VALIDATORS these are functions that are called for password validations. They are called when creating users (and admins too) records, resetting and changing passwords. You can learn more about them from the official documentation.
More documentation on settings can be found here.
manage.py
Most web projects need an entry point where commands start from. An entry point acting as a gateway into the application. In every Django project, it is usually the manage.py file.
This file is needed as a starting point in your application. From here, all commands are run and everything starts up here.
manage.py does the same function as django-admin. It also tells Django the location for the configurations you have in your application. This is set by default and does not need to be changed.
It uses def main() function to handle the default settings module to our settings.py file. It tries to import the execute function, and if it runs into error it throws the ImportError. Otherwise, it takes in whatever argument is passed by the sys.argv from the command line and executes.
sys.argv is a list that takes in the command passed in via the terminal. When we run python manage.py runserver in the command line, sys.argv gets set to ["manage.py", "runserver"] and this is passed to the execute() function.
Arguments like python manage.py startapp trading or python manage.py makemigrations are set to [ "manage.py", "startapp", "trading"] and ["manage.py", "makemigrations"] respectively for execution.
The if statement is set to run if the command given set to manage.py.
Aside from running django-admin functions, you will be using it in running server, handle migrations, and other commands your project will be using. You will also need it when deploying, testing and debugging your projects.
Model Layout
Django provides a simple modelling layout for you. You configure your models in the models.py file in the trading directory. Your classes (or models) are layouts your database tables will follow.
You define your classes based on the data types you want to get from the user(or the admin) for each table. Our models create a migration file that works with the DATABASE variable in the settings.py.
Let’s create two models we’ll need, for products and orders:
from django.db import models class Product(models.Model): name = models.CharField(max_length=50) image = models.ImageField(upload_to='products', default='python.png') price = models.IntegerField() description = models.TextField() def __str__(self): return self.name class Order(models.Model): product = models.ForeignKey(Product, on_delete=models.CASCADE) quantity = models.IntegerField() date = models.DateField(auto_now_add=True) user = models.CharField(max_length=50) def __str__(self): return self.user
The product model has a name, price, description and an image (which when saved will be uploaded to a products folder. This gets created if it folder doesn’t exist) columns. The order has a product (linked to the products table), the quantity, date and user columns.
With this information, Django creates a database schema for the app. Also, creates a Python database-access API for accessing Product and Order objects. Django has a built migration tool so you don’t have to use external packages for migrations.
Next step is to run the migration command and migrate to the database. But before we do that, we have to register trading as an app in our project directory.
First off, we have to configure the trading directory as an app in Django. Django has that done for you in the app.py file. This file registers trading as an app and will be further used in the settings.py file.
Now, in settings.py add trading in INSTALLED_APP. It should look like this:
INSTALLED_APPS = [ 'django.contrib.admin', 'django.contrib.auth', 'django.contrib.contenttypes', 'django.contrib.sessions', 'django.contrib.messages', 'django.contrib.staticfiles', 'trading.apps.TradingConf', ]
On the terminal, run:
$ python manage.py makemigrations trading $ python manage.py migrate
Note: Your virtual environment must be activated and you should be inside the project directory.
python manage.py makemigrations trading takes note of changes made in the trading module and creates a file in the migration folder of changes in models.py and python manage.py migrate then updates the changes.
You can find the generated migration file from the python manage.py makemigrations trading command in the migration directory named 0001_initial.py. You can see the classes and columns as commands for creation inside the file. As more changes in models.py are made, more files will be generated here.
Admin Features
In our current application, we’ll need admin features to manage the products and orders that will be created in the application. Django provides us with an in-built admin functionality already at our disposal. The admin app(feature) has also been registered in our INSTALLED_APP list; 'django.contrib.admin'.
Also, the URL for the admin has also been registered in the urlpatterns list our URL configuration file urls.py; path('admin/', admin.site.urls),. The admin.py file makes it possible for you to register models and the CRUD actions that are to be performed on the models.
To set up the admin, run this on the terminal:
$ python manage.py createsuperuser
You’ll be prompted to enter a username, email and password. After that, you’ve successfully created an admin. To get started with the admin functionality, run the server:
$ python manage.py runserver
Visiting http://127.0.0.1:8000/admin/ will lead to a login session, when you log in (with username and password you created) you are directed to admin dashboard:
Admin dashboard provided by Django. (Large preview)
The groups and users are default configurations that allow admin to access user management and permission. Now let’s register our models.
In the admin.py, add the following lines:
from django.contrib import admin # Register your models here. from .models import Product, Order admin.site.register(Product) admin.site.register(Order)
from django.contrib import admin imports the admin functionality from Django, and then we imported the two classes from our models.py and registered them so an admin can perform CRUD actions on products and order from the dashboard.
After registering the models, your dashboard should look like this:
Product and Order model on Admin Dashboard. (Large preview)
Adding products:
Admin adding a product(shoe) to site. (Large preview)
Making orders from admin dashboard:
Admin adding/making orders. (Large preview)
Easy Routing
Every site needs route or URLs leading to specific pages with certain information for the end-user. Collections of similar information or application are accessed in a particular route. There is a need for grouping routes together for accessibility and communication within files. Django has that done for you in the urls.py file.
The urls.py is a file leading from the ROOT_CONF variable in the settings.py. This is where our main URL configuration is done. When we create views in different files or folders, or even in the urls.py file, they have to be configured in the urlpatterns list.
Django expects a list named urlpatterns in the file. You can change the file in the ROOT_CONF variable to any other file which you placed the urlpatterns list.
urlpatterns = [ path('admin/', admin.site.urls), ]
The list consists of objects that are instances of path or re-path. Each instance has two compulsory parameters, the pattern 'admin/', and a view or URL file, admin.site.urls.
The instances could also be leading to another file with more URL configurations. This is done for readability.
views.py
An important need for a backend application is the views which each route maps to. In Django, you write your function or class based views for an app in the views.py file. A view is a class or function that processes a request and sends back a response to your user.
Edit your views.py file to this:
from django.http import HttpResponse def home(request): return HttpResponse("This is a shopping site for products") def order(request): return HttpResponse("Hello, welcome to our store, browse to our products and order!")
Here we imported HTTPResponse to use it in defining two views (function views) to return sentence when called on. def home should be called when you visit the primary address and def order when you access the order URL.
After creating our views we need to assign it to different routes(or urlpatterns). That can be done in several ways, we can create a urlpatterns list in the same file, or we could import trading.views into ecommerce_site.urls file and create the path.
The preferred way to do so is creating a sub URL configuration file (inside trading), and including it in ecommerce_site.urls. Create a urls.py file in the trading directory. Your directory should look like:
trading/ __init__.py admin.py apps.py migrations/ __init__.py 0001_initial.py models.py tests.py urls.py views.py
Add the following code to your new file (urls.py)
from django.urls import path from . import views urlpatterns = [ path('', views.home, name='home'), path('order/', views.order, name='order'), ]
Let’s register the trading URL configuration file(urls.py) in the project URLs configuration file,
from django.contrib import admin from django.urls import include, path urlpatterns = [ path('admin/', admin.site.urls), path('', include('trading.urls')) ]
To be able to access the urlpatterns we will use the include class from django.urls in line 2. Then chose a pattern and attached the urls.py file in the trading directory.
What we did here was to import the path class from django, and the views.py file. Then our list consists of two path instances for each view. So def home is called on http://127.0.0.1:8000/.
Site when you visit home page. (Large preview)
And def order is called on http://127.0.0.1:8000/order/.
Order URL visited. (Large preview)
Note: The process of running startproject and startapp is not compulsory but highly encouraged by Django. And you can create/move files and folders after running each command to your working convenience.
Dependency Tree
Here is the process in which Django processes requests from URLs coming:
Django searches for the root location (path) for your URLs in the ROOT_CONF variable.
Django loads the python file given in the path provided. And locates the urlpatterns variable, this is a list containing all instances of django.urls.path() and/or django.urls.re_path().
In the list, Django goes in order and looks for a matching URL.
Python, imports and calls the view (either function-based or class-based view). Which is furthered passed with the HTTP request.
The view processes the request and information passed and either returns a message/template or redirects to another view.
If no URL pattern matches, or if an exception is raised during any point in this process, Django invokes an appropriate error-handling view.
Django request handling. (Large preview)
Conclusion
We have learnt of the possibility of creating files for Django without the command line. Also we have learnt the advantages and the building block of a Django Project. Django is an amazing tool in building backend projects with the goal to create simplicity.
You can check out the code for this tutorial on GitHub.
Resources
(ks, ra, yk, il)
Website Design & SEO Delray Beach by DBL07.co
Delray Beach SEO
source http://www.scpie.org/demystifying-djangos-magic/ source https://scpie1.blogspot.com/2020/08/demystifying-djangos-magic.html
0 notes
Text
Demystifying Django’s Magic
About The Author
Precious Ndubueze is a software developer who spends half of her time in her head when not getting lost in problem-solving or writing. More about Precious …
In this article, we will be taking an in-depth look at what Django brings to the table by understanding what the generated files and folder do, this will give us a better understanding of the Django framework.
According to the official documentation,
Django is a high-level Python Web framework that encourages rapid development and clean, pragmatic design. Built by experienced developers, it takes care of much of the hassle of Web development, so you can focus on writing your app without needing to reinvent the wheel. It’s free and open source.
— DjangoProject.com
It is one of Python’s popular framework for building web applications and is most preferred for its scalability in creating a boilerplate with laid down configurations and files. This wraps up the whole goal of Django for developers;
“…building a great application in little time and less worry over basic settings.”
There are basic configurations, files and styling that cuts across all web application, no matter what you’re building. When using Django, these are generated for you automatically when you run certain commands at different points in the development cycle of your application. With this, you’ll have enough time to focus on the core aspect of your developing your application while Django handles the others for you.
It means that there are a lot of things happening underneath the hood. For someone who does not have a full grasp of the moving parts, this can be overwhelming. In this article we’re going to be learning about the following:
We’ll learn how these all fit together and the role they play. It’s important to know that it will not be possible to take a look at everything happening inside of Django. For cases outside the scope of this tutorial, there will be links to point you to resources that will help with that.
For learning purpose, we will be building an e-commerce platform. This is not a full-blown e-commerce site, our application will have only two basic features; creating products and making orders from the admin’s view.
This article will guide you through understanding Django’s pre-built commands, files and basics. It is targeted at developers who have used Django or intend to use it and want to know what happens under the hood. While it is not compulsory that you must have used Django, having experience with the basics of Django before continuing with this article will give you an advantage. You need to have a working knowledge of Python to fully grasp what will be covered in this piece.
Installing Django
If you do not have Django installed already, here are the steps to do that.
First, create a virtual environment, named djangodev. You need this to isolate your Django workspace and its dependent packages.
python3 -m venv ~/.virtualenvs/djangodev
Now to get into your virtual environment, you need to get it activated;
source ~/.virtualenvs/djangodev/bin/activate
If you get any error running with source you can make use of this alternative command,
. ~/.virtualenvs/djangodev/bin/activate
For Windows users, make use of this instead,
...\> %HOMEPATH%\.virtualenvs\djangodev\Scripts\activate.bat
Note: You need to activate the virtual environment anytime you want to use Django.
Now that you’re in your virtual env, install Django:
python -m pip install Django
To check if Django was properly installed, run;
python -m django --version
Shakaboom! Now you’re set for some magic, get your wands ready!
The method of creating files and folders at the go might be simple and straightforward. However, it is not ideal when you have to create a medium or large project and a deadline to beat. We always have a deadline to beat, even for personal projects.
Following this method when creating a new large project, you’ll have to create multiple files and folders and make multiple settings, which could lead to the creation of avoidable bugs and a lot of wasted time. startproject and startapp commands available to us through Django aim to solve this problem. These two commands create files, folders and carry out lots of configuration for you.
Let’s get started by generating a new application using the startproject command.
Scaffolding An Application
We’ll generate our application and take a look at the files that are generated, as well as few commands we’ll use. Run this command in your terminal to get started;
django-admin startproject ecommerce_site
When installing Django, django-admin is added to your path to give it access to perform its actions. It’s Django’s command-line utility for administrative responsibilities. Learn more django-admin uses here; it is a little beyond the scope of this article.
startproject is a Django command that helps generate the project. Here we pass to it the name of our project ecommerce_site. It then goes on to create the project in a directory called ecommerce_site. The directory should look like this,
Showing folder after running startproject. (Large preview)
We’ll need to navigate into the newly created directory and run the command to generate the app.
cd ecommerce_site python manage.py startapp trading
startapp is a command executed by manage.py in the project directory, it creates multiple files, and a folder named using the name specified in the command, in this case, what’s specified is trading. The app folder consists of simple files that should be needed for creating features of an application. Now your directory should be looking like this:
Showing folder after running startapp. (Large preview)
If you’re wondering the difference between a project and an app. A project is a Django web application, it can consist of one or more apps. It’s the folder holding manage.py and the other module that includes the settings.py and other files. An app is a python package that does a certain feature, includes files like models.py, the migration directory and more. You can check out this answer on Stack Overflow for more.
The startproject will create the main project directory, while the startapp will create the app directory. Both are also been passed a name to be used in generation. The startproject is the first command run when creating a new project, while the startapp is run inside the new project directory.
The current layout is a great mapping you can use for whatever application you are building. It’s scalable and consists of files you will be needing. There is a chance to create, rename, edit and move files within the project.
Django’s Configuration
Django provides different settings and configurations for you, after running the two commands in different files, let’s run through the generated files to learn what each does.
settings.py
Most web applications need configurations like; authentication to verify users, permissions to allow certain users with certain abilities and set security standards. All these are needed to give your users the best experience needed. It will take a long time for you as a developer to begin to roll each of these on your own, for every application you work on.
Django provides you with these needed configurations and more — such that you can opt for the ones you want and plug them in. These are done in settings.py, there are already laid settings created to provide basic functionalities for you.
When Django tries to run a project, there are certain variables it looks for. The settings.py is the file holding those variables that lead to other files or information. Django is directed to this file from the manage.py file and takes information or loads other files it is led to from here.
These configurations include:
DEBUG The DEBUG functionality is set to True to enable reading of errors and debugging code in development, it should be set to False during production (i.e when you are deploying). This setting allows you to be able to debug your code better with the help of Django when it tries running your code.
INSTALLED_APPS This is a list of all apps performing a certain feature in Django. It comes with some defaults apps like the 'django.contrib.auth' which is used for user authentication, django.contrib.admin' for admin functionality, and 'django.contrib.messages' needed in sending notification or info to users. Any other app you create using the startapp command will have to be in here before it can be run by Django.
MIDDLEWARE is a lightweight framework for processing inputs and outputs going through Django requests and responses. Each middleware does a specific function with an app, like the 'django.contrib.auth.middleware.AuthenticationMiddleware' works with the 'django.contrib.sessions' to associate users with requests. You should check out further features of each middleware on the docs.
ROOT_URLCONF is a variable to a path where Django looks for your urlpatterns when a request is passed to your Django application. Whenever a request is made in a Django application, Django searches this variable and loads the leading file and loops though the urlpatterns list in search for the matching path.
TEMPLATES is a setting to allow rendering of HTML files to represent a view. It communicates with the request, auth and messages apps. The 'BACKEND' value and the 'APP_DIRS' set to True enables Django to search for HTML files within /templates folder. The 'context_processors' in the OPTIONS are callables, that take in the request as an argument and merge it with the context when a template is been rendered, these callables work to help with debugging, authentication, and handling of requests generally.
WSGI_APPLICATION is a path leading to the application variable in wsgi.py file.
DATABASE is a dictionary that holds access to an external database(or internal like in the case of the default sqlite) like PostgresSQL, MySQL and MongoDB. Here is an example of a Postgres database I will be using for our example:
DATABASES = { 'default': { 'ENGINE': 'django.db.backends.postgresql_psycopg2', 'NAME': 'db_name', 'USER': 'db_user', 'PASSWORD': 'db_password', 'HOST': 'localhost', 'PORT': '', } }
You can decide to use the default sqlite database, this doesn’t work great for production. You can set up a Postgres database like above, you will have to create the database first and pass the user, password with write permission to the database.
Note: For the purpose of this tutorial you can use the default sqlite database set already. The above is a demonstration on how you can set SQL and NO-SQL database connection in Django.
AUTH_PASSWORD_VALIDATORS these are functions that are called for password validations. They are called when creating users (and admins too) records, resetting and changing passwords. You can learn more about them from the official documentation.
More documentation on settings can be found here.
manage.py
Most web projects need an entry point where commands start from. An entry point acting as a gateway into the application. In every Django project, it is usually the manage.py file.
This file is needed as a starting point in your application. From here, all commands are run and everything starts up here.
manage.py does the same function as django-admin. It also tells Django the location for the configurations you have in your application. This is set by default and does not need to be changed.
It uses def main() function to handle the default settings module to our settings.py file. It tries to import the execute function, and if it runs into error it throws the ImportError. Otherwise, it takes in whatever argument is passed by the sys.argv from the command line and executes.
sys.argv is a list that takes in the command passed in via the terminal. When we run python manage.py runserver in the command line, sys.argv gets set to ["manage.py", "runserver"] and this is passed to the execute() function.
Arguments like python manage.py startapp trading or python manage.py makemigrations are set to [ "manage.py", "startapp", "trading"] and ["manage.py", "makemigrations"] respectively for execution.
The if statement is set to run if the command given set to manage.py.
Aside from running django-admin functions, you will be using it in running server, handle migrations, and other commands your project will be using. You will also need it when deploying, testing and debugging your projects.
Model Layout
Django provides a simple modelling layout for you. You configure your models in the models.py file in the trading directory. Your classes (or models) are layouts your database tables will follow.
You define your classes based on the data types you want to get from the user(or the admin) for each table. Our models create a migration file that works with the DATABASE variable in the settings.py.
Let’s create two models we’ll need, for products and orders:
from django.db import models class Product(models.Model): name = models.CharField(max_length=50) image = models.ImageField(upload_to='products', default='python.png') price = models.IntegerField() description = models.TextField() def __str__(self): return self.name class Order(models.Model): product = models.ForeignKey(Product, on_delete=models.CASCADE) quantity = models.IntegerField() date = models.DateField(auto_now_add=True) user = models.CharField(max_length=50) def __str__(self): return self.user
The product model has a name, price, description and an image (which when saved will be uploaded to a products folder. This gets created if it folder doesn’t exist) columns. The order has a product (linked to the products table), the quantity, date and user columns.
With this information, Django creates a database schema for the app. Also, creates a Python database-access API for accessing Product and Order objects. Django has a built migration tool so you don’t have to use external packages for migrations.
Next step is to run the migration command and migrate to the database. But before we do that, we have to register trading as an app in our project directory.
First off, we have to configure the trading directory as an app in Django. Django has that done for you in the app.py file. This file registers trading as an app and will be further used in the settings.py file.
Now, in settings.py add trading in INSTALLED_APP. It should look like this:
INSTALLED_APPS = [ 'django.contrib.admin', 'django.contrib.auth', 'django.contrib.contenttypes', 'django.contrib.sessions', 'django.contrib.messages', 'django.contrib.staticfiles', 'trading.apps.TradingConf', ]
On the terminal, run:
$ python manage.py makemigrations trading $ python manage.py migrate
Note: Your virtual environment must be activated and you should be inside the project directory.
python manage.py makemigrations trading takes note of changes made in the trading module and creates a file in the migration folder of changes in models.py and python manage.py migrate then updates the changes.
You can find the generated migration file from the python manage.py makemigrations trading command in the migration directory named 0001_initial.py. You can see the classes and columns as commands for creation inside the file. As more changes in models.py are made, more files will be generated here.
Admin Features
In our current application, we’ll need admin features to manage the products and orders that will be created in the application. Django provides us with an in-built admin functionality already at our disposal. The admin app(feature) has also been registered in our INSTALLED_APP list; 'django.contrib.admin'.
Also, the URL for the admin has also been registered in the urlpatterns list our URL configuration file urls.py; path('admin/', admin.site.urls),. The admin.py file makes it possible for you to register models and the CRUD actions that are to be performed on the models.
To set up the admin, run this on the terminal:
$ python manage.py createsuperuser
You’ll be prompted to enter a username, email and password. After that, you’ve successfully created an admin. To get started with the admin functionality, run the server:
$ python manage.py runserver
Visiting http://127.0.0.1:8000/admin/ will lead to a login session, when you log in (with username and password you created) you are directed to admin dashboard:
Admin dashboard provided by Django. (Large preview)
The groups and users are default configurations that allow admin to access user management and permission. Now let’s register our models.
In the admin.py, add the following lines:
from django.contrib import admin # Register your models here. from .models import Product, Order admin.site.register(Product) admin.site.register(Order)
from django.contrib import admin imports the admin functionality from Django, and then we imported the two classes from our models.py and registered them so an admin can perform CRUD actions on products and order from the dashboard.
After registering the models, your dashboard should look like this:
Product and Order model on Admin Dashboard. (Large preview)
Adding products:
Admin adding a product(shoe) to site. (Large preview)
Making orders from admin dashboard:
Admin adding/making orders. (Large preview)
Easy Routing
Every site needs route or URLs leading to specific pages with certain information for the end-user. Collections of similar information or application are accessed in a particular route. There is a need for grouping routes together for accessibility and communication within files. Django has that done for you in the urls.py file.
The urls.py is a file leading from the ROOT_CONF variable in the settings.py. This is where our main URL configuration is done. When we create views in different files or folders, or even in the urls.py file, they have to be configured in the urlpatterns list.
Django expects a list named urlpatterns in the file. You can change the file in the ROOT_CONF variable to any other file which you placed the urlpatterns list.
urlpatterns = [ path('admin/', admin.site.urls), ]
The list consists of objects that are instances of path or re-path. Each instance has two compulsory parameters, the pattern 'admin/', and a view or URL file, admin.site.urls.
The instances could also be leading to another file with more URL configurations. This is done for readability.
views.py
An important need for a backend application is the views which each route maps to. In Django, you write your function or class based views for an app in the views.py file. A view is a class or function that processes a request and sends back a response to your user.
Edit your views.py file to this:
from django.http import HttpResponse def home(request): return HttpResponse("This is a shopping site for products") def order(request): return HttpResponse("Hello, welcome to our store, browse to our products and order!")
Here we imported HTTPResponse to use it in defining two views (function views) to return sentence when called on. def home should be called when you visit the primary address and def order when you access the order URL.
After creating our views we need to assign it to different routes(or urlpatterns). That can be done in several ways, we can create a urlpatterns list in the same file, or we could import trading.views into ecommerce_site.urls file and create the path.
The preferred way to do so is creating a sub URL configuration file (inside trading), and including it in ecommerce_site.urls. Create a urls.py file in the trading directory. Your directory should look like:
trading/ __init__.py admin.py apps.py migrations/ __init__.py 0001_initial.py models.py tests.py urls.py views.py
Add the following code to your new file (urls.py)
from django.urls import path from . import views urlpatterns = [ path('', views.home, name='home'), path('order/', views.order, name='order'), ]
Let’s register the trading URL configuration file(urls.py) in the project URLs configuration file,
from django.contrib import admin from django.urls import include, path urlpatterns = [ path('admin/', admin.site.urls), path('', include('trading.urls')) ]
To be able to access the urlpatterns we will use the include class from django.urls in line 2. Then chose a pattern and attached the urls.py file in the trading directory.
What we did here was to import the path class from django, and the views.py file. Then our list consists of two path instances for each view. So def home is called on http://127.0.0.1:8000/.
Site when you visit home page. (Large preview)
And def order is called on http://127.0.0.1:8000/order/.
Order URL visited. (Large preview)
Note: The process of running startproject and startapp is not compulsory but highly encouraged by Django. And you can create/move files and folders after running each command to your working convenience.
Dependency Tree
Here is the process in which Django processes requests from URLs coming:
Django searches for the root location (path) for your URLs in the ROOT_CONF variable.
Django loads the python file given in the path provided. And locates the urlpatterns variable, this is a list containing all instances of django.urls.path() and/or django.urls.re_path().
In the list, Django goes in order and looks for a matching URL.
Python, imports and calls the view (either function-based or class-based view). Which is furthered passed with the HTTP request.
The view processes the request and information passed and either returns a message/template or redirects to another view.
If no URL pattern matches, or if an exception is raised during any point in this process, Django invokes an appropriate error-handling view.
Django request handling. (Large preview)
Conclusion
We have learnt of the possibility of creating files for Django without the command line. Also we have learnt the advantages and the building block of a Django Project. Django is an amazing tool in building backend projects with the goal to create simplicity.
You can check out the code for this tutorial on GitHub.
Resources
(ks, ra, yk, il)
Website Design & SEO Delray Beach by DBL07.co
Delray Beach SEO
source http://www.scpie.org/demystifying-djangos-magic/ source https://scpie.tumblr.com/post/627706793968238592
0 notes
Text
Demystifying Django’s Magic
About The Author
Precious Ndubueze is a software developer who spends half of her time in her head when not getting lost in problem-solving or writing. More about Precious …
In this article, we will be taking an in-depth look at what Django brings to the table by understanding what the generated files and folder do, this will give us a better understanding of the Django framework.
According to the official documentation,
Django is a high-level Python Web framework that encourages rapid development and clean, pragmatic design. Built by experienced developers, it takes care of much of the hassle of Web development, so you can focus on writing your app without needing to reinvent the wheel. It’s free and open source.
— DjangoProject.com
It is one of Python’s popular framework for building web applications and is most preferred for its scalability in creating a boilerplate with laid down configurations and files. This wraps up the whole goal of Django for developers;
“…building a great application in little time and less worry over basic settings.”
There are basic configurations, files and styling that cuts across all web application, no matter what you’re building. When using Django, these are generated for you automatically when you run certain commands at different points in the development cycle of your application. With this, you’ll have enough time to focus on the core aspect of your developing your application while Django handles the others for you.
It means that there are a lot of things happening underneath the hood. For someone who does not have a full grasp of the moving parts, this can be overwhelming. In this article we’re going to be learning about the following:
We’ll learn how these all fit together and the role they play. It’s important to know that it will not be possible to take a look at everything happening inside of Django. For cases outside the scope of this tutorial, there will be links to point you to resources that will help with that.
For learning purpose, we will be building an e-commerce platform. This is not a full-blown e-commerce site, our application will have only two basic features; creating products and making orders from the admin’s view.
This article will guide you through understanding Django’s pre-built commands, files and basics. It is targeted at developers who have used Django or intend to use it and want to know what happens under the hood. While it is not compulsory that you must have used Django, having experience with the basics of Django before continuing with this article will give you an advantage. You need to have a working knowledge of Python to fully grasp what will be covered in this piece.
Installing Django
If you do not have Django installed already, here are the steps to do that.
First, create a virtual environment, named djangodev. You need this to isolate your Django workspace and its dependent packages.
python3 -m venv ~/.virtualenvs/djangodev
Now to get into your virtual environment, you need to get it activated;
source ~/.virtualenvs/djangodev/bin/activate
If you get any error running with source you can make use of this alternative command,
. ~/.virtualenvs/djangodev/bin/activate
For Windows users, make use of this instead,
...\> %HOMEPATH%\.virtualenvs\djangodev\Scripts\activate.bat
Note: You need to activate the virtual environment anytime you want to use Django.
Now that you’re in your virtual env, install Django:
python -m pip install Django
To check if Django was properly installed, run;
python -m django --version
Shakaboom! Now you’re set for some magic, get your wands ready!
The method of creating files and folders at the go might be simple and straightforward. However, it is not ideal when you have to create a medium or large project and a deadline to beat. We always have a deadline to beat, even for personal projects.
Following this method when creating a new large project, you’ll have to create multiple files and folders and make multiple settings, which could lead to the creation of avoidable bugs and a lot of wasted time. startproject and startapp commands available to us through Django aim to solve this problem. These two commands create files, folders and carry out lots of configuration for you.
Let’s get started by generating a new application using the startproject command.
Scaffolding An Application
We’ll generate our application and take a look at the files that are generated, as well as few commands we’ll use. Run this command in your terminal to get started;
django-admin startproject ecommerce_site
When installing Django, django-admin is added to your path to give it access to perform its actions. It’s Django’s command-line utility for administrative responsibilities. Learn more django-admin uses here; it is a little beyond the scope of this article.
startproject is a Django command that helps generate the project. Here we pass to it the name of our project ecommerce_site. It then goes on to create the project in a directory called ecommerce_site. The directory should look like this,
Showing folder after running startproject. (Large preview)
We’ll need to navigate into the newly created directory and run the command to generate the app.
cd ecommerce_site python manage.py startapp trading
startapp is a command executed by manage.py in the project directory, it creates multiple files, and a folder named using the name specified in the command, in this case, what’s specified is trading. The app folder consists of simple files that should be needed for creating features of an application. Now your directory should be looking like this:
Showing folder after running startapp. (Large preview)
If you’re wondering the difference between a project and an app. A project is a Django web application, it can consist of one or more apps. It’s the folder holding manage.py and the other module that includes the settings.py and other files. An app is a python package that does a certain feature, includes files like models.py, the migration directory and more. You can check out this answer on Stack Overflow for more.
The startproject will create the main project directory, while the startapp will create the app directory. Both are also been passed a name to be used in generation. The startproject is the first command run when creating a new project, while the startapp is run inside the new project directory.
The current layout is a great mapping you can use for whatever application you are building. It’s scalable and consists of files you will be needing. There is a chance to create, rename, edit and move files within the project.
Django’s Configuration
Django provides different settings and configurations for you, after running the two commands in different files, let’s run through the generated files to learn what each does.
settings.py
Most web applications need configurations like; authentication to verify users, permissions to allow certain users with certain abilities and set security standards. All these are needed to give your users the best experience needed. It will take a long time for you as a developer to begin to roll each of these on your own, for every application you work on.
Django provides you with these needed configurations and more — such that you can opt for the ones you want and plug them in. These are done in settings.py, there are already laid settings created to provide basic functionalities for you.
When Django tries to run a project, there are certain variables it looks for. The settings.py is the file holding those variables that lead to other files or information. Django is directed to this file from the manage.py file and takes information or loads other files it is led to from here.
These configurations include:
DEBUG The DEBUG functionality is set to True to enable reading of errors and debugging code in development, it should be set to False during production (i.e when you are deploying). This setting allows you to be able to debug your code better with the help of Django when it tries running your code.
INSTALLED_APPS This is a list of all apps performing a certain feature in Django. It comes with some defaults apps like the 'django.contrib.auth' which is used for user authentication, django.contrib.admin' for admin functionality, and 'django.contrib.messages' needed in sending notification or info to users. Any other app you create using the startapp command will have to be in here before it can be run by Django.
MIDDLEWARE is a lightweight framework for processing inputs and outputs going through Django requests and responses. Each middleware does a specific function with an app, like the 'django.contrib.auth.middleware.AuthenticationMiddleware' works with the 'django.contrib.sessions' to associate users with requests. You should check out further features of each middleware on the docs.
ROOT_URLCONF is a variable to a path where Django looks for your urlpatterns when a request is passed to your Django application. Whenever a request is made in a Django application, Django searches this variable and loads the leading file and loops though the urlpatterns list in search for the matching path.
TEMPLATES is a setting to allow rendering of HTML files to represent a view. It communicates with the request, auth and messages apps. The 'BACKEND' value and the 'APP_DIRS' set to True enables Django to search for HTML files within /templates folder. The 'context_processors' in the OPTIONS are callables, that take in the request as an argument and merge it with the context when a template is been rendered, these callables work to help with debugging, authentication, and handling of requests generally.
WSGI_APPLICATION is a path leading to the application variable in wsgi.py file.
DATABASE is a dictionary that holds access to an external database(or internal like in the case of the default sqlite) like PostgresSQL, MySQL and MongoDB. Here is an example of a Postgres database I will be using for our example:
DATABASES = { 'default': { 'ENGINE': 'django.db.backends.postgresql_psycopg2', 'NAME': 'db_name', 'USER': 'db_user', 'PASSWORD': 'db_password', 'HOST': 'localhost', 'PORT': '', } }
You can decide to use the default sqlite database, this doesn’t work great for production. You can set up a Postgres database like above, you will have to create the database first and pass the user, password with write permission to the database.
Note: For the purpose of this tutorial you can use the default sqlite database set already. The above is a demonstration on how you can set SQL and NO-SQL database connection in Django.
AUTH_PASSWORD_VALIDATORS these are functions that are called for password validations. They are called when creating users (and admins too) records, resetting and changing passwords. You can learn more about them from the official documentation.
More documentation on settings can be found here.
manage.py
Most web projects need an entry point where commands start from. An entry point acting as a gateway into the application. In every Django project, it is usually the manage.py file.
This file is needed as a starting point in your application. From here, all commands are run and everything starts up here.
manage.py does the same function as django-admin. It also tells Django the location for the configurations you have in your application. This is set by default and does not need to be changed.
It uses def main() function to handle the default settings module to our settings.py file. It tries to import the execute function, and if it runs into error it throws the ImportError. Otherwise, it takes in whatever argument is passed by the sys.argv from the command line and executes.
sys.argv is a list that takes in the command passed in via the terminal. When we run python manage.py runserver in the command line, sys.argv gets set to ["manage.py", "runserver"] and this is passed to the execute() function.
Arguments like python manage.py startapp trading or python manage.py makemigrations are set to [ "manage.py", "startapp", "trading"] and ["manage.py", "makemigrations"] respectively for execution.
The if statement is set to run if the command given set to manage.py.
Aside from running django-admin functions, you will be using it in running server, handle migrations, and other commands your project will be using. You will also need it when deploying, testing and debugging your projects.
Model Layout
Django provides a simple modelling layout for you. You configure your models in the models.py file in the trading directory. Your classes (or models) are layouts your database tables will follow.
You define your classes based on the data types you want to get from the user(or the admin) for each table. Our models create a migration file that works with the DATABASE variable in the settings.py.
Let’s create two models we’ll need, for products and orders:
from django.db import models class Product(models.Model): name = models.CharField(max_length=50) image = models.ImageField(upload_to='products', default='python.png') price = models.IntegerField() description = models.TextField() def __str__(self): return self.name class Order(models.Model): product = models.ForeignKey(Product, on_delete=models.CASCADE) quantity = models.IntegerField() date = models.DateField(auto_now_add=True) user = models.CharField(max_length=50) def __str__(self): return self.user
The product model has a name, price, description and an image (which when saved will be uploaded to a products folder. This gets created if it folder doesn’t exist) columns. The order has a product (linked to the products table), the quantity, date and user columns.
With this information, Django creates a database schema for the app. Also, creates a Python database-access API for accessing Product and Order objects. Django has a built migration tool so you don’t have to use external packages for migrations.
Next step is to run the migration command and migrate to the database. But before we do that, we have to register trading as an app in our project directory.
First off, we have to configure the trading directory as an app in Django. Django has that done for you in the app.py file. This file registers trading as an app and will be further used in the settings.py file.
Now, in settings.py add trading in INSTALLED_APP. It should look like this:
INSTALLED_APPS = [ 'django.contrib.admin', 'django.contrib.auth', 'django.contrib.contenttypes', 'django.contrib.sessions', 'django.contrib.messages', 'django.contrib.staticfiles', 'trading.apps.TradingConf', ]
On the terminal, run:
$ python manage.py makemigrations trading $ python manage.py migrate
Note: Your virtual environment must be activated and you should be inside the project directory.
python manage.py makemigrations trading takes note of changes made in the trading module and creates a file in the migration folder of changes in models.py and python manage.py migrate then updates the changes.
You can find the generated migration file from the python manage.py makemigrations trading command in the migration directory named 0001_initial.py. You can see the classes and columns as commands for creation inside the file. As more changes in models.py are made, more files will be generated here.
Admin Features
In our current application, we’ll need admin features to manage the products and orders that will be created in the application. Django provides us with an in-built admin functionality already at our disposal. The admin app(feature) has also been registered in our INSTALLED_APP list; 'django.contrib.admin'.
Also, the URL for the admin has also been registered in the urlpatterns list our URL configuration file urls.py; path('admin/', admin.site.urls),. The admin.py file makes it possible for you to register models and the CRUD actions that are to be performed on the models.
To set up the admin, run this on the terminal:
$ python manage.py createsuperuser
You’ll be prompted to enter a username, email and password. After that, you’ve successfully created an admin. To get started with the admin functionality, run the server:
$ python manage.py runserver
Visiting http://127.0.0.1:8000/admin/ will lead to a login session, when you log in (with username and password you created) you are directed to admin dashboard:
Admin dashboard provided by Django. (Large preview)
The groups and users are default configurations that allow admin to access user management and permission. Now let’s register our models.
In the admin.py, add the following lines:
from django.contrib import admin # Register your models here. from .models import Product, Order admin.site.register(Product) admin.site.register(Order)
from django.contrib import admin imports the admin functionality from Django, and then we imported the two classes from our models.py and registered them so an admin can perform CRUD actions on products and order from the dashboard.
After registering the models, your dashboard should look like this:
Product and Order model on Admin Dashboard. (Large preview)
Adding products:
Admin adding a product(shoe) to site. (Large preview)
Making orders from admin dashboard:
Admin adding/making orders. (Large preview)
Easy Routing
Every site needs route or URLs leading to specific pages with certain information for the end-user. Collections of similar information or application are accessed in a particular route. There is a need for grouping routes together for accessibility and communication within files. Django has that done for you in the urls.py file.
The urls.py is a file leading from the ROOT_CONF variable in the settings.py. This is where our main URL configuration is done. When we create views in different files or folders, or even in the urls.py file, they have to be configured in the urlpatterns list.
Django expects a list named urlpatterns in the file. You can change the file in the ROOT_CONF variable to any other file which you placed the urlpatterns list.
urlpatterns = [ path('admin/', admin.site.urls), ]
The list consists of objects that are instances of path or re-path. Each instance has two compulsory parameters, the pattern 'admin/', and a view or URL file, admin.site.urls.
The instances could also be leading to another file with more URL configurations. This is done for readability.
views.py
An important need for a backend application is the views which each route maps to. In Django, you write your function or class based views for an app in the views.py file. A view is a class or function that processes a request and sends back a response to your user.
Edit your views.py file to this:
from django.http import HttpResponse def home(request): return HttpResponse("This is a shopping site for products") def order(request): return HttpResponse("Hello, welcome to our store, browse to our products and order!")
Here we imported HTTPResponse to use it in defining two views (function views) to return sentence when called on. def home should be called when you visit the primary address and def order when you access the order URL.
After creating our views we need to assign it to different routes(or urlpatterns). That can be done in several ways, we can create a urlpatterns list in the same file, or we could import trading.views into ecommerce_site.urls file and create the path.
The preferred way to do so is creating a sub URL configuration file (inside trading), and including it in ecommerce_site.urls. Create a urls.py file in the trading directory. Your directory should look like:
trading/ __init__.py admin.py apps.py migrations/ __init__.py 0001_initial.py models.py tests.py urls.py views.py
Add the following code to your new file (urls.py)
from django.urls import path from . import views urlpatterns = [ path('', views.home, name='home'), path('order/', views.order, name='order'), ]
Let’s register the trading URL configuration file(urls.py) in the project URLs configuration file,
from django.contrib import admin from django.urls import include, path urlpatterns = [ path('admin/', admin.site.urls), path('', include('trading.urls')) ]
To be able to access the urlpatterns we will use the include class from django.urls in line 2. Then chose a pattern and attached the urls.py file in the trading directory.
What we did here was to import the path class from django, and the views.py file. Then our list consists of two path instances for each view. So def home is called on http://127.0.0.1:8000/.
Site when you visit home page. (Large preview)
And def order is called on http://127.0.0.1:8000/order/.
Order URL visited. (Large preview)
Note: The process of running startproject and startapp is not compulsory but highly encouraged by Django. And you can create/move files and folders after running each command to your working convenience.
Dependency Tree
Here is the process in which Django processes requests from URLs coming:
Django searches for the root location (path) for your URLs in the ROOT_CONF variable.
Django loads the python file given in the path provided. And locates the urlpatterns variable, this is a list containing all instances of django.urls.path() and/or django.urls.re_path().
In the list, Django goes in order and looks for a matching URL.
Python, imports and calls the view (either function-based or class-based view). Which is furthered passed with the HTTP request.
The view processes the request and information passed and either returns a message/template or redirects to another view.
If no URL pattern matches, or if an exception is raised during any point in this process, Django invokes an appropriate error-handling view.
Django request handling. (Large preview)
Conclusion
We have learnt of the possibility of creating files for Django without the command line. Also we have learnt the advantages and the building block of a Django Project. Django is an amazing tool in building backend projects with the goal to create simplicity.
You can check out the code for this tutorial on GitHub.
Resources
(ks, ra, yk, il)
Website Design & SEO Delray Beach by DBL07.co
Delray Beach SEO
source http://www.scpie.org/demystifying-djangos-magic/
0 notes
Link
Terms Beginning With 'C' C Corporation C-Suite Call Call Option Callable Bond Canceled Check Candlestick Cap and Trade Capacity Utilization Rate CAPE Ratio Capital Capital Account Capital Adequacy Ratio (CAR) Capital Asset Capital Asset Pricing Model (CAPM) Capital Budgeting Capital Employed Capital Expenditure Capital Gain Capital Gains Tax Capital Goods Capital Improvement Capital Investment Capital IQ Capital Leases Capital Loss Carryover Capital Market Line (CML) Capital Markets Capital Project Capital Stock Capital Structure Capitalism Capitalization Capitalization Rate Capitalization Table Capitalize Capitalized Cost Capitalized Interest Capitulation Carbon Credit Carding Carriage and Insurance Paid To (CIP) Carried Interest Carve-Out Cash Accounting Cash Advance Cash-and-Carry-Arbitrage Cash and Cash Equivalents (CCE) Cash Back Cash Balance Pension Plan Cash Budget Cash Conversion Cycle (CCC) Cash Cow Cash Dividend Cash Equivalents Cash Flow Cash Flow from Financing Activities (CFF) Cash Flow from Investing Activities Cash Flow from Operating Activities (CFO) Cash Flow Statement Cash Management Cash-on-Cash Return Cash on Delivery (COD) Cash-Out Refinance Cash Ratio Cash Surrender Value Cash Value Life Insurance Catalog of Federal Domestic Assistance (CFDA) Caveat Emptor Central Counterparty Clearing House (CCP) Central Limit Theorem (CLT) Centrally Planned Economy Certainty Equivalent Certificate of Deposit (CD) Certificate of Insurance (COI) Certificate of Origin (CO) Certified Financial Planner (CFP) Certified Information Systems Auditor (CISA) Certified Management Accountant (CMA) Certified Public Accountant (CPA) Ceteris Paribus Chairman Channel Stuffing Chapter 11 Chart of Accounts (COA) Chartered Accountant (CA) Chartered Financial Analyst (CFA) Chartered Retirement Planning Counselor (CRPC) Chattel Mortgage Cheapest to Deliver (CTD) Check Checking Account Checks and Balances Chi Square Statistic Chief Executive Officer (CEO) Chief Financial Officer (CFO) Chief Operating Officer (COO) Chief Technology Officer (CTO) Child Tax Credit Chinese Wall Churn Rate Churning Circular Flow Of Income Classical Economics Clawback Clayton Antitrust Act Clearing Clearing House Close Position Closed-End Fund Closed Economy Cloud Computing Chicago Board Options Exchange (CBOE) Chicago Mercantile Exchange (CME) Coase Theorem Code of Ethics Coefficient of Determination Coefficient of Variation (CV) CoInsurance Collar Collateral Collateralized Debt Obligation (CDO) Collateralized Loan Obligation (CLO) Collateralized Mortgage Obligation (CMO) Collection Agency Collusion Combined Loan-To-Value Ratio (CLTV Ratio) Combined Ratio Command Economy Commerce Commercial Commercial Bank Commercial Loan Commercial Mortgage-Backed Security (CMBS) Commercial Paper Commercial Real Estate Commercialization Commingled Fund Commission Commodity Commodity Futures Contract Commodity Trading Advisor (CTA) Common Equity Tier 1 (CET1) Common Law Common Size Financial Statement Common Size Income Statement Common Stock Communism Community Reinvestment Act (CRA) Comparable Company Analysis (CCA) Comparative Advantage Comparative Market Analysis Compensatory Damages Competitive Intelligence Competitive Advantage Complement Compliance Officer Compound Annual Growth Rate (CAGR) Compound Interest Compounding Comprehensive Income Comps Conditional Probability Conditional Value at Risk (CVaR) Confidence Interval Conflict of Interest Conflict Theory Conglomerate Consignment Consolidate Consolidated Omnibus Budget Reconciliation Act (COBRA) Consolidation Construction Loan Consumer Credit Consumer Discretionary Consumer Goods Consumer Packaged Goods (CPG) Consumer Price Index (CPI) Consumer Surplus Consumer Staples Consumerism Consumption Function Contango Contingency Contingent Asset Contingent Beneficiary Contingent Convertible Contingent Liability Contingent Value Rights (CVR) Continuous Compounding Contra Account Contract For Differences (CFD) Contractionary Policy Contrarian Contributed Capital Contribution Margin Controller Conventional Mortgage Convertible Bond Convertible Preferred Stock Convexity Cook the Books Copyright Core Competencies Corporate Bond Corporate Charter Corporate Citizenship Corporate Culture Corporate Finance Corporate Governance Corporate Hierarchy Corporate Social Responsibility (CSR) Corporate Tax Corporation Correction Correlation Correlation Coefficient Correspondent Bank Cost Accounting Cost and Freight (CFR) Cost Basis Cost-Benefit Analysis Cost of Capital Cost Control Cost of Debt Cost of Equity Cost of Goods Sold (COGS) Cost, Insurance and Freight (CIF) Cost of Labor Cost of Living Cost-of-Living Adjustment (COLA) Cost of Revenue Cost Per Click (CPC) Cost Per Thousand (CPM) Cost-Plus Contract Cost-Push Cost-Volume-Profit (CVP) Cottage Industry Counteroffer Counterparty Counterparty Risk Countertrade Coupon Rate Covariance Covenant Cover Letter Coverage Ratio Covered Call Covered Interest Rate Parity Creative Destruction Credit Credit Analyst Credit Bureau Credit Card Credit Card Balance Credit Card Dump Credit Default Swap (CDS) Credit Facility Credit Limit Credit Linked Note (CLN) Credit Rating Credit Report Credit Risk Credit Score Credit Spread Credit Union Creditor Creditworthiness Cross Culture Cross Elasticity of Demand Cross-Sell Crowdfunding Crowding Out Effect Crude Oil Crypto Token Cryptocurrency Cum Dividend Cum Laude Cup and Handle Currency Currency Carry Trade Currency Exchange Currency Peg Currency Swap Current Account Current Account Deficit Current Assets Current Liabilities Current Ratio Current Yield CUSIP Number Custodial Account Custodian Customer Customer Relationship Management (CRM) Customer Service Customer to Customer (C2C) Cyclical Industry Cyclical Stocks Cyclical Unemployment More Terms "Your imagination is our reality" "Your dream becomes reality with us" - AKAL HATI Technology -
0 notes
Text
How to Create an Email List with Firebase, Sendfox and Ionic
If you want to integrate an email list for your app or website, you have countless options – but today I’ll show you a really simple way to make everything work with Firebase cloud functions!
Integrating an email provider can be challenging, especially if they only offer pre-made widgets. With Sendfox, we have access to an API, but we shouldn’t use it directly from our frontend app since that would expose our private keys.
Instead, we use Firebase cloud functions and database trigger to automatically add new subscribers in a safe way!
Email List Setup
First of all you need a Sendfox account, which is free in the beginning.
After creating your account, you need to create a list to which we can later add new subscribers.
You can then find the list ID in the URL of your browser, which we will need at a later point as well.
Finally we also need an API key, so go ahead and create one in your settings and save the value for now somewhere.
The key is shown only once, so note it now before dismissing the view.
Firebase Settings
Next step is Firebase, and you need to create a new project (or use any existing). Inside Firebase, make sure you have enabled the Firestore database by clicking “Get Started” in the right tab.
In order to connect our Ionic app to Firebase we also need the configuration object. You can create it by going to settings -> general -> add app inside Firebase, which will show an object the we need in the next step.
Ionic App Setup
Now let’s move to our app. We can create a blank new Ionic app and install the packages for Angular Fire in order to easily access both the database and the cloud functions.
Go ahead by running:
ionic start devdacticFirelist blank --type=angular cd ./devdacticFirelist npm i firebase @angular/fire
Now it’s time to copy over your configuration object from Firebase, which you can paste into the environments/environment.ts under a new Firebase key like this:
export const environment = { production: false, firebase: { apiKey: "", authDomain: "", databaseURL: "", projectId: "", storageBucket: "", messagingSenderId: "", appId: "" } };
To connect everything, we need to initialize AngularFire with this object. Also, we need to import all the modules that we need within our app later, so change the app.module.ts to:
import { NgModule } from '@angular/core'; import { BrowserModule } from '@angular/platform-browser'; import { RouteReuseStrategy } from '@angular/router'; import { IonicModule, IonicRouteStrategy } from '@ionic/angular'; import { SplashScreen } from '@ionic-native/splash-screen/ngx'; import { StatusBar } from '@ionic-native/status-bar/ngx'; import { AppComponent } from './app.component'; import { AppRoutingModule } from './app-routing.module'; import { AngularFireModule } from '@angular/fire'; import { environment } from '../environments/environment'; import { AngularFirestoreModule } from '@angular/fire/firestore'; import { AngularFireFunctionsModule, FUNCTIONS_REGION } from '@angular/fire/functions'; @NgModule({ declarations: [AppComponent], entryComponents: [], imports: [ BrowserModule, IonicModule.forRoot(), AppRoutingModule, AngularFireModule.initializeApp(environment.firebase), AngularFirestoreModule, AngularFireFunctionsModule ], providers: [ StatusBar, SplashScreen, { provide: RouteReuseStrategy, useClass: IonicRouteStrategy }, { provide: FUNCTIONS_REGION, useValue: 'us-central1' } ], bootstrap: [AppComponent] }) export class AppModule {}
We also need to set a specific region for our functions – you will see in which region your functions run later when you deploy them. If you see a different value then, make sure to change it in here as well!
Ionic Firebase Integration
In terms of our app we will keep it simple for this example, especially the part of the view. We only need the mandatory input fields and buttons to trigger our actions, so go ahead and change the home/home.page.html to:
<ion-header> <ion-toolbar color="primary"> <ion-title> Ionic Firelist </ion-title> </ion-toolbar> </ion-header> <ion-content> <div class="ion-padding"> <ion-item> <ion-label position="floating">Email</ion-label> <ion-input [(ngModel)]="userdata.email"></ion-input> </ion-item> <ion-item> <ion-label position="floating">First Name</ion-label> <ion-input [(ngModel)]="userdata.first_name"></ion-input> </ion-item> <ion-button expand="full" (click)="subscribeDirectly()"> Subscribe with Callable function</ion-button> <ion-button expand="full" (click)="subscribeTriggered()"> Subscribe with DB trigger</ion-button> </div> </ion-content>
As you can see from our view, we will use two different ways to add a subscriber. Not really mandatory, but a good example to show:
How to use a Firestore cloud trigger
How to use a callable cloud function
The first option is done by simply writing to the database. Our Ionic app doesn’t really know what’s happening afterwards, but we will add a cloud function later that will be called whenever we write to a specific location inside our Firestore!
The second way is directly calling a cloud function. We can call a function by its name and pass data to the call – just like we are used to with any regular Http call.
It’s important to understand that we need to call the callable() function in order to actually get an Observable to which we can subscribe, it’s not immediately created in the first line of the subscribeDirectly.
Go ahead by changing your home/home.page.ts to:
import { Component } from '@angular/core'; import { AngularFireFunctions } from '@angular/fire/functions'; import { AngularFirestore } from '@angular/fire/firestore'; import { ToastController } from '@ionic/angular'; @Component({ selector: 'app-home', templateUrl: 'home.page.html', styleUrls: ['home.page.scss'] }) export class HomePage { userdata = { email: '', first_name: '' }; constructor( private functions: AngularFireFunctions, private db: AngularFirestore, private toastCtrl: ToastController ) {} subscribeTriggered() { this.db .collection('subs') .add({ email: this.userdata.email, first_name: this.userdata.first_name }) .then( res => { this.showToast('You are now subscribed!'); }, err => { console.log('ERROR: ', err); } ); } subscribeDirectly() { const callable = this.functions.httpsCallable('addSubscriber'); const obs = callable({ email: this.userdata.email, first_name: this.userdata.first_name }); obs.subscribe(res => { this.showToast(res.msg); }); } async showToast(msg) { const toast = await this.toastCtrl.create({ message: msg, duration: 2000 }); toast.present(); } }
In both cases we will show a toast after the operation, but in the case of the callable function we will use the message we hopefully get back from the call instead of a string directly.
Firebase Cloud Functions
Now it’s time to establish our cloud functions, since the Ionic app won’t work correctly until we have set them up.
Make sure you have the firebase-tools installed globally in order to run the other commands!
To get started, initialize a Firebase project directly at the root of your Ionic project. Inside the dialog, select only Functions (as we don’t need anything else in this example) and continue the answers like shown in the image below.
npm i -g firebase-tools firebase init cd ./functions npm i axios
We also install the axios package, which is a standard helper for performing HTTP requests.
After everything is finished, you will find a new functions folder in your project. This is the place where you develop your cloud functions for Firebase!
As mentioned before, we will implement two different ways to add a subscriber.
Our addSubscriber is a callable function, which will have a regular endpoint inside Firebase after deployment. We already called this function from Ionic directly by its name!
All data that we passed to the function is directly available, and we pass it to our addToSendfox to perform the subscription API call.
The second function newSubscriber will be triggered whenever we write data to the subs collection within Firestore (more specific: create a new document).
Inside the function we also got access to the document, which again holds all relevant information for our subscription call.
Go ahead and replace everything inside the functions/index.ts with:
import * as functions from 'firebase-functions'; const axios = require('axios').default; const sendfoxKey = 'Bearer ' + functions.config().sendfox.key; // Callable cloud function export const addSubscriber = functions.https.onCall(async (data, context) => { addToSendfox(data); return { msg: 'You are now subscribed through a callable function!' }; }); // User a trigger on our database exports.newSubscriber = functions.firestore.document('/subs/{id}').onCreate((snap, context) => { let user: any = snap.data(); addToSendfox(user); return true; }); function addToSendfox(user: any) { // Use your Sendfox List ID user.lists = [18645]; const options = { url: 'https://api.sendfox.com/contacts', method: 'post', headers: { 'Content-Type': 'application/json', Authorization: sendfoxKey }, data: user }; axios(options) .then((response: any) => { console.log('response: ',response); }) .catch((error: any) => { console.log('error: ', error); }); }
Our helper function will perform the actual HTTP request using axios. In here we just need to construct the call to make it a regular post, with the headers we need and the body which needs to contain an array of list IDs to which we subscribed the email (remember the list ID from Sendfox you created in the beginning!).
Before we deploy our functions, we need to set they API key for Sendfox. By writing it to the Firebase environment it is stored in a safe place and not exposed to anyone else.
You can set the configuration by using functions:config:set and write whatever value you want to it.
Afterwards we are done and can continue to deploy the project, but since we only got functions we only want to deploy them:
firebase functions:config:set sendfox.key="YOURAPIKEY" firebase deploy --only functions
After running the deployment you can also see the regions for your cloud functions. If the value here is different from what you initially entered inside your app.module.ts, go ahead and replace it with the actual value you see!
Most likely your functions won’t work correctly and if you inspect the logs within the Firebase functions tab you will see a message like this:
Billing account not configured. External network is not accessible and quotas are severely limited. Configure billing account to remove these restrictions
To make an external API call from your cloud functions you need to upgrade your Firebase to a paid project. You can select it on the left hand side and pick the Blaze plan, but for some testing calls in the beginning you won’t be charged I guess (I don’t know the exact number of calls allowed).
Now the error should be gone and you can enjoy the whole process from Ionic to Firebase and Sendfox!
Conclusion
Creating an email list for your next project might look like a challenging task, but given the capabilities of email services and Firebase cloud functions make the task a simple combination of our available tools!
Of course the process of using Firebase callable functions could be used for a variety of other cases in which you want to make secured API calls to a third-party service that shouldn’t be done from your frontend project.
You can also find a video version of this tutorial below.
youtube
The post How to Create an Email List with Firebase, Sendfox and Ionic appeared first on Devdactic.
via Devdactic https://ift.tt/2U3khH7
0 notes
Text
PNC Bank Review: More Than a Virtual Wallet
Back in 2008, when the iPhone was brand new and Google was about to launch Android, traditional banks like PNC Bank were worried about the future.
Specifically, bankers wondered how they’d interact with millennials and younger digital natives as they aged into the economy.
PNC Bank tried to answer those questions when it launched Virtual Wallet in 2008.
Virtual Wallet took online banking to a new level, letting users track their spending using graphs. It even replaced some traditional banking vernacular with simpler, everyday words.
Later that year the economy almost melted down, and bankers had to start worrying about the present.
But Virtual Wallet kept growing.
The platform attracted a million users within four years.
Virtual Wallet is still central to the PNC Bank customer experience.
Under its hood, you’ll still find PNC Bank’s traditional checking and savings accounts. So let’s take a closer look at those.
Guide to PNC Bank
About PNC Bank
Checking Accounts
Savings Accounts
Loans
Virtual Wallet
My PNC Bank Review
A Brief History
PNC Bank traces its roots to the Pittsburgh Trust and Savings Co., founded in 1845. The firm grew and changed its name several times. By the mid-20th century, it had become Pittsburgh National Corp., hence the initials PNC.
Later on, in 1982, PNC merged with another PNC: Providence National Corp. of Philadelphia. These days the initials PNC don’t officially stand for either company’s name — it’s just PNC. PNC Bank is a subsidiary of PNC itself.
A steady stream of acquisitions in the 1980s and 1990s helped spread PNC Bank across the eastern half of the U.S.
Nineteen states — from Florida to New York and from Alabama to Michigan — have PNC Bank branches.
Where to Find PNC Bank Branches
With more than 2,600 physical branches and an additional 9,000 ATMs, you shouldn’t have trouble connecting with PNC Bank, as long as you live in one of its 19 states:
Alabama
Delaware
Florida
Georgia
Illinois
Indiana
Kentucky
Maryland
Michigan
Missouri
New Jersey
New York
North Carolina
Ohio
Pennsylvania
South Carolina
Virginia
West Virginia
Wisconsin
If you don’t live in one of these states, you can still bank with PNC Bank online, including Virtual Wallet.
Of course, you’d have a much harder time visiting a branch if you needed to speak to someone directly. If you live in another state, maybe consider one of our top rated national banks.
PNC Bank Today
If you’ve seen the PNC Bank logo before but you’re not sure where, it may have been in a grocery store, gas station, or college’s student center. The bank has an unusually large number of ATMs because of its partnerships with retailers and institutions in its 19-state coverage area.
Of course, you could use Virtual Wallet and PNC Bank’s other online tools from anywhere.
PNC Bank is now the nation’s sixth-largest bank measured by deposits. Like other large banks such as Wells Fargo and Bank of America, PNC Bank offers a wide variety of accounts without specializing in any particular service.
Instead, the bank seeks to be your everyday financial partner by providing a little of everything: checking, savings, CDs, IRAs, mortgages, lines of credit, credit cards, and even student loans.
Many of these accounts can be bundled into Virtual Wallet, so let’s take a closer look:
PNC Bank Checking Accounts
Types of Checking Accounts
PNC Bank has three options for checking, and each one requires a minimum $25 opening deposit.
Each one also charges monthly fees which you should be able to waive:
PNC Bank Standard Checking: This is the bank’s most basic option. You can avoid its $7 monthly fee when the account receives $500 in qualifying direct deposits or maintains a $500 average monthly balance. Also, account holders age 62 or older will not be charged the monthly fee.
PNC Bank Performance Checking: Account holders who want an interest-bearing checking account could choose this option. The account’s $15 monthly fee will be waived with $2,000 in qualifying direct deposits or an average monthly balance of $2,000. PNC Bank customers with $15,000 in combined accounts or investments will also avoid the fee. Your balance will gain a small amount of interest.
PNC Bank Performance Select Checking: Performance Select can offer a higher interest rate on balances, but rates still won’t compare with an online bank’s high yield savings options. This account’s $25 monthly fee can be waived if you receive $5,000 in qualifying direct deposits or keep an average monthly balance of $5,000 or $25,000 in combined PNC accounts and investments. Perks with this account include bonus rates on CDs and lower fees on some PNC Bank loans, along with reimbursement of fees if you use another bank’s ATM and identity theft protection.
Check out PNC Bank’s checking accounts>>
What is a Qualifying Direct Deposit?
Most checking account holders can avoid monthly fees effortlessly through receiving qualifying direct deposits. This makes us wonder: What qualifies as a direct deposit?
Basically, money from your paycheck or another outside source such as the Social Security Administration or the IRS would qualify. Transfers from your other accounts or from a service like Venmo or PayPal wouldn’t qualify.
What About Overdraft Fees?
Using Virtual Wallet can help you visualize your accounts and avoid overdrafting. But if you do spend too much, PNC Bank will charge you $36 up to four times a day for each overdraft.
The bank will also charge an additional $7 each time your account stays overdrawn for five or more days in a row.
PNC Bank will continue charging $7 every five days until you reach $98, which equals 14 of the $7 fees.
You can avoid overdrafting by setting up automatic transfers to compensate for your low checking balance. Transfers can come from:
Another PNC Bank checking account.
A PNC Bank savings or money market account.
A PNC Bank credit card.
A personal line of credit.
Each automatic transfer still costs $10, but it’s money well spent if you can avoid several $36 charges. Naturally, lines of credit and credit cards will charge high interest rates on balances resulting from the automatic transfer.
PNC Purchase Payback
This rewards program connects to PNC Bank checking account debit cards and can gradually generate some extra money.
PNC Purchase Payback works kind of like Ebates.
You can activate special offers from retailers using online banking or Virtual Wallet, then use your PNC Bank debit card to make the qualifying purchase. The resulting cash back, usually 2 to 5 percent, will appear in your checking account automatically.
Like any rewards program, it’s best to use offers which fit your lifestyle. If you already shop at Target and you can earn money by continuing to do so, it’s a no-brainer to activate the offer.
It makes less sense to go out of your way to buy something you wouldn’t ordinarily buy just to receive 3 percent cash back.
PNC Bank Savings
Types of Savings Accounts
PNC Bank has three savings account options, and it offers a wider variety of CDs than many banks.
First, let’s look at the traditional savings accounts since they work with Virtual Wallet:
PNC Standard Savings: You’ll need $25 to open a Standard Savings account, which also has a $4 monthly fee unless you keep $300 in the account or transfer in at least $25 a month automatically from another PNC Bank account. The bank does not charge people younger than 18 a monthly fee for savings.
PNC ‘S’ is for Savings: This account is designed specifically for children. It features Sesame Street®️ characters encouraging kids to save more money. Account holders younger than 18 will not pay a monthly fee. If you’re 18 or older, PNC Bank will charge $5 a month unless you have $300 in the account or set up at least $25 in automatic transfers from another PNC Bank account each month.
Premiere Money Market: You’d need $100 to open this account, and its $12 monthly fee can be waived only by keeping $5,000 in the account each month. You’ll get a much better interest rate in a money market account.
PNC Bank’s Savings Rates
Interest rates on PNC Bank’s Standard Savings and ‘S’ is for Savings accounts are usually lower than the national average.
Standard Savings account holders with balances above $2,500 can earn at an interest rate closer to the national average.
The national average is lower than what you can find at an online-only bank specializing in savings.
If you’d like to earn money on your savings at PNC Bank, you’d be better off investing in a CD or opening a Money Market account.
Money Market accounts can generate a more respectable interest rate depending on your balance and your other PNC Bank accounts. For example, someone with Performance Select Checking at PNC Bank can qualify for higher Money Market savings rates.
Open an account with PNC Bank>>
PNC Bank CDs
With a CD you’re agreeing to leave your money alone for a specific period of time in exchange for earning at a higher interest rate. Typically, a longer term allows a higher interest rate.
You can’t buy a CD using Virtual Wallet, but you can get connected in online banking, by phone, or at a branch.
PNC is an outlier with its 10-year CDs. If you can set aside $1,000 or more for 10 years, it could grow at a rate that’s closer to a current high-yield savings rate.
Across the board, PNC Bank has more CD options than many other large banks:
Fixed Rate: A basic CD with guaranteed rates and automated renewal at the end of the term. You’ll need at least $1,000 (7 to 89 days) or $2,000 (90 days to 10 years) to buy a fixed rate CD.
Ready Access: Not sure you can leave your money alone for a few years? You might like PNC Bank’s Ready Access CD, which allows full liquidity after seven days. Terms range from three to 12 months, and interest rates will be lower. Minimum deposit: $1,000.
Callable CD: PNC Bank’s Callable CD can earn a higher rate on a 3-year or a 5-year CD of at least $10,000. In exchange for the higher rate, the bank retains more control over the terms: It can “call” your CD early (after year 1 of a 3-year CD and after year 2 of a 5-year CD). If the bank calls your CD early, you can access the funds (penalty free) for 10 days or leave the money alone and it will roll into a new 12-month CD.
Variable Rate CD: If you worry interest rates might increase after you commit to a CD, a variable rate CD may be a good fit. You’d need at least $1,000 to buy in, and PNC Bank offers only 18-month terms for variable rate CDs. Your rate will be tied to U.S. Treasury Bonds.
Step Rate CD: With a $2,500 minimum deposit you can get into a 36-month Step Rate CD whose rates increase every six months. Before each scheduled rate increase, you can access your money without a fee. This freedom requires some compromise: You’ll get a lower rate than a standard 36-month CD.
PNC Bank IRAs
Even young adults can benefit from an Individual Retirement Account (IRA), which offers tax advantages when you save for retirement.
PNC Bank has Traditional and Roth IRAs and programs to help roll your 401(k) savings into an IRA when you change employers.
PNC Bank Loan Programs
Along with checking and savings, PNC Bank offers customers a standard variety of borrowing programs.
PNC Bank Mortgages
You can borrow money to buy a home in several different ways at PNC Bank:
Fixed Rate: Your standard variety mortgage loan with a fixed interest rate for 10, 15, 20, or 30 years with amounts maxing out at about $484,000. You’d need to put at least 3 percent down.
Adjustable Rate: If you’ll be earning more money in a few years or if you don’t plan to stay in the home very long, you could save money with an adjustable rate mortgage, which starts with a low rate then increases. You’d also need 3 percent down.
Jumbo Loans: In a high-value real estate market like New York City, or if you’re buying beachfront property, you may need a jumbo loan which specializes in financing options above $484,000. Get a 15, 20, or 30-year loan with fixed or adjustable rate and the option to pay back only interest for part of the term.
Subsidized: PNC Bank is authorized to work with the Federal Housing Administration (FHA) and the Department of Veterans Affairs (VA) to offer lower-cost loans to low income (FHA) buyers or veterans (VA).
With PNC Bank you can start the mortgage application process online, but the bank will transition to a traditional application using the information you’ve provided.
PNC Bank does consider non-traditional payment histories such as rent and utilities as it looks at your credit history, which can help some buyers. The bank’s site has educational videos and articles which can help first-time buyers.
But if you’re not already a PNC Bank customer, you’d have more options and a more seamless experience at an online lender such as Rocket Mortgage or PrimeLending, especially when you consider most large banks like PNC Bank sell most mortgages to other lenders anyway.
Refinances and Equity Loans
The bank’s mortgage programs can also help you refinance your property if you’re trying to get out of an adjustable rate mortgage or if you can now qualify for a lower fixed rate.
And, PNC Bank offers several loans to leverage your home’s equity:
Choice Home Equity Line of Credit: Use your home equity to fund a credit card-style account you can use to finance home projects. The pay-as-you-go approach appeals to many borrowers who’d like to avoid a fixed loan. Also, homeowners who want to complete projects gradually enjoy the flexibility. Account minimum: $10,000.
Home Equity Loan: If you want the stability of a fixed rate and you have your project already budgeted, a standard home equity loan can help. You could borrow as little as $1,000.
Home Equity Rapid Refinance: Someone who needs to access equity right away — because of a repair that can’t wait or some kind of financial emergency — may want to speed up the process with this kind of loan. These loans are also popular when interest rates may increase soon.
Rates and fees with these loans aren’t anything to brag about. You can do better with a mortgage specialist.
Other PNC Bank Consumer Loans
If you’re already using PNC Bank’s checking and savings accounts — either with or without Virtual Wallet — you’ll also have access to the bank’s personal loan programs.
PNC Bank can help you with:
Auto Loans: PNC Bank’s auto buying program is surprisingly robust. It’s stocked with helpful calculators, car-finding services, and loans designed for purchasing from a dealer or a private party. The bank also has easy-to-use loans for refinances or lease buyouts.
Student Loans: PNC Bank private student loans can’t beat the lower cost of publicly financed options, but they have other benefits such as discounts when you enroll in autopay and the ability for your co-signer to opt out of the loan after you’ve made 48 on-time payments. Disadvantages include 12-month caps on forbearance periods.
Personal Lines of Credit: PNC Bank lets you take out fixed personal loans — both secured and unsecured — for personal expenses such as unplanned medical bills, higher than anticipated tax bills, or simply to buy a big-ticket item such as a used boat. You can also get a personal line of credit with no collateral that works more like a credit card but with a lower interest rate.
Credit Cards: You can find credit cards specializing in cash back bonuses, lower interest rates, travel rewards, and retail bonus points. Most options require no annual fee, and qualified applicants can get promotional periods of no interest. Even after the promotion expires, PNC Bank’s credit cards shave a few points off the industry’s highest interest rates.
Folding It All Together in Virtual Wallet
PNC Virtual Wallet builds off the ordinary PNC Bank accounts we’ve discussed to change the way customers interact with their money.
Despite the revolutionary talk a decade ago, Virtual Wallet hasn’t changed banking. Customers still have checking accounts, overdraft fees, monthly fees, and minimum deposits to consider.
Instead, Virtual Wallet is more like a budgeting app like Mint or Personal Capital, except with your PNC Bank accounts already tied in.
Virtual Wallet Features
The platform’s features include:
Money Bar: At a glance you can see on a graph your available funds, your money that’s already tied up as an upcoming scheduled payment, and your money in savings.
Calendar with Integrated Bill Pay: Virtual Wallet integrates your budget calendar with online bill payments. This can save a click or two.
Budgeting Tools: You can set up budget categories and easily track how you’re doing. This feature encourages you to make a decision before overspending, which can help you stay accountable.
Savings Tools: To help you save, Virtual Wallet distinguishes between long-term savings and short-term savings for a specific purchase such as an auto downpayment. The platform also encourages savings through auto transfers and impromptu deposits called “punch the pig.”
Account Options: How you build your Virtual Wallet can vary. It can include standard checking and savings accounts or PNC Bank’s more exclusive accounts (Performance checking, for example).
Transfers: Of course you can easily transfer money between accounts using Virtual Wallet. You can also pay someone else with Popmoney, a P2P-style service. Mobile deposit is available using Virtual Wallet’s smartphone apps.
Virtual Wallet Key Fees
Along with the waivable monthly fees and overdraft fees we’ve already discussed when we looked at individual checking and savings accounts, Virtual Wallet customers should be aware of these common fees:
Paper statement fee: To receive a paper statement, PNC Bank will charge an additional $2 a month. For $3 you can get a statement with images.
Staff-assisted transfers: If you call PNC Bank to transfer money rather than transferring money online or at an ATM, the bank will charge $3.
ATM statements: To get a full statement at an ATM you’ll be charged $3. You can get a mini-statement for $2.
Out-of-U.S. ATM fees: The bank will charge $3 or 3 percent, whichever is higher, for using an ATM outside the United States.
Card replacement: If you lose your PNC Bank debit card, you’ll pay $7 for a replacement.
Early closure: PNC Bank can charge $25 if you close your account within 180 days of opening it.
Four Different Virtual Wallets
PNC Virtual Wallet now comes in four varieties:
Virtual Wallet: The original and most basic version; includes PNC Bank Standard Checking and a $7 fee each month unless you’re a student or you’re older than 62. You can waive the fee by receiving $500 in qualifying direct deposits or keeping $500 in checking (called Spend in Virtual Wallet) or $500 in savings (Reserve).
Virtual Wallet With Performance Spend: Folds in PNC Bank’s Performance checking instead of Standard checking. You can earn a small return on your checking balance if you keep $2,000 in checking (Spend); avoid the monthly $15 fee with $2,000 in qualifying direct deposits or $2,000 in checking or savings.
Virtual Wallet With Performance Select: Includes PNC Bank’s Performance Select checking with its ability to earn higher interest on larger balances. Waive the $25 fee by keeping $5,000 or more in the bank or having a combined $25,000 in all PNC Bank accounts or balances.
Virtual Wallet Student: Works like the standard version of Virtual Wallet except parents can monitor from a connected account.
Do PNC Bank and Virtual Wallet Fit Your Life?
If you live near a branch and you’d like to start a new personal banking relationship, PNC Bank should be in a position to handle your everyday needs.
Of course, online reviews will show you testimonials from unhappy customers. That’s true of just about any bank if you look around long enough.
Many bad experiences result from misunderstandings or a failure to read the fine print. Other times, negative reviewers have legitimate issues to discuss. I’d start paying more attention to reviews when you see the same problem arising consistently among multiple customers.
PNC Bank does a lot of things well. It’s not the best at any particular type of account.
You’ll find higher interest rates on savings and lower fees at an online bank. You can find a more seamless mortgage application elsewhere, too.
But PNC Bank does excel at putting it all together.
Whether you’re using a Virtual Wallet product or simply interacting with the bank like you did a generation ago, PNC Bank can be a reliable partner.
Learn more about PNC Bank>>
The post PNC Bank Review: More Than a Virtual Wallet appeared first on Good Financial Cents®.
from All About Insurance https://www.goodfinancialcents.com/pnc-bank-review/
0 notes
Link
A certificate of deposit can be used for short-term savings but can also be used for the long-term as the funds cannot be accessed whenever you would like. To withdraw money from a certificate of deposit without incurring a penalty, you have to wait until the certificate of deposit’s maturity date has occurred.
A certificate of deposit is a loan that you will agree to with your bank. During this time, your money will be locked-in for a certain amount of time until it reaches its maturity date. You can specify a variety of longer terms for your certificate of deposit. These can range from six months to a year and up to five years or more. During this time, the bank agrees to a non-fluctuating, guaranteed interest rate that will be applied when your CD matures at its six-month, one-year, two-year etc. mark. Offering your money to a certain bank exclusively for a set amount of time can help you build wealth faster.
FDIC or NCUA
There is no need to worry about investing your money in a certificate of deposit because $250,000 is covered by the Federal Deposit Insurance Corporation (FDIC) or the National Credit Union Association (NCUA) through a credit union. This organization ensures that your money is protected up to this amount even if the economy or bank has financial problems. This makes your investment a lot safer because you do not have to worry about losing your money.
HOW DOES INTEREST WORK?
The national average for certificates of deposit depends on the term length. As of October 2018, a 1-year CD is 0.72%, 2-year is 0.94%, and 5-year is 1.29%. Looking at the interest of your certificate of deposit is crucial to see if it is high enough to justify locking your money up for a period of months to years. If you think you may need the money faster than six months, you may want to open a savings account instead.
You can withdraw money from your certificate of deposit before its maturity date, but there may be a penalty fee. These fees differ depending on how long your certificate of deposit’s term length is. If your term length is less than a year, you may lose three months of interest. For a 1-year to 2-year CD, you may lose six months and a full year will be removed if you have selected a 5-year CD.
OTHER THINGS YOU SHOULD CONSIDER WHEN SEARCHING FOR A CERTIFICATE OF DEPOSIT
Shop around.
Before applying for a certificate of deposit, it is best to look for a high-yield CD. These may have differing lengths, so it is best to get one that fits your life. When researching, consider the Annual Percentage Yield (APY), which is the number of times your interest compounds. The higher your APY, the quicker your money grows over your term length.
In addition, it is important to know the standard CD rates before choosing your own contract. As of October 2018, a 1-year CD has a 0.28% APY when the deposit is less than $100,000 and a five-year CD has a 0.88% APY. Knowing these numbers can help you make an informed decision for your future.
Follow market trends.
The market is an ever-changing entity. Before purchasing a CD, it is important to look at the possibility of the rates rising. Kiplinger is an excellent site to check possible rates. It offers the leading financial information so you can make the best decision. After you have acquired this information, purchasing a short-term CD and cashing it in December can help you get a better rate. After you have cashed your funds, you can open a longer term CD with a higher rate.
Search for different CD types.
There are many different CDs available, so you have many options to choose from. These may have rates that can be adjusted or other features that allow you to increase your rate or cash your money before it reaches its maturity date. Here are other CDS you may want to look into:
Bump-up CDs:
When you choose a bump-up CD, you can upgrade your CD to a higher interest rate one time if your rates rise during this time period.
Indexed CDs:
These are matched with the rise and fall of the market index or the currencies, bonds, or commodity prices of the economy. A risk of this CD is that you may not get your full deposit back if you remove your money early.
Callable CDs:
These CDs often have longer terms than most other CDs. Their terms can be from five to seven years. They have higher interest rates than others that have the same term lengths, but the bank can cancel a callable CD at any time.
Brokered CDs:
These investments are from a brokerage firm and not a credit union or bank. These offer higher interest rates and can be an excellent investment.
CD Laddering:
If you do not want to have your money tied up for a long time, you can opt for a CD ladder. In order to do this, you would open multiple CDs with differing maturity dates. For instance, you could open five CDs (1-year, 2-year, 3-year, 4-year, 5-year) and place an initial deposit. As each CD matures, you can invest the money into the larger 5-year CD so it can operate at a higher interest rate.
In summary, there are many options available. Researching widely and discussing your options with a financial adviser are an excellent way to build the future you want. A certificate of deposit is a great way to keep your money safe, growing, and ready for you as you become older.
0 notes
Text
Callable CDs: Read the Fine Print Before Investing
Callable CDs: Read the Fine Print Before Investing
Learn about callable certificates of deposit (CDs) and how they offer higher yield returns than regular certificates of deposit, but with a catch.
Powered by WPeMatico
View On WordPress
0 notes
Text
Callable CDs: Read the Fine Print Before Investing
Learn about callable certificates of deposit (CDs) and how they offer higher yield returns than regular certificates of deposit, but with a catch. http://vastseek.com/sources/12-investopedia/65933-callable-cds-read-the-fine-print-before-investing
0 notes
Text
The uses of Bank Guarantees (BG) and SBLC?
What can a SBLC be used for?
SBLC’s (and BG’s) can be used to enhance your ability to apply for a line of credit with your bank; in other words, it can be used as collateral when your bank is asking for additional comfort when you ask them to fund your project. We can help you acquire an SBLC.
The SBLC’s we deal in are genuinely 100% cash-backed and therefore usable as collateral. Our issuers only use top 25 World Banks – mainly from Europe like HSBC, Deutsche, UBS etc. This guarantees world wide acceptance of your SBLC.
These SBLC’s are generated by “someone” blocking their funds on your behalf, so we speak of a “leased” SBLC. In other words the SBLC is owned by the issuer and you are the beneficiary.
The SBLC is generally issued for 1 year and 1 day, but can easily be extended up to 5 years. (It is possible to get an SBLC for only 6 months). Once issued the SBLC is transferred to your bank via the Swift protocol of MT760.
Of course, Leasing of an SBLC comes at a cost. And to be very honest: at a high cost. Financing your project by using an SBLC is very expensive. First you need to pay money to the issuer of the SBLC plus commission to the consultants facilitating the process, Then you need to give the SBLC to your bank, who are providing a Line of Credit against the SBLC, which may only be up to 90% LTV or less. And usually, your bank will charge a one off fee to ‘monetise’ the instrument and also charge interest on the drawn down loan amount.
To successfully apply for an SBLC you need to be aware of four vital points: a) You need to have a good project b) You need to have a bank funding your project based on the supporting collateral of an issued SBLC c) You need to have the money to pay for the leasing of the SBLC, you may also need to pay brokers if they are involved in the transaction. d) You need to have a believable and realistic exit strategy to repay the loan and return the SBLC at the end of the term
All the SBLC’s we deal with are callable, assignable, fully transferable and lienable.
If you are thinking of using an SBLC to participate in a High Yield Trade Program, we are more than happy to assist you in acquiring the SBLC and placing it into trade.
However, you need to be very sure you are able to pay the leasing fees of the SBLC before issue, as most providers will not allow the instrument to be taken into a Trade Program unless and until the fee is paid. You cannot pay the lease fee from the program returns.
It is also not possible to use an SBLC to secure a commodity trade and pay for the SBLC out of the profits from the transaction. When paid for and used correctly, these instruments provide numerous lucrative options. we can provide BG’s, SBLC’s and CD’s, which can be blocked or delivered via SWIFT.
Typical projects we have had successful applications for are:
– Construction and Development
– Resorts -Building or Upgrading
– Growing a Company
– Trade Programs Top Billion Finance are genuine and reliable providers of loan, international project funders, Lease bank guarantee providers & providers of sblc, dlc and letters of credit. Others Talk, but Top Billion Finance. So its time you became a customer of Top Billion Finance so you can feel the difference.
BROKERS:
Brokers are the life blood of our business and as a result we respect them, value them and appreciate them. So new brokers are welcomed, appreciated and compensated with good commission.
If you are interested to work with us, we would like to hear from you using the below contact details...
Company Name:
Top Billion Finance Ltd.
Company Address:
Room 1603-05, Harcourt House, 39 Gloucester Road, Wan Chai, Hong Kong.
Skype:
Website:
www.topbillionfinance.com
Email:
Telephone:
+852 8191 5275
0 notes