#Clonal propagation
Explore tagged Tumblr posts
Visit Tumblr Blog
Explore Tumblr blogs with no restrictions, modern design and the best experience.
Last Seen Tumblr Blogs


Fun Fact
In 2020, 44% of users from Denmark used Tumblr daily.
Link
1 note
·
View note
Text
Things I would want to study in grad school if I had infinite energy and wasn't disabled by my disability, #2018529347248392: I was reading a paper about the role of fungal spores in human illness (esp. asthma) and noticed that the genera of fungi most commonly implicated were also some of the most common pathogens of plant crops and horticultural plants.
In my horticulture class, I am learning a lot about disease in crops, and how monoculture makes crop systems susceptible to disease. Under a monoculture based crop system, some of the most productive agricultural lands are places that receive little natural rainfall. Since moisture allows fungus and other pathogens to grow, it is cheaper to grow crops in a dry region and irrigate them artificially rather than to grow crops in a wet region where rain provides what the crops need, because in a monoculture, there is no diversity and a pathogen that is extremely infectious to one plant will be extremely infectious to every plant in the entire field, creating the worlds most explosive superspreader event.
But even beyond the monoculture crop fields, there is alarming sameness in the intentionally grown plant life of the world---nursery flowers and trees are often clonally propagated and picked out from a few species that are popular...and lawns, the lawns! vast oceans of monoculture grass!
It reminded me of another paper describing how in cities, the diversity of fungal spores is much lower than in the country.
Could plant sameness be affecting our health by affecting the variety of fungus that exists in the ecosystem?
If so...how? Could over-exposure to pathogenic fungi of plant monocultures cause allergic sensitization? Or could the absence of the other fungi associated with more complete plant ecosystems, also affect human health?
528 notes
·
View notes
Text
.https://x.com/CG_Orange_eng/status/1808953796997099637


So the human experimentation fan hypotheses were at least somewhat right. The First Entity was created by patching the Angel Mummy genome with human DNA and culturing those cells formed a humanoid body from which all normal plants are clones. The Angel Mummy might have had damaged DNA but the body itself from that picture is remarkably intact and humanoid looking with arms, legs, and a torso in the picture. irl when biologist struggle to get a complete genome they're working with like 3 hairs (no dna in the shaft, the main hair part) and like 2 specks of skin dust so with so much intact body that the body form was preserved whole it's weird they couldn't get a more complete genome I'd chalk it up to most people not knowing biology but the Angel Mummy could also be like fossilized or like bog bodied something that preserves the structure of soft tissues (there's a reason vertebrate paleontologists are usually dealing with bones). The humans of No Man's Land lost the First Entity sample probably so no new plants can be made. In terms of irl plant biology they're using clonal propagation, which makes Tesla, Knives, Vash, and possibly all Independents all the more notable. Also notable the Angel Mummy had feathers while the cased plants have like... flesh tentacles.
(Insert obligatory ancient aliens meme)
27 notes
·
View notes
Text
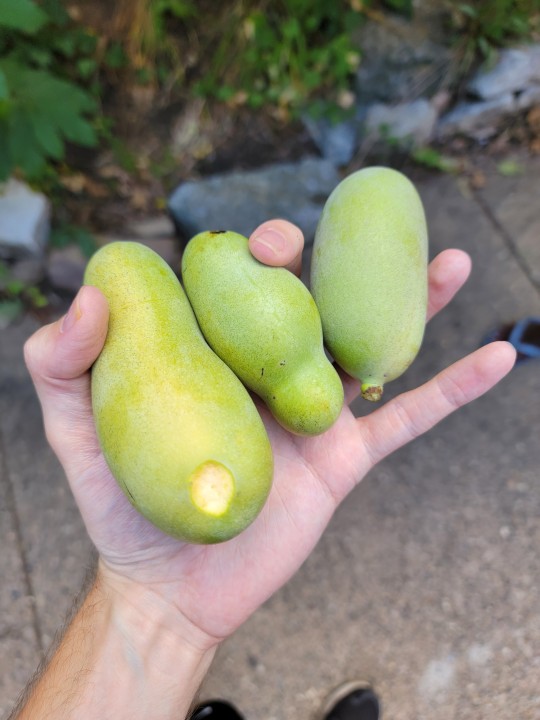

Finally found a paw paw tree on Campus!
Asimina Triloba - aka the Paw Paw is North America's largest indigenous fruit typically found throughout Appalachia, the eastern Midwest, the Ozarks and reaches as high north as southern Ontario. The tree itself is closely related to the custard apple, the flavor of the fruit is very similiar to banana/papaya/persimmon. Although people often rave about this amazing fruit you cannot find it in stores, quite like many forgotten foods, they only last about a week. This short life span makes trasnport difficult and cuttings are almost impossible to propagate. Essentially, all new Paw Paws must be grown from seed or transplanted from young seedlings, making consistency of a cultivar questionable.
The plant itself requires very little light making it one of the rarer understory fruiting trees. Ecologically the seeds/bark/leaves/and roots all contain a natural insecticide so the tree is rarely subject to herbivory. The most common method of propagation is clonally via root sprouts. Historically fruit was consumed by megafauna, however with most species absent in its range new plants rely on bears and human distribution.
All this being said it is a wonderful fruit which has a variety of uses, nutritionally very high in manganese and iron. You can eat paw paws raw or use the pulp in baking recipes similiar as you would a banana (I know a farmer who loves making ice cream with the fruit). Keep an eye out for them! They're not endangered and could use some attention to reenter our local food systems!
#paw paw#asimina triloba#urban forage#the really remind me of persimmon in flavor and seed shape tbh
55 notes
·
View notes
Text
Grim Math: How Many Grimwalkers Did Philip Wittebane Make?
We may never know the exact number of Grimwalkers Philip / Belos made of his brother Caleb, but we can use in-show evidence and math to get us close! From the Grimwalker recipe in Belos’s lab, we know a (singular) bone of ortet is required. Ortet refers to the original mother-plant that clonal offspring plants descend from, usually by grafting or by rooting a cutting of the mother-plant. This ensures the offspring plants are genetically identical to the parent, to propagate favorable traits like disease resistance or fruit quality that might be lost through classic breeding. But The Owl House bends the meaning of ortet to include animal tissue. ‘Planting’ a bone of the deceased, along with other critical ingredients and spells, grows a clone of that person. Philip used this method to create his doomed Golden Guard servants, whom he went on to murder in various ways.

How many doomed Golden Guards did Belos manipulate? Let’s look at a few different ways to quantify the horror!
Assuming the bone of ortet must be used whole and is consumed in the Grimwalker making process (i.e. it cannot be recovered after the Grimwalker’s death), there is a natural limit to how many Grimwalker attempts Philip could make. An adult human skeleton has approximately 206 bones. Interestingly, some people have a little more or less bones due to genetic diversity in the number of ribs, vertebrae, and digits (ex: the six-fingered man in The Princess Bride). Since we have no evidence Caleb had extra fingers, we’ll work with 206 as our maximum number of theoretical Grimwalkers. But by Hunter’s time, had Belos converted Caleb’s entire skeleton into Grimwalkers?
Time to do some subtraction!
Before meeting the Collector in 1660-1670, Philip had acquired Caleb’s skeleton, as seen in the wrapped parcels of bones sitting in his lab. Philip has also collected any information he can find about making Grimwalkers. Note that the Grimwalker recipe posted here is incomplete, with Xs and exclamation points indicating Philip hasn’t gotten it just right yet. We also see a degraded hand sticking out of the floor, finger tagged with the number “4.” It’s reasonable to conclude Philip has consumed 4 bones in failed Grimwalker attempts at this point. We’re down to 202 possible Grims when the Collector gives Philip the missing pieces of the recipe.
Art note: Caleb’s full ribcage is represented with just 8 bones here (4 on each side), far thicker than real ribs, so it is clear the viewer is looking at a ribcage. This is artistic shorthand, since it is difficult to depict all 24 ribs (12 on each side) of the typical human body in a cartoon.


Next, let’s take a look at Belos’s present-day lab from For The Future. There is a torso-sized ribcage and spinal cord still unused. Using the artistic shorthand from before, this is a stand-in for all 24 ribs. We’re down from 202 to 178 Grimwalker opportunities.
The spinal column is made up of 26 bones on average (24 vertebra plus the sacrum and the coccyx (tail bone)). If we assume Caleb was old enough at time of death that the normal spinal bone fusions that occur in adults were complete (vertebra number drops from 33 in kids to 26 somewhere between teenager and young adult), we can proceed with 26 as our spine estimate. The ribcage below appears to be missing the curved tail bone, so we’ll assume the sacrum and coccyx were used or lost along the way. Subtracting the unused 24 vertebra, we’re down to 154 Grimwalker opportunities.
But before we leave Belos’s lab, recall that he had one (just one!) Grimwalker left in reserve whose body he attempted to possess. Unfortunately for Belos, “No. It’s not ready!” The body was unearthed too early to be viable, so 153 max Grimwalker opportunities remain.

But do 153 unaccounted for bones really mean Belos made that many living (however temporarily) Grimwalkers? It is unclear if all bones in the human body are large enough to provide sufficient material to grow a Grimwalker. Perhaps the bones of the hands and feet are too little to use alone, requiring 2-3 at a time. The hands contain 27 bones each (54 for both) and the feet contain 26 bones each (52 for both), meaning most bones in the body (by count) are small in size. We also don’t know if Philip was able to retrieve Caleb’s complete skeleton. Evelyn chased him off after the murder, so presumably Philip had to return later to dig up his brother’s corpse. Graverobbing has its risks, and Philip may have had to settle for a less-than-whole skeleton.
We need to look at evidence for the minimum number of Grimwalkers Belos created. The best place to start is with screenshots of the Grimwalker pit, because if we see their bodies in the show, there are at least that many Grimwalkers.
The Grimwalker pit is a circular chamber that can be divided into 4 quadrants. Going clockwise around the circle: the first quadrant (Q1) contains the stairs leading down from Belos’s main lab, the second quadrant (Q2) has a dark pathway leading to Belos’s Grimwalker lab, the third quadrant (Q3) has a large mound of bodies where the Collector’s disk fell, and the fourth quadrant (Q4) has a dark pathway leading to Belos’s secret ground-level entrance into the skull (this is behind the camera in the 2nd image).


Oriented? Great! Let’s count bodies!
I’m using skulls as the most reliable bone to count, as there is only 1 skull per Grimwalker and it is a nice round feature that is hard to mistake for other bones. There is also less ambiguity in the skull art than there is with masks, since it is unclear if a broken mask piece came from a mask we’ve already counted, or is a separate mask that should be added in. If a mask has a curved structure inside it, I count it as a skull. If I can’t see a round line in addition to the mask, I don’t count it as a skull (possible fallen/empty mask).
Looking at the pile of bones between the stairs (Q1) and Grim lab (Q2), we have 11 skulls in the main pile, and 3 skulls in a smaller pile closer to Q2 (14 total count):


Looking at the pile on the other side of the stairs (Q1 to Q4), we have 9 skulls (23 total count):

There is another angle of Kikimora standing, which appears to have overlap with skull #8 above, so we’ll skip it to avoid double-counts. The skulls at the base of the pillar jutting to the right near the Grim lab (Q2) haven’t been accounted for yet, and neither have the skulls that were previously in shadow and closer to the secret entrance (Q4). We have 8 more skulls to add in (31 total count):

Turning toward the largest mound (Q3), we have 24 skulls (55 total count):

Now there’s some skull stragglers to pick up. The Collector’s disk is blocking the background during King’s Tide, but when we see the same location again in For the Future, the disk is gone. One more skull was hiding behind it (56 total count):

Okay, this next image of a higher angle shot of the large mound (Q3) is harder, because we need to avoid double-counting the skulls from the wide, ground-level shot of the mound (Q3). I’ve marked multiple reference skulls with “#p” to indicate which skull it corresponds to in the wide ground-level view. Ex: skull under cracked-in-half mask #6 from image above is labeled as 6p below. The one hidden skull from behind the Collector’s disk is labeled 1*. There’s another hidden skull from behind the skinny bone-spur holding up the disk (#3 below) and the ambiguous round “rock” behind some ribs between skulls 16p, 17p, and 18p above is clearly skull-colored (#4) from this angle. Overall, I count 7 more skulls not previously seen in the other shot (63 total count):

There are likely to be more skulls out of view behind pillars, beneath masks, or too far under other bones to see, but if we’re only going with “confirmed” skulls, 63 is the minimum number of Grimwalkers Belos created. We have a range of 63 to 153 possible Grimwalkers supported by the art of the show, and our knowledge of human anatomy.
What else can this tell us about the Grimwalkers? Well, we can get an idea of how long the average Grimwalker lived with these estimates. Philip met the Collector sometime between 1660 and 1670, and made his last Grimwalker, Hunter, before the year 2020. This gives us a range of 350 to 360 years in which Belos was making viable (lived after being unearthed) Grimwalkers. For the maximum average Grimwalker lifespan, we’ll use the max year estimate of 360 and divide it by the minimum Grimwalker estimate of 63. That gives us an average lifespan of 5.7 years. Not much, is it?
But it gets worse the more Grimwalkers Belos made in that time. For the minimum average Grimwalker lifespan, we’ll use the min year estimate of 350 and divide it by the maximum Grimwalker estimate of 153. That gives us an average lifespan of only 2.3 years. Just 2.3 years…
I’ll leave you now with a quote from Hollow Mind, after Belos attempted to kill Hunter in his subconscious:
“I was really expecting him to last longer than the others.”

57 notes
·
View notes
Note
Where I’m from the lichen is mostly crustose. A sea of little bumps. Is each thallus a “lichen”? Or is it more of a communal thing? Thnx
Ahh, a question for the ages. First off, gotta mention that lichens are always a communal thing as they are a superorganism made up of a fungal partner, at least one photosynthesizing partner, and a host of commensalistic and parasitic microorganisms. But we do tend to consider individual colonies as a single lichen.
With some crustose lichens, you can see little separations between them by way of a prothallus (thin layer of fungal hyphae growing around an individual thallus, often darker or lighter than the main thallus) or by just looking at the concentric growth pattern out from a center.

Like in the above picture. You can see the dark prothalli and the concentric growth pattern around a central point in the individual thalli. When lichens aren't as neatly arranged like this, that can be much trickier. AND clonal propagation can make that even more difficult to figure out as nearby individuals may actually just be clones of other individuals. And you could remove part of one thallus and it could grow somewhere else as a new individual and then those two parts are physically distant but genetically the same so what does THAT mean? And some lichens that are genetically distinct may just grow into and through each other is a big hodgepodge. Usually one lichen will kill the other eventually, but they can live for a long time as like, lichen soup. So thinking of them as communities is also valid. Usually they try to keep there communities separate, and the mycobiont will at least be genetically distinct, but even saying that can be a stretch because sometimes we find distinct genetic differences WITHIN a thalli so . . . . yeah. Lichens love to challenge our idea of "the individual."
51 notes
·
View notes
Text
Plants exhibit a vast variety of growth forms and abilities. Follow these links to learn more about them!
See photo observations of plant species native to your area with iNaturalist!
Learn techniques for manipulating plant growth! Check out these pruning manuals from North Carolina State University and The US Forest Service. Read about methods of propagating plants from cuttings, propagating plants through layering, grafting plants together, and coppicing to shape trees.
A clonal aspen that forms an entire forest. Perhaps one day you will visit Pando, the Trembling Giant?
What is a tree anyway?
Watch the time lapse growth of a pumpkin, several climbing vines, and a pea plant.
Explore epiphytes, the plants that grow atop larger plants to better reach sunlight.
How do plants regenerate from fire?
What secrets do parasitic plants hold, and how do they infiltrate their hosts?
Plants may not have familiar organs like brains and muscles, but they utilize unique physiological mechanisms to react to their environments, reproduce, spread effectively, and thrive.
0 notes
Photo

Known for its vibrant foliage and futuristic blooms, Bromeliads are tropical plants that every indoor gardener should grow. One of the most fascinating aspects of this plant is its ability to produce “pups”—small offsets that can be used in propagation. These pups can be separated and cultivated into new, independent plants, making bromeliads a rewarding species for propagation enthusiasts. Whether a seasoned gardener or a beginner, this guide will walk you through growing bromeliad pups step-by-step, ensuring healthy and thriving plants. What Are Bromeliad Pups? Bromeliad pups are miniature versions of the parent plant that emerge after the mother plant flowers. Unlike many plants that reproduce primarily through seeds, bromeliads focus their energy on producing these clonal offsets. Once the mother plant blooms—a process typically occurring once in its lifecycle—it begins to die back, channeling its resources into the pups. These offsets can be left attached to the mother plant or removed and grown separately. Common bromeliad genera that produce pups include Aechmea, Neoregelia, Guzmania, Tillandsia, and Vriesea. Each pup has the potential to develop into a mature plant identical to its parent, making propagation straightforward and rewarding. When to Remove Bromeliad Pups? Timing is critical when separating pups from the mother plant. Ideally, you should wait until the pup is at least one-third to one-half the size of the mother plant (typically 3–6 inches tall, depending on the species). At this stage, the pup has developed enough roots and leaves to survive independently. Removing pups too early can stunt their growth or cause them to fail, as they rely on the mother plant for nutrients in their initial stages. Signs a pup is ready for separation: It has a sturdy base with visible roots. It has several well-developed leaves. The mother plant is starting to decline or has fully flowered and is browning. While pups can remain attached to the mother plant indefinitely, removing them allows you to propagate more plants and maintain a tidy appearance as the mother plant naturally dies off. Tools and Materials Needed A sharp, sterilized knife or pair of pruning shears (wipe with rubbing alcohol to prevent disease transmission). A well-draining potting mix (e.g., a blend of orchid bark, peat moss, and perlite). Small pots or containers with drainage holes. A rooting hormone (optional, but helpful for encouraging root growth). A spray bottle with water. A bright, indirect light location for recovery. Step-by-Step Guide to Growing Bromeliad Pups 1. Identify and Prepare the Pup Examine the base of the mother plant to locate the pups. Choose one that meets the size criteria mentioned earlier. Gently pull back any dead or dying leaves from the mother plant to see clearly where the pup connects. 2. Separate the Pup Method 1: Cutting Use your sterilized knife or shears to cut the pup away from the mother plant carefully. Aim to sever it as close to the mother’s base as possible while preserving any roots attached to the pup. If the pup has no roots, don’t worry—it can still grow new ones. Method 2: Twisting For some species, pups can be gently twisted off by hand. Hold the mother plant steady with one hand and twist the pup with the other. This works best with loosely attached offsets. After separation, inspect the cut or break point. With your sterile tool, trim away any damaged tissue to prevent rot. 3. Let the Pup Callous (Optional) If the pup is cut and has a moist wound, set it aside in a dry, shaded area for 24–48 hours. This allows the cut to callous over, reducing the risk of fungal infection or rot when planted. 4. Prepare the Potting Medium Bromeliads thrive in well-draining, airy soil. A recommended mix is: 50% orchid bark or pine bark 25% peat moss or coconut coir 25% perlite or coarse sand Avoid heavy, water-retaining soils like standard potting mix, as bromeliads are prone to root rot. Fill a tiny pot (4–6 inches in diameter) with this mixture, leaving room for the pup’s base. 5. Plant the Pup Make a small hole in the potting mix. If desired, dip the pup’s base in rooting hormone to stimulate root growth (this is optional but can speed up establishment). Place the pup in the hole, ensuring the base is in contact with the soil. Gently press the mix around it to secure it upright. For pups without roots, stabilize them with a stake or by packing the soil snugly. 6. Water and Mist Lightly water the soil around the pup to settle it, but avoid soaking it. Bromeliads prefer minimal soil moisture. Fill the cup with distilled or rainwater for species with a central cup (tank bromeliads like Aechmea or Guzmania). Mist the leaves with a spray bottle to maintain humidity, especially in dry climates. 7. Provide Proper Light and Temperature Place the potted pup in a location with bright, indirect light. Direct sunlight can scorch the young plant, while too little light will slow growth. Ideal temperatures range from 65F–80F. Protect the pup from drafts or sudden temperature drops. Common Challenges and Solutions Root Rot: Overwatering is the leading cause of failure. Ensure excellent drainage and let the soil dry out between waterings. Slow Growth: Insufficient light or nutrients may be the culprit. Adjust the plant’s location or feeding schedule. Pests: Watch for scale, mealybugs, or spider mites. Treat infestations with insecticidal soap or neem oil. How Long Until Maturity? The time it takes for a bromeliad pup to mature varies by species. Most take 1–3 years to reach full size and bloom. For example: Tillandsia (air plants) may mature faster within 1–2 years. Larger species like Aechmea or Vriesea may take closer to 3 years. Patience is key—bromeliads are slow growers, but their beauty is worth the wait. Bonus Tips Leave one pup attached to the mother plant if you want a clumping effect rather than individual plants. Use rainwater or distilled water, as bromeliads are sensitive to chemicals in tap water. Experiment with mounting pups on driftwood or rocks for epiphytic species like Tillandsia. How to Care for Bromeliad Pups? The small offsets produced by a mature bromeliad—are a fantastic way to propagate these tropical beauties. Once separated from the mother plant, pups require specific care to grow into healthy, independent plants. This guide breaks down the essentials of caring for bromeliad pups with simple steps and tips to ensure success. Watering Basics Bromeliad pups need minimal watering compared to other houseplants. Keep the soil lightly moist but never soggy, as overwatering can lead to root rot. For tank bromeliads (like Guzmania or Aechmea), fill the central cup with a small amount of distilled or rainwater. Empty and refill the cup every 1–2 weeks to prevent stagnation. Mist the leaves occasionally to boost humidity, especially in dry environments. Light Requirements Bright, indirect light is ideal for bromeliad pups. Place them near a window with filtered sunlight or under grow lights if indoors. Avoid direct sun, which can scorch their delicate leaves, and steer clear of dark corners where growth will stall. Aim for 6–8 hours of light daily to keep them thriving. Soil and Potting Use a well-draining mix of 50% orchid bark, 25% peat moss, and 25% perlite. Heavy, waterlogged soil is a bromeliad’s enemy, so ensure the pot has drainage holes. If the pup lacks roots initially, it can still establish itself in this airy medium—secure it gently until roots develop. Temperature and Humidity Bromeliad pups prefer warm conditions between 65 and 80 degrees Fahrenheit. Protect them from cold drafts or sudden temperature drops, which can stress the plant. They thrive in 50–60% humidity, so in dry climates, use a humidity tray, mist regularly, or place them in a naturally humid spot like a bathroom. Fertilizing Tips Feed pups sparingly to avoid overwhelming them. Use a diluted, water-soluble fertilizer (20-20-20 at ¼ strength) monthly during spring and summer. Apply it to the soil or cup, not the leaves, and skip fertilizing in fall and winter when growth slows. Less is more with bromeliads—overfeeding can harm them. Pest and Problem Prevention Watch for pests like scale, mealybugs, or spider mites, which occasionally target bromeliads. If spotted, treat with insecticidal soap or neem oil. Watch for signs of trouble, like yellowing leaves (overwatering) or slow growth (low light), and adjust care accordingly. Good airflow around the plant helps prevent fungal issues. How Long Do Bromeliad Pups Take to Flower? The time it takes for bromeliad pups to flower depends on the species, but generally, they require 1–3 years to reach maturity and bloom. Smaller varieties, like Tillandsia, mayflower closer to the 1–2-year mark, while more significant types, such as Aechmea or Vriesea, often take up to 3 years with proper care. Factors like light, water, and nutrients can influence this timeline, so consistent attention is key to encouraging flowering. Conclusion Growing bromeliad pups is a simple yet fulfilling way to expand your collection or share these exotic plants with others. By carefully separating the pups, providing the right conditions, and maintaining consistent care, you’ll soon have a thriving new generation of bromeliads. Whether displayed in pots, terrariums, or as part of a tropical garden, these plants bring a touch of the jungle to any space. Khaja Moinuddin, a computer science graduate, finds joy in gardening and homesteading. Join him on this blog as he shares his experiences in homesteading, gardening, and composting Source link
0 notes
Text
Optimizing Rooting of White Potato Cuttings: A Study of Three Growth Conditions

Abstract
The need to produce a cheap alternative and farmer level technology in the production of clean planting materials of White Potato (Solanum tuberosum L.) prompted the investigation on the rooting response of clones from stem cuttings of different age and number of nodes under different concentrations of synthetic plant hormone Alpha-Naphthalene Acetic Acid (ANAA). A zero generation (G0) mother plant was used as a source of clones to examine whether it could produce roots in a sterilized medium. In a replicated split-split plot experimental design with three factors such as the age of the mother plant, number of nodes and levels of growth regulator, we found that roots emerged from clones 18 days after planting in a sterilized river sand. Significant effect on rooting was influenced by the age of cuttings (p=0.0058), number of nodes (p=0.0058) and ANAA (p=<0.0001). Moreover, significant interactions were found among age of cuttings, number of nodes and ANAA concentrations on rooting (p=0.0044). Implications for the feasibility of mass producing clean planting materials from cloning G0 mother plant are discussed.

Introduction
White potato (Solanum tuberosum L.) is a perennial crop belonging to the Solanaceae family grown mainly for its tubers (Spooner et al., 2014). First cultivated 8000 years ago by the Peruvian farmers in Peru’s Central Andes; now it has more than 4000 different cultivars grown globally (Niekerk et al., 2016; Lutaladio et al., 2009). It was initially introduced in Europe in the sixteenth century and was subsequently distributed throughout the world. Potatoes are the world’s primary non-grain staple food in several countries in Europe and some parts of America due to its nutrient content; with China, India, Ukraine and Russia as top producers (Lutaladio et al., 2009; Shahbandeh, 2022).
The biggest obstacle of the white potato industry in Asia, particularly Philippines is the source of clean planting materials, because potatoes are attacked by bacterial wilt disease caused by pathogen Ralstonia solanacearum. The conventional method of white potato propagation is through the use of tubers, but the risk is high. Other methods are the use of True Potato Seeds (TPS), and through stem cuttings (Morais et al., 2018; Shiwani et al., 2021). At present, the Department of Agriculture’s Northern Mindanao Agri Crops and Livestock Research Complex (DANMACLRC) uses the tissue culture technology to mass produce seedlings and tubers as the source of potato clean planting materials, but cannot cope up with the current demand; thus there is pressure to explore other methods.
Numerous studies were conducted to explore and enhance the propagation of potato through stem cuttings. The work of Zaki and Moustafa (2018) for example, used Indole Acetic Acid (IAA) and Indole Butyric Acid (IBA) at higher concentrations reaching up to 6000 parts per million (ppm) but rooting responses of potato varieties tested differ significantly. Ezzat (2016) dipped the stem cuttings for 1 minute to various rooting hormones such as Indole-3-butyric acid Potassium salt (K-IBA) at 1000 ppm, IAA at 250, and 1-Naphthaleneacetic acid NAA at 500 mg/L. The same hormone IAA was tested by Nikmatullah et al. (2018), but other factors such as age of mother plant and number of nodes was included.
In this study we explored the responses and interactions at different ages of Granola white potato stem cuttings, number of nodes, and levels of hormones in terms of its rooting ability and growth. Results and its potential for tuber production are discussed.
Source : Optimizing Rooting of White Potato Cuttings: A Study of Three Growth Conditions | InformativeBD
1 note
·
View note
Photo

Known for its vibrant foliage and futuristic blooms, Bromeliads are tropical plants that every indoor gardener should grow. One of the most fascinating aspects of this plant is its ability to produce “pups”—small offsets that can be used in propagation. These pups can be separated and cultivated into new, independent plants, making bromeliads a rewarding species for propagation enthusiasts. Whether a seasoned gardener or a beginner, this guide will walk you through growing bromeliad pups step-by-step, ensuring healthy and thriving plants. What Are Bromeliad Pups? Bromeliad pups are miniature versions of the parent plant that emerge after the mother plant flowers. Unlike many plants that reproduce primarily through seeds, bromeliads focus their energy on producing these clonal offsets. Once the mother plant blooms—a process typically occurring once in its lifecycle—it begins to die back, channeling its resources into the pups. These offsets can be left attached to the mother plant or removed and grown separately. Common bromeliad genera that produce pups include Aechmea, Neoregelia, Guzmania, Tillandsia, and Vriesea. Each pup has the potential to develop into a mature plant identical to its parent, making propagation straightforward and rewarding. When to Remove Bromeliad Pups? Timing is critical when separating pups from the mother plant. Ideally, you should wait until the pup is at least one-third to one-half the size of the mother plant (typically 3–6 inches tall, depending on the species). At this stage, the pup has developed enough roots and leaves to survive independently. Removing pups too early can stunt their growth or cause them to fail, as they rely on the mother plant for nutrients in their initial stages. Signs a pup is ready for separation: It has a sturdy base with visible roots. It has several well-developed leaves. The mother plant is starting to decline or has fully flowered and is browning. While pups can remain attached to the mother plant indefinitely, removing them allows you to propagate more plants and maintain a tidy appearance as the mother plant naturally dies off. Tools and Materials Needed A sharp, sterilized knife or pair of pruning shears (wipe with rubbing alcohol to prevent disease transmission). A well-draining potting mix (e.g., a blend of orchid bark, peat moss, and perlite). Small pots or containers with drainage holes. A rooting hormone (optional, but helpful for encouraging root growth). A spray bottle with water. A bright, indirect light location for recovery. Step-by-Step Guide to Growing Bromeliad Pups 1. Identify and Prepare the Pup Examine the base of the mother plant to locate the pups. Choose one that meets the size criteria mentioned earlier. Gently pull back any dead or dying leaves from the mother plant to see clearly where the pup connects. 2. Separate the Pup Method 1: Cutting Use your sterilized knife or shears to cut the pup away from the mother plant carefully. Aim to sever it as close to the mother’s base as possible while preserving any roots attached to the pup. If the pup has no roots, don’t worry—it can still grow new ones. Method 2: Twisting For some species, pups can be gently twisted off by hand. Hold the mother plant steady with one hand and twist the pup with the other. This works best with loosely attached offsets. After separation, inspect the cut or break point. With your sterile tool, trim away any damaged tissue to prevent rot. 3. Let the Pup Callous (Optional) If the pup is cut and has a moist wound, set it aside in a dry, shaded area for 24–48 hours. This allows the cut to callous over, reducing the risk of fungal infection or rot when planted. 4. Prepare the Potting Medium Bromeliads thrive in well-draining, airy soil. A recommended mix is: 50% orchid bark or pine bark 25% peat moss or coconut coir 25% perlite or coarse sand Avoid heavy, water-retaining soils like standard potting mix, as bromeliads are prone to root rot. Fill a tiny pot (4–6 inches in diameter) with this mixture, leaving room for the pup’s base. 5. Plant the Pup Make a small hole in the potting mix. If desired, dip the pup’s base in rooting hormone to stimulate root growth (this is optional but can speed up establishment). Place the pup in the hole, ensuring the base is in contact with the soil. Gently press the mix around it to secure it upright. For pups without roots, stabilize them with a stake or by packing the soil snugly. 6. Water and Mist Lightly water the soil around the pup to settle it, but avoid soaking it. Bromeliads prefer minimal soil moisture. Fill the cup with distilled or rainwater for species with a central cup (tank bromeliads like Aechmea or Guzmania). Mist the leaves with a spray bottle to maintain humidity, especially in dry climates. 7. Provide Proper Light and Temperature Place the potted pup in a location with bright, indirect light. Direct sunlight can scorch the young plant, while too little light will slow growth. Ideal temperatures range from 65F–80F. Protect the pup from drafts or sudden temperature drops. Common Challenges and Solutions Root Rot: Overwatering is the leading cause of failure. Ensure excellent drainage and let the soil dry out between waterings. Slow Growth: Insufficient light or nutrients may be the culprit. Adjust the plant’s location or feeding schedule. Pests: Watch for scale, mealybugs, or spider mites. Treat infestations with insecticidal soap or neem oil. How Long Until Maturity? The time it takes for a bromeliad pup to mature varies by species. Most take 1–3 years to reach full size and bloom. For example: Tillandsia (air plants) may mature faster within 1–2 years. Larger species like Aechmea or Vriesea may take closer to 3 years. Patience is key—bromeliads are slow growers, but their beauty is worth the wait. Bonus Tips Leave one pup attached to the mother plant if you want a clumping effect rather than individual plants. Use rainwater or distilled water, as bromeliads are sensitive to chemicals in tap water. Experiment with mounting pups on driftwood or rocks for epiphytic species like Tillandsia. How to Care for Bromeliad Pups? The small offsets produced by a mature bromeliad—are a fantastic way to propagate these tropical beauties. Once separated from the mother plant, pups require specific care to grow into healthy, independent plants. This guide breaks down the essentials of caring for bromeliad pups with simple steps and tips to ensure success. Watering Basics Bromeliad pups need minimal watering compared to other houseplants. Keep the soil lightly moist but never soggy, as overwatering can lead to root rot. For tank bromeliads (like Guzmania or Aechmea), fill the central cup with a small amount of distilled or rainwater. Empty and refill the cup every 1–2 weeks to prevent stagnation. Mist the leaves occasionally to boost humidity, especially in dry environments. Light Requirements Bright, indirect light is ideal for bromeliad pups. Place them near a window with filtered sunlight or under grow lights if indoors. Avoid direct sun, which can scorch their delicate leaves, and steer clear of dark corners where growth will stall. Aim for 6–8 hours of light daily to keep them thriving. Soil and Potting Use a well-draining mix of 50% orchid bark, 25% peat moss, and 25% perlite. Heavy, waterlogged soil is a bromeliad’s enemy, so ensure the pot has drainage holes. If the pup lacks roots initially, it can still establish itself in this airy medium—secure it gently until roots develop. Temperature and Humidity Bromeliad pups prefer warm conditions between 65 and 80 degrees Fahrenheit. Protect them from cold drafts or sudden temperature drops, which can stress the plant. They thrive in 50–60% humidity, so in dry climates, use a humidity tray, mist regularly, or place them in a naturally humid spot like a bathroom. Fertilizing Tips Feed pups sparingly to avoid overwhelming them. Use a diluted, water-soluble fertilizer (20-20-20 at ¼ strength) monthly during spring and summer. Apply it to the soil or cup, not the leaves, and skip fertilizing in fall and winter when growth slows. Less is more with bromeliads—overfeeding can harm them. Pest and Problem Prevention Watch for pests like scale, mealybugs, or spider mites, which occasionally target bromeliads. If spotted, treat with insecticidal soap or neem oil. Watch for signs of trouble, like yellowing leaves (overwatering) or slow growth (low light), and adjust care accordingly. Good airflow around the plant helps prevent fungal issues. How Long Do Bromeliad Pups Take to Flower? The time it takes for bromeliad pups to flower depends on the species, but generally, they require 1–3 years to reach maturity and bloom. Smaller varieties, like Tillandsia, mayflower closer to the 1–2-year mark, while more significant types, such as Aechmea or Vriesea, often take up to 3 years with proper care. Factors like light, water, and nutrients can influence this timeline, so consistent attention is key to encouraging flowering. Conclusion Growing bromeliad pups is a simple yet fulfilling way to expand your collection or share these exotic plants with others. By carefully separating the pups, providing the right conditions, and maintaining consistent care, you’ll soon have a thriving new generation of bromeliads. Whether displayed in pots, terrariums, or as part of a tropical garden, these plants bring a touch of the jungle to any space. Khaja Moinuddin, a computer science graduate, finds joy in gardening and homesteading. Join him on this blog as he shares his experiences in homesteading, gardening, and composting Source link
0 notes