#Computed and Templates in VueJS
Explore tagged Tumblr posts
Visit Tumblr Blog
Explore Tumblr blogs with no restrictions, modern design and the best experience.
Last Seen Tumblr Blogs


Fun Fact
Tumblr Inc. is using 66 technologies for its website.
Text
How to use Filters, Computed and Templates in VueJS - HIndi / Urdu Tutorial
How to use Filters, Computed and Templates in VueJS – HIndi / Urdu Tutorial
[ad_1]
Get Source Code ————————— https://jsfiddle.net/shoaibb/dqu5fwcL/
Watch My Other Videos on VueJS in Hindi / Urdu Tutorial ——————————————————————————————
How to create Component in VUEJS – #1 – Hindi / Urdu Tutorial https://www.youtube.com/watch?v=gkcyfYpWRiU&index=1&list=PLxnSeqQVewBPeNagBtvjVuyKSvo0sMWO-&t=19s
How to Add and Remove Data from a List in Vue – Hindi / Urdu Tutorial https://www.…
View On WordPress
#Best Hindi Tutorials in VUEJS#Computed and Templates#Computed and Templates in VueJS#how to insert filters in vue js...#vue js#vuejs#vuejs hindi#vuejs tutorial in hindi
0 notes
Text
I-Soft Dubai is hiring “Front End Developer (Vuejs)” Location: Dubai (On Site) Responsibilities: Developing user-facing applications using #Vue.js. Create websites based on templates. Turn XD files into animated, responsive web pages using VueJS, HTML5, CSS3, SASS, and JavaScript. Thoroughly test your work on multiple browsers and mobile devices. Collaborate in concept development and design ideation cross-functionally to help define a creative strategy. Building modular and reusable components and libraries. Optimizing the application for performance. Staying up-to-date with all recent developments in the JavaScript and Vue.js space. Keeping an eye on security updates and issues found with Vue.js and all project dependencies. Proposing any upgrades and updates necessary for keeping up with modern security and development best practices. Skills and requirements: Bachelor degree in computer engineering, information technology, computer science or any related discipline. Proficient in Vue.js, JavaScript, HTML & CSS. Nuxt.js & Composition API experience are a must. Understanding of server-side rendering and its benefits and use cases. Knowledge of functional programming and object-oriented programming paradigms. 3-5 years of relevant experience. If you’re interested, please send your CV.
0 notes
Text
VueJS with Laravel | Perfect Solution to Single Page Web App Development
The article was initially published in WebMeridian blog.
Two technologies are continuously growing in usage and popularity when it comes to web app development. We are talking about VueJs with Laravel — the advantages of combining these two are enormous.
In this article, we will learn how these two technologies have become a perfect solution for single-page web app development. However, before we do that, it is crucial to learn about the two technologies in brief.
What is VueJs?
VueJs is a progressive web application framework with hundreds of features. HTML is more markup by a progressive framework. It means that the HTML file also gets updated whenever the browser does. It is attached to the data model as a template model. One of the biggest advantages is that it is a gradually adjustable structure.
It is a JavaScript framework that is widely used to create User Interfaces (UIs) and single-page applications (SPAs). It makes use of a model-view-view-model (MVVM) architectural pattern. This architecture allows for the business logic to be distinguished from the graphical view.
Take a look at these statistics given below:
0.7% of websites use Vuejs, giving it a 0.9% market share among JavaScript libraries.
52,338 websites in the USA use Vuejs.
What is Laravel?
Laravel follows the Model-View-Controller (MVC) design principle to produce an open-source framework. It was created in 2011 and streamlines the entire development process along with excellent performance. The additional benefit includes simplicity and adaptability. Let us have a look at some of the statistics that prove Laravel is relevant today:
Laravel development is a 2x popular option for PHP framework development in 2022.
Laravel is presently being used by over 761,321 live websites.
Laravel is preferred by several industry verticals while creating websites. Computers, Electronics & Technology (5.63%), Science (3.26%), Government (2.17) and other categories are among the top ones.
Who Is Using VueJs With Laravel?
Laravel is a popular framework with giants like Deloitte, Tesco, and MasterCard using it for their projects. There are many amazing startups and global brands that are preferring Vue for their front-end efforts. Companies with both Vue and Laravel in their stacks include 9GAG, Bitpanda, and AO.com.
Vue development is simple for newbies to pick up, thanks to its exceptional developer popularity and legendary helpful documentation, while allowing professionals to build MVPs rapidly and grow apps effectively as and when required.
Reasons to Use VueJs With Laravel
Below are some reasons to use VueJs with Laravel:
Frontend-driven applications
Applications are created today keeping in mind user experience. Vuejs enables Laravel developers to create a front end in ways that the application does not have to reload the pages whenever an update is made.
Amazing event-driven app
A comprehensive event-driven web application that can control all front-end operations can be made using VueJs. Also, you get composable components that can be used in whichever way you want to use them.
Allows developers to issue database queries using PHP syntax
VueJs uses a virtual DOM, in which the user interface representation is loaded into memory as JavaScript data structures. The ORM, a dynamic PHP adaptation of the active record design, is provided by Laravel. It enables the developers to issue database queries leveraging PHP syntax.
High Security
Laravel is a highly secure PHP framework, and therefore, applications created are highly secure. It protects web applications from malicious attacks. Malware users try to pass query data to attack an application. Laravel prevents SQL injections with Eloquent ORM.
VueJs With Laravel for Single-Page Web App Development
Developers create the ideal SPA applications using Vue.js development as the frontend technology and Laravel as the backend technology. The created applications function inside the browser without reloading the Full page.
All the resources, including CSS, HTML, and scripts are loaded once in a SPA application. As a result, pages are not reloaded when a component is updated. As part of the process, only data gets exchanged back and forth. Another advantage is that there is no waiting time in a SPA application which is a great advantage as it can draw more users.
Native mobile applications can utilize a SPA application’s backend code. SPA made with Vue and Laravel is a perfect solution since they cache local storage, function effectively in offline code, and transmit only one request by storing all the data. To sum up, Vue and Laravel work perfectly together.
Why Use Vue With Laravel for SPA?
Below are some reasons to use Vue with Laravel for Single Page Application (SPA) development:
To succeed as a business, you must create an application that provides a unique user experience. Vue and Laravel provide an array of built-in solutions that can help you create an application with an excellent user experience.
Organizations looking to create Single Page Applications (SPAs) need to factor in the cost of development. The cost is largely governed by how complex the technology they are going to use and resource availability and demand. Vue and Laravel are easy to learn and developers are easily available.
On top of it, they have excellent documentation and committed and helpful communities. Therefore, even if you have a development team that does not excel in these technologies, they can get started.
SPAs created using Vue and Laravel are small in size and therefore load quickly and use less bandwidth. Users in some countries are comfortable accessing with less bandwidth — if you have international markets to target, explore creating SPAs with Vue and Laravel.
Vue’s component-based architecture allows the efficient development of perfectly scalable single-page web apps and enables developers to build MVPs fast.
As discussed above, the Model-View-Controller (MVC) design pattern, which is supported by Laravel, is outstanding and perfect for creating user interfaces.
Laravel has in-built object-oriented syntax and many libraries supporting the use of objects.
Conclusion
Combining VueJs with Laravel is excellent to create Single Page Applications. However, getting a project done is not an easy task. You will need a team of experts and the right talent to combine the two powerful frameworks and build outstanding Single Page Applications (SPAs).
Laravel developers can help you develop a quick and functional core of SPA, while the VueJs developers have the potential to give a richer and more interactive user interface to your web application. If you plan to create SPAs, hire Laravel developer of an experienced development company and get started with your dream project.
1 note
·
View note
Text
Devdocs github

#Devdocs github how to#
#Devdocs github install#
#Devdocs github update#
There are so many ways to contribute to our community. Get Connected # Do I really have something to contribute to Matplotlib? #ġ00% yes. This project is a community effort, and everyone is welcome toĬontribute. MEP28: Remove Complexity from Axes.boxplot MEP15: Fix axis autoscaling when limits are specified for one axis only Some tests generate screenshots of the WebGL canvas in order to compare renderings to previous snapshots.Making your own copy (fork) of Matplotlib Generally, a test is contained with an it('test name') block in the tests/ file. There are numerous existing tests, so you can probably use one of those as a template. You can find tests in the tests folder within the niivue project. If you add a feature, or fix a bug please try to add a test for it. When testing locally from other devices you can navigate to your development computer's local IP address (assuming your phone and computer are on the same local network) at the port specified in the URL you see when running npm run demo. Therefore, please do your best to test features on as many devices as you have access to. When adding features please keep in mind that we want NiiVue to work on all devices that support WebGL 2.0 (laptops, desktops, tablets, and phones). It also gives everyone a change to comment on new posts. Using IssuesĪll contributions should start as a new issue on the NiiVue issue board.īy starting a new issue for everything we ping everyone watching the project at the same time, and therefore alerting them to the feature, bug, or question.
#Devdocs github update#
Feel free to update documentation, add features, fix bugs, or just ask questions on the issue board. # then copy the contents of fnt.txt to the font string in src/fnt.jsĪll contributions to NiiVue are encouraged and welcomed. Nv.loadVolumes(this.volumeList) // press the "v" key to cycle through views Nv.setSliceType(nv.sliceTypeMultiPlanar) // press the "v" key to cycle through views Nv.attachTo('gl') // the canvas element id the parent element can be any size you want (small or large) Niivue will adjust the canvas to 100% of its parent container's size first object in array is background image
WebGL 2.0 capable web browser (Chrome, FireFox).
See the examples here Requirements for NiiVue to work All live views reflect the capabilities of the NiiVue version in the main branch. These are updated and deployed automatically. We host many NiiVue examples via github pages.
Wellcome Centre for Integrative Neuroimaging (University of Oxford).
Center for the Study of Aphasia Recovery (University of South Carolina).
This will enable other researchers and developers to build cloud-based medical imaging tools with a powerful viewer that can operate on any device (desktop, tablet, mobile). The primary aim of NiiVue is to translate the features of the widely used native desktop applications ( MRIcroGL, Surfice) to their web-based equivalents. See our active projects here Overview/Mission
#Devdocs github install#
Installs without the bloat of the development dependencies or testing frameworks npm install -only=prod Projects Getting started Docs and ReferencesĬlick here to go to the docs web page Install NiiVue using npm
#Devdocs github how to#
Our web-based user interface implementation (under development) will demonstrate how to integrate NiiVue into a more comprehensive VueJS, React and Angular projects. However, developers who wish to build custom user interfaces around the NiiVue canvas can manipulate the rendered images and change settings via the API. This core package does not include a comprehensive user interface outside of the canvas (e.g. NiiVue includes many mouse and keyboard interactions that enable browsing and manipulating images displayed in the canvas. The NiiVue package is intented to be used by individuals developing interactive web pages related to showing nifti and other formats popular in neuroimaging. We have additional projects under development that will demonstrate a web-based user interface implementation, and a desktop application built using web technologies. This repository contains the core NiiVue package. NiiVue is a WebGL 2.0 medical image viewer.
0 notes
Text
Ff mod menu templates for ff vewer v3

#Ff mod menu templates for ff vewer v3 update#
#Ff mod menu templates for ff vewer v3 software#
#Ff mod menu templates for ff vewer v3 download#
#Ff mod menu templates for ff vewer v3 free#
Request For Commits #12 - Crowdfunding Open Source (Vue.js) (06-15-2017).
MW S04E08 - Vue.js with Evan You and Sarah Drasner (04-27-2017).
Codecasts #2 - Falando Sobre Vuejs e Web Components ().
#Ff mod menu templates for ff vewer v3 software#
Software Engineering Daily (12-29-2015).
VueJS Uzbekistan - Telegram Community and Support Group.
vueslack - 2300+ registered users worldwide.
VueJS Iran - Telegram Channel & group (group link available in channel bio).
vue-requests - Request a Vue.js module you wish existed or get ideas for modules.
#Ff mod menu templates for ff vewer v3 free#
Prokarman Resume Builder - A Free Resume Builder for crafting resumes for your dream job.Vue.js Interview Questions - A List of 300 VueJS Interview Questions and Answers.Vue.js Jobs - VueJobs - A Vue.js job portal to hire or get hired for all your Vue.js jobs.Notes on Vue - A personal guide to Vue development.Best vue.js Courses On YouTube - Handpicked list of best Vue.js tutorials on YouTube.Vue.js Articles - Assorted Vue 2 and 3 tutorials and articles.Vue.js Workshops - Learn Vue 2, in browser, by building 3 applications: Landing page, Todos App and Podcasts aggregator.( Vue.js, Vue-Router, Vuex, Vue-Axios, Vue-Apollo ).Vue 3 Video Playlist - Amazing Vue 3 tutorials and experiments.Vue Mastery - The ultimate learning resource for Vue developers.- An extensive list of websites created with the Vue.js Javascript framework.Vue.js Online Courses Directory - Vue.js courses from top e-learning platforms curated by Classpert, a online course search engine.Vue.js DEV Community - Official tag for the Vue.js JavaScript Framework on DEV.to.A minimalistic list of Vue.js libraries and components based on the awesome-vue repo. Tips & tricks about the Vue ecosystem, for busy devs. Vue School - Learn Vue.js from video courses by core members and industry experts.Vue Curated Resources - Recommended Vue.js courses and tutorials.Weekly Vue.js Newsletter - Weekly Vue.js news & tips by Vue News - Social website focusing on the latest Vue.js news and information.Vue.js 資料まとめ(for japanese) by Vue.js Wikipedia.If you’re unsure of what to pick, just leave them as they are and press Next.A curated list of awesome things related to Vue.js Go through the installing process and select your desired settings.
#Ff mod menu templates for ff vewer v3 download#
Click the link above, then click the download tab, then click the 32-bit or 64-bit Installer to download:.Notepad++ is far superior than the regular old Notepad and will allow you to edit your XMLs with ease. Don’t worry about any of the other settings for now.Now open it up and make sure it has the path to WinMerge correct.Then just move TS4 XML Compare.exe to your Desktop, no installation required.Find where you downloaded it to on your computer, then right-click to extract it using your extracting program (built-in, WinRAR, 7-zip, etc).Click the link above, then click on the Files tab, and click on TS4 XML Compare.rar as shown below:.
#Ff mod menu templates for ff vewer v3 update#
TS4 XML Compare will help you update any mods that become incompatible with a patch by comparing the old version to the new version.
Now that you have it open, go through the Options and set them as I have them below:.
Once installed, tick Launch WinMerge, then click Finish.
Go through the installing process and select your desired settings. If you’re unsure of what to pick, just leave them as they are and press Next.
Find where you downloaded it to on your computer, then double-click it.
Another window (or tab) will come up and it will automatically download.
Click the link above, then click the Download Now! button.
It’s required for TS4 XML Compare that we’re installing next. You’ll need WinMerge to check if your mods are compatible with new patches.
Close the program and it’s ready to go for the upcoming tutorials.
Once you have all of the settings done, go ahead and click the Save button in the Settings window.
Check to make sure the Sims 4 Path and Sims 4 Documents paths are set correctly.
Now that it’s open, click on Settings in the upper-left:.
Once it’s done installing, tick Launch Sims 4 Studio, then click Finish.
Once it’s done downloading, find where you downloaded it to on your computer and double-click the icon.
Scroll down and click on the Installer link to download:.
Now click on the link that says Sims 4 Studio version number (name) – Open Beta, as shown below (the version number/name will change as it receives updates):.
I’ve always used the Beta regardless and have had no issues. Note – The Community Tested Version was not available at the time that I wrote this guide, once it is you can use either one.
Click on Download Sims 4 Studio – Open Beta Version.
Click the link above, then Register (if needed) and Log in.
Most of these tutorials use Sims 4 Studio. I prefer Sims 4 Studio because it has almost everything you need to create Mods/CC all in one program.
0 notes
Text
vue 3.x components for bootstrap 5.x pagination and modals
The software ecosystem for vue 3.x is still evolving. I could not find any off-the-shelf components for pagination and modals, so I scratched up my own.
For the quick learners, you can visit the logic on github; code is distributed under the MIT license. In the coming days/weeks, I will try to set up parent views that exploit these components and illustrate their use, so please revisit the repo as needs be. For now, you're sledding downhill on your on.
Evan You from MIT is generally credited with authoring vueJS, a javascript framework for frontend development, while bootstrap -- a styling library -- grew out of efforts at Twitter, I believe. Both are fairly well-documented. Bootstrap probably enjoys wider adoption, but vueJS is holding its own in the modern frontend dev efforts.
Pagination
It's truly remarkable what vueJS in combination with bootstrap can accomplish on the web page. Here is what my component looks like for pagination:
<template>
<nav v-if="pagenav.numPages > 0" aria-label="Navigate through unvetted results">
<ul class="pagination justify-content-start">
<li class="page-item">
<a class="page-link" @click="previousPage" href="#">Previous</a>
</li>
<li v-for="pp in pagenav.numPages" :key="pp" class="page-item">
<a class="page-link" @click="navigateToPage(pp)" href="#"
:ref="setAnchor" v-bind:class="{ 'isSelected': isSelected(pp) }">{{ pp }}</a>
</li>
<li class="page-item">
<a class="page-link" @click="nextPage" href="#">Next</a>
</li>
</ul>
</nav>
</template>
<script>
import { computed, onBeforeUpdate, onUpdated } from 'vue';
export default {
name: "Pagination",
props: {
modelValue: {
type: Object,
default: () => {}
}
},
emits: ['update:modelValue'],
setup(props, { emit }) {
const pagenav = computed({
get: () => props.modelValue,
set: (value) => emit('update:modelValue', value),
});
let anchors = []
const setAnchor = el => {
if (el) {
anchors.push(el)
}
}
onBeforeUpdate(() => {
anchors = []
})
onUpdated(() => {
// Empty for now
})
const focusPageAnchor = () => {
anchors[pagenav.value.page].focus();
}
const isSelected = (pp) => {
return pagenav.value.page == (pp - 1);
};
return { pagenav, setAnchor, focusPageAnchor, isSelected };
},
methods: {
previousPage() {
this.pagenav.page = Math.max(0, this.pagenav.page - 1);
this.focusPageAnchor();
},
navigateToPage(pp) {
this.pagenav.page = pp - 1;
this.focusPageAnchor();
},
nextPage() {
this.pagenav.page = Math.min(this.pagenav.numPages - 1, this.pagenav.page + 1);
this.focusPageAnchor();
}
},
};
</script>
<style>
/* XXX color here is same as background color used by bootstrap for focused page-links */
a.isSelected {
background-color: rgb(234, 236, 239);
}
</style>
For 85 lines of markup and logic, this component does wonders. I will just highlight some of the hidden magic here:
* pagenav is a reactive variable injected into the Pagination component but declared, read, and written within the parent component. What that means is that the parent can function as a content manager, while the mechanics of pagination is deferred to the child component. The Pagination component can adjust the current page -- which in turn is picked up by the parent, which adjusts displayed content accordingly. In this light, pagination is a nice, compact example of modern, reactive programming.
* Use v-bind:class for conditional classes. The function isSelected highlights the currently selected page number, and it does so through selectively turning off/on the isSelected class. Got that? Conditional classes have been out there a long time, but here it's done in a fairly terse, reactive way.
PageModal
For purposes of rendering modal dialogs, I leverage bootstrap 5.x modals. My thinking was that I should not have to create new divs every time the UX/UI require a new popup dialog. So instead, I scratched up a component which abstracts away the mechanics of the modal, while leaving the parent view to dictate the profile of each modal. Some of the programming for PageModal is quite similar to the Pagination component.
Here's the logic:
<template>
<div>
<svg xmlns="http://www.w3.org/2000/svg" style="display: none;">
<symbol id="check-circle-fill" fill="currentColor" viewBox="0 0 16 16">
<path d="M16 8A8 8 0 1 1 0 8a8 8 0 0 1 16 0zm-3.97-3.03a.75.75 0 0 0-1.08.022L7.477 9.417 5.384 7.323a.75.75 0 0 0-1.06 1.06L6.97 11.03a.75.75 0 0 0 1.079-.02l3.992-4.99a.75.75 0 0 0-.01-1.05z"/>
</symbol>
<symbol id="info-fill" fill="currentColor" viewBox="0 0 16 16">
<path d="M8 16A8 8 0 1 0 8 0a8 8 0 0 0 0 16zm.93-9.412-1 4.705c-.07.34.029.533.304.533.194 0 .487-.07.686-.246l-.088.416c-.287.346-.92.598-1.465.598-.703 0-1.002-.422-.808-1.319l.738-3.468c.064-.293.006-.399-.287-.47l-.451-.081.082-.381 2.29-.287zM8 5.5a1 1 0 1 1 0-2 1 1 0 0 1 0 2z"/>
</symbol>
<symbol id="exclamation-triangle-fill" fill="currentColor" viewBox="0 0 16 16">
<path d="M8.982 1.566a1.13 1.13 0 0 0-1.96 0L.165 13.233c-.457.778.091 1.767.98 1.767h13.713c.889 0 1.438-.99.98-1.767L8.982 1.566zM8 5c.535 0 .954.462.9.995l-.35 3.507a.552.552 0 0 1-1.1 0L7.1 5.995A.905.905 0 0 1 8 5zm.002 6a1 1 0 1 1 0 2 1 1 0 0 1 0-2z"/>
</symbol>
</svg>
<div ref="activeModalRef" class="modal" tabindex="-1">
<div class="modal-dialog modal-dialog-centered">
<div class="modal-content">
<div class="modal-header alert d-flex align-items-center"
v-bind:class="{ 'alert-primary': isPrimary(), 'alert-warning': isWarning(), 'alert-info': isInfo() }" role="alert">
<svg v-if="activeModal.iconName == 'check-circle-fill'" class="bi flex-shrink-0 me-2" width="24" height="24" role="img" aria-label="Success:"><use xlink:href="#check-circle-fill"/></svg>
<svg v-if="activeModal.iconName == 'info-fill'" class="bi flex-shrink-0 me-2" width="24" height="24" role="img" aria-label="Information:"><use xlink:href="#info-fill"/></svg>
<svg v-if="activeModal.iconName == 'exclamation-triangle-fill'" class="bi flex-shrink-0 me-2" width="24" height="24" role="img" aria-label="Warning:"><use xlink:href="#exclamation-triangle-fill"/></svg>
<h5 class="modal-title">{{ activeModal.title }}</h5>
<button type="button" class="btn-close" data-bs-dismiss="modal" aria-label="Close"></button>
</div>
<div class="modal-body">
<p class="text-start">{{ activeModal.bodyMsg }}</p>
</div>
<div class="modal-footer">
<button v-if="activeModal.hasCancelBtn" type="button" class="btn btn-secondary" data-bs-dismiss="modal">Cancel</button>
<button @click="activeModal.okBtnCallback" type="button" class="btn btn-primary" data-bs-dismiss="modal">OK</button>
</div>
</div>
</div>
</div>
</div>
</template>
<script>
import { computed, onMounted, ref } from 'vue';
export default {
name: 'PageModal',
props: {
modelValue: {
type: Object,
default: () => {}
}
},
emits: ['update:modelValue'],
setup(props, { emit }) {
const activeModalRef = ref(null);
const activeModal = computed({
get: () => props.modelValue,
set: (value) => emit('update:modelValue', value)
});
onMounted(() => {
activeModal.value.ref = activeModalRef.value;
});
const isPrimary = () => {
return activeModal.value.iconName == 'check-circle-fill';
};
const isWarning = () => {
return activeModal.value.iconName == 'exclamation-triangle-fill';
};
const isInfo = () => {
return activeModal.value.iconName == 'info-fill';
};
return { activeModal, activeModalRef, isPrimary, isWarning, isInfo };
},
};
</script>
There likely are better approaches to this logic than what you see here. Here are some highlights:
* activeModal is a reactive variable similar to pagenav in the Pagination component. You can think of activeModal as determining the profile of some modal dialog -- the wording, any header icons, etc. The parent view sets activeModal, and when it raises the modal dialog, the latter is configured properly.
* activeModalRef is a reference to the HTML element -- a div here -- that encompasses the modal dialog. We need to convey that reference to the parent view so it can raise the modal as needs be.
* The svg element is an image sprite that, along with much of the vanilla modal mark-up, I simply copied from bootstrap's online documentation. By setting up an inline sprite, we can then specify self-referential icons in the modal headers.
Summary
That's all for now! When I have the time, I will scratch up examples of how parent views use these components.
Novemeber 17, 2021
0 notes
Text
Who is a Full Stack web Developer and how it is Advantageous?
Are you a Backend developer? Do you code backend for the web applications in Java, or Dot net, or Python, or Nodejs? If yes, then pull up your socks, the front-end challenge is right in front of you. Companies now want you to do the front-end task as well. Yes, please prepare yourself for that. You can still be a frontend developer or a backend developer. Though, Full Stack developers are more in demand. In this article, we discuss this issue in deep. Further, we discuss topics like what a full stack developer is, prior knowledge required for a full stack developer, various skills required, what are the advantages if you are one such, and lastly will discuss the jobs and salary issue. So,let us begin our article. And you can contact us for your Full-stack Developer training. Naresh I Technologies is the number one computer training institute in Hyderabad and among the top five computer training institutes in India. Contact us anytime for your Full stack web Development training.
Who is a Full Stack Developer?
So, who is a full-stack developer? He is the one who can single-handedly complete the whole web development project. He looks after the back-end development work, as well as the front-end development work. The backend is the server, and the front end is the UI. Single-page applications like Angular, React and Vuejs is the modern-day UI. And now we have the UI/UX developed using AR/VR as well. Also, the traditional HTML5, Bootstrap, jQuery, MVC, and various such are part of the front-end development. Some of the above technologies like the last four are used in Backend as well. Anyways, Backend also requires a template. And you provide through the front-endtechnologies’ application. Previously, two different teams used to do the backend and frontend tasks. However, now both one person is conducting tasks. And companies now look for such technocrats in the majority.
Prerequisites for Becoming a Full Stack Developer
You need to be possessed experience in web development or web designing. A web developer can become a full stack developer, and so is a web designer. And, it is the 21st-century requirement. Both need to upgrade themselves to meet this challenge from the market. The demand in the Market is maximum for the Full-stack developer, and there are multiple stacks, that we discuss in the next section. Above all, you should be ready for very hard work. However, the payment will make you happy. Please be assured.
Skills for Full Stack developer
Loads of skills together make a Full-stack developer. Some of the skills required are as below:
Front-end:
HTML5, jQuery, Bootstrap, Material UI, Angular, React Vuejs, AR/VR, MVC, MVVM, and various JS versions.
Backend:
You need different combinations, like as below:
· Java, Spring Boot, Hibernate
· Dot net, C#, LINQ, Entity Framework, ADO.NET, WCF. Web services, Socket programming. Signal R, HTTP, HTTPS, RESTFUL API, and various other technologies in Dot net
· Dot net core version of all the above technologies
· PHP, and various MVC frameworks like Code Igniter, and various such.
· Nodejs, and various frameworks like Express
· Python and various frameworks
You should learn one out of all these backend technologies. And you should complement the backend knowledge with a matching front-end technology. We have various stacks. There is a Dot net Angular Stack, LAMP Stack, MEAN stack, MERN stack, and various such. You need to be proficient in one stack for Full stack designation. However, you need some more technical skills now. And, they are:
· We included entity framework, and let us also add to the list JDBC, Oracle, MSSQL, MYSQL, MongoDB, Document DB, DynamoDB, and various others. Concisely, you should know the structured, semi-structured as well as unstructured databases. And, in the current context, learn from the AWS, Azure, and GCP list, the database you find in your stack.
· Apart from these, you need advanced programming skills like how to make use of the APIs and various third-party tools related to your stack.
· You also need knowledge of the DevOps procedure, as no programmer or designer., and hence a full stack developer can withstand the challenge from the market without DevOps.
· And you need special skills related to version control and repository for sure. Each day you need to push or pull the code from the version control systems like GIT.
Advantages as a Full Stack Developer
There are various advantages you get as a Full-stack developer. They are:
· There is a huge demand for each stack. And you can be a full stack developer in any one stack.
· Pay Scale is the best in the market, and we will experience that in the next section.
· You always have a bright future if you become a full-stack developer in any one of the stacks.
Jobs and Salary related to Full Stack web Developer
Remember, the full-stack developer is one of the highest paying coding jobs, and it ranks fourth currently in the list after System engineer, IT security specialist, and Software Engineer. According to Glass door, the average annual salary of a Full stack developer in the US is around $88000 currently. In India, the average salary of a Full stack developer is around 575000 INR. And it can be as high as around 1195000 INR. Some companies pay even more based on the expertise and experience of the full stack developer.
Hence, if you select Full stack development as your career, you have a bright present, as well as a bright future. And that brings us to the end of the article. Have a nice career! Remember, you can still exist as a backend developer or a front-end developer. However, the demand for Full Stack developers is increasing day by day, as there is less burden on the management hence.
Naresh I Technologies is the number one computer training institute in Hyderabad and among the top five computer training institutes in India. Contact us anytime for your Full-stack Developer training. You can also opt for Full-stack Developer online training, and from any part of the world. And a big package is waiting for you. And all is yours for a nominal fee affordable for all with any range of budget. Let us have a look at what you will get with this Full-stack Developer training package:
· You need to pay a nominal fee.
· You can choose any stack, as per your skills and interest.
· You have the option to select from online and classroom training.
· A chance to study at one of the best Full-stack Developer training institutes in India
· We provide Full-stack Developer training in Hyderabad and the USA, and no matter in which part of the world you are, you can contact us.
· Naresh I technologies cater to one of the best Full-stack Developer training in India.
· And a lot more is waiting for you.
Contact us anytime for your complete Full stack web Development online training.
0 notes
Text
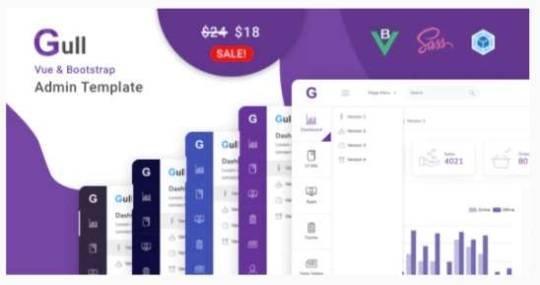
Gull Admin Templates Review - Vuejs & HTML Admin Dashboard Template
About Gull Admin Templates
Gull – Vue is a modern next generation VueJS Admin Dashboard Template which is Feature Rich, Responsive and Easy To Customize. Gull-vue is Pure Vue JS Admin Dashboard Template. No Jquery Dependancy. Gull-vue is built on top of VueCli, Vue,Vuex,sass And BootstrapVue Component. Its Comes With four Attractive Dashboard, five apps, 200+ Widgets, Lots of Charts, UI Components , Two Different Layouts, LIght version, and Dark Version.
Gull Admin Templates is RTL Supported. It can be used for building all kind of Cross-platform Application and Web application backends like custom admin panel, admin dashboard, accounting software, project management, chat application, eCommerce backends, CMS, CRM, ERP or SAAS. Gull provides you all the UI to input and visualize/output large and small datasets. Buy Demo Themes Basic Details Themes Name GullAvailable Store ThemeforestThemes Type Admin TemplatesGutenberg SupportYesCompatible BrowsersIE11, Firefox, Safari, Opera, Chrome, EdgeColumns Support 4+Layout ResponsiveMobile Friendly Yes DocumentationClick Here To View DocumentationThemes Demo Click Here To View Themes Demo
How To Buy Gull Admin Templates From Theme Store
First StepIf You Want Buy Themes From Themes forest Market You Need To First Login Or Register Second Step After Register Or Login Go To Shop At Themes forestThird Step Find Your Suitable Themes From Variety Of Available Themes At Themes forest Fourth StepOnce You Selected Your Themes Click On Buy Button At Themes Forest Fifth StepMake Your Payment From Various Of Payment Mode Available At Themes forest . Final Step Once Payment Successfully Done . You Will Redirect At Thank You For Your Purchase’ Screen . Now Everything Done . From My Account Anytime To View Your Purchase Details, And Download Your Theme Or Its Updates. How To Install Gull Admin Templates Review The normal installation method is done via your WordPress Dashboard area. From your ThemeForest Downloads Screen, click the Download button next to Gull. Select All files & documentation.On your computer, unzip this package you've just downloaded. Within, you'll find a file titled "Gull.zip". This is the theme file.In your WordPress Dashboard, navigate to Appearance > Themes.Click the Add New button and then click the Upload button.Select the "Gull.zip" file and click Upload.Once you've installed Gull, click the Activate button.. Other Features: Minimal, Intuitive and Fully Responsive Design(compatible with major browsers, tablets and phones)BootstrapVue UI Library4 Dashboard versionsDark & Light VersionLanguage SupportHand Crafted UiKits(Buttons,badge,cards,accordion,list ETC ..)DatatablesList ViewApp TourThumb List View Main Features: Pure Vue Js: The Vue Uses Vue Cli,vue router,Vuex and BootstrapVue .No JQuery Full SASS support: The implements bootstrap 4 sass. Styles and custom schemes are written in sass. Prebuilt apps: The has pre made apps(Invoice Builder, Chat, Inbox,Contact). Customizable SASS color schemes:��Customize or create your own color scheme by changing the sass color variable’s value or creating new color scheme file. Data Table: Data table displays a set of data in clean table format with front-end paging options. User can search and sort data. Form Layouts and elements: Horizontal & verticle form layouts with all necessary form inputs and elements. Firebase Authentication: Gull Use Firebase For Authentication by Default Charts: Gull uses echarts/ApexCharts for data visualization. All necessary and common echart options/configurations are written in different file. Gull Admin Template The Gull admin template is built on the BootstrapVue UI library, and offers over 250 UI elements to build your admin panels. It has full RTL support, and it's ready to be translated as well. It supports any kind of backend use case from eCommerce backends to CMS. It comes with a bunch of different prebuilt apps like an invoice builder or a chat as well as versatile datatables & list views.

Easily customizable Reflect your personality! They make sure you can modify the look of Looper by touching just two SCSS files (even one). If you want to go deeper, don’t worry! Each component is separated in their own file so you can modify it without fear. Support Got a question about Looper? I’m here to help in any way They can. Just fill support form bellow and I’ll get back to you shortly: Just hit Contact Seller button on right panel in this page for Pre-sales questions.For technical support, please logged in to your account go to Purchases > Click the Order # > Get Support Read the full article
0 notes
Text
CloudBox | VueJS, HTML File Storage Admin Dashboard Template
CloudBox | VueJS, HTML File Storage Admin Dashboard Template
Cloud-based storage, Computing & Collaboration Web App on Themeforest CloudBox is a Google Drive kind of web template toolkit for Web Designers and Developers. CloudBox allows web designers to modify and debug layouts to improve efficiency and productivity. It is a modern and versatile dashboard with various ready-to-use apps and utility pages. It consists of the most impressive pages like User…

View On WordPress
#backend#Drive Dashboard#dropbox#Files dashboard#glup dashboard#google drive#handlebars#listing dashboard#premium dashboard#scss dashboard kit#storage admin#storage dashboard#storage starter kit#vuejs#web app#web dashboard
0 notes
Text
Full Stack Roadmap 2019
Becoming a full stack web developer seems an intimidating task, especially if you are completely new to the field of coding. As a beginner, you might think that you have a whole lot to learn within a short span of time. The languages, frameworks, libraries and databases along with everything else required is a whole long list of tools of full stack web development. If you start attempting to learn everything at the same time is setting yourself up to FAIL spectacularly. The easiest way to begin any work is to strategize with a road map. A road map is the best way to kick start your attempt to become a full stack web developer.

Tackle each layer one by one. Your objective should be to learn the bare minimum skill set so that you can start experimenting and honing your learned skills. Once you have mastered the basics, you can go ahead and learn full stack technologies which will give you an edge over other people. Follow a structured path and equip yourself steadily rather than trying to learn all over the web development spectrum.
This road map has multiple sections and is the go-to guide for organizing and selecting technologies to learn. The article mainly benefits the noobs but is also useful to the professional coders looking to become a full stack web developer. If you already have knowledge of some of the technologies we are going to talk about here, skip to the sections that will be useful to you. Feel free to customize this road map to suit your needs.
Front end technologies roadmap for a full stack web developer

You can start by learning the technologies required for the presentation or the front end layer. Follow this roadmap strategy if you wish to master front end development requisites. There are again the must learn, should learn and the value additions.
Basic languages
HTML- the HyperText Markup Language is the most basic and must know for any website you are contriving. You define and structure the content of a website.
CSS- this is used for styling websites and adding layouts, fonts and colours.
SQL- Structured Query Language, this is a basic language that is used for database management.
Front-end frameworks
BootStrap- An open-source toolkit for developing responsive, mobile first projects. Uses HTML,CSS and JavaScript. It helps design the website faster and easier. It has design templates for forms, buttons, tables, navigation etc., It also supports JavaScript plugins.
AngularJS- This a structural framework for dynamic web apps. The JavaScript-based open source web framework is maintained by Google and a community of corporations and individuals. They address challenges in a single-page application. It allows usage of HTML as the template language. It data-binding and dependency reduce the amount of coding required substantially.
ReactJS- A JavaScript library maintained by Facebook and a group of companies as well as individual developers. React is optimal for fetching fast-changing data that needs to be recorded. It is used for building user interfaces for single page applications. It allows users to create reusable UI components.
VueJS-This is yet another open-source JavaScript framework for single page applications and UIs.It is very compact in size and high on performance. The best option for new coders, it offers hand-picked the choicest features of other frameworks like Angular and React. It is known as the most approachable framework today.
Other programming languages required by a full stack developer:

You need to be proficient in multiple programming languages as most of the core processes for any business have to be written in them. It is not possible to master all of them in a short time, so we have a list of languages for you to begin with.
JavaScript- It is a just-in-time compiled programming language. It helps in adding dynamic features to your website is the predominant usage of JavaScript. This is used for both front end and back end operations. The JavaScript basics are easy to learn. Many of the front-end as well as back-end frameworks, like NodeJS and AngularJS, use JavaScript. It is widely used for aplication like chatbots using full stack technology.
TypeScript- Developed and maintained by Microsoft for development of large applications. A prerequisite if you want to learn Angular, this has recently become very popular. This is an addition to JavaScript and is always used along with JavaScript for features like type checking.
Python- This is a high-level, general-purpose language. It can be used on a server to create web applications, mathematics and server scripting. It connects to databases to read and manipulate files. It was designed for readability and runs on an interpreter system. It can also be used in a procedural, object-oriented or functional way.
Ruby- A dynamic, open source language, it is easy to learn and code. It focuses on productivity and simplicity.it can be used for web applications, servers, system utilities, backups and database works.
PHP- The most popular scripting language, it can be embedded into HTML. PHP scripts can only be interpreted on a server where PHP is installed. It is used to collect form data, send or receive cookies amongst other functions.
Back end technologies roadmap for a full stack web developer.
Developers need a back end framework so that an application can be created. It is the script-side of a dynamic application. A lot of options are available for back end frameworks.
Express-Express.js is a framework and is used as a web application for Node.js. It is a module of the NodeJS. It can be used for apps that are based on servers that will listen for connection requests from clients. It can be used for single-page, multi-page, and hybrid web applications. It is fast, easy to use and assertive.
NodeJS-This is an open-source, cross-platform in nature, that is runs across various platforms. it is a JavaScript runtime environment that executes JavaScript outside a browser.
Django- This is a high-level Python web framework that follows model-template-view architecture. It is used to simplify the creation of complex, database-driven websites. It is fast and promotes a clean design.
Ruby on Rails- This is a server-side web application framework based on the Ruby language. It provides default structures for databases, web services and web pages. It uses model-view-controller architecture. This is comparatively hard to learn as you have to learn multiple and independent concepts.
Database systems roadmap.
In today's scenario, there are tons of databases. Each company develops its own databases according to their requirements.
The objective of this roadmap is to learn and become a database administrator.
MySQL, SQLite, Postgres- These are Relational Database management system, and the data is stored in table-like schemes. This is good to store business data. These use SQL
MongoDB, Cassandra, Apache storm, Sphinx- These are the NoSQL databases. Their only commonality is that they do not use a relational database scheme. This type of database covers a wide range of technologies and can be used to find key-value DB, graph DBs, streaming DBs etc.,
VoltDB, MemSQL- These are a new kind of database, the NewSQL. They follow the relational scheme but instead of disks, they use memory. the advantage is that they outperform the traditional RDBMS but the limited amount of memory available is definitely a downside to this type of database.
Recommended additional skills for a full stack web developer.
Git- The most popular distributed version control system. It is fast and efficient. It has the capacity to handle small to very large projects. It is used to coordinate between programmers as well as track any changes made to any code stored in its repository. Check out the git basics before getting started. GitHub is the most widely used code repository and thus a must learn for an aspiring coder.
Machine Learning- A subset of AI, it is a top trending topic in 2018, machine learning is now being incorporated into various industries. It has entered the web development field as well. This provides the ability to learn and improve without being explicitly programmed. This is a good-to-learn skill for a full stack web developer.
SSH- The secure shell protocol is used to operate network services securely over an unsecured network. The SSH provides a secured remote login from one computer to another. It ensures the privacy and integrity of the data.
HTTP/HTTPS-HyperText Transfer Protocol (HTTP) is the protocol used by the world wide web. it defines how messages are transmitted, the actions taken by the Web servers and browsers when responding to commands. HTTPS is the secured version of HTTP. Here, the communication protocol is encrypted using Transport Layer Security. It ensures protection against man-in-the-middle attacks and eavesdropping.
Linux command-line basic-Having this skill is not a must but one you should definitely have. It is not necessarily easy or hard to learn and saves a lot of time. The job that otherwise consumes a lot of time when done manually, like organizing items on the back-end will be over very fast.
Data structures and algorithms-Data structures are just ways to store the data while an algorithm is a generic approach methodology to solve a problem or requirement. Every programmer needs to be familiar with these concepts. By themselves, they are not a core skill, but the more intuitive you are about these, the easier it is to solve issues or add requirements. The impacts are felt in efficiency, scalability and performance of an application. As a full stack developer, this will help immensely.
Character encoding-This is a must learn if you are planning on developing global applications. If there is no proper character encoding, you might end up with unreadable text on display, the data will not be properly processed and your content may not be found by the search engines.
Use this road map and start by equipping yourself on these basic to intermediate skills required to become a successful full stack developer. Keep adding to your skills to give more value- addition to your role and by extension to your organization.
#web development#webdesign#full stack web development#ui development#uxdeveloper#html5#css#learn react#angular#php#python
0 notes
Text
Building Desktop Apps With Electron And Vue
About The Author
Front-end developer based in Lagos, Nigeria. He enjoys converting designs into code and building things for the web. More about Timi …
Electron is an open-source software framework developed and maintained by GitHub. It allows for the development of desktop GUI applications using web technologies. In this tutorial, Timi Omoyeni explains what you need to keep in mind when building a desktop application with Vue.js using the Vue CLI Plugin Electron Builder.
JavaScript used to be known as the language for building websites and web applications especially with some of its frameworks such as React, Vue, and Angular but over time (as early as 2009), it became possible for JavaScript to run outside the browser with the emergence of Node.js, an open-source, cross-platform, JavaScript runtime environment that executes JavaScript code outside a web browser. This has led to the ability to use JavaScript for a whole lot more than just web applications, and one of which is building desktop applications using Electron.js.
Electron enables you to create desktop applications with pure JavaScript by providing a runtime with rich native (operating system) APIs. You can see it as a variant of the Node.js runtime that is focused on desktop applications instead of web servers.
In this tutorial, we’re going to learn how to build desktop applications using Electron, we’re also going to learn how to use Vuejs to build Electron applications.
Note: Basic knowledge of Vue.js and the Vue CLI is required to follow this tutorial. All of the code used in this tutorial can be found on my GitHub. Feel free to clone and play around with it!
What Are Desktop Applications?
Desktop applications are applications that run stand-alone in desktop or laptop computers. They are applications that perform specific tasks and are installed solely for this purpose.
An example of a desktop application is your Microsoft Word, which is used for creating and typing documents. Other examples of common desktop applications are web browsers, Visual Studio Code, and Adobe Photoshop. Desktop applications are different from web applications because you have to install the desktop application in order for you to access and make use of it, and they sometimes do not need internet access for them to work. Web apps, on the other hand, can be accessed by simply visiting the URL that such an app is hosted on and always need internet access before you can access them.
Examples of frameworks used in building desktop apps include:
Java Java is a general-purpose programming language that is class-based, object-oriented, and designed to have as few implementation dependencies as possible. It is intended to let application developers write once, run anywhere (WORA), meaning that compiled Java code can run on all platforms that support Java without the need for recompilation.
Java FX According to their official documentation, it is an open-source, next-generation client application platform for desktop, mobile, and embedded systems built on Java.
C# C# is a general-purpose, multi-paradigm programming language encompassing strong typing, lexically scoped, imperative, declarative, functional, generic, object-oriented, and component-oriented programming disciplines.
.NET .NET is a free, cross-platform, open-source developer platform for building many different types of applications. With .NET, you can use multiple languages, editors, and libraries to build for web, mobile, desktop, gaming, and IoT.
What Is Electron?
Electron is an open-source framework for building desktop applications. It was formerly known as ‘Atom shell’ and is developed and maintained by GitHub. It lets you write cross-platform desktop applications using HTML, CSS, and JavaScript. This means that you can build desktop applications for Windows, MacOS and other platforms using one code base. It is based on Node.js and Chromium. Examples of applications built with Electron include the popular Atom editior, Visual Studio Code, WordPress for desktop, and Slack.
Installation
You can install Electron in your project using NPM:
npm install electron --save-dev
You can also install it globally if you’re going to be working with electron apps a lot using this command:
npm install electron -g
Building Vuejs Apps For Desktop With Electron
If you’re familiar with building web applications using Vuejs, it is possible to build desktop applications using Vuejs. All you need for this is the Vue CLI Plugin Electron Builder.
The Vue CLI Plugin Electron Builder
This tool allows you to build Vue apps for desktop with Electron, this means that it makes your Vue application work as an electron app. This means that your Vue application which possibly is a web application can be extended to work in desktop environments without the need to build a separate desktop application in another framework. This gives Vue developers the option and power to go beyond the web. Going forward, you can work on that idea you have and give users a desktop application option — one that can run on Windows, macOS, and LinUX.
To see this in action, we’re going to be building a News app using the News API. The application will provide breaking news headlines and allow you to search for articles from news sources and blogs all over the web with their API. All you need to get started with them is your personal API key which can be gotten from here.
We’ll be building a simple app that offers the following:
A page that displays top and breaking headlines from a selected country with the option to choose a country using their /top-headlines endpoint. News API provides news from a list of countries that they support, find the list here.
News from a selected category using a combination of their /everything endpoint and a query parameter q with which we’ll specify our category.
After getting your API Key, we can create our application using the Vue CLI. Ensure you have the Vue CLI installed on your system, if you do not, install it using this command:
npm install -g @vue/cli # OR yarn global add @vue/cli
Once this is done, create your News app using the CLI:
vue create news-app
We’ll fetch the data from the News API by using Axios for this tutorial, but you can use any alternative you’re more comfortable with. You can install Axios by using any of the following commands:
//NPM npm install axios // YARN yarn add axios
The next step would be to set up an Axios instance for global config in our application. We’re going to be creating a plugins folder in the src folder where we’ll create this axios.js file. After creating the file, add the following lines of code:
import axios from "axios"; let baseURL = `https://newsapi.org/v2`; let apiKey = process.env.VUE_APP_APIKEY; const instance = axios.create({ baseURL: baseURL, timeout: 30000, headers: { "X-Api-Key": apiKey, }, }); export default instance;
Here, we define our baseURL and apiKey which we got from News API and pass it to a new instance of Axios. This instance accepts the baseURL and apiKey together with a timeout property. News API requires you to add your API Key when making a request to their API and offers 3 ways to attach it to your request but here, we’re adding it to the header X-Api-Key property after which we export instance. Once this is done, we can now use this config for all our Axios requests in our app.
When this is done, you can add the Plugin Electron builder with the CLI using this command:
vue add electron-builder
You’ll be prompted to select your preferred Electron version, I selected version 9.0.0 because it is the latest version of Electron (at the time of writing).
When this is done, you can now serve your application using this command:
Using Yarn(strongly recommended) yarn electron:serve OR NPM npm run electron:serve
This will take some time to compile and serve your app. When that is done, your application will pop open on your system, this should look like this:
Auto-open state of your electron app. (Large preview)
If you close the devtools of your app, it should look like this:
Landing page your app. (Large preview)
This electron plugin is super helpful and easy to use because every part of the development of this app works the same way as a Vue app. This means you can have one codebase for both your web application and desktop app. Our app will have three parts:
A landing page that renders top news from a country chosen at random.
A page for rendering top news from the user’s country of choice.
A page that renders top news from a category of the user’s selection.
For this, we’re going to be needing a header component for all our nav links. So let us create a file in the components folder and name it header.vue, and afterward add the following lines of code to it:
<template> <header class="header"> <div class="logo"> <div class="logo__container"> <img src="../assets/logo.png" alt="News app logo" class="logo__image" /> </div> <h1>News App</h1> </div> <nav class="nav"> <h4 class="nav__link"> <router-link to="/home">Home</router-link> </h4> <h4 class="nav__link"> <router-link to="/top-news">Top News</router-link> </h4> <h4 class="nav__link"> <router-link to="/categories">News By Category</router-link> </h4> </nav> </header> </template> <script> export default { name: "app-header", }; </script> <style> .header { display: flex; flex-wrap: wrap; justify-content: space-between; } .logo { display: flex; flex-wrap: nowrap; justify-content: space-between; align-items: center; height: 50px; } .logo__container { width: 50px; height: 50px; } .logo__image { max-width: 100%; max-height: 100%; } .nav { display: flex; flex-wrap: wrap; width: 350px; justify-content: space-between; } </style>
Here, we create a header component that has our app name and logo (image can be found on my GitHub) together with a nav section that contains links to the other parts of our application. The next thing would be to import this page on our layout page — App.vue so we can see our header on every page.
<template> <div id="app"> <app-header /> <router-view /> </div> </template> <script> import appHeader from "@/components/Header.vue"; export default { name: "layout", components: { appHeader, }, }; </script> <style> @import url("https://fonts.Googleapis.com/css2?family=Abel&family=Staatliches&display=swap"); html, #app { min-height: 100vh; } #app { font-family: "Abel", sans-serif; -webkit-font-smoothing: antialiased; -moz-osx-font-smoothing: grayscale; text-align: center; color: #2c3e50; background-color: #fff; } #app h1 { font-family: "Staatliches", cursive; } a { font-weight: bold; color: #2c3e50; text-decoration: none; } a:hover { text-decoration: underline; } a.router-link-exact-active { color: #42b983; } </style>
Here, we replace the default content in the template section with our newly created header component after we have imported and declared it in the script section. Finally, we add some styling for the whole app in the style section.
Now if we try to view our app, it should look like this:
Empty landing page. (Large preview)
The next step would be to add content to our Home.vue file. This page would host the first section of our app; Top news from a country selected at random. Update your Home.vue file with the following lines of code:
<template> <section class="home"> <h1>Welcome to News App</h1> <h4>Displaying Top News from </h4> <div class="articles__div" v-if="articles"> <news-card v-for="(article, index) in articles" :key="index" :article="article" ></news-card> </div> </section> </template> <script> import { mapActions, mapState } from "vuex"; import NewsCard from "../components/NewsCard"; export default { data() { return { articles: "", countryInfo: "", }; }, components: { NewsCard, }, mounted() { this.fetchTopNews(); }, computed: { ...mapState(["countries"]), }, methods: { ...mapActions(["getTopNews"]), async fetchTopNews() { let countriesLength = this.countries.length; let countryIndex = Math.floor( Math.random() * (countriesLength - 1) + 1 ); this.countryInfo = this.countries[countryIndex]; let { data } = await this.getTopNews( this.countries[countryIndex].value ); this.articles = data.articles; }, }, }; </script> <style> .articles__div { display: flex; flex-wrap: wrap; justify-content: center; } </style>
In the script section of this file, we import mapState and mapActions from Vuex, which we’ll be using later on in this file. We also import a NewsCard component (we’ll create this next) that would render all news headlines on this page. We then make use of the fetchTopNews method to fetch the latest news from a country selected at random from the array of countries in our store. This country is passed to our getTopNews action, this would be appended to the baseURL as a query for a country like so baseURL/top-news?country=${randomCountry}. Once this is done, we loop through this data and pass it to the article prop of our Newscard component in the template section. We also have a paragraph that indicates which country the top news is from.
The next thing would be to set up our NewsCard component that will display this news. Create a new file inside your components folder, name it NewsCard.vue, and add the following lines of code to it:
<template> <section class="news"> <div class="news__section"> <h1 class="news__title"> <a class="article__link" :href="article.url" target="_blank"> </a> </h1> <h3 class="news__author" v-if="article.author"></h3> <!-- <p class="article__paragraph"></p> --> <h5 class="article__published"></h5> </div> <div class="image__container"> <img class="news__img" src="../assets/logo.png" :data-src="article.urlToImage" :alt="article.title" /> </div> </section> </template> <script> export default { name: "news-card", props: { article: Object, }, mounted() { this.lazyLoadImages(); }, methods: { lazyLoadImages() { const images = document.querySelectorAll(".news__img"); const options = { // If the image gets within 50px in the Y axis, start the download. root: null, // Page as root rootMargin: "0px", threshold: 0.1, }; const fetchImage = (url) => { return new Promise((resolve, reject) => { const image = new Image(); image.src = url; image.onload = resolve; image.onerror = reject; }); }; const loadImage = (image) => { const src = image.dataset.src; fetchImage(src).then(() => { image.src = src; }); }; const handleIntersection = (entries) => { entries.forEach((entry) => { if (entry.intersectionRatio > 0) { loadImage(entry.target); } }); }; // The observer for the images on the page const observer = new IntersectionObserver(handleIntersection, options); images.forEach((img) => { observer.observe(img); }); }, }, }; </script> <style> .news { width: 100%; display: flex; flex-direction: row; align-items: flex-start; max-width: 550px; box-shadow: 2px 1px 7px 1px #eee; padding: 20px 5px; box-sizing: border-box; margin: 15px 5px; border-radius: 4px; } .news__section { width: 100%; max-width: 350px; margin-right: 5px; } .news__title { font-size: 15px; text-align: left; margin-top: 0; } .news__author { font-size: 14px; text-align: left; font-weight: normal; } .article__published { text-align: left; } .image__container { width: 100%; max-width: 180px; max-height: 180px; } .news__img { transition: max-width 300ms cubic-bezier(0.4, 0, 1, 1), max-height 300ms cubic-bezier(0.4, 0, 1, 1); max-width: 150px; max-height: 150px; } .news__img:hover { max-width: 180px; max-height: 180px; } .article__link { text-decoration: none; color: inherit; } </style>
Here, we display data passed into this component using the article object prop. We also have a method that lazy loads the images attached to each article. This method loops through the number of article images we have and lazy loads them when they become visible. Finally, we have styles targeted at this component in the style section.
The next thing will be to set up our store so we can start getting the latest news. Add the following lines of code to your index.js file:
import Vue from "vue"; import Vuex from "vuex"; import axios from "../plugins/axios"; Vue.use(Vuex); const store = new Vuex.Store({ state: { countries: [{ name: "United States of America", value: "us", }, { name: "Nigeria", value: "ng", }, { name: "Argentina", value: "ar", }, { name: "Canada", value: "ca", }, { name: "South Africa", value: "za", }, ], categories: [ "entertainment", "general", "health", "science", "business", "sports", "technology", ], }, mutations: {}, actions: { async getTopNews(context, country) { let res = await axios({ url: `/top-headlines?country=${country}`, method: "GET", }); return res; }, }, }); export default store;
We are adding two properties to our store, one of these properties is countries. This property contains an array of countries’ object. We also have the categories property; this contains an array of available categories on the News API. The reader will like the freedom to view the top news from specific countries and categories; this will also be needed in more than one part of the app and that is why we’re making use of the store. In the actions section of our store, we have a getTopNews method that fetches top news from a country(this country was passed from the component that called this action).
At this point, if we open our app, we should see our landing page that looks like this:
Updated landing page. (Large preview)
The background.js file
This file is the entry point for Electron into your app. It controls all the Desktop app-like settings for this app. The default state of this file can be found on my GitHub.
In this file, we have some predefined configurations set for the app such as the default height and width for your app. Let’s take a look at some of the things you can do in this file.
Enabling the Vuejs devtools
By default, you have access to dev tools in Electron but it is not enabled after installation. This is as a result of an existing bug on windows 10, so if you open you background.js file, you will find some commented out code with comments that state why they’re commented out:
// Install Vue Devtools // Devtools extensions are broken in Electron 6.0.0 and greater // See https://github.com/nklayman/vue-cli-plugin-electron-builder/issues/378 for more info // Electron will not launch with Devtools extensions installed on Windows 10 with dark mode // If you are not using Windows 10 dark mode, you may uncomment these lines // In addition, if the linked issue is closed, you can upgrade electron and uncomment these lines // try { // await installVueDevtools() // } catch (e) { // console.error('Vue Devtools failed to install:', e.toString()) // }
So if you’re not affected by this bug, you can uncomment the try/catch block and also search for installVueDevtools in this same file(line 5) and also uncomment it. Once this is done, your app will automatically restart, and when you check your dev tools, you should see the Vuejs Devtools.
Vuejs in devtools. (Large preview)
Selecting A Custom Icon For Your App
By default, the Electron icon is set as the default icon for your app, and most of the time, you probably would like to set your own custom icon. To do this, move your icon into your public folder, and rename it to be icon.png. The next thing to do would be to add the required dependency, electron-icon-builder.
You can install it using any of the following commands:
// With Yarn: yarn add --dev electron-icon-builder // or with NPM: npm install --save-dev electron-icon-builder
Once this is done, you can run this next command. It will convert your icon into Electron format and print the following in your console when this done.
Generated info in terminal. (Large preview)
The next thing would be to set the icon option in background.js file. This option goes inside the BrowserWindow option that is imported from Electron. To do this, update BrowserWindow to look like this:
// Add this to the top of your file /* global __static */ // import path import path from 'path' // Replace win = new BrowserWindow({ width: 800, height: 600 }) // With win = new BrowserWindow({ width: 800, height: 600, icon: path.join(__static, 'icon.png') })
Now if we run yarn run electron:build and view our app, we should see the updated icon being used as the app icon but it doesn’t change in development. This issue helps address a manual fix for it on macOS.
Setting Title For Your App
You will notice the title of your app is set to the app name (news-app in this case) and we’ll need to change it. To do that, we have to add a title property to the BrowserWindow method in our background.js file like this:
win = new BrowserWindow({ width: 600, height: 500, title: "News App", icon: path.join(__static, "icon.png"), webPreferences: { // Use pluginOptions.nodeIntegration, leave this alone // See nklayman.github.io/vue-cli-plugin-electron-builder/guide/security.html#node-integration for more info nodeIntegration: process.env.ELECTRON_NODE_INTEGRATION, }, });
Here, we’re setting the title of our app to ‘News App’. But if your index.html file has a title selected or your title doesn’t change to this, try adding this code to your file:
win.on("page-title-updated", (event) => event.preventDefault());
We’re listening for an event that gets fired when our title is updated from BrowserWindow. When this event is fired, we’re telling Electron not to update the title with the one found in index.html file.
Another thing that might be worth changing is the productName, this controls what name appears when you hover on your app’s icon or what your computer recognizes the app as. Right now, the name of our app is Electron. To change this name in production, create a vue.config.js file and add the following lines of code to it:
module.exports = { pluginOptions: { electronBuilder: { builderOptions: { productName: "News App", }, }, }, };
Here, we define productName to be ‘News App’ so that when we run the build command for our app, the name changes from ‘Electron’ to ‘News App’.
Multi Platform Build
By default, when you run the build command, the app that gets created is dependent on the platform that it is being run on. This means if you run the build command on LinUX, the app that gets created would be a LinUX desktop app. The same also applies to other platforms(macOS and windows). But Electron comes with the option to specify a platform (or two platforms) you want to generate. The available options are:
mac
win
linUX
So in order to build the Windows version of your app, run the following command:
// NPM npm electron:build -- --win nsis // YARN yarn electron:build --win nsis
Conclusion
The completed application can be found on my GitHub. The official Electron documentation provides information and a guide that helps you customize your desktop app whichever way you want. Some of the things I tried out but aren’t included in this tutorial are:
Customizing your dock on macOS — https://www.electronjs.org/docs/tutorial/macos-dock.
Setting resizeable, maximizable, and many more — https://github.com/electron/electron/blob/master/docs/api/browser-window.md#new-browserwindowoptions.
So if you’re looking to do much more with your Electron application, their official docs is a good place to start.
Related Resources
Node.jshttps://en.wikipedia.org/wiki/Node.js
Java (programming language)https://en.wikipedia.org/wiki/Java_(programming_language)
Electron (software framework)
JavaFX 14
electronjs
Electron Documentation
Vue CLI Plugin Electron Builder
Lazy Loading Images for Performance Using Intersection Observer by Chris Nwamba
axios
Getting Started With Axios In Nuxthttps://www.smashingmagazine.com/2020/05/getting-started-axios-nuxt/) by Timi Omoyeni
(ks, ra, yk, il)
Website Design & SEO Delray Beach by DBL07.co
Delray Beach SEO
source http://www.scpie.org/building-desktop-apps-with-electron-and-vue/ source https://scpie.tumblr.com/post/624279195687747584
0 notes
Text
Building Desktop Apps With Electron And Vue
About The Author
Front-end developer based in Lagos, Nigeria. He enjoys converting designs into code and building things for the web. More about Timi …
Electron is an open-source software framework developed and maintained by GitHub. It allows for the development of desktop GUI applications using web technologies. In this tutorial, Timi Omoyeni explains what you need to keep in mind when building a desktop application with Vue.js using the Vue CLI Plugin Electron Builder.
JavaScript used to be known as the language for building websites and web applications especially with some of its frameworks such as React, Vue, and Angular but over time (as early as 2009), it became possible for JavaScript to run outside the browser with the emergence of Node.js, an open-source, cross-platform, JavaScript runtime environment that executes JavaScript code outside a web browser. This has led to the ability to use JavaScript for a whole lot more than just web applications, and one of which is building desktop applications using Electron.js.
Electron enables you to create desktop applications with pure JavaScript by providing a runtime with rich native (operating system) APIs. You can see it as a variant of the Node.js runtime that is focused on desktop applications instead of web servers.
In this tutorial, we’re going to learn how to build desktop applications using Electron, we’re also going to learn how to use Vuejs to build Electron applications.
Note: Basic knowledge of Vue.js and the Vue CLI is required to follow this tutorial. All of the code used in this tutorial can be found on my GitHub. Feel free to clone and play around with it!
What Are Desktop Applications?
Desktop applications are applications that run stand-alone in desktop or laptop computers. They are applications that perform specific tasks and are installed solely for this purpose.
An example of a desktop application is your Microsoft Word, which is used for creating and typing documents. Other examples of common desktop applications are web browsers, Visual Studio Code, and Adobe Photoshop. Desktop applications are different from web applications because you have to install the desktop application in order for you to access and make use of it, and they sometimes do not need internet access for them to work. Web apps, on the other hand, can be accessed by simply visiting the URL that such an app is hosted on and always need internet access before you can access them.
Examples of frameworks used in building desktop apps include:
Java Java is a general-purpose programming language that is class-based, object-oriented, and designed to have as few implementation dependencies as possible. It is intended to let application developers write once, run anywhere (WORA), meaning that compiled Java code can run on all platforms that support Java without the need for recompilation.
Java FX According to their official documentation, it is an open-source, next-generation client application platform for desktop, mobile, and embedded systems built on Java.
C# C# is a general-purpose, multi-paradigm programming language encompassing strong typing, lexically scoped, imperative, declarative, functional, generic, object-oriented, and component-oriented programming disciplines.
.NET .NET is a free, cross-platform, open-source developer platform for building many different types of applications. With .NET, you can use multiple languages, editors, and libraries to build for web, mobile, desktop, gaming, and IoT.
What Is Electron?
Electron is an open-source framework for building desktop applications. It was formerly known as ‘Atom shell’ and is developed and maintained by GitHub. It lets you write cross-platform desktop applications using HTML, CSS, and JavaScript. This means that you can build desktop applications for Windows, MacOS and other platforms using one code base. It is based on Node.js and Chromium. Examples of applications built with Electron include the popular Atom editior, Visual Studio Code, WordPress for desktop, and Slack.
Installation
You can install Electron in your project using NPM:
npm install electron --save-dev
You can also install it globally if you’re going to be working with electron apps a lot using this command:
npm install electron -g
Building Vuejs Apps For Desktop With Electron
If you’re familiar with building web applications using Vuejs, it is possible to build desktop applications using Vuejs. All you need for this is the Vue CLI Plugin Electron Builder.
The Vue CLI Plugin Electron Builder
This tool allows you to build Vue apps for desktop with Electron, this means that it makes your Vue application work as an electron app. This means that your Vue application which possibly is a web application can be extended to work in desktop environments without the need to build a separate desktop application in another framework. This gives Vue developers the option and power to go beyond the web. Going forward, you can work on that idea you have and give users a desktop application option — one that can run on Windows, macOS, and LinUX.
To see this in action, we’re going to be building a News app using the News API. The application will provide breaking news headlines and allow you to search for articles from news sources and blogs all over the web with their API. All you need to get started with them is your personal API key which can be gotten from here.
We’ll be building a simple app that offers the following:
A page that displays top and breaking headlines from a selected country with the option to choose a country using their /top-headlines endpoint. News API provides news from a list of countries that they support, find the list here.
News from a selected category using a combination of their /everything endpoint and a query parameter q with which we’ll specify our category.
After getting your API Key, we can create our application using the Vue CLI. Ensure you have the Vue CLI installed on your system, if you do not, install it using this command:
npm install -g @vue/cli # OR yarn global add @vue/cli
Once this is done, create your News app using the CLI:
vue create news-app
We’ll fetch the data from the News API by using Axios for this tutorial, but you can use any alternative you’re more comfortable with. You can install Axios by using any of the following commands:
//NPM npm install axios // YARN yarn add axios
The next step would be to set up an Axios instance for global config in our application. We’re going to be creating a plugins folder in the src folder where we’ll create this axios.js file. After creating the file, add the following lines of code:
import axios from "axios"; let baseURL = `https://newsapi.org/v2`; let apiKey = process.env.VUE_APP_APIKEY; const instance = axios.create({ baseURL: baseURL, timeout: 30000, headers: { "X-Api-Key": apiKey, }, }); export default instance;
Here, we define our baseURL and apiKey which we got from News API and pass it to a new instance of Axios. This instance accepts the baseURL and apiKey together with a timeout property. News API requires you to add your API Key when making a request to their API and offers 3 ways to attach it to your request but here, we’re adding it to the header X-Api-Key property after which we export instance. Once this is done, we can now use this config for all our Axios requests in our app.
When this is done, you can add the Plugin Electron builder with the CLI using this command:
vue add electron-builder
You’ll be prompted to select your preferred Electron version, I selected version 9.0.0 because it is the latest version of Electron (at the time of writing).
When this is done, you can now serve your application using this command:
Using Yarn(strongly recommended) yarn electron:serve OR NPM npm run electron:serve
This will take some time to compile and serve your app. When that is done, your application will pop open on your system, this should look like this:
Auto-open state of your electron app. (Large preview)
If you close the devtools of your app, it should look like this:
Landing page your app. (Large preview)
This electron plugin is super helpful and easy to use because every part of the development of this app works the same way as a Vue app. This means you can have one codebase for both your web application and desktop app. Our app will have three parts:
A landing page that renders top news from a country chosen at random.
A page for rendering top news from the user’s country of choice.
A page that renders top news from a category of the user’s selection.
For this, we’re going to be needing a header component for all our nav links. So let us create a file in the components folder and name it header.vue, and afterward add the following lines of code to it:
<template> <header class="header"> <div class="logo"> <div class="logo__container"> <img src="../assets/logo.png" alt="News app logo" class="logo__image" /> </div> <h1>News App</h1> </div> <nav class="nav"> <h4 class="nav__link"> <router-link to="/home">Home</router-link> </h4> <h4 class="nav__link"> <router-link to="/top-news">Top News</router-link> </h4> <h4 class="nav__link"> <router-link to="/categories">News By Category</router-link> </h4> </nav> </header> </template> <script> export default { name: "app-header", }; </script> <style> .header { display: flex; flex-wrap: wrap; justify-content: space-between; } .logo { display: flex; flex-wrap: nowrap; justify-content: space-between; align-items: center; height: 50px; } .logo__container { width: 50px; height: 50px; } .logo__image { max-width: 100%; max-height: 100%; } .nav { display: flex; flex-wrap: wrap; width: 350px; justify-content: space-between; } </style>
Here, we create a header component that has our app name and logo (image can be found on my GitHub) together with a nav section that contains links to the other parts of our application. The next thing would be to import this page on our layout page — App.vue so we can see our header on every page.
<template> <div id="app"> <app-header /> <router-view /> </div> </template> <script> import appHeader from "@/components/Header.vue"; export default { name: "layout", components: { appHeader, }, }; </script> <style> @import url("https://fonts.Googleapis.com/css2?family=Abel&family=Staatliches&display=swap"); html, #app { min-height: 100vh; } #app { font-family: "Abel", sans-serif; -webkit-font-smoothing: antialiased; -moz-osx-font-smoothing: grayscale; text-align: center; color: #2c3e50; background-color: #fff; } #app h1 { font-family: "Staatliches", cursive; } a { font-weight: bold; color: #2c3e50; text-decoration: none; } a:hover { text-decoration: underline; } a.router-link-exact-active { color: #42b983; } </style>
Here, we replace the default content in the template section with our newly created header component after we have imported and declared it in the script section. Finally, we add some styling for the whole app in the style section.
Now if we try to view our app, it should look like this:
Empty landing page. (Large preview)
The next step would be to add content to our Home.vue file. This page would host the first section of our app; Top news from a country selected at random. Update your Home.vue file with the following lines of code:
<template> <section class="home"> <h1>Welcome to News App</h1> <h4>Displaying Top News from </h4> <div class="articles__div" v-if="articles"> <news-card v-for="(article, index) in articles" :key="index" :article="article" ></news-card> </div> </section> </template> <script> import { mapActions, mapState } from "vuex"; import NewsCard from "../components/NewsCard"; export default { data() { return { articles: "", countryInfo: "", }; }, components: { NewsCard, }, mounted() { this.fetchTopNews(); }, computed: { ...mapState(["countries"]), }, methods: { ...mapActions(["getTopNews"]), async fetchTopNews() { let countriesLength = this.countries.length; let countryIndex = Math.floor( Math.random() * (countriesLength - 1) + 1 ); this.countryInfo = this.countries[countryIndex]; let { data } = await this.getTopNews( this.countries[countryIndex].value ); this.articles = data.articles; }, }, }; </script> <style> .articles__div { display: flex; flex-wrap: wrap; justify-content: center; } </style>
In the script section of this file, we import mapState and mapActions from Vuex, which we’ll be using later on in this file. We also import a NewsCard component (we’ll create this next) that would render all news headlines on this page. We then make use of the fetchTopNews method to fetch the latest news from a country selected at random from the array of countries in our store. This country is passed to our getTopNews action, this would be appended to the baseURL as a query for a country like so baseURL/top-news?country=${randomCountry}. Once this is done, we loop through this data and pass it to the article prop of our Newscard component in the template section. We also have a paragraph that indicates which country the top news is from.
The next thing would be to set up our NewsCard component that will display this news. Create a new file inside your components folder, name it NewsCard.vue, and add the following lines of code to it:
<template> <section class="news"> <div class="news__section"> <h1 class="news__title"> <a class="article__link" :href="article.url" target="_blank"> </a> </h1> <h3 class="news__author" v-if="article.author"></h3> <!-- <p class="article__paragraph"></p> --> <h5 class="article__published"></h5> </div> <div class="image__container"> <img class="news__img" src="../assets/logo.png" :data-src="article.urlToImage" :alt="article.title" /> </div> </section> </template> <script> export default { name: "news-card", props: { article: Object, }, mounted() { this.lazyLoadImages(); }, methods: { lazyLoadImages() { const images = document.querySelectorAll(".news__img"); const options = { // If the image gets within 50px in the Y axis, start the download. root: null, // Page as root rootMargin: "0px", threshold: 0.1, }; const fetchImage = (url) => { return new Promise((resolve, reject) => { const image = new Image(); image.src = url; image.onload = resolve; image.onerror = reject; }); }; const loadImage = (image) => { const src = image.dataset.src; fetchImage(src).then(() => { image.src = src; }); }; const handleIntersection = (entries) => { entries.forEach((entry) => { if (entry.intersectionRatio > 0) { loadImage(entry.target); } }); }; // The observer for the images on the page const observer = new IntersectionObserver(handleIntersection, options); images.forEach((img) => { observer.observe(img); }); }, }, }; </script> <style> .news { width: 100%; display: flex; flex-direction: row; align-items: flex-start; max-width: 550px; box-shadow: 2px 1px 7px 1px #eee; padding: 20px 5px; box-sizing: border-box; margin: 15px 5px; border-radius: 4px; } .news__section { width: 100%; max-width: 350px; margin-right: 5px; } .news__title { font-size: 15px; text-align: left; margin-top: 0; } .news__author { font-size: 14px; text-align: left; font-weight: normal; } .article__published { text-align: left; } .image__container { width: 100%; max-width: 180px; max-height: 180px; } .news__img { transition: max-width 300ms cubic-bezier(0.4, 0, 1, 1), max-height 300ms cubic-bezier(0.4, 0, 1, 1); max-width: 150px; max-height: 150px; } .news__img:hover { max-width: 180px; max-height: 180px; } .article__link { text-decoration: none; color: inherit; } </style>
Here, we display data passed into this component using the article object prop. We also have a method that lazy loads the images attached to each article. This method loops through the number of article images we have and lazy loads them when they become visible. Finally, we have styles targeted at this component in the style section.
The next thing will be to set up our store so we can start getting the latest news. Add the following lines of code to your index.js file:
import Vue from "vue"; import Vuex from "vuex"; import axios from "../plugins/axios"; Vue.use(Vuex); const store = new Vuex.Store({ state: { countries: [{ name: "United States of America", value: "us", }, { name: "Nigeria", value: "ng", }, { name: "Argentina", value: "ar", }, { name: "Canada", value: "ca", }, { name: "South Africa", value: "za", }, ], categories: [ "entertainment", "general", "health", "science", "business", "sports", "technology", ], }, mutations: {}, actions: { async getTopNews(context, country) { let res = await axios({ url: `/top-headlines?country=${country}`, method: "GET", }); return res; }, }, }); export default store;
We are adding two properties to our store, one of these properties is countries. This property contains an array of countries’ object. We also have the categories property; this contains an array of available categories on the News API. The reader will like the freedom to view the top news from specific countries and categories; this will also be needed in more than one part of the app and that is why we’re making use of the store. In the actions section of our store, we have a getTopNews method that fetches top news from a country(this country was passed from the component that called this action).
At this point, if we open our app, we should see our landing page that looks like this:
Updated landing page. (Large preview)
The background.js file
This file is the entry point for Electron into your app. It controls all the Desktop app-like settings for this app. The default state of this file can be found on my GitHub.
In this file, we have some predefined configurations set for the app such as the default height and width for your app. Let’s take a look at some of the things you can do in this file.
Enabling the Vuejs devtools
By default, you have access to dev tools in Electron but it is not enabled after installation. This is as a result of an existing bug on windows 10, so if you open you background.js file, you will find some commented out code with comments that state why they’re commented out:
// Install Vue Devtools // Devtools extensions are broken in Electron 6.0.0 and greater // See https://github.com/nklayman/vue-cli-plugin-electron-builder/issues/378 for more info // Electron will not launch with Devtools extensions installed on Windows 10 with dark mode // If you are not using Windows 10 dark mode, you may uncomment these lines // In addition, if the linked issue is closed, you can upgrade electron and uncomment these lines // try { // await installVueDevtools() // } catch (e) { // console.error('Vue Devtools failed to install:', e.toString()) // }
So if you’re not affected by this bug, you can uncomment the try/catch block and also search for installVueDevtools in this same file(line 5) and also uncomment it. Once this is done, your app will automatically restart, and when you check your dev tools, you should see the Vuejs Devtools.
Vuejs in devtools. (Large preview)
Selecting A Custom Icon For Your App
By default, the Electron icon is set as the default icon for your app, and most of the time, you probably would like to set your own custom icon. To do this, move your icon into your public folder, and rename it to be icon.png. The next thing to do would be to add the required dependency, electron-icon-builder.
You can install it using any of the following commands:
// With Yarn: yarn add --dev electron-icon-builder // or with NPM: npm install --save-dev electron-icon-builder
Once this is done, you can run this next command. It will convert your icon into Electron format and print the following in your console when this done.
Generated info in terminal. (Large preview)
The next thing would be to set the icon option in background.js file. This option goes inside the BrowserWindow option that is imported from Electron. To do this, update BrowserWindow to look like this:
// Add this to the top of your file /* global __static */ // import path import path from 'path' // Replace win = new BrowserWindow({ width: 800, height: 600 }) // With win = new BrowserWindow({ width: 800, height: 600, icon: path.join(__static, 'icon.png') })
Now if we run yarn run electron:build and view our app, we should see the updated icon being used as the app icon but it doesn’t change in development. This issue helps address a manual fix for it on macOS.
Setting Title For Your App
You will notice the title of your app is set to the app name (news-app in this case) and we’ll need to change it. To do that, we have to add a title property to the BrowserWindow method in our background.js file like this:
win = new BrowserWindow({ width: 600, height: 500, title: "News App", icon: path.join(__static, "icon.png"), webPreferences: { // Use pluginOptions.nodeIntegration, leave this alone // See nklayman.github.io/vue-cli-plugin-electron-builder/guide/security.html#node-integration for more info nodeIntegration: process.env.ELECTRON_NODE_INTEGRATION, }, });
Here, we’re setting the title of our app to ‘News App’. But if your index.html file has a title selected or your title doesn’t change to this, try adding this code to your file:
win.on("page-title-updated", (event) => event.preventDefault());
We’re listening for an event that gets fired when our title is updated from BrowserWindow. When this event is fired, we’re telling Electron not to update the title with the one found in index.html file.
Another thing that might be worth changing is the productName, this controls what name appears when you hover on your app’s icon or what your computer recognizes the app as. Right now, the name of our app is Electron. To change this name in production, create a vue.config.js file and add the following lines of code to it:
module.exports = { pluginOptions: { electronBuilder: { builderOptions: { productName: "News App", }, }, }, };
Here, we define productName to be ‘News App’ so that when we run the build command for our app, the name changes from ‘Electron’ to ‘News App’.
Multi Platform Build
By default, when you run the build command, the app that gets created is dependent on the platform that it is being run on. This means if you run the build command on LinUX, the app that gets created would be a LinUX desktop app. The same also applies to other platforms(macOS and windows). But Electron comes with the option to specify a platform (or two platforms) you want to generate. The available options are:
mac
win
linUX
So in order to build the Windows version of your app, run the following command:
// NPM npm electron:build -- --win nsis // YARN yarn electron:build --win nsis
Conclusion
The completed application can be found on my GitHub. The official Electron documentation provides information and a guide that helps you customize your desktop app whichever way you want. Some of the things I tried out but aren’t included in this tutorial are:
Customizing your dock on macOS — https://www.electronjs.org/docs/tutorial/macos-dock.
Setting resizeable, maximizable, and many more — https://github.com/electron/electron/blob/master/docs/api/browser-window.md#new-browserwindowoptions.
So if you’re looking to do much more with your Electron application, their official docs is a good place to start.
Related Resources
Node.jshttps://en.wikipedia.org/wiki/Node.js
Java (programming language)https://en.wikipedia.org/wiki/Java_(programming_language)
Electron (software framework)
JavaFX 14
electronjs
Electron Documentation
Vue CLI Plugin Electron Builder
Lazy Loading Images for Performance Using Intersection Observer by Chris Nwamba
axios
Getting Started With Axios In Nuxthttps://www.smashingmagazine.com/2020/05/getting-started-axios-nuxt/) by Timi Omoyeni
(ks, ra, yk, il)
Website Design & SEO Delray Beach by DBL07.co
Delray Beach SEO
source http://www.scpie.org/building-desktop-apps-with-electron-and-vue/
0 notes
Text
Building Desktop Apps With Electron And Vue
About The Author
Front-end developer based in Lagos, Nigeria. He enjoys converting designs into code and building things for the web. More about Timi …
Electron is an open-source software framework developed and maintained by GitHub. It allows for the development of desktop GUI applications using web technologies. In this tutorial, Timi Omoyeni explains what you need to keep in mind when building a desktop application with Vue.js using the Vue CLI Plugin Electron Builder.
JavaScript used to be known as the language for building websites and web applications especially with some of its frameworks such as React, Vue, and Angular but over time (as early as 2009), it became possible for JavaScript to run outside the browser with the emergence of Node.js, an open-source, cross-platform, JavaScript runtime environment that executes JavaScript code outside a web browser. This has led to the ability to use JavaScript for a whole lot more than just web applications, and one of which is building desktop applications using Electron.js.
Electron enables you to create desktop applications with pure JavaScript by providing a runtime with rich native (operating system) APIs. You can see it as a variant of the Node.js runtime that is focused on desktop applications instead of web servers.
In this tutorial, we’re going to learn how to build desktop applications using Electron, we’re also going to learn how to use Vuejs to build Electron applications.
Note: Basic knowledge of Vue.js and the Vue CLI is required to follow this tutorial. All of the code used in this tutorial can be found on my GitHub. Feel free to clone and play around with it!
What Are Desktop Applications?
Desktop applications are applications that run stand-alone in desktop or laptop computers. They are applications that perform specific tasks and are installed solely for this purpose.
An example of a desktop application is your Microsoft Word, which is used for creating and typing documents. Other examples of common desktop applications are web browsers, Visual Studio Code, and Adobe Photoshop. Desktop applications are different from web applications because you have to install the desktop application in order for you to access and make use of it, and they sometimes do not need internet access for them to work. Web apps, on the other hand, can be accessed by simply visiting the URL that such an app is hosted on and always need internet access before you can access them.
Examples of frameworks used in building desktop apps include:
Java Java is a general-purpose programming language that is class-based, object-oriented, and designed to have as few implementation dependencies as possible. It is intended to let application developers write once, run anywhere (WORA), meaning that compiled Java code can run on all platforms that support Java without the need for recompilation.
Java FX According to their official documentation, it is an open-source, next-generation client application platform for desktop, mobile, and embedded systems built on Java.
C# C# is a general-purpose, multi-paradigm programming language encompassing strong typing, lexically scoped, imperative, declarative, functional, generic, object-oriented, and component-oriented programming disciplines.
.NET .NET is a free, cross-platform, open-source developer platform for building many different types of applications. With .NET, you can use multiple languages, editors, and libraries to build for web, mobile, desktop, gaming, and IoT.
What Is Electron?
Electron is an open-source framework for building desktop applications. It was formerly known as ‘Atom shell’ and is developed and maintained by GitHub. It lets you write cross-platform desktop applications using HTML, CSS, and JavaScript. This means that you can build desktop applications for Windows, MacOS and other platforms using one code base. It is based on Node.js and Chromium. Examples of applications built with Electron include the popular Atom editior, Visual Studio Code, WordPress for desktop, and Slack.
Installation
You can install Electron in your project using NPM:
npm install electron --save-dev
You can also install it globally if you’re going to be working with electron apps a lot using this command:
npm install electron -g
Building Vuejs Apps For Desktop With Electron
If you’re familiar with building web applications using Vuejs, it is possible to build desktop applications using Vuejs. All you need for this is the Vue CLI Plugin Electron Builder.
The Vue CLI Plugin Electron Builder
This tool allows you to build Vue apps for desktop with Electron, this means that it makes your Vue application work as an electron app. This means that your Vue application which possibly is a web application can be extended to work in desktop environments without the need to build a separate desktop application in another framework. This gives Vue developers the option and power to go beyond the web. Going forward, you can work on that idea you have and give users a desktop application option — one that can run on Windows, macOS, and LinUX.
To see this in action, we’re going to be building a News app using the News API. The application will provide breaking news headlines and allow you to search for articles from news sources and blogs all over the web with their API. All you need to get started with them is your personal API key which can be gotten from here.
We’ll be building a simple app that offers the following:
A page that displays top and breaking headlines from a selected country with the option to choose a country using their /top-headlines endpoint. News API provides news from a list of countries that they support, find the list here.
News from a selected category using a combination of their /everything endpoint and a query parameter q with which we’ll specify our category.
After getting your API Key, we can create our application using the Vue CLI. Ensure you have the Vue CLI installed on your system, if you do not, install it using this command:
npm install -g @vue/cli # OR yarn global add @vue/cli
Once this is done, create your News app using the CLI:
vue create news-app
We’ll fetch the data from the News API by using Axios for this tutorial, but you can use any alternative you’re more comfortable with. You can install Axios by using any of the following commands:
//NPM npm install axios // YARN yarn add axios
The next step would be to set up an Axios instance for global config in our application. We’re going to be creating a plugins folder in the src folder where we’ll create this axios.js file. After creating the file, add the following lines of code:
import axios from "axios"; let baseURL = `https://newsapi.org/v2`; let apiKey = process.env.VUE_APP_APIKEY; const instance = axios.create({ baseURL: baseURL, timeout: 30000, headers: { "X-Api-Key": apiKey, }, }); export default instance;
Here, we define our baseURL and apiKey which we got from News API and pass it to a new instance of Axios. This instance accepts the baseURL and apiKey together with a timeout property. News API requires you to add your API Key when making a request to their API and offers 3 ways to attach it to your request but here, we’re adding it to the header X-Api-Key property after which we export instance. Once this is done, we can now use this config for all our Axios requests in our app.
When this is done, you can add the Plugin Electron builder with the CLI using this command:
vue add electron-builder
You’ll be prompted to select your preferred Electron version, I selected version 9.0.0 because it is the latest version of Electron (at the time of writing).
When this is done, you can now serve your application using this command:
Using Yarn(strongly recommended) yarn electron:serve OR NPM npm run electron:serve
This will take some time to compile and serve your app. When that is done, your application will pop open on your system, this should look like this:
Auto-open state of your electron app. (Large preview)
If you close the devtools of your app, it should look like this:
Landing page your app. (Large preview)
This electron plugin is super helpful and easy to use because every part of the development of this app works the same way as a Vue app. This means you can have one codebase for both your web application and desktop app. Our app will have three parts:
A landing page that renders top news from a country chosen at random.
A page for rendering top news from the user’s country of choice.
A page that renders top news from a category of the user’s selection.
For this, we’re going to be needing a header component for all our nav links. So let us create a file in the components folder and name it header.vue, and afterward add the following lines of code to it:
<template> <header class="header"> <div class="logo"> <div class="logo__container"> <img src="../assets/logo.png" alt="News app logo" class="logo__image" /> </div> <h1>News App</h1> </div> <nav class="nav"> <h4 class="nav__link"> <router-link to="/home">Home</router-link> </h4> <h4 class="nav__link"> <router-link to="/top-news">Top News</router-link> </h4> <h4 class="nav__link"> <router-link to="/categories">News By Category</router-link> </h4> </nav> </header> </template> <script> export default { name: "app-header", }; </script> <style> .header { display: flex; flex-wrap: wrap; justify-content: space-between; } .logo { display: flex; flex-wrap: nowrap; justify-content: space-between; align-items: center; height: 50px; } .logo__container { width: 50px; height: 50px; } .logo__image { max-width: 100%; max-height: 100%; } .nav { display: flex; flex-wrap: wrap; width: 350px; justify-content: space-between; } </style>
Here, we create a header component that has our app name and logo (image can be found on my GitHub) together with a nav section that contains links to the other parts of our application. The next thing would be to import this page on our layout page — App.vue so we can see our header on every page.
<template> <div id="app"> <app-header /> <router-view /> </div> </template> <script> import appHeader from "@/components/Header.vue"; export default { name: "layout", components: { appHeader, }, }; </script> <style> @import url("https://fonts.Googleapis.com/css2?family=Abel&family=Staatliches&display=swap"); html, #app { min-height: 100vh; } #app { font-family: "Abel", sans-serif; -webkit-font-smoothing: antialiased; -moz-osx-font-smoothing: grayscale; text-align: center; color: #2c3e50; background-color: #fff; } #app h1 { font-family: "Staatliches", cursive; } a { font-weight: bold; color: #2c3e50; text-decoration: none; } a:hover { text-decoration: underline; } a.router-link-exact-active { color: #42b983; } </style>
Here, we replace the default content in the template section with our newly created header component after we have imported and declared it in the script section. Finally, we add some styling for the whole app in the style section.
Now if we try to view our app, it should look like this:
Empty landing page. (Large preview)
The next step would be to add content to our Home.vue file. This page would host the first section of our app; Top news from a country selected at random. Update your Home.vue file with the following lines of code:
<template> <section class="home"> <h1>Welcome to News App</h1> <h4>Displaying Top News from </h4> <div class="articles__div" v-if="articles"> <news-card v-for="(article, index) in articles" :key="index" :article="article" ></news-card> </div> </section> </template> <script> import { mapActions, mapState } from "vuex"; import NewsCard from "../components/NewsCard"; export default { data() { return { articles: "", countryInfo: "", }; }, components: { NewsCard, }, mounted() { this.fetchTopNews(); }, computed: { ...mapState(["countries"]), }, methods: { ...mapActions(["getTopNews"]), async fetchTopNews() { let countriesLength = this.countries.length; let countryIndex = Math.floor( Math.random() * (countriesLength - 1) + 1 ); this.countryInfo = this.countries[countryIndex]; let { data } = await this.getTopNews( this.countries[countryIndex].value ); this.articles = data.articles; }, }, }; </script> <style> .articles__div { display: flex; flex-wrap: wrap; justify-content: center; } </style>
In the script section of this file, we import mapState and mapActions from Vuex, which we’ll be using later on in this file. We also import a NewsCard component (we’ll create this next) that would render all news headlines on this page. We then make use of the fetchTopNews method to fetch the latest news from a country selected at random from the array of countries in our store. This country is passed to our getTopNews action, this would be appended to the baseURL as a query for a country like so baseURL/top-news?country=${randomCountry}. Once this is done, we loop through this data and pass it to the article prop of our Newscard component in the template section. We also have a paragraph that indicates which country the top news is from.
The next thing would be to set up our NewsCard component that will display this news. Create a new file inside your components folder, name it NewsCard.vue, and add the following lines of code to it:
<template> <section class="news"> <div class="news__section"> <h1 class="news__title"> <a class="article__link" :href="article.url" target="_blank"> </a> </h1> <h3 class="news__author" v-if="article.author"></h3> <!-- <p class="article__paragraph"></p> --> <h5 class="article__published"></h5> </div> <div class="image__container"> <img class="news__img" src="../assets/logo.png" :data-src="article.urlToImage" :alt="article.title" /> </div> </section> </template> <script> export default { name: "news-card", props: { article: Object, }, mounted() { this.lazyLoadImages(); }, methods: { lazyLoadImages() { const images = document.querySelectorAll(".news__img"); const options = { // If the image gets within 50px in the Y axis, start the download. root: null, // Page as root rootMargin: "0px", threshold: 0.1, }; const fetchImage = (url) => { return new Promise((resolve, reject) => { const image = new Image(); image.src = url; image.onload = resolve; image.onerror = reject; }); }; const loadImage = (image) => { const src = image.dataset.src; fetchImage(src).then(() => { image.src = src; }); }; const handleIntersection = (entries) => { entries.forEach((entry) => { if (entry.intersectionRatio > 0) { loadImage(entry.target); } }); }; // The observer for the images on the page const observer = new IntersectionObserver(handleIntersection, options); images.forEach((img) => { observer.observe(img); }); }, }, }; </script> <style> .news { width: 100%; display: flex; flex-direction: row; align-items: flex-start; max-width: 550px; box-shadow: 2px 1px 7px 1px #eee; padding: 20px 5px; box-sizing: border-box; margin: 15px 5px; border-radius: 4px; } .news__section { width: 100%; max-width: 350px; margin-right: 5px; } .news__title { font-size: 15px; text-align: left; margin-top: 0; } .news__author { font-size: 14px; text-align: left; font-weight: normal; } .article__published { text-align: left; } .image__container { width: 100%; max-width: 180px; max-height: 180px; } .news__img { transition: max-width 300ms cubic-bezier(0.4, 0, 1, 1), max-height 300ms cubic-bezier(0.4, 0, 1, 1); max-width: 150px; max-height: 150px; } .news__img:hover { max-width: 180px; max-height: 180px; } .article__link { text-decoration: none; color: inherit; } </style>
Here, we display data passed into this component using the article object prop. We also have a method that lazy loads the images attached to each article. This method loops through the number of article images we have and lazy loads them when they become visible. Finally, we have styles targeted at this component in the style section.
The next thing will be to set up our store so we can start getting the latest news. Add the following lines of code to your index.js file:
import Vue from "vue"; import Vuex from "vuex"; import axios from "../plugins/axios"; Vue.use(Vuex); const store = new Vuex.Store({ state: { countries: [{ name: "United States of America", value: "us", }, { name: "Nigeria", value: "ng", }, { name: "Argentina", value: "ar", }, { name: "Canada", value: "ca", }, { name: "South Africa", value: "za", }, ], categories: [ "entertainment", "general", "health", "science", "business", "sports", "technology", ], }, mutations: {}, actions: { async getTopNews(context, country) { let res = await axios({ url: `/top-headlines?country=${country}`, method: "GET", }); return res; }, }, }); export default store;
We are adding two properties to our store, one of these properties is countries. This property contains an array of countries’ object. We also have the categories property; this contains an array of available categories on the News API. The reader will like the freedom to view the top news from specific countries and categories; this will also be needed in more than one part of the app and that is why we’re making use of the store. In the actions section of our store, we have a getTopNews method that fetches top news from a country(this country was passed from the component that called this action).
At this point, if we open our app, we should see our landing page that looks like this:
Updated landing page. (Large preview)
The background.js file
This file is the entry point for Electron into your app. It controls all the Desktop app-like settings for this app. The default state of this file can be found on my GitHub.
In this file, we have some predefined configurations set for the app such as the default height and width for your app. Let’s take a look at some of the things you can do in this file.
Enabling the Vuejs devtools
By default, you have access to dev tools in Electron but it is not enabled after installation. This is as a result of an existing bug on windows 10, so if you open you background.js file, you will find some commented out code with comments that state why they’re commented out:
// Install Vue Devtools // Devtools extensions are broken in Electron 6.0.0 and greater // See https://github.com/nklayman/vue-cli-plugin-electron-builder/issues/378 for more info // Electron will not launch with Devtools extensions installed on Windows 10 with dark mode // If you are not using Windows 10 dark mode, you may uncomment these lines // In addition, if the linked issue is closed, you can upgrade electron and uncomment these lines // try { // await installVueDevtools() // } catch (e) { // console.error('Vue Devtools failed to install:', e.toString()) // }
So if you’re not affected by this bug, you can uncomment the try/catch block and also search for installVueDevtools in this same file(line 5) and also uncomment it. Once this is done, your app will automatically restart, and when you check your dev tools, you should see the Vuejs Devtools.
Vuejs in devtools. (Large preview)
Selecting A Custom Icon For Your App
By default, the Electron icon is set as the default icon for your app, and most of the time, you probably would like to set your own custom icon. To do this, move your icon into your public folder, and rename it to be icon.png. The next thing to do would be to add the required dependency, electron-icon-builder.
You can install it using any of the following commands:
// With Yarn: yarn add --dev electron-icon-builder // or with NPM: npm install --save-dev electron-icon-builder
Once this is done, you can run this next command. It will convert your icon into Electron format and print the following in your console when this done.
Generated info in terminal. (Large preview)
The next thing would be to set the icon option in background.js file. This option goes inside the BrowserWindow option that is imported from Electron. To do this, update BrowserWindow to look like this:
// Add this to the top of your file /* global __static */ // import path import path from 'path' // Replace win = new BrowserWindow({ width: 800, height: 600 }) // With win = new BrowserWindow({ width: 800, height: 600, icon: path.join(__static, 'icon.png') })
Now if we run yarn run electron:build and view our app, we should see the updated icon being used as the app icon but it doesn’t change in development. This issue helps address a manual fix for it on macOS.
Setting Title For Your App
You will notice the title of your app is set to the app name (news-app in this case) and we’ll need to change it. To do that, we have to add a title property to the BrowserWindow method in our background.js file like this:
win = new BrowserWindow({ width: 600, height: 500, title: "News App", icon: path.join(__static, "icon.png"), webPreferences: { // Use pluginOptions.nodeIntegration, leave this alone // See nklayman.github.io/vue-cli-plugin-electron-builder/guide/security.html#node-integration for more info nodeIntegration: process.env.ELECTRON_NODE_INTEGRATION, }, });
Here, we’re setting the title of our app to ‘News App’. But if your index.html file has a title selected or your title doesn’t change to this, try adding this code to your file:
win.on("page-title-updated", (event) => event.preventDefault());
We’re listening for an event that gets fired when our title is updated from BrowserWindow. When this event is fired, we’re telling Electron not to update the title with the one found in index.html file.
Another thing that might be worth changing is the productName, this controls what name appears when you hover on your app’s icon or what your computer recognizes the app as. Right now, the name of our app is Electron. To change this name in production, create a vue.config.js file and add the following lines of code to it:
module.exports = { pluginOptions: { electronBuilder: { builderOptions: { productName: "News App", }, }, }, };
Here, we define productName to be ‘News App’ so that when we run the build command for our app, the name changes from ‘Electron’ to ‘News App’.
Multi Platform Build
By default, when you run the build command, the app that gets created is dependent on the platform that it is being run on. This means if you run the build command on LinUX, the app that gets created would be a LinUX desktop app. The same also applies to other platforms(macOS and windows). But Electron comes with the option to specify a platform (or two platforms) you want to generate. The available options are:
mac
win
linUX
So in order to build the Windows version of your app, run the following command:
// NPM npm electron:build -- --win nsis // YARN yarn electron:build --win nsis
Conclusion
The completed application can be found on my GitHub. The official Electron documentation provides information and a guide that helps you customize your desktop app whichever way you want. Some of the things I tried out but aren’t included in this tutorial are:
Customizing your dock on macOS — https://www.electronjs.org/docs/tutorial/macos-dock.
Setting resizeable, maximizable, and many more — https://github.com/electron/electron/blob/master/docs/api/browser-window.md#new-browserwindowoptions.
So if you’re looking to do much more with your Electron application, their official docs is a good place to start.
Related Resources
Node.jshttps://en.wikipedia.org/wiki/Node.js
Java (programming language)https://en.wikipedia.org/wiki/Java_(programming_language)
Electron (software framework)
JavaFX 14
electronjs
Electron Documentation
Vue CLI Plugin Electron Builder
Lazy Loading Images for Performance Using Intersection Observer by Chris Nwamba
axios
Getting Started With Axios In Nuxthttps://www.smashingmagazine.com/2020/05/getting-started-axios-nuxt/) by Timi Omoyeni
(ks, ra, yk, il)
Website Design & SEO Delray Beach by DBL07.co
Delray Beach SEO
source http://www.scpie.org/building-desktop-apps-with-electron-and-vue/ source https://scpie1.blogspot.com/2020/07/building-desktop-apps-with-electron-and.html
0 notes
Text
Learning Resources In Challenging Times: Online Workshops Meetups And Events
About The Author
Juggling between three languages on a daily basis, Iris is known for her love of linguistics, arts, web design and typography, as well as her goldmine of … More about Iris …
A month is a long time to stay on top of things. In today’s monthly post, you’ll find an overview of everything we’ve been working on and have also enjoyed reading over the past month.
In these current strange times of isolation and social distancing (with almost all events and conferences being cancelled), it can be quite difficult to feel connected to family, friends and colleagues. Here at Smashing, we believe that is is now more important than ever to stay in touch and support each other. Behind the scenes, the team is working tirelessly on ways to keep the community connected, and oh boy do we have a lot of things in store for you! You didn’t really think we’d give up that easily, did you?
Your workplace may look a lot like Topple’s, but even if it isn’t, make yourself comfortable! We’ll help you boost your skills online and learn practical, actionable insights from experts in the industry.
We’ve been busy over the last few weeks, and we’re not stopping yet! We have online workshops, SmashingConf Live, Smashing Meets and last but not least, Smashing TV coming right at your fingertips! But first, let’s see what else we’ve been up to…
Look What’s Cookin’!
Exciting times! Click!, our latest Smashing book, is available for pre-order with a friendly discount — you can already start reading the eBook until your printed copy arrives at your doorstep. Written by Paul Boag and beautifully designed by Veerle Pieters, the book is split into 11 chapters: from exploring the psychology of decision making and how to measure conversion to exploring ways of how to encourage users to act without alienating them.
There is no shortage of books on marketing agency and UX, but when it comes to bridging the gap between the two, many of us struggle to find the right balance. Pre-order today →
Of course, if you’re feeling smashing today, we’d like to invite you join the Smashing family and get the eBook for free (among with many other eBooks and a few fancy cats!).
Learning And Networking, The Smashing Way
Despite the current circumstances, we’re keen to find ways in which we can offer Smashing experiences to anyone interested in learning from experts in our industry — without needing to leave your desk! We’ve been asking what type of resources you’d like to have, and so all of the following online events is what has landed in our Smashing wishing well. Thank you to everyone who has shared their thoughts and feedback — we’ve been all ears!
1. Online Workshops (May–July)
Our friendly online front-end/UX workshops are bound to boost your skills and help you gain practical, actionable insights from experts in the industry — live. There will be plenty of insightful takeaways, exercises, slides, recordings and friendly Q&A time. Of course, we’re happy to provide discounts for large groups and students.
We already have you covered for the next three months — make sure to save your spot as soon as you can:
Note: If you’re also interested in how you too can run online workshops, listen to Smashing Podcast episode 14 with Rachel Andrew in which she talks about running online workshops and how a traditional event can adapt when participants can’t attend in person.
2. SmashingConf Live (June 9–10)
Meet SmashingConf Live (June 9–10), a truly smashing, friendly online conference on front-end & UX. With interactive live sessions, practical insights, accessible speakers, collaborative notes and fireplace chats with like-minded folks. Jump to first confirmed speakers. Check schedule →
Both days start at 8 AM PDT (check your time), with interactive sessions, followed up with a time for Q&As and discussion zones.
Ah, and the best bit: a conference in which you play an active role — taking part in live sessions, Q&As, discussion zones and challenges. To the schedule. But of course that’s not all! Be prepared for design & coding challenges, scavenger hunt and fireplace sessions with mystery guests. And to keep in style, of course we’ll throw a Smashing Party.
Do you like what you see, but are worried about getting some time off from work? Well, you surely didn’t think we would leave your hanging? We know how difficult it can sometimes be, and so we’ve prepared a neat lil’ Convince-Your-Boss template to help you out. Good luck!
3. Smashing Meets (Free)
We’re super excited to run our very first Smashing meetup next week! We will focus on front-end and UX, but also cover all sorts of topics from performance to accessibility. Smashing Meets wouldn’t be possible without some amazing communities from around the world, so another Thank You to everyone involved!
4. Smashing TV (Free Webinar on May 19th)
Looking for ways to help you expand your accessibility test coverage beyond automation? With very little resources, you can make a meaningful difference. Join us with Carie Fisher and Harris Schneiderman at 7:00 PM CET/1:00 PM EDT who will demonstrate the basics of automated testing and share key lessons on on maximizing your accessibility impact.
Sharing Personal Experiences And Stories
We’re moving onto our 16th episode of the Smashing Podcast next week! The Smashing Podcast is the perfect way to take a little bit of Smashing along with you on your morning walks, while washing the dishes, or anytime you like really. You can subscribe in your favorite app to get new episodes as soon as they’re ready.
Your Design Work Deserves Attention
Do you have artwork you’d love to share with the design community? If so, please do! We are always looking for creative talent, so if you have an idea for a wallpaper design, please don’t hesitate to submit it. Join in! →
Trending Topics On Smashing Magazine
We publish a new article every day on various topics that are current in the web industry. Here are some that our readers seemed to enjoy the most and have recommended further:
��Setting TypeScript For Modern React Projects Using Webpack And Babel” by Blessing Krofegha This article introduces Typescript, a superscript of JavaScript that presents the static type feature for spotting common errors as developers codes, which enhances performance, hence results in robust enterprise applications. You’ll also learn how to efficiently set up TypeScript in a React Project as we build a Money Heist Episode Picker App, exploring TypeScript, React hooks such as useReducer, useContext and Reach Router.
“A Complete Guide To Mechanical Keyboards” by Ben Frain How much thought have you put into your primary input device? Ever considered how much better your interface with your computer might be? In this article, we dive into the possibilities of mechanical keyboards. The different layouts, switch types and even keycap material. Strap yourself in — this will be a deep dive!
“Micro-Typography: How To Space And Kern Punctuation Marks And Other Symbols” by Thomas Bohm For hundreds of years, we have been using white space in typography. Today, in 2020, how do we add spacing to punctuation marks and other symbols, and how do we adjust the space on the left and right side in an easy and consistent way? It is actually not as easy and quick as it should be.
“How To Pass Data Between Components In Vue.js” by Matt Maribojoc With so many different ways to share data across components, you should know which technique is best for your situation. Let’s analyze three of the most common ways to pass data in VueJS.
“Reducing Design Risk” by Eric Olive The pressure to rush market and usability research carries risk. We’ll offer four practical techniques to mitigate this risk and create designs that better serve customers and the company: context over convenience, compromise, better design decisions, design reduction.
Best Picks From Our Newsletter
We’ll be honest: Every second week, we struggle with keeping the Smashing Newsletter issues at a moderate length — there are just so many talented folks out there working on brilliant projects! Kudos to everyone involved!
Interested in sponsoring? Feel free to check out our partnership options and get in touch with the team anytime — they’ll be sure to get back to you right away.
P.S. A huge thank you to Cosima Mielke for writing and preparing these posts!
Creating Accessible Color Palettes
Finding the perfect tint or shade of a color is not only a matter of taste but also accessibility. After all, if color contrast is lacking, a product could, in the worst case, even become unusable for people with vision impairments. A very detailed contrast checker to help you detect potential pitfalls ahead of time comes from Gianluca Gini: Geenes.
The tool lets you tinker with hue ranges and saturation and apply the color palettes to one of three selectable UI mockups. Once applied, you can trigger different kinds of vision impairments to see how affected people see the colors and, finally, make an informed decision on the best tones for your palette. To use the colors right away, just copy and paste their code or export them to Sketch.
Command Line Love
It’s not uncommon for technical documentation to be dry and feel intimidating, especially for people who are just getting started with a new tool. That can get quite frustrating especially when a manual is difficult to read or follow, or the explanations are verbose and lack examples.
Dash Dash takes the Unix (LinUX, BSD, macOS) open source manual pages and sets the content in a beautiful type and layout. It provides not only explanations of all commands, but also search, examples and TL;DR sections. Also, The Art of Command Line takes you on a journey to Command Line from basics to system debugging.
And if you are up for advanced command line techniques, cmdchallenge prompts you to solve tasks with a single line of bash. (vf)
Accessible Component Libraries
While many of the component libraries we create are trying to cover all the usual suspects (the accordions, the tables, the carousels, the drop-downs, along with typography, colors and box shadows), No Style Design System by Adam Silver is focused primarily around accessibility and web forms.
As a system created for and used in his book on Form Design Patterns, Adam’s library provides a set of accessible components for everything from autocomplete, checkboxes and password reveal to radios, select boxes and steppers. Most of them have a minimal CSS styling with clean, accessible markup. And if you need slightly more advanced components, Heydon Pickering’s Inclusive Components has got your back: with comprehensive tutorials on accessible cards, data tables, notifications, sliders, tabbed inerfaces, tooltips, menus and toggles. (vf)
Custom CSS Cascades
Miriam Suzanne built a demo to illustrate a very clever way to define a cascade of custom properties. One that allows you to determine which intent should take priority, without worrying about the specificity of how the value is defined.
See the Pen [Custom Cascades](https://codepen.io/smashingmag/pen/JjYawPP) by Miriam Suzanne.
See the Pen Custom Cascades by Miriam Suzanne.
Miriam shows how it works at the example of a button. Due to how the cascade is arranged, the default button is always falling back to --btn-bg--default. Adding the disabled attribute, always overrides any other button colors, no matter where they are defined, and, when new button types are created, --btn-bg--type ensures that only the defaults are overridden but not the state. The approach also lets you set these values contextually. A smart solution to avoid the usual dangers that highly-specified inline styles usually bring along.
Front-End Bookmarks
Some of us save all the useful articles and talks they come across in one ever-growing bookmark folder (which can make finding what you’re looking for quite a challenge at times), others have a more organized approach. Like Manuel Matuzović.
Manuel collects articles and talks about HTML, CSS, and JavaScript on his site Front-End Bookmarks, grouped alphabetically by elements, attributes, properties, selectors, methods, and expressions. No matter if you’re looking for information on how to correctly use aria-labelledby or what the ::marker pseudo-element is all about, chances are good that Manuel already compiled helpful resources on the topic. By the way, if you feel that a resource is missing in the collection, don’t hesitate to contribute to it on GitHub.
GitHub Tips And Tricks
Do you know how to automatically squash commits on GitHub when merging pull requests? Or how to open a repo in the browser using GitHub CLI? If not, Joe Previte’s collection of GitHub tips and tricks might be for you.
In bite-sized videos, Joe shares small but powerful tips to take your GitHub workflow to the next level. And for those of you who prefer to learn by reading, most tips are also available as short blog posts. Handy little timesavers.
The Sound Of Colleagues
Working from home can have some real advantages over working from an office, but let’s be honest, it can be a rather lonely experience, too, when there are no colleagues around. If you feel your home office is getting too quiet and you need some bustle in the background to stay focused, The Sound of Colleagues has got your back.
The Sound of Colleagues lets you mix office noises to create your custom office ambient noise. People typing and talking, phones ringing, the coffee machine, the printer — all of these little things add up to bring a bit of office feeling to your home. Maybe it’ll even help you boost your productivity, who knows?
A Minimalist And Modern Media Player Library
If you want to embed a media player on your site, Vime might be worth taking a closer look at. Built around the idea that you control the player, not the other way around, the open-source library provides an alternative to Videojs and Plyr and supports HTML5, HLS, Dash, YouTube, Vimeo, and Dailymotion.
Vime does not only shine with a minimalist, sleek look, but it is responsive, accessible, modular, and lightweight, too. It gets by without any external dependencies and comes in different packages tailored to different needs so that you can pick just what’s required for your use case. And since minimalist doesn’t mean bland, Vime is backed up by a plugin system that offers a lot of room for customization — think custom controls, settings, tooltips, and more. The last two versions of all modern browsers as well as IE11 are supported.
(cm, vf, ra)
Website Design & SEO Delray Beach by DBL07.co
Delray Beach SEO
Via http://www.scpie.org/learning-resources-in-challenging-times-online-workshops-meetups-and-events/
source https://scpie.weebly.com/blog/learning-resources-in-challenging-times-online-workshops-meetups-and-events
0 notes
Text
Angular JS vs React JS
Reference Angular JS vs React JS
People, especially entrepreneurs from small businesses and SMEs, face difficulty in selecting one appropriate js framework (out of Angular or React JS) for their project. Here, I am going to make their task easy. Let’s start from the start!
Javascript is one of the most famous front-end languages used in all software development companies in the present time. It has around 120.5k Github stars, 21 forks, and 1200 contributors. Angular and React JS are two important javascript frameworks that have gained a lot of attention nowadays.
Short Introduction to Angular and React
Angular
Developed by Google
First released in 2010
The upgraded version (Angular JS 2 or Angular) came in 2016
React
Maintained by Facebook
Released in 2013
Now, let’s have a look at what StackOverflow says about various frameworks including angular and react.
Find more Top Web Development Companies
Image courtesy: Stackoverflow
Google trends also say something about these two popular js frameworks. Let’s look at it also.
Image courtesy: Google Trends
From the above images, it is clear that React JS has a higher priority than Angular and Google Trends also says ReactJS is the most popular library. In the next step, we will compare both of them based on certain factors to decide which one would be better to choose for your development project.
Get to know more about Best Mobile App Development Companies
Angular, React JS and apps
Here I would like to emphasize the fact that Angular is mostly used for large applications. Large in the sense, an app that uses a huge part of the computer memory. For example, a video streaming app and music instrument app is a large application.
However, ReactJS is a library, not a complete framework. It means it does not have a complete set of tools required to create all kinds of applications, it is just a library. Hence, it is mostly preferred for a Single Page Application.
Comparison between Angular Js and React Js
The major difference between Angular JS and React JS is present in the state of its management. Angular JS has data binding bundled in by default. However, React is usually augmented by Redux to give unidirectional data flow and work with immutable data.
Implementation
Angular JS is a framework that offers a large number of native options and features. It permits you to benefit from a number of options directly that makes it possible to start a project faster without being intimidated by the choices to be made at startup.
When comparing React JS vs Angular JS, It is quite important to know that React JS is an open-source JavaScript library. Hence, you need to add external component libraries to have the same number of features. You will need to add elements for routing to force unidirectional flows, to call APIs, set up tests, manage dependencies and more.
Data Binding
Angular JS uses a two-way binding that connects the Document Object Model values to model data. It means if for user interaction with the field, a new value is offered to the app it will result in the update of both the view and the model.
Furthermore, it helps write less boilerplate code to include the interactions between components in your app. However, the two-way data binding approach has a negative impact on performance.
React JS supports one-way binding. It offers singular behavior for your application. The implementation of dependencies helps singularity to separate from the classes and the risks of error can be minimized. Moreover, the one-way data flow in React helps to control the complexity. So, it’s much easier to debug the self-contained components of large React applications similar to larger Angular JS applications.
Performance
Angular’s MVVM provides the benefit of reducing the loading speed of the web pages considerably. Moreover, communication is in the asynchronous mode. It reduces the number of entrances to the server. Since the visual interface is on the client-side, part of the backend queries is removed. It enhances the speed of designing web applications.
React JS creates its own virtual DOM where components are attached. It comes with the comfort of search within a website since entire data gets displayed without refreshing the page. Hence, Angular provides a lower performance with difficult and dynamic applications. Moreover, virtual DOM is helpful enough in increasing the performance of React JS.
Scalability
With its instinctive design and powerful CLI, Angular JS is easy to scale. However, React is testable and hence scalable compared to other frameworks like Vuejs.
Dependency Injection
It is a software design pattern that supports making components reusable, maintainable, and testable. AngularJS automatically finds the appropriate injected objects with various parameters such as $filter, $routeParams, store, and $scope.
$inject and $provide are the two functions that make dependency injection possible in the Angular JS framework. However, the built-in container for dependency injection with React is missing.
It is made possible by the inclusion of instrument modules, such as Browserify, Require JS, and ECMA Script 6 modules.
Directive and Templates
Angular JS has its directives to work on DOM. ng-bind or ng-app are some of the standard directives with Angular JS. Moreover, you can make your directives as well. It is considered as one of the most powerful methods to work with DOM.
Furthermore, we can use directives, both standard and specific to bind DOM elements with Angular JS applications.
However, React does not provide any classification into templates and directives or template logic. The template logic is required to be written in the template itself. React selects to interpret all templates and the UI every time an event happens.
Architecture
Angular JS is completely based on the MVVM (Model-View-View-Model). It comes with an exhaustive list of tools as well as features such as data link, change detection, forms, routing, navigation, and Http implementation.
React only covers the MVC (Model-View-Control), so you will need to use other libraries like Redux and Flux as a controller or react-router for navigation.
A Comparison Table for Angular and React JS
Here is a table that includes various parameters against the technology (Angular or React JS). This table shows the properties of both technologies. It will surely help you to make out a clear decision for selecting the technology for your app development project.
It can be seen in the table that Angular has a regular DOM while React JS has a virtual DOM. Moreover, Angular has a Bi-directional data binding process and React JS has a unidirectional data binding process.
Also, Angular has a component-based app architecture while React JS has no app architecture. Moreover, in the end, React JS is an open-source JS library while Angular has a fully-featured MVC framework.
Wrapping up
Hence, on the basis of the above-mentioned properties, you could easily make a decision whether you should go with Angular or React JS for your app development project.
It is quite clear that Angular is used basically for large-sized applications such as video streaming app. Hence, in case you want to create an application that is going to take a lot of memory on the user’s mobile phone, then you can easily opt for Angular. It will provide the proper functionality to your app.
But, if you are planning to create a single page application, then you can go for React JS. The main reason behind this lies in the fact that React JS is a library instead of a full-fledged framework. Hence, when you work with React JS, you require different other tools and libraries to fulfill your project’s requirements.
0 notes
Text
Who is Full Stack web Developer and how it is Advantageous?
Are you a Backend developer? Do you code backend for the web applications in Java, or Dot net, or Python, or Nodejs? If yes, then pull up your socks, the front-end challenge is right in front of you. Companies now want you to do the front-end task as well. Yes, please prepare yourself for that. You can still be a frontend developer or a backend developer. Though, Full Stack developers are more in demand. In this article, we discuss this issue in deep. Further, we discuss topics like what a full stack developer is, prior knowledge required for a full stack developer, various skills required, what are the advantages if you are one such, and lastly will discuss the jobs and salary issue. So,let us begin our article. And you can contact us for your Full-stack Developer training. Naresh I
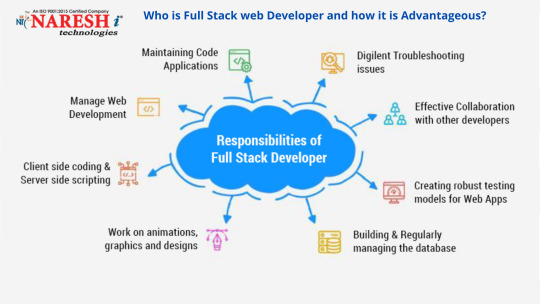
Technologies is the number one computer training institute in Hyderabad and among the top five computer training institutes in India. Contact us anytime for your Full stack web Development training
Who is a Full Stack Developer?
So, who is a full-stack developer? He is the one who can single-handedly complete the whole web development project. He looks after the back-end development work, as well as the front-end development work. The backend is the server, and the front end is the UI. Single-page applications like Angular, React and Vuejs is the modern-day UI. And now we have the UI/UX developed using AR/VR as well. Also, the traditional HTML5, Bootstrap, jQuery, MVC, and various such are part of the front-end development. Some of the above technologies like the last four are used in Backend as well. Anyways, Backend also requires a template. And you provide through the front-endtechnologies’ application. Previously, two different teams used to do the backend and frontend tasks. However, now both one person is conducting tasks. And companies now look for such technocrats in the majority.
Prerequisites for Becoming a Full Stack Developer
You need to be possessed experience in web development or web designing. A web developer can become a full stack developer, and so is a web designer. And, it is the 21st-century requirement. Both need to upgrade themselves to meet this challenge from the market. The demand in the Market is maximum for the Full-stack developer, and there are multiple stacks, that we discuss in the next section. Above all, you should be ready for very hard work. However, the payment will make you happy. Please be assured.
Skills for Full Stack developer
Loads of skills together make a Full-stack developer. Some of the skills required are as below:
Front-end:
HTML5, jQuery, Bootstrap, Material UI, Angular, React Vuejs, AR/VR, MVC, MVVM, and various JS versions.
Backend:
You need different combinations, like as below:
· Java, Spring Boot, Hibernate
· Dot net, C#, LINQ, Entity Framework, ADO.NET, WCF. Web services, Socket programming. Signal R, HTTP, HTTPS, RESTFUL API, and various other technologies in Dot net
· Dot net core version of all the above technologies
· PHP, and various MVC frameworks like Code Igniter, and various such.
· Nodejs, and various frameworks like Express
· Python and various frameworks
You should learn one out of all these backend technologies. And you should complement the backend knowledge with a matching front-end technology. We have various stacks. There is a Dot net Angular Stack, LAMP Stack, MEAN stack, MERN stack, and various such. You need to be proficient in one stack for Full stack designation. However, you need some more technical skills now. And, they are:
· We included entity framework, and let us also add to the list JDBC, Oracle, MSSQL, MYSQL, MongoDB, Document DB, DynamoDB, and various others. Concisely, you should know the structured, semi-structured as well as unstructured databases. And, in the current context, learn from the AWS, Azure, and GCP list, the database you find in your stack.
· Apart from these, you need advanced programming skills like how to make use of the APIs and various third-party tools related to your stack.
· You also need knowledge of the DevOps procedure, as no programmer or designer., and hence a full stack developer can withstand the challenge from the market without DevOps.
· And you need special skills related to version control and repository for sure. Each day you need to push or pull the code from the version control systems like GIT.
Advantages as a Full Stack Developer
There are various advantages you get as a Full-stack developer. They are:
· There is a huge demand for each stack. And you can be a full stack developer in any one stack.
· Pay Scale is the best in the market, and we will experience that in the next section.
· You always have a bright future if you become a full-stack developer in any one of the stacks.
Jobs and Salary related to Full Stack web Developer
Remember, the full-stack developer is one of the highest paying coding jobs, and it ranks fourth currently in the list after System engineer, IT security specialist, and Software Engineer. According to Glass door, the average annual salary of a Full stack developer in the US is around $88000 currently. In India, the average salary of a Full stack developer is around 575000 INR. And it can be as high as around 1195000 INR. Some companies pay even more based on the expertise and experience of the full stack developer.
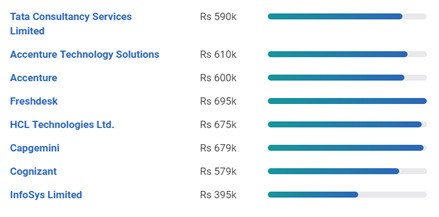
Hence, if you select Full stack development as your career, you have a bright present, as well as a bright future. And that brings us to the end of the article. Have a nice career! Remember, you can still exist as a backend developer or a front-end developer. However, the demand for Full Stack developers is increasing day by day, as there is less burden on the management hence.
Naresh I Technologies is the number one computer training institute in Hyderabad and among the top five computer training institutes in India. Contact us anytime for your Full-stack Developer training. You can also opt for Full-stack Developer online training, and from any part of the world. And a big package is waiting for you. And all is yours for a nominal fee affordable for all with any range of budget. Let us have a look at what you will get with this Full-stack Developer training package:
· You need to pay a nominal fee.
· You can choose any stack, as per your skills and interest.
· You have the option to select from online and classroom training.
· A chance to study at one of the best Full-stack Developer training institutes in India
· We provide Full-stack Developer training in Hyderabad and the USA, and no matter in which part of the world you are, you can contact us.
· Naresh I technologies cater to one of the best Full-stack Developer training in India.
· And a lot more is waiting for you.
Contact us anytime for your complete Full stack web Development online training.
0 notes