#CreateUser
Explore tagged Tumblr posts
Visit Tumblr Blog
Explore Tumblr blogs with no restrictions, modern design and the best experience.
Last Seen Tumblr Blogs


Fun Fact
The most popular pages on Tumblr are about Minecraft, GIFs, and David J. Peterson.
Text
Introduction to GraphQL for Full Stack Applications

What is GraphQL?
GraphQL is a query language for APIs and a runtime for executing those queries by leveraging a type system defined for the data. Developed by Facebook in 2012 and open-sourced in 2015, GraphQL provides a flexible and efficient alternative to REST APIs by allowing clients to request exactly the data they need — nothing more, nothing less.
Why Use GraphQL for Full Stack Applications?
Traditional REST APIs often come with challenges such as over-fetching, under-fetching, and versioning complexities. GraphQL solves these issues by offering:
Flexible Queries: Clients can specify exactly what data they need.
Single Endpoint: Unlike REST, which may require multiple endpoints, GraphQL exposes a single endpoint for all queries.
Strongly Typed Schema: Ensures clear data structure and validation.
Efficient Data Fetching: Reduces network overhead by retrieving only necessary fields.
Easier API Evolution: No need for versioning — new fields can be added without breaking existing queries.
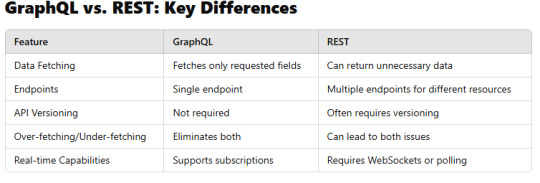
GraphQL vs. REST: Key Differences
Core Concepts of GraphQL
1. Schema & Types
GraphQL APIs are built on schemas that define the data structure.
Example schema:graphqltype User { id: ID! name: String! email: String! }type Query { getUser(id: ID!): User }
2. Queries
Clients use queries to request specific data.graphqlquery { getUser(id: "123") { name email } }
3. Mutations
Used to modify data (Create, Update, Delete).graphqlmutation { createUser(name: "John Doe", email: "[email protected]") { id name } }
4. Subscriptions
Enable real-time updates using Web Sockets.graphqlsubscription { newUser { id name } }
Setting Up GraphQL in a Full Stack Application
Backend: Implementing GraphQL with Node.js and Express
GraphQL servers can be built using Apollo Server, Express-GraphQL, or other libraries.
Example setup with Apollo Server:javascriptimport { ApolloServer, gql } from "apollo-server"; const typeDefs = gql` type Query { hello: String } `;const resolvers = { Query: { hello: () => "Hello, GraphQL!", }, };const server = new ApolloServer({ typeDefs, resolvers });server.listen().then(({ url }) => { console.log(`Server running at ${url}`); });
Frontend: Querying GraphQL with React and Apollo Client
Example React component using Apollo Client:javascriptimport { useQuery, gql } from "@apollo/client";const GET_USER = gql` query { getUser(id: "123") { name email } } `;function User() { const { loading, error, data } = useQuery(GET_USER); if (loading) return <p>Loading...</p>; if (error) return <p>Error: {error.message}</p>; return <div>{data.getUser.name} - {data.getUser.email}</div>; }
GraphQL Best Practices for Full Stack Development
Use Batching and Caching: Tools like Apollo Client optimize performance.
Secure the API: Implement authentication and authorization.
Optimize Resolvers: Use DataLoader to prevent N+1 query problems.
Enable Rate Limiting: Prevent abuse and excessive API calls.
Conclusion
GraphQL provides a powerful and efficient way to manage data fetching in full-stack applications. By using GraphQL, developers can optimize API performance, reduce unnecessary data transfer, and create a more flexible architecture.
Whether you’re working with React, Angular, Vue, or any backend framework, GraphQL offers a modern alternative to traditional REST APIs.
WEBSITE: https://www.ficusoft.in/full-stack-developer-course-in-chennai/
0 notes
Text
PHP 8 Features and How to Use Them in Custom Development

PHP 8 brings a host of new features, optimizations, and improvements that can significantly enhance custom development projects. These enhancements are designed to improve performance, streamline coding practices, and introduce modern programming concepts. In this blog, we will explore some of the standout features of PHP 8 and how to effectively utilize them in your custom development projects.
1. Just-In-Time (JIT) Compilation:
Overview: JIT compilation is one of the most anticipated features in PHP 8. It aims to improve performance by compiling parts of the code at runtime, rather than interpreting it each time it is executed.
How to Use: To enable JIT, you need to configure the `opcache` settings in your `php.ini` file:
```ini
opcache.enable=1
opcache.jit_buffer_size=100M
opcache.jit=tracing
```
Benefits: JIT can significantly enhance the performance of CPU-intensive tasks, making PHP 8 a great choice for complex applications.
2. Union Types
Overview: Union types allow a function or method to accept multiple data types, providing more flexibility and type safety in your code.
How to Use:
```php
function processInput(int|float $input): int|float {
return $input * 2;
} ```
Benefits: Union types reduce the need for complex type-checking logic and make your code more readable and maintainable.
3. Named Arguments
Overview: Named arguments allow you to pass arguments to a function based on the parameter name, rather than the parameter position.
How to Use:
```php
function createUser(string $name, int $age, bool $isAdmin = false) {
// Function implementation
}
createUser(age: 25, name: "Alice", isAdmin: true);
```
Benefits: Named arguments enhance code clarity and reduce errors by allowing you to specify only the arguments you need, in any order.
4. Attributes (Annotations)
Overview: Attributes provide a native way to add metadata to your classes, methods, properties, and functions, replacing the need for docblock annotations.
How to Use:
```php
#[Route('/home')]
class HomeController {
// Class implementation
}
```
Benefits: Attributes make it easier to process metadata and integrate with tools and frameworks that use reflection.
5. Constructor Property Promotion
Overview: Constructor property promotion simplifies the syntax for defining and initializing class properties directly in the constructor.
How to Use:
```php
class User {
public function __construct(
private string $name,
private int $age
) {}
}
``` Benefits: This feature reduces boilerplate code and makes class definitions more concise.
6. Match Expression
Overview: The match expression is a more powerful and flexible alternative to the switch statement, supporting strict comparisons and returning values.
How to Use:
```php
$status = match($code) {
200 => 'OK',
404 => 'Not Found',
500 => 'Server Error',
default => 'Unknown Status',
};
``` Benefits: Match expressions simplify complex conditional logic and improve code readability.
7. Null Safe Operator
Overview: The null safe operator allows you to safely navigate through potentially null values without having to explicitly check for null at each step.
How to Use:
```php
$result = $user?->getProfile()?->getAddress()?->getCity();
``` Benefits: The null safe operator reduces the risk of null pointer exceptions and makes your code cleaner.
8. Improvements in Error Handling
Overview: PHP 8 introduces several improvements in error handling, such as more specific exception types and better error messages.
How to Use:
```php
try {
// Code that might throw an exception
} catch (TypeError $e) {
// Handle type error
} catch (ValueError $e) {
// Handle value error
}
```
Benefits: Improved error handling makes debugging easier and enhances the robustness of your applications.
Conclusion PHP 8 introduces a wealth of features and improvements that can significantly boost your custom development projects. From performance enhancements with JIT compilation to cleaner and more efficient coding with union types, named arguments, and constructor property promotion, PHP 8 offers tools that modernize and streamline PHP development. By leveraging these features, you can write more readable, maintainable, and high-performing code, ensuring your custom applications are robust and future-proof. Embrace these new capabilities in PHP 8 to stay ahead in the ever-evolving landscape of web development.
The incorporation of custom PHP development practices alongside these new features can maximize the potential of your projects, making them more adaptable and future-ready.
Also Read: 10 Best Web Development Languages for Your Project in 2024
0 notes
Text
26.4 JavaScript 객체 디스트럭처링
JavaScript 객체 디스트럭처링 JavaScript 객체 디스트럭처링(Destructuring)은 객체 속성을 쉽게 추출하고 변수를 할당할 수 있는 편리한 방법입니다. 이는 코드의 가독성을 높이고, 데이터를 보다 쉽게 다룰 수 있게 해줍니다. 이번 포스팅에서는 객체 디스트럭처링의 기본적인 사용 방법과 다양한 활용 사례에 대해 자세히 설명하겠습니다. 기본 문법 객체 디스트럭처링은 중괄호 {} 안에 객체의 속성 이름을 넣어 해당 속성의 값을 변수로 추출합니다. const person = { name: 'John', age: 30, city: 'New York' }; const { name, age, city } = person; console.log(name); // John console.log(age); // 30 console.log(city); // New York 변수 이름 변경 디스트럭처링을 할 때 변수 이름을 변경할 수도 있습니다. 콜론 :을 사용하여 객체 속성 이름과 변수 이름을 매핑할 수 있습니다. const person = { name: 'John', age: 30, city: 'New York' }; const { name: personName, age: personAge, city: personCity } = person; console.log(personName); // John console.log(personAge); // 30 console.log(personCity); // New York 기본값 설정 해당 속성이 객체에 없을 경우 기본값을 설정할 수도 있습니다. const person = { name: 'John', age: 30 }; const { name, age, city = 'Unknown' } = person; console.log(city); // Unknown 중첩 객체 디스트럭처링 중첩된 객체 속성을 디스트럭처링할 수도 있습니다. const person = { name: 'John', age: 30, address: { city: 'New York', zipcode: 10001 } }; const { name, address: { city, zipcode } } = person; console.log(city); // New York console.log(zipcode); // 10001 나머지 속성 가져오기 디스트럭처링을 할 때 특정 속성만 제외하고 나머지 속성을 가져올 수도 있습니다. const person = { name: 'John', age: 30, city: 'New York' }; const { name, ...rest } = person; console.log(name); // John console.log(rest); // { age: 30, city: 'New York' } 함수 매개변수에서의 디스트럭처링 함수의 매개변수로 객체를 전달할 때도 디스트럭처링을 사용할 수 있습니다. function printPerson({ name, age, city }) { console.log(`Name: ${name}, Age: ${age}, City: ${city}`); } const person = { name: 'John', age: 30, city: 'New York' }; printPerson(person); // Name: John, Age: 30, City: New York 예제 종합 위에서 배운 내용을 종합하여 예제를 작성해보겠습니다. const book = { title: 'JavaScript: The Good Parts', author: { firstName: 'Douglas', lastName: 'Crockford' }, year: 2008, publisher: 'O'Reilly Media' }; // 중첩 객체 디스트럭처링과 변수 이름 변경 const { title, author: { firstName: authorFirstName, lastName: authorLastName }, year, publisher: bookPublisher = 'Unknown' } = book; console.log(title); // JavaScript: The Good Parts console.log(authorFirstName); // Douglas console.log(authorLastName); // Crockford console.log(year); // 2008 console.log(bookPublisher); // O'Reilly Media 배열 디스트럭처링 객체뿐만 아니라 배열에서도 디스트럭처링을 사용할 수 있습니다. const numbers = ; const = numbers; console.log(first); // 1 console.log(second); // 2 console.log(rest); // 실용적인 예제 디스트럭처링은 실제로 어떻게 사용될 수 있는지에 대한 몇 가지 실용적인 예제를 살펴보겠습니다. API 응답 처리 API로부터 받은 JSON 응답을 처리할 때 유용하게 사용할 수 있습니다. const response = { data: { user: { id: 1, name: 'John Doe', email: '[email protected]' }, status: 'success' } }; const { data: { user: { id, name, email } }, status } = response; console.log(id); // 1 console.log(name); // John Doe console.log(email); // [email protected] console.log(status);// success 설정 객체 함수에 전달되는 설정 객체의 디스트럭처링 예제입니다. function setupCanvas({ width = 600, height = 400, backgroundColor = 'white' } = {}) { console.log(`Width: ${width}, Height: ${height}, BackgroundColor: ${backgroundColor}`); } setupCanvas({ width: 800, height: 600 }); // Width: 800, Height: 600, BackgroundColor: white setupCanvas(); // Width: 600, Height: 400, BackgroundColor: white 파라미터 디폴트 값과 조합 함수의 파라미터 디폴트 값과 디스트럭처링을 조합하여 사용할 수 있습니다. function createUser({ name = 'Anonymous', age = 0, isActive = false } = {}) { console.log(`Name: ${name}, Age: ${age}, Active: ${isActive}`); } createUser({ name: 'Alice', age: 25 }); // Name: Alice, Age: 25, Active: false createUser(); // Name: Anonymous, Age: 0, Active: false 결론 JavaScript 객체 디스트럭처링은 다양한 상황에서 유용하게 사용할 수 있는 강력한 기능입니다. 이를 활용하면 코드의 가독성과 유지보수성을 크게 향상시킬 수 있습니다. 이번 포스팅에서 소개한 다양한 예제를 통해 객체 디스트럭처링을 보다 효과적으로 활용할 수 있기를 바랍니다. Read the full article
0 notes
Text
New User Creation / Add new user

Create a new user in Linux
Table of Contents: Adding new user Changing Password User Login Switch User Granting Admin Privileges User Aliases Reloading Aliases Testing Conclusion >Adding new user:Creating new user with the name "testuser" shown as below. # useradd testuser

> Changing Password:Creating password for newly created user ( ie., testuser )# passwd testuserChanging password for user testuser. New UNIX password: # set passwordRetype new UNIX password: # confirmpasswd: all authentication tokens updated successfully.

> User Login:Login with newly created user ( ie., testuser ). localhost login: testuser # Enter user-name .password: # Enter testuser password ( Password will not be display ) Then press Enter.

> Switch user:We can switch between users by using 'su' command. the below example is switch to root user.su - l $ su -l root # switch user to root , if we did not type any username then it will take root user by default . ie., we can login to root by using 'su - ' as well.Password: # Enter root password# # we have logged into root user. the '#' indicates that we are now using root user.

>Granting Administrative Privileges:Assigning administrative privileges to a user to execute root commands without switching to root user. ( ie., testuser ) # usermod -G wheel testuserEdit '/etc/pam.d/su' file. the file looks like as below.# vi /etc/pam.d/su#%PAM-1.0 auth sufficient pam_rootok.so # Uncomment the following line to implicitly trust users in the "wheel" group. #auth sufficient pam_wheel.so trust use_uid # Uncomment the following line to require a user to be in the "wheel" group. #auth required pam_wheel.so use_uid auth substack system-auth auth include postlogin account sufficient pam_succeed_if.so uid = 0 use_uid quiet account include system-auth password include system-auth session include system-auth session include postlogin session optional pam_xauth.so

Un Comment the below lines from the file."auth sufficient pam_wheel.so trust use_uid" "auth required pam_wheel.so use_uid"The file will be looks like below.# vi /etc/pam.d/su#%PAM-1.0 auth sufficient pam_rootok.so # Uncomment the following line to implicitly trust users in the "wheel" group. auth sufficient pam_wheel.so trust use_uid # Uncomment the following line to require a user to be in the "wheel" group. auth required pam_wheel.so use_uid auth substack system-auth auth include postlogin account sufficient pam_succeed_if.so uid = 0 use_uid quiet account include system-auth password include system-auth session include system-auth session include postlogin session optional pam_xauth.so

> User aliases: Creating an alias for the root user and forwarding all root user emails another user. ( ie., testuser ) # vi /etc/aliasesuncomment the last line and enter the username as shown below.root: testuser

> Reloading aliases: # newaliases

> Testing:Try to login to root user from testuser. in general, it should ask for the password. but testuser having root privileges so that we can login without entering any password like a root user.$ su -l root #

> Conclusion:We have learned user creation, password creation, User login, Switching user using 'su' command, Assigning administrative privileges to a normal user in this article and tested successfully.Any questions please make a comment.Thankyou Read the full article
0 notes
Text
ok so maybe the mistake with postgres was trying to be cute and use createdb and createuser instead of just psql -c in a bash file
#I just hoped that there would be something better#maybe this is just a haskell problem but psycopg and its cursors are confusing enough for me that i'd rather not try to deal with that#or sqlalchemy
1 note
·
View note
Text
How to use UserManager and SignInManager in Asp.net
New Post has been published on https://is.gd/XVTZ1Z
How to use UserManager and SignInManager in Asp.net

UserManager and SignInManager in Asp.Net Core Identity
Asp.net core provides two important services.
UserManager
SignInManager
The above 2 services are used to create users, validate the user and then add it to the database.
These are 2 core services of Identity framework. To use these services we need to inject these services in the controller and we inject this in the constructor like below.
public class AccountController : Controller private ILogger logger; private readonly UserManager<IdentityUser> _user; private readonly SignInManager<IdentityUser> _signInManager; public AccountController(ILogger<AccountController> logger,UserManager<IdentityUser> user,SignInManager<IdentityUser> signInManager) this.logger = logger; _user = user; _signInManager = signInManager;
UserManager:
This user manager took one generic parameter which is IdentityUser. UserManager has following methods
CreateAsync
DeleteAsync
UpdateAsync
Etc…
SignInManager:
This also takes a generic parameter which is IdentityUser. This has below methods.
SignInAsync
SignOutAsync
IsSignIn
Etc…
Now see the Register method
[HttpPost] public async Task<IActionResult> Register(RegistrationVIewModel model) if (ModelState.IsValid) var user=new IdentityUser() UserName = model.Email, Email = model.Email ; var result= await _user.CreateAsync(user, model.Password); if (result.Succeeded) _signInManager.SignInAsync(user, true); return View();
In this, we first create object of IdentityUser and assign the value to parameter from model to that user. After this we use the CreateAsync method of UserManager class and call them to create a user.
Our createUser is an async method so we will use the await keyword and store result in variable.If we are created successfully then we use the signInManager method to signIn which takes 2 parameters of one of the overloaded methods. In this first parameter is user and second parameter is Boolean flag for cookies. 2 type of cookies
Session Cookie:- when the browser is closed the cookie will remove or deleted.
Permanent Cookie:- Even when the browser is closed the cookie is stored on client machine.
If some error occurred we need to add this model state to achieve this we do following
foreach (var errors in result.Errors) ModelState.AddModelError("",errors.Description);
Then this will display on our view.

In the above fig, you will able to see that when I used weak password the errors are propagated to this and it will display on view.
After this if you fill information correctly then it will create the user and add it to the database table which is AspNetUsers tables and password is stored in hash format means even if anyone connects to this database it will not see password easily.

1 note
·
View note
Text
6 stycznia 2023

◢ #unknownews ◣
Witam w pierwszym wydaniu zestawienia w tym roku - zapraszam do lektury :)
1) Hackerzy webowi vs producenci samochodów 19:0 - pentesty https://samcurry.net/web-hackers-vs-the-auto-industry/ INFO: Opis podatności znalezionych przez speców od websecurity w panelach webowych oraz systemach API 19 różnych producentów samochodów. Dość techniczne opisy. Użyteczna wiedza dla pentesterów. 2) Kryptografia przechowywania haseł - jak to działa? https://soatok.blog/2022/12/29/what-we-do-in-the-etc-shadow-cryptography-with-passwords/ INFO: Prawdopodobnie wiesz, że trzymanie haseł jako plaintext oraz ich szyfrowanie to zło. Oczywiście trzeba je hashować! Okazuje się, że na hashowaniu temat się nie kończy. Wiesz czym różni się hashowanie od funkcji dostarczającej hasło bazującej na kluczu albo czym są algorytmy wymiany kluczy? Kiedy bcrypt jest bezpieczny, a kiedy SHA2? Czy Argon2 jest odpowiedzią na każde pytanie? Świetny tekst dla ludzi zainteresowanych tematem bezpieczeństwa IT (i kryptografią oczywiście). 3) Zmień tanią stację pogodową w dashboard w devopsowym stylu https://medium.com/@jaxzin/how-i-turned-a-cheap-weather-station-into-a-personal-devops-dashboard-5c8820790fd5 INFO: Bardzo ciekawe połączenie technologii takich jak Grafana, Home Assistant, Docker oraz InfluxDB z tanim hardware (stacja pogodowa + odbiornik fal radiowych). Dobra lektura dla fanów elektroniki i tematu inteligentnych domów. 4) Może potrzebujesz modułów, a nie mikroserwisów? https://blogs.newardassociates.com/blog/2023/you-want-modules-not-microservices.html INFO: Mikroserwisy, to całkiem popularne słowo kluczowe używane podczas dyskusji o różnych usługach. To rozwiązanie ma zarówno swoich zwolenników, jak i przeciwników. Wielokrotnie jednak, wymieniając zalety mikroserwisów zapominamy, że podobne właściwości mają stare, dobrze znane od lat moduły. Ciekawy punkt widzenia autora. 5) Budowanie Commodore 64 - od podstaw. Absolutnych podstaw. https://celso.io/retrocomputing/2022/12/27/c64-from-scratch INFO: Ciekawy wpis dla wielbicieli retro technologii. Autor postanowił, że zbuduje własną kopię Commodore 64, zamawiając podzespoły takie jak tranzystory, rezystory, chipy, kondensatory itp. Sporo pracy. Jeśli interesujesz się elektroniką, to powinno Ci się spodobać. 6) OpenAI Cookbook - jak optymalnie wykorzystywać narzędzia typu GPT-3 https://github.com/openai/openai-cookbook INFO: Jak generować kod (w stylu Copilota), jak pisać posty na bloga, jak wykonywać prostą klasyfikację elementów itp. Poradnik jest darmowy i pochodzi wprost od OpenAI, więc możemy uznać, że twórcy tego rozwiązania wiedzą co mówią i znają się na rzeczy ;) 7) "Type keys" jako oznaka źle ustrukturyzowanego kodu https://jesseduffield.com/Type-Keys/ INFO: Przekazujesz do funkcji np. "createUser" i typ tworzonego usera, ale typ jest tak naprawdę zahardcodowany i nigdy się nie zmienia, a funkcja ta pod spodem woła kolejną i przekazuje ten parametr? Jest szansa, że wpadłeś właśnie w zapętlone zależności między funkcjami. Wykres zawarty w artykule lepiej wyjaśnia, dlaczego optymalizacja takiego kodu upraszcza aplikację. Na końcu artykułu znajduje się prawdziwy kod z piekła rodem - 'kod lorem ipsum'. Nie wiem, czy kiedykolwiek widziałem coś gorszego do czytania. Nie idźcie tą drogą, pokazując komuś przykłady... 8) Jak smartfony wpłynęły na rynek aparatów fotograficznych? https://www.visualcapitalist.com/cp/charting-the-smartphone-effect-camera-market/ INFO: Ciekawa analiza rocznej sprzedaży aparatów w ciągu ostatnich 70 lat i korelacja tych danych ze sprzedażą smartfonów. Wyniki są oczywiste, ale zaskakująca jest skala tego zjawiska. Na początku artykułu jest przyjemna dla oka animacja pokazująca zmiany na przestrzeni lat. 9) ChatGPT dla Google (i innych wyszukiwarek) - wtyczka do przeglądarek https://github.com/wong2/chat-gpt-google-extension INFO: Niektórzy mówią, że ChatGPT zaczął zastępować im zapytania do Google. Czasami jednak użyteczniejsze wyniki daje wyszukiwarka, a czasami AI. Którego więc używać? Obu jednocześnie! To rozszerzenie wysyła Twoje zapytanie do silnika ChatGPT i wkomponowuje wynik do strony z wynikami. Rozszerzenie współpracuje z Chrome, Operą, Firefoxem, Brave i ma wsparcie dla 10 wyszukiwarek. 10) Apple namiesza na rynku audiobooków? https://authors.apple.com/support/4519-digital-narration-audiobooks INFO: Firma Apple wprowadza rozwiązanie, które potrafi zamienić każdego ebooka w jego wersję audio. Nie jest to jednak znana od lat "robo-mowa", a coś, co ma konkurować z prawdziwymi lektorami. Wykorzystywane do tworzenia audiobooków modele głosów są trenowane pod konkretne gatunki książek (obecnie jedynie fikcja i romanse). Głosy posiadają swój 'charakter', bardzo ciekawą barwę i moim zdaniem, słuchając tak stworzonych wersji audio książek, można zapomnieć, że czyta je automat. Może to oznaczać prawdziwą rewolucję na rynku audiobooków. My jednak musimy poczekać, aż technologia zacznie obsługiwać język polski. 11) Infrastruktura stojąca za bankomatami - jak to działa? https://www.bitsaboutmoney.com/archive/the-infrastructure-behind-atms/ INFO: Bankomaty są w jakiś tajemniczy sposób połączone z bankami, tylko jak dokładnie to działa i dlaczego posiadanie sieci bankomatów jest tak opłacalnym biznesem, jeśli klient za ich usługi nie płaci? Garść ciekawostek. 12) WhatsMyName - wyszukiwarka kont w serwisach online https://whatsmyname.app/ INFO: Świetne narzędzie do wyszukiwania kont na podstawie loginu. Przydaje się przy śledztwach OSINT-owych. Podajesz login poszukiwanego, a aplikacja sprawdza jego istnienie na około 530 portalach z całego świata. Przeszukanie wszystkich portali trwa dosłownie kilkanaście sekund. 13) Ciekawe (i momentami zaskakujące) właściwości CSS-a, których mogą Ci się przydać. https://chriscoyier.net/2022/12/21/things-css-could-still-use-heading-into-2023/ INFO: Czy wiesz, że każdy blokowy element HTML może mieć zmienne rozmiary (mowa o drag and drop przez usera), kolumny w CSS wcale nie muszą mieć równej szerokości, a sam CSS natywnie obsługuje includowalne snippety kodu? Garść użytecznych porad. 14) Ile da się zarobić na kanale z budowlami z klocków LEGO, mając 2.9mln subów? https://brickexperimentchannel.wordpress.com/2022/11/19/my-youtube-earnings/ INFO: Ciekawa analiza statystyk Twórcy kanału "Brick Experiment Channel". Autor wspomina także o poniesionych kosztach i analizuje potencjalne zarobki kanałów konkurencji. Jeśli tylko lubisz cyferki i analizy biznesów, to Ci się spodoba. 15) Dlaczego warto zainteresować się "architekturą wyspową"? https://betterprogramming.pub/why-you-should-use-islands-architecture-b4f291708a02 INFO: Przeważnie dyskusja między programistami toczy się wokół renderowania aplikacji po stronie klienta, czy też serwera. A gdyby tak wybrać rozwiązanie pośrednie, łączące zalety obu wymienionych? Dobre wprowadzenie do tematu dla tych, którzy z 'wyspami' w aplikacjach się jeszcze nie spotkali. 16) "Pair programming" - wnioski po pracy w projekcie w stylu "pair-only" https://blog.testdouble.com/posts/2022-12-07-what-i-learned-from-pairing/ INFO: Programowanie w parach czasami stosowane jest w firmach do rozwiązywania bardziej złożonych problemów lub do sprawniejszego wdrażania nowych ludzi do projektu. Istnieją jednak firmy, w których istnieje kultura 'pair programing by default', gdzie samodzielne pisanie kodu jest sporadyczne. Jakie są dobre i złe strony takiego rozwiązania? 17) Priorytety zadań i estymacja czasu dla programistów https://devszczepaniak.pl/priorytetyzacja-zadan INFO: Od macierzy Eisenhovera, przez elementy metodyki GTD, model VUCA, technikę pomodoro, na różnych połączeniach tych metod kończąc. Jest nawet zastosowanie ciągu Fibonacciego w tym wszystkim. Coś dla fanów produktywności i optymalizacji pracy. Sporo przemyśleń autora. 18) Analiza wpadek świata web3 w 2022 roku https://newsletter.mollywhite.net/p/in-2022-web3-went-just-great INFO: Powspominajmy. Trzeba przyznać, że w świecie crypto, tokenów itp. nie działo się w ubiegłym roku za dobrze. Upadki, włamania, pęknięcie bańki... trochę się tego nazbierało. 19) Ta sama aplikacja napisana w kilkudziesięciu technologiach - platforma Medium https://github.com/gothinkster/realworld INFO: Ciekawy projekt pokazujący, jak napisać klona platformy "Medium" (ta z artykułami) z użyciem dziesiątek różnych frameworków frontendowych, backendowych, a nawet bez frameworków. Linkuję do głównego repo, ale jeśli chcesz przeglądać konkrety, to kliknij "CodebaseShow" w sekcji "Implementations". Idealne rozwiązanie dla uczących się nowych technologii/frameworków. 20) Jak działa algorytm nauki stosowany w ANKI? https://www.juliensobczak.com/inspect/2022/05/30/anki-srs.html INFO: ANKI to prawdopodobnie jedno z najpopularniejszych, open sourcowych rozwiązań do nauki z wykorzystaniem 'powtórzeń w odstępach' (spaced repetition). W praktyce polega to na tym, że dane wejściowe dzielimy na te, które już przyswoiliśmy i te, które sprawiają nam trudność. Co pewien czas także powtarzamy całość zbioru danych. Brzmi banalnie, ale okazuje się, że stojący za tą niesamowitą skutecznością ANKI algorytm, jest o wiele bardziej złożony niż to, co widać na pierwszy rzut oka. 21) CSS Subgrid - czas nauczyć się nowej metody ustalania układu na stronie https://12daysofweb.dev/2022/css-subgrid/ INFO: Mieliśmy Flexboxa i Grida i przy tych dwóch rozwiązaniach wielu początkujących frontendów już wysiadało. Ten rok przyniesie nam jeszcze subgrida! A do tego jeszcze subgrida w subgridzie! Ilości zagadnień do ogarnięcia dla frontendów przybywa, ale to rozwiązanie może bardzo ułatwić swobodne rozmieszczanie elementów w ramach strony. 22) Supernormal - automatyczne tworzenie notatek z videocallów https://supernormal.com/ INFO: Wersja darmowa obsługuje tylko spotkania odbywające się na Google Meets i ma limit 10 spotkań na miesiąc. Wspiera języki angielski, niemiecki, hiszpański i portugalski. Ciekawe rozwiązanie, które po meetingu przygotuje dla Ciebie transkrypt i notatkę w punktach (tworzoną przez AI) na temat tego, o czym rozmawialiście, jakie decyzje zapadły i kto ma się czym zająć. Wersja komercyjna zaczyna się od $13/msc (z limitem 600 minut spotkań miesięcznie). 23) Bardeen - nowe narzędzie do automatyzacji zadań online https://www.bardeen.ai/ INFO: To coś jak Make, Zapier, czy IFTTT. Działa jako rozszerzenie do Chrome i pozwala Ci zautomatyzować akcje wykonywane na Twojej skrzynce mailowej (gmail), w dokumentach Google, na GitHubie, Jirze, Trello, czy WhatsAppie. Integracji stale przybywa, a podczas trwania wersji beta, aplikacja jest w pełni funkcjonalna i darmowa. Docelowo mają mieć także jeden plan 'darmowy na zawsze'. 24) Powstała otwartoźródłowa alternatywa dla ChatGPT! - jest jednak pewien haczyk... https://techcrunch.com/2022/12/30/theres-now-an-open-source-alternative-to-chatgpt-but-good-luck-running-it/ INFO: Rozwiązanie jest w pełni darmowe i "każdy" może je uruchomić samodzielnie. Gdzie więc leży problem? Pierwszym problemem jest to, że technologia przychodzi bez wytrenowanego modelu (sami musimy go wytrenować), a to rodzi kolejne problemy, ale tego dowiesz się z artykułu. 25) 24-godzinny zegar uwzględniający wiele stref czasowych https://poleclock.com/ INFO: Dobre rozwiązanie do zastosowania w firmach, w których zespoły rozsiane są po całym świecie. Jednym rzutem oka można zobaczyć, która godzina jest w kilku pozostałych biurach. Użyteczne rozwiązanie do wyświetlania np. na jakimś współdzielonym dashboardzie. 26) Email Tracker - narzędzie do śledzenia odczytania maila przez adresata https://chrome.google.com/webstore/detail/email-tracker/bnompdfnhdbgdaoanapncknhmckenfog INFO: Wysyłając wiadomość przez webmaila, możesz jednym kliknięciem (to wtyczka do przeglądarki) dodać do niego niewidzialnego piksela śledzącego otwarcie przesyłki. Jest to ta sama technologia, której używają nadawcy newsletterów (np. ja wiem dzięki niej, że teraz czytasz te słowa). Rozszerzeń tego typu jest mnóstwo, ale wszystkie skupiają się tylko na integracji z Gmailem. To rozszerzenie ma wsparcie dla bezpłatnego Gmaila. Outlooka, Google Workspace, Microsoft 365 i Yahoo Mail. Wersja darmowa ma limit wiadomości, jakie dziennie możesz śledzić, ale zakładam, że nie potrzebujesz śledzić "wszystkiego", a np. 2-3 konkretne maile, wysłane do klientów. 27) OpenAI to lider w branży AI - czy Google przejmie jego pozycję? https://www.forbes.com/sites/johanmoreno/2022/12/29/openai-positioned-itself-as-the-ai--leader-in-2022-but-could-google-supersede-it-in-23/ INFO: Chodzą słuchy, że firmie Google marzy się pozycja także i w tej branży. Czy naprawdę dysponują technologiami lepszymi niż GPT-3, GPT-3.5 i nadchodzącą wersją 4.0? Ten artykuł to bardziej zbiór przewidywań i analizy poczynań Google niż suche fakty. Niemniej, przedstawiona wizja głośnego wejścia Google w tę branżę wydaje się niezwykle prawdopodobna. Biorąc pod uwagę, że firma posiada własną infrastrukturę (GCP) i nie musi korzystać z cudzego (OpenAI działa na AWS), cenowo z pewnością mogą rozłożyć GPT na łopatki. 28) Kody klawiszy do JavaScript - implementacja skrótów klawiszowych https://omatsuri.app/events-keycode INFO: Jak dodać do swojej aplikacji online obsługę skrótów klawiszowych? Nie jest to trudne, o ile tylko znasz na pamięć wszystkie kody klawiszy. Ta aplikacja nie tylko podpowie Ci, którego keycodu potrzebujesz, ale też napisze za Ciebie kod gotowy do wklejenia do aplikacji. Na podlinkowanej stronie znajdziesz jeszcze kilka innych, interesujących narzędzi. 29) Skrajnie prosta metoda na uruchomienie VSCode na Androidzie https://faun.pub/put-vscode-on-your-android-smartphone-f55484c8b162 INFO: Android potrafi uruchomić w zasadzie dowolną dystrybucję Linuksa, a Linux uruchamia VSCode-server. A gdyby tak to połączyć? Nowoczesne smartfony i tablety stają się coraz mocniejsze i posiadają z roku na rok więcej pamięci. Dlaczego by więc nie wykorzystać ich do programowania, gdy chwilowo nie masz dostępu do tradycyjnego komputera? 30) Firefox od wersji 109 do (prawdopodobnie) 120 będzie się częściowo się przedstawiał jako.. 109? https://miketaylr.com/posts/2022/12/how-the-IE-11-ua-string-broke-sites-in-firefox.html INFO: Do wersji 109 z user-agentem nie było problemów i wszystko szło gładko. Z 110 pojawił się już pewien problem, który rozwiąże dopiero pojawienie się wersji 120. Czy domyślasz się, o co może chodzić? Winnym jest oczywiście IE 11 ;) 31) Widok struktury w stylu drzewa w CSS - tutorial https://iamkate.com/code/tree-views/ INFO: Prawdopodobnie wiele razy spotkałeś się z widokiem rozwijanej, wielokrotnie zagnieżdżonej listy elementów (coś jak struktura katalogów) na stronie. Realizacja takiego rozwiązania z użyciem JavaScript jest bardzo prosta. Jak to jednak zrobić w czystym HTML+CSS? 32) Jak szybko i drastycznie odchudzić WIndows 10 - bez dodatkowych aplikacji https://gabrielsieben.tech/2023/01/02/debloating-windows-10-with-one-command-and-no-scripts/ INFO: Ta metoda NIE nadaje się do przygotowania systemu do codziennej pracy. Służy ona do zbudowania systemu do zadań specjalnych. Przykładowo, potrzebujesz Windowsa, na którym zainstalowana jest Twoja aplikacja i nic więcej, albo Windowsa z samą przeglądarką, bez żadnych dodatkowych aplikacji systemowych. Można to osiągnąć jednym, prostym poleceniem. To rozwiązanie dla harduserów, którzy wiedzą co robią. 33) Efekt moiré w cyfrowym świecie - skąd się bierze i jak się go pozbyć? https://newsletter.shifthappens.site/archive/moire-no-more/ INFO: Moire to prążki pojawiające się na zdjęciach cyfrowych. Czasami podczas ich obróbki (np. resize), a czasami już przy robieniu fotek. Prawdopodobnie widziałeś ten efekt, fotografując telewizor lub bardzo mocno prążkowaną powierzchnię. 34) OV - rozbudowany zamiennik dla less/more w Linuksie https://github.com/noborus/ov INFO: Jest to terminalowe narzędzie do podglądu danych tekstowych. Świetnie jednak nadaje się nie tylko do pracy z prostymi plikami tekstowymi, ale także z danymi tabelarycznymi, czy z logami. Mnie najbardziej pozytywnie zaskoczyła funkcja automatycznego kolorowania (różnymi kolorami) linii zawierających pewne słowa - można dzięki temu szybko wyłowić pewne zdarzenia z logów. == LINKI TYLKO DLA PATRONÓW == 35) Lista zasobów/narzędzi dla pasjonatów OSINT https://uw7.org/un_9d3017185d58c INFO: Narzędzia wyszukujące dane na temat stron internetowych, domen, sieci, geopolityki i wielu innych dziedzin. 36) Baza 400+ ciekawych projektów opartych na Notion (darmowe i płatne) https://uw7.org/un_e66822b977d8a INFO: Projekty, szablony i baz danych - wszystkie stworzone w Notion. Autorzy zarabiają na nich dziesiątki, a nawet i setki tysięcy dolarów rocznie. Możesz je traktować jako inspirację do stworzenia swojego pierwszego, płatnego produktu online lub po prostu wchłonąć prezentowaną tam wiedzę. Jeśli nie chcesz za nic płacić, to kliknij strzałkę w kolumnie "Price", wybierz "Filter..." i wpisz tam "$0". Otrzymasz 136 zupełnie darmowych, ale równie wartościowych projektów. Niestety, autor mocno zaniedbał bazę i niekiedy można trafić na niedziałające linki. Pomimo tej niedogodności, baza i tak jest użyteczna jako inspiracja.
0 notes
Text
In this blog post we discuss how you can install PostGIS on Debian 11 / Debian 10 Linux system. PostGIS is an open source extension for the powerful PostgreSQL relational database system. It enables you to create Geographic objects on the PostgreSQL database server. The features of PostGIS are derived from Open Geospatial Consortium SQL specifications. PostGIS is installable on most Linux distributions, Windows and macOS operating systems. We’ll add the PostGIS APT repository for PostgreSQL then install PostGIS on Debian system from the repository to get the latest releases of the package. Some key features of PostGIS extension are: Processing and analytic functions for both vector and raster data for splicing, dicing, morphing, reclassifying, and collecting/unioning with the power of SQL raster map algebra for fine-grained raster processing Spatial reprojection SQL callable functions for both vector and raster data Support for importing / exporting ESRI shapefile vector data via both commandline and GUI packaged tools and support for more formats via other 3rd-party Open Source tools Packaged command-line for importing raster data from many standard formats: GeoTiff, NetCDF, PNG, JPG to name a few Rendering and importing vector data support functions for standard textual formats such as KML,GML, GeoJSON,GeoHash and WKT using SQL Rendering raster data in various standard formats GeoTIFF, PNG, JPG, NetCDF, to name a few using SQL Seamless raster/vector SQL callable functions for extrusion of pixel values by geometric region, running stats by region, clipping rasters by a geometry, and vectorizing rasters 3D object support, spatial index, and functions Network Topology support Packaged Tiger Loader / Geocoder/ Reverse Geocoder / utilizing US Census Tiger data Step 1: Update system Update the package repository index by running the following commands in your terminal. sudo apt update You can install other basic tools sudo apt install wget curl gnupg2 software-properties-common apt-transport-https Step 2: Add PostgreSQL repository Pull packages signing GPG key from PostgreSQL website wget --quiet -O - https://www.postgresql.org/media/keys/ACCC4CF8.asc | sudo apt-key add - Then add PostgreSQL repository to your Debian system: echo "deb http://apt.postgresql.org/pub/repos/apt/ `lsb_release -cs`-pgdg main" |sudo tee /etc/apt/sources.list.d/pgdg.list Step 3: Install PostgreSQL Database Server PostgreSQL is required to be installed before installation of PostGIS on Debian. Use our previous guides for this installation. Install PostgreSQL 14 on Debian Install PostgreSQL 13 on Debian Once you’ve installed and configured PostgreSQL Database Server on your Debian system you can proceed with the installation of PostGIS extension. Step 4: Install PostGIS on Debian 11 / Debian 10 After the installation of PostgreSQL, proceed to install PostGIS on Debian 11 / Debian 10 Linux system. For PostgreSQL 14: sudo apt update sudo apt install postgis postgresql-14-postgis-3 For PostgreSQL 13: sudo apt update sudo apt install postgis postgresql-13-postgis-3 For PostgreSQL 12: sudo apt update sudo apt install postgis postgresql-12-postgis-3 Step 5: Enable PostGIS onDebian 11 / Debian 10 You need to activate PostGIS features on a database before you can store spacial data. The example below will show you how to create a database and activate the Spacial features. 1.Switch to postgres user. sudo -i -u postgres 2.Create test user/database. postgres@debian-bullseye-01:~$ createuser postgis_user postgres@debian-bullseye-01:~$ createdb postgis_db -O postgis_user 3.Connect to the test database: postgres@debian-bullseye-01:~$ psql -d postgis_db psql (14.1 (Debian 14.1-1.pgdg110+1)) Type "help" for help. 4.Enable the PostGIS extension on the database: postgis_db=# CREATE EXTENSION postgis; CREATE EXTENSION 5. Verify PostGIS is working postgis_db=# SELECT PostGIS_version();
postgis_version --------------------------------------- 3.1 USE_GEOS=1 USE_PROJ=1 USE_STATS=1 (1 row) Comprehensive usage guide is available in the official PostGIS Documentation website. PostGIS installation on other Linux distributions Install PostGIS on CentOS 7 Install PostGIS on CentOS / AlmaLinux / Rocky Linux 8 Install PostGIS on Ubuntu
0 notes
Text
30.4 JavaScript 코드 축약
JavaScript 코드 축약 JavaScript 코드 축약은 코드의 가독성을 높이고, 유지보수성을 향상시키며, 불필요한 반복을 줄이기 위해 사용되는 중요한 기법입니다. 이번 포스팅에서는 다양한 코드 축약 기법에 대해 자세히 설명하고, 실용적인 예제들을 통해 어떻게 적용할 수 있는지 알아보겠습니다. 변수 선언 축약 변수 선언 시 let, const를 사용하여 여러 변수를 한 줄로 선언할 수 있습니다. 이는 여러 변수를 선언할 때 반복되는 코드를 줄여줍니다. let x = 10, y = 20, z = 30; const a = 1, b = 2, c = 3; 삼항 연산자 삼항 연산자는 조건문을 보다 간결하게 작성할 수 있게 해줍니다. if-else문을 축약하여 한 줄로 표현할 수 있습니다. let age = 20; let status = age >= 18 ? 'adult' : 'minor'; console.log(status); // adult 단축 평가(Short-Circuit Evaluation) 논리 연산자를 사용하여 간단한 조건문을 작성할 수 있습니다. || 연산자는 첫 번째 피연산자가 false일 경우 두 번째 피연산자를 반환하고, && 연산자는 첫 번째 피연산자가 true일 경우 두 번째 피연산자를 반환합니다. let name = userName || 'Guest'; let isAuthenticated = isLoggedIn && hasToken; 객체 속성 축약 객체를 생성할 때 키와 값이 동일한 경우 축약할 수 있습니다. 이는 객체 리터럴을 간결하게 작성하는 방법입니다. let name = 'John'; let age = 30; let person = { name, age }; console.log(person); // { name: 'John', age: 30 } 화살표 함수 화살표 함수는 익명 함수를 더 간결하게 작성할 수 있게 해줍니다. 특히 콜백 함수를 작성할 때 유용합니다. // 기존 함수 선언 function add(a, b) { return a + b; } // 화살표 함수 const add = (a, b) => a + b; console.log(add(2, 3)); // 5 배열 메서드 map, filter, reduce 등의 배열 메서드를 사용하면 반복문을 보다 간결하게 작성할 수 있습니다. 이는 배열을 다룰 때 매우 유용합니다. let numbers = ; // 기존 for문 let doubled = ; for (let i = 0; i < numbers.length; i++) { doubled.push(numbers * 2); } // map 메서드 사용 let doubled = numbers.map(num => num * 2); console.log(doubled); // 템플릿 리터럴 템플릿 리터럴을 사용하면 문자열을 더 간결하고 가독성 있게 작성할 수 있습니다. 특히 문자열 내에서 변수를 포함할 때 유용합니다. let name = 'John'; let age = 30; // 기존 문자열 연결 let greeting = 'Hello, my name is ' + name + ' and I am ' + age + ' years old.'; // 템플릿 리터럴 사용 let greeting = `Hello, my name is ${name} and I am ${age} years old.`; console.log(greeting); // Hello, my name is John and I am 30 years old. 단축 속성명과 계산된 속성명 객체 리터럴에서 속성명을 간략하게 또는 동적으로 정의할 수 있습니다. let propName = 'name'; let person = { : 'John', age: 30 }; console.log(person); // { name: 'John', age: 30 } 파라미터 기본값 함수의 매개변수에 기본값을 설정하여 조건문을 줄일 수 있습니다. 이는 함수 호출 시 인자가 생략되었을 때 유용합니다. // 기존 기본값 설정 function greet(name) { name = name || 'Guest'; console.log('Hello, ' + name); } // 기본값 사용 function greet(name = 'Guest') { console.log('Hello, ' + name); } greet(); // Hello, Guest 객체 디스트럭처링 객체 디스트럭처링을 사용하면 객체 속성을 쉽게 추출하여 변수에 할당할 수 있습니다. 이는 코드의 가독성을 높여줍니다. const person = { name: 'John', age: 30, city: 'New York' }; const { name, age, city } = person; console.log(name); // John console.log(age); // 30 console.log(city); // New York 실용적인 예제 디스트럭처링은 실제로 어떻게 사용될 수 있는지에 대한 몇 가지 실용적인 예제를 살펴보겠습니다. API 응답 처리 API로부터 받은 JSON 응답을 처리할 때 유용하게 사용할 수 있습니다. const response = { data: { user: { id: 1, name: 'John Doe', email: '[email protected]' }, status: 'success' } }; const { data: { user: { id, name, email } }, status } = response; console.log(id); // 1 console.log(name); // John Doe console.log(email); // [email protected] console.log(status);// success 설정 객체 함수에 전달되는 설정 객체의 디스트럭처링 예제입니다. function setupCanvas({ width = 600, height = 400, backgroundColor = 'white' } = {}) { console.log(`Width: ${width}, Height: ${height}, BackgroundColor: ${backgroundColor}`); } setupCanvas({ width: 800, height: 600 }); // Width: 800, Height: 600, BackgroundColor: white setupCanvas(); // Width: 600, Height: 400, BackgroundColor: white 파라미터 디폴트 값과 조합 함수의 파라미터 디폴트 값과 디스트럭처링을 조합하여 사용할 수 있습니다. function createUser({ name = 'Anonymous', age = 0, isActive = false } = {}) { console.log(`Name: ${name}, Age: ${age}, Active: ${isActive}`); } createUser({ name: 'Alice', age: 25 }); // Name: Alice, Age: 25, Active: false createUser(); // Name: Anonymous, Age: 0, Active: false 배열 디스트럭처링 객체뿐만 아니라 배열에서도 디스트럭처링을 사용할 수 있습니다. 이는 배열의 요소를 쉽게 추출할 수 있게 해줍니다. const numbers = ; const = numbers; console.log(first); // 1 console.log(second); // 2 console.log(rest); // 결론 JavaScript 코드 축약 기법을 활용하면 코드를 더욱 간결하고 효율적으로 작성할 수 있습니다. 이번 포스팅에서 소개한 다양한 기법들을 통해 코드의 가독성과 유지보수성을 향상시킬 수 있기를 바랍니다. Read the full article
0 notes
Text
Koa crud operations
Backend
backend > api > Product.api.js
//import methods in dal
const {removeByID,editProduct,getProductByID,GetAllProduct,create} = require("../dal/Products.dao")
//map create method
const createProduct = async({name , description, price})=>{
//create object
const product ={
name ,
description,
price
}
return await create(product);
}
//get all methods
const GetAll = async ()=>{
return await GetAllProduct();
}
//get by id
const getProductID = async id=>{
return await getProductByID(id);
}
//delete product
const removeProductID = async id =>{
return await removeByID(id);
}
//update
const UpdateProduct = async(id,{name , description, price})=>{
return await editProduct(id,{name , description, price});
}
//export to routes
module.exports={
removeProductID,
UpdateProduct,
GetAll,
createProduct,
getProductID
}
backend > api > UserApi.js
const { Login, createUser, getAllUsers } = require("../dal/User");
//user create
const RegisterUser = async (data) => {
const user = {
name: data.name,
email: data.email,
password: data.password,
userRole: data.userRole,
};
return await createUser(user);
};
//get all users
const getAllUsersList = async () => {
return await getAllUsers();
};
//login
const loginUsers = async (data) => {
const createUser = {
email: data.email,
password: data.password,
};
return await Login(createUser);
};
module.exports = { loginUsers, getAllUsersList, RegisterUser };
backend > dal > Connection.js
const {MongoClient} = require("mongodb");
const client = new MongoClient('mongodb://localhost:27017', {
useNewUrlParser: true,
useUnifiedTopology: true
});
client.connect(err => {
if(err){
console.error(err);
process.exit(-1);
}
console.log("Successfully connected to MongoDB");
})
module.exports = client;
backend > dal > Products.dao.js
const product = require("./Connection").db("store1").collection("productions");
//object id access to the document based on the _id
const ObjectId = require("mongodb").ObjectId;
//create
const create = async ({ name, price, description }) => {
const result = await product.insertOne({ name, price, description });
return result.ops[0];
};
//read all
const GetAllProduct = async () => {
const pro = await product.find();
return pro.toArray();
};
//read product by id
const getProductByID = async (id) => {
return await product.findOne({ _id: ObjectId(id) });
};
//update
const editProduct = async (id, { name, price, description }) => {
console.log(id);
const result = await product.replaceOne(
{ _id: ObjectId(id) },
{ name, price, description }
);
return result.ops[0];
};
//remove product
const removeByID = async (id) => {
await product.deleteOne({ _id: ObjectId(id) });
};
module.exports = {
removeByID,
editProduct,
getProductByID,
GetAllProduct,
create,
};
backend > dal > User.js
const User = require("./Connection").db("users").collection("userdetails");
const ObjectID = require("mongodb").objectId;
//create user
const createUser = async ({ name, email, password, userRole }) => {
const result = await User.insertOne({ name, email, password, userRole });
return result;
};
//get all users
const getAllUsers = async () => {
const data = await User.find();
return data.toArray();
};
//login
const Login = async ({ email, password }) => {
const user = await User.findOne({ email: email });
if (user) {
if (user?.password !== password) {
return { msg: "login faild" };
} else {
return { msg: "login ok", token: user._id, userRole: user.userRole };
}
} else {
return { msg: "login faild" };
}
};
module.exports = { Login, createUser, getAllUsers };
backend > routes > ProductRoutes.js
const Router = require("@koa/router");
const { removeProductID,UpdateProduct, GetAll, createProduct, getProductID} = require ("../api/Product.api");
//define perfix
const router = new Router({
prefix:'/products'
})
//get all products
router.get('/all', async ctx=>{
ctx.body = await GetAll();
})
//add product
router.post('/add', async ctx=>{
let product = ctx.request.body;
product = await createProduct(product);
ctx.response.status = 200;
ctx.body = product;
})
//get item by id
router.get('/:id' , async ctx=>{
const id = ctx.params.id;
ctx.body = await getProductID(id);
} )
//delete product
router.delete('/:id' , async ctx=>{
const id = ctx.params.id;
await removeProductID(id);
ctx.response.status = 200;
})
//update
router.put('/:id' , async ctx=>{
const id = ctx.params.id;
let product = ctx.request.body;
product = await UpdateProduct(id,product);
ctx.response.status = 200;
ctx.body = product;
})
module.exports = router;
backend > routes > UserRoutes.js
const Router = require("@koa/router");
const {loginUsers,getAllUsersList,RegisterUser} = require("../api/UserApi");
//perfix
const router = new Router({
prefix:"/user"
})
//create user
router.post("/register" , async(ctx)=>{
let data = ctx.request.body;
var user = await RegisterUser(data);
ctx.response.status = 200;
ctx.body=user
})
//get all users
router.get("/getAllUsers" , async(ctx)=>{
ctx.body= await getAllUsersList();
})
//login
router.post('/login' , async(ctx)=>{
let data = ctx.request.body;
let logins = await loginUsers(data);
ctx.response.status = 200;
ctx.body=logins;
})
//delete account
//router.delete("/remove-User/:id" , async(ctx)=>{
// const id = ctx.params.id;
// var data = await del
//})
module.exports = router;
backend > .gitignore
/node_modules/
backend > package.json
{
"name": "backend",
"version": "1.0.0",
"description": "This project demonstrates the creatio of REST API",
"main": "index.js",
"scripts": {
"test": "echo \"Error: no test specified\" && exit 1"
},
"author": "",
"license": "ISC",
"dependencies": {
"@koa/cors": "^3.3.0",
"@koa/router": "^10.1.1",
"cors": "^2.8.5",
"koa": "^2.13.4",
"mongodb": "^3.6.6"
},
"devDependencies": {
"koa-bodyparser": "^4.3.0",
"uuid": "^8.3.2"
}
}
backend > server.js
const Koa = require("koa");
const bodyParser = require("koa-bodyParser");
const cors = require("@koa/cors");
const productRoutes = require("./routes/ProductRoutes");
const UserRoutes = require("./routes/UserRoutes");
const app = new Koa();
app.use(
cors({
origin: "http://localhost:1234",
})
);
app.use(bodyParser());
app.use(productRoutes.routes()).use(productRoutes.allowedMethods());
app.use(UserRoutes.routes()).use(UserRoutes.allowedMethods());
//setup connection
app.listen(3003);
console.log("application is running on port 3003");
1 note
·
View note
Text
How To Install Odoo 15 In Ubuntu 18.04 ? | Steps To Install Odoo 15
How To Install Odoo 15 In Ubuntu 18.04 LTS ?
Technical
Steps To Install Odoo 15 On Ubuntu 18.04
Odoo is the most popular all-in-one business software in the world.To Install Odoo 15 on Ubuntu 18.04 you just need to follow the below steps. There are many ways to install Odoo depending on the requirements and the easy and quick way to install Odoo by using APT repositories. If you want to work with running multiple Odoo versions on the same system then you can either use docker compose or docker Install Odoo in a virtual environment. This blog is to provide steps for installation and configuration of Odoo for production environment using Git source and Python environment on an Ubuntu 18.04 system. Note : Odoo 15 is not launched yet so we have used the “master” branch for Installation.
To install Odoo 15 on Ubuntu 18.04 LTS you just follow the below steps.
Step 1 : Update Server
sudo apt-get update
sudo apt-get upgrade -y
Step 2 : Create Odoo User in Ubuntu
sudo adduser -system -home=/opt/odoo -group odoo
Step 3 : Install PostgreSQL Server
sudo apt-get install postgresql -y
Step 4 : Create Odoo user for postgreSQL
sudo su - postgres -c "createuser -s odoo" 2> /dev/null || true
Step 5 : Install Python Dependencies
sudo apt-get install git python3 python3-pip build-essential wget python3-dev python3-venv python3-wheel libxslt-dev libzip-dev libldap2-dev libsasl2-dev python3-setuptools node-less libjpeg-dev gdebi -y
Step 6 : Install Python PIP Dependencies
sudo -H pip3 install -r https://raw.githubusercontent.com/odoo/odoo/master/requirements.txt
Step 7 : Install other required packages
sudo apt-get install nodejs npm -y
sudo npm install -g rtlcss
Step 8 : Install Wkhtmltopdf
sudo apt-get install xfonts-75dpi
sudo wget https://github.com/wkhtmltopdf/packaging/releases/download/0.12.6-1/wkhtmltox_0.12.6-1.bionic_amd64.deb
sudo dpkg -i wkhtmltox_0.12.6-1.bionic_amd64.deb
sudo cp /usr/local/bin/wkhtmltoimage /usr/bin/wkhtmltoimage
sudo cp /usr/local/bin/wkhtmltopdf /usr/bin/wkhtmltopdf
Step 9 : Create Log directory
sudo mkdir /var/log/odoo
sudo chown odoo:odoo /var/log/odoo
Step 10 :Install Odoo
sudo apt-get install git
sudo git clone --depth 1 --branch master https://www.github.com/odoo/odoo /odoo/odoo-server
Step 11 : Setting permissions on home folder
sudo chown -R odoo:odoo /odoo/*
Step 12 : Create server config file
sudo touch /etc/odoo-server.conf
sudo su root -c "printf '[options] \n; This is the password that allows database operations:\n' >> /etc/odoo-server.conf"
sudo su root -c "printf 'admin_passwd = admin\n' >> /etc/odoo-server.conf"
sudo su root -c "printf 'xmlrpc_port = 8069\n' >> /etc/odoo-server.conf"
sudo su root -c "printf 'logfile = /var/log/odoo/odoo-server.log\n' >> /etc/odoo-server.conf"
sudo su root -c "printf 'addons_path=/odoo/odoo-server/addons\n' >> /etc/odoo-server.conf"
sudo chown odoo:odoo /etc/odoo-server.conf
sudo chmod 640 /etc/odoo-server.conf
Step 13 : Now Start Odoo
sudo su - odoo -s /bin/bash
cd /odoo/odoo-server
./odoo-bin -c /etc/odoo-server.conf
0 notes
Text
Today’s guide will cover how to install PostGIS on Ubuntu 22.04|20.04|18.04 Linux. PostGIS is an open source PostgreSQL database extension for creating Geographic objects on the PostgreSQL object relational database. The features of PostGIS are derived from Open Geospatial Consortium SQL specifications. PostGIS can be installed on Ubuntu, Debian, SUSE Linux, Red Hat based Linux systems such as CentOS, Scientific Linux, Windows and macOS. The PostgreSQL build team has packages for Debian and Ubuntu for several versions of PostgreSQL. We’ll add the PostGIS APT repository for PostgreSQL and install PostGIS on Ubuntu 22.04|20.04|18.04 from it. Let’s now kickstart the installation of PostGIS on Ubuntu 22.04|20.04|18.04 Linux system. Step 1: Update system You can do APT package list update and system upgrade before you get started. sudo apt update sudo apt -y upgrade A reboot is necessary after an upgrade. sudo reboot Step 2: Add PostgreSQL repository Before you start the installation of PostGIS on Ubuntu 20.04|18.04 Linux, you’ve to add PostgreSQL APT repository to your system where binary packages will be downloaded and installed. sudo apt -y install gnupg2 wget --quiet -O - https://www.postgresql.org/media/keys/ACCC4CF8.asc | sudo apt-key add - After importing GPG key, add PostgreSQL APT repository. echo "deb http://apt.postgresql.org/pub/repos/apt/ `lsb_release -cs`-pgdg main" |sudo tee /etc/apt/sources.list.d/pgdg.list Step 3: Install PostgreSQL Database Server PostgreSQL is required to be installed before installation of PostGIS on Debian / Ubuntu. Use our previous guides for this installation. Install PostgreSQL 13 on Ubuntu For different version of PostgreSQL, replace version number with your desired installation version. Step 4: Install PostGIS on Ubuntu22.04|20.04|18.04 After the installation of PostgreSQL, proceed to install PostGIS on Ubuntu22.04|20.04|18.04 Linux distribution. With PostgreSQL 13: sudo apt update sudo apt install postgis postgresql-13-postgis-3 The next is for PostgreSQL 12. Replace 13 with your PostgreSQL version. sudo apt update sudo apt install postgis postgresql-12-postgis-3 Step 5: Enable PostGIS on Ubuntu22.04|20.04|18.04 You need to activate PostGIS features on a database before you can store spacial data. The example below will show you how to create a database and activate the Spacial features. 1.Switch to postgres user. sudo -i -u postgres 2.Create test user/database. -bash-4.2$ createuser postgis_test -bash-4.2$ createdb postgis_db -O postgis_test 3.Connect to the test database: -bash-4.2$ psql -d postgis_db psql (11.5 (Debian 11.5-3.pgdg100+1)) Type "help" for help. 4.Enable the PostGIS extension on the database: postgis_db=# CREATE EXTENSION postgis; CREATE EXTENSION 5. Verify PostGIS is working postgis_db=# SELECT PostGIS_version(); postgis_version --------------------------------------- 3.5 USE_GEOS=1 USE_PROJ=1 USE_STATS=1 (1 row) For more PostGIS mastery, visit the PostGIS Documentation website.
0 notes
Text
Aug 23
Starting day at 8:42AM bc I fell asleep again at 7.
Allara chillara stretching and walking around flexing all the while tensing about the day.
What's the point of yoga if you're stressed the whole time?
Be cool
Wait, what do I do? Do they reach out to me? Should I mail? it's 9:34AM.
Shit did they forget?
They can't fire me on the first day, right?
I swear if I get fired in under a month, I'm gonna give up this career and start painting.
And I could just opensource for the love of dev.
Chill!!
OKay, I pinged Rejulettan, they’re creating accounts and stuff.
11AM First standup. Said “Hi”. ;_; WHY? All that stuff you prepped?
That’s a lot of accounts
Digesting a jargon explosion.
WTF are all these for?
Terraform? Like what they plan to do with mars.
I have access to everything.
I can burn down the whole thing if I wanted to.
UNLIMITED POWER!!! !
... R+A helping me with setup. Cool.
X is helping with the a/cs. Isn't he busy? Okay, I'll never be able to do that job. Working and handling all this people and keeping in touch with every one of em to make sure everything's okay. I mean, I can't even properly eat lunch and watch a sitcom together.
I'm writing too much. If I put all this effort into working, I would be a lot more productive.
But if I stopped logging here, I would be distracted more.
Only writing helps me discipline now. Is it tho? I haven't explored more ways yet.
Am I a machine now? I need proper algorithms and instructions to do stuff now
The daily update doc.
2:30PM mentors mailed.
3:49PM finished up with email reply. Explained stuff.
4:05PM Setting up things.
Distracted 5:18PM - It’s okay. Complete the project in your own time. No one’s judging you for failing gsoc. If they are, fuck them.
When was the last time you failed sth? Exactly.
5:30PM - yea right, you can finish setting up by 6.. Haha. idiot. Stop blasting alice glass in your ears and you can focus more.
Pottathi!!
Setup - following doc https://3.basecamp.com/3910353/buckets/5944669/documents/2878232344
sudo apt-get install postgresql postgresql-contrib
Trying to start psql cli
Psql psql: error: FATAL: role "compile" does not exist
5:46PM - distracted again.
Distracted again 5:51PM. That lasted 30mins. Looks like an improvement tho
initdb /usr/local/var/postgres initdb: command not found
sudo -u postgres; psql psql: error: FATAL: role "compile" does not exist
sudo -i -u postgres - yaay
psql :D Yep. default postgres db exists.
pg_ctl -D /usr/local/var/postgres start
pg_ctl -D /usr/local/var/postgres stop pg_ctl: command not found
Okay, skipping to creating databases. Varnodth vech kaana
create database falcon OWNER postgres
create database falcon_export_wip OWNER postgres
create database healthgraph_export OWNER postgres
create database sheldon OWNER postgres
create database falcon_export OWNER postgres
\l gives only 3 dbs now. What?
Okay, all of those need semicolons, idiot
$ sudo -u postgres createuser anaswara
$ sudo -u postgres psql
ALTER USER anaswara WITH ENCRYPTED PASSWORD '@atr7070';
Wait, should I encrypt or postgres chythoolo? YEP!! IDIOT!!
What if postgres encrypts my sha hash again? NOOOO!!!
Okay, nthelum idu
GRANT ALL PRIVILEGES ON DATABASE falcon TO anaswara; GRANT ALL PRIVILEGES ON DATABASE falcon_export_wip TO anaswara; GRANT ALL PRIVILEGES ON DATABASE healthgraph_export TO anaswara; GRANT ALL PRIVILEGES ON DATABASE sheldon TO anaswara; GRANT ALL PRIVILEGES ON DATABASE falcon_export TO anaswara;
https://zulip.compile.com/user_uploads/2/pQztq9JGf4b0nhUOXHkWaAXm/falcon.schema.sql.gz
https://zulip.compile.com/user_uploads/2/SNCT7OHeOZQd2vq1PErA8rXd/falcon.data.sql.gz Unauthorized
OKay, got the files.
zcat ~/Downloads/falcon.schema.sql-1629724096467.gz | psql -d falcon -O -X /usr/lib/postgresql/12/bin/psql: invalid option -- 'O'
Try "psql --help" for more information.
It’s already 7:02PM.
7:14PM - Distracted again!!! Okay, it’s DA from now on. Don’t think about gsoc for 2 days.
zcat ~/Desktop/falcon.schema.sql-1629724096467.gz | psql -d falcon -0 -X The flag was actually 0 not o ………..(-_-)
But psql: error: FATAL: role "compile" does not exist.
zcat ~/Desktop/falcon.schema.sql-1629724096467.gz | psql -d falcon -0 -X -U anaswara -W
psql: error: FATAL: Peer authentication failed for user "anaswara"
Okay, https://stackoverflow.com/a/17443990
Can be solved with this https://www.postgresql.org/docs/9.0/auth-methods.html#:~:text=19.3.1.-,Trust%20authentication,-When%20trust%20authentication
But let’s just create new roles with same username and password as unix user. “Compile” - “compile”
Zcat
“
ALTER TABLE
ALTER TABLE
WARNING: no privileges could be revoked for "public"
REVOKE
WARNING: no privileges could be revoked for "public"
REVOKE
WARNING: no privileges were granted for "public"
GRANT
WARNING: no privileges were granted for "public"
GRANT
REVOKE
REVOKE
GRANT
ERROR: role "redash" does not exist
ERROR: role "gandalf" does not exist
REVOKE
REVOKE
GRANT
ERROR: role "redash" does not exist
ERROR: role "gandalf" does not exist
REVOKE
REVOKE
”
GRANT ALL PRIVILEGES ON DATABASE falcon TO compile;
GRANT ALL PRIVILEGES ON DATABASE falcon_export_wip TO compile;
GRANT ALL PRIVILEGES ON DATABASE healthgraph_export TO compile;
GRANT ALL PRIVILEGES ON DATABASE sheldon TO compile;
GRANT ALL PRIVILEGES ON DATABASE falcon_export TO compile;
Ignoring all the errors
sudo apt-get install -y python-dev build-essential git python-pip virtualenvwrapper mosh libyajl2 graphviz supervisor libpq-dev postgresql-client nginx libffi-dev libyaml-dev zip unzip apgdiff autoconf automake libtool libleveldb-dev python2-dev swig libssl-dev
Sds Reading package lists... Done
Building dependency tree
Reading state information... Done
Note, selecting 'python-dev-is-python2' instead of 'python-dev'
Package python-pip is not available, but is referred to by another package.
This may mean that the package is missing, has been obsoleted, or
is only available from another source
However the following packages replace it:
python3-pip
E: Package 'python-pip' has no installation candidate
Cloning into 'healthgraph'...
The authenticity of host 'yoda.compile.com (139.59.30.154)' can't be established.
ECDSA key fingerprint is SHA256:N2I9nBx9N72puf3bUAYfBeMUr1V0ZmZVKTpx1nZzGp8.
Are you sure you want to continue connecting (yes/no/[fingerprint])? yes
Warning: Permanently added 'yoda.compile.com,139.59.30.154' (ECDSA) to the list of known hosts.
[email protected]'s password:
Permission denied, please try again.
Retry
Cloning into 'healthgraph'...
sign_and_send_pubkey: signing failed for ED25519 "/home/compile/.ssh/id_ed25519" from agent: agent refused operation
[email protected]'s password:
What’s goin on? I added ssh keys this morning
Adding ssh keys again
Should I generate ssh keys again? Nop
Oh ssh-add
Yaay
That’s a hugerepo. Healthgraph. HUH. DUH.
Cause that’s the only way the roses bloom… in my mind.. Aaa
git clone [email protected]:engineering/sheldon.git
Omu, they’re dorks.
It’s 9:11PM
Booo..
3 minutes to break time. I want break now. Well, you’re writing so it’s a break. Okay, put on some music.
Sheldon is a small repo. Young sheldon.
Wtf am I doing? Successfully wasted break. Nop.
10:48PM. I think I ate too much.
Okay, finish up.
0 notes
Text
How To Install Odoo 15 In Ubuntu 18.04 LTS ?

Steps To Install Odoo 15 On Ubuntu 18.04
Odoo is the most popular all-in-one business software in the world.To Install Odoo 15 on Ubuntu 18.04 you just need to follow the below steps. There are many ways to install Odoo depending on the requirements and the easy and quick way to install Odoo by using APT repositories. If you want to work with running multiple Odoo versions on the same system then you can either use docker compose or docker Install Odoo in a virtual environment. This blog is to provide steps for installation and configuration of Odoo for production environment using Git source and Python environment on an Ubuntu 18.04system. Note: Odoo 15 is not launched yet so we have used the “master” branch for Installation.
To install Odoo 15 on Ubuntu 18.04 LTS you just follow the below steps.
Step 1 : Update Server
sudo apt-get updatesudo apt-get upgrade -y
Step 2 : Create Odoo User in Ubuntu
sudo adduser -system -home=/opt/odoo -group odoo
Step 3 : Install PostgreSQL Server
sudo apt-get install postgresql -y
Step 4 : Create Odoo user for postgreSQL
sudo su - postgres -c "createuser -s odoo" 2> /dev/null || true
Step 5 : Install Python Dependencies
sudo apt-get install git python3 python3-pip build-essential wget python3-dev python3-venv python3-wheel libxslt-dev libzip-dev libldap2-dev libsasl2-dev python3-setuptools node-less libjpeg-dev gdebi -y
Step 6 : Install Python PIP Dependencies
sudo -H pip3 install -r https://raw.githubusercontent.com/odoo/odoo/master/requirements.txt
Step 7 : Install other required packages
sudo apt-get install nodejs npm –ysudo npm install -g rtlcss
Step 8 : Install Wkhtmltopdf
sudo apt-get install xfonts-75dpisudo wget https://github.com/wkhtmltopdf/packaging/releases/download/0.12.6-1/wkhtmltox_0.12.6-1.bionic_amd64.debsudo dpkg -i wkhtmltox_0.12.6-1.bionic_amd64.debsudo cp /usr/local/bin/wkhtmltoimage /usr/bin/wkhtmltoimagesudo cp /usr/local/bin/wkhtmltopdf /usr/bin/wkhtmltopdf
Step 9 : Create Log directory
sudo mkdir /var/log/odoosudo chown odoo:odoo /var/log/odoo
Step 10 :Install Odoo
sudo apt-get install gitsudo git clone --depth 1 --branch master https://www.github.com/odoo/odoo /odoo/odoo-server
Step 11 : Setting permissions on home folder
sudo chown -R odoo:odoo /odoo/*
Step 12 : Create server config file
sudo touch /etc/odoo-server.confsudo su root -c "printf '[options] \n; This is the password that allows database operations:\n' >> /etc/odoo-server.conf"sudo su root -c "printf 'admin_passwd = admin\n' >> /etc/odoo-server.conf"sudo su root -c "printf 'xmlrpc_port = 8069\n' >> /etc/odoo-server.conf"sudo su root -c "printf 'logfile = /var/log/odoo/odoo-server.log\n' >> /etc/odoo-server.conf"sudo su root -c "printf 'addons_path=/odoo/odoo-server/addons\n' >> /etc/odoo-server.conf"sudo chown odoo:odoo /etc/odoo-server.confsudo chmod 640 /etc/odoo-server.conf
Step 13 : Now Start Odoo
sudo su - odoo -s /bin/bashcd /odoo/odoo-server./odoo-bin -c /etc/odoo-server.conf
Now your odoo instance is up and running.
Go to web browser and access your odoo at localhost:8069
#odoo 15#install odoo 15 in ubuntu#installation steps#ubuntu 18 04#odoo installation guide#install odoo#steps for installation#install odoo 15
0 notes
Text
Odoo 14 Installation On Ubuntu 20.04
How To Install Odoo 14 In Ubuntu 20.04?

Steps For Odoo 14 Installation On Ubuntu 20.04
There are many ways for Odoo 14 Installation On Ubuntu 20.04 but here we are giving steps to install using Git Repository.
Step 1: Update Server
sudo apt-get update
sudo apt-get upgrade -y
Step 2: Create Odoo User in Ubuntu
sudo adduser -system -home=/opt/odoo -group odoo
Step 3: Install PostgreSQL Server
sudo apt-get install postgresql -y
Step 4: Create Odoo user for postgreSQL
sudo su - postgres -c "createuser -s odoo" 2> /dev/null || true
Step 5: Install Python Dependencies
sudo apt-get install git python3 python3-pip build-essential wget python3-dev python3-venv python3-wheel libxslt-dev libzip-dev libldap2-dev libsasl2-dev python3-setuptools node-less libjpeg-dev gdebi -y
Step 6: Install Python PIP Dependencies
sudo apt-get install libpq-dev python-dev libxml2-dev libxslt1-dev libldap2-dev libsasl2-dev libffi-dev
sudo -H pip3 install -r https://raw.githubusercontent.com/odoo/odoo/master/requirements.txt
Step 7: Install other required packages
sudo apt-get install nodejs npm -y
sudo npm install -g rtlcss
Step 8: Install Wkhtmltopdf
sudo apt-get install xfonts-75dpi
sudo wget https://github.com/wkhtmltopdf/packaging/releases/download/0.12.6-1/wkhtmltox_0.12.6-1.bionic_amd64.deb
sudo dpkg -i wkhtmltox_0.12.6-1.bionic_amd64.deb
sudo cp /usr/local/bin/wkhtmltoimage /usr/bin/wkhtmltoimage
sudo cp /usr/local/bin/wkhtmltopdf /usr/bin/wkhtmltopdf
Step 9: Create Log directory
sudo mkdir /var/log/odoo
sudo chown odoo:odoo /var/log/odoo
Step 10: Install ODOO
sudo apt-get install git
sudo git clone --depth 1 --branch 14.0 https://www.github.com/odoo/odoo /odoo/odoo-server
Step 11: Setting permissions on home folder
sudo chown -R odoo:odoo /odoo/*
Step 12: Create server config file
sudo touch /etc/odoo-server.conf
sudo su root -c "printf '[options] \n; This is the password that allows database operations:\n' >> /etc/odoo-server.conf"
sudo su root -c "printf 'admin_passwd = admin\n' >> /etc/odoo-server.conf"
sudo su root -c "printf 'xmlrpc_port = 8069\n' >> /etc/odoo-server.conf"
sudo su root -c "printf 'logfile = /var/log/odoo/odoo-server.log\n' >> /etc/odoo-server.conf"
sudo su root -c "printf 'addons_path=/odoo/odoo-server/addons\n' >> /etc/odoo-server.conf"
sudo chown odoo:odoo /etc/odoo-server.conf
sudo chmod 640 /etc/odoo-server.conf
Step 13: Now Start Odoo
sudo su - odoo -s /bin/bash
cd /odoo/odoo-server
./odoo-bin -c /etc/odoo-server.conf
Now your odoo instance is up and running.
Go to web browser and access your Odoo at localhost: 8069
Source: Odoo Installation Blog
Check Our Other Technology Related Blogs, Here
#Ubuntu 20.04 LTS#Installation Odoo 14 On Ubuntu#Installation Steps#Odoo#Odoo 14#Odoo 14 Installation
0 notes