#DB16
Photo
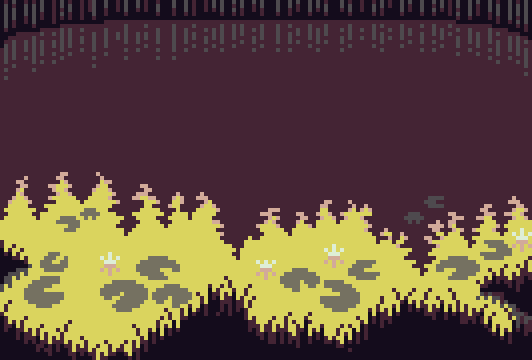
Based on everyones favorite Theodor Kittelsen illustration.
Palette: DB16
208 notes
·
View notes
Text
#UKDEALS Dusty Bin DB16 Bagless Vacuum Cleaners - Ash Vacuum Cleaner for Car, Outdoor BBQ Cleaner, Stove, Workshop, Log Burner or Garage - Dust Collector with HEPA Dual Filtration System, 20L Capacity Cylinder https://www.bargainshouse.co.uk/?p=106624 https://www.bargainshouse.co.uk/?p=106624
0 notes
Photo

$105.0 ~ ZeroTech DB16-100B Dobby 13MP Mini Selfie Pocket Drone, Compact Camera Drones, Camera Drones, Drone for Aerial, Best Camera Drones, Aerial Camera Drones, High End Camera Drones, Small Camera Drones Find Out This Compact Camera Drones
#CompactCameraDrones#CameraDrones#DroneforAerial#BestCameraDrones#AerialCameraDrones#HighEndCameraDrones#SmallCameraDrones
0 notes
Text
Rockville dB16 8000 Watt Peak/2000w RMS Mono 2 Ohm Amplifier Car Audio Amp
Rockville dB16 8000 Watt Peak/2000w RMS Mono 2 Ohm Amplifier Car Audio Amp
https://m.media-amazon.com/images/S/vse-vms-transcoding-artifact-us-east-1-prod/v2/22ff9186-78ae-568e-9b2b-543f5b67b7c3/ShortForm-Generic-480p-16-9-1409173089793-rpcbe5.mp4
Product Description
Rockville dB16 8000 Watt Peak/2000 Watt Dyno-Certified RMS Mono 2 Ohm Amplifier Car Audio Amp
Description:
The dB16 is a mono amplifier with 8,000 watts peak output and 2,000 watts Dyno-Certified power.…

View On WordPress
0 notes
Text
Pixatool crack

#Pixatool crack crack#
Save/Load Presets and custom palette if any.Exports Image and Video at 1280×720 max resolution.With Ctrl pressed, on pick color, sets auto next color slot.Create your own 32 color palette (Saved with presets).Set palettes: NES, Gameboy, CPC, C64, Pico8, DB16 ….Open files from local/internet or dropping in the app.Features: All effects works with the palette colors limitation. Also PixaTool is able to convert images into ASCII/ANSI art exported in images (.PNG). Dither Blur available for overall dithering. Pixatool allows you to get 8bit/Pixel style images or videos, optimize your PixelArt or just adding some cool effects.Dither modes: Normal, Additive, XOR, Source Atop….Bayer Dithering: 2x4x8x for Predefined & Custom pals.Overall Dithering : Checks, Dots, Triangles, Stripes.Add/Remove RGB values from the overall image.Pixelate image until 12x (Separated Width/Height).Special FX: ASCII-ART, Radial & Hexagonal Pixelation….Basic FX: Contrast, Brightness, Sharpen, Blur, Gamma….All features supported on Win/Mac/Linux.All effects works with the palette colors limitation.To keep updated: Conversion example with PixaTool. Works as a PixelArt converter or PixelArt conversion tool. You can use PixaTool to get 8bit / Pixel style images / sprites or videos, optimize your PixelArt or game assets just adding some cool effects.Pixatool 1.35 Pixatool v1.35 (macOS) 67.17 MB You can use PixaTool to get 8bit/Pixel style images or videos, optimize your PixelArt or just adding some cool effects.As you probably hinted, you need to load the desired image, an action that you. Intuitive, but rather cluttered interface The tool does not need installation or configuration and hence, you can use it as soon as you decompress the archive. Pixatool 1.35 Pixatool v1.35 (macOS) 67.17 MB You can use PixaTool to get 8bit/Pixel style images or videos, optimize your PixelArt or just adding some cool effects. PixaTool is a tool that provides you with a quick way to transform any picture to a veritable pixel art sprite that you may want to use for other projects. ,Graphics,Image Editing,MacOs Apps,Pixatool.
#Pixatool crack crack#
Would you please crack the “parallels desktop 15.1.2(47123)” app and upload. Pixatool 1.35 – Create 8bit pixel style images. Pixatool allows you to get 8bit/Pixel style images or videos, optimize your PixelArt or just adding some cool effects.
0 notes
Photo

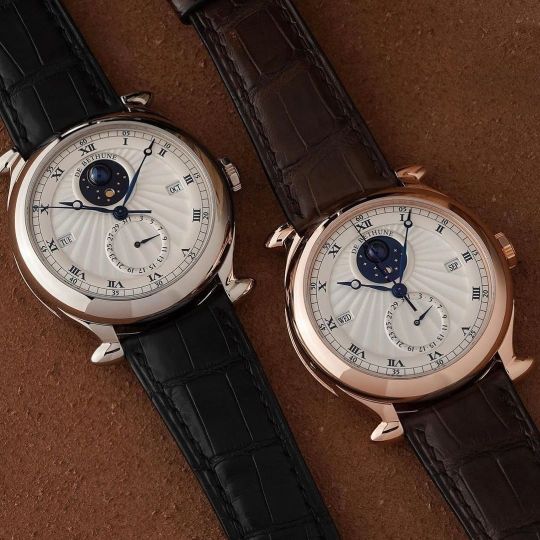
De Bethune DB16 Tourbillon Regulator. @h.m.uhren #casebackfridays #debethune #db16 #haulogerie https://www.instagram.com/p/CXBMU0SP9Nh/?utm_medium=tumblr
11 notes
·
View notes
Photo
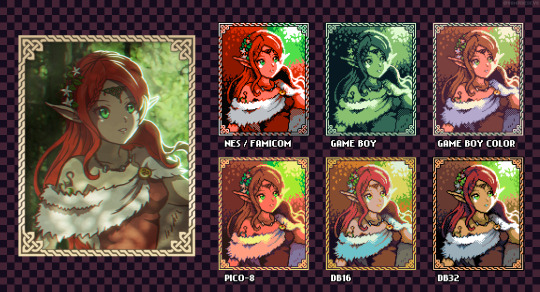
An anime styled Dungeon and Dragons character I drew recently.
I decided to turn her portrait into pixel art, and that idea eventually became various versions of the portrait following different systems limitations or testing different color palettes.
The NES / FAMICOM, Game Boy and PICO-8 versions follow each system’s limitations and restrictions, and could be easily replicated in a game that runs on the real thing. DB16 and DB32 only use the colors avaible in Dawnbringer’s DB16 and DB32 palettes respectively.
I’ll upload a full body version of this character’s art later, and I’m also planning to do more of these portraits for characters from different campaigns I have been a part of.
I’d also love to start taking commissions soon, both for high resolution and for pixel art, so I probably will be delving into more details about that in future posts.
10 notes
·
View notes
Text

Choose your champion. Sorry, we only got creatures and weirdos in stock right now.
Palette: DB16
5 notes
·
View notes
Photo

Panther head bracelet Black leather bracelet Panther bracelet Pagan bracelet Woven bracelet Bronze b https://ift.tt/2SSb0Px
#Pinterest#3 Piece Style https://www.pinterest.com/r/pin/450430400229874598/4766733815989148850/db16
1 note
·
View note
Text
SwimCity 2000 Postmortem
I didn’t have a lot of time this Ludum Dare, so I tried to make the simplest thing that is still a complete and playable experience, taking up no more than fifteen minutes.
Download here: https://blubberquark.itch.io/swimcity-2000
LDJAM submission: https://ldjam.com/events/ludum-dare/50/swimcity-2000
Day 1
I knew in advance I would be a bit short on time that weekend, so after very little brainstorming, a city builder where the water rises beat out other ideas like an inverted Downwell where you climb faster than an advancing wall of doom. I generally try to avoid games that could have fit previous LD themes, so I didn’t want to do anything where the player would be running put of space, or going deeper and deeper, et cetera.
Based on these considerations, I decided on a city builder, and because rising water was going to be a main game mechanic, I knew I’d need to either make it it in true 3D, with a side-view (think Oxygen Not Included), or with isometric graphics. I have written isometric renderers before, one of them just to illustrate a tumblr post, so I knew I could do that quickly.
I decided to model my graphics on SimCity 2000, which was mostly the original SimCity formula, but with isometric graphics - and much, much more stuff in it. You could raise the terrain, flatten mountains, and excavate valleys.
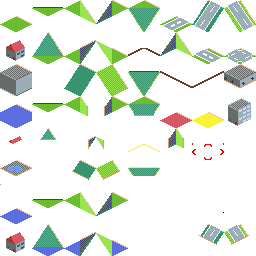
I drew some 32x32 terrain tiles in aseprite, with the default db16 colour palette. Looking at SimCity 2000 for guidance, I realised that this old game looked super washed-out and ugly, and I was confident I could do better!
Based on the terrain I remembered from SimCity 2000, I decided that the elevation of the map could only go up one level per tile. This ensured I did not have to draw dozens of different slope tiles. I then decided that the map would not be represented as tiles, but as elevations of grid points. Tiles would be selected from a dictionary based on the relative elevations of their corner grid points. This way, it’s impossible to place incompatible tiles next to each other. I ruled out certain cases to make sure my tile selection thingy that was somewhere between marching squares and marching cubes would not be too difficult to implement. In a “full game”, I probably would not constrain the level design this way to make implementation easier or reduce the number of pixel art assets.
Then I drew the tiles in a semi-submerged state, and put everything together in a simple rendering demo where I could raise and lower the global water level.

That was day 1.
Day 2
After a false start trying to pre-compute flood basins, I decided to simulate water levels based on grid points, and to store buildings per-tile. The water simulation would run every tick, equalising the water levels between adjacent grid points, and the tile renderer would pick tiles based on the averaged water levels of all four grid points, in addition to ground elevation.
This worked, kind of, but it was invisible to the player. Every tick, every grid point was updated, but it just worked out like a global water level in practice. In order to show the player that something was happening, I added particle effects for the water flow.

This worked a bit better. Instead of raising and lowering a global water level, my demo now increased or decreased the local water for all tiles, and you could see the water flow to equalise the level again.
I had expanded my demo level a bit, with an interesting basin in the north corner, which would fill up faster than the open plains in the centre, and some high-elevation plateaus in the south-east,
Next I implemented buildings. Instead of having buildings placed on grid points, I decided to place them on tiles, in a separate data structure. That makes one data structure to store elevation (grid points), one for particles (world space), one for water levels, and one for buildings (tiles between grid points).
I added a special rule in the water flow simulation that prevented water from flowing over dams, if the dam way between grid points and higher than the water level.
Then I worked on the UI. At first, I tried a simple approach to picking tiles with the mouse cursor, but that did not work well. Different tiles have different shapes, and then there are buildings. There is no simple and accurate way to select a tile. I side-stepped this problem by doing drawing and picking in a single pass (for details. look at this tumblr post).
After trying to implement some procedural generation, I quickly scrapped that idea again. I couldn’t reliably get the system to generate interesting features that would flood the way I wanted it.
Day 2 was cut short again. I think I needed to shovel snow.
Day 3
I had a cool water simulation and some buildings, but no real gameplay. I was already a day late. I decided on some really simple city building mechanics. My goals were:
The game is visibly a city builder inspired by SimCity 2000, not just a flooding sandbox
The simulation is tile-based, without fancy agent-based stuff.
You can’t win, the city will eventually be submerged in water
The mechanics are simple and forgiving. You don’t need to understand how they work, you can just build stuff and figure it out.
There is only one resource and one metric.
The first set of rules that I tried worked reasonably well.
Start with $100
Residential zones cost $20
Commercial zones cost $50
Dams cost $10, $10, $20, $30, $40, and so on
Residential zones have a fixed spawn chance, commercial zones spawn chance increases with spawned residential buildings
Roads and zones can only be built next to roads, dams can be built everywhere
The last rule made it work: Everything needs to be connected to the road network. Once there is water on the roads, it’s only a matter of time before EVERYTHING is flooded!
It took me a couple of playthroughs to tweak the speed at which water flows in, the spawn rate of particles, and the timing of revenue collection.
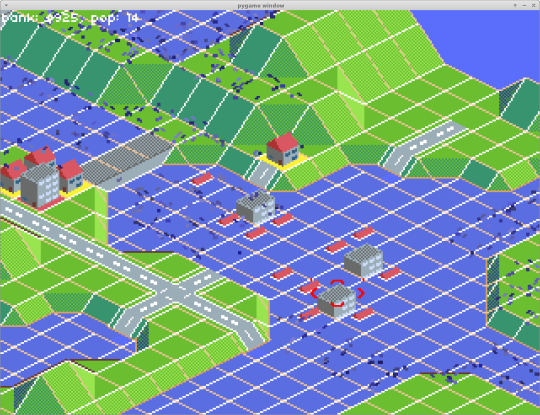
There is no real meat to the gameplay, but by the time you figured out what you need to do, the flooding has already started, and you find yourself making a decision between growing your city, building the dam higher, and increasing your revenue in the short term. This means you play the game twice, and get to a population of 50 or so in the second playthrough (and 80 to 100 in the third, but that’s just showing off).
You start with your first roads and buildings near the water, but elevated by one level, so you have to move away relatively quickly, but you also won’t completely drown right away.
What went right
I am pleased with the way I used the theme. The flowing water slowly rising spells doom from the start.
I also like the look of my isometric pixel art graphics. It looks really pretty, brighter than the original SimCity 2000. I got a lot of positive feedback.
I like that the design is simple. It’s about only one thing, and it does not distract from that. The city building has only for things to build, but they all work well together.
The title. You have to admit it’s funny!
What went wrong
The water simulation is really janky. I spent a lot of time on dead ends, and the way it works now is really hacky and janky. It is basically the simple water simulation I wrote after the flood basin pre-computation, with some added special cases. I lost a lot of time making it work.
I forgot to add a “tweet this“ button to the game over screen, as well as the Blubberquark Software title card. I didn’t even add controller support in a post-compo build.
The actual city building is really sparse. There is nothing cool to look at, no cutesy “Wuselfaktor” like in Die Siedler II, no building properties to inspect. I could have remedied this somewhat by making more “empty“ tiles with grass, rocks, and different trees, or different-looking building variants with no gameplay differences, but I didn’t make enough time for that.
The particle effects of the jam version give the game some much-needed legibility, but they also slow down the simulation and they aren’t properly culled or occluded, often making it harder to see what’s going on.
It wasn’t clear in the UI when tiles update and taxes are collected (every ten seconds).
I spent hours trying to make certain ideas work before I went back to the simplest possible solution.
What I learned
Making an isometric city builder from scratch is not much more difficult than making a platformer, but it is much easier to balance a platformer than a puzzle game. Balancing a city builder takes so much time.
Getting your data structures right in the beginning is more important than the algorithms. I knew that already, but I foolishly disregarded it.
Procedural generation in a game jam is a waste of time, unless 1. the level you want to generate is bigger than you can manually design in such a short time or 2. the game is supposed to be re-played a lot even as a jam game or 3. the generation is super simple.
Python is really not made for this kind of game. I am running into insurmountable performance problems at certain map sizes. It would have been fine if the game was completely turn-based, or if updates happened at a slower time scale, but as-is, the simulation runs every frame, drawing runs every frame, and there is no straightforward way to have the simulation run in another thread. The problem is not the software rendering of PyGame, but the way the water levels are updated. Even NumPy would not help much, because there is no function in NumPy that does the thing I want, so I could at most use a NumPy array to store the data, but operate on it in pure Python code (no releasing the GIL). Speeding up rendering, for example by rendering the terrain in a shader, would free up CPU resources though, even though it wouldn’t allow utilisation of more CPU cores.
Still, updating every tile every frame is more flexible than pre-computing flood basins and re-computing them when dams are changed.
Performance was surprisingly important, because I needed to try out different (unoptimised) water flow systems.
Future Plans
I knew going in that I wouldn’t make this into a “full“ game, and built something that relies on a single gimmick for short experience. Eleven of the Ludum Dare games I worked on (22, 30, 32, 33, 36, 40, 41, 43, 46, 47, 50) were not designed to be “finishable“ into a “full“ game.
I have made my peace with this. I don’t want to work on another “big” game anyway; I am working on an unannounced big game that did not start in a game jam. Even if I wanted to work on a city builder from a game jam, I would probably try to focus on Deep Sea Settler first.
If I wanted to make SwimCity 2000 into a “full” game, I would have to tone down the water simulation, and make flowing water one mechanic among many. The whole “delaying the inevitable“ theme would have to go. The main focus of the game would have to be changed from stackable dams to something else. The design only really works because of the theme, and because it’s a jam game. Expanding it would mean completely overhauling the main loop and all game mechanics.
And yet, I got positive feedback telling me to keep working on this! Friends told me that SwimCity 2000 isn’t that fun yet, but it’s interesting and I could make something of it. I really don’t think so. A game that takes two hours per game, broken up into multiple play sessions, needs something other than a single gimmick to keep it going.
At most, I could see a campaign of ten different cities, where each one has a different type of challenging geography, with water flow only one mission of the ten. And then I’d need to balance the game mechanics for those other challenges, and make the game interesting without the “hunger clock“ of rising water levels.
That said, I can see these potential futures for SwimCity 2000:
City Builder: Tone the water simulation way down, add dozens of buildings, zones, utilities, tile stats, and some agent simulation, and make something that is basically SimCity 2000, but lighter and more game-ey and less sober city simulation. Add different sizes of buildings, different sizes of roads, streets, and highways, trees, different biomes. Definitely add the ability to tear down buildings and change the terrain (at a steep cost). Dams cannot be stacked higher than 2 units any more.
Disaster City Builder: Keep most of the water stuff, add fire, meteors, King Kong generic non-trademarked giant gorilla, aliens, viral outbreaks, football hooligans, the Boston Molasses Flood of 1919, and other disasters. Just add some building types and city sim things, but focus on general mayhem. This option lets me keep the spirit of the current game. Maybe the water simulation could have momentum, and then we’d have tsunamis. Or landslides...
God Game: Make the city development automatic and focus on sandbox/terrain stuff. Somebody suggested this in the Ludum Dare comments, but I think this is basically just Populous. I never played it, but I know it was the isometric precursor to Black & White.
Real-Time Strategy: Just take out everything except the terrain rendering and make something that is sort of like StarCraft or Age of Empires.
Something Completely Different: I don’t know, maybe a Monument Valley de-make, or a Naya’s Quest fan game, based on the isometric view.
32 notes
·
View notes
Photo

Recientemente uno de mis clientes me pidió ayuda, dentro de la comisión, para poder crear sus propios iconitos de inventario. Yo, que no sabía absolutamente nada más que buscar los de otros y usarlos, me puse a la aventura para encontrar un método sencillo pero que diera buenos resultados. ¡Y aquí está el resultado! Espero que les sirva a ellos y a ustedes para sus foros.
Primero que nada, necesitaremos 2 programas:
Aseprite (o algún programa similar al mismo).
Photoshop (yo uso CC 2020).
Luego necesitarás la imagen que quieras usar, en formato png, con transparencia y, más por comodidad que otra cosa, que tenga el tamaño exacto (sin bordes vacíos alrededor).
En mi caso, voy a usar esta. Cuanto más simple y limpia sea vuestra imagen, mejor, porque tendréis que limpiar menos.
Ahora vamos a abrir nuestro Aseprite y vamos a irnos a File > Open y buscaremos nuestro png.
Ahora, veréis que en la parte izquierda tienes cuatro botoncitos: Edit Colors, Sort & Gradients, Presets y Options. Vamos a clickar presets. Estos son los colores que usará Aseprite para indexar los colores de nuestro iconito. Básicamente, "simplifica" los colores de la imagen. Seleccionáis uno y os dirigís a Sprite > Color Mode > Indexed (No Dithering).
Yo uso db16 casi siempre, y si quiero cambios de colores concretos, voy a hacer click en ellos y le daré al icono de Edit Colors para modificarlo. En este caso, quería tonalidades azules más que amarillas/verdosas así que lo he cambiado en ese sentido.

Ahora, iremos a Sprite > Sprite Size. Vais a ir reduciendo poco a poco su tamaño, de 25% en 25%. Una vez os quedéis cerca del tamaño que buscáis para vuestro icono, lo cambiáis a mano en la sección de pixeles. Una vez lo tengáis, os vais a File > Save as > y os aseguráis de que sigue en png.
Ahora mismo, mi pixel está así:

Ahora tendremos que limpiarlo un poco y darle borde. Nos dirigimos a photoshop y lo abrimos allí. En mi caso, voy a limpiar algunos bordes (si se os quedan puntitos sueltos, por ejemplo), y equilibrar alguno de los colores. Es importante trabajar siempre con Lápiz, tanto en la goma de borrar como en el pincel. Para localizar todos los cuadrados de un mismo color, usaremos la varita (W) y desmarcaremos la cajita de "Contiguo". Después de un rato limpiando, ya tenemos una imagen un poco más simple:

Si queréis reducirla de tamaño en este estado, tendréis que aseguraros de que tenéis la opción de remuestreado en bilineal. Por ejemplo, en nuestro caso, se vería así tras una pequeña limpieza:

Pero nos queda un último paso y es el trazado. La forma más simple de hacerlo es la siguiente:
Aumenta tu lienzo +2 píxeles de alto y ancho.
Selecciona la capa que contiene tu icono.
Selección > Modificar > Expandir > 1px.
Manteniendo pulsado CTRL y ALT, pulsa de nuevo en tu capa.
Rellena la selección de negro (#000).
Es posible que tengáis que limpiar el trazo, claro. Lo ideal es que no haya cuadrados en las conexiones (esquinas), para que se vea más limpio.
Y ya lo tendríamos (en grande y en pequeño).


Espero que este tutorial os haya servido, y si es así, los reblogs para que llegue a más gente se agradecen enormemente. ¡Un abrazo!
63 notes
·
View notes
Text
while doing a star wars photoshoot yesterday me and my sister came to two conclusions:
1) din x luke needs a cooler ship name than DinLuke
2) if R2D2 and BB-8 were a ship, their ship name should be their names multiplied. i'm too lazy to actually do the math so let's just say it's RB16-DB16
#uhhhh me#star wars#someone who remembers how to to math pls do the multiplication for me#also PLS tell me if DinLuke has another ship name we didn't look beyond a delirium-induced google search
21 notes
·
View notes
Photo
De Bethune DB16 Tourbillon Regulator. @watchbox #debethune #tourbillon #regulator https://www.instagram.com/p/CY0AqcpvljL/?utm_medium=tumblr
23 notes
·
View notes
Link
https://file.army/i/e69soo
1 note
·
View note
Text
In-depth Comparison Review on Autel DS808 and MS906 OBD2 Scanner
Autel DS808 automotive scan tool and MS906 diagnostic scanner tare both high-quality scanners. Here comes the question: which one is ideal for your job?
Prior consideration for customers:
If you’re looking for a faster and powerful diagnostic scanner, then the Autel Maxisys MS906 auto diagnostic scanner is the best choice for you. But if you’re a small garage owner with little activity or a car enthusiast who deals with just a few numbers vehicles, then the Autel Maxidas DS808 scan tool is the best for you.
Comparison Chart: Autel DS808 VS MS906
FeaturesAutel DS808Autel MS906Works:more than 80 US, Asian and European vehicle makesmore than 80 US, Asian and European vehicle makesDisplay:7-inch LCD capacitive touchscreen with 1024×600 resolution8.0” LED capacitive touch screen with 1024x768P resolutionMemory:32 GB32 GBRam:1.5 GB2 GBSensors:Ambient light sensor for brightness auto changingGravity Accelerometer, Ambient Light Sensor (ALS)Processor:Cortex-A9 processor (1.5 GHz)Samsung Exynos 6-Core Processor (1.3 GHz quad-core ARM Cortex-A7 + 1.7 GHz dual-core ARM Cortex-A15)Operating System(OS):Android 4.4.4Android 4.4.4Audio Input/Output:Input: N/A, Output: buzzerMicrophone, Single SpeakerOBDI connector:No(Need to purchase additionally)YesCharging:Charges via 5 VDC power supply Charging via 12 V AC/DC power supplyCamera:No8MPHardware:GoodBetter than DS808Operating Temperature:-10 to 60°C-10 to 55°CUpdate Option:1-year Free Update1-year Free UpdateVehicle Coverage:Acura, Audi, Bentley, Benz, Dodge, Daewoo, Ford, Fiat, Gm, GMC, BMW, Bugatti, Chrysler, Citroen, Holden, Honda, Hyundai, Infiniti, Land Rover, Lexus, Maybach, Mazda, Isuzu, Jaguar, Jeep, Kia, Mini, Mitsubishi, Nissan, Opel, Porsche, Peugeot, Renault, Saab, Scion, Seat, Skoda, Smart, Sprinter, Subaru, Suzuki, Toyota, Volkswagen, Vauxhall, Volvo, VWAbarth, Acura, Alfa, Bugatti, Chevrolet, Chrysler, Audi, Bentley, Benz, BMW, Citroen, Dodge, Dacia, Daihatsu, Fiat, Ford, Gm, Holden, Honda, Jaguar, Jeep, Hyundai, Infiniti, Isuzu, Kia, Land Rover, Lexus, Lancia, Maybach, Mazda, Mini, Peugeot, Porsche, Renault, Mitsubishi, Nissan, Opel, Saab, Scion, Seat, Skoda, Smart, Sprinter, Subaru, Suzuki, Volvo, Toyota, Vauxhall, VW, Etc.Connectivity:Mini USB 2.0, USB 2.0, Wi-Fi, Micro SD card (supports up to 32GB)Wi-Fi (802.11 b/g/n), DB16 DLC, USB 2.0, SD Card (Support up to 32GB)Power and Battery:3.7 V/3200 mAh lithium-polymer battery3.7V/5000 mAh lithium-polymer batteryTested Battery Life:Around 4.5 hours of continuous useup to 6 hours of continuous operationWeight:2.42 pounds2.05 poundsDimensions(W x D x H):9.4 x 1.4 x 5.9 inches10 x 1.4 x 6.9 inchesWarranty:Limited One Year Warranty12-month warranty
Autel Maxisys MS906 Automotive Diagnostic Scanner:
Autel Maxisys MS906 automotive diagnostic scanner has the same functions as the Autel DS808. The only difference is in the hardware. The MS906 comes with a larger touchscreen of 8.0-inches and has a powerful built-in battery. Additionally, it has a built-in 8MP camera which the DS808 lacks.
In terms of performance, this scan tool is a bit faster and more powerful. It also covers more than 80 US, Asian, and European vehicles. Apart from that, it offers one year of free online updates and a one-year warranty.
📷
Pros:
The powerful operating system that allows the user to multitask
User-friendly design
Auto-VIN technology for easy vehicle identification
It comes with a rear camera for taking photos and sharing with other technicians.
Performs a wide range of functions
Has wireless connectivity
Broad vehicle coverage of over 80 US, European, and Asian vehicles
Large internal storage
One-year free updates and one-year warranty
Cons:
A longer recharge time
Quite expensive for beginners and small auto repair shops
Autel Maxidas DS808 diagnostic tablet:
The Autel Maxidas DS808 is a comprehensive diagnostic scanner. It is an upgrade of the Autel DS708 and functions the same as the Autel MS906 scan tool. The device covers over 80 US, European, and Asian vehicle makes and models. Additionally, it is equipped with Android 4.4.4 and a fast quad-core processor. This makes diagnosis and analysis of results to be efficient and quick.
Besides, it has a 7-inch LCD touchscreen display with a resolution of 1024 by 600. It can as well perform basic functions, advanced functions, and special functions. With such features and one year of free online updates, this is a nice gadget to have in your garage.
Pros:
Compact and sleek design
Intuitive user interface
Performs various functions
It covers most vehicle makes manufactured from 1996 and the latest
Fast boot-up time of 15 seconds
Full OBD2 support including CAN capability
Free online update and a 12-month warranty
Cons:
It comes with only one year of free updates
Our suggestions for customers:
Choosing the best scan tool for your needs is not easy. This is because there are many scan tools on the market with the same functions and features. In this case, the Autel MS906 and DS808 may appear to be similar, but they as well vary a lot. If you’re looking for a quality mid-range diagnostic code reader, then we advise you to try out the DS808 scan tool. But if you’re a professional mechanic or a big Auto repair shop, then you should go for the more powerful and faster MS906 scan tool. This tool is more expensive but has more functions and performs better than the DS808 code reader.
https://www.cardiagtool.co.uk/
Source: http://blog.cardiagtool.co.uk/in-depth-comparison-review-on-autel-ds808-and-ms906-obd2-scanner/
0 notes
Photo

O incrível De Bethune DB16 Régulateur Tourbillon e seu movimento a corda manual calibre DB2509, com frequência de 36.000 aph A caixa de ouro rosa tem 43 mm de diâmetro O modelo com turbilhão e calendário perpétuo foi lançado em #baselworld2013 💰 360.000 Francos Suíços 📷 @de_bethune • • #debethune #debethunedb16 #db16tourbillon #perpetualcalendar #finewatchmaking #hautehorlogerie #independentwatchmaking #relogioserelogios
#debethunedb16#finewatchmaking#relogioserelogios#perpetualcalendar#baselworld2013#debethune#hautehorlogerie#independentwatchmaking#db16tourbillon
5 notes
·
View notes
Last Seen Blogs

fairy-dollyy
🎀 Lola 🎀

mrsvoldemort
The elder daughter 🇵🇸

nbimaru
kemono jihell

nc---art
Supercool animator in training

yeats-infection
sphinx face