#DIY retouching
Text
Mastering Beauty: Enhancing Jewelry Visuals with Clipping World
In the digital age, where visual appeal holds immense significance, the demand for top-notch jewelry imagery has surged. Enter the realm of Clipping World, a pivotal player in the domain of jewelry retouching services. This article unfolds the artistry of perfecting jewelry visuals, exploring the best jewelry retouching services and the role of Clipping World as a prominent jewelry retouching service provider.

The Art of Jewelry Photography
Capturing the intricate beauty of jewelry poses challenges, and the need for impeccable images is critical in the competitive landscape. This section delves into the nuances of jewelry photography and the transformative impact that jewelry retouching services can have on elevating image quality.
Understanding Clipping World's Jewelry Retouching Services
Within the realm of jewelry image retouching services, Clipping World stands out. From enhancing colors to refining details, this section highlights the specialized services offered by Clipping World. The focus is on how these services go beyond the ordinary, providing a distinctive touch to jewelry images.
Professionalism in Image Enhancement
Delving into the professionalism of image retouching, we compare the skillful hand retouching provided by Clipping World to automated tools. The discussion emphasizes the importance of maintaining authenticity, a hallmark of the best jewelry retouching services in the industry.
Common Mistakes in Jewelry Image Enhancement
Avoiding pitfalls is essential in the world of jewelry image editing. This section sheds light on common mistakes and the significance of striking the right balance between realism and aesthetics—a key aspect mastered by Clipping World.
Tools and Techniques: Navigating Clipping World and Beyond
Exploring the tools and techniques employed by Clipping World, we traverse the landscape of Adobe Photoshop, the industry-standard. Additionally, we touch upon AI-powered solutions, showcasing how Clipping World integrates cutting-edge technology for unparalleled results.
Benefits of Outsourcing to Clipping World
Outsourcing jewelry image retouching to Clipping World proves to be a strategic move. This section outlines the time and cost efficiency offered by this service provider and the access to specialized skills that set the best jewelry retouching services apart.
DIY Tips with Clipping World Insights
For those venturing into DIY image retouching, we discuss the recommended software, including insights from Clipping World. This section provides basic techniques, empowering amateurs to enhance their jewelry images with the precision seen in professional services.
Trends in Jewelry Image Retouching with Clipping World's Influence
Analyzing current trends, we witness the impact of Clipping World in steering the industry towards minimalism and natural lighting effects. Adapting to these trends ensures that jewelry images remain contemporary and captivating.
Clipping World's Showcase: Case Studies
This section presents real-world examples showcasing Clipping World's transformative power. Before-and-after comparisons and success stories highlight the tangible impact of high-quality images on customer engagement and conversion rates.
Future of Jewelry Image Retouching: Clipping World's Vision
Looking ahead, we explore the evolving technologies embraced by Clipping World and their integration with augmented reality. Clipping World's vision hints at a future where customers can virtually experience jewelry before making a purchase.
Building Trust with Clipping World: Customer Perception Matters
Examining the link between high-quality images and customer trust, we discuss how Clipping World contributes to a positive brand image. Ethical considerations in retouching play a crucial role in shaping customer perception, aligning with Clipping World's commitment to authenticity.
Industry Standards and Guidelines: Clipping World's Compliance
Navigating the standards set by e-commerce platforms and adhering to ethical guidelines is essential. This section provides insights into Clipping World's compliance requirements and ethical considerations, setting the benchmark for the industry.
The Evolution of Clipping World's Jewelry Retouching Services
As the demand for high-quality images grows, we explore Clipping World's role in the market's trajectory. The competition and innovation in the field of jewelry image retouching services, spearheaded by Clipping World, drive market growth, shaping the industry's future.
Conclusion: Clipping World's Artistry Unveiled
Mastering the art of jewelry image retouching is an intricate dance between aesthetics and authenticity. Clipping World's expertise goes beyond mere enhancement; it tells a story. In a world where visuals communicate, Clipping World emerges as a leader, ensuring that jewelry images not only attract but also build trust with customers.
FAQs
Is Clipping World exclusively for online sales image retouching?
No, while online sales benefit significantly from Clipping World's expertise, their services extend to print materials, catalogs, and various marketing materials.
How does Clipping World differentiate from automated tools in
jewelry image retouching?
Clipping World combines skillful hand retouching with cutting-edge technology, providing a distinctive touch that automated tools often lack.
What software does Clipping World recommend for DIY jewelry
image retouching?
Clipping World recommends Adobe Photoshop for its versatility but also provides insights into user-friendly alternatives for beginners.
How does Clipping World address ethical considerations in image retouching?
Clipping World ensures transparency in retouching, aligning with ethical considerations to provide authentic representations of jewelry.
What trends does Clipping World foresee in the future of jewelry image retouching?
Clipping World anticipates trends like minimalism and increased integration with augmented reality for a more immersive customer experience.
#Jewelryjewelry retouching#image enhancement#Clipping World#jewelry photography#retouching services#visual appeal#authenticity#digital marketing#Adobe Photoshop#DIY retouching#customer trust#industry standards#augmented reality integration#future trends#online sales#ethical considerations#brand image#competition and innovation#customer engagement#cutting-edge technology#case studies#before-
0 notes
Text
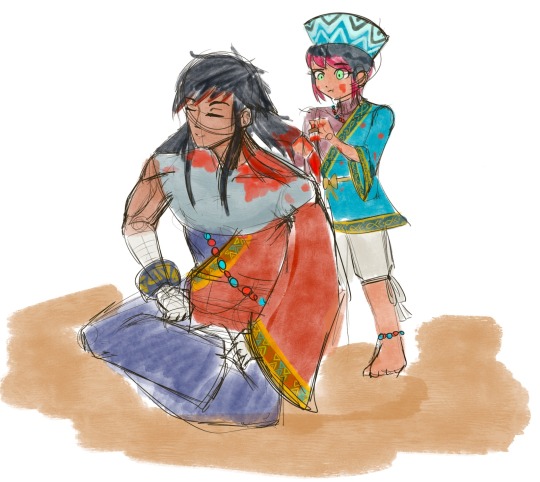
My HC is that Yua was actually the one to dye both her and his brother's hair with DIY hairdye from spices when they both joined the Nayshalli Resistance, and Bosch let her do it bc I believe he's a good big brother and it made her happy so he let her do whatever to his hair. (PS.: Probs it had to be retouched by auntie Kalima later on bc it turned blotchy-)
#bosch waraya#sf6 bosch#street fighter 6#fanart#pls just let them be together again they deserve to be happy#hush Im coping#doodle
23 notes
·
View notes
Text
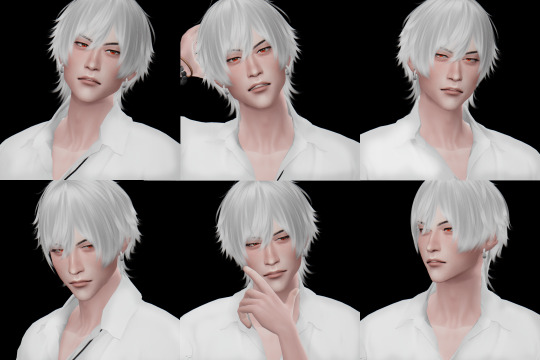

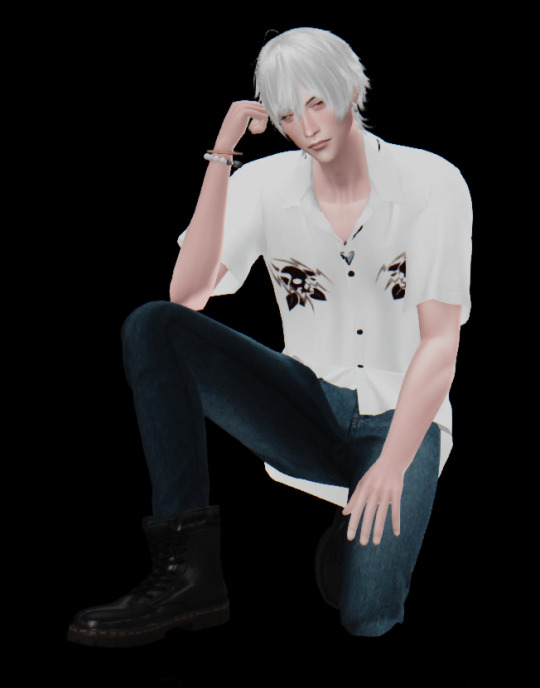
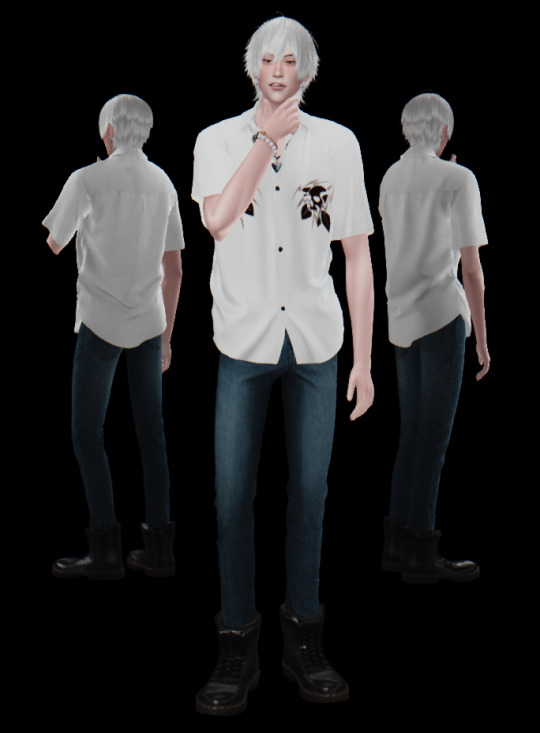
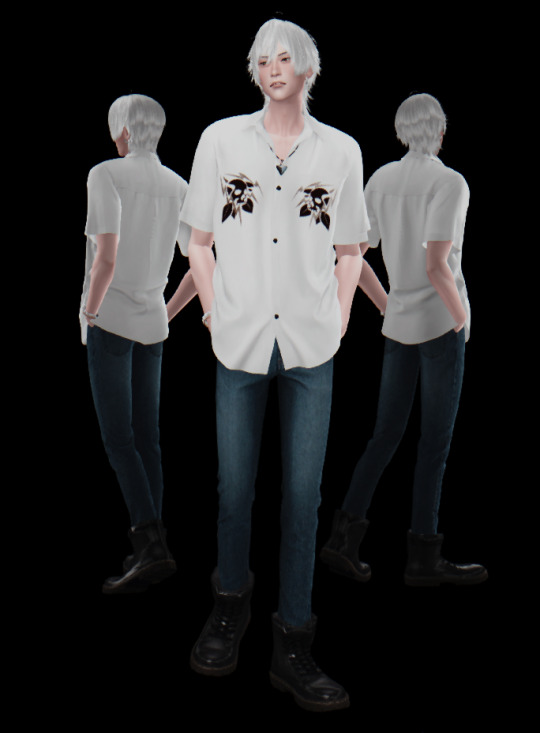

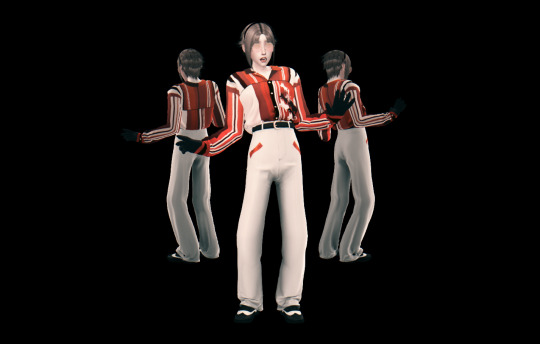
Samatoki Aohitsugi - Hypnosis Microphone
碧棺 左馬刻 - ヒプノシスマイク
Heyo, how’s it going~?
Here it is the baddie of Samatoki xd I dont like him very much (why he has to be so mean to Ichiro sometimes ;-;) but I love how he raps, grows over all the lore and protects Nemu uwu also he turned quite the fine man in 3D lol
Talking about the sims, I had quite the travel with the shirt and boots in... in blender xD I know I said i wouldnt touch the damn program (I am a Maya fanboy (?)) but this shirt was the only one that checked all the boxes, just that it had a pocket and the pocket was a different UV island obviously so I had to re uv a little xd I tried adding more buttons but it didnt go well lol I suppose it is bcs i have to paint weight or add the buttons to the rig but i dont know shit about rigging lol
The boots was just scaling them up a little cause they were clipping badly with all jeans I tried unu didnt want the jeans to go over bcs... thats not how Sama wears his boots xd
does he have tats? I dont know, but I didnt add any either lol
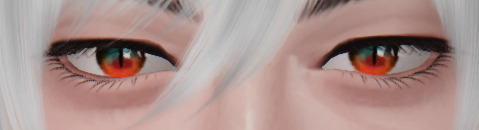
also see this beautiful eyesss @pralinesims you diy eyes are so GOD uwuwu
cc list uwu:
Skin:
https://mousysims.tumblr.com/post/627162293823848448/face-only-skinblend-masculine-feminine-all by @mousysims
Eyes:
https://www.patreon.com/posts/di-eye-diy-eye-34678649 by @pralinesims
Eyelashes:
http://kijiko-catfood.com/3d-lashes-uncurled-eyelashes-edition/
http://kijiko-catfood.com/eyebrow-ver2/ by @kijiko-sims
Hair:
https://www.patreon.com/posts/69024002 by @zaozzaa
Bracelet, piercings, necklace amd boots:
https://losts4cc.tumblr.com/post/640675057738317824/s4simomo-anime-cc by Simomo, I did scale up the boots a little xd
they erased all their cc and sns (i had their cc from long ago xd), be cautious when downloading not from original source >< (that's why I put full links, is not aesthetic, but at least you can select it and paste it yourself and know before hand where you are going xd, I havent had problems with the sim comm but you never know sadly...)
Shirt:
https://www.patreon.com/posts/kk-collar-shirts-52975513 by @ooobsooo, retextured by me
Jeans:
https://www.patreon.com/posts/50105559 by @gorillax3-cc
CAS BG:
https://vyxated.tumblr.com/post/719719135185092608/cas-replacements-set-02 by @vyxated
Reshade:
https://fiesemietze.tumblr.com/post/641246832367992832/preface-download-at-the-end-reshade-version by @fiesemietze
Poses:
https://nell-le.tumblr.com/post/189644526639/male-model-pose-pack-n1-27-male-poses-ingame-and by @nell-le
https://katverse.com/2019/10/25/pose-pack-22/ by @katverse
https://karzalee.wixsite.com/studiok/post/2018/04/28/skc-male-pose-set-4 by @karzalee
https://www.patreon.com/posts/request-sitting-48869510 by @helgatisha
this time i downloaded all new brand poses so I know which I used xd
If something is missing, you can found it in my last posts maybe xd.
As always, if you want some retexture just pm me uwu
That’s all for today~, next comes fancy corrupt cop Iruma Jyuto uwu I really like him xd last year I made his sim but it turned quite bad hope i can re do it and turns smth good xd good thing that I lost that save so I can start fresh xd just sad cause I liked my old Rio (Rio is one of my favs uwu) unu
little extra, wanted to share my buster bros desktop uwu
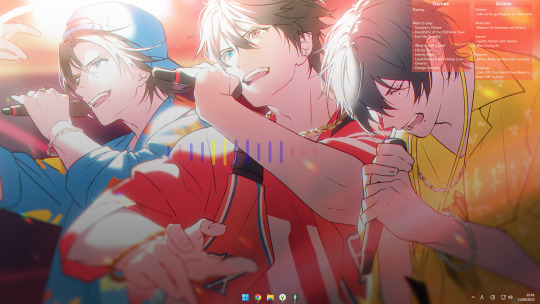
they look so cool uwuwu I retouched the image a little cause the lighter in me likes a good bloom in a bright image lol also matched the visualizer to their colors uwu
baii!
#hypmic sims#ts4#sims 4#hypmic#reshade#sims 4 cc#cas#hypnosis microphone#mad trigger crew#samatoki aohitsugi#hypmic samatoki#hypnosis mic samatoki#helgatisha
45 notes
·
View notes
Text
Why Professional Image Editing is Right for Your Business
In today’s digital age, visuals play a crucial role in capturing the attention of your audience and conveying your brand message effectively. Whether you’re an e-commerce store, a social media influencer, or a corporate entity, the quality of your images can make or break your online presence. While it may be tempting to handle image editing in-house or opt for DIY solutions, investing in professional image editing services can take your business to the next level. Here’s why:

Enhance Visual Appeal: Professional image editing can elevate the visual appeal of your photos, making them more attractive and engaging to your target audience. Skilled editors can adjust lighting, color balance, and composition to create visually stunning images that leave a lasting impression on viewers.
Maintain Brand Consistency: Consistency is key to building a strong brand identity. Professional image editors understand your brand guidelines and can ensure that all your images align with your brand’s aesthetics and messaging. This consistency across your visual content helps reinforce your brand image and builds trust with your audience.
Stand Out from the Competition: In a crowded digital marketplace, it’s essential to differentiate your brand from competitors. Professionally edited images can help you stand out by showcasing your products or services in the best possible light. High-quality, visually appealing images can grab the attention of potential customers and set you apart from competitors with mediocre visuals.
Save Time and Resources: Outsourcing image editing to professionals saves you valuable time and resources. Instead of spending hours trying to perfect your images, you can focus on core business activities while skilled editors handle the editing process efficiently. This allows you to streamline your workflow and achieve faster turnaround times for your visual content.

Ensure High-Quality Results: Professional image editing services goes beyond basic adjustments and filters. Experienced editors have the expertise and tools to deliver high-quality results that meet the highest standards. Whether you need product retouching, background removal, or complex photo manipulation, professionals can deliver flawless results that meet your specifications.
Revamp your images and captivate your audience with Moths Studio’s professional image editing services. From color correction to retouching, our skilled editors will elevate your visuals to new heights. Get a quote now!
0 notes
Link
PRO EDU - Natural Light Fashion & DIY Techniques Welcome to an on-set learning experience built around creativity in fashion photography, makeup, styling, natural light, and retouching in Lightroom & Photoshop. This 25+ hour course is built around the essentials of conceptualizing various fashion photo shoots using available natural light and entry-level camera gear.
0 notes
Text
5 BUSINESS HEADSHOT MISTAKES TO AVOID
Greetings, I’m Anthony Mongiello, your go-to headshot photographer in Los Angeles. In a city where first impressions matter as much as the Hollywood sign, having a killer business headshot is non-negotiable. As an award-winning professional in the field, I’ve seen it all. Today, let’s explore the top five mistakes you need to steer clear of to ensure your professional image truly shines.
1. IGNORING PROFESSIONAL GUIDANCE
Imagine you’re gearing up for your business headshot session, armed with enthusiasm and a Pinterest board full of poses. While having inspiration is great, ignoring professional guidance can lead to disaster. As your experienced headshot photographer in LA, I’m here to guide you through the process. Trust me; those quirky poses might look great on Instagram, but for your professional headshot, we want to convey competence and approachability. I’ll help you strike the perfect balance, ensuring your headshot speaks volumes about your expertise and qualities.
Investing in a professional headshot session is about curating an image that resonates with your target audience. So, let go of the preconceived notions, and let’s create a headshot that not only turns heads but also opens doors to new opportunities.
2. NEGLECTING WARDROBE CHOICES
One of the most common mistakes I witness is neglecting wardrobe choices. Remember, your headshot is your personal brand, and every detail matters. Opt for timeless, solid colors that complement your skin tone and convey professionalism. Steer clear of distracting patterns or overly casual attire that could send the wrong message about your business.
During your session with Anthony Mongiello Photography, we’ll discuss wardrobe options tailored to your industry and personal style. Whether you’re in finance, entertainment, or entrepreneurship, I’ve got the expertise to ensure your wardrobe choices enhance, not detract from, your professional image. Your headshot should reflect confidence and authenticity – let’s make sure your wardrobe shows just that.
3. OVERLOOKING THE IMPORTANCE OF LIGHTING
Lighting is the unsung hero of a stunning headshot, and overlooking its importance is a serious mistake. Many DIY headshot attempts fall victim to harsh shadows, unflattering angles, and inconsistent lighting. As your dedicated headshot photographer, I prioritize creating a well-lit environment that highlights your best features and captures your unique qualities.
When it comes to headshots, natural light is often the golden ticket. However, mastering it requires finesse and expertise. During your session with me, I’ll leverage natural light or artificial lighting setups to accentuate your strengths and diminish any imperfections. Your headshot should communicate professionalism – let’s ensure every beam of light contributes to that perfect image.
4. NEGLECTING FACIAL EXPRESSION
A static, lifeless expression can make you appear disengaged, while an overly enthusiastic one might be perceived as unprofessional. Striking the perfect balance requires finesse, and that’s where I come in as your expert headshot photographer.
At Anthony Mongiello Photography, I’ll guide you through a range of expressions, ensuring we capture your personality without veering into extremes. From the subtle confidence of a CEO to the friendly approachability of a creative professional, we’ll tailor your expressions to align with your industry and personal brand. Don’t settle for a one-size-fits-all approach – let’s create a headshot that speaks volumes about who you are as a professional.
5. IGNORING RETOUCHING
The final mistake to avoid is underestimating professional retouching. While authenticity is key, a touch of strategic retouching can elevate your headshot to new heights. From minimizing imperfections to enhancing natural features, the goal is to present the best version of yourself without sacrificing authenticity.
At Anthony Mongiello Photography, I bring a keen eye for detail to the retouching process. My goal is to enhance, not alter, your unique features, ensuring your headshot exudes professionalism while remaining true to who you are. Don’t let a lack of retouching expertise undermine the impact of your headshot – entrust your image to a seasoned professional who understands the balance between genuineness and enhancement.
CONCLUSION
There you have it – five business headshot mistakes to avoid if you’re aiming for success. Remember, your headshot is more than just a photo; it’s your first handshake with potential clients and collaborators. When you choose Anthony Mongiello Photography, you’re gaining a partner dedicated to capturing your professional identity with precision. Let’s redefine your professional image. Schedule your session today and step into the spotlight with confidence and style!
0 notes
Text
Real Estate Photo Editing On A Budget: Affordable Solutions And Tools
In the aggressive global of actual estate, charming visuals play an essential role in attracting able consumers and showcasing houses of their high-quality mild. High-first-class photographs can extensively impact the notion of a property's value and desirability. However, expert real property photo editing offerings can often include a hefty price tag. Fortunately, there are cheap answers and equipment available for DIY real property picture modifying and real estate photo retouching which can help dealers and owners decorate their belongings snapshots without breaking the bank.

Real Estate Photo Editing: Elevating Your Property Images
Real property photo enhancing entails enhancing assets pix to make them extra visually appealing and tasty to capability shoppers. From adjusting lights and hues to eliminating imperfections and improving info, actual estate picture modifying and real estate photo retouching can remodel regular pic into lovely visual assets that capture the attention of consumers.
Affordable Solutions for DIY Real Estate Photo Editing
DIY real estate photography is a value-powerful alternative for capturing assets photos without the want for professional photographers. With the proper techniques and gadgets, house owners and agents can take extraordinary snapshots in their residences and make fundamental changes using loose or less expensive picture editing software.
Utilizing Real Estate Photo Editing Software
There are several lower priced and consumer-friendly actual property photo editing software options available that provide effective modifying tools and capabilities. These software programs permit customers to decorate shades, alter lighting, and get rid of blemishes to create visually stunning images that showcase houses within the quality possible manner.
Exploring Budget-Friendly Real Estate Photo Editing Tools
Best Real Estate Photo Editing Software
Investing in the right actual property image editing software can make a good sized difference within the first-class of belongings snap shots. While expert editing software like Adobe Photoshop may be out of reach for those on tight finances, there are several cheap options available that offer similar features and abilities.
DIY Real Estate Photo Editing Services
For folks that opt to outsource their real property photo modifying duties, there are finances-friendly options to be had via on line structures and freelance marketplaces. These services generally provide brief turnaround times and competitive pricing, making them an appealing alternative for marketers and house owners looking to streamline their workflow without breaking the financial institution.
The Takeaway
In the modern competitive actual estate market, fascinating visuals are important for attracting capable consumers and using sales. While expert actual estate photo enhancing offerings can be luxurious, there are inexpensive answers and equipment to be had for DIY editing that permit marketers and house owners to beautify their belongings photographs without exceeding their budget. By leveraging DIY pictures techniques, exploring budget-pleasant modifying software, and utilizing on-line modifying offerings, real estate professionals can increase their marketing efforts and showcase properties within the satisfactory viable mild. With the right tools and assets, attaining lovely property snapshots on finances is inside reach for absolutely everyone in the real estate industry.
#real estate photography app#real estate photography software#real estate drone photography#residential real estate photography
0 notes
Text
Reviving Memories: The Art of Photo Restoration
In the ever-evolving tapestry of technology, the art of photo restoration stands as a beacon, breathing new life into moments frozen in time. At Forever Studios, we understand the profound impact of preserving cherished memories through photo restoration. Join us as we explore the intricate process of revitalizing old photographs and the significance they hold.

In an era dominated by digital imagery, the charm of old photographs often gets overshadowed. Yet, these snapshots encapsulate not just moments but the essence of bygone times. At Forever Studios, we embark on a journey to uncover the magic behind photo restoration.
Capturing Time: The Essence of Old Photos
Old photos are not mere prints; they are portals to the past. Each image tells a story, capturing the emotions, styles, and settings of a specific era. The nostalgic allure of these photographs is undeniable, and preserving them is akin to preserving a piece of history.
Why Photo Restoration Matters
The Fading Beauty of Time
Old photos bear witness to the wear and tear of time. Fading colors, yellowing paper – these are signs of a history that demands attention. Through photo restoration, we embark on a mission to reverse the aging process and restore images to their former glory.
Rediscovering Cultural Heritage
Beyond personal nostalgia, old photos are windows into cultural heritage. They document fashion trends, societal norms, and historical events, offering a visual narrative that textbooks often fail to convey. Preserving these visuals is our commitment to safeguarding cultural legacies.
The Intricacies of Photo Restoration
Manual vs. Digital Restoration
Photo restoration is an art that marries tradition with technology. While manual restoration involves skilled artisans delicately retouching photographs, digital restoration employs advanced software to breathe life into images. The amalgamation of these approaches ensures a comprehensive restoration process.
Preserving Authenticity
At Forever Studios, we prioritize preserving the authenticity of each photograph. Our restoration experts meticulously analyze every detail, from color tones to minute imperfections, ensuring that the final result stays true to the original.
The Professional Touch
Expertise Matters
When it comes to revitalizing precious memories, expertise matters. Our team comprises skilled professionals with a keen eye for detail. This ensures that each photo undergoes a transformation that goes beyond restoration – it becomes a revitalization of the emotions encapsulated within.
State-of-the-Art Technology
In the realm of photo restoration, technology is a powerful ally. We leverage cutting-edge tools and software to enhance efficiency and accuracy. This commitment to staying at the forefront of technological advancements sets us apart in the industry.
DIY Photo Restoration: A Brief Guide
Embracing Creativity
For the enthusiasts eager to embark on a DIY photo restoration journey, creativity is the key. Photo editing software opens a world of possibilities, allowing individuals to add a personal touch to the restoration process.
Attention to Detail
Whether it's manually restoring a print or using digital tools, attention to detail is paramount. Every scratch and every discoloration tells a story, and the restoration process should respect and preserve these nuances.
Conclusion: Preserving the Tapestry of Time
In the symphony of technology and artistry, photo restoration emerges as a melody that resonates with the heart. We believe in the power of preserving memories, not just as images but as living testimonials of the past. Join us in this journey of reviving memories and weaving the tapestry of time anew.
0 notes
Text
How to Save Money on House Painting Costs: Tips for Homeowners in Dublin
Are you a homeowner in Dublin, Ireland, looking to give your home a fresh and vibrant look? House painting is a fantastic way to breathe new life into your abode, but it can also be a significant investment. In this blog, we will explore practical and cost-effective tips to help you save money on your house painting project while ensuring your home looks stunning. Let’s dive right in!
Planning and Preparation
Before you rush into the paint store, take a moment to plan your painting project. Choosing the right paint colours and types is crucial. The colours you select can significantly impact the overall aesthetic of your home. Plus, opting for high-quality paint can save you money in the long run, as it often lasts longer and requires fewer coats. Make sure to calculate the required amount of paint accurately to avoid over-purchasing.
Choosing the right paint can also impact your home’s energy efficiency. Some paints are designed to provide better insulation, keeping your home warmer in winter and cooler in summer. Look for paints with energy-efficient features to save money on heating and cooling bills.
Budgeting and Cost Saving
Setting a budget is a critical step in saving money on house painting. Create a detailed budget that includes not only paint but also supplies, equipment, and any potential labour costs if you choose to hire professionals. Research the cost factors specific to Dublin and Ireland, such as average labour rates and the price of paint in your region.
Finding affordable, high-quality paint is possible. Don’t underestimate the power of good deals on painting equipment and supplies. Shop during sales and consider buying in bulk to save money in the long run. Some stores offer their own lines of paint that can be just as good as the more expensive ones.
Save on paint application by using efficient techniques. For instance, using a roller for large, flat surfaces and a brush for details can reduce paint wastage and make your project more cost-effective.
DIY or Professional Painters
When it comes to house painting in Dublin, you have two primary options: DIY or hiring professional painters. While DIY can save you money on labour costs, it might not be the best choice. Consider your skill level, the size of the project, and your available time. The expertise of professional painters will result in a more efficient and higher-quality finish. If you force the DIY route even if you don’t have the skills to do so, you may ending up spending a lot more time and money due to multiple retouches. Because of this, the best option is to hire professional painters.
When you hire professional painters, choose local experts. Local painters are often more affordable, and they understand the specific needs and styles of Dublin homeowners. They can also provide a more personalised and cost-effective service, ensuring your project goes smoothly.
Proper Maintenance and Preservation
Once your painting project is complete, make sure you maintain it properly. Regular cleaning and upkeep can prolong the life of your paint job, saving you money in the long run. Be mindful of the cleaning products you use, as harsh chemicals can damage paint. Instead, opt for mild, non-abrasive cleaners.
Government Grants and Rebates
In Ireland, there are often government incentives for energy-efficient upgrades, including house painting. Be sure to check for grants and rebates offered by local authorities like the Sustainable Energy Authority of Ireland (SEAI) to help offset your painting costs. Such incentives not only save you money but also contribute to a more sustainable home.
Saving money on house painting in Dublin is possible with proper planning, cost estimation, and a few smart choices along the way. By following these tips, you can refresh your home’s appearance without breaking the bank. Whether you decide to go the DIY route or hire professional painters, remember that a well-executed painting project can add value to your home and provide you with years of enjoyment. So, roll up your sleeves, plan your project, and enjoy the transformation of your Dublin home!
Do you need house painters for your home in Dublin? Do you need to know more about what can be done to save on house painting costs? Our experts can answer your questions and address your concerns. Call us at 086 608 1817 or click here to reach us today!
0 notes
Text
Photo editing service
A photo editing service is a professional service that specializes in enhancing and modifying photographs to improve their overall quality, appearance, and appeal. These services offer a wide range of editing techniques and tools to address various aspects of a photo, such as color correction, exposure adjustment, removal of imperfections or blemishes, retouching, cropping, resizing, and much more. Photo editing services typically employ skilled editors who are proficient in using advanced software like Adobe Photoshop or Lightroom to achieve desired results. By utilizing these services, individuals and businesses can transform their ordinary photos into visually stunning and captivating images, suitable for various purposes like online marketing, social media, printing, personal use, and professional portfolios.
- Professional photo retouching

Professional photo retouching is the process of enhancing and improving the appearance of a photograph. It can involve various techniques, such as adjusting brightness and contrast, removing blemishes or wrinkles, smoothing skin, correcting colors, removing or adding elements, and more.
To get professional photo retouching done, you have a few options:
1. DIY using photo-editing software: If you have basic editing skills and access to software like Adobe Photoshop or Lightroom, you can retouch your photos yourself.
2. Hiring a freelance retoucher: There are many freelance retouchers available online who specialize in photo retouching. Platforms like Upwork, Fiverr, and Freelancer allow you to hire retouchers based on their skill level and portfolio. Make sure to communicate your requirements and provide reference photos for clear instructions.
3. Working with a professional retouching service: Several companies and agencies specialize in professional photo retouching. They often have a team of retouchers with different specializations and offer a range of services. You can search online for reputable retouching services and compare their prices and portfolios before making a decision.
When choosing a method, consider your skill level, time constraints, and the level of retouching you require. It's important to communicate your expectations clearly and provide any specific instructions or reference images to achieve the desired results.
- Color correction and enhancement

Color correction and enhancement is the process of adjusting and improving the colors in an image or video. It is commonly used in photography, graphic design, and video production to ensure accurate and visually appealing colors.
There are several techniques and tools available for color correction and enhancement, depending on the software you are using. Here are some common methods:
1. White Balance Adjustment: This involves adjusting the colors in an image to remove any unwanted color casts. It provides a neutral color balance and ensures that whites appear true white.
2. Exposure Adjustment: This helps to correct the brightness and contrast levels in an image or video. It allows you to brighten or darken specific areas to achieve the desired look.
3. Saturation and Vibrancy Adjustment: These adjustments control the intensity and richness of colors in an image or video. Increasing saturation can make colors more vibrant, while decreasing it can create a more muted effect.
4. Selective Color Correction: This technique allows you to adjust the individual colors in an image or video. It can be used to enhance or correct specific colors, such as making blues more vibrant or reducing the intensity of reds.
5. Curves and Levels Adjustment: These tools provide granular control over the tonal range and color balance of an image or video. They allow you to adjust shadows, highlights, and midtones to fine-tune the overall look.
6. Color Grading: This is a more advanced technique used in video production to create a specific mood or look. It involves adjusting the color tones and creating a consistent color scheme throughout a video.
When it comes to color correction and enhancement, it's important to work with the original files and make non-destructive edits whenever possible. This allows you to easily revert back to the original if needed.
Different software applications offer these color correction and enhancement tools, such as Adobe Photoshop, Lightroom, DaVinci Resolve, and Final Cut Pro, among others. It's important to familiarize yourself with the specific tools and processes within your preferred software to achieve the desired results.
- Background removal and replacement

Background removal and replacement refers to the process of isolating the main subject in an image or video and removing the existing background. This allows for the replacement of the original background with a new one, creating a different visual context or enhancing the overall aesthetic of the image or video.
There are various techniques and tools available for background removal and replacement. Some popular methods include:
1. Manual selection: Using selection tools in photo editing software, such as Photoshop, the user manually selects the subject and removes the background. This method requires precision and can be time-consuming, especially for complex images.
2. Background eraser tool: Many image editing software provide a background eraser tool that automatically removes background pixels based on similar color or tone. This tool requires fine-tuning to ensure accurate removal.
3. Masking: With masking, the user can create a layer mask to reveal or hide certain parts of an image. By painting over the areas to be removed or kept, the background can be effectively separated from the subject.
4. Deep learning-based methods: Recent advancements in AI and machine learning have introduced automated background removal techniques. These methods utilize deep learning algorithms to analyze and extract the main subject from an image or video. Tools like Adobe Sensei, Remove.bg, and Unscreen utilize these techniques to offer quick and accurate background removal.
Once the background is removed, the user can replace it with a new background of their choice. This can be done by either manually adding a new background or using pre-existing background templates or stock images. Some advanced software even allows for the seamless integration of the main subject with the new background, ensuring a realistic and visually pleasing result.
It's important to note that the effectiveness of background removal and replacement techniques depends on factors such as image complexity, subject extraction accuracy, and the user's skill level. Experimenting with different methods and tools will help achieve the desired outcome.
- Image resizing and cropping
When it comes to image resizing and cropping, there are several methods you can employ depending on your requirements and the tools at your disposal. Here are a few common approaches:
1. Image Editing Software: This is the most versatile and commonly used method. Software like Adobe Photoshop, GIMP, or Pixlr allows you to easily resize and crop images. These tools provide precise control over dimensions, resolution, aspect ratio, and cropping. You can choose to resize by percentage, specific dimensions, or even maintain the original aspect ratio while resizing. Cropping allows you to select a specific portion of an image and remove the rest.
2. Online Image Editors: If you don't have access to dedicated image editing software, you can use online image editing tools such as Canva, Fotor, or Pixlr. These web-based tools offer resizing and cropping features similar to dedicated software. You can upload your image, specify the desired dimensions, and then either crop or resize accordingly.
3. Command Line Tools: If you prefer using the command line or need to automate the process, you can use command line tools like ImageMagick. ImageMagick is a powerful tool that provides various command line options for image manipulation, including resizing and cropping. You can find detailed documentation and examples on the ImageMagick website.
4. Programming Libraries: If you are familiar with programming, you can utilize libraries such as OpenCV (for C++/Python), PIL/Pillow (for Python), or GD (for PHP) to perform image resizing and cropping programmatically. These libraries provide APIs and functions that allow you to manipulate images, including resizing and cropping.
Remember to always work on a copy of your original image to preserve the original and avoid losing any important data. Additionally, be mindful of the aspect ratio to prevent distortion when resizing and choose the appropriate cropping ratio to maintain the desired composition.
- Beauty and skin retouching

Beauty and skin retouching is a technique used in photo editing to enhance the appearance of a person's skin and overall beauty. There are various software applications and tools available that can be used for this purpose.
When retouching skin, the goal is to achieve a natural and subtle enhancement while maintaining the person's original features. Here are some common techniques used in beauty and skin retouching:
1. Blemish Removal: This involves removing any acne, spots, or other imperfections on the skin. Clone stamp or healing brush tools can be used to carefully remove blemishes without affecting the surrounding areas.
2. Skin Smoothing: To create a smooth and flawless look, techniques like frequency separation can be used. This involves separating the texture and color of the skin and then using a blur or smoothing effect on the texture while preserving the color information.
3. Skin Tone and Color Correction: Adjusting the skin tone and color can help achieve a more even and vibrant look. Tools like curves or color balance can be used to correct any color imbalances or discolorations.
4. Reducing Wrinkles and Fine Lines: Techniques such as dodge and burn can be used to selectively lighten or darken areas, helping to reduce the appearance of wrinkles and fine lines.
5. Enhancing Features: Beauty retouching may involve enhancing features such as eyes, lips, and hair. Techniques like dodge and burn can be used to enhance highlights and shadows, adding depth and dimension.
It's important to approach beauty and skin retouching with care and avoid excessive edits that result in an unnatural or unrealistic appearance. It's also essential to respect the person's individuality and ensure their consent when retouching their photos.
- Object and people removal
Removing objects and people from images is a common task in image editing and graphic design.
1. Content-Aware Fill: Many photo editing software, such as Adobe Photoshop, offer a Content-Aware Fill feature. This tool analyzes the surrounding areas of the object or person you want to remove and fills in the space with similar textures and colors, creating a seamless result.
2. Cloning/Healing Brush: Another common method is to use cloning or healing brushes. These tools allow you to sample pixels from one area of the image and paint over the object or person you want to remove. This technique requires careful attention to detail to ensure a natural-looking result.
3. Layer Masking: If you are working with layers in your image editing software, you can use layer masking techniques to remove objects or people. By creating a layer mask and painting black on the mask where you want to hide the object or person, you can effectively remove them.
When using any of these methods, it's important to have good editing skills and pay attention to the details to achieve a convincing result.
- Photo restoration and repair
Photo restoration and repair is the process of restoring and repairing old, damaged, or faded photographs to their original condition or improving their overall appearance. Here are some steps and techniques commonly used in photo restoration and repair:
1. Assess the damage: Begin by analyzing the condition of the photograph, identifying any cracks, tears, stains, color fading, or other damage. This evaluation helps determine the best approach for restoration.
2. Digitize the photo: If the photo exists in physical form, it's important to create a digital copy. This can be done by scanning the image using a high-resolution scanner or by taking a high-quality photograph of the original using a digital camera.
3. Clean the image: Remove any physical dirt, dust, or debris from the scanned or photographed image using software tools like Photoshop. Be careful not to damage the original photo during this process.
4. Fix cracks and tears: Use specific tools in photo editing software to repair any cracks or tears in the image. The clone stamp or healing brush tool can be used to copy and replace damaged parts of the photo with adjacent undamaged areas.
5. Restore color and contrast: Adjust the color balance, exposure, and contrast levels in the image to enhance its overall appearance. This can help revitalize faded colors and improve the image's clarity.
6. Remove stains and spots: Utilize the spot healing brush or patch tool in software like Photoshop to remove stains, spots, or scratches. These tools can be effective in seamlessly blending and repairing damaged areas.
7. Reconstruct missing parts: In cases where important elements of the image are missing, such as facial features, backgrounds, or objects, digital reconstruction techniques can be employed to recreate and restore those parts.
8. Preserve the original look: While restoration aims to improve the photo's appearance, it's crucial to maintain its original characteristics and avoid over-editing. Retain the original essence of the photograph while making necessary repairs.
9. Print and display: Once the restoration is complete, the photo can be printed on high-quality archival paper to ensure its longevity. Consider framing or storing it in an acid-free sleeve or album to protect it from further damage.
It's worth noting that photo restoration and repair can be a complex and time-consuming process, particularly for severely damaged photographs. In such cases, it may be best to consult a professional photo restoration service or specialist who has the expertise and specialized equipment to handle more challenging restoration projects.
- Adding or removing objects or text
To add or remove objects or text in a photo, you can use photo editing software such as Adobe Photoshop or GIMP (a free and open-source alternative).
1. Open the photo in the photo editing software.
2. To add an object or text:
a. Use the selection tools (e.g., the lasso tool or the pen tool) to outline the area where you want to add the object or text.
b. Create a new layer to add the object or text on.
c. Use the appropriate tool (e.g., the brush tool or the text tool) to place the object or text on the new layer.
d. Adjust the position, size, color, and other properties as needed.
3. To remove an object or text:
a. Use the selection tools to outline the object or text you want to remove.
b. Use the appropriate tool (e.g., the eraser tool or the content-aware fill tool) to remove the selected area.
c. Clean up any remaining artifacts or inconsistencies by using tools such as the clone stamp or the healing brush.
4. Once you are satisfied with the changes, save the edited photo.
It's also important to respect copyright and intellectual property rights when editing photos. Always make sure you have the necessary permissions to make changes to someone else's work.
- Photo manipulation and compositing
Photo manipulation and compositing refer to the process of altering and combining multiple images to create artistic or realistic visuals. It involves techniques such as retouching, color correction, blending, removing or adding elements, and adjusting overall composition to achieve a desired result.
Image editing software like Adobe Photoshop, GIMP, or Affinity Photo are commonly used for photo manipulation and compositing tasks. These software tools provide a wide range of features and tools that enable users to edit, enhance, and manipulate images with precision.
In photo manipulation, creative effects can be applied to images to create surreal or imaginative results. This can involve adding or removing objects, changing backgrounds, adjusting lighting and colors, and manipulating shapes and perspectives. The goal is to transform an image into something different from its original form.
Compositing, on the other hand, involves merging multiple images seamlessly to create a new composition. This technique is often used in areas like advertising, film, and digital art. Compositing allows for the creation of scenes that are challenging or impossible to capture in a single photograph.
Overall, photo manipulation and compositing are powerful techniques used by photographers, designers, and artists to create visually stunning and impactful images by manipulating and combining multiple photographic elements.
- Special effects and filters
Special effects and filters are commonly used in various forms of media, such as movies, photography, and social media platforms, to enhance visual aesthetics and create unique visual experiences. Here are some common types and applications of special effects and filters:
1. Visual Effects (VFX): Visual effects involve the use of computer-generated imagery (CGI) to create realistic or fantastical elements that are not feasible or safe to capture during filming. VFX can be used to create explosions, monsters, environments, and other imaginative elements.
2. Filters in Photography: Filters are often used in photography to alter the appearance of an image. They can enhance or change colors, add artistic effects, adjust brightness and contrast, or simulate vintage looks. Common types of filters include polarizing filters, color filters, and neutral density filters.
3. Augmented Reality (AR) Filters: AR filters are popular in social media apps like Instagram and Snapchat. These filters use augmented reality technology to overlay virtual elements onto real-time camera feed, allowing users to add effects, masks, animations, and interactive elements to their photos and videos.
4. Video Filters: Video filters are used to modify the colors, tones, and overall look of a video footage. They can help set the mood, create a specific atmosphere, or give a vintage or retro aesthetic to the video. Video editing software often provides a range of built-in filters that can be applied to achieve various visual effects.
5. Green Screen Effects: Green screen or chroma key effects are widely used in video production. In this technique, the subject is filmed in front of a green or blue screen, and during editing, the green or blue background is replaced with a different image or video. This allows for the integration of the subject into different environments or scenarios.
It's important to note that creating high-quality special effects and using filters often requires specialized software like Adobe after Effects, Photoshop, or dedicated video editing tools. Additionally, professional expertise and experience are usually needed to achieve desired results.
0 notes
Text
Affordable Photo Editing and Retouching Services: Elevating Your Visual Story
In a world dominated by visuals, the significance of striking images cannot be overstated. Whether you're a photography enthusiast or a seasoned professional, having access to affordable photo editing and retouching services can truly elevate your visual storytelling game. Join us in exploring the wonders of these services and discover how they can transform your ordinary photos into extraordinary visual narratives.
Unveiling the Magic: The Essence of Professional Photo Retouching Services
Photo retouching is akin to giving your images a makeover, and a professional touch is the key. Much like a skilled makeup artist enhances facial features, professional photo retouching services refine and enhance the visual appeal of your images. From removing blemishes to adjusting colors and lighting, it's the art of making your photos look their absolute best.
Why Affordable Matters: Unlocking Quality with Budget-Friendly Photo Retouching Services
Quality should not be reserved for the elite; it should be accessible to all. Affordable photo retouching services empower individuals and businesses alike to access top-notch editing without straining their budgets. It's about making professional-level photo enhancement accessible to everyone.
Listen Podcast: https://shorturl.at/rCK15
The Game-Changers: Exploring the World of Digital Photo Retouching Services
Blemish Begone: Flawless Faces with Digital Precision
Bid farewell to imperfections with digital finesse. Affordable digital photo retouching services can seamlessly erase blemishes, acne, and other skin imperfections, leaving you with a flawless and natural-looking face.
Color Correction: Vibrancy Brought to Life
Colors that pop, memories that last. Professional photo retouching services specialize in enhancing and correcting colors, ensuring every hue and tone is vivid and true to life. Your memories deserve to be as vibrant as the moment itself.
Perfecting Portraits: Beyond the Selfie with Precision
Transform every portrait into a masterpiece with precision. Affordable services can refine facial features, adjust lighting, and add a touch of glamour, making your portraits truly unforgettable.
Background Bliss: From Mundane to Magical Digitally
Change the scene, not the moment, with digital mastery. Affordable digital photo retouching services allow you to switch backgrounds, turning ordinary settings into extraordinary landscapes, all while preserving the essence of the original photo.
Old to Gold: Digital Photo Restoration at Its Best
Revive the past with a modern digital touch. Whether it's a faded family photo or a vintage snapshot, affordable digital retouching can breathe new life into old images, preserving precious memories for generations to come.
Finding Your Perfect Fit: How to Choose the Right Online Photo Retouching Services
Selecting the right online photo retouching services is crucial. Consider factors such as turnaround time, customer reviews, and the range of editing options. It's not just about affordability; it's about finding a service that understands and enhances your unique style.
DIY vs. Professional: Weighing Your Options for Photo Retouching Services
The DIY Dilemma: Pros and Cons of Self-Service Photo Editing
Is the DIY route for you? We'll explore the advantages and drawbacks of taking matters into your own hands when it comes to photo editing and retouching services.
Professional Perks: What Experts Bring to the Table in Photo Retouching?
The value of expertise. Discover why entrusting your photos to professionals can yield results that surpass your expectations.
Making the Most of Your Investment: Tips for Maximizing Photo Retouching Services
Get the best value for your investment. We'll provide insider tips on how to make the most out of affordable photo retouching services, ensuring that every penny spent is a penny well-invested.
Communication is Key: Conveying Your Vision Digitally
Your digital vision matters. Learn how to effectively communicate your expectations to ensure the retouching aligns with your unique style and preferences.
Trial and Error: Exploring Editing Styles Online
Don't settle, experiment online. Discover the importance of trying out different editing styles online to find the one that resonates best with your personal taste.
Consistency Counts: Building Your Visual Brand Digitally
A cohesive digital identity. Explore how consistent digital photo retouching services can contribute to building a recognizable and compelling visual brand for individuals and businesses alike.
In Conclusion: Your Digital Memories, Your Digital Masterpiece
As we conclude this journey into the world of affordable photo editing and retouching services, it's evident that transforming your digital memories into masterpieces is not only achievable but also budget-friendly. Whether you choose the DIY path or opt for professional assistance, the key is to embrace the digital magic that photo retouching brings to your images.
FAQs: Your Burning Questions on Photo Retouching Services Answered
Q1: Can affordable photo retouching really compete with high-end services?
A1: Absolutely! Affordable doesn't mean compromising on quality. Many budget-friendly services, including those offered by "Clipping World," provide exceptional results that rival their high-end counterparts.
Q2: How long does it take for photo retouching services to deliver the edited images?
A2: Turnaround times vary, but most services, including "Clipping World," provide a timeline during which you can expect your edited photos. It's essential to communicate any specific deadlines you may have.
Q3: Are there any risks involved in using affordable photo retouching services?
A3: Like any service, there are potential risks. However, thorough research, reading reviews, and choosing reputable providers like "Clipping World" can significantly minimize these risks.
Q4: Can I request specific edits, or do they follow a standard process?
A4: Many services, including "Clipping World," allow you to communicate your preferences and specific edits. Clear communication ensures the final result aligns with your vision.
#photo editing#retouching services#professional photo retouching service#photo retouching service#professional photo retouching services#photo retouching services#digital photo retouching services
0 notes
Text
Mysta Rias - Luxiem
Heyo, how’s it going~?
Srry for disappearing for a year xD got a job, have no time for simming unu BUT this is a special ocassion owo sad, but special (? Vtuber Mysta Rias is graduating soon, so I wanted to do a little something, and here is the little something, a Mysta sim uwu
I really love vtubers, and Luxiem is my fav group, and Mysta is one of my favs (I like Luca too much too xd) so I had to do this xd
I really loved how he turned out, and had too much fun painting his awesome shirt owo
If there is no choker is bcs I couldnt find one that I liked xD if someone founds a suitable choker for him please tell me ><
cc list uwu:
Skin:
https://mousysims.tumblr.com/post/627162293823848448/face-only-skinblend-masculine-feminine-all by @mousysims
Chin Slider:
https://miikocc.tumblr.com/post/648360817514971136/chin-slider
by @miikocc
Neck Slider:
https://www.simfileshare.net/download/1002156/ by @lemon-sims4
Teeth:
https://www.patreon.com/posts/default-non-19-34447183 by @magic-bot
Hair and hairband:
https://obsims.tumblr.com/post/693128668155904000/my-star-hairstyle by @obsims
Eyelashes:
http://kijiko-catfood.com/3d-lashes-uncurled-eyelashes-edition/
http://kijiko-catfood.com/eyebrow-ver2/ by @kijiko-sims
Eyebrows:
https://www.thesimsresource.com/downloads/details/category/sims4-hair-facial/title/s-club-wm-thesims4-eyebrows-34m/id/1336662/ by @sclub-privee
Eyes and sunglasses:
https://www.patreon.com/posts/di-eye-diy-eye-34678649
https://www.thesimsresource.com/downloads/details/category/sims4-accessories-female-glasses/title/ekseo-glasses/id/1384390/
by @pralinesims, sunglasses retextured by me
Shirt and pants:
https://www.patreon.com/posts/33735729
https://www.patreon.com/posts/high-waist-wide-64113941
by @gorillax3-cc
GGG is my fav for clothes <3
I retextured both uwu, although the pants was just the pockets and belt so I wouldn't count it as retexture haha
Hat:
https://www.sglynp.com/forum.php?mod=viewthread&tid=136930&highlight=luxiem by 掠仙LueXian
Gloves:
https://www.patreon.com/posts/nails-in-gloves-75020851 by @nv-games
Okey, see this, this is so clever! It add nails to the mesh of the fingers, so you can use it with any gloves you want owowo I just used NV-Games mesh, and then retextured EA's default gloves, so ty NV for making such a useful cc uwu
Shoes:
https://www.patreon.com/posts/58534893 by @jius-sims, retexture by me
CAS BG:
https://vyxated.tumblr.com/post/719719135185092608/cas-replacements-set-02 by @vyxated
Reshade:
https://fiesemietze.tumblr.com/post/641246832367992832/preface-download-at-the-end-reshade-version by @fiesemietze, I just retouched it a little xd no dof cause my pc explotes even when I have a 3060 ;-;
If something is missing, you can found it in my last posts maybe xd.
As always, if you want some retexture just pm me uwu
That’s all for today~
I have Yamada Saburo still in the works, is just that he doesnt convince me haha
Who should I do next? I like a lot of VTubers so maybe I can do a few more owo
PD. yes, he crotch area is too low, I know xd I couldnt fix it, maybe is bcs the pants are for female xd I tried to search for a crotch slider but... yeah, you can imagine what I found lol so it will stay like this xd
40 notes
·
View notes
Text

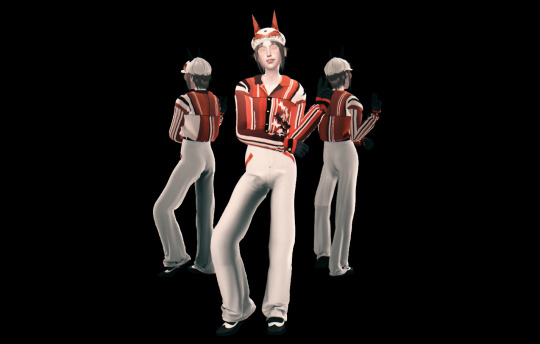
DIY..But only halfway. Retouching my horns for the Halloween season, and finally getting to paint the new horns. Best thing about Ara, she's like the third easiest troll if you just want to buy her horns. I got hese from Spirit Halloween some years ago. Hopefully I can get a Damara cosplay or Handmaid cosplay together.
#homestuck cosplay#diy projects#aradia megido#horns#im still stuck in this hell#there is no escape#i need more media to cosplay from
1 note
·
View note
Text
Mastering Product Photography on a Budget: A Comprehensive Guide by Zuber Memon

Product photography is an essential element for any business, and Zuber Memon is no exception. High-quality product images can help increase sales, enhance brand credibility, and create a lasting impression on potential customers. However, for small businesses or startups like Zuber Memon, investing in expensive photography equipment and professional photographers may not be feasible. That's where budget-friendly product photography comes into play.
In this comprehensive guide, we will explore cost-effective strategies and tips to help Zuber Memon excel in product photography without breaking the bank. From equipment choices to lighting setups and post-processing techniques, we've got you covered.
Choosing the Right Equipment
The first step in budget product photography is selecting the right equipment. While high-end cameras and lenses are ideal, there are alternatives that can yield impressive results without the hefty price tag. Consider the following:
a. Smartphone: Modern smartphones boast advanced camera capabilities, making them suitable for product photography. Ensure you have a phone with a high-resolution camera and adjustable settings.
b. Digital Camera: If you prefer a dedicated camera, opt for an entry-level DSLR or mirrorless camera. Look for second-hand or refurbished options to save money.
c. Tripod: Invest in a sturdy tripod to eliminate camera shake and ensure stability during shots.
Mastering Lighting
Lighting is crucial in product photography. Here's how to create professional-looking images on a budget:
a. Natural Light: Utilize natural light by shooting near a window. Soft, diffused light on overcast days works best. Use white curtains or diffusers to further soften harsh sunlight.
b. DIY Lightbox: Create a DIY lightbox using inexpensive materials like white poster board and tissue paper. Place your product inside for soft, even lighting.
c. Reflectors: Reflectors bounce light onto your subject, reducing shadows. Use household items like white foam boards or aluminum foil-covered cardboard as reflectors.
Styling Your Products
Product styling plays a pivotal role in showcasing your merchandise effectively:
a. Background: Use a plain, clutter-free background. White or light-colored backdrops work well for most products. Consider purchasing affordable backdrop options or create your own using large sheets of paper.
b. Props: Add props to enhance the product's story or demonstrate its use. Be cautious not to overwhelm the product itself.
c. Consistency: Maintain consistency in your product placement and styling across all images for a polished look.
Camera Settings and Composition
Understanding your camera settings and composition techniques can significantly improve your product photos:
a. Aperture: Use a wide aperture (low f-stop) for a blurred background (bokeh) that isolates the product.
b. ISO: Keep the ISO as low as possible to reduce noise in the image.
c. Composition: Experiment with angles, rule of thirds, and the Golden Ratio to create visually appealing shots.
Shooting Techniques
Practice different shooting techniques, such as:
a. Bracketing: Take multiple shots at different exposure levels and merge them in post-processing for optimal lighting.
b. Focus Stacking: Combine multiple images with different focus points to achieve full product clarity.
Editing and Post-Processing
Post-processing can elevate your product images to the next level:
a. Free Software: Utilize free or budget-friendly editing software like GIMP, Pixlr, or Lightroom's mobile app.
b. Retouching: Remove imperfections, adjust exposure, and enhance colors as needed.
c. Consistency: Maintain a consistent editing style for a cohesive product catalog.
Workflow and Organization
Establish an efficient workflow for capturing, editing, and organizing your product photos. Consistency in file naming and folder structure will save you time and frustration.
Practice and Patience
Finally, the key to mastering product photography on a budget is practice. Continuously refine your skills and learn from your mistakes. Be patient with yourself, as excellence takes time to achieve.
Conclusion
Incorporating these budget-friendly product photography techniques will allow Zuber Memon to create compelling images that attract customers and boost sales. With the right equipment, lighting, styling, and post-processing, stunning product photos are within reach without breaking the bank. Start capturing your merchandise in its best light today!
1 note
·
View note
Text
The Definitive Guide to Professional Photos for Aspiring Models
Hello future super models! Anthony Mongiello here, your go-to guy for headshots in beautiful Los Angeles. Wondering if you really need professional photos for your modeling career? Well, grab a seat, because investing in top-notch images is your golden ticket to the runway.
THE FIRST IMPRESSION
In the competitive world of modeling, first impressions are everything. You want to grab casting directors and agents by the eyeballs and make them pause in awe. Professional photos do just that – they’re your golden key to unlocking the doors of opportunity. These images tell your story before you even utter a word. I’ve seen it happen time and time again – a killer headshot can be exactly what you need to land you that coveted modeling gig.
STANDING OUT IN THE CROWD
In a city where everyone is vying for the spotlight, you need to stand out like a diamond in a sea of rhinestones. Professional photos elevate your portfolio from mundane to mesmerizing. As an award-winning headshot photographer in LA, I understand the nuances of capturing your unique essence. Whether it’s the sparkle in your eyes, the tilt of your head, or the confidence in your posture, these are the elements that set you apart. When your images are a work of art, casting directors take notice, and suddenly, you’re not just another face – you’re the face they remember.
DIY VS. PROFESSIONAL
Now, I get it. With smartphones boasting high-quality cameras, you might be tempted to grab a friend and go on a DIY photoshoot adventure. But hold up, superstar – because the professional route is the only way to go.
LIGHTING AND COMPOSITION
Sure, you can snap a quick pic with your phone, but can you capture the perfect lighting that enhances your features and creates jaw-dropping shadows? Can you compose a shot that not only showcases your beauty but also tells a story? That’s where the magic of a professional photographer comes in. I have mastered the art of lighting and composition, turning your photos into masterpieces that leave a lasting impression.
RETOUCHING AND EDITING
Let’s face it – we all have our imperfections. But do you want those pesky blemishes stealing the spotlight in your modeling portfolio? Of course not! Professional photos undergo a touch of editing magic to accentuate your strengths and diminish any distractions. As your trusted photographer, I bring years of experience to the table, ensuring that every image in your portfolio is a flawless work of art.
THE POWER OF A KILLER HEADSHOT
Now, let’s zoom in on the star of the show – the headshot. It’s not just a close-up of your face; it’s the gateway to your modeling success.
CONFIDENCE CAPTURED
A killer headshot exudes confidence. It’s not just about looking pretty – it’s about transmitting a powerful presence that screams, “I own the runway!” When casting directors see that confidence, they can’t help but envision you as the face of their next big campaign.
VERSATILITY FOR VARIED ROLES
Modeling isn’t a one-size-fits-all industry. Whether you’re strutting down a catwalk, gracing the pages of a magazine, or showcasing a product, your headshot needs to be as versatile as you are. I specialize in capturing the essence of your unique style, ensuring that your portfolio reflects the dynamic range of roles you’re ready to conquer. From fashionista to fitness models, I’ve got you covered.
THE EXPERIENCE
So, you’re sold on the idea of professional photos – but why choose Anthony Mongiello Photography for your modeling journey? Well, because the ride with me is nothing short of extraordinary.
TAILORED SESSIONS FOR EVERY MODEL
No two models are alike, and your photoshoot should reflect your individuality. With Anthony Mongiello Photography, each session is tailor-made to bring out your best. We discuss your goals, preferences, and the vibe you want to convey, ensuring that every frame tells your unique story. This personalized approach sets the stage for an unforgettable experience and jaw-dropping images.
PINNACLE OF PROFESSIONALISM
In the fast-paced world of modeling, time is of the essence. When hiring me for your headshots, you’re investing in a seamless, professional experience. From the initial consultation to the final delivery of your images, I prioritize efficiency without compromising quality. Because in this industry, timing is everything.
THE VERDICT
As you start on your modeling journey, remember this – professional photos aren’t just a luxury; they’re a necessity. It’s the secret weapon that catapults you from aspiring models to in-demand superstar. So, if you’re ready to take the leap, schedule your photo shoot with me today. Let’s capture your essence, tell your story, and set the runway ablaze. Your modeling success starts with a click – and that click is just a photoshoot away!
Original Content published on Anthony Mongiello website. Read Original Content: https://www.anthonymongiello.com/guide-to-professional-photos-for-models/
0 notes
Text
Discover 7 Best Cricut Software to Get Pro-level DIY Projects
The Cricut cutting machine is used widely by DIY enthusiasts. No matter whether you are a fashion designer or a crafter, you can use the Cricut machine and let your design enter the real world. However, using a Cricut cutting machine is not enough; you also need Cricut software where you can create your designs. This software allows you to cut out any kind of shape and font. Using this, you create stunning projects on different devices, like desktop computers, tablets, laptops, and smartphones.
Sometimes, the digital die-cutting unit won’t allow you to cut multiple fonts. As a result, you need to buy a separation, which is far more expensive and redundant to invest in. Hence, I will suggest you use similar tools. For this, you need to read the guide till the end.
In this blog, you will find the most widely used Cricut app alternatives that will provide you with the platform to show your creativity.
1. Cricut Design Space
Design Space is a software platform provided by the Cricut brand itself to create layout art and text, which can be further cut on Cricut machines. This Cricut software is completely free and comes with your Cricut device.
The tool is powerful and easy to use, which lets you complete numerous projects from scratch. Since the software was developed for the Cricut machine, you won’t find some features anywhere else.
Moreover, the software works well with desktop and mobile devices. So, grab your phone and PC and start diving into your design. In addition, it includes a lot of free templates, designs, and fonts for popular items such as cards and invitations.
2. Adobe Photoshop

Photoshop is an excellent tool for creating graphics and editing your photos. Mostly, it is used by graphics designers and professional people, including hobbyists.
Here, you can work on photographs to retouch and manipulate them as per your wish. Not only that, but it is quite good at making all types of vector art, making it a crucial tool in your Cricut list.
Since Photoshop provides a variety of tools, you can create several designs that you can imagine. Even though it is not affordable software, it can do a lot if you use it. Plus, this can be an irreplaceable alternative to Cricut software.
3. Adobe Illustrator
Adobe Illustrator is one of the best Cricut software for professionals and artists who use Cricut. On Illustrator, you can create various shapes, symbols, and texts with captivating font styles.
You will not get stuck in between while working on it, as you will be able to find the solutions through the online tutorials. It’s all because of its popularity among arts enthusiasts.
Go for this software if you are ready to pay to get all the features you need.
4. Canva
This is the popular free tool that you can use as a Cricut software. The tool has a pleasing interface with all the features to make your design look gorgeous. However, the platform is especially good for lettering and stickers.
Additionally, Canva gives a wide range of options for font styles that you can use for free. For stickers, you can use pre-made templates that are downloadable, making it easy for anyone to design without having prior experience.
If you are okay with a premium subscription, then go for the Canva brand kit, where you can access an extensive library that includes millions of stock photos, videos, audio, and graphics. It offers all the tools to create the premier design that you can think of.
5. CorelDRAW
It is a multitasking Cricut software and is ideal for creating vector graphics. By using this app, you can make signs, logos, 3D models, animations, and other internet graphics on your computer.
Many professional photo artists use this platform to work on their new ideas to align with the latest trends.
It also gives you the option to customize your existing designs. Also, you can work on predesigned templates that include floral and geometric types of patterns.
Corel offers a free trial. Hence, you can try its free trial before you make a purchase.
6. Inkscape

This is completely free Cricut software as it is an open-source vector graphics editor. You can give it a try because it is capable of working with raster and vector images.
If you want vinyl material and paper to be cut, then this software can help you in numerous ways to create your designs by using paths and shapes.
The most advanced feature of Inkscape is its ability to export SVG files, which are known as the universal file type that lets you move between different design programs without any problems. This feature makes it an excellent Cricut software for your Cricut projects.
7. Affinity Designer

The tool is a perfect choice for those who want to work in detail. For example, if you want to edit every pixel of your designs, then you must go for it. It is capable of zooming up to 1,000,000%, which is great for working on each pixel to make your design look better.
The Affinity designer comes with amazing features, such as a powerful color tool to select colors from any photos and many more.
Similarly, you will be amazed by its clean and straightforward interface. It is quite similar to Inkscape or Sketchup. It is my advice that you consider the best Cricut software to use in 2023.
FAQs
Can I use Canva for my Cricut projects?
Yes, Canva is a free tool that provides a range of features to edit your designs, images, and texts. It is also comparable with Cricut. To use this software, you must create your Canva account, and once done, you can start your creativity. Plus, you can use its subscription version to access extensive libraries.
Is it possible to use Cricut Design Space for free?
Yes, definitely! You can download the Design Space account without a subscription. Design space is the only way to run your Cricut machine. Additionally, it doesn’t require Cricut Access to use it. Using this app will allow you to get limited free fonts and images, which you can infuse into your design, too, for free of cost.
Do I need a computer to use Cricut?
No, you can use a Cricut machine without a computer as well. For this, you need a smartphone, and you can do your design to some extent. Using a smartphone has its disadvantages, such as you will not get all the features that you might be getting on your computers. Therefore, it is always good to use a computer if you want to design something better.
#cricut software#cricut new machine setup#cricut.com/setup#cricut setup#cricut explore air 2#cricut#design.cricut.com#design.cricut.com/setup#cricut design space login#design
0 notes
Last Seen Blogs
jackce
Jackce

disgruntled-bisexual
Untitled

fam-ily-system
FamILY System

ledmyplaceusa1-blog
LEDMyplaceusa

your-clt-local-lesbean
ray the gay