#DIYTips
Explore tagged Tumblr posts
Visit Tumblr Blog
Explore Tumblr blogs with no restrictions, modern design and the best experience.
Last Seen Tumblr Blogs


Fun Fact
70% of Tumblr users say the Dashboard is their favorite place to spend time online.
Text
A simple and beautiful DIY tip that can make your life easier ✨😉
7 notes
·
View notes
Text
Once upon a time, in a quiet little town surrounded by towering pines and whispering rivers, there was a woodshop named Craft Master Plans. Now, this was no ordinary shop; it was a place where wood whispered its stories, and tools hummed along as if enchanted by a hidden magic. The shop belonged to an old carpenter named Elias, known across the land for his unmatched craftsmanship and wisdom passed down through generations.
#WoodSelection#DIYTips#Woodworking101#ProjectPlanning#CraftMasterPlans#WoodworkingMagic#EnchantedWoodshop#WoodworkingSecrets
4 notes
·
View notes
Text
Why is My Water Heater Making Noises: What They Mean 🔊
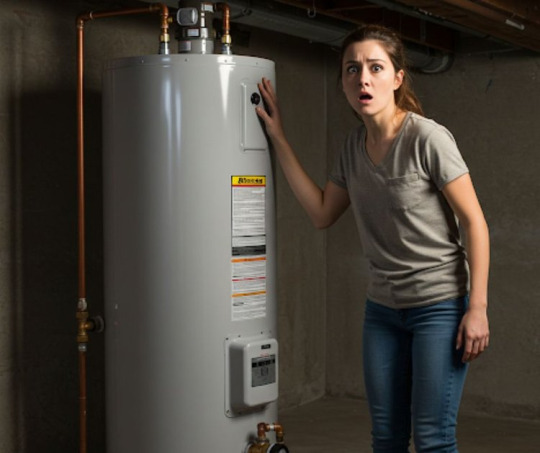
You didn't ask for drama, but your water heater making noise at 11:47 PM clearly has other plans. A pop here, a hiss there, maybe a metal-on-metal screech that sounds like your pipes are auditioning for a horror film. 😬
Most people brush it off: "It's just the heater doing heater things." Until one day, it's not just noise. It's rust in the water. Or a bloated power bill. Or a tank leak big enough to rinse your garage floor. 😭
Look, your water heater isn't being "quirky." It's giving you clues – and ignoring them makes you one warranty clause away from regret. Let's decode what those sounds really mean!
(Another eye-catching image/GIF, perhaps showing water being flushed from a drain valve looking murky, then clear.)
Decoding the Drama: What Are Those Noises?!
Popping or Crackling:
Sounds like: Rice Krispies in a jet engine. 🥣✈️
What it means: Sediment buildup at the bottom of your tank. When the burner fires, water superheats underneath that gunk and bursts through.
Why care: Kills efficiency, shortens lifespan, can lead to pressure buildup.
The fix: FLUSH THAT TANK! Not next month. Now. (Seriously, annual flushes save lives... er, heaters.)
Whistling or Screeching:
Sounds like: A tea kettle, but from your heater. 📢
What it means: Something's narrowing the water's path – like scale buildup or a partially closed valve. Water's squeezing through like toothpaste through a pinhole.
Why care: BIG pressure red flag. Your heater is under strain.
The fix: Check your inlet/outlet valves (make sure they're WIDE open). If it keeps whistling, it's begging for professional help.
Rumbling:
Sounds like: A distant thunderstorm. ⛈️
What it means: More sediment! Water trapped beneath the gunk is boiling, sending vibrations through the tank.
Why care: Boiling water + trapped minerals = pressure. Pressure = stressed components. Stressed components = failure. Slow countdown!
The fix: Tank flush again. If it's old (pushing a decade+), might be time for a water heater replacement.
Knocking or Banging:
Sounds like: A drunk raccoon stuck in your walls. 🦝
What it means: Classic "water hammer" – sudden stops in water flow. Or thermal expansion, or loose pipes.
Why care: Can damage pipe joints, valves, and your plumbing system.
The fix: Install water hammer arrestors. Secure loose pipes. Call a pro if it persists.
Humming:
Sounds like: A bored bee. 🐝
What it means: Often just loose heating elements vibrating (for electric heaters). Annoying, usually not dangerous.
Why care: Get it tightened before it shakes itself into misalignment.
Water Heater Making Noise When Water Is Off? Even when you're not using hot water, the heater cycles to maintain temp. Temp changes cause expansion/contraction, leading to creaking or ticking. Sometimes normal, but if it's loud or constant, it can mean sediment or thermal stress.
Why Do Heaters Get So Noisy? It's a high-pressure job! 95% of noise comes from:
Sediment Buildup: Hard water minerals are the #1 culprit.
Thermal Expansion: Water expands when heated. If no expansion tank, parts flex and creak.
Loose/Failing Parts: Heating elements, pipe joints, pressure valves wear out or get loose.
Valve/Pressure Issues: Partially closed valves or failing pressure relief valves cause noise and strain.
When to DIY (and When to CALL A PRO!):
DIY: Check/fully open valves. Perform a tank flush (annually!). Tighten loose components (with power OFF!).
CALL A PRO if:
Noises persist after DIY fixes.
You see any water damage or leaks.
Your heater is older than your last car.
You're unsure about touching anything (especially gas lines or electrical!).
Preventive Tips (So You Don't Hear the Drama!):
Flush your tank annually! (Seriously, do it.)
Check valves/fittings periodically.
Install a water softener if you have hard water.
Get professional inspections every 1-2 years.
Your water heater isn't making noise to be quirky. It's giving you a heads-up! Don't ignore it. Handle the simple stuff, and for the big stuff, call reliable plumbing experts who won't upsell you unless it's genuinely time for a water heater replacement.
This article is first published on - Why is My Water Heater Making Noises: What They Mean
#WaterHeater#HomeMaintenance#PlumbingProblems#DIYTips#HomeOwner#HotWater#SedimentFlush#HomeRepair#DontIgnoreTheSigns#PreventativeMaintenance
0 notes
Text
The Real Cost of Ignoring Gutter Cleaning
Gutter cleaning is one of those home maintenance tasks that’s easy to forget—until it’s too late. It’s tempting to think that a few leaves or twigs won’t do much harm, but the truth is, neglecting your gutters can lead to serious and expensive damage to your home. From roof leaks to foundation issues, the consequences stack up quickly.
If you’ve ever searched for gutter cleaning near me or wondered whether it’s worth hiring a rain gutter cleaning service, this post is for you.
💸 Hidden Expenses That Come With Clogged Gutters
Ignoring gutter cleaning services can cost you far more than a cleaning fee. Here’s what you could be facing down the road:
1. Roof Repairs & Water Damage
When your gutters are blocked, water backs up and seeps under the roof shingles. Over time, this leads to rot, mold, and ceiling leaks. Repairing even a small section of roof damage can run into hundreds or thousands of dollars.
2. Cracks in Your Foundation
Overflowing water from blocked gutters often pools around the base of your home. That water seeps into the ground and applies pressure to your foundation. Eventually, this can result in cracks, shifting, or even complete foundation failure.
Search for guttering near me to help avoid these costly issues.
3. Basement Flooding
Once water breaches your foundation, it’s a short trip to your basement. Flooding can ruin flooring, drywall, insulation, and anything you’re storing down there. It also creates the perfect environment for mold and mildew to thrive.
4. Damaged Siding & Exterior Walls
Clogged gutters allow water to overflow and run down your siding. Over time, this causes peeling paint, warped wood, rust stains, and sometimes internal wall leaks. Repairing siding damage or replacing waterlogged materials adds unnecessary expense to your home maintenance budget.
5. Landscape Destruction
A common but overlooked consequence of overflowing gutters is landscape erosion. Instead of being directed through downspouts, rainwater gushes down uncontrolled, washing away mulch, exposing roots, and damaging plants or garden features.
6. Pest Infestations
Leaves and standing water in your gutters attract pests. Mosquitoes breed in stagnant water. Birds and rodents nest in gutter debris. Insects like termites are drawn to damp, rotting wood. Left unchecked, clogged gutters become a welcome mat for all kinds of pests.
Search tip: If this sounds familiar, start with a local gutter repair contractor to inspect for hidden pest entry points.
7. Gutter & Fascia Damage
When gutters become too full of debris, they sag under the weight. That strain can cause them to separate from your home or damage the fascia board they’re attached to. The cost to replace gutters and fascia boards quickly adds up—especially if you delay repairs.
Related searches: gutter cleaning Sacramento, sacramento gutter replacement
8. Decreased Property Value
Visible damage from clogged gutters—like peeling paint, roof leaks, and cracked foundations—lowers curb appeal and property value. Even if your home looks fine on the outside, inspectors will flag issues caused by neglected maintenance.
If you're planning to sell, invest in a gutter cleaning service beforehand to avoid losing value or deal flow during inspections.
🕒 How Often Should You Clean Your Gutters?
Generally, homeowners should clean their gutters at least twice a year—in spring and fall. If your home is surrounded by pine trees, or you’ve experienced heavy storms, more frequent cleaning may be needed.
Search for gutter cleaning Sacramento CA or your local area to find trusted help during these seasons.
🔧 Is DIY Gutter Cleaning Enough?
DIY gutter cleaning might seem like a cost-saving move, but it comes with safety risks, especially for multi-story homes. Professional gutter cleaning services often include debris removal, downspout flushing, system inspection, and early repair detection.
If you’ve searched for gutter repair Folsom CA or similar terms lately, it may be time to upgrade from DIY and call in the pros.
🧾 Bottom Line: Gutter Cleaning Is a Smart Investment
While skipping gutter maintenance might save money short-term, it usually results in higher long-term expenses. Water damage, pest control, landscape repair, mold remediation, and structural fixes can cost thousands. Regular rain gutter cleaning service is affordable, fast, and can extend the lifespan of your roof, siding, and foundation.
Next time you notice leaves piling up or water overflowing, don’t wait. Search for gutter cleaning near me and take proactive steps to protect your home before the next downpour.
#HomeMaintenance#GutterCleaning#DIYTips#RainGutters#WaterDamage#HomeCare#GutterRepair#RoofCare#FoundationTips#SeasonalHomeTips
0 notes
Text
Create a Strong Home Brand
http://home-how.com is short, clear, and ideal for blogs, home improvement platforms, or property content. 🔗 https://www.godaddy.com/en-uk/domainsearch/find?domainToCheck=home-how.com
0 notes
Text
Fancy yourself as a bit of a DIY enthusiast? We reckon there’s nothing quite as satisfying as crafting your own little slice of outdoor paradise. That’s why we’ve put together this handy guide packed with DIY tips to help you nail your garden building DIY project.
#garden room#garden shed#log cabin#summer house#diy#diy projects#diy build#do it yourself#garden#home and garden#workshop#home and living#diytips#building#construction#garden tips#tips and advice#DunsterHouse#man cave#home gym#office space#home & lifestyle#outdoor space#outdoorliving#outdoor entertaining#house and home#home bar#games room#garden design#garden project
0 notes
Text
🌿 Outdoor Furniture Care 101 🌿

Did you know that direct sunlight can make wood brittle and rain can cause mildew on cushions? Don’t let the weather ruin your outdoor space! Learn how to: ✔️ Choose the best weather-resistant materials ✔️ Prevent rust & mold buildup ✔️ Keep your patio furniture looking brand new Read our full guide here! 📖
0 notes
Text

DIY Garage Door Repair – When to Call in the Experts
DIY repairs can save money—but sometimes, it's better to call in the professionals. If your garage door is making strange noises, has a broken spring, or you’re unsure about what’s wrong, don’t risk further damage. Let LIV Garage Doors handle the tough stuff! We offer fast, reliable service for all your garage door needs.
0 notes
Text
Pest Control: Why It’s Essential for Your Home

Pests like rodents, termites, and cockroaches can cause serious damage to your home and health! 🤯 That’s where pest control comes in—helping you eliminate and prevent infestations effectively.
🔹 Types of Pests: From rats 🐀 and bedbugs 🛏️ to mosquitoes 🦟 and ants 🐜, each pest requires a unique approach. 🔹 Methods of Pest Control: You can use chemical, biological, physical, and cultural control methods to keep your home pest-free. 🔹 DIY vs. Professional Pest Control: While DIY solutions work for minor issues, professional services ensure long-term protection.
💡 Prevention Tips: ✅ Keep your home clean 🧹 ✅ Seal all cracks and entry points 🚪 ✅ Properly dispose of waste 🚮 ✅ Maintain your yard 🌿
Don’t wait for an infestation! Act now and protect your home from unwanted guests. 🏠✨
🔗 Read more: Full Guide on Pest Control
0 notes
Text
🏠 Keep Your Garage Door in Top Shape All Year Long! 🌟 Seasonal Maintenance Tips for Smooth Operation
Your garage door is an unsung hero of your home. Not only does it keep your car safe and your garage secure, but it also plays a key role in your home’s curb appeal. But just like any other part of your house, your garage door requires a little love and care to perform its best. 🌟 Don’t wait for a breakdown to happen—keep your garage door in peak condition with these simple, seasonal maintenance tips.
🔑 Why Garage Door Maintenance Matters: More Than Just Convenience!
A little maintenance goes a long way when it comes to your garage door. Here's why you should stay on top of it:
Enhanced Safety 🛡️: Regular maintenance helps spot potential hazards before they cause serious issues.
Longevity ⏳: Proper care can extend the life of your door, keeping it functioning for years.
Save Money 💰: Preventative maintenance keeps repair costs low and performance high.
Smooth Operation 🚪: A well-maintained door runs quietly and efficiently—no more annoying squeaks!
For more tips on keeping your home safe and functional, check out my post on Home Security Tips.

🌸 Spring: Fresh Start for Your Garage Door!
Spring cleaning isn’t just for your home—your garage door deserves a little attention, too!
🔧 Tighten Hardware: Check bolts, nuts, and screws. Tighten anything loose to avoid future trouble.
🧽 Clean the Tracks: Dust and dirt can slow things down. Wipe down the tracks for smooth movement.
⚖️ Test the Balance: Disconnect the opener and manually lift the door. If it doesn’t stay in place, a professional may need to adjust the springs.
Make sure to also check out my Ultimate Spring Cleaning Guide for more home maintenance tips.
🌞 Summer: Keep It Running Smoothly in the Heat!
Summer’s heat can put extra stress on your garage door. Stay ahead with these tips:
🛢️ Lubricate Moving Parts: Apply garage door lubricant to hinges, rollers, and tracks to prevent rust and friction.
🌪️ Check the Weatherstripping: Inspect the rubber seal at the bottom of your door. Replace it if it’s cracked to keep the heat (and pests!) out.
🔗 Inspect Cables: Check cables for fraying or wear. If you spot damage, call in the experts to avoid accidents.
For more on preparing your home for summer, see my post on How to Beat the Summer Heat at Home.
🍂 Fall: Get Ready for the Cooler Months Ahead
Before the cold sets in, make sure your garage door is ready to handle it!
🚨 Test Auto-Reverse: Test the auto-reverse safety feature. If it doesn’t reverse when it hits an object, the sensors may need adjustment.
🧼 Clean and Paint: Wipe down the door to remove dirt. If you spot any rust, it’s time for a fresh coat of paint!
🔋 Check the Opener: Make sure your opener is functioning well and test its batteries for peace of mind.
Also, check out my Fall Home Prep Checklist for more tips to get your home ready for the season!
❄️ Winter: Ensure Your Door Performs in the Cold!
Winter can be tough on garage doors, so a little preparation goes a long way.
🔄 Inspect Rollers: Make sure the rollers are moving freely. Replace any worn-out ones to prevent freezing.
❄️ Keep It Clear: Clear snow and ice around the garage door to avoid any obstructions that might affect its performance.
⚙️ Adjust Settings: Cold temperatures may require you to tweak the force settings on your opener. Ensure it’s operating smoothly even when the temperature drops!
For more winter-ready home tips, don’t miss my post on Winterizing Your Home: Essential Tips.
💡 Pro Tip: It’s All About Prevention!
Maintaining your garage door year-round can help you avoid unexpected repairs and keep it working like new. But don’t hesitate to call in a professional for the trickier tasks (like adjusting springs or fixing frayed cables). A little maintenance today goes a long way tomorrow!
🔧 Have you ever had a garage door problem you couldn’t solve? Drop a comment below or message me for more tips! 🚪
0 notes
Text

How to Program Your LiftMaster Garage Door Opener
#LiftMaster#GarageDoorOpener#DIYHomeImprovement#GarageDoor#HomeAutomation#SmartHome#GarageDoorProgramming#TechTips#DIYTips#HomeTips#LiftMasterOpener#GarageOrganization#HomeHacks#GarageLife#TechHacks#GarageRemodel#SmartGarage#LiftMasterDIY#HomeMaintenance#DoorOpenerGuide
0 notes
Text
Did you know Leonardo da Vinci designed a bridge that doesn’t need nails, screws, or glue? It’s called the self-supporting bridge and it works by cleverly interlocking wooden beams. The more weight you put on it, the stronger it gets! Originally designed for military use, it could be built and removed super quickly. Such a genius idea from centuries ago! What do you think—would you try building one? 🤔
4 notes
·
View notes
Text
How to Build the Perfect Adirondack Chair
Materials and Tools
Materials:
Wood: Cedar, pine, or redwood are great for outdoor durability.
Wood screws: Stainless steel or galvanized to resist rust.
Wood glue: Exterior-rated for added stability.
Sandpaper: Various grits (80, 120, 220).
Exterior wood finish: For weather protection (paint, stain, or sealer).
Tools:
Circular saw or jigsaw
Power drill and bits
Sanding block or power sander
Measuring tape
Clamps
Pencil and square
Step-by-Step Instructions
Step 1: Prepare the Wood
Choose Quality Wood: Start by selecting high-quality wood boards that are thick and durable. Cedar or redwood is ideal for outdoor furniture due to its resistance to weather and pests.
Cut the Boards to Size: Measure and cut your wood to the following pieces:
Back slats: 5–7 boards (1"x4"), about 30-36 inches in length, depending on your preferred back height.
Seat slats: 5–6 boards (1"x4") for a comfortable seat width.
Armrests: Two pieces, each about 4 inches wide, 20–24 inches long.
Legs: 4 pieces cut to provide a sturdy, slightly reclined angle.
Sand the Wood: Smooth all cut pieces with 80-grit sandpaper, progressing to finer grits (120, then 220) for a comfortable finish.
Unlock Your Next Project! Download Your Adirondack Chair Plans Now and Start Building Your Dream Chair Today!
👉 https://craftmasterplans.com
Step 2: Assemble the Base
Attach the Front and Back Legs: Position the legs to achieve a gentle backward slope. Connect the front legs to the side of each back leg with screws, ensuring both sides match for stability.
Build the Seat Frame: Attach horizontal supports between the legs to create a sturdy base frame for the seat slats.
Secure the Seat Slats: Evenly space the slats across the frame and secure each with wood screws, leaving a slight gap between slats for water drainage if outdoors.
Step 3: Construct the Chair Back
Arrange the Back Slats: Line up the slats vertically with a slight curve or slight angle outward for extra comfort.
Attach Slats to the Back Frame: Secure each slat to a horizontal support, making sure they’re evenly spaced.
Attach the Back to the Seat Frame: Use wood screws to connect the back of the chair to the base securely.
Step 4: Add Armrests and Finishing Touches
Attach Armrests: Position the armrests on top of the legs, ensuring they’re level. Secure them with screws.
Sand and Finish: Sand any remaining rough areas, especially edges, to prevent splinters.
Apply a Weatherproof Finish: Coat your chair with an outdoor-rated finish like paint, stain, or clear sealer to enhance durability.
Tips for a Professional Finish
Test the Chair: Sit in your chair to make sure it’s comfortable. Adjust the back angle if needed.
Consider Padding: For extra comfort, add outdoor-rated cushions to the seat and back.
Customize with Paint or Stain: For added style, paint your chair a bright color or stain it for a natural look.
Final Thoughts
Building an Adirondack chair is a rewarding project that combines woodworking skills with functionality. Taking time to get each step right ensures a comfortable, long-lasting piece that will become a cherished part of your outdoor space. Enjoy the satisfaction of crafting a classic chair that’s both stylish and practical!
With this guide, you’ll be able to create a perfect Adirondack chair that’s both beautiful and functional, ready to bring comfort and style to your backyard or patio. Happy building!
Unlock Your Next Project! Download Your Adirondack Chair Plans Now and Start Building Your Dream Chair Today!
👉 https://craftmasterplans.com
#woodworkingbasics#essentialtools#learnwoodworking#projectsuccess#tooltips#diytips#craftmasterplans#diyprojects#woodcraft#woodselection
2 notes
·
View notes
Text

#poolleak#poolliner#poolmaintenance#leakdetection#swimmingpoolrepair#homeimprovement#poolcare#diytips#poolrepair
1 note
·
View note
Text
How Tab Washers Enhance Bolt Security and Prevent Loosening | Ultimate Guide
This article helps in understanding tab washer is a type of locking washer designed to prevent bolts and nuts from loosening under vibration, movement, or other external forces. Unlike standard flat washers, tab washers have one or more tabs that engage with the surface of the surrounding material or the nut, locking it in place.
These Shim washers are simple yet highly effective in maintaining the tightness of bolts, even in the harshest environments. The tab works by physically engaging with a slot or hole in the component it's securing, effectively locking the bolt in place and preventing it from turning or loosening.

While tab washer are excellent for preventing bolt loosening, there are other fastening solutions available. Here's a quick comparison:
1. Lock Nuts
Lock nuts are another solution to prevent bolt loosening, but they tend to be more expensive and can sometimes damage the threads.
2. Loctite Adhesives
Loctite adhesives are often used to secure bolts, but they can be difficult to remove if servicing is required. In contrast, tab washers are reusable and easy to work with.
3. Spring Washers
Spring washers provide tension to prevent loosening but don’t have the locking mechanism of tab washers, which makes tab washers a more secure option in many cases.
4. Locking Bolts
Locking bolts offer security similar to tab washers but are more complex to install and typically more expensive.
This article also helps as, tab washer are used in a wide range of industries and applications. Here are some examples of where they excel:
1. Automotive Industry
In vehicles, where high vibrations are common, tab washers prevent critical fasteners from loosening and ensure the safety and functionality of the vehicle.
2. Industrial Equipment
Tab washers are commonly used in machinery to prevent bolts from loosening under heavy usage.
3. Aerospace
In aerospace applications, where safety is paramount, tab washers are often used to secure fasteners in components like engines and structural parts.
4. Construction
For large construction projects, tab washers are essential in ensuring bolts in steel structures and heavy equipment stay securely in place.
Conclusion
Tab washers are an essential component in ensuring the security of Foundation bolts and preventing loosening over time. Whether you're working on an automotive, industrial, or aerospace project, tab washers offer a simple, cost-effective solution to keep your fasteners secure and your operations running smoothly. With various types available and numerous benefits, they’re an excellent choice for anyone looking to enhance the longevity and durability of their mechanical assemblies.
So, the next time you're considering securing a foundation bolt in a high-vibration or high-stress environment, consider using tab washers to provide that extra level of bolt security.
This guide will equip you with the knowledge to take your garment construction skills to the next level and create clothes that look and feel truly professional.
Link
How Tab Washers Enhance Bolt Security and Prevent Loosening | Ultimate Guide
#TabWashers#BoltSecurity#FastenerSolutions#PreventLoosening#EngineeringEssentials#SecureFastening#DIYTips#MechanicalStability#WasherGuide#UltimateGuide
0 notes
Text
Top 5 Mistakes to Avoid When Working with Particle Board
Particle board is a fantastic, cost-effective material for various home and office projects. It’s versatile, easy to work with, and, thanks to brands like Gmica Pre Lam, it’s available in high-quality, pre-laminated finishes that are perfect for DIY projects. But, as with any material, there are some key pitfalls to avoid to ensure you get the best results. Here, I’ll walk you through the top five common mistakes to avoid when working with particle board so you can make your projects look professional and durable.
1. Using the Wrong Fasteners
One of the biggest mistakes beginners make with particle board is choosing the wrong fasteners or screws. Particle board is made from compressed wood particles, which means it doesn’t hold screws as well as solid wood or plywood. If you’re using regular wood screws, they may not bite into the board securely and can cause the board to split or crumble around the fastener.
What to Do Instead: Opt for particle board screws that are specifically designed for this material. These screws have coarse threads that provide a better grip. Another tip is to pre-drill pilot holes slightly smaller than the diameter of your screws. This reduces stress on the board, allowing the screws to go in smoothly without causing cracking or chipping.
2. Ignoring the Weight Limits
Particle board may be durable, but it’s not as strong as solid wood or even some other engineered woods like MDF. It’s crucial to understand and respect its weight limitations, especially if you’re building furniture, shelves, or cabinetry. Overloading particle board can cause it to sag, bend, or even break over time.
What to Do Instead: When planning your project, make sure you distribute weight evenly across particle board surfaces. Avoid placing heavy items in one spot, particularly near the edges, which are more prone to damage. Gmica Pre Lam particle boards come in various thicknesses, so selecting the right thickness for your project is key. Generally, a thicker board will be better suited for heavier loads, but it’s always a good idea to double-check your weight requirements.
3. Failing to Seal or Finish Edges
Unlike solid wood, particle board edges are more porous and can absorb moisture from the environment. If left unsealed, the edges may swell, warp, or degrade over time. Many people overlook this crucial finishing step, but it can make a huge difference in the appearance and longevity of your project.
What to Do Instead: Sealing the edges of particle board is simple but essential. You can use edge banding or apply a sealant to keep moisture out. Edge banding is an easy way to create a clean, finished look, and it’s available in various colors and finishes to match your pre-laminated particle board from Gmica Pre Lam. Alternatively, you can apply wood filler or paint to seal the edges if you’re working on a painted project.
4. Skipping Pre-Laminated Options
One mistake that can really add unnecessary time and effort to a project is not choosing pre-laminated particle board when a laminated finish is needed. Trying to add laminate or a veneer to particle board on your own can be tricky, time-consuming, and prone to imperfections.
What to Do Instead: Choose pre-laminated particle boards, like those offered by Gmica Pre Lam, to simplify your process. With pre-laminated particle board, you get a smooth, ready-to-use surface that’s ideal for furniture, cabinetry, and shelving. You save yourself the hassle of gluing on laminate sheets and dealing with air bubbles or uneven surfaces. Plus, with a variety of finishes, you can find a pre-laminated board that fits your style perfectly.
5. Neglecting Proper Support and Bracing
Particle board needs sufficient support, especially when used for larger pieces like shelves, tabletops, or cabinet panels. Unlike solid wood, particle board can’t withstand bending or flexing as much, so if it’s not properly supported, it may begin to warp or crack.
What to Do Instead: Make sure to add adequate support to your particle board projects. If you’re building shelves, consider adding brackets at regular intervals to prevent sagging. For larger pieces, like a tabletop or a cabinet base, include internal braces or support frames. Using thicker particle boards for larger surfaces also helps, so make sure to consider the board thickness before starting your project.
Final Thoughts
Working with particle board can be rewarding, especially for DIYers looking to create high-quality projects without a high cost. Avoiding these common mistakes can make a huge difference in the longevity and appearance of your creations. Using reliable, pre-laminated particle boards, like those from Gmica Pre Lam, ensures you’re starting with a solid, quality material that’s easier to work with and gives you professional results right from the start.
Remember, a little extra care in choosing the right fasteners, sealing edges, providing adequate support, and selecting pre-laminated options can save you from a lot of frustration and ensure your project not only looks good but stands the test of time. Happy building!
For more details :
visit us : www.gmicaprelam.com

#GujaratColourLamPvtLtd#Gmica#GmicaPreLam#WoodenChipBoard#BagasseBoard#ParticleBoardProjects#DIYFurnitureTips#HomeImprovement#WoodworkingBasics#FurnitureBuilding#DIYHomeDecor#WoodworkingMistakes#PreLaminatedBoard#DIYTips
0 notes