#Disable onenote quick note
Explore tagged Tumblr posts
Visit Tumblr Blog
Explore Tumblr blogs with no restrictions, modern design and the best experience.
Last Seen Tumblr Blogs


Fun Fact
Total funding amounts to $125.3M.
Text
Y'know, aside from the creepiness of this, there is something interesting to it.
Quick note: Unlike what the first post implies, these hotkeys can be turned off, albeit only with a third-party app. It's baked into the shell (Windows Explorer), not the OS. Unlike Ctrl+Alt+Delete which can never be disabled for security reasons. I like to use PowerToys which has a keyboard shortcut mapping feature, and you can just set the remap to "Disable"
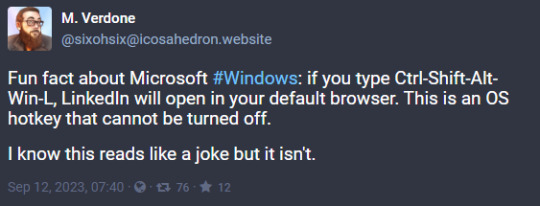
The shortcut prefix "Ctrl+Shift+Alt+Win" can be applied to handful of other keys. (I believe this is what the "Office" key does on some keyboards, although I don't get why they couldn't have used a different virtual key).
Office - Naturally, brings up the Office/MS365 app.
Office + L - Linked in.
Office + T - Opens Microsoft Teams in your browser.
Office + L - Opens Yammer in your browser. (Yammer? Really? Who uses that anymore...)
Office + W - Opens Microsoft Word.
Office + X - Opens Microsoft Excel.
Office + N - Opens Microsoft OneNote.
Office + O - Opens Microsoft Outlook.
Office + P - Opens Microsoft Powerpoint.
Side note: The key combo Ctrl+Alt+Shift+Super is also commonly known as Hyper.
4K notes
·
View notes
Text
5 Essential Tips for Mastering Smartphone Efficiency

Boost Your Productivity: 5 Essential Tips for Mastering Smartphone Efficiency
In a world where smartphones have become ubiquitous, it’s essential to harness their power to enhance productivity rather than succumbing to distractions. The key lies in finding a balance between leveraging the countless capabilities of your smartphone while staying focused on your goals. In this blog post, we will explore five practical tips that will help you maximize your productivity with smartphones. By implementing these strategies, you can transform your device into a valuable tool that empowers you to achieve more in both your personal and professional life.
First and foremost, we’ll delve into the art of streamlining your smartphone notifications. The constant influx of alerts from various apps can derail your concentration and hinder productivity. We’ll guide you through the process of evaluating your apps and identifying which ones truly necessitate real-time notifications. By fine-tuning your notification settings, you’ll be able to minimize distractions and focus on what truly matters. Additionally, we’ll explore a range of productivity apps and tools that can revolutionize the way you organize tasks, manage time, and maintain efficiency. From task management apps to note-taking tools and time-tracking resources, we’ll provide insights into selecting the right applications that align with your unique needs and workflow. With these tips in your arsenal, you’ll be equipped to unlock the full potential of your smartphone and skyrocket your productivity to new heights.
Streamline Your Notifications
One of the major distractions smartphones bring is the constant influx of notifications from various apps. To regain control of your focus and productivity, it’s crucial to streamline your notifications. Start by reviewing the apps on your phone and determine which ones truly require real-time notifications. Disable or limit notifications for non-essential apps, such as social media or games, and prioritize those related to work or important communication channels.
Additionally, take advantage of the notification management features available on most smartphones. You can set priority levels for different apps, customize notification sounds, or even schedule “Do Not Disturb” mode during dedicated working hours. By reducing unnecessary interruptions, you can maintain your concentration and be more productive.
Utilize Productivity Apps and Tools
While smartphones can be a source of distraction, they also offer a wide array of productivity apps and tools that can help you stay organized and efficient. Take advantage of these resources to streamline your tasks and enhance productivity. Here are a few types of apps that can boost your productivity:
a) Task management apps: These apps allow you to create to-do lists, set reminders, and track your progress. Some popular options include Todoist, Wunderlist, or Microsoft To Do.
b) Note-taking apps: Capture ideas, make quick notes, or create detailed project outlines using note-taking apps like Evernote, Google Keep, or Microsoft OneNote.
c) Time-tracking apps: Monitor your time usage and identify areas where you can improve. Apps like Toggl, RescueTime, or Forest can help you track your time and stay focused.
d) Pomodoro technique apps: The Pomodoro technique involves working in focused bursts with short breaks in between. Apps like Focus@Will, Be Focused, or Tomato Timer can help you implement this technique effectively.
Remember, choose apps that align with your specific needs and workflow to ensure they truly enhance your productivity.
Optimize Your Smartphone’s Settings
Your smartphone’s settings can greatly impact your productivity. Take a few moments to customize your phone’s settings for maximum efficiency. Here are a few key settings to consider:
a) Display and brightness: Adjust the screen brightness to a comfortable level and enable night mode or blue light filters to reduce eye strain, especially during nighttime usage.
b) Battery and power-saving settings: Optimize your phone’s power settings to conserve battery life, allowing you to use your device for longer periods without interruptions.
c) Keyboard shortcuts: If your smartphone supports it, customize keyboard shortcuts to automate repetitive tasks or quickly access frequently used apps.
d) Voice assistants: Utilize voice assistants like Siri, Google Assistant, or Bixby to perform tasks hands-free, such as setting reminders, sending messages, or initiating calls.
Practice Digital Wellbeing
Maintaining a healthy relationship with your smartphone is essential for productivity. Practicing digital wellbeing involves establishing healthy usage habits and setting boundaries to prevent smartphone addiction and distractions. Here are a few strategies to promote digital wellbeing:
a) Set boundaries: Determine specific times when you will disconnect from your phone, such as during meals, family time, or before bed. Establishing these boundaries will help you stay focused and present in other areas of your life.
b) Use app timers: Many smartphones offer built-in app timers or screen time trackers. Utilize these features to monitor your app usage and set limits for time-consuming applications.
c) Take regular breaks: Incorporate short breaks into your routine where you intentionally step away from your smartphone. Use these moments to stretch, meditate, or engage in other activities that promote mindfulness.
d) Prioritize offline activities: Dedicate time each day for offline activities, such as exercise, reading, or pursuing hobbies that do not involve your smartphone. This will provide a healthy balance and reduce reliance on digital devices.
Customize Your Productivity Environment
Your smartphone is just one part of your productivity equation. To optimize your efficiency, it’s crucial to create a conducive environment for focused work. Consider the following tips:
a) Organize your home screen: Arrange your app icons in a way that promotes easy access to essential tools and minimizes distractions. Group related apps into folders and place them on secondary screens.
b) Create a clutter-free workspace: Whether you’re working from home or in an office, ensure your workspace is clean, organized, and free from unnecessary distractions. Use desk organizers and remove items that are not directly related to your current tasks.
c) Choose productivity-enhancing wallpapers: Select wallpapers that inspire and motivate you to stay focused. This could be a calming nature scene, an inspiring quote, or a minimalist design that helps declutter your visual space.
d) Use productivity-enhancing accessories: Consider investing in accessories such as wireless headphones, ergonomic phone stands, or Bluetooth keyboards. These tools can improve your comfort and efficiency while working with your smartphone.
With proper management and mindful usage, your smartphone can be a powerful productivity tool rather than a source of distraction. By streamlining notifications, utilizing productivity apps, optimizing settings, practicing digital wellbeing, and customizing your productivity environment, you can enhance your focus and efficiency. Embrace these tips to take control of your smartphone usage and unlock your productivity potential in both personal and professional endeavors.
0 notes
Text
Disable onenote quick note

#DISABLE ONENOTE QUICK NOTE FOR ANDROID#
#DISABLE ONENOTE QUICK NOTE SOFTWARE#
#DISABLE ONENOTE QUICK NOTE WINDOWS#
You can drag content from any note container into another to combine the notes they contain. There are page templates you can use and create if needed. Each object placed into a page of a notebook, such as an attached file or a Microsoft Excel table, is placed within a container. Whenever you move the mouse pointer over notes you’ve previously typed, you will see the note container. When you type on a page, a small gray frame or note container appears around the text. Add content to and organize your OneNote notebook includingĮxcel spreadsheets, audio, video, files, Outlook email and internet browser screen captures. When you reopen a notebook on multiple devices using OneNote, your latest changes will be there.Ģ. OneNote does all the saving and synchronizing for you. You can switch between multiple notebooks and add content without having to worry about saving your latest changes. Adding a note to a page is as easy as placing your cursor on a page and starting to type. It is normally saved in OneDrive which also allows you to easily share it in a channel in Microsoft Teams. The notebook is the key object in Microsoft OneNote and is composed of pages, subpages, sections, views, and a variety of content. Select File, New, Save to OneDrive, and enter a notebook name.
#DISABLE ONENOTE QUICK NOTE FOR ANDROID#
Once you start using OneNote, you will benefit from installing the mobile version for Android or iOS.ġ.
#DISABLE ONENOTE QUICK NOTE WINDOWS#
If that sounds amazing and useful, it is.Īnother version of OneNote, named OneNote for Windows 10, is also available and contains similar features with a different arrangement of the user interface. And you can easily search across notebooks to find the notes and audio or video content you have saved in any notebook. You can insert file attachments, printouts, and email. You can print, export, and email the note pages to colleagues, invite them to share and simultaneously edit notebook content, or share the notebook in a Microsoft Teams channel. The Microsoft OneNote desktop app allows you to create notebooks, sections, and pages where your notes are placed. This how-to article will help you use the Microsoft OneNote desktop app (formerly OneNote 2016) at basic through intermediate level. The Microsoft OneNote desktop app can become one of your favorite time-management tools.
#DISABLE ONENOTE QUICK NOTE SOFTWARE#
To text using the software tool, open the notes app and tap the square icon.Much of our work involves taking notes, collecting content, and sharing information as part of day-to-day business activities and meetings. If you use the Send to OneNote function and have the online notebook open in OneNote 2016, the page will sync down to OneNote 2016. Zapier is the easiest way to connect OneNote with the apps you already use. Open it (CTRL + Shift + ESC, or right click on your taskbar and choose Task Manager) and go to the Startup tab. However, because the function is tied to the mailbox you are working in, Outlook items will be sent to a notebook in that account, not to a master notebook you use with all email accounts. There, disable the Send to OneNote Tool in the list of items. While you are at that screen, I suggest you also disable various other applications or services that may delay the startup of your computer. If you use local notebooks in OneNote or use it with POP or IMAP accounts, you’ll need to disable the new OneNote function. To disable the new Send to OneNote command in Outlook desktop, open File > Options > Advanced. Scroll to the bottom and untick Use Send to OneNote with OneNote for Windows 10, if available. Find Microsoft OneNote item and check or uncheck the checkbox. To disable it everywhere, including in Outlook on the web and in Outlook on Mac, you need to disable it in Manage Add-ins in your account online. If the check box is selected, Microsoft OneNote application will run at Windows Startup otherwise it will not run. After making the changes click on OK button to apply your changes. Once you click on OK button, System Configuration window display the. To find tags, you need to use the search feature of OneNote. In Outlook for Windows, go to File > Manage Add-ins (at the bottom of the screen.) This will open the account’s Manage Add-ins dialog. Click on the search icon in the left sidebar of OneNote.
0 notes
Text
Onenote quick note

#ONENOTE QUICK NOTE HOW TO#
#ONENOTE QUICK NOTE SOFTWARE#
#ONENOTE QUICK NOTE FREE#
You can now work with the task in Outlook just like you Note that the task description contains a hyperlink to the OneNote page we used to create the task. The task you just created on the task list. To see the task you just created in OneNote, open your MS Outlook task list. Your changes when Outlook prompts you to do so. It by clicking the X in the upper right corner of the window. When you're done filling out the New Task window, close Define the importance of the task using the Priority field.Describe the importance of the task using the Priority field (choose between Low, Normal, and High).Now it's time to fill out the task details: The Outlook Newįill out the details in the Outlook New Task window. To schedule a specific date, select the Custom option. Menu, pick a timeframe for when you want to add the task to the Outlook tasks The task name should describe the task so you can find it later. Type a description of the task in the blank space next to the checkbox. A checkbox, representing a new task, appears on a blank Once you've added a new task, type the name of the task next to the checkbox. In this case,Īlready added a pre-existing task called File the XYZ Start by opening the appropriate section in the correct notebook. Open Your Notebook Section and Add a Task Use OneNote to Add a New Task to Your Outlook Tasks ListĬan add a task to your Outlook To-Do-List from OneNote. The right, you’ll see a place for a list of Pages in the section that’sĪren’t any pages on the list yet because we haven’t created them.)Īnd name your own notebooks and sections according to your organizational The sections I added are called Meetings, Minutes, Correspondence, and Tasks. On You can see, I’ve already added a Notebook called Project XYZ toĪdded some Sections (sometimes called folders) to the notebook. Each notebook contains Sections and each section contains Pages. Notice that OneNote is organized into Notebooks. The first thing you’ll want to do is open OneNote on your Once you’ve activated OneNote, you can use it as an Outlook task manager by creating tasks in Outlook and saving them to OneNote or creating tasks in OneNote and saving them to Outlook. You should now see the OneNote icon on the ribbon when the Home tab is selected. Outlook items to activate it, then click OK. The ComĪdd-ins without a checkmark are inactive. You'll see lists of active, inactive, and disabled add-ins. Inactive, and disabled application add-ins: Manage Microsoft Office Add-ins window you’ll see lists of active, Select the Add-ins option to activate OneNote. Select Options from the Account Information window to access the Outlook Options window.Ĭlick Options on the left. If OneNote isn’t active in your version of Outlook, you’ll If OneNote is active with Outlook, you'll see a OneNote icon in the ribbon. If OneNote is enabled, you’ll see a OneNote icon You can start using, the MS OneNote Add-in, you need to make sure it’s enabled. That you’ve learned what MS OneNote is, you’re ready to start using it. Learn even more about Microsoft OneNote basics, here are some tutorials: OneNote also includes peer collaboration tools.
#ONENOTE QUICK NOTE SOFTWARE#
It can also be integrated into other software Is integrated into MS Outlook and you can use it along with your MS OutlookĬalendar and To Do List. Your notebook is now virtual and your tabs are called sections. When you were in school you may have used a notebook with It allows you to organize and store information as well as keep track of OneNote is a notetaking/to-do-list tool that comes as a part of MS Office
#ONENOTE QUICK NOTE HOW TO#
Now let's move on to our tutorial on how to use Microsoft Outlook with OneNote. Organization strategies and killer tips for managing all your incoming email
#ONENOTE QUICK NOTE FREE#
You can get even more control over your projects by learning how to manage your email inbox, so be sure to grab our Free eBook: The Ultimate Guide to Inbox Zero Mastery. It's packed with inbox In this tutorial, you'll be learning how to use OneNote and Outlook for project management tasks. Guide to Inbox Zero Mastery ( Free eBook Download) Using MS OneNote along with the Outlook calendar to take meeting minutes andĭistribute them to meeting participants. We’ll share how MS Outlook can help you store and We'll also show you how to use OneNote to effectively manage In this tutorial, we'll show you how to activate the OneNoteįeature in MS Outlook. There are even OneNote collaborationįeatures you can use to share your information with others. That arrives by email in handy notebooks with tabs. You can not only track your tasks, you can also keep track of other information With the Outlook Calendar To-Do-List tools. People don't realize that you can use MS OneNote as an Outlook task manager You've been using your Microsoft Calendar and To-Do-List to keep track You're like most of us, a lot of your important tasks and notes arrive viaĮmail.
0 notes
Text
Mac disable quick note

MAC DISABLE QUICK NOTE FOR MAC
MAC DISABLE QUICK NOTE MAC OS X
MAC DISABLE QUICK NOTE PASSWORD
MAC DISABLE QUICK NOTE OFFLINE
If you need additional assistance with OneNote for Mac, please try any of the following: You can apply passwords to individual notebook sections, one at a time, but not to all of the sections in the same notebook all at once. For more information, see Move or copy notes in OneNote for Mac.Ĭan I password-protect an entire notebook? However, you can create a new section in your notebook and then move the single page you want to protect into that new section before locking it with a password. You can apply passwords to individual notebook sections, but not to an individual page.
MAC DISABLE QUICK NOTE PASSWORD
Learn more about password protection.Ĭan I password-protect just a single page? Important: Unfortunately, if you forget your password, no one will be able to unlock your notes for you - not even Microsoft Technical Support. OneNote can extract the text it recognizes in pictures so you can paste it elsewhere in your notes (or into another app), where you can edit and format the text as needed.
MAC DISABLE QUICK NOTE FOR MAC
OneNote for Mac supports Optical Character Recognition (OCR), a process that recognizes text shown in pictures. There seems to be no way to copy text from a picture I’ve inserted. If you’ve made sure that you have the latest version of macOS but are still having trouble getting app updates, see Check for updates in OneNote for Mac. To check what version you have, click the Apple menu on your Mac, and then click About This Mac.
MAC DISABLE QUICK NOTE MAC OS X
In order to continue getting new OneNote updates from the App Store, your Mac must be running Mac OS X 10.10 or later. We’ve changed the minimum system requirements for OneNote for Mac to take advantage of the latest capabilities in macOS. I used to get updates for OneNote, but they seem to have stopped.
MAC DISABLE QUICK NOTE OFFLINE
After syncing shared notebooks, you’ll be able to see any notes from the other notebook authors that were added or changed during the time you were offline - and they will be able to see the changes you have made. As soon as you reconnect to the Internet, OneNote will automatically sync your changes to the notebook on OneDrive. While you work offline, OneNote will warn you that it cannot sync the notebook. If you temporarily disconnect from the Internet for any reason (for example, while traveling on an airplane), you can keep working offline in the cached (locally saved) copy of the notes on your Mac. If you don’t already have a Microsoft account, click here to sign up for free. You already have an account if you use any of these services: A Microsoft account is an email address used to sign in to Microsoft services. To create or open notebooks in OneNote, sign in with your Microsoft account or the organizational account you’ve been given by your work or school. OneNote for Mac requires access to OneDrive using a Microsoft account. This lets you open, view, and edit your notebooks on all your devices so they’re always up-to-date. OneNote for Mac continually syncs all of your notes with OneDrive. Why do I have to sign in to use OneNote on my Mac? To learn more about these changes, see Get started with the new OneNote. All of your notebooks, sections, and pages can now be found in columns on the side of the app - efficiently navigable with screen readers and keyboards. Why does OneNote look different from before?Īn improved layout in OneNote for Mac makes it easier than ever to organize your notes. Please check back periodically for new and recently updated questions and answers. Like most modern software, OneNote is frequently updated to add new functionality and to improve existing features. Note: The information in this article applies to the most current version of OneNote for Mac.
0 notes
Text
Microsoft onenote 2010 templates

#Microsoft onenote 2010 templates windows#
You can paste this into an email now that it is available as a URL. Right click the link icon for the note, and select Copy Link. Now, if you want to pass this linked note on to a friend in an email, it doesn’t appear to be that easy to extract the hyperlink out, but it quite simple in fact. If you try taking linked notes in Outlook, Excel or Adobe Reader for instance, no icon will appear, signifying that these applications aren’t supported for taking linked notes. You’ll know that it works when a small icon appears to the left of your note. Note on Application Compatibility: Linked Notes do not work with every application. Tip! There’s a Linked Notes in OneNote button on the Review tab of the ribbon in Word, PowerPoint and Internet Explorer which gives you another option to start taking Linked Notes. Clicking the linked note should take you to the exact page or PowerPoint slide you were viewing when you typed the note. Click the icon to be taken to the web page.Ĭool, huh? Now try this with another application such as Word or PowerPoint. Hover over the text in OneNote which will show an icon of the application the notes are linking to. Simply by having the web browser page active and typing notes in OneNote, I’ve created a reference back to the website I was viewing. Here I’ve taken some notes on a forum I visited. Since you are already in a web browser if you are reading this, place your cursor in the OneNote window to start typing. You can enable and disable any time you like while OneNote is docked. You can enable Linked Notes by selecting Start Taking Linked Notes or disable Linked Notes by selecting Stop Taking Linked Notes. You’ll want to make sure Linked Notes are enabled by clicking the Linked Notes icon in the left corner of the OneNote content area. Linked Notes! Linked Notes is the feature that enables us to take notes that link back to the content we are viewing in our applications. Want to stop taking linked notes and return to good ‘ol regular OneNote? No problem, just click the Dock to Desktop button again or push Ctrl + Alt + D to restore OneNote to the normal view.īut we don’t want to stop now do we? Let’s try taking some notes…but not just any notes.
#Microsoft onenote 2010 templates windows#
The rest of your application windows automatically adjust in size, and text in the Docked OneNote window automatically wraps so you don’t have to scroll side to side. OneNote docks itself to the right hand side of your screen in a narrow format. You can also use the shortcut Ctrl + Alt + D. In OneNote 2010, click the Dock to Desktop button in the Quick Access toolbar in the top left corner. And best of all, OneNote automatically creates hyperlinks that point back to the web page or application you were viewing at the time. You can take notes while still being able to view the content in the other applications. What it does is dock OneNote to the right side of your screen along side other applications such as web browsers, Word, PowerPoint, etc. I’m talking about the Docked OneNote feature. But seriously, if you aren’t using this feature today, you’ll want to after seeing just how cool it is. Without further ado… The single greatest life altering OneNote feature ever Since that’s about all it does in the collection process, we’ll spend the majority of our time focusing on OneNote and how it can help us capture and collect all of our “digital stuff.” All my email gets sent straight to my Inbox for processing later. What it is good at is corralling our email. It plays a much larger role in other steps in the GTD process, but not for capturing. As it pertains to collecting our stuff, Outlook is simply a bucket, or an Inbox for gathering our email. I don’t really look at Outlook as a capture device per say. A brief note on Outlook as a GTD capture device We’ll eventually process these inputs and decide what to do with them, but for now we’ll focus on making sure we understand the tools and features that allow us to capture all the information that we come across each and every day. With GTD, the very first thing we must be able to do is capture and record all of our inputs. Now that we have Outlook and OneNote setup, we can begin using our GTD system. In Part 3 of the GTD with Outlook 2010 and OneNote 2010 Series, we setup OneNote to work with GTD. Table of Contents: GTD with Outlook 2010 and OneNote 2010
0 notes
Text
Windows 11: Snipping tool not working (Bug Fix): OneNote Shortcut + Download
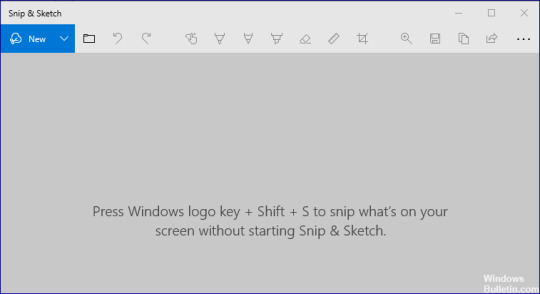
Windows 11: Snipping tool not working (Bug Fix): OneNote Shortcut + Download- Snipping Tool is a proprietary Windows screen capture tool that also allows you to edit screen captures. You can start Snipping Tool from Windows search menu -> Snipping Tool. To update: Stop getting error messages and slow down your system with our optimization tool. Get it now at is the link It works fine, but if you use the new "Windows key + Shift + s on your keyboard" key combination, you can use it to create a screenshot. But it does not allow you to edit or save this screenshot. In this guide, you will learn how to fix this problem on your computer in a few easy steps. What is the reason why the Windows Snipping Tool shortcut is not working properly? Most of the time, programs like Snipping Tool are unresponsive because there is a temporary error in the application. You can easily solve this problem by restarting the Snipping Tool. If you are unable to use the Windows shortcut for the Snipping Tool on your computer, it may be due to the Focus Assist feature. You can solve this problem simply by disabling Focus Assist on your computer. Temporary errors, such as Snipping Tool error, can be caused by corrupted files on your PC. A quick and easy way to remove these corrupted errors caused by unwanted files is to use a reliable PC cleaner. How to troubleshoot the Windows "Snipping Tool" shortcut not working October 2021 update: Now you can avoid PC problems using this tool, such as protecting against file loss and malware. Plus, it's a great way to optimize your computer for maximum performance. The program fixes common errors that can occur on Windows systems with ease, without the need for hours of troubleshooting when you have the perfect solution at your fingertips: - Paso 1: Download PC Repair & Optimizer Tool (Windows 10, 8, 7, XP, Vista - Microsoft Gold Certified). - Step 2: Click "Start scan To find Windows registry problems that could be causing problems on the PC. - Step 3: Click "Repair everything” To solve all the problems. Check the properties of the shortcut key - On your desktop, right-click the Snipping Tool icon and select Properties. - If there is no shortcut on the desktop, type Snipping Tool in the search box. - Right-click on the Snipping Tool icon and select Open File Location. - Right-click on the Snipping Tool icon and select Properties. - In the Properties window, click the Shortcut tab. - If you see None in the Keyboard shortcut: field, it means that you have not defined a shortcut to access the tool. - Press None and then press any key on your keyboard. - Note that you cannot use the Windows + S key combination because it is already reserved for something else. - Click Apply and OK to save your changes. - Close the Properties window and press the key combination you assigned to run the Snipping tool, and you should be able to access the tool without any problem. Use the new Crop and Draw tool - Microsoft is trying to replace the Snipping Tool with a new app called Snipping and Sketching. - That is why Microsoft has provided the Shift + Windows + S key combination for the new Snip tool. - Press the key combination Shift + Windows Key + S, and the new Crop and Sketch tool will be available to you. If you don't want to use the long Shift + Windows + S key combination to open the Crop and Draw tool, you can use the PrtSc (Print Screen) key. Do the following steps: - Click Start and select Preferences. - Click Accessibility. - Under Interaction, click Keyboard. - Scroll down to the Print Screen shortcut and check the Use PrtScn button to open the input screen option. That's it. Pressing the PrtSc key on the keyboard will open the Snipping Tool. Frequent questions - Press the Windows key and open Settings. - Then select Applications and expand Snip & Sketch. - Now open Advanced Settings and click Exit. - Then check if the problem is solved. - Otherwise, repeat steps 1-3 to open Snip and Sketch's advanced options. To open the Snipping Tool, press the Start key, type Snipping, and press Enter. (There is no shortcut key to open the Snipping Tool.) To select the crop type, press Alt + M, then use the arrow keys to select Freeform, Rectangular, Window, or Full Screen, then press Enter. How do I defrost the compression tool? You can close the compression tool by pressing ALT + TAB. It will show all open windows and then you can choose to close the application. If the Snipping Tool isn't working properly, such as the Snipping Tool's shortcut, eraser, or pencil isn't working, you can exit the Snipping Tool and start it again. Press "Ctrl + Alt + Del" on your keyboard to display the Task Manager. Find SnippingTool.exe and close it, then restart it. https://www.youtube.com/embed/KQJPVZ7b3YU Snipping tool not working on Windows 11? How to fix the error Sadly, the Snipping Tool hasn't worked for many users lately, especially those who recently upgraded to Windows 11 from Windows 10, as they are getting this long error: 'This application cannot be opened. One problem with Windows is that it prevents Screen Snipping from opening. Updating your PC might help fix it. ' Snipping Tool Broken Problem - How to Fix It Image: Twitter Here's how you can repair Snipping Tool on your Windows 11 PC. You can use the first two fixes found by the community or use the last method suggested by Microsoft. Let us begin. Solution n. # 1: use the older version of the app Snipping tool not working on Windows 11? How to fix If you recently upgraded from Windows 10, you can use the older version of Snipping Tool that will be available on your boot controller. Windows stores your previous installation for the first 10 days from the date of your update. You can use this to your advantage to use the older version of Snipping Tool on your PC. Navigate to the following route to get started. C:/Windows.old/Windows/System32/ Find 'SnippingTool.exe' in the current folder and copy it to your clipboard. Navigate to the following route now. C:/Windows/System32/ Paste the file that you had copied to your clipboard earlier. Afterwards, copy the file named SnippingTool.exe.mui from the path given below. C:Windows.oldWindowsSystem32en-US Paste the copied file into the following folder. C:WindowsSystem32en-US Replace each and every file if prompted. Try using the Windows + Shift + S keyboard shortcut now and click + New. The Snipping Tool should now be working as intended and the message 'This app cannot be opened. One problem with Windows is preventing Screen Snipping from opening. Updating your PC might help fix it. ' error. Solution n. # 2: reinstall the Snipping Tool If the above solution didn't work for you, you can try reinstalling Snipping Tool. Follow the guide below to get started. press Windows + S On your keyboard, find PowerShell and click 'Run as administrator'. Now type the following command and press Enter on your keyboard. get-appxpackage *Microsoft.ScreenSketch* | remove-appxpackage Snipping Tool will now be removed from your PC. We recommend that you restart your PC at this time. Once restarted, start PowerShell as administrator again and run the following command. Get-AppXPackage *Microsoft.ScreenSketch* -AllUsers | Foreach {Add-AppxPackage -DisableDevelopmentMode -Register "$($_.InstallLocation)AppXManifest.xml"} Once the application is installed, you can close PowerShell and use the Snipping Tool as intended. The application should now work properly on your PC. Solution n. 3: last resort: upgrade your PC Surprisingly, this is the official solution issued by Microsoft to get Snipping Tool working on your system again. Follow the guide below to update your PC. press Windows + iand click on 'Windows Update'. Click on 'Advanced Options'. Now click on 'Recovery'. Click on 'Reset PC. Select 'Keep my files' and follow the instructions on the screen to update your PC. We hope this guide has helped you get the Snipping Tool back up and running on your PC. If you have any issues or have any questions, feel free to leave them in the comment section below. Read the full article
0 notes
Text
How Can We Fix Office 365 While Working on Windows 10?
Here, we will discuss some simple and easy-to-understand procedures to fix Office 365 while working on a Windows 10 operating system and avoiding a full suite reinstall. It is imperative to understand that the repair procedures described here can only be employed if one faces problems in Microsoft Word, Microsoft Excel, OneNote, or any other applications offered by Microsoft Office 365. Office 365 Troubleshooting Tool If you are proceeding to repair the most prevalent Office 365 problems, it has been recommended by cyber experts that one must use the Office 365 Troubleshooting Tool (which can also be called Recovery Assistant and Office Support) offered by Microsoft. If you wish to download and install Office 365 Troubleshooting Tool, you must visit the link: https://www.microsoft.com/en-us/download/100607. Before commencing any further repair procedures, it has been recommended that you should launch the Troubleshooting Tool once to see if it can solve your issue. Procedures to Follow If the Troubleshooting Tool Doesn’t Work Suppose the Troubleshooting or the Recovery Assistant and Office Support is not able to solve your issue. In that case, it is advisable to go for the reset option on Office 365 installation, which you can do so using the “Repair Mode.” However, before proceeding further, you should check if there are any security updates for Windows or Office; if there are any updates, you should install them and verify whether they do solve your problem or not. You can also try momentarily disabling each and every third-party system security tool and firewall application (except Windows Defender, which should never be disabled). Now, follow the below-written procedures. 1) First, arrive at the “Settings” and enter “Apps.” Then, click on Apps & Features. 2) Locate the Microsoft Office 365 icon in the installed programs list, which would be available in your system. 2) Once you find it, click on it, and then hit the “Modify” option. 3) A prompt will then appear on the screen, which will show you “Quick Repair” and “Online Repair.” Now, let us understand what those are- a) Quick Repair: This fixing option does not need an internet connection and uses the option of local 365 distro cache. b) Online Repair-If you go for this option, the installer (click-to-run) commences the download process of the newest version of Office 365 from the CDN network and initiates the full installation process. Once the process is concluded, you will have to proceed to commence the activation of the office copy. It is always recommended by Microsoft representatives that a user must always try “Quick Repair” first, and only if the issue does not get resolved must you go for the online mode. 4) After completing the procedure of online repair, a prompt will appear on the screen informing you about the installation of Office 365. Note:-A reminder that a user is always treated with the latest version of office products when buying Office 365, which is not the case if you are using the older versions. You can also repair your Microsoft Office 365 by following the command prompt. You can follow the below steps for reference. 1) Launch the file “OfficeClickToRun.exe.” At the time of downloading your Office product, the file gets automatically saved to the Common Data Directory. 2) Suppose, if you want to launch “Quick Repair” of Office 365 x86, go to “Program Files,” then to “Common Documents,” after that, head towards “Microsoft Shared.” Hit on “ClickToRun,” and then proceed to click on “OfficeClickToRun.exe.” 3) Launch the full recovery for Office 365 x64. 4) Launch the app, and once a prompt appears asking for your email address, specify it along with the product key to activate your product. Conclusion There is a high probability that the above-stated procedures will solve your problem; however, if none of the solutions work out for you, contact customer support or visit: support.microsoft.com. Microsoft always recommends that we should try to fix our problem with the “Troubleshooting” Tool first, and only if it doesn’t work should we proceed towards other solutions. Source :- https://us9office.com/how-can-we-fix-office-365-while-working-on-windows-10/
0 notes
Text
Noted App For Mac

Bored of note taking in traditional way , so here you can take a look at the latest note -taking method . Here we list out the Best Note taking apps for PC and Smartphone .

At work, you will surely need to note down bullet points or you will need to note important tasks and other activities to be done. Since these days everyone uses computers and android phones, use of pen and paper has been reduced. So, in these computers and smart phones, where can you note down your important work easily? I am sure that you all might have come across various note-taking apps for computers and smart phones. These apps make it easier for you to remember your tasks and responsibilities.

Contents
Take notes wherever you go. When you add your internet accounts to Notes, you can keep your notes with you no matter which device you’re using—so you can save that dream destination on your Mac, then have it handy on your iPad when you’re with your friends. How to add or remove notes accounts. If you want a powerful yet tastefully designed note-taking app, look no further than Bear. Bear is a beautiful app, featuring gorgeous typography and themes. But underneath this are powerful features. Like many writing apps, it supports the lightweight markup language called Markdown.
Take note of everything with Samsung Notes. Write, draw, and highlight in a variety of styles and colors with the S Pen. Add photos and voice memos, and save your notes with searchable tags. And whenever inspiration strikes, simply pop out the S Pen to quickly jot down notes on your locked screen. The simplest way to keep notes All your notes, synced on all your devices. Get Simplenote now for iOS, Android, Mac, Windows, Linux, or in your browser.
1 Best Note taking apps of the year
Best Note taking apps of the year
You will never miss out to complete any work if you have noted all the points in your phone or computer. Now let us see what all note-taking apps are available these days to use in computers and smart phones. The note-taking apps mentioned below are some of the best cross-platform apps that make your work quick.
Now of you ever want to note down anything you don’t have to look for pen and paper use these Best Note-taking apps for Android , iPhone and PC to take easy notes .
Best Note taking apps for Windows
If you want to make quick notes in your windows system you can now do it with the comfort of windows note taking apps .
Quip
Cortana
Simple Note
Microsoft OneNote
Evernote
Sticky Notes
Notepad
Scrble
Read Also : Best free office software for Computer & Smartphone
Best Note taking apps for Mac
Below given is the list of best note taking apps for Mac .

Evernote
Microsoft OneNote
Simple Note
Bear
Google Keep
Zoho
Read Also : Best VPN For the Future
Best Note taking apps for iPhone / iPad – iOS note taking apps
Like the above seen note taking softwares for windows and Mac , here is the list of note taking apps for iOS users .
Apple Notes
Bear
Simple Note
Best Note taking apps for Android
ColorNote
OneNote
Google Keep
EverNote
SimpleNote
LectureNotes
Omni Notes

Finally given above is the exclusive list of note taking apps for Android users .
Read Also : Enable or Disable Superfetch for Windows
Best Sticky Notes App For Mac
Best Note taking apps for Windows , Mac , Android & iPhone / iPad
1) OneNote
OneNote is one of the best note taking apps with a number of features and majority of them are for free. Since OneNote comes from Microsoft, it integrates with Office tools like Ms Word, Excel etc. Thus, the tool becomes more powerful for you to use. In this note-taking app, you can write, type and draw images related to the notes in your own way.
Another advantage of using OneNote is that, you can easily capture an image to add in the notes. You will not have to crop the image and waste your valuable time. OneNote will automatically crop the image you have selected to fit in the notes. Moreover, you can easily take the notes and refer for your future use. OneNote is compatible with both computers and smartphones.
2) EverNote
This is the next note-taking app for your computers and android phones which is very powerful. EverNote can organize all your notes very efficientlyand it has a cloud storage space of 60MB to store your data online. Like OneNote App, you can add images to this note as well. But an extra feature of attaching the pages of a website is also available with EverNote App.
This note-taking app is perfect for students since it can store any kind of data with any size and content. EverNote App is free for anyone to use but it only has a few features and it only provides a few of them to the user.
Read Also : Must Have Smartwatch apps for Android and Apple watches
3) WorkFlowy
Workflowy note-taking app works fully offline and it is also fast. It also gives an instant access to the notes you have saved without searching for it from a number o tabs in your browser. This app is very simple and it only has a very minimal interface. When you are creating a note and if you want to highlight or mark any points that are really important, you can do so with the help of hash tags.
You can zoom in or zoom out the notes to read and also navigating this app is very easy. You can just use the mouse pointer to zoom in and zoom out the notes you have added. With this Workflowy App, you can share the notes with others at your office. You also have the option of hiding the notes and add to archive with just one click.
4) Google Keep
With features like location reminder, alerts on pre-select times, Google Keep is our next choice of note-taking app which is hooked up to Google services. This app is compatible with IOS, Web, Android, Windows and Mac and has card based notes. Like Evernote and Onenote, you can add images along with the notes you jot down.
Notes App For Microsoft Surface Pro
Google Keep App can transcribe the notes you type or write. It has the feature to record even your handwriting. The notes you type will be recorded in the form of messages with its memo feature. You can also synchronize your notes from one device to another with the help of nifty OCR in Google Keep. Apart from these features, you get access to colour codes and attributes to make your notes look unique from the rest.
Read Also : Google Datally App to Control Mobile Data & WiFi Finder
5) Standard Notes
You can access this note-taking app online with widget support and it comes with 100% privacy and AES – 265 encryption. The best highlight of using Standard Note is that you can access the notes you have created 5 years back. Isn’t that great? You can recheck all the important notes again if you require. Standard Notes app is the only one note-taking app which has an end to end privacy. Thus, this app sounds suitable for both office and personal work. Standard notes App is compatible with iOS, Android, Windows, Web and Mac.
To make your notes look more attractive, you get access to different themes that are changeable and it also allows you to add power extensions. You will never have to worry about losing any notes you have made in Standard Notes. This app is encryption protected with a secret key and no one can decrypt the notes. Only thing you have to remember always is the secret key. Without this, no one can retrieve the data.
6) Dropbox Paper
This app is a product of Dropbox in which you can work with your team. Dropbox Paper is another note-taking app that supports themes and is integrated to Dropbox. It also offers great collaboration tools. Usually, everyone uses Dropbox to save files in the cloud storage. The main advantage of using Dropbox Paper is, it gives a flexible workspace for the user to make notes easily.
Samsung Notes App For Mac
This app is very simple since it has a very minimal design aids. You can type your data or copy and paste the link of YouTube or you can even tweet using this Dropbox Paper note-taking app. If you are working in Dropbox as a team or with any of your team member, you can easily make notes with them, share comments and even embed images. For any kind of creative work, this app is one of the best choices. This note-taking app called Dropbox Paper is free to use if you are an account holder of Dropbox.
Music Notes App For Mac
All these above mentioned note-taking apps are compatible with both computers and smart phones. You can use it from anywhere you want. Anybody can use these apps in their computers or in android phones. Read about each app and learn the advantages and disadvantages and choose the best app that suits your need. So, do not wait. Make use of these amazing note-taking apps to make your work easier and hassle-free.
0 notes
Text
Lync For Mac Microsoft

This content has been archived, and is no longer maintained by Indiana University. Information here may no longer be accurate, and links may no longer be available or reliable.
Microsoft Lync For Mac 365
Microsoft Lync 2019 Download
Lync For Mac Microsoft Office 2016
Mar 14, 2017 In the Microsoft Lync for Mac 2011 Update volume window, double-click the Lync for Mac 2011 Update application to start the update process, and then follow the instructions on the screen. If the installation finishes successfully, you can remove the update installer from your hard disk. Turn on logging for troubleshooting in lync for mac. To do this, follow these steps: a. On the lync menu, click preferences, and then click general. Under logging, click to select the turn on logging for troubleshooting check box. Exit lync for mac, and then restart lync for mac to create a log file. Reproduce the issue. Unlike other Mac applications, you cannot add custom emoticons or emoticons from other applications to Lync for Mac. For a list of more emoticons that you can use in Lync for Mac, see the article Keyboard shortcuts for emoticons. To turn off emoticons, on the Lync menu, click Preferences Appearance.
Oct 27, 2016 At the Microsoft download center, choose Download to download the Lync for Mac 2011 update program onto your Mac. The lync14.dmg file is downloaded onto your computer. This is the Lync for Mac 11 update.
May 23, 2020 Microsoft Lync 14.4.3 for Mac is available as a free download on our application library. The software lies within Communication Tools, more precisely Texting & Video calls. This free software for Mac OS X was originally produced by Microsoft. This program's bundle is identified as com.microsoft.Lync.
Microsoft has rebranded its unified communications client, Lync, as Skype for Business. As of January 22, 2017, if you're running Windows, you'll see the Skype for Business interface. Lync for Mac still works to access IU's UniCom service.
Both Lync for Mac and Skype for Business allow you to:
Chat using instant messaging
Make PC-to-PC phone calls
Make video calls
Share files
Share your desktop
See others' availability and manage the information others see about you
The features you can use depend on which mode you're using, UniCom Basic or UniCom Enterprise Voice; see IU UniCom feature comparison. Students are eligible for UniCom Basic only.
The capabilities of Lync are integrated with Microsoft Office applications. For more about the Windows and Mac versions, see below.
Before attempting to use either client with Indiana University's UniCom service, see Get started with UniCom/Skype for Business.
For an introduction to UniCom, including how-to PDFs and videos, seeUniCom.
Additional resources are available at Learn how to use UniCom.
Mac
For a list of Lync for Mac features, see the ClientComparison Table. For additional support resources, see:
Lyncfor Mac 2011 Deployment Guide (PDF)
Lync for Mac Quick Tour (video)
Indiana University students, faculty, and staff can download Lync for Macfrom IUware.
Phones
IU faculty and staff can obtain Lync-compatible devices (USB devices or IP phones) by going through their department telecommunications coordinators and/or their ITPros. For more about available devices, see About office telephone equipment at IU.
If you do not know who your telecommunications coordinator is, at IU Bloomington, call 812-856-2287; at IUPUI, call 317-274-3004. You can also email Communications Planning and Implementation.
To learn the name of your department's IT Pro, consult your supervisor, your departmental website, or IT People. If you still cannot identify your IT Pro, call the UITS Support Center at 812-855-6789 (Bloomington) or 317-274-4357 (Indianapolis).
-->
Topic Last Modified: 2018-01-23
The following tables compare the features and capabilities of Lync 2013 clients in the following categories:
Enhanced Presence Support
Contacts and Contact Groups Support
IM Support
Conferencing Support
Telephony Support
External Users Support
Archiving, Compliance, and Logging Support
modern auth
These tables indicate the features that are available to Lync users in an on-premises deployment of Lync Server 2013. The same features are also available to Skype for Business Online and Microsoft 365 or Office 365 users unless otherwise indicated.
Important
See Mobile client comparison tables for Lync Server 2013 for details about feature availability in Lync 2013 mobile clients.

Note
For details about Skype for Business Online subscription plans, see the Skype for Business Online Service Description at https://go.microsoft.com/fwlink/p/?LinkId=282430.
Lync Server 2013 supports the following previously released clients: Lync 2010, Lync 2010 Mobile, Lync Phone Edition, and Lync 2010 Attendant. For information about these clients, see the Lync 2010 version of the Client Comparison Tables at https://go.microsoft.com/fwlink/p/?LinkID=213798.
The Lync 2013 client supports audio and video in a Virtual Desktop Infrastructure (VDI) environment. For details about Lync 2013 capabilities in a VDI environment, see Supported virtualization technologies and known limitations in Lync Server 2013.
Microsoft Lync For Mac 365
Enhanced Presence Support
Feature/capabilitySkype for Business 2015 and 2016 clientSkype for Business on MacLync 2013Lync Windows Store appLync 2013 BasicLync Web AppLync 2010Lync 2010 AttendantLync Phone EditionCommunicator for Mac 2011Lync for Mac 2011
View status
●
●
●
●
●
●
●
●
●
●
Publish status
●
●
●
●
●
●
●
●
●
●
View status notes and Out of Office messages
●
●
●
●
●
●
●
●
●
●
Add a custom location
●
●
●
●
Add a custom note
●
●
●
●
●
●
●
●
●
Use a photo from any public site for My Picture
●
●
Contacts and Contact Groups Support
Feature/capabilitySkype for Business 2015 and 2016 clientSkype for Business on MacLync 2013Lync Windows Store appLync 2013 BasicLync Web AppLync 2010Lync 2010 AttendantLync Phone EditionCommunicator for Mac 2011Lync for Mac 2011
View and Modify Contacts list
●
●
●
●
●
●
●1
●
●
●
Tag contacts for status change alerts
●
●
●
●
●
●1
●
Control privacy relationships
●
●
●
●
●1
Search the corporate address book
●
●
●
●
●
●
●1
●
●
●
Search Microsoft Outlook contacts
●
●
●
●
●
●1
●
●
Manage contact groups
●
●
●
●
●
●1
●
●
Expand distribution groups and Microsoft 365 Groups
●
●
●
●
●
●
●1
●
Search for Response Groups
●2
●2
●
●1
Display recent contacts group
●
●
●
●
●1
Display current conversations group
●
●
●
●
●
●1
●
Display alternate contact views (for example, tile)
●
●
●
●
●
●1
●
Sort contacts by Group, Relationship, or New (people who’ve added you to their Contacts list)
●
●
Sort by group
●
●1
Sort contacts by Status (availability)
●
●
●
●1
●
Search and add Exchange contacts
●
●
●
1 For Skype for Business Online, Microsoft 365, or Office 365 users, Lync 2010 Attendant is not supported.
2 For Skype for Business Online, Microsoft 365, or Office 365 users, this feature is not available.

IM Support
Feature/capabilitySkype for Business 2015 and 2016 clientSkype for Business on MacLync 2013Lync Windows Store appLync 2013 BasicLync Web AppLync 2010Lync 2010 AttendantLync Phone EditionCommunicator for Mac 2011Lync for Mac 2011
Initiate IM or email to a contact
●
●
●
●
●
●
●1
●
●
Navigate among multiple IM conversations/Track multiple conversations in a single tabbed window
●
●
●
●
●
●
●1
●
●
Log IM conversations in Outlook
●
●
●
●
●
●1
Saved in Communicator for Mac
Saved in Lync for Mac
Use prepared conversation templates
●
●1
Check spelling
●
●
●
●
●
Skill search (with SharePoint Server integration)
●2
●2
●2
● 2
●1, 2
Persistent Chat (Group Chat) integration
●3
●3
●3
Escalate a Persistent Chat room to a Lync Meeting with one click
●3
●3
Inline pictures of sender and receiver in IM window
●
●
●
●
Send ink messages
●
Receive ink messages
●
●
●
Set IM messages as high importance
●
●
1 For Skype for Business Online, Microsoft 365, or Office 365 users, Lync 2010 Attendant is not supported.
2 On-premises Lync Server 2013 and on-premises SharePoint 2013 is required for skill search.
3 For Skype for Business Online, Microsoft 365, or Office 365 users, Persistent Chat is not available.
Conferencing Support
Note
Lync meeting features are not available in Skype for Business Online Standalone Plan 1.
In Lync-to-Lync sessions, a Skype for Business Online Plan 1 user can participate in desktop sharing and application sharing if they are invited by a user who has access to sharing features.
For details, see the Skype for Business Online Service Description at https://go.microsoft.com/fwlink/?LinkID=282430.
Feature/capabilitySkype for Business 2015 and 2016 clientSkype for Business on MacLync 2013Lync Windows Store appLync 2013 BasicLync Web AppLync 2010Lync 2010 AttendantLync Phone EditionCommunicator for Mac 2011Lync for Mac 2011
Add computer audio
●
●
●
●
●
●
(requires plug-in)
●
●1
●
●
●
Add video
●
●
●
●
●
●
(requires plug-in)
●
●
●
View multiparty video (gallery view)
●
●
●
●
●
Use in-meeting presenter controls
●
●
●
●
●
●
●
●
Access detailed meeting roster
●
●
●
●
●
●
●
●1
●
Participate in multiparty IM
●
●
●
●
●
●
●
●1
●
●
Share the desktop (if enabled)
●
● 2
●
●
●
(requires plug-in)
●
●2
●2
Share a program (if enabled)
●
View only
●
●
●
(requires plug-in)
●
View only
Add anonymous participants (if enabled)
●
●
●
●
●
●
●
Use dial-in audio meetings
●3
●
●3
●3
●3
●3
●
●1
●
Initiate a Meet Now meeting
●
●
●
●
●
●
●
Add and present Microsoft PowerPoint files
●
●
Present only
●
●
●
View only, annotations not available4
Navigate Microsoft PowerPoint files
●
●
●
●
●
●
Add and edit OneNote meeting notes
●
●
Edit only (not add)
Use a whiteboard
●
●
●
●
●
Conduct polls
●
●
●
●
●
Upload files to share with others
●
●
●
●
●
●
Schedule a meeting or conference
Outlook or Lync Web Scheduler
Requires Mac Outlook version 15.28 or later
Outlook or Lync Web Scheduler
Outlook or Lync Web Scheduler
Outlook or Lync Web Scheduler
Lync Web Scheduler
●
Outlook
Q&A Manager
●
●
●
Create public meetings with static meeting IDs from Outlook
●
●
●
Disable meeting IM
●
●
●
●
●
●
Mute Audience
●
●
●
●
●
●
●
Make everyone an attendee
●
●
●
●
●
●
Delegate can schedule a meeting on behalf of delegator
●
●
●
●
Synchronize delegates between UNRESOLVED_TOKEN_VAL(skypeforbusiness) and Outlook
●
●
●
●
Set Video Spotlight (lock video)
●
●
●
●
●
●
●
●
Give/Take control of screen sharing
●
●
●
●
1 For Skype for Business Online, Microsoft 365, or Office 365 users, Lync 2010 Attendant is not supported.
2 Participants cannot control desktops that are shared by Skype for Business on Mac, Lync for Mac 2011, or Communicator for Mac 2011 users. Mac users can control desktops shared by Windows users.
3 For Skype for Business Online, Microsoft 365, or Office 365 users, this feature requires an audio conferencing provider.
4 The Lync for Mac 2011 client cannot view Microsoft Office 2013 PowerPoint presentations when they have been shared in a conference by the Lync Web App 2013 client.
Voice (Telephony) Support
Note
Lync Voice features are limited to certain Skype for Business Online subscription plans. For details, see the “Lync Voice Features” topic in the Skype for Business Online Service Description at https://go.microsoft.com/fwlink/?LinkID=282430.
Feature/capabilitySkype for Business 2015 and 2016 clientSkype for Business on MacLync 2013Lync Windows Store appLync 2013 BasicLync Web AppLync 2010Lync 2010 AttendantLync Phone EditionCommunicator for Mac 2011Lync for Mac 2011
Initiate a call
●2
●
●2
●
●2
●2
●1
●
●
●
Click to call a contact
●2
●
●2
●
●2
●2
●1
●
●
●
Transfer a call
●2
●
●2
●
●2
●2
●1
●
●
Manage call forwarding
●3
●
●3
●
●3
●1
●
●
Manage team call settings
●3
●3
●3
●1
Manage delegates
●3
●3
●3
●
Initiate a call to a Response Group
●3
●3
●3
●1
Support emergency services (E911)
●3
●
Requires Lync Server 2013 CU8 HF1 or later
●3
●3
●3
●1
●
●
IM notification to SIP URI(s) for E-911 call
●
●
●
●
●
●
●
●
IM notification to distribution list for E-911 call
●
●
●
●
●
●
●
Connect to voice mail, set up or change greeting
●3
●
●3
●
●3
●1
●
●
Missed call notification
●
●
●
●
●
●
●
●
●
Make calls on behalf of another contact (manager/delegate scenario)
●3
●3
●3
Handle another's calls if configured as a delegate
●3
●3
●3
●1
●
Manage a high volume of calls
●3
●1
Call park
●3
●3
Group call pickup
●3
●3
●
1 For Skype for Business Online, Microsoft 365, or Office 365 users, Lync 2010 Attendant is not supported.
2 For Skype for Business Online, Microsoft 365, or Office 365 users, this feature is available for PC to PC calls only.
3 For Skype for Business Online, Microsoft 365, or Office 365 users, this feature is not available.
External Users Support
Feature/capabilitySkype for Business 2015 and 2016 clientSkype for Business on MacLync 2013Lync Windows Store appLync Web AppLync 2010Lync 2010 AttendantLync Phone EditionCommunicator for Mac 2011Lync for Mac 2011
Initiate IM with a public contact
●
●
●
●
●
●1
●
●
Initiate IM with a federated contact
●
●
●
●
●
●1
●
●
Conduct two-party or multiparty calls with external users
●2
●
●2
●2
●
●1
●
●
●
1 For Skype for Business Online, Microsoft 365, or Office 365 users, Lync 2010 Attendant is not supported.
2 For Skype for Business Online, Microsoft 365, or Office 365 users, this feature is not available.
Recording
Feature/capabilitySkype for Business 2015 and 2016 clientSkype for Business on MacLync 2013Lync Windows Store appLync 2013 BasicLync Web AppLync 2010Lync 2010 AttendantLync Phone EditionCommunicator for Mac 2011Lync for Mac 2011
Client-side recording of audio, video, application sharing, desktop sharing, and uploaded content
●1
●1
●
Client-side recording of file transfers, shared OneNote pages, and PowerPoint annotations
●2
●2
●
Select preferred recording resolution
●
●
1 For Skype for Business Online, Microsoft 365, or Office 365 users, recording is unavailable in certain Skype for Business Online standalone plans. Recording requires full Lync 2013 client rights. For details, see the Skype for Business Online Service Description at https://go.microsoft.com/fwlink/?LinkID=282430.
2 For Skype for Business Online, Microsoft 365, or Office 365 users, recording of file transfers, shared OneNote pages, and PowerPoint annotations is unavailable.
Archiving, Compliance, and Logging Support

Feature/capabilitySkype for Business 2015 and 2016 clientSkype for Business on MacLync 2013Lync Windows Store appLync 2013 BasicLync Web AppLync 2010Lync 2010 AttendantLync Phone EditionCommunicator for Mac 2011Lync for Mac 2011
Archiving of IM conversations in Outlook Conversation History
●2
●2
●2
●2
●
●1
Saved in Communicator for Mac
●
Client-side archiving of audio, video, application sharing, desktop sharing, and uploaded content
●2
●2
●
Client-side archiving of file transfers, shared OneNote pages, and PowerPoint annotations
●3
●3
●
Access sign-in logs from Lync icon in the task bar
●
●
●
Microsoft Lync 2019 Download
1 For Skype for Business Online, Microsoft 365, or Office 365 users, Lync 2010 Attendant is not supported.
2 For Skype for Business Online, Microsoft 365, or Office 365 users, this feature requires Exchange Online and is controlled by the user’s Exchange mailbox In-Place Hold attribute.
3 For Skype for Business Online, Microsoft 365, or Office 365 users, archiving of file transfers, shared OneNote pages, and PowerPoint annotations is unavailable.
Client limitations
Basic client limitations
The features below are available using the Full client and are not available with the Basic client:
Manage team call settings
Manage delegates
Make calls on behalf of another contact (manager/delegate scenario)
Handle another's calls if configured as a delegate
Manage a high volume of calls
Initiate a call to a Response Group
Call park
Group call pickup
Lync For Mac Microsoft Office 2016
Online or Hybrid user account limitations
User accounts can exist either Online or On-premises, and that will affect the features available to that user. Users with accounts on Skype for Business Online will not have access to the following features, even with the Full client:
Enhanced Presence: Use a photo from any public site for My Picture
Contacts: Search for Response Groups
IM Support: Persistent Chat (Group Chat) integration
IM Support: Escalate a Persistent Chat room to a Meeting with one click
External Users: Conduct two-party or multiparty calls with external users
0 notes
Text
The problems of using OneNote the way I do
My OneNote post is ridiculously popular, and I never expected to be as such. I thought it was too long and too obscure to be useful. I just wanted to help out a handful of people in the community, and now it’s garnered over 33,000 notes. In terms of studyblr, that is a lot of notes.
I hope the main message of my post remains clear: OneNote is flexible and powerful. I’m not in any way affiliated with Microsoft, though I will absolutely sell out to recommend OneNote, because this is probably my favourite program. It’s just that good of a program.
However, the way I use OneNote is in no way reflective of the only way to use it. I’ve mentioned it in the post and I want to make it clear that you should find your own way. I know many students who use it and every single one of them uses it differently.
The main issue is that it’s cumbersome. You’re logging everything. I love planning out every single day and writing in the fine details, but that is not the case for everyone. Your best bet for planning is getting a premade planner from a dollar store. They’re cheap and effective and best of all, simple. I don’t need to use OneNote like that, but I just prefer having a separate tab to write in reminders and dates. The same goes for syllabus information. Usually during syllabus week (the first class that’s spent just going over the syllabus), I write notes in the syllabus section. Many professors give out important information, which has helped greatly in knowing how to prepare for their class.
[If you’re interested in other ways to organize your school stuff in OneNote, I highly recommend this post on Students Toolbox for more inspiration.]
Another issue is the formatting. Not to brag, but I’m very quick at formatting and I’ve memorized a ton of keyboard shortcuts One of the biggest advantages of OneNote is you can type literally anywhere. My notes are a glorified Word document in a really long table. It’s great for neatness, but can be a formatting nightmare for others.
Also, typing notes isn’t the best way to take notes. I say this as someone who does for her needs. When you type notes, you are more prone to recording, rather than listening. In fact, I will be switching to handwriting (rather, sketchnoting) notes and typing out my notes at a later point, after I have listened to the lecture. However, typing notes also confer a great advantage to disabled students, which is why I recommend it.
Sabrina from Students Toolbox also describes other problems with OneNote, such as notes often not being printed correctly. The post I just linked is another great alternative for taking notes.
While OneNote is a versatile program, it has its downsides, and I would just like to emphasize that. My advice would be to try it, and then modify it according to your needs.
18 notes
·
View notes
Text
📰 eLearn Updates (January 2018)
New Post has been published on https://collect.readwriterespond.com/elearn-updates-january-2018/
📰 eLearn Updates (January 2018)
Here is a collection of links and resources associated with GSuite and Hapara for January 2018.
Updates
What’s New in Google Data Studio? – There have been a number of updates to Data Studio, including the ability to coordinate colours, field reports editing and the display of images in tables.
Improved accessibility for Google Sheets, Slides, and Drawings – Google has added Braille support for Sheets and the option of magnifiers to Slides and Drawings.
New navigation menu for Admin console – Google has grouped menu options based on how customers use them to create a logical multi-layered menu. This makes the menu shorter and more scannable, helping users find things quickly.
Additional Changes to the YouTube Partner Program (YPP) to Better Protect Creators – Google has announced that new channels will need to have 1,000 subscribers and 4,000 hours of watch time within the past 12 months to be eligible for ads. We will begin enforcing these new requirements for existing channels in YPP beginning February 20th, 2018.
Share a Copy of a Google Form – Alice Keeler has coded an Add-on for Google Forms that creates a copy of the Form you are using and asks who you want to share the copy with
Introducing the security center for G Suite—security analytics and best practices from Google – Google are introducing the security center for G Suite, a tool that brings together security analytics, actionable insights and best practice recommendations from Google to empower you to protect your organization, data and users.
More menu improvements in Google Docs and Slides �� Based on usage data and your feedback, Google are making some changes to the menus and toolbars in Google Docs and Slides on the web.
Exploring art (through selfies) with Google Arts & Culture – Google has created an experiment that matches your selfie with art from the collections of museums on Google Arts & Culture
Legacy Google Drive desktop sync client now shutting down on May 12th, 2018 – Google is shutting down the legacy desktop sync application.
Google Earth Pro 7.3.1 Released – Google released a new version of the desktop version of Google Earth Pro version 7.3.1 (which is free despite the confusing “Pro” name).
Improved attachment compliance in Gmail – Gmail Data Loss Prevention (DLP) has been identified to not only check for certain attachment types, but it also checks the attachments in case they have been falsely renamed.
A new year for Chrome video – Google have begun adding support for High Dynamic Range (HDR) to get vibrant colors, darker blacks, and brighter whites from the latest HDR displays.
Tools for every school: G Suite for Education updates – Jonathan Rochelle discusses the addition of some enterprise features, such as encryption and cloud searching, to GSuite for Education.
Tailoring education for the 21st century: perspectives from educators – Google’s latest study ‘Fostering exploration and excellence in 21st century schools’ found that a holistic approach is key. This includes integrating different educational strategies and techniques, and empowering teachers with greater autonomy.
Three new ways to manage files and free up space on Files Go – Files Go is our new app for freeing up storage on your phone.
Pioneer new lessons in your classroom with Google Expeditions – Google announce a beta program that allows schools and educators to create their own expeditions.
Publish sites to a specific audience in the new Google Sites – Google have added the ability to share sites with specific audiences.
Gmail contextual gadgets going away on August 1st, 2018 – With the launch of Gmail of Add-ons, Google is closing down contextual gadgets.
A reintroduction to Google’s featured snippets – In this post—the first in a new series going behind-the-scenes on how Google Search works— Danny Sullivan explores when, where and why we provide featured snippets.
Take your Blocks models to the next level – Brittany Mennuti explains that the latest release of Blocks, available on Steam and the Oculus Store, has lots of new features that make it more powerful and even easier to use
Resources
Drive
How to Embed MP3 Audio Files In Web Pages with the help of Google Drive – Amit Agarwal provides a step by step guide for adding and embedding audio from Google Drive.
Backup your digital information and devices – Ian O’Byrne talks about the importance of having important information backed up three ways: the original file on your computer, a local backup and a backup in another location.
View your Slack activity from within Google Drive – Google is adding activity events to allow you to see, in Drive, when a file is shared or discussed from within Slack.
Chrome
Chrome is turning into the new Internet Explorer 6 – Tom Warren says that Microsoft might have celebrated the death of Internet Explorer 6, but if Google isn’t careful then it might just resurrect an ugly era of the internet where “works best with Chrome” is a modern nightmare.
How To Set A Default User In Chrome – Patrick Lucas Austin explains how to set a default user with Chrome.
Chrome extensions galore! – Matt Miller facilitated a chat associated with Chrome extensions, with teachers sharing their perspective.
Clean out your browser extensions – Ian O’Byrne argues that one of the best ways to mitigate risk is to regularly clear out your browser extensions that you don’t regularly use.
Another round of click-fraud extensions pulled from Chrome Store – Richard Chirgwin reports that Icebrg’s Justin Warner and Mario De Tore have claimed that a cumulative half a million Chrome users have been hit by four malicious browser extensions pushing click and SEO fraud.
Nasty New Chrome And Firefox Addons Won’t Let You Uninstall Them – Logan Booker explains that viruses don’t want to be removed, so the nastier ones will fight to stay put by disabling protection software, cloaking their presence and even generating fake windows and dialog boxes to give you a bum steer.
How Google Fights Password Thieves – Kate Conger sheds some light on how Google accounts become compromised, as well as how Google finds new ways to fight back.
Manage Multiple Google Accounts – Alice Keeler provides a quick reminder on the importance of adding multiple accounts to the browser.
Taking Notes on a Touchscreen – Three Options Compared – Richard Byrne compares Zoho Notebook, OneNote and Google Keep for taking notes on a touchscreen.
Try These 5 Keyboard Shortcuts – Alice Keeler provides an array of shortcuts for Windows, Mac and Chromebooks.
All types of Chromebooks for all types of learners – Cyrus Mistry discusses the release of a new generation of Chromebooks, as well as ways that they are being integrated with STEAM.
“Ok Google, read my book”… Introducing audiobooks on Google Play – With audiobooks on Google Play, rolling out today in 45 countries and nine languages, you can turn your time stuck in traffic, on the treadmill, or waiting in line into reading time.
Research
No, Google’s Arts & Culture app isn’t secretly evil – Karen Hao explains that the Arts and Culture app is set up in a way that prevents Google from feeding its algorithms as there is no built-in feedback loop
Every Lesson is a Search Lesson – Alice Keeler discusses the importance of searching and why we need to teach it explicitely.
The Shallowness of Google Translate – Douglas Hofstadter demonstrates the problems with Google Translate based on the lack of understanding and meaning within the process.
Docs
The Engaging Lesson: How to Combine Mind Mapping & G Suite – Nancy Morris explains how to combine mind mapping with Google Docs in the creation of ideas and knowledge.
Control F: Replace the Extra Space – Alice Keeler demonstrates how to remove double spacings from your text using find and replace.
All Kaizena features now available inside Google Docs – Kaizena announce an update to Google Docs Add-on allowing students to record voice messages, embed lessons and track skills right inside a Google Doc
Ten Overlooked Google Docs Features – Richard Bryne shares ten features that are often overlooked, such as the ability to restrict sharing and adjust page layout.
Gmail
Delegate additional Gmail privileges to users – Google have introduced three new Gmail privileges that G Suite super admins can grant to other users—without needing to give them super admin status: (1) Email Log Search, (2) Access Admin Quarantine, and (3) Access Restricted Quarantines.
15 Gmail Hacks for Busy Teachers – Reuben Yonatan provides a series of tips associated with Gmail and supports this with easy to follow graphics.
How to Create & Send Screencasts from Your Inbox – Richard Byrne demonstrates how to generate and send screenshots from your inbox using Loom.
How to Send Emails with Google Forms Based on User’s Answers – With the Forms Email Notifications add-on, you can automatically send emails to anyone each time a user submits your Google Form.
Calendar
New Google Calendar web UI to begin automatically upgrading users on January 8th, 2018 – From January 8th, Google will begin auto-upgrading users whose domains are set to the automatic (default) rollout option.
Make Appointment Slots in Google Calendar – Alice Keeler provides a how to make appointment slots in the new Google Calendar.
Slides
Everything is Digital When You Can Take a Picture of It – Alice Keeler demonstrates how to use Slides to capture work and then provide feedback.
21 New Free Interactive Pear Deck Templates for Google Slides – Eric Curts says that wth the new version of the Pear Deck add-on a few things have changed, including 21 pre-made interative templates.
This Add-on Makes It Easy to Create Photo Slideshows – Richard Byrne explains that Photo Slideshow is a free Add-on that makes it quick and easy to import an entire Google Photos or Google Drive folder into Google Slides
Free Music to Use In Google Slides Presentations – Richard Byrne provides a guide to an add-on for inserting music and some links to some free repositories.
How to Create an Interactive Diagram in Google Slides – Richard Byrne shows that by linking slides you can create an interactive diagram in Google Slides.
Ten Overlooked Google Slides Features – Richard Byrne discusses a number of features assocaited with Slides that will let you accomplish the things that you used to do in PowerPoint or Keynote while others will just save you a bit of time
Google Slides: Collaborative Meme Template – Alice Keeler demonstrates how to include all 4 C’s in an assignment involving the creation of a meme.
How to Add Q&A to Your Google Slides Presentations – Richard Byrne creates a short video documenting how to add Q&A to your Google Slides presentations.
Forms
formRecycler – Easy Reuse of Google Forms Questions – Richard Byrne shows how to use the formRecycler add-on to copy questions from one form to another.
Google Forms: Require a Valid Email Address – Alice Keeler steps through how to require a valid email address to be submitted via Google Forms.
Sheets
3 new tools to help improve your Apps Script development and management experience – Google are providing three new tools to help further improve your workflows and manage Apps Script projects: Apps Script dashboard, Apps Script API and Apps Script Command Line Interface.
BigQuery + Data Studio (pricing, upload limits, formatting) – David Krevitt addresses some questions associated with BigQuery and Data Studio.
Conditional color formatting with custom formulas in Sheets – David Krevitt discusses custom formulas for conditional formatting.
An easy formula: 5 reasons your business should try Google Sheets – Google provide a guide to why Sheets is so powerful, bringing together a number of updates and improvements, such as automation and artifical intelligence.
How to use Google Sheets: A Beginner’s Guide – Ben Collins provides a tutorial that will help take users from being an absolute beginner with Sheets, through to a confident, competent, intermediate-level user.
Classroom
Google Classroom Tips – Tony Vincent collects together a number of his graphics assocated with Google Classroom in one space.
Google Classroom: Edit Class Name – Alice Keeler provides some guides on naming Google Classroom’s and how to modify them.
Google Classroom: Submit a Screenshot and use DriveSlides – Alice Keeler discusses the use of DriveSlides to collect together student screenshots.
Drawings
Use Google Drawings as an Alternative to Thinglink – Richard Byrne discusses how Thinglink recently made some changes to their free plans that further limited access for students and suggests using Google Drawings instead to create hyperlinked images.
Caption This! A fun, deep-thinking Google Drawings activity – Matt Miller and Laura Steinbrink provide a series of visual activities to do with Google Drawings to support deeper thinking.
Add an Image to Your Tweet – Alice Keeler has shown how to create a graphics to add to Google to share on Twitter.
Resize a Google Drawing – Alice Keeler explains how to change the size of a canvas in Google Drawings.
Geo Tools
Google Maps No Longer Lets You Post Negative Reviews About Your Crappy Job – Sidney Fussell explains how Google has updated its Maps policies to ban certain business reviews left by former employees.
Polar Bear “Street” View Lesson Plans – Richard Byrne discusses Polar Bears International offer of lesson plans designed to help students learn about polar bears and their habitat.
Connecting Classrooms
Hanging Out with Google Hangouts – GTT038 – Kasey Bell and Matt Miller discuss Hangouts and its potential in the connected classroom.
Finding a class to partner with virtually AND activities to do together – Matt Miller provides twenty activities to do with virtual partner classes.
Hangouts Meet metrics in Reports API; tablet support now available – To help you better understand Hangouts Meet usage within your domain,Google are introducing more than 50 new metrics in the Reports API Customer Usage report. These new metrics provide details on the duration, size, and device-specific characteristics of the Meet calls across your organization.
Google’s art selfies aren’t available in Illinois. Here’s why. – Ally Marotti explains why the Arts & Culture Selfie feature is banned in Illinois due to laws around biometrics.
Google Is Testing a New App That Would Let Anyone Publish a Local News Story – Bulletin is an app for contributing hyperlocal stories about your community, for your community, right from your phone. If you are comfortable taking photos or sending messages, you can create a Bulletin story.
Google Home in the Classroom? – Holly Clark discusses the possibilities and potentials associated with Google Home.
Keep
Google Keep: Quick Student Feedback on Google Docs and Slides – Larry Goble suggestions making your own lists, stickers and comments in Keep to use when providing feedback in Docs and Slides.
YouTube
The Social-Media Star and the Suicide – People may want to punish Logan Paul’s crassness and disrespect in posting a dead body, but he, like every other social-media star, was responding to the incentives that have been set up for them.
When Playing a YouTube Video – Tony Vincent provides a simple graphic with three useful shortcuts to use when playing video on YouTube.
It’s the (Democracy-Poisoning) Golden Age of Free Speech – Discussing the democratic problems with YouTube and Facebook, Zeynep Tufekei argues that we can decide how we want to handle digital surveillance, attention-channeling, harassment, data collection, and algorithmic decisionmaking, we just need to start the discussion.
Transcribing audio with less pain – Christian Bokhove explains how he uses YouTube to transcribe audio.
My Unprofessional Videos – Richard Byrne explains that he makes ‘unprofessional’ videos for three reasons: best use of time, value and modelling a meaningful process.
10 Interactive Tools for Students to Create How-To Videos – Farid Gasim lists a number of applications that students can use in the creation of videos.
YouTube to fund videos that ‘counter hate’ as pressure over extremism grows – Alex Hern reports that YouTube is to spend more than $5m funding creators who “counter hate and promote tolerance.”
Content moderation is not a panacea: Logan Paul, YouTube, and what we should expect from platforms – Tarleton Gillespie explains there is no simple answer as to where such lines should be drawn in regards to YouTube, as every rule associated with content moderation will be plagued with “what abouts”
Now even YouTube serves ads with CPU-draining cryptocurrency miners – Dan Goodin reports the use of malicious adds within YouTube that are being used to support the mining of bitcoin.
Photos
When It Comes to Gorillas, Google Photos Remains Blind – Tom Simonite explains that Google’s caution around images of gorillas illustrates a shortcoming of existing machine-learning technology. With enough data and computing power, software can be trained to categorize images or transcribe speech to a high level of accuracy. But it can’t easily go beyond the experience of that training. And even the very best algorithms lack the ability to use common sense, or abstract concepts, to refine their interpretation of the world as humans do.
Go-to Google Photos tips for 2018 – Daisy Lui provides some tips associated with Google Photos, including the ability to share, remove clutter and organise using labels.
General
EdTech Trends for 2018 with Martin McKay – Martin McKay discusses the use of data from 12 million users to develop a set of nationalised writing norms.
g(Math) Has Been Deleted – Try These Three Alternatives – Richard Byrne provides some other Add-ons students might consider using for inserting graphs and equations into your Google Documents and Google Forms.
Answering your questions about “Meltdown” and “Spectre” – Matt Linton and Matthew O’Conner provide a Q and A associated with the impact of Spectre and Meltdown.
Review & Revoke Social Logins & Third Party App Access – Ian O’Byrne raises several concerns with social logins for new accounts, such as trusting one site with personal or private information that you gave to another site.
How Google Keeps Our Data Safe- Teaching and Learning Webinar – Lisa Thumann leads a webinar discussing data and the protections put in place by Google to protect it.
15 Ideas to Google-Fy Student Projects – Whoos Reading curates a list of activities that Google can support.
0 notes
Text
Develop your digital skills this academic year – new dates released
ISD Digital Skills Development has released new dates for Term 3. As usual, we are offering a wide range of courses covering Excel, Photoshop, Matlab, SPSS, and more..
New this term we are offering a Creating accessible documents course. Making documents accessible is important for everyone, whether or not they have a disability or impairment. New regulations have recently come into effect that make it even more crucial. In this session you will learn how to make your PowerPoint, Word, Excel and PDF files more accessible. Book a place on a Creating accessible documents course. To find out more about creating accessible content, please visit our dedicated webpage.
See below for our current schedule of courses and workshops and details of how to book.
More digital skills development opportunities…
Digital Skills Development at IOE offer training in a wide range of digital tools including Microsoft SharePoint, Teams, OneNote and Visio, screencasting, infographics, mind mapping and presentation tools, with some sessions specifically aimed at Mac users. You can also learn about text-to-speech software, polling, blogging and much more. Visit the Digital Skills Development at IOE booking system for details and to book. Sessions are open to all UCL staff and students and booking opens on 23rd April.
We have a vast range of high-quality video-based courses available at LinkedIn Learning. LinkedIn Learning is the new platform on which we are now hosting our Lynda.com content. These cover technical skills but also business, personal and creative skills as well. Visit the UCL LinkedIn Learning page to find out more.
Not sure what you need or have a more specific issue you would like help with? Come along to one of the Digital Skills Development drop ins for more individual support.
Current schedule
For a full list of courses and workshops take a look at our course catalogue. Visit the UCL booking system to book on the sessions listed below. Enrol on our Moodle course to be the first to be notified about any new sessions. Please note that the booking links for Excel Essential Skills Workshop 2 are only made available to those who have completed Excel Workshop 1.
30/04/2019 10:00 13:00 Data Manipulation in R with Rstudio 30/04/2019 14:00 17:00 Managing Long Documents in Word 2016 01/05/2019 10:00 13:00 Excel 2016 Essential Skills (STAFF ONLY) 01/05/2019 16:00 17:00 Excel Essential Skills Workshop 1 02/05/2019 10:00 13:00 A Quick Introduction to UNIX 03/05/2019 10:00 11:00 Word Essential Skills – WORKSHOP 1 03/05/2019 11:00 12:00 Word Essential Skills – WORKSHOP 1 07/05/2019 10:00 17:00 Introduction to Matlab (Part 1) 08/05/2019 10:00 13:00 Charting with Excel 2016 09/05/2019 10:00 17:00 Introduction to Matlab (Part 2) 15/05/2019 10:00 13:00 Introduction to Photoshop CS4 15/05/2019 16:00 17:00 Excel Essential Skills Workshop 1 16/05/2019 10:00 13:00 Further Unix 17/05/2019 10:00 11:00 Word Essential Skills – WORKSHOP 2 17/05/2019 11:00 12:00 Word Essential Skills – WORKSHOP 3 21/05/2019 10:00 17:00 Getting started with Stata 22/05/2019 10:00 13:00 Using Excel 2016 to manage lists (STAFF ONLY) 23/05/2019 10:00 17:00 An Introduction to R with RStudio 28/05/2019 17:30 20:30 An Introduction to R with Rstudio (Part 1) 29/05/2019 16:00 17:00 Excel Essential Skills Workshop 2 30/05/2019 10:00 13:00 Excel 2016 Essential Skills (STAFF ONLY) 30/05/2019 14:00 16:00 Creating accessible documents 30/05/2019 17:30 20:30 An Introduction to R with Rstudio (Part 2) 31/05/2019 10:00 11:00 Word Essential Skills – WORKSHOP 4 31/05/2019 11:00 12:00 Word Essential Skills – WORKSHOP 5 05/06/2019 10:00 12:00 Creating accessible documents 06/06/2019 10:00 13:00 Data Visualization in R with ggplot2 06/06/2019 14:00 16:00 Pivot Tables with Excel 2016 11/06/2019 10:00 12:00 Creating accessible documents 20/06/2019 14:00 16:00 Creating accessible documents 25/06/2019 10:00 12:00 Creating accessible documents
from Digital Education team blog https://blogs.ucl.ac.uk/digital-education/2019/04/15/develop-your-digital-skills-this-academic-year-new-dates-released-2/ via IFTTT
0 notes
Text
Destroy Windows 10 Spying 1.6 Crack
Destroy Windows 10 Spying 1.6 Crack is a portable version of the application that gives security against Microsoft’s interference on the PC, without the client’s permission. After Windows 10 starts, Microsoft can enter the laptop without permission. It learned through the community world that Microsoft can’t make its mind respectful of privacy or no longer. Destroying Windows 10 spy laptops is not the easiest to be limited to Windows 10, but different Windows 7, Home Windows 8 and Windows 8.1. The technology Trojan horse mentioned that the family Windows 10 now has permission to spy on the computer without approval.
anti spyware windows 10 is a pronunciation way, and updates in Windows 7 and 8 also make Microsoft’s secret agent. The way it is used can cure this essential sexual destruction.privacy protector for windows 10 patches can uninstall updates that help internal spies on the PC. The file it came with is not set. Its far-movable deformation does not require the previous use of this system.
Review Destroy Windows 10 Spying
Destroy Windows 10 Spying 1.6 Crack is the latest operating system provided by Microsoft and may change the way we use and view the entire window. However, as a new operating system, it is still vulnerable to attacks, and there are reports of anonymous data being sent to Microsoft or elsewhere. These data are private and personal and must be stopped.
anti spyware for windows 10 Espionage because it prevents anonymous data from being sent and deleted by applications that cannot be removed in the normal way. Anonymous data is a block, the application stops doing so and more. You can also clear and view the host file on the notepad.
Ever wanted to completely disconnect with Microsoft, keeping you up-to-date? Then try to destroy Windows 10 spyware. Destroying Windows 10 Espionage is a free, small program that can make several changes to the pc running Windows 10, thereby increasingly disconnecting pc from Microsoft services. The default setting will add a long list of rules to your host file and Windows Firewall to block access and entry from Microsoft. This program is mainly configurable via the “Settings” menu, giving you a list of the contents to be executed.
Once you have decided what rules and settings to use, click on the big “windows 10 spyware removal” and the program will get work, providing a list of tasks to complete. Finally, destroying Windows 10 spyware is a quick way to make several changes to the Windows 10 operating system, which completely disconnects you from Microsoft. Note: When we test this application, it also changes it so that it cannot access Bing!
Destroy Windows 10 Spying 1.6 Crack is a utility for windows 10 that will allow you to ensure data protection. The program does not require any installation. It only needs to stop sending anonymous data to the Microsoft operating system. best windows 10 privacy tool spies also supports KB3080149 and KB3075249 updates for windows 7.8 and 8.1. These latest updates introduced the same anonymous data delivery system in previous Microsoft OS.
Although this can be done manually, dws destroy windows spying is responsible for modifying the computer’s host file to prevent sending data to some of Microsoft’s domains. The software also allows you to delete or view host files in Notepad. Destroying Windows 10 Spy provides a feature that you can uninstall for some installed programs by default, Windows 10.
Destroying Windows 10 Spyware is a small portable utility that enables you to quickly and easily disable the task of monitoring user action activities and subsequently sending detailed reports to Microsoft servers in the Windows 10 telemetry parameters.
Destroy Windows 10 Spying 1.6 Crack Full Version
In addition to improving user security and privacy levels, the program also allows you to delete system applications in Windows 10, such as 3D Builder, Camera, Mail, Calendar, Maps, News, Weather, Finance, Groove Music, Movie TV, OneNote, XBOX, card collections, voice recorders, etc.
On the Russian forum, windows 10 anti spyware appeared around the discussion of privacy features in Windows 10. The big disadvantage: Unfortunately, this tool does not list what it did. By clicking on “Remove Windows 10 Spy” all spy features are turned off. Here you must already have real confidence in the author, first of all, because no recovery point is pre-set. Our tip: Run this tool only if you have a new backup behind your hand.
Destroy Windows 10 Spying 1.6 Crack is a free utility for removing and disabling spyware modules in the Windows operating system. The main advantages of this program are ease of use and integration. Destroying Windows 10 Spyware adds the Microsoft IP address to the host file and firewall rules, which makes it impossible to send any confidential information about the user. Using this utility, you can also delete unnecessary system applications that run in the background and consume RAM.
Destroying Windows 10 Spyware is a free program that allows users to block any applications and services that transfer data to Microsoft. Users are advised to take privacy protection into account when using computers on a daily basis. It also allows you to delete applications built into Windows 10 that you don’t like or need (for example: Builder 3d, Xbox, Selected Tiles News).
Destroying Windows 10 spyware stops various Microsoft tools for collecting personal data from the Windows 7, Windows 8.1, and Windows 10 operating systems. By clicking , the program will modify the computer’s host file to prevent sending data to some of Microsoft’s domains. The software also allows you to delete or view host files in Notepad. Finally, Destroying Windows 10 Spyware provides a feature that allows you to remove some of the default programs installed in Windows 10.
windows 10 spy destroy is a free tool that will allow us to disable all spyware options, block all connections to Microsoft servers, and remove the few basic applications included in the system that cannot be eliminated by conventional means. Destroying Windows 10 spyware automatically disables Microsoft’s main privacy option while blocking all Skype advertisements, editing system host files by adding all known Microsoft IPs, and blocking all connections to the company’s servers.
Destroy Windows 10 Spying 1.6 Crack is a portable version of the application that provides security against Microsoft failure on the PC without the privilege of the client. After starting to destroy Windows 10, Microsoft can enter the laptop without permission. It is through the global community that Microsoft is unable to express its opinion on privacy issues. Cell phone spies destroy 10 windows no longer limited to window 10. Simple, but also Home Windows 7 Windows 8 and Windows 8.1.
Features Of Destroy Windows 10 Spying 1.6 Crack:
Uninstall helps to monitor computer updates.
Prevents some of Microsoft’s move-in and out connections.
Remove allowed apps in the spring.
Protect safety.
There are no errors and viruses.
With the modern version comes.
Prevents tracking user activity.
Automatically create recovery points.
Utilities and small size portability.
Supports 32- and 64-bit systems.
Improve user security and privacy levels.
Efficient
Disable and enable Windows updates
Eliminating spy apps
Close Windows Defender
Restrict IP address
Remove subway app
Open source
Add to host spy domain
Remove Office 2016 telemetry
What’s New
Reduced length and introduction from scratch.
Force adjustments within the host.
The software will now create device repair factors earlier than any modifications.
Everyday and professional models are introduced.
Utility’s “Extended delete” menu.
Fixed to automatically disable device updates.
Fixed defects and performance improvements.
The post Destroy Windows 10 Spying 1.6 Crack appeared first on CrackInstaller.
from CrackInstaller https://ift.tt/2x0yiwQ via IFTTT
0 notes
Text
Creating inclusive classrooms with the help of OneNote
Today’s post was written by Jameson Lee, assistive technology coordinator of special education for the Catholic District School Board in Eastern Ontario.
At the start of the school year, our special education team established the goal to deepen the purposeful use of technology to support struggling students—especially for those with special education needs and disabilities. This goal was based on the belief that all students should have an opportunity to be a part of an inclusive learning environment, where diversity is embraced, celebrated and valued by all members of the school community.
To identify specific strategies and tools to improve learning for all students, we needed to prioritize students first and technology tools second. We initially focused our efforts on understanding the needs of our students by digging deeper into their learning profile with careful attention on the students’ individual strengths and abilities. If we approached teaching and learning by starting with what each child could do and then pairing it with specific technology tools, we believed we could reach all our learners.
It was also around this time that OneNote had become the most requested app for training and support by staff. The popularity of OneNote was likely a result of the previous year’s focus on increasing awareness and building staff capacity around Office 365. To this extent, classroom teachers had observed the benefit of OneNote Class Notebooks and wanted to learn more about the ways they could use it to personalize learning for their students. In particular, the special education teachers understood how OneNote Class Notebook is a tool with which they can organize and quickly access all their information for students. The students were also excited about how much fun it was to use OneNote for learning—and it being available for free at home was a bonus for parents. It was the first time in my career that I can remember everyone being excited about using the same app for learning. The versatility of OneNote is one of my favorite things—it provides something for everyone.
To make learning come alive through OneNote for both staff and students, we thoughtfully crafted our starting point based on the learner profile and focused on comprehension, memory, organization, planning, processing speed and information. Recognizing that many of the OneNote tools can be used for different purposes, we looked to see where overlap would exist because strategies and tools in one area will often support in other areas. For example, a student with organization and planning difficulties may have trouble keeping a physical binder organized as well as remembering where all the different assignments have been filed. Using OneNote, digital files can be easily stored, organized and accessed.
OneNote makes it easy to incorporate both visual and verbal information in one place to ensure information is accessible to all learners. Inserting pictures, embedding videos and typing or inking text on the same page reaches all learning styles and preferences. Being able to incorporate multimedia is highly engaging and supports students’ understanding of concepts, instructions and their ability to make connections to what they already know and apply it to new learning. With a OneNote Class Notebook, both teachers and students share the learning because of the ability to quickly share within the digital space.
Memory plays such a critical role for students, affecting every aspect of their learning. Having to remember instructions, concepts, procedures or recall prior learning to make sense of each situation can be incredibly demanding. For students who rely on their teachers or a peer to seek clarification, they can begin to take control of their own learning when the OneNote Class Notebook incorporates pictures, screen clippings and videos with to-do tags. These supports help walk students through the steps required for each learning situation. It could be the steps required for solving a math problem or a video explaining the outline of a news report. At first, students may need help accessing the sections. Over time, however, they will be able to independently access their OneNote Class Notebook and refer to the necessary sections and pages to clarify the expectations of a task.
There is an abundance of planning tools to keep work organized and quickly track down notes and assignments. Tables, tags, links and custom templates make it incredibly easy to chunk information, create checklists and stay on top of deadlines. OneNote Class Notebooks can hold numerous documents in one location that allow staff and students to quickly scan across sections and pages without having to open multiple files. The quick and easy access to work can reduce frustration and lost papers, and it allows students to get to work without worrying where they saved their files and the file name.
Some of our exceptional students understand, interpret and recall new learning without any difficulties, but the time it takes to process their thinking becomes the barrier for success. These students will take extra time to express their understanding. Whether it is through typing their thoughts or creating an illustration, written output is a challenge. Using OneNote to ease the demands of the task allows students to better show their level of understanding. The Learning Tools dictation or use of recorded audio allows students to focus on their thoughts and worry less about how to express their ideas. Other students find it helpful to use pictures instead of drawing diagrams and then annotating using digital ink. By taking a picture, the demands of the task are reduced, and the student can focus on explaining what they know, because the task is about explaining their level of understanding, not how quickly they can draw.
Perhaps the biggest breakthrough in the past year for students who need additional support to be able to accurately interpret what they see and hear in the classroom is OneNote’s Learning Tools Immersive Reader. Whether a student has trouble interpreting visual examples or struggles with too much language, the ability for the document to be read aloud and quickly customized with large or small font, or different spacing between letters and words being highlighted as it is read aloud, means each student starts with the same document, and they can independently personalize their reading experience.
Over the past year, Office Lens has quickly become the preferred app to digitize physical copies of handouts and notes to transfer to OneNote. But the most significant impact for students has been the recent addition of the Immersive Reader within Office Lens. This feature is reaching yet another group of reluctant readers. For example, a student who uses Office Lens on a regular basis mentioned how quickly he can start reading using this tool. “It helps to read long paragraphs because you can just take a picture of it and it starts to read for you.” Another student found Office Lens to be helpful because he understands things better when they are read aloud, instead of trying to remember and read in his head at the same time. “Being able to focus on what I am hearing helps to get my work done.” Office Lens does more than read words; it is opening possibilities for learning in a way that not only creates independence but makes reading enjoyable.
Approaching teaching and learning with the belief everyone can succeed gives every student an equal opportunity to reach their full potential. Using OneNote, we have the confidence to reach all types of learners, who require a range of carefully selected tools based on their strengths and abilities. Our classrooms need to be inclusive places, where all students belong, can contribute and are empowered to achieve more—OneNote makes that possible.
—Jameson Lee
The post Creating inclusive classrooms with the help of OneNote appeared first on Office Blogs.
from Office Blogs http://ift.tt/2qlvXIu via IFTTT
0 notes