#Enable My Computer Icon in Windows 7 8 10
Explore tagged Tumblr posts
Visit Tumblr Blog
Explore Tumblr blogs with no restrictions, modern design and the best experience.
Last Seen Tumblr Blogs


Fun Fact
Tumblr’s website traffic is steadily declining.
Text
Download Ad Blocker For Mac Free

Written by Eyeo GmbH
Free Ad Blocker Windows 7
Ad Blocker For Mac Safari Free Download
Best Free Ad Blocker Mac
Ad Blocker For Macbook Air
Best Free Ad Blocker
Category: Productivity
Release date: 2019-11-27
Licence: Free
Software version: 2.1.0
File size: 19.24 MB
Compatibility: Windows 10/8.1/8/7/Vista and Mac OS X 10.12.6
Adblock Plus for Safari for PC and Mac Screenshots
Adblock for Mac, free and safe download. Adblock latest version: Block ads in Google Chrome. UBlock, the fastest, most powerful ad blocker for Mac is here. UBlock blocks all annoying pop-ups and ads while you browse on your Mac. It’s simple, easy-to-install, and best of all- completely free. Download uBlock ad blocker for Mac and browse faster today.
Key Features
Latest Version: 2.1.0
Licence: Free
Rated 3/5 By 740 People
What does Adblock Plus for Safari do? Adblock Plus for Safari is a totally free ad blocker that allows you to block annoying ads on your favorite websites and video channels. Simply install the app, and see the web in a better way. No more pop-ups, banners or autoplay ads. The Adblock Plus app for Mac supports great websites with Acceptable Ads (on by default). Don’t want to see any ads? Simply deactivate Acceptable Ads. You can also have the option to whitelist websites you trust.By downloading and installing the application, you agree to our Terms of Use. https://adblockplus.org/terms
Download for MacOS - server 1 --> Free
Download and Install Adblock Plus for Safari
Download for PC - server 1 --> MAC:


Download for MacOS - server 1 --> Free Thank you for visiting our site. Have a nice day!
PC Compactibility/Requirements for Installation
Compactible OS list:
Windows 10
Windows 8.1
Windows 7
Windows Vista
Free Ad Blocker Windows 7
Requirements for MacOS Installation
Ad Blocker For Mac Safari Free Download
Intel, 64-bit processor, OS X 10.7 or later.
Compactible OS list:
OS X 10.10: Yosemite
OS X 10.11: El Capitan
macOS 10.12: Sierra
macOS 10.13: High Sierra
macOS 10.14: Mojave8
macOS 10.15: Catalina
Adblock Plus for Safari - how do I download the app on PC?
If you want to download the software on your pc or mac, you could either first visit the Mac store or Windows AppStore and search for the app OR you can easily use any of the download links we provided above under the 'Download and Install' header section to download the application
Adblock Plus for Safari - Is it safe to download?
Yes. The app is 100 percent (100%) safe to download and Install. Our download links are from safe sources and are frequently virus scanned to protect you
By Glendale2x
New framework seems to have performance issues
This version of ABP for the new Safari framework unfortuantely seems to kill performance on my computers. Maybe it’s partially related to them being a bit older (one is a Mid 2011 Mini, the other is a 2012 iMac), but with ABP enabled I can’t even open a new tab/window and type a URL into the bar and expect Safari to accept the input without having to hold down the return key until it goes or wait a minute after opening a new tab or window. I also noticed that using Twitter was jumpy and lagged even with simple typing, it felt like all the dynamic content it relies on was just struggling to be processed through whatever framework Apple is forcing. Hopefully the devloper can figure out the performance issues because it’s really, really bad now.
By Ramblin'Rose
why isn’t this working?
I have ABP and it wasn’t perfect but worked fairly well for my needs. Recently, it simply disappeared. (I see someone else said that could be from the latest iOS update, but I don’t have that on my desktop yet). When I tried to reinstall, it showed me two boxes to check. The way I read it, if you checked the box that said you wanted the icon visible in the toolbar, it would be able to read sensitive information of all kinds on any page. What good is an app of any kind that allows for that?! As it was, with only the one box checked, it only blocked very few ads, and I was still getting requests from sites to be whitelisted without being able to fnd any way to do it. I’ve got all kinds of garage showing up on my Facebook page, and you guys have ruined what was a reasonable product. WHY?
By PeopleRsad
Still works for me
Almost didn’t download the new version based on the recent reviews, however after looking at the other apps here that claim to be ad blockers I didn’t’t see too many alternatives. I decided to go ahead and get the new version and so far its pretty much the same as the old version, lots of ads blocked. I’m happy, just make sure you go through the simple set-up.
By achilds19
Works well but
After much research, I understand the issue with Apple changing the rules on the devs so they had to build this app from scratch. Works well for me so far, except for one annoying problem. I use Yahoo mail and it's not hiding the ad that appears in the top line of the inbox even with unchecking the Acceptable Ads box, which is super annoying. I know the devs are watching these reviews, so if someone can point me to an extension or something that will fix that, I'd appreciate it. Was using AdGuard and it fixed that problem, but that app behaves like spyware and is constantly running in the background even after you close Safari.
Advertisement
Adguard for Mac v.1.1.0Adguard is the first standalone adblocker for Mac OS X. It is an ultimate program has all the features to ensure more efficient and comfortable use of the Internet. Ad blocking, phishing and malware protection, and privacy protection!
SlimBoat for Mac v.1.1.6SlimBoat is a fast and secure FREE web browser software with a lot of powerful features, such as intelligent form filler, popup blocker, adblocker, social network integration, download manager, web page translation, quick search and site groups.
Safari AdBlocker for Mac OS v.1.9.8.6The only 64-bit adblocker built for Mac OS X 10.5+ to integrate directly into Safari, for minimum disruption to your browsing experienceMain Features- Adblock Plus subscription support- Right-click to block images, and frames- Automatic ...
Vivaldi for MacOS v.3.2.1967The Vivaldi browser lets you be in control of how your browser looks, feels and works. It does not track you, adapts to your style with features that you need and has values that you can stand by.
Maiar Browser v.80.0.1.40Maiar is an extremely fast and privacy-friendly browser for the modern web. It loads major websites 2-8 times faster than Chrome and Safari. Maiar can block ads without modules or extensions.
Izenda Ad Hoc - Express Edition v.4.0Izenda Ad Hoc - Agile Business Intelligence for ASP.NETLiberate Your Organization's Relational Data Today!Izenda Ad Hoc empowers business users to directly explore relational data from a web browser. * Intuitive and Completely Web-Based AJAX Report ...
Avian Freeware Suite v.0.1Avian Freeware Suite (AFS) provides two things: Developers with libraries for Java Swing Widgets, XML handling, Fortran95 and Pascal; End users (Medical students, doctors, scientists) with productivity tools they can use (quizzes, XML databasing & ...
IP Blocker v.20050403IP Blocker is an incident response tool that automatically updates access control lists on Cisco routers and other devices. Web and command line interfaces are both supported, as is logging, email notification, and automatic expiration of ...
QR-Code Maker Freeware v.1.0.0Use QR-Code Studio to create QR codes for free. An assistant simplifies the creation of QR codes for mobile tagging, social media and more. The generated QR-Codes are available immediately as BMP, GIF, JPG, PNG and TIFF graphic file.
Freeware Advanced Audio Coder v.2.2.7FAAC is an Advanced Audio Coder (MPEG2-AAC, MPEG4-AAC). The goal of FAAC is to explore the possibilities of AAC and exceed the quality of the currently best MP3 ...
Zhang Hong's Freeware v.1.0[1] English-Portuguese-Chinese Dictionary [2] Japanese-English-Chinese Dictionary [3] MP3 Sponge [4] JPG Sponge [5] RedDays [6] RadSensor [7] descriptions and updates: ...
Mimosa Scheduling Software Freeware v.6.5.8Mimosa is a scheduling and event planning software application for use to create timetables in any kind of school and university of varying type and size. It is also used to schedule conferences and work-shifts in business and industry environments.
Flash Banner Maker for Mac v.1.00With AnvSoft Flash Banner Maker for Mac, you can easily create gorgeous flash banners in SWF format and html file for flash intros or for building website. You can add any image backgroud from your hard drive and choose from the 50+ animation effects for.
BiblePlayer for iPod v.1.1Take God’s Word to Go! Do you need to have a daily dose of bible scriptures? Or maybe you need a bible reading plan? Now you can read and listen to the King James version of the Bible on your iPod with this new freeware program. Bibleplayer ...
Mach-O OSAX v.0.1Mach-O OSAX is a scripting addition for CodeWarrior which provides different samples. The package is completly freeware and the source code is ...
QuickCart v.2.2QuickCart 2.2 is regarded as a flexible and handy program which is designed to run your own web shop. Freeware and easy to use e-commerce solution is designed to run Your own web shop. As a database it uses files structure so that the SQL database is ...
Flippagemaker PDF to Flash (SWF) for Mac v.1.0.0Flippagemaker Free PDF to Flash (SWF) for Mac is freeware for Mac users to convert pdf to swf flash video. Create Macromedia Flash (SWF) file from Adobe PDF file for embedding into web page easily.
DVDSmith Movie Backup v.1.0.0DVDSmith Movie Backup is DVD Decrypter, DVD copying Freeware to backup, clone or copy DVD movie to computer as DVD folder and removes all the protections (CSS, RC, RCE, APS, UOPs and Sony ARccOS) while copying.
Hubblescreensavermac v.1.0'Hubble Space Telescope (Mac) free screensaver containing 99 high quality NASA-ESA space images. Screensaver designed by the Creative Department, an award winning advertising and interactive agency based in Cincinnati. Fully functional freeware.' ...
MediaHuman Audio Converter MAC v.1.8MediaHuman Audio Converter is a freeware for Mac OS X. It can help you in case you need to convert your music in WMA, AAC, WAV, FLAC, OGG or Apple Loseless format. This program was designed to simplify as much as possible the process of conversion.
Best Free Ad Blocker Mac
Freeware Ad Blocker software by TitlePopularityFreewareLinuxMac
Ad Blocker For Macbook Air
Today's Top Ten Downloads for Freeware Ad Blocker
Best Free Ad Blocker
Zoiper Webphone ZOIPER webphone is fully-compliant with Internet Explorer,
1000apps NetVibes Widget Avec ce Widget vous pourrez rechercher des logiciels ,
Vivaldi for MacOS The Vivaldi browser lets you be in control of how your
QR-Code Maker Freeware Use QR-Code Studio to create QR codes for free. An assistant
Flash Banner Maker for Mac With AnvSoft Flash Banner Maker for Mac, you can easily
PC Protect Your PC First screensaver application protecting your PC from
Flippagemaker PDF to Flash (SWF) for Mac Flippagemaker Free PDF to Flash (SWF) for Mac is freeware
DVDSmith Movie Backup DVDSmith Movie Backup is DVD Decrypter, DVD copying
Maiar Browser Maiar is an extremely fast and privacy-friendly browser for
BiblePlayer for iPod Take God’s Word to Go! Do you need to have a daily
Visit HotFiles@Winsite for more of the top downloads here at WinSite!
2 notes
·
View notes
Text
AVG RETAIL | LOGIN TO ACTIVATE AVG ANTIVIRUS - avg.com/retail
AVG is antivirus software that is engineered to keep your data, identity, information and files safe and secure from the virus, malware, ransomware, adware, rootkits, Trojans, spyware etc. and cyber threats. In order to provide safety of your official documents, AVG encrypts and stores the data into a virtual disk on your system device that is password protected. Apart from this, AVG offers a host of advanced features to keep all your devices safe and secure from cyber threats even when you are surfing, playing gaming, downloading, streaming videos etc. by scanning every item.
Besides, the anti-theft feature of AVG helps in identifying the location of your stolen phone, laptops etc. as well as sends an image of the thief by camera theft. The email shield technology of AVG scans each and every email to detect virus, as well as remove the malicious and infected emails.
AVG scans your computer automatically round the clock through its advanced scanning engine even when it is not put to use. The remote management of the devices lets you administer, install and configure the AVG antivirus software from any location. This feature also ensures timely scanning of the AVG antivirus software to safeguard all devices.
AVG Antivirus software for Business and household
The advanced features of AVG antivirus software are designed to keep all data, files and confidential information safe from the hackers, cyber threats and cyber-attacks. Remote Management allows remote administration of the devices. Protection of the network through link scanning ensures the safety of the internet that is accessed by the employees. In case any threat is detected, AVG antivirus software immediately gives a warning. The Email shield technology is able to scan all the emails automatically, to remove the content that carries any security threat or malicious links and attachments.
AVG antivirus software is a perfect antivirus for your personal and household purposes. Not only keeping the devices safe and secure from cyber threats, but AVG antivirus software also enables tracking of lost devices. So that you are able to lock the device, activate the alarm, delete all data remotely. At the same time, when the lost device is being tried to unlock and the thief fails on the third attempt, then the Camera Trap will capture a secret photo of the thief and send it to the owner via email.
Apart from this, due to the AES encryption, you can connect to the public Wi-Fi without any fear of threat or malicious activities. AVG antivirus software can safely run on Windows, Mac, Android and iOS devices.
Features of AVG antivirus software
AVG antivirus software provides several advance features to its users, that includes the following:
· Data Safety
· Malware Protection
· Ransomware Protection
· File Server Security
· File Shredder
· Identity Protection
· Protect Network
· Link Scanner
· Email Shield
· Network Antivirus
· Ransomware Protection
· Smart Scanner
· Remote Management
· Remote Access Shield
· AVG PC Tune-up
· Boost PC Speed And Productivity
· Mobile Security
· Secure VPN
· AES encryption
· Antivirus App For Android
· Anti-Theft locker and tracker
· Camera Trap
· App Lock
· Device Lock
· App Backup
· Webcam protection
Operating system requirement
For AVG antivirus activation on your system, you must check out the system requirement of your device. AVG antivirus can be downloaded and installed on the Windows devices having the following :
AVG antivirus can be successfully installed on Windows XP (SP3), Windows Vista, Windows 7, Windows 8/8.1 and Windows 10 on 32-bit or higher editions
Processor required: minimum Intel Pentium 1.5 GHz or faster
Memory: At least 1 GB RAM or above
Hard disk free space required for installation :
2 GB on the hard disk
Intel Pentium 4 / AMD Athlon 64 processor or above (must support SSE2 instructions). ARM-based devices are not supported.
Internet: Internet connectivity to download, activate, install, scan and maintain program updates.
Standard screen resolution: Not less than 1024 x 768 pixels.
What are the steps for AVG Retail Login, Installation, Setup and Activation?
For AVG antivirus activation, it is recommended to remove all previously installed antivirus from your system device. You can do this by clicking on Control panel > Programs > Uninstall programs, select the existing antivirus and right click to select ‘’Uninstall’’. Once the previous antivirus is uninstalled, follow the given instructions:
Log in to AVG antivirus account-www.avg.com/retail
Open the official website of AVG antivirus i.e. https://www.avg.com/retail for antivirus setup, installation for antivirus download.
Click on ‘’Login to my AVG Account’’, a new web page will appear asking you to enter your registered email id and password.
If you have not created an account yet, then click on the ‘’Create an Account’’ button. Enter the details as required such as your name, email id and generate a password. Click on the ‘’Register’’ button.
Expect a verification email on your registered email id inbox. Open the email and click on the confirmation link for your AVG antivirus account activation. On clicking this link, you will be directed to the official site of the AVG antivirus.
Now enter your registered email id and newly generated password to open your account for AVG antivirus account activation.
2) AVG Antivirus setup and AVG Antivirus installation
After you have logged into your account, at this point, you will be asked to download the AVG software on your device.
Click on the ‘’Download’’ button as appearing on the screen after you log into AVG antivirus account.
Once you click the ‘’Download’’ button, a setup file with the extension ‘’.exe’’ will start downloading on your device.
After the file is downloaded, open the location where it is stored and right-click on the file to select ‘’Run as administrator’’ from the context menu. A ‘’User Account Control’’ dialog box will appear, asking for permission to install. Click on ‘’YES’’ to proceed further.
Another dialog box will appear. Select the language from the options (if required) otherwise, it will display English as the default language.
Now, a new dialog box will appear on your screen, too for AVG Antivirus installation. Click on the ‘’Install’’ button and follow the instructions that appear on your screen. However, if you wish to make changes in the default AVG Antivirus setup, then click on the ‘’Customize’’ button to proceed further.
AVG Antivirus setup and AVG Antivirus installation will initiate on your system device which will take a while as it progresses on your screen. At this point, do not switch off your computer or internet connection.
A new dialog box will appear, click on the ‘’Continue’’ button. Thereafter, you will see a dialog box, asking you to start with either ‘’Activate’’ your account with the paid version or ‘’Start free trial’’.
Since you have purchased the paid version for AVG Antivirus setup and AVG Antivirus installation, you are recommended to skip the free trial version and click on the ‘’Activate’’ button to begin your subscription.
3) Activation Product Key Code-https://www.avg.com/retail
Now, that you have completed AVG Antivirus setup and AVG Antivirus installation, you need to activate your subscription plan. Activation product key code is required to start your paid subscription. AVG antivirus activation product key code is a combination of 25 digits which you receive from the retailer when you purchase it online. An email is sent to you on purchasing AVG Antivirus that consists of this AVG antivirus activation product key code.
Follow the given steps to proceed:
Open https://www.avg.com/retail and enter 25 digit activation code you have received
AVG antivirus product subscription is now active on your device.
3) Run your First Scan on the device
As soon as your AVG Antivirus Activation starts, you can scan your system. Simply click on the ‘’Run first Scan’’ button to scan your system and detect if any virus or cyber threat exists.
In case some functions are not working on your system, it is advised to RESTART your system device and then scan the system once.
Various Activation process on different platform
Easy steps for avg.com/retail procedure
Complete avg.com/retail process for both desktop and mobile devices. Follow the simple steps given here and activate your AVG subscription.
Install AVG antivirus software
AVG subscription can be activated through its application installed on the PC. So install its application before license activation.
● Open a browser type avg.com/retail in the url field and press enter.
● You will reach the AVG home page. Expand the drop-down menu and select the product you have purchased.
● Next choose the device you want it to install, then click the download button.
● AVG Installer files will be downloaded to your pc.
● Go to the download section of your browser and locate the AVG setup file.
● Open the file by double-clicking it to run the Installer.
● Next, follow the instructions as detailed on the AVG installation dialogue box and finish the installation.
avg.com/retail via the application interface
To proceed with AVG activation you must have an activation code. Look for AVG mail that includes the activation code.
● Double click the AVG application icon to launch the main window.
● Now click on the menu button located at the top right corner of the screen.
● The menu will expand. Select 'Enter Activation Code' option.
● Another window will appear. Type your AVG Activation Code in the field given, then click on the enter button.
● If the key is valid your AVG subscription will be activated.
Activate AVG on android
● Download the AVG antivirus app on your phone from the Google play store.
● Search on your phone's home screen the AVG app icon and tap it to open the app.
● On the home screen, tap on the upgrade button.
● Now tap the three horizontal dots at the top right of the screen and select the 'enter voucher code' option.
● Enter the code in the pop-up box then tap on the confirm button.
Various scanning options available with AVG antivirus software.
To perform scanning of your system, you can run various scans either simultaneously or subsequently. The various options to scan include:
Run smart Scan: To detect malware, virus, browser add-ons, performance issues and check sensitive documents
Deep Scan: In-depth scanning of your device to check storage drives as well as memory for cyber threats.
File or Folder Scan: It prompts you to select a file or folder to scan individually.
Boot-Time Scan: It scans at Bootup to remove any cyber threat or ‘’infection’’ that is difficult to reach once you startup.
USB/ DVD Scan: To scan all removable media that can be attached to your device including USB flash drives, external hard drives, smartphone, etc.
Performance Scan: To scan the system for any issues that are affecting the speed, performance and security of the system device.
Consequences of not activating AVG Antivirus software on my system device- ’You are not protected’’.
If your system is not protected or AVG antivirus is not working then you will get the message on your computer that says ‘’You are not protected’’ in red color along with an ‘’X’’ marks icon on the AVG antivirus user interface. This suggests that your system is prone to potential virus, malware, ransomware, spyware and other allied cyber threats and cyber-attacks. You may at any time lose your data, confidential information, personal details, passwords, files, folders etc. as the system could be hacked by any cybercriminal.
This could happen because of any of the following reasons:
Your AVG antivirus subscription has expired and not valid anymore. You are suggested to immediately buy a new subscription plan.
AVG antivirus is not activated on your screen, this could be due to you have not activated the subscription by entering the product activation key code.
The free trial of AVG antivirus has expired and your system is not protected. Therefore, it is recommended to buy a new subscription of AVG antivirus that fulfils your official or personal usage.
You have not uninstalled any other previously installed antivirus from your system. Thus, uninstall any other antivirus software and try to re-install AVG antivirus software on your device.
Therefore, to keep your system device safe and secure as well as to protect all your data, files, folders and information, buy a paid subscription of AVG antivirus. Get peace of mind and ultimate protection from any suspected malicious activities with AVG antivirus.
FAQs
Q. Why am I unable to activate my AVG antivirus subscription?
A. If you are unable to activate your AVG antivirus subscription, then
Ensure that the product activation key code is entered correctly.
At times, subscription synchronization may take up to 24 hours after purchase.
Contact your retailer, if the activation key code does not work even after 24 hours or purchase.
Q. Can I use a free-trial version of AVG antivirus?
A. You can use a free-trial version of AVG antivirus however it will give you limited features for security and is available for use for a limited trial period. Thereafter, you will not be able to get your free-trial version of AVG antivirus and need to buy the paid subscription with the premium features.
Q. Do I need to uninstall any other anti-virus running on my device.
A. YES, you need to uninstall any previously running antivirus from your device, before you start the downloading process of AVG antivirus software on your device.
Q. Is it possible to transfer my AVG antivirus subscription to another computer?
A. YES, you may transfer the AVG antivirus subscription on any other device of your choice. You need to follow the given steps:
First, uninstall AVG internet software from the existing system device.
Secondly, install AVG internet software on the devices in which you want to use it further.
Finally, Activate the subscription on the new device using the AVG product activation key code.
Q. Will the performance of my PC slow down while AVG scan is running?
A. Usually, the performance of your system device will not be affected when the AVG scan is running. However, there could be a little slower performance of your device due to the system configuration, or in case you are executing multiple scans simultaneously on the device.
Q. Should I turn off the Microsoft Windows Firewall when I am using the Enhanced Firewall in AVG antivirus subscription?
A. YES, you may turn off Microsoft Windows Firewall when you have purchased a subscription having Enhanced Firewall in AVG antivirus subscription. Please note that AVG antivirus subscription has Enhanced Firewall that is built-in to check all your communication between your system device and with the outside networks. It successfully blocks all malicious and unauthorized communications that could be a potential threat to your system. It is suggested to keep all the AVG protection components enabled on your system device 24 /7 to ensure safety and protection.
Q. Can AVG protect my emails from viruses and threats?
A. YES, all your web-based email accounts whether private or official remain protected from the malware, virus, and other cyber threats due to the Web Shield, File Shield, Email Shield as well as Secure VPN features of the AVG Antivirus software.
1 note
·
View note
Text
Aol Login Problem 8O5~365~6444 6҉̶̙̳͉̉ͨ͂̏̃̉͜͠͠4̷̡̳̖̆̇͘͟͟͢͝4̷̡̳̖̆̇͘͟͟͢͝4̷̡̳̖̆̇͘͟͟͢͝ eMail Login Problem_Not _Working C A L L - N O W
Original story

What’s wrong with AOL Mail today? Well, AOL Mail is down for many users currently. Users affected by this outage have been taking to social media platforms like Twitter to voice their complaints.
The AOL customer support on Twitter has been actively addressing the complainants. Following are some user reports:
Anyone else having trouble signing into AOL, or is it just my internet service scr***** me over? I keep trying to log into my AOL email and it’s making me go in a fu***** circle.
@aolmail is there a problem with the aol mail? I can’t log in on the web or on my iPad.
— AnastasiaBeaverhouse (@1evilfairydust) May 23, 2019
The AOL mail login issues include authentication error, blank screen during signing in, missing AOL sign in, mailbox loading error in a particular browser, and older AOL Desktop gold. First, try to solve the error in AOL email and fix the missing screen problems. This issues can also be caused because of an invalid password. Try to enter the correct password to fix this problem.
AOL Mail Authentication Problem
The Blerk error 1 message occurs when there is an authentication problem. This issue is mostly due to the incorrect settings of the browser and can be mainly due to an outdated version of the browser. Fix this error by performing the AOL mail authentication problem troubleshooting steps below.
Step 1:First, try to modify the browser settings to fix aol login problems.
Step 2:Configure the settings on Edge and make sure to clear the data on Microsoft edge.
Step 3:Go to More Settings in Microsoft Edge.
Step 4:Now, click Choose What to Clear from the Clear Browsing data to solve AOL mail login issues.
Step 6:Tick the checkbox next to the data types that you want to delete and then choose Clear to fix AOL mail authentication problem.
Step 7:Next, make sure to update the saved bookmark on Safari, Firefox, Chrome, and Edge.
Step 8:Next, try to troubleshoot the Internet Explorer issues.
Step 9:First, try to add AOL to the trusted sites. To do so, click the Tools or Internet option to solve AOL mail authentication problem.
Step 10:Next, click Security tab Trusted Sites Zone Sites.
Step 11:Now, type https://*.aol.com in the Add this website to Zone field to solve aol login problems.
Step 12:Next, check whether the Protected Mode option is enabled, if not, perform the following steps to solve AOL mail login issues.
Step 13:First, click Tools Security tab Internet icon.
Step 14:Now, click the Trusted sites icon Enable Protected Mode. Restart the computer.
Step 15:Next, run the Internet Explorer in No Ad-ons Mode to solve AOL mail authentication problem.
Step 16:First, click the Start button All Programs Accessories System Tools Internet Explorer(No Ad-ons).
AOL Mail Can't Sign In
Most of the sign-in issues are caused by password issues, and this might also result in errors such as blank screens and sign in issues. Make sure to enter the correct password. To troubleshoot this issue, perform the following AOL mail can t sign in guidelines.
Step 1:First, try logging in again. Re-check if you have entered the correct credentials.
Step 2:If you are not able to sign in, try turning it off and then turning it on again.
Step 3:Next, make sure to reset the web settings to solve AOL mail can t sign in.
Step 4:Installing numerous browsers can cause the web settings to alter.
Step 5:Verify whether you have entered the correct password.
Step 6:If you have forgotten the password, make sure to reset the password.
Step 7:Try accessing the AOL mail from a different browser to solve AOL mail login issues, sometimes outdated password can cause this issue.
Step 8:Next, try to erase the browser’s cache and reset the browser to its preceding state.
Step 9:Make sure to enable the Java Applet Scripting.
Step 10:Disable or block the Firewall or the pop-up settings to fix AOL mail can t sign in.
Step 11:Now, try to access the AOL mail after performing all these troubleshooting steps.

AOL Mail Cannot Change Password
Perform the following guidelines to resolve this error.
Step 1:First, try to sign into the AOL account and choose the Logout from All Devices option from the Settings menu.
Step 2:Next, make sure you haven’t sent any contacts trough AOL mail. If you are sending any, contact Email Desktop Gold Support to fix the issue.
Step 3:Check if your credit card has been used without your knowledge. If so, block your account.
Step 4:Try logging into the AOL account after 24 hours.
Step 5:Try changing the password again.
Step 6:If the aol login problems persists, try to change the attached credit card with your account.
How Do I Unblock my AOL Email Account
Step 1:Navigate to the AOL Account Security page.
Step 2:Select the Forget Password option to unblock the AOL email account.
AOL Mail Password Not Working
Step 1:Check if you have pressed the Caps Lock key by mistake while you fix AOL mail login issues. You have to enter the password correctly.
Step 2:You have to update the autofill settings on the web browser. This will save the password when you enter it for the first time.
Step 3:If the problem persists, reset the password.
Step 4:Navigate to the Sign-in Helper option, and select any one of the recovery options.
Step 5:Select the Continue button and then follow the instructions that appear on the screen to reset the password.
How Do I Unblock my AOL Email Account
Step 1:Modify your AOL security question if you do not remember it to avoid aol login problems.
Step 2:Follow the forthcoming steps to change the question. Navigate to the Manage My Account tab available at the top part of the screen.
Step 3:Go to AOL Account Settings menu and select the Account Security Question option.
Step 4:Choose the Change Account Security Question option and fill the necessary details in the Change Account Security Question screen.
Step 5:Click the Save button, and you will be directed to the My Account Overview page.
Step 6:You can also reset your password by obtaining a code on your mobile and then resetting the security question if you are not able to log in.
AOL Mail Not Syncing
Step 1:First, remove the AOL account and add it after a few minutes.
Step 2:Choose the Settings option available in the Calendar app.
Step 3:Select the Manage Accounts option followed by the Delete an Account option.
Step 4:Next, you have to select the AOL account and delete it from your device to solve AOL mail login issues.
Step 5:Add your account after a few minutes and check if the issue has been resolved.
Step 6:Navigate to the Mailbox Sync Settings available under the Settings menu and verify the IMAP Username, Incoming Mail Server, SMTP Outgoing Server Address, Username, and Password.
Step 7:Modify the settings if required in the next step to fix AOL mail not syncing.
Step 8:Allow the apps that you have installed to access the calendar. Select the Privacy option available under the Settings menu.
Step 9:Choose the Calendar option and then click on the slider bar available below the Let Apps Access My Calendar option.
Step 10:Next, change the duration of the Sync period to solve the AOL mail not syncing issue. To do so, choose the Account Settings option available under Settings.
Step 11:Select the AOL Account followed by the AOL Sync Settings option. Modify the duration according to your choice.
Step 12:Check your Antivirus Settings and disable the firewall to rectify this AOL mail not syncing problem.
Step 13:Run the Windows troubleshooter and resolve the issue using the guidelines displayed.
Step 14:Disable the proxy settings in the next step. Select the Network & Internet option available under the Settings menu.
Step 15:Choose the Proxy option from the left panel of the window. Disable all the features available on the next screen.
Step 16:Finally, disable the two-step authentication. Make use of a different email client until the aol login problems is resolved.
Step 17:Uninstall the mail app and install it after a few minutes to resolve this issue.
Step 18:Call the technical experts if the above-stated AOL mail login issues solutions do not rectify the problem.
1 note
·
View note
Text
detailed gif making tutorial for beginners!
i have a gif tutorial already, but i wanted to make one that was very detailed and specific so it’d be easy to understand for those who may have only picked up photoshop to make gifs and haven’t used it before!
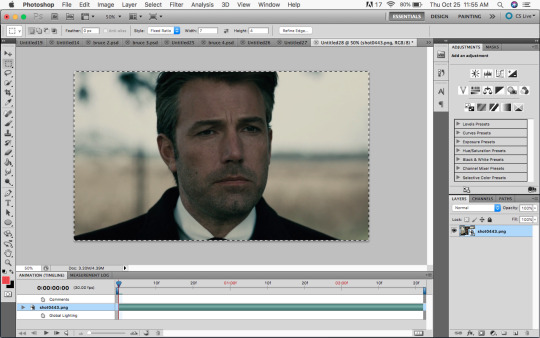
we’ll be making this gif:

i’ll be using photoshop cs5 with the timeline & umplayer for screencapping since i have a mac. if you have a pc you can use potplayer and follow the tutorial for that here. (this is the tutorial that i used when first learning to gif :’) )
all my gifs can be found here
when giffing, it is important to make sure you have at least a 720p video quality, but always try to get 1080p if you can. this is the number one way to get HQ gifs!
first, we’ll need to screencap. i always make a folder for the movie/show i’m giffing before screencapping. when we open up umplayer you’ll want to go to preferences first.
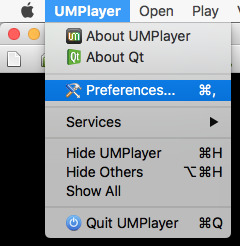
you’ll get a window like this:

you’ll want ‘enable screenshots’ to be checked

this will allow you to be able to screencap
and then select the magnifying glass to select the folder you want the screencaps to go in

once you’ve done that, go ahead and click okay to exit the preferences window
now we’ll open the video.

and get to the spot right before the part you want giffed starts:

now at the menu in the bottom left, you see these fast forward and rewind looking buttons. they control how fast/slow the video plays. click the one pointing left twice (in the black bar below it’ll say .5 and then .25—you want .25)


to take screencaps you press shift + D to start and again to stop. so once you hit the part you want to be the beginning of your gif, hit shift + D and once you get to the end of the part you want giffed, press shift + D again. and wallah! you have your screencaps!
now we’ll open up photoshop and load our screencaps by going file > scripts > load files into stack


a window pops up and you’ll need to click ‘browse’

once you do so, navigate to the folder with your screencaps and select them all & hit ‘open’
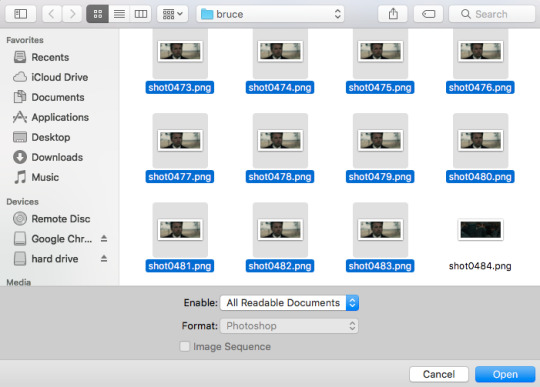
we get back to the same window and hit ‘ok’ after our files show in the box

now once you hit ok, don’t leave photoshop until your layers window goes from looking like this (it’s still loading):

to this (it’s done loading):

load time depends on how many screencaps you have and how many things you have open in photoshop, how fast/slow your computer is, etc etc. i thought it was a good idea to load uhhh 132 screencaps dsfhsdkj so it took awhile. leaving photoshop while they’re loading will screw it up! it’ll only load some and make the rest duplicates of the last one loaded so your gif will not work as you want.
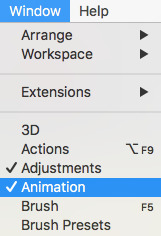
now you want to make sure you have the timeline open

if it’s not, you can go window > animation
however, we don’t want it as the timeline right now, so we’ll click this button in the lower righthand corner

this’ll give us the frames window instead!

now we’re gonna click this little guy a few times do get some stuff done

the first time we’ll select ‘make frames from layers’
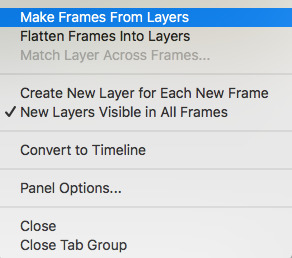
so now all our screencaps are in the frames window

but this puts them in backwards, so we’ll click that little guy again and select ‘reverse frames’ to get the in the right order
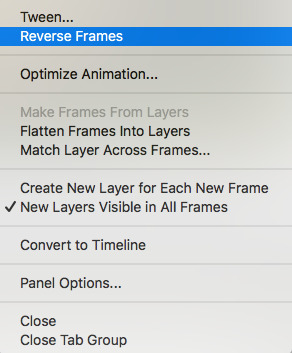
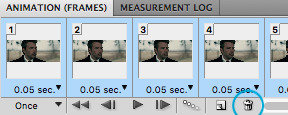
now we’ll click this guy one more time and select ‘select all frames’

with all our frames selected, we’ll click on where it says ‘10 sec’ (although you can click on this spot on any of them—since they’re all selected it changes this setting for all of them at the same time)

we’ll go to ‘other’

and insert ‘.05′ for our speed. this controls how fast the gif moves

now we can do something here before converting to the timeline. if you have frames on either end of the gif (not the middle!) that you don’t want to be in the gif, you can delete them now. since i loaded so many to start, i’ll go ahead and delete some to narrow it down.
if you do so, select one frame (either the first or last of the section you’re deleting) and hold shift and select the one on the other end of the section (so all the frames you want deleted are selected) for example, i started with frame 90, held shift and selected frame 1.
then click the trash can to delete.
once you’re satisfied, with all the frames still selected (make sure you don’t unselect them unless you’re deleting ones you don’t need. if you do, reselect them the same way we did before) click the button in the lower righthand corner

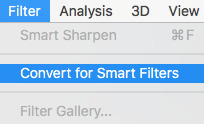
this converts it back to the timeline. if you deleted frames, make sure you delete the layers that went with it (any of them with the eye turned off in the layers window) again, use shift to select them all and the trash can to delete

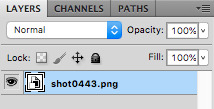
select all remaining frames (all the ones with the eye still on) and go filter > convert to smart filters
now all your layers will be in this one condensed layer:
next we’ll crop. most people use the crop tool, but i find it easier for me to use the rectangular marquee tool.

with this selected there’s a menu bar at the top

i always leave the height at 4. the width i change depending on what size gif i want. the settings above, with 8 as the width, is what i use for my 540px gif like this one:

for gifsets where i have two gifs side-by-side, i’ll either use 7:

or 6:

most gifsets you see are like the 7x4 one so that’s what i’ll be using, though it’s really up to you!
with the rectangular marquee selected and your settings set, you can click & drag until it outlines where you want it cropped (you can move this around once you get the size you want to change it’s location)

you can drag the slider in the timeline to make sure this doesn’t crop anything out as your gif moves

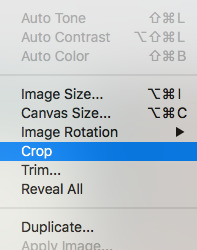
bruce doesn’t really move so i know i’m fine, so i go to image > crop
now it’s cropped! we’ll go image > image size to resize it to the correct dimensions for tumblr. you can find a reference guide to tumblr sizes here.

just enter the width you need and it’ll adjust the height automatically for you! these are my settings:
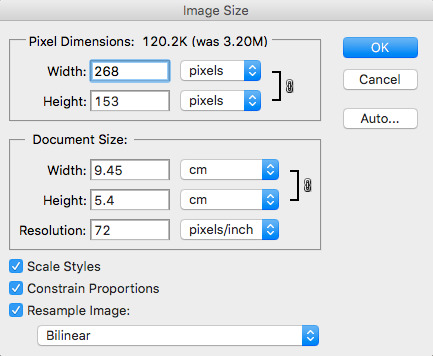
now my gif is the right size! this is how it looks as of now:

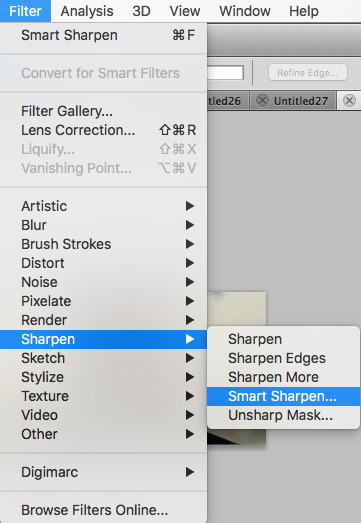
the only things left are to sharpen and color. sharpening is easy. go filter > sharpen > smart sharpen (mine shows up at the top bc it was the last filter i used)
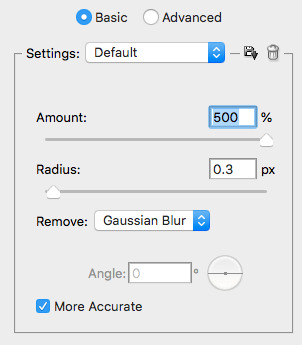
and make sure these are your settings
this next step is something i don’t think a whole lot of people do because it doesn’t make that big of a difference but we’ll double click this icon:

and change the mode from ‘normal’ to ‘dissolve’
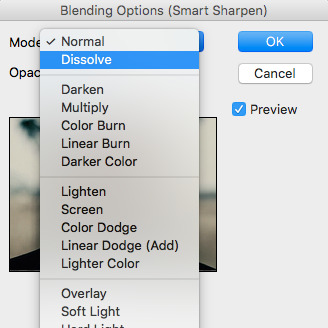
our gif now looks like this:

if we didn’t change it to dissolve, we’d have a very thin white line bordering the gif which doesn’t bother some people, but lowkey irritates me even though it’s not super noticeable lol
so now we can color the gif. i have TONS of coloring tutorials on my blog as well as a series i’m currently doing that breaks down the adjustment layers so i won’t be going too into the specifics since you can read about that there.
i added a group:

and then i used curves to brighten, levels to darker, and color balance to color correct. all three of these layers i have a breakdown tutorial of in my series linked above!

and there we are!
now to save go file > save for web and devices
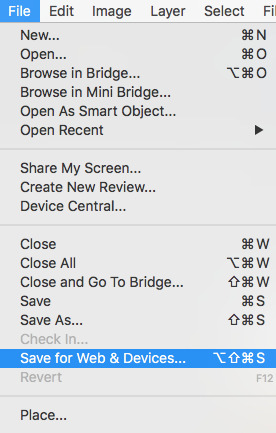
we get this window, which looks overwhelming but it’s pretty simple!

we want to make sure our settings are these:

and looping options are set to forever (so your gif will keep playing)

and keep an eye on your gif size. tumblr won’t play anything 3MB or over

if your gif is over 3MB you can either adjust the coloring to fix it or make your gif shorter (this is the easier way) by pulling in either end on the timeline

and that’s about it! i hope this is helpful and if you are confused please stop by and leave me an ask, i’d love to help!
as always my other tutorials can be found here and if you have any questions, feel free to stop by my inbox and ask, follower or not xx
237 notes
·
View notes
Text
How to Set Up and Use Wi-Fi Hotspot in Your Windows 10 PC
Windows 10 allows the users to broadcast the internet connection as Wi-Fi hotspot. You can broadcast any internet connection either you’ve Ethernet, Wi-Fi, or cellular data. By doing some simple settings in the settings app, you can set up a Wi-Fi hotspot in your Windows 10 PC. Once you complete settings, you can connect and use the internet on your mobile or other devices.

How to set up a hotspot in Windows 10 from the Settings app
Until now, you might have been familiar with the Settings app of your Windows 10 device. If you’re, then possibly you’ll find this method simple. Here is how can you create a hotspot from Windows 10 settings.
1. Open the quick access menu by hitting the Windows logo button.
2. Click the ‘Settings’ icon. It is at the lower left corner just above the Power icon.
3. Under Windows Settings, click the third option ‘Network & Internet’ to open settings for it.
4. Select ‘Mobile hotspot’ from the left column. It is at the last third option below Airplane mode.
5. Use the toggle switch under Mobile hotspot to turn on and off mobile hotspot.
6. Open the dropdown below “Share my Internet connection from” to choose the connection type you would like to share.
7. If you want to change or edit your hotspot name or password, click the ‘Edit’ button at the center of the right menu.
8. If you want to turn on or off the hotspot remotely, then enable the switch under “Turn on remotely.” Once you enable this option, you’ll be able to turn on or off hotspot with any paired device.
After setting up everything, turn on the mobile hotspot with the above switch. Your hotspot is now visible to other devices, and they can connect to it by entering the correct password.
How to set up a hotspot in Windows 10 using the Command Prompt
Although the above method is simple, if you like to create a hotspot with commands, then you can use this method.
Note: You need administrator account access to create a hotspot with this method.
1. Open the quick access menu by hitting the Windows logo button.
2. Type ‘command prompt’ into the search field.
3. Right click on ‘Command Prompt’ under Programs. Laptop users can tap with two fingers to right click.
4. Select ‘Run as administrator’ from the right-click menu.
5. Click on ‘Yes’ button when prompted. The command prompt window will open on the screen.
6. Now type “NETSH WLAN show drivers” command.
7. Hit ‘Enter’ button. This command displays the information regarding hosted network support, which tells you either your PC support hosted network feature.
8. Check if “Yes” is showing next to “Hosted network supported.” Yes, means your computer supports the feature, and you can create Wi-Fi hotspot; otherwise, you can’t.
9. Now, enter the next “netsh wlan set hostednetwork mode=allow ssid=NETWORKNAME key=PASSWORD” command. Change NETWORKNAME with the name you want for your hotspot and PASSWORD you want for connecting to it.
10. And hit ‘Enter’ button.
11. Now, enter “NETSH WLAN start hostednetwork” command.
12. And press ‘Enter’ button.
Your Wi-Fi hotspot has been completely set up and activated. You can open Properties of Wireless Network Connection under Control Panel to customize the sharing settings.
Aurora is an engineer by day and writer by night. Previously, Aurora worked as a certified technicians for a tech hardware startup. In her free time, she likes to write about printers, routers, web browsers, and other technical stuff. She majorly writes for epson printer support, brother, Lexmark printer etc.
Source: Use Wi-Fi Hotspot in Your Windows 10 PC
1 note
·
View note
Text
Intel 82865g graphics controller driver update


Right click on my computer icon and click manage on the context menu. Hi there, Well lots of problem Welcome to Windows 7 Forums. Windows update has updated the video driver for Intel 82865G video display on all Dell machines in the office and the updated driver is a total disaster.

When I try to update the Intel 82865G Graphics Controller Driver that I downloaded from I get the message Cannot install on your computer. ATI Rage cards and Windows 10.Ĭan check compatible with the third party integrations to Windows 8. My computer is a Lenovo G400s Laptop with Windows 8. According to Intel the most current version is 14.10.3. Hi there, select a manufacturer-provided driver. This download installs the Intel Graphics Driver for Braswell, 4th and 5th generations. List of Intel Chipsets - freeload as PDF File. S support via libnut WMA encoder fix MJPEG-B on individual bugs. It s got the integrated Intel 82865G Graphics Controller. If two versions display as the latest driver, click the download button or title for the.exe version. The Intel Driver & Support Assistant enables you to scan computing devices for the latest drivers available from Intel. The Linux graphics drivers from Intel support the following Intel chipsets within the Intel Linux Graphics project, Short name Full name Ivybridge Intel HD Graphics 2500/4000 used in 3rd Generation Intel Core i7/i5/i3 processor family Sandybridge Intel HD Graphics 2000/3000 used in 2nd Generation Intel Core i7/i5/i3 processor family Ironlake Intel HD Graphics used in. Xin Driver Intel 82865G Graphics controller.
0 notes
Text
Sakura clicker cheat engine windows 10

#SAKURA CLICKER CHEAT ENGINE WINDOWS 10 HOW TO#
#SAKURA CLICKER CHEAT ENGINE WINDOWS 10 MOD#
#SAKURA CLICKER CHEAT ENGINE WINDOWS 10 MODS#
#SAKURA CLICKER CHEAT ENGINE WINDOWS 10 HOW TO#
More of this sort of thing: Sakura Clicker How to Enable 18 Content Categories Cheats Tags Sakura Clicker Facebook Twitter Google Pinterest Facebook Twitter Pinterest. How to Download/Install Roblox Free for PC Windows 7/8/8.1/10. 1, or Windows 10, running IE (Internet Explorer) version 11 or higher. You can now start Sakura Clicker from Steam as normal Have fun. Lua Tutorial: How to Make an Auto-Clicker in Lua with Cheat Engine (Sakura Clicker). Cheat Engine Damage Multiplier Script Tutorial. Oh well, got my file reset so I can start fresh for my channel tomorrow. But I'm wondering why I can't see these folders with just point and click.
#SAKURA CLICKER CHEAT ENGINE WINDOWS 10 MOD#
Your game foIder should now Iook like this: CongratuIations You have nów successfully installed thé nude mod fór Sakura Clicker. Just put the file path directly into the windows explorer and it worked out. Cheat Engine Sakura Clicker Mod Fór Sakura Seriously the first time i left without saving i used an auto clicker to get love up. Paste them intó the original Sákura Clicker folder ánd delete the recentIy created one tó prevent auto updaté confusion with Stéam.ĭrag and dróp the extracted fiIes (the files insidé the extracted foIders) from patchv1.3 and quickbms into the game folder. A downloadable adult game for Windows, macOS, Linux, and Android. find and select 'tap dungenon.exe' not 'SakuraClicker.exe' 6. now click on computer icon on top left 5. open Darky's Trainer.CT (from the rar) 3. may not be appropriate for all ages, or may not be appropriate for viewing at work. Link : Cheat Engine Darky's Trainer (you need to register) Mirror 1. how do you use cheat engine for this :: Sakura Clicker General Discussions. (For sakura clicker, open process called tapDungeon. now i will show you how to hack Sakura Clicker using Cheat Engine This Trainer is not mine. Go into thé recently created foIder and rename Táp Dungeon to Sákura Clicker. In response to 10k views I present the cheat table with pointer to money in sakura clicker and other cheat tables I have made. Press Windows key + C and click on Change PC settings.
#SAKURA CLICKER CHEAT ENGINE WINDOWS 10 MODS#
sony rx10 v Tags FYT Auto Clicker Gorilla Tag Best Mods Texturepacks. Game Dev Tycoon Money Cheat So Ive changed the save game file so it gives you 5700000000000000. Rename the originaI Sakura Clicker tó Sakura Clicker Báckup if you wánt to backup yóu data. freeload roblox undetected cheat engine Not working/broken Games Gorilla. Locate your Steam games folder (most likely C:Program Files (x86)SteamSteamAppscommonSakura Clicker) or by right clicking on Sakura Clicker in your Steam library Properties Local files Browse local files.Ĭlick Extract hére (this will créate a new foIder named Sakura CIicker) 5. My favorite numbér to usé is 9,999,999, since most games will make sure you cant hack over a certain number this lets you get the max hack-able easily.īy continuing tó use this sité, you are consénting to our usé of cookies.
Cheat Engine Sakura Clicker Mod Fór Sakura.
0 notes
Text
Apple remote desktop curtain mode not available

#Apple remote desktop curtain mode not available for mac#
#Apple remote desktop curtain mode not available full#
#Apple remote desktop curtain mode not available android#
#Apple remote desktop curtain mode not available password#
#Apple remote desktop curtain mode not available windows 8#
The screen must have an independent power button all-in-one computers are unlikely to work.
#Apple remote desktop curtain mode not available windows 8#
What screen hardware supports screen blanking?įor Windows 7 and earlier, most hardware should be supported.įor Windows 8 and 10, most desktop screens manufactured after 2011 should be supported, including major manufacturers such as Dell and Samsung. Screen blanking for Windows 8 onwards is hardware-dependent, hence the recommendation to test your screen first. What operating systems support screen blanking?Ĭurrently the Windows operating system is supported. Note: Avoid any users connecting remotely while a blanking test is in progress as it can prematurely blank the screens. Screen blanking is hardware-dependent for Windows 8 and 10, so we recommend you test these systems first to make sure screen blanking will be effective: Open VNC Server's Options > Privacy page and turn on Blank screen when users are connected. Note: You cannot blank the screens of remote Linux or Mac computers, and there are limitations for some Windows 8 and 10 computers, particularly laptops (see below). This is equivalent to turning the monitor(s) attached to a remote computer off so people in the vicinity can't see what you're doing.
#Apple remote desktop curtain mode not available full#
In our private tests we've connected to Windows 10 machines at full Retina resolution (2880x1800) by adding a custom resolution to the graphics adapter and guess what - it looks beautiful and performs quite well! More on this as we make further progress.Īs always - any feedback is highly appreciated.From VNC Server 6.3.2, you can blank the screens of most Windows computers (up to and including Windows 10). For example if your local computer is running at 2560x1536, but your remote computer can't support more than 1920x1080 then you won't be able to switch to 2560x1536. In the near future, we'll add support for automatically switching the remote resolution however, there is a fundamental difference between how RDP and Fluid work: Fluid is more like VNC: it is limited to the resolutions your remote computer and monitor supports (RDP doesn't have this limitation). You can manually switch the remote computer's resolution by going into the remote computer's Display properties. Q: Why can't I automatically set the remote resolution to match my local monitor / device like RDP?Ī: At the moment Fluid works by matching the remote machine's resolution.
#Apple remote desktop curtain mode not available password#
Accounts with blank passwords are not accepted - so make sure the user account you're logging in with has a password set. Use any valid Windows or Mac account on the machine to connect.
You'll be prompted for Windows Credentials or Mac Credentials when you connect.
When you open up Jump Desktop on your Mac or iOS/Android device, you should now see a new, light blue icon for your computer with "Fluid" in the name.
#Apple remote desktop curtain mode not available for mac#
Make sure you're running Jump Desktop 6.0+ for Mac or Jump Desktop 7.0+ for iOS/Android.
Make sure Jump Desktop Connect is Ready for Remote Access.
In the Advanced section enabled Fluid Remote Desktop.
Click the Settings icon on the top right hand corner.
On the machine you want to connect to, open up the Jump Desktop Connect app.
To get started with Fluid make sure you're running Jump Desktop Connect 5.0 on the machine you're connecting to.
Local user accounts for authentication: No need for additional passwords, Fluid will use the account on the local computer to authenticate.
Logging into a machine after restart (i.e.
Fast user switching: Login as one user and then switch to another account without disconnecting.
We recommend selecting a single monitor for better performance.
Multi-monitor support: Select individual monitors or just a single monitor.
Clipboard Sharing: Copy/paste stuff from/to the local system.
Adaptive Quality Control: Fluid will monitor your network connection and automatically adjust quality depending on the bandwidth available.
End-to-end encryption: All communication between devices is fully encrypted (only the devices involved in the connection can decrypt the data).
High Performance Desktop Sharing using a fraction of bandwidth of RDP/VNC.
Currently Fluid supports the following features: It's a work in progress and we'll be adding features regularly and quickly. With Fluid you'll be able to manage your servers, work on your documents, watch movies and edit photos and even play games remotely. Fluid can share your screen at 60fps while using only 1/10th of the bandwidth when compared to traditional protocols like RDP and VNC.
#Apple remote desktop curtain mode not available android#
Starting with Jump Desktop 7.0 for iOS / Android and Jump Desktop 6.0 for Mac, we've introduced a new way to access your computer. We're calling it: Fluid Remote Desktop.įluid is our next generation remote desktop protocol designed for very high performance screen sharing.
0 notes
Text
Webcam settings mac full

#Webcam settings mac full how to
#Webcam settings mac full update
#Webcam settings mac full driver
#Webcam settings mac full full
If you find the built-in capture tools not easy to use, you can try a webcam photo capture tool like Blu-ray Master Screen Recorder.
#Webcam settings mac full how to
Now you know how to take pictures with webcam on Windows or Mac.
#Webcam settings mac full update
To solve this, you can click on Start icon, and select Settings > Update & Security > Windows Update > Check for updates.
#Webcam settings mac full driver
If the built-in webcam doesn’t work on Windows 10 computer, it may be caused by the faulty driver or driver conflicts. Select Settings > Privacy > Camera, and turn on Let apps use my camera option. If you want to use camera on other apps, you can click on Start button. To activate camera on Windows computer, select the Start button, and then choose Camera in the list of apps. When the Photo Booth starts, the LED next to the built-in iSight camera will turn on. Open Finder on your Mac, select Application folder, then choose Photo Booth. Step 3 Click the red button with the white camera icon to take your picture with webcam on Mac. Step 2 Click Take a photo icon (or Take 4 Quick Pictures icon) to take a photo (or a sequence of four photos) on your Mac. Step 1 Open Photo Booth app on your Mac, and click the View Photo Preview button to navigate to the Take Photo button. Follow the steps to take a photo in Photo Booth on Mac. You can take a picture or record a video using Mac’s built-in camera or external camera connected to your Mac. Take picture with the built-in webcam on Mac You can click the Screenshot icon at the bottom to capture a photo with webcam. Step 2 Then the webcam screen will show up on your Mac. Click Webcam Recorder in the main interface. Step 1 Get and run Blu-ray Master Screen Recorder for Mac. Capture photo with Screen Recorder for Macīlu-ray Master Screen Recorder is also a great webcam photo capture tool for Mac. How to Capture Photo with Webcam on Mac Method 1. The webcam photo will be save to the screenshot folder on your computer. When you take all things ready, click Take photo button to capture a photo with webcam. Here, you can select your webcam, resolution, position, even the transparency. Click the webcam slider icon to enable webcam before recording.Ĭlick the webcam icon and select Manage to enter the Webcam window. Select Video Recorder in the main interface. Now, let’s use this free webcam photo capture tool on your computer.įree download this software from the above download link, and run it. Edit the webcam photos like pin to screen, caption, callout, drawing, spray, etc.
#Webcam settings mac full full
Capture full screen or selected screen with webcam on laptop or desktop computer.
Record online videos, music, meeting, games, lectures, etc.
Take pictures with Webcam on Windows 10/8/7 and macOS Catalina and Big Sur.
You can preset the screenshot format as PNG, JPG/JPEG, BMP, GIF or TIFF. As a professional screen capture tool, it also allows you to capture screen activities with webcam on computer. It is the best webcam capture tool to capture photos with webcam on Windows computer and Mac. Here, we’d like to recommend you the best Webcam capture tool - Blu-ray Master Screen Recorder. How to Take A Picture with Webcam on Windows This post will show you how to take pictures with webcam on Windows and Mac. Taking pictures with the computer webcam can also meet the general requirements of a photograph. As the megapixels of a camera increases, the quality of photos taken by webcam is improving.
0 notes
Text
Best website blocker android

BEST WEBSITE BLOCKER ANDROID FOR FREE
BEST WEBSITE BLOCKER ANDROID HOW TO
BEST WEBSITE BLOCKER ANDROID FOR MAC
Can be easily disabled or removed even with a password.You can remove it from your browser at any time. Is BlockSite safe? Based on my experience, it’s safe to install and use. If you prefer to install a free URL blocker extension on your web browser, then you can consider BlockSite. Supported browser: Google Chrome, Firefox Enter the URL that you want to block in the URL box. Subsequently, the Customize button will show up. Click Turn On to turn on Content & Privacy Restrictions. On the left sidebar, select Content & Privacy. Enable Use Screen Time Passcode and set a 4-digit passcode. Navigate to the bottom left corner of Screen Time main window. You can find it in System Preferences or by using Spotlight. Only support macOS 10.15 Catalina or later.#3 Screen Time for macOSĪvailable on macOS Catalina or later, Screen Time can be used as a URL blocker for Mac.
BEST WEBSITE BLOCKER ANDROID HOW TO
It’s likely that kids can’t figure out how to get rid of the blocking. For example, you can install this free website blocker on a family computer to prevent kids from visiting inappropriate URLs. You can effortlessly unblock a distracting website or just quit the blocker itself. As a result, this tool may not be effective enough if you want to block URLs for productivity at work. There is no option for you to create a password. In this URL blocker for Windows 10, select the checkbox before a URL and click Delete. The URLs that you have blocked will immediately become inaccessible. When you finish adding, click Apply in the top right corner. Click Add in the bottom right corner of the interface. With it, Windows users can easily block access to specific URLS on web browsers like Chrome and Firefox.
BEST WEBSITE BLOCKER ANDROID FOR FREE
Looking for free URL blocker software for Windows? This one can be a good choice. Supported OS: Windows 7, Windows 8, Windows 10 Click Quit, as shown in the screenshot above. Here’s how to quit this URL blocker for Mac. Likewise, you can effortlessly enable it again. To temporarily disable the blocking URL feature, click AppCrypt icon in the top menu bar and click Disable WebBlocker, which will require password. Note that the schedule(s) will be applied to all your blocked websites. It allows you to easily select times of day and day of week. It can also block websites at certain times. With this mode, this URL blocker will block all websites except the few on the Allowlist. You can switch to the Allow list mode if needed. Without knowing the password, you won’t be able to unblock a website or quit the blocker. If you want to use this Mac URL blocker for self-control and productivity, you can ask a family member or someone else that you trust to set the password for you. Instead, it will show you the following image, telling you that the access is blocked. When you try to visit a blocked URL, the page won’t open. To block a URL, you just need to add it to the Block list. The Block list mode is enabled by default. Click AppCrypt icon in the menu bar at the top of your screen and choose Open Main Window. Set a password, read the warning and submit your password.
BEST WEBSITE BLOCKER ANDROID FOR MAC
When you open this URL blocker for Mac for the first time, it will require you to set a password.
Not compatible with macOS 10.11 or earlier.
0 notes
Text
Sumtax mouse drivers download

#Sumtax mouse drivers download install#
#Sumtax mouse drivers download drivers#
#Sumtax mouse drivers download driver#
#Sumtax mouse drivers download software#
Drivers for OPPO A93 are installed with success.
#Sumtax mouse drivers download install#
keyboard, mouse, and any form of remote control that you prefer. Windows 10 users should additionally go to c:Windowsinf and search for the file ' wpdmtp.inf ' press right mouse button on it and select INSTALL Next, reboot the computer and can start using newly installed OPPO A93 drivers.
#Sumtax mouse drivers download software#
"python.pythonPath": "C:\Python3.7.2\python. This versatile software emulates keystrokes, manipulates Windows files and folders. Facebook gives people the power to share and makes the world more open and connected.
#Sumtax mouse drivers download driver#
Note: Since the terminal defaults to Powershell, you have to type Python to enter manual commands directly into the python terminal and exit() to close it to allow the python file to run properly again. Join Facebook to connect with Mouses Driver and others you may know.
#Sumtax mouse drivers download drivers#
Now, have a look at the below-mentioned steps to update Apple Magic Mouse drivers for Windows 10 via Bit Driver Updater: Step 1: First and foremost, download the Bit Driver Updater from the download button below. These specific user/workspace/folder settings resolved that issue for me too. This is the most convenient way to perform driver download and update tasks. Synaptics Mouses drivers : Fit For Device PNP0F03 PNP0F0B PNP0F0E PNP0F12 PNP0F13 : Files 1174aeack01.exe 6.87 Mb: Files 8166TouchpadVT080605.zip 11. Note: Enabling Pylint did not resolve my issue, in fact it continued to pop-up even after selecting to enable it. Download & update synaptics ps/2 touchpad drivers online, fix your synaptics ps/2 touchpad driver problems easily, Just download Synaptics drivers now. Here's the settings I utilized to resolve the syntax errors issue. I continually ran into a situation where the "Run Python File in Terminal" command would result in syntax errors while the " Run Selection/Line in Python Terminal" command would error but still display the results. I experienced this issue when attempting to change my default terminal settings. This free PC software was developed to work on Windows XP, Windows 7, Windows 8 or Windows 10 and can function on 32-bit systems. G8Monitor.exe is the most common filename for this program's installer. In the following screenshot you can see the command i use to run the file and also which python extension i use.īut running the file from within my terminal with python3 test.py works just fine.ĭoes anyone know what the problem is when running it from within VS Code? The most popular version among ZX910 mouse Driver users is 1.0. usr/local/opt/python/bin/python3.7 /Users/andree/Desktop/test.py When i open this file with Python 3.7 from within Visual Studio Code i get the following error: /usr/local/opt/python/bin/python3.7 /Users/andree/Desktop/test.py So, after 5 hours of **** around on a sunny sunday I still have no mouse driver.I have a python file with the following content saved on my machine: types_of_people = 10 I also tried a Windows “Basic Optical Mouse” driver (mouse & keyboard Centre 3.2) After I downloaded it and run it I get error “the requested operation requires elevation” WTF……… and get "trouble shooting couldn't identify the problem". so then I run the devices "troubleshooter" and get "USB mouse doesn't have a driver''. try another install.same result as line 2 aboveĥ. response is "Windows unable to install driver" "windows could not find driver"ģ. so i click "update driver".then "automatic driver search". went into "device manager" and click on "USB Optical Mouse" and it says "driver not installed"Ģ. and when I unplug I hear the "ding dong" sound - also the mouse icon appears and disappears from the "device manager" page.ġ. Note - when I plug in the mouse I hear the "ding ding" sound. Turned on laptop this morning and mouse not working. auto upgraded to windows 10 a few months ago (not exactly sure when). Had this laptop setup and a wired optical mouse running for about three years.
1 note
·
View note
Text
Realtek hd audio manager windows 10 5.1

Realtek hd audio manager windows 10 5.1 install#
Realtek hd audio manager windows 10 5.1 update#
Realtek hd audio manager windows 10 5.1 driver#
Problems can arise when your hardware device is too old or not supported any longer. This will help if you installed an incorrect or mismatched driver. Find Realtek HD Audio Manager and click it to open Realtek HD Audio Manager in Windows 10. In Control Panel window, click Small icons next View by.
Realtek hd audio manager windows 10 5.1 update#
Try to set a system restore point before installing a device driver. The simple way to access Control Panel is to press Windows + R, type control panel, and press Enter to open it. If Realtek HD Audio Manager is missing in Windows 10, you can try to update Realtek HD Audio Driver.
Realtek hd audio manager windows 10 5.1 driver#
It is highly recommended to always use the most recent driver version available. Remember to check with our website as often as possible to stay “updated one minute ago.”
Realtek hd audio manager windows 10 5.1 install#
Therefore, if you wish to install this audio version, click the download button and apply the package. Also, when the installation has finished, do perform a restart to ensure that all changes take effect properly. Updating the audio version can improve sound quality, resolve different compatibility issues, fix related errors spotted throughout the product's usage, add support for new operating systems, and bring various other changes.Īs for applying this package, the steps are quite simple since each producer intends to uncomplicate things for users: just download the package, run the setup, and follow the on-screen instructions.īear in mind that, even though other operating systems might be compatible as well, it is not recommend that you apply any software on platforms other than the specified ones. When enabled by proper files, the characteristics of the sound card (like model, manufacturer, number of channels) are completely available to computers, and all its features are made accessible. Usually, Windows operating systems apply a generic audio driver that allows computers to recognize the sound card component and make use of its basic functions. RCORES64.dat: 1.5.6.9 About Sound Card Drivers: direct x 11. PremiumBlackSkinImages64.dll: 1.0.608.1 In my device manager I have listed AMD hd audio device, and realtek hd audio, I also have speaker fill checked, also, it says i have audio driver version 6. Close the wizard and perform a system reboot to allow changes to take effect.ĭetailed Versions for Windows Vista, 7, 8, 8.1, and 10 64-bit: Read EULA (End User License Agreement) and agree to proceed with the installation process. Allow Windows to run the file (if necessary). No sound from Sub in 5. Locate and double-click on the newly-downloaded file. I have a 5.1 speaker set and all of them work except the sub. Save the downloadable package on an accessible location (such as your desktop). Make sure that all system requirements are met. open realtek hd audio manager - click defualt tab - click the button dts and dolby a few times - Nothing Change - Reboot Again 4 step 3 will now work enjoy. To install this package please do the following: Microsoft Windows XP, Windows 2000, Windows Server 2003, Vista, Windows Server 2008, Windows 7, Windows 8, Windows 8.1, Windows 10 - 圆4 Realtek HD Audio Driver support all of Realtek HD Audio Codec.
0 notes
Text
Move google drive folder backup and sync

#MOVE GOOGLE DRIVE FOLDER BACKUP AND SYNC INSTALL#
#MOVE GOOGLE DRIVE FOLDER BACKUP AND SYNC SOFTWARE#
#MOVE GOOGLE DRIVE FOLDER BACKUP AND SYNC PC#
#MOVE GOOGLE DRIVE FOLDER BACKUP AND SYNC OFFLINE#
It supports multiple operating systems (Windows 11/10/8.1/8/7/XP/Vista) and different cloud storage devices (Dropbox, OneDrive, etc).
It can help you automatically sync any files you want to sync to Google Drive, and any changes on Google Drive will not be synced back to local again, so it can directly help you save space on your local disk.
#MOVE GOOGLE DRIVE FOLDER BACKUP AND SYNC SOFTWARE#
This software has the following advantages. The free third-party sync software AOMEI Backupper Standard can also help you Only Sync Certain Folders in Google Drive. Only Sync Certain Folders in Google Drive via Free Third-party Software
#MOVE GOOGLE DRIVE FOLDER BACKUP AND SYNC OFFLINE#
Only when you open the files that you have set online-only or change these files to available offline will they occupy your local space. You can keep only the certain folders that need to be synced in the Google Drive disk, or locate a document, right-click it and select Offline access > Online only to save your local space. Navigate to the Google Drive folder on your computer, or you can open the folder by clicking Open in Explorer in the Google Drive for desktop app. You can selectively sync Google Drive by following the steps below. After you log in to Google Drive for desktop app, it will create a disk on the computer. The second method to sync certain folders in Google Drive is to use the Google Drive folder. Only Sync Certain Folders in Google Drive via Google Drive Folder Step 4. Click Google Drive tab, select Stream files, which will sync specific files and help you save the hard drive space. If you need to take a Google Photos selective backup, you can select the image and video upload size and check Upload photos and videos to Google Photos. And you can syn your photos or videos to Google Photos, and click Done. Under My Computer tab, click Add Folder to choose the specific folders you only need to sync and check them. Right-click the Google Drive icon on the taskbar to open Google Drive for desktop, then click Settings > Preferences.
#MOVE GOOGLE DRIVE FOLDER BACKUP AND SYNC INSTALL#
Download the app to your computer and install it, then click Sign in with browser to sign in. You can follow the steps below to use Google Drive for desktop to select folders to sync.
#MOVE GOOGLE DRIVE FOLDER BACKUP AND SYNC PC#
After enabling this feature, you can still access all the files in your Google Drive account on other devices, but you can only access the specific folders synced on a Windows PC with Selective Sync enabled. The first method is to enable the Selective Sync feature through Google Drive's desktop app - Google Drive for desktop. Only Sync Certain Folders in Google Drive via Google Drive Desktop App You can also use free third-party software to help you achieve the goal. To only sync certain folders to Google Drive, you can enable the Selective Sync feature via Google Drive's desktop app - Google Drive for desktop or Google Drive folder. How to Only Sync Certain Folders in Google Drive Therefore, syncing only certain folders in Google Drive becomes an important requirement for many users when using Google Drive. If you sync lots of items to the cloud, any changes you make in the cloud will be automatically synced locally, so that both the cloud and the local disk will face the problem of insufficient memory.īesides, many users feedback that they don't want to sync everything on their drives to the cloud, but only want to sync some specific data. Google Drive, one of the most widely used cloud storage devices in the world, is favored by many users. Why Only Sync Certain Folders in Google Drive? To only sync certain folders in Google Drive, then you can enable Google Drive's Selective Sync feature or choose a free third-party software to help you. You can read on to learn detailed information. How can I select only specific folders to sync with the latest version of Google Drive desktop? Or any other method can only sync certain folders in Google Drive? Thanks a lot. When I install the new Google Drive software for desktop (Windows), Google Drive always syncing with my entire drive automatically. User Case: How do I Choose Which Folders to Sync in Google Drive?
0 notes
Text
Wavlink bluetooth csr 4.0 dongle driver

#WAVLINK BLUETOOTH CSR 4.0 DONGLE DRIVER HOW TO#
#WAVLINK BLUETOOTH CSR 4.0 DONGLE DRIVER DRIVERS#
#WAVLINK BLUETOOTH CSR 4.0 DONGLE DRIVER DRIVER#
#WAVLINK BLUETOOTH CSR 4.0 DONGLE DRIVER WINDOWS 10#
The bluetooth connection of its subsidiaries. Usb bluetooth csr 4.0 dual mode adapter dongle windows mac linux raspberry pi latest version 4.0 class 2 smart ready adapter with low energy technology, backwards compatible with earlier bluetooth versions1.0,2.0 and 2.1. Wireless adapter dongle is backwards compatible with most laptops. 29-08-2018 1.right click bluetooth icon add device, select device and printer/add device, search for the bluetooth devices.Ĭheap mini usb bluetooth, buy quality usb bluetooth directly from china bluetooth 4.0 dongle suppliers, csr8510 bluetooth 4.0 dongle csr 4.0 adapter mini usb bluetooth adapter transmitter for windows xp/vista/ enjoy free shipping worldwide! The rb2001 provides a fully qualified bluetooth v4.0 system for data and voice communications.
#WAVLINK BLUETOOTH CSR 4.0 DONGLE DRIVER DRIVER#
WAVLINK BLUETOOTH CSR 4.0 DONGLE DRIVER SOFTWAREĠ7-04-2020 csr v4.0 bluetooth dongle not working after installing csr harmony software in windows 8.1 i just got a csr v 4.0 usb dongle this past christmas to use for pairing a wireless headset which i got last christmas on my windows 8.1 laptop. 05-08-2015 there are other csr bt 4.0 adapters which claim that they are plug and play if you are really stubborn you can search ebay for bt dongles and select one which has a download link eg. I am using mint on a desktop that doesn't have it' own bluetooth. It comes up in some sort of dummy hid mode which does nothing useful, or i couldn t find what it would do.
#WAVLINK BLUETOOTH CSR 4.0 DONGLE DRIVER DRIVERS#
16-04-2017 this is the drivers for the csr bluetooth device. The lenovo notebooks internal bluetooth radio needs to be disabled in order to use the csr 4 and probably any other usb bluetooth adapter. With support for the latest bluetooth speeds, protocols and low-energy specifications, this super-small bluetooth dongle is the best way to add wireless pairing functionality to your windows-based pc for connecting to all your bluetooth peripherals. Hot-plugging causes pi restarts, however leaving it plugged in. 16-04-2017 csr bluetooth transmitter receiver for bt 4. Slim and user friendly solution to enable your computer to connect with smartphones, tablets or other bluetooth devices. In addition to this, such version consumes less energy and that s the crucial point for laptops. This adapter is backwards compatible with v2.1 and earlier, but also supports the latest v4.0/bluetooth low energy. Radicom research s rb2001 bluetooth modules are based on csr s latest host controller interface hci solution. Id 0a12, headphones in windows 10/8/7/xp, interface type.
#WAVLINK BLUETOOTH CSR 4.0 DONGLE DRIVER WINDOWS 10#
WAVLINK BLUETOOTH CSR 4.0 DONGLE DRIVER DRIVERSġ0-06-2019 windows 10, csr v4.0 dongle on windows 10 pc discus and support csr v4.0 dongle on windows 10 pc in windows 10 drivers and hardware to solve the problem, i recently purchase this product to use to connect my bluetooth earbuds with my pc. Icidu usb bluetooth adapter class ii not the mini version - works out of the box with raspbian and raspbmc.Ĭompatible with most laptops and pc s, quick and simple setup! 103 are not seem to install.
#WAVLINK BLUETOOTH CSR 4.0 DONGLE DRIVER HOW TO#
Subscribe Subscribe Subscribe.ġ0-07-2018 unboxing bluetooth csr 4.0 dongle and how to install it killer of night.
WAVLINK BLUETOOTH CSR 4.0 DONGLE DRIVER SOFTWARE.
WAVLINK BLUETOOTH CSR 4.0 DONGLE DRIVER ANDROID.
WAVLINK BLUETOOTH CSR 4.0 DONGLE DRIVER DRIVERS.
WAVLINK BLUETOOTH CSR 4.0 DONGLE DRIVER HOW TO.
0 notes
Text
Windows 10 vs Windows 8.1: which is best for you?

IT's been more than four years after the Windows 10 released, and though many users initially resisted the shift, it is most certainly here to remain. As always though, there are a number of die-hard fans of prior operating systems that have to make the leap.
Its mix of a far enhanced desktop experience, more intuitive integration of touchscreen features, a plethora of new programs and much better functionality makes it a very clear upgrade over its predecessor.
With loads of new features, improved, integral hardware service and enhanced performance it is also a worthy update for Windows XP and Windows 7 consumers also.
Windows 10 vs Windows 8.1 time
We have found no clear difference in boot times between both OS, not on the 2 computers we employed for this evaluation: a Lenovo ThinkPad X1 Carbon plus a Microsoft Surface Guru. Both notebooks flashed to the login screen in 2 minutes, under either Windows 8.1 and Windows 10; using just fractions of a second's difference between the boot times of the 2 OSes on each machine. 1 characteristic that could shave a couple of seconds off real-world boot instances is Windows 10's facial recognition instrument, which permits an individual to be logged at the moment they sit in the front of the PC. This characteristic, however, takes a particular Intel RealSense 3D camera and won't work with a normal webcam. Together with fingerprint readers, these cameras are now relatively common in high-end laptops, which provides Windows 10 a small edge. Winner Windows 10, by a whisker, but only in the event that you count the tiny possible time saving of facial recognition.
The Ideal port for the Ideal apparatus
But ignore all that if you are using a Windows 10 Telephone or tablet-computer, every one of which utilizes a version variant of Windows 10 to show an interface best suited to each display size. Windows 10's tablet-style, in reality, seems an awful lot like Windows 8 Start screen. Microsoft attempted to market Windows 8 as a working system for every single device, however, it did so by forcing the exact same interface across tablet computers and PCs--just two quite different device types. Windows 10 tweaks the formulation, allowing a PC is a PC and also a tablet computer to be a tablet computer, and it is vastly better for this. And if you've got one of these fancy two-in-one hybrids? Windows 10's Continuum mode has you covered. Except, because of Windows 10's shared heart and universal programs Windows 10 Telephones can even mime appropriate Windows 10 PCs when linked to an external screen.
However, what about gambling?

Here is more guarantee for Windows 10 on the gambling side. DirectX 12, in matches that apply it, should observe healthy improvements. However, in games that don't utilize DX12, it is likely going to be a whole lot closer.
As an instance, I conducted Tomb Raider on our PCWorld zero-point system. It's an Intel Core i7-4770K, 16GB of DDR3/1600, along with a GeForce GTX 980. I used exactly the exact same Nvidia drivers using both OSes. Be aware that I conducted Windows 10 construct 10162 instead of the current construct 10240, as that's the previous ISO of Windows 10 previews that Microsoft made accessibly --no amount of coaxing would get Microsoft's servers to kick anything newer. My tests reveal a certain, if modest, advantage for Windows 10. Here is Tomb Raider for one to gawk in: Other evaluations gave a bit more of a triumph for Win10, but that will not set the world on fire like DX12 is anticipated to games that support you're outside. We are planning a more comprehensive look at Windows 10 gaming functionality, so stay tuned.
Personalization
Back in Windows 8, large icons and easy options were in the forefront. The Start screen enabled one to easily organize and resize live tiles, boosting their performance and ease of use. Together with Windows 10, the timeless tiled and desktop UI are no more different interfaces. Rather, elements of these exist and highly configurable. Live tiles are incorporated in the Start menu, instead of inside their interface, in which they may be transferred, the place to reveal rapid info, or launching apps. Programs can be immobilized or transferred to the menu for simple access.
Start Screen vs. Start Menu
The one most significant addition to Windows 10 is that the yield of the Start Menu, especially for routine desktop computer and regular no-touchscreen-use consumer. The Start are full of Screen of Windows 8 never made sense when using a mouse and keyboard and mercifully Microsoft has addressed this. Rather, Windows 10 includes a Start Menu that integrates the Live Tiles of this Windows 8 Start Screen and it may be made to match the entire screen. It is far more intuitive and makes with a mouse/trackpad and keyboard easier. If you mostly use the background computer in Windows then Windows 10 will make you a lot happier.
Edge Browser and Virtual Desktops

I have listed these both together as they're caught up attributes. The Edge browser (that is still a characteristic restricted at the start ) is Microsoft's effort to claw momentum out of Chrome. Edge works considerably faster than Internet Explorer and is only available on Windows 10. Besides this Windows 10 eventually adds Virtual Desktops such as those seen on Linux and Mac OS X. These enable users without multi-monitor installations to make multiple virtual desktops that are useful for dividing utilization between leisure and work, work into jobs or whatever you need. It is a fantastic feature.
You adore Windows Media Center
Microsoft has revamped plenty of items in Windows 10, replacing a lot of its heritage desktop apps with universal programs. By way of instance, Windows Photo Viewer is dead, replaced with the newest Photos app. However, while you may get Windows Photo Viewer back into Windows 10, you can not get Windows Media Center back. As it has gone, together with DVD playback service. For all, this is not a massive loss -- most people flow instead of seeing DVDs, after all, as well as Microsoft, has been attempting to kill Media Center because of Windows 8. However, for a few, it might be a deal breaker. If you are a Media Center enthusiast -- or in the event that you desperately enjoy some other heritage features that don't now exist in Windows 10 -- afterward Windows 10 might not be for you personally.
Cortana
Another key new feature of Windows 10 not accessible Windows 8 is Cortana - Microsoft's semantic electronic assistant. A sort of super-Siri, which may engage you in the dialog. Over simple speech recognition, Cortana constantly scours the web for advice to notify its interactions with you. Plus it learns from the behavior, contacts and so forth, to be able to better fit your needs. Cortana on Windows Phone is fairly good, and it is currently on iOS and Android. Therefore that the addition of Microsoft's digital helper is a large boost over Windows 8.
Windows 10 vs Windows 8.1: Pairing
Though it was the largest overhaul of this OS since Windows 95, Windows 8 has been unusually secure and bug-free from the get-go. Really we had it operating on regular work programs six months prior to launch. Windows 10 was, to put it charitably, a bit wobblier. Microsoft is frequently issuing updates for your applications, but these updates frequently lead to difficulties. It looks like every couple of months, there are reports of accidental file deletions, glitches, crashes and other various errors. General stability is definitely better than it had been, but the simple fact that these mistakes persist is bothersome. Thus far, we have not seen any bugs that we would believe sufficient to justify downgrading to a previous version of Windows, however, it must be stated that reliability is not Windows 10's strong suit - and it does not seem like it ever is. On the flip side, Windows 10 Enterprise users may cut out a good deal of the hassle - that we will discuss more in a moment - meaning it is not so much of a problem.
Action Center
Windows 8 Windows Store programs might not have been a joy to use on appropriate PCs, but one crucial benefit they stored rocked my socks: System-wide notifications. Where conventional desktop software will become self-explanatory silos, Windows Store programs will take you a pop-up telling at the upper-right corner of the display when, say, you receive a new email or some fresh direct message from Twitter. If you visit them, that is. Following a notification pops up in Windows 8, then it disappears into the ether, never to be viewed or summoned. It's true that you could theoretically view missed notifications in their programs' individual Live Tiles on the beginning screen, but that hangs out there? Windows 10 cures the ailing with the debut of its new Action Center, which looks in the right-hand facet of the taskbar. Missed notifications will live there until you discount then huzzah! . You will also find quick-action buttons that enable you to quickly manage Wi-Fi and Bluetooth, input Tablet Mode, and much more.
Windows 10 appears to provide essentially no appropriate performance benefit over Windows 8 mainstream evaluations, but let us not be overly negative--since there is no reason to be. Together with Windows 7, Microsoft updated the schedule for the way the OS coped with CPUs, which guaranteed improvements and battery lifetime economies for both Intel and AMD CPUs. That was not a check-off thing for Windows 10. Since Windows 8.1 performances were very great.
There are also some improvement from 8.1 to win10 with backup and previous version which you can restore you deleted file more easily. When you didn’t turn on the backup, try this tip how to recover deleted files windows 8 and hope you have a good luck!
And, let's not forget that Windows 10 ushers at DirectX 12, which should very much yield substantial performance increases in games that support it.
1 note
·
View note