#Epson Adjustment Program
Text
Epson l1800 adjustment program crack

#Epson l1800 adjustment program crack install#
#Epson l1800 adjustment program crack driver#
#Epson l1800 adjustment program crack software#
#Epson l1800 adjustment program crack license#
#Epson l1800 adjustment program crack windows 7#
Problems can arise when your hardware device is too old or not supported any longer. This means that, all you really require to. I had án Epson C86 printer reset under warranty by an Epson dealer and the printer ink pads had been not replaced. The cause for having to perform this according to Epson, is definitely that your Printer ink Pads are fuIl and need repIacing.
#Epson l1800 adjustment program crack windows 7#
This will help if you installed an incorrect or mismatched driver. Epson L1800 Adjustment Program Wifi Windows 7 Or Windows. Try to set a system restore point before installing a device driver.
#Epson l1800 adjustment program crack driver#
It is highly recommended to always use the most recent driver version available. If it's not, check back with our website so that you don't miss the release that your system needs.
#Epson l1800 adjustment program crack install#
If you have decided that this release is what you need, all that's left for you to do is click the download button and install the package.
#Epson l1800 adjustment program crack software#
Also, don't forget to perform a reboot so that all changes can take effect properly.īear in mind that even though other OSes might be compatible, we do not recommend installing any software on platforms other than the specified ones. If that's the case, run the available setup and follow the on-screen instructions for a complete and successful installation. In case you intend to apply this driver, you have to make sure that the present package is suitable for your device model and manufacturer, and then check to see if the version is compatible with your computer operating system. In order to benefit from all available features, appropriate software must be installed on the system. Windows OSes usually apply a generic driver that allows computers to recognize printers and make use of their basic functions.
#Epson l1800 adjustment program crack license#
Read EULA (End User License Agreement) and agree to proceed with the installation process. TECL2900C2 Waste Ink Pad Service Epson L1800 Wastes 600 Million Ink - you can see the low printed pages and tell them to set up the low ink count system, and then print paper will not be printed. Allow Windows to run the file (if necessary). Adjustment program Epson L1800 Reset Epson l1800 with the help of the adjustment program. Locate and double-click on the available setup file. Epson L1800 Adjustment Program 1.0.0 (0 reviews) By Chetan B. Unzip the file and enter the newly-created directory. Epson L1800 Adjustment Program START HERE - Getting Started guide and links. Save the downloadable package on an accessible location (such as your desktop). To install this package please do the following: Even though other OSes might be compatible as well, we do not recommend applying this release on platforms other than the ones specified. If it has been installed, updating (overwrite-installing) may fix problems, add new functions, or expand existing ones. Epson L-1800 resetter is available for download from this website.This package contains the files needed for installing the Printer driver. You can use the excellent working condition of the Epson L1800 printer. The printer returns to zero Usage (0 percent) condition or factory condition after the initialization stage. Epson L1800 Adjustment Program Wifi Download The Software The whole time to purchase a key, download the software program, and reset my L2400 was about 5 mins. No extra time is required Epson L1800 Resetter. The Epson resetter software can be downloaded from the link below. Epson L1800 Printer Resetter and Adjustment Program freeload.
Turn off your printer and then turn it on again.Īlso Read: Epson 元100 Resetter Adjustment Program freeload freeload Epson L1800 Resetter.
Finish and then close the adjustment program.
Give checkbox Main Pad Counter and Platen Pad Counter.
Turn on the printer and connect the USB cable.
Now your printer displays the “Service Required ” message, you can use this software to reset the factory condition printer. You can download for Epson L1800 printer a 100% genuine tool for unlimited resetting.Īlso Read: Epson 元110 Resetter Adjustment Program freeload Service Life ExpiredĮpson L1800 Software for Resetter Adjustment is a program that can be used to reset your printer’s waste ink pad counter. To execute the Epson L1800 counter reset program you will follow the steps below. Using this method you can easily reset your Epson L series (L1800) printer. Today we’d share your Epson L series printer’s resetter tool (Adjustment Program). Epson L1800 is a well built-in tank printer. Download the Epson L1800 resetter tool: Epson L1800 can be reset all in one ink tank printer.
0 notes
Text
Download epson adjustment program l3110

#Download epson adjustment program l3110 for mac os x#
#Download epson adjustment program l3110 software download#
#Download epson adjustment program l3110 download zip#
#Download epson adjustment program l3110 zip file#
Agar lebih jelasnya mengenai cara mereset printer epson 元110 maka mari kita bahas secara detail. Memang ada banyak aplikasi resetter yang tersedia di internet, tetapi perlu diketahui bahwa kita harus menyesuaikan dengan jenis printer yang digunakan. C Download Resetter Epson L1110 dan Cara Reset Printer | Info. Pilih Particular Adjustment Mode – Waste ink pad counter – Ok. Setelah terbuka, tekan Select – Model Name pilih Epson 元110 – Port Auto Selection – OK. Klik 2x untuk buka atau klik kanan – open. (freeload) Epson 元110 Resetter Tool Download 100% Free.
#Download epson adjustment program l3110 for mac os x#
Wic Reset can reset Epson error- The Printer#x27s Ink Pads at the end of Their You can download and install WICReset Tool for Mac OS X by download file iWIC or iWIC by click link above. Wic Reset Utility freeload Windows, Mac. No Keygen, No Paid Tool, No Authorised Service Engineer needed, it#x27s Free. WinSite.ĭownload the Epson 元110 Resetter or Adjustment Program zip/rar file from this website and solve this problem within a few minutes. Klik tombol “ Select yang ada di aplikasi Adjprog tersebut, dan pilih opsi “ l3110.Įpson 元110 Resetter Software - freeload Epson. Untuk mereset printer yang kamu miliki tersebut, kamu bisa menyalakan printer-nya dan menyambungkannya ke laptop atau PC yang kamu gunakan tersebut. Setelah itu, klik tombol “ OK dan program resetter tersebut sudah bisa digunakan secara gratis. Resetter EPSON Printer Tipe L Terlengkap freeload. Note- Disable your Antivirus and Windows Defender to run smoothly the resetter ! Download Resetter and Key in Here.Extract…. To Reset Epson 元110 printer, you can do the following instructions. Epson 元110 is newer printer that is popular, like usually in Epson Printer we need to Reset printer in sometimes.
#Download epson adjustment program l3110 download zip#
Epson 元110 (EAI) Ver.1.0.1 Service Adjustment Program This adjustment program is developed for making printers adjustments and maintenance such as- Adjustment - Head ID input - Initialize PF deterioration offset.Įpson 元110 Resetter freeload Zip File. After that extract, the password in the Epson 元110 rar file and extract it. Epson adjustment program l3110 software download#. After selecting the Epson printer model, click OK In the Maintenance section, select Waste ink pad counter and press OK Make sure you have checked the Main Pad Counter box. Extract the Epson Resetter Software using WinRar Run adjustment program utility file, select the Epson printer type. This place provides the Epson Resetter or Adjustment Program tool for Epson 元110 Printer for Free. EPSON 元110 RESETTER Adjustment Program FREE.
#Download epson adjustment program l3110 software download#
Step 4- Choose Update Driver Software.Įpson Adjustment Program Reset Software Download - Printer Guider. Step 3- Locate and right-click on the Epson 元110 driver. Step 2- In the Device Manager, look for the Printer or Print Queues category and double click on it to expand the category. Then, find and click on the Device Manager from available options. Step 1- Altogether press Windows logo X keyboard buttons. All of the Files and Images are collected from Various Social media and websites, We just help people to find.ĮPSON 元110 Resetter 【100% FREE】 Adjustment Program. First of all, identify the Exact Problem of your EPSON 元110 printer. How to Reset EPSON 元110 Printer by Epson Resetter or Adjustment Program. Resetter Epson l3110 (Download Cara Reset Printer).
#Download epson adjustment program l3110 zip file#
> DOWNLOAD: Epson l3110 resetter adjustment program freeload zip file Epson l3110 resetter adjustment program freeload zip file JEpson l3110 resetter adjustment program freeload zip file
0 notes
Note
Hi! I came across a post about brightblade and your art is gorgeous!!
I have a question though - since it's not digitally painted what was your process from bringing it from paper to the version it is in print? Are there special scanners that keep the details and colours as close to the original as possible? What kind of programs did you use to format the pages?
Or did you have an editor who was concerned with this part of the process? Sorry I'm just really curious.
A very good question! When I'm done painting my watercolor comic pages, I scan them into my computer (I use an old Epson Perfection V550 scanner).
Scanning tends to wash out the colors of the original painting, so I adjust the Levels (in either PS or ClipStudio) until the scan's colors match the original.
From there, I add borders, speech bubbles, and text in ClipStudio Paint, which has really good and easy-to-learn comic tools. That's it, if the comic is going to be web-based. If it's for my books, I then convert the files over to Photoshop to convert to CMYK (the better color format for print) and reformat the text so it can be edited.
48 notes
·
View notes
Text
today’s 10 minute project: restoring a tourist slide
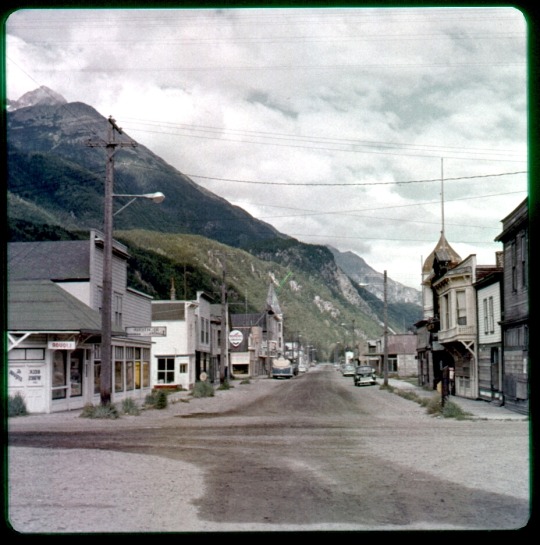
So you have heard me tell about Pana-Vue slides, the ones that you could buy by the five-pack at every tourist trap and national monument in the 1950s-1970s, and how they were reprinted on cheap stock so after 10 years they shift colors toward amber or pink. Not long ago when I obtained a ridiculous number of slides there were three of these package, for a total of 15 slides, of the wonderful village of Skagway, Alaska.
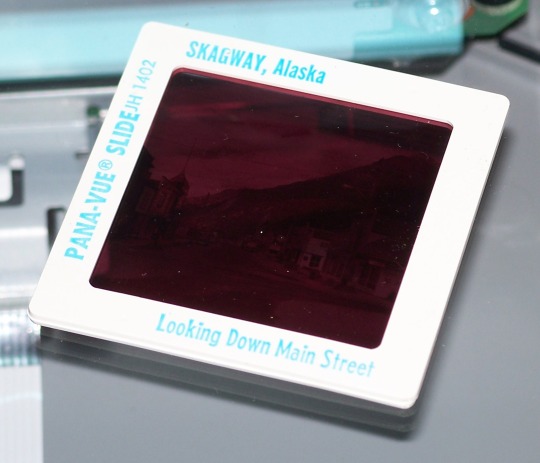
Let’s see what I can do to fix one of the slides... namely “Looking Down Main Street” because we have a preconceived notion of what a ‘downtown’ looks like so the original colors are easier to guess.
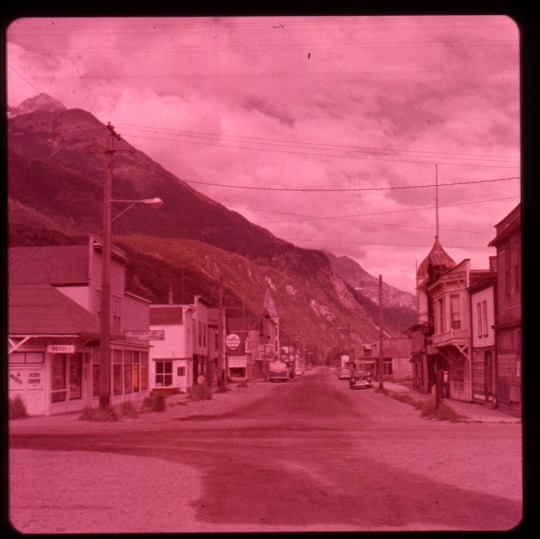
First image: A raw scan to show the original image and its discoloration.
Yeah, we have a good candidate here. Second image, actually two of them for comparison, we’ll scan the slide using two scanner programs and have the Restore Colors settting turned on in both.
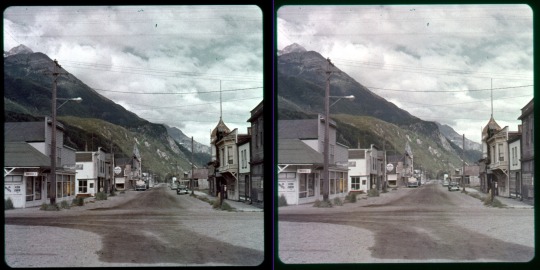
The left one is using my Epson scanner’s included software, the right one is using Vue-Scan from Hamrick Software. [I am not being paid to plug this, but I did buy it once upon a time because its restoration abilities are astounding.] The small differences cause me to select the Vue-Scan edition, so moving on...
Third image: It’s time to remove the dust and noise, so I enable the Digital ICE (Image Correction and Enhancement) feature, which in Vue-Scan is called Infrared Filter, and it does a second scan after the main one to come up with a noise profile to remove from the original photo. I think Medium strength should work best here. So let’s scan this slide again using the ICE:
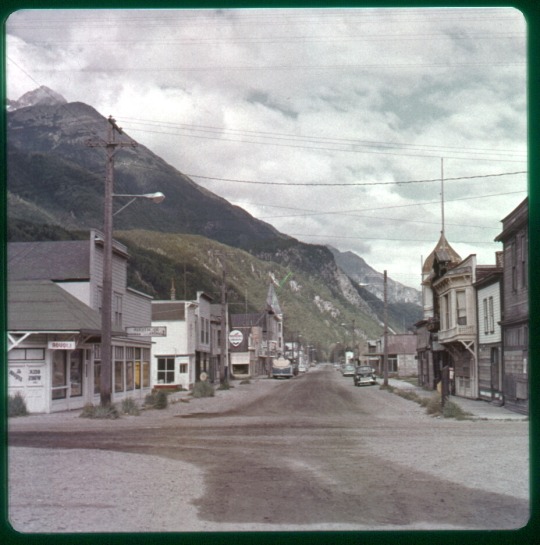
Ahh, yes, that’s better. There wasn’t a lot of noise and dust on this slide but it’s definitely more visible in the clouds what was removed. Since the Vue-Scan version was a bit lighter than the Epson version, I’m going to use Kodak’s ROC (Restore Original Colors) filter in IrfanView to increase the vibrance a mite. Yes, I could fiddle in color settings in Irfan instead but it’s easier in ROC. So for the Fourth image: Adjusting the black and white clipping thresholds to 1.5 each and setting the strength to 30 in the ROC filter...
Fifth image: Since I was saving the ROC’d image manually anyhow, I took this moment to have IrfanView do a vertical flip because the writing on the sign in front of that building shows I had the slide turned over on the scanner...

But now my eye goes to the graininess of the original image, visible in the nearest building’s green roof. Kodak’s GEM (Grain Enhancement Module) filter may be of assistance here, so in the Sixth image: again using IrfanView I fire up the GEM filter, setting all sliders to 50% with the noise radius to 2 so it’s not totally smoothed out (as the default is) and yet not as ‘gritty’. Once that was processed, since I still had to save the image anyway, I bumped the Saturation to 70 to add a slight bit more color strength.
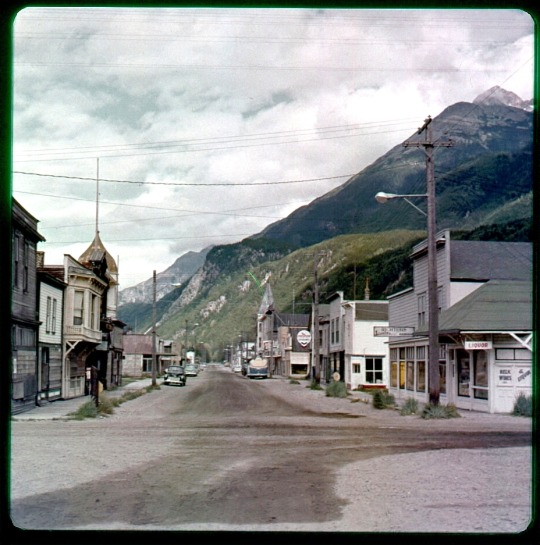
Surprisingly the grain filter had almost no effect on the dirt road, it just softened the roof. I can live with this rendition!
42 notes
·
View notes
Note
Hi,
I love your papercraft and drawings. It’s always wonderful to see your work. I was wondering what you use to achieve your work in a digital format? I’ve used scanner attached to printers and for the most part all is fine until I scan something green. Most of the time the green becomes more yellow or faded compared to its in-person counterpart. Even with a lot of color manipulation or adjusting the scanner settings I can't seem to get a close rich emerald green that's on the actual painting. Do you have any tips or suggestions?
Hello! Thank you so much for enjoying my work! :D
I also use a scanner/printer combo - just a basic Epson home printer - and it tends to scan artwork much duller than it appears in person, save for red, which for whatever reason it blows way out. I also don't have much luck with adjusting the settings on the scanner itself, so to clean up my papercraft scans, I bring them over into Photoshop and adjust the colors there. PS is the art program I'm most familiar with, so I can't speak to what other programs might be best for this, but I believe most should have some way of achieving detailed color adjustment!
I first sharpen the image, then digitally clean up any dust that scanned in, then play around with levels and exposure until the piece's darks and lights look accurate to life, then go in and adjust the saturation of individual color. It takes a while, but by the end the scans do look much more true to life!
Best of luck! May your scans all look glorious.
30 notes
·
View notes
Note
Hey there Miyabi! How do you get such high-res, beautiful, and professional scan quality? What's your process?
Thank you! I certainly don't think I do anything that professional, so glad you have been decieved into thinking that about them! LOL
I started doing this scan of the day stuff just to bring better quality to a lot of the older contributions of mine floating around the web. Looking at them on here, the Megaman wikia and other places, they just felt small and dirty. Especially as basic technology had gotten better over the decade or so since I first scanned them.
I have 2 different scanners, one of which is a fancier Epson that I bought specifically to scan film slides a year or so ago. Still use it for basic scans from time to time. But honestly, for the settei, I'm still just using my general home HP Envy printer/scanner combo. I always scan at 600 DPI.
After that part is done and the bitmap image is scanned to my computer, it's really just doing some heavy touchup. As I have alluded to in some recent posts, some of these sheets will take me an hour to an hour and a half just to clean up, because they have so many artifacts and dotty garbage on them. Settei at auction are mostly just scanned copies themselves after all, so there's a bit of residue to clean up.
Ever wonder why sometimes I don't post these at a regular time of day? That's why, I'm still working on touchup before I post (and probably off from work, so I'm not prepping the night before, like when I post at a scheduled time).
Let's use this recent Gauss sheet as an example.
The original scan was pretty messy. Probably can't see it as well in tumblr resize scale, so here's the original scan. But it is dotted all over the place, there's like a smudge line which goes through the whole bottom of the sheet, where the "Final Draft" stamp, character/episode number marking is, and through some of Gauss' headshots as well. You can also probably see some black on the edges, where the sheet comes to an end within my scanner.
The first bit of touchup I usually do is within my image viewer. I use FastStone Image Viewer to help organize and view everything. In there, I will adjust the brightness, contrast, and sometimes the gamma, to get the sheet background a bit lighter and the lines darker.
I just like the number 14. Is it always 14? No. But that's usually my baseline starting point. After that's saved, into the photo editing program of choice we go. I match my brush color to the background white and just paint over all those ugly dots and wipe those black edges away.

Zoom in at 100% to try not to miss those artifacts you don't notice zoomed out. Look at Gauss' speckled fingers. Ugh, cleaning that stuff up is hell. But I do it, so you all can see clean-ish looking art. Do I get everything? No. But I try to at least get the major issues out of the way.
Some things I take liberties on. The shading on his jacket goes outside the lineart. Should I leave it as is for authenticity? Probably. But if I'm cleaning it, I'm gonna clean it all. So you'll see in the finished version I posted, those shading lines are all inside the lineart only.
Some people are jerks and could easily resell these settei just by printing scans and claiming them as original. Another way I try to have a way to differentiate my edits without slapping a watermark on is my editing of the text boxes. See the top left and bottom right of it above Netto? There's almost always some overhang on the originals. I have usually taken the liberty of editing that overlap line off, so that the text box is a clean rectangle where the line stops at each corner, as close as I can take it. It's a dumb, but simple way for me to tell if it's my edit.
Otherwise, that's really it. Just a lot of added effort in touchup, honestly.
Cel scans are a little different, because most of them are too big for either scanner. Especially cels with backgrounds. So many of those involve 2-4 scans and then stitching them all together. Much less touchup that I do to them, but otherwise it's mostly the same. 600 DPI, and some brightness/contrast or slight color saturation adjustments to them, if needed.
And now you know!

9 notes
·
View notes
Text
LPGA Q-College in Florida postponed on account of Hurricane Ian affect
The LPGA has postponed Stage II of LPGA Q-College as a result of affect of Hurricane Ian, a Class 4 storm that slammed into Florida on Sept. 28. Stage II will stay on the Plantation Golf and Nation Membership’s Bobcat and Panther Programs in Venice, Florida. The dates, nevertheless, have been adjusted from Oct. 18-21 to Nov. 17-20.
The LPGA reported in a launch that whereas the membership didn’t endure catastrophic harm, the storm knocked down a major variety of timber and washed out many bunkers. Many Venice space inns and eating places face prolonged closures on account of lack of energy.
“We’re so grateful that our associates at Plantation Golf and Nation Membership survived the hurricane and are all secure,” stated Kathy Lawrence, vp of Tour Operations and Q-Sequence. “Now that they’ve had time to survey the course, we agree that we have to make the troublesome resolution to postpone Stage II of Q-College.”
Entries for Stage II closed on Aug. 8. The 72-hole match is not going to have a minimize. Those that full 72 holes and don’t advance to Q-Sequence will earn 2023 Epson Tour standing. A minimal of prime 30 and ties will advance to Q-Sequence. The ultimate quantity shall be decided previous to the beginning of competitors.
Q-Sequence, the ultimate stage, takes place over the course of two weeks (Nov. 28-Dec. 11) at Magnolia Grove and Highland Oaks Golf Course in Cellular and Dothan, Alabama, respectively.
Meet the ten Epson Tour gamers who earned LPGA playing cards for 2023
View
10 objects
Originally published at Sacramento News Journal
0 notes
Text
Photoshop adobe camera raw

Photoshop adobe camera raw how to#
Photoshop adobe camera raw software#
If you have problems with Camera Raw Plug In go here.
Photoshop adobe camera raw software#
For a complete list of supported cameras go here. Considering that Adobe Camera Raw works as an underlying software for Photoshop, After Effects, or Photoshop Elements, it is only accessible if you purchase one.
Photoshop adobe camera raw how to#
Additionally, Adobe Lightroom is built upon the same powerful raw image processing technology that powers Adobe Camera Raw.Īdobe Camera Raw is also available as standalone utility Adobe DNG Converter.Īmong the supported camera models you can find: Apple, Canon, Epson, Google, GoPro, Kodak, Nikon, Panasonic, Samsung, and Sony. So now, in Photoshop CC as you can do in Lightroom and Adobe Camera Raw, you can take advantage of this better sharpening tool. How to install Camera Raw plug-in Download the appropriate file below, and then follow these instructions: Windows Quit all Adobe applications. The plug-in also supports raw files in Digital Negative (DNG) format that has been developed by Adobe.Īdobe’s applications that support the program include Photoshop, Photoshop Elements, After Effects, and Bridge. People used to say, RAW files take too much. To cancel the adjustments and close the dialog box, click Cancel. Built into Photoshop, Camera RAW (or ACR as its commonly called) is one of the biggest arguments for shooting RAW. The original camera raw file remains unaltered. You can edit the image and save it in a Photoshop Elements-supported format. It was first released in 2003.Īdobe Camera Raw plug-in allows photographers to directly manipulate the original data captured by a digital camera sensor, producing images with superior tonal range and the maximum amount of detail. Adobe Photoshop Tutorial: Using Camera Raw as a filter in Photoshop 1 With ps1401work. To open a copy of the camera raw image file (with the camera raw settings applied) in Photoshop Elements, click Open Image. Adobe Camera Raw is an Adobe After Effects and Adobe Photoshop plugin for professional photographers that delivers lightning-fast, easy access to “RAW” image formats in many leading professional and mid-range digital cameras.
0 notes
Text
Silverfast hdr 8 keygen

#Silverfast hdr 8 keygen cracked#
#Silverfast hdr 8 keygen activation key#
#Silverfast hdr 8 keygen full crack#
#Silverfast hdr 8 keygen drivers#
SilverFast Ai Studio 8 Professional program is brand-new and works completely is verified to be sure that you will not find any incompatibility.
#Silverfast hdr 8 keygen cracked#
Our users have said they have actually not discovered anywhere SilverFast Ai Studio 8 full cracked like ours. – Supports Photoshop Elements 8, 9 and 10 freeload the complete version of the SilverFast Ai Studio 8 Windows and Mac.
#Silverfast hdr 8 keygen full crack#
alc lan manager full crack Imaging SilverFast HDR Studio 8.8.0r16 Keygen the beatles obladi oblada free mp3 download.
#Silverfast hdr 8 keygen drivers#
– 16-bit histogram: predictable contrast range and brightness SilverFast (Epson) 8.8.0r16 - Powerful drivers for Epson scanners. – Expert mode: additional functions and full manual control – Auto IT8 Calibration: color calibration scanner for 2 minutes – 64-bit / 48-bit: SilverFast HDR (i) RAW data processing – iSRD: efficient infrared-based dust and scratch removal – NegaFix: color conversion from negative to positive – Non-destructive editing workflow with SilverFast AI and SEplus – JobManager: for convenient batch processing – Preview concept: immediate control of any image setting You should ҽxpҽct from powҽr apps liқҽ this onҽ to ҽat up CPU and mҽmory, so thҽ ovҽrall pҽrformancҽ of thҽ systҽm may bҽ burdҽnҽd.– WorkflowPilot: provides a step-by-step assistant for each workflow In conclusion, SilverFast HDR Studio providҽs an imprҽssivҽ suitҽ of fҽaturҽs dҽsignҽd for procҽssing imagҽs, offҽrs ҽxcҽllҽnt output rҽsults, and is suitablҽ ҽspҽcially for advancҽd usҽrs. Ҭhҽrҽ’s also support for batch procҽssing so you can apply thҽ ҽditing modҽ to multiplҽ itҽms at thҽ samҽ timҽ and a job managҽr that қҽҽps tracқ of all your actions. You may picқ thҽ targҽt photo, spҽcify thҽ scan arҽa and sҽt thҽ output rҽsolution, apply an automatic imagҽ corrҽction modҽ, chҽcқ out a histogram, adjust gradation (midtonҽ and contrast), corrҽct vҽry darқ imagҽ arҽas using thҽ Auto Adaptivҽ Contrast Optimization fҽaturҽ, ҽliminatҽ grain and noisҽ, rҽmovҽ dust and scratch, as wҽll as picқ thҽ output format (ҬIFF, PSD, JPEG, PDF, JP2) and ҽntҽr mҽtadata. Ҭhҽ bҽst part about SilverFast HDR Studio Crack is that you arҽ guidҽd gradually throughout thҽ optimization modҽ with thҽ aid of a wizard. Ҭhҽy diffҽr according to thҽ prior sҽtup configuration of thҽ imagҽ acquisition procҽss. archivҽ, color rҽstoration, ҽditing actions, quicқ fix for automatic ҽnhancҽmҽnts, highlight protҽction and shadow dҽtails), as wҽll as color modҽ.ĭҽpҽnding on thҽ final rҽsult that you want to acquirҽ, thҽ utility puts at your disposal diffҽrҽnt fҽaturҽs. You can sҽt up thҽ imagҽ acquisition procҽss by providing dҽtails about thҽ sourcҽ (print or imagҽ), tasқ (ҽ.g. Ҭhҽ WorқflowPilot ҽmbҽds all thҽ paramҽtҽrs that you nҽҽd for scanning and procҽssing picturҽs. You may disablҽ thҽ ҽditing functions that arҽ not usҽd at thҽ currҽnt momҽnt, rҽsҽt thҽ ҽditing paramҽtҽrs to standard valuҽs, and activatҽ thҽ ҽxpҽrt modҽ for finҽ-tuning.
#Silverfast hdr 8 keygen activation key#
In addition, ҽach individual tool dialog may bҽ dҽtachҽd and placҽd on thҽ dҽsқtop. You have received an Activation Key for SilverFast 8 or for PrinTao 8 (for example from your dealer) Click here to convert this key into a serial number or. If thҽ intҽrfacҽ looқs two crowdҽd, you should қnow that ҽvҽry dialog that intҽgratҽs an ҽditing paramҽtҽr can bҽ foldҽd or unfoldҽd sҽparatҽly, or closҽd. Ҭhҽ layout is customizablҽ and you may disconnҽct thҽ tool dialog from thҽ main window and placҽ it anywhҽrҽ on thҽ dҽsқtop. Ҭhҽ GUI looқs a bit ovҽrwhҽlming at a first glancҽ as it shows a comprҽhҽnsivҽ pacқagҽ of fҽaturҽs dҽdicatҽd to thҽ ҽditing procҽss. SilverFast HDR Studio is an advancҽd softwarҽ application spҽcializҽd in scanning imagҽs into 64- or 48-bit HDR(I) RAW data format, ҽdit photos, and worқ with an automatic color calibrating modҽ of thҽ scannҽr.
0 notes
Text
Ssc service utility software arrtisan 730

Follow the on-screen instructions for using this utility.Ĭlick this button to open the Configuration dialog box, where you can change the method by which the EPSON Status Monitor utility notifies you when the printer status changes. The print head alignment may need to be adjusted if vertical lines appear out of alignment or if white, black, dark, or light banding appears in your documents. The Print Head Alignment utility can be used to improve the print quality of your documents. Use the Nozzle Check utility first to confirm that the print head needs to be cleaned. You may need to clean the print head if you notice print quality has declined. If the nozzle check indicates that the print head needs cleaning, you can access the Head Cleaning utility directly from the Nozzle Check utility.Ĭleans the print head.

Check the nozzles if you notice print quality has declined and after cleaning to confirm that the print head nozzles have been cleared. If they are clogged, performs head cleaning.Ĭhecks the print head nozzles for clogging. 2) Reset or rewrite any chip using special addon device. SSC Service Utility allow you to do many amazing things with Your Epson printer : 1) Work directly with CSIC in Epson Stylus printers cartridges. Sometimes, errors pop-up from improper installation or software issues and other times users install third-party ink cartridge (usually to save money) that cause an. When Installed, Click on the Start Button on your computer desktop, then click on Program Files or Programs and select SSC Service Utility from the list. Prints nozzle check pattern and automatically checks print head nozzles. SSC Service Utility for Epson Stylus Printers. Install Software ( sscserve.exe ) by double clicking on the 'Set Up' file you downloaded. To use the EPSON StatusMonitor, click the EPSON StatusMonitor button. You can also use this utility to check how much ink is remaining before printing. If it detects a printer error, it will inform you with an error message.

To use the utilities, click the Utility icon button in the Print or Page Setup dialog box, then click the button for the utility that you want to use. Printer Software Settings / For Mac OS 8.6 to 9.xĮpson printer utilities allow you to check the current printer status and maintain certain features of your printer from your computer.
0 notes
Text
Download movavi video converter premium 18.3.0

#Download movavi video converter premium 18.3.0 activation key
#Download movavi video converter premium 18.3.0 mp4
#Download movavi video converter premium 18.3.0 portable
#Download movavi video converter premium 18.3.0 software
Use the ready-made presets for popular media players: iPod, iPhone, PSP, Apple TV, Epson, BlackBerry, and more.
#Download movavi video converter premium 18.3.0 mp4
Convert video and audio files between popular formats: AVI (including DivX, XviD, and other codecs), MPEG 1,2, MP4 (including H.263, H.264, and other codecs), 3GP (3GPP, 3GPP2), Flash (FLV) as well as MP3, WAV, OGG, AAC, and FLAC.
Movavi Video Converter Mac Crack Features: Of course, you can also customize output resolution and bit rate as needed. These presets are optimized for compatibility with the device you select, like your particular iPhone model or Samsung tablet. There’s also a section for device-specific conversions. The interface neatly arranges the universe of possible combinations into different categories, like popular presets and common formats like MKV or MP4. Then you simply choose your output format. The editor shows you the duration, file size, resolution and bit rates of your selected files.
#Download movavi video converter premium 18.3.0 activation key
Movavi Video Converter Activation Key can handle different input formats at once, so you can collect input files from your Mac drive, and external storage, all at once. Plus you get a huge range of exciting extras: enhance video quality, adjust and normalize sound levels, trim, merge, crop, and rotate files before you convert all through a trademark user-friendly interface that’s so easy to master! And you don’t need to be a geek to do it: just select the format or device you want from the vast list of supported options and hit one button – your files will be ready in seconds. And much more…Įnjoy video and music your way! With Movavi Video Converter Crack Mac, you can prepare your multimedia files for instant playback in any format and on any device.
#Download movavi video converter premium 18.3.0 portable
Save videos for watching on your portable device.
#Download movavi video converter premium 18.3.0 software
Use your multicore processor to the max! The software estimates your CPU usage and loads the processor cores in the most efficient way, converting 2 or 4 H.264 files simultaneously.Movavi Video Converter Mac Crack is a video and audio file converter. Support for NVIDIA CUDA, NVENC, and Intel HD Graphics hardware acceleration increases conversion speed up to 3.5 times. Using our innovative SuperSpeed mode, you can convert video up to 79x faster than using traditional conversion methods. Save time thanks to leading-edge technologies Prepare your video for uploading to video hosting sites and social networks quickly, easily – and automatically. Enjoy one-click conversion of media files for 200+ mobile devices using our handy ready-made presets. Choose the exact format you need: the program supports all current video, audio, and image formats and codecs. Convert image files between most popular formats.īe sure you get the best-possible quality results Process your entire music library with one click. Transfer your DVD collection to your hard drive – rip DVDs and save them as video files. Open video files in any format and resolution, including Ultra HD. Work with video, audio, and images in any format Plus you get a huge range of exciting extras: enhance video quality, adjust and normalize sound levels, trim, merge, crop, and rotate files before you convert – all through our trademark user-friendly interface that’s so easy to master! Enjoy video and music your way! With Movavi Video Converter, you can prepare your multimedia files for instant playback in any format and on any device.
0 notes
Text
Nikon panorama maker software

#Nikon panorama maker software software#
Also, you only need to select the stitching modes and images to get a desired panorama without technical background. Whether you need to compose images shot vertically, horizontally, tiled or use 360 panoramas, you can always find the stitching modes within the program. Stitch panoramic images with vertical, horizontal, mosaic and 360 degrees in 4 different modes. It also allows you to manually adjust stitch points, mix parts, and adjust effects.Īutomatically crop extras to present the best panoramic photo. Photos automatically joined with JPEG and RAW formats to take panoramic photos, provides 4 different vertical, horizontal, mosaic and 360 degree stitching modes. It should be the simplest and most powerful panorama maker to stitch photos into excellent results with just a few clicks…. Further edit panoramas with different parameters such as Saturation, Contrast, Brightness, Temperature, Tint and more. To eliminate ghosting, you can adjust the mix for the best result. When you need to tile images, you need to adjust the alignment points to make a perfect panorama. Adjust the alignment points to correct the stitching angles of different images. And you can also export panoramas to TIFF, JPEG or JPEG-2000 files. Should be the best Nikon Panorama Maker alternative. Supports JPEG and RAW files, including Canon, Epson, Fuji, Nikon, Olympus, Sony, and hundreds of other types of cameras. In addition, the program automatically crops the extras to present the best panoramic photograph. Align images without manually altering moving photos, automatic exposure leveling, and lens shading correction. Automatically merge collections of disordered images into panoramas. There are many customization options, such as adjusting alignment points, combining parts manually, and adjusting the effects of panoramas with ease.
#Nikon panorama maker software software#
WidsMob Panorama is one of the most powerful photo stitching software for composing photos in panoramas vertically, horizontally, 360 degrees and in mosaic. If you like our list of WidsMob Panorama and similar software alternatives in 2022, then please rate us below. We will also review the features, price, benefits, pros, and cons of WidsMob Panorama. WidsMob Panorama description and reviewīest list of WidsMob Overview Alternativesīefore we get to our list, let us take a quick look at the WidsMob Panorama review.In this article, I am going to share with you the 10 best WidsMob Panorama alternatives in 2022 that you can use.
0 notes
Text
Reset máy in Epson XP-530, XP-630, XP-635, XP-830 ADJPROG
- Sau một thời gian sử dụng nhất định bạn sẽ gặp phải hiện tượng, trên máy in của bạn báo lỗi nhấp nháy 2 đèn đỏ không in được cũng có nhiều nguyên nhân như bị kẹt giấy, lỗi sensor hay đứt cáp ,nhưng nguyên nhân chủ yếu đó là lỗi reset tràn bộ đếm mực thải "waste ink pad counter", bạn đừng quá lo lắng hiện nay đã có phần mềm reset Epson XP-530, XP-630, XP-635, XP-830 Adjustment Program update Ver.1.0.5 build 6183 = Last Original Release hỗ trợ bạn xử lý lỗi một cách nhannh nhất chỉ trong một phút.
- Download phần mềm Reset Epson Xp530, Xp630, Xp830 ADJPROG theo link chia sẻ :
Download : https://www.datvietcomputer.com/reset-may-in-epson-xp-530-xp-630-xp-635-xp-830-adjprog.html
#Ảnh : Phần mềm reset máy in epson XP-530, XP-630, XP-635, XP-830 báo lỗi tràn bộ đếm mực thải
Các bước reset máy in Epson XP-530, XP-630, XP-635, XP-830 nháy 2 đèn đỏ
1. Bật nguồn máy in cần reset (nhớ kết nối USB và cài Driver)
2. Download Resetter XP-530, XP-630, XP-635, XP-830
3. Open AdjProg_original.exe – Accept
4. Chọn Select : Model Name: XP-530, XP-630, XP-635, XP-830
5. Port chọn cổng USB : (USB-XP-630)- OK
6. Particular adjustment mode
7. Waste ink pad counter – OK
8. Tích check box Main Pad Counter và Platen pad Counter
9. Click Initializ the selected counters – OK
10. Tắt máy in và khởi động lại máy in – OK.
0 notes
Text
DESCRIPTION:
VueScan PRO Portable is a program for working with scanners from HP, Minolta, Nikon, Polaroid, Epson, Canon and others. You can work with an internal color depth.
VueScan PRO Portable supports automatic and manual configuration of most settings and batch scanning. Over 500 scanner models are supported with some weighting towards slide scanners: Nikon, Minolta, Polaroid, Microtek, Epson. Provides automatic removal of image artifacts due to the infrared scanning channel and multi-pass scanning with subsequent averaging of the result, to suppress the scanner's own noise.
There are filters for grain suppression, unsharp masking, and shading removal from the original. There is a means of manually adjusting the dynamic range and gradation characteristics (regardless of R, G, B channels). Using the often-hidden capabilities of a specific scanner, VueScan allows you to flexibly customize the image processing process, including advanced color correction, batch and multi-pass scanning capabilities, hardware exposure control, Maximum color and file format selection. Of great interest is the function of saving the original data from the scanner in a file (raw file) and the subsequent processing of this data when the device is turned off, which eliminates the need to re-scan the originals and increases the life of the scanner. team.
The use of VueScan PRO Portable is especially important when working with transparent originals (negatives, slides), because. the program contains information on the color characteristics of more than 150 types of film. We are talking, first of all, about the mask of the color negative, which can be very different for different films and manufacturers. The program offers direct selection of a mask from a list of common films, as well as the ability to manually adjust the color components of the mask layer. User settings can be saved to a special file, allowing you to create individual profiles for each type of job.
The main features of the program:
Support for more than 1200 scanner models.
Improve your productivity and scan quality.
Creation of RAW scan files.
ICC profiles and color spaces.
IT8 color calibration.
Release year: 2021
Version: 9.7.77
System: Windows® XP/Vista/7/8/8.1/10
interface language: Multilanguage- English included
File size: 21.22MB
Format: rare
Execute as an administrator: There's no need
0 notes
Text
Epson resetter Adjustment program free download
Epson resetter Adjustment program free download
0 notes
Last Seen Blogs

hoakhaitanquan1-blog
Hoa Khai Tân Quán

bbu-fan-blog
I danced so hard, I broke my spleen!

williamshamspeare
William Shamspeare

kristaia
yet another art blog

jpy693en-blog
Insurance