#File Size and Resolution for Images Used in WordPress Posts and Pages
Explore tagged Tumblr posts
Visit Tumblr Blog
Explore Tumblr blogs with no restrictions, modern design and the best experience.
Last Seen Tumblr Blogs


Fun Fact
28.6 is the average number of monthly visits per US mobile user.
Text
What’s the Ideal File Size and Resolution for Images Used in WordPress Posts and Pages?
The right image can bring your WordPress page to life, but the wrong one? It can grind your site to a halt. That’s why understanding the file size and resolution for images used in WordPress posts and pages is so crucial. This guide offers practical advice for finding the perfect balance between visual quality and loading speed.

When users land on your site, they judge it within seconds. A slow-loading, oversized image not only tests their patience—it kills your SEO too. This blog breaks down recommended dimensions (like 1200x628px for blog images and 1920x1080px for headers), preferred file sizes (under 150 KB for most images), and resolution tips (always 72 DPI for web).
What makes this guide stand out is how it pairs those recommendations with real-world tools and strategies: TinyPNG for compression, WebP for modern file formats, and Jetpack or EWWW for post-upload optimization. Plus, it dives into responsive images and how WordPress uses srcset to serve the best-fit version based on device size.

Whether you're a blogger, designer, or digital marketer, optimizing the file size and resolution for images used on your site can mean faster pages, better rankings, and happier visitors. This guide gives you the steps to make it happen.
0 notes
Text

How to Compress JPG Images Easily: A Practical Guide
Learn how to compress JPG images easily with practical tips, tools, and insights. Discover ways to reduce image size without sacrificing quality using online converters like A2Z Converter.
In the digital age, images are an integral part of our online communication, but large image files can slow down websites, eat up storage space, and lead to slower loading times. JPG (or JPEG) is one of the most common image formats, but it often needs compression to maintain web performance and save storage. Luckily, there are several easy ways to compress JPG images without sacrificing quality. In this blog post, we'll explore practical tips, trends, and tools for compressing JPG images effectively.
Whether you are a photographer, web designer, or casual user, this guide will show you how to easily compress JPG images, including online tools like A2Z Converter to make the process smooth and efficient.
Why Compress JPG Images?
Compressing JPG images has several advantages:
Improves Website Speed: Smaller images load faster, improving the user experience and increasing SEO rankings.
Saves Storage Space: Compressing images allows you to store more files without taking up much space.
Easier Sharing: Compressed images are quicker to upload and share via email, messaging apps, or social media.
With that in mind, let’s dive into the best ways to compress your JPG files.
Practical Tips for Compressing JPG Images
1. Use Online Image Compression Tools
One of the easiest ways to compress JPG images is by using an online image compression tool. These platforms allow you to upload your JPG file and get a compressed version without installing any software.
Top Online Tools:
A2Z Converter: This versatile platform allows you to compress JPG files quickly and for free. It's particularly useful for those looking for a straightforward, no-fuss solution.
TinyPNG: Another widely popular tool, which also supports JPG files.
CompressJPEG: A simple, effective tool that compresses multiple images simultaneously.
How to Use A2Z Converter to Compress JPG Images:
Go to A2Z Converter.
Select the “JPG Compress” option from the menu.
Upload your JPG file.
Adjust the compression settings if needed.
Download the compressed image within seconds.
2. Adjust the Image Quality Manually
If you have access to photo editing software like Photoshop or GIMP, you can manually adjust the quality of your image to reduce file size. Here's how you can do this:
In Photoshop:
Open the JPG file.
Go to File > Save As and choose JPG format.
Adjust the quality slider to reduce the image size.
Click Save.
In GIMP:
Open the JPG file.
Click File > Export As, and choose JPG.
Adjust the compression level on the slider.
Click Export.
Both methods allow you to find a balance between file size and image quality.
3. Reduce Image Dimensions
One effective way to reduce the size of your JPG file without compromising much on quality is by reducing the image dimensions (height and width). This is especially useful for web pages where full-resolution images are unnecessary.
Resizing Tools: You can use online resizing tools or photo editors to resize the dimensions of your image. If you're using A2Z Converter, the tool allows you to not only compress but also resize your images for additional space savings.
4. Batch Compress Multiple JPG Images
For those who need to compress many images at once, batch compression tools save a lot of time. Many online tools, including A2Z Converter, offer batch processing options, allowing you to upload and compress multiple images in one go.
Steps for Batch Compression:
Go to A2Z Converter.
Select the “Batch Compress JPG” option.
Upload multiple files at once.
Adjust compression settings if needed and download the compressed images.
5. Use Image Compression Plugins for Websites
For those managing websites, especially on WordPress, image compression plugins can automatically optimize images as you upload them. Some of the best plugins include:
Smush: Automatically compresses images in WordPress without compromising quality.
ShortPixel: Offers both lossy and lossless compression.
These plugins ensure your website remains fast without you manually compressing each image.
Latest Trends in JPG Compression
1. AI-Based Compression Tools
AI-powered tools are becoming increasingly popular for image compression. These tools use machine learning to intelligently compress images without visible loss in quality. Services like Google’s Guetzli and JPEG XL are leading this trend, and it is only a matter of time before AI becomes a mainstream feature in image compression tools.
2. Lossless Compression
While lossy compression removes some of the image data to reduce file size, lossless compression maintains the original quality. Though the file size reduction is not as drastic, lossless compression is ideal for professionals who need high-quality images without data loss.
3. WebP Conversion
Many websites are moving towards WebP, a format that offers better compression without significant quality loss. However, JPG remains dominant, and compressing JPG files is still a highly relevant task.
For those interested in converting images to WebP format, A2Z Converter also offers a WebP conversion tool.
Common Mistakes to Avoid When Compressing JPG Images
Over-compressing: Compressing your image too much can lead to significant quality loss. Use a moderate compression setting.
Ignoring Image Dimensions: Reducing file size without resizing the dimensions often results in suboptimal performance. Always resize your images to fit their intended display size.
Not Testing the Image: Always preview your compressed image to ensure the quality is acceptable before using it.
Call to Action (CTA)
Ready to make your images load faster and take up less space? Compress your JPG images today using A2Z Converter’s JPG Compression Tool, and experience the simplicity of quick, high-quality image compression for free. Whether you're looking to optimize your website or save storage space, A2Z Converter has the tools you need to get started. Visit A2Z Converter now to try it for yourself!
#ImageCompression#JPGCompress#ReduceImageSize#ImageOptimization#JPGCompression#PhotoCompress#OptimizeImages#FileSizeReduction#A2ZConverter#CompressJPG#FasterWeb#ImageTools
0 notes
Text
Image Converter Website Maker Plugin WordPress v1.9 - with Original License Key
https://themesfores.com/product/image-converter-website-maker-plugin/ Make your Image Converter Website on WordPress v1.9 – with Original License Key Image Converter Website with Original License Key | Retailer License ***All License Received Only Email Please Signup with Original Email id*** Retailer License: Rs.399/Year Plan: Received 1 Year + 1 Domain License and 1 Year Auto Updates Received on WordPress Dashboard. No.1 image conversion with Ultimate Image Converter Website Maker Plugin, the all-in-one WordPress plugin designed to make your online image management effortless Website. Whether you’re working with PNG, JPG, GIF, WEBP, or HEIC formats, this plugin offers advanced options to adjust image resolution and quality, allowing for optimized, professional results every time. With simple integration using the shortcode [ image_converter_online ], you can add an intuitive image uploader and converter to any post or page. The plugin supports multiple uploads, drag-and-drop functionality, and real-time conversion options – allowing your users to convert images instantly. To schedule automatic image deletion, use one of the following cronjob commands on the Plugin About Section. Click to Check Demo Why Choose Image Converter Website Maker WordPress Plugin? Supports Multiple Formats: Convert images to PNG, JPG, GIF, WEBP, BMP, HEIF, and more with ease. Customizable Button Text: Tailor the plugin’s user interface through the Plugin Manager. Automated File Deletion: Securely delete images after 1 hour, 1 day, or 30 days, powered by a reliable WordPress cron job. Instant Previews & Downloads: Converted images are displayed with thumbnails, file sizes, and one-click download and delete options, all within a sleek interface. Perfect for Bloggers, Web Developers, and e-commerce Sites, the Ultimate Image Converter Pro plugin saves time while ensuring your media files are handled with precision. Enhance your site’s user experience, boost your site’s performance, and convert images like a pro – all from your WordPress dashboard. Plugin Requirements: Requires PHP 8.2 and the following PHP extensions: GD, Imagick, Exif, and Fileinfo. Use Suggest Hosting For Guarantee 100% Working Support Hosting: 👉Hostinger Extra Discount: https://bit.ly/47lUH3R 👉Vepex 90% off: https://bit.ly/3QLMrFm In most cases, #1 will work fine and is way easier. == Changelog == = 1.9.0 = 17/09/2024 * Addad: Frequently Asked Questions * Fix: Ui fixing * Fix: Modify style * Fix: fix select all buttons = 1.8.0 = 15/09/2024 * Feature: Delete All Options * Feature: Download All Button Added * Feature: Added Cron Job * Feature: Added Setting Options * Fix: Button color * Fix: Automatic Delete all Converter Images Read More Documents… https://themesfores.com/product/image-converter-website-maker-plugin/ #ToolsPlugin #WordpressPlugins #WordPressThemesandPluginWithLicenceKey
0 notes
Text
Transforming Designs: How to Convert Figma to WordPress Effectively
In the dynamic world of web development, transforming a meticulously crafted design into a functional website is both an art and a science. Figma, a robust design tool, is increasingly becoming the go-to for web designers due to its collaborative features and versatility. However, converting Figma designs into a WordPress site can be a daunting task if you're not well-versed in the process. This blog aims to demystify the conversion process and provide a clear roadmap for developers and designers alike.

Why Choose WordPress for Your Website?
Before diving into the conversion process, it’s essential to understand why WordPress is the platform of choice for many developers. WordPress powers over 40% of all websites on the internet, thanks to its flexibility, scalability, and user-friendly interface. Custom WordPress development allows for the creation of unique, feature-rich websites that cater to specific business needs.
Benefits of Converting Figma Designs to WordPress
Visual Precision: Figma’s vector-based design system ensures that your website looks exactly as you envisioned it.
Collaboration: Figma’s collaborative tools allow designers and developers to work together seamlessly, ensuring that the final product aligns with the initial design.
Efficiency: Converting designs from Figma to WordPress can streamline the development process, saving time and reducing errors.
Step-by-Step Guide to Convert Figma to WordPress
Step 1: Prepare Your Figma Design
Organize Layers: Ensure that your Figma design is well-organized with named layers and groups. This will make the development process smoother.
Responsive Design: Check that your design is responsive, meaning it will look good on various devices and screen sizes.
Step 2: Export Assets from Figma
Images and Icons: Export all images, icons, and other graphical elements from Figma. Ensure they are in the correct formats (e.g., PNG, SVG) and resolutions.
CSS and Styles: Use Figma’s built-in tools to extract CSS styles for text, buttons, and other elements.
Step 3: Set Up Your WordPress Environment
Local Development Environment: Set up a local development environment using tools like XAMPP, WAMP, or Local by Flywheel.
Install WordPress: Download and install the latest version of WordPress on your local environment.
Step 4: Develop the WordPress Theme
HTML and CSS: Create HTML and CSS files based on your Figma design. Start with a basic HTML structure and gradually add styles.
Theme Structure: Follow the WordPress theme hierarchy to create essential files like header.php, footer.php, index.php, style.css, and functions.php.
Template Files: Use WordPress template files to define different parts of your site, such as the homepage, single posts, and pages.
Step 5: Implement Functionality
Custom Post Types: Define custom post types in functions.php if your site requires specific content types.
Advanced Custom Fields (ACF): Use the ACF plugin to create custom fields and add more flexibility to your content management.
Plugins: Install necessary plugins to add functionality like SEO, security, and performance optimization.
Step 6: Test and Optimize
Cross-Browser Testing: Ensure your site works well across different browsers and devices.
Performance Optimization: Optimize images, minify CSS and JavaScript files, and leverage caching to improve site performance.
SEO: Implement SEO best practices, including meta tags, alt texts for images, and a clean URL structure.
Common Challenges and Solutions
Responsive Design Issues: Use media queries in CSS to ensure that your site looks good on all devices.
Alignment and Spacing: Pay close attention to the spacing and alignment of elements to ensure they match your Figma design.
Complex Animations: Use CSS and JavaScript libraries like Animate.css or GSAP to recreate complex animations.
Tools and Plugins to Facilitate the Conversion
Figma to HTML Tools: Tools like Anima or Figma2HTML can automate parts of the conversion process.
WordPress Page Builders: Elementor or Beaver Builder can help you build complex layouts without extensive coding.
Theme Frameworks: Use frameworks like Genesis or Underscores to speed up theme development.
Conclusion
Converting Figma designs to WordPress involves a combination of design precision and coding expertise. By following the steps outlined above, you can ensure a smooth and efficient conversion process, resulting in a stunning, fully functional WordPress website. Whether you’re a designer looking to bring your vision to life or a developer aiming to streamline your workflow, mastering the Figma to WordPress conversion process is an invaluable skill in the realm of custom WordPress development.
0 notes
Text
Common WordPress Errors and How to Fix Them
There is no denying the strength of the WordPress program. On the other hand, there is a 100% chance that you will experience some technical difficulties at some point. These WordPress problems can be frustrating and waste time that could be better spent doing anything else.

You will be able to fix the majority of these errors on your own, which is good news. If you are familiar with the most common WordPress errors and the primary factors that contribute to them, you should be able to resolve the majority of the problems that exist on your website.
In this article, we will demonstrate several useful methods that you can use to get started. After that, we will discuss the most typical WordPress Errors and demonstrate how to correct each one. Let's get going!
The Most Frequent WordPress Errors and How To Repair Them
The following is a helpful guide that will walk you through fixing the most frequent WordPress errors.
1. The terrifying white screen WordPress that precedes death:
The white screen WordPress is exactly what it sounds like a screen that is completely blank and devoid of any distinguishing features. It is possible that an error message will appear every so often.
The white screen WordPress problem may typically be traced back to one of two sources: either plugins or themes. There is a possibility that this will result in compatibility errors, preventing you from accessing your site.
However, in addition to those suggested causes, there are also a number of others. You can find a comprehensive list of potential causes and helpful solutions in the post that we have written on repairing the WordPress "white screen WordPress."
2. 400 Error: [ WordPress 404 page]
Four hundred faults can manifest in a variety of guises, ranging from 400 to 499. However, each of these problems is an HTTP client fault. As a result, it is typically possible to identify them as being caused by a communication problem with your server.
There are numerous solutions available, depending on the client's error code. A number of the particular error codes, including the 401 error and the 403 disallowed error, each have multiple potential resolutions.
3. Internal server error
These 500 faults can be a little bit of a head-scratcher. You are only told the title of the situation, which is that your server has collapsed. You are rarely given any further information outside the title.
Because of this lack of specificity, resolving an internal server problem typically involves performing certain debugging steps. The good news is that most of the time, it can be fixed by taking a few specific actions in the right order. To walk you through the process, we have compiled a guide on the 500 internal server errors.
4. A problem with the memory limit
Errors related to memory limits can typically be tracked down to the hosting provider. In most cases, the quantity of server RAM that is available to you is predetermined by the plan that you have purchased. You'll encounter this error if you go over the limit that's been set.
As demonstrated for fixing HTTP image upload errors, the simplest way to fix the problem is to raise the RAM limit for PHP. On the other hand, if you consistently encounter this memory limit problem, you should think about increasing your hosting plan in order to free up more memory.
5. There Was a Problem Establishing the Connection to The Database
In order for your WordPress site to function correctly, it is necessary for it to establish a connection with the MySQL database. Both you and your users will be unable to access your dashboard, and they will not be able to read your material. To our relief, the solution to this problem is not overly complicated. First, make sure that your database credentials are correct. You can also attempt the following methods to fix the database connection error if everything is configured properly.
6. You Have Exceeded the Maximum Allowed Size of Uploaded Files.
Your WordPress site has its own individual upload limit, which is established based on a number of different variables. If you attempt to upload a file that is larger than this limit, you will see a warning indicating that the upload failed. You can view your limit by heading to the Media menu and selecting the Add New option.
You can increase the size of your uploads by modifying the php.ini file on your server. Having said that, this will not be applicable to all hosting plans. As a result of this, we strongly suggest getting in touch with your web hosting provider or, alternatively, simply compressing your photographs.
7. Exceeded the Maximum Allotted Amount of Time
When your website processes data, it will often do so with an upper limit on the amount of time the execution can take.
8. The Automatic Update Did Not Work.
Keeping your WordPress site up to date with the most recent technologies may be accomplished in a hands-off manner with automatic updates. However, there is a possibility that this process could fail, which would result in a WordPress website that is broken. In the event that this occurs, the most effective option is to manually update your website. You should also consider taking a few precautionary measures to ensure that you are upgrading WordPress in a secure manner.
9. There Was a Problem Writing the File to the Disc.
After attempting to upload media files, the error "Upload: Failed to write file to disc" is likely to appear on your screen. If you run a site that is heavy on photos, this can be an extremely frustrating issue. In most cases, these two factors are the primary contributors:
Incorrect permissions assigned to the File.
A problem with the server.
You may get started by checking to see if the permissions on your files are set up correctly. If it doesn't work, you might want to try getting in touch with your host.
10. A problem occurred during the secure connection
When the configuration of your server is incorrect, your secure connection will fail to establish. As a direct consequence of this, your website is unable to establish a connection with WordPress.org. This may prevent you from upgrading the essential files on your system. These WordPress problems do not have a fix that you can implement on your own, unfortunately. There are situations in which all you have to do is wait for a few minutes for it to go away on its own. In the event that the issue does not fix itself, you can communicate directly with your host.
11. Error 521 reported by Cloudflare:
Cloudflare is a robust web security service that also has the ability to boost your website's load time. However, there is a possibility that the Cloudflare service will be unable to connect to your server at times. This causes an error with the code 521.
To resolve this issue, check to be that your server is online and operational. The next thing you should do is examine whether or not your firewall is preventing Cloudflare's IP ranges from being accessed. In addition, you are free to get in touch with your host at any time for assistance.
12. Access to the specified file type or page is denied:
Because of security concerns, WordPress does not support the uploading of some types of files. This stops hackers from gaining unauthorized access to your data, which is the case the majority of the time. On the other hand, this may prohibit users from posting things that aren't malicious. You can use a free plugin like File Upload kinds to customize your website so that it will allow the upload of various file kinds.
13. Syntactical problems in WordPress
When there is a problem with the structure of your code, this can lead to syntax errors. It is quite improbable that this will occur on its own. In all likelihood, it will take place in any of these two scenarios. You have just recently uploaded some custom code to your website, and one of those lines of code contains a syntax mistake. Perhaps you made a typing error by accident. You may have installed a new plugin or theme, which resulted in a problem with the syntax. In most cases, the syntax error will identify the specific File and line that is the source of the problem, which you may then utilize to troubleshoot the issue. If you still aren't able to figure it out, reverting any recent code changes or installing any new plugins or themes is a smart initial step to take. You can also activate the debug mode in WordPress, which will assist you in locating the source of the issue.
14. Invalid SSL messages
A website can be protected in a way that is both straightforward and efficient by installing an SSL certificate. In point of fact, the vast majority of reputable hosts provide these services at no cost. Despite this, the procedure can be difficult, and it is possible that you will encounter a variety of WordPress errors along the way.
The most effective method for avoiding them is to ensure that your certificate is initially configured appropriately. You can accomplish this by utilizing the built-in SSL certificate installer tool that most hosts make available to their customers. In addition to that.
Check that you have implemented HTTPS correctly on your WordPress site by configuring it properly.
Be sure to renew your SSL certificate if your server doesn't already do it automatically nevertheless, the majority of hosts will perform this task for you automatically.
If you are still experiencing problems with the SSL certificate provided by your host, you should think about contacting customer care.
18. A Database that is corrupted:
Your WordPress website will not be able to use a file that has become corrupted because it cannot read it. This may result in an error that reads "Error Establishing Database Connection" or other hiccups in the system. Restoring a previous version of your website is going to be the simplest solution to this problem. After that, everything on your website should work normally.
Conclusion:
WordPress mistakes can take many forms and look very different from one another. Some of them might not even be that bothersome, but others might completely destroy your website. Fortunately, being aware of the most common causes can help you better prepare for any eventuality.

Dollar2host
Dollar2host.com
We provide expert Webhosting services for your desired needs
Facebook Twitter Instagram
0 notes
Text
Essential Plugins to Set Your Blog Up For Success

Since starting my blog, I have spent many long hours and late nights researching the perfect plugins. I knew that I didn’t want to waste time switching to different ones, nor did I want the hassle of buggy plugins that would only give me headaches in the long run.
If you’re a brand new blogger (or even a seasoned one), I’ve listed all the plugins you’ll need in order to set your WordPress blog up for success – from the start. Whether they’re plugins for SEO, site speed, online stores, site builders/theme designers, contact forms, backups, analytics or more, I’ve got you covered.
With just a few clicks, you’ll be weeks ahead of other bloggers that don’t even know where to start, or are still procrastinating when they could already be launching or bringing in juicy traffic to their new blog!
The technical, admin aspects of your blog should not be complicated. Just focus on the essentials, set them up, and then start writing amazing content! Now, let’s dive in…
SEO: SmartCrawl & more
If you don’t know what SEO means, don’t worry, I gotchu. It stands for Search Engine Optimisation and essentially comprises all the many strategies that help your website be more juicy to search engines. This can be done in several ways, to name a few:
increasing the speed of your website’s loading time
optimizing photos (forget about .png formats, use optimised .jpg formats instead) by lowering their resolution size (ex. from 3000×3000 pixels to 700×700 for instance) and/or their file size (ex. from 10mb to 0.60mb)
using tags, titles and descriptions efficiently on your blog posts and images
having a beautiful and effective schema set up (the photo, title and description people see – when searching for your website in search engines or when your link is posted on social media)
sitemaps
and more.
For SEO, I use a collection of plugins by the same developer, which ensures their compatibility and running smoothly without hiccups. I find them speedy, bug-free and efficient. Other plugins I’ve tried ended up causing incompatibility issues with other plugins and they were also not user friendly. I find that a user friendly interface for a plugin or app is a great reflection on the product’s quality as a whole. A plugin that gives a great experience to users will also be a highly effective one, from my experience.
The first SEO plugin is SmartCrawl, where you have options like SEO checkup, which shows you a score on your entire website’s SEO rating and where you need improvement; you can configure your website’s schema, upload your sitemap for search engines to crawl, and more. Most importantly, on each post you can add focus keywords so search engines will know what the article is about, and you also get an instant score on the post’s SEO rating and what aspects require improving (ie. you need to add more internal or external links, or your images are missing ALT titles, etc).
Hummingbird helps with caching and page load speed. Smush helps with optimising images by decreasing their file size while maintaining quality, and it also gives you visibility in what photos require... Read more
#blogger#blogging tips#how to build a blog#bossbabe#entrepreneurship#blogging advice#entrepreneur tips#entrepreneurs on tumblr#business tips#lumen's business tips#plugins#wordpress#seo#marketing#business#advice#tips#success#articles
43 notes
·
View notes
Link
Following are blogging tips associated with the planning and content of the blog.
6) The planning and layout of the blog should be nice, neat and delightful so that it can create an honest impression on the visitor and he should feel to remain more and visit again. Content quality should even be good for this.
7) Navigation and layout should be specified visitors should be able to find the recent posts, labels very easily. So if Recent posts and Labels are near the highest of the sidebar they'll be visible on the primary screen of the blog and therefore the visitor will have a fast idea of what the blog is about and may jump to his topic of interest quickly.
8) Use pictures, images wherever possible to create your post colourfully and attractive. Do picture/image optimization as described in my earlier post. No must use large images, you'll be able to use a medium to small images.
9) Loading time of the blog shouldn't be very long or visitors will run away before the page opens. So keep a check on what widgets/code you're installing and does it slows down the loading. If you're loading pictures, ensure that the file size isn't big.
Do not use BMP files, you'll be able to use jpg, png files. Also, check the image size. you'll be able to do all this using photoshop. As sometimes images load slower from external sources, confirm also.
Blogging tips associated with writing and visitors.
10) Write your post after proper research and gathering total information. don't write too long. Use grouping, paragraph, subtitling for arranging the knowledge within the post body.
11) Writing language should be easy to grasp and wherever possible write in a humorous way. If a visitor enjoys your post he will return.
12) Give links to useful resources associated with your topic. Also give links to your earlier posts with proper anchor text wherever possible. This improves the inner linking of your blog.
13) Encourage the reader to participate/comment. you'll also run some contests or surveys on your blog and keep some prizes for that.
14) Use a stunning and professional-looking theme/template and header image for your blog. There are many free templates available so you'll be able to easily get one suitable for your blog. Choose 3 column template which uses full 1024 X 768 resolution. this offers you more room.
15) The font colour and size should be such the blog should be readable in numerous screen resolutions. Other blogging tips to extend readers and revenue.
16) Burn your feed at Feedburner and supply subscribe via email facility for your RSS feed.
17) Check your blog visibility and feed a unique browser. Especially in internet explorer and Firefox.
18) try and increase your RSS feed subscriber and use AdSense for feed to display Google AdSense on the feed.
19) Use Google AdSense or other advertisements within the post body, right-hand sidebar and below the header. Use AdSense link unit with labels or links or below the header. Match background colour of AdSense with blog or post background colour.
20) Read my post on blog traffic tips to create traffic from sources apart from a quest engine.
Following are precautionary blogging tips
21) There shouldn't be many outgoing links (pointing to other websites/blogs) within the post or sidebar. Remove unnecessary outgoing links. Place all outgoing links near the underside of the right-hand sidebar or footer.
22 ) Don't buy or sell links for link building.
23) If paid posts are a requirement for you retain it a minimum or have a separate website/blog for paid posts or articles.
24) As said above don't write the identical post again ( duplicate content ). don't edit old post titles and content for computer programme optimization.
25) Don't have METATAGS just for the most home URL of the blogger blog, because it is used for all the posts and you may get duplicate metatag error in Google webmaster tools. you're also misguiding and confusing search engines by having the identical meta tag for all posts. So you'll be able to use a script/widget which may give different METATAGS to individual posts. WordPress bloggers can have METATAG for the individual post by using an in one SEO plug-in.
For more information you can follow me on Twitter and Crunchbase -
Twitter - https://twitter.com/ClazieScott
Crunchbase - https://www.crunchbase.com/person/scott-clazie
1 note
·
View note
Text
10 Best Free WordPress Plugins for 2020
It is safe to say that you want to design your own website or upgrade the current one? Here we present to you a rundown of 15 most famous free WordPress plugins for you. The rundown contains various kinds of plugins designed for the various needs of users. Be it streamlining, relocation, store, displaying of images or availability, these plugins have loads of elite highlights to coordinate your prerequisites that will make your site more useful and appealing!
Yoast SEO

Yoast is a WordPress SEO plugin. It accompanies numerous advanced and prepared to utilize highlights and offers the most exceptional sitemap functionalities, absolute power over breadcrumbs and consequently sets authoritative URLs for keeping away from copy content. It gives SEO examination to SEO agreeable writings and comprehensibility investigation for better substance. Yoast is accessible in both free and premium versions.
Features
Page & post optimization
Content Optimization
Social Card
Focus Key Phase
WooCommerce

WooCommerce is a modern WordPress eCommerce plugin that accompanies bunches of themes and blocks, customizable store extension and effective payment options. It likewise accompanies MailChimp, Google Analytics, and Facebook integration.
Features
SEO Optimization
Inventory Management
Order Management
Customer Account & Guest Checkouts
Elementor

Elementor is a WordPress pluguin for advanced page building that accompanies box shadows, background overlays, hover effects, headline effects, gradient background, shape divider, and animations.It permits versatile altering and fixes or redo update history.
Features
Drag & drop editor
300+ Designer Premade Templates
Responsive Editing
WooCommerce Builder
MailChimp

MailChimp is basic and ready to use WordPress plugin for connectivity. It permits users to remain associated with clients and assists with conveying the correct message to the perfect individuals at the perfect time. With this plugin, you can have unlimited authority over the form fields and send anything they wish to.
Features
WooCommerce
Buddy Press
Contact Form 7
Event Manager
Jetpack

Jetpack is a plugin for security and site management that accompanies helpful widgets, custom widgets galleries, site insights and analysis, improved distribution and mass website managements. It offers users simple and easy site management.
Features
Brute force attack protection
Malware Scanning
Easy CSS Editing
Social Sharing
W3 Total Cache
W3 Total Cache is a WordPress cache lugin that improves the SEO highlights of the sites by reducing loading time with CDN integration and improving website execution. It permits caching of posts, pages, feed, CSS and Javascript in memory, disk or CDN. It is likewise viable with shared hosting, virtual private servers, and dedicated clusters.
Features
Transparent Content delivery network
Secure Socket Layer
Mobile Support
Minification of Post, Pages and RSS Feed
Redirection

Redirection is a famous WordPress divert plugin that accompanies redirect manager, HTTP Headers and fine-grained authorization. It offers users an excessively quick redirection.
Features
Login Status Analysis
404 Error Tracking
Apache and Nginx Support
Import & Export System
MonsterInsights
MonsterInsights is a simple method to install Google Analytics that permits e-commerce tracking, an affiliate link and ad tracking, document download tracking and custom link tracking. It offers page-level analytics and empowers Google to optimize for A/B testing and changes speed and sample rate. You can integrate with Google Analytics’ Chrome browser opt-out extension and implicit cookie opt-out system.
Features
Universal Tracking
Real-Time Stats
Google Analytics Dashboard
GDPR Compatible
OptinMonster

OptinMonster is a famous pop-up and email opt-in tool that offers advanced page-level tracking and behavior personalization. You can simply incorporate with all email marketing services with this plugin. It accompanies MonsterEffect Technology for alluring popup animations.
Features
Drag & Drop Page Builder
Optin Forms Templates
A/B Split Testing Tool
Conversion Analytics
Mashshare

Mashshare is a professional WordPress social media plugin that is a customizable ecosystem social media sharing and content optimization. It is extendable with many additional items like Google, Whatsapp, Pinterest, Linkedin, Reddit, Tumblr, and so on. It likewise accompanies high-resolution lossless vector font share button icons.
Features
Social Share Buttons
Many Short Codes
Multi-Language capable
Developer Friendly
ShortPixel

Shortpixel is a WordPress plugin for picture enhancement that accompanies a one-click backup, installed features and and offers outright picture security. It works with any well-known gallery and supports JPG, PNG, and GIF and is E-commerce prepared.
Features
Automatic & bulk optimization
One API key for many sites
PHP Compression Tools
No file size limit
Final Thoughts
I trust we could give you some alleviation in your journey to website creation. Did you get what you were searching for? Experience this rundown, get the one generally reasonable for you and add it to your dashboard. Adding additional highlights or functionalities to your website is not, at this point a fantasy. With the previously mentioned plugins, everything can be made simple.
1 note
·
View note
Text
Creating a Mobile-Friendly WordPress Website: Why It Matters for Your Moncton Business
With the growing number of mobile users, having a mobile-friendly website is no longer an option but a necessity for businesses in Moncton. As the leading content management system (CMS), WordPress offers robust features and tools to create mobile-responsive websites that provide an optimal user experience across devices. In this blog post, we will explore the importance of mobile responsiveness in web design and how WordPress enables Moncton businesses to build mobile-friendly websites.
The Rise of Mobile Users: Mobile devices have become an integral part of people's lives, with an increasing number of users relying on smartphones and tablets for browsing the internet. Having a mobile-friendly website ensures that you cater to this growing audience and provide a seamless browsing experience. Neglecting mobile optimization can lead to high bounce rates, frustrated users, and missed business opportunities.
Improved User Experience: Mobile-responsive websites adapt to different screen sizes and resolutions, providing an optimized user experience regardless of the device used. A mobile-friendly website offers easy navigation, legible content, and touch-friendly elements, allowing users to interact with your site effortlessly. By prioritizing user experience, you enhance customer satisfaction, engagement, and ultimately, conversion rates.
Search Engine Optimization (SEO) Benefits: Search engines, like Google, prioritize mobile-friendly websites in their search results. With the mobile-first indexing approach, Google primarily uses the mobile version of a website for indexing and ranking. Having a mobile-friendly WordPress website increases your chances of ranking higher in search engine results pages (SERPs), driving more organic traffic to your site and improving your online visibility.
WordPress Mobile Responsiveness: WordPress offers a wide range of mobile-responsive themes and plugins, making it easy to create a mobile-friendly website. When selecting a theme, look for "responsive" or "mobile-friendly" designations. These themes automatically adjust the layout, font sizes, and images based on the user's device. Additionally, plugins like WPtouch and Jetpack's Mobile Theme provide additional mobile optimization features.
Customizable and Flexible Design: WordPress's flexibility allows you to customize and tailor your website's design to suit different devices. With the help of plugins like Elementor or Divi, you can create responsive designs, rearrange content, and optimize elements specifically for mobile users. WordPress's block editor, Gutenberg, also offers responsive block options for better control over your website's mobile appearance.
Performance Optimization: Mobile users expect fast-loading websites. WordPress offers various performance optimization techniques to enhance the speed and responsiveness of your mobile site. Utilize caching plugins, such as WP Rocket or W3 Total Cache, to store static versions of your site and minimize server requests. Compress and optimize images using plugins like Smush or Imagify to reduce file sizes without compromising quality, leading to faster load times.
Mobile-Friendly Testing: WordPress provides built-in tools and plugins that allow you to test your website's mobile responsiveness. Use the Mobile-Friendly Test tool from Google Search Console to identify any mobile usability issues and receive recommendations for improvement. Additionally, plugins like WP Mobile Menu and WP Mobile Detect help customize menus and content specifically for mobile devices.
Continuous Mobile Optimization: As technology and user expectations evolve, ongoing mobile optimization is crucial. Regularly monitor your website's mobile performance, analyze user behavior through analytics tools, and seek feedback from your mobile users. Stay updated with the latest WordPress releases, themes, and plugins to leverage new features and advancements in mobile optimization.
Conclusion: Having a mobile-friendly website is essential for businesses in Moncton to reach and engage with their target audience effectively. WordPress provides the necessary tools, themes, and plugins to create mobile-responsive websites that adapt seamlessly across devices. By prioritizing mobile responsiveness, you enhance user experience, improve search engine visibility, and drive business growth in the mobile era. Invest in a professional WordPress agency in Moncton to ensure your website is mobile-friendly and optimized for success.
0 notes
Text
Boost Your Website's Performance: Tips for Optimizing Page Speed?
New Post has been published on https://abnoubshenouda-digitalmarketer.com/boost-your-websites-performance-tips-for-optimizing-page-speed/
Boost Your Website's Performance: Tips for Optimizing Page Speed?
In today’s digital age, website page speed is a critical factor for online businesses to consider. Slow-loading pages can frustrate visitors, cause them to leave the website, and negatively impact the website’s search engine rankings. In contrast, a website that loads quickly can improve user experience, boost engagement, and increase conversions.
In this article, we will discuss tips for improving your website’s page speed. We’ll cover everything from optimizing images to reducing HTTP requests, and we’ll explore ways to test your website’s page speed so that you can see the results of your efforts.
Optimize Images
Images play an essential role in web design, but they can also be one of the biggest culprits of slow page speed. Unoptimized images can be large files that take a long time to load, causing users to lose patience and leave the site.
To optimize your images, you can start by compressing them to reduce their file size. There are several tools available for this purpose, such as Adobe Photoshop, TinyPNG, and Compressor.io. You can also use a plugin like WP Smush for WordPress sites, which automatically compresses images upon upload.
Another way to optimize images is to reduce their dimensions. Many websites use large, high-resolution images that look great but are unnecessary for the web. By resizing your images to the appropriate dimensions, you can reduce their file size and improve page speed.
Finally, you can use a content delivery network (CDN) to deliver your images more efficiently. A CDN stores your website’s files in multiple locations worldwide, allowing users to access them from the nearest server. This can significantly reduce loading times for visitors who are far away from your website’s hosting location.
Minimize HTTP Requests
Every time a user loads a webpage, the browser sends a request to the server for each file needed to render the page. This includes images, stylesheets, scripts, and other resources. The more HTTP requests the browser has to make, the longer it takes to load the page.
To minimize HTTP requests, you can start by reducing the number of files needed to render your website. This means combining multiple CSS and JavaScript files into a single file and removing any unnecessary files.
You can also use browser caching to store frequently used files locally on the user’s device. This way, the browser doesn’t have to request the same file multiple times, reducing the number of HTTP requests.
Use a Content Delivery Network (CDN)
A content delivery network (CDN) can significantly improve page speed by storing your website’s files in multiple locations worldwide. This allows users to access your website’s files from the nearest server, reducing the distance that the data has to travel.
CDNs are especially useful for websites with a global audience or those that serve large files, such as images or videos. By using a CDN, you can ensure that your website loads quickly for visitors from anywhere in the world.
Minify CSS, JavaScript, and HTML
CSS, JavaScript, and HTML files can be large and complex, which can slow down page speed. To improve page speed, you can minify these files by removing any unnecessary characters, such as white space, comments, and line breaks.
There are several tools available for minifying CSS, JavaScript, and HTML files, such as YUI Compressor, Uglify JS, and HTML Minifier. These tools can help reduce file size and improve page speed without affecting the functionality of your website.
Use Lazy Loading
Lazy loading is a technique that delays the loading of non-critical elements on a page until the user scrolls down to view them. This can significantly reduce page load time, especially for pages with many images or videos.
Lazy loading is achieved by using JavaScript to load images and other resources only when they become visible on the user’s screen. This means that the browser only requests the resources that the user is likely to view, rather than loading everything upfront.
There are several plugins available for WordPress and other content management systems that enable lazy loading, such as Lazy Load by WP Rocket, Lazy Load by WP Forms, and Lazy Load for Videos. By using lazy loading, you can improve page speed and enhance user experience for your visitors.
Enable Browser Caching
Browser caching allows the browser to store certain files, such as images, stylesheets, and JavaScript files, on the user’s device. This means that the browser doesn’t have to request these files from the server every time the user visits your website, reducing the number of HTTP requests and improving page speed.
To enable browser caching, you can add cache headers to your server configuration or use a plugin that handles caching for you. For WordPress sites, popular caching plugins include W3 Total Cache, WP Super Cache, and WP Rocket.
Optimize Your Website’s Code
Your website’s code can have a significant impact on page speed. Bloated, inefficient code can slow down page load times, while optimized, streamlined code can improve page speed and enhance user experience.
To optimize your website’s code, you can start by removing any unnecessary code, such as comments, white space, and unused CSS or JavaScript files. You can also use minification tools to compress your code, as we discussed earlier.
Another way to optimize your website’s code is to use efficient coding techniques, such as loading JavaScript files asynchronously and using CSS sprites for images. By using efficient coding techniques, you can improve page speed and ensure that your website runs smoothly for your visitors.
Reduce Server Response Time
Server response time is the amount of time it takes for the server to respond to a request from the browser. A slow server response time can significantly impact page speed, as the browser has to wait longer for the server to deliver the content.
To reduce server response time, you can start by choosing a reliable hosting provider with fast servers. You can also optimize your website’s code, as we discussed earlier, to reduce the amount of time it takes for the server to process requests.
Finally, you can use a content delivery network (CDN) to reduce server response time by storing your website’s files in multiple locations worldwide. By using a CDN, you can ensure that your website’s content is delivered quickly and efficiently to your visitors.
Test Your Website’s Page Speed
Testing your website’s page speed is essential to see the results of your efforts and identify any areas that need improvement. There are several tools available for testing page speed, such as Google PageSpeed Insights, GTmetrix, and Pingdom.
These tools analyze your website’s performance and provide a detailed report with recommendations for improving page speed. They can also help you identify any issues that may be slowing down your website, such as large image files, too many HTTP requests, or inefficient code.
By regularly testing your website’s page speed, you can ensure that it loads quickly for your visitors and remains competitive in search engine rankings.
Conclusion
Improving your website’s page speed is essential for providing a positive user experience, increasing engagement, and boosting conversions. By optimizing images, minimizing HTTP requests, using a content delivery network (CDN), minifying CSS, JavaScript, and HTML, using lazy loading, enabling browser caching, optimizing your website’s code, reducing server response time, and testing your website’s page speed, you can ensure that your website loads quickly and efficiently for your visitors.
Remember, page speed is a critical factor in search engine rankings
reference
Here are some of the references used in this article:
“The State of Online Retail Performance” (Akamai, 2017)
“Site Speed & SEO” (Moz)
“Mobile Page Speed Study” (Google, 2018)
“How Website Speed Actually Impacts Search Ranking” (Moz)
#aem page speed optimization#best page speed optimization plugin wordpress#best page speed test#booster page speed optimizer#content strategy#customer conversion#digital marketing#does page speed affect seo#google page speed algorithm update#google page speed best practices#how much does page speed affect seo#marketing#page speed analyzer#page speed and seo#page speed best practices#page speed by google#page speed does not affect seo#page speed ecommerce#page speed in seo#page speed insights vs lighthouse#page speed ranking factor#page speed seo#paid advertising#tips#SEO
0 notes
Text
Why Image Resizing And Compressing is Important

Resizing an image is one of those impenetrable problems many people have trouble with. I don't know why, because it should be a very easy task. You can do so on your desktop or by using an online image resizing app. When it comes to online images, size matters a lot. Particularly for people with poor internet connections who can't wait for a page with pictures to load. These people often become irritated and abandon the platform in search of another. Make sure you upload appropriately sized images to the internet. That wasn't so difficult to understand, was it? However, even though resizing is so easy, people continue to snap large-sized images with digital cameras and then attempt to post them on the web. Often resulting in sluggish websites. You can use a quick online image compresser tool such as Réduire Taille JPG. Why Image Resizing is Important Knowing how to properly use digital images is an essential tool for making your website stand out from competitors. Resizing images without losing their quality is also a great way to make an excellent first impression on visitors, who are most often captivated by pictures above all else. Another important reason behind the need to redimensionner image properly is page speed. Make Image Files the Correct Width and Height Content management systems like WordPress automatically provide you with size options when you add a picture, so if you use one of those, you may suppose you're all set! However, it's essential to note that these tools only affect the size at which the image is displayed; the file size is unaffected. You can see this step by right-clicking on an image and selecting "open image in a new tab;" you'll see the picture in all its original-size glory. This may be all good if you're already using fairly small images, but it will still slow down your page load time if the images you've used are significantly bigger than how they'll appear on the page. Instead of depending on your CMS to size images, use an image editor like Photoshop, or free tools like Réduire Taille JPG or even good old Microsoft Paint, to réduire taille image to the correct size. Compress Your Images The other major component of photo resizing is compression. Simply put, image compression is a way to optimize images to reduce their file size, ideally without reducing (or noticeably reducing, anyway) image quality. How this works is fairly technical, but in layman's terms, compression squishes the data of your photo into smaller packages to send from the server to the browser, where it's reassembled into the original image. There are two ways to do this: Lossless compression compresses the data in such a manner that the original can completely reduire taille photo without a loss of image quality. This is what you'll want to go for in most cases – otherwise, your images will start to look pixelated and less crisp. Lossy compression allows for images to get much smaller in file size but with a reduction in image quality. Is it possible to resize an image without losing its quality? Yes! It is easy to do so. But first, you need to understand how to compresser image. Speaking of photo types, there are various common image file formats commonly used online. JPEG is one of them. Used to optimize web pages, JPEG's are convenient, given their reduced jpg size and quick loading speeds. PNG is a step up from JPEG, offering high quality but at the cost of advanced file sizes and reduced page speed. With powerful programs like Photoshop, different photo types can be easily transformed into other formats. Keep a common purpose in mind, as remaking from a low-resolution format to a high-resolution setup will not necessarily improve the quality of your picture.
0 notes
Text
How We Increased Revenue with Speed Optimization [Local SEO Case Study]
Last year, I pitched a series of technical SEO topics for local SEO on twitter and got lots of positive feedback.

One of these elements of technical SEO that can feel extremely daunting and unfamiliar to local SEOs is speed optimization.
There are some key scenarios when local SEOs should seriously consider speed optimization, even for a small local client. After all, these clients are still impacted by the issues that come along with having a slower website — such as higher bounce rates, lower conversions, and worst of all, a poor user experience.
There are also plenty of instances where speed optimization is a practical next step in your SEO strategy. If your client has great content, great links, but low engagement or rankings, speed issues may be the culprit.
This case study is about a client just like that. The only service my team at RicketyRoo provided during the length of the case study was speed optimization, and we saw some impressive results. In this post, I’ll share our experience, and hopefully this inspires you to take on some speed issues you’ve been nervous to address.
The client
The client is a multi-location residential cleaning franchise with over 40 locations across the United States. The website consists of approximately 580 pages, with a landing page for each location.
Our client’s goal is pretty simple: take a bigger piece of the pie from the larger nationwide home cleaning franchises. Our technical audit showed that the site was very slow, so site speed is where we started.
Our methodology
1. Set up staging environment with WPEngine
Whether you’re using tools and plugins or choose to manually update the website for speed, you should create a staging (or test) environment. Making manual changes to the code that a website is built with (even through a plugin) can break a website. A staging environment is a cloned version of the production site that can be tinkered with without the risk of breaking anything on the live site. Once you have a staging site set up, you can essentially update and change any elements you would like and test without fear of your client losing traffic or leads.

Our speed philosophy is to test and verify. Verifying that the staging site is still functional after making a change and then getting an updated score through the speed tool of your choice is the only way to be confident about the changes you are making.
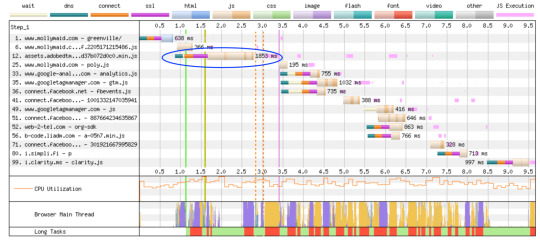
2. Run through a tool like WebPageTest
During this stage, you’re diagnosing issues such as script files returning 404 errors, unused CSS files causing longer load times, and render-block resources. Find these issues and update them. Web.dev is a great resource for finding solutions:
1. Review Core Web Vitals scores to determine where issues lie.

2. Find out what’s taking the longest amount of time from the waterfall

3. Review render-blocking resources and update (deferring them is likely the best call here)
3. Check to see if anything is broken
This is why we’re using a staging environment — just in case any of these changes we’ve made breaks something. Check out the live staging site and compare the visual and functionality to the production version of the site. If everything is working as expected, then you’re doing great.
4. Review large images via WebPageTest
The Largest Contentful Paint issues are often caused by images that are too large. There are many guides on how to optimize images out there. If you’re using WordPress, you can also use a plugin like Imagify:
Download any large images, resize, and reduce space
Reupload images at smaller sizes
Check image resolution on staging site
5. Rinse and repeat for other page templates
Everything we’ve done so far we’ll repeat for every template type used on the site. Most sites will have separate templates for location pages, services, categories, blogs, products, contact pages, etc. Each of these page types should be reviewed with a tool like WebPageTest.
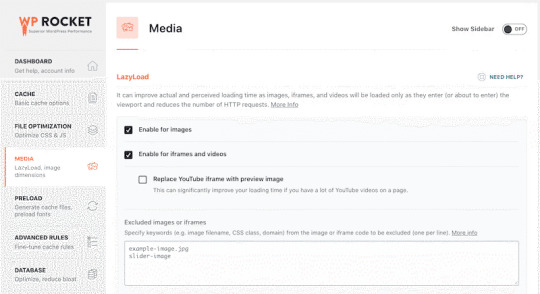
6. Install WP Rocket
If your site is on WordPress, you can use WP Rocket to further optimize your site for speed. WP Rocket can sometimes have issues with other plugins or themes used on WordPress sites, so it’s important to test on the staging site first.
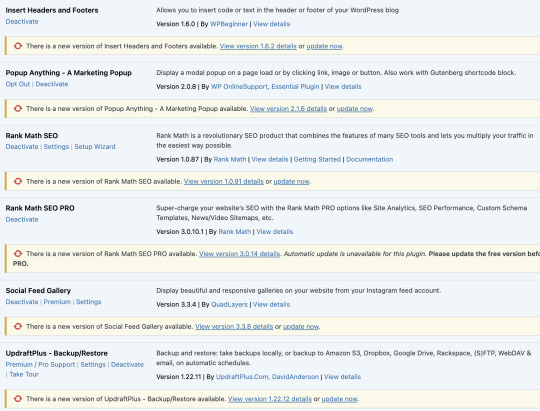
7. Review plugins
While we’re on the topic of plugins, you should also review your current plugins and deactivate and remove any that are not in use.
8. Check to see if anything is broken
We’ve made a decent amount of changes at this point. We should review the live version of the staging site again and compare it to the production site.
9. Run through Webpagetest again
Let’s see how we’ve done! If you’re happy with your results then your work is nearly done.


10. Push changes live
Any changes you made should now be pushed to the production site.
11. Annotate changes in GA
Remember to annotate these changes so that you can check back and draw a conclusion from your results for yourself.
Results
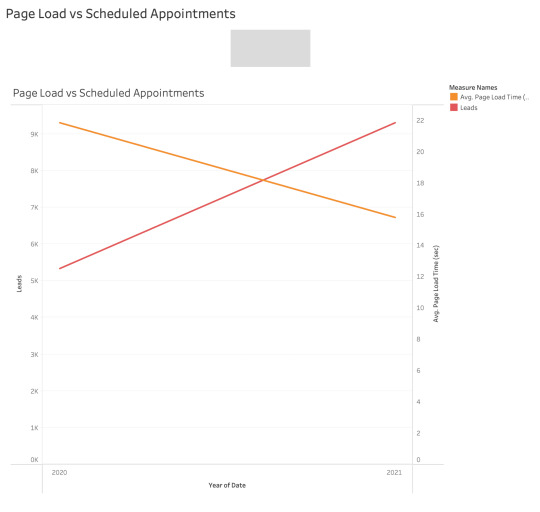
Our speed optimization started in July 2020. Soon after, we saw improvement in rankings for non-branded keywords that already ranked in the top 20 positions. The client saw a 32% increase in new users, a 47% increase in phone calls, and a 63% increase in free quote requests in a year-over-year comparison of 2021 to 2020. 2021 saw a 55%+ increase in revenue over 2019 and over 60% in comparison to 2020.

This correlates with an increase in both site traffic and qualified leads. Our client measures qualified leads as scheduled appointments, which grew by 49% PoP.


We also reviewed the CRux data for our client in comparison to closely-ranked competitors. The winner for each UX/speed element is highlighted in yellow. As you can see, our client’s scores are generally higher than competitors that do not rank as well:

Conclusion
Technical SEO can be done, even if you don’t consider yourself a tech expert. Having a backup makes it easy to test out changes with confidence. Never dismiss the importance of a SEO tactic because you’re unfamiliar. Our client saw ranking and improvements as well as a 55% increase in revenue due to Core Web Vital optimization alone. Now that you have a staging website, you’re free to tackle other technical issues you may have discovered but felt uncomfortable with approaching.
0 notes
Text
How We Increased Revenue with Speed Optimization [Local SEO Case Study]
Last year, I pitched a series of technical SEO topics for local SEO on twitter and got lots of positive feedback.

One of these elements of technical SEO that can feel extremely daunting and unfamiliar to local SEOs is speed optimization.
There are some key scenarios when local SEOs should seriously consider speed optimization, even for a small local client. After all, these clients are still impacted by the issues that come along with having a slower website — such as higher bounce rates, lower conversions, and worst of all, a poor user experience.
There are also plenty of instances where speed optimization is a practical next step in your SEO strategy. If your client has great content, great links, but low engagement or rankings, speed issues may be the culprit.
This case study is about a client just like that. The only service my team at RicketyRoo provided during the length of the case study was speed optimization, and we saw some impressive results. In this post, I’ll share our experience, and hopefully this inspires you to take on some speed issues you’ve been nervous to address.
The client
The client is a multi-location residential cleaning franchise with over 40 locations across the United States. The website consists of approximately 580 pages, with a landing page for each location.
Our client’s goal is pretty simple: take a bigger piece of the pie from the larger nationwide home cleaning franchises. Our technical audit showed that the site was very slow, so site speed is where we started.
Our methodology
1. Set up staging environment with WPEngine
Whether you’re using tools and plugins or choose to manually update the website for speed, you should create a staging (or test) environment. Making manual changes to the code that a website is built with (even through a plugin) can break a website. A staging environment is a cloned version of the production site that can be tinkered with without the risk of breaking anything on the live site. Once you have a staging site set up, you can essentially update and change any elements you would like and test without fear of your client losing traffic or leads.

Our speed philosophy is to test and verify. Verifying that the staging site is still functional after making a change and then getting an updated score through the speed tool of your choice is the only way to be confident about the changes you are making.
2. Run through a tool like WebPageTest
During this stage, you’re diagnosing issues such as script files returning 404 errors, unused CSS files causing longer load times, and render-block resources. Find these issues and update them. Web.dev is a great resource for finding solutions:
1. Review Core Web Vitals scores to determine where issues lie.

2. Find out what’s taking the longest amount of time from the waterfall
3. Review render-blocking resources and update (deferring them is likely the best call here)
3. Check to see if anything is broken
This is why we’re using a staging environment — just in case any of these changes we’ve made breaks something. Check out the live staging site and compare the visual and functionality to the production version of the site. If everything is working as expected, then you’re doing great.
4. Review large images via WebPageTest
The Largest Contentful Paint issues are often caused by images that are too large. There are many guides on how to optimize images out there. If you’re using WordPress, you can also use a plugin like Imagify:
Download any large images, resize, and reduce space
Reupload images at smaller sizes
Check image resolution on staging site
5. Rinse and repeat for other page templates
Everything we’ve done so far we’ll repeat for every template type used on the site. Most sites will have separate templates for location pages, services, categories, blogs, products, contact pages, etc. Each of these page types should be reviewed with a tool like WebPageTest.
6. Install WP Rocket
If your site is on WordPress, you can use WP Rocket to further optimize your site for speed. WP Rocket can sometimes have issues with other plugins or themes used on WordPress sites, so it’s important to test on the staging site first.

7. Review plugins
While we’re on the topic of plugins, you should also review your current plugins and deactivate and remove any that are not in use.

8. Check to see if anything is broken
We’ve made a decent amount of changes at this point. We should review the live version of the staging site again and compare it to the production site.
9. Run through Webpagetest again
Let’s see how we’ve done! If you’re happy with your results then your work is nearly done.


10. Push changes live
Any changes you made should now be pushed to the production site.
11. Annotate changes in GA
Remember to annotate these changes so that you can check back and draw a conclusion from your results for yourself.
Results
Our speed optimization started in July 2020. Soon after, we saw improvement in rankings for non-branded keywords that already ranked in the top 20 positions. The client saw a 32% increase in new users, a 47% increase in phone calls, and a 63% increase in free quote requests in a year-over-year comparison of 2021 to 2020. 2021 saw a 55%+ increase in revenue over 2019 and over 60% in comparison to 2020.

This correlates with an increase in both site traffic and qualified leads. Our client measures qualified leads as scheduled appointments, which grew by 49% PoP.

We also reviewed the CRux data for our client in comparison to closely-ranked competitors. The winner for each UX/speed element is highlighted in yellow. As you can see, our client’s scores are generally higher than competitors that do not rank as well:

Conclusion
Technical SEO can be done, even if you don’t consider yourself a tech expert. Having a backup makes it easy to test out changes with confidence. Never dismiss the importance of a SEO tactic because you’re unfamiliar. Our client saw ranking and improvements as well as a 55% increase in revenue due to Core Web Vital optimization alone. Now that you have a staging website, you’re free to tackle other technical issues you may have discovered but felt uncomfortable with approaching.
0 notes
Text
Website Maintenance Checklist to Avoid Technical Glitches
What is Website Maintenance?
Website maintenance keeps your website secure and performant, which reduces the chances of downtime.
When you own a website, you don't just write articles and publish them for the world to read. You design, plan, write, research, test, implement and maintain it. You don't even need any special coding skills; however, keeping your site updated is not something that can be ignored.
Read on to find out how you can keep your website healthy and updated by following a few simple steps.
Benefits of Website Maintenance
Updating your website regularly keeps its content fresh and adds new features that may benefit users as well as search engines.
Your website will be more secure from hackers or failures due to outdated software or operating systems.
You won't lose traffic if your site goes down for any reason. This is particularly important as Google ranks websites higher in web searches when they're up and running, rather than offline.
An updated website can gain you more visitors and free traffic.
Website maintenance is less costly than dealing with unforeseen problems that are difficult to fix once they arise, such as broken pages or lost traffic due to downtime.
Maintenance Checklist to Avoid Technical Glitches
Here's a simple checklist of the main things you should do before making any website changes:
Check Your Website Speed
Every second your website takes to load is time that potential customers spend away from your business. Slow loading times have been shown to reduce user engagement, which doesn't give you a good return on investment toward search engine rankings.
Test your website's speed with Pingdom tools, which send requests from various locations around the world and tell you how long each one takes to load. Then check this data against industry benchmarks (1 second is the ideal) to see if any improvements need to be made.
Renew Website Domain Name and SSL Certificate
If your website still uses an HTTP protocol instead of HTTPS, you should change that immediately since it's more secure. You can also improve trust by installing an SSL certificate on your site, which tells web browsers that they are safe to transact with you online. Keep in mind that changing domain names is easy these days due to services like Namecheap, which lets you switch over all your DNS records and other elements easily and affordably.
Check Your Backups
Backups are a necessary part of website maintenance because they help you recover lost website content and reduce the chances of a crash if something goes wrong with the website.
The various ways backups can be done is by using:
A- The server's backup function (most web hosts provide one)
B- A software such as Akeeba Backup to set up daily, weekly, and monthly automated backups for your whole site or specific areas/modules of your site, including database and files
C- Manual backup to download and save all changes made on your site -images, pages, videos, etc. To manually saved in external storage devices like pen drive, hard drive, etc. to keep copies for disaster recovery later. For people with larger websites, this may require a backup plugin for specific CMS systems such as WordPress.
Your website might not be fully protected if you're only doing backups occasionally, or aren't creating offsite backups. If a hacker wants access to your site badly enough, they'll find a way to breach it if backups aren't included.
It's not that difficult to keep your website backed up regularly. Services like CodeGuard make backing up and restoring websites easy because you can do it from the same place where you manage other services for your website. You should also consider setting up offsite backups at an external location, preferably in another country or hemisphere, so your data is less likely to be lost due to natural disasters or other unforeseen circumstances.
Backups are like insurance policies – don't expect anything to happen but still hope for the best! If something does happen, you will have a backup to save the day. You can automate this process or at least check them manually once in a while.
Security updates and bug fixes
To continue using the most recent versions of PHP, MySQL, etc., security updates must be applied regularly. If these applications are not updated, website visitors may face security vulnerabilities.
As far as bugs are concerned, WordPress is one of the most popular CMS systems at the moment with thousands of plugins and themes to choose from. Bugs are common in these types of software because they are created by voluntary developers who usually write free code for the WordPress community without expecting financial returns.
Check Your Website Responsiveness
A mobile-friendly website is one that has been specifically designed for viewing on smartphones, tablets, and desktop computers. If yours isn't responsive yet (and most aren't), it's likely losing valuable traffic. If you can, redesign your site so it responds to different screen resolutions and adjusts according to the viewer's preferred device.
Check Your Website for Broken Links and 404 Errors
Fixing broken links is important because search engine crawlers monitor these errors and report them as signs that your site isn't well-maintained or reliable. You can use free resources like Xenu Link Sleuth to find broken links on your website. Once you've located them, simply delete or replace those pages with working content.
Broken links or 404 errors will appear when any link on your website points to an incorrect destination or the resource is not found in the location where it should be, resulting in visitor frustration and abandoning their shopping carts. To fix these types of errors search for all wrong destinations and redirect them to relevant pages you want them to land on. You can use free tools like Xenu's Link Sleuth and Screaming Frog SEO Spider for this purpose.
Many security issues arise due to user error, along with careless mistakes that are easy enough to avoid if you're aware of them. While maintaining a WordPress blog, for example, you should use strong usernames and passwords, avoid using plugins that aren't regularly updated, edit your .htaccess file to increase website security, and always remember to use reputable hosting services.
Reply to Form Inquiries
Serving customers is an integral part of any successful business. Unfortunately, if you don't have the time or resources for this, they might head to your competitor's site instead. In order to keep sales coming in from all channels (including the contact form on your website), make sure you reply to prospects within one business day.
Reply to all inquiries that get posted on your contact forms (including queries submitted via emails). Even if it's a simple message like "We will try and get back to you as soon as possible," this shows that you care about customer service and helps build a rapport with your visitors.
Be sure you always have someone available who can read emails sent through your site's contact form and forward them along to the correct individuals within the organization so they're not left sitting in a spam folder or designated "social" folder.
Check Your Website Speed
Your website's speed is one of the biggest factors in how Google ranks your pages, so if yours isn't up to snuff you could be losing traffic. You should regularly check Google PageSpeed Insights, Pingdom Tools, and GTmetrix for tips on how to improve load time.
A faster website means increased visitor satisfaction, higher rankings in search engine results pages (SERPs), and lower bounce rates, which is why page loading times should be regularly checked. Tools like Google Analytics offers the option to view average loading times for specific pages on your site. If it's taking too long to load individual posts or static images -try reducing the size of these files through re-compression or using alternative options like SiteGround SuperCacher), this will increase website speed dramatically.
Measure Your Website Performance
If you're looking for ways to measure website performance after implementing improvements, try using services like WebPagetest, New Relic, or ClickDensity. These tools will tell you how your website looks from a performance perspective and help you gauge whether or not it's faster since the last time you checked.
Apart from measuring speed, Google PageSpeed Insight will give you a detailed report on how fast various files on your site load and which ones need immediate attention. Optimize everything from texts to images with this free tool for a bigger and better user experience.
Renew Your Domain Name and SSL certificate
The internet has come a long way in the past few years, but nobody knows exactly what's coming next to change everything yet again. You can prepare by making sure your domain name is renewed so that another company doesn't snatch it up when you're not looking.
Domain names and SSL certificates often expire without users knowing about them. So keep track of them by renewing them prior to they come close to expiry; otherwise, you might lose SEO benefits as well as search rankings if they become disabled unexpectedly.
These are some of the most overlooked parts of web hosting but they play a crucial role in delivering an exceptional user experience.
Renewing the domain name ensures that it stays with its current host if there is a need to move sites from their current hosts due to poor support or high costs. Domain names should be renewed every year for this reason. In order to be sure that the process is done in time, set up a calendar reminder on your phone or PC weeks before the expiration date of the domain name.
If possible, renew your domain names for multi-year periods instead of just one year at a time. This will save both money and stress down the line because you won't have to worry about losing your blog address if something goes wrong with your payment history.
Update Your Copyright
If you want to show site visitors that your blog is up-to-date and current, make sure you update the copyright year on your site. Even though it doesn't have any bearing on search rankings, this simple step will avoid confusing or frustrating readers who visit your site regularly.
It doesn't matter how many times your site was updated last year; by setting the updated dates on all pages regularly you are sending out messages of freshness to search engines which will definitely boost up rankings over time.
Many website owners aren't aware of what maintenance entails. If yours has gotten a little behind in recent months/years, now would be a good time to enforce some more stringent policies so that all members of the Internet community have equal access to it. These are just ten things related to a website maintenance that you can use as part of your checklist -- there are many more small steps you can take every day to keep your online presence running smoothly.
Conclusion
These are some of the most important points to check when it comes to maintaining a high-quality website for visitors and search engines alike so… If you care about your site's performance, user experience and would like others to visit again - follow this checklist once in a while.
You need to make sure that your technology is up-to-date, secure, and able to handle anything the future may hold. To do this, you will have to schedule regular maintenance of your site in order to avoid technical glitches. Think about it as an investment for the future - with time it will definitely pay off!
The team at Pixel Street will design a professional website for your business and create it with customized features without costing too much. With our affordable prices, you can have the best web development service around!
0 notes