#Fix Please Insert a Disk into Removable Disk Error
Explore tagged Tumblr posts
Visit Tumblr Blog
Explore Tumblr blogs with no restrictions, modern design and the best experience.
Last Seen Tumblr Blogs


Fun Fact
The KCSC sent more than 20K requests to delete posts related to prostitution and porn to Tumblr from January to June 2017.
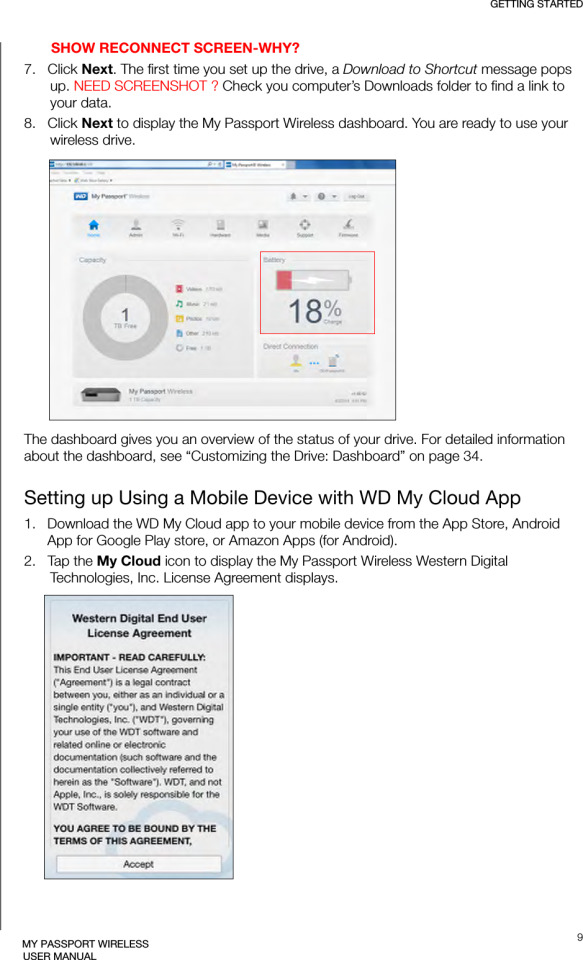
Text
Fix "Please Insert a Disk into Removable Disk"
Here's a solution guide you on how to fix Please insert a disk into removable disk error from pen drive, USB flash drive or memory card which is unreadable or inaccessible, you can follow the step-by-step tutorial to fix this error by using free disk data recovery software.
5 common causes of please insert a disk into removable disk error.
There are many error prompts while using a pen drive, USB flash drive or memory card. Please insert a disk into the removable disk is one of the common errors in Windows or Mac system. Actually, there are 5 common faults may cause this error:
1. Poor Quality flash drive, the flash drive maker may use poor quality chip which might contain bad sectors.
2. Improper operation, such as remove the memory card, USB flash drive while it's still reading & writing.
3. Drive letter conflict. While some other drive or partition has the same drive letter as the USB drive.
4. USB in safe mode. The USB firmware didn't load by the controller.
5. Bad sectors or physically damaged.
What's happening while having Please insert a disk into removable disk error?
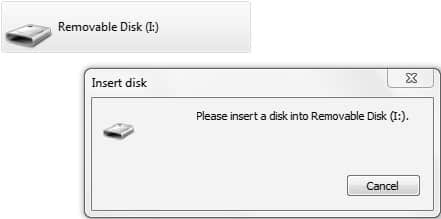
If you right-click the drive letter and check the properties, USB drive shows 0 bytes, which means the Windows system cannot detect its real storage capacity. Besides, by checking Device Manager, the USB drive was assigned with a different name, if you are trying to format this USB drive, you'll receive a prompt Windows was unable to complete the format error.
That's too bad to realize that we may lose the data, such as photos, documents, video, audio, archive files forever, the good news is you can still have the chance by fixing Please insert a disk into removable disk error and then recover data with free disk data recovery software to retrieve them back.
Step-by-step to fix Please insert a disk into removable disk error.
Solution 1: Assign the drive letter
1. Start the computer and log in as Administrator account in Windows.
2. Insert your flash drive into the USB port. Right-click Computer and select Manage, and then click Disk Management.
3. Find and right-click on the USB disk and select "Change Drive Letter and Path" in Disk Management.
4. Select a drive letter that hasn't been occupied by other partitions.
Solution 2: Create a new volume
1. Plug the USB disk to the computer and open Disk Management > Right-click on Computer or This PC icon from the desktop and select Manage > Click Disk Management on the left side.
2. On the right part, you can see disks and partitions in your computer, find out the plugged USB disk which might be shown as Unallocated.
3. Right-click the disk and select New Simple Volume, and the New Simple Volume Wizard appears.
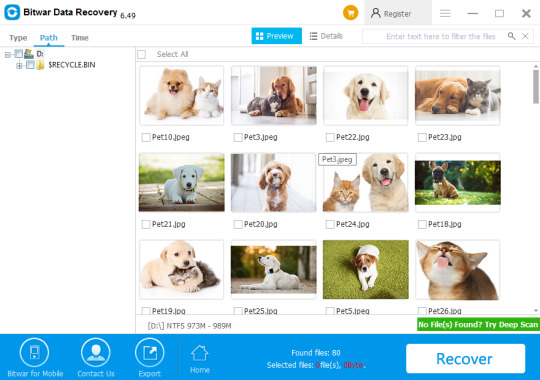
How to recover data with Free disk data recovery software?
1. Download Bitwar Data Recovery, install the software on your computer. Launch the software after installation.
Tips: Make sure do not install the software on the USB drive, otherwise, it may cause permanent data loss.
Easily solved!
Please refer here for more solutions to fix Please Insert a Disk into Removable Disk.
#Fix Please Insert a Disk into Removable Disk#Please Insert a Disk into Removable Disk#Fix Please Insert a Disk into Removable Disk Error#Recover Data with Free Disk Data Recovery Software#Recover Data from Error Disk
1 note
·
View note
Text
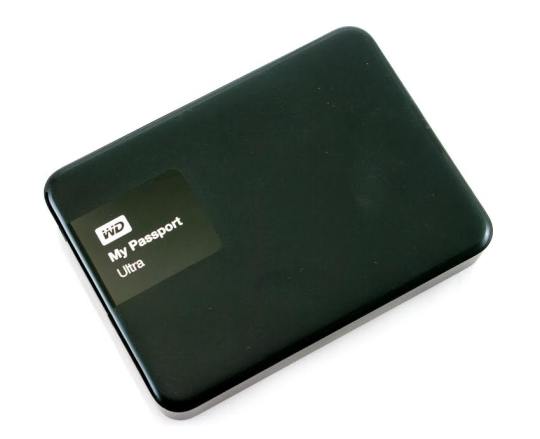
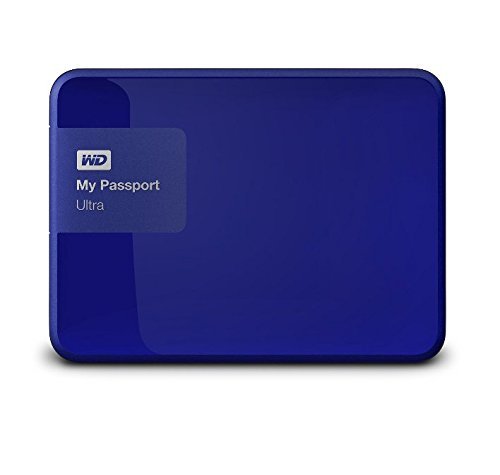
Wd My Passport Ultra Software Download Mac

I have eventually got my personal mac, the problem is I have a WD My Passport portable HD, with all my art, photos, and data I had done with the PC. I wish to copy files from my mac to the drive, it wont allow me. But when I open and copy files from the drive to the mac it works. How do I fix this without formatting the drive?
Summary: Have you received the error: 'The disk you inserted was not readable by this computer' on Mac? Don't worry, this article will focus on how to fix WD My Passport is corrupted or unreadable on Mac. To avoid the loss of important data, you'd better recover lost data from the unreadable WD My Passport with iBoysoft Data Recovery for Mac.
WD My Passport external hard drive is able to work on Mac and Windows for data transferring or backup. It is popular for its auto backup and passport protection features, keeping your files and folders safe. However, there are times that the WD My Passport becomes unreadable or corrupted on Mac. You may be greeted with errors like 'The disk you inserted was not readable by this computer', which prevents you from accessing all data stored on the drive.
Dec 04, 2018 Another difference is My Passport Ultra is USB-C ready, USB 3.0 compatible and formatted for Windows 10 to with plug-and-play storage out of the box. It also includes with NTFS driver for macOS so you can work on macOS operating system without reformatting. While you have to reformat My Passport into compatible file format in order to use it on.
My Passport; My Cloud Home; My Cloud; My Book; Internal Drives / SSDs; WD Elements / WD easystore; Embedded & Removable Flash; WD ReadyView; Legacy & Other Products; Downloads WD Software; Product Firmware; Product Downloads; Warranty & Returns Warranty Services; Warranty Policy; Data Recovery; Shipping Addresses.
List of all WD firmware and software available for download.
It's so frustrating when you meet this issue. If you are struggling to solve this issue, you will find a collection of verified troubleshooting steps.
Table of contents
1. Causes of WD My Passport not readable on Mac error
2. How to fix 'WD My Passport unreadable' on Mac error?
3. Conclusion
Note: If you received the disk not readable error with three options: Initialize, Ignore and Eject, please don't select 'Initialize'. Initializing the drive will erase all of the data that is currently sitting on the drive, which makes it difficult to recover lost data.
Causes of WD My Passport not readable on Mac error
Let's at first take a look at the complaint from community.wd.com:
'My WD My Passport 2TB Portable External Hard Drive has suddenly become unreadable on my laptop (MacBook Pro Server with macOS 10.12 Sierra) and I have tried on a MacBook Pro 2011 running 10.13 High Sierra with the same results. Any suggestions to fix my unreadable WD drive?'
The good news is, even though you have been prompted with an error message, at least your WD My Passport drive is recognized. There are many reasons that can lead to a drive not being readable, but essentially this is because the internal file system is damaged. Some of the possible reasons for this error are described as follow:
Mac malfunctions
Outdated drivers
Faulty connections
Write-protected drive
The WD My Passport is not formatted
An internal file system error or bad sectors
Virus/malware infection to your WD My Passport
Incompatibility issue between your WD My Passport and Mac machine
Accidental interruption or removal of your WD My Passport during transferring data
How to fix 'WD My Passport unreadable' on Mac error?
In most cases, the issue can be repaired with a simple initialize. But this operation will remove all data stored on this drive. Are there any other ways to fix WD My Passport unreadable issue on Mac? Of course, just try these solutions one by one:
Solution 1: Re-insert the WD My Passport
The first and foremost thing is to remove the WD My Passport safely from Mac and then re-plug it into the USB port properly. If the external hard drive mounts and appears on the left sidebar of Finder, then you can access the drive. However, if the WD drive still won't mount or the error persists, continue with the next method below.
Solution 2: Check the Mac computer
The next step is to check whether your Mac machine has a problem or not. Just connect a different storage device to your Mac. If this error still pops up, the problem may refer to your Mac machine, you can restart your Mac to see if everything works well. Otherwise, if you can see the other drive in Finder, the problem is associated with the previous WD My Passport.
Solution 3: Check if the WD My Passport is encrypted
The WD My Passport for Mac corrupted or readable issue can also happen if the drive is encrypted by BitLocker. By default, the Mac computers cannot recognize a BitLocker encrypted drive, which means you are unable to read or write BitLocker encrypted drive on Mac.
You can insert the drive in a PC and then turn off the BitLocker encryption so that it can be read on Mac. In addition, you can access a BitLocker encrypted drive with the help of a third party tool.
Solution 4: Update Mac drivers
Drivers enable one or more hardware devices to communicate with the computer's operating system. If drivers are out-of-date, a variety of issues will happen such as the disk not readable error. Apple handles all system and driver updates for your system. To check if any updates are available, please do the following:
Step 1: Go to Apple menu and select 'App Store'.
Step 2: Click on the 'Updates' button located on the top pane.
Step 3: Check available updates for your system and applications.
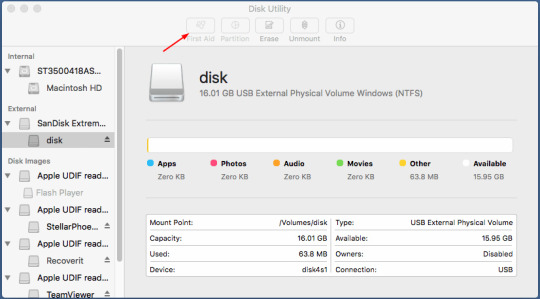
Solution 5: Repair the WD My Passport in Disk utility
Disk Utility is a built-in used to erase, format or manage internal disks and external storage devices. The most important feature of Disk Utility is First Aid, which helps detect and repair any issue with your disk. Here is how to run First Aid on your Mac to repair the unreadable WD My Passport:
Step 1: Open Disk Utility from your /Applications/Utilities folder.
Step 2: Select the unreadable WD My Passport in the left side bar.
Step 3: Select the 'First Aid' tab.
If Disk Utility tells you the disk is about to fail, back up your data and replace the disk. You can't repair the disk. Otherwise, continue to step 4.
Step 4: Click Run.
If Disk Utility reports that the disk appears to be OK or has been repaired, you're done. Otherwise, you have to back up as much of your data as possible.
Solution 6: Recover lost data and erase the WD My Passport
If the error still exists, you have no choice but erase the WD My Passport. But keep in mind that you will lose all data store on this disk. If you didn't back up important data, you should get lost data back with free Online data recovery software at first.
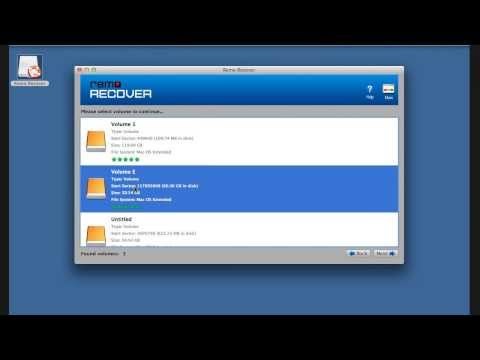
Step 1: Recover lost data from the unreadable WD My Password on Mac
If you are not sure which data recovery tool you can trust, iBoysoft Data Recovery for Mac is highly recommended to recover lost data from the unreadable or corrupted WD My Passport. This free Mac data recovery can scan and recover lost data from unreadable SD cards, internal Macintosh hard drives, external hard drives, USB flash drives, etc. iBoysoft Data Recovery for Mac provides a complete Mac data recovery solution even if your Mac won't boot/turn on, your device is failing, inaccessible or has lost a partition.
Moreover, iBoysoft Data Recovery for Mac can also recover recently or permanently deleted files, recover lost data from formatted hard drives, recover lost data from unmountable hard drives, and recover lost data from inaccessible drives, etc. This software supports recovering documents, photos, videos, emails, and music files. It's fully compatible with macOS Big Sur 11/Catalina 10.15/Mojave 10.14/High Sierra 10.13/Sierra 10.12 and Mac OS X 10.11/10.10/10.9/10.8/10.7.
1. Download and install iBoysoft Data Recovery for Mac on Mac.
2. Launch iBoysoft Data Recovery for Mac.
3. Select the unreadable WD My Passport and click 'Next' to search for lost files.
4. Preview the searching results, choose those you want and click 'Recover' to get them back.
5. Go over to ensure all lost files have been successfully restored.
Step 2: Erase the unreadable WD My Password in Disk Utility
After you get files off the WD My passport hard drive, you are safe to erase this external hard drive to make it work again. Reformatting will fix the unreadable error and the drive can be ready to use. Then you can copy the recovered data back.
• How to format external hard drive on Mac?
Solution 7: Ask data recovery service for help
However, if the solutions above don't fix the WD My Passport unreadable issue for you, or your WD My Passport even won't show up on Mac, it's probably the drive has been physically damaged. In that case, you should send it to a local data recovery service or replace it with a new one.
Wd My Passport Ultra Software
Wd My Passport Ultra Software Download Mac Version
Conclusion
Wd Passport Ultra Software Download
Hope these solutions have helped you fix the WD My Passport corrupted or unreadable issue. If you have any question about this article, stay in touch with us for further assistance. Specifically, we'd love to hear if you have other solutions for this issue.
1 note
·
View note
Text
Recover Lost Files From Corrupted USB
This article offers several methods to fix the corrupted USB drive. And Bitwar Data Recovery software comes handy to recover the data when data loss happens to the USB.
Reasons for USB corruption or inaccessible:
1. Logical Issues 2. Physical Issues Some common physical corruption issues are connecting interruption. The USB port may be damaged because of no power supply. Thus, you should confirm the power supply and try to connect your USB drive to another PC, then replace the USB port. However, if the USB drive is damaged caused by other reasons, you have to take it to a professional repair facility. While if there are some logical software issues with the USB drive, you can quickly fix it. In such a situation, you need to change the USB drive’s file structure to make it usable again.
Recovering files from logical issues
Reinstall the drivers
There are times when the drivers that run your USB drive get corrupted and your PC is not able to detect the storage media. If so, you can reinstall drivers by following these simple steps:
1. Right-click “My Computer/ This PC”. Click “Manage” and click “Device Manager” on the left side.
2. Double-click “Disk Drives” in the list. Right-click on the name of your pen drive.
3. Click “Uninstall”. Click “OK”.
4. Disconnect your storage media and restart your PC.
5. Connect your pen drive again. Your PC will detect it and prompt you to reinstall the driver before use.
Repair USB drive by using CMD
CMD is your best choice for damaged USB flash drive recovery. It allows you to fix a corrupted USB drive without formatting and can avoid data loss. In addition, it can also be used to correct the SD card.
1. Plug your USB flash drive or pen drive to your computer.
2. Go to the start menu, type in “cmd” in the search bar, hit “Enter” and then you can see something named “cmd. Exe” in a list of programs.
3. Right-click “cmd. exe” and type in “chkdsk /X /f USB drive letter:” or “chkdsk USB drive letter: /f “, for example, “chkdsk /X /f G:” or “chkdsk h: /f” in the following command windows to start repairing a damaged USB pen drive. This operation will make Windows check and fix the file system on the /flash drive. If the repair process works well, the description “Windows has made corrections to the file system” will appear in the command window. It suggests that the corrupted USB pen drive is successfully fixed and can be reaccessed. However, If the USB drive has bad sectors, your data may be lost during the process of repairing. Therefore, you need to back up or restore essential data from the USB drive before using the CHKDSK command.
Fix USB drive file system errors
If you are using Windows 10 or a lower version, you can carry out the following steps to repair the USB Flash Drive:
1. Insert the USB drive into the USB port of your system
2. Go to My Computer>Removable Disk icon.
3. Right-click the Removable Disk Icon and open its Properties.
4. Click on the Tools tab.
5. Click the Rebuild button
6. Let the scan process get completed. Close the scan window once it’s completed.
7. Right-click the icon of the USB flash drive and Eject. Then remove the drive from the USB port. Hope this way can help you solve the problem, and you can try to restore your precious data by using a professional data recovery tool.
Recover data from the USB drive
If all the above solutions are unavailable, you could try the “recover data first then format the USB drive” way to repair USB flash drive without losing data. This way is available for all data loss cases. So I recommend you to use Bitwar Data Recovery software to retrieve data from the USB drive. Bitwar Data Recovery is a fast, reliable and free data recovery software with powerful functions. So, please try it without hesitation when you suffer from data loss from the USB drive. Free download and install Bitwar Data Recovery software and then make sure your USB drive is connected to the PC. Follow the below steps to get back all data.

Fix And Recover!
Please refer here for more about corrupt USB data recovery.
#Fix Corrupted USB#Corrupted USB Data Recovery#Recover Lost Files From Corrupted USB#Fix Corrupted USB and Recover Lost Data
1 note
·
View note
Text
Repair flash drive
Can a corrupted/broken, damaged USB drive be fixed and retrieve data back? A USB drive, just like any other data storage device, has the possibility of corruption or inaccessibility can be because of physical and logical issues. In the next following guide, we will show you how to repair the corrupted USB drive and get your data back. We introduce Recoverit Data Recovery which is a professional USB data recovery tool to help you retrieve USB data back.
How to Repair Corrupted/Broken/Inaccessible USB Flash Drive
How to Recover Files from Corrupted USB Drive ?
Repair flash drive
What Caused the USB Drive Got Broken?
When your USB drive gets corrupted or damaged, you will get an error message like "Please Insert Disk into Removable Disk". The other common errors: "USB Device Not Recognized or Malfunctioned", "you need to format the disk before using it". The error is a clear indicator of a corrupt flash drive controller software. The drive got virus-infected and the files got corrupted. It also indicates there is a problem with the NAND memory. If it is a relatively new USB drive, it can be caused by low-quality NAND chips usually a feature in cheap drives. Not being able the access the controller software has caused the drive to be unreadable by the operating system.
Flash drive repair for computers is still a lot easier to use with a better recovery rate compared to ones for SD cards. However, the software you use to recover data from damaged USB drive needs first to be able to detect the drive especially since corrupted drives will not mount as easily. Then the software will need to recover data in one of the many strange formats that are used.
How to Repair Inaccessible USB Flash Drive
1. How to fix Undetectable USB Flash Drive
The first step to repair a USB drive is getting the Windows operating system to recognize it. The steps below will help force the Windows operating system to recognize it, the steps to fix USB flash drive not recognized error.
Start by clicking on 'Control Panel' and then 'Drive Manager'.
Click on the '+' symbol to expand on the 'Disk Drives' list.
You will see an arrow that faces down across the 'USB drive' Just double-click on it and choose the 'Enable Device' option.
Then you click 'next' and then 'next' again, and finally, it's done.
Once the drive recognition steps have been completed, you then have to assign drive letters. This can be done by following the steps below:
Click on 'Start' then 'control panel' and then go to 'Security' and choose 'Administrative Tools' and click on 'Computer Management'.
Right-click on your USB drive. You then choose the 'Change Drive Letter and Paths'.
Click on the 'Add' button and then 'OK'
You can now assign any one of the available drive letters to the USB drive by simply clicking on it.
You then right-click on the drive and give it the 'online' designation.
2. How to Fix USB Drive Logical Issues in Windows
The first step is to insert your USB thumb drive into the computer's USB drive.
Click on 'My Computer' and choose the USB drive that appears.
Right-click on the drive and go to 'Properties'.
Then choose the 'Tools' tab.
Click on the 'Check Now' button.
You should be now presented with two repair options, i.e. "Scan for and attempt to recover bad sectors" and "Automatically fix file system errors".
Check both the boxes and click 'start' to commence the scanning process.
Once the scan is complete click 'close.'
3. For Windows 7 Users as Following Steps:
Start by inserting the USB drive into the port of your computer
Right-click on the USB drive in 'My Computer' and then go to 'Properties'.
Click the 'Tools' tab.
Then click on the 'Rebuild' button.
The scan takes a while to complete after it completes close the 'scan' window.
Then just right click on the USB drive and then 'Eject' before removing the USB drive from the computer.
4. Windows is Unable to Format the Drive Error:
Step 1. The USB drive should be inserted into the port and then right-click My Computer icon. Select the "Manage" option
Step 2. Click the Disk Management option.
Step 3. Select the faulty drive and make sure that it is checked for health and the other factors that are being presented by the system
Step 4. Right-click and select "Format" option to format it
Recover Files from Damaged USB Drive
Hope those solutions can help you fix or repair the corrupted USB flash drive, what if all cannot solve the problems, you should buy a new one to replace or follow the next steps to recover your data from the corrupted flash drive with Recoverit Data Recovery program. It is the professional USB data recovery software to recover lost data from corrupted/broken/damaged/inaccessible USB flash drives.
The USB data recovery program can easily recover deleted files from USB flash drives on Windows and Mac. Undeleted files from a formatted USB device, restore files after virus-infected USB, or any other data loss issue from USB flash drive.
Download | Win Download | Mac
Steps to Recover Data from Corrupted USB Flash Drive
Download and install Recoverit Data Recovery on your computer. Connect your USB drive to the computer and follow the next steps to perform flash drive recovery on Windows computer. If you are working on Mac, you should download Recoverit Data Recovery for Mac.
Step 1 Select the USB Flash Drive
Make sure your USB drive is detected by the computer, select it, and click the "Start" button to process.
Step 2 Scan USB Flash Drive to Search Data
Recoverit Flash Drive Data Recovery will start a quick scan to search for data. If you cannot find your data after the first scan, you can go to scan again with "All-around Recovery". It will search for more files but will take more time.
Step 3 Preview and recover data from a USB drive
After the scan, you can preview some recoverable files like photos and images. Select your data and click the "Recover" button to get your data back.
Note: Please do not save any recovered data to the damaged or corrupted USB drive, get a safe storage device to save all recovered data to avoid data loss again.
This powerful data recovery software can easily help you retrieve lost files from corrupted flash drives, otherwise, it also can help you recover deleted or lost files from other external devices like SD memory cards, digital cameras, mobile phones, external hard disk drive, etc. Download Recoverit Data Recovery software as below and get your data back.
0 notes
Text
Partition find and mount unknown device


How to Fix "Device Not Detected in Windows' (3 Ways)
Insert windows installation disk > Reboot your computer > Enter any key > Format Your PC > Enter > Select your disk > Delete.
Type “compmgmt.msc” in the command prompt box > Disk management > Format (right click on disk).
Type cmd in the command prompt box > Format X: /FAT32 (enter your disk letter).
Place the NANDs on the data recovering tool, which consists of NANDs readers, and you will be able to recover the files.īonus: Related USB and Hardware Fixes How to Fix "Unable to Format Flash Drive" with CMD and Other Ways (3 Ways).
Carefully separate the NANDs from the PCB using a precision soldering iron.
Look on the controller chip to know the exact type, but be careful when examining the chip to avoid damaging the PCB board and NAND.
Get recovery software and a NAND reader that supports the drive’s controller type.
You may have to a hire an expert to do the job for you, but read the following steps to see if you can do it own your own. Recovering data from a flash disk is a complicated task. Some conditions that can make your gadget dead include damaged circuit board (blown resistors/capacitors, lifted pads, damaged NANDs, and broken crystal oscillator), damaged controller chip, and unresponsive drive. If your pen stick is damaged beyond repair, you may have to concentrate only on recovering the data. How to Recover Data/Files from a USB Flash Drive Your drive could be dead, and the best thing to do is to recover the data or files contained in it. You may have to forget about your data storage gadget if you see some of these error messages on your screen, or if your USB flash drive is not showing up or not detected.
"USB Device Not Recognized or Malfunctioned.".
"Please insert disk into removable disk.".
"Can’t format the drive, quit any disk utilities or other programs that are using this drive, and then try formatting again.".
"Please insert a disk into drive windows.".
"Pen drive is detected, but not showing in My Computer.".
"The disk is write protected, remove write protection or use another disk.".
"Generic volume cannot be stopped right now.".

For a list of available ports, click here" (common in Windows 7). "This USB device can perform faster if you connect it to a high-speed USB 2.In addition to the above mentioned errors, there are other less serious errors of flash sticks that should not make you panic, such as:
0 notes
Text
Sd card reader not working windows 8.1

SD CARD READER NOT WORKING WINDOWS 8.1 INSTALL
SD CARD READER NOT WORKING WINDOWS 8.1 DRIVER
SD CARD READER NOT WORKING WINDOWS 8.1 ARCHIVE
SD CARD READER NOT WORKING WINDOWS 8.1 SOFTWARE
Problems can arise when your hardware device is too old or not supported any longer. This will help if you installed an incorrect or mismatched driver. Try to set a system restore point before installing a device driver.
SD CARD READER NOT WORKING WINDOWS 8.1 DRIVER
It is highly recommended to always use the most recent driver version available. Also make sure you constantly check with our website so that you don't miss a single new release. SD card not being read / Not even found in Device Manager - posted in Internal Hardware: So I was going to get videos from my cameras sd card to my pc but when I inserted it, nothing came up.
SD CARD READER NOT WORKING WINDOWS 8.1 INSTALL
Therefore, if this package improves your card reader's functionality in any way, hit the download button, and install it on your computer.
SD CARD READER NOT WORKING WINDOWS 8.1 ARCHIVE
Moreover, updating the software's version might also increase the device's transfer speed, fix various problems, or add support for new features.Īs for the installation process, the steps are very obvious and easy: simply expand the downloaded archive (if necessary), run the setup, and follow the on-screen instructions.
SD CARD READER NOT WORKING WINDOWS 8.1 SOFTWARE
Installing the embedded card reader software gives your system the ability to exchange data with supported memory cards.Įnabling this feature provides compatibility with cards such as MMC, SD, SDHC, micro SD, and many others that can be used with smartphones, cameras, tablets, and related products. Close the wizard and perform a system reboot to allow changes to take effect. Read EULA (End User License Agreement) and agree to proceed with the installation process. Allow Windows to run the file (if necessary). Locate and double-click on the newly-downloaded file. Save the downloadable package on an accessible location (such as your desktop). Make sure that all system requirements are met. To install this package please do the following: Even though other OSes might be compatible as well, we do not recommend applying this release on platforms other than the ones specified. Are you facing SD card errors in Windows Phone 8.1 Close. Press question mark to learn the rest of the keyboard shortcuts. It worked fine for a month or so and later on my phone started to freeze Press J to jump to the feed. If it has been installed, updating (overwrite-installing) may fix problems, add new functions, or expand existing ones. Im having a Lumia 720 and I store my apps on my SD card. Find out the most possible causes and take measures correspondingly, thus you can settle out the issue effectively and quickly. Provides support for additional notebook models. If your SD card will not format in Windows 10, 8, 8.1, or 7, don’t worry. The card reader enables users to read from or write to supported removable storage cards, which are typically used in digital cameras, digital music players, and cellular phones. Problems can arise when your hardware device is too old or not supported any longer.This package contains the driver that enables the Realtek Card Reader in supported notebook models that are running a supported operating system. Wireless LAN Standard: IEEE 802.11b/g/n Graphics Controller Manufacturer: Intel Display Screen Type: Active Matrix TFT Color LCD There is no audible sound, no disk drive available in Windows Explorer, and in Device Manager, the O2 is not listed in 'Storage Controllers' where it should Reading Time: 4 mins. Memory Card Supported: Secure Digital (SD) Card The reader worked fine in Windows 8, but after installing the update, the SD card reader does not work at all when inserting a memory card.
0 notes
Text
Acronis true image 2015 unlimited

Acronis true image 2015 unlimited serial numbers#
Acronis true image 2015 unlimited full version#
Acronis true image 2015 unlimited serial number#
Acronis true image 2015 unlimited install#
Acronis true image 2015 unlimited update#
The interface is simple easy to use and the only reason to buy it would be if you want to make differential or incremental clones otherwise there is no difference. To simply make clones and image files Macrium Free is full featured and runs as fast as Acronis. However I quit using Acronis years ago because it had so many issues with Windows 8 and 8.1 I didn't feel safe with it and I know you don't want to hear about anything else but if you uninstalled it and tossed it out, and a free program was much easier to use and did the same job then how would you be out money? EaseUs isn't the one to use because it is monstrously slow but Macrium Refelct is quick like Acronis. You can go into startup and remove all of the Acronis mentions by going Run, msconfig, ok, startup and simply unchecking every mention of Acronis and it will still run, just not in the background slowing down your system. If the program bothers you and slows down your computer, that is what it does. Now that said be aware of something please. Then you can utilize Acronis outside of Windows by running the functions you want from the bootable rescue cd which you need to have anyway because if the hard drive died, without a rescue cd you could never use image files to restore to a new drive anyway. I think what plodr is saying is uninstall the program from Programs and Features in Control panel after making a rescue disk inside Acronis 2015 first.
Acronis true image 2015 unlimited serial number#
Insert the full serial number in the appropriate box, and then click Proceed. On the menu bar, click Acronis True Image 2015, and then click Enter Serial Number.Ĥ.
Acronis true image 2015 unlimited full version#
Purchase the full version at the Acronis website:ģ. To upgrade to the full version of the product:ġ. You can upgrade your trial subscription at the Acronis website: After the trial period is over, Acronis Cloud works in recovery-only mode for 30 days.Īfter this period, you won't be able to use the Acronis Cloud service and all your data will be deleted. An encrypted backup to Acronis Cloud fails, and the Decompression error message is displayed.
Acronis true image 2015 unlimited serial numbers#
Fixed issues: Serial numbers for Acronis True Image 2014 OEM are not accepted for the product upgrade. You have unlimited storage space during the trial period. Upgrade to Acronis True Image 2015 3 computers or Acronis True Image 2015 Unlimited is now available from the product interface. After the trial period, the programįunctionality is blocked and you will need to upgrade to the full version if you wish to continue usingĪfter the trial period expires, your backups are not deleted and can be used for recovery in the full
Acronis true image 2015 unlimited install#
If you want first to try and evaluate Acronis True Image 2015, you can install the free, 30-day trial Find Acronis True Image 2015 in the list, and then drag it to the Trash. Open the Finder, and then click Applications.Ģ. To remove Acronis True Image 2015 from your Mac:ġ. Full System Image Backup Backup your entire system image - that is all your apps, files. The only professional-grade full system protection supporting both local and cloud backup with all the cloud space youll ever need. You can download it, and then install it over your version of Acronis True Image 2015.Īll your backups and settings will be kept. The new definition of data protection Protect all of your PCs, Macs and your digital life with Acronis True Image Unlimited.
Acronis true image 2015 unlimited update#
You are solely responsible for adequate protection and backup of the data and equipment used in connection with using software Acronis True Image Unlimited for PC and Mac.Acronis True Image 2015 notifies you automatically when an update is available from the Acronis True Image 2015 looks different from its predecessors. They really focused on core essentials, presented with a beautiful and simplified interface. The use of the software and any damage done to your systems. The new Acronis True Image 2015 brings a different back-to-basic like approach. PCWin has not developed this software Acronis True Image Unlimited for PC and Mac and in no way responsible for PCWin freeload center makes no representations as to the content of Acronis True Image Unlimited for PC and Mac version/build 1.1 is accurate, complete, virus free or do not infringe the rights There are inherent dangers in the use of any software available for download on the Internet. Brand-new Acronis True Image Unlimited brings faster disk imaging technologies, data migration and the.Īcronis True Image Unlimited for PC and Mac 1.1 download version indexed from servers all over the world. Subscription-based backup and recovery software with unlimited cloud storage, support of both PC and Mac, and free upgrades to next versions.
0 notes
Text
Windows 7 install media driver missing 無料ダウンロード.Intel® Graphics Media Accelerator Driver, Windows 7* 64, Windows Vista* 64 (exe)
Windows 7 install media driver missing 無料ダウンロード.Windows 10 のダウンロード

Windows 10 November 2021 Update.Create installation media for Windows
Load Driver A media driver your computer needs is missing. This could be a DVD, USB, or Hard disk driver. If you have a CD, DVD, or USB flash drive with the driver on it, please insert it now. Note: If the installation media for Windows in the DVD drive or on a USB drive, you can safely remove it for this step Dec 27, · Not knowing specifically where to get the driver or how to load it during Windows setup, I can offer what I would try next if it were me. Download Kyhi's Recovery Tools. Mount the ISO file. Replace the \sources\ file on the Windows 10 installation USB flash drive with the \sources\ file from Kyhi's recovery tools Feb 26, · Click the Continue button in the Validation Required section above to begin the short validation process. Once validated, you will be returned to this page with specific instructions for obtaining the download. This release of the Windows Driver
Windows 7 install media driver missing 無料ダウンロード.Download FFmpeg
To create installation media, go to the software download website, where you'll find step-by-step instructions. On that website, you can select a version of Windows and create your own installation media using either a USB flash drive or a DVD. To go directly to one of the versions, select one of these links: Windows 7. Windows Apr 26, · Basically, all you have to do is remove the USB installation drive midway through the process, then try using another port. Here are the steps: Download the Media Creation Tool and create a USB installation drive. Boot your computer from the drive. Wait until all the installation files have loaded. Select your preferences, then click Install Now Feb 26, · Click the Continue button in the Validation Required section above to begin the short validation process. Once validated, you will be returned to this page with specific instructions for obtaining the download. This release of the Windows Driver
Gone are the days when users would have to go through a lengthy process just to install Windows. After all, Microsoft has made the steps easier and simpler.
On the other hand, it is still possible for you to encounter driver-related problems that may prevent you from completing the installation process. So, what should you do when a media driver is missing on Windows 10? You might notice that the USB installation media is booting properly. However, the installation process is not successful due to a missing USB hub driver.
There are various reasons why this error occurs, and here are some of them:. Keep reading this article to learn the solutions that will help you get rid of this problem. Before you can even try fixing the issue, you have to ensure that your computer meets the requirements for Windows Moreover, you should update your BIOS before you initiate a clean installation of the operating system.
Listed below are the minimum system requirements for running Windows If you want to have a seamless workflow, it would be best to have at least 2GB of RAM or 3GB for the bit version. This will also provide you with a better processing power. Some users have found a way to work around this problem, and the solution is quite easy. When they initiated a clean installation of Windows 10, they used the method for fixing the same error in Windows 7 and Windows 8.
Basically, all you have to do is remove the USB installation drive midway through the process, then try using another port. Here are the steps:. The aforementioned solution should work for you. However, it is worth noting that this method was mostly for users who had previously installed Windows 10 on their unit. In this case, it would be advisable to install Media Creation Tool on a different USB stick.
It is also worth noting that if you have never installed Windows 10 on the computer in question, it is possible that the certain issues with the USB 3. As such, you should only use the USB 2. You can easily identify a USB 3. It is possible that the SATA mode is causing the problem. This error specifically occurs when the machine is using IDE, but the installation media boots with SATA. With that said, changing the SATA to IDE in BIOS or UEFI can resolve the issue. Simply follow the instructions below:.
Unstable PC performance is often caused by outdated or corrupt drivers. Auslogics Driver Updater diagnoses driver issues and lets you update old drivers all at once or one at a time to get your PC running smoother.
Some users have tried working around the error by disabling certain options in BIOS. If you are trying to install a bit version of Windows 10, you can boot into BIOS and try to disable Legacy USB and Legacy BIOS. In some configurations, users can set the USB option solely to USB 3. On the other hand, we recommend setting it to Auto if such option is available in the BIOS menu. Provided by Microsoft, this program typically works just fine.
As the error message suggests, the problem occurred due to a missing media driver. As such, you should ensure that you have the latest manufacturer-recommended versions of your drivers. Your email address will not be published. Ad blockers may interfere with some important blog features, such as comments, images, etc.
Please consider disabling your ad blocker so you can have the best experience on this website. Eunice Samson 26 April - 4 min read. Link copied. Do you like this post? You may also like 5. How to fix a jammed keyboard key easily. How to fix Rockstar Games Launcher not working on Windows 11? How to fix Rockstar Games Launcher not working on Windows 10?
Leave a Reply Cancel reply Your email address will not be published. Auslogics Blog. Stories from Auslogics, a connected space for product teams 💪. Ad Blocker Detected Ad blockers may interfere with some important blog features, such as comments, images, etc.
Got it. All personal data you provide to us is handled in accordance with applicable laws, including the European GDPR. Please see our Privacy Policy for more details. Great to see you among our subscribers!
0 notes
Text
Macos Sierra Patcher Tool For Unsupported Macs

The link itself gives the answer macOS Sierra Patcher Tool for Unsupported Macs Since it’s unsupported, it’s by definition, riskier than install Sierra on supported Macs.
. The “macOS High Sierra Patcher” application is intended for those with unsupported Macs. MacOS Serria 10.12 Vmware image by dmos25 torrent on isoHunt MacOS High Sierra Patcher is a small but powerful tool to help you set up a Mac OS High Sierra.
MacOS Catalina Patcher (formerly macOS Mojave Patcher, macOS High Sierra Patcher and macOS Sierra Patcher) is a small yet powerful tool that can help you create a bootable USB drive that can be used to install macOS Catalina on Mac computers older than mid 2012, basically acting as a macOS Mojave patch for unsupported Macs.
Macos Sierra Patcher Tool For Unsupported Macs Windows 10
Macos Sierra Patcher Tool For Unsupported Macs 7
Macos High Sierra Patcher
Sierra Patcher will now create a macOS installer on the drive you selected, making edits on the fly so that the resulting installer can be used on unsupported machines. Once the installer is created, Sierra Patcher will say Complete! And your USB drive should now show as OS X Base System instead of its previous name. MacOS Mojave Patcher (formerly macOS High Sierra Patcher and macOS Sierra Patcher) is a small yet powerful tool that can help you create a bootable USB drive that can be used to install macOS Mojave on Mac computers older than late 2009, basically acting as a macOS Mojave patch for unsupported Macs.
Questionsor comments? Feel free to contact me at (email protected) Pleasetake a look at the FAQ located at the bottom of this page as well. I also have a YouTube video going over the whole process. Requirements: - Early-2008 or newer Mac Pro, iMac, or MacBook Pro(MacPro 3,1 and 4,1, iMac 8,1 and 9,1, MacBook Pro 4,1, 5,1 5,2, 5,3,5,4, and 5,5) - Late-2008 or newer MacBook Air or Aluminum Unibody MacBook (MacBookAir 2,1, MacBook 5,1) - Early-2009 or newer Mac Mini or white MacBook (Macmini 3,1, MacBook 5,2) - Early-2008 or newer Xserve (Xserve 2,1, Xserve 3,1) Machines that ARE NOT supported: - 2006-2007 Mac Pros, iMacs, MacBookPros, and Mac Minis (MacPro 1,1 and 2,1, iMac 4,1, 5,1, 5,2, 6,1 and7,1, MacBook Pro 1,1, 2,1, and 3,1, Macmini 1,1 and 2,1) -- The 2007 iMac 7,1 is compatible if the CPU is upgraded to a Penryn-based Core 2 Duo, such as a T9300. - 2006-2008 MacBooks (MacBook 1,1, 2,1 3,1 and 4,1) - 2008 MacBook Air (MacBookAir 1,1) -- Note: Make sure SIP is disabled on the system you intend to installHigh Sierra on. If it's not or you're unsure, just boot into your Recoverypartition of your currently installed copy of OS X, open Terminal, andrun 'csrutil disable'. Things you'll need: - A copy of the macOS High Sierra InstallerApp. This can be obtained from the Mac App Store using a machinethat supports High Sierra, or by using the built-in downloading feature of the tool. In the Menu Bar, simply select 'Tools > Download macOS High Sierra...' - A USB drive that's at least 8 GB in size - A copy of the tool - Download here (Current version: 2.7.0, SHA1: 73f180d30200ef5f6d900440fe57b9c7d22bd6bf) -- View changelog and download older versions here Known issues: - Trackpad (MacBook5,2 affected only). The trackpad in the MacBook5,2isn't fully supported in High Sierra. While it works and is fully usable,High Sierra detects it as just a standard mouse, preventing you fromchanging some trackpad-oriented settings. How to use: 1. Insert your desired USB drive, open Disk Utility, and format it as OS X Extended (Journaled). 2. Open the 'macOS High Sierra Patcher' tool, and browse for your copy of the macOS High Sierra Installer App. *Ensure that the tool successfully verifies the app. 3. Next, select your USB drive in the Target Volume list, and click 'Start Operation.' 4. When the operation completes, boot your target unsupported Mac offthe USB drive you just created by holding down the Option key while turning on the machine, and selecting the drive. Note: Only perform steps 5 and 6 if you intend to do a clean install.Otherwise, you can simply skip these steps and install to your volumecontaing a previous version of OS X, and it'll do an in-place upgrade. 5. When the installer boots, open Disk Utility from the Utilities menu, or by double-clicking it in the Utilities window on the bottom left corner of the screen. 6. Select the disk or partition you want to install on, and erase it,ensuring to use either Mac OS Extended (Journaled), or APFS as the filesystem type.If formatting an entire drive, ensure GUID is selected. -- Please note that if you use APFS, you will not have a bootable Recovery partition. -- It is recommended that you only use APFS if the target drive is an SSD. -- If you decide to use APFS, a custom booting method will be installed by the post-install tool, as the firmware of these unsupported machines does not natively support booting from APFS volumes. It is not quite as clean as native booting, but will not cause any issues while running High Sierra. A demo of the modified booting process can be viewed here. 7. Install macOS normally onto the desired volume. 8. When the install completes, reboot back onto the installer drive.This time, open the 'macOS Post Install' application. 9. In the application, select the Mac model you are using. The optimalpatches will be selected for you based on the model you select. You canalso select other patches of your choosing. -- The 'i' button next to each patch will show more details about the respective patch. 10. Select the volume you have just installed macOS High Sierra on, andclick 'Patch.' When it finishes patching, click 'Reboot'. It may sitthere for a few moments rebuilding caches before rebooting. -- If for somereason the system fails to work correctly after rebooting, boot backinto your installer drive, run the post install patch again, and select'Force Cache Rebuild' before rebooting. This isn't necessary under mostcircumstances. 11. When it reboots, it should now boot into a fully working copy ofmacOS High Sierra. Additional Info: - If selected in the macOS Post Install tool, your High Sierra install will have a program named 'Patch Updater' located in your /Applications/Utilities folder. This program will alert you when new updates to patches are available for your machine, and will prompt you to install them. If you do not have Patch Updater installed, but would like it, you can download and run the script found here to do so. Updates System updates, such as 10.13.1, should install normally if 'Software Update Patch' was selected in the macOS Post Install tool, or installed using the Patch Updater program. If for some reason updates aren't showing up, or you did not apply the patch, you can install it manually using the script found here. -- If the machine does not start up properly after applying a system update, you will need to boot off your patched installer volume, and re-run the post-install patch on your High Sierra volume. Ensure you select 'Force Cache Rebuild' before rebooting. FAQ: Q: The tool created the USB drive successfully, but when booting, the progress bar hangs a bit more than half way. A: Check your copy of the Install macOS High Sierra App. If you're using thelatest version of the tool, you must be using the latest version of theInstall macOS High Sierra App. Version 1.1 ofthe patch tool and older support older versions of the installer app. Q: The patch tool gives me errors, such as 'Error copying files...'. A: Check to make sure your USB drive is writeable. Try re-formatting it, or just try a different USB drive. Q: The patch tool gives me a 'Mounting Failed' error A: Check to make sure your Install macOS High Sierra App is the correct one.It should be around 5GB in size. If you used the 'Skip App Verification' option, you have most likely selected an invalid app thatdoesn't contain the necessary files. Q: I cannot open my copy of Install macOS High Sierra with the patch tool. A: If you downloaded the copy linked above, it is distributed inside aDMG file. You must open this file (mount it) to access the InstallmacOS High Sierra App you need to select. Q: I don't see my hard drive partition in the installer screen or in the post-install tool. A: Make sure FileVault is disabled, or use the instructions found here to unlock it manually using Terminal. Q: I get a 'NO' symbol when starting up after successfully installing High Sierra. A: Make sure you have run the post-install patch on the correct volume, as detailed above in steps 8-10. Q: I get a 'NO' symbol when starting up from the patched USB drive A: Check the supported/not supported list at the top of this page. Ensure your machine is in the supported list. Q: My iSight camera doesn't work after installing High Sierra A: Make sure you properly remove (using the program's uninstaller, not by simply dragging the application to the Trash) all virtual machine software installed on your machine, such as VirtualBox, VMWare, etc. Q: I get 'NSURL' errors when trying to update my machine or use the App Store A: This is usually the result of having an invalid CatalogURL set. To revert to stock, simply run 'sudo softwareupdate --clear-catalog' in Terminal, and then run the software update patch script located above. Q: Safari, App Store, and/or Mail stopped working after installing a system update A: Download and run the Onyx application, select 'Maintenence' at the top, then click the Run button. Q: I get a 'No packages were eligible for install' error when attepting to install High Sierra A: This is due to your system's date and time being set incorrectly. To fix it, you can either boot into your current OS X install and set the date, or you can use Terminal after booting from your patched USB installer drive to set the date. Instructions to set the date using Terminal can be found here.
To get the latest features and maintain the security, stability, compatibility, and performance of your Mac, it's important to keep your software up to date. Apple recommends that you always use the latest macOS that is compatible with your Mac.
Learn how to upgrade to macOS Big Sur, the latest version of macOS.
Check compatibility
MacOS Patcher is a command line tool for running macOS Sierra, macOS High Sierra, macOS Mojave, and macOS Catalina on unsupported Macs Catalina Unus It's integrated into macOS Patcher so you if you have a Mac supported by it, you can create your patched installer using Catalina Unus, and then add macOS Patcher's patches to it by selecting the. MacOS Sierra Patcher is a free-to-use application for Mac OS that allows you to easily create a modified install drive. MacOS Sierra Patcher is a free. Install drive to use for installing macOS Sierra.
If a macOS installer can't be used on your Mac, the installer will let you know. For example, it might say that it's too old to be opened on this version of macOS, or that your Mac doesn't have enough free storage space for the installation.
To confirm compatibility before downloading, check the minimum requirements for macOS Catalina, Mojave, High Sierra, Sierra, El Capitan, or Yosemite. You can also find compatibility information on the product-ID page for MacBook Pro, MacBook Air, MacBook, iMac, Mac mini, or Mac Pro.
Make a backup
Before installing, it’s a good idea to back up your Mac. Time Machine makes it simple, and other backup methods are also available. Learn how to back up your Mac.
Download macOS
It takes time to download and install macOS, so make sure that you're plugged into AC power and have a reliable internet connection.
Safari uses these links to find the old installers in the App Store. After downloading from the App Store, the installer opens automatically.
macOS Catalina 10.15 can upgrade Mojave, High Sierra, Sierra, El Capitan, Yosemite, Mavericks
macOS Mojave 10.14 can upgrade High Sierra, Sierra, El Capitan, Yosemite, Mavericks, Mountain Lion
macOS High Sierra 10.13 can upgrade Sierra, El Capitan, Yosemite, Mavericks, Mountain Lion
Safari downloads the following older installers as a disk image named InstallOS.dmg or InstallMacOSX.dmg. Open the disk image, then open the .pkg installer inside the disk image. It installs an app named Install (Version Name). Open that app from your Applications folder to begin installing the operating system.
macOS Sierra 10.12 can upgrade El Capitan, Yosemite, Mavericks, Mountain Lion, or Lion
OS X El Capitan 10.11 can upgrade Yosemite, Mavericks, Mountain Lion, Lion, or Snow Leopard
OS X Yosemite 10.10can upgrade Mavericks, Mountain Lion, Lion, or Snow Leopard
Install macOS
Follow the onscreen instructions in the installer. It might be easiest to begin installation in the evening so that it can complete overnight, if needed.
If the installer asks for permission to install a helper tool, enter the administrator name and password that you use to log in to your Mac, then click Add Helper.
Please allow installation to complete without putting your Mac to sleep or closing its lid. Your Mac might restart, show a progress bar, or show a blank screen several times as it installs macOS and related firmware updates.
Learn more
You might also be able to use macOS Recovery to reinstall the macOS you're using now, upgrade to the latest compatible macOS, or install the macOS that came with your Mac.
Within this post, I will illustrate How To Install macOS Unlocker For Vmware Patch Tool. While we have provided macOS VMware Unlocker Patch Tool on Windows, we will install macOS VMware Unlocker Patch Tool. Installing macOS Catalina or alternative versions on Windows can be very complicated and hard without VMware Workstation Player, especially a macOS VMware Unlocker Patch Tool. That’s why we’ve supplied VMware Workstation Player first, which is a pretty useful virtual machine program. There are two types of VMware Workstation. The first one is the VMware Workstation Pro, and the next one is the VMware Workstation Player. We are going to explain more and also make you more aware.
VMWARE UNLOCKER
The VMware Workstation Pro is the top edition of this VMware Workstation and is somewhat expensive. Here’s the URL to buy it. The VMware Workstation Player is your free version of this VMware Workstation, free for students or other personal use. When you install VMware Workstation Guru or Player, it will have to install macOS VMware Unlocker Patch Tool to install macOS. That is because, as we have mentioned previously, VMware straightly supports macOS on VMware in Windows. That’s because Apple does not let its operating system to be set up someplace else except on its hardware. That includes the complete of its operating system such as iOS, macOS, WatchOS.
MACOS MOJAVE
Update following the update comes in Apple. Following macOS High Sierra, macOS Mojave, and then macOS Catalina. These upgrades come really late for Apple fans and even Windows macOS fans. The main reason is, Windows users may even install macOS High Sierra, set up macOS Mojave, and set up macOS Catalina on their Windows PC. All these are possible because of these essential tools, especially macOS Catalina VMware Unlocker Patch Tool, macOS Mojave VMware Unlocker Patch Tool, macOS High Sierra Unlocker Patch Tool. The only blackened tool which is important is VMware Workstation set up beforehand. Once the VMware is set up, it is pretty easy to install macOS VMware Unlocker Patch Tool on Windows.
While we have some idea about what’s VMware, it is kinds and also catch it in the previous post. Now it is time to Understand about VMware Unlocker Patch Tool for macOS (Unlocker for VMware). Here is everything you need to know about macOS High Sierra VMware Unlocker.
VMware Unlocker Patch Tool, which is also frequent as VMware Unlocker for macOS, macOS VMware Unlocker, macOS Mojave Unlocker, and Unlocker for VMware. These are the most common names of the Unlocker, which we know. That means if any of these is explained, you should likely they are calling off VMware Unlocker Tool. The VMware Unlocker Patch is actually a set of tools that’s a particular program like some other software such as VMware Workstation.
DOWNLOAD UNLOCKER FOR VMWARE PATCH TOOL
Although it isn’t required to patch VMware for installing macOS on Mac, even if it’s to a virtual machine, that’s because Apple supports installing macOS within Mac but not external. This specific tool or application includes a few and much more of the technical tools such as VMware-vmx, vmwarebase.dll, VMware base, which completely functions to spot and alter VMware Workstation’s configurations, options and also downloads the VMware Tools for your specific machine. In the end, it will help run and install macOS on VMware using all the options that macOS Unlocker does.
To install and operate macOS on VMware on Windows, we certainly need VMware Unlocker, in which case, we have provided macOS VMware Unlocker. Download VMware Unlocker Patch Tool for macOS (Unlocker for VMware). With this, there is no chance to install macOS Catalina on VMware. It is nearly impossible. So select a copy of this in the download link below.
This Unlocker for VMware works for any VMware version such as VMware Workstation 15, VMware Workstation 14, or other.
When you’ve downloaded it, extract it and proceed with steps to set up VMware Unlocker Patch Tool.
INSTALL MACOS UNLOCKER FOR VMWARE PATCH TOOL (UNLOCKER FOR VMWARE)
Macos Sierra Patcher Tool For Unsupported Macs Windows 10
When installing macOS is simple with those tools, there’s no reason not to take action. It doesn’t make sense. Fifa 2012 for mac. Irrespective of which Windows version and VMware Workstation, the VMware Unlocker is the best instrument to help us set up macOS Catalina on VMware. Regrettably, installing macOS on VMware on AMD does not operate for now. But it works on VirtualBox for many. We’ve established an exclusive tutorial on How to Install macOS Big Sur on VirtualBox on Windows.
To set up VMware Unlocker Tool, initially, installing VMware Workstation is demanded. Just VMware Fusion doesn’t work, and many others like VMware Workstation and Player works.
High Sierra Patcher Dosdude1
Whenever the VMware is set up, shut it if it’s open.
Now browse to the VMware Unlocker documents and click on win-install, and select Run As Administrator.
This can run the command prompt and will automatically close.
Great! The VMware has been patched, and it is now ready to do the job.
Fire up VMware and click on Create a New Virtual Machine.
Next up, click on the magician.
Macos High Sierra Patcher Tool For Unsupported Mac Pro Early 2008 3.1
Then select I’ll set up the operating system later.
Macos High Sierra Patcher Tool Download
So there it is! The Apple Mac OS X is currently there with its version in the drop-down menu. Select macOS 10.15 or 10.14 or anything version and click on Next.
Mac Os Sierra Patch Tool
Wallpaper for mac os x hd. Following this, then proceed with the setup from the tutorial we have provided below.
Macos High Sierra Patcher Download
Macos Sierra Patcher Tool For Unsupported Macs 7
That was about VMware Unlocker Patch Tool. With all these, we end up this post now. I am hoping it works, and it should help. When something we’ve left or might love to include or create some nice suggestions, we are delighted to hear.
Macos High Sierra Patcher
0 notes
Text
Drivers Axiz Laptops & Desktops

Drivers Axiz Laptops & Desktops
Drivers Axiz Laptops & Desktops Best Buy
Drivers Axiz Laptops & Desktops Refurbished
Drivers Axiz Laptops & Desktops Computers
Laptops Displays / Desktops Motherboards / Components Networking / IoT / Servers. Download the latest drivers, software, firmware and user manuals.
Step by step setup of an Axis 207 for access from the Internet.
With South Africa progressing from Level 5 of the nationwide lockdown to Level 4 on 1 May – which was a public holiday – today (4 May) will officially see many more ICT companies resume operations, albeit still with some restrictions. The IT channel is one of the beneficiaries of the new regulations gazetted in.
Axiz is an African company invested in the future of the African Information Technology age. Our focus is to build ecosystems in order to simplify the way our customers interact with technology, solutions and each other.
Dec 21, 2020 • Filed to: USB Recovery • Proven solutions
How do I Fix a Corrupted Flash Drive?
Can a corrupted/broken, damaged USB drive be fixed and retrieve data back? A USB drive, just like any other data storage device, has the possibility of corruption or inaccessibility can be because of physical and logical issues. In the next following guide, we will show you how to repair the corrupted USB drive and get your data back. We introduce Recoverit Data Recovery which is a professional USB data recovery tool to help you retrieve USB data back.
What Caused the USB Drive Got Corrupted/Damaged/Broken?
When your USB drive gets corrupted or damaged, you will get an error message like 'Please Insert Disk into Removable Disk'. The other common errors: 'USB Device Not Recognized or Malfunctioned', 'you need to format the disk before using it'. The error is a clear indicator of a corrupt flash drive controller software. The drive got virus-infected and the files got corrupted. It also indicates there is a problem with the NAND memory. If it is a relatively new USB drive, it can be caused by low-quality NAND chips usually a feature in cheap drives. Not being able the access the controller software has caused the drive to be unreadable by the operating system.
Flash drive repair for computers is still a lot easier to use with a better recovery rate compared to ones for SD cards. However, the software you use to recover data from damaged USB drive needs first to be able to detect the drive especially since corrupted drives will not mount as easily. Then the software will need to recover data in one of the many strange formats that are used.
Drivers Axiz Laptops & Desktops
How to Repair Corrupted/Broken/Inaccessible USB Flash Drive
1. How to fix Undetectable USB Flash Drive
The first step to repair a USB drive is getting the Windows operating system to recognize it. The steps below will help force the Windows operating system to recognize it, the steps to fix USB flash drive not recognized error.
Start by clicking on 'Control Panel' and then 'Drive Manager'.
Click on the '+' symbol to expand on the 'Disk Drives' list.
You will see an arrow that faces down across the 'USB drive' Just double-click on it and choose the 'Enable Device' option.
Then you click 'next' and then 'next' again, and finally, it's done.
Once the drive recognition steps have been completed, you then have to assign drive letters. This can be done by following the steps below:
Click on 'Start' then 'control panel' and then go to 'Security' and choose 'Administrative Tools' and click on 'Computer Management'.
Right-click on your USB drive. You then choose the 'Change Drive Letter and Paths'.
Click on the 'Add' button and then 'OK'
You can now assign any one of the available drive letters to the USB drive by simply clicking on it.
You then right-click on the drive and give it the 'online' designation.
2. How to Fix USB Drive Logical Issues in Windows
The first step is to insert your USB thumb drive into the computer's USB drive.
Click on 'My Computer' and choose the USB drive that appears.
Right-click on the drive and go to 'Properties'.
Then choose the 'Tools' tab.
Click on the 'Check Now' button.
You should be now presented with two repair options, i.e. 'Scan for and attempt to recover bad sectors' and 'Automatically fix file system errors'.
Check both the boxes and click 'start' to commence the scanning process.
Once the scan is complete click 'close.'
3. For Windows 7 Users as Following Steps:
Start by inserting the USB drive into the port of your computer
Right-click on the USB drive in 'My Computer' and then go to 'Properties'.
Click the 'Tools' tab.
Then click on the 'Rebuild' button.
The scan takes a while to complete after it completes close the 'scan' window.
Then just right click on the USB drive and then 'Eject' before removing the USB drive from the computer.
4. Windows is Unable to Format the Drive Error:
Step 1. The USB drive should be inserted into the port and then right-click My Computer icon. Select the 'Manage' option
Step 2. Click the Disk Management option.
Step 3. Select the faulty drive and make sure that it is checked for health and the other factors that are being presented by the system
Step 4. Right-click and select 'Format' option to format it
How to Recover Files from Corrupted USB Drive with Recoverit Data Recovery
Scsi driver download windows 10. Hope those solutions can help you fix or repair the corrupted USB flash drive, what if all cannot solve the problems, you should buy a new one to replace or follow the next steps to recover your data from corrupted flash drive with Recoverit Data Recovery program. It is the professional USB data recovery software to recover lost data from corrupted/broken/damaged/inaccessible USB flash drive.
The USB data recovery program can easily recover deleted files from USB flash drive on Windows and Mac. Undeleted files from a formatted USB device, restore files after virus-infected USB, or any other data loss issue from USB flash drive.
Video tutorial on How to Recover Data from USB Flash Drive
Steps to Recover Data from Corrupted USB Flash Drive
Download and install Recoverit Data Recovery on your computer. Connect your USB drive to the computer and follow the next steps to perform flash drive recovery on Windows computer. If you are working on Mac, you should download Recoverit Data Recovery for Mac.
Drivers Axiz Laptops & Desktops Best Buy
Step 1 Select the USB Flash Drive

Make sure your USB drive is detected by the computer, select it, and click the 'Start' button to process.
Step 2 Scan USB Flash Drive to Search Data
Recoverit Flash Drive Data Recovery will start a quick scan to search for data. If you cannot find your data after the first scan, you can go to scan again with 'All-around Recovery'. It will search for more files but will take more time.
Innovation in Visualization, Wireless Imaging, and OR Integration. As an industry pioneer over the last 20 years, NDS has been first to market with LCD surgical displays, 60 GHz wireless imaging, cordless secondary monitors, and OR integration solutions. Our mission is to deliver innovative solutions that benefit clinicians by engendering clinical confidence, improving ergonomics, increasing. Nds surgical imaging driver download for windows 10 kms.
Step 3 Preview and recover data from a USB drive
After the scan, you can preview some recoverable files like photos and images. Select your data and click the 'Recover' button to get your data back.
Note: Please do not save any recovered data to the damaged or corrupted USB drive, get a safe storage device to save all recovered data to avoid data loss again.
This powerful data recovery software can easily help you retrieve lost files from corrupted flash drive, otherwise, it also can help you recover deleted or lost files from other external devices like SD memory card, digital camera, mobile phone, external hard disk drive, etc. Download Recoverit Data Recovery software as below and get your data back.
Drivers Axiz Laptops & Desktops Refurbished
USB Topic
Drivers Axiz Laptops & Desktops Computers
Recover USB Drive
Format USB Drive
Fix/Repair USB Drive
Know USB Drive
0 notes
Text
6 Solutions to Fix "The Disk You Inserted was Not Readable by This Computer" on Mac
"The disk you inserted was not readable by this computer" error message generally occurs when you access an external hard drive on Mac. But don't worry. This page offers 6 easy and efficient methods to fix the error. Download Bitwar Data Recovery for Mac to help if necessary.
When you get the message "The disk you inserted was not readable by this computer", you will be unable to access the data in th2 drive. Actually, "the disk you inserted was not readable by this computer" is one of the most common errors that Mac users have met. Many reasons can cause such the error, including virus infection, file corruption, internal file system errors, faulty connections, Mac malfunctions, upgrading Mac OS, as well as drive corruption. But don't panic, just follow the instructions below to fix the problem.

Solutions to fix "The Disk You Inserted Was Not Readable by This Computer" on Mac
Solution 1. Check the Mac computer
Just connect a different storage device to Mac, if you can see it in Finder, the problem may refer to the external device. So try re-connecting the external device to Mac. Just remove it safely from Mac and then re-plug it. Then, attempt to access it to see if the error persists. If this error still pops up, you could move on to try other ways.
Solution 2. Check the file system format
Check the detailed information of the external device. If it is the file system that Mac isn't compatible with, you can understand why it is unreadable on High Sierra. In this situation, to fix "disk is unreadable" error, you can change its file system. After the above some basic checks, if error "the disk you inserted was not readable by this computer" still occurs, you should recover the data from the error disk first. Because the solutions next will delete or overwrite the data on the disk,
Solution 3. Repair unreadable external device in Disk utility
You can use the Disk Utility built-in Mac to do a disk repair. Disk Utility allows you to format, manage and repair the disk. It's helpful for you to fix many drive issues including the "The disk you inserted was not readable by this computer" error. Disk Utility's "First Aid" is a Mac built-in tool to verify and repair certain disk problems. Step 1: Launch Disk Utility. Step 2: Select the unreadable drive on the left side. Step 3: Select the "First Aid" tab.
Step 4: Click Repair Disk at the bottom of the screen.
Step 5: After repairing finishes, check to see if Mac reads your external drive.
If Disk Utility reports that the disk appears to be OK or has been repaired, you're done.
Recover data from the unreadable external drive
You need to recover important data from unreadable external drive if you're not sure what third-party data recovery program you can trust, you can do it with Bitwar Data Recovery for Mac. It is a reliable & easy-to-use data recovery software that can recover data from unreadable external hard drive, hard drive, USB flash drive, SD card, memory card, digital camera on Mac OS. To recover the corrupted files, you just need a few clicks:
Install the Bitwar Data Recovery for Mac
Free download Bitwar Data Recovery for Mac, then install it on your Mac OS. This software is compatible with OS X 10.11 and later. Tips: For the latest macOS 10.13 (High Sierra) system requirements, Mac users are not allowed access to system disk from apps. If you want to recover data from the system disk, please disable the system feature "System Integrity Protection (SIP)", and see the guide on How to Disable System Integrity Protection (SIP) in macOS High Sierra (macOS 10.13)?

Why not have a try?
Please refer here for more about Mac data recovery.
#Fix The Disk You Inserted was Not Readable by This Computer on Mac#The Disk You Inserted was Not Readable by This Computer on Mac#The Disk You Inserted was Not Readable by This Computer#Mac data recovery.
1 note
·
View note
Text
Radio Victoria Fueguina Driver Download

RadioShack Digital AM/FM Pocket Radio. RadioShack Digital AM/FM Weather Tabletop Radio. $49.99 Retro RadioShack Tandy TRS-80 'CoCo' Badge T-Shirt. Listen to your favourite radio stations. More than 1000 online radio stations from Canada live at radio-canada-online.com.
Radio Victoria Fueguina Driver Downloads
Radio Victoria Fueguina Driver Download Windows 7
Radio Victoria Fueguina Driver Download
Silicon image hard disk controller driver download for windows 10 64-bit. Products
FORScan for WindowsFORScan for Windows v2.3.38 - freeInformation about Extended LicenseBuy Extended License: 1 year, 3 years, 5 years or lifelongGet free Extended License - 2 months trialBuy USB adapter OBDLink EX on Amazon.US, on BMDiag (UK).FORScan Lite for iOS - attention: some functions are missing in FORScan Lite. Please see comparsion of applicationsFORScan Lite 1.5.9 for iOS (Core 2.3.36) - paidFORScan Viewer for iOS - free, please use it to check compatibility before purchasing FORScan Lite for iOSBuy OBDLink MX+ adapter for iOS and Android on Amazon.US.FORScan Lite for Android - attention: some functions are missing in FORScan Lite. Please see comparsion of applicationsFORScan Lite 1.5.9 for Android (Core 2.3.36) - paidFORScan Demo for Android - free, please use it to check compatibility before purchasing FORScan Lite for AndroidBuy OBDLink MX+ adapter for iOS and Android on Amazon.US.Buy Bluetooth adapter vLinker FD for Android on Amazon.US, on Amazon.DE, on Alibaba
Other links
From sleep apnea to respiratory conditions including COPD, ResMed has innovative solutions to help people live a healthier life. Rediscover restful sleep! All products by ResMed Everything you need to provide patients with comfortable and effective respiratory and sleep therapy, including our groundbreaking devices, masks and accessories (tubing, humidifiers, filters and more). Here are the steps to check whether the device you are buying is new or refurbished. Steps to check device status: 1. Enter Device Serial number in search bar 2. Follow the verification code process 3. Click on inquire 4. You will get the status message whether the device is new or refurbished. Unknown devices show up in the Windows Device Manager when Windows can’t identify a piece of hardware and provide a driver for it. An unknown device isn’t just unknown — it’s not functioning until you install the right driver. Windows can identify most devices and download drivers for them automatically. Drivers resmed port devices.
Last version Changes History
Nsc sicherheitstechnik usb devices driver download for windows. Free nss usb driver download software at UpdateStar - Install the driver to establish a cable connection between your compatible Nokia phone and a compatible PC.Important for Windows 2000 or XP or Vista users: Drivers for the Nokia DKE-2, DKU-2, CA-42, CA-53, CA-70, and CA-101 cables are now. The driver is loaded based on a compatible ID match similar to other USB device class drivers included in Windows. USB Class02&SubClass02. If you want to load Usbser.sys automatically, set the class code to 02 and subclass code to 02 in the Device Descriptor. For more information, see USB communications device class. When you plug the device into your USB, Windows will look for the associated driver, if it cannot find this driver then you will be prompted to insert the driver disc that came with your device. Common USB Device errors are ‘ usb port not working ‘, ‘device descriptor request failed error’ or ‘bugcodeusbdriver’ issues. Nsc Bluetooth Device free download - Bluetooth Software Ver.6.0.1.4900.zip, Bluetooth 2.0Broadcom Bluetooth Driver and Applicationv6.0.1.4900.zip, Bluetooth for Windows 10, and many more programs.
+ Added feature * Improved/changed feature - Bug fixed/removed feature
2.3.38 beta, 2021-01-22 (download)
+ Vehicle database update + Many new configuration parameters for different modules and models + New APIM configuration parameters for SYNC3 v3.1..3.4 + New configuration parameter PCM 'PTO RPM Controller State' to disable RPM controller on Transit 2.2/2.4/3.2 2006 model year + Configuration and programming function RCM 'Module initialization/relearn from Central Configuration' for Mustang 2015+ + Automated loading factory As Built Data in PCM 'VID configuration' function + Configuration and Programming function 'Transmission Characterization Update' (note: only update by strategy is available for now) for 2017+MY cars with 8F, 10R80, 10R140 transmissions + Service functions PCM 'DPF Static Regeneration', 'Reset the Diesel Particulate Filter Learned Values', 'Reset Differential Pressure Sensor Learned Values', 'Read Fuel Injector correction factors', 'Change Fuel Injector correction factors'for:
C-Max 1.5 TDCi 2015 model year
Ecosport 1.5 TDCi 2018 model year
Fiesta 1.5 TDCi 2017 model year
Focus 1.5 TDCi 2019 model year
Ka / Figo 1.5 TDCi 2018 model year
Transit Connect 1.5 TDCi StgVI 2014-2020 model years
Transit Courier 1.5 TDCi StgVI 2014 model year + Service functions PCM 'Reset pilot injection quantity learned values', 'Reset pilot injection quantity learned values - Cylinder 1.4', 'Reset MAF Sensor Adaptation', 'Reset the High Pressure Fuel System Learned Values' for:
Transit Courier 1.5 TDCi StgVI 2014 model year + Service functions PCM 'Reset Engine Oil Deterioration Learned Value', 'Reset EGR Valve Adaptations', 'Reset EGR Throttle Adaptation', 'Reset the Water In Fuel Warning Indicator', 'Reset the Turbocharger Variable Vane Position Sensor Adaptation', 'Reset MAF Sensor Adaptation', 'Reset pilot injection quantity learned values', 'Reset the High Pressure Fuel System Learned Values', 'Reset Nitrogen Oxide Sensor (NOX) #1 Adaptations', 'Reset Nitrogen Oxide Sensor (NOX) #2 Adaptations', 'Reset Oxidation Catalyst Adaptation' 'Reset Air Conditioner Request Signal Adapation', 'Reset Crankshaft Position Sensor Adapation' for:
F-Series (P473) 6.7 Powerstroke 2013-2016 model years + Service functions DDM 'Power Window Initialization (driver's side)', PDM 'Power Window Initialization (passenger's side)' for:
Escape 2020-2021 model years
Explorer Mk6 2020 model year
Focus Mk4 2018 model year
Kuga 2020 model year
Lincoln Aviator 2020 model year + Service functions for ABS/ESP module: 'Calibrate Lateral Acceleration Sensor', 'Calibrate Longitudinal Sensor', 'Calibrate Pressure Sensor' for:
Escort 2015 model year
Ka /Figo 2015 model year
Edge 2019-2020 model years Lincoln MKX / Nautilus 2019-2020 model years + Sub-function 'Perform Clutch System Test' to service function 'TCM Adaptive Learning' for vehicles with Powershift transmission 6DCT250 (DPS6) + Service function HVAC 'Actuators Calibration' for:
Ecosport 2018 model year
Escape/Kuga 2020 model year
Explorer Mk6 2020 model year
Fiesta 2017 model year
Focus Mk4 2019 model year
Lincoln Corsair 2020 model year
Lincoln Aviator 2020 model year + Service function CCM 'Calibrate Cruise Control Sensors' for:
Focus Mk4 2019 model year + Service function 'ABS Service Bleed' for:
Transit 2000-2005 model years + improved support for 2021MY models * improvement in 'PATS Programming' function, 'Module Initialization' sub-function for:
Transit 2.0/2.4 Duratorq-DI 2000-2001 model year * fixes and improvements in service functions 'The installation of a new automatic transmission with the original TCM', 'The removal and installation of the selector lever or the selector lever cable', 'Transmission fluid drain and refill', 'The installation of a new TCM', 'The installation of a new automatic transmission with a new TCM' for TCM module of:

Radio Victoria Fueguina Driver Downloads
Galaxy/S-Max with automated transmission 450 2006/2010 model years
Mondeo Mk4 with automated transmission 2007/2011 model years * fixes and improvements in service function 'Change Fuel Injector Correction Factors' for CAN TDCi engines (to prevent failure programming injector codes in some rare cases) * improvement in service function 'TCM Adaptive Learning' for vehicles with Powershift transmission 6DCT250 (DPS6) - incorrect PATS configuration detection (again!) in service function 'PATS Programming' for:
Ranger 2007-2011 model year
F-Series (P356) 2008-2010 model year
E-Series 2008 model year - unability to unlock Continental IPC for writing in Puma 2020 - bug in 'PATS Programming' function, 'Module Initialization' sub-function for:
E-Series 2009-2019 model years - content bug in DTC database
Within the bounds of AMD Fusion Developer Summit, Advanced Micro Devices has presented its new graphics card AMD FirePro W9000. The new graphic solution is based on a couple of 28-nm Tahiti chips and is actually a prototype of Radeon HD 7900 adapter. FirePro W9000 is chiefly targeted at professionals used to work with 3D technologies and video editing applications. AMD FirePro W9000 is based on a red circuit board developed to work with PCI Express 3.0x16 bus. The cooling system is represented by a solid cooler of active type, a high-end radiator, three 90 mm. noiseless fans and copper heat tubes. The organization of additional power presupposes the availability of two dedicated eight-contact slots.
Radio Victoria Fueguina Driver Download Windows 7
Radio Victoria Fueguina Driver Download
The new professional graphics card is furnished with GDDR5 memory in 6 GB volume capacity and 384 bit interface. Six DisplayPort slots are called to connect the card with displays. GPU lock frequency equals to 1 GHz which allows the card to ensure the performance in the …
0 notes
Text
Advance Laptops & Desktops Driver

I want to unlock the all BIOS settings to change power option. This Laptop include Insyde H20 (version F66) BIOS. I tried a few solutions which I've found on Google but it does not work.How to enter advanced bios settings hp?
HP Bios Advanced Settings
Advance Car Parking Game Car Driver Simulator is the latest car drive parking and totally genuine car parking games of 2020. Are you looking forward to have a new car parking and car driving games to park your vehicle as much as you want? We know you are here with a hope to find a drive parking game that suits you perfectly.
Feb 05, 2021 The Best Laptops for 2021. Shopping for a notebook is more than just poring over spec lists. Whether you want a simple budget PC, a productivity workhorse, or a screaming machine for gaming, our.
Install Advance AN-5444 laptop drivers for Windows 7 x64, or download DriverPack Solution software for automatic drivers intallation and update.
Hower, there are a few concerns with the Blade 15 Advanced, aside from the price. If you’re primarily interested in a gaming laptop with high refresh rates, then it makes little sense to pay an extra $300 for the 4K 60Hz OLED touchscreen when the $3,000 Blade 15 Advanced version has a 1080P 240Hz panel. The Advanced Model now features the world’s first and fastest 15.6” laptop displays with refresh rates up to 360 Hz FHD or 240 Hz QHD, all packed in the smallest 15” RTX gaming laptop chassis. View All Models.
HP has locked some settings on your laptop that are managed by the system configuration because the device is configured for optimal performance.
You can't unlock advanced bios settings hp laptop with HP official help. You may try use the 3rd party tool to unlock and make changes, but HP does not recommend and there is no information about what tools can be used.
If you need to fix any circuit control, hardware program control fault, please try the following.
How to Enter the BIOS on a Windows 10?
Go to Settings (Windows + I) > Update& Security > Recovery and under Advanced startup click Restart Now.
After waiting for the boot to complete, you will see the advanced options.
Choose Troubleshoot > Advanced Options > UEFI Firmware Settings and click Restart, which will boot into your UEFI BIOS.
How to Set Bios to Default Windows HP
After turning on the laptop, press the Esc key several times.
Then press F10 to enter the BIOS.
If you want to choose to boot the operating system from USB, press F9 to go to the place where you want to select the boot order. To enter the BIOS, you need to press F10.
Then press F9 to load the default settings and select 'Yes' and press 'Enter'.
Then press F10 to save your changes and exit and restart your computer, then check again.
How to Update the BIOS HP
Some hardware conflicts or performance upgrades may not be resolved by change the advanced BIOS settings. You need to try to update the BIOS.
If you need to update the BIOS to solve specific problems, improve performance or support new hardware components, please refer to this page for operations.
How to Modify Bios to Install Windows 7 on ASUS Laptop?
1. Press the F2 key to enter the BIOS interface when booting. Use the arrow keys to enter the (Secure) menu and select the (Secure Boot Control) option with the arrow keys to set it to 'Disabled'.
2. Use the arrow keys to enter the (Boot) menu. Use the arrow keys to select the (Lunch CSM) option and set it to 'Enabled'.
3. Click F10 to save the settings, restart the laptop, and click ESC to select the boot item when booting.
How to Boot from USB ASUS?
Way 1: Select the startup option
1. First insert the USB drive that has been used to make the boot disk into the computer USB port, and then turn it on. After the boot screen appears, press the 'ESC' button continuously.
2. Then windows will pop up a quick start option, we just need to select the U disk and click enter.
Way 2: Enter the bios to setup u disk boot
1. Insert the u disk that has already made the boot disk into the USB port of the computer, then turn it on.After the boot screen appears, press 'F2' continuously to enter the BIOS setup main interface.
2. Press the left/right direction keys to move the cursor and select to the 'BOOT' setting option. Boot is the place to set the boot option
3. Move the cursor to the boot and press the up and down arrow keys to move the cursor to the 'Hard drive BBS Priorities' option and press the Enter key.
4. We select the first one, and then press the Enter key, a boot option will pop up, one of the options is the information of the notebook hard drive, and one is the u disk we just inserted.We just press the up and down direction keys to select, select the U disk,press the Enter key.
5. After adjusting the U disk to the first place, we press 'F10' to save and exit and will restart your computer automatically. At this point, the ASUS notebook change bios start-up option is complete.
Asus Laptop Bios Setup UEFI Boot Menu?
1. When the ASUS notebook is powered on, press the F2 key to enter the BIOS interface. Use the arrow keys to enter the (Boot) menu. Use the arrow keys to select the (Lunch CSM) option and set it to 'Disabled'.
2. Use the arrow keys to enter the (Secure) menu and use the arrow keys to select the (Secure Boot Control) option and set it to 'Enabled'.
Advance Laptops Reviews
3. Click F10 to save the settings and restart, and click ESC to select the start-up option when booting.
The above is about how to enter laptop bios and set the hard disk option. Unlock advanced bios settings hp laptop can help you install the system through bios settings. If you have more questions about laptop repair, please leave a message below.
Advance Laptops For Senior Citizens
Advance Laptops Vs


Related Articles:
The Advanced Boot Options screen lets you start Windows in advanced troubleshooting modes. You can access the menu by turning on your computer and pressing the F8 key before Windows starts.
Some options, such as safe mode, start Windows in a limited state, where only the bare essentials are started. If a problem doesn't reappear when you start in safe mode, you can eliminate the default settings and basic device drivers and services as possible causes. Other options start Windows with advanced features intended for use by system administrators and IT professionals. For more information, go to the Microsoft website for IT professionals.
Repair Your Computer
Shows a list of system recovery tools you can use to repair startup problems, run diagnostics, or restore your system. This option is available only if the tools are installed on your computer's hard disk. If you have a Windows installation disc, the system recovery tools are located on that disc.
Safe Mode
Advance Laptops Cyber
Starts Windows with a minimal set of drivers and services.
Hp Desktop Drivers
To start in safe mode:
Remove all floppy disks, CDs, and DVDs from your computer, and then restart your computer. Click the Start button , click the arrow next to the Shut Down button (or the arrow next to the Lock button), and then click Restart.
Do one of the following:
If your computer has a single operating system installed, press and hold the F8 key as your computer restarts. You need to press F8 before the Windows logo appears. If the Windows logo appears, you'll need to try again by waiting until the Windows logon prompt appears, and then shutting down and restarting your computer.
If your computer has more than one operating system, use the arrow keys to highlight the operating system you want to start in safe mode, and then press F8.
On the Advanced Boot Options screen, use the arrow keys to highlight the safe mode option you want, and then press Enter.
Log on to your computer with a user account that has administrator rights.
Advance Laptops Black Friday
Safe Mode with Networking. Starts Windows in safe mode and includes the network drivers and services needed to access the Internet or other computers on your network.
Safe Mode with Command Prompt. Starts Windows in safe mode with a command prompt window instead of the usual Windows interface. This option is intended for IT professionals and administrators.
Enable Boot Logging. Creates a file, ntbtlog.txt, that lists all the drivers that are installed during startup and that might be useful for advanced troubleshooting.
Enable low-resolution video (640×480). Starts Windows using your current video driver and using low resolution and refresh rate settings. You can use this mode to reset your display settings. For more information, see Change your screen resolution.
Last Known Good Configuration (advanced). Starts Windows with the last registry and driver configuration that worked successfully.
Directory Services Restore Mode. Starts Windows domain controller running Active Directory so that the directory service can be restored. This option is intended for IT professionals and administrators.
Debugging Mode. Starts Windows in an advanced troubleshooting mode intended for IT professionals and system administrators.
Disable automatic restart on system failure. Prevents Windows from automatically restarting if an error causes Windows to fail. Choose this option only if Windows is stuck in a loop where Windows fails, attempts to restart, and fails again repeatedly.
Disable Driver Signature Enforcement. Allows drivers containing improper signatures to be installed.
Start Windows Normally. Starts Windows in its normal mode.
0 notes
Text
Repair usb drive
Can a corrupted/broken, damaged USB drive be fixed and retrieve data back? A USB drive, just like any other data storage device, has the possibility of corruption or inaccessibility can be because of physical and logical issues. In the next following guide, we will show you how to repair the corrupted USB drive and get your data back. We introduce Recoverit Data Recovery which is a professional USB data recovery tool to help you retrieve USB data back.
How to Repair Corrupted/Broken/Inaccessible USB Flash Drive
How to Recover Files from Corrupted USB Drive ?
repair usb drive
What Caused the USB Drive Got Broken?
When your USB drive gets corrupted or damaged, you will get an error message like "Please Insert Disk into Removable Disk". The other common errors: "USB Device Not Recognized or Malfunctioned", "you need to format the disk before using it". The error is a clear indicator of a corrupt flash drive controller software. The drive got virus-infected and the files got corrupted. It also indicates there is a problem with the NAND memory. If it is a relatively new USB drive, it can be caused by low-quality NAND chips usually a feature in cheap drives. Not being able the access the controller software has caused the drive to be unreadable by the operating system.
Flash drive repair for computers is still a lot easier to use with a better recovery rate compared to ones for SD cards. However, the software you use to recover data from damaged USB drive needs first to be able to detect the drive especially since corrupted drives will not mount as easily. Then the software will need to recover data in one of the many strange formats that are used.
How to Repair Inaccessible USB Flash Drive
1. How to fix Undetectable USB Flash Drive
The first step to repair a USB drive is getting the Windows operating system to recognize it. The steps below will help force the Windows operating system to recognize it, the steps to fix USB flash drive not recognized error.
Start by clicking on 'Control Panel' and then 'Drive Manager'.
Click on the '+' symbol to expand on the 'Disk Drives' list.
You will see an arrow that faces down across the 'USB drive' Just double-click on it and choose the 'Enable Device' option.
Then you click 'next' and then 'next' again, and finally, it's done.
Once the drive recognition steps have been completed, you then have to assign drive letters. This can be done by following the steps below:
Click on 'Start' then 'control panel' and then go to 'Security' and choose 'Administrative Tools' and click on 'Computer Management'.
Right-click on your USB drive. You then choose the 'Change Drive Letter and Paths'.
Click on the 'Add' button and then 'OK'
You can now assign any one of the available drive letters to the USB drive by simply clicking on it.
You then right-click on the drive and give it the 'online' designation.
2. How to Fix USB Drive Logical Issues in Windows
The first step is to insert your USB thumb drive into the computer's USB drive.
Click on 'My Computer' and choose the USB drive that appears.
Right-click on the drive and go to 'Properties'.
Then choose the 'Tools' tab.
Click on the 'Check Now' button.
You should be now presented with two repair options, i.e. "Scan for and attempt to recover bad sectors" and "Automatically fix file system errors".
Check both the boxes and click 'start' to commence the scanning process.
Once the scan is complete click 'close.'
3. For Windows 7 Users as Following Steps:
Start by inserting the USB drive into the port of your computer
Right-click on the USB drive in 'My Computer' and then go to 'Properties'.
Click the 'Tools' tab.
Then click on the 'Rebuild' button.
The scan takes a while to complete after it completes close the 'scan' window.
Then just right click on the USB drive and then 'Eject' before removing the USB drive from the computer.
4. Windows is Unable to Format the Drive Error:
Step 1. The USB drive should be inserted into the port and then right-click My Computer icon. Select the "Manage" option
Step 2. Click the Disk Management option.
Step 3. Select the faulty drive and make sure that it is checked for health and the other factors that are being presented by the system
Step 4. Right-click and select "Format" option to format it
Recover Files from Damaged USB Drive
Hope those solutions can help you fix or repair the corrupted USB flash drive, what if all cannot solve the problems, you should buy a new one to replace or follow the next steps to recover your data from the corrupted flash drive with Recoverit Data Recovery program. It is the professional USB data recovery software to recover lost data from corrupted/broken/damaged/inaccessible USB flash drives.
The USB data recovery program can easily recover deleted files from USB flash drives on Windows and Mac. Undeleted files from a formatted USB device, restore files after virus-infected USB, or any other data loss issue from USB flash drive.
Download | Win Download | Mac
Steps to Recover Data from Corrupted USB Flash Drive
Download and install Recoverit Data Recovery on your computer. Connect your USB drive to the computer and follow the next steps to perform flash drive recovery on Windows computer. If you are working on Mac, you should download Recoverit Data Recovery for Mac.
Step 1 Select the USB Flash Drive
Make sure your USB drive is detected by the computer, select it, and click the "Start" button to process.
Step 2 Scan USB Flash Drive to Search Data
Recoverit Flash Drive Data Recovery will start a quick scan to search for data. If you cannot find your data after the first scan, you can go to scan again with "All-around Recovery". It will search for more files but will take more time.
Step 3 Preview and recover data from a USB drive
After the scan, you can preview some recoverable files like photos and images. Select your data and click the "Recover" button to get your data back.
Note: Please do not save any recovered data to the damaged or corrupted USB drive, get a safe storage device to save all recovered data to avoid data loss again.
This powerful data recovery software can easily help you retrieve lost files from corrupted flash drives, otherwise, it also can help you recover deleted or lost files from other external devices like SD memory cards, digital cameras, mobile phones, external hard disk drive, etc. Download Recoverit Data Recovery software as below and get your data back.
0 notes
Text
Flash After Effects

Flash After Effects
Flash After Effects Tutorials
The Flash After Effects
Flash over after effect? Or After effects over flash? Just recently I have worked out how to animate sprites in after effects. Previously I would animate my sprite animations in flash then convert it into a video file and add the sound effect on after effects, and any other further effects. Here is something I created a few years back which I made in flash, then converted and edited in after effects.
Subscribe Now:More:light flashes on After Effects is.
Flash Player's end of life is December 31st, 2020. Please see the Flash Player EOL Information page for more details. This document lists the file formats which Adobe After Effects can import and export. You can add support for additional file formats to After Effects by installing a third-party plug-in.
Hello!Today I'll be showing you how to make black flashes in after effects, enjoy!If you have any questions, feel free to ask me in the comments! After months of waiting - It's time to learn how to use STRIKE the right way! Recreating Flash running in Adobe After Effects!Download it here: https://www.
But recently I worked out that sprite animation was possible in after effects. So i created this very short animation.
So this in mind, it got me thinking. What program was better for sprite animation?
In flash, sprite animation is easy because you can add all the images and take the character frames out of the original image then put into the work space. In after effects to get the frames for the animation, you have to key out the background to the sprite sheet, then mask out each picture frame that you want. It’s a slightly different way to flash, however in both pieces in software it is quite tedious and time consuming.
Flash is also very handy for creating animation loops, like walk loops. These are obvious where it comes in handy, but I have not found any way of making an animation loop in after effects for this sort of thing.
After effects however can produce better quality images compared to flash because you don’t have to convert any file, and because the software won’t mess up any of the images. You don’t have to change any of the options to get a better image, whereas in flash to view high quality animations you had to go into the JPEG option and increase the quality.
After effects is also handy with how you can manipulate the objects, as the rotation, scale, position and other aspects are split into their own sets on the timeline, in flash all the manipulation is on one timeline for each object, which means if you wanted to manipulate two different aspects of an image, but at different times, it may get a little more complicated and time consuming in flash, than it would in after effects.
After effects has a much more powerful and flexibly virtual camera. Flash on the other hands has an actionscripited camera that, don’t get me wrong works effectively. However cannot do 3D effect at all, whereas the camera in after effect has to be in 3D to work. This give it an edge because it means you can make more elaborate animation with foregrounds and backgrounds, and also make more than one angle, rather than it just being a platform.
Adding effects is also easier in after effects because you can add proper effects on to any file, whereas in flash you can only add effects onto movie files. After effects has an input motion blur which reacted to the movements of the file and adds the blur in relation to the movements. In flash you have to add them manually. Any blurred camera looks have to be manually done too, but after effects has it built in.
The last thing is that after effect allows you to animate in a 3D environment, this can also be done in flash, but is more complicated and time consuming as part of it has to be scripted to do it properly right. No scripting is involved in after effects.
Flash After Effects
Well-rounded and powerful program which enables you to create professional-looking photos, render 3D graphics and add motion to them
What's new in Adobe After Effects CC 2021 18.1:

Bugs Fixed:
Fixed an issue that could cause After Effects to crash when copying layers using Linear Color key.
Fixed an issue with 3D Scene Navigation that caused spring loaded “C” AND “V” keys to not work correctly.
Read the full changelog
Professional multimedia editors are already aware of the importance of their software, as the application they use needs to be both feature-packed and intuitive enough to allow users to easily locate each function with ease. Adobe After Effects is one of the most complex tools one can work with in regards to designing motion graphics or cinematic visual effects.
Time-consuming installation and a few tips
First and foremost, it needs to be mentioned that this software comes with a large installer, therefore it takes a while to download, go through the entire setup and load.
When first launching the software, the Welcome Screen comes in handy to beginners and pros alike, as it displays some tips meant to optimize the manner in which you operate Adobe After Effects.
Import images and take advantage of incorporated presets
When creating a new composition, users can customize it by adding text strings, solid colors, camera, lights, as well as new distinct layers. Alternatively, the composition can be viewed as a flowchart, to ensure smooth manipulation of its components.
The application also supports inserting common images or Photoshop-based ones, and users can apply effects such as stylize, distort, and shatter. All the elements can be combined, adjusted and edited so as to obtain a custom high-quality animation - presets can also be of use when looking for inspiration for a new project.
Includes a standalone animation tool that helps users bring characters to life
The Adobe Character Animator is deployed alongside Adobe After Effects, providing users with a powerful animation tool they can use to bring to life models created with Photoshop or Illustrator.
The great thing about Adobe Character Animator is that it can track facial expressions and motion using a simple webcam, and apply them to two-dimensional characters. Moreover, it can mimic mouth movement and enables users to use audio recording to become the voice of their characters, with worry-free lip-syncing.
Apply an array of effects and set up various parameters
Considering the numerous types of effects and layer actions (such as time-reverse, mask, blend, switch) supported by Adobe After Effects, it is best to experiment with them before applying them to your final creation.
Experts are bound to access the Preferences section when they want to adjust the amount of RAM that can be used by the software, or to configure the video preview and audio hardware settings.
Conclusion
It might burden your computer’s performance, yet you should know that all jobs are finalized in a fair amount of time without running into issues such as errors, crashes or bugs.
Although the interface might seem a bit overwhelming, it is quite professional and there are plenty of Help contents integrated. All in all Adobe After Effects is an efficient and reliable piece of software, which deserves all the credit it has been given over the years.
Filed under
Adobe After Effects was reviewed by Elena Opris
5.0/5
LIMITATIONS IN THE UNREGISTERED VERSION
7 days trial
SYSTEM REQUIREMENTS
Intel Core2 Duo or AMD Phenom II processor; 64-bit support required
16GB of RAM (32GB recommended)
5GB of available hard-disk space; additional free space required during installation (cannot install on removable flash storage devices)
Additional disk space for disk cache (10GB recommended)
1280x1080 display
Broadband internet connection and registration are necessary for required software activation, validation of subscriptions, and access to online services
Optional: Adobe-certified GPU card for GPU-accelerated ray-traced 3D renderer
Load comments
This enables Disqus, Inc. to process some of your data. Disqus privacy policy
Adobe After Effects CC 2021 18.1
add to watchlistsend us an update
Flash After Effects Tutorials
buy now$20.99Individual monthly license
buy now$33.99Business monthly license
runs on:
Windows 10 64 bit Windows 8 64 bit Windows 7 64 bit
file size:
2 MB
main category:
Multimedia
developer:
visit homepage
The Flash After Effects
top alternatives FREE
top alternatives PAID
0 notes
Text
Guide to Fix the ‘Operating System Not Found’ Error on Windows 10
Windows 10 users experience a variety of error codes, glitches, and problems on the operating system. But out of all the errors, the most terrible or dreaded error to show up on the screen is ‘Operating System not Found.’ It is a dreadful sight to see, but the bitter truth is that it is most likely to happen at some point. Despite this error, your data on the system remains safe, and you can still get access to your most important files.

If you see this error code on your PC screen, use the following guide to solve this problem:
Check the Basic Input/Output System (BIOS)
In the BIOS, you need to make sure that your machine recognizes your hard drive, and the drive on which Windows OS is installed is programmed as the Preferred Boot Drive. The entering procedure in the BIOS varies from manufacturer to manufacturer. But the most common keys that you’ll need are to press one of the Function keys, Escape, or Delete key. You will find a message appearing on your screen, advising you about the boot process’s correct access key.
Please note that the BIOS menu also varies from device to device. Using your keyboard, you need to locate the Boot tab along the top of the screen. Within the Boot tab, use the following steps:
1. Highlight the Hard Drive and press the Enter key. Ensure that the Hard Drive is listed above USB Storage, Removable Devices, CD/DVD\BD-ROM, and Network Boot.
2. Adjust the order using the (+) plus and (–) minus keys.
If you don’t find the hard drive listed, then try to reset the BIOS to default. The procedure to reset the BIOS starts at the bottom of the BIOS menu. In the menu, you will find a key for Setup Defaults or Reset BIOS. Press either of the Function keys (that works for your PC) and confirm your decision when prompted. To save the settings, restart your system. Now you are ready to move onto the next step.
Fix the Boot Records
Typically, Windows relies on the Master Boot Record (MBR), DOS Boot Record (DBR), and the Boot Configuration Database (BCD) to boot your PC or laptop. If either of these three records gets damaged or corrupted, then the user encounters the “Operating system not found” error message on their system. Fortunately, you can fix them using a removable Windows installation drive. We would recommend you to use Windows Media Creation Tool for this procedure. Depending on the system you use, you’ll have to use a single key or change the boot order from the BIOS menu during the process. Follow these steps to continue:
1. You’ll find a Windows Setup screen where you have to enter your preferred language, keyboard, and time format.
2. Then, click on Next and select Repair Your Computer.
3. Go to Troubleshoot and click on the Advanced options.
4. Select Command Prompt and enter the following commands:
bootrec.exe /fixmbr
bootrec.exe /fixboot
bootrec.exe /rebuildbcd
Don’t forget to hit the Enter key after each command line, and each one of these will take a few minutes to complete. Once the procedure completes, restart your PC and check if it boots successfully.
Enable or Disable UEFI Secure Boot
Every Windows system has a UEFI firmware and Secure Boot enabled, but it fails to work properly in many cases. And the reason for its failure could be that your Windows 10 system is running on an MBR disk. It will disable your device from booting in UEFI mode. This is why it is crucial to enable or disable the UEFI Secure Boot and check if it is good enough to make a difference. You have to make the adjustments in the BIOS menu’s Security tab. Then, click on the Secure Boot option.
Activate the Windows Partition
One of the reasons you see the ‘Operating System not Found’ message could be that the Windows partition has disabled. But, using Windows’ native diskpart tool, you can fix the issue. To go through the procedure, you’ll need the Windows installation media USB, and then follow the steps given below:
1. Turn on your PC and boot from the tool.
2. Then, enter your language preferences, etc., click on Next.
3. Select Repair Your Computer, and go to Troubleshoot. Click on Advanced Options and select Command Prompt.
4. In Command Prompt, type “diskpart” and hit the Enter key.
5. Insert “list disk” and press the Enter key. This will bring you a list of all the disks attached to your system. Note down the disk number you need.
6. Then, type select disk [number]. Replacing [number] with the disk number mentioned earlier, and then, hit the Enter key again.
7. Now type list volume and press Enter to see all the partitions on the disk you selected.
8. Find out the partition Windows is installed on and again note down the number.
9. Then, type select volume [number], again replace [number] with the number you noted.
10. Insert “active” and press the Enter key. Restart your desktop to check the final results.
Despite using all the techniques mentioned above, if you continue to see the ‘Operating System not Found’ message, you must visit an expert or a computer repair shop.
Graccey Leio is a self-professed security specialist; she has been manufacture the people aware of the security threats. Her obsession is to write about Cybersecurity, cryptography, malware, societal engineering, internet and new media. She writes for McAfee security products at mcafee.com/activate.
Source : Operating System Not Foun
0 notes