#HTMLElements
Explore tagged Tumblr posts
Visit Tumblr Blog
Explore Tumblr blogs with no restrictions, modern design and the best experience.
Last Seen Tumblr Blogs


Fun Fact
The total number of visits Tumblr.com received during January 2021 is 327 million.
Text
HTML (HyperText Markup Language) is the foundation of web development and is used to create and structure web pages. It consists of elements enclosed in tags that define how content is displayed in a web browser.
#HTML#WebDevelopment#FrontendDevelopment#TechEducation#HTML5#TechBooks#HTMLForBeginners#MarkupLanguage#WebDesign#TechLearning#HTMLTags#WebAppDevelopment#WebDesignSkills#HTMLStructure#ResponsiveDesign#HTMLForms#HTMLCSS#WebDevelopmentTutorial#HTMLBestPractices#TechTutorial#WebDesignTips#HTMLElements#MobileFirstDesign#FrontendWebDesign#HTMLSyntax#SEOOptimization
0 notes
Text
The Rise of Web Components: A Comprehensive Guide for Front-End Developers

Introduction
Developing modern, effective, and maintainable web applications requires staying ahead of the curve in the ever changing field of web development. The use of web components is one of the most recent innovations that is becoming popular in the front-end development community. We will examine the emergence of web components, their advantages, their creation and application processes, and their influence on the direction of web development in this extensive book.
Comprehending Web Components
Web components are a collection of web platform APIs that enable developers to design encapsulated, configurable, and reusable web application components. These comprise Custom Elements, Shadow DOM, HTML Templates, and HTML Imports as its four primary components.
1.Custom Elements: Developers are allowed to define their own HTML elements with unique behaviours thanks to Custom Elements. This makes it possible to create reusable parts that fit into any website with ease.
2.Shadow DOM: By building a scoped subtree of DOM elements and styles, Shadow DOM encapsulates web components. By doing this, you can make sure that styles and functions that are defined inside a web component stay contained and don’t affect other parts of the website.
3.HTML Templates: These allow you to define HTML sections that may be copied and added to the Document Object Model (DOM) as needed. This is helpful for building data-populated component structures that are reusable and dynamic.
4.HTML Imports: With HTML Imports, web component developers can include external HTML pages as dependencies. This facilitates the management of dependencies and the reuse of components in other projects.
Advantages of Web Elements Front-end developers and web applications can benefit from the following when using web components:
1.Reusability: By encapsulating functionality into self-contained components that are readily reused across several projects, web components facilitate code reusability.
2.Encapsulation: Web components are protected from styles and functionality leaking out and clashing with other areas of the page by the shadow DOM.
3.Maintainability: Developers can design more manageable and modular codebases, which facilitate the management and updating of large-scale web applications, by encapsulating functionality and styling within web components.
4.Interoperability: Web components are compatible with current web frameworks and libraries since they are constructed using common web technologies like HTML, CSS, and JavaScript.
Creating and Using Web Components: The process of creating and utilising web components is simple and may be carried out with either standard JavaScript or well-known front-end frameworks such as Angular, React, or Vue.js. This is a simple illustration of how to make and utilise a unique web component:
<!DOCTYPE html> <html> <head> <title>Web Component Example</title> <script> // Define a new custom element class MyComponent extends HTMLElement { constructor() { super(); this.attachShadow({ mode: ‘open’ }); this.shadowRoot.innerHTML = ` <style> /* Styles scoped to the shadow DOM */ :host { display: block; padding: 1rem; background-color: lightblue; } </style> <p>Hello, World!</p> `; } } // Register the custom element customElements.define(‘my-component’, MyComponent); </script> </head> <body> <! — Use the custom element → <my-component></my-component> </body> </html>
Future of Web Development Web components are expected to have a big impact on the field as long as they continue to gain traction and browser support keeps getting better. Web components are a great way to create scalable, maintainable, and effective modern web applications because of their focus on interoperability, encapsulation, and reusability.
Conclusion Front-end developers’ approach to creating web applications has significantly changed as a result of the emergence of web components. Web components provide a potent way to build contemporary, maintainable, and scalable web applications by adopting the concepts of reusability, encapsulation, and interoperability. Web components are expected to become a crucial component of the web development toolkit as browser support advances and usage rises, influencing the direction of web development for Years to come.
Ready to dive deeper into the world of web development? Enhance your skills and stay ahead of the curve with our comprehensive Front end developer course at LearNowX. Whether you’re just starting out or looking to level up your expertise, our course covers everything you need to know about web components and much more. Don’t miss out on this opportunity to elevate your career in web development. Enroll now at LearNowX and become a master front end developer!
0 notes
Text
Every TypeScript example and tutorial I've come across so far mainly focuses on language features, static typing, and working with Visual Studio. However, I couldn't find much guidance on how to use TypeScript effectively with JavaScript and the DOM.
I remember having the same question a while back, just like Johnny on Stack Overflow. "Can we use TypeScript to manipulate the DOM?" This question motivated me to dive deeper and figure it out, and I'm here to share what I've learned.
Configuration: Using TypeScript for DOM manipulation is straightforward, but it does require some configuration. You'll need to include the specific types for DOM access, which aren't available by default in TypeScript. To do this, you must explicitly configure the TypeScript compiler to include the "dom" library in the compilerOptions section of your tsconfig.json file. It's worth noting that the decision not to include these types by default might suggest that TypeScript's creators initially intended it more for server-side development with Node.js than for front-end work.
/** tsconfig.json - Configuration file in the project folder for the TypeScript compiler */ { "compilerOptions": { "lib": [ "es2015", "dom" ], "strict": true, "target": "es2015" } }
Hello World: In this article, I'll create a simple "Hello, world!" program to demonstrate how to use the DOM in TypeScript. Since this is my first post about TypeScript, I'll cover the basics of working with DOM types and address a common challenge that beginners might encounter. Please note that I won't be discussing DOM events in this post; that's a topic for a future article.
Let's start with the basics by changing the inner text value of an existing HTML element. I began by creating an HTML file with a standard HTML5 boilerplate, including an <h1> element with the id "greeter" in the body.
<!DOCTYPE html> <html lang="en"> <head> <!-- ... --> </head> <body> <h1 id="greeter">Hello</h1> </body> </html>
Next, I opened a new TypeScript file and added the following code:
let greeter: HTMLHeadingElement = document.getElementById("greeter") as HTMLHeadingElement; greeter.innerText = "Hello world!";
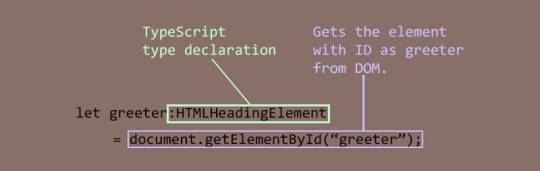
In this code, I created a variable called greeter and assigned the type HTMLHeadingElement to it. The HTMLHeadingElement type is defined in the "dom" library we added to the configuration. It tells the TypeScript compiler that greeter expects an HTML heading element and nothing else. Then, I assigned the greeter to the value returned by the getElementById function, which selects an element by its ID. Finally, I set the inner text of the greeter element to "Hello world."
When I compiled the code with the following command:
tsc script.ts
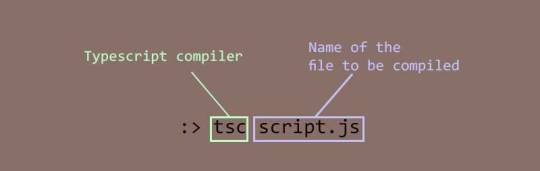
It produced the following error:
Type 'HTMLElement | null' is not assignable to type 'HTMLHeadingElement'. Type 'null' is not assignable to type 'HTMLHeadingElement'.
It's a bit frustrating, but TypeScript is doing its job. This error means that I tried to assign a greeter, which is of type HTMLHeadingElement, with an object of type HTMLElement that the getElementById method returned. The HTMLElement | null in the error message indicates that the method's return value can be either of type HTMLElement or null.
To address this, I used TypeScript's type assertion feature to tell the compiler that the element returned by getElementById is indeed a heading element, and it doesn't need to worry about it. Here's the updated code:
let greeter: HTMLHeadingElement = document.getElementById("greeter") as HTMLHeadingElement; greeter.innerText = "Hello world!";
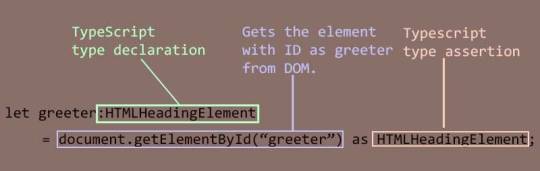
With this change, the compilation was successful. I included the script.js file generated by the compiler in the HTML document and opened it in a browser.
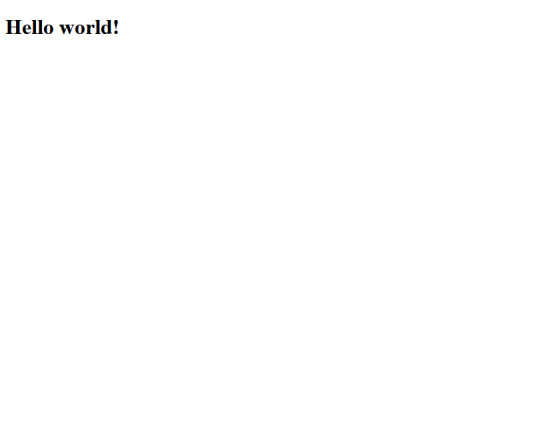
Decoration Time: Now that I've confirmed that everything works as intended, it's time to make the page more visually appealing. I wanted a font style that was informal, so I chose the "Rock Salt" font from Google Fonts. I imported it into my stylesheet, along with "Dancing Script" as a secondary font, using CSS imports. I then added a few more elements to the HTML document, centered all the text using CSS flexbox, added a background from UI gradients, and adjusted the positions of some elements for proper arrangement. The page now looked beautiful.
Animation: To add a finishing touch, I wanted to include a background animation of orbs rising to the top like bubbles. To create the orbs, I decided to use <div> elements. Since I wanted several orbs with different sizes, I split the task into two steps to simplify the work.
First, I created a common style for all the orbs and defined a custom animation for the orbs in CSS. Then, I created the orbs dynamically using TypeScript. I created a set number of <div> elements, assigned them the pre-defined style, and randomized their sizes, positions, and animation delays to make them appear more natural.
Here's an excerpt of the code for creating the bubbles:
function createBubbles() { for (let i = 0; i < bubbleCount; i++) { let div: HTMLDivElement = document.createElement("div") as HTMLDivElement; let divSize = getSize(); div.style.left = getLeftPosition() + "px"; div.style.width = divSize + "px"; div.style.height = divSize + "px"; div.style.animationDelay = i * randomFloat(0, 30) + "s"; div.style.filter = "blur(" + randomFloat(2, 5) + "px)"; div.classList.add("bubble"); bubbleBuffer.push(div); } console.log("Bubbles created"); }
After creating the orbs, I added them to the DOM and started the animation:
function releaseBubbles() { createBubbles(); for (let i = 0; i < bubbleCount; i++) { containerDiv.appendChild(bubbleBuffer[i]); } console.log("Bubbles released"); }
And with that, the animation of orbs rising like bubbles was set in motion.
Here's the final output:
youtube
You can find the complete code in this repository.
Conclusion: While writing this article and creating the example, I realized the involvement of advanced concepts like type assertion and union types. I now understand why the authors of those tutorials didn't include them; introducing them could confuse beginners. It's best to learn TypeScript thoroughly before venturing into DOM manipulation.
In my example, I skipped null checking when fixing the type mismatch error, as it seemed unnecessary for the demonstration. However, in real projects, it's important to check for null values to avoid runtime errors. I also didn't
#While writing this article and creating the example#I realized the involvement of advanced concepts like type assertion and union types. I now understand why the authors of those tutorials di#beginner#typescript#dom manipulation#Youtube
0 notes
Text
45 Custom Social Network URL's for Sharing Content

Social media sharing buttons are essential for any website to encourage users to share your content with their friends and followers. Adding share links to your website can help drive more traffic, increase engagement, and ultimately boost conversions. In this article, we'll provide a list of URLs that can be added to your website to create share links. Simply replace the tokens with the relevant data and you'll be good to go.
Why add Custom Links?
Plugins are slow. We can tailor custom code to only the style, and the links you want. Additional performance benefits can be granted by creating custom links that use your theme's features, such as Bootstrap or jQuery. In addition, sites using Icon Packs like FontAwesome, Ionicons and others may use their libraries to prevent even more code being added to the page.
Code Examples, to Auto-Update the Link, on click.
Here's a code snippet that you can use to achieve the desired functionality: JavaScript jQuery TypeScript document.addEventListener("DOMContentLoaded", function() { let socialLinks = document.querySelectorAll(".social_link_example"); socialLinks.forEach(link => { link.addEventListener("click", function(event) { event.preventDefault(); let dataHref = this.getAttribute("data-href"); let currentUrl = window.location.href; let pageTitle = document.querySelector("h1").innerText; let pageDescription = document.querySelector("meta").getAttribute("content"); dataHref = dataHref.replace("%url%", encodeURIComponent(currentUrl)); dataHref = dataHref.replace("%title%", encodeURIComponent(pageTitle)); dataHref = dataHref.replace("scription%", encodeURIComponent(pageDescription)); window.open(dataHref, "_blank"); }); }); }); $(document).ready(function() { let socialLinks = $(".social_link_example"); socialLinks.each(function() { $(this).on("click", function(event) { event.preventDefault(); let dataHref = $(this).attr("data-href"); let currentUrl = window.location.href; let pageTitle = $("h1").text(); let pageDescription = $("meta").attr("content"); dataHref = dataHref.replace("%url%", encodeURIComponent(currentUrl)); dataHref = dataHref.replace("%title%", encodeURIComponent(pageTitle)); dataHref = dataHref.replace("scription%", encodeURIComponent(pageDescription)); window.open(dataHref, "_blank"); }); }); }); document.addEventListener("DOMContentLoaded", function() { let socialLinks: NodeListOf = document.querySelectorAll(".social_link_example"); socialLinks.forEach((link: HTMLElement) => { link.addEventListener("click", function(event: MouseEvent) { event.preventDefault(); let dataHref: string | null = this.getAttribute("data-href"); let currentUrl: string = window.location.href; let pageTitle: string = document.querySelector("h1")!.innerText; let pageDescription: string = document.querySelector("meta")!.getAttribute("content")!; if (dataHref) { dataHref = dataHref.replace("%url%", encodeURIComponent(currentUrl)); dataHref = dataHref.replace("%title%", encodeURIComponent(pageTitle)); dataHref = dataHref.replace("scription%", encodeURIComponent(pageDescription)); window.open(dataHref, "_blank"); } }); }); }); This code will add a click event listener to all elements with the class .social_link_example. When clicked, it replaces the tokens %url%, %title%, and scription% in the data-href attribute with the current page URL, the text of the first
element on the page, and the content of the page's meta description, respectively. Finally, it opens the share link in a new browser window. You can customize this code to match your website's structure and add more tokens if needed. Make sure to include this code within your HTML file or include it as an external script.
List of Social Networks Share URLs
Facebook https://www.facebook.com/sharer/sharer.php?u=%url% Replace %url% with the URL of the content you want to share. LinkedIn https://www.linkedin.com/shareArticle?mini=true&url=%url%&title=%title%&summary=%summary%&source=%source% Replace %url% with the URL of the content, %title% with the title of the article, %summary% with a brief summary, and %source% with the source of the content (e.g., your website name). Pinterest https://pinterest.com/pin/create/button/?url=%url%&media=%media%&description=scription% Replace %url% with the URL of the content, %media% with the image URL, and scription% with a brief description of the content. Twitter https://twitter.com/intent/tweet?url=%url%&text=%text%&via=%username%&hashtags=%hashtags% Replace %url% with the URL of the content, %text% with the tweet text, %username% with your Twitter handle, and %hashtags% with any relevant hashtags (separated by commas). Reddit https://www.reddit.com/submit?url=%url%&title=%title% Replace %url% with the URL of the content and %title% with the title of the article. WhatsApp https://api.whatsapp.com/send?text=%text% %url% Replace %url% with the URL of the content and %text% with a brief message or description. Telegram https://telegram.me/share/url?url=%url%&text=%text% Replace %url% with the URL of the content and %text% with a brief message or description. Tumblr https://www.tumblr.com/widgets/share/tool?canonicalUrl=%url%&title=%title%&caption=ption%&tags=%tags% Replace %url% with the URL of the content, %title% with the title of the article, ption% with a brief caption, and %tags% with relevant tags (separated by commas). Email mailto:?subject=%subject%&body=%body%%url% Replace %subject% with the email subject, %body% with the email body, and %url% with the URL of the content. Pocket https://getpocket.com/save?url=%url%&title=%title% Replace %url% with the URL of the content and %title% with the title of the article. Buffer https://buffer.com/add?text=%text%&url=%url% Replace %text% with the pre-filled text for the post and %url% with the URL of the content. Digg https://digg.com/submit?url=%url%&title=%title% Replace %url% with the URL of the content and %title% with the title of the article. Mix https://mix.com/add?url=%url% Replace %url% with the URL of the content. VKontakte (VK) https://vk.com/share.php?url=%url%&title=%title%&description=scription%&image=%image%&noparse=true Replace %url% with the URL of the content, %title% with the title of the article, scription% with a brief description, and %image% with the image URL. XING https://www.xing.com/spi/shares/new?url=%url% Replace %url% with the URL of the content. Scoop.it https://www.scoop.it/bookmarklet?url=%url%&title=%title%¬e=%note% Replace %url% with the URL of the content, %title% with the title of the article, and %note% with a brief note or comment. Slashdot https://slashdot.org/bookmark.pl?url=%url%&title=%title% Replace %url% with the URL of the content and %title% with the title of the article. Evernote https://www.evernote.com/clip.action?url=%url%&title=%title% Replace %url% with the URL of the content and %title% with the title of the article. Hacker News https://news.ycombinator.com/submitlink?u=%url%&t=%title% Replace %url% with the URL of the content and %title% with the title of the article. Flipboard https://share.flipboard.com/bookmarklet/popout?url=%url%&title=%title% Replace %url% with the URL of the content and %title% with the title of the article. Instapaper https://www.instapaper.com/edit?url=%url%&title=%title%&description=scription% Replace %url% with the URL of the content, %title% with the title of the article, and scription% with a brief description. StumbleUpon (now Mix) http://www.stumbleupon.com/submit?url=%url%&title=%title% Replace %url% with the URL of the content and %title% with the title of the article. Note: StumbleUpon has rebranded as Mix, but the share link can still be used for sharing content. Diigo https://www.diigo.com/post?url=%url%&title=%title%&description=scription% Replace %url% with the URL of the content, %title% with the title of the article, and scription% with a brief description. Delicious https://del.icio.us/save?url=%url%&title=%title%¬es=%notes% Replace %url% with the URL of the content, %title% with the title of the article, and %notes% with any additional notes. Meneame https://www.meneame.net/submit.php?url=%url% Replace %url% with the URL of the content. Plurk https://www.plurk.com/m?qualifier=shares&status=%url% Replace %url% with the URL of the content. HubPages http://hubpages.com/submit?url=%url%&title=%title% Replace %url% with the URL of the content and %title% with the title of the article. LiveJournal http://www.livejournal.com/update.bml?event=%url%&subject=%title% Replace %url% with the URL of the content and %title% with the title of the article. Blogger https://www.blogger.com/blog-this.g?u=%url%&n=%title%&t=scription% Replace %url% with the URL of the content, %title% with the title of the article, and scription% with a brief description. Odnoklassniki https://connect.ok.ru/dk?st.cmd=WidgetSharePreview&st.shareUrl=%url% Replace %url% with the URL of the content. Yahoo Mail http://compose.mail.yahoo.com/?body=%url% Replace %url% with the URL of the content. Outlook.com https://outlook.live.com/owa/?path=/mail/action/compose&body=%url% Replace %url% with the URL of the content. Google Bookmarks https://www.google.com/bookmarks/mark?op=add&bkmk=%url%&title=%title%&annotation=scription% Replace %url% with the URL of the content, %title% with the title of the article, and scription% with a brief description. Line https://social-plugins.line.me/lineit/share?url=%url% Replace %url% with the URL of the content. Qzone https://sns.qzone.qq.com/cgi-bin/qzshare/cgi_qzshare_onekey?url=%url%&title=%title%&desc=scription%&summary=&site= Replace %url% with the URL of the content, %title% with the title of the article, and scription% with a brief description. Renren http://widget.renren.com/dialog/share?resourceUrl=%url%&srcUrl=%url%&title=%title%&description=scription% Replace %url% with the URL of the content, %title% with the title of the article, and scription% with a brief description. Douban https://www.douban.com/share/service?href=%url%&name=%title%&text=scription% Replace %url% with the URL of the content, %title% with the title of the article, and scription% with a brief description. Weibo http://service.weibo.com/share/share.php?url=%url%&title=%title%&pic=&appkey= Replace %url% with the URL of the content and %title% with the title of the article. Baidu http://cang.baidu.com/do/add?it=%title%&iu=%url%&fr=ien#nw=1 Replace %url% with the URL of the content and %title% with the title of the article.
Conclusion
Adding social media share links to your website can significantly increase your online presence and reach. By using the URLs provided above and replacing the tokens with your content's specific details, you can create customized share links for your website. Ensure that you test the links to guarantee they function properly, and watch your content gain traction on social media platforms. Read the full article
0 notes
Text
1 note
·
View note
Text
HTML Elements
0 notes
Text
ARE HTML HEADING TAGS (H2-H6) A GOOGLE RANKING FACTOR?

There is no doubt that H2-H6 heading tags are influential, but they may not be the most effective SEO factor when it comes to ranking in SERPs ( Search Engine Results Page).
Table of Contents
- H2-H6 Tags: Is it a Google Ranking Factor? - Is H2-H6 Tag Important for Google Ranking? - How to Use H2-H6 Tags - What is the bottom line?
1. H2-H6 Tags: Is it a Google Ranking Factor?
I suppose it would make sense that the keywords shown in H2-H6 subheadings are more heavily weighted than just words without any headings like here: "The belief here is that"... It would also make sense for tags of their own to count towards some sort of ranking factor because they're technically a part of your content as well.H2-H6 Tags and SEO There is no doubt that H2-H6 tags are influential, but they may not be the most effective SEO factor when it comes to ranking in SERPs. The relevance of these tags to users and search results are open to question and, in reality, how they rank is largely determined by your ability to improve your keyword density – something all sites should be attempting to achieve regardless. It might be, then, that it is the new indexation strategy instead of tags that are more important in how your site ranks.
2. Is H2-H6 Tag Important for Google Ranking?
H2-H6 tags are highly weighted as ranking factors because of Google’s Knowledge Graph. For example, in the following Google result, after searching for “where is the most beautiful city in the world” the H2 tag for “things to do” is way ahead of the H2 tag for “what to do”: This is based on Google’s own research, which was only performed for their own sites, so don’t get too excited just yet if you’re still thinking of this as an SEO ranking factor that everyone should be following. As I said above, this is very subjective information, and only takes into account what’s in Google’s own internal algorithm – the biggest argument that critics will use against this is that this isn’t an actual ranking factor.
3. How to Use H2-H6 Tags
One of the big challenges is that these tags are very little used in SEO. The most prominent example of this is the ‘h2’ tag, which is almost never used. The other big challenge is that you don’t need to use every single H2-H6 tag, you’ll find that depending on your product and search intent, some of them will be irrelevant and others will not be ranking factors, and some will be a ranking factor. You need to make a judgement on what to include and what not to include. One advice I can give is to try and identify which of the tags make sense to include. Telling Google in which subheadings and position types of your brand can do better may be all you need to boost your visibility on the search engine. You can learn more about H2-H6 tags and how to use them here.
4. What is the bottom line?
There are no direct links connecting tags to rankings or search engine rankings. They aren’t used to rank pages at all. This entire idea is one of “fake SEO” or web spam. I’m sure you don’t want to create a fake website that ranks for highly important search phrases in the hopes that it’ll garner more traffic and therefore help the SEO work. Write with Relevancy in Mind, NOT with SEO Motivation Once you get into an information race, then your motivation gets distorted, people start to look for keywords and other “keywords” that appear to be related to the keywords and that they are in position with. What’s the opposite of an SEO “black hat SEO or clickbait phrases in context? Are Headings Important? In the realm of H2-H6 related keywords, headings are still very important. I hope you will like the content and that it will help you learn. ARE HTML HEADING TAGS (H2-H6) A GOOGLE RANKING FACTOR? If you like this content, do share it. Read the full article
0 notes
Video
youtube
HTML TUTORIAL FOR BEGINNERS - 3- HTML ELEMENTS EXPLAINED #htmlelementsex...
0 notes
Link

There are two types of html elements:
1.Empty Elements
2.Nested Elements
EMPTY HTML ELEMENTS
HTML elements with no content are called empty elements.
<br> is an empty element without a closing tag (the <br> tag defines a line break):
<p>This is a <br> paragraph with a line break.</p>
Empty elements can be “closed” in the opening tag like this: <br />.
NESTED HTML ELEMENTS
HTML elements can be nested (elements can contain elements).
All HTML documents consist of nested HTML elements.
This example contains four HTML elements:
Example
<!DOCTYPE html> <html> <body> <h1>My First Heading</h1> <p>My first paragraph.</p> </body> </html>
0 notes
Text
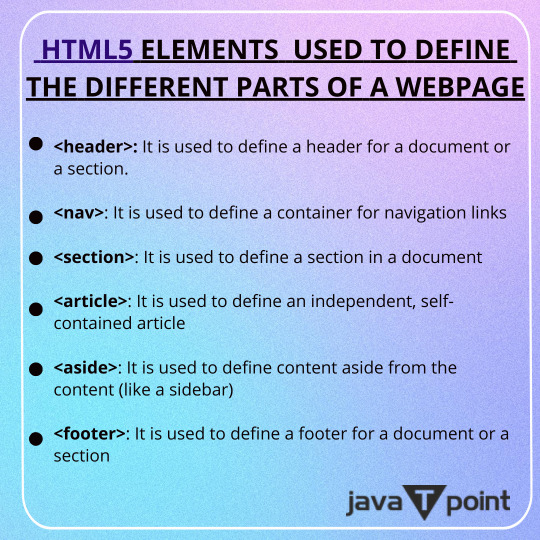
HTML ELEMENTS
A quick follow up on my previous post about HTML Tags. The picture below are 10 HTML ELEMENTS I consider the most important ( remember this is entirely my opinion). The picture below will give you an overview of the basic HTML elements.
There are a few global elements, the most common of them are:

Each element can also have attributes - each element has a different set of attributes relevant to the element. Hope this information helps someone 😊
11 notes
·
View notes
Text
Definition of HTML.
0 notes
Video
youtube
Learn About HTML Elements and Attributes | Learn HTML and CSS | HTML Tut...
0 notes
Text
Shadow DOM usage
class MyRootElement extends HTMLElement { constructor() { super(); this.innerHTML = ` <div>Welcome to ${this.innerHTML}'s Page!</div> `; } }
customElements.define("junk-node", MyRootElement);
Now to use it, just do
<junk-node>Whatever</junk-node>
Note: Shadow DOM elements are not visible to querySelector
1 note
·
View note
Text
We’re making Tumblr more accessible!
If you’re an avid user of Tumblr on mobile web, then you might’ve noticed some improvements we made. Bigger font sizes and higher contrast text? Your screen reader actually reads what you hope it would? You’ve guessed it, we’re making Tumblr ✨accessible✨.
Why?
Since we’re rewriting the web, we wanted to make sure we did so with accessibility in mind. I could give you a long description why, but plenty of articles explain better than I can. Put simply: the web should be made useable for everyone.
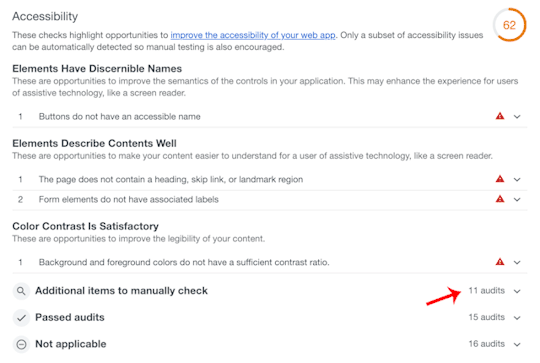
We began with using the accessibility auditing tool in Google Lighthouse to check the improvements that could be made. Initially, our score wasn’t that great: 62. If you factored in areas that need to be manually checked then our score would have been abysmal. However, we’ve made great strides since then and are on our way to achieving that coveted 💯
We had inaccessible menus and poorly described elements, among other things. Using a tool like VoiceOver or TalkBalk you can see what experiencing Tumblr on mobile web with a screen reader was like. Here's a gif showing what the mobile web experience on Tumblr was like prior to the changes.

What we did
Some of the more noticeable improvements we made were introducing design changes to increase readability and making improvements following WAI-ARIA guidelines. We'll walk through a few other changes we made using React.
Visual order on the page follows DOM order
One of the larger changes we made was to revamp modals and popovers (e.g., the post activity screen). Originally we used React Portals but it isn't always the most friendly for accessibility. Ideally you want to have elements appear in logical DOM order and Portals provides a way to circumvent that. So, no more Portals!
The user's focus is directed to new content added to the page
Next step was to provide a way to manage focus. We want to a) direct focus to the modal when it's opened and b) return focus to the element that opened the fullscreen modal. Using React's lifecycle methods and refs, this is simple enough to implement. In your modal component:
public targetEl: HTMLElement; // The element used to open the modal public buttonEl: HTMLElement;
public componentDidMount() { // We add an event listener to get the element that opened the modal document.addEventListener('focus', this.setOriginalTargetEl, true); // We set focus to some element inside your modal this.buttonEl.focus(); }
public componentWillUnmount() { // Return focus to the element that opened the modal if (this.targetEl) { this.targetEl.focus(); } }
public setOriginalTargetEl = event => { // Only set it once to get the initial target if (!this.targetEl) { this.targetEl = event.relatedTarget; document.removeEventListener('focus', this.setOriginalTargetEl, true); } };
public render() { return ( <div> <button ref={(el) => this.buttonEl = el}> Back </button> <div>Your content</div> </div> ); }
This can make navigation a lot easier.
Tada!


Of course, we’re still fine-tuning different elements of the site since accessibility is more than just a number. A lot of these changes will be even more noticeable when the new Tumblr dashboard comes to your desktop. There’s still more to come, so keep your eyes open!
Think there’s a way to make Tumblr more accessible? Hit us up at tumblr.com/jobs and come work with us!
- Nora Mohamed / @nomo
428 notes
·
View notes
Text

1 note
·
View note
Text
Introduction to Web Components

When you begin your journey as a developer, you learn that you should reuse code as much as possible. For front-end development, though, it is not so easy. When you have to create custom markup structures, they end up in being complex in style and script and using them multiple times can turn your page into a mess. Web Components, that are called the building blocks of web applications, promise to solve such problems.
Web components are a set of web platform APIs that allow us to create custom, reusable and encapsulated HTML tags for web pages and web apps. Such custom components and widgets build on the established standards, can work across various browsers, and can be used with any JavaScript library or framework that works with HTML.
Web components specifications
Web components incorporate four (in certain classifications, three) main technologies that can be used together to create versatile custom elements with encapsulated and reusable functionality:
Custom Elements
Custom elements are in essence fully-valid HTML elements, just like <div>, or <article>, but they have custom templates, behaviors and tag names (e.g. <one-dialog>) made with JavaScript APIs. They would always have a hyphen in their name, like <calendar-slider> and browser vendors have committed to create no new built-in elements containing a dash in their names to prevent conflicts. They can be used out-of-the-box with today’s most popular frameworks, including Angular, React, Vue, etc. with minimal effort. Custom elements contain their own semantics, behaviors, markup that can be checked in the HTML Living Standard specification.
Example:
class ComponentExample extends HTMLElement { connectedCallback() { this.innerHTML = `<h1>Hello world</h1>`; } }customElements.define(‘component-example’, ComponentExample);
As you can see, custom elements (in this case, <component-example>) must in some way extend an HTMLElement in order to be registered with the browser.
Shadow DOM
The shadow DOM is an encapsulated version of the DOM. It isolates DOM fragments from one another, including anything that could be used as a CSS selector and the corresponding styles, in a somewhat similar to <iframe> manner. At the same time, when we create a shadow root, we still have total control over that part of our page, but scoped to a context. It is critically important as it ensures that a component will work in any environment even if the page has other CSS or JavaScript. More information on how to use encapsulated style and markup in web components can be found in the shadow DOM specification.
Example:
To attach a shadow root, we should run something like:
const shadowRoot = document.getElementById(‘shadow’).attachShadow({ mode: ‘open’ });shadowRoot.innerHTML = ' <style> button { color: purple; } </style> <button id=”button”>Switch to use the CSS color purple <slot></slot></button>';
HTML Template
The HTML <template> element allows us to stamp out reusable templates of code inside a normal HTML flow that is not immediately rendered, but can be used at a later time when called upon. You can write a template of any shape or structure that could be created at a later time. To learn how to declare fragments of markup that go unused at page load, but can be instantiated later on at runtime you can check the HTML template element specification.
Example:
<template id=”movie-template”> <ul id=”movies”><li> <span class=”name”></span> — <span class=”year”></span> — <span class=”director”></span> </li></ul> </template>
The example above doesn’t render any content until a script has consumes the template, instantiates the code and tells the browser what to do with it.
ES Modules
ES Modules is the recent ECMAScript standard for working with modules. The standardization of a module system for browsers completed with ES6 and browsers started implementing it, so that now ES Modules are supported in Chrome, Safari, Edge and Firefox (since version 60). Modules as collections of smaller components that can be reused in our application, let developers encapsulate all kinds of functionality, and expose this functionality to other JavaScript files, as libraries. The process of including JS documents in a standards based, modular, performant way is defined in the ES Modules specification.
Example:
// From component folder import { Users } from ‘../components/users.js’; import { Issues } from ‘../components/issues.js’;class Dashboard { loadDashboard(){ // Create new instances const users = new Users(); const issues = new Issues(); console.log(‘Dashboard component is loaded’); } }export { Dashboard }
Benefits of web components
Web Components provide multiple benefits for developers and business.

Benefits for code:
Reusability: Once created, web components can be imported, used and reused in applications;
Readability: Compartmentalized, reusable code reduces the application size, simplified debugging and makes it more readable;
Declaration: You can more easily declare components on your page;
Composability: Shadow DOM allows composing applications with smaller chunks of code;
Extensibility: Custom elements API can extend browser elements or custom web components;
Scoping: Shadow DOM ensures DOM and CSS scoping so that styles don’t leak out and component DOM is local;
Interoperability: Native web components are interoperable at the browsers lowest (DOM) level.
Benefits for project
Brand consistency: Having your front-end application code split up into component libraries or even design systems can ensure brand consistency through the company. It also provides an additional benefit of the ability to be used by all teams, regardless of tech stack;
Cost-efficiency: Developers will have the ability to focus solely on making native reusable components, similar to LEGOs, and use these blocks in other applications across teams, which in the end saves money;
Faster deployments: Having ready-made code blocks, developers will be able to build and deploy applications more quickly. This leads to less time devoted to developing new features;
Quality improvement: As a by-product of reusing and reviewing the same code multiple times, the overall quality will improve in the course of time.
How to use web components?
To use a custom element you can simply import it and use the new tags in an HTML document. The ways to install custom elements, though can vary. Most elements today can be installed with NPM, but it is recommended to look at the README for the commands to install the specific element. NPM also handles installing the components’ dependencies. For more information on NPM, see npmjs.com.
Generally speaking, using a custom element is no different to using a <div> or any other element. Instances can be declared on the page, created dynamically in JavaScript, event listeners can be attached, and so on.
Libraries for building web components
Many libraries already exist that make it easier to build web components, including the following that we find useful:
Polymer provides a set of features for creating custom elements.
Slim.js provides data-binding and extended capabilities for components, using es6 native class inheritance.
Stencil generates standards-compliant web components.
Hybrids is a UI library for creating Web Components.
Angular provides the createCustomElement() function for converting an Angular component, together with its dependencies, to a custom element.
HTML and DOM specs already add features to support web components, letting web developers easily extend HTML with new elements with encapsulated styling and custom behavior. This proves that web components are already our present and it is time we start using them in applications.
3 notes
·
View notes