#How To Install Mysql PHP Server on Ubuntu 14.04
Explore tagged Tumblr posts
Visit Tumblr Blog
Explore Tumblr blogs with no restrictions, modern design and the best experience.
Last Seen Tumblr Blogs


Fun Fact
Women make up for the other 50% of Tumblr’s audience.
Link
How To Install Mysql, PHP Server on Ubuntu 14.04
MySQL is a linux based open-source database management system. It's a popular database management system on linux. It uses relational database managemen
0 notes
Text
How to Install Nextcloud on Ubuntu Server
New Article has been published on http://computingondemand.com/install-nextcloud-ubuntu-server/
How to Install Nextcloud on Ubuntu Server
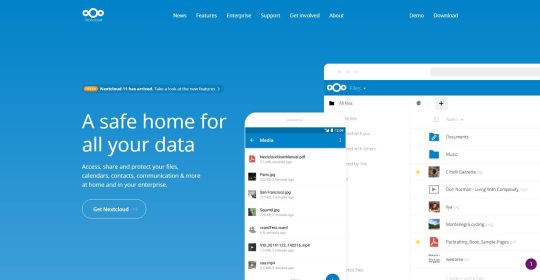
There are a lot of things Windows Server does well. However, coming off of the NAS environment, there are a lot of things that it doesn’t. One of these is a simple method for web access to various files and folders, along with the ability to share them via user login or simple url. Until recently, there had been only one real player in this space, OwnCloud. I had fiddled with the product for some time, but features were slow to show and it just didn’t work the way I had been hoping it would.
When I had finished the last server build, I had been looking for a way to simply address the needs that QNAP had been fulfilling for me with ease. With MyQNAPCloud I could easily share files or folders without issue. While on the hunt for the latest release of OwnCloud, I hit Google and just tried something. I tried “OwnCloud vs” and let the magic of Google happen. That is how I found Nextcloud.
While I won’t get into how Nextcloud came to be, I will tell you that there are a ton of similarities between the two products. When you do some research, it will become clear why that is. However, that is neither here nor there, the product is attractive, seamless, but a major pain in the … to get running. As usual, the best things in life are on linux. With that in mind, I created a Hyper-V hosting Ubuntu Server LTS 16.04 and started my journey.
Much of what I detail out here will be under the assumption that you have a CLEAN Ubuntu LAMP server up and running. For me, Hyper-V was a quick and logical start, but that doesn’t limit you to anything. Feel free to run VirtualBox, VMWare, or dedicated hardware.
Considerations
Before you build out your virtual machine for this install, there are some considerations to make. For instance, you need to plan for the amount of space that your VM will occupy. For me, it is easy, all my folders reside on another server, so a 100GB virtual hard drive is overkill. I have seen some “paid” for preconfigured VMs running around in 500GB and 1TB flavors.
System Requirements
(Taken Directly from Nextcloud.com)
Memory
Memory requirements for running an Nextcloud server are greatly variable, depending on the numbers of users and files, and volume of server activity. Nextcloud needs a minimum of 128MB RAM, and we recommend a minimum of 512MB.
Recommended Setup for Running Nextcloud For best performance, stability, support, and full functionality we recommend:
Red Hat Enterprise Linux 7 / Ubuntu 16.04 LTS
MySQL/MariaDB
PHP 7.0 +
Apache 2.4 with mod_php
Supported Platforms
Server: Linux (Debian 7, SUSE Linux Enterprise Server 11 SP3 & 12, Red Hat Enterprise Linux/CentOS 6.5 and 7 (7 is 64-bit only), Ubuntu 14.04 LTS, 16.04 LTS)
Web server: Apache 2 (mod_php, php-fpm) or Nginx (php-fpm)
Databases: MySQL/MariaDB 5.5+; PostgreSQL; Oracle 11g (currently only possible if you contact us <https://nextcloud.com/enterprise> as part of a subscription)
PHP 5.6 + required
Hypervisors: Hyper-V, VMware ESX, Xen, KVM
Desktop: Windows XP SP3 (EoL Q2 2015), Windows 7+, Mac OS X 10.7+ (64-bit only), Linux (CentOS 6.5, 7 (7 is 64-bit only), Ubuntu 12.04 LTS, 14.04 LTS, 14.10, Fedora 20, 21, openSUSE 12.3, 13, Debian 7 & 8).
Mobile apps: iOS 7+, Android 4+
Web browser: IE11+, Microsoft Edge, Firefox 14+, Chrome 18+, Safari 7+
Database Requirements for MySQL / MariaDB
The following is currently required if you’re running Nextcloud together with a MySQL / MariaDB database:
Disabled or BINLOG_FORMAT = MIXED configured Binary Logging (See: MySQL / MariaDB with Binary Logging Enabled)
InnoDB storage engine (MyISAM is not supported)
“READ COMMITED” transaction isolation level (See: Database “READ COMMITED” transaction isolation level)
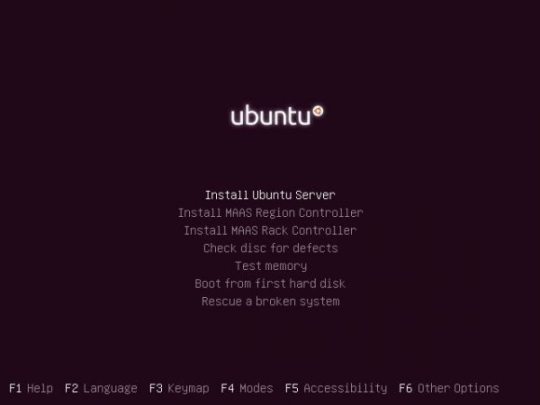
Installing Ubuntu Server
Download: https://www.ubuntu.com/download/server/thank-you?version=16.04.1&architecture=amd64
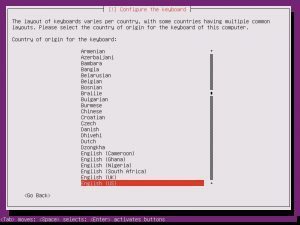
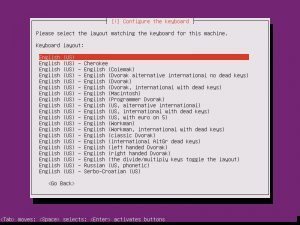
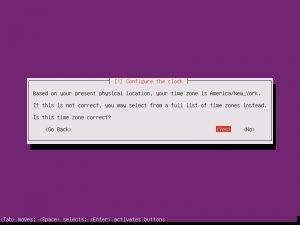
Walking through the standard install, for the most part, is a series of next and enter clicks. There isn’t much excitement. After you get past choosing your language, Install Ubuntu Server.
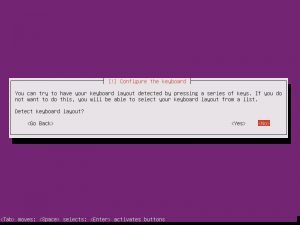
The installation will guide you through a series of pretty standard questions:


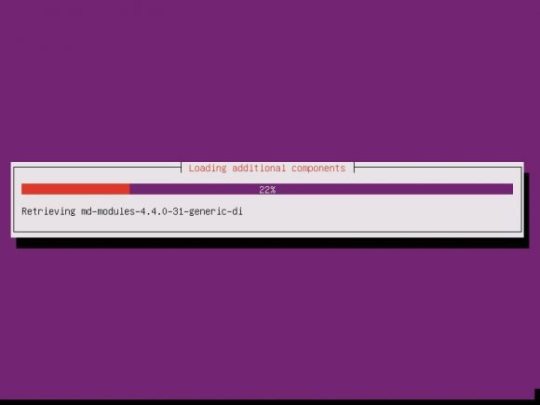
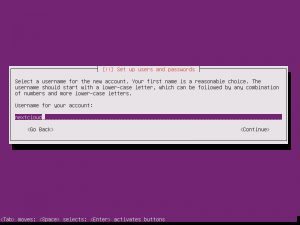
Once the additional components are completed, it is time to pick your system’s hostname. If you don’t know, a hostname is a label assigned to a device for identification. I named mine “nextcloud”, but while creating this tutorial, I left the default in place.

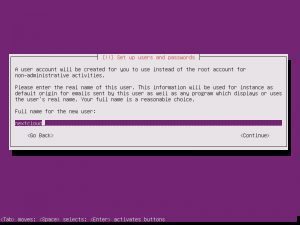
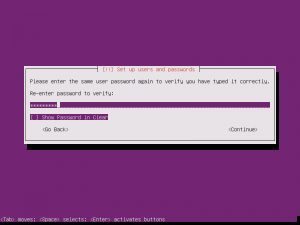
The username and password you choose are completely up to you. Make them something you will not forget!
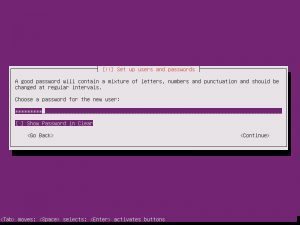
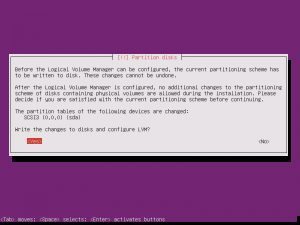
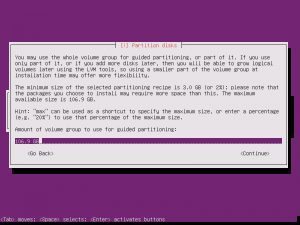
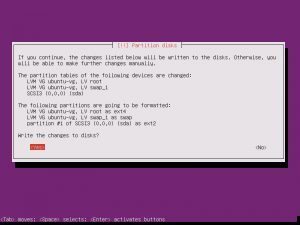
When asked the next few questions, the easiest way to go is with the defaults, that is until you get to Paritition Disks.
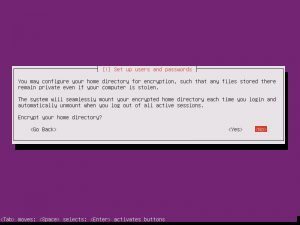
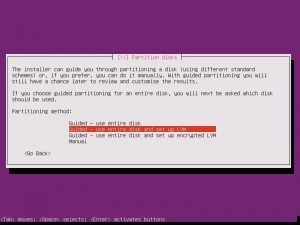

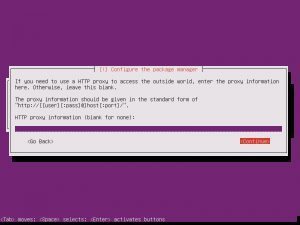
Partition disks, Yes. Full Size, Yes. Write Changes, Yes. Proxy, continue.
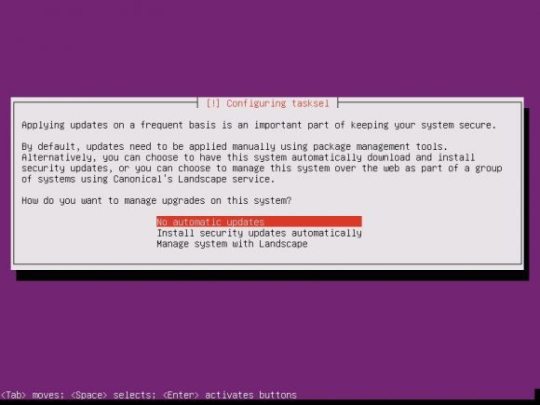
Choosing whether Ubuntu will install updates automatically is up to you, this is something you can change.
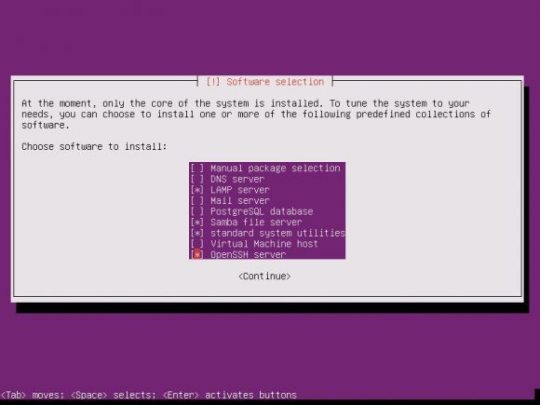
Software selection is the start. Here, the easiest way to proceed is to select LAMP, SAMBA, OpenSSH.
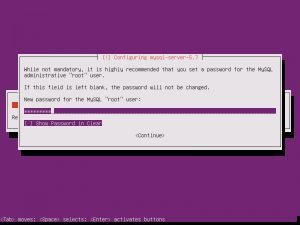
If you selected the previous recommendations, you will eventually be asked for a MySQL password. Pick a password that is easy to remember but hard enough to guess.

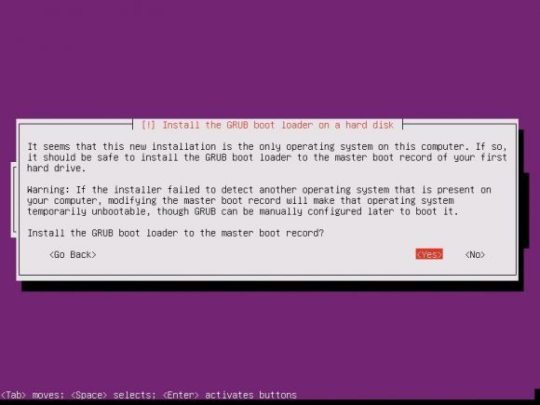
Install GRUB
As your installation finishes, it is important to take note that you have a basic install of Ubuntu Server. This is not a hardened version nor are there any security considerations made. Security is not something to take lightly and there are plenty of threads on many great sites that can get you going.

Installing Nextcloud
Once your system has rebooted, the fun work of installing Nextcloud can begin. I would like to start off by saying, I am not the author of this entire process. While some of it is mine, I have also collected the information from various websites and collected them into a single tutorial.
Log into your system with the username and password you provided during your install.
When you first log into your server, you will be dropped in your user’s home directory. The path for this will be, by default, /home/username
There are a few modules that Nextcloud will need
sudo apt-get install libxml2-dev php-zip php-dom php-xmlwriter php-xmlreader php-gd php-curl php-mbstring
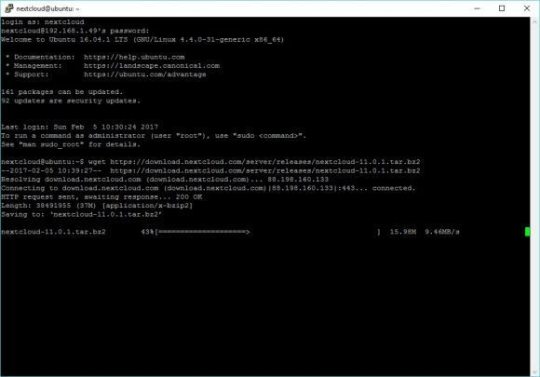
Let’s start by fetching the latest build, available at the time of this tutorial, of Nextcloud
wget https://download.nextcloud.com/server/releases/nextcloud-11.0.1.tar.bz2
Now, we need mod_rewrite
a2enmod rewrite
Restart Apache
sudo service apache2 reload
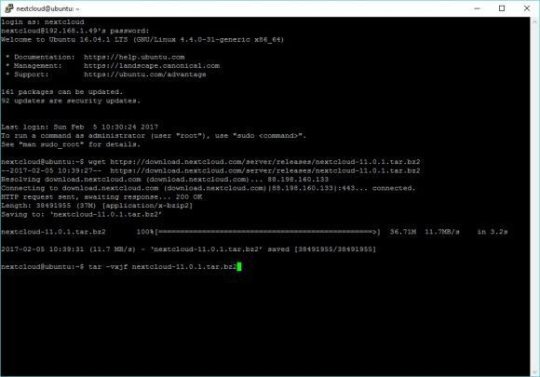
Once the download has completed, let’s untar.
tar -vxjf nextcloud-11.0.1.tar.bz2
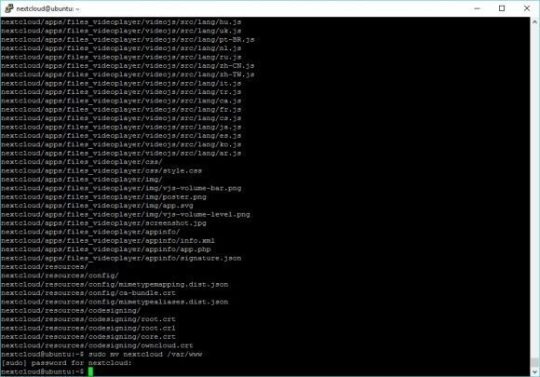
Move the folder to /var/www. When you first run “sudo” you will have to re-enter your password.
sudo mv nextcloud /var/www
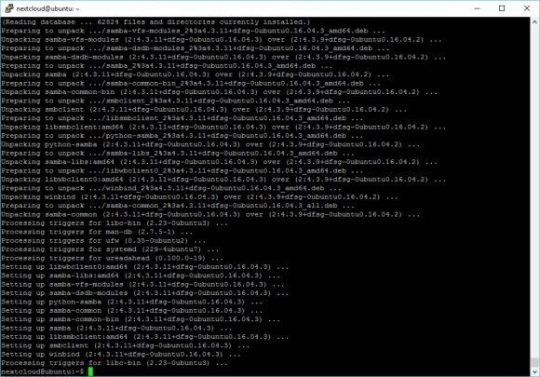
If you plan on connecting Nextcloud to your Windows Server, like I am, you will have to make sure you have Samba installed and configured. In my efforts, I have found that SMB2 is required for Nextcloud to function properly.
sudo apt-get install smbclient php-smbclient
Change the configuration of samba for SMB2
sudo nano /etc/samba/smb.conf
When the file opens, you will have to add teh following lines under [global]
max protocol = SMB2 client max protocol = SMB2

To exit the editor CTRL-X and click Y to confirm, then Enter to save
Create the apache configuration file
sudo nano /etc/apache2/sites-available/nextcloud.conf
Paste the following into the file and save.
Alias /nextcloud "/var/www/nextcloud/"
Alias /nextcloud “/var/www/nextcloud/” Options +FollowSymlinks AllowOverride All Dav off
SetEnv HOME /var/www/nextcloud SetEnv HTTP_HOME /var/www/nextcloud
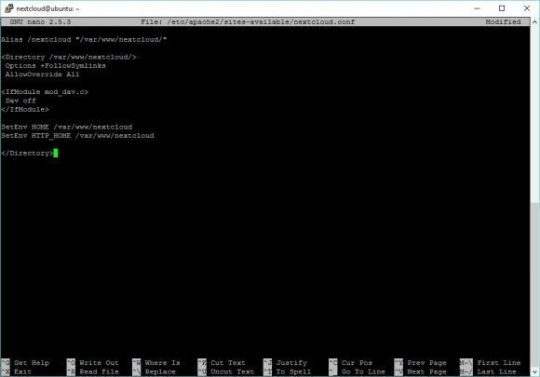
To exit the editor CTRL-X and click Y to confirm, then Enter to save
Create a symbolic link for apache
sudo ln -s /etc/apache2/sites-available/nextcloud.conf /etc/apache2/sites-enabled/nextcloud.conf
Enable the apache modules required for Nextcloud.
sudo a2enmod headers
restart apache
sudo service apache2 reload
Create the DB for Nextcloud
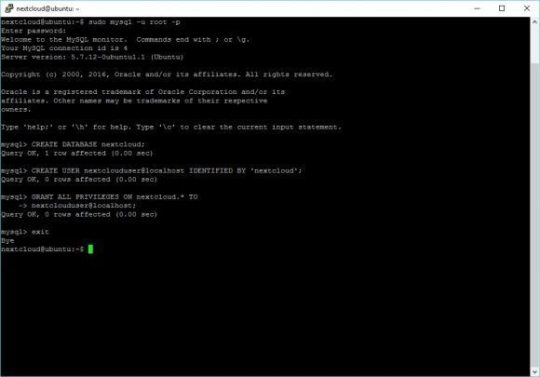
sudo mysql -u root -p
When prompted, enter the password your created for your database during the install
Create the user for your database. In the example below, I chose nextcloud as the password for the user nextclouduser. DO NOT USE THAT PASSWORD! Create your own password.
CREATE USER nextclouduser@localhost IDENTIFIED BY 'nextcloud';
Grant all privileges for that user
GRANT ALL PRIVILEGES ON nextcloud.* TO nextclouduser@localhost;
Exit
Secure and provide write abilities for Nextcloud (nextcloud in the example below is the username I chose during install)
sudo nano /home/nextcloud/grantperm.sh
Paste the following
#!/bin/bash ocpath='/var/www/nextcloud' htuser='www-data' htgroup='www-data' rootuser='root'
printf “Creating possible missing Directories\n” mkdir -p $ocpath/data mkdir -p $ocpath/updater
printf “chmod Files and Directories\n” find $ocpath/ -type f -print0 | xargs -0 chmod 0640 find $ocpath/ -type d -print0 | xargs -0 chmod 0750
printf “chown Directories\n” chown -R $rootuser:$htgroup $ocpath/ chown -R $htuser:$htgroup $ocpath/apps/ chown -R $htuser:$htgroup $ocpath/config/ chown -R $htuser:$htgroup $ocpath/data/ chown -R $htuser:$htgroup $ocpath/themes/ chown -R $htuser:$htgroup $ocpath/updater/
chmod +x $ocpath/occ
printf “chmod/chown .htaccess\n” if [ -f $ocpath/.htaccess ] then chmod 0644 $ocpath/.htaccess chown $rootuser:$htgroup $ocpath/.htaccess fi if [ -f $ocpath/data/.htaccess ] then chmod 0644 $ocpath/data/.htaccess chown $rootuser:$htgroup $ocpath/data/.htaccess fi

To exit the editor CTRL-X and click Y to confirm, then Enter to save
Grant execution privileges
sudo chmod +x grantperm.sh
Run the script
sudo ./grantperm.sh
Open a browser, navigate to the IP address or hostname of the server you just completed to finalize the Nextcloud install
http://ipaddress/nextcloud
If you don’t know the IP address of the machine, you can use ifconfig to find it
ifconfig

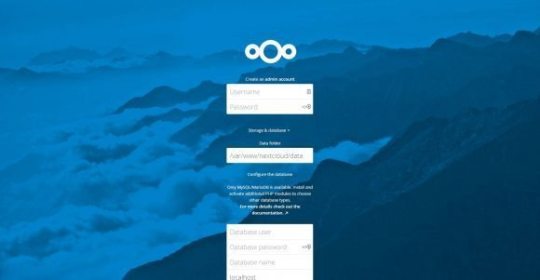
Fill in the required fields and enjoy. If you followed this tutorial to the letter, pick a username and password for nextcloud admin
Database user: nextclouduser Password: nextcloud Database: nextcloud Database host: localhost
There are more things to do, for instance, there are a ton of security concerns to consider. There are also caching recommendations. I also highly recommend that you consider using https for your server.
Caching: https://docs.nextcloud.com/server/11/admin_manual/configuration_server/caching_configuration.html Security: https://docs.nextcloud.com/server/11/admin_manual/configuration_server/harden_server.html Backups: https://docs.nextcloud.com/server/11/admin_manual/maintenance/backup.html
0 notes
Link
Learn to setup virtual cloud servers and develop database-driven websites using the latest web technologies.
WEB DEVELOPMENT
Created by YouAccel Training
Last updated 6/2019
English
English [Auto-generated]
What you’ll learn
Understand the essentials of Local and Wide Area Networks
Setup a basic network.
Register a domain name with Domain Privacy
Forward a domain, renew and administer a domain
Configure Nameservers and DNS Zone Files
Create and Configure a Testing server on a Local Windows or MAC System.
Configure a Production web server on popular cloud hosting platforms.
Create disk backups and install disk images on a virtual server
Setup Ubuntu on a Virtual Machine
Install and configure WAMP for Windows
Install and configure MAMP for MAC
Administer a remote server using PuTTY or Terminal
Proficiently navigate the Linode Virtual Server Dashboard
Configure Security Settings on a Virtual Ubuntu Server
Scale a virtual server up and down depending on needs
Install LAMP Stack (Linux, Apache, MySQL, PHP, PhpMyAdmin) on a local and remote server
Setup users and access privileges on an Ubuntu server
Upload files using FileZilla FTP Client
Proficiently Program in HTML, CSS, JavaScript, jQuery, Bootstrap, PHP, and AJAX
Create mobile responsive web applications using Bootstrap
Create unique animated objects using jQuery
Create and administer MySQL databases using PhpMyAdmin
Create Web-based Login Authentication using PHP and MySQL
Create the famous “Google Search Suggest” Feature using AJAX and PHP
Create server and client side validation algorithms for web forms.
Use Google Apps for Work to setup a customized business email address
Requirements
Students will require an internet connection and PC or MAC Computer System.
Please note that all required downloads are free.
Text Editor such as Text Wrangler (MAC) or Notepad++ (Windows)
FileZilla FTP Client (Downloaded in Section 9).
PuTTY and PuTTY Key GEN for Windows users (Downloaded in Section 8).
WAMP Server for Windows Users and MAMP Server for MAC Users (Downloaded in Section 7).
Tight VNC Viewer for Windows Users and RealVNC Viewer for MAC Users (Downloaded in Section 8).
Description
**UPDATE: Our course has been updated and is fully compatible with the latest versions of Ubuntu (16.04 & 18.04 LTS). You can also continue using 14.04 LTS if you prefer, as the content is compatible with all three versions.
This course offers a comprehensive look into the entire web development process – from local server configuration using WAMP and MAMP (Apache, MySQL, PHP) to production deployment using the latest web technologies including: LAMP Stack (Linux, Apache, PHP and MySQL) for Ubuntu, HTML5, CSS, Bootstrap, JavaScript, jQuery, XML, and AJAX.
The content is ideal for those interested in working as a web developer, launching a web application, or devoted enthusiasts. The concepts explored in this course are suitable for individuals of all skill levels. Each module starts with the fundamental concepts and gradually transitions into more advanced material.
What makes this course unique?
This course is specifically intended to teach students to develop web applications using the most efficient methods and the latest web technologies. Through live demonstrations we teach the importance of using scalable cloud hosting infrastructures during the development process. This includes small informational websites of only a few pages to advanced ‘big data’ style, dynamic web applications. We go through several live examples of web development and Linux based server configurations on popular Cloud hosting providers such as Linode.
Section 1 & 2 (Introduction, How the Internet Works)
The course begins with with an overview of learning objectives. We then explore how the internet works, including the composition and transmission of data packets over both local and wide-area Networks. Next we take a look at the HTTP and HTTPS protocols as applicable to client and server side communications – including DNS Lookups. This section will also teach students how email exchange works over SMTP and IMAP. The role of Network Ports and Firewalls are also introduced.
Section 3, 4: (The Web Development Process, Planning a Website)
Students will gain an understanding of all the steps involved in the web development process.
Section 5: Web Hosting and System Requirements
We conduct an in-depth case analysis of web hosting solutions including: Shared, Virtual Private, Dedicated and Cloud Hosting.
We provide an overview of various packages offered by different web hosting companies and weigh the pros and cons of each one.
Students are also introduced to the importance of web server scalability and the advantages of cloud hosting over traditional hosting services. We also examine the infrastructure requirements of popular, resource intensive applications such as Netflix and Facebook to emphasize the importance of avoiding costly mistakes in the initial stages of development.
Section 6: Domain Names
We provide an overview of the domain name registration process. This includes the role of registrars and TLD (Top Level Domain) administration by ICANN. ccTLD’s (Country Code Top Level Domains) are also explored.
Students gain hands-on experience with the registration process using popular domain registrars. We provide a comparison of different registrars and register a sample domain name using GoDaddy. Other topics of discussion include: domain name privacy and administration, auto-renewal, domain forwarding, and name server assignment.
Section 7: Testing Environment
Students are introduced to configuring a local testing server on a PC or MAC system using WAMP (Windows) or MAMP (MAC). The lessons provide a detailed guide on installation of the packages and an overview of the interface.
Section 8: Production Environment
Students acquire the skills needed to optimally configure a live production environment for securely hosting web applications on a cloud server (Linode). The section starts with an overview of different cloud hosting providers such as Amazon Web Services, Microsoft Azure, Linode and Digital Ocean.
We then provide a live demonstration of server setup using Linode. This includes deployment of Ubuntu and installation of LAMP Stack (Linux) on the Linode Server using remote access consoles such as Terminal (MAC) and PuTTY for Windows.
Students gain an in-depth knowledge of server maintenance, file and directory commands. We also explore SSH Authentication for multiple users and file permissions to reduce security vulnerabilities. Remote Desktop connections for server administration are taught, using Tight VNC (Windows) and RealVNC (MAC).
A thorough overview of the Linode server management console is conducted, to show students how to scale servers, change root passwords, manage the DNS Zone file and create back-ups.
Section 9: FTP Setup
Students learn the role of an FTP (File Transfer Protocol) client to connect to a remote server, through a local machine. We provide a live demonstration on file upload using FileZilla and explore the FileZilla Interface for connection management.
Section 10: HTML Development
This section explores HTML. HTML is a key fundamental building block when learning to develop websites. Students initially learn the basics of HTML page structure and gradually transition into working with spacing, text formatting, lists, images, videos, links, anchors, tables, forms and much more. We include several projects, where students are shown first-hand, how to develop and code html web pages from scratch.
Section 11: CSS Development
Students learn to use CSS to create stylish, responsive web page layouts. We start by discussing the parts and types of CSS rules, followed by CSS classes, DIVS, and ID’s. Students gain significant exposure to various formatting options, including margins, padding, font properties, backgrounds, transparency, positioning, link styling and CSS tables. This section includes a hands-on web development project where students utilize the concepts explored in the lesson.
Section 12: Document Object Model (DOM)
As a precursor to JavaScript, we explore the DOM (Document Object Model). We explain its usage and application in manipulating HTML and CSS elements.
Section 13: JavaScript Development
We introduce students to JavaScript coding to add interactivity to static HTML and CSS pages. The section starts with discussing JavaScript placement, using both internal and external scripts. We then take a look at JavaScript output, variable declarations, arithmetic operators, objects, strings, math functions, arrays, conditional statements, loops, functions and events. Students also go through two hands-on projects that will further solidify their knowledge of the concepts explored in the lessons.
Section 14: JQuery Library
We explore the jQuery library and many of its unique features, used to create stunning, animated web pages. We start with the basics, from embedding jQuery into web pages to working with Selectors. Students then explore working with events, toggling, fading, sliding, and other forms of animation. The lessons also teach students how to work with callbacks, chaining, dragables, accordion menus and many other functions.
Section 15: Bootstrap Framework
Students are taught to use the Bootstrap framework for responsive, mobile-first – front-end development. As one of the leading open-source development libraries, Bootstrap is an essential part of the developers coding arsenal. The section begins with teaching students how to include essential Bootstrap files into web pages. It then explores the Bootstrap Grid system and popular layout strategies for optimal cross-device and cross-browser compatibility.
Students gain exposure to just about every Bootstrap component, from typography, tables and images, to jumbotrons, wells, alerts, buttons, glyphicons and progress bars. The section includes several hands-on exercises that will walk students through the process of creating stunning layouts, complete with modals, carousels, popovers, drop-down menus, forms and much more.
Section 16: PHP Development
Students gain exposure to creating dynamic web applications and functionality using PHP. We start with the basics, including variable declaration and data output. The lessons then transition into working with objects, conditional statements, loops, functions, arrays and form validation.
Section 17: MySQL Database Integration
Students learn to unleash the true power of web application development with MySQL database integration. We start with the basics from database and table creation, to user management. Next we explore the execution of commonly used SQL statements for database modification and administration. Students are also taught how to create database connections and execute SQL statements from PHP scripts.
Section 18, 19 (XML, AJAX, & Development)
We explore XML and AJAX integration to create dynamic content, without page refresh. The lessons cover several hands-on training exercises that will encompass many of the exciting functions AJAX offers. Students will build a website complete with database integration, registration forms with server-side validation, user authentication, and a SMTP-based contact submit form.
Section 20: Google Apps for Work
Students learn to create a customized business email address using Google Apps for Work. Email administration is also explored, along with alias creation.
Who this course is for:
No prerequisite knowledge required
Students interested in a career in web development
Students interesting in starting a web based business
Students who want to transition from basic shared, vps or dedicated hosting packages to sophisticated cloud hosting solutions
Students wanting to update or learn new programming skills using the latest web scripting languages
Web Development enthusiasts
Size: 3.1GB
DOWNLOAD TUTORIAL
The post WEB DEVELOPMENT MASTERCLASS – COMPLETE CERTIFICATE COURSE appeared first on GetFreeCourses.Me.
0 notes
Text
The best Linux web hosting services of 2018
Visit Now - http://zeroviral.com/the-best-linux-web-hosting-services-of-2018/
The best Linux web hosting services of 2018
Linux hosting is everywhere. Whether you’re looking for a simple shared hosting account or a powerful dedicated server, the chances are that you’ll be offered a Linux-based option first.
In many cases, you might not care. If your hosting needs are simple, you’ll probably choose an account based on the allocated web space, bandwidth and similar features – the operating system is so far down most people’s priority list that often it’s not even mentioned in comparison tables.
But if you’re an experienced user, know more about Linux, or you perhaps need to build a technically complex website where you have full control over everything, it’s a different story.
You might want to choose your preferred distro or control panel. You could need more control over the server and its components. Hosts may throw in all kinds of goodies to get you started – a firewall, mail server, private DNS – and offer quality support to keep your site up and running.
Every web host has its own idea of what makes a great Linux package, but we’ve listed five of our favorite providers to point you in the right direction. Keep reading to find out more.
1. InMotion Hosting
Fast and feature-packed hosting from a reliable provider
Professional features
Excellent support
CentOS only
InMotion Hosting is a professional Linux web host which delivers high levels of power and control right across its range.
InMotion’s shared hosting includes many beginner-friendly features, for example – free website migration, a bundled website builder, regular backups – but that’s just the start. More experienced users will be happy to see support for MySQL and PostreSQL databases, PHP 7, Ruby, Perl and Python, SSH access and more.
There are interesting touches wherever you look. You don’t just get the option to have WordPress, PrestaShop or Joomla preinstalled, for instance – InMotion throws in WP-CLI to enable managing multiple WordPress installations from the command line. It’s a far more capable product than you might expect, considering prices start at $5.99 (£4.30) a month for the two-year plan.
It’s a similar story as you upgrade. Optional self-managed VPS hosting – from $19.99 (£14.30) a month for the initial term – gives you CentOS 7 and a firewall, but after that, you’re able to install, optimize and configure the server however you like. Even InMotion’s managed VPS hosting still gives you root access for considerable low-level control.
What you don’t get here is any upfront choice of operating system: CentOS 7 is it. But as InMotion points out, that does mean you’ll benefit from its 12 years’ worth of experience in optimizing, securing and modifying the OS. Even if that does cause you some setup issues, the Launch Assist feature gives you a minimum of two hours with an InMotion tech support person to help you solve any problems.
2. SiteGround
Powerful Linux hosting for demanding users
Powerful features
Genuine technical expertise
Responsive support
Every Linux host claims to offer the best possible technical support, but separating the experts from the pretenders isn’t always easy. One way to identify the most knowledgeable providers is to check their high-end products. You won’t get the same level of support if you’re buying a basic shared hosting package, but just knowing that level of expertise is available somewhere in the company can be useful.
SiteGround is a great example. If the company’s standard hosting products aren’t enough, it can build enterprise-level solutions from scratch, and SiteGround’s website lists some of the technologies it supports: custom private clouds, smart use of Linux containers, replication between databases, and in-depth expertise in WordPress, Drupal, Nginx, Apache, PHP, MySQL, MongoDB, ElasticSearch, Redis, Solr, Memcached and more. This is clearly a provider that knows what it’s doing.
Home users won’t get the same level of support, of course, but even SiteGround’s shared hosting plan delivers more than you might expect: free Let’s Encrypt SSLs, cPanel and SSH access, Cloudflare integration, unlimited emails and databases, HTTP/2-enabled servers, free daily backups, and 24/7 technical support by phone, chat and a ticket system. Not bad at £2.75 ($3.85) a month plus tax for the initial term, £6.95 ($9.75) afterwards.
Ramping up to a VPS-like Cloud Hosting plan gets you a very well-specified CentOS system. MySQL 5, PostgreSQL, 5 PHP versions, HHVM, Apache, Nginx, Exim mail server, a private DNS server setup and Iptables firewall are all preinstalled and managed by SiteGround. Prices start at £48 ($67.20) a month plus tax.
Opt for a dedicated server and you’ll get high-end extras like Git integration and performance-boosting Nginx-based cache options for WordPress, Memcached and HHVM.
You probably won’t want all these features – maybe you only need a few – but they do provide a strong indicator of the company’s technical expertise. If you’re looking for a provider that can support your site and help it grow, SiteGround could be a wise choice.
3. Hostwinds
Power-packed Linux hosting for expert users
Choice of OS
Good value
Limited support
Linux hosting is available from just about everyone, but anything less than a dedicated server is often fully managed by the provider (they set up, manage and maintain the OS and all its components for you). That’s great for beginners, but more experienced users might be frustrated by the lack of features and control.
Hostwinds’ unmanaged VPS packages allow you to take complete charge of your workspace. You can choose from a range of operating systems, including CentOS, Ubuntu, openSUSE, Debian and Fedora. You can tweak and set up the operating system however you like, configure your own backup scheme, and more.
Unmanaged packages bring responsibilities, too. If there’s a missing update or some mystery software issue, you’ll be the one who has to fix it. But that shouldn’t be too intimidating for Linux users, and many elements of Hostwinds’ packages remain simple and easy-to-use (site management via cPanel, automated WordPress and other installs via Softaculous, and so on).
Even better, as you’re not paying for management, Hostwinds gives you a 50% discount on every package. Normal managed Linux VPS packages range from $9.99 (£7.14) for 1 CPU core, 512MB RAM, 20GB disk space, 1TB traffic, up to $49.99 (£35.70) for 2 cores, 4GB RAM, 50GB disk space, 2TB traffic – but the unmanaged range runs from $4.99 (£3.60) to $24.99 (£17.85). There’s no long-term contract required, so you can try the service for as little as a month to see if it works for you.
4. Liquid Web
CentOS, Debian, Ubuntu? Take your pick
Choice of OS
Excellent support
Above average prices
Part of the appeal of Linux hosting should be the level of control you get over your working environment, but this doesn’t happen with every provider. Often you’re presented with a standard base environment – typically CentOS and cPanel – with no standard ability to choose anything else.
Liquid Web has been providing quality VPS and dedicated hosting packages for years, and one reason for this success could be its flexibility. Whatever you’re after, the company offers in-depth low-level control over your server specifications.
You’re not stuck with a single version of CentOS, for instance. Liquid Web offers CentOS 6 (optionally with CloudLinux) and 7, as well as Debian 8, Ubuntu 14.04 and 16.04. The CentOS 7 images can include cPanel or Plesk, and plans are available in a mix of self-managed, core-managed and fully-managed variations.
There’s even more power over some supplementary features. While other hosts might throw in a standard backup plan, Liquid Web enables choosing how many daily backups you’d like to retain, or it can squeeze as many backups as will fit into a defined amount of disk space. Both options are charged at a very reasonable $0.12 per GB per month, so you only pay for whatever you use.
However your server is configured, Liquid Web’s excellent support is on hand 24/7/365 to resolve problems as quickly as possible. And we do mean quickly: if, say, there’s a hardware failure, the company promises it will be replaced within 30 minutes of the problem being identified.
What’s more, Liquid Web backs up these promises with an impressive service level agreement. If the company doesn’t respond to an initial helpdesk ticket within 30 minutes, you’ll be credited with 10 times the amount they missed it by, and there are similar clauses to cover you for power outages, network failure and more.
5. OVH
Learn the Linux basics on a budget
Wide choice of OS, control panels
Amazingly cheap
Poor support
Choosing the right Linux host can be difficult, especially if you’re a hosting newbie and unsure of which features you might need.
One option is to gain some experience by signing up with a flexible budget host like OVH. The company doesn’t have the best support and we wouldn’t recommend it for business-critical sites, but you do get a huge amount for your money and it’s a very cheap way to learn more about your Linux options.
Do you need a wider choice of operating systems, for instance? OVH VPS plans support Arch Linux, CentOS 6, CentOS 7, Debian 7, Debian 8, Debian 9, Ubuntu 14.04 Server and Ubuntu 16.04 Server, along with Kubuntu 14.04 Desktop if you need a user interface.
You’re not restricted to cPanel as a website manager, either: OVH also supports CozyCloud and Plesk Onyx.
OVH says you can have WordPress, Drupal, Joomla! and PrestaShop pre-installed, conveniently, although there’s no mention of a general Softaculous-type one-click application installer. Still, with full root access you should be able to manually set up whatever you need.
What’s really impressive here is the price, which starts at just £3.99 (£5.60) plus tax per individual month, dropping to £2.99 ($4.20) if you sign up for a year. OVH isn’t the best Linux host by any means, but it does provide a very cheap way to experiment with different distros and control panels to find out what works for you. It’s well worth a look for Linux newbies or anyone who feels they need more hosting experience before handing over the big money.
0 notes
Text
Upgrade Joomla! PHP Version
Joomla is one of the most powerful and secure CMS on the planet now. But Joomla itself is not enough to protect your site if you are running old version of PHP. People often criticize, its CMS fault when their site get hacked but they didn’t realized it's could be their server stack.
Joomla recently raised its PHP version requirements to PHP 5.6 or 7 however it can run on PHP 5.3.10+ too. PHP 7 is already released and it's a breakthrough of PHP history. So, its high time to upgrade your server PHP version to PHP 7 or at least 5.6+. In this tutorial, I’m going to show you how you can do that.
**IMPORTANT : If you decided for PHP 7 make sure your Joomla version is 3.5+ in order to work properly.
Managed or Shared Hosting
The Easiest Way
Ask your host to update PHP version of your hosting. Most likely, they will do it for free and it’s the most easiest way to update. However, if they are refused or unable to do so, it's high time to switch to a reliable provider.
Upgrade PHP From cPanel
Most cPanel based hosting provider allow you to update PHP version from your cPanel. Search PHP Version Manager or PHP Configuration option and click on it.
Select PHP version 5.6+ or 7 and save.
Upgrade from .htaccess file
If above 2 method doesn’t work for you, your best bet is to upgrade PHP version using .htaccess file.
Go to cPanel, File Manager and choose "Web Root (public_html/www)". There create a new file (or edit the existing one) called .htaccess and add the following line:
To switch to PHP 5.6
AddHandler application/x-httpd-php56 .php .php5 .php4 .php3
To switch to PHP 7.0
AddHandler application/x-httpd-php70 .php .php5 .php4 .php3
This setting will apply recursively to all of the subdirectories. In case you'd like to have a different version of PHP in a subdirectory, create a new .htaccess file in it with the directive for the desired PHP version in it.
VPS or Dedicated Server
If you are running Ubuntu 14.04 or below you can update using this commands :
sudo apt-get upgrade sudo apt-get dist-upgrade
Lets add php repo in our list. Pleaes choose approprite version.
For PHP 5.6
sudo apt-add-repository ppa:ondrej/php5-5.6
For PHP 7.0
sudo apt-add-repository ppa:ondrej/php
Upgrade to PHP 5.6
sudo apt-get install php5
Your PHP version is upgraded now and you just need to restart your server
Apache : sudo service apache2 restart
Nginx : sudo service nginx restart
Upgrade to PHP 7
Upgrading to PHP 7 require a little amount of extra work. Depends on your webserver you can perform this commands.
Upgrading mod_php with Apache
First, install the new packages. This will upgrade all of the important PHP packages, with the exception of php5-mysql, which will be removed.
sudo apt-get install php7.0
Note: If you have made substantial modifications to any configuration files in /etc/php5/, those files are still in place, and can be referenced. Configuration files for PHP 7.0 now live in /etc/php/7.0.
If you are using MySQL, make sure to re-add the updated PHP MySQL bindings:
sudo apt-get install php7.0-mysql
Upgrading PHP-FPM with Nginx
This section describes the upgrade process for a system using Nginx as the web server and PHP-FPM to execute PHP code.
First, install the new PHP-FPM package and its dependencies:
sudo apt-get install php7.0-fpm
You'll be prompted to continue. Press Enter to complete the installation. If you are using MySQL, be sure to re-install the PHP MySQL bindings:
sudo apt-get install php7.0-mysql
Note: If you have made substantial modifications to any configuration files in /etc/php5/, those files are still in place, and can be referenced. Configuration files for PHP 7.0 now live in /etc/php/7.0.
Now update your Nginx server block with new php7.0 socket path.
fastcgi_pass unix:/run/php/php7.0-fpm.sock;
Save and exit the file. Now you are just a restart away.
sudo service nginx restart
Check your PHP version for Joomla admin > System > System Information. You can see your PHP version number there.
I strongly recommend to upgrade to PHP 7 because its PHP's later version and it will make your website blazing fast without doing anything.
0 notes
Photo

Getting Started with Vagrant on Windows
Vagrant is the hot new buzzword right now on the web, it seems like everyone must be using it.
If you don’t know, you’ll know Vagrant is a program to aid in creating virtual machines via a set of reusable options and configurations. Many people have shared their configurations and scripts via GitHub and elsewhere.
Vagrant is great if you want to spring up servers on-the-fly, to test programs, learn how to use Linux tools, or do stuff in a test environment before trying it on a production system. Do you want to learn to install the PHP Apache MySQL stack from scratch on a new server? Or play with setting up a cache server like Varnish in front of Apache? Even try your hand at Nginx? Vagrant makes things a bit simpler than using VirtualBox directly.
Let’s take a look at how to get Vagrant set up on Windows.
Installing the Megabits and Pieces
To get started, go ahead and install these tools:
VirtualBox
Vagrant
Get a copy of both PuTTY and PuTTYGen here.
Create Your Projects
Now that you have it all set up, you can start your first Vagrant project by creating a project folder, which will house the various configurations for each of your VMs. You’ll use the command line to run Vagrant commands from within these folders.
Create your first project folder and call it C:\vm\test\.
Tip: As a Windows user, you can quickly open a command prompt to your project by holding down shift and right-clicking the project folder, then choose “open command window here”.
Using Vagrant
The only commands we need to get servers up and running are vagrant init and vagrant up.
Open a command line and change directories to your test project folder. Then, type vagrant init and a new vagrant file will be created in the current directory. Open and read that file, there are lots of comments you can study. You can set shared folders between guest and host, turn on port forwarding, set the hostname, and more.
Browse the Vagrant Cloud for user-created base boxes you can use. For this example, we’ll use “ubuntu/trusty64” which is the “official” base box for Ubuntu Server 14.04 LTS (Trusty Tahr). Delete the Vagrant file you just created, and type the following:
Continue reading %Getting Started with Vagrant on Windows%
by Zack Wallace via SitePoint http://ift.tt/2iNe3r6
0 notes