#How to Install NodeJS
Explore tagged Tumblr posts
Visit Tumblr Blog
Explore Tumblr blogs with no restrictions, modern design and the best experience.
Last Seen Tumblr Blogs


Fun Fact
If you dial 1-866-584-6757, you can leave an audio post for your followers.
Text
Certainly! Let’s explore how to build a full-stack application using Node.js. In this comprehensive guide, we’ll cover the essential components and steps involved in creating a full-stack web application.
Building a Full-Stack Application with Node.js, Express, and MongoDB
1. Node.js: The Backbone of Our Application
Node.js is a runtime environment that allows us to run JavaScript on the server-side.
It’s built on Chrome’s V8 JavaScript engine and uses an event-driven, non-blocking I/O model, making it lightweight and efficient.
Node.js serves as the backbone of our application, providing the environment in which our server-side code will run.
2. Express.js: Simplifying Server-Side Development
Express.js is a minimal and flexible Node.js web application framework.
It provides a robust set of features for building web and mobile applications.
With Express.js, we can:
Set up middlewares to respond to HTTP requests.
Define routing rules.
Add additional features like template engines.
3. MongoDB: Storing Our Data
MongoDB is a document-oriented database program.
It uses JSON-like documents with optional schemas and is known for its flexibility and scalability.
We’ll use MongoDB to store our application’s data in an accessible and writable format.
Building Our Full-Stack Application: A Step-by-Step Guide
Setting Up the Environment:
Install Node.js:sudo apt install nodejs
Initialize a new Node.js project:mkdir myapp && cd myapp npm init -y
Install Express.js:npm install express
Creating the Server:
Create a basic Express server:const express = require('express'); const app = express(); const port = 3000; app.get('/', (req, res) => { res.send('Hello World!'); }); app.listen(port, () => { console.log(`Server running at http://localhost:${port}`); });
Defining Routes:
Define routes for different parts of our application:app.get('/user', (req, res) => { res.send('User Page'); });
Connecting to MongoDB:
Use Mongoose (a MongoDB object modeling tool) to connect to MongoDB and handle data storage.
Remember, this is just the beginning! Full-stack development involves frontend (client-side) work as well. You can use React, Angular, or other frontend libraries to build the user interface and connect it to your backend (Node.js and Express).
Feel free to explore more about each component and dive deeper into building your full-stack application! 😊 12
2 notes
·
View notes
Text
Looking for a good book on Angular.js? This is a book we liked and exclusively covering its review on our website.Pro AngularJS(By: Adam Freeman )Also known as Angular or Angular.js, AngularJS is a leading open-source web application framework that is used primarily for building dynamic JavaScript single-page applications.With increasing popularity of the framework, it has become necessary to understand the salient features for programming any software. Written by Adam Freeman, this is one of the best books on the topic that offers comprehensive information about the Angular.js framework.The 1st part of the book offers a step-by-step process to build a real application while it offers information about various features. This section also offers an introduction to JavaScript, CSS, and HTML for beginners.The second and third part of the book offers information regarding various features and their use. Adam Freeman is an experienced IT professional, who is now retired after working in many senior positions such CEO and Chief Technology Officer at a global bank.Who Should Read This Book?As per the author, this book is primarily targeted towards web developers with functional knowledge of CSS, HTML, and JavaScript. As the books start with the introduction and building of an actual application, this book is good for readers who have set up the required environment and are ready to start building an application. This book is also a good option for the people who believe in learning with a practical demonstration about how to create dynamic and rich web apps by using AngularJS and how to customize and extend this framework. This book is also targeted towards those developers who are involved in testing, refining, and deployment of AngularJS projects in any organization.What Is Good In This Book?As per the author, this book is primarily targeted towards web developers who have some functional knowledge regarding the development of websites. This book starts with the steps for building an online application, specifically an online sports store; however, the web developer can start building an online application similar to a sports store and include various features as required. The other parts of the book take up these features again one by one and explain their use with suitable examples. In this way, the book offers both practical and theoretical knowledge of AngularJS for readers.The author starts with MVC pattern concepts and its benefits with separation of presentation code, data, and logic. He further shows how to use various AngularJS features for the production of professional-quality results. The author carefully unwraps the nuts-and-bolts of the software framework in order to build an actual application.The language of the book is very easy, concise and includes detailed information to avoid common problems. The building of an actual application enhances the confidence of the learner and increases his or her thirst to know more. The author fulfills this desire by taking up every feature topic by topic, in other sections of the book.What Is Not So Good In This BookThe author has used many pre-installed programs such as Deployd, MongoDB, and NodeJS while describing the process of creating a new application. However, the Deployd environment is defunct in the software world today.The author mentions this fact but does not give an alternative. In most cases, the student is unable to install or run Deployd environment or it takes a lot of time. Also, most other software books define various features of the software first, and then they go on to build an application. However, this book reverses the order. Some people who like to learn in a sequential manner way do not appreciate this method.Although this book does not use a conventional method to teach AngularJS to readers, it uses an innovative and effective method to teach this software framework. AngularJS is one of the upcoming open-source web applications much in demand in the software world.
For the web developer who has functional knowledge of web designing languages such as CSS and HTML, this is one of the ideal books to buy, for developing dynamic web applications.
0 notes
Note
hey I hope this isn't super annoying, but do u have any tips for that neocities template situation u made a while ago? ive been stuck at setting up my node environment (it wont recognize it as an internal/external command operable program or batch file, if that helps.)
again i TOTALLY understand if this is just my problem to figure out but I cant find helpful info elsewhere...
i'm assuming you're on windows!
so, windows has an "environment variable" called PATH. an environment variable is basically just a value that can be used by any program that can see it. your command line uses PATH to look for executable files that it can run as commands
so for example, imagine you have an executable (.exe) file at, say: -> C:/FileMaker/filemaker.exe in this case, if you add "C:/FileMaker/" to your PATH, then you can go in your command line and type "filemaker", and it would run filemaker.exe.
i'm assuming you're trying to run npm in your command line. however, if there is no npm.exe in your PATH, and you try to run npm i, then it'll give you "not recognized as an internal/external command".
this means one of the following:
npm is not installed. it can be installed bundled with node.js at the node.js website, or through nvm (or nvm-windows). when you install it with node.js, make sure "add to PATH" is enabled!
2. npm IS installed, but it is not in your PATH. this is weird and i'm not sure why it would happen, but if you can find npm.exe, this is quite easily remedied.
search for system "environment variables" in your computer. i use win10; for win10, there is a button called "Environment variables..." that opens a second window. then you find Path and then double click that, which opens a third window, then you wanna add the folder path to the end of the list

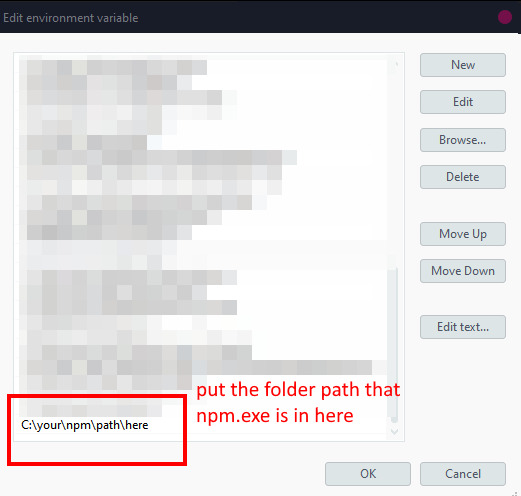
in case it helps and you need to track down npm.exe manually, i have two npm.exe files at these places, which might match your setup:
C:/Program Files/nodejs/npm.exe C:/Users/[user]/AppData/Roaming/npm/npm.exe
3. npm IS installed and it IS in your path, but your command line cannot see the environment variables. the primary reason for this would be that you did not restart the command line after installing node and/or updating the environment variables; go ahead and do that if you haven't. the secondary reason for this would be you're using a command line in something else (like vs code), and for some reason in that situation updating the environment variables can be very finnicky. try using your system's command line instead.
worst case scenario, you can also replace "npm" in your command line with the full path to npm. like: "C:/Program Files/nodejs/npm.exe i". this would work!
(sometimes using the "where" command helps to locate stuff, like "where npm", but i dont know how where actually works; for all i know it could be using PATH as well, in which case it would be useless for finding things not already in your PATH.)
0 notes
Text
How to Deploy Your Full Stack Application: A Beginner’s Guide
Deploying a full stack application involves setting up your frontend, backend, and database on a live server so users can access it over the internet. This guide covers deployment strategies, hosting services, and best practices.
1. Choosing a Deployment Platform
Popular options include:
Cloud Platforms: AWS, Google Cloud, Azure
PaaS Providers: Heroku, Vercel, Netlify
Containerized Deployment: Docker, Kubernetes
Traditional Hosting: VPS (DigitalOcean, Linode)
2. Deploying the Backend
Option 1: Deploy with a Cloud Server (e.g., AWS EC2, DigitalOcean)
Set Up a Virtual Machine (VM)
bash
ssh user@your-server-ip
Install Dependencies
Node.js (sudo apt install nodejs npm)
Python (sudo apt install python3-pip)
Database (MySQL, PostgreSQL, MongoDB)
Run the Server
bash
nohup node server.js & # For Node.js apps gunicorn app:app --daemon # For Python Flask/Django apps
Option 2: Serverless Deployment (AWS Lambda, Firebase Functions)
Pros: No server maintenance, auto-scaling
Cons: Limited control over infrastructure
3. Deploying the Frontend
Option 1: Static Site Hosting (Vercel, Netlify, GitHub Pages)
Push Code to GitHub
Connect GitHub Repo to Netlify/Vercel
Set Build Command (e.g., npm run build)
Deploy and Get Live URL
Option 2: Deploy with Nginx on a Cloud Server
Install Nginx
bash
sudo apt install nginx
Configure Nginx for React/Vue/Angular
nginx
server { listen 80; root /var/www/html; index index.html; location / { try_files $uri /index.html; } }
Restart Nginx
bash
sudo systemctl restart nginx
4. Connecting Frontend and Backend
Use CORS middleware to allow cross-origin requests
Set up reverse proxy with Nginx
Secure API with authentication tokens (JWT, OAuth)
5. Database Setup
Cloud Databases: AWS RDS, Firebase, MongoDB Atlas
Self-Hosted Databases: PostgreSQL, MySQL on a VPS
bash# Example: Run PostgreSQL on DigitalOcean sudo apt install postgresql sudo systemctl start postgresql
6. Security & Optimization
✅ SSL Certificate: Secure site with HTTPS (Let’s Encrypt) ✅ Load Balancing: Use AWS ALB, Nginx reverse proxy ✅ Scaling: Auto-scale with Kubernetes or cloud functions ✅ Logging & Monitoring: Use Datadog, New Relic, AWS CloudWatch
7. CI/CD for Automated Deployment
GitHub Actions: Automate builds and deployment
Jenkins/GitLab CI/CD: Custom pipelines for complex deployments
Docker & Kubernetes: Containerized deployment for scalability
Final Thoughts
Deploying a full stack app requires setting up hosting, configuring the backend, deploying the frontend, and securing the application.
Cloud platforms like AWS, Heroku, and Vercel simplify the process, while advanced setups use Kubernetes and Docker for scalability.
WEBSITE: https://www.ficusoft.in/full-stack-developer-course-in-chennai/
0 notes
Text
CookAgent

CookAgent is an artificial intelligence "AI" chatbot that helps you cook. For now is Windows Only.
How to install CookAgent.
Download this repo zip file.
Unzip the file.
Install Nodejs. If you do not know how, go to this URL
Open the folder you downloaded and double-click the install.bat file.
Your browser will open the CookAgent application.
This project is for fun. Play and test the CookAgent its for free.
0 notes
Text
Connect MongoDB with Node.js
In this new post, I show how to connect our application to #MongoDB using #Nodejs. Send users and test your application using an #APIs client.
In this new post, I show how to connect our application to MongoDB using Node.js. Let’s start with the installation of MongoDB if you want to test your application locally. The source code of this post is available on GitHub. Install MongoDB First, if we want to play locally on our laptop, we have to install MongoDB. Download the installer from this link and follow the instructions. After you…
0 notes
Text
Article on How to install Angular on Ubuntu
Ubuntu is an open source operating system from the house of Linux. You will get security, support, and managed services from the publisher of Ubuntu with cutting age technology .To install Angular on Ubuntu, you first need to have Node.js and npm (Node Package Manager) installed . Then you will able install Angular at your system
Here's a step-by-step guide:
1. First install Node.js and npm :
- Open your terminal (Ctrl+Alt+T).
- Run the following commands to update your package index and install Node.js and npm. Wait for sometime , it may take a little bit time to install.
sudo apt update
sudo apt install nodejs
sudo apt install npm
2. To verify the installation of Node.js , run the following command
node -v
The terminal will return like this
v20.9.0
That means your node.js installation in successfull.
3. Now we need to Install Angular CLI
- CLI stands for Command Line Interface
- In the Terminal type the following
sudo npm install -g @angular/cli
It will also take some time
To verify that Angular CLI has been installed successfully, run this command:
ng version
or
ng v
- You should see output displaying the Angular CLI version, Node.js version, and other related information.

4. How to create a New Project ?
- After installing Angular CLI, you can create a new Angular project by navigating to the directory where you want to create the project and running:
ng new your-app-name
- Here " your-app-name " should be you own app name.
5. A new project will be created . Several projects file automatically generated
your-app-name.css for writing style sheet
your-app-name.html for writing html
your-app-name.ts for writing typed script
you have to create new folder for images , videos other file if required.
6. Serve the Angular Application
- Once the project is created, navigate into the project directory:
cd my-angular-app
- Then, serve the application using the Angular CLI:
ng serve
- This command will build the application and serve it locally. You can access it by navigating to http://localhost:4200 in your web browser.
That's it! You have successfully installed Angular on your Ubuntu system. You can now start building Angular applications and i am sure you will love to work Angular in Ubuntu.
0 notes
Text
How to Send Form Data Using Axios Post Request in React

Many developers use React, a leading programming language for app development. Industry leaders prefer React for cross-platform application development. A proper understanding of React and the library is essential to work well for the project. If you want to handle react project properly, you can hire react developer and finish the task.
As a React developer, sending form data to a server in react with the Axios. Processing axios is an important javascript library. It is the best way to make HTTP requests from a browser or nodejs. Individuals must understand how to use the Axios to make a post request and send form data.
About Axios:
Axios acts as an HTTP client for JavaScript that works in browser and node.js. It is an easy-to-use and lightweight library that delivers the perfect interface for HTTP requests. Axios can build on top of XMLHttpRequest API and fetch API.
On the other hand, it supports promise API and intercepts responses. Axios is responsible for transforming requests, canceling requests, and response data. It is excellent for changing JSON data and provides client-side support to safeguard from the XSRF. It supports browsers like Safari, Mozilla Firefox, Google Chrome, Edge, and IE.
Form data:
Form data is the encoding type that transfers to the server for processing. Other encoding types can be utilized for non-file transfer like plain, text, application/x-www-form-urlencoded, and a lot more. React developer helps you in sending form data in react projects with Axios.
If form-data lets files to include in form data, plain or text propel data as plain text without encoding. It is applicable for debugging and not for production. Application/x-www-form-urlencoded instructs data as a query string. Encoding type can be included in HTML with enctype attribute.
Send form data in the Axios request:
Sending form data in the React app to the server is an important task among many developers. Axios is an important library for making HTTP requests quickly in React. You can understand the important process of sending form data in the react project using Axios.
While using Axios, developers easily make post requests and set the data they wish to send as a request body. If you carry out this process, you can utilize the Axios.post() method that acquires two arguments. It obtains arguments like server URL and data you need to send.
FormData object joins two fields with matching values. It makes HTTP requests to specific URLs with a FormData object. It uses them as a request body and sets the content-type header to multipart or form data.
Once the request is successful, the response can log into the console. If the request is abortive, the error response can log to the console. Using Axios in the project requires installing Axios first. You can install it with the proper command.
Launch react project:
Whether you have a project already, you don’t need to launch. If you don’t have any projects on your device, you can create them first.
You can open a terminal and run the required command.
npx create-react-app axios-form
Once project creation is over, you can go to the project directory.
Install axios:
To use Axios for post requests in the React project, you must install it properly. You can use the following command to install the Axios.
npm install axios
After successfully installing the Axios, you can carry out sending the form data in a project with the Axios post request.
Create form component:
When it comes to the React project, you must make a new component for form. You can name it and save it with .js
// src/Form.js
import React, { useState } from ‘react’;
import axios from ‘axios’;
function Form() {
const [formData, setFormData] = useState({
name: ‘’,
email: ‘’,
});
const handleChange = (e) => {
const { name, value } = e.target;
setFormData({ …formData, [name]: value });
};
const handleSubmit = async (e) => {
e.preventDefault();
try {
const response = await axios.post(‘YOUR_API_ENDPOINT’, formData);
console.log(‘Form data submitted successfully:’, response.data);
} catch (error) {
console.error(‘Error submitting form data:’, error);
}
};
return (
<form onSubmit={handleSubmit}>
<label>
Name:
<input
type=”text”
name=”name”
value={formData.name}
onChange={handleChange}
/>
</label>
<br />
<label>
Email:
<input
type=” email”
name=” email”
value={formData.email}
onChange={handleChange}
/>
</label>
<br />
<button type=”submit”>Submit</button>
</form>
);
}
export default Form;
In this component, you can label the form with two input fields. You can utilize the useState hook to deal with form data. Axios is ideal for making the post request when the form submits successfully.
Import and apply form component:
After creating the form component, you need to import and apply the form component to the project.
// src/App.js
import React from ‘react’;
import Form from ‘./Form’;
function App() {
return (
<div className=”App”>
<h1>React Form with Axios POST Request</h1>
<Form />
</div>
);
}
export default App;
Replace your_api_endpoint:
In the form component, you can replace your_api_endpoint with the actual endpoint. It is easy to send the form data in a project and complete them easily
Run React application:
After the above step is over, it is time to run the React application with the following command like
npm start
React application is running and allows you to access it in the browser. You can fill out the form and click the submit button. You must view the form data that is sent to a specified API endpoint in the browser console. You can try the necessary steps for the form data sending in the project utilizing the Axios post request.
Conclusion:
Overall, the above details are useful to understand the process of sending the form data in react with Axios. With the help of a hire react expert, you can get the proper guidance and support to handle this process.
Experts assist you in integrating the form component with the server-side endpoint and dealing with the data effectively in a project. Axios makes a form data sending process in the react app development project. So, you can work with the skilled and knowledgeable react expert and obtain an ideal solution for challenges.
The React Company : Empowering Developers in React Technology.
Don’t Hesitate to Get in Contact for More Info.
#hire react developer#React Development Services#React js development services#hire react js engineers#react js experts
0 notes
Text
How to Install Node.js on Linux Using Different Methods?
Node JS is an open-source, back-end Javascript code outside a web browser. Here are the steps on how to install Node.js on Linux using various methods. hire node js develoepr
Node.js is a cross-platform that runs on the V8 engine and executes Javascript code outside a web browser. It also allows developers to use Javascript to write command-line tools and run scripts server-side to produce dynamic web page content before the page is sent to the user’s web browser.
.js is a standard filename extension for Javascript code, but Node.js doesn’t refer to a file in this context.
Overview of Node.js
Node.js allows the creation of web servers and networking tools using Javascript and modules that handle various core functionalities. Javascript is the only language that Node.js supports natively. As a result, Node.js applications can be written in Clojure script, Dart, and others. It is officially supported on macOS, Linux, and Microsoft Windows 8.1.
Node.js brings event-driven programming to web servers and allows the development of fast web servers in JavaScript. It connects the ease of a scripting language with the power of Unix network programming. It was built on top of Google’s V8 Javascript engine since it was open-sourced under the BSD license. The Node.js developer community has developed web frameworks to accelerate the development of applications. The frameworks include Socket.IO, Derby, Express.js, Feathers.js, and others.
Modern desktop IEDs provide debugging features for Node.js applications. These IDEs include JetBrains, Microsoft Visual Studio, or TypeScript with Node definitions. It is supported across several cloud hosting programs like Google Cloud Platform, Joyent, and others.
Install NodeJS on Linux Using NVM
This is the best way to install Node.js. NVM is a bash script used to manage multiple Node.js versions. It allows us to install and uninstall Node.js and switch from one version to another. The best thing is we can install any available Node.js version of our choice using NVM.
Install Node.js on Linux using your distribution’s package manager
It is available in the default repositories of most Linux distributions. If you want to have a stable Node.js on your Linux, you can install it using the distribution package manager.
On Arch Linux and its derivatives like Antergos, Manjaro Linux, run the “$ sudo pacman -S nodejs npm” command to install it.
On RHEL, CentOS, you need to enable the EPEL repository first. $ sudo yum install epel-release and then install Node.js using $ sudo yum install nodejs npm command.
For More Info: mobile app development company in india
React Native Development Company
web development
0 notes
Text
How to Generate and Download PDF in Node JS
PDF (Portable Document Format) files are an effective way to save and share HTML documents while preserving their original layout and content. Using a suitable HTML to PDF conversion library ensures that the file keeps its exact layout and content, regardless of the software, operating system, or device it's viewed on. Moreover, PDFs are versatile, supporting a wide range of content types like vector graphics, audio, animations, interactive fields, buttons, hyperlinks, and even 3D models. This versatility makes PDFs a popular choice for creating portfolios, reports, and presentations.
But how do you generate a PDF file on the web server side? Besides using an HTML-to-PDF converter, you will need Node.js on the web server.
About Node.js
Node.js is a free, open-source server environment that can run on various platforms, including Mac OS X, Unix, Windows, and Linux. It relies on JavaScript on a server to open a file and return its content to the client. One of its benefits is eliminating wait times, as it can proceed with the next request. Plus, it runs memory-efficient non-blocking and single-threaded asynchronous programming.
Using Node.js
Having a comprehensive HTML to PDF library simplifies downloading web pages and online invoices into a more portable format. In addition, it helps to create and download a PDF in NodeJS. Here’s how:
After downloading Node.js to your web server, pick an appropriate installer and run and install it without changing the default settings.
With a new project, make a new folder called pdf make
Go to that folder and run the command line with npm install pdf make to create the index.js
Add the code in the index.js file to create the PDF file.
Why Node.js?
Node.js is a versatile solution that can do the following:
Create dynamic page content
Generate, read, open, delete, close, or write files on the server
Obtain form data
Delete, modify, or add data to the database
Simplify HTML to PDF conversion.
An online HTML-to-PDF converter can be a more convenient alternative to Node.js. With the right HTML to PDF library, it can convert any HTML file quickly and accurately. Just be sure to use a reliable product like HiQPdf Software.
Download HiQPdf today and start converting HTML to PDF quickly and securely. You can also try the online demo to learn more about how it works.
0 notes
Video
youtube
Nestjs Framework Installation & Project Setup Tutorial for JavaScript De... Full Video Link - https://youtu.be/TZeIqdlLOUQ Check out this new video on the CodeOneDigest YouTube channel! Install Nestjs framework & setup project. Learn how to install Nest framework & setup nestjs project. #video #nestjs #typescript #nodejs #javascript #codeonedigest@java @awscloud @AWSCloudIndia @YouTube @codeonedigest #typescript #javascript #nestjs #javascript #node #nestjstutorial #nestjsmicroservices #nestjsvsexpress #nestjsinstallation #nestjsproject #nestjsprojectsetup #nestjstutorialforbeginners #nestjsexplained #nestjsexampleproject #nestjsmodulesexplained #nestjscontroller #nestjsproviders #nestjsmicroservicestcp #nestjsapplication #nestframeworktutorial #nestjsframework #nestjsfulltutorial #nestjsfullcourse #nestjsproject #nestjsprojecttutorial #nestjsconcepts #nestjs
1 note
·
View note
Text
How to Install Node.js and NPM on Windows and Mac?

Quick Overview:
This guide gives a fast and simple stroll through for introducing Node.js and NPM on two Windows and Mac. From downloading the right rendition to confirming the establishment, we cover every one of the essential moves toward preparing your set up and to begin creating.
Introduction:
Here is our detailed guide on introducing Node.js and NPM on Windows and Mac! Node.js has turned into a foundation in current web improvement, offering a productive and versatile method for making network applications. Close by it, Node Package Manager (NPM) fills in as the help for overseeing bundles in Node.js. Whether you’re a fledgling venturing into the universe of improvement or an accomplished proficient hoping to find a way to improve your abilities, this guide will walk you through the establishment cycle in a clear, bit-by-bit way.
What is NPM
NPM, or Node Package Manager, is a priority apparatus in the domain of JavaScript and online development. It is the default package manager for Node.js, a Node.js runtime.
NPM is utilized to oversee project conditions by introducing, refreshing, and dealing with the numerous libraries and bundles that an undertaking might require. Little utilities to frameworks are examples of these packages.
Each bundle incorporates a form number and a rundown of conditions, guaranteeing that ventures have all that they need to flawlessly execute. Moreover, NPM provides an enormous assortment of open-source packages, making it a significant asset for developers wishing to utilize existing arrangements or offer their work to others.
This capacity further develops improvement processes as well as empowers a worldwide developer community of sharing and cooperation.
Components of NPM
Package Registry: NPM houses a tremendous online database set of public and confidential packages, permitting developers to transfer and share their code, as well as download and utilize code shared by others. This registry is a broad vault that contains a huge number of bundles, making it an indispensable asset for JavaScript developers.
Command Line Interface (CLI): NPM gives an order line interface that developers use to collaborate with the package registry, oversee project conditions, and run scripts. This CLI instrument is fundamental for introducing, refreshing, and overseeing packages within a project, and it offers different orders to smooth out these processes.
Package.json File: The package.json file is a key component in any Node.js project using NPM.It contains metadata about the task, like name, adaptation, and conditions. This document is utilized to give data to NPM that permits it to distinguish the undertaking as well as handle the venture’s conditions.
What’s NodeJS?
Node.js is a cross-stage open-source runtime climate for executing JavaScript code beyond a program. JavaScript was previously utilized to a great extent for client-side prearranging in web browsers.
Node.js, then again, permits developers to use JavaScript for server-side scripting, which includes running contents on the server to produce dynamic website page content before the page is transmitted to the user’s web browser.
Subsequently, Node.js represents a “JavaScript all over” worldview, uniting on the online application improvement around a solitary programming language as opposed to isolating dialects for server-and client-side contents.
Its non-blocking, occasion-driven architecture is considered magnificent execution, making it ideal for creating versatile network applications, for example, web servers, chat apps, and real-time communication apps.
Node.js utilizes the V8 JavaScript engine, which is the very motor that drives Google Chrome and gives astounding execution and rich capacities for server-side applications.
To begin with Node.js and NPM, you’ll require a couple of fundamental components:
Operating System Compatibility: Node.js and NPM are cross-stage and might be introduced on Windows, macOS, and Linux. For the best similarity and security, ensure your working framework is state-of-the-art.
Node.js Installation: In light of the fact that NPM is incorporated with Node.js, you should initially introduce Node.js. It is accessible for download from the Node.js site. Select the right adaptation for your situation; for the most part, the LTS (long-term maintenance) variant is liked for its unwavering quality and broadened support.
Text Editor or Integrated Development Environment (IDE): A decent code manager or Integrated Development Environment (IDE) is fundamental. Visual Studio Code, Brilliant Message, and Atom are phenomenal decisions for JavaScript and Node.js improvement.
fundamental JavaScript Knowledge: In light of the fact that Node.js is a JavaScript runtime, having a central comprehension of JavaScript is required. Despite the fact that you needn’t bother to be a specialist, knowledge of JavaScript syntax and standards will be very advantageous.
Skills in Command Line Interface (CLI): Node.js and NPM frequently cooperated with utilizing an order line interface. Fundamental CLI capacities are required, for example, directories and running commands.
Internet access is required to download Node.js and NPM packages, as well as to access online resources, documentation, and communities.
Understanding of Version Control (Optional but Recommended): Comprehension of a rendition control framework, for example, Git can be helpful, particularly while dealing with bigger tasks or helping out others.
Curiosity and eagerness to learn: The JavaScript biological system is enormous and steadily evolving. A learning and exploring mentality is pivotal in staying aware of new devices, systems, and best practices.
How to Install Node.js and NPM on Windows and Mac?
Installing Node.js and NPM on both Windows and Mac is a straightforward process. Here’s a step-by-step guide for both operating systems:
For Windows:
Download Node.js:
Visit the official Node.js website: nodejs.org.
You’ll see two versions available for download: the LTS (Long Term Support) version and the Current version. Choose the LTS version for stability.
Click on the “Windows Installer” link to download the .msi file suitable for your system (32-bit or 64-bit).
Run the Installer:
After the download, run the .msi file.
Follow the prompts in the Setup Wizard. Accept the license agreement and click ‘Next’.
Choose the installation location and click ‘Next’.
Make sure “NPM package manager” is selected in the components to install. Click ‘Next’.
Allow the installer to add Node.js to the PATH.
This step is crucial for running Node.js from the command line.
Finalize Installation:
Click ‘Install’ to begin the installation.
Once completed, click ‘Finish’ to close the Setup Wizard.
Verify Installation:
Open Command Prompt.
Type node -v to check the Node.js version.
Type npm -v to verify NPM installation.
For Mac:
Download Node.js:
Visit nodejs.org.
Choose the LTS version for stability.
Click on the “macOS Installer” link to download the .pkg file.
Run the Installer:
Open the downloaded .pkg file.
Follow the prompts in the installation wizard. Agree to the terms, and continue with the default settings.
Using Homebrew (Alternative Method):
If you prefer using a package manager, you can install Node.js and NPM using Homebrew.
First, install Homebrew by opening the Terminal and running:
Then, install Node.js with:
Verify Installation:
Open Terminal.
Run node -v to check the Node.js version.
Run npm -v to ensure NPM is installed.
By following these steps, you will have successfully installed Node.js and NPM on your Windows or Mac computer, setting you up for developing applications with Node.js.
How to Install Node Using “Homebrew”?
Step 1-
Install Node.js and NPM:
Installing Node.js and NPM on your Mac is very easy using Homebrew. Homebrew simplifies the process by managing the download, unpacking, and installation of Node and NPM for you.
First, open your Terminal and run the following command:
brew install node
This command will download and install the necessary files for Node.js and NPM. Wait for the process to complete.
Step 2: Verify Node.js and NPM Installation
After installing Node.js and NPM, it’s important to verify that the installation was successful. This process is similar to verifying the installation on a Windows system.
In your Terminal, run the following commands:
For Node.js, type and run:
node -v
This command displays the installed version of Node.js.
For NPM, type and run:
npm -v
This command displays the installed version of NPM.
Homebrew also helps in keeping Node.js and NPM up to date. Ensure that you have the latest version of Node package available in Homebrew.
If you need to update Homebrew itself, run the following command:
brew update
To upgrade to the latest version of Node.js and NPM, execute
brew upgrade node
This command updates Node.js and NPM to their latest available versions.
By following these steps, you will have successfully installed and verified Node.js and NPM on your Mac using Homebrew, with the added advantage of easy updates in the future.
This format provides a clear and concise guide for Mac users to install and verify Node.js and NPM using Homebrew, along with instructions for keeping their installations up to date.
How to Install Node Using NVM – Node Version Manager?
Installing Node.js using NVM (Node Version Manager) is a great choice, especially if you need to manage multiple versions of Node.js. NVM allows you to install and switch between different Node versions with ease. Here’s how to do it:
For Linux and macOS:
Install NVM:
Open your terminal.
To install NVM, run the following curl or wget command:
curl -o- https://raw.githubusercontent.com/nvm-sh/nvm/v0.39.1/install.sh | bash
or
wget -qO- https://raw.githubusercontent.com/nvm-sh/nvm/v0.39.1/install.sh | bash
The script clones the NVM repository to ~/.nvm and adds the source line to your profile (~/.bash_profile, ~/.zshrc, ~/.profile, or ~/.bashrc).
Activate NVM:
To activate NVM, either close and reopen your terminal or run the following command:source ~/.bashrc
Alternatively, for zsh users: source ~/.zshrc.
Check if NVM Was Installed Successfully:
Run nvm –version to check if NVM was installed successfully.
Install Node.js:
Now, you can install Node.js. To install the latest version, run:
nvm install node
To install a specific version, use:
nvm install 14.17.3
(Replace 14.17.3 with your desired version.)
Switch Between Node Versions:
You can switch between installed versions using:
nvm use 14.17.3
Set a default Node version with:
nvm alias default 14.17.3
Verify Installation:
Check the Node version using node -v.
Check the NPM version using npm -v.
For Windows:
NVM for Windows is a separate project from NVM. To install:
Download NVM for Windows:
Go to the NVM for Windows repository on GitHub (github.com/coreybutler/nvm-windows).
Download the latest installer (nvm-setup.zip).
Run the Installer:
Extract and run the nvm-setup.exe file.
Follow the setup wizard to install NVM for Windows.
Install and Use Node:
Once installed, open the command prompt and use NVM commands similar to Linux/macOS to install and use different Node.js versions.
By using NVM, you gain the flexibility to manage multiple Node.js versions for different projects, making it an ideal tool for any JavaScript developer’s toolkit.
Key Pointers to Consider:
Compatibility with Existing Projects: Ensure the Node version you select is compatible with the libraries and frameworks you’re using in your projects.
Environment Consistency: For teams, maintain consistency in Node versions across development, testing, and production environments to avoid version-related issues.
Access to Latest Features vs. Stability: Balance the need for new features available in the latest Node releases against the stability and support offered by LTS (Long Term Support) versions.
Community and Ecosystem Support: Consider the level of community and technical support available for the Node version you choose, including documentation, forums, and third-party tools compatibility.
Conclusion
Installing Node.js with NPM on Windows and Mac is a simple operation that unlocks a world of possibilities in modern web development. Whether you’re a seasoned developer or just getting started, the procedures detailed in this tutorial give a clear route to efficiently setting up your work environment.
Remember that selecting the proper Node.js version is critical, balancing the latest features with the reliability of LTS versions. After successfully installing Node.js with NPM, you are now ready to build scalable and high-performance apps, manage package dependencies, and contribute to a wide ecosystem of open-source libraries. Accept the adventure that awaits you in the dynamic and thrilling world of JavaScript development!
Originally published by: How to Install Node.js and NPM on Windows and Mac?
#Nodejsinstallation#InstallingNodejsonWindows#InstallingNodejsonMac#NPMsetuptutorial#WindowsNodejsinstallation#MacNodejsinstallationguide#NodejsandNPMsetup#NodejsinstallationGuide
0 notes
Text
Build a Twitch Clone with the NODEJS AND FLUTTER
Twitch, the popular live streaming platform, has taken the world by storm. With millions of users tuning in daily to watch their favorite streamers, it's no wonder that many entrepreneurs and developers are eager to create their own platforms similar to Twitch. If you've ever wondered how to build a Twitch clone, you're in the right place. In this article, we'll delve into the world of live streaming and guide you through the process of creating your very own Twitch-like platform using Node.js and Flutter.
1. What is a Twitch Clone?
Before diving into the technical aspects, let's understand what a Twitch clone is. A Twitch clone is a platform that allows users to broadcast live video content to an audience in real-time. It typically includes features like user profiles, chat functionality, and monetization options. Creating a Twitch clone offers a unique opportunity to tap into the ever-growing demand for live streaming content.
2. Why Choose Node.js and Flutter?
Choosing the right technologies is crucial. Node.js, known for its scalability and real-time capabilities, is an excellent choice for the backend of your Twitch clone. On the other hand, Flutter, a framework by Google, is perfect for building a cross-platform mobile app with a beautiful user interface. The combination of Node.js and Flutter ensures a seamless user experience.
3. Setting Up Your Development Environment
To kickstart your project, you'll need to set up your development environment. Install Node.js and Flutter on your system and configure them for your project. This step is essential to ensure smooth development and testing.
4. Building the Backend with Node.js
Your Twitch clone's backend is the brain behind the operation. Develop features like user registration, video streaming, and chat functionality using Node.js. Node.js's event-driven, non-blocking I/O model is perfect for handling multiple concurrent users.
5. Creating the Frontend with Flutter
The frontend of your Twitch clone is what users will interact with. Flutter allows you to design a stunning and responsive user interface. Implement features like user profiles, video playback, and interactive chat rooms. Make your app visually appealing to keep users engaged.
6. User Authentication and Profiles
User authentication is vital to ensure the security and privacy of your platform. Learn how to implement secure user registration and profiles. Make it easy for users to create accounts and personalize their profiles.
7. Live Streaming Functionality
The heart of your Twitch clone is live streaming. Dive deep into the technicalities of streaming live video. Understand codecs, streaming protocols, and transcoding to ensure a seamless streaming experience for your users.
8. Chat and Interaction Features
Build a robust chat system that allows users to interact with each other and streamers. Implement features like emotes, whispers, and moderation tools to create an engaging community.
9. Monetization Strategies
Explore different monetization strategies, such as ads, subscriptions, and donations. Learn how to integrate payment gateways and reward your content creators.
10. Testing and Debugging
Every software project requires thorough testing and debugging. We'll guide you through best practices for testing your Twitch clone and provide tips for efficient debugging.
11. Deploying Your Twitch Clone
Once your platform is ready, it's time to deploy it to the web. Learn how to choose a hosting provider, configure your server, and make your Twitch clone accessible to users worldwide.
12. Growing Your User Base
User acquisition is a critical aspect of any online platform. Discover marketing strategies and tactics to attract and retain users. Building a strong user base is key to the success of your Twitch clone.
13. Legal and Ethical Considerations
Operating a live streaming platform comes with legal and ethical responsibilities. Understand copyright issues, content moderation, and user guidelines to maintain a safe and legal environment for your users.
14. Challenges and Solutions
Building a Twitch clone is no small feat. We'll discuss common challenges you may encounter during development and provide solutions to overcome them.
15. Conclusion
In conclusion, creating a Twitch clone app script using Node.js and Flutter offers an exciting opportunity to enter the world of live streaming. With the right technology stack and careful planning, you can build a platform that attracts a wide audience and content creators. Don't miss out on the live streaming revolution—start building your Twitch clone today!
0 notes
Text
Mastering Node.js Events with WebTutor: Unleash the Power of Event-Driven Development
Node.js, known for its event-driven architecture, has transformed the way we build scalable and responsive web applications. Understanding Node.js events is pivotal for any web developer looking to harness this power. In this blog, we will delve into the significance of Node.js events and how WebTutor can be your guiding star in mastering them.
Node.js Events: The Heartbeat of Event-Driven Development
Node.js is built around an event-driven, non-blocking I/O model. Events are at the core of this architecture, allowing your applications to respond to various actions and conditions asynchronously. Here's why grasping Node.js events is essential:
Responsive Applications: Event-driven development enables your applications to respond quickly to user interactions, making them highly responsive and user-friendly.
Scalability: Node.js' event loop can handle thousands of concurrent connections efficiently, making it suitable for building scalable applications.
Modularity: Events encourage modularity, making it easier to organize your code and add new features as your application grows.
Real-Time Features: Events are ideal for implementing real-time features like chat applications, live notifications, and online gaming.
WebTutor: Your Gateway to Event-Driven Mastery
WebTutor is your trusted companion on the journey to becoming an event-driven development expert with Node.js. Here's why it's the perfect platform for mastering Node.js events:
Comprehensive Event-Based Courses: WebTutor offers a wide range of Node.js event-based courses, catering to beginners and experienced developers alike. Whether you're starting from scratch or diving into advanced topics, there's a course for you.
Hands-On Learning: WebTutor believes in practical learning. Their courses are filled with interactive exercises and projects that allow you to apply your knowledge in real-world scenarios.
Expert Instructors: The platform features instructors who are Node.js experts with a passion for teaching. They provide valuable insights, tips, and guidance to help you become proficient in Node.js events.
Flexible Learning: WebTutor's flexible course structure accommodates your schedule, whether you have a full-time job or other commitments. Learn at your own pace and convenience.
Certification: Upon completing a course, WebTutor offers certification, validating your Node.js event-driven development skills and enhancing your career prospects.
Community Support: WebTutor fosters an active online community where you can connect with fellow learners, share experiences, and seek assistance when needed.
Read more: An Introduction To Node.js: Server Side JavaScript
Conclusion
Node.js events are the backbone of event-driven development, a critical paradigm in modern web application development. By mastering Node.js events, you'll be equipped to build applications that are not only highly responsive but also scalable and modular.
Don't miss out on the opportunity to become an event-driven development expert. Embark on your journey with WebTutor today, and let it guide you toward unlocking the full potential of Node.js events. Your future in web development is bright, and WebTutor is here to illuminate the path!
Learn More
Learn online NodeJS Installation
Learn Online NodeJS Https Module
Learn online NodeJS Express.JS
#Learn Online Nodejs#Online Nodejs Tutorial#Introduction to Nodejs#Nodejs tutorials#Learn Nodejs online#Nodejs Introduction#Node.js Events#Learn Node.js Events#Online Node.js Events#Understanding Node.js events#Node.js Events Tutorial#Web Tutor#Webtutor
0 notes
Text
Serverless NodeJS App Development Guide
In the ever-evolving landscape of software development, the combination of serverless architecture and NodeJS has gained immense popularity for its ability to create applications that are both efficient and scalable. This comprehensive guide will walk you through the process of building serverless applications with NodeJS, from understanding the fundamentals to implementing advanced features. Whether you're a seasoned developer or a newcomer, this guide will equip you with the knowledge to create cutting-edge serverless applications that meet the demands of modern development. Serverless NodeJS App Development Guide NodeJS, a powerful runtime environment, coupled with the serverless architecture, offers developers a unique approach to building applications. This section explores the key aspects of the Serverless NodeJS App Development Guide. Understanding Serverless Architecture and Its Benefits Serverless architecture, despite its name, doesn't mean there are no servers involved. Rather, it abstracts the server management away from developers. With the Serverless NodeJS App Development Guide, you'll explore the benefits of reduced operational overhead, auto-scaling, and cost optimization that come with serverless architecture. Leveraging the Power of NodeJS for Serverless Applications NodeJS's non-blocking I/O and event-driven architecture make it a natural fit for serverless development. Learn how to harness its asynchronous capabilities to create responsive and efficient applications. Setting Up Your Development Environment Get started by setting up a development environment tailored for serverless NodeJS applications. We'll guide you through installing NodeJS, npm packages, and essential tools for smooth development. Building Your First Serverless NodeJS App Follow along with a hands-on example to build a simple serverless application. Learn the basics of creating Lambda functions, integrating with API Gateway, and deploying your app to the cloud. Implementing Serverless APIs with ExpressJS Explore how to create robust APIs using the popular ExpressJS framework within a serverless context. Build RESTful APIs that communicate seamlessly with various services. Data Storage and Management in Serverless Environments Dive into various strategies for storing and managing data within a serverless architecture. Discover the integration of databases, object storage, and caching mechanisms. Authentication and Authorization in Serverless Apps Security is paramount. Learn how to implement authentication and authorization mechanisms to ensure your serverless NodeJS applications are protected from unauthorized access. Monitoring and Logging for Serverless Applications Effective monitoring and logging are crucial for maintaining healthy applications. Uncover tools and techniques to gain insights into the performance and behavior of your serverless apps. Automating Deployment and CI/CD Pipelines Efficiently manage deployments with automated CI/CD pipelines. Learn how to set up continuous integration and continuous deployment for your serverless NodeJS applications. Error Handling and Troubleshooting Even in a serverless world, errors can occur. Explore best practices for error handling, debugging, and troubleshooting to ensure smooth operation of your applications. Advanced Serverless Patterns and Architectures Take your skills to the next level by exploring advanced serverless patterns such as fan-out/fan-in, event sourcing, and microservices architecture using NodeJS. Performance Optimization Techniques Fine-tune the performance of your serverless NodeJS applications with techniques like cold start mitigation, optimized code structure, and efficient resource management. Serverless Security Best Practices Delve into serverless security best practices, including managing secrets, implementing least privilege principles, and safeguarding against common vulnerabilities. Real-world Use Cases and Case Studies Discover real-world applications of serverless NodeJS development across various industries. Learn from case studies that highlight successful implementations and lessons learned. Serverless DevOps and Collaboration Explore how DevOps practices align with serverless development. Learn how to collaborate effectively in a serverless development team and manage versioning and deployments. Future Trends in Serverless NodeJS Development Stay ahead of the curve by exploring emerging trends in serverless NodeJS development. Gain insights into the future of serverless technology and how it intersects with NodeJS. FAQs How does serverless architecture save costs for developers? Serverless architecture allows developers to pay only for the compute resources they consume, eliminating the need to provision and manage servers. This results in cost savings as resources are scaled automatically based on demand. Can I use my preferred npm packages in a serverless environment? Yes, you can use npm packages in a serverless environment. However, be mindful of the package size, as it can affect the cold start performance of your functions. How do I handle long-running tasks in a serverless app? For long-running tasks, consider breaking them into smaller, manageable chunks using event-driven patterns. Alternatively, offload such tasks to specialized services that are better suited for longer processing times. Is serverless architecture suitable for large-scale applications? Absolutely. Serverless architecture's auto-scaling and event-driven nature make it well-suited for large-scale applications with varying workloads. What are the key security considerations for serverless NodeJS apps? Key security considerations include managing environment variables and secrets securely, implementing proper authentication and authorization mechanisms, and regular security audits. How can I mitigate cold start latency in serverless applications? To mitigate cold start latency, consider optimizing your code for faster initialization, implementing warm-up strategies, or using provisioned concurrency to keep functions warm. Conclusion Embark on a journey into the world of Serverless NodeJS App Development with confidence. By following this guide, you'll be equipped to create applications that combine the flexibility of serverless architecture and the power of NodeJS. From setting up your development environment to deploying sophisticated serverless applications, this guide covers the full spectrum of topics you need to know. Stay up-to-date with emerging trends and continuously refine your skills to remain at the forefront of this dynamic field. Read the full article
0 notes
Text
Using NodeJS with React.js | Perfect Stack for Modern App Development
React is a well-known front-end JavaScript package that creates captivating user interfaces. On the other hand, developers can design scalable web apps with great functionality and minimal latency using the server-side JavaScript environment Node.js. But combining React with Node.js is highly helpful for creating full-stack contemporary online apps. This article discusses why you should combine these two cutting-edge technologies and how they brilliantly function to create maintainable apps that run swiftly.
Introducing Node.js
A JavaScript run-time environment called Node.js was developed using Google Chrome's V8 engine. It is an open-source programming language that accelerates development and helps create reliable backends that can run across various platforms.
Introducing ReactJS
Creating reusable UI elements is made feasible by the front-end JavaScript package ReactJS. It makes it easier to create huge, dynamic web programs that are data-driven. It also provides excellent functionality and responsiveness on a number of devices. ReactJS is widely used on websites that use the JavaScript library. Users can build scalable online applications with attractive UIs, dashboards, and front-ends thanks to React's straightforward architecture.
Why Combine Node.js and React for Modern Web App Development?
1. Scalability
2. MERN Stack
3. JSON APIs
4. Real-time Data
5. Fast Development
6. SPAs (Single Page Applications)
7. Single Language for Front-end and Back-end
8. Ability to install packages with NPM
9. Organized Process
Your web development project might be advanced with a great deal less time and work if you use React and Node.js. To create compelling online applications, you must collaborate with qualified full-stack developers. If you want to design a modern web project using React and Node, you should work with devoted and knowledgeable professionals. This article will help you to get all information about the Using NodeJS with React.js for Modern App Development.
0 notes