#How to Setup My Amped Router
Explore tagged Tumblr posts
Visit Tumblr Blog
Explore Tumblr blogs with no restrictions, modern design and the best experience.
Last Seen Tumblr Blogs


Fun Fact
The “We are the 99%” Tumblr blog became the slogan for the Occupy Wall Street movement.
Link
Do you know how to setup the Amped Wireless Extender? Here are easy tips that you can follow to set up the Amped router. Visit setup.ampedwireless.com page to open the login page and access the router’s interface. For more details, call us today.
#amped router setup#setup.ampedwireless.com#amped extender setup#amped wireless setup#amped router login
1 note
·
View note
Text
How do I update my Amped Wireless RTA1750 Router via setup.ampedwireless.com?
Setup.ampedwireless.com
launches its latest firmware versions for its router frequently. Although it’s a really good practice to keep the router updates with the upcoming smart technology in the market. Updating the firmware also improves the performance and quality strength to the settings of a router, hence we all should update our setup.ampedwireless RTA17850 router every quarter month.
Let’s talk more about How to update the Amped Wireless RTA1750 Router?. There are two ways to upgrade the setup.ampedwireless RTA1750:
Automatic setup.ampedwireless RTA1750 Router update
Manual setup.ampedwireless RTA1750 Router update
Well, you will definitely find the automatic firmware update easy as compared to manually updating the router. The automatic update starts checking for new firmware updates once to click on the screen check now button. If available, a new version will be looked at and kept in front of you in a couple of minutes or less. Whereas in the Manual setup, you need to look for the newly updated firmware from the setup.ampedwireless.com original website. Next you need to download it in a zip file and upload it.

Read the below steps to update Amped Wireless RTA1750 Router via setup.ampedwireless.com
Few things you need to ensure before upgrading the Amped Wireless RTA1750 Router’s firmware is to always save the current Amped Wireless RTA1750 Router settings. Do it this way:-
1.Simply access www.setup.ampedwireless.com and get yourself logged in.
2.On the Settings Page, click on Save Settings
Method 1:- Amped Wireless RTA1750 Router’s Manual firmware upgrade:
1. Visit the Amped Wireless Elite Support Website “www.ampedwireless.com” and search for the latest firmware available.
2. Download the latest firmware version file.
3. The file type of the firmware version will be zip and you need to unzip after saving it into your system.
4. Basically, this firmware file is a text document that releases notes/ instructions on how to upgrade the Amped Wireless RTA1750 Router’s firmware.
5. Now access to the setup.ampedwireless.com network, through any web browser.
6. Ensure your computer is connected to the Amped network through a wired connection via ethernet cable or over WiFi network.
7. In the URl type www.setup.ampedwireless.com or try using the default login IP address http://192.168.1.240 and press enter.
8. Login to Amped Wireless RTA1750 Router by entering the username and password.
9. The settings page or dashboard of the Amped Wireless RTA1750 Router will open up.
10. Select the More Settings option on the dashboard’s justify panel.
11. Then click on Management option > Upgrade Firmware option.
12. Click on Choose File or Browse option on the firmware upgrade page, for Amped Wireless RTA1750 Router’s manual firmware upgrade.
13. Locate the downloaded zip file that you saved on your computer earlier and highlight it to open it.
To begin the manual firmware upgrade of your Amped Wireless RTA1750 Router’s firmware, click Upload.

After following the above steps and completing the firmware update, Amped Wireless RTA1750 Router will reboot and restart reaching the setup.ampedwireless.com login page.
Method 2 :- Amped Wireless RTA1750 Router’s Manual firmware upgrade:
1. Access to the setup.ampedwireless.com network, through any web browser.
2. Type www.setup.ampedwireless.com in the URL or try using the default login IP address http://192.168.1.240 and press enter.
3. Make sure your computer is connected to the Amped network through a wired connection via ethernet cable or over WiFi network.
4. Enter the username and password tp Login Amped Wireless RTA1750 Router.
5. Dashboard or the settings page of the Amped Wireless RTA1750 Router will open up.
6. Click the More Settings option on the dashboard’s justify panel.
7. Then click on Management option > Upgrade Firmware option.
8. Click check now, Amped router will start searching the available firmware.
9. Once found, click Install.
The Amped router will itself upgrade the firmware and reboot on its own.
For Assistance Call us at 917-732-0091
https://setuppampedwireless.com/
1 note
·
View note
Text
How to Setup My Amped Router
There is no need to worry if you forgot how to set up the amped wireless router. Setup.ampedwireless is the best solution to setup the amped wireless router. With the help of Setup.ampedwireless.com one can easily be able to change the amped wireless setting as per the need. Here, we will suggest the perfect amped wireless setup.
Try to disconnect the current router from the PC, modem and the power outlet. In case, you don’t have the existing router, then directly move to the next step. After that, the user needs to power off the modem. But before that, make sure there should be no power backup battery. Kindly don’t try to switch on your modem until step.
Start connecting the Ethernet cable from the modem. On the other side, connect another end to Amped router WAN port.
Now, from the Router LAN Port 1,2,3,4 to the user’s PC tries to connect other Ethernet cables.Try to build a connection between the router and the modem. Note: In case, if the users don’t have a PC. He/she can also work with other computing devices.
Fortunately, turn on the modem by plug-in the power. If batteries available, try to re-install it. Wait sometimes, till the booting process.The installation process of router
Join the antennas.
Secondly, try to plug-in power. You should wait till the user will able to see power, internet, Wi-Fi, LAN port power light of colored solid green, white either blue.
Let’s suppose if you are using Smartphone’s, and then try to connect it with Router’s wireless network-Amped
At the bottom of the router, the user will able to found the default username and password. Try to access Amped setup wizard If once you properly connected, open the web browser of your choice. Enter the given URL http://setup.ampedwireless.com. In situation, the user will find any issue for visiting the site, and then they try http://192.168.3.1.
Begin the setup process
Click to begin the setup.
Click to the setup wizard present at the dashboard. Click to the Next to continue the process. Hereby, the router will start checking for internet connectivity and wait for a minute. Fortunately, the user will able to see the green check mark after the completion of the Amped setup wizard
#How to Setup My Amped Router#Setup Amped Wireless#Amped Wireless Setup#http://www.setup.ampedwireless.com
0 notes
Text
How do I setup my Amped Wireless Extender?
Only users with the correct Wireless settings can connect to your router’s network. Until or unless a network is open, no user can connect to a router’s network if he doesn’t have the correct wireless credentials. Wireless credentials of a network consisting of the SSID name and Wi-fi password used by a user to connect to the router’s network. You can also hide the network name from the Wi-fi list using the “Hide SSID” option from the Wireless settings of the setup.ampedwireless.com interface.
http://setupampedwireless.info/
0 notes
Link
A user can perform the Amped Extender Setup either through the WPS connection method or through the Wi-Fi connection process. Most users use the WPS connection process as it is a convenient method to connect to the extender. The condition that applies while connecting the extender to a router with the WPS connection is that your router must have a WPS button on either the front panel or the back panel. While connecting to the Amped Range Extender wirelessly for the first time, a user has to type the default Network Name on the Wi-Fi list and enter the default Wi-Fi password on the Network Key field.
0 notes
Link
whenever you get problems for accessing login to tp link modem then you can change settings for your device easily. In this article, we are going to explain how you can easily manage your device from a remote location. By means of remote, we want to say, you can configure your device from your office or even if you are at any vacation.
0 notes
Text
How to Login My Amped Wifi Router
if you do not setup,login, reset, not changed amped wireless router password in your home or office. contact us on our router supporting team. we guide how to setup & login, reset, also changed your amped wireless router username & password.easy to Setup Amped Wireless Router. “Setup.ampedwireless.com” helps you to get the dashboard page of the Amped device. Manage wireless settings by computer.
0 notes
Text
The Single Best Strategy To Use For My Personal Frequency Audio Program
Visit Official Site: https://viddeals.us/My-Personal-Frequency
I established everything I have right now by un-making each of the things that had held me down, and by environment favourable intentions, producing new positivity.
Deposits made by check are acknowledged within our sole discretion. We reserve the ideal to refuse, return, or limit any deposit you make to your account.
About the day you initiate your transaction around the Personal Financial savings Web page, the quantity will likely be reflected inside your Present Harmony and will begin/prevent earning curiosity straight away. Money transferred into your Personal Financial savings account is going to be available for withdrawal around the 5th small business day‡ once the deposit is initiated.
We have been required by legislation to offer you specified disclosures and tax paperwork. So as to apply online, you will be required to agree to obtain the notices electronically, to acknowledge receipt of them, and also to electronically fill out the IRS Kind W-nine.
An announcement cycle could be the calendar time period for the duration of which a single banking assertion is created. A press release cycle commonly commences over the working day on the thirty day period the account is opened.
It is possible to build a immediate deposit along with your employer or for Federal payments utilizing your account and routing quantities. After getting those quantities, you need to Get in touch with your employer or having to pay company to obtain good sorts and instructions, and make use of your Personal Savings account particulars:
When your router employs an interior antenna, adding an exterior one particular will be a good suggestion, as the latter tends to mail a stronger sign. Your router could possibly have feature antennas you may incorporate on oneself, but if not (or for those who threw them absent long ago), a lot of router suppliers market antennas individually.
Earlier mentioned all else, ensure that you select one which can broadcast an equivalent signal: do not buy an 802.11n extender When your router is on 802.11ac. For additional on how to decide on and setup an extender, Examine the very best wi-fi selection extenders we have analyzed.
We have to have your electronic mail address to deliver updates with your application standing. We could also ship you important account updates and exceptional presents. For information about how we secure your privacy, you should read through our Privateness Assertion.
On line banking is more effortless. Just by using your Laptop or cell intelligent cellular phone, you may url your current bank account to your Personal Financial savings account. You don’t have to strategy your day about a visit on your financial institution’s spot.
To Obtain your account range, log in to the account by clicking in this article. Then select "Clearly show Account Numbers" in the very best correct corner from the page. Your whole account range will Show while in the dashboard portion, underneath "My Accounts".
There is a wide array of virtual amps and consequences You may use, and drum tracks that sound like they have been carried out by actual musicians.
Administrators may possibly delay giving favourable and improvement suggestions to distributed staff members because it will take more time to put in writing it out or ebook a video clip connect with.
Whilst MacOS isn’t constantly the only real platform for nice software program, In relation to free of charge recording apps, it has the ideal from the bunch.
My Personal Frequency Review My Personal Frequency My Personal Frequency MP3 My Personal Frequency Audio Program My Personal Frequency System My Personal Frequency Audio Program Review ================================= https://www.youtube.com/watch?v=xTG0I5iZ5Jw
youtube
0 notes
Link
What is SWR SWR is a data fetching strategy standing for Stale While Revalidate. This is a pretty popular data fetching strategy but Vercel published an npm package with React hooks that make it easy to use this strategy in web applications. The basic idea of the useSWR hook can be explained by looking at an example:
import useSWR from "swr"; const App = () => { const { data, error } = useSWR("STRING_KEY", doSomethingWithKey); if (error) return <div>Error while loading data!</div>; if (!data) return <div>Loading...</div>; return <div>We have {data}!</div>; };
As you can see the hook takes 2 arguments the first one is a string key that's supposed to be a unique identifier for the data usually this will be the URL of your API. And the the second argument is a function that returns data based on this key (usually some sort of fetcher function). So now that we know the basics of SWR let's build an application with it. If you wanna skip ahead to a specific part check the Table of Contents below or if you wanna see the finished project then you can check it out live at https://typemd.now.sh or see the source code at https://github.com/kartiknair/typemd.

Prerequisites
Setup
Creating a Firebase App
The model
Configure Firebase in your code
Basic navigation
Setting up a Firestore database
Getting files from the database
Basic dashboard UI
The editor
Deleting files
Image uploads
General improvements
Conclusion
Also just wanted to say before we get into it that this post was originally published on my blog so feel free to check it out there: https://blog.kartikn.me/react-firebase-swr
Prerequisites
Make sure you have the latest (or somewhat recent) versions of Node and NPM installed, also have your favourite code editor on the ready we're gonna put it to lots of use today.
Setup
For our first step we're gonna use create-react-app to bootstrap a React project and also install a few dependencies:
firebase our "backend"
react-with-firebase-auth a HOC that makes authentication with firebase very easy
rich-markdown-editor is the markdown editor we'll use for this app. I chose this one specifically because it has a very friendly API to work and also has a very user-friendly design.
@reach/router as our client-side routing algorithm, you'll see why we'll need this very soon.
Run these commands to create the app and install said dependencies:
npx create-react-app markdown-editor # Or on older versions of npm: npm i -g create-react-app create-react-app markdown-editor cd markdown-editor npm i firebase react-with-firebase-auth rich-markdown-editor @reach/router
I also uninstalled the testing libraries and testing specific code as those are beyond the scope of this post but you can keep them and use them as you like.
Creating a Firebase App
To be able to use Firebase in our web app we actually need to set up a Firebase project so let's do that. Head over to https://firebase.google.com and log in to your Google account. Then in the console create a new project:

I'm going to choose not to have analytics on but you can do so if you wish.

Now that we have our project created in the project click the little web icon:

And copy this configuration object it gives you and keep it wherever you like (don't worry too much about it you can come back and view it later in the dashboard):
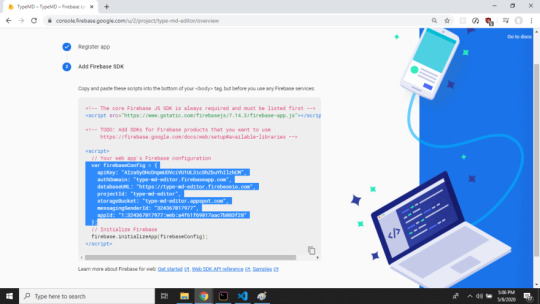
We're also going to set up our authentication so head to the authentication section and choose whichever providers you would like to support and follow their instructions on how to set it up. The 'Google' provider works with 0 config so if you just want a quick start that's what I would recommend. I also followed the docs and enabled the 'GitHub' provider but that's up to you.

The model
Before we jump into the code let's structure the application in our head. We need mainly three different views: the 'Log In' view which the user will see if they are not logged in, the 'Dashboard' which will show a logged in user all their files, and finally the 'Editor' view which will be the view that the user will see when they are editing a file. Great now that we have that planned out in our head let's make it. I personally don't like the way create-react-app so I'm gonna restructure the code a bit, but this is how I like to do it and you don't have to do it this way. It's well known in the React community that you can basically do whatever you want as long as you're comfortable with it, so do as you like but make sure to translate the paths that I'm using.

Configure Firebase in your code
Great now that we've done all our prep we can finally start working on the code. First let's set up firebase in our project, so you remember that configuration object now make a file in your project which exports that object out:
/* src/lib/firebaseConfig.js */ export default { apiKey: "YOUR_API_KEY", authDomain: "YOUR_AUTH_DOMAIN", databaseURL: "YOUR_DATABASE_URL", projectId: "YOUR_PROJECT_ID", storageBucket: "YOUR_STORAGE_BUCKET", messagingSenderId: "YOUR_SENDER_ID", appId: "YOUR_APP_ID", };
You might be worried about having this hard coded in your code, but it isn't that much of an issue if somebody gets their hands on your configuration because we're gonna set up authentication rules on your database. If you're still worried you can add all these values to a '.env' file and import it in that way. Now that we have this configuration we're gonna make another file where we initialize our firebase app using this config and then we'll export it out so we can reuse it in our code:
import * as firebase from "firebase/app"; import "firebase/auth"; import firebaseConfig from "lib/firebaseConfig"; // Check if we have already initialized an app const firebaseApp = !firebase.apps.length ? firebase.initializeApp(firebaseConfig) : firebase.app(); export const firebaseAppAuth = firebaseApp.auth(); export const providers = { googleProvider: new firebase.auth.GoogleAuthProvider(), githubProvider: new firebase.auth.GithubAuthProvider(), // <- This one is optional };
Great! Now that our firebase app is set up let's go back to the mental image we created of our app, you remember that?
Basic navigation
Well we're gonna implement that using reach-router and our firebase authentication HOC:
/* src/components/App/App.js */ import React from "react"; import { Router, navigate } from "@reach/router"; import withFirebaseAuth from "react-with-firebase-auth"; import { firebaseAppAuth, providers } from "lib/firebase"; import { Dashboard, Editor, SignIn } from "components"; import "./App.css"; const createComponentWithAuth = withFirebaseAuth({ providers, firebaseAppAuth, }); const App = ({ signInWithGoogle, signInWithGithub, signOut, user }) => { console.log(user); return ( <> <header> <h2>TypeMD</h2> {user && ( <div> <a href="#log-out" onClick={() => { signOut(); navigate("/"); }} > Log Out </a> <img alt="Profile" src={user.photoURL} /> </div> )} </header> <Router> <SignIn path="/" user={user} signIns= /> <Dashboard path="user/:userId" /> <Editor path="user/:userId/editor/:fileId" /> </Router> </> ); }; export default createComponentWithAuth(App);
Yep I know it's a lot of code, but bear with me. So the basic idea is that we have a constant Header component and then below that we have our different routes. Since we wrap our App component with the firebase authentication HOC we get access to a few props like the sign in, sign out methods and also the currently logged in user (if there is one). We pass the sign in methods to our SignIn component and then we pass the sign out method to our header where we have our logout button. So as you can see the code is pretty intuitive in its qualities. Now let's see how we handle the user logging in on our Sign In page:
/* src/components/SignIn/SignIn.js */ import React from "react"; import { navigate } from "@reach/router"; const SignIn = ({ user, signIns: { signInWithGoogle, signInWithGithub } }) => { if (user) { navigate(`/user/${user.uid}`); return null; } else { return ( <div className="sign-in-page"> <h3> Welcome to TypeMD a simple & beautiful online markdown editor </h3> <p> Sign in with your social accounts to have files that are synced accross devices </p> <div className="sign-in-buttons"> <button onClick={signInWithGoogle}>Sign in with Google</button> <button onClick={signInWithGithub}>Sign in with GitHub</button> </div> </div> ); } }; export default SignIn;
As you can see those methods we passed down to it are being used when the buttons are clicked and then we check if there is a logged in user we redirect them to the dashboard using the navigate method that reach-router provides.
Setting up a Firestore database
Now that we have authentication set up we need to set up our database, so let's head to our firebase console again and let's make a firestore database. In your console click on database in the sidebar and choose 'Cloud Firestore' if it's not already selected. Then click start collection:

I'm going to name the collection 'users' because that's how we're going to manage our data:

For the first document I'm going to just add a test one because we're going to delete this right after:
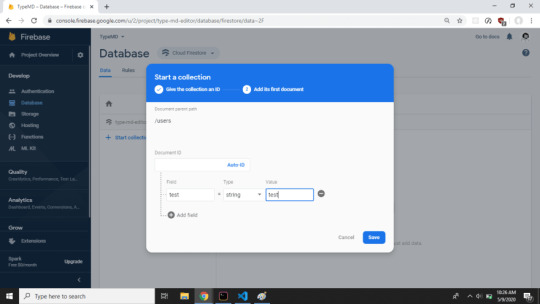
Now let's delete the test document:

If you remember I told you before that it doesn't matter if your configuration object gets leaked that's because we're going to head to the 'rules' section and set up a rule so that an authenticated user can only access their file. The language is pretty self explanatory so here's the rule:
rules_version = '2'; service cloud.firestore { match /databases/{database}/documents { // Allow only authenticated content owners access match /some_collection/{userId}/{documents=**} { allow read, write: if request.auth.uid == userId } } }
This rule works because of the way we're going to structure our data. The way we do it is once the user logs in we check if they're id is in the database, if it is we get that users files subcollection and return that, if they're not in the database then we'll create an empty entry for them which they can add files to later. The authentication rule just makes sure that an authenticated user can only access their files and nobody else's. Now if you remember our firebase.js file where we exported our firebase app and authentication providers, well in the same file add these two lines to make our database accessible by other files:
import "firebase/firestore"; export const db = firebaseApp.firestore();
Getting files from the database
Now we can import that in our dashboard and create a function wherein we'll check if a user of the given id exists in the database, if so we return their data, and if not we create it let's call it getUserData:
import { db } from "lib/firebase"; const getUserFiles = async (userId) => { const doc = await db.collection("users").doc(userId).get(); if (doc.exists) { console.log("User found in database"); const snapshot = await db .collection("users") .doc(doc.id) .collection("files") .get(); let userFiles = []; snapshot.forEach((file) => { let { name, content } = file.data(); userFiles.push({ id: file.id, name: name, content: content }); }); return userFiles; } else { console.log("User not found in database, creating new entry..."); db.collection("users").doc(userId).set({}); return []; } };
As you can see from the above code firebase has done an amazing job at having readable queries which I appreciate a lot especially when debugging. This is pretty great but we don't really have any files to look at. So let's also make a method to create a file based on a user ID and file name:
const createFile = async (userId, fileName) => { let res = await db.collection("users").doc(userId).collection("files").add({ name: fileName, content: "", }); return res; };
Pretty simple right? In this function we're finding our user in the users collection and the in that user's files sub-collection we're adding a new file. Now we're using the add function instead of set as we were using before so that firebase can randomly generate the ID for our file. This allows users to have multiple files of the same name with no issues.
Basic Dahsboard UI
Now we can start with the UI for our Dashboard so let's just make a simple list where each element will be using reach-router's Link to navigate the user to the editor page:
/* src/components/Dashboard/Dashboard.js */ const Dashboard = ({ userId }) => { const [nameValue, setNameValue] = useState(""); const { data, error } = useSWR(userId, getUserFiles); if (error) return <p>Error loading data!</p>; else if (!data) return <p>Loading...</p>; else { return ( <div> <form onSubmit={(e) => { e.preventDefault(); if (nameValue) { setNameValue(""); createFile(userId, nameValue); mutate(userId); } }} className="new-file-form" > <input type="text" placeholder="Your new files name..." value={nameValue} onChange={(e) => setNameValue(e.target.value)} /> <button type="submit" className="add-button"> Create </button> </form> <ul className="files-list"> {data.map((file) => { return ( <li key={file.id} className="file"> <Link to={`/user/${userId}/editor/${file.id}`} className="link"> {file.name} </Link> </li> ); })} </ul> </div> ); } };
Again we have a lot of code but that's mostly just the UI. However this is the first time we're using the useSWR hook and we're passing it the user ID as a key and then for it's data fetching function we pass it the getUserData method we created before. Then we use the same pattern that I showed you in the first example to check for errors and loading and finally if we have the data we loop through and show it in a list. We're also using hooks to keep track of the create file input form but I'm hoping you're already familiar with how to use them. This is great but right now our Links going to the editor are pretty useless because we don't have an Editor component yet so how bout we do that now.
The editor
As I mentioned earlier we're using an amazing open-source editor called rich-markdown-editor so we're going to import it and then use it's defaultValue prop to show us our saved content:
/* src/components/Editor/Editor.js */ import React, { useState, useEffect } from "react"; import useSWR, { mutate } from "swr"; import { db } from "lib/firebase"; import { Link, navigate } from "@reach/router"; import MarkdownEditor from "rich-markdown-editor"; const getFile = async (userId, fileId) => { const doc = await db .collection("users") .doc(userId) .collection("files") .doc(fileId) .get(); return doc.data(); }; const Editor = ({ userId, fileId }) => { const { data: file, error } = useSWR([userId, fileId], getFile); const [value, setValue] = useState(null); useEffect(() => { if (file !== undefined && value === null) { console.log("Set initial content"); setValue(file.content); } }, [file, value]); const saveChanges = () => { db.collection("users").doc(userId).collection("files").doc(fileId).update({ content: value, }); mutate([userId, fileId]); }; if (error) return <p>We had an issue while getting the data</p>; else if (!file) return <p>Loading...</p>; else { return ( <div> <header className="editor-header"> <Link className="back-button" to={`/user/${userId}`}> < </Link> <h3>{file.name}</h3> <button disabled={file.content === value} onClick={saveChanges} className="save-button" > Save Changes </button> </header> <div className="editor"> <MarkdownEditor defaultValue={file.content} onChange={(getValue) => { setValue(getValue()); }} /> </div> </div> ); } }; export default Editor;
Just like before we're using the same pattern where we have a method that gets the data and then we have useSWR with our key. In this case we're using an array of keys so that we can pass down both the user ID and file's ID to the fetcher function (which is getFile() here). We're also using the useState() hooks to keep track of the editors state, usually we would update the value of the editor with our stateful value but we don't have to do that here. Once our data is available we just pass it as the defaultValue to our editor and then track changes using it's provided onChange method. You may have noticed the useEffect() at the top of the function. We're using that to actually set the initial value of our stateful value variable this helps us keep track of whether the user has unsaved changes or not. Look at us now! We have a basic but working editor, now where do we go from here? Well there's a lot (& I mean a lot) of stuff to add to this & I'll cover a few of those in the improvements section. But for now we have two more crucial features that we could add and one of them is a lot more difficult to implement than the other. So let's start with the easy one:
Deleting Files
A pretty small but important thing to add to our Dashboard component. For this we're going to use the ref.delete method that firebase provides, here's our deleteFile function:
const deleteFile = async (userId, fileId) => { let res = await db .collection("users") .doc(userId) .collection("files") .doc(fileId) .delete(); return res; };
Now we can actually call that when a button is pressed:
{...} <button onClick={() => { deleteFile(userId, file.id).then(() => mutate(userId)); }} className="delete-button" > x </button> {...}
Great! Now let's get to the more difficult feature:
Image uploads
The editor we're using, rich-markdown-editor has a prop called uploadImage which expects a promise that will resolve to string URL of the uploaded image. To this callback it'll provide the image as a JavaScript File object. For this we're going to have to setup a storage bucket in firebase. So let's head back to the console and click on Storage in the sidebar. Click the 'Get Started' button and create your bucket using whatever location you want. Once you're in we're again going to change our security rules but this time we'll allow reads from anyone but writes only from authenticated users. Here are the rules for that:
rules_version = '2'; service firebase.storage { match /b/{bucket}/o { match /users/{userId}/{allImages=**} { allow read; allow write: if request.auth.uid == userId; } } }
Like we did previously with firestore we need to create a reference to our storage bucket using our initialized firebase app so let's go back to firebase.js and do that:
import "firebase/storage"; export const store = firebaseApp.storage();
Great! Now we can import this reference in our code and use it to read or write to the store. So let's make a function that takes a File object and uploads it to the store:
const uploadImage = async (file) => { const doc = await db .collection("users") .doc(userId) .collection("images") .add({ name: file.name, }); const uploadTask = await store .ref() .child(`users/${userId}/${doc.id}-${file.name}`) .put(file); return uploadTask.ref.getDownloadURL(); };
Ok so since firebase's storage offering doesn't have a way to upload files with a random unique name we're going to create a sub-collection for each user called images and then every time we upload an image we'll add it in there. After that completes we take that ID and add a hyphen and the original filename to it and then we upload it using the ref.put method that firebase storage provides. After the upload task completes we return it's URL using the getDownloadURL method. Now all we need to do is provide this method as a prop to our editor:
{...} <MarkdownEditor defaultValue={file.content} onChange={(getValue) => { setValue(getValue()); }} uploadImage={uploadImage} /> {...}
Great! Look at us we've come so far. We have a half-decent markdown editor on hand add a few hundred lines of CSS and you'll have a full-fledged side project. But there are a few things that we can add easily to improve the general user experience, so let's get to them.
General Improvements
So there are many things to improve but the first thing I wanted to handle was the fact that if you're not logged in & visit any of the pages it just errors out. So I added a useEffect hook where it'll redirect you back to the home page:
useEffect(() => { if (!user) { navigate("/"); } }, [user]);
Once that was out of the way I also wanted to give the user feedback when they had unsaved changes and tried to leave the page. This is accomplished using another useEffect hook so that we can add a listener to the beforeunload event:
const onUnload = (event) => { event.preventDefault(); event.returnValue = "You have unsaved changes!"; return "You have unsaved changes!"; }; useEffect(() => { if (file && !(file.content === value)) { console.log("Added listener"); window.addEventListener("beforeunload", onUnload); } else { window.removeEventListener("beforeunload", onUnload); } return () => window.removeEventListener("beforeunload", onUnload); });
Pretty simple but in my opinion makes a significant difference. I also added a toasts using the amazing react-toastify packages to let the user when their changes have been saved or else when an error occurs:
import { ToastContainer, toast } from "react-toastify"; const saveChanges = () => { {...} toast.success("🎉 Your changes have been saved!"); }; {...} <div> <div className="editor"> <MarkdownEditor defaultValue={file.content} onChange={(getValue) => { setValue(getValue()); }} uploadImage={uploadImage} onShowToast={(message) => toast(message)} /> </div> <ToastContainer /> </div> {...}
And that's all for general tiny improvements, the toasts are perhaps a touch too much but I think they're pretty delightful (might remove it though).
Conclusion
So I hope you were able to learn how amazing this stack for web applications is. Using SWR & Firebase with React makes for an amazing developer experience and also (because of the caching) gives the users a blazing fast user experience.
0 notes
Text
Hook up community
hook up This 2016 survey measured citizen perceptions of neighborhood quality of life, public safety, and satisfaction with local criminal justice agencies. Once i had worked it out i could not resist but post my excitement into a crochet group. Whereas people who expressed less symptoms of loneliness and depression had an increase in those feelings after a penetrative sex hook up. Otherwise, you'll need to connect the audio signal to a different device, such as external computer speakers or your home stereo system. Was thinking about getting 3 connect amps and just hooking 2 pairs to each amp to have 3 zones. The of the 1960s brought a loosening of sexual morals which allowed for sex to become uncoupled from relationships and non-marital sex to become more socially acceptable.
hook up Young women tend to be honest about their sexual encounters and experiences, while young men tend to lie more often about theirs. Sociologist Wade discusses several scholars who disagree that contemporary college students desire long-term monogamous relationships. Your reciever will handle all the bass management. This is more common among boys than girls. The winner of multiple national awards for innovation, the Red Hook Justice Center houses a courtroom in which a single judge hears cases that under ordinary circumstances would go to three different courts—Civil, Family, and Criminal.
Hookup culture Other studies, such as Vrangalova and Ong, found no gender difference. Students who reported to Freitas that they were profoundly upset about hooking up say the encounters made them feel, among other things, used, miserable, disgusted, and duped. Set your speaker sizes, and set subwoofer to yes in the yamaha's menu. Wire more if you can because wired is always more reliable than wireless. Don't be afraid to embrace her beauty, let her encourage you. Homosexual men also engaged in hookup sex during the 1800s, meeting in spaces that were transient in nature, such as wharves and boarding houses. You may have solved your problem already, but i had the same problem with my desktop.
hook up Kids Bathroom: 1 dual coil 8 ohms with volume control. Studies have generally shown that greater alcohol use is associated with more sexual activity in the course of a hookup. Other venues such as public , Internet cruising networks, and bathhouses are popular for gay men, but not for lesbians or heterosexuals. The majority of teens 68% who hook up with a friend or an ex will hook up with them again. Historians D'Emilio and Freedman put the beginning of casual sex, including college hookups, further back in history, to the early 1800s, and explain the phenomenon as shaped by historical and cultural forces.
How to hook up my setup Just hook the sub up to the Yamaha with an rca cable. Jill Could you be a bit more clear? In television sexual monogamy differs from gender, suggesting men stray away from commitment, while women desire it. Is this too old for it to have a place to hook up an Ethernet cable? Most students report with not concerning themselves with or being concerned about the health risks that come with hookups, however, especially if their partner was a member of their own community, such as a student on the same college campus. It can range from acts that involve kissing, oral sex, or intercourse. The recent introduction of and have shaped hookup culture, especially among gay men. Jennifer Aubrey and Siobhan Smith have found that between genders there are minimal differences when it comes to behavior and frequency in hookups; on the other hand, women still face a harder social stigma, because their social status decreases with increased sexual partners, while men's social status increases with more sexual partners.
Trying to hook up TV with S Video There has been such a decline in dating culture on college campuses that most students have had more hookups than first dates. Some girls also reported that the main reason they are involved with random hook ups is because they think that is what boys want. Over all, 25% of those who had sexual experience with a dating partner have also hooked up with someone they were not dating. Also a pair of outdoor speakers. While doing this I discovered there is No place on the back of the computer to run an Ethernet cable to the router.
If I hook up my hughesnet internet to my TV and th... Subculture can affect gender roles and sexuality, and youth subcultures are particularly susceptible to peer pressure. You; Michale Sferra; Meagan Hubbard; Sneha Thamotharan; et al. Emily was feeling the 'pressure' of delivering a flower each day and it was taking away her normal crochet time that she loves so much. But, on the contrary girls will have sex with their partner in order to match them. They then researched what emotional affects being involved in sexual intercourse hookups had on them.
No Place on computer to hook up an ethernet cable? But evidence exists that young women are propelling it too. Vrangalova and Ong's study documented that students who had a stable personality orientation towards casual sex reported a heightened sense of well being after experiencing casual sex. So i decided to make a rectangle. Only 6% of teens have had sex with someone they just met, and these encounters are a one time affair 75% of the time. This is based on how i was taught the granny square by not chaining between clusters.
0 notes
Text
🖕com.checkpoint.cpfw
Ok, this one is another from the "Hard Headache" series.
If you can’t ping your own computer (macbook in my case) in your private network but you can access any other device from that computer, keep reading...
tl;dr: The problem might be with com.checkpoint.cpfw which is macOS’s kernel extension of the Check Point Endpoint Security VPN for macOS. To be sure run this command in your terminal kextstat -kl | awk ' !/apple/ { print $6 } '
This gives you list of all 3rd party kernel extensions and if the com.checkpoint.cpfw is one of it, it's most likely blocking your network access. To remove it call sudo /Library/Application\ Support/Checkpoint/Endpoint\ Connect\uninstall.
Long story:
Today I tried to connect to my macbook from my smartTV for some reason and I was getting errors. So, I tried to connect to the laptop from my iPhone and I couldn't too. Even ping didn't work. Which was weird - everything was whitelisted, the router was correctly setup, no firewall, no blocked ports, no other things that could block it. I even could ping any device in the network from that macbook.
The biggest mistery was that my phone could see the macbook but the ping was failing. I kept running the ping while I ran the sudo tcpdump -i en1 dst host 192.168.1.20 on my macbook and I could see the ping packets! This command tells you about every incoming packet - so if I can see the ping packets but I can't ping, something has to block transmission in my computer.
After hours of practicing google-fu I finally tried to list all kernel extensions: kextstat -kl | awk ' !/apple/ { print $6 } '. The com.checkpoint.cpfw was first in the list and I started to be suspicious. WTF is that, I've never heard of it. This thing is so hidden that you don't even see it in running processes. When I google it I was told it's related to VPN. That was smelly and I recalled I installed some VPN tool ages ago in order to connect to one of my client's VPN. Installing this software was the only option how to get there - it was Microsoft VPN and I had to get there from macOS. After another hour I was able to locate its files and how to remove them from the system by calling simple sudo /Library/Application\ Support/Checkpoint/Endpoint\ Connect\uninstall. Right after the removal the ping started working again.
I remember I uninstalled this software when I didn't need it anymore. But the b!7c# obviously stayed hidden in my system.
Stay away from Check Point Endpoint Security VPN for macOS!
0 notes
Text
How to complete Amped wireless Setup through setup.ampedwireless.com?
Read the below steps to complete Amped Wireless Setup via setup.ampedwireless.com. The steps mentioned below are easy and very descriptive so that you can follow it without any hassle and confusion. Following are the steps to Amped Wireless Setup via setup.ampedwireless.com:- 1.If you’re a Wi-Fi router user, firstly start turning the Router OFF. Simply Plug out the router from the wall socket and for modem as well, 2. Take an ethernet cable and form a connection between Amped Wireless router and modem. Connect to the WAN port of your Amped wireless router. 3. Turn on the modem first and then the Amped Wireless Router. Wait for a minute. 4. Now form a connection between the Amped wireless router and the computer/ whichever is your device that can get connected with an ethernet cable. 5. Once connected to the internet, open a web browser and access the setup.ampedwireless on the web. 6. Simply type the http://setup.ampedwireess.com in the URL/ address bar. 7. Press Enter, a login screen will appear. 8. In case you are setting up for the first time you will see a setup configuration screen instead of Login screen. The Smart Setup Wizard pops up automatically and starts the Amped wireless setup process once you click the Begin Setup option. The Setup Wizard also directs you to follow the on screen instructions on this matter. 9. Select the Automatic Configuration option, it allows the configuration of Amped wireless routers to automatically setup with the default settings. 10. Click on the Next button. 11. You are then required to opt to enter a newly created SSID /Network Name for your Amped Wireless router and similarly a password. Once done, you’re finally done setting up your Amped Wireless Router.

How to connect an Amped Wireless Router through a WPS button?
If you’d like to connect your Amped Wireless Router via WPS button available on your Amped router, read the following guide to get done within one go.
This amped setup can be done with your Wi-Fi device having WPS one-touch setup by following the below steps:
1. Press the WPS button and hold it for 2–3 seconds. It is on the back panel of your Amped wireless router.
2. There will be a power LED on the amped wireless router which starts to blink.
3. Push the WPS button located on your wireless adapter at the same time, or you can also enable WPS using the provided software for your wireless adapter.
4. Once that’s done, WPS will automatically configure and establish the connection. And alter the settings for your wireless adapter to connect to your Amped wireless Router.
What If Setup.ampedwireless.com is not responding?
We don’t deny that though, because it happens sometime when you try to access setup.ampedwireless.com. The common issues are like you may see an error that the page cannot be displayed or there is a bad gateway.
In that case, what you need to do is to ensure that an Ethernet cable coming from the amped wireless router is well connected to your computer or not. Do not connect your computer wirelessly to an amped wireless router. If you see that any of your computer is connected to some other wireless router, try to disable the Wi-Fi adapter of your computer and also disable the firewall programs.
How to RESET my Amped wireless router?
Following are the steps to reset Amped wireless router to its factory default settings using the following methods:
Use the Reset button
Via web interface of the router
When you reset the amped wireless router, it’s quite easy with the RESET button.
1. Search the reset/restore button that is present at the back of the router.
2. Take a straightened paper clip or a likewise pin, press and hold the reset button for like 10 seconds or so. Release the button after that.
3. After a few minutes the LED light will flash which indicates that your Amped wireless router has been restored back to its factory default settings.

Follow the below steps for reset yout amped router via Web Interface, please login before starting:-
1. Type www.setup.ampedwireless.com in the URL/ address bar of the web browser.
2. Fill in the default login credentials to enter the admin page of the amped wireless.
3. Open the settings page and selec on the factory reset tab which will restore the router to factory setting.
For Assistance Call us at 917–732–0091
https://bit.ly/2Dv4YSP
0 notes
Text
Like most photographers these days, I have some pretty intensive power requirements when I’m out shooting: phone, tablet, mirrorless cameras, flashes, lights… the list goes on and on. When I’m near an outlet, it’s no problem, but when I’m not? We’ve all been there. In the airport, where six people are already huddled around the lone power outlet on the concourse. In an old bus across Morocco, or a cross country flight in coach for that matter. On the train from Cologne to Prague. In a tent on the Olympic Peninsula, with work to do, and a battery icon that has just turned red.
These are the times when I’d rather be rescued by the PowerElf than Legolas.
The PowerElf is a 46.8Ah power-bank that is currently being launched on IndiGoGo for $129. That’s 46,800mAh… a lot of power. For comparison, the expensive batteries ($80) in my Sony A7RIII, hold about 2.3Ah each (2280mAh). It holds seventeen times the capacity of an iPhone X. It has a variety of outlets to power small devices like phones and also larger ones, like laptops and tablets.
I got an early production model to test out[1. The manufacturer provided this unit to me for free, but I never provide positive reviews in exchange for money or goods. This review is as honest and objective as I can make it. I have not and will not receive payments for any sales of this unit, but as always, if you purchase any products through my ads and affiliate links on this site, you we will hopefully get a commission]. Let’s take a look.
What Can the PowerElf Do?
There are four power outlets on the PowerElf: 1 x 12v cigarette-lighter port, 2 x Standard USB ports, 1 USB-C Port (45 Watt), and 1 x 9-12v output for a standard barrel adapter plug (and a cable is included). There’s an input jack of the same size to plug it into the wall and charge the thing. It also has a built-in LED flashlight (modes: on, flashing, red, red-flashing[7. Be aware that when flashing red, the light sends a morse-code SOS signal. This is an international distress call, and should not be used lightly.]) and it has a power-button.
Charging my phone via USB.
The PowerElf has about 20 times the capacity of my Sony batteries (2 in grip).
The USB ports will work like the much smaller power-banks that you probably already own, but it will last longer. The standard USB ports offer 2.4A at 5v. The USB-C is Quick Charge 3.0. (Incidentally, the red, braided-nylon USB cables in these photos are made by Anker, and I love them).
Where this thing gets really cool is the cigarette-lighter jack. This puts out enough current to power and charge my Microsoft SurfacePro tablet, no problem, and it’s always my first device to go dead when I’m away from a power outlet. Awesome.
[/media-credit] This is the only power bank I’ve found that can charge my Surface Pro.
Need more options? This seems to work: I plugged in a little 100W power inverter, and then plugged in a little table lamp. No problem. Of course, there will be a limit to what you can power, but you’ll be able to power a fair number of household items with this setup.
The 9-12v barrel jack can power/charge a laptop with the same size jack. If you want to use this for a Surface, you can also buy a cable that fits here. It turns out that the jack is a pretty standard size, so I tried it with a variety of things around the house. All of these things powered on.
Charging my Eneloops with the PowerElf was possible, but required a hack.
Here, the PowerElf is hooked up to a desktop-sized external hard drive. This worked nicely, and I could have powered the Surface at the same time, but didn’t. More practically, my power goes out, I can power my cable modem/router.
Attached to a phono pre-amp for one of my turntables.
Finally, it’s worth mentioning that the PowerElf is designed to be charged quickly with a 60W solar panel. Fold-up solar panels are pretty common on Amazon, though they cost around $150. The PowerElf requires one that puts out 14-25 volts through a DC5521 plug, and most of them do.
Does it Work?
Yes.
With a couple of caveats. First, the 9-12v barrel jack output works great for high-power consuming applications, but for low ones (less than 150mA, currently), it will not always recognize that a device is connected and the PowerElf will automatically power down after about 30 seconds (though there are workarounds[5. To keep the power from shutting down, you can plug in a device to one of the USB ports, like your phone.]). So, it’s great for laptops, not so great for small electronics like an Arduino. I’ve spoken at length with the developers about this, and they’ve explained that they’ll make the production version more sensitive in this regard.
[/media-credit] Attached to an Arduino alternative. I could also have used the USB input.
Second, and this is just quibbling, the LED light on the front of the unit works, but it does flicker visibly. If I had to read by it, I suspect it would cause fatigue.
Build and Design
The PowerElf is designed for safety, with 10 layers of protection[6. Various instances of short-circuit protection, over-charging and over-discharging protection, reverse voltage protection, etc.] and an IP64 housing (water, dust, and shockproof), but alas, I didn’t put it to the test. It’s supposed to withstand water spray from any direction, but I wasn’t about to pour a bucket of water on it. I’ve seen what lithium ion batteries can do when they’re mistreated.
That said, the case is nice and sturdy and all of the ports have rubber doors that seem pretty water resistant. The outer case is a sturdy plastic, but I didn’t drop it on a concrete floor to see how it would hold up. For normal usage, though, it should last just about forever.
Problems? Nothing major. The rubber top cover has to be pushed into place pretty firmly to get a good seal, and it’s easy to push the power and flashlight buttons in the process.
Who is this For?
Let’s face it: if you’re a backpacker and going on a hike across the Andes, this is probably not going to be in your pack (and neither is a laptop) unless you have some serious production obligations. If you do, it absolutely will be. It weighs 2.7lbs and is a little bulky. It fits nicely into the slot in my camera bag for a 70-200mm f/2.8 lens, and it weighs just a little less (this Canon 70-200 weighs 2.9lbs).
[/media-credit] The PowerElf weighs 2.65 lbs, and the Canon lens weighs about 2.88 lbs.
Photographers who are camping a reasonable distance away from their cars will love the PowerElf, as will photographers who are traveling in areas with questionable power availability. If you’re going to be on a long flight to India or Australia and your plane doesn’t have a power outlet, the PowerElf will be your dream come true. And if you’re one of those young, fit photographers who doesn’t mind the weight of an extra 70-200 lens in your pack, then the PowerElf will let you work wherever you happen to be. And of course, journalists and travelers of every sort will appreciate the access to reliable power when away from the desk.
Value
At $129, the PowerElf is a pretty remarkable value, especially because nothing out there on the market seems to match its feature set. There are a couple of similarly sized chargers out there that have built-in inverters and household power outlets, but they’ll hold less than half the power of the Elf and still cost $80–90 or more. Units with similar power capacity generally have a much larger footprint than the PowerElf, and cost significantly more ($160, in this case). Other power banks have similar capacity and price, but lack the output options (no cigarette-lighter port, no USB-C).
If you only need USB outputs, then smaller devices likt he Anker PowerCore 26800 will provide a little more than half the power in a smaller, more portable format. It won’t be able to help with your laptop or Surface, though.
Conclusion
The PowerElf will be a fixture on all of my future photography expeditions. As photographers become more and more dependent on battery-powered devices, having access to reliable power can mean the difference between getting the job done and missing your only opportunity. The PowerElf can provide that power, and in a very safe, sturdy, and portable package.
[media-credit id=1 align=”aligncenter” width=”740″][/media-credit]
Review: The PowerElf Power Bank Like most photographers these days, I have some pretty intensive power requirements when I'm out shooting: phone, tablet, mirrorless cameras, flashes, lights...
0 notes
Text
The 8 features Amazon and Google must add to the Echo and Home
New Post has been published on https://latestnews2018.com/the-8-features-amazon-and-google-must-add-to-the-echo-and-home/
The 8 features Amazon and Google must add to the Echo and Home
The Amazon Echo and Google Home are amazing devices and both have advantages over the other. In my home, we use the Amazon Echo and have them around the house and outside. I have the original in the living room, a Dot in bedrooms, my office and outside, a Tap in my woodworking workshop and Spots in the kids’ room (with tape over the camera). They’re great devices but far from perfect. They’re missing several key features and the Google Home is missing the same things, too.
I polled the TechCrunch staff. The following are the features we would like to see in the next generation of these devices.
IR Blaster
Right now, it’s possible to have the Echo and Home control a TV, but only through 3rd party devices. If the Echo or Home had a top-mounted 360-degree IR Blaster, the smart speakers could natively control TVs, entertainment systems, and heating and cooling units.
Echo and Homes are naturally placed out in the open, making the devices well suited to control devices sporting an infrared port. Saying “turn on the TV” or “turn on the AC” could trigger the Echo to broadcast the IR codes from the Echo to the TV or wall-mounted AV unit.
This would require Amazon and Google to integrate a complete universal remote scheme into the Echo and Home. That’s not a small task. Companies such as Logitech’s Harmony, Universal Remote Control and others are dedicated to ensuring their remotes are compatible with everything on the market. It seems like an endless battle of discovering new IR codes, but one I wish Amazon and Google would tackle. I would like to be able to control my electric fireplace and powered window shades with my Echo without any hassle.
A dedicated app for music and the smart home
The current Home and Alexa apps are bloated and unusable for daily use. I suspect that’s by design, as it forces the users to use the speaker for most tasks. The Echo and Home deserve better.
Right now, Amazon and Google seemingly want users to use voice to set up these devices. And that’s fine to a point. If a user is going to use these speakers for listening to Spotify or controlling a set of Hue lights, the current app and voice setup works fine. But if a user wants an Echo to control a handful of smart home devices from different vendors, a dedicated app for the smart home ecosystem should be available — bonus points if there’s a desktop app for even more complex systems.
Look at Sonos . The Sonos One is a fantastic speaker and arguably the best sounding multi-room speaker system. Even though Alexa is built into the speaker, the Sonos app is still useful as it would be for the Echo and Home, too. A dedicated music app would let Echo and Home users more easily browse music sources and select tracks and control playback on different devices.
The smart speakers can be the center of complex smart home ecosystems and deserve a competent companion app for setup and maintenance.
Logitech’s Harmony app is a good example here as well. This desktop app allows users to set up multiple universal remotes. The same should be available for Echo and Home devices. For example, my kids have their own Spotify accounts and do not need voice access to my Vivint home security system or the Hue bulbs in the living room. I want a way to more easily customize the Echo devices throughout the home. Setting up such a system is currently not possible and would be clunky and tiresome to do through a mobile app unless it’s dedicated to the purpose.
Mesh networking
Devices such as Eero and Netgear’s Orbi line are popular because they easily flood an area with wi-fi that’s faster and more reliable than wi-fi broadcasted by a single access point. Mesh networking should be included in the Google Home or Amazon Echo.
These devices are designed to be placed out in the open and in common spaces, which is also the best placement for wi-fi routers. Including a mesh networking extender in these devices would increase their appeal and encourage owners to buy more while also improving the owner’s wi-fi. Everyone wins.
Buying Eero seems like the logical play for Amazon or Google. The company already makes one of the best mesh networking products on the market. The products are well designed and packaged in small enclosures. Even if Google or Amazon doesn’t build the mesh networking bits directly into the speaker, it could be included in the speaker’s wall power supply allowing both companies to quickly implement it across its product lines and offer it as a logical add-on as a secondary purchase.
3.5mm optical output
I have several Dots hooked up to full audio systems thanks to the 3.5mm output. But it’s just two-channel analog, which is fine for NPR but I want more.
For several generations, the MacBook Pro rocked an optical output through the 3.5mm jack. I suspect it wasn’t widely used, which led to Apple cancelling it on the latest generation. It would be lovely if the Echo and Home had this option, too.
Right now, the digital connection would not make a large difference in the quality of the audio since the device streams at a relatively low bit-rate. But if either Google or Amazon decide to pursue higher quality audio like offered from Tidal, this would be a must-have addition to the hardware.
Outdoor edition
I spend a good amount of time outside in the summer and managed to install an Echo Dot on my deck. The Dot is not meant to be installed outside, and though my setup has survived a year outside, it would be great to have an all-weather Echo that was much more robust and weather resistant.
Here’s how I installed an Echo Dot on my deck. Mount one of these electrical boxes in a location that would keep the Echo Dot out of the rain. Pop out one of the sides of the box and fit the Dot inside the box. The Dot should be exposed and facing down. Plug in the power cable and 3.5mm cable through the hole in the side and run the audio to an amp like this to power a set of outside speakers. I used asphalt shingles to cover the topside of both devices to protect them from water dripping off the deck. This setup has so far survived a Michigan summer and winter.
I live outside a city and have always had speakers outside. From my Dot’s location under the deck, it still manages to pick up my voice allowing control of Spotify and my smart home while I’m around my yard. It’s a great experience and I wish Amazon or Google made a version of its smart speakers so more people could take their voice assistants outside.
Improved privacy
There’s an inherent creepiness with having devices always listening throughout your home. An early bug caused the Google Home Mini to record everything and sending the recordings back to Google. Consumers should have more options in how Amazon and Google handle the recorded data.
There should be an option to allow the user to opt out of sending recordings back to Amazon or Google even if concessions have to be made. If needed give the user the option of opting out of several features or let the user decide if the recordings should be deleted after a few days or weeks.
Consumers are soon going to be looking for this sort of control as the topic grows in intensity following Facebook’s blunder and it would be wise for Google and Amazon to get ahead of consumers’ expectations.
A new portable speaker
I use a Tap in my workshop and it does a fine job. But the cloth covering gets dirty. And I discovered it’s not durable after dropping it once. What’s worse, if the always-listening mode is activated, the speaker must be put back on its dock after 12 hours or the battery completely dies.
The Tap was one of the first Amazon Echo devices. Originally users had to hit a button to activate Alexa, but the company added voice activation after it launched. It’s a handy speaker but it’s due for an upgrade.
A portable Echo or Home needs to be all-weather, durable and easily cleanable. It needs to have a dock and built-in micro-USB port, and it must have voice activated control — bonus points if it can lock out unknown voices.
Improved accessibility features
Voice assistant devices are making technology more accessible than ever but there are still features that should be added. There are lots of people who have speech impairments who can hear perfectly well, but an Alexa Echo or Google Home won’t recognize their speech accurately at all.
Apple added this ability to Siri. Users can text it queries. The option is available on iOS 11 under the accessibility menu. The Google Home and Amazon Echo should have the same feature.
Users should be able to send text queries to Echo via their mobile phone (from within the Alexa app via a free form text-styled chatbot) and still listen to the response and still take advantage of all the skills and smart home integration. From a technical point of view, it would be trivial since it wouldn’t need any voice to text translation and it would increase the appeal of the device to a new market of shoppers.
Motion sensors
There are several cases where an included motion sensor would improve the user experience of a voice assistant.
A morning alarm could increase in intensity if motion isn’t detected — or likewise, it could be deactivated by sensing a set amount of motion. Motion detectors could also act as light switches, switching on lights if motion is detected and then switching off lights if motion is no longer detected. But there’s more, automatic lowering of volume if motion is not detected, additional sensors for alarms, and detecting users for HVAC systems.
0 notes
Link
The Amazon Echo and Google Home are amazing devices and both have advantages over the other. In my home, we use the Amazon Echo and have them around the house and outside. I have the original in the living room, a Dot in bedrooms, my office and outside, a Tap in my woodworking workshop and Spots in the kids’ room (with tape over the camera). They’re great devices but far from perfect. They’re missing several key features and the Google Home is missing the same things, too.
I polled the TechCrunch staff. The following are the features we would like to see in the next generation of these devices.
IR Blaster
Right now, it’s possible to have the Echo and Home control a TV, but only through 3rd party devices. If the Echo or Home had a top-mounted 360-degree IR Blaster, the smart speakers could natively control TVs, entertainment systems, and heating and cooling units.
Echo and Homes are naturally placed out in the open, making the devices well suited to control devices sporting an infrared port. Saying “turn on the TV” or “turn on the AC” could trigger the Echo to broadcast the IR codes from the Echo to the TV or wall-mounted AV unit.
This would require Amazon and Google to integrate a complete universal remote scheme into the Echo and Home. That’s not a small task. Companies such as Logitech’s Harmony, Universal Remote Control and others are dedicated to ensuring their remotes are compatible with everything on the market. It seems like an endless battle of discovering new IR codes, but one I wish Amazon and Google would tackle. I would like to be able to control my electric fireplace and powered window shades with my Echo without any hassle.
A dedicated app for music and the smart home
The current Home and Alexa apps are bloated and unusable for daily use. I suspect that’s by design, as it forces the users to use the speaker for most tasks. The Echo and Home deserve better.
Right now, Amazon and Google seemingly want users to use voice to set up these devices. And that’s fine to a point. If a user is going to use these speakers for listening to Spotify or controlling a set of Hue lights, the current app and voice setup works fine. But if a user wants an Echo to control a handful of smart home devices from different vendors, a dedicated app for the smart home ecosystem should be available — bonus points if there’s a desktop app for even more complex systems.
Look at Sonos. The Sonos One is a fantastic speaker and arguably the best sounding multi-room speaker system. Even though Alexa is built into the speaker, the Sonos app is still useful as it would be for the Echo and Home, too. A dedicated music app would let Echo and Home users more easily browse music sources and select tracks and control playback on different devices.
The smart speakers can be the center of complex smart home ecosystems and deserve a competent companion app for setup and maintenance.
Logitech’s Harmony app is a good example here as well. This desktop app allows users to set up multiple universal remotes. The same should be available for Echo and Home devices. For example, my kids have their own Spotify accounts and do not need voice access to my Vivint home security system or the Hue bulbs in the living room. I want a way to more easily customize the Echo devices throughout the home. Setting up such a system is currently not possible and would be clunky and tiresome to do through a mobile app unless it’s dedicated to the purpose.
Mesh networking
Devices such as Eero and Netgear’s Orbi line are popular because they easily flood an area with wi-fi that’s faster and more reliable than wi-fi broadcasted by a single access point. Mesh networking should be included in the Google Home or Amazon Echo.
These devices are designed to be placed out in the open and in common spaces, which is also the best placement for wi-fi routers. Including a mesh networking extender in these devices would increase their appeal and encourage owners to buy more while also improving the owner’s wi-fi. Everyone wins.
Buying Eero seems like the logical play for Amazon or Google. The company already makes one of the best mesh networking products on the market. The products are well designed and packaged in small enclosures. Even if Google or Amazon doesn’t build the mesh networking bits directly into the speaker, it could be included in the speaker’s wall power supply allowing both companies to quickly implement it across its product lines and offer it as a logical add-on as a secondary purchase.
3.5mm optical output
I have several Dots hooked up to full audio systems thanks to the 3.5mm output. But it’s just two-channel analog, which is fine for NPR but I want more.
For several generations, the MacBook Pro rocked an optical output through the 3.5mm jack. I suspect it wasn’t widely used, which led to Apple cancelling it on the latest generation. It would be lovely if the Echo and Home had this option, too.
Right now, the digital connection would not make a large difference in the quality of the audio since the device streams at a relatively low bit-rate. But if either Google or Amazon decide to pursue higher quality audio like offered from Tidal, this would be a must-have addition to the hardware.
Outdoor edition
I spend a good amount of time outside in the summer and managed to install an Echo Dot on my deck. The Dot is not meant to be installed outside, and though my setup has survived a year outside, it would be great to have an all-weather Echo that was much more robust and weather resistant.
Here’s how I installed an Echo Dot on my deck. Mount one of these electrical boxes in a location that would keep the Echo Dot out of the rain. Pop out one of the sides of the box and fit the Dot inside the box. The Dot should be exposed and facing down. Plug in the power cable and 3.5mm cable through the hole in the side and run the audio to an amp like this to power a set of outside speakers. I used asphalt shingles to cover the topside of both devices to protect them from water dripping off the deck. This setup has so far survived a Michigan summer and winter.
I live outside a city and have always had speakers outside. From my Dot’s location under the deck, it still manages to pick up my voice allowing control of Spotify and my smart home while I’m around my yard. It’s a great experience and I wish Amazon or Google made a version of its smart speakers so more people could take their voice assistants outside.
Improved privacy
There’s an inherent creepiness with having devices always listening throughout your home. The Google Home Mini was even caught recording everything and sending the recordings back to Google. Consumers should have more options in how Amazon and Google handle the recorded data.
There should be an option to allow the user to opt out of sending recordings back to Amazon or Google even if concessions have to be made. If needed give the user the option of opting out of several features or let the user decide if the recordings should be deleted after a few days or weeks.
Consumers are soon going to be looking for this sort of control as the topic grows in intensity following Facebook’s blunder and it would be wise for Google and Amazon to get ahead of consumers’ expectations.
A new portable speaker
I use a Tap in my workshop and it does a fine job. But the cloth covering gets dirty. And I discovered it’s not durable after dropping it once. What’s worse, if the always-listening mode is activated, the speaker must be put back on its dock after 12 hours or the battery completely dies.
The Tap was one of the first Amazon Echo devices. Originally users had to hit a button to activate Alexa, but the company added voice activation after it launched. It’s a handy speaker but it’s due for an upgrade.
A portable Echo or Home needs to be all-weather, durable and easily cleanable. It needs to have a dock and built-in micro-USB port, and it must have voice activated control — bonus points if it can lock out unknown voices.
Improved accessibility features
Voice assistant devices are making technology more accessible than ever but there are still features that should be added. There are lots of people who have speech impairments who can hear perfectly well, but an Alexa Echo or Google Home won’t recognize their speech accurately at all.
Apple added this ability to Siri. Users can text it queries. The option is available on iOS 11 under the accessibility menu. The Google Home and Amazon Echo should have the same feature.
Users should be able to send text queries to Echo via their mobile phone (from within the Alexa app via a free form text-styled chatbot) and still listen to the response and still take advantage of all the skills and smart home integration. From a technical point of view, it would be trivial since it wouldn’t need any voice to text translation and it would increase the appeal of the device to a new market of shoppers.
Motion sensors
There are several cases where an included motion sensor would improve the user experience of a voice assistant.
A morning alarm could increase in intensity if motion isn’t detected — or likewise, it could be deactivated by sensing a set amount of motion. Motion detectors could also act as light switches, switching on lights if motion is detected and then switching off lights if motion is no longer detected. But there’s more, automatic lowering of volume if motion is not detected, additional sensors for alarms, and detecting users for HVAC systems.
via TechCrunch
0 notes
Text
Eero appears to have solved most of my home’s wifi problems
It’s a universal struggle throughout much of the modern society. A first-world problem that many can relate to: how to get a reliable wifi signal into all of those places in your how where you need it. My home was no different in that there are wall and levels and it made reliable and strong wifi seemingly impossible. I had tried to mitigate this before moving to an Apple Airport Extreme and a fancy (though big and ugly) Comcast router that gave me a new 5.0 Ghz network that Comcast said would help. It didn’t.
With a couple of kids in the house and desire to watch Netflix “Signal strength Poor” isn’t what you want on your Roku. And this is our third or fourth wireless router in this house.
Side note rant: Comcast said I needed to move my router to a central location in my house which, in this house, is a kitchen/dining room with no cable outlet nor any place to set the monolithic cable router without it’s cacophony of flashing lights being out on full display. But Comcast will run me a new cable outlet … for a price.
I decided to try this wireless mesh network route as that seems to be the things that the cool kids are doing. I love the concept and it seems to make much more sense than just a repeater or signal boosting antenna. Plus I like the idea of being able to take this somewhat expensive gear with me when I move to another ISP or another house.
I asked for Twitter advice and got a few responses.
I switched to using a couple Orbi units and now getting full bandwidth everywhere in house
— Jamie LeJeune (@restlesspix) December 15, 2017
Check out amped wireless. Pretty good results so the kids can use the PS4 in the basement. https://t.co/Wnc0cj2571
— Hey Now! (@ericosterberg) December 15, 2017
This one from Comcast (for all its faults Comcast is great with Twitter support) was of interest.
Hi Scott! Stay tuned for our Xfinity xFi Pods to be available in your area. More info here: https://t.co/HQoNPn087W -Sami
— Comcast (@comcast) December 15, 2017
What could be easier then plugging in a Comcast-supported wifi mesh network device to my Comcast network? Since they aren’t yet available in my area a little googling revealed that these Comcast XFi Pods are just a re-branded Plumes and I could buy Plume today. A little more internet research reveled billions of articles on wireless mesh network products with tons of different options. In the end I chose the Eero.
The Eero with two beacons
After reading a number of comparison tests and Amazon reviews I went with system that was the Eero base station and two beacons, a system designed for 2 – 4 bedroom homes. These mesh systems aren’t cheap and this Eero was $249 with a $50 holiday discount. The Eero was available from Amazon while the Plume wasn’t but more on the shipping debacle at the bottom of this article.
I went with the “2 – 4 bedroom homes” option, $349 with a regular price of $399. Additional beacons can be added for $149.
This particular kit arrived packed in an easy to understand box. You pull out one of the components and you’re instructed to download the Eero mobile app which is where all the setup happens. There is the Eero base station that I plugged into my (well Comcast’s because I have to rent the thing) router via Ethernet and then the two beacons that plug into wall outlets to create the mesh. Setup couldn’t have been any easier.
You have to create and account within the Eero app to setup the system. I found this rather odd since it’s a piece of hardware I’m using with existing hardware in my home. But that’s what they ask you to do.
They let you know upon pulling anything out of the box you have to download a mobile app to setup the Eero in your home. You can’t setup an Eero with a web browser. They even answer why a data connection is necessary to setup an Eero.
The Eero base station plugging into the Comcast router via ethernet. This was placed in an upstairs corner room used as an office.
The Eero beacons plug into your AC outlets. Thankfully one of the plug prongs aren’t grounded/neutral (this is US 120-volt we’re talking about here) but the beacons have to be placed tall side up.
Once the Eero beacons are placed the mobile app goes through the setup. My first beacon was placed in a central kitchen area the floor below the base station.
The second Eero beacon was placed in the family room where we usually had horrible reception. Though it’s not recommended to place a beacon near a large electronic device this was about the only easy accessible spot not hidden by furniture. This room is a floor below the base station with a couple of walls between.
When your mesh is setup and working you create a new network with the Eero gear as opposed to it latching onto an existing network and strengthening it. This is important to note in that you might have to reprogram some devices around the home like thermostats, alarms or Christmas lights.
So how are those signals and speeds?
The red outlines are the old networks broadcasting from the Comcast wireless router. The orange outline is the new Eero network. Yes I like 2001: A Space Odyssey. I also couldn’t hijack the neighbor’s wifi.
This was my first speedtest using the Speedtest.net app after setting up the network in the central part of the house. Not too bad.
The Eero mobile app also has can run a speed test. Oddly it was showing quite slow speeds right after setup but it didn’t feel like the network was running that show on the connected devices.
So I tried a few other speed tests. How about the XFINITY Speed Test since that’s my ISP! They always seem to show fast downloads.
A Verizon speed test? Seems worth trying since I am on a Verizon phone but yes, connected via Comcast wifi. That’s looking fine.
If you Google “internet speed test” there’s an option for an in-browser speedtest but that result was terrible. I don’t know how exact some of these things are anyway. I’m sure there are many factors to consider. Or some of them are unreliable.
I contacted Eero support which was very helpful and they said just to monitor it over a few days but if I was getting good speeds on most of these speed tests and the network seemed to be working right (and fast) then everything was probably okay.
Within the Eero app it tracks recent speed tests and those tests did seem to come into line with the other tests. But then they went back down in the Eero app but still have stayed fast in the other tests.
A few notes on the Eero …
Eero support was nice and responsive via Twitter and I was able to have a DM conversation with them as well as send them images of my speed tests without us following each other. I was surprised to know they can partially access my Eero system just from the email address I had to provide during setup.
Eero support via Twitter DMs went well. I didn’t expect them to be able to see things on my network just from my email account setup!
Putting one of the Eero beacons on the outlet in my kitchen meant I had to remove a very useful nightlight as they wouldn’t both fit into the outlet. But low and behold each Eero beacon has a built-in nightlight! That is convenient.
The Eero beacons have a built-in night light. A nice touch.
You have to install the beacon (and by install I mean plug it in) in the proper orientation and it prompts you to do this correctly. I assume this is for best reception by the antenna but it also means you get the option of using the built-in nightlight. You can turn the nightlight off in the app as well as set a schedule or have it use the ambient lighting of the room. It’s a nice touch.
The Eero mobile app can do a lot of useful things to help manage the hardware and the new network you’ve set up. Since it’s a mobile app hopefully it will continue to be upgraded with more useful features.
When things are up and running the app can track all of the beacons and devices you have connected as well as things like signal strength, which beacon the devices are connected to and how much data they are consuming. Any of the connected devices can be blocked from the Eero network from within the app.
For $99 per year you can get Eero Plus which is “premium protection for your network.”
The best thing about this Eero install?
Our family room Roku now shows “Signal strength Excellent” for the first time ever. Crisis averted.
What about your solution for extending the range of your network? What solutions do you use? If you’ve got another alternative please let us know in the comments.
About that shipping …
Amazon (and the Prime membership) is usually quite reliable. I placed the order on a Sunday and since our area has a distribution outlet there was an option for same day delivery (by 9 PM on a Sunday!) by regular Prime and not Amazon Prime Now which is also available in my area. The package didn’t show on that Sunday so I assumed that it would just by default come on Monday. But then I got this notification:
This Amazon notification said the first Eero was lost in transit and I had to buy it again, which I did. But it wasn’t lost, it arrived a few days later.
The “replacement” Eero that I had to buy again arrived before the lost in transit one. Even though I used the “buy it again” from the lost shipment you can see the price was different, more expensive. Something seems fishy here.
That would be the first time we’ve seen Amazon shipping issues but okay, it happens. What I found strange was that Amazon wouldn’t just automatically resend the item but instead showed an option to buy it again. I still wanted it so I did … buy it again.
That bought again Eero showed up as planned. But then the next day another unexpected Amazon package showed up.
And here’s the second, supposedly damaged Eero. Or maybe the other Eero that came which I have already installed was supposed to be the damaged one. Who knows.
So much for the bulletproof Amazon system. What’s more odd is that I now have two Eeros and the Amazon app doesn’t seem to know. Anyone want an Eero?
The post Eero appears to have solved most of my home’s wifi problems appeared first on ProVideo Coalition.
First Found At: Eero appears to have solved most of my home’s wifi problems
0 notes