#How to activate Windows 10 without any software
Explore tagged Tumblr posts
Visit Tumblr Blog
Explore Tumblr blogs with no restrictions, modern design and the best experience.
Last Seen Tumblr Blogs


Fun Fact
Tumblr’s website traffic is steadily declining.
Text
Have YOU got an old Windows PC Microsoft has told you can't run Windows 11? It's time to give it a new life!
How to install Windows 11 on unsupported PC Hardware using Rufus. You can also disable some other Windows 11 bullshit like data harvesting and needing a Microsoft account.
It has been in the news a lot lately that Windows 11 isn't allowed to be installed on PCs without certain requirements, including the TPM 2.0, a chip that was only included in PCs made in 2018 or later. This means that once Windows 10 stops receiving security updates, those PCs will not be able to (officially) run a safe, updated version of Windows anymore. This has led to an estimated 240 million PCs bound for the landfill. Thanks Microsoft! I get you don't want to be seen as the insecure one, but creating this much waste can't be the solution.
(I know nerds, Linux is a thing. I love you but we are not having that conversation. If you want to use Linux on an old PC you are already doing it and you don't need to tell me about it. People need Windows for all sorts of reasons that Linux won't cut.)
So lately I have been helping some under privileged teens get set up with PCs. Their school was giving away their old lab computers, and these kids would usually have no chance to afford even a basic computer. They had their hard drives pulled so I have been setting them up with SSDs, but the question was, what to do about the operating system? So I looked into it and I found out there IS actually a way to bypass Microsoft's system requirement and put Windows 11 on PCs as old as 2010.
You will need: Rufus: An open source ISO burning tool.
A Windows 11 ISO: Available from Microsoft.
A USB Flash Drive, at least 16GB.
A working PC to make the ISO, and a PC from 2018 or older you want to install Windows 11 on.
Here is the guide I used, but I will put it in my own words as well.
Download your Windows 11 ISO, and plug in your USB drive. It will be erased, so don't have anything valuable on it. Run Rufus, select your USB drive in the Device window, and select your Windows 11 ISO with the Select button. (There is supposed to be a feature in Rufus to download your ISO but I couldn't get it to work.?
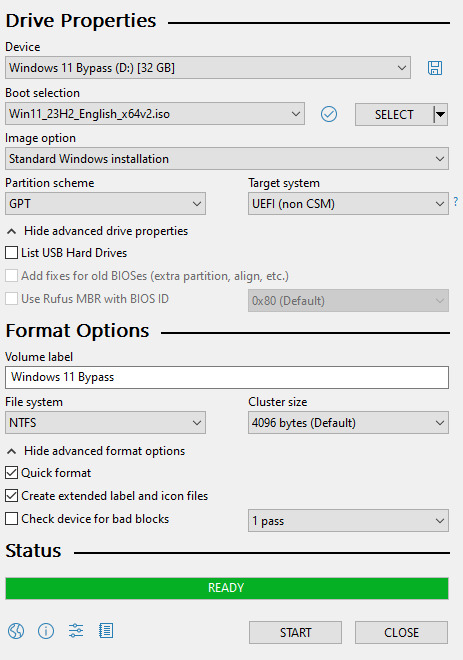
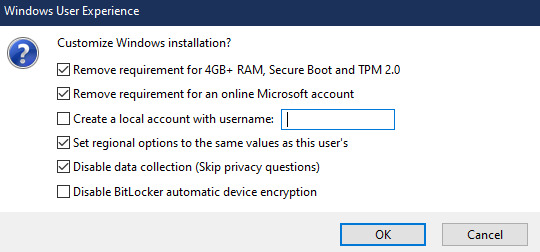
Choose standard windows installation, and follow the screenshot for your settings. Once you are done that, press Start, and then the magic happens. Another window pops up allowing you to remove the system requirements, the need for a microsoft account, and turn off data collecting. Just click the options you want, and press ok to write your iso to a drive.
From there you just need to use the USB drive to install windows. I won't go into details here, but here are some resources if you don't know how to do it.
Boot your PC from a USB Drive
Install Windows 11 from USB Drive
If you had a licensed copy of Windows 10, Windows 11 will already be licensed. If you don't, then perhaps you can use some kind of... Activation Scripts for Microsoft software, that will allow you to activate them. Of course I cannot link such tools here. So there you go, now you can save a PC made from before 2018 from the landfill, and maybe give it to a deserving teen in the process. The more we can extend the lives of technology and keep it out of the trash, the better.
Additional note: This removes the requirement for having 4GB Minimum of RAM, but I think that requirement should honestly be higher. Windows 11 will be unusable slow on any system with below 8GB of RAM. 8GB is the minimum I think you should have before trying this but it still really not enough for modern use outside of light web and office work. I wouldn't recommend trying this on anything with 4GB or less. I am honestly shocked they are still selling brand new Windows 11 PCs with 4GB of ram. If you're not sure how much RAM you have, you can find out in the performance tab of Task Manager in Windows, if you click the More Details icon on the bottom right. If you don't have enough, RAM for old systems is super cheap and widely available so it would definitely be worth upgrading if you have a ram starved machine you'd like to give a new life.

#Windows#Windows 11#tech#tech advice#pc#TPM 2.0#rufus#open source#open source software#technology#tech tips
725 notes
·
View notes
Text
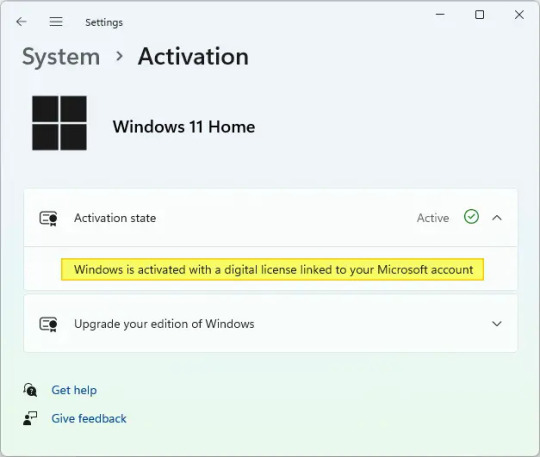
How to Downgrade Windows 11 Pro to Windows 11 Home directly
This article will show you how to downgrade from Windows 11 Pro, Pro Education, Education, or Enterprise to Windows 11 Home without a clean installation. The trick is to change the Edition ID in the registry and then do a repair installation using the ISO or Media Creation Tool.
However, as we all know, A direct downgrade is not supported, and it would normally require a clean install of Windows 11 Home, but it will result in losing all your programs, and settings and all files and data in C drive !
Step 1: Change the Edition ID in registry
Method 1:
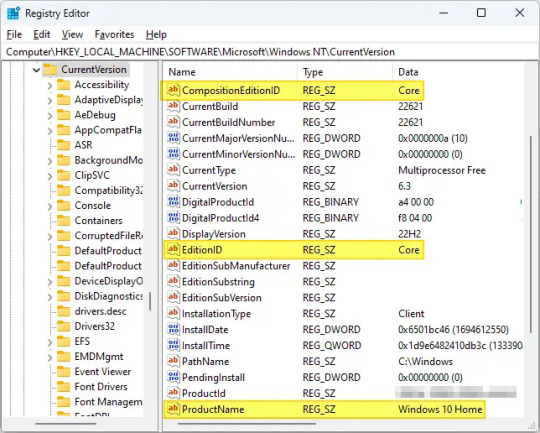
Search”Regedit”, then click it, then go to the following branches one by one, And change the values for the two branches.
HKEY_LOCAL_MACHINE\SOFTWARE\Microsoft\Windows NT\CurrentVersion HKEY_LOCAL_MACHINE\SOFTWARE\Wow6432Node\Microsoft\Windows NT\CurrentVersion
2. Double-click “CompositionEditionID” and set its data to “Core“. 3. Double-click “EditionID” and set its data to “Core“. 4. Double-click “ProductName” and set its data to “Windows 10 Home.”
#Important# Please set the “ProductName” value to “Windows 10 Home” even it is Windows 11
5, After modifying the value data in the above two branches, exit the Registry Editor.
Method 2:
1. First , please make sure you’ve signed in Windows 11 Pro as an administrator.
2. Create a txt document then change the extension .txt to .reg file, then input these codes and save it:
Windows Registry Editor Version 5.00 [HKEY_LOCAL_MACHINE\SOFTWARE\Microsoft\Windows NT\CurrentVersion] “CompositionEditionID”=”Core” “EditionID”=”Core” “ProductName”=”Windows 11 Home” [HKEY_LOCAL_MACHINE\SOFTWARE\Wow6432Node\Microsoft\Windows NT\CurrentVersion] “CompositionEditionID”=”Core” “EditionID”=”Core” “ProductName”=”Windows 11 Home”
3. Double click on the .reg file to start to merge the registry.
4. Please select “Yes”, “Yes”, “Ok” to approve and complete the merge.
5. There is no use for the .reg file any more, you can delete it.
Step 2: Downgrade Windows 11 Home with ISO file or Media Creation Tool.
1, Download Windows 11 ISO file, then open the ISO file with win-rar or 7-zip, then double click “Setup”.
Because we changed the EditionID and Product Name, so we will be able to install the Windows 11 Home.
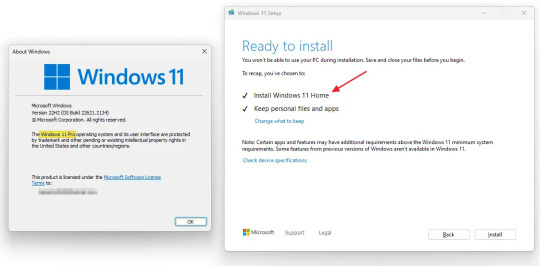
2, Follow the steps: “ready to install”, Select “Install; “Change what to keep”, please select “keep personal file and apps”; then click “Next” and then click “Install”.
When the repair install has finished, you will now be downgraded to the Windows 11 Home edition without losing anything.
If your Windows 11 Home is not activated by a digital license before, then you will need to Change product key to a valid Windows 11 Home key to activate.
14 notes
·
View notes
Note
So my hope, eventually, is to have my own purpose-built computer which is an expandable skeleton and will more-or-less never need to be entirely tossed out, only supplanted/upgraded Ship of Theseus style.
However, Microsoft is getting a bit too uppity for my tastes, and I hope to mainly run Linux on that eventual computer.
However, I'm also a gaming man, and I recognize that, in many cases, Linux kinda sucks for games, or, at least, that's what I've heard. Emulation is also a pain I'd rather not deal with (both of Windows and of games themselves), and so, for games that don't support Linux, I'd like to have the option of having Windows on the same machine, so that I can run Linux most of the time, but switch to Windows whenever I wanna play games.
My question is how realistic is that? I know that machines with multiple OS's exist, and you can choose which one you want at boot, but I'm hoping for this to be an extremely fancy computer, connected to a lot of extremely fancy computer peripherals. Would switching OS's without power cycling the machine screw with the other hardware? Is it even possible, or would you need to power cycle it in any case? Is there any way to build this hypothetical computer, or am I asking too much/investing too much effort? Would it be easier/better to just build a really good Windows machine and a really good Linux machine?
So the use case you're talking about is pretty popular among a certain kinds of Tech Nerd, and most of them solve it with iommu GPU Passthrough and a windows VM on Linux. I knew a few people doing this back in like 2018 and while it's a little fidgety it's fairly reliable.
You can't share GPU's the way you can share CPU and Memory. Not on consumer hardware, anyway. So if you want to run a VM with windows with a gaming GPU, it needs its own entire GPU just for that.
The basic layout is this: Build a normal high end system with a lot of extra resources, say, 32+GB of RAM, 10+ CPU cores, a couple terabytes of storage, and two separate GPU's. Run Linux on the system, as your host, and only use one of the GPU's. Create a VM on the host under qemu and hand it 16GB of RAM, 6 cores, a terabyte or two of storage, and use iommu to pass it the other GPU. Now use software like LookingGlass to capture the framebuffer directly off the Windows GPU and forward it to your Linux GPU, so that you can display your windows system inside Linux seamlessly.
Now, you do need two GPU's, so it can get expensive. A lot of people choose to run one higher end GPU for windows and a basic GPU for Linux, but that's up to your use case. You can run two identical GPU's if you wish.
The main place this kind of thing is being tinkered with is the Level1Techs forum, Wendell is a big advocate of GPU virtualization and so has aggregated a lot of information and people with relevance here. He also makes a lot of video stuff on IOMMU.
youtube
So I have to have two whole GPU's?
Kind of. There ARE ways to live-reset a running GPU which allows you to do tricks where you can swap a single GPU between the host and the VM without rebooting, but it's extremely dubious and flaky. Virtualized GPU partitioning exists but only on extremely expensive server GPU's aimed at virtualization servers for enterprise so it's well outside of our price range.
If you're interested in single-GPU, there is ongoing work getting it to run on consumer hardware on the Level1Techs forum and he's even running some kind of Hackathon on it, but even the people having success with this have pretty unreliable systems.
https://forum.level1techs.com/t/vfio-passthrough-in-2023-call-to-arms/199671
This setup works fine maybe 25% of the time. I can always start the VM just fine, my linux desktop stays active and any software launched after the VM gets the GPU will render on the iGPU without issues. However I suffer from the reset bug, and 75% of the time shutting down the VM won’t return the GPU to Linux and I have to reboot to fix that.
I'm quite satisfied with this setup.
Is this a good idea
It depends on what you need and how willing you are to switch between the host and VM. A LOT more things run smoothly on Linux these days. Wendell started tinkering with IOMMU back in like 2015, and I started gaming on Linux back in 2016. If you had native software, great! Without that, well, good luck with anything less than five years old.
I played Burnout Paradise and even Subnautica on my 750Ti laptop on plain old Wine, and then DXVK came out in 2018 and the world got flipped turned upside down and I have video of me running Warframe on Linux with that same mediocre system a few weeks before Proton hit the scene and we got flipped turned... right way up? Now with Proton I would say most things run pretty well under a mixture of automatic steam stuff and scripts off lutris and homemade WINEPREFIXes.
That said, if you want everything to Just Work, it's hard to beat a VM. I'm not sure how competitive games run, but for everything else a VM is going to be more reliable than WINE.
30 notes
·
View notes
Note
hello! I found you through one of your art tutorials and absolutely loved it, it's really inspired me to try it. I was just wondering, not being familiar with digital art, what set up/ app/ tools do you use (or recommend)? do I need a fancy tablet? thank you :)
I'm so glad to hear it! I hope wherever your drawing journey takes you, that you will keep having fun along the way :)
I am always glad to show my setup!
Let's start with the hardware!
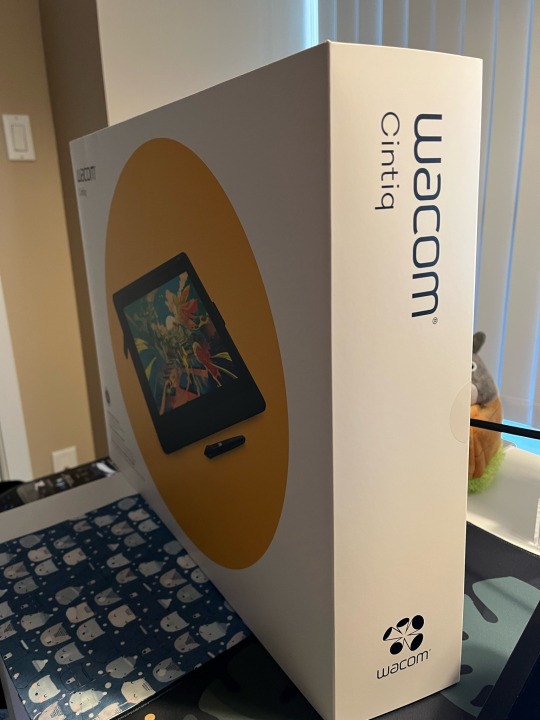
Nowadays, I use a Wacom Cintiq 16, which I purchased this year for around $800 CAD.
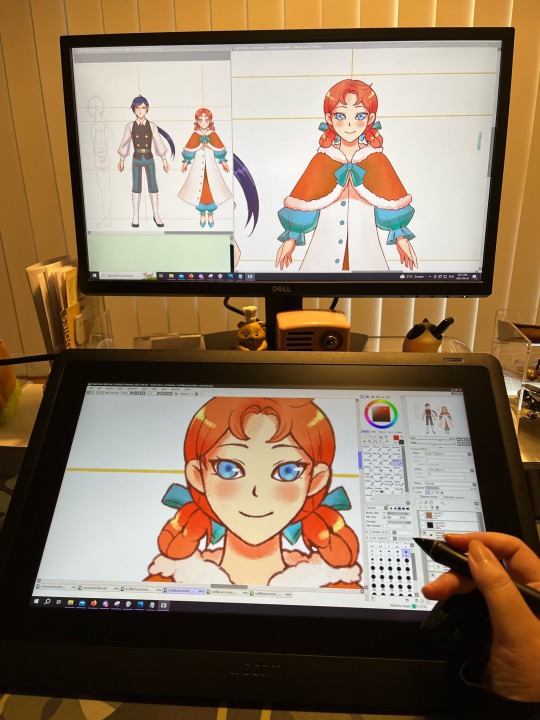
This device very much on the fancy side but as someone who has done digital art for 20+ years, it has helped me complete my works in a much shorter amount of time. The Cintiq surface allows me to draw directly on the screen.
Before that, I used a tablet - the Wacom Intuos v4 S, which I received as a gift from my Dad. It held up for 10+ years and was still working excellently when I gave it away for my Mom to use. :) In 2009 I believe it was priced around $250 CAD.
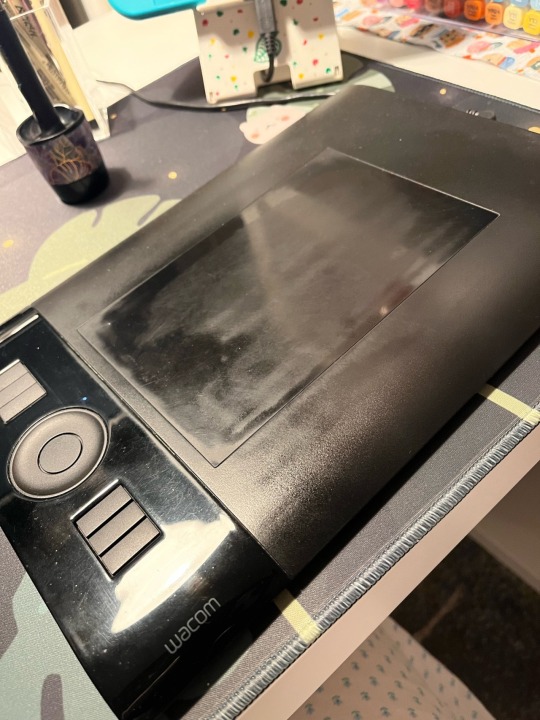
The surface was a lot more matte when I purchased it and has since gotten shinier from all the abrasion and usage and skin contact. I remember it had a protective transparent sheet which I tore off on the first day of use. LOL
My desktop PC is i7 processor @ 3.20 GHz with Windows 10 64bit, 16gb, with a NVIDIA GeForce GTX 1060 video card. Monitor is 24". Notably I use my PC for other activities such as gaming.
Now let's talk about drawing programs!
My software of choice is PaintToolSai v2! It is very lightweight and has a smaller toolset compared to Photoshop or Clip Studio.

I favor it because I feel that it has a better response to pen input, which helps create higher quality lines. It is very stable and performs very well - I don't think I've ever had any crashes while using v2, which is still in development. The smaller price point helps. The current price is 5500JPY, which should be around $50 CAD these days? The price was lower when I purchased it years and years back, and I was able to upgrade to v2 without any additional cost.
As for what I recommend for a beginner? I admit, it's a little hard for me to say - the landscape of digital painting has changed so much over the past ten years that so many new tools and software have come out while I was still using Sai and my Intuos!
But if you start shopping around, there are some things that may factor into your decision. Please note that I will be speaking as someone who uses mainly desktop systems and tablets for digital art.
Price: The price of a good-quality drawing tablet can range from the $100s to the $1000s. If you are a beginner, you may not experience the benefits of a professional-standard tablet right away, so it's ok to start small! For software, there are quite a few free options to get you started, such as Medibang or Krita. If you have an iPad, Procreate is available on the store for $9.99, though you may need to invest in a stylus.
System Specs: If you have a laptop or a PC, be sure to double check your specs to make sure it can support the hardware and software of your choice! The requirements are less stringent than gaming, so at least i3 with 8gb RAM will work! You will also need to make sure you have enough storage space to hold large files. I've read that the sweet spot for storage is 128GB. If you are a beginner, you probably won't hit the limit in a short amount of time - just be aware that file sizes for digital art can reach 100s of MB depending on size and complexity.
Pressure Sensitivity: This is a measure of how sensitive your tablet is to pressure changes so that you can vary between solid/translucent and thin/thick lines as you are drawing. The recommendation for newcomers is 1,024 levels. Any less, and the experience may be lacking and the results less than satisfying.
Display Size: Tablet size can vary! Wacom Tablets in particular come in Small, Medium and Large. Make sure it can fit on your working space! I've had no problems creating art work using the smallest size, though it has caused a bit of wrist strain.
A monitor/display screen of at least HD quality with a resolution of at least 300dp is recommended! Screen size will also affect your experience. So, similar with gaming, consider what might be most comfortable for you!
Learning Curve: If you are drawing on a screenless tablet for the first time, then it may take some time to get used to the feeling of drawing the tablet surface while keeping your eyes on the monitor. Don't be discouraged if you're not getting the same results as you would using pen and paper! It will definitely feel different, but with time and practice you will gradually get accustomed to it.
Each software comes with its own toolset - some larger than others! For complex programs like Clip Studio and Photoshop, the number of features and the level of customization available can be overwhelming! That said, most software programs for digital art come with a standard set of basic tools, such as Brush, Select, Straight Line, Erase, Zoom, Copy + Paste, Undo etc. So it is perfectly feasible to get started using a complex program, familiarize yourself with the basics, and try some of the more advanced features once you get confident.
(Meanwhile, I am terrified of Clip Studio's seemingly endless features whenever I open it and usually find myself running back to Sai for safety lolol)
Public Opinion: Take caution when watching Youtube reviews, as artists (especially popular ones) are known to accept company sponsorships. Ask around if you can, take a look at the best, worst, and average customer reviews, and check out a public discussion like Reddit where opinions may differ! Take note of the good and bad experiences. And, where invited, ask artists like or not-like me. :)
I should note this far that I'm not sponsored by anyone or anything. ;;;; I swear on my Mom I'm not a Wacom plant. (That said I will gladly continue to sing my praises of PaintToolSai for free. It is an excellent program and please consider supporting the smaller devs!)
That's it! ...I think? I'm almost certain that there are at least one or two things that I've neglected to mention, but so far, those are the points I can think of, so I hope you find it useful. :)
Each digital art journey is different, and so your mileage may vary with the factors above! I do hope that as you get started with creating stuff digitally, that you have a fun and enjoyable experience.
I also invite other people to share their opinions, agreements, and disagreements to the points above! Especially if there is anything important that I may have missed. I hope this is helpful and thank you again everyone for your positive comments on my tutorials. :')
14 notes
·
View notes
Text
I have Linux Mint on my travel laptop. I do not have it on my Larger Less-Travel-y Laptop, because I need Acrobat Pro to do work, and I am a Word user at a skill level that makes switching to Libre Office difficult. (Also I use both Word and Acrobat Pro in my day job; there is no option of "just get used to something else." It'd always be "get used to both.") I also use ABBYY FineReader, and there is absolutely nothing Linux-friendly that compares.
Can attest that Linux Mint is easy to install and easy to use. Slightly more difficult to set up to run on a flash drive that remembers your settings instead of wiping the base OS. (...I hauled in Linux-Fluent Daughter to set that up. I could've done it alone but was getting frustrated. Creating partitions on a flash drive is not fun for non-techies.)
(Srsly, Linux folks, why the hell is there no How To Switch From Windows website? Why is there no nice, open community and attached Discord for So You Want To Defenestrate Your Computer? No tiny nonprofit focused on End The Chromebook Conspiracy? Where's the "We convert Win7 Laptops into Linux For Students" group?)
Notes from a power Windows user who has loved Linux for decades but has very little practical experience with it:
The "choose a distro" advice is terrible. There are no guidelines for it, 2/3 of the searchable advice about it is more than 10 years old, and fully half of that is "how to get the smallest possible distro onto your very tiny ancient drive." And it's great to know that I can run Linux off a 2gb flash drive! But. It's not what I actually need.
Info about "how do I run this set of programs I use all the time" is also terrible. And often hostile, and packed with "you should be using open source software instead."
At no point in the "hey you should try Linux!" discussions does anyone mention "oh by the way, some laptops will have no native support for certain exotic features like audio or printing. You will need to track down special drivers or weird third-party plugin things to make those work. You will only discover this lack after you have installed Linux, joined a Zoom call, and realized that your OS thinks your speakers don't exist."
Choose a password you are comfortable typing A LOT. Seriously, security is less of an issue here than "password I can type 30 times during a fix-it session." You can switch to a more secure password when you're comfortable with the OS. (Don't use "password" or "pa55w0rd" as your password, but you also don't need to go the "correct horse battery staple" route.)
A notable number of apps do not have a "click here to install" feature that we get used to with Windows. Snap and Flatpak are not difficult to learn or work with, but they are different. (And they usually take more space than expected.)
A lot of apps require frequent updates to function. Especially the ones that don't have a native Linux version. This is also frustrating.
OS emulators and virtual drives are next-level techistry and any suggestions for using them should be followed with either a very solid tutorial (in TEXT form, not a video) or an offer to hand-hold while someone gets it set up.
Once you start using Linux - if it's Mint, it will mostly seem like Windows. Sometimes there'll be a weird error message. WHEN SEARCHING FOR ADVICE: make sure to add [linux mint] to the search terms, AND limit the results to the last year. Otherwise, you wind up finding forum posts from 2014 that say "Ugh this driver issue has been FIXED; just fuckin install Ubuntu 12 already." (Ubuntu is currently at 24.1.)
Some people will tell you you can use Linux without getting into command-line activity. They are lying. You will need to be at least somewhat comfortable with the Terminal. This is not hard, but it is different. And there are no starter tutorials on this. (I have been looking literally for decades.) (I do not speak Command Line well enough to write one.)
Some people will tell you Linux isn't functional unless you learn a whole lot of command-line functions and do most of your operations from there. They are also lying.
There are differences between the distros that, as a Windows or Mac user, you cannot comprehend. Like. They will rattle off a list of features and those will mean nothing to you. They mean nothing to me. I went with Mint because it is "most like Windows." My daughter uses PopOS because it has better VR support. I think.
You will occasionally have to re-install the whole damn OS, and it will be terrifying. It will tell you your files are safe. This is correct, if you have not done weird customized wonkery to them, in which case, you don't need the warning.
Google knows about Linux and they are Not Happy. Newer Chromebooks can't be directly converted to Linux without fucking with the hardware - as in, open them up and remove the thing they installed to make Linux not work. (Or rather, to make ChromeOS always recoverable.) However, even those will allow running Linux off a flash drive.
The key advantages to Linux:
Lack of Microsoft & Apple's increasing demands to collect all your personal data.
Lack of random "upgrades" that fuck up your existing processes. (That said: If you use cloud-based apps - like, oh, Discord - you will need frequent updates anyway.)
Whateverthefuck is going on with AI invading your computer - you can dodge all of that.
If you do want to customize things, you can. You can change a lot of the appearance, the startup details, what software gets priority in the system, and a whole swarm of back-end details that most Windows users (including me) are pretty much oblivious to. CAVEAT: None of that is as easy as many Linux stans make it sound. SECOND CAVEAT: If you customize your system to hell and back, you won't be able to work (well) on a standard base-install version. The result of this, is that Linux experts often flounder when helping newbies, because they don't know what any of the default settings are anymore. (They are experts. They know what's available and how to make it work. They just don't know where it's hiding in your system.)
Linux will run on much smaller, slower computers than MS or Apple, because, see above, it's not trying to spy on you or inflict AI shenanigans on you. A basic student-functional Linux laptop can be much cheaper than what's needed to run the current Windows or MacOS, and less cloud-driven that Chromebooks.
I swear to fucking god. I would claw out OneDrive from my computer if I could. I would burn down their servers if I could. I would run down their stocks to the ground if I could. I hope every single one of their workers gets a better offer from a competitor in the next 24 hours. I hope every single one of their light bulbs explodes at the same time. I hope every single carton of milk in their fridge will always be expired.
Stop backing up my fucking files.
Stop asking me to back up my fucking files.
Stop taking my fucking files off my fucking computer.
I don't want a fucking reminder in three fucking days. Let me fucking say no.
Fuckers.
29K notes
·
View notes
Text
Test Automation Benefits: 10 Ways Your Team Can Win With Test Automation — Powered by Genqe

In today’s fast-paced software development landscape, the demand for faster releases, superior quality, and robust performance is higher than ever. Businesses can no longer afford lengthy manual testing cycles, nor can they rely solely on human testers to catch every bug. This is where test automation becomes a game-changer.
With advanced tools like Genqe, test automation transforms how QA teams operate — bringing in speed, accuracy, and unmatched efficiency. In this article, we will explore 10 key ways your team can win with test automation, and why Genqe is the ideal platform to drive this transformation.
What is Test Automation?
Test automation involves using specialized software tools to execute predefined tests on an application automatically. These automated tests compare actual outcomes with expected outcomes, enabling faster detection of bugs, performance issues, and regressions.
Genqe is a leading-edge tool purpose-built to simplify and supercharge your test automation process. With Genqe, your QA and development teams can create, manage, and execute automated tests at scale — without the traditional complexities of scripting and framework setup.
Why Should You Care About Test Automation?
The manual testing process can be laborious, error-prone, and difficult to scale in today’s agile environments. Automated testing with Genqe allows your team to:
✅ Run repetitive tests rapidly ✅ Ensure consistent test execution ✅ Detect bugs early ✅ Reduce overall testing costs ✅ Accelerate software release cycles
But the true potential goes even deeper. Let’s dive into 10 powerful benefits your team will enjoy by leveraging test automation with Genqe.
1. Speed Up Time-to-Market
Manual testing simply cannot keep pace with today’s rapid development cycles. Automated tests can be executed in parallel across multiple environments and devices — something that would take days or weeks if done manually.
With Genqe, your team can schedule automated test runs at any time — overnight, on weekends, or during deployment windows — without requiring human supervision. This means you can identify issues sooner and ship faster, giving your product a competitive edge.
2. Improve Test Coverage
Manual testers often focus on the “happy path,” leaving edge cases and regression scenarios under-tested due to time constraints. Automated tests, powered by Genqe, can easily run thousands of test cases across different configurations and environments — ensuring thorough coverage.
Whether it’s functional testing, regression testing, cross-browser testing, or performance validation — Genqe allows your team to expand test coverage without expanding the team itself.
3. Reduce Human Error
Even the most skilled manual testers are prone to mistakes when repeating the same tests hundreds of times. Automated tests are consistent, repeatable, and not subject to fatigue.
With Genqe, once your tests are defined, they run exactly the same way every time — capturing any deviation from expected behavior with precision. This improves software reliability and reduces the risk of releasing buggy code to customers.
4. Save Valuable Time for Your QA Team
Manual regression testing can consume vast amounts of your QA team’s time, especially before major releases. Automated regression testing with Genqe drastically reduces this workload — freeing your testers to focus on higher-value activities like exploratory testing and usability testing.
As a result, your team becomes more productive and better aligned with strategic quality initiatives rather than being stuck in repetitive cycles.
5. Achieve Continuous Testing
In agile and DevOps environments, continuous integration (CI) and continuous delivery (CD) pipelines rely on continuous testing to maintain quality. Automated testing is the only way to achieve this.
Genqe integrates seamlessly with your CI/CD tools, allowing automated tests to run as part of every build and deployment process. This ensures that defects are caught as soon as they are introduced — creating a feedback loop that continuously improves code quality.
6. Enable Parallel Testing Across Devices and Platforms
Testing your application across multiple browsers, devices, and OS versions is critical — but also resource-intensive. Manual testing here is practically impossible at scale.
Genqe offers robust support for parallel testing, enabling your tests to run simultaneously across various environments. This allows you to validate your application across the ecosystem quickly, ensuring a consistent experience for all users.
7. Make Testing Scalable
As your application grows, the number of required tests increases exponentially. Manually scaling up testing is not sustainable.
With Genqe, scaling your test suite is easy. You can add new test cases, environments, and configurations without adding testers. Automation allows you to handle increasing test demands with the same or even fewer resources — maximizing ROI.
8. Enhance Collaboration Across Teams
Automated test results provide a shared language for QA, development, and business stakeholders. Genqe makes test results easy to understand and share, with visual reports and detailed logs.
This promotes better collaboration across teams, as everyone can see what’s working, what’s broken, and where the focus needs to be. Teams can prioritize fixes and improvements based on reliable, automated feedback.
9. Lower Long-Term Testing Costs
While there is an initial investment in building an automated test suite, the long-term savings are substantial. Automated tests can be run thousands of times with no incremental cost, whereas manual testing incurs labor costs every time.
Genqe further reduces the cost of automation by making it easy to create and maintain tests — without requiring deep programming skills or complex infrastructure. The result is a higher return on your testing investment over time.
10. Drive Continuous Quality Improvement
Perhaps the greatest benefit of test automation is that it fosters a culture of continuous quality improvement. When automated tests run with every code change, quality becomes an integral part of the development process — not an afterthought.
With Genqe, your team gets instant insights into quality trends, defect patterns, and improvement opportunities. This enables continuous learning and innovation — ultimately resulting in better products and happier customers.
Conclusion
Test automation is no longer a “nice to have” — it’s a critical enabler of modern software development. Teams that embrace automation with a powerful tool like Genqe can unlock dramatic improvements in speed, quality, efficiency, and collaboration.
Here’s a quick recap of the 10 key ways your team can win with test automation using Genqe:
Speed up time-to-market
Improve test coverage
Reduce human error
Save valuable QA team time
Achieve continuous testing
Enable parallel testing
Make testing scalable
Enhance team collaboration
Lower long-term costs
Drive continuous quality improvement
Whether you’re starting your test automation journey or looking to scale an existing strategy, Genqe provides the capabilities, flexibility, and simplicity your team needs to succeed.
Start winning with test automation — start testing smarter with Genqe. 🚀
If you’d like, I can also provide: ✅ Sample headlines for LinkedIn promotion ✅ Suggested SEO keywords ✅ A call-to-action paragraph to encourage teams to try Genqe
0 notes
Text
Is That Windows 11 Pro Key on Amazon Legit? A Must-Read Guide for New PC Builders
Building your own PC is a rewarding experience, especially when you power it on for the first time. But once the hardware is set up, there’s one crucial task left—installing and activating Windows. Many new builders, just like you, start looking for a Windows 11 Pro key online, often turning to platforms like Amazon for a quick and affordable solution. But are those cheap Windows 11 Pro keys legit?
In this article, we’ll explore what a Windows 11 Pro key really is, the types of licenses available, what risks come with third-party sellers, and how to protect your new system with a genuine activation key.
What Is a Windows 11 Pro Key?
A Windows 11 Pro key is a 25-character alphanumeric code used to activate the professional version of Microsoft’s latest operating system. This key proves that your copy of Windows is genuine and grants full access to features like:
Remote Desktop
BitLocker encryption
Group Policy management
Enhanced networking options
These features are especially useful for power users, developers, business professionals, and anyone needing advanced control over their PC.
Without activation, Windows 11 Pro will still install and work, but with limitations like a persistent watermark, no personalization, and restricted access to updates and security patches.
Why Buy a Windows 11 Pro Key?
When building your PC, using a valid Windows 11 Pro key ensures:
Full functionality of the OS
Access to Microsoft’s security updates
Compatibility with enterprise-level software
Peace of mind that your system is legal and secure
For professionals and tech-savvy users, Windows 11 Pro offers more flexibility than the Home version, making the right activation key essential for unlocking its full potential.
Are Cheap Windows 11 Pro Keys on Amazon Legit?
This is the big question. You may see listings on Amazon selling Windows 11 Pro key for as little as $10–$30, compared to the official price of around $199 from Microsoft. While these offers are tempting, here’s what you need to know:
What Could These Keys Be?
OEM Keys These are valid but are meant for system builders and are legally tied to the first hardware setup they’re activated on. They’re not transferable.
Volume License Keys Intended for organizations and institutions. When sold individually, they’re often in violation of Microsoft’s terms.
Reused or Recycled Keys These may have been used on older systems and might not work again—or could stop working later.
Stolen or Counterfeit Keys Some keys are obtained through unauthorized means and may be blacklisted by Microsoft.
What Are the Risks?
Deactivation: Microsoft can detect and disable illegitimate keys at any time.
Security Threats: Some sellers distribute malware alongside fake keys.
No Support: Without a valid license, you won’t get help from Microsoft if anything goes wrong.
Wasted Money: If the key fails to work or is revoked later, you’ll have to buy another one.
How to Identify a Legitimate Windows 11 Pro Key
If you decide to buy a Windows 11 Pro key from Amazon or any third-party marketplace, here are a few tips to avoid scams:
1. Check the Seller’s Reputation
Only buy from sellers with high ratings and many positive reviews. Be cautious of newly created accounts.
2. Avoid “Email Delivery Only” Keys
Authentic sellers will provide the key through official, secure platforms. Avoid sketchy emails or downloadable documents.
3. Look for Clear License Type
The product listing should specify whether the key is OEM, Retail, or Volume. Transparency is a good sign.
4. Compare Prices Realistically
If the price is too good to be true, it probably is. Extremely cheap keys often raise red flags.
5. Prefer Digital Downloads from Authorized Retailers
If you're buying online, go through Microsoft, Newegg, Best Buy, or Amazon itself—not third-party vendors on those platforms.
How to Use Your Windows 11 Pro Key
Once you've purchased a genuine key, activating Windows 11 Pro is easy:
Open the Settings app.
Go to System > Activation.
Click Change product key.
Enter your 25-character Windows 11 Pro key.
Follow the on-screen instructions to complete activation.
After successful activation, your Windows 11 Pro system will be fully unlocked, and you’ll no longer see any activation prompts or restrictions.
Final Thoughts
If you’ve just built your PC, don’t risk its performance and security with a shady activation method. While it’s understandable to want to save money, buying a Windows 11 Pro key from unverified sellers can lead to future headaches—from deactivation to data compromise.
Instead, invest in a genuine Windows 11 Pro key from a trusted source. Not only will you get the full feature set of one of Microsoft’s most powerful operating systems, but you’ll also gain peace of mind knowing your software is secure, legal, and built to last.
0 notes
Text
Boost Your Fortnite FPS in 2025: The Complete Optimization Guide
youtube
Unlock Maximum Fortnite FPS in 2025: Pro Settings & Hidden Tweaks Revealed
In 2025, achieving peak performance in Fortnite requires more than just powerful hardware. Even the most expensive gaming setups can struggle with inconsistent frame rates and input lag if the system isn’t properly optimized. This guide is designed for players who want to push their system to its limits — without spending more money. Whether you’re a competitive player or just want smoother gameplay, this comprehensive Fortnite optimization guide will walk you through the best tools and settings to significantly boost FPS, reduce input lag, and create a seamless experience.
From built-in Windows adjustments to game-specific software like Razer Cortex and AMD Adrenalin, we’ll break down each step in a clear, actionable format. Our goal is to help you reach 240+ FPS with ease and consistency, using only free tools and smart configuration choices.
Check System Resource Usage First
Before making any deep optimizations, it’s crucial to understand how your PC is currently handling resource allocation. Begin by opening Task Manager (Ctrl + Alt + Delete > Task Manager). Under the Processes tab, review which applications are consuming the most CPU and memory.
Close unused applications like web browsers or VPN services, which often run in the background and consume RAM.
Navigate to the Performance tab to verify that your CPU is operating at its intended base speed.
Confirm that your memory (RAM) is running at its advertised frequency. If it’s not, you may need to enable XMP in your BIOS.

Avoid Complex Scripts — Use Razer Cortex Instead
While there are command-line based options like Windows 10 Debloater (DBLO), they often require technical knowledge and manual PowerShell scripts. For a user-friendly alternative, consider Razer Cortex — a free tool that automates performance tuning with just a few clicks.
Here’s how to use it:
Download and install Razer Cortex.
Open the application and go to the Booster tab.
Enable all core options such as:
Disable CPU Sleep Mode
Enable Game Power Solutions
Clear Clipboard and Clean RAM
Disable Sticky Keys, Cortana, Telemetry, and Error Reporting

Use Razer Cortex Speed Optimization Features
After setting up the Booster functions, move on to the Speed Up section of Razer Cortex. This tool scans your PC for services and processes that can be safely disabled or paused to improve overall system responsiveness.
Steps to follow:
Click Optimize Now under the Speed Up tab.
Let Cortex analyze and adjust unnecessary background activities.
This process will reduce system load, freeing resources for Fortnite and other games.
You’ll also find the Booster Prime feature under the same application, allowing game-specific tweaks. For Fortnite, it lets you pick from performance-focused or quality-based settings depending on your needs.
Optimize Fortnite Graphics Settings via Booster Prime
With Booster Prime, users can apply recommended Fortnite settings without navigating the in-game menu. This simplifies the optimization process, especially for players not familiar with technical configuration.
Key settings to configure:
Resolution: Stick with native (1920x1080 for most) or drop slightly for extra performance.
Display Mode: Use Windowed Fullscreen for better compatibility with overlays and task switching.
Graphics Profile: Choose Performance Mode to prioritize FPS over visuals, or Balanced for a mix of both.
Once settings are chosen, click Optimize, and Razer Cortex will apply all changes automatically. You’ll see increased FPS and reduced stuttering almost immediately.
Track Resource Gains and Performance Impact
Once you’ve applied Razer Cortex optimizations, monitor the system changes in real-time. The software displays how much RAM is freed and which services have been stopped.
For example:
You might see 3–4 GB of RAM released, depending on how many background applications were disabled.
Services like Cortana and telemetry often consume hidden resources — disabling them can free both memory and CPU cycles.

Enable AMD Adrenalin Performance Settings (For AMD Users)
If your system is powered by an AMD GPU, the Adrenalin Software Suite offers multiple settings that improve gaming performance with minimal setup.
Recommended options to enable:
Anti-Lag: Reduces input latency, making your controls feel more immediate.
Radeon Super Resolution: Upscales games to provide smoother performance at lower system loads.
Enhanced Sync: Improves frame pacing without the drawbacks of traditional V-Sync.
Image Sharpening: Adds clarity without a major hit to performance.
Radeon Boost: Dynamically lowers resolution during fast motion to maintain smooth FPS.
Be sure to enable Borderless Fullscreen in your game settings for optimal GPU performance and lower system latency.
Match Frame Rate with Monitor Refresh Rate
One of the simplest and most effective ways to improve both performance and gameplay experience is to cap your frame rate to match your monitor’s refresh rate. For instance, if you’re using a 240Hz monitor, setting Fortnite’s max FPS to 240 will reduce unnecessary GPU strain and maintain stable frame pacing.
Benefits of FPS capping:
Lower input latency
Reduced screen tearing
Better thermals and power efficiency
This adjustment ensures your system isn’t overworking when there’s no benefit, which can lead to more stable and predictable gameplay — especially during extended play sessions.
Real-World Performance Comparison
After applying Razer Cortex and configuring system settings, players often see dramatic performance improvements. In test environments using a 2K resolution on DirectX 12, systems previously capped at 50–60 FPS with 15–20 ms response times jumped to 170–180 FPS with a 3–5 ms response time.
When switching to 1080p resolution:
Frame rates typically exceed 200 FPS
Reduced frame time results in smoother aiming and lower delay
Competitive advantage improves due to lower latency and higher visual consistency
These results are reproducible on most modern gaming rigs, regardless of brand, as long as the system has adequate hardware and is properly optimized.
Switch Between Performance Modes for Different Games
One of Razer Cortex’s strongest features is its flexibility. You can easily switch between optimization profiles depending on the type of game you’re playing. For Fortnite, choose high-performance settings to prioritize responsiveness and frame rate. But for visually rich, story-driven games, you might want higher quality visuals.
Using Booster Prime:
Choose your desired game from the list.
Select a profile such as Performance, Balanced, or Quality.
Apply settings instantly by clicking Optimize, then launch the game directly.
This quick toggle capability makes it easy to adapt your system to different gaming needs without having to manually change settings every time.
Final Performance Test: Fortnite in 2K with Performance Mode
To push your system to the limit, test Fortnite under 2K resolution and Performance Mode enabled. Without any optimizations, many systems may average 140–160 FPS. However, with all the Razer Cortex and system tweaks applied:
Frame rates can spike above 400 FPS
Input delay and frame time reduce significantly
Gameplay becomes smoother and more responsive, ideal for fast-paced shooters

Conclusion: Unlock Peak Fortnite Performance in 2025
Optimizing Fortnite for maximum FPS and minimal input lag doesn’t require expensive upgrades or advanced technical skills. With the help of tools like Razer Cortex and AMD Adrenalin, along with proper system tuning, you can dramatically enhance your gameplay experience.
Key takeaways:
Monitor and free system resources using Task Manager
Use Razer Cortex to automate performance boosts with one click
Apply optimized settings for Fortnite via Booster Prime
Match FPS to your monitor’s refresh rate for smoother visuals
Take advantage of GPU-specific software like AMD Adrenalin
Customize settings for performance or quality based on your gaming style
By following this fortnite optimization guide, you can achieve a consistent fortnite fps boost in 2025 while also reducing input lag and ensuring your system runs at peak performance. These steps are applicable not only to Fortnite but to nearly any competitive game you play. It’s time to make your hardware work smarter — not harder.
🎮 Level 99 Kitchen Conjurer | Crafting epic culinary quests where every dish is a legendary drop. Wielding spatulas and controllers with equal mastery, I’m here to guide you through recipes that give +10 to flavor and +5 to happiness. Join my party as we raid the kitchen and unlock achievement-worthy meals! 🍳✨ #GamingChef #CulinaryQuests
For More, Visit @https://haplogamingcook.com
#fortnite fps guide 2025#increase fortnite fps#fortnite performance optimization#fortnite fps boost settings#fortnite graphics settings#best fortnite settings for fps#fortnite lag fix#fortnite fps drops fix#fortnite competitive settings#fortnite performance mode#fortnite pc optimization#fortnite fps boost tips#fortnite low end pc settings#fortnite high fps config#fortnite graphics optimization#fortnite game optimization#fortnite fps unlock#fortnite performance guide#fortnite settings guide 2025#fortnite competitive fps#Youtube
0 notes
Text
AZ Instant PayDay Review – DFY Amazon Royalty Profit System
Welcome to my AZ Instant PayDay Review, Are you looking for a completely passive income stream with little to no upfront work, zero tech skills, and massive scalability? If so, AZ Instant PayDay promises to be the next big opportunity in the online business world.
We are introducing AZ Instant PayDay, a done-for-you profit system that turns simple audiobooks into $25–$50 royalty payments, over and over again, using nothing but a phone and WiFi.

In this detailed and SEO-optimized AZ Instant PayDay review, we’ll take a deep dive into what this system offers, how it works, whether it lives up to the hype, and if it’s the right choice for aspiring entrepreneurs or anyone looking to build passive income streams through Amazon.
What Is AZ Instant PayDay?
AZ Instant PayDay is a done-for-you Amazon royalty commission system that allows users to earn passive income by uploading pre-made audiobooks to a little-known Amazon-owned platform, specifically ACX, which powers Audible. This system requires no writing, recording, or technical skills.
Users are provided with high-quality, ready-to-upload audiobooks that generate recurring royalties each time they are played or purchased. Designed for beginners and side hustlers, AZ Instant PayDay automates the entire process, making it easy to start earning consistent, hands-free income online.
AZ Instant PayDay Review: Overview of Product
Product Creator: Glynn Kosky
Product: AZ Instant PayDay
Launch Date: 2025-Apr-15
Launch Time: 10:00 EDT
Front-End Price: $17 One-Time Payment! (Limited-Time Access)
Official Site: Click Here To Visit Official Salespage
Product Type: Tools and Software
Support: Effective and Friendly Response
Recommended: Highly Recommended
Bonuses: YES, Huge Bonuses
Skill Level Required: All Levels
Discount Coupon: Use Code “AZINSTANT3” for $3 Off Full Funnel
Refund: YES, 180 Days Money-Back Guarantee
AZ Instant PayDay Review: Key Features of AZ Instant PayDay
✍Earn by Uploading Audiobooks – From Any Device!
With the AZ Instant Payday system, you can start making money simply by uploading audiobooks. Whether you’re using a Mac, Windows PC, or even just your smartphone or tablet, you’re good to go. This system works seamlessly across all devices.
✍1-Click Monetization That Works Like Magic
Activate AZ Instant Payday and unlock the ability to upload audiobooks and start receiving consistent $25–$50 payments with just one click. It’s truly that simple.
✍Step-by-Step Video Training Included
Worried about where to start? Don’t be. We provide comprehensive A-Z video training to help you set up and launch your AZ Instant Payday system from scratch. Perfect for complete beginners or anyone looking to scale faster.
✍Dedicated Support Team, Ready 24/7
If you ever hit a bump in the road or need help maximizing your results, our professional support team is available around the clock. We’re committed to helping you succeed every step of the way.
✍No Extra Costs or Hidden Fees
Forget about additional expenses like hosting, domain names, or email autoresponders. AZ Instant Payday gives you everything you need to profit—without spending an extra dime.
✍Foolproof System Designed for Success
You can’t go wrong here. Just upload the ready-made audiobooks we provide, follow our simple instructions, and start earning. No guesswork, no technical skills required.
✍Perfect for Beginners
New to making money online? No problem! AZ Instant Payday is specifically built with beginners in mind. We equip you with all the tools, training, and support you need to achieve real results.
✍No Computer? No Problem!
You don’t even need a laptop to get started. Use your smartphone, tablet, or any internet-connected device to operate the system and receive payments—anytime, anywhere.
✍Get Paid From Anywhere in the World
Whether you’re in the U.S., Europe, Asia, or anywhere else, AZ Instant Payday works globally. All you need is internet access and your copy of the system.
AZ Instant PayDay Review: How Does It Work?
You’re Now Just 3 Clicks Away From Receiving $25-$50 In Amazon Royalties Over and Over Again!
STEP #1: ACCESS
Click Any Of The “Get Instant Access Now” Buttons On This Page To Create Your AZ Instant Payday Account.
STEP #2: DOWNLOAD
Download the Done-For-You Audiobooks Given To You.
STEP #3: UPLOAD
Upload The Audiobooks To Amazon & Get Paid $25-50 Royalties Over & Over.
AZ Instant PayDay Review: Who Should Use It?
Affiliate Marketers
Teenagers
College Students
Entrepreneurs
People In Their 20s
Housewives
Freelancers
Stay At Home Dads
Busy People
Marketing Agencies
The Family Man
Old Age Pensioners
Digital Marketers
And Many Others
AZ Instant PayDay Review: OTO’s And Pricing
Front End (FE): AZ Instant PayDay ($17)
OTO1: UNLIMITED ($47)
OTO2: 100% DONE FOR YOU ($67)
OTO3: UNLIMITED TRAFFIC ($97)
OTO4: AUTOMATION ($67)
OTO5: ATM EDITION ($37)
OTO6: License Rights ($197)
AZ Instant PayDay Review: Money Back Guarantee
AZ Instant Payday Iron-Clad 180 Day 100% Money Back PLUS Guarantee
AZ Instant Payday alongside all its resources together with bonuses will be available for the following 180 days under a risk-free guarantee. Watch the app perform its powerful transformation of free traffic into concrete outcomes for yourself. The US-based support staff at AZ Instant Payday stands ready 24 hours to answer your questions. If you make a decision to cancel usage of our services at any time regardless of the reason.
Users have access to six months during which they can request a complete refund without any trouble. If you demonstrate your truthfulness by using AZ INSTANT PAYDAY we will give double your money back after providing individual coaching support for a period of six weeks. We are deeply committed to your achievement therefore we put our heart into your success. We commit to doing all necessary steps for delivering your desired outcomes while you invest with confidence.
AZ Instant PayDay Review: Pros and Cons
Pros:
100% Done-For-You Audiobooks
Real, legal royalty income from Amazon
No selling, no ads, no cold outreach
Easy-to-follow setup and video training
Passive recurring income potential
No prior experience or tech skills needed
Cons:
Requires a one-time investment
You must have internet access.
Nothing wrong with it, it works perfectly!
My Own Customized Exclusive VIP Bonus Bundle
***How To Claim These Bonuses***
Step #1:
Complete your purchase of the AZ Instant PayDay: My Special Unique Bonus Bundle will be visible on your access page as an Affiliate Bonus Button on WarriorPlus immediately after purchase. And before ending my honest AZ Instant PayDay Review, I told you that I would give you my very own unique PFTSES formula for Free.

Step #2:
Send the proof of purchase to my e-mail “[email protected]” (Then I’ll manually Deliver it for you in 24 HOURS).
AZ Instant PayDay Free Premium Bonuses

Frequently Asked Questions (FAQ’s)
Q. What devices does this work on?
AZ INSTANT PAYDAY is web-based so it works on every device out there. All you need is an internet connection.
Q. Is this really beginner friendly?
Absolutely – the majority of our beta testers were brand new to making money online. And you also won’t need any technical skills or previous experience.
Q. Is there a money back guarantee?
Yes, you are covered by our 180-day money back guarantee. There is absolutely no risk when you act now. The only way you lose is if you don’t grab AZ INSTANT PAYDAY at the special discount…
Q. Are there any monthly costs or fees?
Nope! AZ INSTANT PAYDAY includes everything you need. Because there are no extra costs involved, this is as close to a ‘pure profit’ model as you’ll get.
Q. How long does it take to set up?
Even if you’re brand new you can be up and running in 5 minutes. AZ INSTANT PAYDAY is a self-updating system that requires no daily maintenance.
Q. What if I need help or support?
We love helping our customers! Professional, patient & friendly support staff are on hand to answer any questions you may have.
Q. How do I get started?
Easy! Just click the button below to get in at the lowest possible price before the next price increase.
Final Verdict: Is AZ Instant PayDay Legit or Hype?
AZ Instant PayDay is a legitimate and powerful system for anyone looking to tap into Amazon’s booming audiobook platform without the usual barriers. With done-for-you content, clear step-by-step training, and zero need for technical skills or experience, it offers a real passive income opportunity. While results depend on effort and consistency, the potential to earn $25–$50 per audiobook repeatedly makes this system a smart, low-risk investment for long-term royalty profits.
🚀 Don’t miss out guys and start your journey with AZ Instant PayDay today!
>>> Click Here to Visit AZ Instant PayDay and Get Instant Access Now <<<
Check Out My Previous Reviews: AI Coloring Book Creator Review, Cash AI App Review, AI News Avatar Review, Ghibili Videos AI Review, and InfluenX AI Review.
Thank for reading my honest “AZ Instant PayDay Review” till the end. Hope it will help you to make purchase decision perfectly.
#azinstantpayday#azinstantpaydayreview#azinstantpaydaydiscount#azinstantpaydaycoupon#azinstantpaydayreviews2025#azinstantpaydayappreview2025#azinstantpaydaybonusses#azinstantpaydayproduct#azinstantpaydayprice#azinstantpaydayotos#azinstantpaydayoffers#azinstantpaydaybonus#azinstantpaydaybuy#azinstantpaydayWebsite#azinstantpaydaysite#azinstantpaydayapp#azinstantpaydayhonestreviews#azinstantpaydaylatestreviews#azinstantpaydayusersexperience#azinstantpaydayusersreview
0 notes
Text
How to Download and Install KMSpico for Windows 10/11
KMSpico is a widely used software tool designed to activate Microsoft Windows and Office products. It simplifies the activation process and helps users enjoy the full features of their system without complicated steps. If you're using Windows 10 or 11 and are exploring reliable methods for activation, this guide will walk you through how to safely download and install KMSpico from a trustworthy source, all while avoiding any unsafe practices.
What is KMSpico?
KMSpico is an offline activator developed by trusted developers who intended to automate the activation of Microsoft software using the Key Management Service (KMS) technique. It creates a virtual server on your machine and mimics a KMS server to complete activation. This tool is favored for its simplicity, automation, and user-friendly interface.
Is KMSpico Safe to Use?
While many versions of KMSpico circulate online, not all of them are safe or trustworthy. Downloading from unverified sources can lead to potential risks including malware and privacy threats. It is essential to choose a secure and reputable site when downloading such tools.
Best Place to Download KMSpico
For a secure and safe download, Norta Download is highly recommended. This platform offers verified and clean versions of both the Windows Activator and KMSpico Activator. Norta Download ensures that the files are up-to-date and scanned for any potential issues, making it a trusted source for users.
How to Download KMSpico from Norta Download
Visit the official website of Norta Download.
Navigate to the KMSpico Activator or Windows Activator section.
Select the appropriate version for your Windows system (Windows 10 or Windows 11).
Click on the download link and save the file to your PC.
Ensure that your antivirus or Windows Defender is not actively blocking the download during this process.
Installation Guide for KMSpico on Windows 10/11
Once you've downloaded the file, follow these steps for a smooth installation:
Extract the ZIP File After downloading, extract the file using any file extraction software like WinRAR or 7-Zip.
Run the Setup as Administrator Locate the KMSpico installer in the extracted folder, right-click, and choose “Run as administrator.” This step ensures that the tool has the necessary permissions for activation.
Follow the On-Screen Instructions The setup will guide you through the installation process. Simply follow the prompts and complete the installation.
Launch the KMSpico Tool After installation, open KMSpico. The interface will display options for activation. Select either Windows or Office (depending on your need), and the tool will begin the activation process.
Wait for the Confirmation Within a few seconds, you will see a message confirming successful activation.
Final Tips for Smooth Operation
Temporarily Disable Antivirus: Some antivirus software may detect KMSpico as a potential risk due to its behavior of modifying system settings. Temporarily disable your antivirus during installation, but always make sure you’re downloading from a safe site like Norta Download.
Restart Your PC: After activation, it's recommended to restart your computer to ensure all changes are applied.
Keep Software Updated: Occasionally check Norta Download for updated versions to maintain compatibility with the latest Windows updates.
Conclusion
KMSpico is an efficient and user-friendly tool to activate Windows 10 or 11 systems. When downloaded from a safe source like Norta Download, users can be confident in its performance and safety. Always follow best practices during installation and avoid suspicious websites to keep your system secure and optimized.
0 notes
Text
How MS Toolkit Activator Bypasses Windows Activation: Discussed

Microsoft has rigid strategies in position to defend its products, making certain that just valid duplicates of its software are utilized. Nevertheless, some users seek means to bypass these activation processes. One such strategy is actually utilizing the Microsoft Toolkit activator. This tool makes it possible for people to bypass Windows activation, providing a simple technique to activate Windows or even Office without entering into an item key. Let's discover how this tool works and why a lot of pick it for their system activations.
What Is Actually MS Toolkit Activator?
The MS Toolkit activator is a program tool created to bypass Windows activation and activate Microsoft Office and Windows systems. It automates the method, making it much easier for consumers who need to have activation without the inconvenience of personally getting in product keys. The MS Toolkit download allows individuals to activate their software along with just a handful of clicks on. A lot of favor this tool for its performance and the truth that it is actually a free solution, creating it popular amongst those that need a stopgap. The Microsoft Toolkit latest version download makes certain far better Compatibility along with more recent Windows variations, making the method smoother than ever.
How the Activator Functions
The MS Toolkit activator operates by customizing certain documents in the system software, tricking Windows or even Office in to presuming it has actually been switched on with a legitimate item key. It makes use of a technology phoned KMS (Key Monitoring Service) to activate the software without requiring direct communication along with Microsoft's servers. After Windows Toolkit activator download, the individual can easily opt for whether to activate Windows or Microsoft Office, depending on their necessities. The tool incorporates effectively along with different versions, featuring the Microsoft Toolkit download for Windows 10, guaranteeing that customers can easily access full capability after activation.
Bypassing Activation Without a Product Key
One of the key advantages of making use of the Microsoft Toolkit activator is that it bypasses the need for a product key. This could be specifically beneficial for consumers who have shed their original key or even those who are actually unable to obtain one. By using this activator, individuals may activate Windows or even MS Office without encountering the barricades of getting in a long item key. This not simply conserves time but also clears away the frustration affiliated with Microsoft's standard activation techniques. With the Microsoft Toolkit activator free download, users can quickly obtain access to entirely operating program in merely a few measures.
Advantages of utilization Microsoft Toolkit Activator

There are a number of conveniences to making use of the MS Toolkit activator. To begin with, it's free and doesn't demand any sort of payment for activation. Second, it is actually quick and simple to utilize, along with a straightforward user interface that any individual can get through. The MS Toolkit download enables you to activate Windows or Office without intricate creates or even procedures. In addition, the tool supports a vast array of Microsoft items, so you can use it all over various versions of Windows and Office. The Microsoft Toolkit activator free download is a reliable solution for anybody wanting to activate their software without extra expenses.
Why Pick Microsoft Toolkit Activator?
For consumers hoping to avoid pricey item keys or even challenging activation methods, the MS Toolkit activator provides a great solution. It's a free tool that doesn't require technological understanding to operate, making it available to a large range of users. Whether you are actually utilizing Windows 7, 8, or even 10, or any type of version of Office, this activator can easily help. Along With the Windows Toolkit activator download, individuals can quickly activate their systems and proceed functioning without interruption. Its own vast Compatibility, convenience of making use of, and the Microsoft Toolkit latest version download make sure that individuals can maintain their program approximately day and completely practical.
Lastly, the MS Toolkit activator supplies a swiftly, reputable, and free method to activate Windows and Office systems. Whether you need to download Microsoft Toolkit activator for Windows 10 or a more mature version, it supplies a simple solution that bypasses traditional activation strategies. This tool has actually obtained level of popularity as a result of to its own simpleness, Compatibility, and efficiency, making it a go-to for individuals trying to find a hassle-free activation experience.
0 notes
Text
How to Securely Utilize MS Toolkit Activator Without Dangers?
Utilizing software program activation tools may typically happen along with dangers, particularly when it involves Microsoft items. MS Toolkit activator provides a hassle-free way to activate Windows and Office items, however security needs to constantly be a priority. Guaranteeing you're using it correctly and from trusted resources can easily shield your system from malware, viruses, and unwanted program. Let's look into how to properly utilize the Microsoft Toolkit activator free download and avoid any kind of prospective dangers.
Download from Trustworthy Resources
The first and very most crucial step is to download Microsoft Toolkit activator from a reliable and depended on website. Prevent third-party web sites that could give broken versions or changed installers. These data typically contain malware or even other damaging program. To keep secure, constantly go with formal resources or areas recognized for discussing safe and secure tools. As soon as you choose for a relied on website, you will have the ability to download Microsoft Toolkit latest version download with peace of mind.
Inspect for Legitimacy and Compatibility
Before functioning the Microsoft Toolkit activator free download, ensure the tool is actually appropriate with your system. Compatibility examinations help prevent concerns with system stability or functions after activation. The Windows Toolkit activator download should match your details version of Windows or Office. Utilizing a tool that is actually certainly not suitable can result in significant problems, featuring corrupting your documents or even stopping the program from working correctly.
Turn Off Antivirus Momentarily
Numerous antivirus plans are going to banner the Microsoft Toolkit download for Windows 10 as a potential threat. This takes place since activators can sometimes activate false alarm systems, dued to the fact that they modify system setups. Momentarily disabling your anti-viruses software program while you're using the MS Toolkit download may be actually essential, yet help make certain to turn it back on as soon as you've finished the activation process. This are going to provide a safety and security web just in case there are any sort of sticking around dangers.
Comply With Activation Directions Carefully

Using the Microsoft Toolkit activator requires cautious obedience to the activation directions. These directions guarantee you do not unintentionally activate an incorrect version of the software or even overlook measures that could possibly trigger issues. It is actually consistently highly recommended to observe the actions given in the toolkit information or from counted on tutorials to activate your Windows or Office item without a drawback.
Monitor Your System After Activation
When you've activated your software application with the Microsoft Toolkit activator, it is crucial to track your system for any kind of unusual behavior. Often, also legit activation tools can easily lead to small problems. After activation, note how your system works, and if you observe just about anything unique, perform a system browse or even rejuvenate your system to a previous condition. This can easily aid resolve any kind of small concerns resulted in in the course of activation and maintain your system operating perfectly.
By observing these basic yet reliable actions, you can safely utilize the MS Toolkit activator and appreciate the perks of a totally turned on Microsoft item without putting your system in danger.
0 notes
Text
Download iZotope Ozone 8 Advanced

If you're looking to elevate your music production and achieve radio-ready, professional-quality masters, iZotope Ozone 8 Advanced is the perfect solution. This industry-leading AI-powered mastering suite combines cutting-edge processing, spectral shaping, and advanced tonal balance control, making it easier than ever to refine your tracks. Whether you're a producer, mixing engineer, or mastering professional, Ozone 8 Advanced offers the tools you need to bring your music to life.
Why Choose iZotope Ozone 8 Advanced? 🚀
With 12 powerful mastering modules and AI-driven mastering assistants, Ozone 8 Advanced provides everything you need to enhance, balance, and finalize your music. Let’s dive into some of its standout features:
🎯 Tonal Balance Control – Achieve a Perfect Mix
Ozone 8’s Tonal Balance Control allows you to compare your mix to industry-standard reference tracks and make precise adjustments to ensure it sounds great on any system. Say goodbye to muddy lows, harsh mids, and weak highs—this tool gives you real-time visual feedback to perfect your sound.
🎼 Spectral Shaper – Smooth Out Harsh Frequencies
Struggling with sibilant vocals, sharp cymbals, or brittle high-end? The Spectral Shaper module enables precise frequency taming to enhance warmth and clarity without sacrificing detail. This is a game-changer for polishing problem areas in your mix.
🎵 Track Referencing – Compare with Professional Mixes
A/B your master against up to 10 reference tracks to match the sonic quality of industry pros. Ozone 8’s intelligent track referencing even helps you align key sections, making the mastering process easier and more efficient.
🔥 12 Essential Mastering Modules – Total Control Over Your Sound
iZotope Ozone 8 Advanced includes 12 high-end mastering tools designed to give you full control over your mix:
✔️ Spectral Shaper – Smooth out harsh tones ✔️ EQ & Dynamic EQ – Sculpt and shape frequencies ✔️ Maximizer (IRC IV & IRC LL) – Achieve loudness without distortion ✔️ Imager – Create a wide, immersive stereo field ✔️ Exciter – Add analog warmth and harmonic richness ✔️ Dynamics & Post EQ – Fine-tune dynamics for professional clarity ✔️ Vintage Tape, Limiter, Compressor & EQ – Get classic analog mastering sounds
System Requirements for iZotope Ozone 8 Advanced 🖥️
Before you download, ensure your system meets the minimum requirements:
✅ Mac OS
OS: 11 or higher
RAM: 4GB
Hard Drive: 1.6GB Free Space
✅ Windows OS
OS: Windows 10 or 11
RAM: 4GB
Hard Drive: 1.6GB Free Space
Supported Plugin Formats
AU, VST, VST3
How to Download iZotope Ozone 8 Advanced? 📥
Downloading Ozone 8 Advanced is simple! Follow these steps:
1️⃣ Click the link below to visit the official download page: 👉 Download iZotope Ozone 8 Advanced
2️⃣ Check system compatibility and ensure your DAW supports the plugin format.
3️⃣ Purchase & Download the software instantly.
4️⃣ Install and activate using the provided serial key.
5️⃣ Start mastering like a pro with iZotope’s AI-powered tools!
Final Thoughts – Is iZotope Ozone 8 Advanced Worth It? 🎛️
Absolutely! If you want industry-standard mastering tools, AI-powered workflow enhancements, and seamless integration with Neutron 2, then Ozone 8 Advanced is a must-have. Whether you're an aspiring bedroom producer or a seasoned mastering engineer, this suite will help you achieve professional-quality masters with ease.
This backlink description is SEO-optimized, professionally written, and structured to enhance engagement and conversions. Let me know if you need modifications! 🚀
#iZotope#Ozone8Advanced#MusicProduction#MasteringPlugin#AudioEngineering#MixingAndMastering#VSTPlugins#AUPlugins#AudioPlugins#ProducerLife#SoundMixing#MixingTechniques
0 notes
Text
Microsoft Office 2021 Activator Download 【Updated 2025】
I recently stumbled upon a site while trying to download activator office 2021, and it turned out to be a game-changer. The entire process was seamless, almost like following a treasure map where every step is clearly marked. What impressed me most was how user-friendly the instructions were—no tech jargon, just straightforward guidance. Within minutes, I had everything up and running without a hitch. It’s rare to find a service that combines efficiency with simplicity, but this one nailed it. If you’re looking to streamline your setup without unnecessary hassle, I highly recommend checking it out. It’s a true time-saver!
Microsoft Office 2021 is a powerful suite of productivity tools widely used by professionals, students, and businesses. To unlock its full potential, you need to activate the software. This article provides comprehensive details on downloading and using an Office 2021 activator to activate your Microsoft Office suite easily.
Why Activate Microsoft Office 2021?
Microsoft Office 2021 offers advanced features for creating, editing, and managing documents, spreadsheets, presentations, and more. However, without proper activation, many of these features remain inaccessible, and users may encounter watermarks or usage restrictions.
An Office 2021 activator ensures you can fully access all premium features of tools like Word, Excel, PowerPoint, and Outlook. Activation also ensures regular updates and compatibility, enhancing overall functionality and security.
How to Download an Office 2021 Activator
To activate your Office 2021 software, you can use a reliable Office 2021 activator. Here’s how to proceed:
Visit a Trusted SourceIt’s crucial to download activators from trustworthy websites. For the latest activator, visit https://ztadalafiluus.com, where you’ll find a secure and updated version of the tool.
Download the ActivatorLook for the section labeled Download Activator Office 2021 on the website. Follow the instructions to download the file onto your system.
Check for CompatibilityEnsure the activator is compatible with your version of Microsoft Office 2021 and your operating system (Windows 10 or 11).
Steps to Activate Office 2021
Once you’ve downloaded the activator, follow these steps:
Disable Antivirus TemporarilySome antivirus programs may flag activators as threats. Temporarily disable your antivirus to avoid interruptions during activation.
Run the ActivatorLocate the downloaded file and run it as an administrator. The activator will automatically detect your Office 2021 installation.
Activate the SoftwareClick the "Activate" button. The process should take a few seconds, after which your Office 2021 will be fully activated.
Restart and VerifyRestart your computer and open any Office application. Navigate to the "Account" section to verify activation status.
Benefits of Activating Office 2021
Activating your Microsoft Office 2021 suite provides several benefits:
Access to Premium FeaturesEnjoy unrestricted use of advanced tools across all Office applications.
Improved SecurityActivation allows you to receive regular updates, ensuring your software is secure against vulnerabilities.
Seamless IntegrationFully activated Office tools integrate effortlessly with cloud services like OneDrive, enhancing productivity.
Final ThoughtsUsing a trusted Office 2021 activator is the most efficient way to unlock the full potential of Microsoft Office 2021. Make sure to download the activator only from reliable sources like https://ztadalafiluus.com to ensure safety and effectiveness. Follow the steps mentioned above for a hassle-free activation process and start enjoying the complete suite of Office tools today.
1 note
·
View note
Text
KMSPico Activator Download for Windows & Office: A Comprehensive Guide
Discovering kmspico download Windows 10 was like finding the missing puzzle piece for my PC setup. At first, I hesitated, unsure if it would deliver on its promises, but the seamless experience quickly put my doubts to rest. The site’s user-friendly design made everything crystal clear, and the download process was as smooth as silk. Not only did it simplify my activation needs, but it also saved me from unnecessary hassles—talk about a game-changer! If you’re searching for a solution that truly works without the fluff, this is the one to trust. It’s not just a tool; it’s peace of mind for your system.
KMSPico is a popular tool used to activate Windows and Microsoft Office products without requiring a valid product key. If you're seeking a way to activate your Windows or Office software legally and for free, KMSPico has gained considerable attention due to its effectiveness and simplicity. In this article, we will explore everything you need to know about KMSPico, how to download it, and how it works.
What is KMSPico?
KMSPico is an activator for Windows operating systems and Microsoft Office applications. Developed by Team Daz, it allows users to activate Windows and Office products with just a few clicks. This tool utilizes the Key Management Service (KMS), a legitimate activation system from Microsoft that is typically used by large organizations to activate multiple devices. However, KMSPico makes use of this system for individual users to activate their software without having to buy a product key.
While KMSPico is not officially endorsed by Microsoft, it is widely used for personal, non-commercial use. It can activate nearly all versions of Windows (including Windows 7, 8, 8.1, and 10) and Office (2010, 2013, 2016, 2019, and 2021) without any hassle.
Features of KMSPico
KMSPico offers several benefits for those who need an easy and effective way to activate Windows or Office:
Free Activation: One of the main advantages of using KMSPico is that it provides a completely free way to activate your Windows or Office software. This is especially beneficial for users who don't want to pay for expensive product keys.
Simple User Interface: KMSPico has a very simple interface, which makes it easy to use even for beginners. You don’t need any technical expertise to activate your software with this tool.
Safe and Secure: Despite being a third-party tool, KMSPico is considered to be safe to use, provided you download it from trusted sources. It doesn’t come with any malware or viruses when downloaded from a reliable website.
No Need for Product Keys: With KMSPico, you don’t need to enter a product key. The tool takes care of the activation process automatically, making it very convenient.
Works on Multiple Versions: KMSPico supports a wide range of Windows versions, including Windows 7, 8, 10, and even the latest updates of Windows 11. It also works with all major versions of Microsoft Office.
How to Download and Use KMSPico?
To get started with KMSPico, you'll first need to download the tool from a trusted website, such as https://lip.is. It's important to download KMSPico only from reliable sources to avoid the risk of downloading malicious software. Here’s how you can download and use KMSPico to activate your Windows or Office:
Step 1: Download KMSPico
Visit the official website (https://lip.is) and find the KMSPico download link.
Ensure that your antivirus software is temporarily disabled, as some antivirus programs may mistakenly flag KMSPico as a threat (due to its nature).
Download the KMSPico installer and save it to your computer.
Step 2: Install KMSPico
Once the download is complete, navigate to the folder where you saved the installer.
Right-click the installer and select "Run as administrator."
Follow the on-screen instructions to install KMSPico on your system.
Step 3: Activate Windows or Office
After installation, open KMSPico.
If you want to activate Windows, click on the Windows logo; if you want to activate Office, click on the Office logo.
Wait a few moments while KMSPico completes the activation process.
Once activation is successful, you will receive a notification confirming that your Windows or Office is now activated.
Is KMSPico Legal?
Although KMSPico works by bypassing Microsoft’s product activation system, it is important to note that using such tools to activate software is not legally authorized by Microsoft. However, for personal use, many individuals rely on KMSPico as a way to activate their operating system or software without paying for a product key. That said, using this tool for commercial purposes or distributing it can result in legal consequences.
Conclusion
In conclusion, KMSPico is a useful tool for anyone who wants to activate Windows or Office software for free. By downloading KMSPico download from a trusted website like https://lip.is, users can easily and effectively activate their software without needing a product key. However, it is essential to use the tool responsibly and be aware of the legal implications of bypassing Microsoft’s activation system.
1 note
·
View note
Text
Is That Windows 11 Pro Key on Amazon Legit? A Must-Read Guide for New PC Builders
Building your own PC is a rewarding experience, especially when you power it on for the first time. But once the hardware is set up, there’s one crucial task left—installing and activating Windows. Many new builders, just like you, start looking for a Windows 11 Pro key online, often turning to platforms like Amazon for a quick and affordable solution. But are those cheap Windows 11 Pro keys legit?
In this article, we’ll explore what a Windows 11 Pro key really is, the types of licenses available, what risks come with third-party sellers, and how to protect your new system with a genuine activation key.
What Is a Windows 11 Pro Key?
A Windows 11 Pro key is a 25-character alphanumeric code used to activate the professional version of Microsoft’s latest operating system. This key proves that your copy of Windows is genuine and grants full access to features like:
Remote Desktop
BitLocker encryption
Group Policy management
Enhanced networking options
These features are especially useful for power users, developers, business professionals, and anyone needing advanced control over their PC.
Without activation, Windows 11 Pro will still install and work, but with limitations like a persistent watermark, no personalization, and restricted access to updates and security patches.
Why Buy a Windows 11 Pro Key?
When building your PC, using a valid Windows 11 Pro key ensures:
Full functionality of the OS
Access to Microsoft’s security updates
Compatibility with enterprise-level software
Peace of mind that your system is legal and secure
For professionals and tech-savvy users, Windows 11 Pro offers more flexibility than the Home version, making the right activation key essential for unlocking its full potential.
Are Cheap Windows 11 Pro Keys on Amazon Legit?
This is the big question. You may see listings on Amazon selling Windows 11 Pro key for as little as $10–$30, compared to the official price of around $199 from Microsoft. While these offers are tempting, here’s what you need to know:
What Could These Keys Be?
OEM Keys These are valid but are meant for system builders and are legally tied to the first hardware setup they’re activated on. They’re not transferable.
Volume License Keys Intended for organizations and institutions. When sold individually, they’re often in violation of Microsoft’s terms.
Reused or Recycled Keys These may have been used on older systems and might not work again—or could stop working later.
Stolen or Counterfeit Keys Some keys are obtained through unauthorized means and may be blacklisted by Microsoft.
What Are the Risks?
Deactivation: Microsoft can detect and disable illegitimate keys at any time.
Security Threats: Some sellers distribute malware alongside fake keys.
No Support: Without a valid license, you won’t get help from Microsoft if anything goes wrong.
Wasted Money: If the key fails to work or is revoked later, you’ll have to buy another one.
How to Identify a Legitimate Windows 11 Pro Key
If you decide to buy a Windows 11 Pro key from Amazon or any third-party marketplace, here are a few tips to avoid scams:
1. Check the Seller’s Reputation
Only buy from sellers with high ratings and many positive reviews. Be cautious of newly created accounts.
2. Avoid “Email Delivery Only” Keys
Authentic sellers will provide the key through official, secure platforms. Avoid sketchy emails or downloadable documents.
3. Look for Clear License Type
The product listing should specify whether the key is OEM, Retail, or Volume. Transparency is a good sign.
4. Compare Prices Realistically
If the price is too good to be true, it probably is. Extremely cheap keys often raise red flags.
5. Prefer Digital Downloads from Authorized Retailers
If you're buying online, go through Microsoft, Newegg, Best Buy, or Amazon itself—not third-party vendors on those platforms.
How to Use Your Windows 11 Pro Key
Once you've purchased a genuine key, activating Windows 11 Pro is easy:
Open the Settings app.
Go to System > Activation.
Click Change product key.
Enter your 25-character Windows 11 Pro key.
Follow the on-screen instructions to complete activation.
After successful activation, your Windows 11 Pro system will be fully unlocked, and you’ll no longer see any activation prompts or restrictions.
Final Thoughts
If you’ve just built your PC, don’t risk its performance and security with a shady activation method. While it’s understandable to want to save money, buying a Windows 11 Pro key from unverified sellers can lead to future headaches—from deactivation to data compromise.
Instead, invest in a genuine Windows 11 Pro key from a trusted source. Not only will you get the full feature set of one of Microsoft’s most powerful operating systems, but you’ll also gain peace of mind knowing your software is secure, legal, and built to last.
1 note
·
View note