#How to choose the appropriate specifications of circuit breakers
Explore tagged Tumblr posts
Visit Tumblr Blog
Explore Tumblr blogs with no restrictions, modern design and the best experience.
Last Seen Tumblr Blogs


Fun Fact
In 2020, 27% of US Tumblr users had an annual household income of over $100,000.
Text
An article "Some common problems about circuit breakers" was published
An article "Circuit protection dry goods: Some common problems about circuit breakers" was published today Original address: https://www.dhsic.com/news/148

#Circuit protection#Dry goods#Circuit breakers#Common problems with circuit breakers#Types of circuit breakers#Definition of circuit breakers#How to choose the appropriate specifications of circuit breakers#Installation and wiring methods of circuit breakers#Daily maintenance points of circuit breakers#Common types of circuit breaker failures#Precautions for safe use of circuit breakers#Application example guide of circuit breakers#New technologies for smart circuit breakers#How to choose circuit breakers
0 notes
Text
A Comprehensive Guide to Power Systems Protection for Engineers
Introduction:
Power systems protection is a critical aspect of electrical engineering that focuses on safeguarding electrical equipment, personnel, and the power grid from faults, failures, and abnormal operating conditions. This comprehensive guide aims to provide engineers with valuable insights into key principles, techniques, and best practices in power systems protection.
1. Understanding System Operation and Fault Types:
Before delving into protection strategies, it is essential to have a solid understanding of how power systems operates and the various types of faults that can occur. This includes studying system components, such as generators, transformers, transmission lines, circuit breakers, relays, and protective devices. Familiarity with fault types like short circuits, open circuits, ground faults, and transient overvoltages is crucial as a foundation.
2. Principles of Protection Coordination:
Effective power systems protection requires proper coordination among protective devices. Engineers must understand the concept of selectivity to ensure that only the device closest to a fault operates, minimizing disruption to the rest of the system. Proper coordination involves selecting appropriate current settings, time delays, and coordination curves for relays and circuit breakers.
3. Relay Device Fundamentals:
Relays are an integral part of power systems protection, serving as the first line of defense against electrical faults. Engineers should have a thorough knowledge of different relay types, including overcurrent relays, differential relays, distance relays, and directional relays. Understanding their operating principles, features, and limitations aids in choosing the most suitable relays for specific applications.
4. Protective Device Coordination:
Coordinating protective devices within a system is critical to maintaining stability and preventing cascading failures during faults. Engineers must carefully analyze and design protection schemes that consider factors such as fault impedance, fault currents, relay response characteristics, and coordination margins. Advanced techniques like time grading and impedance grading can be employed to achieve optimal coordination.
5. Fault Analysis and System Modeling:
Performing fault analysis and system modeling helps engineers gain insights into power flow, fault currents, voltage profiles, and system stability. Engineers must be proficient in using software tools like ETAP, PSCAD, and DSA Tools to accurately simulate fault scenarios and assess the performance of protection schemes. Detailed knowledge of system modeling techniques enables engineers to make informed decisions regarding relay settings and coordination.
6. Communication-Based Protection:
With the increasing complexity of modern power systems, communication-based protection plays a crucial role in maintaining reliability. Knowledge of communication protocols such as IEC 61850, GOOSE (Generic Object-Oriented Substation Event), and SCADA (Supervisory Control and Data Acquisition) systems is essential for engineers to design and implement advanced protection solutions that utilize real-time data exchange between substations and control centers.
7. Integration of Automation and Control Systems:
Incorporating automation and control systems into power systems protection enhances operational efficiency and reduces response time during faults. Engineers need to understand concepts like remote terminal units (RTUs), programmable logic controllers (PLCs), and human-machine interfaces (HMIs). Familiarity with protocols like Modbus, DNP3 (Distributed Network Protocol), and OPC (OLE for Process Control) enables seamless integration of protection systems with wider control infrastructure.
8. Commissioning, Testing, and Maintenance:
Implementing effective protection strategies requires thorough commissioning, testing, and maintenance procedures. Engineers should be well-versed in practices like primary injection testing, secondary injection testing, relay calibration, fault simulation, and periodic inspections. Adhering to manufacturer guidelines, industry standards, and safety protocols ensures equipment reliability and optimal performance.
9. Access to Resources and Industry Awareness:
Staying connected with organizations like the IEEE (Institute of Electrical and Electronics Engineers) and IET (Institution of Engineering and Technology) is crucial for access to valuable resources. Engineers should actively seek research papers, technical articles, conferences, and networking opportunities. Staying informed about relay technology advancements from prominent manufacturers aids in adopting the latest protection techniques.
10. Software Applications for Enhanced Protection:
Utilizing software applications is vital in power systems protection. Advanced tools like ETAP, PSCAD, and DSA Tools aid in relay coordination analysis, fault simulation, and system modeling. Acquiring proficiency in these common industry software packages enables engineers to design and optimize protection schemes effectively.
11. Compliance with Local National Codes:
Adhering to local national codes and regulations is paramount in power systems protection. Understanding and implementing specific electrical codes and standards relevant to the country of operation is crucial. Compliance ensures safe and reliable system design, installation, and operation aligned with legal requirements and best practices.
Conclusion:
By encompassing the principles, techniques, and best practices discussed in this guide, engineers pursuing careers in power systems protection can develop a strong foundation. Continuous learning, staying updated on industry advancements, and compliance with local national codes will ensure engineers can design, implement, and maintain robust and reliable protection schemes for the power grid and its critical assets.
The Author Biography: Qusi Alqarqaz
Qusi Alqarqaz is an experienced professional in power system protection, specializing in sharing knowledge and guiding young engineers. With a career spanning utility and oil and gas industries in Texas, New Mexico, and Qatar, he has amassed extensive industry experience.
Collaborating with leading manufacturers such as SEL, ABB, Siemens, Schneider, among others, Qusi has gained proficiency in a range of protective relays. He actively pursues continuing education, completing professional development courses with software providers including ETAP and Milsoft, enabling him to utilize advanced tools for power system analysis and protection design.
Qusi's dedication to staying up-to-date with industry advancements led him to pursue additional training. He completed professional development courses at Wisconsin University, equipping him with specialized knowledge crucial for working with high-voltage power systems. He also studied power generation extensively at Strathclyde University in the UK.
Qusi actively shares his knowledge through collaborating on large-scale projects and providing training sessions for professionals. Through his posts, he aims to offer guidance and mentorship for young engineers in power system protection. His practical advice and personal experiences will empower the next generation of experts in this field.
Contact the Author:
Qusi actively shares his knowledge through collaborating on large-scale projects and providing training sessions for professionals.
Qusi Alqarqaz
9 notes
·
View notes
Text
Should You Hire an Electrician Near Me in Antelope, CA for Home Rewiring?
When it comes to home rewiring, one of the most important decisions homeowners in Antelope, CA, face is choosing the right professional to handle the job. Electrical work can be tricky, and ensuring that the wiring in your home is up to code and safe is essential for both your comfort and safety. But when it comes to hiring a specialist, you may be wondering: “Should I hire an electrician near me in Antelope, CA, for home rewiring?” Let’s break down the benefits and reasons why choosing a local expert like Hagan Electric is a wise decision.
Why Is Home Rewiring Important?
Before we dive into why hiring a local electrician is important, let's quickly discuss why home rewiring is so crucial. Over time, the wiring in older homes can become outdated or damaged, leading to serious safety concerns such as electrical fires, power surges, and short circuits. Older wiring systems may also not be equipped to handle the energy demands of modern appliances and devices. If your home is experiencing flickering lights, frequent circuit breaker trips, or outdated electrical panels, it may be time to consider rewiring.
The Case for Hiring an Electrician Near Me in Antelope, CA
There are a number of compelling reasons to choose a local electrician for your rewiring needs. Here’s why hiring someone in Antelope, CA is not only convenient but also the best choice for your home:
1. Expertise in Local Codes and Regulations
Each region has its own set of electrical codes and safety regulations. By hiring an electrician in Antelope, CA, like the trusted professionals at Hagan Electric, you can rest assured that they are familiar with local building codes. Local electricians know exactly what’s required to bring your home’s electrical system up to code, ensuring that everything is compliant with California’s electrical standards. This knowledge helps avoid costly delays and potential fines.
2. Faster Response Times
A local electrician can offer quicker response times than an out-of-town company. When you need rewiring done, waiting days or even weeks for someone to travel to your home can delay essential repairs and upgrades. By choosing a local expert, you can expect faster, more efficient service.
At Hagan Electric, we take pride in offering prompt and reliable service for Antelope homeowners. We understand the urgency that electrical issues bring, so we prioritize your needs to ensure your home’s electrical systems are functioning properly as soon as possible.
3. Familiarity with Antelope Homes
Electricians familiar with Antelope will have experience working with the types of homes common in the area. This knowledge means they understand how older homes were wired and what modern upgrades are necessary to improve safety and energy efficiency. Whether you're in a newer development or an older, more historic property, a local electrician will know how to navigate potential challenges and provide the most appropriate solutions.
4. Personalized Service and Reputation
Hiring a local electrician like Hagan Electric means you’re choosing a company that’s invested in your community. We believe in building long-term relationships with our clients and offering personalized service tailored to your needs. You won’t just be another customer in the queue. We take the time to understand your home’s unique wiring challenges and provide the best solutions for your specific situation.
Additionally, local electricians often have established reputations within the community. As a trusted provider in Antelope, CA, Hagan Electric is proud of our positive reviews and longstanding relationships with homeowners in the area. We aim to deliver the highest quality workmanship, which is why our clients come back to us time and time again.
5. Cost-Effective Solutions
One of the common concerns homeowners have when it comes to rewiring is cost. Hiring a local electrician can help save money, not just because of their proximity, but also because they are familiar with the most cost-effective materials and solutions for your specific needs. Hagan Electric works with our clients to provide transparent pricing and budget-friendly options, so you’re never blindsided by unexpected costs.
Why Choose Hagan Electric for Your Home Rewiring Needs?
At Hagan Electric, we specialize in rewiring homes throughout Antelope, CA, and the surrounding areas. With years of experience in the electrical industry, we provide top-notch service and expert craftsmanship, ensuring your home is safe, energy-efficient, and up to code. We use the latest tools and technology to guarantee your rewiring project is completed efficiently and effectively.
Our licensed electricians are skilled in all aspects of electrical work, from minor repairs to full home rewiring. Whether you're looking to upgrade your electrical panel or replace outdated wiring, we’ve got you covered.
Get in Touch with Hagan Electric Today!
If you’re ready to tackle your home rewiring project and want the best in Antelope, CA, look no further than Hagan Electric. Don’t wait until small electrical issues turn into big problems. Contact us today to schedule a consultation or request a quote. Let us help you ensure the safety and efficiency of your home’s electrical system.
Hagan Electric
8149 Hearth Pl, Antelope, CA 95843
(916) 858-9487
0 notes
Text
How to Install Electrical Wiring for New Home Construction

Electrical wiring installation is one of the most crucial steps in new home construction. Properly installed wiring ensures that your home’s electrical system is safe, efficient, and up to code. Electrical wiring provides the foundation for all electrical components like lighting, outlets, and appliances, making it essential for the functionality and safety of your home. In this article, we’ll guide you through the process of installing electrical wiring for new home construction, from planning and preparation to completion.
1. Planning and Preparation
Before diving into the installation process, thorough planning is essential. Electrical wiring in a new home needs to be well thought out to ensure it meets both your needs and local building codes.
1.1 Understanding the Electrical Layout
The first step in the planning phase is to determine the overall electrical layout. This includes deciding where outlets, switches, lighting fixtures, and major appliances will be located. Creating a blueprint of your home’s electrical system helps ensure that the wiring is routed efficiently and that the placement of outlets and switches is functional.
1.2 Know Local Building Codes
Every area has specific electrical codes that must be followed during installation. These codes are designed to ensure safety and reliability. Before starting the installation, familiarize yourself with local building codes or consult a professional electrician to ensure compliance. This will help avoid mistakes that could lead to costly rework or even safety hazards.
1.3 Choosing the Right Materials
For wiring, you will need to select the appropriate wire gauge, type of wire insulation, and other components like junction boxes, switches, and outlets. The wire gauge depends on the specific electrical load the circuit will carry. For example, a standard lighting circuit might use 14-gauge wire, while higher-power circuits, such as those for electric stoves, require thicker 10 or 12-gauge wire.
2. Installing Electrical Wiring
Once the planning and preparation stages are complete, it's time to begin the actual wiring installation. This phase involves running wires through the walls, connecting them to outlets and switches, and ensuring everything is safely grounded.
2.1 Turning Off the Power and Ensuring Safety
Before starting any electrical work, ensure that all power sources are turned off to prevent electrical shock. If you’re working in an area that is already partially built, confirm that the power is disconnected at the breaker panel. If you're unsure, it’s safest to hire a licensed electrician to do the wiring installation.
2.2 Running the Wires
Once safety is ensured, begin running the electrical wiring through the walls, floors, and ceilings according to your layout plan. Wires should be routed through stud bays and secured with wire staples to prevent movement. Be careful not to damage the wire insulation, and ensure that the wires are not bent too sharply, as this can damage them and compromise their safety.
2.3 Installing Outlets, Switches, and Junction Boxes
As you route the wiring, you will need to install junction boxes where wires will be connected. These boxes should be mounted flush with the wall surface and be of the appropriate size to accommodate the connections. After installing junction boxes, connect the wires to outlets, switches, and light fixtures, ensuring that the wiring is properly secured and stripped of insulation before connections are made.
Use the correct screws and connectors for each device to ensure a secure connection. When installing outlets and switches, make sure they are properly grounded by connecting the ground wire to the ground terminal. This step is crucial to prevent electrical shock and ensure safe operation.
3. Testing and Inspection
Once the wiring is installed and all outlets, switches, and fixtures are connected, the system must be thoroughly tested and inspected to ensure it is functioning correctly and meets all safety standards.
3.1 Testing for Proper Connections
Test each circuit to verify that it is functioning correctly. Start by checking that all switches and outlets are working as expected. Use a voltage tester to check for proper voltage at each outlet, and ensure that there are no short circuits or improper connections.
3.2 Ensuring Code Compliance
After completing the installation and testing the system, an inspection may be required to ensure that the electrical wiring complies with local building codes. Typically, a licensed electrical inspector will check the installation to verify that it follows code requirements, including proper wire gauge, grounding, and safety protocols.
3.3 Troubleshooting and Making Adjustments
If the inspector finds any issues, they may require modifications or adjustments. For example, you might need to reroute a wire, add extra grounding, or install additional junction boxes. Once any issues are resolved, recheck the system to ensure everything is working as expected.
4. Final Steps
Once the electrical system is installed, tested, and inspected, it’s time for the final steps of the installation process.
4.1 Installing the Electrical Panel
The electrical panel (also known as the breaker box) is the heart of your electrical system. It distributes electricity to various circuits throughout your home. When installing the panel, make sure it is securely mounted in a dry, accessible location and connected to the incoming electrical service. Each breaker in the panel should correspond to a specific circuit in your home, and they should be properly labeled for easy identification.
4.2 Connecting the System to the Power Grid
The final step involves connecting the electrical panel to the local power grid. This task is often performed by a utility company, as it requires coordination with their infrastructure. Once connected, the system can be energized, and power can be distributed throughout the home.
4.3 Final Inspection and Testing
After the system is connected, perform a final round of testing to ensure that everything is working correctly. Check that all breakers are functioning, and confirm that all outlets, switches, and light fixtures are powered and functioning as intended.
Conclusion
Installing electrical wiring for a new home construction is a complex and essential process that requires planning, expertise, and attention to safety. By understanding the layout, following local codes, and using the correct materials, you can ensure that your home's electrical system is both safe and efficient. While it’s possible to do this work yourself if you're experienced, it’s highly recommended to hire a licensed electrician for complex installations to ensure safety and compliance with building codes. Proper electrical wiring will not only power your home but also protect your family from potential electrical hazards.
0 notes
Text
Professional AC Installation & Repair in Vadodara – Residential and Commercial Services
In the sweltering heat of Vadodara, a well-functioning air conditioner isn't just a luxury—it's a necessity. Whether you're looking to install a new AC, replace an old one, or need expert repairs, choosing the right service provider is crucial. This comprehensive guide delves into the professional AC installation and repair services available in Vadodara, highlighting their importance, benefits, and how to select the best service for your needs.
Why Professional AC Installation & Repair Matters
Proper installation and timely repairs ensure that your air conditioner operates at peak efficiency. A well-installed unit consumes less energy, cools more effectively, and has a longer lifespan. Regular maintenance and prompt repairs can prevent minor issues from escalating into major problems, saving you from expensive repairs or replacements in the future. Additionally, a clean and well-maintained AC unit filters out dust, allergens, and pollutants, ensuring that the air circulating in your space is fresh and healthy.
Comprehensive AC Services in Vadodara
Professional AC technicians in Vadodara offer a wide range of services to cater to all your cooling needs:
1. AC Installation
Installing a new air conditioner involves more than just placing a unit in a room. It requires:
Site Assessment: Evaluating the room size, insulation, and sunlight exposure to recommend the appropriate AC type and capacity.
Proper Mounting: Ensuring the unit is securely installed to prevent vibrations and noise.
Electrical Setup: Safely connecting the AC to the power supply, including circuit breakers and grounding.
Testing: Running the system to check for leaks, proper cooling, and noise levels.
2. AC Repair Services
Over time, AC units may encounter issues such as:
Cooling Problems: Reduced or no cooling due to refrigerant leaks or compressor issues.
Electrical Failures: Problems with the power supply or internal components.
Water Leakage: Blocked drainage pipes causing water to leak inside.
Unusual Noises: Grinding or buzzing sounds indicating mechanical issues.
Professional technicians diagnose these problems accurately and provide timely repairs to restore comfort.
3. AC Maintenance
Regular maintenance is vital to keep your AC running efficiently:
Cleaning: Removing dust and debris from filters, coils, and fins.
Refrigerant Check: Ensuring the refrigerant levels are adequate for optimal performance.
Component Inspection: Checking for wear and tear in parts like fans and compressors.
System Testing: Verifying the overall functionality and efficiency of the unit.
Leading AC Service Providers in Vadodara
Several reputable companies in Vadodara offer professional AC services:
Smart City Care: Offers a range of services including installation, repair, and maintenance for various AC types. They provide transparent pricing and have a team of skilled technicians.
Urban Company: Known for their quick and efficient services, they offer foam-jet AC cleaning, gas refills, and installation/uninstallation services. They provide a 30-day warranty on repairs, ensuring customer satisfaction.
Urban AC Repair: Specializing in inverter AC repairs, they offer services like AC shifting, dismantling, and gas charging. Their technicians are trained to handle both residential and commercial AC units.
ACservice4U: Offers high-quality air conditioner installation services to residential and commercial clients with the use of professional equipment and quality materials, at a lower cost.

Tips for Choosing the Right AC Installation in Vadodara
Selecting a reliable AC Installation Service Vadodara is essential for ensuring quality service:
Check Credentials: Ensure the technician is certified and experienced in handling your specific AC model.
Read Reviews: Look for customer testimonials and online reviews to gauge service quality.
Compare Prices: Obtain quotes from multiple service providers to ensure competitive pricing.
Inquire About Warranties: A reputable technician should offer warranties on both parts and labor.
Availability: Choose a provider that offers timely services, especially during peak summer months.
How to Book AC Services in Vadodara
Booking professional AC Repair Service in Vadodara is straightforward:
Online Booking: Visit the service provider's website or use their mobile app to schedule an appointment.
Phone Booking: Call the service provider's customer support number to book a slot.
Walk-In: Visit the service center in person to discuss your requirements and schedule a service.
Ensure you provide details like the AC brand, model, and the specific issue you're facing to help the technician prepare adequately.
In Vadodara's hot climate, a well-maintained air conditioner is crucial for comfort. By choosing professional AC installation and repair services, you ensure optimal performance, energy efficiency, and longevity of your cooling system. Regular maintenance and timely repairs further enhance the lifespan of your AC, providing consistent comfort throughout the year.
Remember, investing in professional services not only saves you money in the long run but also ensures peace of mind knowing your AC is in capable hands.
For more information or to book a service, contact one of the reputable AC service providers mentioned above. Stay cool and comfortable in Vadodara.
0 notes
Text
Residential Electrical Wiring in Long Island: A Comprehensive Guide to Mastering the Basics
Residential Electrical Wiring in Long Island: A Comprehensive Guide to Mastering the Basics
From the top resource for residential electrical wiring on Long Island, greetings! Understanding the intricacies of electrical wiring is crucial for both functionality and safety, whether you're building a new house or renovating an existing one. In this book, we'll go over everything you need to know to become an expert in residential electrical wiring on Long Island.
Understanding Electrical Wiring for Residential Properties
Learn the fundamentals of electrical wiring in Long Island homes by embarking on an expedition. We can assist you with everything from basic concepts to advanced techniques.
Why Safe Electrical Wiring Is Important
Find out why proper electrical wiring is necessary for residential buildings. Purchasing high-quality electrical wiring is crucial for several reasons, such as guaranteeing effectiveness, security, and adherence to regulations.
Key Elements of a Residential Electrical System
Examine the essential components of home electrical systems. Effective wiring requires an understanding of a variety of components, including outlets, switches, and circuit breakers.
Electrical Wiring Codes and Regulations for Long Island
Stay informed about the latest electrical codes and regulations in Long Island. Following these rules is essential to ensuring safety and averting potential legal issues.
Types of Wiring Suitable for Residential Properties
Look at the various types of wiring commonly used in residential structures. To make informed decisions, weigh the benefits and drawbacks of several options, such as copper-clad aluminum and aluminum and copper wire.
Methods for Electrical System Planning and Design
Learn the importance of meticulous design and planning when it comes to electrical wiring. Numerous factors, including as load calculations, circuit design, and the placement of outlets and fixtures, affect how safe and efficient an electrical system is.
Safety Procedures for Electrical Wiring Installation
Prioritize safety during the electrical wiring installation process. By using the appropriate tools and equipment and following safety protocols, precautions can help prevent accidents and injuries.
Common Electrical Wiring Errors to Avoid
Avoid common risks that could compromise the safety and functionality of your electrical system. Be aware of these flaws to ensure a smooth and error-free wiring process.
FAQs
Is it necessary to hire a professional electrician for residential wiring projects?
While DIY electrical work may seem tempting, hiring a licensed electrician is highly recommended to ensure safety and compliance with regulations.
What factors should I consider when choosing electrical wiring materials?
Factors such as durability, cost, and compatibility with your home's electrical system should be taken into account when selecting wiring materials.
How often should residential electrical systems be inspected?
It's advisable to schedule regular inspections by a qualified electrician to detect any potential issues and ensure the continued safety and performance of your electrical system.
Can I upgrade my home's electrical system to meet increased power demands?
Yes, upgrading your electrical system may be necessary if you're adding new appliances or experiencing frequent power disruptions. Consult with a licensed electrician to assess your needs and make appropriate upgrades.
What are the signs of electrical problems in residential properties?
Signs such as flickering lights, tripped circuit breakers, and burning odors indicate potential electrical issues that should be addressed promptly by a professional electrician.
Are there any government incentives or rebates available for upgrading residential electrical systems?
Depending on your location and specific circumstances, there may be government incentives or rebates available for energy-efficient upgrades to your home's electrical system. Consult with local authorities or utility companies for more information.
In conclusion
Congratulations for making the first move toward mastering residential electrical wiring on Long Island! The dependability, efficiency, and safety of your home's electrical system may be ensured with the correct knowledge and by following best practices. Prioritize safety at all times and consult a qualified electrician before starting any complex wiring jobs.
#Electrical Wiring Residential Long Island#Electric Repair Service Long Island#24 hour Electrician Long Island
0 notes
Text
Need a Commercial Electrician in Havertown, PA? Here’s What to Look For
Reliable electrical work is the backbone of any successful small business. From powering your equipment to keeping your space well-lit and safe, an experienced commercial electrician is essential. But finding the right professional for your needs in Havertown, PA, can feel daunting.
What should you look for in a reliable commercial electrician? How do you find someone who understands your specific business needs? This guide will help you make an informed decision, so your business can stay powered and productive.

Qualities of a Reliable Commercial Electrician
Choosing the right commercial electrician requires more than just picking the first name you see in a directory. Here's what you should prioritize:
1. Licensure and Certifications: First and foremost, ensure that the electrician you hire is appropriately licensed and certified in Pennsylvania. Licensure demonstrates they have the necessary training and meet the state's safety standards. Certifications in specialized areas of electrical work, such as energy-efficient systems or industrial wiring, can also be a bonus.
2. Experience: Look for electricians with several years of experience in commercial settings. A professional who has worked with other businesses, especially within your industry, will better understand the complexities and urgency of commercial electrical systems. For instance, a retail store has different electrical needs than a small manufacturing unit. An experienced electrician will know how to tailor their work to suit your requirements.
3. Professionalism: Professionalism matters. You'll want someone who communicates, shows up on time, and respects deadlines. This ensures your business will face minimal disruption during electrical repairs or installations.
4. References and Reviews: Strong testimonials and positive online reviews are great ways to vet potential electricians. Ask for references from past commercial clients, and don't hesitate to ask for their feedback.
Understanding Your Business's Electrical Needs
Before hiring a commercial electrician, it's essential to have a clear understanding of your business's specific electrical requirements. Small companies in Havertown often need a variety of services, including:
Common Electrical Services:
Upgrades and Installations: New systems, wiring upgrades, or installing energy-efficient lighting.
Repairs and Maintenance: Fixing faulty wiring, outlets, or breakers to ensure safety and functionality.
Safety Inspections: Compliance with local codes and regulations to avoid fines or safety hazards.
Custom Solutions: Tailored services such as emergency lighting systems or dedicated circuits for critical equipment.
Assessing which of these apply to your business can help you find an electrician specializing in your type of project.
What Exactly is a Commercial Electrician?
For those unfamiliar with the term, a commercial electrician is a trained professional focusing on commercial buildings' electrical systems. This includes everything from installing complex wiring systems in office buildings to maintaining lighting and power systems in retail stores.
Unlike residential electricians, commercial electricians work with larger-scale systems and often work with higher voltage requirements. Their expertise lies in understanding businesses' needs and providing solutions that ensure safety, efficiency, and compliance with local codes.
Why Their Expertise Matters:
Safety First: Electrical systems in commercial spaces often involve heavy-duty equipment and higher risks. Expertise is non-negotiable.
Business Costs: An efficient electrical system saves money on energy bills and reduces repair costs in the long run.
Compliance: Local laws and regulations around electrical systems can be strict, and non-compliance could result in penalties.
Keeping Your Business Powered with Confidence
Your choice of a commercial electrician can significantly impact your business's operations. By taking the time to research and hire the right fit, you'll ensure that your electrical needs are met reliably and professionally.
Whether you need emergency repairs, a safety inspection, or a complete electrical overhaul, finding a trusted commercial electrician in Havertown, PA, will keep commercial electricianyour business thriving.
#commercial electrician#commercial electrician near me#commercial electrician services#commercial electricians
0 notes
Text
How to Choose the Best MCB Distribution Box for Your Electrical Needs
An MCB distribution box, in any electricity system, constitutes a very indispensable component that maintains the safe delivery of power into the system concerned. Whether intended for residential application, commercial installation, or some industrial use, the right kind of MCB distribution box matters to avoid some electrical hazards or ensure long time reliability.
We at Star India Electricals are the best MCB distribution box manufacturer in India and are focused on providing you with high-quality, durable solutions. This guide will help you understand the key factors in choosing the best MCB distribution box for your specific needs.
Understanding MCB Distribution Boxes
An MCB is a mini circuit breaker, which is small in size for the distribution of circuit breakers. The objective of installing them is proper safety against short circuit and overload to electrical circuits, and this comes in very important safety product ranges used in various homes, offices, factories, and different other commercial buildings.
Star India Electricals is one of the top MCB distribution box manufacturing companies in India, which offers a wide range of excellent quality MCB distribution boxes designed for particular electrical settings to ensure complete safety and efficiency.
Important Points While Choosing MCB Distribution Box
1. Quality and Longitivity
The most important aspect of an MCB distribution box is its quality. A heat-resistant, corrosion-proof, and long-lasting box will ensure good performance.
At Star India Electricals, we manufacture high-quality MCB distribution boxes that can withstand harsh environmental conditions, making us the best MCB distribution box manufacturer in India.
2. Number of Poles and Circuits
MCB distribution boxes are available in different configurations, such as single-phase and three-phase setups. Depending on your electrical load, you must select the correct number of poles and circuits.
We are one of the best MCB distribution box manufacturers who offer personalized versions for both residential and commercial applications.
3. Safety Features
A quality MCB distribution box should have the following features:
Fire-resistant enclosures
Proper insulation
Secure locking mechanisms
Clearly labelled circuits
As one of the best MCB distribution box suppliers, we take care to ensure our products meet all safety requirements.
4. Size and Capacity
Selecting an appropriately-sized one can make sure that all circuit breakers fit in it while leaving enough space for future additions.
As the best MCB distribution box wholesaler in India, we cater to different sizes based on the demand.
5. Affordability and Cost-Effectiveness
Quality comes first, but affordability also does. Many are looking for affordable MCB distribution box manufacturers in India that will give cheaper alternatives without compromising quality.
Star India Electricals will give you affordable options, hence making it one of the best MCB box wholesalers in India.
6. Brand Reputation and Supplier Reliability
It also ensures a good quality check and long life. As India's leading manufacturer of MCB distribution boxes, we are believed for innovation and durability and satisfy customers.
Why Choose Star India Electricals?
Being one of the best manufacturers of MCB box in India, we serve the best in class electrical products for various sectors. Here are the reasons behind our customer confidence:
High Quality Materials-While manufacturing MCB distribution boxes, we utilize rust-resistance and fire-proof materials.
Best Price Distribution Box-We are amongst the inexpensive MCB distribution box manufacturers, though we don't compromise over the quality.
Widest Area Coverage-We are amongst the best MCB distribution box wholesalers in India because we undertake bulk orders.
Made-to-order products-Our distribution boxes in varied sizes and specifications are made for our clients' requirements.
Role Played by the Best MCB Distribution Box Wholesaler
A reliable wholesaler guarantees availability, affordability, and on-time delivery. We are a leading MCB box wholesaler for electricians, contractors, and businesses because we provide quality products.
By dealing with Star India Electricals, one of the best MCB distribution box wholesalers in India, you can avail:
Bulk supply at competitive prices
Guaranteed quality assurance
Wide variety of options
Conclusion
The proper choice of the MCB distribution box is essential for electrical safety and efficiency. What is more important is durability, a good number of safety features, and correct size along with price. At Star India Electricals, we take pride in being a high MCB distribution box manufacturer in India with sturdy solutions to cater to your requirements without any increase in cost. Whether you seek a cheap MCB distribution box manufacturer in India or a best MCB distribution box wholesaler in India, we are at your service to deliver quality products that suit your requirements.
0 notes
Text
The Ultimate LED Downlight Installation Guide for a Brighter Home
Upgrading your home’s lighting can make a world of difference, and LED downlights are one of the best options available today. Not only do they provide a sleek and modern look, but they also offer energy efficiency, longevity, and superior brightness. In this guide, we’ll walk you through everything you need to know about LED downlight installation to ensure your home shines brighter, all while saving on energy costs.
Why Choose LED Downlights?
Before we get into the installation process, let’s look at why LED downlights are such a popular choice for homes:
Energy Efficiency: LED lights use significantly less energy compared to traditional incandescent or halogen bulbs. This means lower electricity bills and reduced carbon footprint.
Long Lifespan: LEDs can last up to 50,000 hours, which means fewer replacements and long-term savings.
Brightness and Quality: LED downlights offer bright, even lighting, making them ideal for any room in the house, from kitchens to living rooms and bathrooms.
Design Flexibility: These lights can be installed flush with the ceiling, providing a modern and minimalist aesthetic.
Heat Management: LED lights generate less heat, making them safer and reducing the load on air conditioning in warmer months.
Step-by-Step LED Downlight Installation Guide
1. Planning and Layout
Before you begin the installation process, determine the layout of your downlights. Here’s how to plan:
Room Functionality: Consider the purpose of the room. A kitchen may require brighter, more focused lighting, while a living room could benefit from softer, ambient lighting.
Spacing: A general rule of thumb is to space your downlights about 1.5 to 2 meters apart. Also, keep lights around 0.5 to 1 meter away from walls to avoid shadows.
Height of Ceiling: The higher the ceiling, the wider the beam angle should be to ensure adequate light distribution.
2. Choosing the Right LED Downlights
Not all LED downlights are created equal. When choosing yours, consider:
Wattage: For general home lighting, 7-10 watts is typically sufficient. However, you may need higher wattage for specific areas like the kitchen.
Lumens: This is the measure of brightness. Around 700-800 lumens per light is ideal for living spaces.
Beam Angle: A wider beam angle (90-120 degrees) is suitable for living areas, while a narrower angle (30-60 degrees) works better for task lighting.
Color Temperature: Choose between warm white (2700K-3000K) for a cozy feel, neutral white (3500K-4000K) for a balanced look, or cool white (5000K-6000K) for a bright, modern feel.
Dimmability: Opt for dimmable LED downlights if you want to control the ambiance of a room.
3. Tools and Materials Needed
Before starting the installation, gather these essential tools:
Downlight fixtures
LED downlights
Electrical wire
A hole saw or adjustable hole cutter
Wire strippers
Insulated screwdriver
Voltage tester
Ladder
4. Turning Off the Power
Safety is paramount when dealing with electrical installations. Always turn off the power at the circuit breaker before starting any work. Use a voltage tester to ensure that no electricity is flowing to the area where you’ll be working.
5. Cutting the Holes
Measure and mark where you want each downlight installed. Using a hole saw, cut out the appropriate size hole for your downlights in the ceiling. Be cautious not to cut into any joists or wiring.
6. Wiring the Downlights
Run the electrical cable through the ceiling, ensuring you have enough length at each hole to wire the lights. Follow these steps for wiring:
Strip the ends of the electrical wires using wire strippers.
Connect the wires: Match the live, neutral, and earth wires from the ceiling to the corresponding wires on the downlight (usually color-coded). Use insulated connectors for a safe and secure connection.
Secure the wiring inside the junction box, ensuring it’s neat and protected from damage.
7. Inserting the LED Downlights
Once the wiring is done, gently push the downlight into the ceiling hole. Most LED downlights come with spring-loaded clips that hold them in place. Ensure they sit flush with the ceiling for a clean, professional finish.
8. Testing the Lights
After all downlights are installed, switch the power back on at the circuit breaker. Test each light to ensure they are wired correctly and functioning as expected. If any lights are flickering or not turning on, double-check the wiring connections.
9. Final Touches
If you opted for dimmable LED downlights, install the dimmer switch and test the lights at various brightness levels. Make any necessary adjustments to the alignment of the lights, and clean up any dust or debris from the installation process.
Professional Installation vs. DIY
While installing LED downlights may seem like a simple task, working with electricity can be dangerous. If you’re not comfortable with electrical work, it’s best to hire a professional electrician. A certified electrician will ensure that your LED downlight installation is safe, complies with local regulations, and is done efficiently.
Conclusion: Brighten Your Home with LED Downlights
LED downlights are a fantastic way to brighten up your home while reducing energy costs. Whether you’re planning to install them in your kitchen, living room, or bathroom, the steps outlined in this guide will help you achieve a modern, efficient lighting setup. For those not confident in DIY electrical work, hiring a licensed professional ensures a safe and high-quality installation.
Cornell Electrical is here to help with all your LED downlight installation needs. Contact us today for expert advice and installation services that will transform your home’s lighting.
0 notes
Text
What Should You Know About the Installation Process of a 277V Power Supply? Get Answers Here!
This article was originally published by medium.com. Read the original article here.
When it comes to installing a 277V power supply for commercial or industrial lighting, understanding the technical specifics and safety measures is crucial. This voltage level, typically seen in commercial buildings rather than residential, offers efficiency for high-demand systems but requires careful handling due to its higher voltage. Whether you're updating your current system or setting up a new one, knowing about the 277V setup is vital for safety and effectiveness. Moreover, understanding different parts needed for installation makes sure a perfect fit. Planning ahead helps you integrate the new system with existing ones smoothly. In this article, you will learn about some key aspects of the installation process, focusing on the importance of choosing the right components and ensuring that all installations meet the required standards and regulations.
Understanding the Basics of 277V Power Supply
A 277V power supply is mainly used for lighting in commercial buildings. This system helps distribute power more efficiently, losing less energy than lower voltage systems. It's important to know that working with 277V must follow specific electrical safety standards. Only experienced professionals should handle the installation to avoid any accidents due to the high voltage.
Choosing the Right 277V Driver
Selecting the appropriate 277V driver is fundamental in ensuring that your lighting system operates efficiently and safely. This driver regulates the power to the lights, maintaining a constant voltage which is crucial for the longevity and reliability of your lighting fixtures. When choosing a driver, considering the following factors with your lighting fixtures helps in achieving optimal performance.
wattage,
dimming capabilities,
and compatibility
These factors will also help your lighting system work well while using less energy and reducing heat.
Installation Tips for 277V Lighting Systems
Installing 277V lighting requires several essential steps to keep things safe and working well. First, make sure all circuit breakers are turned off before you start the installation to prevent any electrical accidents. Use tools that are meant for electrical work and make sure all connections are tight. It’s a good idea to consult with a certified electrician who knows about 277V systems to ensure everything follows local electrical rules and standards.
Regular Maintenance and Safety Checks
Once your power supply system is installed, regular maintenance and safety checks are essential to ensure it continues to operate safely and efficiently. Schedule regular inspections to check for any potential issues like loose connections or worn-out components. This proactive approach not only prolongs the life of your lighting system but also helps maintain safety in your commercial space.
Summary
Understanding how to install 277V lighting can significantly improve the efficiency and safety of your lighting systems in commercial or industrial places. Knowing this helps you avoid common mistakes during installation that could cause problems later. It also allows for better planning and makes it easier to connect with existing electrical systems. In the end, a properly installed 277V lighting system can lower energy costs and boost productivity in the workplace. Whether you're looking to upgrade your current lighting solutions or install new ones, consider reaching out to businesses like LED City for reliable products and expert advice. They have a wide range of products from bulbs to outside lights. Moreover, their prices are affordable, which helps you to choose suitable LED lighting without worrying about finances.
0 notes
Text
Is It Hard to Find a Reliable Electrician in Norwood? What You Should Know Before Hiring
Finding a dependable and skilled electrician can be a daunting task, especially if you’re unfamiliar with what to look for. If you’re searching for an Electrician in Norwood, there are several factors you should consider to ensure you get the best service for your needs. At iElectrical & Communications, we understand the importance of finding a trustworthy professional to handle your electrical needs. Here’s a comprehensive guide to help you make an informed decision.
1. Understand Your Electrical Needs
Before you begin your search for an electrician, it’s crucial to identify the specific electrical issues or projects you need help with. Whether it’s installing new lighting, repairing faulty wiring, or upgrading your electrical system, understanding your requirements will help you find an electrician with the appropriate expertise.
Basic Repairs: For minor electrical repairs, such as fixing a broken outlet or a tripped circuit breaker, you may need a general electrician.
Complex Installations: If you’re looking to install new appliances or undertake significant renovations, a specialist with experience in those areas will be required.
Upgrades and Safety Checks: For upgrading your electrical system or conducting safety inspections, make sure to choose a licensed electrician with a strong track record.
2. Verify Qualifications and Licensing
When hiring an Electrician in Norwood, it’s essential to verify their qualifications and licensing. An accredited electrician should have the necessary certifications and licenses to perform electrical work safely and legally.
Licensing: Ensure the electrician holds a valid license issued by the relevant authorities. This guarantees they have met the required standards and are legally authorized to perform electrical work.
Insurance: Confirm that the electrician has adequate insurance coverage. This protects you from potential liabilities in case of accidents or damage during the job.
3. Check Experience and Expertise
Experience plays a significant role in the quality of electrical work. An electrician with years of experience is more likely to handle complex issues effectively and provide reliable solutions.
Specialization: Depending on your needs, you might want to choose an electrician with specific expertise. For instance, if you’re installing energy-efficient systems, look for someone with experience in green technologies.
Reputation: Research the electrician’s reputation by reading customer reviews and asking for references. A reputable electrician should have positive feedback and satisfied clients.
4. Obtain Multiple Quotes
Getting quotes from several electricians can help you compare prices and services. However, don’t base your decision solely on cost.
Detailed Quotes: Ensure that the quotes you receive are detailed and itemized. This will help you understand what you’re paying for and avoid unexpected costs.
Value for Money: Consider the overall value of the service, including the quality of workmanship, materials used, and the electrician’s professionalism.
5. Evaluate Communication and Customer Service
Effective communication is key to a successful project. Choose an electrician who listens to your needs, provides clear explanations, and keeps you informed throughout the process.
Responsiveness: Pay attention to how promptly the electrician responds to your inquiries and how well they address your concerns.
Professionalism: The electrician should demonstrate professionalism in their conduct, from the initial consultation to the completion of the job.
6. Trust Your Instincts
Finally, trust your instincts when choosing an Electrician in Norwood. If something doesn’t feel right or if you have any reservations, don’t hesitate to look for another option.
At iElectrical & Communications, we pride ourselves on delivering exceptional electrical services with a commitment to quality and customer satisfaction. Our team of licensed and experienced electricians is ready to handle all your electrical needs with professionalism and expertise.
For reliable and top-notch electrical services in Norwood, contact us today. We’re here to help you with all your electrical requirements and ensure your home or business operates smoothly and safely.
0 notes
Text
Power Up Your Potential: A Guide to Power Distribution Units (PDUs)
In the world of data centers and server racks, reliable power distribution is crucial. Power distribution units (PDUs) are the unsung heroes that ensure your critical equipment receives the consistent and stable power it needs to function. Here at RackLink, we understand the importance of having the right PDU solution for your specific needs.

What is a PDU?
A PDU is a centralized power distribution device that provides multiple outlets for powering equipment within a rack enclosure. They come in a variety of configurations to suit different needs, from basic units with standard outlets to intelligent PDUs with advanced monitoring and control capabilities.
Choosing the Right PDU for Your Needs
When selecting a PDU, there are several key factors to consider:
Number of Outlets: The number of outlets you'll need depends on the number of devices you plan to power. RackLink offers PDUs with a variety of outlet counts to accommodate even the most demanding setups.
Outlet Type: Select a PDU with the appropriate outlet type to match the plugs of your equipment. Common outlet types include GPO (Australian three-pin plug) and IEC (international C13/C14 connector).
Mounting Options: Consider how you will mount the PDU within your rack. Many PDUs are designed for vertical mounting within a standard 19-inch rack enclosure.
Metered vs. Unmetered: Basic PDUs simply distribute power. Metered PDUs provide real-time data on power usage, allowing you to monitor energy consumption and identify potential inefficiencies.
Managed vs. Unmanaged: Unmanaged PDUs offer basic power distribution. Managed PDUs allow for remote monitoring and control of individual outlets, providing greater flexibility and control over your power infrastructure.
Benefits of Using PDUs
There are several advantages to using PDUs in your rack enclosures:
Improved Power Distribution: PDUs provide a centralized and organized way to distribute power to multiple devices.
Enhanced Safety: PDUs often include features like overload protection and circuit breakers to safeguard your equipment from electrical hazards.
Simplified Cable Management: PDUs help to reduce cable clutter within your rack, improving airflow and overall system organization.
Remote Monitoring and Control (Managed PDUs): Managed PDUs allow you to monitor power usage and remotely control individual outlets, streamlining power management and troubleshooting.
RackLink: Your Trusted Partner for PDU Solutions
At RackLink, we offer a comprehensive selection of high-quality PDUs from leading manufacturers. Our knowledgeable staff can help you select the perfect PDU to meet your specific requirements and budget. We also provide a range of PDU accessories, including mounting brackets and cable management solutions.
Browse our PDU selection at https://www.racklink.com.au/Power-Strips_PDUs/ or contact us today to discuss your PDU requirements.
Let RackLink be your partner in powering your potential.
0 notes
Text
What Size Wire For 15 Amp 240v Table Saw

Are you a DIY enthusiast or a professional woodworker wondering about the appropriate wire size for your 15 amp 240v table saw? Choosing the wrong wire size can result in electrical hazards, circuit damage, or even fire. Therefore, it's crucial to understand the electrical requirements and factors to consider when selecting the right wire for your table saw's power needs.
In this blog post, we'll provide tips on calculating the minimum wire gauge, as well as other important considerations for wire sizing. By the end of this reading, you'll have all the information you need to confidently power up your table saw with the appropriate wire size.
Analyzing 15 Amp 240v Table Saw Electrical Requirements

To understand the electrical requirements for your 15 amp 240v table saw, you'll need to know what size wire is recommended. The wire size plays a crucial role in ensuring safe and efficient operation of your equipment. In this case, a 12-gauge wire is typically recommended for a 15 amp 240v table saw.
When it comes to electrical wiring, the gauge refers to the thickness or diameter of the wire. A lower gauge number indicates a thicker wire, which can handle more current without overheating. For a 15 amp table saw operating at 240 volts, a 12-gauge wire is appropriate because it can safely handle up to 20 amps of current.
Also Read: How Flat Should a Table Saw Top Be
Choosing the right size wire for your table saw is important to avoid potential hazards such as overheating and electrical fires. Using an undersized wire may cause excessive heat buildup and lead to damage or failure of the equipment.
Note: Regularly inspecting your wiring system and following proper installation guidelines will help maintain safety and optimal performance for your 15 amp 240v table saw.
Considerations When Choosing The Right Wire Size For 15 Amp 240v Table Saws
One important factor to consider when choosing the appropriate wire gauge for a 15 amp 240v table saw is the distance between the power source and the tool. The length of wire needed to connect the two directly affects electrical resistance and voltage drop. As distance increases, so does resistance, resulting in a decrease in voltage reaching the tool.
To ensure optimal performance and safety, selecting a wire size that can handle both the amperage of the table saw and compensate for any potential voltage drop is crucial. If you are unsure of the wire size, you must first consult an electrical code reference or consult with a qualified electrician who can provide guidance based on your specific situation.
Generally, for distances up to 50 feet, using a 14-gauge wire is acceptable for a 15 amp 240v table saw. However, if the distance exceeds this threshold, it is recommended to use thicker wires such as 12-gauge or even 10-gauge depending on how far away your power source is located.
Calculating The Minimum Wire Gauge For 15 Amp Table

When considering the minimum wire gauge for an electrical installation, there are several key points that need to be taken into account.
Ampacity and Wire Gauge
The wire gauge needed for a 15 amp 240v table saw can vary depending on the distance from the power source. Here are four factors to consider when determining the appropriate wire gauge:
Distance: The longer the distance between the table saw and the power source, the thicker the wire gauge should be to compensate for voltage drop.
Ampacity: The wire must be able to handle at least 15 amps of current without exceeding its maximum capacity.
Material: Different materials have varying resistances, so choose a wire made of copper or aluminum based on your specific requirements.
Breaker Size: The breaker protecting the circuit should match or exceed the ampacity of both the table saw and wire, ensuring safe operation.
Voltage Drop Considerations
To ensure your electrical system operates efficiently, it's important to consider voltage drop when selecting the appropriate wire gauge for your 15 amp 240v table saw.
Voltage drop occurs when electric current travels through a wire and encounters resistance, resulting in a decrease in voltage along the length of the wire. This can lead to inefficient operation of your table saw and potentially cause damage to the motor.
To minimize voltage drop, you need to choose a wire gauge that can handle the current without significant resistance. For a 15 amp 240v table saw, a suitable wire gauge would be 14 AWG copper wire. This size allows for efficient power transmission while minimizing any potential voltage drop issues.
Always consult electrical codes and standards before making any modifications or installations to ensure compliance and safety.
Overcurrent Protection Requirements
Choosing the appropriate overcurrent protection is crucial for ensuring the safety and functionality of your electrical system. Here are four key considerations when determining the right overcurrent protection for your specific needs:
Current rating: The overcurrent protection device, such as a circuit breaker or fuse, must have a current rating that matches or exceeds the maximum current expected to flow through the circuit.
Voltage rating: Ensure that the overcurrent protection device is rated for the voltage level of your electrical system. Using a device with an insufficient voltage rating can lead to dangerous situations.
Trip characteristics: Different types of overcurrent protection devices have different trip characteristics, including time-delayed or instantaneous tripping. Consider which type is most suitable for your application's requirements.
Inverse time-current curve: Familiarize yourself with the inverse time-current curve provided by manufacturers to understand how quickly an overcurrent protection device will trip at different current levels.
15 Amp 240v Table Saw Wire Installation Tips
youtube
Check your local electrical codes and regulations before installing your table saw to ensure that it is compliant with safety regulations. Here are some tips for a smooth installation:
Choose the right location: Find a dedicated space in your workshop that is well-ventilated and away from any flammable materials. Ensure there is enough clearance around the saw for easy access and maneuverability.
Proper grounding: Always connect your table saw to a properly grounded outlet or circuit. This will help prevent electrical shocks and potential damage to the motor or other components.
Use appropriate wire size: You'll need the right wire gauge for a 15 amp 240V table saw. Refer to local electrical codes or consult an electrician to determine the appropriate wire size.
Secure connections: Use appropriate connectors or terminals when wiring your table saw. Loose connections can lead to overheating or failure of the electrical system.
Conclusion
So when selecting the appropriate wire size for a 15 amp 240v table saw, it's critical to understand the electrical requirements. This process may seem daunting, but by following the guidelines, you can ensure both safety and compliance. Distance and voltage drop also play a significant role in determining the right size wire.
It's worth considering that the minimum wire gauge may not always be the ideal choice for your table saw's needs. Taking into account various factors and choosing a suitable type of wire can impact your saw's efficiency and operation, making it a crucial decision that should not be taken lightly.
0 notes
Text
Long Island Residential Electrical Wiring: An In-Depth to Learning the Basics
Long Island Residential Electrical Wiring: An In-Depth to Learning the Basics
Outline
Knowing How to Wire Residential Properties Electrically
Set off on an adventure to learn the principles of Long Island residential electrical wiring. We can help you with everything from fundamental ideas to sophisticated methods.
The Importance of Safe Electrical Wiring
Learn why residential homes require adequate electrical wiring. Investing in high-quality electrical wiring is essential for a number of reasons, including ensuring efficiency, safety, and regulatory compliance.
Major Residential Electrical System Components Explore the key elements that comprise domestic electrical systems. Comprehending various components, such as outlets, switches, and circuit breakers, is essential for efficient wiring. Long Island Electrical Wiring Codes and Regulations Keep up with the most recent Long Island electrical codes and regulations. Adherence to these guidelines is crucial in order to guarantee safety and prevent possible legal complications.
Wiring Types Appropriate for Residential Properties Examine the many kinds of wiring that are frequently utilized in residential buildings. Consider the advantages and disadvantages of various options, such as copper-clad aluminum and aluminum and copper wire, in order to make well-informed choices.
How to Plan and Design an Electrical System Discover the significance of careful planning and design for electrical wiring. A safe and effective electrical system is largely dependent on variables including load calculations, circuit structure, and outlet and fixture location. Safety Measures to Take While Installing Electrical Wiring Throughout the installation of the electrical wiring, put safety first. Precautions can help avoid mishaps and injuries by employing the right instruments and equipment and adhering to safety procedures.

FAQs About Electrical Wiring for Residential Properties in Long Island
FAQs
Is it necessary to hire a professional electrician for residential wiring projects?
While DIY electrical work may seem tempting, hiring a licensed electrician is highly recommended to ensure safety and compliance with regulations.
What factors should I consider when choosing electrical wiring materials?
Factors such as durability, cost, and compatibility with your home's electrical system should be taken into account when selecting wiring materials.
How often should residential electrical systems be inspected?
It's advisable to schedule regular inspections by a qualified electrician to detect any potential issues and ensure the continued safety and performance of your electrical system.
Can I upgrade my home's electrical system to meet increased power demands?
Yes, upgrading your electrical system may be necessary if you're adding new appliances or experiencing frequent power disruptions. Consult with a licensed electrician to assess your needs and make appropriate upgrades.
What are the signs of electrical problems in residential properties?
Signs such as flickering lights, tripped circuit breakers, and burning odors indicate potential electrical issues that should be addressed promptly by a professional electrician.
Are there any government incentives or rebates available for upgrading residential electrical systems?
Depending on your location and specific circumstances, there may be government incentives or rebates available for energy-efficient upgrades to your home's electrical system. Consult with local authorities or utility companies for more information.
To sum up
Well done on taking the initial step toward becoming an expert in Long Island residential electrical wiring! With the right information and by adhering to best practices, you can guarantee the dependability, efficiency, and safety of the electrical system in your house. Always put safety first, and seek the advice of a licensed electrician before beginning any complicated wiring projects.
#Electrical Wiring Residential Long Island#Electric Repair Service Long Island#24 hour Electrician Long Island
1 note
·
View note
Text
What Is The Best Way To Clean Sediment From A Water Heater?

If you own a home in the city of Huntington Beach, you are familiar with water heater Installation in Huntington Beach, and you understand the importance of proper water heater installation and maintenance.
A sediment buildup in your water heater tank can affect the efficiency of the appliance and possibly even cause damage. You should clean it regularly to prevent these issues from occurring.
Unfortunately, even with regular maintenance and proper installation, sediment can still accumulate in your water heater over time.
This post will explain the best ways to carry out water heater repair in Huntington Beach, CA on your own, particularly cleaning sediment from your water heater, so you can keep it running safely and efficiently.
The Tools You’ll Need
With the right tools and a bit of know-how, cleaning sediment from your water heater can be a fairly straightforward process.
Before you start water heater repair in Huntington Beach, it’s important to have the right tools on hand. Here is a list of essential items for cleaning sediment from a water heater:
1. Safety Goggles
When dealing with any kind of appliance repair, it’s always important to have safety goggles on hand. This is especially true when dealing with a water heater repair, as splashes of hot water or acidic solutions can cause harm to your eyes.
2. Gloves
In addition to safety goggles, it’s also important to wear gloves when cleaning sediment from a water heater. This will help protect your hands from any potential burns that could occur due to the high temperature of the water.
3. Brush
A brush will be necessary for scrubbing off any loose sediment from the surface of the tank. It’s important to use a brush specifically designed for use with a water heater as other types of brushes may be too abrasive and damage the surface of the tank.
4. Vacuum Cleaner
If there are any large chunks of sediment inside the tank, a vacuum cleaner can help to remove them. Be sure to use a vacuum specifically designed for water heaters so that it can properly suck up the sediment without damaging the tank.
5. Chemical Cleaner
After brushing off any loose sediment, it’s often necessary to use a chemical cleaner to dissolve any remaining sediment.
It’s important to choose an appropriate chemical cleaner for your particular type of water heater, as different models may require different solutions.
The Steps to Follow
Step 1. Switch off The Water Heater
The first step in cleaning out your water heater is to switch it off. This will prevent you from causing any damage while working on it, which could be costly in the long run.
You can either do this manually by flipping the switch off, or you can turn off the water heater by turning off its circuit breaker or flipping its switch to “off.”
Be sure to make sure that the power is completely off before you begin. This will ensure your safety and help to maintain your water heater from any damage that may occur during the cleaning process.
Call the water heater repair Huntington Beach technician for help if you are unsure at this initial stage.
Step 2. Shut off The Cold Water Valve and Wait For The Water to Cool
The next step is to turn off the cold water valve that feeds into the water heater. This will prevent any hot water from flowing into your home while you’re cleaning out the sediment. You can usually access this valve by following a pipe back from your faucet or shower head.
Once you’ve turned off all of the above components, let the water cool down and drain out. This can take up to 24 hours, so be patient!
Step 3. Connect a Garden Hose or Drain to The Tank’s Side Drain Valve
Attach a drain hose or garden hose to the drain valve on the side of the water heater and turn on a hot faucet in your home. Any remaining air in the tank will be pushed out by doing this, making emptying simpler.
Don’t Forget! You may also want to consider enlisting the help of a professional. If your water heater is older, it may be more cost-effective to contact a local heater repair Huntington Beach technician who can professionally assess your unit and ensure the repair is carried out correctly. In the long term, you can save money and time by doing this.
Step 4. Put The Hose’s Tip in a Container or Drain
The end of the hose should go into a bucket or drain. This will catch any water that comes out of the tank if you wish. You can also attach this hose to a garden hose outside if you want to drain it directly into your yard or garden.
You want to make sure that the end of your drain hose isn’t submerged in water, so place it in a bucket or drain once you are done attaching it.
Step 5. Open the Faucets
One of your home’s faucets should be opened. This will help push any remaining air out of the system and allow for easier draining. The goal is to get as much water out of the tank as possible before beginning.
Once all of your faucets are turned on, keep them running until they get cold. This will facilitate removing any remaining air from the system and facilitating drainage.
Step 6. To Begin Draining The Tank, Open The Drain Valve
The drain valve is located at the bottom of your water heater. It will be an orange or black valve that you can turn with a wrench. Turn the valve counterclockwise until it stops (this should take about five turns).
Once you have turned on all of your faucets, leave them running until they go cold. Once all of your faucets have been running for a while and have gone cold, you can turn off the water to your house.
This will prevent any residual air from being sucked back into the system when you open the hot water faucet later. Open the hot water faucet on your sink.
The easiest way to do this is by turning on one of your kitchen sinks. Leave it running until all of the air has escaped from around its pipes (this could take up to 30 minutes).
Conclusion
You must use the appropriate tools for the task. With these tools in hand, you’ll be well on your way to carrying out water heater Installation in Huntington, and you will be guaranteed of having a clean and efficient water heater in no time. You will also need to follow the above suggestions in this post!
But if you are unsure of anything you can do, look for the best way to clean sediment from your water heater technician in Huntington Beach, and then it is important to have it professionally serviced.
A professional technician of EZ Leak Detection will be able to provide the most comprehensive service, ensuring that all areas of the heater are thoroughly cleaned and inspected.
They will also be able to advise on the best course of action should further problems arise. Regular maintenance will help prolong the life of your water heater and reduce the risk of sediment buildup.
Author Bio:-
Name - Karl Brown
Karl, a marketing manager at EZ Leak Detection, loves to write about plumbing and HVAC services to make the life of the reader easier. Leakages in your property can be dangerous but not all the leaks are easily accessible. He has given extensive information about water leak and slab leak and tips to detect them quickly along with quick solutions to prevent you from inconveniences and health hazards.
Leakage problems and malfunction of appliances demand comprehensive solutions. Also, regular maintenance is not the thing to be missed for leading life with zero hassles. Read our recent post related to leakage detection and repair, alerts for HVAC shutdown and how to repair it, and installation of AC and water heater in San Diego.
Source :- Best Way To Clean Sediment From Water Heater
0 notes
Text
What Is The Best Way To Clean Sediment From A Water Heater?
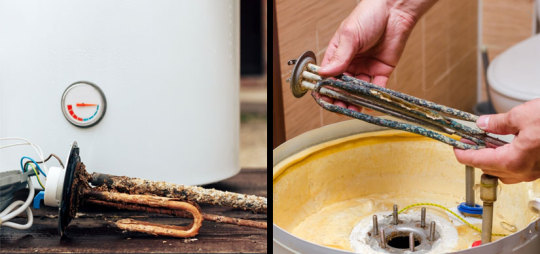
If you own a home in the city of Huntington Beach, you are familiar with water heater Installation in Huntington Beach, and you understand the importance of proper water heater installation and maintenance.
A sediment buildup in your water heater tank can affect the efficiency of the appliance and possibly even cause damage. You should clean it regularly to prevent these issues from occurring.
Unfortunately, even with regular maintenance and proper installation, sediment can still accumulate in your water heater over time.
This post will explain the best ways to carry out water heater repair in Huntington Beach, CA on your own, particularly cleaning sediment from your water heater, so you can keep it running safely and efficiently.
The Tools You’ll Need
With the right tools and a bit of know-how, cleaning sediment from your water heater can be a fairly straightforward process.
Before you start water heater repair in Huntington Beach, it’s important to have the right tools on hand. Here is a list of essential items for cleaning sediment from a water heater:
1. Safety Goggles
When dealing with any kind of appliance repair, it’s always important to have safety goggles on hand. This is especially true when dealing with a water heater repair, as splashes of hot water or acidic solutions can cause harm to your eyes.
2. Gloves
In addition to safety goggles, it’s also important to wear gloves when cleaning sediment from a water heater. This will help protect your hands from any potential burns that could occur due to the high temperature of the water.
3. Brush
A brush will be necessary for scrubbing off any loose sediment from the surface of the tank. It’s important to use a brush specifically designed for use with a water heater as other types of brushes may be too abrasive and damage the surface of the tank.
4. Vacuum Cleaner
If there are any large chunks of sediment inside the tank, a vacuum cleaner can help to remove them. Be sure to use a vacuum specifically designed for water heaters so that it can properly suck up the sediment without damaging the tank.
5. Chemical Cleaner
After brushing off any loose sediment, it’s often necessary to use a chemical cleaner to dissolve any remaining sediment.
It’s important to choose an appropriate chemical cleaner for your particular type of water heater, as different models may require different solutions.
The Steps to Follow
Step 1. Switch off The Water Heater
The first step in cleaning out your water heater is to switch it off. This will prevent you from causing any damage while working on it, which could be costly in the long run.
You can either do this manually by flipping the switch off, or you can turn off the water heater by turning off its circuit breaker or flipping its switch to “off.”
Be sure to make sure that the power is completely off before you begin. This will ensure your safety and help to maintain your water heater from any damage that may occur during the cleaning process.
Call the water heater repair Huntington Beach technician for help if you are unsure at this initial stage.
Step 2. Shut off The Cold Water Valve and Wait For The Water to Cool
The next step is to turn off the cold water valve that feeds into the water heater. This will prevent any hot water from flowing into your home while you’re cleaning out the sediment. You can usually access this valve by following a pipe back from your faucet or shower head.
Once you’ve turned off all of the above components, let the water cool down and drain out. This can take up to 24 hours, so be patient!
Step 3. Connect a Garden Hose or Drain to The Tank’s Side Drain Valve
Attach a drain hose or garden hose to the drain valve on the side of the water heater and turn on a hot faucet in your home. Any remaining air in the tank will be pushed out by doing this, making emptying simpler.
Don’t Forget! You may also want to consider enlisting the help of a professional. If your water heater is older, it may be more cost-effective to contact a local heater repair Huntington Beach technician who can professionally assess your unit and ensure the repair is carried out correctly. In the long term, you can save money and time by doing this.
Step 4. Put The Hose’s Tip in a Container or Drain
The end of the hose should go into a bucket or drain. This will catch any water that comes out of the tank if you wish. You can also attach this hose to a garden hose outside if you want to drain it directly into your yard or garden.
You want to make sure that the end of your drain hose isn’t submerged in water, so place it in a bucket or drain once you are done attaching it.
Step 5. Open the Faucets
One of your home’s faucets should be opened. This will help push any remaining air out of the system and allow for easier draining. The goal is to get as much water out of the tank as possible before beginning.
Once all of your faucets are turned on, keep them running until they get cold. This will facilitate removing any remaining air from the system and facilitating drainage.
Step 6. To Begin Draining The Tank, Open The Drain Valve
The drain valve is located at the bottom of your water heater. It will be an orange or black valve that you can turn with a wrench. Turn the valve counterclockwise until it stops (this should take about five turns).
Once you have turned on all of your faucets, leave them running until they go cold. Once all of your faucets have been running for a while and have gone cold, you can turn off the water to your house.
This will prevent any residual air from being sucked back into the system when you open the hot water faucet later. Open the hot water faucet on your sink.
The easiest wa
y to do this is by turning on one of your kitchen sinks. Leave it running until all of the air has escaped from around its pipes (this could take up to 30 minutes).
Conclusion
You must use the appropriate tools for the task. With these tools in hand, you’ll be well on your way to carrying out water heater Installation in Huntington, and you will be guaranteed of having a clean and efficient water heater in no time. You will also need to follow the above suggestions in this post!
But if you are unsure of anything you can do, look for the best way to clean sediment from your water heater technician in Huntington Beach, and then it is important to have it professionally serviced.
A professional technician of EZ Leak Detection will be able to provide the most comprehensive service, ensuring that all areas of the heater are thoroughly cleaned and inspected.
They will also be able to advise on the best course of action should further problems arise. Regular maintenance will help prolong the life of your water heater and reduce the risk of sediment buildup.
Source :- Best Way To Clean Sediment From Water Heater
0 notes