#How to configure the Windows Firewall to allow only specific IP Address
Explore tagged Tumblr posts
Visit Tumblr Blog
Explore Tumblr blogs with no restrictions, modern design and the best experience.
Last Seen Tumblr Blogs


Fun Fact
In Q3 of 2020, 31% of US users access the Tumblr app daily.
Text
Boost your Windows VPS server security by configuring a Windows firewall to allow only trusted IP addresses access to specific ports with our guide.
#How to configure the Windows Firewall to allow only specific IP Address#How do I allow only certain IP Address in Windows Firewall?#How to Add IP Address in Windows Firewall
0 notes
Text
How Does Dedicated Server Hosting Work?
A client is provided a physical server that is exclusively dedicated to him with dedicated server hosting. While in shared or virtual hosting, the resources are shared between different users, a dedicated server provides all the resources that comprise the CPU, the RAM, the storage space, the bandwidth that are solely assigned for usage. Here’s an overview of how it works:
How Does Dedicated Server Hosting Work?
1. Provisioning and Setup
Choosing Specifications: Hardware requirements including CPUs cores, RAM size, storage type (SSD/HDD), network bandwidth are chosen by the client according to requirements.
Operating System Installation: The preferred OS being Linux, Windows Server and others are preinstalled in the hosting provider’s server.

Alt Text: Image showing how a dedicated server allows full control over resources
Server Management Software: Some of the additional packages: Control panel (cPanel, Plesk), Database server (MySQL, MSSQL) can be also preset.
Initial Configuration: The hosting provider sets up the network access on the server, updates the necessary security issues, and secures the appropriate firewall.
2. Access and Control
Full Root/Administrator Access: Clients fully manage the Chicago dedicated server or any location. So they can implement applications, regulate exigent services, and modify settings.
Remote Management: Remote access is usually affirmed with SSH for Linux servers and a Remote Desktop Protocol for Windows-based servers.
Control Panels (Optional): cPanel is an example of how server management on various flavors can be done through a web-based graphical interface.
3. Performance and Resources
No Resource Sharing: Everything is calculated for one client – CPU, memory, and disk usage are thus concentrated on the client.
Scalability: Unlike cloud hosting, Chile dedicated servers or any place are a little more constricted. But they can be upgraded with increased hardware or load balancers.
4. Security and Monitoring
Isolated Environment: The risks resulting from other users are also absent on the Chicago dedicated server or any geographical location. The reason is the other clients are not served on the same server.

Alt text: Image representation to show how to secure a dedicated server
DDoS Protection and Firewalls: Web hosts who offer such services provide various security features to counteract cyber threats.
Monitoring Tools: Through the dashboard or some other tool, a Chile or any location’s dedicated server on which the bot runs (load, CPU usage, memory, overall network activity) can be checked.
5. Backup and Maintenance
Automated Backups: This should be noted that the hosting provider or client can set common backups to avoid this kind of dilemma.
Managed vs. Unmanaged Hosting:
Managed: The server management monitors updates, security patches, monitoring, and backup with the server provider’s assistance.
Unmanaged: The client is fully responsible for maintenance tasks.

Alt Text: Pictorial representation of the managed and unmanaged server hosting difference
6. Network and Bandwidth
High-Speed Connections: Data centers that are solely rented mostly offer large bandwidth for traffic without incurring a lag.
Dedicated IP Address: It is common that each server obtains its IP, which can be useful for a website, mail server or application hosting.
7. Cost and Use Cases
Higher Cost: As it gives an environment to use only by one client, dedicated hosting is more costly than shared or VPS hosting.
Use Cases: It is appropriate for loads that require a lot of resources. It also benefits game servers, active websites, SAAS solutions, and enterprise-level databases.
To sum up, with the help of dedicated server hosting, a client gains the maximal control, security, and performance provided by the possibility of using the entire server. The device is suitable for companies and/or organizations, that require high reliability, have a large workload or need a high level of data protection.
0 notes
Text
which vpn protocol has the best compatibility with firewalls
🔒🌍✨ Get 3 Months FREE VPN - Secure & Private Internet Access Worldwide! Click Here ✨🌍🔒
which vpn protocol has the best compatibility with firewalls
VPN protocol compatibility
VPN protocol compatibility is a crucial aspect to consider when choosing a Virtual Private Network (VPN) service. VPN protocols are sets of rules and procedures that dictate how data is transmitted between devices over the internet when using a VPN. Different protocols offer varying levels of security, speed, and compatibility with different devices and networks.
The most common VPN protocols include OpenVPN, IKEv2/IPsec, L2TP/IPsec, and SSTP. OpenVPN is widely regarded as one of the most secure and versatile protocols, offering robust encryption and compatibility with multiple platforms such as Windows, macOS, Android, and iOS. IKEv2/IPsec is another popular choice known for its stability and fast connection speeds, making it ideal for mobile devices.
When it comes to compatibility, some devices and networks may only support specific VPN protocols. For example, if you plan to use a VPN on your iOS device, it is essential to choose a service that supports IKEv2/IPsec or L2TP/IPsec, as these protocols are natively supported on iOS devices. Similarly, Windows users may benefit from protocols such as SSTP, which is integrated into the Windows operating system.
It's also important to consider the level of security offered by each protocol. While some protocols prioritize speed and performance, others prioritize encryption and data security. Depending on your needs, you may choose a protocol that strikes the right balance between speed and security.
In conclusion, VPN protocol compatibility plays a significant role in determining the effectiveness and usability of a VPN service. By understanding the different protocols and their compatibility with your devices and networks, you can make an informed decision when selecting a VPN provider.
Firewall integration
When it comes to cybersecurity, integrating a firewall is a crucial step in safeguarding your network from potential threats. A firewall acts as a barrier between your internal network and external networks, monitoring and controlling incoming and outgoing network traffic based on predetermined security rules. By integrating a firewall into your network infrastructure, you can enhance your overall security posture and minimize the risk of unauthorized access and cyber attacks.
There are two main types of firewalls that can be integrated into a network: hardware firewalls and software firewalls. Hardware firewalls are physical devices that are typically installed at the network perimeter, providing an added layer of security for all devices connected to the network. Software firewalls, on the other hand, are programs that can be installed on individual devices to monitor and filter network traffic on a more granular level.
Integrating a firewall into your network involves setting up rules and configurations that determine how traffic is allowed or blocked. This includes specifying which ports and protocols are permitted or restricted, as well as creating rules based on IP addresses, domain names, or application types. Regularly updating and monitoring these rules is essential to ensure that your firewall is effectively protecting your network.
Overall, firewall integration is a critical component of any cybersecurity strategy, helping to prevent unauthorized access, data breaches, and other malicious activities. By implementing and maintaining a firewall solution, you can strengthen your network security defenses and safeguard your sensitive information from cyber threats.
VPN tunneling methods
VPN tunneling methods are crucial for ensuring secure and private internet connections. VPN stands for Virtual Private Network, and it allows users to create a secure connection to another network over the internet. When data is transferred through a VPN, it is encrypted to ensure that it remains private and secure from prying eyes.
There are several VPN tunneling methods that are commonly used to establish a secure connection:
PPTP (Point-to-Point Tunneling Protocol): One of the oldest VPN protocols, PPTP is easy to set up and widely supported. However, it is not as secure as other protocols due to its weaker encryption.
L2TP/IPsec (Layer 2 Tunneling Protocol with IPsec): L2TP/IPsec is a more secure option that combines the best features of both protocols. It provides strong encryption and is supported on a wide range of devices.
OpenVPN: Known for its security and versatility, OpenVPN is an open-source protocol that uses SSL/TLS for key exchange. It is highly configurable and can bypass firewalls and other restrictions.
SSTP (Secure Socket Tunneling Protocol): Developed by Microsoft, SSTP is integrated into Windows operating systems and provides strong security through SSL encryption. It is a good option for users who require high levels of security.
IKEv2/IPsec (Internet Key Exchange version 2 with IPsec): This protocol is known for its stability and fast reconnection times. It is commonly used on mobile devices and is considered secure and reliable.
By understanding the different VPN tunneling methods available, users can choose the one that best fits their security and privacy needs. Whether for personal use or business purposes, using a VPN with robust tunneling protocols can help safeguard sensitive data and online activities.
Firewall-friendly VPN protocols
Firewall-Friendly VPN Protocols Explained
In today's digital landscape, virtual private networks (VPNs) play a crucial role in ensuring online privacy and security. However, not all VPN protocols are created equal when it comes to compatibility with firewalls. Some protocols may encounter difficulties traversing firewalls, leading to connectivity issues and compromised security. That's where firewall-friendly VPN protocols come into play.
One of the most widely recognized firewall-friendly VPN protocols is Secure Socket Tunneling Protocol (SSTP). Developed by Microsoft, SSTP encapsulates VPN traffic within the HTTPS protocol, making it indistinguishable from regular web traffic. This feature allows SSTP to bypass most firewalls that permit HTTPS traffic, ensuring reliable connectivity even in restrictive network environments.
Another firewall-friendly VPN protocol gaining popularity is OpenVPN. Known for its robust security features and open-source nature, OpenVPN is highly adaptable and can operate on any port, including commonly allowed ports like TCP port 443 (HTTPS). By utilizing encryption and authentication mechanisms similar to HTTPS, OpenVPN can effectively evade firewall restrictions while maintaining data confidentiality and integrity.
IKEv2/IPsec (Internet Key Exchange version 2/IP Security) is another firewall-friendly VPN protocol worth mentioning. Built with mobility and security in mind, IKEv2/IPsec is designed to establish and maintain VPN connections seamlessly, even when switching between different networks. Its ability to operate over UDP port 500 and TCP port 443 makes it well-suited for bypassing firewalls without sacrificing performance or security.
In conclusion, when choosing a VPN protocol for use in firewall-restricted environments, opting for firewall-friendly options like SSTP, OpenVPN, and IKEv2/IPsec can ensure seamless connectivity and robust security. By leveraging these protocols, users can enjoy the benefits of VPN technology without worrying about compatibility issues with firewalls.
Network security and VPNs
Title: Enhancing Network Security with VPNs
In today's interconnected digital landscape, where data breaches and cyber threats loom large, ensuring robust network security is paramount for individuals and organizations alike. One indispensable tool in this endeavor is the Virtual Private Network (VPN), a technology that provides a secure and encrypted connection over the internet, shielding sensitive data from prying eyes and malicious actors.
VPNs function by creating a private tunnel between the user's device and the VPN server, encrypting all data traffic that passes through it. This encryption prevents unauthorized access to the transmitted information, effectively safeguarding it from interception or manipulation. Whether browsing the web, accessing corporate networks remotely, or transmitting confidential files, VPNs offer a layer of protection that is invaluable in today's threat landscape.
One of the key benefits of using a VPN is the preservation of privacy and anonymity online. By masking the user's IP address and encrypting their internet activity, VPNs prevent ISPs, advertisers, and other third parties from tracking their online behavior and gathering personal information. This not only enhances privacy but also helps users evade censorship and geo-restrictions, allowing access to content and services that may be blocked in certain regions.
Furthermore, VPNs play a crucial role in securing remote connections, particularly in the era of remote work and telecommuting. With employees accessing corporate networks from various locations and devices, VPNs provide a secure channel for transmitting sensitive data and conducting business activities without exposing the organization to cyber threats.
However, it's essential to choose a reputable VPN provider and adhere to best practices for secure usage. This includes regularly updating VPN software, using strong authentication methods, and avoiding the transmission of sensitive information over unsecured networks.
In conclusion, VPNs serve as a cornerstone of network security, offering users a reliable means of protecting their data and privacy in an increasingly interconnected world. By leveraging the encryption and anonymity provided by VPN technology, individuals and organizations can mitigate the risks posed by cyber threats and safeguard their online activities effectively.
0 notes
Text
can you make a vpn for your home network
🔒🌍✨ Get 3 Months FREE VPN - Secure & Private Internet Access Worldwide! Click Here ✨🌍🔒
can you make a vpn for your home network
Home VPN setup
Title: Setting Up a Home VPN: Ensuring Privacy and Security Online
In today's digital age, safeguarding your online privacy and security is paramount. One effective way to achieve this is by setting up a Virtual Private Network (VPN) within the comfort of your home. A home VPN not only encrypts your internet connection but also masks your IP address, providing anonymity and protecting your data from potential cyber threats.
To begin with, you'll need to choose a reliable VPN service provider. Look for one that offers strong encryption protocols, a wide server network, and a user-friendly interface. Many reputable VPN providers offer both free and paid options, catering to different needs and budgets.
Once you've selected a VPN provider, the next step is to install the VPN software on your preferred devices. Most VPN services offer apps for various operating systems, including Windows, macOS, iOS, and Android. Simply download the app, follow the installation instructions, and log in with your account credentials.
After installing the VPN software, you'll have the option to connect to servers located around the world. Connecting to a server in a different country can help you bypass geo-restrictions and access content that may be blocked in your region.
Furthermore, configuring your home router to work with the VPN can extend its protection to all devices connected to your network. This ensures that every device, from laptops to smart TVs, benefits from encrypted internet traffic.
It's essential to regularly update your VPN software to patch any vulnerabilities and stay protected against evolving threats. Additionally, familiarize yourself with your VPN provider's privacy policy to understand how your data is handled.
In conclusion, setting up a home VPN is a proactive measure to safeguard your online privacy and security. By encrypting your internet connection and masking your IP address, a VPN offers peace of mind in an increasingly interconnected digital world.
DIY VPN for home network
Title: Creating Your Own VPN for Home Network: A Step-by-Step Guide
In an era where online privacy and security are paramount, setting up your own Virtual Private Network (VPN) for your home network can offer enhanced protection and control over your internet connection. A DIY VPN allows you to encrypt your internet traffic and route it through a secure server, shielding your data from prying eyes and potential cyber threats.
Here's a step-by-step guide to creating your DIY VPN for your home network:
Choose Your VPN Protocol: Select a VPN protocol that suits your needs. Popular options include OpenVPN, L2TP/IPsec, and WireGuard. Consider factors such as security, speed, and compatibility with your devices.
Set Up a Server: You'll need a dedicated server to act as your VPN gateway. This can be a physical server or a virtual server hosted by a cloud provider. Install your chosen VPN server software on this server.
Configure Your Router: Access your router's settings and enable VPN passthrough if necessary. Set up port forwarding to direct VPN traffic to your server. Each router model has its own interface, so consult your router's manual for specific instructions.
Generate Certificates and Keys: Create SSL/TLS certificates and cryptographic keys for authentication and encryption. Most VPN server software includes tools to generate these securely.
Install VPN Client Software: Install VPN client software on the devices you want to connect to the VPN. This software will establish a secure connection to your VPN server.
Connect and Test: Enter the server details into your VPN client software and connect to your DIY VPN. Test the connection to ensure everything is working correctly.
Enhance Security: Consider additional security measures such as firewall rules, intrusion detection systems, and regularly updating your VPN server software to patch any vulnerabilities.
By following these steps, you can create your own VPN for your home network, providing an extra layer of privacy and security for your online activities. Remember to adhere to best practices and stay informed about emerging threats to keep your DIY VPN secure and effective.
Creating a secure VPN at home
Setting up a secure Virtual Private Network (VPN) at home is crucial for safeguarding your online privacy and data security. With cyber threats on the rise, having a VPN offers an extra layer of protection when accessing the internet from your home network.
To create a secure VPN at home, you first need to choose a reputable VPN service provider. Look for one that offers strong encryption protocols, a no-logs policy, and a kill switch feature. These elements ensure that your online activities remain private and cannot be traced back to you.
Next, install the VPN software on your device and follow the setup instructions provided by the service provider. Make sure to configure the VPN settings properly to optimize security and performance. You may also need to choose a server location to connect to – selecting one closer to your physical location typically results in faster connection speeds.
Once your VPN is up and running, test it to ensure that your IP address is masked and your internet traffic is encrypted. You can use online tools to check for DNS leaks and confirm that your VPN is working as intended.
Remember to keep your VPN software updated to patch any potential vulnerabilities and regularly monitor your connection for any irregularities. By taking these steps, you can create a secure VPN at home and browse the internet with peace of mind knowing your data is protected.
Setting up VPN on home router
Setting up a VPN on your home router can provide an extra layer of security and privacy for all devices connected to your network. By encrypting your internet connection and masking your IP address, a VPN helps protect your sensitive data from potential hackers or other online threats.
To set up a VPN on your home router, you will first need to subscribe to a VPN service that offers router support. Once you have chosen a VPN provider, you can log in to your router's settings through a web browser. Look for the VPN configuration section, where you can input the VPN server details provided by your service provider.
After entering the server details, you will need to save the settings and restart your router to establish the VPN connection. Depending on the router model, the setup process may vary slightly, so it's essential to refer to your router's user manual for specific instructions.
Once the VPN connection is established, all devices connected to your home network will benefit from the added security and privacy features provided by the VPN. This means that any data transmitted over the network, whether it's browsing the web, streaming content, or accessing online services, will be encrypted and secure.
Setting up a VPN on your home router is a proactive step towards safeguarding your online activities and personal information. With the added layer of protection that a VPN offers, you can browse the internet with peace of mind knowing that your data is secure from prying eyes.
Personal VPN for home internet
Title: Enhancing Security and Privacy at Home with a Personal VPN
In an era where digital privacy is becoming increasingly crucial, safeguarding your online activities at home has never been more important. One effective solution gaining traction is the use of a Personal Virtual Private Network (VPN). A Personal VPN creates a secure and encrypted connection between your device and the internet, ensuring that your data remains confidential and protected from prying eyes.
One of the primary benefits of utilizing a Personal VPN for home internet is enhanced security. By encrypting your internet traffic, a VPN prevents hackers, ISPs (Internet Service Providers), and other malicious entities from intercepting sensitive information such as passwords, financial details, and browsing history. This added layer of security is particularly vital when using unsecured Wi-Fi networks, commonly found in public spaces like cafes, airports, and hotels.
Moreover, a Personal VPN grants you the ability to bypass geographical restrictions and access content that may be blocked in your region. Whether you're streaming movies, accessing social media platforms, or engaging in online gaming, a VPN allows you to enjoy unrestricted internet access without limitations.
Privacy is another significant advantage of using a Personal VPN. With concerns over data privacy and online tracking on the rise, a VPN offers peace of mind by masking your real IP address and location. This not only protects your privacy but also prevents advertisers and third-party websites from profiling you based on your online activities.
Setting up a Personal VPN for your home internet is relatively straightforward, with numerous providers offering user-friendly applications compatible with various devices and operating systems. Additionally, many VPN services offer features such as automatic kill switches, DNS leak protection, and multi-device support to further enhance your online security and privacy.
In conclusion, investing in a Personal VPN for your home internet is a proactive step towards safeguarding your digital presence. By encrypting your data, bypassing restrictions, and preserving your privacy, a VPN empowers you to browse the web with confidence and peace of mind.
0 notes
Text
What is IPSec and how does it work?
What is an IPSec article and how does it work? Get acquainted (gain, obtain) with present-day techniques that came from IPsec Protocols, which are used to set up encrypted connections between two or more devices. These types of protocols help keep data sent over public networks secure. You should know that IPsec is often used to set up V.P.N. VPN, which is done by encrypting IP packets and authenticating the packet source.
What is ip?
IP stands for Internet Protocol, which is the main routing protocol used in the Internet. This protocol specifies where the data should travel and which destination it should reach. But the IPSec protocol also adds encryption and authentication to the process.
Who made IpSec?
This protocol is a joint product of Microsoft and Cisco Cisco Systems works by authenticating and encrypting each data packet in a data stream.
What port does IPsec use?
The software port or network port is where the information is sent. In other words, a port is a place through which data enters or leaves a computer or server, and a number is assigned to each of these ports, which are between 0 and 65535. IPsec also typically uses port 500 to perform encryption and decryption algorithms.
What are the benefits of IPSec?
Replay attack protection: Assigns a unique number to each data packet (packet) which deletes the packet if that number is duplicate.
Confidentiality of information or encryption: VPN connection security is increased by PFS in this protocol, which is done by creating a unique key in each connection.
Information source authentication: Confirmed by the message authentication code (HMAC)
That message has not changed.
Transparency: Ipsec works at the network layer, which is actually transparent to applications and users. As a result, there is no need to change the routers and firewalls during use
Dynamic re-encryption: The security keys for decryption change at regular intervals. This prevents identity theft and hacker attacks.
Replay attack protection Any software can be compatible with this protocol Confidentiality of information (encryption) Having transport mode Having tunnel mode Authentication of the source and origin of information Layer 3 or Network Authentication.
Types of IPSec IPSec security protocols
IPsec is an open source standard and part of the IPv4 suite. IPsec can communicate between both transport mode and tunnel mode. IPsec is a global standard and can perform a variety of security processes using a set of protocols it uses, including the protocols used in IPsec. To give privacy to the data and finally Security Associations or SA to create the data used in AH and ESP.
1. IPSec AH protocol The Authentication Header (AH) protocol was developed in the early 1990s in the United States Naval Research Laboratory. This protocol ensures the security of the data source by authenticating IP packets. In this algorithm, using the sliding window method and deleting old packets and assigning a sequence number, the contents of the IPsec packet are protected against attacks such as replay attacks. In fact, with this technique, one can only be sure that the data packets have been sent from a reputable source and have not been tampered with.
In this case, both the upload and the header are encrypted. The term Tunnel is used instead of AH. All data is protected by HMAC. And only peer-to-peer points know the secret key made by HMAC and can decrypt it. And as mentioned, because headers are also encrypted and can not be changed in networks where NAT is done, the VPN service can not be used.
Integrity of submitted data Data source authentication Reject resended packages 2. IP Encapsulating Security Payload (ESP) The IP Encapsulating Security Payload (ESP) protocol was developed at the Naval Research Laboratory in 1992 as part of a DARPA-sponsored research project. The work of this protocol ensures data authentication through the source authentication algorithm, data integrity through the hash function, and confidentiality through IP packet encryption. ESP is used in settings and configurations that support either encryption only or authentication only. This is a weakness because it is unsafe to use encryption without authentication.
In this case, only the upload is encrypted and the headers remain the same without change. The term Transport is used instead of ESP. In this method, both parties must perform authentication operations and also the data is sent in encrypted form.
In fact, unlike the AH protocol, the ESP protocol in Transport mode does not provide integration and authentication for the entire IP packet. In Tunnel mode, where the entire original IP packet is located with a new packet header, ESP protects the entire internal IP packet (including the internal header) while the external header (including external IPv4 options or IPv6 extension) remains unprotected. They stay.
3. Security association IPsec protocols use a Security Association to create interconnected security features such as algorithms and keys. In fact, when the AH or ESP protocol is specified to be used, the Security Association provides a wide range of options. Before exchanging data, the two hosts agree on which algorithm to use to encrypt the IP packet. The hash function is used to ensure data integrity. These parameters are agreed in each session that has a specific life (time) and also a specific key must be specified for each session.
In how many modes can IPSec work? (Operation Modes)
IPsec AH and IPSec ESP protocols can be used in host-to-host transport mode as well as in network tunneling mode.
1. IPSec Transport Mode In transport mode, only the encrypted or verified IP packet and routing remain intact because the IP header is neither modified nor encrypted. However, when the authentication header is used, the hash value is invalidated and the IP addresses cannot be modified and translated with the Network address translation method. The Transport and Application layers are always secured with a hash, so they can not be modified in any way, even by translating port numbers.
2. Tunnel Mode or IPSec Tunnel Configuration In Tunnel mode, the entire IP packet is encrypted and authenticated. It is then categorized in a new IP packet with a new IP header. From tunnel mode to create virtual private networks for network-to-network communication (e.g. between routers to link sites), host-to-network communication (e.g. remote user access), and host-to-host communication (e.g. Private chat) is used.
Key management in IPSec protocol
IPSec is widely used in VPN technology for authentication, privacy, integrity and key management in IP-based networks.
IPSec establishes communication security within network equipment with the help of secure encryption services. For IPSec to function properly, both the sender and receiver must share a public key, which is achieved through the use of the "key management" protocol. This protocol allows the receiver to obtain a public key and authenticate the sender based on a digital signature.
2 notes
·
View notes
Text
Postgresql create database

Postgresql create database how to#
Postgresql create database install#
Postgresql create database upgrade#
An Azure resource group is a logical container into which Azure resources are deployed and managed. # to limit / allow access to the PostgreSQL serverĮcho "Using resource group $resourceGroup with login: $login, password: $password."Ĭreate a resource group with the az group create command. # Specify appropriate IP address values for your environment Server="msdocs-postgresql-server-$randomIdentifier" Tag="create-postgresql-server-and-firewall-rule" ResourceGroup="msdocs-postgresql-rg-$randomIdentifier" Use the public IP address of the computer you're using to restrict access to the server to only your IP address. Replace 0.0.0.0 with the IP address range to match your specific environment. Server names need to be globally unique across all of Azure so the $RANDOM function is used to create the server name.Ĭhange the location as appropriate for your environment. The following values are used in subsequent commands to create the database and required resources. or use 'az login'įor more information, see set active subscription or log in interactively Set parameter values subscription="" # add subscription hereĪz account set -s $subscription #. If you don't have an Azure subscription, create an Azure free account before you begin. Use the following script to sign in using a different subscription, replacing with your Azure Subscription ID. Sign in to AzureĬloud Shell is automatically authenticated under the initial account signed-in with. Subsequent sessions will use Azure CLI in a Bash environment, Select Copy to copy the blocks of code, paste it into the Cloud Shell, and press Enter to run it. When Cloud Shell opens, verify that Bash is selected for your environment. You can also launch Cloud Shell in a separate browser tab by going to. To open the Cloud Shell, just select Try it from the upper right corner of a code block. It has common Azure tools preinstalled and configured to use with your account. The Azure Cloud Shell is a free interactive shell that you can use to run the steps in this article.
Postgresql create database upgrade#
To upgrade to the latest version, run az upgrade. Run az version to find the version and dependent libraries that are installed. For more information about extensions, see Use extensions with the Azure CLI.
Postgresql create database install#
When you're prompted, install the Azure CLI extension on first use. For other sign-in options, see Sign in with the Azure CLI. To finish the authentication process, follow the steps displayed in your terminal. If you're using a local installation, sign in to the Azure CLI by using the az login command.
Postgresql create database how to#
For more information, see How to run the Azure CLI in a Docker container. If you're running on Windows or macOS, consider running Azure CLI in a Docker container. If you prefer to run CLI reference commands locally, install the Azure CLI. For more information, see Azure Cloud Shell Quickstart - Bash. Use the Bash environment in Azure Cloud Shell. Consider using the simpler az postgres up Azure CLI command.
0 notes
Text
Neorouter port forwarding 32976

NEOROUTER PORT FORWARDING 32976 PORTABLE
NEOROUTER PORT FORWARDING 32976 SOFTWARE
NEOROUTER PORT FORWARDING 32976 PLUS
I still need to do some real testing of it, so far I've just installed it and tested it within my home LAN, but so far I have to say I am pretty impressed indeed. The difference is that user accounts and authentication takes place on your router, not a 3rd Party server. If you've ever used the peer-to-peer VPN application Hamachi, now known as LogMeIn I think, then you will find that NeoRouter is very similar in how it operates.
NEOROUTER PORT FORWARDING 32976 PLUS
So you could allow one user access only to your shared folder, and a different user access to the shared folder plus VNC, etc. So you can do stuff like Wake-on-LAN, VNC/Remote Desktop, File sharing etc from one client to another - you can fine tune what services are enabled to each user and machine in the Console. This is the default behaviour - you can also set it so it does go via your router if you prefer that. So a file transfer from machine A to machine B will go directly - not via your router which is only used for authentication. The cool thing is not only can each computer log onto the server, they can also connect directly to each other (if you allow that). Those problems may be fixable, I need to test more.įor each remote computer that you enable access, you can define what services each user can connect to (FTP, SMB, VNC, etc). I tried changing it to 443, but had some problems and so reverted to the default port. The default port is 32976, and the server appears to automatically open the firewall (though I haven't tested remotely). I think you don't have to use this if you want, you could just use the server IP or your own dynamic address name. The clients just connect to a domain/username. The NeoRouter server appears to contain a built-in dynamic dns service hosted at that also stores the server port number, so when you change the server port you don't need to change it on the clients. NeoRouter Configuration Explorer aka Console - this is the administration app you use to setup user accounts, computers, server port and domain. There's also a version-update facility via a menu.Ģ.
NEOROUTER PORT FORWARDING 32976 PORTABLE
There's a portable version suitable for use on a USB key available. NeoRouter Network Explorer aka ClientUI - this is the VPN client app that you use to connect to the router. Basically there's two applications to use:ġ.
NEOROUTER PORT FORWARDING 32976 SOFTWARE
There is no specific GUI in the tomato router, but that's OK because you configure everything through the NeoRouter Console software - which is part of the NeoRouter server software on the downloads page (I'm using the Windows version). would be keen to hear from anyone who is able to try the current ND build they offer. I'm keen to try it, but think my router (Buffalo WHR-G54S) needs a non-ND build of Tomato, so am waiting for them to compile it before I can do so. If one or more clients are behind NAT or corporate firewalls, NeoRouter uses NAT traversal techniques to establish the direct connection." Each client computer maintains a control connection to the server and establishes direct P2P connections to other clients for data transfer. One of user's computers is designated as server to store user profiles and computer directory information, to handle authentication, and to mediate P2P connections among clients. "NeoRouter uses a hybrid peer-to-peer architecture. At least this is how I read it from here. one interesting feature is one vpn client can connect to another vpn client directly via P2P, with the server only being used for authentication. Not sure if it can do site-to-site as in 1 router to another router but.
0 notes
Text
Introduction How do I configure an instance of MS SQL Server Database Engine to listen on a specific fixed port? This guide will walk you through the process of configuring your SQL Server Database Engine to listen on a port that you choose using SQL Server Configuration Manager. Let us begin: Step 1: Open Configuration Manager Hit Windows Keyboard key and search for SQL Server Configuration Manager as shown in the screenshot below Step 2: Server Network Configuration Once SQL Server Configuration Manager is open, click on the drop-down list of SQL Server Network Configuration and choose “Protocols for [name of your SQLServer]”. That will reveal three options on the right panel as shown on the image below: Step 3: Unset Listen All Right-click on the TCP/IP and choose Properties which will pop a new TCP/IP Properties window as shown below. On the Window, there are two Tabs on the top left corner, that is Protocol and IP Address. Depending on which IP and port you would wish your Database Engine to listen on, the settings on the Protocol Tab will help you. By default, listening is set to All on the “Listen All” part. If you would wish specific IPs and Port to be used, set this value to No as shown below. Step 4: Change MS SQL Service TCP Port Click on IP Address Tab. Therein several IP addresses sections appear to be shown as IP1, IP2, up to IPAll. One of these is for the IP address of the loopback adapter, 127.0.0.1. In case you left “Listen” to “All” in the Protocol Tab, then head over to the IPALL section and set the TCP Port to your desired number and delete the 0 against TCP Dynamic Ports as shown below. Step 5: Configure Database Engine Port In case you set “Listen All” part to No, head over to IP1, change “Enabled” to “Yes“, type in the IP Address eg 10.20.2.29 here, delete the 0 in TCP Dynamic Ports and key in the Port you would wish the Database Engine to Listen from. Check the screenshot below for more visual details. After you are done keying in the necessary data, click Apply and OK. Step 6: Enable TCP/IP After the above steps are done, right-click on TCP/IP and select Enable as shown below. Step 7: Restart MS SQL Service Restart your MS SQL Instance. Hit Windows button and search for Services. Under Services, look for SQL Server (your_instance). Right-click on it and choose Restart. Your SQL Server is now listening on the Port you have specified. You only need to enable the port on Windows Firewall if it was not allowed yet.
0 notes
Text
Read to know all about firewalls.
A firewall is a piece of hardware or software that is used to protect a private computer or a network of computers. This security is achieved through the use of software, hardware, or both to allow only authorised traffic and to prevent unauthorised users from accessing private computers and networks.
A computer firewall is a type of cybersecurity tool. A firewall in a computer is used to protect information by detecting and blocking all unauthorised access attempts. Before proceeding, a beginner must understand the fundamentals of a firewall as well as how a firewall works. A router in your home is a simple example to answer the question, "What is a Firewall?" The Firewall in Windows 10 is an answer to the question, "What is a Firewall in a computer?"
There are various types of firewalls that can be installed based on the needs of the users. We will look at the various types of firewalls that are available.
Proxy Firewalls: These were among the first types of firewalls. One of the features of this Firewall is that it prevents outside networks from connecting directly to a computer. This Firewall serves as a gateway from one network to another for specific applications.
Packet Filtering Firewalls: This is the most basic type of firewall, and it is used to create a barrier at the router. The Firewall's operation is limited to checking the source and destination IP addresses without delving into packet details. This is an example of a Firewall from one of the oldest architectures.
Circuit level Gateways: This simple Firewall configuration works by examining the TCP handshake to ensure that the packet is coming from a legitimate source.
Stateful Inspection Firewalls: This is a different type of Firewall that combines the two methods mentioned above to create a more secure configuration.
Next-Generation Firewalls (NGFW): As threats grow, most larger companies are opting for next-generation Firewalls, which provide far more benefits than traditional Firewalls. These NGFW types include a plethora of high-end capabilities designed to provide top-tier Firewall benefits to large organisations with a higher risk profile.
Software Firewalls: A software firewall is a type of firewall that is installed on a computer The definition of a firewall is software that is installed on a device without the use of any additional hardware. This also answers the question of what firewall software is. In the case of stand-alone or individual computers, the question of whether Windows Firewall is sufficient may be legitimate. While Windows provides some basic protection, there is always a need for firewalls in the form of an anti-virus plus application.
Hardware Firewalls: Hardware Firewalls are devices that serve as the first line of defence, filtering data packets before they reach servers. The main disadvantages of hardware-based firewalls are that they are easily bypassed by insider attacks and that the hardware capabilities vary depending on the supplier.
These are some of the types of firewalls. The type that is appropriate for an organisation must be selected after careful consideration of all factors, including vulnerabilities
A firewall is mandatory in a business infrastructure as it protects a company’s network and computers from cyber threats and malicious network traffic. Cyber legend technologies LLC is the best Firewall Supplier in Dubai.
0 notes
Text
Block Little Snitch From Calling Home

Block Little Snitch From Calling Home Song
Little Snitch Block Calling Home Software
Little Snitch Crack
Block Little Snitch From Calling Home Run
Nov 23, 2009.How To Block Programs From Accesing The Internet- Mac. In this video I show you how to block programs from getting to the internet. How To Connect Two Routers On One Home. It has options to grab the entire list or grab new entries past a certain date. Just grab the output and copy/paste into Little Snitch. The script is written to block access to any process, any port. You can also delete those lines and it will only block Mail.
Here is a script to take the hosts from From http://pgl.yoyo.org/adservers/ and convert them to rules for Little Snitch.
It has options to grab the entire list or grab new entries past a certain date.
Zebralette vst free download. Feb 03, 2015 Download Zebralette (Synth) Windows/VST 32/64/AAX - Mac/AudioUnit 32/64/VST/AAX “Zebralette is just one of Zebra2’s oscillators packed into a simple, easy-to-learn framework – but you have everything you need to make some pretty amazing sounds. Apr 04, 2019 free vst plugins, free vsti, vst plugins download, vst download, vst free download, best Free VST, free effects, vst synth,free synth vst. FREE VST PLUGINS. FREE VST PLUGINS. VST Instruments. Drum machines. Zebralette is a hybrid synth. Zebralette has two LFOs (one per voice, one global), a multi-stage envelope and three on-board. A free synthesizer and an introduction to Zebra 2 ’s fantastic oscillators. Perhaps it will persuade you to try Zebra 2 and upgrade. If one oscillator is this powerful, imagine what you can achieve with four and all the other great features available in Zebra 2. Zebralette is included with the Zebra 2 download and is installed at the same.
Just grab the output and copy/paste into Little Snitch.
The script is written to block access to any process, any port.You can also delete those lines and it will only block Mail.Or use the options to enter any process, port or protocol you want to block.
Installation: Copy the text generated by the output from a plaintext editor into LittleSnitch Rules
Save the script in your home directory, I called mine getadblock.sh.

Make sure to make it executable:
chmod +x getadblock.sh Cooking fast game download.
Output looks like:
File - GetAdblock.sh
Run Command
Little Snitch is a popular Mac app that detects outbound connections and lets you set up rules to block those connections. Once installed, Little Snitch monitors your internet traffic and every time it detects an outbound connection, for example, Adobe Reader trying to access the internet, it pops up a window and ask you if you want to allow the connection one time, or make a rule to allow Adobe Reader to access the Internet but just not go to adobe.com
In short, Little Snitch is one of the best apps, to keep an eye on your Mac’s Internet connections. But, do we really need an alternative? Well, for starters, it costs you over $40 and upgrades are extra. This alone can be a reason to look for alternatives that cost nothing or at least relatively cheaper than Little Snitch.
So here are some alternatives to Little Snitch for Windows and macOS. Let’s start with Mac first.
Read: The Best WiFi Analyser For Mac
Little Snitch Alternatives for Mac
1. Murus Lite
Mac’s own firewall comes with one of the best features available in network firewalls called the PF (packet filter). However, for some users, it may seem a little complex to use and this is where Murus comes in the picture.
Murus brings the PF feature of a firewall in an intuitive, drag & drop based interface that lets you define your own rule set and control the network permissions on your mac. What makes it different from the existing inbuilt firewall? Well, here’s the catch. Common firewalls like Mac’s own PF, restrict and monitor the inbound and outbound network traffic based on attributes like IP address, ports, protocols etc. and by restricting the network functions itself, it affects all the applications. Murus, on the other hand, helps to use PF feature to convert the network firewall into an application firewall wherein you can allow or restrict movement of data packets for each application individually which even helps in restricting spreading of virus, worms or data leak by an application.
Price: Murus comes in three versions: Murus Lite (Free), Murus Basic ($10), and Murus Pro ($17). While Murus lite is the free version of the application, Murus Basic and Murus Pro are the paid versions that come packed with some extra features like logs Visualizer, Vallum, and all companion apps.
Check it out here: Murus
2. Radio silence
Radio Silence is yet another application to control your app specific firewall functions. It has one of the simplest interfaces which allows you to keep a tab on applications. Softwares that try to connect with a remote server outside the user’s control are blocked instantly. The Firewall has its eye on the incoming traffic, Radio Silence does the opposite and looks for outgoing traffic too.
Little Snitch vs Radio Silence
Initially, Little Snitch gives you too many notifications about connection, which may feel overwhelming to some users. Although, it goes away after few weeks of usage.
Radio silence, on the other hand, is quite silent in the functionality as it runs in the background. without any active tabs, icon display or pop-ups. Once you block an app with Radio Silence, it stays blocked, there is no notification or pop-ups, ever.
Price: Radio Silence costs around $9 and comes with a testing trial of 30 days. You get your money back if it doesn’t meet your expectations. There’s also a 24-hour free trial available for those who want to test this software’s limits in a single stretch.
Check out: Radio Silence
3. Private Eye
Private Eye, a real-time network monitoring application that allows monitoring of your live connections made by an application. The app also indicates the presence of an online server where such information is being transmitted.
It displays all attributes of the live connections that the applications in your system have to the web like the time of connection and the IP address of the server connected to.
Although you can filter and view the results by application or by incoming and outgoing traffic, Private Eye doesn’t have the power to alter any of these connections. You get just enough information to know when an app connects to a server without authorization.
Price: Private Eye is a free application.
Check out: Private Eye
4. Hands off
Hands off is one of the most trusted applications and alternative to Little Snitch when it comes to network privacy. It is also an all-rounder application that gives protection both as the network firewall and application-specific firewall. It controls both inbound and outbound traffic of an application.
Read: See What Others Are Browsing on Your WiFi
Hands off is a little different from other similar applications. It protects and monitors the disk access, and giving an intuitive and user-friendly interface. This app monitors and blocks access to the files stored in your system from online servers and also from the local applications. It prevents the applications from seeking IP address, accessing disk data, erasing disk data, and even storing cookies. Its disk management is so strict that it even controls the read and write permissions of the disk data files even if the applications have access to the files but the interface and usage come in handy.
Price: Hands Off is otherwise an expensive application ($49) but can be tried and tested for free with limited functionality. The advanced functions of the application are accessible in the paid version. The tutorial file that tags along with the application setup is informative.
Check out: Hands Off
5. TCPBlock
TCPBlock is by far the lightest application based firewall available for mac and is absolutely free. It also monitors and protects both inbound and outbound traffic on your mac and can prevent certain applications from opening network connections to unknown servers while you are online.
Block Little Snitch From Calling Home Song
TCPBlock is implemented as a loadable kernel module which contains all the blocking logic. You can configure it in the System Preferences > TCPBlock preference pane or with the TCPBlock command line utility. All the configuration changes are made in a configuration file on the hard disk of your mac.
Price: Although TCPBlock has discontinued from the market, its previous versions are still available to download for free. It requires only 1.1 MB of your disk space. TCPBlock has the best reviews that an application can get and is still one of the favorites amongst the users. The only catch in using the available version of this application is turning off the SIP (System Integrity Protection). SIP when deactivated, allows third-party applications to run on your mac.
Check out: TCP Block
6. Security Growler
Little Snitch is still hands-down the best connection alerting software available for Mac, we suggest to check it out if you want a comprehensive firewall/alerting system, and are willing to pay a few bucks to get it. Security Growler, on the other hand, is centered around monitoring log files for any kind of pattern. It doesn’t just monitors the TCP connection table but also alerts you of Sudo events, Keychain authorization events, and anything else you can think of that’s reported to a log file.
This app is significantly more lightweight than Little Snitch, it comes in at <15MB of RAM used, simply because it aims to solve a simpler problem than Little Snitch. This application is not designed to prevent malicious connections, that’s what firewalls are for, it’s just meant to keep an unobtrusive log, and alert you whenever important security events are happening. The more informed you are, the better you can protect yourself.
Security Growler is a menu bar based application that sends you notifications whenever one of its monitored patterns have a log update. One thing that sets it apart from other applications, Prowl which sends you notifications over your iPhone and iPad.
Check out: Security Growler
7. LuLu
LuLu by Objective see is another popular opinion amongst Mac users who wish to keep a check on their system’s network activity. The reason for its popularity is because the software is open source, has no ads whatsoever, and comes with all features.
LuLu aims to block all unauthorized outgoing connections unless you specifically allow them. You can choose to allow local or third-party apps and services from the separated menu available. The app interface is pretty simple yet extensive and its operations are so simple that even a child could use it.
When you first install the app you can choose to allow or disallow Apple programmes and previously installed third-party apps. These settings could be later changed from preferences. Under the ‘rules’ head, you can select the services and apps you wish to block from using network services. The app even has a passive mode where it will allow all new apps and still work in silence for the previously installed apps.
Check Out: LuLu by Objective See
Little Snitch Block Calling Home Software
Little Snitch Alternatives for Windows
While there is no true alternative to Little Snitch in Windows, we found two applications that came close.
Little Snitch Crack
8. Glasswire
GlassWire is quite a simple app which allows you to monitor changes in the system like microphone, webcam or apps in general. It also comes with a firewall feature just like Little Snitch, however, it isn’t that powerful. For example, Little Snitch can allow or refuse to authorize the specific domain and ports of an application trying to access a server online. GlassWire on the other hand only allows or block all connections an application attempts to initiate. There is no option to make specific rules for an app in Glasswire.
Read: 5 Best Network Monitoring Tools for Windows
Price: Glasswire follows the freemium model, The free version of Glasswire shows you which program is connected to which IP address. Although, the paid version of Glasswire has “ask to connect” feature, which gives you a pop-up when an app attempts to make a connection.
Check out: GlassWire
9. Net Limiter
Compared to Glasswire, Net Limiter is a similar alternative to Little Snitch on Windows. Once installed, the app shows you the list of all apps that are making connections to the internet along with their present download and upload speed. You can block network connectivity on individual programs or even restrict how much bandwidth a particular app gets.
Block Little Snitch From Calling Home Run
Price: Net Limiter is a paid app that cost $29, however it comes with a full 30 days trial.
Check out: Net Limiter
Little Snitch Alternatives
So, these were some of the free and paid alternatives to Little Snitch. It would be nice if Apple would build such detailed functionality into macOS, but they won’t do it for as simple a reason that it’s too hard to use for a regular mac user. So, you can either spend a few bucks and buy little snitch, or use these alternatives, whatever you use, let us know your thoughts and experiences in the comments. And if you ask my opinion, I’d suggest LuLu because of its intuitive UI and simple controls.
0 notes
Text
Filezilla Server Service

Files.com Cloud – FREE TRIAL. Files.com give you a awesome cloud tool that allows your company.
Here is your guide o FileZilla server setup configuration on Windows Server 2019. We go over how to enable TLS, configure passive mode, create a user and a g.
Logging in FileZilla Server. FileZilla Server, like the client, includes two means of logging, screen and file log. As FileZilla Server is split in two parts (service and administration interface), the screen log won't work if the admin interface isn't running, for example if no user is logged on. FileZilla is an FTP program for file uploading and downloading to and from your FTP site, server, or host. The program lets you transfer files and navigate among folders, Web sites, and your computer.
Filezilla Server is a free and open source software that allows you to create your own FTP server in a few simple steps. It can be said that it is the server counterpart of the well known FTP client application Filezilla.

Filezilla Server supports both FTP and FTPS (SSL/TLS), can be installed on any Windows system, and provides a file upload and download service, using any FTP client or backup software.
See also:How to make an incremental FTP backup (upload) with Iperius
In this short tutorial, we will show how easy it is to install and configure our FTP server with Filezilla.
First of all, let’s download the setup from the official website: https://filezilla-project.org/download.php?type=server
Start the setup and proceed with the following steps:
Select the components to be installed as shown in the image above.
Proceed to the next step, where you can find the following important configuration:
We recommend leaving the default settings for starting the service. FileZilla server will be installed as a Windows service and will then start in the background each time the machine is started. This option is obviously necessary when you’re installing FileZilla on server systems. As for the port for the FTP server administration panel, you can use the default number or specify a different one for security reasons. You can use any port number that is not already in use, for example 8387 (note: this is not the FTP port, but the port for FTP server administration).
Leave the option checked to start the server after the installation completes.
In the next screen, set up to start the FTP server management interface manually (otherwise it will start at each user logon). Leave the option checked to start the management interface as soon as the installation is complete.
Click now on the “Install” button to complete the installation. Once the installation is complete, the management interface will be immediately opened, as you can see in the image below:
The FTP server service at this point will have already been started, so through this interface you can connect to it to configure the server parameters. Since this is the local machine, you can leave “localhost” and specify the port (here you can see the default one, otherwise you have to specify the one you chose during installation). You can leave the password empty, because by default it is not set, and click on “Connect”.
Filezilla Server For Mac
So let’s move on to the basic configuration of the FTP server, which will allow you to immediately perform an upload test of some files.
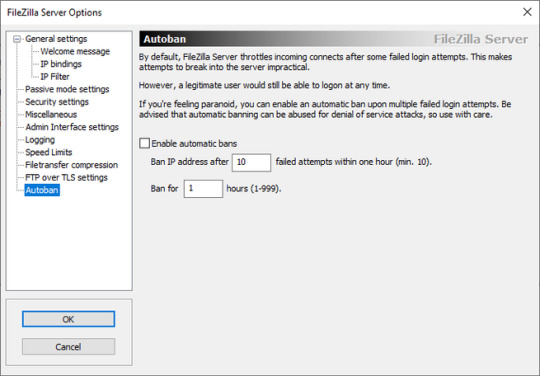
Click on the button to open the general preferences, then set the FTP connection port. The default one is 21.
If you want to use this FTP server to offer a public service, you may need to block some unwanted IP addresses, or to restrict the connection only to certain IP addresses. Let’s see this setting in the image below:
If you do not want to allow incoming connections on all ports or if your FTP server is behind a NAT router (so to allow connections from outside your network), you need to tell FileZilla Server to use a specific range of ports for passive-mode connections. These ports must then be opened on the firewall. If you have a NAT router, you need to forward these ports to the local machine where FileZilla Server is installed. Depending on the router model, you can forward a range of ports or you must forward all ports individually.
Valid ports can be between 1 and 65535, but ports below 1024 are reserved for other protocols. It is better to choose ports >= 50000 for FTP in passive mode. Due to the nature of TCP (the underlying transport protocol), a port can not be reused immediately after each connection. So the range of ports should not be too small or the transfers of multiple small files can fail. In most cases, a series of 50 ports should be sufficient. Let’s see the simple configuration in the following image:
If you do not want to allow connections to your FTP server from the Internet, and therefore for use it in the local network only, you can ignore these passive mode settings.

In the options related to the administration panel, you can set some important configurations, including the connection port, a password, and a possible restriction only to certain IP addresses:
Another interesting possibility is the bandwidth limitation (Speed Limits), ie the maximum speed allowed for upload and download. This can be very useful if you host the FTP server in your network and do not want any large file transfers to saturate the entire internet band.

Finally, there are also the FTP over TLS options, which are the security options to enable FTPS connections. In order to do this, we clearly need to purchase a certificate (you can do that at GeoTrust, DigiCert, GlobalSign, Symantec, Thawte, etc.). As you can see in the image below, if you want to enable this option, you need to specify the certificate file and password:
You can find useful guides for this configuration also at the companies from which you can buy the certificate, like this: https://www.digicert.com/ssl-certificate-installation-filezilla.htm
We have therefore concluded our overview of the main Filezilla Server settings. Now we can proceed to another important configuration, namely the creation of a user account for the connection and the folder where the files will be saved on the server.
Open the user management as shown in the image below:
Filezilla Server Service Not Starting
Click on “Add” and specify a username. You can create groups before and assign each user to a specific group. In this case we do not specify any groups.
As soon as the account is created, you need to set its FTP password:
Then click on the item “Shared folders”, to set in which folder the FTP server must save the files sent by this user:
The selected folder will be the home directory of the user’s FTP space. In the image below you can see how it is therefore necessary to set all the permissions, to allow the user to manage in the most complete way the files in his space. Writing permission is obviously essential to allow uploading:
Click on “OK” to save the user and his configuration.
Filezilla Server Download

Now one last major configuration remains to be made in the system to allow connections to this server, ie we need to open the FTP port on the Windows firewall (or on other firewalls if necessary). Here we have chosen the default port, 21, but it can obviously be any other port.
At this point you can already connect to the FTP server, using the IP address of the machine where you installed Filezilla Server and the credentials of the user account you created. Recall that if you are in a local network it is not necessary to use the passive mode. To connect you can use any FTP client like Filezilla, WinSCP, Cyberduck, etc., or use the FTP client integrated in Iperius Backup.
An FTP server inside you network, on a dedicated machine, can be used to perform network backups safely, quickly and protected from ransomware viruses. In fact, you can have a better security level than simple shared folders, better manage the data transfer bandwidth, allow access only to specific IP addresses and better manage user permissions. For FTP backup you can certainly use Iperius Backup, as shown in this tutorial.
(Italian, French, German, Spanish, Portuguese (Brazil))
0 notes
Text
Vpn Free Download For Mac

4/5(7votes )
Free Vpn Download For Mac Reddit
Free Vpn Download For Mac 10.6.8
Vpn Free Download For Macbook Air
Best Free Vpn For Mac
Best Free Vpn For Mac Download
On MAC we use OpenVPN® Protocol which ensures maximum security and speed! Urban VPN for MAC is optimized for privacy, high speed, unlimited bandwidth and a secure connection to hide your IP. On top of that, it's completely free! Try Urban VPN. Mac users interested in Osx 10.6.8 vpn generally download: VPN Unlimited 7.9 VPN Unlimited is a Mac utility designed to help you protect your privacy while browsing the web. Because Opera's browser VPN is built right in, you are able to use it immediately and don't need to download a VPN extension. Get Opera's easy to use browser VPN free of charge when you download the Opera browser. To enable VPN in Opera: Go to your Settings (Alt+P). Select Advanced in the left sidebar, and click Features. Under VPN, toggle on.
Do you want to access Netflix, BBC iPlayer, Hulu and many more country-specific apps and website? In that case, you need a reliable Virtual Private Network Service such as VPN 360.
With this VPN app, you can access these websites and apps. This is also very important for the people who love to travel abroad and wanted to use the same platform they are using from their respective homes.
App for macbook pro. Portable monitors are still fairly expensive (and bulky), luckily, though, you can use an iPad instead using a nifty app called Duet. Just realize that the bandwidth isn’t quite what you would get with one of the, so it can be a bit laggy when you bump the quality up. Price: £14.99 (around $20 or AUS$25)If you’re anything like us, working on just one monitor or screen is just painful. But it’s still better for watching videos, reading websites and typing up documents. Developed by ex-Apple engineers, it works by tethering your iPad to your Mac using one of Apple’s Lightning cables and firing up the app on both devices.You can then drag apps and windows onto your iPad’s screen just like you would with a second monitor, and if you have a more recent iPad with a Retina display, you’ll get the full benefit of all those beautiful pixels.
VPN 360 is very essential because your network will be protected whenever you are connected to it. You can prevent yourself from getting hacked because this app will encrypt the connection between you and the website you are accessing.
Whenever you use it, the following that we provided were not the only benefits of this application. The other benefits of this VPN apps are to hide your IP address from outside network. That’s why you can access a country-specific blocked website.
It is also beneficial for people who love to use facebook, youtube or any other social networking app without anyone knowing that you are surfing from these websites. With this feature, you can expect your connection to be anonymous and secured, giving you complete privacy online.
Free Vpn Download For Mac Reddit
This VPN app will also let you ignore strict firewall rules from their switch or routers. Allowing you to enjoy accessing websites that you wanted.
Since VPN 360 have a lot of advantages and benefits, most of you wanted to use it on a computer. But the problem is, no version was released for the Windows and Mac OS. But there’s a trick that will let you run VPN 360 for PC so continue reading this whole article.
How To Use VPN 360 App On PC
If you are one of the people who are looking for a way to install and use the VPN 360 app, then you must follow our simple guidelines that you can see below. Make sure that your computer has enough resources such as free disk space and RAM.
To get this app working, we are going to use a tool for emulating the Android Operating System like BlueStacks. With this software, you can almost download and run all games and apps on your computer as long as it is based on Android. This means that you can also use the VPN 360 on PC using this tool.
You Might Also Like: Kiwi VPN Free For Windows And Mac
Steps To Download And Install VPN 360 For PC
First, make sure that you have an internet connection and then go to the website of BlueStacks emulator. This is required for running VPN 360 app so this is the only choice for now.
The second step is to download and then install it to your computer or laptop. Make sure that you download the installer for the Operating System that you are using, for example, if you are using Windows OS, then get the Windows version, else, Mac version.
The third step is to accept all of its terms and condition and then click next to continue the installation of BlueStacks emulator for your PC.
The fourth step is to enter your Google account ID from the PlayStore since you need it in order to install VPN 360 on your PC. Wait for the set up to finished and when it does you can proceed to the next step.
Next, you need to download the app that you wanted to install, use the search function and then look for the VPN 360 using the search function. You can click the install button after you found it.
Installing this will finally allow you to run VPN 360 app on PC. So go ahead and open the app after the installation. This is the most simple way of installing this app on your computer but if you want to use an alternative way of installing VPN 360, you skip the PlayStore activation.
Must Download: Free Download VPN Melon For PC – Windows & Mac
Installing VPN 360 App Using The APK Installer
If you don’t like to provide your Gmail ID, that is also fine. So, the first thing you need to do is to get the installer file and look for Google.
Run the BlueStacks emulator and hover your mouse to the triple-dot located at the upper left side of the emulator. Now click install apk so that you can add the APK of VPN 360 that you have downloaded recently.
This will start the BlueStacks to run this application and finally start using the VPN app on your PC. However, this method has a small drawback. The APK file does not automatically update itself so to get the latest version, you need to download it again.
Installation Of VPN 360 App With Nox Emulator
Free Vpn Download For Mac 10.6.8
If you wish to try a different emulator, you can also check NoxPlayer for running Android-based software. To make the VPN 360 works on your computer, follow the installation procedure below:
Download the NoxPlayer from its website which you can access from here. That link will direct you to its one and only official website.
Run the setup file of NoxPlayer and configure it.
Wait until the set up completed and then enter your account of Google.
Open PlayStore and search for the VPN 360 app.
Install and wait for it.
Go back to Home and then click the icon of VPN 360. Now you can enjoy using this app on your PC.
Also Check: Free Fast VPN Service
Conclusion
VPN 360 is beneficial and one of the best apps that you can use for free. They also offer a premium version that will provide you a faster connection and more option for choosing a server location. Thanks for the emulator without it, we cannot run the VPN 360 for PC.
Download And Install AIMP For Windows PC Or Mac - October 28, 2020
How To Download And Install Endoscope App For PC - October 27, 2020
BYJU’S On PC – How To Install On Windows 7/8/10 - October 23, 2020
Privacy is major concern and with increasing heinous cybercrimes, one has to be very careful while browsing Internet. To keep your online privacy intact and access websites blocked in your country, you can use VPN. With VPN installed on your Mac, you can hide your IP address and access blocked content easily.
VPN expands the horizon and expose you to wide variety of content, which you couldn’t access in your area. Moreover, it is an excellent tool which you help you to maintain privacy and anonymity when surfing the web. Most VPN are available at a minimal cost but if you are looking for a VPN app, we will help you with that. Before that, you need to know what a VPN does and how to choose best free VPN for Mac?
What A VPN Does & How To Choose Best Free VPN For Mac?
VPN acts much like a firewall and it enables users to safely access private network and make it easy to share data remotely via public networks. Mostly VPN services takes help of a desktop application that runs in background encrypting your data when browsing web. However, this is not the ultimate solution to protect your privacy, but just a part of it. Before choosing a free VPN for Mac, you need to consider a few things. Some of them are free bandwidth, major locations, P2P, ad blocking and more. We have listed some of the best VPN services for Mac, have a look!
1. CyberGhost VPN
CyberGhost VPN a complete VPN solution that allows you to access blocked site, stream sport events, play region locked games and more. Let’s look at the features of CyberGhost VPN:
Connects you with everything keeping privacy intact
It hides your Wi-Fi address, to make online browsing secure.
Protects your online identity guards and secures your banking transaction.
One tap protection to encrypt data transfer.
Automatically connects you with the best matched server based on the location.
Lets you enjoy your Internet without any restriction.
CyberGhost VPN provides 24/7 customer support via live chat.
2. Surfshark
Surfshark is a secure VPN that provides private access to open Internet. This VPN encrypts all Internet traffic shared between devices. Plus, users IP address is also hidden so that nobody can track your online activity. Let’s look at the features of the Surfshark in detail:
It gives a clean browsing experience by blocking ads, malware and more.
It allows specific apps and websites to bypass the VPN.
It comes with AES 256-GCM encryption to safeguard personal information from hackers and third parties.
It offers camouflage mode so that no one including your Internet provider can’t identify that you are using a VPN.
3. Nord VPN
Nord VPN is one of the best free VPN for Mac as it provides secure and private network. Let’s look at the features of Nord VPN:
It protects you while on public Wifi networks, annoying ads, secure your online activity from malware and other cybercrimes.
It enables you to secure up to 6 devices with single Nord VPN account.
It lets you enjoy your Internet with no boundaries, no matter where you travel.
It secures your IP address so that nobody can track which websites you surfed and what files you downloaded.
Nord VPN comes with excellent customer service which are always ready to support every hour of the day
4. HotSpot Shield
HotSpot Shield is a secure VPN which comes with ultra-fast VPN servers which comes with military grade encryption. Let’s look at the features of Hotspot Shield:
It supports all platforms, so you can download Hotspot Shield and access on whichever device you want.
You can get secure access to Internet without being hacked or tracked.
It hides your IP address, physical location of VPN server.
Hotspot Shield VPN doesn’t log your browsing activity, so your ISP can’t keep a track of websites or apps that you use.
HotSpot Shield comes with Kill Switch protection which protects your identity if the connection is lost for some time so that you are not vulnerable even for a second.
5. TunnelBear
TunnelBear is a secure VPN that works well and provides private connection to less restricted Internet. With this free VPN, you can hide your IP address and location from websites, ads and hackers. Let’s look at the features of the TunnelBear in detail:
It comes with AES 256-bit encryption which safeguards your personal information from third parties and hackers while using public Wi-Fi.
It makes accessing emails, domestic news, favorite sites whilst travelling abroad.
It limits advertisers from tracking your online activities.
You get to stream faster with TunnelBear VPN and also you can avoid getting tracked by ISP.
TunnelBear is one of the best VPN software for Mac as it doesn’t log any activity of its customers and keep the privacy intact. You can also use TunnelBear against VPN blocking with Ghostbear feature as it makes your VPN data less prone to detection to ISPs, governments or others.
6. Express VPN
Express VPN is a high speed, easy to use and setup which makes best vpn for MacOS. It is secure & anonymous which makes it easier to keep you off the radar of hackers and privacy intruders. Let’s look at the features of Express VPN:
It helps you to unblock the websites and apps across 94 countries.
It has a huge network of more than 2000 global VPN servers with faster connections, unlimited bandwidth.
You can use Express VPN service for Mac, iOS, Windows, Linux and Android.
It lets you stream or download anything from anywhere in the world without revealing IP address to intruders.
Express VPN comes with 256-bit AES encryption, kill switch, DNS/IPv6 leak protection, and split tunneling. It comes with 148 VPN server locations in 94 countries with unlimited server switches.
7. VYPR VPN
VYPR VPN is one of the best VPN services for Mac which gives you Internet privacy and freedom to browse any site without any intrusion. Let’s have a look at the features VYPR VPN:
It offers OpenVPN, Chameleon, PPTP and L2TP/IPsec, so you can choose your preferred level of speed, encryption and protection.
It lets you connect to any VyprVPN server without any limitations, server switching apps, and download caps.
Vypr VPN offers more than 70 server locations across six continents.
When you connect to VyprVPN, your ISP can only see encrypted traffic.
Vypr VPN has NAT firewall to provide an extra layer of security. It has a support team which works 24*7*365 to help you via email or live chat.
8. Hide me
Hide me is one of the best VPN software for Mac if you want to maintain your anonymity and encrypts your connection. Let’s take a look at the features of Hide.me:
It has more than 150 dedicated gigabit servers through Europe, The United States and Asia so that you can access websites securely.
me manage and create without logging user data or activities. So, your information never goes to third party.
It has various VPN protocols such as PPTP, SoftEther, SSTP, L2TP/IPsec, OpenVPN and IKEv2
It comes with AES 256-bit encryption with 8192-bit keys.
Hideme works on MacOS, Windows, iOS, Android, Routers, Linux, Smart TVs, and Consoles. It provides you complete protection against IPv6, IP leaks and DNS leaks.
9. Private Tunnel
Private Tunnel is one of the best free VPNs for Mac which comes with more than 50 VPN servers over 23 regions in 12 countries. Let’s take a look at the features of Private Tunnel:
It masks your public IP address and encrypt connections to protect your privacy.
It protects your network from online threats, reducing cyber-attacks, spoofing & DDoS attacks.
It connects your devices to unrestricted access to websites and information.
It provides 24*7 customer support online via ticketing system and chat support.
Private Tunnel comes with AES encryption, AES block size makes it less prone to attacks than others. It encrypts traffic, secure connections on Wifi HotSpots as well.
10. Windscribe
Windscribe is a secure VPN which unlocks all locations and comes with config generator. It secures your identity by hiding your IP and timestamp. Let’s look at the features of Windscribe:
It has larger network which comes with server in over 55 countries and 100 cities.
It has strongest encryption which has AES-256 cipher with SHA512 auth and a 4096-bit RSA key.
It helps you generate OpenVPN, SOCKS, and IKEv2 config for all your devices.
It blocks all connectivity outside the tunnel to avert all types of hacks and leaks.
With this VPN, your computer becomes a secure Wi-Fi router. You can change your time zone and access the websites blocked for your location. Windscribe blocks ads and trackers to ditch the hackers.
Vpn Free Download For Macbook Air
11. Speedify
Best Free Vpn For Mac
Speedify is yet another best free VPN for Mac which comes with bonding technology, which enables you to use multiple Internet connections concurrently to get maximum speed. Let’s take a look at the features of Speedify:
Best Free Vpn For Mac Download
You get better streaming, live broadcast without throttled Internet connection.
You can set preferences rules for all the Internet connections individually to monitor usage.
The server network covers 28 countries so that you get better connection on the basis of availability and latency.
This VPN also improves latency, reduce lag for faster gameplay and trustable performance.
It uses a ChaCha- or AES-based encryption algorithm, depending on device support to provide security. Speedify has no log VPN policy so nothing is traced or tracked back.
Is a Free VPN the Right Solution for Your Mac?
There are plenty of free VPNs in the market however, not every one of them work well on your Mac. You have to be very careful with free VPNs as they come with restrictions such as limited data transfer, pop-up ads, slow speeds and more. Although, there are other harms of using it such as planting trackers, intruding your security and privacy.
Therefore, we have listed some of the safest and free unlimited VPN for Mac to help you maintain your anonymity and surf online without any restrictions and worries.
0 notes
Text
Scan For All Mac Address On Network

How would you communicate with a device when you don’t have the IP?
Mac Address Changer
Mac Address Scanner
Advanced IP Scanner. Reliable and free network scanner to analyse LAN. The program shows all network devices, gives you access to shared folders, provides remote control of computers (via RDP and Radmin), and can even remotely switch computers off. It is easy to use and runs as a portable edition. It should be the first choice for every network. This command will scan your network from 192.168.0.1 to 255 and will display the hosts with their MAC address on your network. In case you want to display the mac address for a single client, use this command make sure you are on root or use 'sudo' sudo nmap -Pn 192.168.0.1 this command will display the host MAC address and the open ports.
You might be in a situation where you don’t have the IP address of a device in a local network, but all you have is records of the MAC or hardware address.
Or your computer is unable to display its IP due to various reasons, and you are getting a “No Valid IP Address” error.
Finding the IP from a known MAC address should be the task of a ReverseARP application, the counterpart of ARP.
But RARP is an obsolete protocol with many disadvantages, so it was quickly replaced by other protocols like BOOTP and DHCP, which deal directly with IP addresses.
In this article, we’ll show you how to find IPs and device vendors using MAC addresses with different methods for free.
Understanding ARP
ARP (Address Resolution Protocol) is the protocol in charge of finding MAC addresses with IPs in local network segments.
It operates with frames on the data link layer.
As you might already know, devices in the data link layer depend on MAC addresses for their communication.
Their frames encapsulate packets that contain IP address information.
A device must know the destination MAC address to communicate locally through media types like Ethernet or Wifi, in layer 2 of the OSI model.
Understanding how ARP works can help you find IPs and MAC addresses quickly.
The following message flow diagram can help you understand the concept:
The local computer sends a ping (ICMP echo request) to a destination IP address (remote computer) within the same segment. Unfortunately, the local computer does not know the MAC address… it only knows the IP address.
The destination hardware address is unknown, so the ICMP echo request is put on hold. The local computer only knows its source/destination IP and its source MAC addresses. ARP uses two types of messages, ARP Request and Reply.
The local computer sends an ARP REQUEST message to find the owner of the IP address in question.
This message is sent to all devices within the same segment or LAN through a broadcast MAC (FF:FF:FF:FF:FF:FF) as the destination.
Because the remote computer is part of the same network segment, it receives the broadcast message sent by the local computer. All other computers in the LAN also receive the broadcast but they know that the destination IP is not theirs, so they discard the packet. Only the remote computer with destination IP, responds to the ARP REQUEST with an ARP REPLY, which contains the target MAC address.
The local computer receives the ARP REPLY with the MAC address. It then resumes the ICMP echo request, and finally, the remote computer responds with an ICMP echo reply.
Finding IPs with ARP
You can use ARP to obtain an IP from a known MAC address.
But first, it is important to update your local ARP table in order to get information from all devices in the network.
Send a ping (ICMP echo reply) to the entire LAN, to get all the MAC entries on the table.
To ping the entire LAN, you can send a broadcast to your network.
Open the Command Prompt in Windows or terminal in macOS and type.
ping 192.168.0.255
My subnet is 192.168.0.0/24 (mask of 255.255.255.0), so the broadcast address is 192.168.0.255 which can be calculated or found with a “Print Route” command in Windows or a “netstat -nr” in macOS. Or can also be obtained with a subnet calculator.
For Windows:
Step 1.
Open the CMD (Command Prompt)
Go to the “Start” menu and select “Run” or press (Windows key + R) to open the Run application
In the “Open” textbox type “cmd” and press “Ok”.
This will open the command-line interface in Windows.
Step 2.
Enter the “arp” command.
The arp command without any additional arguments will give you a list of options that you can use.
Step 3.
Use the arp with additional arguments to find the IP within the same network segment.
With the command “arp -a” you can see the ARP table and its entries recently populated by your computer with the broadcast ping.
Step 4.
Reading the output.
The information displayed in the arp-a is basically the ARP table on your computer.
It shows a list with IP addresses, their corresponding physical address (or MAC), and the type of allocation (dynamic or static).
Let’s say you have the MAC address 60-30-d4-76-b8-c8 (which is a macOS device) and you want to know the IP.
From the results shown above, you can map the MAC address to the IP address in the same line.
The IP Address is 192.168.0.102 (which is in the same network segment) belongs to 60-30-d4-76-b8-c8.
You can forget about those 224.0.0.x and 239.0.0.x addresses, as they are multicast IPs.
For macOS:
Step 1:
Open the Terminal App. go to Applications > Utilities > Terminal or Launchpad > Other > Terminal.
Step 2:
Enter the “arp” command with an “-a” flag.
Once you enter the command “arp -a” you’ll receive a list with all ARP entries to the ARP Table in your computer.
The output will show a line with the IP address followed by the MAC address, the interface, and the allocation type (dynamic/static).
Finding IPs with the DHCP Server
The Dynamic Host Configuration Protocol (DHCP) is the network protocol used by TCP/IP to dynamically allocate IP addresses and other characteristics to devices in a network.
The DHCP works with a client/server mode.
The DHCP server is the device in charge of assigning IP addresses in a network, and the client is usually your computer.
For home networks or LANs, the DHCP Server is typically a router or gateway.
If you have access to the DHCP Server, you can view all relationships with IPs, MACs, interfaces, name of the device, and lease time in your LAN.
Step 1.
Log into the DHCP Server. In this example, the DHCP server is the home gateway.
If you don’t know the IP address of your DHCP Server/ Gateway, you can run an ipconfig (in Windows) or ifconfig (in macOS/Linux).
This particular DHCP Server/Gateway has a web interface.
Step 2.
Enter the IP address on the search bar of the web browser, and input the right credentials.
Step 3.
Find the DHCP Clients List.
In this TP-Link router, the DHCP Server functionality comes as an additional feature.
Go to DHCP > DHCP Clients List. From this list, you can see the mapping between MAC addresses and their assigned IPs.
Using Sniffers
If you couldn’t find the IP in the ARP list or unfortunately don’t have access to the DHCP Server, as a last resort, you can use a sniffer.
Packet sniffers or network analyzers like Nmap (or Zenmap which is the GUI version) are designed for network security.
They can help identify attacks and vulnerabilities in the network.
With Nmap, you can actively scan your entire network and find IPs, ports, protocols, MACs, etc.
If you are trying to find the IP from a known MAC with a sniffer like Nmap, look for the MAC address within the scan results.
How to find the Device and IP with a Sniffer?
Step 1.
Keep records of your network IP address information.
In this case, my network IP is 192.168.0.0/24. If you don’t know it, a quick “ipconfig” in Windows cmd or an “ifconfig” in macOS or Linux terminal can show you the local IP and mask.
If you can’t subnet, go online to a subnet calculator and find your network IP.
Step 2.
Download and open Nmap.
Download Nmap from this official link https://nmap.org/download.html and follow its straightforward installation process.
Step 3.
Open Nmap (or Zenmap) and use the command “sudo nmap -sn (network IP)” to scan the entire network (without port scan).
The command will list machines that respond to the Ping and will include their MAC address along with the vendor.
Don’t forget the “sudo” command.
Without it, you will not see MAC addresses.
Finding out the device vendor from a MAC address
Ok, so now you were able to find out the IP address using “arp -a” command or through the DHCP Server.
But what if you want to know more details about that particular device?
What vendor is it?
Your network segment or LAN might be full of different devices, from computers, firewalls, routers, mobiles, printers, TVs, etc.
And MAC addresses contain key information for knowing more details about each network device.
First, it is essential to understand the format of the MAC address.
Traditional MAC addresses are 48 bits represented in 12-digit hexadecimal numbers (or six octets).
The first half of the six octets represent the Organizational Unique Identifier (OUI) and the other half is the Network Interface Controller (NIC) which is unique for every device in the world.
There is not much we can do about the NIC, other than communicating with it.
Android flash tool for pc. Allows you to flash an Android build to your device fordevelopment and testing. To get started, you need a development machine and anAndroid device.
But the OUI can give us useful information about the vendor if you didn’t use Nmap, which can also give you the hardware vendor.
A free online OUI lookup tool like Wireshark OUI Lookup can help you with this.

Just enter the MAC address on the OUI search, and the tool will look at the first three octets and correlate with its manufacturing database.
Final Words
Although the RARP (the counterpart of ARP) was specifically designed to find IPs from MAC addresses, it was quickly discontinued because it had many drawbacks.
RARP was quickly replaced by DHCP and BOOTP.
But ARP is still one of the core functions of the IP layer in the TCP/IP protocol stack.
It finds MAC addresses from known IPs, which is most common in today’s communications.
ARP works under the hood to keep a frequently used list of MACs and IPs.
But you can also use it to see the current mappings with the command arp -a.
Aside from ARP, you can also use DHCP to view IP information. DHCP Servers are usually in charge of IP assignments.
If you have access to the DHCP server, go into the DHCP Client list and identify the IP with the MAC address.
Finally, you can use a network sniffer like Nmap, scan your entire network, and find IPs, and MACs.
If you only want to know the vendor, an online OUI lookup like Wireshark can help you find it quickly.
The first step of troubleshooting any network problem is by pinging the IP address. Well, for that you need to know the IP address of the device or in cases IP address of all the devices in the network. There are several ways to do this and it entirely depends on the type of OS you are using. So, here are ways to find the IP Address of other devices in your network whether it is Windows, Android, iOS, Ubuntu and macOS.
Find IP Address of Other Devices on Your Network
In this article, we would be dealing with ways to find the private IP address of devices. Since the public IP address of all the devices within the same network remains the same i.e. the IP address of your router. In case, you are surprised by the word public and private IP address, it’s fairly simple. We have a detailed article on the difference between Public and Private IP and how to find the IP address of your own device.
1. How to Find IP Address in cmd For Network
The simplest way to do that in Windows is via the command line. To open the command prompt, type “cmd” on the Start menu. When you see the command prompt, right click on it and click on “Run as Administrator”.
In case you are using windows 10, you can directly run Command Prompt as an Administrator. Just right-click on the Start icon and click on Command Prompt(Admin).
Once you get the Command Prompt window, type the following command.
This will display the entire list of ARP entries. In case you are wondering, ARP is a network utility which maintains a track of all private IP addresses in the network.
Find IP Address of all Devices on Network Using Windows App
Find IP addresses through the command line might be the simplest way but not the most intuitive one. If you are not good with command line then you should download this Nirsoft utility called Wireless Network Watcher. The app has a portable version as well as exe.
As soon as you open the app, it starts scanning your network. Give it some time and it will list up the active connections in your network. The app will display all computers, smartphones and smart homes devices that are currently connected to the network. Along with the Device Name and IP address, it also presents other relevant information like MAC Address, Device Information etc along with its IP Address.
Read: Useful NirSoft Utilities That Every Windows User Should Try
2. Find all IP Address on the Network on Ubuntu
If you are working with Ubuntu or any Unix based OS then following are the ways. You can find the IP address using arp utility on the terminal. To open the terminal, right-click anywhere on the desktop and select “Open Terminal”.
Alternatively, you can also click on the Activities button at the top-left corner. This will bring up a search bar. Type Terminal on it and click on the Terminal icon once it pops up.
Once the terminal window opens, type the following command.
Another intuitive way to do this is through GUI. You have to install a tool called Angry IP Scanner. To install the Angry IP Scanner, you need to add an entry to the APT repository. APT (Advanced Packaging Tool) will then be able to fetch Angry IP Scanner from that particular location. To add the entry to the repository, type the following command
In case you are facing any issues with IP Scan Installation, make sure you have disabled gpg signatures check. You can do that by using the following command.
Once the entry is successfully added, we need to update the apt-get repository. To do that, type the following command
Once the apt repository is updated successfully, we can install the Angry IP Scanner application. Type the following command to fetch and install the application
Alternatively, if you have a browser you can also choose to install from the Angry IP Scanner website directly. Once you launch the app, it will the network you are connected to. Once, it is completed you can see the active connections in your network.
It has advanced tools like opening an FTP, Telnet, SSH connection for any of the IP devices. One thing it lacks is the inability to show hostnames for the devices. Most of the devices come up as N/A in the hostname. This can, however, be found out by using the host command but that takes an extra step.
Read: How to use Angry IP Scanner – Beginners Guide
3. How to Find who is on my WiFi on macOS
On macOS, the steps are quite similar to that of Ubuntu. To find the IP Address of other devices in your network via the command line, we need to first open the terminal. To do that, hit Cmd + Space to trigger Spotlight Search. Type “Terminal” on the search bar. Click on the Terminal icon when the search results populate.
Once the terminal window opens, type the following command.
This will list down the IP’s in your local network with their MAC Addresses. IPs are listed in round brackets followed by the MAC Address.
You cannot see the hostname (name of the computer or smartphone) through the command line. For that, you will have to do a host search separately for each IP. For example, if I need to find the hostname of 192.168.1.105, then I have to execute the following command
host 192.168.1.105
If the commands sound too much work, you can download a freeware from the Mac App Store called LAN scan. This app will list the IP addresses connected to the Local network along with other details like MAC addresses, Vendor etc. This app does not grab he Hostnames like Wireless Network Watcher. In order to get the hostnames of the devices, you need to get the premium variant. It can be purchased at a one-time fee of $7.
Also Read: Find Out Who’s Connected to Your WiFi
4. Android & iOS
On Android and iOS, there is no native way to check the IP Address of all the devices in the network. Hence, you will have to download a third-party app for this. Fing is a powerful network utility available for both Android and iOS which lets you scan your network. All you have to do is open the app and it will automatically start scanning all of the devices on your network. You’ll see all of their IP addresses, their names.
Unlike all the other apps we tested for Windows and Mac, Fing was the only that can figure out your connected devices brands and models. It can even fetch the device icon – wheater it’s an iPhone, MacBook, Router or Printer etc.
Check out Fing (iOS, Android)
Apart from just scanning IPs, you can also ping them or see the open ports on the particular device.
5. Router
One of the most popular ways to check who is connected to your WiFi network is by using your router’s web interface.
In case you have access to the router web interface, you can simply log in to the web portal and check. The web portal address, username, and password are mostly printed behind the router. In case you don’t have physical access to the router, the web portal URL is mostly the PC’s gateway address. To find that, open command prompt and type the following command.
The default username and password depends on the router’s manufacturer. Mostly, the username and password is “admin”. In case this doesn’t work for you, visit the official manufacturer site to get the default credentials.
Once you are logged in, look out for the Wireless or DHCP option. We need to navigate to the DHCP client’s list. On this page, you can see the entire list of devices connected to the network with their Client Name and MAC Address. You can also choose to block particular devices from this interface. To read more about it, check our article on how to block someone from your network.
The good thing about this approach is that you don’t have to install any software because you can access your router from any device. However, the only downside is that you need to know the router’s login credentials. If you are in a work environment then you might not have access to these details to log into the routers admin page. In that case, you will have to use the methods mentioned above.
Mac Address Changer
Final Say
Mac Address Scanner
Once you have found the IP address of the devices in your network. You can start configuring your network accordingly. You can start assigning Static IP Addresses to your device, configuring SSH, access your computer remotely etc.
0 notes
Text
Kaspersky Coupon Code 2018
That's the menu where they can save websites that they want to use again, clicking them easily to get to them. As a safety measure, do have a backup of Windows registry so that you can Kaspersky promo code restore the default computer settings in case of system crash or Kaspersky discount coupon 2018 any unpleasant situation. On the other hand, if you built a website for business purposes, a paid hosting service is a better and perfect choice. And every little bit adds up to a higher page ranking! However, you must weigh the Kaspersky promo 2018 pros and cons of individual programs before making your final selection. Many realtors are not likely to dissuade you, as a more expensive home translates into more commission for them. Technical supportAccording to your business requirement, you can go for either the single or multiple web page hosting plans. However, what these people did not realize was that their bargain surgery will most often end up costing them more in the long run to Kaspersky discount coupon fix the botched jobs. As you can see, if search engine optimizing is important to your website, its vital that you dont miss the most commonly overlooked part of SEO and reserve your website for a good length of Kaspersky discount time, to prove to Google that youre serious about building a quality, successful web presence. These crafts can be unstable when driven slower but may be a small tricky when taken much too fast too. We may frequently see individuals on the Internet, TV or in magazines who have the bodybuilding physique we aspire towards, so we somehow feel that by weight training and eating a certain way, we can develop an identical appearance, when Kaspersky coupon code in fact our physical makeup is unique and specific to each of us, meaning that results others produce do not in any way indicate we are capable of the same, or conversely, we may even be able to greatly exceed the bodybuilding success of those we admire. How much air conditioning is required and what is the right temperature to be maintained, are questions, which must be answered to prevent any unexpected server crashes. Cardiovascular exercise still has a role in a complete exercise routine, but excess cardio may actually cause wasting of muscle tissue! Kaspersky coupon How many students, for example, have gone on to college? The Endpoint Security icon in the system tray informs you when issues affect your computer by changing the way it looks: Critical issues affect the security of your system. Coffee machines are portable gadgets - Most of the gadgets for home are compact and portable. Therefore when examining all these features of Windows Virtual private server web hosting, there Kaspersky discount 2018 is absolutely no problem that will describes why you should not go ahead for VPS website hosting. Therefore after this diet it is easy to maintain balanced feeding. There will always be lots of spare capacity in cloud computing because not every website or application stored is going to be always in high demand. Many businesses today had depended on the internet for the marketing of its products. The more she hears "NO" the more persistent she becomes Cool! This will open an entire new world of promise where you are able to do activities that you were not capable of do before. And he says in a loud voice, "Are we going to win this game?" And the players start yelling, "Yeah coach, we're going to win this game!" And the coach says even louder, "Are we going to win this game?" And even louder, the players start yelling, "Yeah coach, we're going to win this game!" And then the coach yells even louder, "Ladies, I don't think you heard me, "Are we going to win this game?" And even louder the players yelled, "Yeah coach, we are going to win this game" And they started pounding loudly on the lockers with their Kaspersky coupon 2018 fists. It is divided into two categories, Virus and Spyware/Risks, and the time period to be shown can be set to anything between an hour and a year. If your child is frightened by a nightmare or thunderstorm, he or she can sleep in the comfort of your room near you without taking over your bed. And please realize that this value must be provided by you not the company whose products or services you may be selling. Your Firewall probably has three settings: On, On with no exceptions or Off. If they like what they see and finds them helpful, they will most likely buy my actual product. Kaspersky promo Smoking has been proven to cause problems with your health. The insurers are likely to witness increased number of enrollments in their health products through the online insurance quote engine utility, which can further improve the bottom line figures for insurers. That means if they are successful in repairing the computer problem, only then do you pay them for the service otherwise it's no cost! Due Kaspersky promo code 2018 to the fact that vintage truck parts for Ford are not scarce, this is the major reason why it is preferable to select the Ford brand for classic trucks. If the software promises an easy installation, it should have a clean and easy-to-use interface. Outsourcing has been proven as one of the most effective marketing techniques where time and money are saved. Cybercriminals stepped up their use of Osama Bin Laden's death by inserting malware into PCs when users fall for phony claims of photographs and videos, security researchers said today."It's not really surprising," said Mikko Hypponen, the chief research officer of Helsinki-based F-Secure. We know that it necessary for proper maintenance and to extend the life of the automobile. Kaspersky coupon code 2018 To allow these, the firewall configuration must be changed which compromises the existing corporate security policy. Every server on the Internet has a unique numerical IP (Internet Protocol) address.
1 note
·
View note
Text
How to Cloud Enhances Your Dedicated Server

Now more than ever, businesses need flexibility for their services.
What happens when you have outgrown Virtual Private Servers (VPS)? What do you do when you need the scalability of the cloud and also the resources of a physical, dedicated server?
If you need hosting for:
Resource-hungry websites & applications
Multiple websites of all kinds
Databases with or without the webserver on the same server
Reselling hosting to clients
Cloud firm Cloud Dedicated Servers provide a great solution worth considering. It is important for websites, applications, and platforms to be able to scale and have their hosting environments grow with them. Cloud services can do that, and more.
But what exactly is cloud?
What is Cloud?
Last July, we told you about our Cloud VPS and how it works. Recall that cloud computing is the practice of using a network of remote servers hosted on the Internet to store, manage, and process data. With this as the foundation, we are able to build and use other technologies to offer sophisticated solutions like the Cloud VPS.
A VPS is a server that exists as a piece of software running on a host or parent server. A hypervisor is used to manage these virtual servers. These virtual servers are clustered together under Liquid Web’s Cloud Platform, offering the ability to move server instances between parent servers without needing to migrate data or reconfigure the server settings.
What is a Traditional Dedicated Server?
By contrast, a traditional Dedicated Server takes the cloud out of the equation and gives you the bare metal server. Your server environment is run directly off of the hardware with the operating system and all files directly installed on the server. These servers provide customization that is attractive to most businesses because you are dealing with swappable internals.
Dedicated servers are single-tenant hosting services. Unlike with a VPS, there is no parent server dividing server instances. All components of the server, such as the CPU, cores, RAM, and storage are at the disposal of the tenant, which gives the owner reliability, performance, and security.
How the Cloud Enhances a Dedicated Server
The implementation for Cloud Dedicated Servers is similar to our Cloud VPS. Liquid Web’s proprietary Cloud Platform, based on KVM, is what drives the virtualization. It allows the servers to have dynamic provisioning in a scalable, virtual environment. But instead of sharing the processor with other instances, you have the full use of the CPU and its cores.
Think of Cloud Dedicated as an actual dedicated server with a virtual layer running on top.
Cloud Dedicated combines the processing power and resources of a traditional dedicated server with the instant provisioning and flexibility of the cloud. Bare metal cloud servers deliver the complete hardware transparency and scalability websites and applications demand.
One potential drawback to traditional dedicated servers is that moving to a new server involves migrating data. This can be a time-consuming process depending on the project(s) hosted on the server and the time it takes to migrate the data, test the data, and point the DNS. And with DNS propagation, your sites and apps can also see downtime.
Cloud Dedicated Servers make this process seamless. Like the VPS, you are able to resize the bare metal server instance from one to the other without having to migrate data or change server settings. Aside from a couple of server reboots, there is not much downtime as there are no DNS changes to speak of. While it is not an instant process, you are still able to scale faster than with a full-on data migration.
Use Cases for Cloud Dedicated
Cloud dedicated can be useful in a myriad of circumstances and setups, such as with database hosting, hosting multiple sites, cloud private networking and more.
Database Hosting
As mentioned previously, the resources of the host server are at your disposal because your server environment is the only one on the parent server. The full CPU and all cores are dedicated to your sites and databases.
The importance of having this kind of power is valuable to those that host resource intensive databases. Databases require the kind of single-threaded CPU performance per core that is found in a dedicated server. Adding our cloud platform only enhances this by giving you the ability to resize your server to another instance with a different CPU or other resources as your business grows.
Hosting Multiple Sites
Just as in the case with databases, Cloud Dedicated Servers act as an excellent choice for agencies and resellers that require hosting for several sites on the same server. The processing power would be more than capable of running your sites and handling their requests. And because resizing does not require a data migration, you can rest assured that all of the hard work put into setting up the sites and server settings will remain intact.
Cloud Private Networking
Need more than one server with the ability to communicate with each other? No problem! You can deploy a Cloud Private Network for your cloud servers to communicate with each other over an internal, isolated private network.
The bandwidth used on the closed system is free and does not count against your regular bandwidth usage, and there is no additional cost.
Cloud Firewall
The Cloud Firewall provides you with the protection and security isolation that a conventional hardware firewall would give to your dedicated server. You are given two options. The first is the Basic Firewall, which lets you allow or deny common web services with a simple checkbox interface. If you need more detailed rules the second option, our Advanced Firewall will enable you to specify services and ports as well as source and destination IPs for fine-grained tuning of firewall rules.
Cloud Load Balancing
More functionality exists for those that have a high load on their servers as a result of increased traffic. Liquid Web’s Cloud Load Balancer allows users to create Virtual IP addresses (VIPs) and intelligently distribute traffic across multiple cloud servers. Your site visitors can be shared across numerous devices to increase performance during times of high activity.
The Cloud Server Load Balancer can significantly increase the reliability of your web application because if one of your server nodes fails, the traffic is automatically shifted to another server node without any interruption of service.
Choosing a Cloud Dedicated Server
Having several options to choose from can make the final step of selecting the right server(s) a bit challenging. Here are some of the options you have as well as some things to consider when choosing a Cloud Dedicated Server.
What is My Budget?
In other words, how much are you able and willing to pay for hosting? Quite often, the cheapest solution is not the best solution.
Do your research to ensure the amount of service you will receive is reasonable for the cost
Think about current resources needed as well as future resources that may be required to expand your business
Do I Need a Specific Server Location?
It’s important to think about where your visitors are located relative to the geographic location of your server. While this can be alleviated by the use of a Content Delivery Network (CDN), you can also cut cost if your visitors are in the same concentrated area as your server. Knowing where your server is located will help determine if other services will be needed.
Liquid Web offers 2 data centers in Lansing, MI (Central US), one in Phoenix, AZ (Western US) and another in Amsterdam, The Netherlands (Europe) to serve the needs of our clients globally.
What Are My Security Needs?
Securing your server is paramount to ensuring your site and data remain protected. The extent of that security needs to be determined based on the amount of risk you plan to take versus the risk that your hosting provider will assume.
Knowing what you need and what your potential provider offers will save you headaches down the road.
Who will be Managing the Server?
Knowing who will be managing your server and the degree of management they provide is also an essential factor in choosing your server and provider. Decide up front whether the server will be handled by you, a developer, or your provider to determine responsibilities. You will want to plan to fill any gaps between the management you require and what can be given.
Cloud Dedicated Options Available
Liquid Web offers several different configurations of Cloud Dedicated Servers to fit your unique business needs.
Operating System: Linux vs Windows
Linux – Choose from CentOS, Ubuntu, and Debian
Windows – Choose from Windows Server 2012 R2 and Windows Server 2016
Management Levels: Self, Core, or Fully Managed
Self Managed – For expert users who need to customize their server fully. We take care of the hardware and infrastructure while you manage your server.
Core Managed – For those looking for management but don’t require a control panel like Plesk or cPanel. We manage your server’s infrastructure, hardware, and the core elements of the LAMP or WIMP server stacks.
Fully Managed – For those that need a bit more help with their server. Our expert techs manage your hardware, infrastructure, and the web server. Fully Managed servers include cPanel or Plesk, which are industry-leading control panels.
Backups
On-server backups – Use your primary storage to keep backups taken by your control panel or other solutions of your choosing.
Remote backups – Use our Cloud Backups to store full server backups on our servers, managed by us for your disaster recovery needs. Choose Pay Per Gig (As you Go) or Quota pricing.
The Best of Cloud and Dedicated
Cloud Firm Provide Cloud Server in India Lowest price. Cheap Cloud server. Best Cloud server at lowest price. Cloud server with excellent features at lowest cost. Our Cloud Servers come made to measure to ensure you get the best results for your business. Provision them with a wide choice of RAM, SSD /HDD hard drives and bandwidth options. High performance, Reliable, affordable Cloud Servers. High bandwidth Cloud Servers at lowest price. 24X7 supports. Best Cloud Server provider in India. We are providing various type Cloud Servers: • Custom Cloud Servers(100% customizable) • Dedicated Server instant setup Please visit website for more details:
more: http://cloud.firm.in
IT Monteur, B-71, Shalimar Garden Extn-2, Ghaziabad, UP, India-201005
Phone: +91-9582907788 +91-9654016484 0120-2631048 Mail: [email protected]
=============================================================
Related Post = Top 7 Technic of Choosing Google Cloud Hosting
=============================================================
0 notes