#How to design shirts with cricut for beginners
Explore tagged Tumblr posts
Visit Tumblr Blog
Explore Tumblr blogs with no restrictions, modern design and the best experience.
Last Seen Tumblr Blogs


Fun Fact
The average Tumblr user visits about 67 pages every month.
Text
What is a Cricut Machine, and What Can it Do?
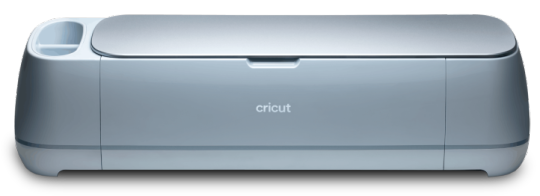
My cricut.com/setup machines are some of the most powerful tools in my craft toolkit. I use them all the time to make a wide variety of crafts, including custom t-shirts, greeting cards, stickers, and so much more. In this article, I’ll share all sorts of information about the family of cricut design space cutting machines and what they can do. I’ll explain what they are, how they work, and tell you exactly what supplies you’ll need to get started.
You may also be wondering which of the three Cricut models is the best choice for your needs. I recommend the design.cricut.com/setup Explore to most beginners – but the Cricut Maker and the Cricut Joy are fantastic machines too! Keep reading for a comparison of the three Cricut machines so you can confidently choose the best Cricut model for you!
What is a Cricut Machine?
A cricut.com/setup is an electronic cutting machine that can cut all sorts of designs from materials like paper, vinyl, card stock, and iron-on transfers. Some cricut design space machines can even cut leather and wood. You can use the Cricut to cut just about anything you would typically cut with scissors or an X-acto knife. That said, a design.cricut.com/setup can cut with much more precision and speed than would ever be achievable by hand.
Best Cutting Machines
Machines like the cricut.com/setup are sometimes called die-cutter machines or craft plotters. Other brands of cutting machines include the Silhouette Cameo and the Brother ScanNCut.
There are currently three types of Cricut machines on the market: The Cricut Explore, the Cricut Maker, and the Cricut Joy.
The design.cricut.com/setup Explore is the mid-level option and the best-selling machine. The cricut design space Maker is one step up from the Explore and can cut a wider variety of materials with more types of tools. The Joy is a smaller model that’s portable, easy to set up, and simple to use.
How Cricut Machines Work
You can think of a cricut design space cutting machine like a household printer. Except instead of printing your design onto a sheet of paper, a Cricut machine uses a small, movable blade to cut the design out of a sheet of paper (or other material.) First, you create a design in Cricut’s design software or app. Then, you send the design to the Cricut cutting machine via Bluetooth or USB. The Cricut machine receives the design and cuts it out using a small, precise blade.
What is the best Cricut for a beginner?
The best Cricut machine for the beginner on a budget is the Cricut Explore 3. The Cricut Explore 3 is cricut design space most popular machine, and for a good reason! It cuts over 100 materials: cardstock, vinyl, iron-on, and specialty materials like glitter paper, cork, and bonded fabric. It’s not the fastest or quietest cutting machine, but it does a lot and is very beginner-friendly.
Which Cricut should you get?
The best Cricut for you depends on the kinds of projects you like to do. Think about what types of materials you’ll want to cut before choosing which Cricut machine to buy.
When to choose the Cricut Explore: The Cricut Explore is the best-selling Cricut machine and offers you great “bang for your buck.” The Cricut Explore is my all-around top choice for design.cricut.com/setup newbies on a budget. It’s a relatively fast and powerful machine that cuts up to a maximum width of 12″. And like I’ve mentioned before, it cuts more than 100 popular craft materials, including paper, vinyl, and iron-on.
So, if you prefer paper and vinyl crafts (and don’t need to cut a lot of fabric and wood), your best choice is the Cricut Explore.
When to choose the Cricut Maker: The Cricut Maker can do everything the Cricut Explore can do, and so much more. I recommend upgrading to the Maker if you want the versatility to cut heavy-duty materials like wood and leather and delicate materials like crepe paper and fabric for sewing projects.
Speaking of using the Cricut sewing projects, the Cricut Maker has a special rotary cutter tool perfect for cutting fabric pattern pieces, quilt appliques, and other fabric projects.
When to choose the Cricut Joy: The Cricut Joy is Cricut’s newest cutting machine. The Cricut Joy is perfect if you like to make quick, small-scale projects, like labels and cards
0 notes
Text
Beginner's Guide to Cricut Infusible Ink Pens
Cricut Infusible Ink is a permanent printing technology that generates vibrant and crisp designs on various surfaces. It's also resistant to heat and water. Use the new Cricut's infusible Ink line of products with your Cricut Maker or Cricut Explore Air to make professional-looking shirts, bags, coasters, and more from the comfort of your home.
Cricut Infusible Ink line products consist of pens/markers and transfer sheets. The transfer sheets are similar to a heat transfer vinyl sheet, but Cricut Infusible Ink pens differ from regular Cricut pens. We are sure you have many questions related to Infusible Ink Pens. Continue reading our blog to find answers to your questions.
What are Cricut Infusible Ink Pens?
Cricut Infusible Ink pens or markers are designed to work with the Cricut machine. Load them directly into the accessory clamp of the Cricut machine and let them both do their job. The Cricut pen and markers have a special ink that fuses with the base material during the sublimation process. During the sublimation process, when heat and pressure are applied, the solid ink in the pen goes through a chemical transformation and turns into a gas. The gas penetrates the base material and dries back into a solid state, becoming a part of the material. It won't peel off or crack, and the colors will stay bright even after many washes.
What is the Difference Between Cricut Pens and Markers?
The only difference is the nib size; the invisible ink pens have a 4mm tip, whereas the infusible ink markers are 1mm thick. Use the ink pens to write and draw thin lines and the marker to fill in the designs drawn with the pens. Super fine lines aren't great with Infusible Ink Transfer Sheets, as cutting and weeding tiny lines is difficult, and it works best with thick solid images. The Cricut pens help you achieve the result where the transfer sheet failed. Both the pens and markers come in two colorways: traditional colors (green, red, black, purple, and brown) and neon brights (yellow, blue, green, pink, and orange).
What Supplies Do You Need for the Sublimation Process?
The first and foremost thing you will need is Cricut Infusible Ink pens and markers. A Cricut machine, Cricut compatible blanks, heat source, Cricut EasyPress mat, laser copy paper, LightGrip mat, heat resistant tape, butcher paper, Cardstock, scissors, lint roller (for fabric projects), and lint-free cloth (for coasters). Theoretically, any polyester or poly-coated base material will do the trick. However, Cricut only guarantees the brightness and durability of its blanks with infusible ink compatibility badges.
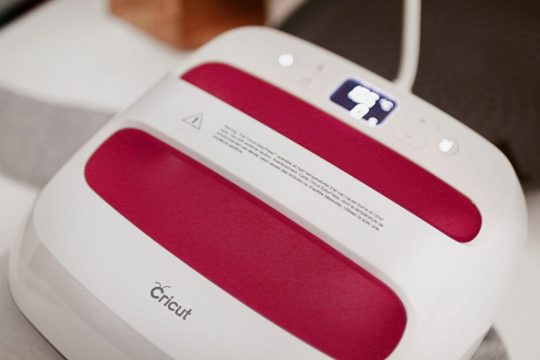
These blanks include T-shirts, tote Bags, coasters, and baby onesies. These compatible blanks have been through rigorous testing, so you can be ensured that you will get the best results. The infusible Ink system was calibrated to work with Cricut EasyPress 2. You could use a regular household iron, but it doesn't get enough infusible ink. Also, the heat is not evenly distributed. The Cricut EasyPress 2 can generate heat up to 400 degrees, which is the most appropriate temperature for most infusible ink applications.
The original EasyPress can generate heat up to 350 degrees, but it was not hot enough for infusible ink. You can still use it, but you may not get the desired results. Laser copy paper is designed to handle a high level of heat and has a special coating that keeps the ink from bleeding. You will need Butcher paper to protect the EasyPress machine from any escaped infusible ink. To protect the EasyPress mat from escaped Infusible Ink, use 80 lb or heavier Cardstock.
How to Customize a Blank T-shirt With Infusible Ink Pens & Markers?
The first step is choosing the Cricut-compatible blank (in this case, we are using a Cricut T-shirt) and any infusible ink pens or markers. Try to be creative by choosing thin pens and thick markers from the Basics and Neon color packs. The Next step is creating your design on the Design Space app. The infusible Ink pens can only draw your designs, so you need to use single-layer shapes without any 'fill.’ If you want your images to be colorful, you can color them by hand once Cricut does the outline drawing.
Click the 'Projects' button to create a pre-designed project. Size the image to fit the size of the t-shirt. In the space, attach all the graphic elements and click 'Make.’ Ensure to mirror your design before heat transfers. Choose 'copy paper' for your material. Into Clamp A, load the pen or marker suggested the pen or marker. Onto the LightGrip Mat, load a single sheet of laser copy and load the mat into the Cricut machine. Hit the Go button to start drawing. Once the machine finishes drawing, unload the mat and remove the paper from the mat.
Pre-heat EasyPress 2 to 400 degrees. Cut out the extra white space off the design to your blank. Place the piece of Cardstock inside the shirt and place the EasyPress mat between the Cardstock and the back of the shirt. Clean the T-shirt with a lint roller. On top of the shirt, place the butcher paper, then place the Cricut EasyPress 2 on top of your design for the recommended time. Lift EasyPress 2 carefully and let the shirt cool. Then carefully remove the tape and copy the paper.
Visit: cricut.com/setup
Source https://cricutmachinemakersetup.blogspot.com/2023/05/beginners-guide-to-cricut-infusible-ink.html
#cricut setup#cricut.com/setup#www.cricut.com/setup#cricut design space setup#cricut easypress2#design.cricut.com/setup#cricut.com setup mac
1 note
·
View note
Text
cheat sheet htv sizing chart hack U39Y#
💾 ►►► DOWNLOAD FILE 🔥🔥🔥🔥🔥 One of its many varieties is HTV that relies on the power of heat. Cricut Cheat Sheet, Cricut Size Guide, T-Shirt Decal Size Guide, Baby Onesie Size. Printable Cheat Sheets for Sizing and Placement for Heat Transfer Vinyl - Beginners Guide PDF Instant Download. thebestvinylcutter. While the final size of your design, and where you place it, will ultimately depend on your personal preference, we have developed a guide. Reference this infographic when you need to know the letter and number sizes for uniforms. Also available, is our wall graphic chart with all of the transfer. 9 While the final size of your design, and where you place it, will ultimately depend on your personal preference, we have developed a guide to help give you a baseline of what is commonly done. We have included recommendations on how big your design should be and where it should be placed from the neckline on infant, toddler, youth, adult and plus sized t-shirts. Remember this is just a guide - your or your customers' personal preferences could be for a larger or smaller designs, but this will give you a good jumping off point. For crafters struggling to find the center of your garments and properly place your designs, we have really great trick to help. Start by folding your garment in half longways. Lightly press or iron the shirt where you folded it in half. When you unfold your shirt, you will be left with a line that you can use as your center point. You then fold your design in half sticky side out and crease the top to create an indention in the carrier sheet. Then you can line up the crease with the line on your shirt. This is a pretty fool-proof method for finding the center of your shirt. Since each shirt can vary slightly due to manufacturing, this is the best way to center and place HTV designs. And it works for more than just shirts! You can use this method for other garments, garden flags, canvas and more! If you have questions about where you should place your HTV design, or how big it should be, ask away! Send us a message at Facebook. October 05, July 11, March 06, October 04, September 15, September 02, Hologram 12"x5' Heat Transfer Roll. Hologram 12x12 Heat Transfer Vinyl Sheet. Placing Heat Transfer Vinyl Tip: Fold in Half For crafters struggling to find the center of your garments and properly place your designs, we have really great trick to help. Watch how we did it here: If you have questions about where you should place your HTV design, or how big it should be, ask away! Kelli McDaniel. What are the guidelines for putting a design or lettering on the back of a shirt? Leave a comment Your email address will not be published. Get Social. Share ideas, get answers, and craft with confidence! Just added to your wishlist:. My Wishlist Continue. You've just added this product to the cart:. Go to cart page Continue. Product Price Quantity Options. Features Availability: Price Options Actions.
1 note
·
View note
Text
cheat sheet htv sizing chart mod 0095&
💾 ►►► DOWNLOAD FILE 🔥🔥🔥🔥🔥 One of its many varieties is HTV that relies on the power of heat. Cricut Cheat Sheet, Cricut Size Guide, T-Shirt Decal Size Guide, Baby Onesie Size. Printable Cheat Sheets for Sizing and Placement for Heat Transfer Vinyl - Beginners Guide PDF Instant Download. thebestvinylcutter. While the final size of your design, and where you place it, will ultimately depend on your personal preference, we have developed a guide. Reference this infographic when you need to know the letter and number sizes for uniforms. Also available, is our wall graphic chart with all of the transfer. 9 While the final size of your design, and where you place it, will ultimately depend on your personal preference, we have developed a guide to help give you a baseline of what is commonly done. We have included recommendations on how big your design should be and where it should be placed from the neckline on infant, toddler, youth, adult and plus sized t-shirts. Remember this is just a guide - your or your customers' personal preferences could be for a larger or smaller designs, but this will give you a good jumping off point. For crafters struggling to find the center of your garments and properly place your designs, we have really great trick to help. Start by folding your garment in half longways. Lightly press or iron the shirt where you folded it in half. When you unfold your shirt, you will be left with a line that you can use as your center point. You then fold your design in half sticky side out and crease the top to create an indention in the carrier sheet. Then you can line up the crease with the line on your shirt. This is a pretty fool-proof method for finding the center of your shirt. Since each shirt can vary slightly due to manufacturing, this is the best way to center and place HTV designs. And it works for more than just shirts! You can use this method for other garments, garden flags, canvas and more! If you have questions about where you should place your HTV design, or how big it should be, ask away! Send us a message at Facebook. October 05, July 11, March 06, October 04, September 15, September 02, Hologram 12"x5' Heat Transfer Roll. Hologram 12x12 Heat Transfer Vinyl Sheet. Placing Heat Transfer Vinyl Tip: Fold in Half For crafters struggling to find the center of your garments and properly place your designs, we have really great trick to help. Watch how we did it here: If you have questions about where you should place your HTV design, or how big it should be, ask away! Kelli McDaniel. What are the guidelines for putting a design or lettering on the back of a shirt? Leave a comment Your email address will not be published. Get Social. Share ideas, get answers, and craft with confidence! Just added to your wishlist:. My Wishlist Continue. You've just added this product to the cart:. Go to cart page Continue. Product Price Quantity Options. Features Availability: Price Options Actions.
1 note
·
View note
Text
How To Make Money Using A Vinyl Cutter

What Is Vinyl Cutting?
To start a vinyl cutting organisation, you will need to be familiar with a vinyl cutting maker and a home computer system that has a design software if you choose to really do whatever yourself. Here you can also check the Best Vinyl Cutter reviews and buying guide.
The vinyl cutting device is managed by a computer system. It scans the style on your computer and converts it to a summary. From there, the device cuts the design with a sharp blade from a vinyl sheet. A lot of vinyl cutters appear like routine computer system printers. With them, you can make sticker labels, logo designs, and several styles for your home, workplace, and customers.
What Supplies Are Required?
Beginning a vinyl service needs little capital, and just 1% of sellers needed loans to start their company.
Nevertheless, while this business needs little capital, you require a lot of commitment and hard work to prosper. Some of the products or materials you'll need to establish a vinyl cutting organisation include:
Individual Laptop or Desktop:
This is most likely among the very first things you currently own. If you do not, then you need to get one to set up your vinyl cutting organisation.
The minimum specs of the computer system must be 4GB of RAM, a 2.0 GHz processor and adequate area on its hard disk. The screen must be big enough to task sensible images. So, it's recommended that you get one with a 16-bit, 1366 X 768 resolution. You'll also need broadband connectivity.
Vinyl Cutter:
Getting a vinyl cutter is what will get most of your capital. You can not afford to cut cost on this device, specifically if you're preparing to expand your service in the long term. That's why we suggest preliminary satisfaction be done by a 3rd party business like FoamCorePrint in the beginning stages,
You'll require to get a quality cutter. Among the very best desktop machines, you can purchase are the Silhouette Cameo 3 and the Cricut Explore Air 2. Both makers are economical, and many small companies today started with among these devices. For a more sophisticated and more expensive maker, you can buy Klic-N-Kut's KNK Zing Orbit or KNK Force.
Although they are more expensive, they are recommended for effective home-based business because they cut the most accurate vinyl decals in the fastest time.
Other things you'll require consist of;
A Heatpress; used for moving the print
Vinyl Rolls; in different colours like white, black, blue, silver, red, and pink
Transfer Tape
Cutting Mat
A squeegee
Application tape
Electronic camera
Accounting software
Packing and shipping materials
What Software Application Can I Utilize?
Vinyl cutters include their software application. It will allow you to design standard vectors or load purchased or downloaded design templates that will be eliminated by the device. To create a competitive advantage for your business, you'll need to be able to cut out your styles. There is a great deal of software application readily available online, however the most professional of them include;
CorelDRAW
This is a budget-friendly vinyl cutting software utilized by many designers. It is easy to discover, and it is perfect for both beginners and advanced designers. It also has user-friendly tools that enable you to edit your designs with the professional-grade application.
Easy Cut Studio
Thousands of users use the Easy Cut Studio vinyl cutting software. It is user-friendly, and it allows you to draw your images on the cutting mat in quick time. It provides functions for auto-tracing, freehand illustration, Bezier operations, lattice design, rhinestone style, and far more.
Sure Cuts A Lot Pro
The Sure Cuts A Lot Pro is an easy-to-use vinyl cutting software application. The software permits you to produce images for decals, T-shirts, indications, and others. It has functions like Photoshop and other Adobe modifying software application into the SCAL workflow (user-friendly guidelines, magnetic snapping, and even masking).
Business Licensing and Copycats
The majority of the designs you'll be utilizing might be downloaded styles, other than if you're planning on developing all your styles. Downloading styles are common, although you will require to buy a commercial license if you plan to offer online.
Unlike a personal license, purchasing a business license is not a cheap financial investment. If you offer downloaded designs online without an industrial license, it is tantamount to theft, and you can get taken legal action against. If you do enough research study, you might find a reduced business license.
On the other hand, if you're competent at developing your own designs, you can produce your own commercial license. This allows you to send out a cease-and-desist letter through your attorney to anyone using your styles without your consent.
Starting Your Vinyl Cutting Company In Your Area
Prior to opening an online or offline company, you'll require to check the U.S. patent and hallmark office to ensure that you're not using another business's name. Select a name that is descriptive and which is not on Pinterest, Facebook, or Instagram.
You can begin offering your crafts to family and friends. From there, branch off to your local community. You can ask them to get the word out to other associates and good friends who might need vinyl decals, stickers, labels, signs, cards, or celebration devices. You can also take part in events/craft fairs at schools or convention centres.
Other locations and individuals you can offer in your area include:
Sports groups for schools
Wedding event organizers for invitations cards, menus and sticker labels for design
Party organizers for baby shower cards and decors.
Interior designers for vinyl wall decals
Regional businesses for indications and stickers for their clients
Throughout crafts shows, you can likewise show beautifully-finished products so that possible customers can pick and manage your craft. You can show mugs, Tee shirts, tumblers, and much more.
Beginning Your Vinyl Cutting Organisation Online
For most brand-new services, starting an online company is normally the first step to getting recognized and selling. For some others, offering online is often the next action after setting up their local store. You can establish your site if you don't want the additional charges that come with sites like Etsy.
You can likewise open a social media page for your business Facebook and Instagram. Websites like Esty provide crafters a platform to offer to individuals in requirement of their craft, at a budget-friendly cost.
If you want to begin on Etsy, here are a few useful tips:
Use stunning photos
Have individuals you know to purchase your products and get them to leave feedback
Load and ship on time
Start with low costs
Enhance your keywords to get discovered quicker
Have a good client service
0 notes
Text
It’s been so long since I last posted!
Today I just felt the urge of having to share my review of a craft machine that I’ve been using for the last year and a half. It’s seriously every crafter’s dream machine.
Crafting is a hobby of mines. It’s something that I like to do on my spare time that takes time but SPARKS JOY. 😉 I absolutely love my Cricut and feel so happy to have it in my life.

I got my machine from Michaels for USD $220. They have a wide range of colors but I purchase the color in Coral which appears to be a Michaels Exclusive. I absolutely the color! Most of the time, I use my machine to cut vinyl. My Cricut is for personal use but there are a lot of people who turn their Cricut into a feasible business on Etsy. 😊
Cricut uses an app called Design Space where you prepare your files to cut on the machine. The app is pretty easy to use once you get the hang of how the app works and understand the different terminologies.
Some Tips for Cricut Beginners (based on my own experience)
Refer to a lot of Youtube videos and blogs for Cricut 101.
Nice downloadable fonts can be found on DaFont
Join Cricut Groups on Facebook. The community is extremely helpful when you need advice or a little inspiration on a project.
Remember to reverse your image in Design Space before cutting when you work with Iron On Vinyl (HTV)
Don’t forget to weld your letters together to great one large word file before cutting with the Cricut.
Just have fun with it and be creative!
I never posted about the projects I’ve created in the past but below are just a few.
Cotton Ball & Q-Tip Holder

The containers were purchased from Dollar Store.
Hubby and Wifey Towel

The microfiber towels were purchased from Amazon.
Bride Flip Flops

The flip flops were purchased from Charlotte Russe.
Bridal Party Tank Tops

The tanks tops were purchased from H&M. I used gold glitter iron on vinyl for the letters.
Wedding Mirror Decor

📷 Credit: Billings Photography
I used regular white vinyl that was purchased from Amazon.
Minnie Birthday Outfit

My niece was turning one so I designed a shirt for her. The toddler set that I used as a base was purchased from Carters. The iron on vinyl is from Cricut and Siser.
Matching Couples Boba Pokemon Shirt (Munchlax and Igglybuff)

For my boyfriend’s love of boba and Pokemon Go, I made us matching shirts. We wore it this past community day for the Swinub event. I purchased the long sleeve shirts from Michaels. The iron on vinyl was purchased from Cricut.com. I used the Everyday Iron On Vinyl.
The project possibilities are endless! ☺️
Feel free to use the projects I’ve done as inspiration for your projects! Happy crafting!
If you have a Cricut, what is your favorite type of project to make? If you don’t have a Cricut, what is something you would like to make if you had a Cricut?
Thanks for stopping by. Until next time!
❤️ Connie
Cricut Explore Air 2 It's been so long since I last posted! Today I just felt the urge of having to share my review of a craft machine that I've been using for the last year and a half.
#boba#couplesshirt#craft#cricut#decal#DIY#exploreair#handmade#homedecor#HTV#igglybuff#ironon#michaels#minniemouse#munchlax#pokemon#vinyl#wedding
1 note
·
View note
Text
Cricut Maker Setup Download for PC [Bluetooth/ USB]
All the users need to know about the procedure revolving around the Cricut Maker Setup Download for PC. After setting up the machine, the user will get the do-it-yourself project expected from it. Due to the blades inserted inside the machine, it holds the capacity to chop more than 300+ different kinds of materials.
You can create different kinds of projects from this model of Cricut machine, which involves school projects, customized t-shirts, wooden crafts, etc. If you are a beginner and want to become an expert in handling this machine, this article is the best choice.
How to Pair Maker Machine With a PC Via Bluetooth?
The process of pairing up this machine is straightforward and easily understandable. You have to open the Bluetooth and wait until searching for a new device is complete. In addition to that, choose the machine name and enter the PIN. The notification about your device's connection with the machine will be shown on your screen.
Followed by the pairing up of the machine, it will be easy for the user to complete the machine setup procedure with the PC. It would be best if you didn't get confused, as you'll get information about the setup procedure through the following section.
How to Setup Cricut Maker Machine With PC Via USB Cable?
Before commencing the crafting process, all users need to know about the Cricut Machine setup procedure with PC (Windows/Mac). It will be an easy path to finish the process with the Computer. The stages of setting up Maker with both software are the same. However, to know about those processes, have a look at the below content:
After finishing the device pairing procedure with the machine, you'll be able to create the designs on the Design Space canvas. Besides the pairing and setting up process, you will also benefit from Fast mode while using the Maker series machine.
What is Fast Mode and How to Use It?
Users will encounter this feature in Cricut Maker and Cricut Explore Air 2 machines. Through this feature, the machine will easily cut and write 2 times faster on the mat than its previous models.
You can benefit from this feature while working with Vinyl, Iron-On, and Cardstock material. You've to be very careful while using this mode, as you might damage the material and your project. Have a look at the Fast Mode feature mechanism stages:
Conclusion
In conclusion, the article taught you about Bluetooth pairing the PC with the machine, setting up the process, and the overview of fast-mode features. Besides, if you still have any issues related to the topic, refer to the FAQs below.
Frequently Asked Questions
Question: Why is my machine dragging through the material?
Answer: Multiple reasons result in material dragging from the machine. Check the following settings to stop the machine from pulling your material: ensure that you've chosen the correct material in the Design Space in the Dial Set before starting the cutting process, try to use a new blade to avoid this kind of mishappening, or remove the blade housing from the machine.
Question: Why is my machine making unusual noises during the cutting process?
Answer: The machine might make unusual noises during the cutting process if you push the cut button or use another power cord rather than the one given in the box or if the pressure setting is too high.
Question: Is it worth purchasing Cricut Maker for crafting various projects?
Answer: This machine is a perfect choice if you want to make different kinds of DIY projects, from materials covering the thinnest to the thickest material.
Visit: Cricut.com/setup cricut.com design space cricut design space setup cricut.com setup mac design.cricut.com/setup
Source: https://installcricut.wordpress.com/2023/04/26/cricut-maker-setup-download-for-pcbluetooth-usb/
#cricut#cricut setup#cricut.com/setup#www.cricut.com/setup#cricut design space setup#design.cricut.com/setup#cricut maker#cricut explore air 2 setup#install cricut explore air 2
0 notes
Text
Do I need to mirror iron on vinyl?
If you're new to the world of coping with heat transport vinyl, then you are in the right place! That is my complete beginner's guide to utilizing heat transfer or iron vinyl, and I am here to show you just how to use heat transport vinyl so you can start making!
Heat transport vinyl (aka HTV) is hands-down my favourite way to customize gifts for your friends. I mean, who doesn't adore a fun new t-shirt? And with heat transfer vinyl, you may easily customize it to be something private that they will love. But iron on vinyl is not only good for t-shirts! Prepared to have crafting with heat transport vinyl? Let's try this! PSST -- If you're brand new to crafting with vinyl, make sure you take a look at my Vinyl 101 webpage to discover all of my vinyl tools for newbies. How to Use Heat Transport Vinyl with your Silhouette or even Cricut There are a couple of basic steps to working with heat transfer vinyl, and I will walk you through each one. They are preparing your cut file, cutting, gluing, as well as implementing. That's it! To help you through the processing of making your own iron to vinyl projects, I am going to make myself a new t-shirt (yay!) Utilizing my Craft Queen layout which you are able to get over in my So Fontsy shop. Get Cut File The first step in crafting with heat transport vinyl would be to prepare your layout to cut in the outer machine applications you are using. (In case you do not have a digital cutting machine like a Silhouette or Cricut, you can cut heat transport vinyl through the hand. Have a look at this job I did fully cut for more info on this ) What's a Cut File? Once I say"cut file," I suggest the design which you wish to cut out of vinyl and place on your top or other surface. The most typical cut file type is most probably SVG, but you may use a .Studio, .png, .dxf, or .jpg file depending on the software you are using. I personally am a fan of SVG documents since they utilize most cutting edge applications. (NOTE: You should possess at Silhouette Studio Designer Edition or more to utilize SVG documents, and I definitely recommend that Silhouette users update to Silhouette Studio Designer Edition) Where to Locate Cut Documents If you are seeking cut files, then be sure to check out the free cut documents I have on the blog. I also have a cut file shop and take part in a monthly reduction file bundle that you might want to test out. Finally, I am also frequently pinning cut files to my Silhouette plank . For this shirt, I utilized my Craft Queen layout, which will be readily available for purchase in my own shop. I am using a t-shirt which I obtained from Happy Crafters, and it is a great little vinyl shop which also carries tons of amazing sterile tops just waiting to be vinyl-ed. I just used my ruler to have an overall idea of how tall and wide I wanted to reduce my design. I opted to cut it around 8 inches broad. As soon as you understand how big you would like to reduce your design, open the cut file in your cutting software. Next, you'll need to scale the image to the right size. Just click the design and then use the handles from the corners to scale it down to the size you desire. Next, you have to mirror or flip your design . The reason that you need to mirror your layout when dealing with heat transfer or iron on vinyl, you cut the layout on the rear side of the vinyl. HTV has a clear plastic carrier sheet that covers the cover of the vinyl, and another side is where the heat-sensitive glue is (it is not sticky or tacky to the touch). You reduce your layout on the glue side, then the clear plastic sheet on the opposite side holds your design in place until it is applied to a shirt or surface. Thus, to be sure our layout appears right when it's placed on the last surfacewe will need to first mirror or flip the design before cutting. That is truly simple to do with whatever machine you've got. I will reveal to you just how you can get it done both in the Silhouette Studio applications and in Cricut Design Space. To mirror the plan from Silhouette Studio, click the item to pick it. Then, select the Mirror option in the Object drop down menu then select Flip Horizontally (see image below).
0 notes
Text
Easter Egg Hunt Christian Crafts Tote With Cricut Maker – Video
Let’s make an Easter egg hunt Christian crafts tote for Easter Sunday! We all have the beautiful baskets, but this tote is for egg gathering!
I love the Easter egg hunt, but I always hated the kids dumping their Easter baskets out. So this is my answer. Leave the baskets alone and grab a canvas tote for egg collecting! It will likely hold more candy and eggs anyway!
And I thought it would be wonderful to put a darling iron-on saying on the tote that reminds us all the Jesus gave his life for us. I came up with “Hippity Hop Jesus Took My Spot!” :)
What You’ll Learn In This Video
In this video you’ll learn several things in Design Space and then on the craft table. If you’re a Cricut Maker beginner, start at the beginning, but if you know your way around Design Space, start at minute 12:00 in the video. That is when we go the the craft table! Overall, in this video, you’ll learn how to:
Upload a cut file
Change layer colors
Ungroup
Attach
Measure your material and resize the design to fit
Space plan on the material
Stack and layer iron-on
Use EasyPress and change for temps based on materials
Supplies For Easter Egg Hunt Tote
Cricut Maker
Standard Mat
Canvas Bag
Everyday Iron-on (all others)
Glitter Iron-On (purple)
Foil Iron-On (bronze)
Weeding Tool
EasyPress
EasyPress Mat
Christian SVG, PNG, JPEG – Free For First Week To Email List and YouTube Subscribers!
Video – How To Make An Easter Egg Hunt Christian Crafts Tote
youtube
I share new videos every week on YouTube to help you learn how to use your Cricut! I’d love for you to come craft with me.
Subscribe to Kim Byers on YouTube
More Christian Crafts
Amazing Grace Free SVG & Tshirt
Christian Gifts Prayer SVGs
Raised On Jesus & Sweet Tea Tshirt
St. Patrick’s Day – I Don’t Need Luck I Have Jesus Tshirt
More Easter Crafts
Treat For Your Easter Egg Hunt and Easter Brunch – Free Printable
Easter Egg Hunt T-Shirt
Easter Egg Decorating – To Look Like Carrots
As always, I hope you’re inspired to craft, bake, create and celebrate!
INSTAGRAM | FACEBOOK | PINTEREST | GOOGLE+ | TWITTER | YOUTUBE | BLOGLOVIN
This post contains affiliate links, which means if you purchase something through this post I will earn a small fee from the retailer at absolutely no cost to you. They pay me for bringing you to them and I use it to keep the craft room stocked and the coffee pot working! Don’t worry. All content, ideas, photography and opinions are that of my own and I’d have it no other way!
Easter Egg Hunt Christian Crafts Tote With Cricut Maker – Video seen first on The Celebration Shoppe
you may also like:
Easy Butterfly Cupcakes
Carrot Rice Krispies Treats For Easter AKA Bunny Food
Wedding Stationery You Can Personalize
How To Upload Designs To Cricut Design Space - Video Tutorial
Make An Iron On Graphic TShirt With Cricut - Video Tutorial
The post Easter Egg Hunt Christian Crafts Tote With Cricut Maker – Video appeared first on The Celebration Shoppe.
0 notes
Text
Cricut Expression 2 Review: Everything That You Need To Know
Arts and crafts is a time for enjoyment, whether it is for personal or professional endeavors. Regardless of its use, investing in the wrong die cutting machine can be time consuming, expensive, and frustrating. There are many options available today to choose between for your craft cutting needs, both manual and electronic. If you are considering an electronic cutting machine, you may not want to overlook some good older products. We will review one of these machines, the Cricut Expression 2, as well as compare it to similar products to help you decide what die cutting machine is best for you.
Quick Navigation
What Is The Product?
Cricut Expression 2
Specifications
Cartridges
Display/Cutting
Materials
Similarities To Cricut Expression
Pricing
Additional Design Purchases
Tools
Brother ScanNCut CM350
Silhoutte Camceo 3
Cricut Explore Air 2
Comparison Table
Proper Care
Conclusion
What Is The Product?
Cricut Expression 2

The Cricut Expression 2 is an electronic die-cutting machine for home use that cuts a wide variety of materials for primarily arts and crafts purposes. Materials can be cut from ¾ inch to 23.5 inches. You use the LCD touchscreen to make your configurations for your projects. It comes with a 12"x12" mat that grips the material in place during the cutting process. The mat also has measurement markings on it (1-inch) to assist you with alignment of your images on the materials.
There are many good die cutting machines to choose from that are beginner friendly or good for those who just want a basic machine, which may make choosing the right one for you difficult. Many of the machines have similarities, and making a purchase based on a crafting items bundled with the machine to catch your eye is not the best way to make a good choice. One of the best ways is to look at the pros and cons.
PROS
The Cricut Expression 2 is easy to use. The LCD touchscreen is large, much improved from Cricut Expression.
It comes with over eight times as many images as the Silhouette Cameo 3 does with the two included cartridges, so you can get started on crafting projects right away.
The cutting rate is fast and can cut intricate designs.
One of the best features is the detailed mat preview that allows you to see everything and correct any errors before cutting your project.
Reviewers report the machine feels a little on the heavier side, which makes it feel durable.
Unlike software-based die cutting machines, this one uses image cartridges which can plug into the Cricut, allowing you the freedom to cut wherever you want to because you do not need a computer.
CONS
It requires the use of only Cricut cartridges, which can be expensive. They can also be hard to find now that they are discontinued by Cricut.
According to a small number of reviewers, cartridge images are not “sophisticated.”
If you are looking for a die cutting machine that lets you create your own design, like the Brother ScanNCut does, then this is not the machine for you. The Cricut Craft Room software and wireless adaptor are discontinued.
QUALITY
PRICE
RATING
$$$
Check Price on Amazon
Specifications
It is a great machine for people who are not tech savvy or tech crazy. You will not be stuck on the computer since it does not require a computer to use. One great feature for this machine is the light over the cutting field. It also cuts fast with great precision.
Cartridges
This incredibly portable machine comes with two cartridges. It is pre-loaded with over 800 images for you to get your creative energy flowing. The cartridges, Cricut Alphabet and Cricut Essentials, include 110 layered images, three fonts, and 40 phrases.
Display/Cutting
There is no keyboard; instead it displays on a large LCD touchscreen. Use the handy stylus on the screen and you see everything for your project. Each layer can be displayed at one time along with all the available features. Once you think you have what you want, you can arrange images on the mat by using the mat preview feature before cutting your project. This helps you use your material efficiently and prevent costly errors. No computer connection is needed to use this feature either.
Materials
Material settings can be customized, and images can be sized and rotated independently on its own mat. Images can also be flipped and slanted. Each project you work on can hold up to six mats. If you have a particular set up for materials you work with, it can be saved in the machine and included in the dropdown list under the Cut Settings Screen. There are also pre-defined materials on the list. In addition to the materials, you can make other changes such as the cutting speed and pressure.
Similarities To Cricut Expression
Like the original Cricut Expression, you can craft a variety of projects using the following materials:
Vinyl
Magnet
Fabric
Thin foil
Vellum
Cardstock
Also, like the Cricut Expression, it has the capability of cutting a batch of one image fast using the Auto Fill and Quantity features. You can quickly create projects, such as “thank you” cards, party favors, and invitations.
Build Volume: 23”x9.4”x11.3”
Weight: 16.6lbs
Cutting Capacity: ¼” – 23 ½”
Cutting Mat Size: 12”x12”
Cutting Speed: Five settings
Display: Full-color LCD touch-screen with stylus
Create Own Design Capable: No
Can you use third-party material?: No
Target Audience: Hobbyists
Pricing
While the Cricut Expression 2 is discontinued, you can continue to purchase it online at Amazon, ebay and other online platforms. Prices vary based on what is included in the package. It may or may not include the starter kit, additional cartridges, or a larger mat (12”x24”). The price range can be as high as six hundred dollars, such as on Amazon, and as low as sixty dollars for a used one on eBay for just the basics (no bundles).
There is also an Anniversary Edition of the Cricut Expression 2, which has some differences, including price. It comes with more fun designs with the cartridges Cricut Decals and Just a Note cartridges.
Additional Design Purchases
While your purchase will come with a great variety of images, there may be other images you want to explore. Cricut produced over three cartridges with different images and themes including seasonal, animals, wedding, and additional fonts that you may be able to find online.
It may be helpful to refer to the Cricut Image Library for cartridges that may be available. While the cartridges are no longer in stock with Cricut, you can use the information to review the images on each cartridge and to search the name of the cartridge you desire online. You will likely find cartridges on eBay or similar website.
Tools
You can purchase a Cricut Deep Cut Blade and Housing, which is best used for thicker materials like thick cardstock, chipboard, and magnet. It cut materials up to 1.55mm.
A larger mat is also an optional purchase and is great for larger projects. The Cricut Standard Grip Mat large mat is 12”x24” and typically sold as a set of two. Some machines may already come with the larger mat; however, typically it only comes with a 12"x12" mat.
How It Compares
Brother ScanNCut CM350

Check Price on Amazon
Ease of Use
This is a nice machine for beginners and good for home crafting use. It is not designed for large productions, such as t-shirts. It cuts the basic materials, however if vinyl is your primary material, it is not the best choice. Reviewers report the image you want to cut needs to be traced with a fine black line for the machine to see and cut it. Some also report a large learning curve in figuring out how to use the machine.
Assembly Time
Inserting the cutting blade is a simple drop into the machine. Reviewers report assembly to be easy.
Build Quality
The machine works fast, and most reviewers report positively about the machines results. However, some reviewers report issues with the blade getting dull too soon as well as issues with cutting corners due to the way the mechanism is built.
Warranty
Brother offers a one-year limited warranty for parts and labor and a two-year limited warranty for electronic components and printed circuit boards.
Silhoutte Camceo 3

Check Price on Amazon
Warranty
One-year limited warranty for hardware. The warranty does not include the blade, cutting mat, and other consumable parts.
Cricut Explore Air 2

Check Price on Amazon
Ease of Use
Overall, the machine is easy to use; however, there are some setbacks. Reviewers complained about software issues and the requirement to pay ten dollars monthly for the software online to work and not being notified of it at the point of sale. You have to be connected to the internet in order to cut, and if your internet is spotty, your projects will not be properly cut. Also, intricate designs are time consuming.
Assembly Time
Set up is easy unless you are one of the few unfortunates with the software issues.
Build Quality
Reviewers report the machine is made well.
Warranty
Cricut offers a one-year warranty only when purchased from an authorized seller.
Comparison Table
Product
Image
Rating
Price
Brother ScanNCut CM350

Check Price on Amazon
Brother ScanNCut CM350

Check Price on Amazon
Silhoutte Camceo 3

Check Price on Amazon
Cricut Explore Air 2

Check Price on Amazon
Proper Care
Before concluding our review, we thought it would be good to include a note about proper care of the machine. It is important to carefully review the manual of the Expression 2 for cleaning instructions. Many reviewers note that complaints about issues with the device, such as the blade and the mat, stem from not taking proper care of the machine as instructed. The manual details how to clean all the machine's parts. If you are more of a visual person, you can also find many videos on YouTube. If all else fails, you can always contact customer service online or otherwise for additional assistance. Cricut has an FAQ section on its website that can be searched. You might be able to search your question about cleaning or anything related to your machine.
Conclusion
If you are passionate about arts and crafts, whether you are new or experienced in crafting, you will appreciate the portability, ease, and speed of the Cricut Expression 2. With its great variety of included images, all the features offered on the easy to use touchscreen and overall use of the machine, we give give this machine an easy four out of five stars rating. In a world of ever-evolving technology, sometimes it is nice to have a good ol’ reliable machine that is more simplistic and less time consuming.
If you do not want to concern yourself with hunting down the whereabouts of where to purchase the cartridges but like the features of the Cricut machine, you may want to consider other Cricut options. Since the production of Cricut Expression 2, the company has produced many additional fine die cutting machines, although they are not cartridge based. The new ones rely on software; however, you can find some with wireless capability, such as the Cricut Explore. Regardless of what you choose, Cricut has popular quality-made products that can give your crafting experience an extra element of fun.
The post Cricut Expression 2 Review: Everything That You Need To Know appeared first on Heat Press Machine Reviews.
from Heat Press Machine Reviews https://heatpressmachineguide.com/cricut-expression-2-review/
0 notes
Text
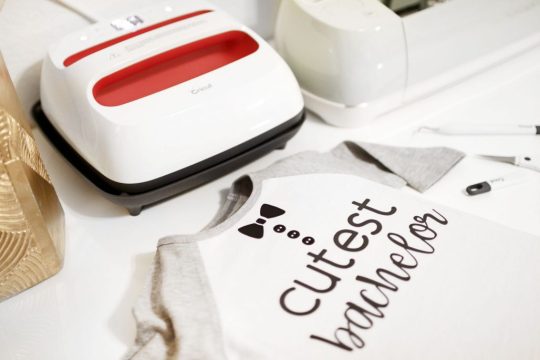
How to Make Custom Shirts with Cricut: A Step-by-Step Guide
I am obsessed with my Cricut machine and create projects on it every day. You can call it my hobby or my big passion for crafting. Recently, I have made dozens of custom shirts with my Cricut Maker machine, and you can create some on your own, too. Following this guide, your guesswork will be reduced to zero, as I will share some of the easiest steps on how to make custom shirts with Cricut.
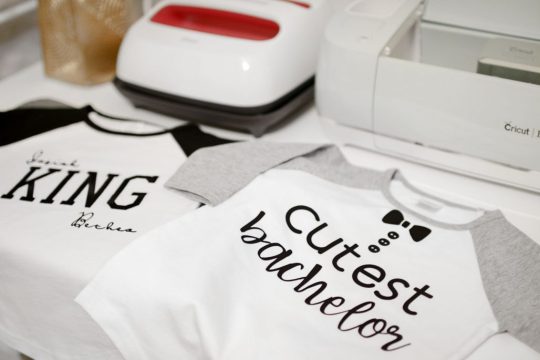
If you are interested in my tutorial, I would recommend you continue it till the end so as not to miss anything important. I have been creating unique stuff with my Cricut for more than 6 years now; it has been a beautiful journey for me.
Whether you are a beginner or a well-trained Cricut user, this post will help you get some ideas for starting something new. I hope you found this blog helpful and that you will come back for more Cricut-related blogs like this one. Let’s start learning how to design shirts with Cricut for beginners.
Which Is the Best Cricut for Making Shirts?
When you are making a custom shirt, you will have this doubt about which machine to choose. My answer would be to choose anyone you have. Whether you have Cricut Maker, Joy, or Explore, you can choose anyone with your iron-on vinyl to make a perfect custom shirt.
However, you will need to insert the fine point blades to cut this type of vinyl. I hope you got an answer to it. Let’s move forward with this guide on making your custom shirt.
How to Make Custom Shirts with Cricut Machine?
When you are clear about which machine to use and what design you wanna make, let’s get started with my steps. Well, you will need a few things before you move your hands on the desktop. So, gather up all the listed things here.
Cricut Explore Air 2
EasyPress 2
EasyPress mat
Shirt apparel
Weeding tool
Brayer tool
Scissors
Standard mat
Premium vinyl
Are you ready with all these? So you’re good to go. When you are ready, head to your Cricut Design Space and show some of your creativity. And follow all the steps carefully.
Step 1: Go to the Cricut Design Space App
In the first step, you should go to your Design Space and pick a design to print on your shirt. As the Cricut app is full of ready-to-make designs, fonts, images, and templates, you won’t have to hustle to make a design. I am using my Explore Air 2 machine; you can use a machine you’re familiar with.
Step 2: Adjust Your Design
Once you are ready with your final design, you can take some time to make that fit for you. For example, you can change the design’s color. On the Design Space canvas, you will get a few options on the right-hand side, from where you can choose your favorite color for the shirt.
Step 3: Change Vinyl Color
Here, you need to change your vinyl color as your shirt’s color may not be a good match with the vinyl’s color. In order to keep the color vibrant and not blend them, you have an option to change the color of your iron-on vinyl. To do this, you should click on the Layers option on the canvas. After that, you can click on the white box with the Layer option and pick a color for your vinyl.
Step 4: Final Your Design
If you find the color combo not as expected, you can change it. Once you have done all the updates, you are ready to save your design. You need to hit the Save button along with the name of your project to remember what this design is about. I am making a design that says “Cutest Bachelor.” Let’s check more steps on how to make custom shirts with Cricut.
Step 5: Load Your Material (Iron-on Vinyl)
In this step, you are ready to cut your project with your special Cricut machine. Don’t forget to load your vinyl on a Cricut cutting mat and then into the Cricut machine. Once you are done, you can start the cutting. Also, select the correct size of your mat on your machine so that your design fits the cutting mat. And the most important thing is to align the iron-on vinyl correctly to get an expected cut.
Step 6: Cut Your Design
When your design is ready, and you have checked all the settings, you can allow your Cricut machine to perform a cut for you. Once you hit the Go button on your machine, it will show you a preview of your final design. If you are satisfied with it, click the Continue button to get a cut. Once the design is fully cut, unload your cutting mat.
Step 7: Weed Out the Excess Vinyl
When you have a cut in your hand, take a weeding tool and take out excess vinyl to make the design clear and ready to be ironed. You can use your hands too, but a weeding tool is more convenient. Now, you have finally come to the main part of how to make custom shirts with Cricut.
Step 8: Ready Your EasyPress
When your design is ready, you can set your Cricut EasyPress to cotton or linen to get the desired results. So, now you need to put your weeded design on the shirt apparel and use a Cricut EasyPress 2 to heat it. However, before that, you must use a brayer tool to remove lint and fibers from the shirt’s fabric. Once you do that, for the next steps.
Step 9: Preheat Your Shirt
When your apparel is ready, use your EasyPress to preheat it for 15 seconds with moderate pressure to remove the moisture and wrinkling. For the final heating, you should consider a Cricut Heat Guide that will help you find the best setting for your design. After that, use the temperature and pressure accordingly.
Step 10: Apply Heat to Your Shirt
And the last step is to just apply the heat as the Cricut guide suggests. Use a towel to place on your vinyl design, and apply heat for 30 seconds. Using a towel will prevent your iron-on from getting damaged. Viola, you have just designed a perfect custom shirt with your Cricut.
Conclusion
You were all wondering how to make custom shirts with Cricut. And with my blog, you might have found this process a bit easier than before, I guess. Don’t worry; if you follow the instructions carefully, I can bet you can make a fabulous shirt.
However, be mindful of the heating setting as it can ruin your project and waste everything. It’s always better to use a household iron while making your first project. When you get familiar with the process, you can take one step ahead with an EasyPress.
#how to setup cricut maker#How to design shirts with cricut for beginners#Best cricut for making shirts#How to Make Custom Shirts with Cricut
0 notes
Text
10 Best Heat Transfer Vinyl Reviews 2018 – Ultimate Buying Guide
If you are a T-shirt entrepreneur, looking forward to designing your own unique fashion statement then you need the Best Heat Transfer Vinyl and we are here help you.
It’s the obvious dream of every designer to create designs and prints which leave an everlasting impression on your customers.
This not just a piece of cake, you need to make proper planning regarding your designs, which machines to be used and which substrate cloth to be used. If you don’t use high-quality heat transfer vinyl papers even after having all the above mention things you cannot achieve what you planned for.
If you have been in the vinyl business for quite some time then you will surely agree that if you don’t select proper vinyl, it will not only ruin your design but also impact your business. Today there are lots and lots of vinyl’s are available in the market and it becomes quite impossible to select the best one among them. With proper knowledge and budget, you can easily select the best vinyl transfer paper for your suitable garments.
What is Heat Transfer Vinyl?
Okay, the very first thing that we are going to do is to understand what a” heat transfer vinyl” is actually? HTV or Heat Transfer Vinyl is the ultimate answer to all you transfer designs projects. It enables you to give a personalized touch to your every project.
HTV is a thin sheet of polyurethane or polyvinyl chloride material on a clearer and self-adhesive material. These are available in roll and sheets from which designs are cut using computer controlled cutters such as Silhouette Cameo or the Cricut or Rolland GX or even hands. These designs are then weeded for the extra material and are generally heat pressed to complete the transfer.
If high-quality vinyl is used and applied properly thin it becomes a part of the fabric and lasts as long as the garment itself. The Heat Transfer Vinyl can be distinguished from other transfer media as it feels soft and smooth in touch and also has many vibrant colures. Moreover, it does not give any rubbery or stiff texture.
Why you need heat transfer vinyl?
It’s time to answer the most important question in this article today. There are a ton of reasons which I can point out in favor of heat transfer vinyl when compared to other forms transfer. Most important ones are mentioned below.
Precise designs and accurate cuts: As most of the vinyl cutting is done by computer-automated cutters so you get more attractive designs. The designs are sharpers plus there is no chance of soiling a design by human errors.
Affordable: One thing which I would like to highlight is that the vinyl transfers are many costs efficient when compared to direct to garment print or the screen printing process.
Sizable: The vinyl transfer business is highly adaptable to the business needs. As you can easily store the designs made well in advance without any issues, so when a sudden demand is felt simply use the designs to get products ready.
Vibrant color and multiple forms: Have you seen the T-shirts with really vibrant color worn by people around you which look much more appealing. These are nothing but vinyl design, there are lots of effects with which they are available such as opaque vinyl, Sparkling Vinyl, Metallic vinyl, patterns or glitter vinyl.
Durability: Out of all the other transfer forms Heat Transfer Vinyl is the one which lasts the most. If the transfer is properly made then the vinyl transfer will last as long as the garment itself.
Things to considering Before Buy
We have discussed quite a few things about heat transfer vinyl but before making the final purchase there are certain factors which you should look for. These are some of the basic features of high-quality vinyl which ensures the better quality products.
Quality of the vinyl: There are the various quality of heat transfer vinyl available on the market today and find the best one is a challenge. Try to get the best one available until and unless you want to get frustrated with your designed products. The best vinyl will be durable, won’t fade or crack and most importantly do not peel off, no matter how many time they are washed. One key feature of top quality vinyl that they are thin, which makes them easier to work on. Look for the user reviews to get the best one, if you find peeling, bubbling or melting issues in the review it’s more than enough to stay away from it.
Ease of transfer: This might be the most important point here if you know the proper transfer characteristics of vinyl it will save you a lot of hard work.
Transfer time: It’s the time required by the vinyl to get completely stuck to the substrate under the properly fixed parameter such as temperature and pressure. It also gives you a rough idea that how much time will a piece require.
Transfer temperature: As known by its name it is a heat transfer method, so we need to know the proper temperature at which it works. If the temperature is correct it will give better results.
Pressure: Most of the vinyl require a hard press while the transfer is taking place. Look for the pressure required by the vinyl to get completely transferred.
Color combination: Every pack of vinyl comes with a different color combination so it totally depends on you that which option you go with. These packs come with a very wide variety of colors from simple shades of grey to all the stuff found in the rainbow. Choose a pack which offers you diverse and trendy colors while being practical all your projects.
Size of vinyl: It is a very important factor, depending on the quantity required in a single transfer and as a whole on the entire project. If you are beginner sheets may be enough for you but later in the day, you may consume yards of vinyl.
Washable: Although vinyl is known for lasting, the last thing you want for your design to lose its quality as gets washed. Look for the piece which offers maximum wash cycle life.
These are just some of the highlight aspects which you should consider before selecting a pack, there are other factors depending on the project and budget which will be discovered at some later point in time.
Top 10 Heat Transfer Vinyl Reviews
Qbc Craft 12×12 Permanent Adhesive Vinyl Sheets (36 Pack)
If you just started the vinyl print business and are really looking for something that would easy to work with, then this started bundle might be the item you need. It comes in a super-sized package containing 36 sheets of heat transfer vinyl. Being in the sheet form allows you to easily take measures of your design and customize them accordingly. The vinyl material is of supreme quality and is highly durable even after years of rough use and washing. In my view, if used on garments it’s going to stay as long as the garment lasts itself.
Talking about the dimensions all the 36 sheets bear the same size of 12” X 12, that’s a decent size to work with most of the vinyl cutters and heat presses. They offer you the most extensive color range, needless to mention they literally have all the vibrant and practical colors out there. Because of such a wide range of colors, there is no project out there which you can leave apart and you can come up with something for every product thrown at you.
When it comes to the usage part the Qbc vinyl sheets are a charm as the packet comes with a nice instructional sheet. It is simple to understand and can be referred if have any doubts about the application. The pack includes transfer tapes which help in the easy repositioning of vinyl sheets thus reducing the chances of tearing or stretching.
For working with small decals with finer details you need to use the opaque blue grid transfer tape which is less adhesive thus allowing finer details to stay intact while withdrawing the sheets after cutting and weeding. But when you are working large designs consider using the red transfer tape as its aggressively adhesive.
Highlighted Features:
Highly durable vinyl can last up to 5 years if applied properly
Designed for indoor as well as outdoor use
Gives you lots of vibrant shades
The self-adhesive back makes it best heat transfer vinyl for Silhouette cameo and Circut
3 MIL thick which makes it ideal for any kind of craft or decoration projects
#02. Ultimate Oracal 651 Starter Pack 63 Glossy Self Adhesive Vinyl Sheets
If you want something in the tight budget that offers the superior quality and offers almost all the different shades needed for a project then you go for the Ultimate Oracal. People often get confused with the name of this vinyl set, first of all, let me clarify that it is not a set of 651 sheets rather 651 means Outdoor Adhesive Vinyl in a glossy finish. The pack still come with 63 Assortment and two extra sheets namely matte black and matte white.
Talking about the quality of the vinyl, its designed for outdoor use which means it can last for much longer. It can be used for outdoor signage, Dishes, decoration mugs or any kind of project that going to be exposed and washed regularly. All of this makes it highly durable.
The sheets are very much sticky and if transferred properly then will last for a very long time. Some of the users have even used the products which are washed in a dishwasher and the vinyl still stay as good, this gives you an idea about the durability of the product.
The vinyl sheets are overall of very high quality and are very thin. If you plan on to using this on Circut or Cameo use it on the paper setting else it will be shredded. The people who used the vinyl set never faced any problem in the transfer or cutting the design. This vinyl is ideal for making smaller projects.
The only reason that why it is not in the number one position is that it does not comes with transfer tapes whereas the Obc craft comes with two different transfer tapes.
Highlighted Features:
Highly durable, Made for outdoor use
Gives you lots of vibrant shades
The self-adhesive back makes it ideal to be used with any kind of vinyl cutters
Very well for smaller projects.
5 MIL thick which makes it ideal for any kind of craft or decoration projects
#03. iImagine Vinyl 72-Sheets of Premium Permanent Self Adhesive Vinyl Sheets
If you were okay with Ultimate Oracal but want something extra in the same price range then here we have the iImagine Vinyl set for you. And by extra here we mean a different kind of vinyl such as the glossy, the matte finished or the metallic ones. Here you get all of them in one pack. The pack comes with 60 sheets along with bonus 12 sheets which increase the count up to 72.
This vinyl set features most of the vibrant colors and in different shades and texture which makes it stand apart from rest. Also, when the compared price per piece of the sheet is one of the most affordable ones.
Talking about the quality of the vinyl, it’s a permanent vinyl as described by the manufacturer which makes it similar to the 651 thus it has been made designed for outdoor use. It can be used for outdoor signage, letters, Banners, Mugs, Dishes, Cars or any kind of flat surface where you need them. The project can be exposed and washed regularly as the vinyl is highly durable.
The vinyl sheet is very thin which talks about its quality itself and gave no problems to users it on Circut or Cameo. The only thing that you need to take care is maintaining the speed, thickness and blade setting on those automatic cutters. You need to use transfer tapes for this vinyl to avoid any issues with the final project.
As per users the transfer and cutting characters are really good and they never faced any issue while weeding too. It should have been provided with transfer tapes as in the case of Obc Craft.
Highlighted Features:
Similar to 651, designed for outdoor use
Gives you lots of vibrant shades in different textures
The self-adhesive back makes ideal for working on projects like tumblers, glass, ceramics, and others
0 MIL thick, making it ideal for craft and decors
#04. ATNTY HTV Heat Transfer Vinyl White
If you are into T-shirt print business and are looking for some of the best HTV to engrave texts and simple designs in pure white then we have the best product for you. If you are considering to get the best quality heat transfer vinyl in the budget then there is nothing wrong with this vinyl. At $ 1.44 per sheet they may sound a bit more expensive than our top three picks, but let me assure that these are high-quality vinyl solely designed for working with softer and smoother surfaces.
Some of the persons questioned me that why we should go for a 16 piece pack of vinyl in a single color that costs nearly as much as 65 piece pack with a lot of color options. My answer was that to sell a $ 3 T-shirt for $ 15, because of the better quality of vinyl printing.
The vinyl comes in a nice folder which prevents it from getting damaged or folded and at the same time keeps it clean. It cuts great and has a very smooth transfer process. There is no issue for weeding even when fine cuts are expected. This is the best heat transfer vinyl for cotton T-shirts. It only takes 20-30 seconds to transfer at 320 – 330-degree temperature. The vinyl is quite durable and stays as new even after multiple wash cycles if applied properly it will outlast the fabric itself.
Because of its slightly thin it cuts well on the Cricut and the silhouette ( use setting 5 for depth, 8 for speed and 7 for thickness). The only thing that you need to take care is that needs to be pressed a little longer while transferring.
Highlighted Features:
Designed for indoor use on fabrics and garments mostly
So thin that it does not even feel on fabric
Great for small projects
Best vinyl sheets for beginners
#05. ATNTY-Heat Transfer Vinyl Assorted Colors – 22 Colors
If you tried your hands on the White or Black vinyl from ATNTY and found it quite exciting and easy to work with then it’s time for upskilling yourself. T-shirt print business requires you to be able to print in multiple colors and at will. There is no room for error and the quality needs to be premium that’s where our next to heat transfer vinyl comes into play. These vinyl sheets are a bit on the expensive side and costs around $ 1.5 each, but looking at the quality they are worth every penny.
This pack contains three glittering sheets of dimension 10” x 12.19” and rest 19 sheets are simple and of size 12” x 12” each. The contains some of the trendiest colors and includes special highlight colors such as Gold, silver, and pink in glitter shade. The vinyl comes in the exact same folder which prevents it from getting damaged or folded and at the same time keeps it clean.
It cuts great and has a very smooth transfer process. There is no issue for weeding even when fine cuts are expected. This is similar to its white and black counterpart and is easily the best heat transfer vinyl for T-shirts. It only takes 20-30 seconds to transfer at 320 – 330-degree temperature. The vinyl is very durable, stays as new even after multiple wash cycles and maintains its color and texture. If applied properly it will outlast the fabric itself.
Because of its much slimmer design, it cuts extremely well on the Cricut and the silhouette and other cutting machines. If you are looking to do hats, hoodies, and sweatshirts this might be the best vinyl sheets for you. It takes the similar time and temperature setting as the ATNTY HTV White.
Highlighted Features:
Features all the vibrant colors available
Has the special glitter HTV which are much more expensive
So thin that it does not even feel on fabric
Highest rated heat transfer vinyl on Amazon
Highly durable stays as new even after long time use.
BRIGHT IDEA Heat Transfer Vinyl HTV Bundle
At number 6 we the Bright Idea HTV bundle, you may not have liked the above products for some reason or you want something extra. Well, right here we have the bright idea that has got a ton of reasons to be selected. This is the vinyl which is designed to take care of all your heat transfer needs. The bundle contains 2 sheets of white and black along with 2 metallic sheets namely golden and silver besides the rainbow swatch. And if that was not enough it features a Glow in the Dark vinyl sheet which of premium quality. Honestly speaking, it’s the one pack that can take care of toys, caps, aprons and much more.
These vinyl sheets are made from high-quality polyurethane which gives them extra flexibility and being strong and durable at the same time. Talking about the durability of this vinyl it can sustain up to 100 wash cycles without showing any signs of fading, peeling or developing cracks. The color vibrancy and shape stays as new for a very long period of time.
The HTV sheets feature a strong adhesive layer which makes it much comfortable to work with any of the automatic vinyl cutters. Also, it makes the wedding and application process much simple. It is ideal for creating superior quality designs that require fine cuts such as monogramming, lettering or texts. It works well with both the iron and heat press machines.
If you needed something that goes well with almost all the fabric such as cotton, polyester, Rayon, and others then this is the vinyl sheets you were looking for. Even now if you don’t find sufficient reasons think once again as it comes with 100% money back guarantee (no questions asked) if the users are not satisfied.
Highlighted Features:
Features all the vibrant colors available
Has the special metallic and Glow in dark HTV sheets which are quite expensive
Highly durable stays as new even after long time use.
Comes with money back guarantee
Permanent Adhesive-Backed Vinyl Sheets by EZ Craft USA
Well if you are looking for something that has been designed to works with all the automatic cutters and at the same time provides you with various texture then your search is over. What if I say that it is much cheaper than what you been approximating, it’s like Santa has brought you a gift. Well, it’s the best-priced pack of 40 which has all the vinyl in 12” x 12” size. The set has a white and black in matte finish, 3 sheets each of metallic texture for golden and silver, 2 brushed silver sheets and 30 regular rainbow swatches, what more do you want?
The vinyl sheets feature high-quality adhesive backing along with liner to protect it. Because of this the sheet does not gets ruined or separated during the cutting or weeding process. The liner is very easy to peel thus prevents from creating the mess. The vinyl is made from premium quality polyurethanes which makes it much thinner and stronger at the same time.
The vinyl sheets come in a flatly packed folder which prevents the bent corners which are caused in rolls. It’s more like an Oracal 651 sheet meant to be used for the outdoor purpose. Its durable and can last up to several years facing high exposure. Even after a long run, it can hold its color and shine.
It’s good for any kind of flat surfaces such as mugs, vases, cars, signages, and others. If it’s a flat and smooth surface you can use this vinyl on that. Moreover, it comes with a lifetime satisfaction guarantee which means if you are unhappy with the product simply return it and get the refund.
Highlighted Features:
Features all the vibrant colors available
Designed for outdoor use
Has the special metallic sheets which are quite expensive
Highly durable stays as new even after long time use.
Comes with money back guarantee
#08. Premium Heat Transfer Vinyl Iron on
Okay you need to buy some high-quality heat transfer vinyl sheet and also your old cutting mat has had enough wear and tear and you need a Teflon sheet too for the transfers. This bundle has got you covered for everything mentioned above and all those at a much smaller budget. The package contains 15 HTV sheets of dimension 12” x 10” of vibrant and primary color.
The vinyl is made from 100% polyurethane making it much slimmer and stronger same time. Its stretch resistant and has been provided with a modified adhesive layers which make the weeding process very easy. Because of the thin nature, it has to be cut on paper setting on most of the cutters. Talking about the quality, it has been designed to be weather resistant which means you can use them in warm as well as freezing cold conditions. The vinyl is durable and outlasts most of the fabrics with which they were used if applied properly.
The vinyl has been designed to transfer using only irons but if you have a heat press it will be great. You can even use it on smaller projects like mugs and other flat surfaces.
Highlighted Features:
Features all the vibrant colors available
Designed to be used with simple irons
Comes with a cutting mat
Highly durable stays as new even after long time use.
Comes with a Teflon transfer sheet
#09. Heat Transfer Vinyl for T-Shirts, 16 Pack
At number 9 on our list, we have the U-ZM HTV for T-Shirts which is as good as any of the above-mentioned vinyl sheets. There is no issue of quality with these vinyl sheets too but the only reason they are so down on the list is that they just offer only vinyl sheets whereas every other product on the list offers you something extra.
The bundle has 16 sheets of vibrant colored vinyl sheets which are convenient to work with. The sheets come in 12” x 12” size and are perfect to work with most of the computer controlled cutters like the cameos and the circuits.
The vinyl sheets are made from 100% PU which makes them quite durable and the color & texture remains as new even after 50 wash cycles. Because of the high-quality PU, it’s much easier to cut and weed for even smaller and sharper design. Also, it features instructions written on every sheet of vinyl, so you are never going to make a mistake.
Highlighted Features:
Features all the vibrant colors available
Designed to be used with almost all the computerized cutters
Highly durable stays as new even after long time use.
#10. Heat Transfer Vinyl Black and White
Finally, we are at the end of our list we have the last product for you. What would you do with your regular vinyl pack if you are working on a project where you require large quantities if white and black vinyl? You get stuck in middle, as most of them have only one or two black & white sheets. The solution to this problem is the U-ZM Heat Transfer Vinyl bundle as it has 5 sheets each of black and White. It is one of the best heat press vinyl out there and works like charm with most of the fabrics.
The sheets are as good as any other on the list and are made from 100% PU which makes them highly durable and they look like new even after 50 washes. Because of the high-quality PU, it’s much easier to cut and weed for even smaller and sharper design. They come in 12” x 12” size and are ideal to work with most of the automatic cutters.
Highlighted Features:
Made from high-quality PU
Designed to be used with almost all the computerized cutters
Highly durable stays as new even after long time use.
Final Verdict
Now that you have seen some of the best heat transfer vinyl sheet bundles available on the market today, its time to make the decision that which one do you need. Before making the final selection look for the requirements of your project. If you are starting for simple T-shirts then you can go with a bundle that offers you a lot of colors to play with so that you can have multiple color combinations. Also, look for the wash cycle life and texture that you require for a particular project. Finally, do not try to save some bucks and end up purchasing a low-quality product. I am sure you can find something on our list that fulfills all your needs.
The post 10 Best Heat Transfer Vinyl Reviews 2018 – Ultimate Buying Guide appeared first on Heat Press Machine Reviews.
from Heat Press Machine Reviews http://heatpressmachineguide.com/best-heat-transfer-vinyl/
0 notes