#How to make bootable usb
Explore tagged Tumblr posts
Visit Tumblr Blog
Explore Tumblr blogs with no restrictions, modern design and the best experience.
Last Seen Tumblr Blogs


Fun Fact
Tumblr has a low social media market share in South America.
Text
Have you got an old Mac that is no longer supported by Apple? It's time to give it a new life.
How to install the latest MacOS on Mac hardware that is no longer officially supported using OpenCore Legacy Patcher.
I recently discovered this and it has been a game changer. Recently my partner needed a Mac for her music course, so we bought a 2012 Macbook Pro as it was cheap and on paper still had decent hardware for working with music. We were then disappointed to find out that it is no longer supported by Apple, and therefore can't run the latest version of Logic, which she needed to inter-op with the school comptuers. Just as we thought we had bought a less than useful computer, I found this video about OpenCore Legacy Patcher from Youtuber Action Retro.
It's a community made piece of software that allows you to install the latest version of MacOS on any Intel Mac, from the late 2000s onwards. All you need to do is download the application on a mac, it will then allow you to make a bootable USB drive for any version of MacOS you want, and you just need to choose the specific mac you are targeting from a list, and it "blesses" the bootable drive, allowing you to install it on your unsupported mac using the normal install process.
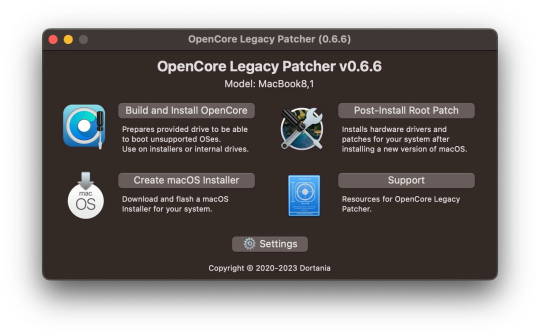
I tried it and it it worked perfectly on the 2012 Macbook Pro, and the latest version of MacOS Sonoma is running perfectly well on the 12 year old hardware. It also allowed us to install the latest version of Logic, so it's working great.
Props to the team for making this and allowing hardware that would otherwise be e-waste to continue to be usable with the modern internet and software. If you end up using it, please consider donating to the team as apparently they had to jump through some serious technical hoops to get this working. Here is the link again if you need it: https://dortania.github.io/OpenCore-Legacy-Patcher/
#mac#MacOS#Computers#OpenCore Legacy#OpenCore Legacy Patcher#Software#hardware#Apple#computer recycling#Action Retro
3K notes
·
View notes
Note
Please, please explain how to install and use linux like I'm 5 years old. I'm so sick of windows adding AI and other bullshit to my already struggling elderly laptop but I'm really not good with computers at all so I have no idea where to start with Linux.
Okay, so, I'm going to break this down into steps I would give the average tumblr user first, and then if any of them are confusing or use words you don't understand, ask me and I'll explain that step in greater detail.
Step 0) BACK. UP. YOUR. SHIT.
NEVER EVER EVER CHANGE YOUR OPERATING SYSTEM WITHOUT A COMPLETE BACKUP OF ALL YOUR FILES.
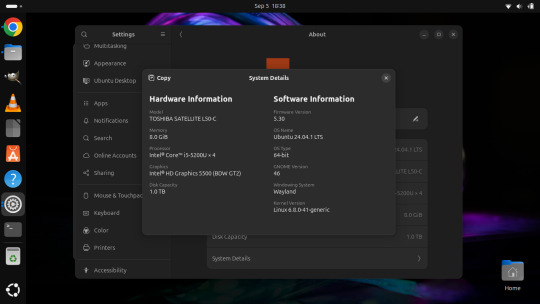
Step 1) Learn your machine. You need to know:
How much RAM you have
If your processor is 32 or 64 bit
How big your hard drive is
On windows, you can find out all of this by going to the start menu, typing "about" and opening the first result on your system instead of the internet.
For additional instructions, visit this page.
Step 2) Pick your Linux.
There's like 10,000 kinds of Linux, each tailored to particular functions that the end-user (that is you!) might want to have. The sheer amount is very daunting, so first I'm going to give my suggestions, then I'll explain how to pick for yourself.
For Mac users, I suggest Kubuntu. For windows users, I suggest Mint Cinnamon. If your laptop is really REALLY old, I recommend Sparky Stable, which is the lightest weight Linux I would ever suggest for a new user. In every case, download the version suited to your processor (32 bit can be labelled "x86" or "32 bit"; 64 bit is always labelled "64 bit").
If you want to try a different type of linux, you'll need to make sure your laptop meets the "minimum specs" or "system requirements." These numbers tell you how much RAM, processor and hard drive space the linux will use. (That's why you needed those numbers at the beginning.)
Step 3) Collect your supplies. You're going to need:
An ISO burning program compatible with your current system, like Balena Etcher.
A copy of the ISO file for the Linux you want to use.
Your laptop.
An 8gb or larger USB flash drive.
Step 3) Make a bootable USB drive
Install Balena Etcher, hitting "okay" and "next" when prompted. Last I checked, Etcher doesn't have adware attached, so you can just hit next every time.
Plug your USB drive into the laptop.
Open Etcher.
Click "flash from file" and open the ISO file with your Linux on it.
Click "Select target" and open the USB drive location. Hit the "flash" button. This will start writing all the linux installer data to your flash drive. Depending on the speed of your machine, this could take as long as 10 minutes, but shouldn't be much longer.
Step 4) Boot to the USB drive
This is, in my opinion, the trickiest step for a lot of people who don't do "computer stuff." Fortunately, in a rare act of good will, Windows 10 made this process a lot easier.
All you'll need to do is go to settings, then recovery, then advanced startup and pick the button labelled "use a device."
This tutorial has images showing where each of those is located. It's considered an "advanced setting" so you may get a spooky popup warning you that you could "harm your system by making changes" but we're not doing anything potentially harmful so you can ignore that if you get it.
Step 5) Try out linux on the flash drive first.
Linux installs using a cool little test version of itself that you can play around in. You won't be able to make changes or save settings, but you can explore a bit and see if the interface is to your liking. If it's hideous or hard to navigate, simply pick a new linux version to download, and repeat the "make a bootable USB" step for it.
Step 6) Actually install that sucker
This step varies from version to version, but the first part should be the same across the board: on the desktop, there should be a shortcut that says something like "install now." Double click it.
Follow the instructions your specific linux version gives you. When in doubt, pick the default, with one exception:
If it asks you to encrypt your drive say no. That's a more advanced feature that can really fuck your shit up down the road if you don't know how to handle it.
At some point you're going to get a scary looking warning that says 1 of 2 things. Either:
Install Linux alongside Windows, or
Format harddrive to delete all data
That first option will let you do what is called "dual booting." From then on, your computer will ask every time you turn it on whether you want Windows or Linux.
The second option will nuke Windows from orbit, leaving only linux behind.
The install process is slower the larger your chosen version is, but I've never seen it take more than half an hour. During that time, most linux versions will have a little slideshow of the features and layout of common settings that you can read or ignore as you prefer.
Step 7) Boot to your sexy new Linux device.
If you're dual booting, use the arrow keys and enter key to select your linux version from the new boot menu, called GRUB.
If you've only got linux, turn the computer on as normal and linux will boot up immediately.
Bonus Step: Copy Pasting some code
In your new start menu, look for an application called "terminal" or "terminal emulator." Open that up, and you will be presented with an intense looking (but actually very harmless) text command area.
Now, open up your web browser (firefox comes pre-installed on most!), and search the phrase "what to do after installing [linux version you picked]"
You're looking for a website called "It's FOSS." Here's a link to their page on Mint. This site has lots and lots of snippets of little text commands you can experiment with to learn how that functionality works!
Or, if you don't want to fuck with the terminal at all (fair enough!) then instead of "terminal" look for something called "software manager."
This is sort of like an app store for linux; you can install all kinds of programs directly from there without needing to go to the website of the program itself!
296 notes
·
View notes
Text
I'm not going to derail the post telling people how to remove Windows recall, because there are legitimate situations where you are trapped with windows.
But there are fewer of them than it probably seems. Please, if you can figure out how to make a bootable USB drive, try Linux. Do it via a live environment and poke around, see if you can figure out how to do the things you do regularly.
If you decide to go in, you don't even have to ditch windows entirely. I didn't. But the difference is now I'm only booting into it once every few months to play a game that doesn't run well under Linux.
And my boot times are stupid fast. Login screen to functional desktop in 2-3 seconds. That's on a SATA SSD, the NVMe drive that Windows is on takes 30 - 40 seconds when primed, and closer to a minute or two when I'm only booting every now and then.
11 notes
·
View notes
Note
do you have any Linux advice for someone Linux-curious? i have a copy of Ubuntu downloaded but have been hesitant to bite the bullet on it
Having a reason to switch to do something is generally the only way I'll make a major change. In this case, my laptop was dying, so it was the ideal time to break from Windows. If you're just curious, I would make a bootable USB and play around with the OS, see how it feels.
My experience is that the transition was fine. I think I'm a little more tenacious than most, so I may have forgotten the more painful parts, but thus far I think it's been worthwhile.
Advice if you go through with it
If you choose linux mint, it will offer the option to dual boot with Windows. I wanted to jump right in, so I said no. If I could do it again, I would dual boot. It's good to have a backup.
Replace libreoffice with OnlyOffice
Download Gnome Tweaks, Gnome Extensions, Caffiene extension, and either Dash to Dock or Dash to Panel for basic QoL improvements
when you install stuff, it generally doesn't show up in your list of applications. Usually rebooting fixes this.
Understand that it can take a while to grasp whether something is doable or not because Linux users struggle with understanding where new users are coming from. Sometimes "of course it's possible to do x" means "It's possible to do x but it will take you days to implement what is ultimately an inferior version of what you were asking for."
on that note, if you plan to use photoshop regularly, leave a partition for Windows. Yes, it's ostensibly possible to make photoshop work on linux through methods x, y, and z, but you'll sink a lot of time into creating an unstable, less less functional variant. Or try Krita.
make anki cards or print out a list of the more common commands, the kind of stuff they put on linux command mouse pads. Or get a linux command mouse pad.

^probably would have had a smoother install if I'd remembered I had this rolled up not three feet away from me
19 notes
·
View notes
Text
Just hear me out...
So, Edge, CoPilot, and worst of all, Recall are just terrible for a large number of reasons - namely privacy and security. We're in a time period where this is just going to get worse and worse that any number of precautions just aren't going to cut it because the people who are doing this to you aren't some random bad actor trying to hack your system. It's a specific bad actor that made the system FOR YOU. And that just about sucks any way you try to cut it.
There are some things you can do - but you might not like it:
Believe it or not, the absolute easiest solution is switching to Linux.
BUT WAIT! DON'T STOP READING JUST YET!
Hear me out. I get it, we grew up on MS Windows and a lot of us are on Apple systems too (which are also riddled with AI garbage), but Linux isn't what it used to be, even a decade ago. And yes, there's like a billion different distributions out there, how do you even choose, right? Let me tell you, even linux users are annoyed by it too. But, linux CAN give you a lot of the same things windows and mac can without the AI and spyware bullshit and the different distributions aren't really that different - it's really just a lot of engineers going, "well this is good, but this is how I WOULD DO IT," and still be able to use the same packages.
Here's how I'd recommend approaching linux without having to throw your os in a garbage fire:
grab a popular distribution of Linux - I recommend Linux Mint (it's pretty user friendly) - read through this: https://linuxmint-installation-guide.readthedocs.io/en/latest/choose.html#
get an empty USB stick (preferably around 64 gigs just to have the space, but you can get away with something much smaller) and create a bootable image with it
Restart your pc with the usb stick in - You can now run linux - for free (always free) - off the usb stick without affecting anything else. You can install stuff, mess around, play with it, yadda yadda.
So yes, there will also be a learning curve with it too. It's linux, it's new, it's different. But once you get your feet wet, you'll start seeing windows as super clunky and bloated.
If you don't want to do THAT, you can also try linux through your browser: Read through this article:
Basically it's a virtual machine that you can play with, but it's a little restricted sooo probably not the most accurate experience, but something to still play with. You can also learn a lot from this site as well:
BUT IF YOU DON'T WANT TO DO ANY OF THAT AND RATHER STAY ON WINDOWS (sorry not a mac user so I can't really think of solutions for mac users)
The alternative is really messing with registry keys and blocking ports that Copilot and Recall use through the firewall which can greatly mess up your PC if you don't know what you're doing.
Did i mention linux is free and it has a MASSIVE community for support?
Anyway - EITHER WAY YOU CHOOSE - we ALL need to start being a little more tech savvy. Things are going to get worse and if we're blind to it, we're walking to our doom willingly.
Just a side note: This doesn't mean linux is like the most secure thing in the world - you still need an antivirus and set up firewalls and be diligent about malware and privacy and such. Like, that's still a 'you' responsibility no matter what operating system you use. So keep that in mind
11 notes
·
View notes
Text
Installing Kali Linux on a USB Stick: A Step-by-Step Guide
If you want a portable, powerful cybersecurity toolkit you can carry in your pocket, installing Kali Linux on a USB stick is the perfect solution. With Kali on a USB, you can boot into your personalized hacking environment on almost any computer without leaving a trace — making it a favorite setup for ethical hackers, penetration testers, and cybersecurity enthusiasts.

In this guide, we'll walk you through how to install Kali Linux onto a USB drive — step-by-step — so you can have a portable Kali environment ready wherever you go.
Why Install Kali Linux on a USB?
Before we dive into the steps, here’s why you might want a Kali USB:
Portability: Carry your entire hacking setup with you.
Privacy: No need to install anything on the host machine.
Persistence: Save your settings, files, and tools even after rebooting.
Flexibility: Boot into Kali on any system that allows USB boot.
There are two main ways to use Kali on a USB:
Live USB: Runs Kali temporarily without saving changes after reboot.
Persistent USB: Saves your files and system changes across reboots.
In this article, we’ll focus on setting up a Live USB, and I'll also mention how to add persistence if you want. and if you seek knowledge about kali linux you can visit our website any time
Website Name : Linux Tools Guide
What You’ll Need
✅ A USB drive (at least 8GB; 16GB or more recommended if you want persistence). ✅ Kali Linux ISO file (download it from the official Kali website). ✅ Rufus (for Windows) or Etcher/balenaEtcher (for Mac/Linux/Windows). ✅ A computer that can boot from USB.
Step 1: Download the Kali Linux ISO
Go to the Kali Linux Downloads page and grab the latest version of the ISO. You can choose between the full version or a lightweight version depending on your USB size and system requirements.
Tip: Always verify the checksum of the ISO to ensure it hasn't been tampered with!
Step 2: Insert Your USB Drive
Plug your USB stick into your computer. ⚠️ Warning: Installing Kali onto the USB will erase all existing data on it. Backup anything important first!
Step 3: Create a Bootable Kali Linux USB
Depending on your operating system, the tool you use may vary:
For Windows Users (using Rufus):
Download and open Rufus (Get Rufus here).
Select your USB drive under Device.
Under Boot selection, choose the Kali Linux ISO you downloaded.
Keep the Partition scheme as MBR (for BIOS) or GPT (for UEFI) based on your system.
Click Start and wait for the process to complete.
For Mac/Linux Users (using balenaEtcher):
Download and open balenaEtcher (Get Etcher here).
Select the Kali ISO.
Select the USB drive.
Click Flash and wait until it's done.
That's it! You now have a Live Kali USB ready.
Step 4: Boot Kali Linux from the USB
Restart your computer with the USB plugged in.
Enter the BIOS/UEFI settings (usually by pressing a key like F12, Esc, Del, or F2 right after starting the computer).
Change the boot order to boot from the USB first.
Save changes and reboot.
You should now see the Kali Linux boot menu! Select "Live (amd64)" to start Kali without installation.
(Optional) Step 5: Adding Persistence
Persistence allows you to save files, system changes, or even installed tools across reboots — super useful for real-world usage.
Setting up persistence requires creating an extra partition on the USB and tweaking a few settings. Here's a quick overview:
Create a second partition labeled persistence.
Format it as ext4.
Mount it and create a file /persistence.conf inside it with the content: cppCopyEdit/ union
When booting Kali, choose the "Live USB Persistence" option.
Persistence is a little more technical but absolutely worth it if you want a real working Kali USB system!
Troubleshooting Common Issues
USB not showing up in boot menu?
Make sure Secure Boot is disabled in BIOS.
Ensure the USB was properly written (try writing it again if necessary).
Kali not booting properly?
Verify the ISO file integrity.
Try a different USB port (preferably USB 2.0 instead of 3.0 sometimes).
Persistence not working?
Double-check the /persistence.conf file and make sure it's correctly placed.
Conclusion
Installing Kali Linux onto a USB stick is one of the smartest ways to carry a secure, full-featured hacking lab with you anywhere. Whether you’re practicing ethical hacking, doing security audits, or just exploring the world of cybersecurity, a Kali USB drive gives you power, portability, and flexibility all at once.
Once you’re set up, the possibilities are endless — happy hacking! 🔥
2 notes
·
View notes
Text
SO. In trying to fix a sudden IP configuration error manifesting out of nowhere on J's computer started, I went through a whole lot of troubleshooting and fuss until I hit the step to do a selective startup, which promptly caused an even bigger problem after I rebooted: Trying to log in and getting "Something happened and your PIN isn't available."
SOMETHING. HAPPENED. What happened? How is a PIN 'not available'? WHO KNOWWWWWWS.
And of course when you can't log into the only admin account on the computer you can do fuck-all else, like, say, change system config to do a normal boot, so I had to make a bootable Lubuntu USB and via that try blanking J's password and, as a precaution, promoting the test account I'd made to see if the IP config problem was from profile corruption to admin.
Windows still whined about the PIN 'not being available' (HISSSSS) but via the test account I could reset system config and magically, he could log into his own account again... with his PIN.
And his connection is still fucked, too (but wasn't on Lubuntu, so it's not the hardware).
Anyway moral of the story is don't use a PIN for Windows and consider disabling the password bullshit altogether, because it can mysteriously just decide not to work when you're taking normal fucking troubleshooting steps. Christ on a fucking bike Windows has gotten BAD.
6 notes
·
View notes
Text
I just figured out how to make a bootable usb with the dd command, it’s SO much easier than hunting down a compatable program. I think it’s how I’m going to be making bootable usbs from now on.
2 notes
·
View notes
Text

05.09.24
Linux laptop project 2024.
I decided to upgrade my old laptop by making it a Linux dual boot system. I had never done this before. I downloaded the ISO files for Linux Mint 22 'Wilma' and Ubuntu 24.04.1 'Noble Numbat' LTS.
The selected files include the standard desktop environments for each, Cinnamon, for Linux Mint and GNOME for Ubuntu.
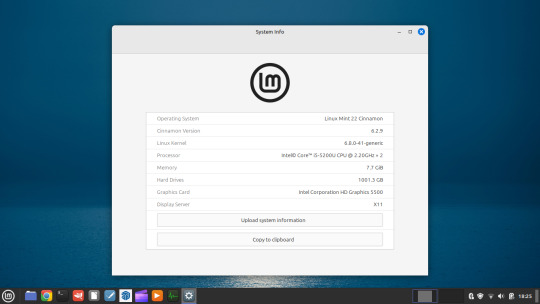
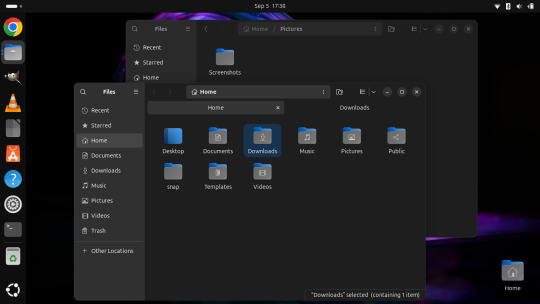
Then using the built in USB disk creator on Linux Mint, I created bootable USBs, one for Linux Mint and one for Ubuntu. I decided to install Linux Mint first. The installation includes creating partitions and I used the installation partition creator to create a 25 Giga-byte partition in which I installed Linux Mint. The installation went ahead smoothly, and when it completed, I booted up Linux Mint. It looked perfect.
See screenshots below.


I then installed GParted, which is a more powerful partition manager to create the additional partitions I needed. I created a 25 Giga-byte partition for Ubuntu, two other 25 Giga-byte partitions and I hundred Giga-byte data partition formatting them all using ext4.
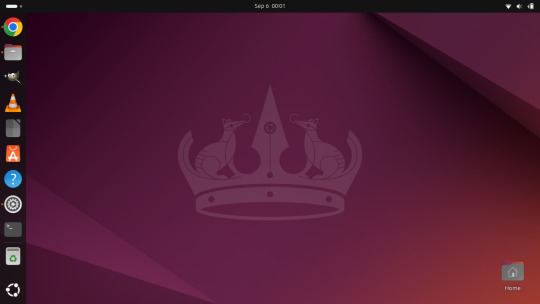
I then installed Ubuntu. During the installation, I selected the extended install, rather than the minimal install, so I had a full Ubuntu desktop installation on the second partition on my laptop hard drive. This all went well and at the end of it all I had a system which could boot either Linux Mint or Ubuntu.


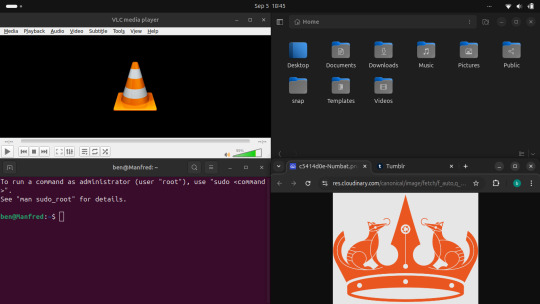
After installation, I booted each system up individually and updated them with the latest updates available, and then I installed necessary software that I wanted such as the Google Chrome Browser, Audacity, VLC Media Player, GIMP, Asunder CD ripper.
I also reinstalled the Chrome web apps for Microsoft Clipchamp and Trimble SketchUp web.
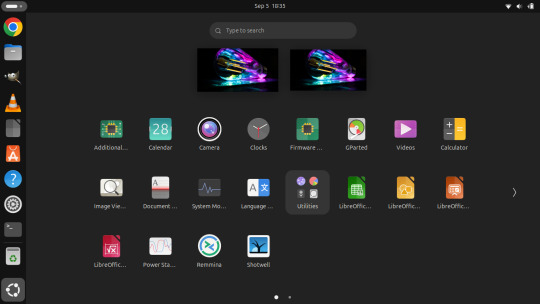
The majority of software bundled on these Linux distros is already preinstalled. I then had fun tweaking each install and making them look how I wanted.
Here is a list of some of the tasks I did in both installs:
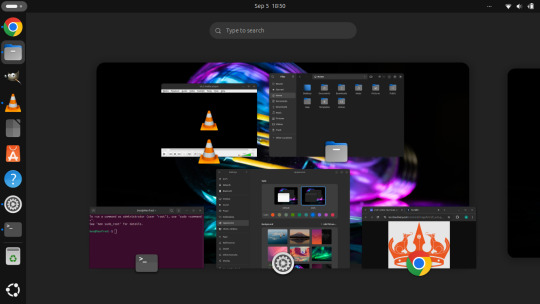
- configuring the desktop environment to my liking, e.g. background, theme colour, dark theme (Ubuntu) mixed colour scheme (Mint). - added Bluetooth devices (headphones, Mini-Rig speaker) - added the printer device - dual booted into each one to check them out!
-
After this, Dad wanted to finish the set-up in such a way that I could link my local laptop Documents, Downloads, Pictures, Music and Video folders directly to the data partition, which would mean that I could access those folders automatically from any installed Linux distributions, however this didn't quite go to plan and messed some things up, so we decided to re-install both operating systems again and I repeated all the previous steps and left out the folder sharing part for now.
-
The images underneath show the final desktop installs with my various theme and desktop personalisation's applied and all the installed apps.
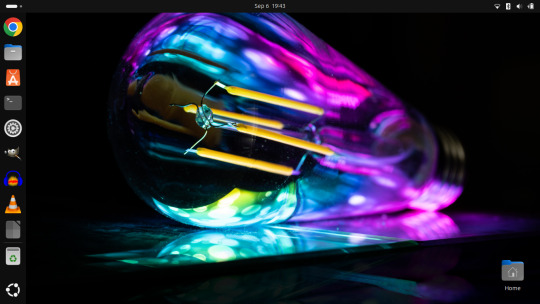
Here is a screenshot of the 'GNOME image viewer' in Mint and Ubuntu.

Ubuntu Linux is celebrating its 20th anniversary with a web post.
See link below:
https://ubuntu.com/20years
For more information about the Linux laptop project, search 'Linux' on my Tumblr blog!
6 notes
·
View notes
Text
Well the bad news is that the nearest store didn't have a suitable backpack for a grill bag. The only options were a $20 backpack that was made for a kindergartner and is way too small for my needs or a hiking pack for $90 which is way more than I want to spend. I might have to break down and go to Walmart lol.
The good news is that I got my hands on a new flash drive so I can make a bootable USB for Ubuntu. Funny how the smallest drive available is 64GB for only $7. Seems like just a decade ago 32GB was big dick storage.
5 notes
·
View notes
Text
Anyway the post I wanted to reblog was about making a bootable usb with persistence! It's essentially a little computer hosted on the usb, and can be run on almost any laptop/computer with a USB port. Download Windows on that USB, Linux Mint, Ubuntu, anything you want! You could even download multiple OSes if you use a multi boot creator (and you have enough space)!
You can go to pendrivelinux and use the Yumi creator (Your USB Multiboot Installer). There are even guides on there for how to download various OSes, though the basic rules should be the same. Plus, you can always use guides from other sites and other installers!
Personally, I plan to use Mint once I get a new USB (I need a new one for various reasons). I'm going to put Mint Cinnamon version on there (it's the most popular) and try to download it onto my laptop as well. My laptop is slow though so if that doesn't pan out I'll use the XFCE version since it's very light weight and uses little resources!
Here is a guide for installing Mint via Yumi and Here is Mint's guide to verifying the integrity and authenticity of the iso you download.
#I heard Linux lite is also a good one for slow devices#MAN I really want to make a bootable USB RIGHT NOW but I want to get a new USB first.#Firstly cus while yumi says you can use the USB as a normal USB after#I'm not sure if it means *only* after or not. Like will it delete all my files but then afterwards I can put new files on it just fine? Cus#I want to keep my old stuff. More pressingly though I bent my USB a little and then bent it back. But now I don't think it goes into ports#Smoothly. I don't want to damage a random laptop so I try not to use it much. But if I made a bootable USB I'd want to use it all the time.#On the plus side if I get a new USB I can get one with a lot more GBs. So I can download multiple OSes! I think I'd be able to do that with#Current USB but I'm planning on going from 32GB to 128GBs so it's a significant improvement! Plus it'd come with a thing to loop a keychain#Through. So that'd be nice.
2 notes
·
View notes
Text
End of the workweek!
You read that title correctly! Due to "Hemelvaart" in Belgium and Holland, we have thursday and friday off! Today I will be going over Monday and Tuesday with you! On monday i came into the office and had my usual morning talk with Glennrick! We talked about the state of the printers and some more IT stuff! Once I was done I went to Dwayne to see if he had any tasks for me. He handed me an empty USB drive and asked me to make a bootable USB for windows 10 pro. So i started working on it. I ran into some issues so i couldn't finish my task by lunch, I also had to make an instructions manual for Adobe Acrobat reader, showing people how they could add a digital signature to their documents. At lunch, charees came to me and asked me if i wanted to go along with her to the Parlement of Aruba to watch a friend of hers give a presentation about child mistreatment. It was very nice to see the parlement from the inside. And i felt really good after the presentation because you could see the happines on clem's face, just because a few of us showed up to support her. There was a very big table where we all sat down. And being there with 2 ministers and a bunch of head's from department felt very important. A room filled with important people while i'm sitting there as a student was a little intimidating, yet very impressive. Once we were done there, we went back to the university. There weren't any tasks left for me to do, so I just worked on my blog a little. On tuesday morning there was a symposium in the aula which i sadly enough couldn't attend because of a few tasks. I finished the manual and went back to working on the bootable USB. Around 11AM, Glennrick told me to hop in the car because we were going somewhere. Francis, a student of SisSTEM needed help. He wanted a VOIP phone installed in his office. He got a dedicated office from the local hospital to do research on how AI Aerobics coaching affects your cardiovascular health. Upon reaching his office we instantly noticed he doesn't even have ports to install a phone. Francis explained some more about his research before we took off again. In the afternoon, Dwayne took me to the computerlab to label the computers and put them back in the right order. We also looked into bolting the desks to the ground so students couldnt move the desks and break the cables.
At the end of the day, we went out for dinner at Bugaloe, where I tried a surprisingly delicious sloppy joe. As the evening progressed, we encountered some friendly gentlemen from the United States who struck up a conversation with us. We danced and had a blast throughout the night. Before parting ways, we exchanged contact information. It turned out they were all members of the United States Army, and it was their last day before deployment. I expressed my gratitude for their service and mentioned that I wished we had met earlier. We promised to stay in touch, although they mentioned that communication might be limited during their upcoming three-week deployment. They assured me they would reach out once they were back. I will be eagerly awaiting their return.
On Wednesday, I headed straight to work with the task of creating a tutorial video on adding a digital signature to a PDF document. Unfortunately, the university's expensive microphone failed to connect, so I had to rely on the built-in microphone of a webcam. The sound quality was poor, but with some editing magic, I managed to make it sound decent at least. In the afternoon i was asked to prep a slim computer (very small computer that runs on the domain) for the VRES room, this one had a solid state drive instead of a regular hard drive, meaning it would go faster. At the end of the day, Glennrick wanted to have another mentor meeting with me to update me on my progress. I was satisfied to see the "good"box ticked almost everywhere. Next week I can give it my all and hopefully get to see a couple "excellent" boxes being ticked! In the evening, the rest of the group went out for drinks! I wasn't in the mood and decided to stay at the appartment to relax and blow of some steam for the upcoming long weekend! That wraps up my (brief) work week! Stay tuned for more updates coming soon! Signing off for now with love <3 Bon wiként!
This was my (short) work week! More updates coming soon! Signing off for now <3 Bon wiként!
3 notes
·
View notes
Text
How to Wipe Data on SSD: A Complete Guide
Solid State Drives (SSDs) are faster, more durable, and more energy-efficient than traditional hard drives. But when it comes time to sell, recycle, or repurpose your SSD, simply deleting files or formatting the drive isn't enough to protect your sensitive data. To ensure your personal or business information is truly unrecoverable, you need to wipe the SSD securely.
This guide walks you through the process of wiping an SSD properly, and shows how to use a reliable third-party tool — iReaShare Data Wipe — to simplify and secure the task.

Why You Should Properly Wipe an SSD Unlike traditional HDDs, SSDs use flash memory and have built-in wear-leveling and garbage collection mechanisms. These features improve performance but also make traditional data-wiping methods (like overwriting sectors multiple times) ineffective or even damaging.
Key reasons to wipe your SSD securely: Protect privacy: Prevent identity theft or data leaks. Prepare for resale or donation: Ensure the next user can't recover your data. Ensure compliance: Meet data protection standards like GDPR or HIPAA.
Method 1. Using Manufacturer Utilities Most SSD manufacturers (Samsung, Crucial, SanDisk, etc.) offer proprietary utilities with secure erase functions. These tools issue built-in ATA Secure Erase or NVMe sanitize commands to reset the SSD to factory state. Pros: Designed for your specific SSD Cons: Might not support third-party drives or non-Windows OS
Method 2. Using Disk Management (Not Recommended for SSDs) You can format the SSD or delete partitions via Windows Disk Management. However, this doesn’t erase the data; it simply removes access to the files. Warning: Data can still be recovered with recovery tools.
Method 3. Using Command Line Tools Power users may use tools like diskpart in Windows or hdparm in Linux. These can issue secure erase commands, but they require careful input and may not be user-friendly.
Method 4. Using iReaShare Data Wipe If you're looking for a simple, safe, and effective way to wipe an SSD, iReaShare Data Wipe is a great solution. It's designed to permanently erase data beyond recovery, while being easy to use even for beginners.
How to Wipe SSD with iReaShare Data Wipe Step 1: Visit the official iReaShare website. Download iReaShare Data Wipe and install it on your Windows computer. Launch it. Step 2: Connect the SSD to your computer via SATA, M.2 slot, or external enclosure (USB to SATA adapter, for example). Ensure it is detected by the software. Step 3: From the main interface, locate your SSD under the list of connected drives. Select the correct drive. Double-check the drive letter or name to avoid wiping the wrong drive.

Step 4: iReaShare Data Wipe offers 2 data erasure levels: Quick Erase and Deep Erase. You can choose it as you need. Step 5: Click the "Erase Now" button. A warning will appear notifying that data cannot be recovered. Confirm your choice.

Wait for the process to complete. This can take several minutes to hours depending on the method and SSD size. Step 6: After wiping, the tool will notify you of completion.
Final Tips Back up important data before wiping — the process is irreversible. Always double-check the selected drive before proceeding. If your SSD is bootable, you may need to create a bootable USB version of the software.
Conclusion Properly wiping an SSD is crucial before selling, recycling, or repurposing it. While there are many options, iReaShare Data Wipe provides a reliable, user-friendly, and effective solution for securely erasing your SSD with peace of mind.
Whether you're a tech-savvy user or a beginner, iReaShare simplifies the complex task of secure data deletion, helping ensure your privacy and data security are never compromised.
0 notes
Text
Slimjaro Reviews Australia (Honest Customer Reviews 2025) Must Check Once Before Buying!
Introduction
Linux enthusiasts are always on the lookout for lightweight, fast, and efficient operating systems that can breathe new life into older hardware or provide a streamlined experience on modern machines. Slimjaro Reviews is one such distribution that has gained attention for its minimalistic approach while retaining the power of Arch Linux.
In this detailed Slimjaro review, we’ll explore its features, performance, installation process, software availability, and overall usability to help you decide if it’s the right choice for your needs.
What is Slimjaro?
Slimjaro is a lightweight Linux distribution based on Arch Linux and Manjaro. It is designed to be fast, minimal, and highly customizable while maintaining the stability and rolling-release model of Arch. Unlike standard Manjaro, which comes with a full suite of pre-installed applications, Slimjaro strips away unnecessary packages, offering a leaner experience ideal for:
Older or low-spec computers
Users who prefer a minimal setup
Developers and advanced users who want control over their system
Key Features of Slimjaro
Lightweight & Fast – Uses fewer system resources than standard Manjaro.
Arch-Based – Benefits from the Arch User Repository (AUR) and rolling updates.
Multiple Desktop Environments – Offers Xfce, Openbox, and LXQt for flexibility.
Minimal Pre-Installed Software – Only essential apps are included, allowing users to customize their setup.
Manjaro Tools – Retains useful utilities like Manjaro Hardware Detection (MHWD) and Pamac package manager.
Slimjaro Performance Review
One of the biggest selling points of Slimjaro is its performance. Let’s break down how it performs in different scenarios.
1. System Resource Usage
Compared to standard Manjaro or Ubuntu, Slimjaro consumes significantly less RAM and CPU at idle:
OS
Idle RAM Usage
Idle CPU Usage
Boot Time
Slimjaro (Xfce)
~250-350 MB
1-3%
~15-20 sec
Manjaro (Xfce)
~500-600 MB
2-5%
~20-25 sec
Ubuntu (GNOME)
~800-1000 MB
5-10%
~30-40 sec
This makes Slimjaro an excellent choice for older PCs, netbooks, or lightweight workstations.
2. Gaming & Multimedia Performance
Thanks to its minimal background processes, Slimjaro can improve gaming performance on weaker hardware. However, since it doesn’t come with proprietary drivers pre-installed, users must manually install:
Graphics Drivers (NVIDIA/AMD via MHWD)
Multimedia Codecs (Optional but recommended)
Once configured, Slimjaro performs well for emulation, indie games, and even some AAA titles via Steam (Proton).
3. Responsiveness & Stability
Unlike some ultra-lightweight distros that sacrifice stability, Slimjaro maintains a good balance. It rarely crashes, and the rolling-release model ensures up-to-date software without major system-breaking updates.
Installation Process
Slimjaro provides a user-friendly Calamares installer, similar to Manjaro. Here’s a quick overview:
Download the ISO from the official Slimjaro website.
Create a bootable USB using tools like Slimjaro Reviews Australia
or Rufus.
Boot into Live Environment to test before installing.
Run Calamares Installer – Configure partitions, user accounts, and timezone.
Reboot & Enjoy – The system boots into a clean, minimal desktop.
Note: Unlike Manjaro, Slimjaro doesn’t include many pre-installed apps, so users must manually install additional software post-installation.
Software & Package Management
Since Slimjaro is Arch-based, it supports:
Pamac (GUI Package Manager) – Easy access to AUR and official repos.
Pacman (CLI) – For advanced users who prefer terminal commands.
AUR Support – Install virtually any Linux software.
Default Apps in Slimjaro
Slimjaro keeps things minimal:
File Manager: Thunar (Xfce), PCManFM (LXQt)
Web Browser: Firefox (minimal setup)
Text Editor: Mousepad (Xfce), FeatherPad (LXQt)
Terminal: Xfce Terminal, QTerminal (LXQt)
Users can easily install additional software like:
Office: LibreOffice, OnlyOffice
Multimedia: VLC, MPV
Development: VS Code, Neovim
Desktop Environment Options
Slimjaro offers multiple lightweight desktop environments:
1. Xfce Edition
Best for: Balanced performance and customization.
Pros: Stable, highly configurable, good for beginners.
Cons: Slightly heavier than Openbox/LXQt.
2. Openbox Edition
Best for: Ultra-minimalist users who love keyboard-driven workflows.
Pros: Extremely lightweight Slimjaro Chemist Warehouse.
Cons: Requires manual configuration (tint2 panel, menu editors).
3. LXQt Edition
Best for: Users who want a modern but lightweight experience.
Pros: Qt-based, clean interface, good for mid-range systems.
Cons: Fewer customization options than Xfce.
Pros & Cons of Slimjaro
✅ Pros
✔ Lightweight & Fast – Great for old hardware. ✔ Arch + AUR Support – Access to the latest software. ✔ Customizable – Start with a minimal base and build up. ✔ Stable Rolling Release – No need for major upgrades.
❌ Cons
✖ Not for Beginners – Requires some Linux knowledge. ✖ Limited Default Apps – Needs manual software installation. ✖ Less Polished Than Manjaro – Fewer pre-configured settings.
LIMITED TIME OFFER: -
Visite Here: -https://slimjarocanada.ca/
1 note
·
View note
Text
For those looking for a change, and i cannot stress this enough i've been repeatedly telling people to change because windows 11 is starting to go off of the seriously terrible to handle end, GET A LINUX DISTRO
Here's some counter arguments for every person making excuses
I'm too used to windows!
Here's a distro you might like, it's called Winbuntu, it is Ubuntu with a full on windows skin to make the transition to linux smoother!
I'm not smart enough to use the command line!
First off, stop talking yourself down, everything is learnable. Second off, With modern linux distros you actually have to use the command line VERY LITTLE, as always, everything wants to make it as easy as possible for you
But how will i play my games made for windows??
Wine or Proton. Steam will allow you to play any game you want with an EXE using their new proton system!! To use it, simply install steam, and you're done! For wine, it can practically emulate any EXE now, and its incompatibilities are pre windows 7 games, much like modern windows versions can't handle. Again, just install from the website, and you're done.
I'm not sure how to change!
Simple solution! You find the installer, create a bootable disk, plop in a USB, make it on the USB, then simply restart your computer and you're done.
Scared of losing your old data? That's fair! Wait until you can get your hands onto another drive or SSD, if you know anything about computers you can probably make out the wires that are supposed to fit together, then in your pc you can use that one to install linux on it!
Seriously! The way windows 11 is going is not good for the health of your pc AT ALL and i use it only because i don't yet have a place to install linux on safely. Consider switching if you can, i know i will.
"windows 11 upgrade ready!" "your computer is eligible for windows 11!" "download windows 11 now!"

53K notes
·
View notes
Text
Microsoft Windows 11 Pro License Key
Rated 5.00 out of 5 based on 5customer ratings
5 Reviews Sold: 6
₨ 3,600Current price is: ₨ 3,600.₨ 6,120Original price was: ₨ 6,120.
Get Windows 11 Pro License Key now and enjoy everything you need in one powerful system.
You will receive all the details to install the package. In addition, you are assured of the latest updates and it is possible to use the package for life (without subscription).
After ordering, you will receive the activation code, manual and download link directly from Microsoft. This product can be installed on 1 PC/laptop and can be reinstalled on the same device if needed.
The product can be installed in several languages, including Dutch, English, German or French.
Availability: 91 in stockMicrosoft Windows 11 Pro License Key quantityAdd to cartBuy Now
Add to wishlist
SKU: BZ-WIN-11-PRO-OEMCategory: Microsoft WindowsBrand: Microsoft
Description
Reviews (5)
Bullet Points:
Genuine Microsoft License for Lifetime ActivationGet a genuine Windows 11 Pro license key for lifetime use on a single PC with no need of reactivation in future. Move to a new, safer system with reliable support by the latest Microsoft updates.
Instant Delivery with Easy Installation GuideYou will receive your activation key, installation instructions, and download link in 1-12 hours. Learn how to easily and rapidly install Windows 11 Pro using this simple guide.
Compatible with Multiple Languages and RegionsThis is a global Windows 11 Pro license that comes with multiple language support options – English, Dutch, German, French among others. You gain the right to use your license without limitations at anytime and in any country.
Permanent Activation Without Recurring FeesTo keep your copy of Windows 11 Pro up to date and guarantee that your computer will operate optimally for the rest of your life, don’t sign up for expensive subscription services. Make sure to know what has been new in features and security updates.
Dedicated Customer Support and AssistanceSupport is available with live chat or through email. We are here to help whether it is with activation or installation and to make your experience as smooth as possible from the get go.
Windows 11 Pro Activation Notes:
Maximize your PC’s performance with the help of the license key for Windows 11 Pro. One is an original Microsoft license that activates the product permanently on a specific device and provides a powerful and deep experience. Here’s what you need to know about the activation process and features:
Key Activation: The activation key to your program is connected with the motherboard of your PC and cannot be used on another computer.
Instant Delivery: Once you make the payment, within 1-12 hours, you will receive an activation key along with the instructions to use it.
Lifetime Use: Experience it for one time lifetime activation and no more subscription fees ever required.
Region and Language: This Global License offers support for various languages which makes this solution rather diverse and rather easily adjustable.
Regular Updates: Make sure you’ve got the newest and most useful features of Windows installed as well as the improvements in the security system.
Installation Process:
To activate Windows 11 Pro, follow these simple steps:
Download Windows 11 Installation Media:
Go to the main Microsoft’s site and with the help of the Search, type in Windows 11 Media Creation Tool.
Save the tool and then execute it to build a bootable USB or DVD.
Prepare the Bootable Installation Media:
Plug the USB drive or put the DVD in your PC.
Type reboot and this allows you to start your computer with the USB drive or DVD. Perhaps, you have changed the boot sequence of your computer in the BISO system of the equipment.
Install Windows 11 Pro:
Please read these instructions to continue the installation process of Windows 11. Select your language, time, and keyboard options and then click on next – Install Now.
When asked for the product key, select “I don’t have a product key” and under the Windows 11 edition choose “Windows 11 Pro”. Complete the installation.
Activate Windows 11 Pro:
Go to the next steps navigate to: “Settings”>”Update and Security”>”Activation”.
Type change product key and enter the Windows 11 Pro purchased license key.
On successful activation, you will be instructed on how to proceed with activation. Your Windows 11 Pro is complete and everything should be working in your Windows 11 Pro.
System Requirements:
Processor: 1 GHz processor or faster, having two or more cores, on a 64 bit processor.
Memory: 4 GB or more.
Storage: Standard 64 GB of free disk space available.
Internet Connectivity: Required for the updating of the application and a number of features.
If you still have any problems you can get help from YOUTUBE
0 notes