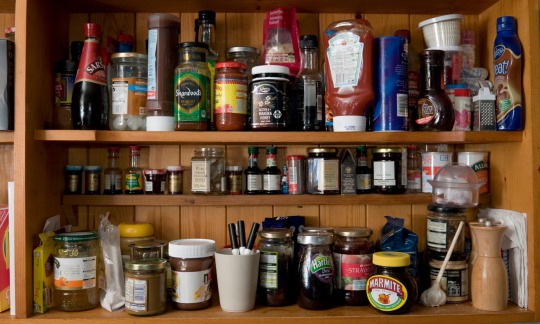
#I can leave the tin of powdered milk in the pantry for months and then pull it out whenever I need it. no worry about spoiled milk
Text
.
#tag talk#the problem with going out and meeting new people to make friends is that so many people are highkey unbearable to be around#they'll fuck up basic scheduling for dates and meetups. they'll flake and message you about it two days later.#literally scheduled a dinner date with some dude and he never showed. texts me an hour later like “sorry I fell asleep” bitch you what?#like. messaging me literally last minute going “hey I've decided to not show up” is better than ghosting.#this isn't the first time something like this has happened. but like. why do people not respect my time.#I try so hard to communicate clearly and be transparent about timeline and schedule and letting people know if something comes up#and I'm not saying I'm better than other people. I'm saying I don't know why other people don't do it too. it feels like the bare minimum.#anyway. my brother was giving me shit for not sticking with friends for more than a few months and like. bro I have good reason.#I'm not going to choose to put in the effort for a relationship with someone if it's constant work on my end and constant let-downs on thei#like. bro I know I'm just some cheap ass to you but I'm still a person so maybe realize that I've put you in my schedule respect that#anyway. not being lonely isn't as easy as meeting new people. you have to actually like the people you meet.#meeting people you hate just entrenches you in the desire to never talk to people ever again.#unrelated. I cooked the best chicken of my life yesterday. milk butter garlic onion and lemon pepper.#crushed and minced garlic. diced onion. milk. butter. lemon pepper. heated in a pan.#then chicken pieces added to sauce in pan for a little bit. then moved to a pan in the oven.#I usually don't like chicken but damn this is genuinely so good. also my parents always cut chicken cross-grain and imo it's harder to eat#I prefer cutting the meat with the grain. idk why but it's so much easier to chew.#oh! pro tip. if you have trouble with milk going bad in the fridge cause you don't use it enough. powdered milk. big adhd tip#I can leave the tin of powdered milk in the pantry for months and then pull it out whenever I need it. no worry about spoiled milk#back to social and people. like. even nice people. I just don't like them anyway. idk why. like. nice polite people. mm too boring#would I like to be able to hold onto friends? sure. is that a reasonable expectation given my track record? no#I wasn't joking when I said I could drop tumblr no problem. it's nice here but relationships are fragile nothing built on air and dust#idk. cursed to a life of eternal loneliness. super fun. don't take this as a call for help. I don't need you to say “I'm sorry you're sad”
1 note
·
View note
Text
[GRAD 701] [Design Studio V] Interview 4 20/04/2020, 2:39pm
Week 5,
What do you do for a living? Practicing artist since 2002, freelance design since 2013, teach as a secondary high school teacher since 2015
For how long? [Answered in first question.]
3 Words to describe yourself… systematic, gamer, indecisive
3 life goals… ensured I completed tertiary education, to be successful at anything I apply myself to, try all the butter chicken in the world and find the best one
How do you start your day (no need to go into too much detail - lol)? School week: wake up at 5am, shower, wait for Jason (husband) leave home by 6 to teach 9-3
Tell us about your living situation. I live with my husband and our 2 cats. We are currently renting in Māngere, Auckland.
Favourite food and why? Chocolate, it is an addiction: when I was 15, I scored my first job at the supermarket making money and having chocolate on hand, it was easily attainable. Early on my mom would be chocolate biscuits and chocolates, Butter chicken. I. also like bananas ...anything chicken.
Relations with preparing your own food and/or takeaways? Since being in lockdown, prepping my food has been fairly easy. Both Jason and I are both good cooks and bakers... they are times when I get lazy, and all I want to do is order takeaways because it’s convenient ...we do often prep our own food.
How do you keep track of food quality? If we pre-prepped food, it usually has the date on the food that is being prepared. Normally we won't prepare anything longer than 5 days ...if smells off on day 5 or day 6, then it goes out.
Best before dates. Do you still ignore it? any rules of your own? I actually try to keep to the best before dates. If its tinned food and some packaged fruit ... if it’s preserved, it can actually last 3 months more than the best before date. The only reason why there's a best before date is to imply that you try to eat it by this date. The only rule that I have that if is been sealed and there's no damage to the product then it can keep for an extra month or 2.
What do you do if your food does expire? Why? Generally, smell test, the taste test, the look test: if it looks ok, if it smells ok, and tastes ok. it's still ok for like a day or 2. Generally try to eat it within that time frame. If it's off, then that goes in the bin.
How often do you forget about the existence of certain food products in your household? We try to limit how much food we have in the house. For example, we always have fresh fruit, we always make sure that the fresh fruit is in a place that is visible, so it always be at the kitchen table... We try to limit the amount of food we have in the house because there's only 2 of us... We’re not big eaters, the only time we forget about types of food would be pasta, but pasta has a long shelf life for forever and that’s the same as rice... and tin tomatoes...
Tell me a story about the last time you discovered spoiled food/ingredients? When I was at school, I always take my lunch to school every day... and there was a time I had in a sealed bag and in the sealed container... I completely forgot about it... And this one time, I left the container, my lunch bag, in the office... And I think I had left it in there over like a couple of weeks. It was chicken and salad and had cheese, I went back to it later when I realised there was a smell and I like pinpointed it in my bag, I went over to my bag and unzipped it and I freaked out, because when I opened it, inside the container, was like swarming maggots there was so many maggots... long story short, I threw the entire thing out excluding the bag... it was super gross.
How did you feel about that? How did you react? I was super embarrassed that I had left it there for such a long time, but at the same time, no body mentioned anything, so it was just like something I picked up fingers crossed. I'm really like scared of maggots and worms. When I see maggots, I would freak out.
Fridge vs Freezer vs Pantry effectiveness. How do you Categorise each item into each of the storage methods? Freezer - freeze food that I want to last longer than a week or if I'm not ready to use it: meat, frozen veges, fruit, bread, milk, pre-prepped meals, stews, casseroles. Fridge-: spreads, condiments, large bottles, water, butter, eggs, fresh veges and fruit compartment: lettuce, spinach, cucumber, tomatoes... large cavity: massive water jug, pre-prepped meals, pre-contained, pre-jarred... pantry: soups, long-life milk...protein powders, almond milk, tablets, seeds, container of rice, tinned food, dried noodles... baking, oils, chippies, other appliances, booze and a large bag of flour...and some lunch stuff.
How do you feel about your food usage, how much food is thrown out on a weekly basis? In previous time, a lot of food was thrown out... but since moving into our new house, we’ve kind of restricted the amount of food that we have... I don't think we've thrown anything out since moving here (any food) because most of it has been eaten and rationed out properly.
What food items are the most thrown out? Usually it’s like cooked food...
Any interesting facts/information regarding food expiration in your household? Nope.
Where did you get your food knowledge from? Ministry of health recommendations? Family? Many years ago, I did a food program, a cafe barista course... and working in hospitality has taught me a lot of things.
Your one “wish” when it comes to food expiration/quality. Affordability. Good quality food comes at a cost.
Your one "quote” when it comes to food expiration/quality. “Try to stick to the date.”
0 notes
Text
Is Old Yeast OK? The 17 Rules of Expiry Dates – From Eggs to Meat to Oils
Use-by dates are a food-safety matter so you should always take them seriously. Here’s a guide to where you do – and definitely don’t – have some leeway
— Guardian USA | Zoe Williams | Thursday 23 April, 2020
Breaking the mould ... is Theresa May’s approach to jam-eating a good rule of thumb?
One news event you may have missed this month was that Tesco lost a judicial review over selling foods past their use-by date. The company had been taken to court by Birmingham city council, and was launching a challenge using the evidence of the food microbiologist Slim Dinsdale, a swashbuckler of the pathogenic world, who favours the “smell it and see” approach. All of this was over-ruled by judges, who decided that use-by dates were, overall, still important enough for public safety to be observed.
This was, of course, all overshadowed, by the coronavirus outbreak; but the use-by date controversy has never been more up to date. The cook, author and campaigner Jack Monroe runs ad hoc advice sessions called Lockdown Larder on Twitter, and says: “Since I’ve been doing it, by a country mile the most-asked question I’ve had is: ‘I’ve got this yeast, it went out of date two months ago, can I use it? I’ve got these sardines, they went out of date a year ago, can I use them?’ People want someone they perceive to be an expert to reassure them. As a species, we seem to have lost the ability to trust our own senses.”
This gets to the core of the matter. If you want a blanket rule for everyone, the use-by date is that rule. I can only tell you what I would eat. If it happens to be the same as Theresa May (who famously admitted to scraping the mould off jam), that’s just coincidence.
Erik Millstone, emeritus professor of science policy at the University of Sussex, lays out the ground rules: ignore sell-by dates. “Those are a guidance by the retailers for the retailers, so they can manage their stock. The indications concerning food safety, particularly microbiological food safety, that’s use-by dates.” But are all use-by dates created equal?
Eggs
Eggs, strictly speaking, don’t have a use-by date but a best-before-end (BBE), which is mostly to do with quality and taste rather than safety. Either way, this is a hill I’m prepared to die on: dates are irrelevant to eggs, because of the float test. Drop the egg in a glass of water. If it floats to the surface, it’s definitely off. If it sits flat on its side, it’s definitely fresh. If it sits vertically, it’s somewhere between fresh and off (I would still eat it). A fully off egg will also smell disgusting, but you can save yourself that trauma by conducting this test.
The sulphurous smell of an off egg triggers a useful disgust mechanism, because the bacterium causing it – Pseudomonas – can be injurious. Salmonella is far more dangerous, being undetectable, but British hens are inoculated.
Bread
If a bread past its BBE date is mouldy, or smells of mould, don’t eat it. Don’t just chop off the mouldy bit, because there is a twilight when mould spores are present but not yet visible. Mould on bread isn’t the most dangerous of the fungi, but it’s still revolting.
Spices
I remember being astonished to read (in Delia) that you should do a complete spice overhaul every year, because they won’t taste as good. As I have spices that are older than my children; this seemed extremely wasteful. There are spices that most cooks won’t get through in a year (za’atar) unless you live with Yotam Ottolenghi. But Delia’s right, if you want them to last longer, buy them whole and grind yourself to order, or go back in time and store them in brown rather than clear glass.
Nuts
Ah, this is where things get interesting. Millstone says: “Some of the compounds formed from mould can be seriously toxic, especially aflatoxins, which can be carcinogenic.” These are found on mouldy grain and nuts.
You can’t buy dangerous grains and nuts (because of that blasted EU), but you should take very seriously the use-by date on what you have bought. There is no meaningful trade-off between risk now and cancer later. It’s not like pharmaceuticals; it’s just a bar snack.
Harissa, Wasabi Paste and Other things That Discolour
Some time before anything goes mouldy, it may go a bit grey (if it started out green) or just a murkier version of itself (if it started out red). This is plain pigment oxidisation and is not dangerous, though it is a bit unappetising – if the fat has oxidised, you will be able to smell it.
Yeast, Baking Powder and Other Things That React
Monroe raises the stakes here: “I’ve personally used yeast that is 10 years out of date. But it’s not been opened, and was stored away from direct light in cool conditions. It didn’t rise as well as normal yeast would. If you’re using old yeast, I would always recommend using 1.5 times the amount the recipe states, leave it for an extra hour, and if you’re really running low on flour, make a quarter batch, then if it doesn’t rise, or doesn’t go so well, you can work it into a soda bread and you’re not going to waste half a bag of what is currently quite a precious resource.”
Baking powder and bicarbonate of soda typically have shelf lives of one to two years, but storage is more important than numbers, and there is a school of thought that says bicarb lasts for ever. Yup, for ever.
Fresh Meat and Fish
These are “particularly vulnerable to bacterial spoilage,” Millstone says, “and if it smells off, it’s definitely off.” However, some forms of spoilage are smellier than others, so just because it doesn’t smell doesn’t mean it’s safe. “If I had a piece of chicken one day past its use-by date,” Millstone continues, I wouldn’t simply barbecue it and eat it, but I might put it in a casserole and cook it at a high temperature for quite a long time.”
Vulnerability to rottenness is partly about surface area – how much the meat has come into contact with the outside world, and how much of it is subject to direct heat while you’re cooking. This is why mince is such a minefield, because it has a huge surface area, and if you’re cooking a burger medium rare, the middle won’t have been thoroughly cooked. A whole bird has a much smaller surface area. Game birds are a subtle enterprise, the window between how it’s supposed to smell and “off” being so narrow. It’s eater-beware in this case.
Cured Meat and Fish
Salt, naturally, has a preservative effect, and the sniff and overall appearance test should work with things such as salami. These things have a pretty good shelf life to begin with, and are very low effort (you don’t have to cook them, you just have to pop them in your mouth). So there is something to be said for using your memory rather than your judgment. Eat them before the use-by date, and you won’t have to play ham-roulette.
Pesto, Jam and Other Jars Full of Mould
The food safety scene is united on this – nothing with mould should be consumed, except where it has been introduced deliberately (blue cheese). It does, however, seem a bit absurd, if you have a jam with a bit of mould on, stuffed with sugar so you know it’s fine underneath, to have to chuck the whole lot out. Millstone is slightly forgiving on this. “If there’s a bit of mould on the top surface of jam that can be safely removed, then the jam lower down might well be safe. But if the entire top surface is covered in mould, you should discard it.” Pesto will taste rank if it’s mouldy as pine nuts go rancid very fast.
Dried Fruit
Again, frozen, tinned and dried food gets a BBE date rather than a use-by date. You can sail past the BBE on dried fruit by as much as a year, though the higher the water content, the less time you have – figs and dates won’t last as long as currants and raisins. Do yourself a favour, though, and taste these things if they are very old. If they no longer taste of themselves, that’s just a waste of calories.
Oils
Certain oils (walnut, sesame) seem to go off much faster than others (vegetable, olive oil) but this is usually because we don’t use them fast enough. The smell and taste of a rancid oil is subtle but very insistent, and you can easily ruin a whole dish with a very small amount of it. Don’t give it the benefit of the doubt; smelling it, tasting it, smelling it again, not wanting to chuck it out because it was expensive. It’s much more wasteful to ruin more food than to throw it away.
Dried Pulses and Beans
We think of these as forever foods, but by the end of the best-before date, they will be tough and won’t taste as good. Vexingly, they will have toughened at different rates within the packet, so it will be impossible to adjust your cooking times for toughness without some of them going mushy. Stick with the guidelines.
Flour
Your real enemy is the weevil. Some people say just sift them out, others (Millstone) remind us that you don’t know what else those bugs have been crawling over.
Cheese, Milk and Yoghurt
Hard cheeses are less vulnerable to mould and bacteria than soft ones, since their higher salt content has a protective effect. All bets are off for cheeses in which the mould is deliberate. Those are delicious. I would happily saw the mouldy end off a cheddar and eat the rest. Milk has the fabulous trait of smelling awful – and shortly after that, separating – to warn you that it’s off. Yoghurt is the great unknown (I have never met anybody who takes yoghurt use-by dates seriously). Monroe will eat a yoghurt a week after its expiration. I once found one at the bottom of my daughter’s school bag, decided it would probably be fine, and it exploded. So don’t listen to me (on this one occasion).
Oat and Almond Milks
These new fangled milks will keep in pantry conditions for several months, then for seven days in the fridge. There hasn’t been a huge amount of consumer experimentation; the best anecdotal evidence is that they lose their flavour, rather than becoming disgusting. Oat milk is lower in fat and higher in sugar, so will last longer. Almond milk won’t have a very strong smell, even if it’s off, so taste it tentatively.
Crisps
Best-before dates on crisps are so long, and crisps themselves so delicious, that it’s actually quite hard to find any that are out of date. Monroe got some two-year-out-of-date Doritos from a vending machine the other day (“Were they the best Doritos I’ve ever had? Probably not, but they were fine”); I had some Quavers this morning that should have been eaten by February. They are loaded with salt and preservatives. Probably the worst they can bring is disappointment, of not being crunchy enough.
Tins
The best-before dates on cans range between three and five years from purchase, but this is essentially a way of saying “for ever, all things being equal” – if you’re dealing in units of half a decade, you’re not really talking about the food perishing, but rather the tin. Acidic foods such as tinned tomatoes can attack the can from the inside. Otherwise, rust, dents, any attack on its structural integrity can interfere with its powers of preservation. If you have a tin with a dent in it, even if you can clearly remember the time you dropped it, it’s still better not to eat it. I once had some Swedish anchovies that swelled up like a bloater fish. I don’t know how that happened, but I didn’t try to eat them.
Jack Monroe’s Good Food for Bad Days is out at the end of May
0 notes
Text
Upside Down Walnut, Chocolate, & Pear Cake
Our little back house we are renting is about four miles from the ocean here in Costa Mesa/Newport Beach. We get the foggy marine layer on the mornings it chooses to hang over the coast, and we have a very tempered climate year round. In the past I’ve brushed southern California off as having no seasons, but this just isn’t true. I think with social media these days we see so much in the fall of the iconic leaves changing, and more clearly defined seasons of certain regions of the world, that is has become commonplace to standardize these quarterly shifts. Maybe it’s just me and my tendency to seek out change, but I’m coming around to seeing a more full, open picture. Every little dot of latitude and longitude on the map has it’s own unique characteristics when it comes to seasons, and I’m beginning to appreciate our a-typical southern California ones.
September and October are two of the warmest months here where I live, which is wonderful if you can get past the photos of falls leaves and warms mugs of cocoa elsewhere. Why is it wonderful? The crowds of people have all gone home, the kids are back in school, and the beaches and national parks are now near-empty to enjoy. Around here we call it “locals’ summer”. I don’t do well in the heat, so this time can be tough for me to get through, but November and December are the greatest gift after these few warm months. This is my season, this is the time of year I fall in love with California. The air is chilly and as crisp as you can get with the pacific ocean nearby. The light is the most beautiful light I’ve ever seen. The sunsets make you weak in the knees. And the smell that permeates the entire city is pure heaven. The farmers market is still overflowing, with fall produce finally coming in alongside unlikely jewels such as tomatoes, avocados, oranges, and so many greens (kale, chard, herbs, etc). Local pomegranates are half the size of my head and two dollars a piece.
Approaching Thanksgiving this year, and hosting for the first time with my parents coming into town, I tried pondering a new theme we could base our cooking around that felt more fitting for our area. As is typical this time of year, we have a three day heat bump that lands right over Thanksgiving. Normally I would say something negative about California and how I wish I lived somewhere cooler. But not this year, I’m celebrating where we live. So we are having a California-themed Thanksgiving with dishes made from all of the produce that was overflowing the most at the farmers market this past weekend. Our backyard will be in shade in the late afternoon, so we will set up the table under our twinkle lights and eat outside. Roasting a dozen heavy dishes on a warm day doesn’t sound right to me, so I’m planning a few lighter twists. I’ll be sure to share them on Instagram stories a bit if you’re curious to see what we are making. I’m really excited you guys, it feels good to be going with the grain and not against it for once.
Part of my inspiration to dig deeper into understanding and loving the unique spot in the world where I live came from reading Valentina‘s pages in her new cookbook, Everyday Vegetarian. She lives in a small medieval town on the eastern side of Italy and shares her region’s history and culinary traditions in a way that reads like a poetic novel. From cover to cover you are immersed in recipes and stories that overlap each other into one beautiful picture of her culture. Valentina takes traditional recipes that have been passed down for generations in her family, alongside some newer ones of her own, and shows how to make them vegetarian (and many of them vegan too) without compromising the tradition. It’s beautifully photographed, with such a lovely cover to have sitting out on your kitchen counter too (see photo below recipe). She shows how there is so much more to Italian cooking outside of pasta and tomato sauce (although she has recipes for both from scratch that are incredible) and how to cook throughout the seasons in her nook of the world as well. I want to make every recipe from cover to cover and book a trip to Italy ASAP to experience so much of what she describes.
The first recipe that jumped out to me was her grandma’s upside down prune cake, which she suggests in the fall making with pears, nuts, and chocolate instead. So I did just that, and it was so scrumptious I had to share it with you here too! I used a mixture of freshly milled flours from the incredible people over at Eat Grain, which I link to individually in the recipe below. You can taste the freshness, and even see it, in these flours. I’ve never experienced anything like it – and the nutrition is suppose to be even better as well! Check out their line on their site here if you’d like, they are shipping anywhere in North America for free for the rest of the year – which is perfect timing for some holiday baking.
I hope those of you celebrating Thanksgiving this week have the most wonderful, joy-filled time. Maybe this cake could even squeeze onto one of your holiday tables too ;). -xx
SHOP MY PANTRY >>
RECIPE NOTES: The recipe below is pretty darn near exact to Valentina’s, with a few small exceptions. Here are the few substitutions I made which you can convert back to the original if you desire to: I use coconut sugar instead of brown sugar, apple sauce instead of sunflower oil, and a mixture of whole spelt and rye instead of whole wheat. I also halved the recipe below and prepared it in a 6 inch springform pan in the photos above, since I knew we would have lots of sweets on hand this week. This worked out really well, but I know I’ll be making the full recipe next time – it was just too good.
UPSIDE DOWN WALNUT, CHOCOLATE, & PEAR CAKE
Makes one 10 inch cake, serves 8 to 10.
1 3/4 cups almond or soy milk
1 tablespoon apple cider vinegar
1/4 cup of water
2 teaspoons vanilla extract
1/4 cup unsweetened apple sauce (or sunflower oil)
juice and zest of 1 lemon
1 cup coconut sugar, plus 1 teaspoon for the pan
1 cup of sifted spelt flour (white)
3/4 cup whole spelt flour
1/4 cup whole rye flour
1/3 cup potato starch
1 heaping teaspoon baking soda
1 heaping teaspoon baking powder
1 teaspoon ground cinnamon
pinch of salt
15 small pears
1/3 cup chopped raw walnuts
1/3 cup chopped dark chocolate
optional: extra chopped walnuts and dark chocolate for sprinkling on top
Preheat the oven to 350F. Line a 10-inch springform pan with parchment paper and lightly oil the sides (I forgot to oil mine and it still removed itself nicely, but it is probably safer to do so). Sprinkle about a teaspoon of coconut sugar on the bottom.
Combine the sifted (white) spelt, whole spelt, and rye flour with the potato starch, baking soda, baking powder, cinnamon, salt, coconut sugar, and lemon zest in a large bowl and whisk to remove any lumps (I sifted mine, and added the sugar and zest afterwards).
In a large glass measuring cup, combine the almond or soy milk, vinegar, and lemon juice and stir. After a few seconds, the milk will start to curdle. Immediately add the water, applesauce (or sunflower oil), and vanilla. Stir well. Slowly pour this into the dry mix, stirring with a whisk to break any lumps. The batter will be somewhat on the liquid side.
Core each pear and slice into 1/4 inch thick wedges. Arrange in a circle in the prepared springform pan, until the bottom is completely filled. Sprinkle the chopped walnuts and dark chocolate on top, and slowly pour the cake batter into the tin. Bake for 40 to 50 minutes (mine took 50), until cooked through when tested in the center with a toothpick. Once cooked and golden on top, turn off the oven and let it sit inside for 5 minutes more.
Remove the cake from the oven and release from the springform pan onto a wire rack. Flip upside down so that the pears are on top, and peal away the parchment paper. This is optional, but while the cake is warm I sprinkled some dark chocolate on top, and when it had melted I added a small handful of additional chopped walnuts. Once fully cooled, slice and serve the cake. Store leftovers in an airtight container on the counter, or in the fridge (it’s really good cold), and enjoy within three days.
This recipe was originally found in the cookbook Everyday Vegetarian, and is being republished here with Valentina’s permission. See more of her beautiful work on her blog, Hortus Cuisine, and on Instagram.
I love seeing what you create! Be sure to tag your photos on Instagram with #FWmakers.
This post contains affiliate links (they are underlined for clarity). Purchases you make through these links will help fund the work I do here on Faring Well at no extra cost to you. Thank you sincerely for your constant love and support.
Naturally Vegetarian by Valentina Solfrini
O R D E R H E R E
Source: http://faring-well.com/upside-down-walnut-chocolate-pear-cake/
0 notes
Text
Primal Provisioning For Staying Home
How’s everyone doing out there? I hope you are all doing your best to protect your health, including your mental health. These are wild times to say the least.
I don’t know what it is like in your neck of the woods. Where I live, a lot of people saw the writing on the wall at the end of last week and prepared to self-quarantine. Stores were suddenly packed as people stocked up with the necessary supplies to stay home for several weeks. (Yes, and dozens of rolls of paper towels and toilet paper, too.)
I’m sure many of you have already put recommended social distancing policies into place. If you haven’t stocked your homes with supplies that will allow you to avoid going out as much as possible, now’s the time. I’m going to focus on prepping your kitchen today. Don’t forget the other parts, though: prescription and over-the-counter medicines, basic hygiene (soap, laundry detergent), pet food.
How Much Do I Really Need?
That’s hard to say. The U.S. Department of Homeland Security recommends having a two-week supply of food. On the other hand, it’s clear from some of the hardest-hit areas around the world that we all face the possibility of staying in for longer than that. A lot of people are stocking up for longer, but please remember that everyone needs to shop now. Prepare for a few weeks, yes. Hoard for months, no.
I’m sensitive to the fact that not everybody has the resources to buy two or three weeks of food at one time. Even in countries that have implemented strict closures, grocery stores have remained open. That means we can hope and expect that we’ll be able to shop for more food as we need it even if stricter quarantines go into effect. Of course, do what you can to be safe—avoid crowds, keep your distance from other shoppers, don’t go out if you’re feeling sick, wash your hands after leaving the store.
What Should I Get?
You’ll want to pick up extra frozen and shelf-stable food. Also get your usual groceries—meat, eggs, produce, and so on—to last through the first week.
In my opinion, this isn’t the time to split hairs between “Primal” and “not Primal.” Yes, it’s great to stick to your normal nutrient-dense foods to support overall wellness right now. At the same time, if you’d feel more comfortable having a pound of dried beans in your cupboard just in case, go for it.
Obviously don’t buy food that makes you sick. Beans work for me; they might not work for you. I’m also not advocating you dive face-first into sheet cake. Just don’t let perfect be the enemy of good, especially if your stores have limited supplies right now. Make the best decisions you can, but the last thing any of us needs is unnecessary added stress right now.
Provisions List
The list below is to give you ideas. You obviously don’t need everything here.
BEFORE SHOPPING
Check your spice cabinet. I’m not putting any herbs and spices on the list, so add any you want to restock.
Check your salt. Cooking without salt is a major bummer, plus you want to keep your electrolytes up.
Take stock of what you already have in your fridge and pantry. Don’t bother to buy more tuna if you already have a whole case. Leave some for the next shopper.
STOCK YOUR FRIDGE
Fresh meat/poultry/seafood to cook the first week
Fresh produce to cook the first week*
Eggs
Condiments (salad dressings, mayo, ketchup & mustard)
Fermented foods*: sauerkraut, pickles, kimchi (gut health is always important!)
Dairy products: Greek yogurt, cheese, cream for your coffee
Don’t forget that a lot of produce actually doesn’t require refrigeration, such as:
Avocados (keep them in the fridge to delay ripening, though)
Potatoes, sweet potatoes
Winter squashes: acorn, spaghetti, kabocha, delicata, pumpkins
Stone fruits: peaches, plums, nectarines
Apples, pears
Citrus fruits (just watch for rotten ones—they’ll spoil everything)
Whole melons
Bananas
Onions
Garlic
Peppers (store in a paper bag)
STOCK YOUR FREEZER
Frozen meat/poultry
Frozen fish
Frozen vegetables (for smoothies, don’t forget frozen greens and even avocados if you can find them)
Frozen berries
Butter
STOCK YOUR PANTRY
Canned/tinned fish
Coffee/tea
Collagen
Cooking oils (olive, coconut, avocado, etc.), ghee
Coconut milk
Nuts & nut butter
Bone broth
Pasta sauce
Grain-free pasta (e.g., Banza)
Jerky, beef sticks, biltong, hard salami
Olives
Grain-free crackers
Grain-free granola
Whey protein powder
Protein bars
Dark chocolate
Non-dairy milk in Tetra Paks
Creamer like Better Half and Nutpods (shelf stable until opened)
Beans
Quinoa
Lentils
Rice
*Note that fermented foods that are shelf stable, like sauerkraut and pickles, have been heat-treated. That kills the living organisms that make fermented foods so beneficial for health. That doesn’t mean you can’t enjoy shelf-stable pickles or sauerkraut, of course, but don’t eat them for their probiotics.
**The items in italics are ones that I would consider “borderline” foods in terms of Primal sensibilities.
BAKING (OPTIONAL)
Chia seeds
Hemp seeds
Flax seeds
Coconut flakes
Coconut flour
Almond flour
Paleo pancake mix (e.g., Birch Benders)
MISCELLANY
Electrolytes
Parchment paper
Food storage containers and bags
GENERAL TIPS
If you’re feeling anxious about leaving the house or, for example, you’re immunocompromised and need to take extra precautions, consider grocery delivery services like Instacart and Amazon Prime Whole Foods delivery. Last time I looked, they were predictably running much slower than usual, but they were still operating. Some grocery stores do curbside pick-up so you don’t have to get out of your car. Order meat and seafood online if you have freezer space. If you have a favorite brand of protein bar or gluten-free bread or whatever, look to see if you can order directly from the company.
Expect that everything might be slower than normal and supplies might be limited. Plan ahead if you can, but also don’t hoard food. And yes, I know that’s vague. We’re all figuring this out as we go along.
If you have kids at home, this is a great time to get them involved with cooking. Little ones can help you wash produce, stir ingredients, brush oil, tear lettuce, and break apart broccoli and cauliflower. Older kids can progress to using different kitchen appliances with supervision, cutting herbs with scissors, chopping ingredients once they can handle a knife, and helping read recipes to you while you cook.
Minimize Waste
One way to avoid having to shop more often is to make the most of what you have. Here are my three favorite ways to avoid waste:
Make bone broth with all your vegetable and meat scraps and bones. I use my slow cooker because I can add scraps to it over a day as I cook, but the stovetop or a pressure cooker also works great. You can also freeze scraps to use later.
If you have a stockpile of nuts, you can make your own nut milk for coffee or chia pudding. Then use the pulp in recipes, such as these from Elana Amsterdam of Elana’s Pantry.
If your freezer isn’t full, freeze leftovers before they go bad so you can thaw and reheat them later.
GO EASY ON YOURSELF
Like I said, we’re all figuring this out as we go along. I know a lot of people are dealing with financial and food insecurity right now. If you need support or ideas for how to make it through, please reach out in the comments.
(function($) { $("#dfMldQS").load("https://www.marksdailyapple.com/wp-admin/admin-ajax.php?action=dfads_ajax_load_ads&groups=674&limit=1&orderby=random&order=ASC&container_id=&container_html=none&container_class=&ad_html=div&ad_class=&callback_function=&return_javascript=0&_block_id=dfMldQS" ); })( jQuery );
window.onload=function(){ga('send', { hitType: 'event', eventCategory: 'Ad Impression', eventAction: '94519' });}
The post Primal Provisioning For Staying Home appeared first on Mark's Daily Apple.
Primal Provisioning For Staying Home published first on https://venabeahan.tumblr.com
0 notes
Text
Primal Provisioning For Staying Home
How’s everyone doing out there? I hope you are all doing your best to protect your health, including your mental health. These are wild times to say the least.
I don’t know what it is like in your neck of the woods. Where I live, a lot of people saw the writing on the wall at the end of last week and prepared to self-quarantine. Stores were suddenly packed as people stocked up with the necessary supplies to stay home for several weeks. (Yes, and dozens of rolls of paper towels and toilet paper, too.)
I’m sure many of you have already put recommended social distancing policies into place. If you haven’t stocked your homes with supplies that will allow you to avoid going out as much as possible, now’s the time. I’m going to focus on prepping your kitchen today. Don’t forget the other parts, though: prescription and over-the-counter medicines, basic hygiene (soap, laundry detergent), pet food.
How Much Do I Really Need?
That’s hard to say. The U.S. Department of Homeland Security recommends having a two-week supply of food. On the other hand, it’s clear from some of the hardest-hit areas around the world that we all face the possibility of staying in for longer than that. A lot of people are stocking up for longer, but please remember that everyone needs to shop now. Prepare for a few weeks, yes. Hoard for months, no.
I’m sensitive to the fact that not everybody has the resources to buy two or three weeks of food at one time. Even in countries that have implemented strict closures, grocery stores have remained open. That means we can hope and expect that we’ll be able to shop for more food as we need it even if stricter quarantines go into effect. Of course, do what you can to be safe—avoid crowds, keep your distance from other shoppers, don’t go out if you’re feeling sick, wash your hands after leaving the store.
What Should I Get?
You’ll want to pick up extra frozen and shelf-stable food. Also get your usual groceries—meat, eggs, produce, and so on—to last through the first week.
In my opinion, this isn’t the time to split hairs between “Primal” and “not Primal.” Yes, it’s great to stick to your normal nutrient-dense foods to support overall wellness right now. At the same time, if you’d feel more comfortable having a pound of dried beans in your cupboard just in case, go for it.
Obviously don’t buy food that makes you sick. Beans work for me; they might not work for you. I’m also not advocating you dive face-first into sheet cake. Just don’t let perfect be the enemy of good, especially if your stores have limited supplies right now. Make the best decisions you can, but the last thing any of us needs is unnecessary added stress right now.
Provisions List
The list below is to give you ideas. You obviously don’t need everything here.
BEFORE SHOPPING
Check your spice cabinet. I’m not putting any herbs and spices on the list, so add any you want to restock.
Check your salt. Cooking without salt is a major bummer, plus you want to keep your electrolytes up.
Take stock of what you already have in your fridge and pantry. Don’t bother to buy more tuna if you already have a whole case. Leave some for the next shopper.
STOCK YOUR FRIDGE
Fresh meat/poultry/seafood to cook the first week
Fresh produce to cook the first week*
Eggs
Condiments (salad dressings, mayo, ketchup & mustard)
Fermented foods*: sauerkraut, pickles, kimchi (gut health is always important!)
Dairy products: Greek yogurt, cheese, cream for your coffee
Don’t forget that a lot of produce actually doesn’t require refrigeration, such as:
Avocados (keep them in the fridge to delay ripening, though)
Potatoes, sweet potatoes
Winter squashes: acorn, spaghetti, kabocha, delicata, pumpkins
Stone fruits: peaches, plums, nectarines
Apples, pears
Citrus fruits (just watch for rotten ones—they’ll spoil everything)
Whole melons
Bananas
Onions
Garlic
Peppers (store in a paper bag)
STOCK YOUR FREEZER
Frozen meat/poultry
Frozen fish
Frozen vegetables (for smoothies, don’t forget frozen greens and even avocados if you can find them)
Frozen berries
Butter
STOCK YOUR PANTRY
Canned/tinned fish
Coffee/tea
Collagen
Cooking oils (olive, coconut, avocado, etc.), ghee
Coconut milk
Nuts & nut butter
Bone broth
Pasta sauce
Grain-free pasta (e.g., Banza)
Jerky, beef sticks, biltong, hard salami
Olives
Grain-free crackers
Grain-free granola
Whey protein powder
Protein bars
Dark chocolate
Non-dairy milk in Tetra Paks
Creamer like Better Half and Nutpods (shelf stable until opened)
Beans
Quinoa
Lentils
Rice
*Note that fermented foods that are shelf stable, like sauerkraut and pickles, have been heat-treated. That kills the living organisms that make fermented foods so beneficial for health. That doesn’t mean you can’t enjoy shelf-stable pickles or sauerkraut, of course, but don’t eat them for their probiotics.
**The items in italics are ones that I would consider “borderline” foods in terms of Primal sensibilities.
BAKING (OPTIONAL)
Chia seeds
Hemp seeds
Flax seeds
Coconut flakes
Coconut flour
Almond flour
Paleo pancake mix (e.g., Birch Benders)
MISCELLANY
Electrolytes
Parchment paper
Food storage containers and bags
GENERAL TIPS
If you’re feeling anxious about leaving the house or, for example, you’re immunocompromised and need to take extra precautions, consider grocery delivery services like Instacart and Amazon Prime Whole Foods delivery. Last time I looked, they were predictably running much slower than usual, but they were still operating. Some grocery stores do curbside pick-up so you don’t have to get out of your car. Order meat and seafood online if you have freezer space. If you have a favorite brand of protein bar or gluten-free bread or whatever, look to see if you can order directly from the company.
Expect that everything might be slower than normal and supplies might be limited. Plan ahead if you can, but also don’t hoard food. And yes, I know that’s vague. We’re all figuring this out as we go along.
If you have kids at home, this is a great time to get them involved with cooking. Little ones can help you wash produce, stir ingredients, brush oil, tear lettuce, and break apart broccoli and cauliflower. Older kids can progress to using different kitchen appliances with supervision, cutting herbs with scissors, chopping ingredients once they can handle a knife, and helping read recipes to you while you cook.
Minimize Waste
One way to avoid having to shop more often is to make the most of what you have. Here are my three favorite ways to avoid waste:
Make bone broth with all your vegetable and meat scraps and bones. I use my slow cooker because I can add scraps to it over a day as I cook, but the stovetop or a pressure cooker also works great. You can also freeze scraps to use later.
If you have a stockpile of nuts, you can make your own nut milk for coffee or chia pudding. Then use the pulp in recipes, such as these from Elana Amsterdam of Elana’s Pantry.
If your freezer isn’t full, freeze leftovers before they go bad so you can thaw and reheat them later.
GO EASY ON YOURSELF
Like I said, we’re all figuring this out as we go along. I know a lot of people are dealing with financial and food insecurity right now. If you need support or ideas for how to make it through, please reach out in the comments.
(function($) { $("#dfMldQS").load("https://www.marksdailyapple.com/wp-admin/admin-ajax.php?action=dfads_ajax_load_ads&groups=674&limit=1&orderby=random&order=ASC&container_id=&container_html=none&container_class=&ad_html=div&ad_class=&callback_function=&return_javascript=0&_block_id=dfMldQS" ); })( jQuery );
window.onload=function(){ga('send', { hitType: 'event', eventCategory: 'Ad Impression', eventAction: '94519' });}
The post Primal Provisioning For Staying Home appeared first on Mark's Daily Apple.
Primal Provisioning For Staying Home published first on https://drugaddictionsrehab.tumblr.com/
0 notes
Text
Upside Down Walnut, Chocolate, & Pear Cake
Our little back house we are renting is about four miles from the ocean here in Costa Mesa/Newport Beach. We get the foggy marine layer on the mornings it chooses to hang over the coast, and we have a very tempered climate year round. In the past I’ve brushed southern California off as having no seasons, but this just isn’t true. I think with social media these days we see so much in the fall of the iconic leaves changing, and more clearly defined seasons of certain regions of the world, that is has become commonplace to standardize these quarterly shifts. Maybe it’s just me and my tendency to seek out change, but I’m coming around to seeing a more full, open picture. Every little dot of latitude and longitude on the map has it’s own unique characteristics when it comes to seasons, and I’m beginning to appreciate our a-typical southern California ones.
September and October are two of the warmest months here where I live, which is wonderful if you can get past the photos of falls leaves and warms mugs of cocoa elsewhere. Why is it wonderful? The crowds of people have all gone home, the kids are back in school, and the beaches and national parks are now near-empty to enjoy. Around here we call it “locals’ summer”. I don’t do well in the heat, so this time can be tough for me to get through, but November and December are the greatest gift after these few warm months. This is my season, this is the time of year I fall in love with California. The air is chilly and as crisp as you can get with the pacific ocean nearby. The light is the most beautiful light I’ve ever seen. The sunsets make you weak in the knees. And the smell that permeates the entire city is pure heaven. The farmers market is still overflowing, with fall produce finally coming in alongside unlikely jewels such as tomatoes, avocados, oranges, and so many greens (kale, chard, herbs, etc). Local pomegranates are half the size of my head and two dollars a piece.
Approaching Thanksgiving this year, and hosting for the first time with my parents coming into town, I tried pondering a new theme we could base our cooking around that felt more fitting for our area. As is typical this time of year, we have a three day heat bump that lands right over Thanksgiving. Normally I would say something negative about California and how I wish I lived somewhere cooler. But not this year, I’m celebrating where we live. So we are having a California-themed Thanksgiving with dishes made from all of the produce that was overflowing the most at the farmers market this past weekend. Our backyard will be in shade in the late afternoon, so we will set up the table under our twinkle lights and eat outside. Roasting a dozen heavy dishes on a warm day doesn’t sound right to me, so I’m planning a few lighter twists. I’ll be sure to share them on Instagram stories a bit if you’re curious to see what we are making. I’m really excited you guys, it feels good to be going with the grain and not against it for once.
Part of my inspiration to dig deeper into understanding and loving the unique spot in the world where I live came from reading Valentina‘s pages in her new cookbook, Everyday Vegetarian. She lives in a small medieval town on the eastern side of Italy and shares her region’s history and culinary traditions in a way that reads like a poetic novel. From cover to cover you are immersed in recipes and stories that overlap each other into one beautiful picture of her culture. Valentina takes traditional recipes that have been passed down for generations in her family, alongside some newer ones of her own, and shows how to make them vegetarian (and many of them vegan too) without compromising the tradition. It’s beautifully photographed, with such a lovely cover to have sitting out on your kitchen counter too (see photo below recipe). She shows how there is so much more to Italian cooking outside of pasta and tomato sauce (although she has recipes for both from scratch that are incredible) and how to cook throughout the seasons in her nook of the world as well. I want to make every recipe from cover to cover and book a trip to Italy ASAP to experience so much of what she describes.
The first recipe that jumped out to me was her grandma’s upside down prune cake, which she suggests in the fall making with pears, nuts, and chocolate instead. So I did just that, and it was so scrumptious I had to share it with you here too! I used a mixture of freshly milled flours from the incredible people over at Eat Grain, which I link to individually in the recipe below. You can taste the freshness, and even see it, in these flours. I’ve never experienced anything like it – and the nutrition is suppose to be even better as well! Check out their line on their site here if you’d like, they are shipping anywhere in North America for free for the rest of the year – which is perfect timing for some holiday baking.
I hope those of you celebrating Thanksgiving this week have the most wonderful, joy-filled time. Maybe this cake could even squeeze onto one of your holiday tables too ;). -xx
SHOP MY PANTRY >>
RECIPE NOTES: The recipe below is pretty darn near exact to Valentina’s, with a few small exceptions. Here are the few substitutions I made which you can convert back to the original if you desire to: I use coconut sugar instead of brown sugar, apple sauce instead of sunflower oil, and a mixture of whole spelt and rye instead of whole wheat. I also halved the recipe below and prepared it in a 6 inch springform pan in the photos above, since I knew we would have lots of sweets on hand this week. This worked out really well, but I know I’ll be making the full recipe next time – it was just too good.
UPSIDE DOWN WALNUT, CHOCOLATE, & PEAR CAKE
Makes one 10 inch cake, serves 8 to 10.
1 3/4 cups almond or soy milk
1 tablespoon apple cider vinegar
1/4 cup of water
2 teaspoons vanilla extract
1/4 cup unsweetened apple sauce (or sunflower oil)
juice and zest of 1 lemon
1 cup coconut sugar, plus 1 teaspoon for the pan
1 cup of sifted spelt flour (white)
3/4 cup whole spelt flour
1/4 cup whole rye flour
1/3 cup potato starch
1 heaping teaspoon baking soda
1 heaping teaspoon baking powder
1 teaspoon ground cinnamon
pinch of salt
15 small pears
1/3 cup chopped raw walnuts
1/3 cup chopped dark chocolate
optional: extra chopped walnuts and dark chocolate for sprinkling on top
Preheat the oven to 350F. Line a 10-inch springform pan with parchment paper and lightly oil the sides (I forgot to oil mine and it still removed itself nicely, but it is probably safer to do so). Sprinkle about a teaspoon of coconut sugar on the bottom.
Combine the sifted (white) spelt, whole spelt, and rye flour with the potato starch, baking soda, baking powder, cinnamon, salt, coconut sugar, and lemon zest in a large bowl and whisk to remove any lumps (I sifted mine, and added the sugar and zest afterwards).
In a large glass measuring cup, combine the almond or soy milk, vinegar, and lemon juice and stir. After a few seconds, the milk will start to curdle. Immediately add the water, applesauce (or sunflower oil), and vanilla. Stir well. Slowly pour this into the dry mix, stirring with a whisk to break any lumps. The batter will be somewhat on the liquid side.
Core each pear and slice into 1/4 inch thick wedges. Arrange in a circle in the prepared springform pan, until the bottom is completely filled. Sprinkle the chopped walnuts and dark chocolate on top, and slowly pour the cake batter into the tin. Bake for 40 to 50 minutes (mine took 50), until cooked through when tested in the center with a toothpick. Once cooked and golden on top, turn off the oven and let it sit inside for 5 minutes more.
Remove the cake from the oven and release from the springform pan onto a wire rack. Flip upside down so that the pears are on top, and peal away the parchment paper. This is optional, but while the cake is warm I sprinkled some dark chocolate on top, and when it had melted I added a small handful of additional chopped walnuts. Once fully cooled, slice and serve the cake. Store leftovers in an airtight container on the counter, or in the fridge (it’s really good cold), and enjoy within three days.
This recipe was originally found in the cookbook Everyday Vegetarian, and is being republished here with Valentina’s permission. See more of her beautiful work on her blog, Hortus Cuisine, and on Instagram.
I love seeing what you create! Be sure to tag your photos on Instagram with #FWmakers.
This post contains affiliate links (they are underlined for clarity). Purchases you make through these links will help fund the work I do here on Faring Well at no extra cost to you. Thank you sincerely for your constant love and support.
Naturally Vegetarian by Valentina Solfrini
O R D E R H E R E
Source: http://faring-well.com/upside-down-walnut-chocolate-pear-cake/
0 notes
Text
What to Do With Leftover Vanilla Bean Pods
New Post has been published on https://makesomethingtasty.com/what-to-do-with-leftover-vanilla-bean-pods/
What to Do With Leftover Vanilla Bean Pods
amzn_assoc_placement = "adunit0"; amzn_assoc_tracking_id = "pramedgro-20"; amzn_assoc_ad_mode = "search"; amzn_assoc_ad_type = "smart"; amzn_assoc_marketplace = "amazon"; amzn_assoc_region = "US"; amzn_assoc_title = "Shop Related Products"; amzn_assoc_default_search_phrase = "cooking"; amzn_assoc_default_category = "Kitchen"; amzn_assoc_linkid = "51fe4d035c7af8dc5928e6f5e5b79c4e"; amzn_assoc_default_browse_node = "284507"; amzn_assoc_rows = "4"; amzn_assoc_design = "text_links";
[Photographs: Vicky Wasik]
The best part about the years I worked as a pastry chef was, hands down, the unlimited supply of vanilla beans I got to play with every day. There’s nothing quite like the distinct, if extremely niche, pleasure of sinking a paring knife into a fat pod, then splitting it open to scrape out the rich paste stuffed inside. I’d save the seeds for low-moisture projects, like vanilla shortbread or peanut brittle, then dispatch the empty pods in “wet” applications—poached pears, vanilla ice cream, panna cotta, and so on.
Later on, I’d give the empty pods a light rinse, wipe them clean, and then dry them in a low oven so I could store and reuse them down the road. This rarely, if ever, included making vanilla sugar, a popular trick among home cooks that results in an undeniably appealing aroma. Unfortunately, that scent is like the top note of perfume: fleeting at best, and too volatile to survive the rigors of boiling or baking. For that reason, I’m more inclined to store my vanilla pods in a package of something that’s ready to eat—say, a bag of homemade granola or a tin of sugar cookies.
Given that vanilla beans cost more than ever these days (and, as Eater reports, are only getting pricier), it’s all the more important to make the most of every pod. Leftover vanilla can be a great source of flavor and aroma for your favorite recipes, but only with methods aimed at extracting the pods’ water-soluble compounds. So go ahead—stick that vanilla bean into a bag of sugar, or store it alongside some tasty treat, but be sure you also put it to work later on with one of these applications.
Long-Term Cold Infusions
Slip a leftover vanilla bean into a bottle of maple syrup and let it hang out in the fridge for a month, or add one to a quart of milk or cream and let it steep for a week before using it in your favorite recipes. Whether you tuck the bean into a jug of cold-brew coffee or a jar of lemon syrup, these slow, cold infusions will impart a mellow vanilla character to whatever you’ve got stashed in the fridge.
Short-Term, High-Heat Infusions
The next time you whip up a batch of caramel sauce, cajeta, or sweetened condensed milk, toss that leftover vanilla bean right on in. Pull it out when you’re done, or leave it in to double down with a cold infusion when those sweets are stored in the fridge.
Brown Butter and Toasted Cream
If you’ve never enhanced brown butter with a vanilla bean, you’re really missing out. This relatively high-heat method pulls out the pod’s deeper, oakier notes, rather than the light, perfume-y vanilla aroma we’re used to. It’ll add delicious complexity to classics like yeast-raised waffles, carrot cake, and chocolate chip cookies.
The same idea can extend to Sohla’s toasted cream, in which leftover vanilla can create a secondary layer of flavor behind the browned, toffee notes of cooked cream.
Fruity Desserts
Aside from obvious applications, like poached pears, leftover vanilla pods can add a creamy, aromatic presence in dishes like roasted strawberries, homemade applesauce, cherry ice cream, and lemon syrup (or perhaps an orange variation, if you wanna groove on a Creamsicle vibe). Just toss your pod into the pot with whatever fruit you’re cooking, and remove it when you’ve reached your desired level of vanilla flavor.
Ground Vanilla
After drying out, leftover vanilla beans are brittle enough to be ground up alongside coffee beans if you dig the pairing. Alternatively, they can be reduced to a powder in a spice mill and added with other dry ingredients to any recipe that could benefit from a vanilla boost—take your pick!
Traditional Recipes
Whether you’re making panna cotta or vanilla ice cream, any time a recipe calls for a freshly split vanilla bean, you can sub in a leftover pod so long as you steep it for a greater length of time—I’ll often take that to about 24 hours. Just be sure to cover your liquids during that long interval, as a surprising amount of evaporation can happen along the way.
All of the wet methods above will also work to rehydrate old, withered vanilla beans that have never been used, but are too dry to split and scrape (the sort you’ll often see sold in glass vials at the supermarket, or lurking in a bag you forgot about in the pantry). After soaking in a hot or cold infusion, those brittle beans will soften right up, at which point they can be split and scraped so the seeds won’t go to waste. Dried-out unused pods that haven’t been split can be ground up with coffee beans or for vanilla powder, just like split ones.
Once you start thinking beyond that bag o’ sugar, you’ll find no end of use for those leftover vanilla pods, and a growing appreciation for the nuanced flavor they bring to the table.
amzn_assoc_placement = "adunit0"; amzn_assoc_search_bar = "true"; amzn_assoc_search_bar_position = "bottom"; amzn_assoc_tracking_id = "pramedgro3-20"; amzn_assoc_ad_mode = "search"; amzn_assoc_ad_type = "smart"; amzn_assoc_marketplace = "amazon"; amzn_assoc_region = "US"; amzn_assoc_title = "Shop Related Products"; amzn_assoc_default_search_phrase = "cookware"; amzn_assoc_default_category = "All"; amzn_assoc_linkid = "b45319dac495d29e17b5eff312392025";
Source link
0 notes
Photo

New Post has been published on http://cookingtipsguide.com/what-to-do-with-leftover-vanilla-bean-pods/
What to Do With Leftover Vanilla Bean Pods
amzn_assoc_placement = "adunit0"; amzn_assoc_tracking_id = "cookingtipsguide-20"; amzn_assoc_ad_mode = "search"; amzn_assoc_ad_type = "smart"; amzn_assoc_marketplace = "amazon"; amzn_assoc_region = "US"; amzn_assoc_title = "Shop Related Products"; amzn_assoc_default_search_phrase = "cooking"; amzn_assoc_default_category = "Kitchen"; amzn_assoc_linkid = "51fe4d035c7af8dc5928e6f5e5b79c4e"; amzn_assoc_default_browse_node = "284507"; amzn_assoc_rows = "4"; amzn_assoc_design = "text_links";
[Photographs: Vicky Wasik]
The best part about the years I worked as a pastry chef was, hands down, the unlimited supply of vanilla beans I got to play with every day. There’s nothing quite like the distinct, if extremely niche, pleasure of sinking a paring knife into a fat pod, then splitting it open to scrape out the rich paste stuffed inside. I’d save the seeds for low-moisture projects, like vanilla shortbread or peanut brittle, then dispatch the empty pods in “wet” applications—poached pears, vanilla ice cream, panna cotta, and so on.
Later on, I’d give the empty pods a light rinse, wipe them clean, and then dry them in a low oven so I could store and reuse them down the road. This rarely, if ever, included making vanilla sugar, a popular trick among home cooks that results in an undeniably appealing aroma. Unfortunately, that scent is like the top note of perfume: fleeting at best, and too volatile to survive the rigors of boiling or baking. For that reason, I’m more inclined to store my vanilla pods in a package of something that’s ready to eat—say, a bag of homemade granola or a tin of sugar cookies.
Given that vanilla beans cost more than ever these days (and, as Eater reports, are only getting pricier), it’s all the more important to make the most of every pod. Leftover vanilla can be a great source of flavor and aroma for your favorite recipes, but only with methods aimed at extracting the pods’ water-soluble compounds. So go ahead—stick that vanilla bean into a bag of sugar, or store it alongside some tasty treat, but be sure you also put it to work later on with one of these applications.
Long-Term Cold Infusions
Slip a leftover vanilla bean into a bottle of maple syrup and let it hang out in the fridge for a month, or add one to a quart of milk or cream and let it steep for a week before using it in your favorite recipes. Whether you tuck the bean into a jug of cold-brew coffee or a jar of lemon syrup, these slow, cold infusions will impart a mellow vanilla character to whatever you’ve got stashed in the fridge.
Short-Term, High-Heat Infusions
The next time you whip up a batch of caramel sauce, cajeta, or sweetened condensed milk, toss that leftover vanilla bean right on in. Pull it out when you’re done, or leave it in to double down with a cold infusion when those sweets are stored in the fridge.
Brown Butter and Toasted Cream
If you’ve never enhanced brown butter with a vanilla bean, you’re really missing out. This relatively high-heat method pulls out the pod’s deeper, oakier notes, rather than the light, perfume-y vanilla aroma we’re used to. It’ll add delicious complexity to classics like yeast-raised waffles, carrot cake, and chocolate chip cookies.
The same idea can extend to Sohla’s toasted cream, in which leftover vanilla can create a secondary layer of flavor behind the browned, toffee notes of cooked cream.
Fruity Desserts
Aside from obvious applications, like poached pears, leftover vanilla pods can add a creamy, aromatic presence in dishes like roasted strawberries, homemade applesauce, cherry ice cream, and lemon syrup (or perhaps an orange variation, if you wanna groove on a Creamsicle vibe). Just toss your pod into the pot with whatever fruit you’re cooking, and remove it when you’ve reached your desired level of vanilla flavor.
Ground Vanilla
After drying out, leftover vanilla beans are brittle enough to be ground up alongside coffee beans if you dig the pairing. Alternatively, they can be reduced to a powder in a spice mill and added with other dry ingredients to any recipe that could benefit from a vanilla boost—take your pick!
Traditional Recipes
Whether you’re making panna cotta or vanilla ice cream, any time a recipe calls for a freshly split vanilla bean, you can sub in a leftover pod so long as you steep it for a greater length of time—I’ll often take that to about 24 hours. Just be sure to cover your liquids during that long interval, as a surprising amount of evaporation can happen along the way.
All of the wet methods above will also work to rehydrate old, withered vanilla beans that have never been used, but are too dry to split and scrape (the sort you’ll often see sold in glass vials at the supermarket, or lurking in a bag you forgot about in the pantry). After soaking in a hot or cold infusion, those brittle beans will soften right up, at which point they can be split and scraped so the seeds won’t go to waste. Dried-out unused pods that haven’t been split can be ground up with coffee beans or for vanilla powder, just like split ones.
Once you start thinking beyond that bag o’ sugar, you’ll find no end of use for those leftover vanilla pods, and a growing appreciation for the nuanced flavor they bring to the table.
amzn_assoc_placement = "adunit0"; amzn_assoc_search_bar = "true"; amzn_assoc_search_bar_position = "bottom"; amzn_assoc_tracking_id = "cookingtipsguide-20"; amzn_assoc_ad_mode = "search"; amzn_assoc_ad_type = "smart"; amzn_assoc_marketplace = "amazon"; amzn_assoc_region = "US"; amzn_assoc_title = "Shop Related Products"; amzn_assoc_default_search_phrase = "cookware"; amzn_assoc_default_category = "All"; amzn_assoc_linkid = "b45319dac495d29e17b5eff312392025";
Source link
0 notes
Text
What to Do With Leftover Vanilla Bean Pods
New Post has been published on https://culinaryinquisitor.com/what-to-do-with-leftover-vanilla-bean-pods/
What to Do With Leftover Vanilla Bean Pods
amzn_assoc_placement = "adunit0"; amzn_assoc_tracking_id = "wasto77-20"; amzn_assoc_ad_mode = "search"; amzn_assoc_ad_type = "smart"; amzn_assoc_marketplace = "amazon"; amzn_assoc_region = "US"; amzn_assoc_title = "Shop Related Products"; amzn_assoc_default_search_phrase = "cooking"; amzn_assoc_default_category = "Kitchen"; amzn_assoc_linkid = "51fe4d035c7af8dc5928e6f5e5b79c4e"; amzn_assoc_default_browse_node = "284507"; amzn_assoc_rows = "4"; amzn_assoc_design = "text_links";
[Photographs: Vicky Wasik]
The best part about the years I worked as a pastry chef was, hands down, the unlimited supply of vanilla beans I got to play with every day. There’s nothing quite like the distinct, if extremely niche, pleasure of sinking a paring knife into a fat pod, then splitting it open to scrape out the rich paste stuffed inside. I’d save the seeds for low-moisture projects, like vanilla shortbread or peanut brittle, then dispatch the empty pods in “wet” applications—poached pears, vanilla ice cream, panna cotta, and so on.
Later on, I’d give the empty pods a light rinse, wipe them clean, and then dry them in a low oven so I could store and reuse them down the road. This rarely, if ever, included making vanilla sugar, a popular trick among home cooks that results in an undeniably appealing aroma. Unfortunately, that scent is like the top note of perfume: fleeting at best, and too volatile to survive the rigors of boiling or baking. For that reason, I’m more inclined to store my vanilla pods in a package of something that’s ready to eat—say, a bag of homemade granola or a tin of sugar cookies.
Given that vanilla beans cost more than ever these days (and, as Eater reports, are only getting pricier), it’s all the more important to make the most of every pod. Leftover vanilla can be a great source of flavor and aroma for your favorite recipes, but only with methods aimed at extracting the pods’ water-soluble compounds. So go ahead—stick that vanilla bean into a bag of sugar, or store it alongside some tasty treat, but be sure you also put it to work later on with one of these applications.
Long-Term Cold Infusions
Slip a leftover vanilla bean into a bottle of maple syrup and let it hang out in the fridge for a month, or add one to a quart of milk or cream and let it steep for a week before using it in your favorite recipes. Whether you tuck the bean into a jug of cold-brew coffee or a jar of lemon syrup, these slow, cold infusions will impart a mellow vanilla character to whatever you’ve got stashed in the fridge.
Short-Term, High-Heat Infusions
The next time you whip up a batch of caramel sauce, cajeta, or sweetened condensed milk, toss that leftover vanilla bean right on in. Pull it out when you’re done, or leave it in to double down with a cold infusion when those sweets are stored in the fridge.
Brown Butter and Toasted Cream
If you’ve never enhanced brown butter with a vanilla bean, you’re really missing out. This relatively high-heat method pulls out the pod’s deeper, oakier notes, rather than the light, perfume-y vanilla aroma we’re used to. It’ll add delicious complexity to classics like yeast-raised waffles, carrot cake, and chocolate chip cookies.
The same idea can extend to Sohla’s toasted cream, in which leftover vanilla can create a secondary layer of flavor behind the browned, toffee notes of cooked cream.
Fruity Desserts
Aside from obvious applications, like poached pears, leftover vanilla pods can add a creamy, aromatic presence in dishes like roasted strawberries, homemade applesauce, cherry ice cream, and lemon syrup (or perhaps an orange variation, if you wanna groove on a Creamsicle vibe). Just toss your pod into the pot with whatever fruit you’re cooking, and remove it when you’ve reached your desired level of vanilla flavor.
Ground Vanilla
After drying out, leftover vanilla beans are brittle enough to be ground up alongside coffee beans if you dig the pairing. Alternatively, they can be reduced to a powder in a spice mill and added with other dry ingredients to any recipe that could benefit from a vanilla boost—take your pick!
Traditional Recipes
Whether you’re making panna cotta or vanilla ice cream, any time a recipe calls for a freshly split vanilla bean, you can sub in a leftover pod so long as you steep it for a greater length of time—I’ll often take that to about 24 hours. Just be sure to cover your liquids during that long interval, as a surprising amount of evaporation can happen along the way.
All of the wet methods above will also work to rehydrate old, withered vanilla beans that have never been used, but are too dry to split and scrape (the sort you’ll often see sold in glass vials at the supermarket, or lurking in a bag you forgot about in the pantry). After soaking in a hot or cold infusion, those brittle beans will soften right up, at which point they can be split and scraped so the seeds won’t go to waste. Dried-out unused pods that haven’t been split can be ground up with coffee beans or for vanilla powder, just like split ones.
Once you start thinking beyond that bag o’ sugar, you’ll find no end of use for those leftover vanilla pods, and a growing appreciation for the nuanced flavor they bring to the table.
amzn_assoc_placement = "adunit0"; amzn_assoc_search_bar = "true"; amzn_assoc_search_bar_position = "bottom"; amzn_assoc_tracking_id = "wasto77-20"; amzn_assoc_ad_mode = "search"; amzn_assoc_ad_type = "smart"; amzn_assoc_marketplace = "amazon"; amzn_assoc_region = "US"; amzn_assoc_title = "Shop Related Products"; amzn_assoc_default_search_phrase = "cookware"; amzn_assoc_default_category = "All"; amzn_assoc_linkid = "b45319dac495d29e17b5eff312392025";
Source link
0 notes
Text
What to Do With Leftover Vanilla Bean Pods
New Post has been published on http://cookingawe.com/what-to-do-with-leftover-vanilla-bean-pods/
What to Do With Leftover Vanilla Bean Pods
amzn_assoc_placement = "adunit0"; amzn_assoc_tracking_id = "workathome089-20"; amzn_assoc_ad_mode = "search"; amzn_assoc_ad_type = "smart"; amzn_assoc_marketplace = "amazon"; amzn_assoc_region = "US"; amzn_assoc_title = "Shop Related Products"; amzn_assoc_default_search_phrase = "cooking"; amzn_assoc_default_category = "Kitchen"; amzn_assoc_linkid = "51fe4d035c7af8dc5928e6f5e5b79c4e"; amzn_assoc_default_browse_node = "284507"; amzn_assoc_rows = "4"; amzn_assoc_design = "text_links";
[Photographs: Vicky Wasik]
The best part about the years I worked as a pastry chef was, hands down, the unlimited supply of vanilla beans I got to play with every day. There’s nothing quite like the distinct, if extremely niche, pleasure of sinking a paring knife into a fat pod, then splitting it open to scrape out the rich paste stuffed inside. I’d save the seeds for low-moisture projects, like vanilla shortbread or peanut brittle, then dispatch the empty pods in “wet” applications—poached pears, vanilla ice cream, panna cotta, and so on.
Later on, I’d give the empty pods a light rinse, wipe them clean, and then dry them in a low oven so I could store and reuse them down the road. This rarely, if ever, included making vanilla sugar, a popular trick among home cooks that results in an undeniably appealing aroma. Unfortunately, that scent is like the top note of perfume: fleeting at best, and too volatile to survive the rigors of boiling or baking. For that reason, I’m more inclined to store my vanilla pods in a package of something that’s ready to eat—say, a bag of homemade granola or a tin of sugar cookies.
Given that vanilla beans cost more than ever these days (and, as Eater reports, are only getting pricier), it’s all the more important to make the most of every pod. Leftover vanilla can be a great source of flavor and aroma for your favorite recipes, but only with methods aimed at extracting the pods’ water-soluble compounds. So go ahead—stick that vanilla bean into a bag of sugar, or store it alongside some tasty treat, but be sure you also put it to work later on with one of these applications.
Long-Term Cold Infusions
Slip a leftover vanilla bean into a bottle of maple syrup and let it hang out in the fridge for a month, or add one to a quart of milk or cream and let it steep for a week before using it in your favorite recipes. Whether you tuck the bean into a jug of cold-brew coffee or a jar of lemon syrup, these slow, cold infusions will impart a mellow vanilla character to whatever you’ve got stashed in the fridge.
Short-Term, High-Heat Infusions
The next time you whip up a batch of caramel sauce, cajeta, or sweetened condensed milk, toss that leftover vanilla bean right on in. Pull it out when you’re done, or leave it in to double down with a cold infusion when those sweets are stored in the fridge.
Brown Butter and Toasted Cream
If you’ve never enhanced brown butter with a vanilla bean, you’re really missing out. This relatively high-heat method pulls out the pod’s deeper, oakier notes, rather than the light, perfume-y vanilla aroma we’re used to. It’ll add delicious complexity to classics like yeast-raised waffles, carrot cake, and chocolate chip cookies.
The same idea can extend to Sohla’s toasted cream, in which leftover vanilla can create a secondary layer of flavor behind the browned, toffee notes of cooked cream.
Fruity Desserts
Aside from obvious applications, like poached pears, leftover vanilla pods can add a creamy, aromatic presence in dishes like roasted strawberries, homemade applesauce, cherry ice cream, and lemon syrup (or perhaps an orange variation, if you wanna groove on a Creamsicle vibe). Just toss your pod into the pot with whatever fruit you’re cooking, and remove it when you’ve reached your desired level of vanilla flavor.
Ground Vanilla
After drying out, leftover vanilla beans are brittle enough to be ground up alongside coffee beans if you dig the pairing. Alternatively, they can be reduced to a powder in a spice mill and added with other dry ingredients to any recipe that could benefit from a vanilla boost—take your pick!
Traditional Recipes
Whether you’re making panna cotta or vanilla ice cream, any time a recipe calls for a freshly split vanilla bean, you can sub in a leftover pod so long as you steep it for a greater length of time—I’ll often take that to about 24 hours. Just be sure to cover your liquids during that long interval, as a surprising amount of evaporation can happen along the way.
All of the wet methods above will also work to rehydrate old, withered vanilla beans that have never been used, but are too dry to split and scrape (the sort you’ll often see sold in glass vials at the supermarket, or lurking in a bag you forgot about in the pantry). After soaking in a hot or cold infusion, those brittle beans will soften right up, at which point they can be split and scraped so the seeds won’t go to waste. Dried-out unused pods that haven’t been split can be ground up with coffee beans or for vanilla powder, just like split ones.
Once you start thinking beyond that bag o’ sugar, you’ll find no end of use for those leftover vanilla pods, and a growing appreciation for the nuanced flavor they bring to the table.
amzn_assoc_placement = "adunit0"; amzn_assoc_search_bar = "true"; amzn_assoc_search_bar_position = "bottom"; amzn_assoc_tracking_id = "workathome089-20"; amzn_assoc_ad_mode = "search"; amzn_assoc_ad_type = "smart"; amzn_assoc_marketplace = "amazon"; amzn_assoc_region = "US"; amzn_assoc_title = "Shop Related Products"; amzn_assoc_default_search_phrase = "cookware"; amzn_assoc_default_category = "All"; amzn_assoc_linkid = "b45319dac495d29e17b5eff312392025";
Source link
0 notes
Text
What to Do With Leftover Vanilla Bean Pods
New Post has been published on https://cucinacarmela.com/what-to-do-with-leftover-vanilla-bean-pods/
What to Do With Leftover Vanilla Bean Pods
amzn_assoc_placement = "adunit0"; amzn_assoc_tracking_id = "carmela-20"; amzn_assoc_ad_mode = "search"; amzn_assoc_ad_type = "smart"; amzn_assoc_marketplace = "amazon"; amzn_assoc_region = "US"; amzn_assoc_title = "Shop Related Products"; amzn_assoc_default_search_phrase = "cooking"; amzn_assoc_default_category = "Kitchen"; amzn_assoc_linkid = "51fe4d035c7af8dc5928e6f5e5b79c4e"; amzn_assoc_default_browse_node = "284507"; amzn_assoc_rows = "4"; amzn_assoc_design = "text_links";
[Photographs: Vicky Wasik]
The best part about the years I worked as a pastry chef was, hands down, the unlimited supply of vanilla beans I got to play with every day. There’s nothing quite like the distinct, if extremely niche, pleasure of sinking a paring knife into a fat pod, then splitting it open to scrape out the rich paste stuffed inside. I’d save the seeds for low-moisture projects, like vanilla shortbread or peanut brittle, then dispatch the empty pods in “wet” applications—poached pears, vanilla ice cream, panna cotta, and so on.
Later on, I’d give the empty pods a light rinse, wipe them clean, and then dry them in a low oven so I could store and reuse them down the road. This rarely, if ever, included making vanilla sugar, a popular trick among home cooks that results in an undeniably appealing aroma. Unfortunately, that scent is like the top note of perfume: fleeting at best, and too volatile to survive the rigors of boiling or baking. For that reason, I’m more inclined to store my vanilla pods in a package of something that’s ready to eat—say, a bag of homemade granola or a tin of sugar cookies.
Given that vanilla beans cost more than ever these days (and, as Eater reports, are only getting pricier), it’s all the more important to make the most of every pod. Leftover vanilla can be a great source of flavor and aroma for your favorite recipes, but only with methods aimed at extracting the pods’ water-soluble compounds. So go ahead—stick that vanilla bean into a bag of sugar, or store it alongside some tasty treat, but be sure you also put it to work later on with one of these applications.
Long-Term Cold Infusions
Slip a leftover vanilla bean into a bottle of maple syrup and let it hang out in the fridge for a month, or add one to a quart of milk or cream and let it steep for a week before using it in your favorite recipes. Whether you tuck the bean into a jug of cold-brew coffee or a jar of lemon syrup, these slow, cold infusions will impart a mellow vanilla character to whatever you’ve got stashed in the fridge.
Short-Term, High-Heat Infusions
The next time you whip up a batch of caramel sauce, cajeta, or sweetened condensed milk, toss that leftover vanilla bean right on in. Pull it out when you’re done, or leave it in to double down with a cold infusion when those sweets are stored in the fridge.
Brown Butter and Toasted Cream
If you’ve never enhanced brown butter with a vanilla bean, you’re really missing out. This relatively high-heat method pulls out the pod’s deeper, oakier notes, rather than the light, perfume-y vanilla aroma we’re used to. It’ll add delicious complexity to classics like yeast-raised waffles, carrot cake, and chocolate chip cookies.
The same idea can extend to Sohla’s toasted cream, in which leftover vanilla can create a secondary layer of flavor behind the browned, toffee notes of cooked cream.
Fruity Desserts
Aside from obvious applications, like poached pears, leftover vanilla pods can add a creamy, aromatic presence in dishes like roasted strawberries, homemade applesauce, cherry ice cream, and lemon syrup (or perhaps an orange variation, if you wanna groove on a Creamsicle vibe). Just toss your pod into the pot with whatever fruit you’re cooking, and remove it when you’ve reached your desired level of vanilla flavor.
Ground Vanilla
After drying out, leftover vanilla beans are brittle enough to be ground up alongside coffee beans if you dig the pairing. Alternatively, they can be reduced to a powder in a spice mill and added with other dry ingredients to any recipe that could benefit from a vanilla boost—take your pick!
Traditional Recipes
Whether you’re making panna cotta or vanilla ice cream, any time a recipe calls for a freshly split vanilla bean, you can sub in a leftover pod so long as you steep it for a greater length of time—I’ll often take that to about 24 hours. Just be sure to cover your liquids during that long interval, as a surprising amount of evaporation can happen along the way.
All of the wet methods above will also work to rehydrate old, withered vanilla beans that have never been used, but are too dry to split and scrape (the sort you’ll often see sold in glass vials at the supermarket, or lurking in a bag you forgot about in the pantry). After soaking in a hot or cold infusion, those brittle beans will soften right up, at which point they can be split and scraped so the seeds won’t go to waste. Dried-out unused pods that haven’t been split can be ground up with coffee beans or for vanilla powder, just like split ones.
Once you start thinking beyond that bag o’ sugar, you’ll find no end of use for those leftover vanilla pods, and a growing appreciation for the nuanced flavor they bring to the table.
amzn_assoc_placement = "adunit0"; amzn_assoc_search_bar = "true"; amzn_assoc_search_bar_position = "bottom"; amzn_assoc_tracking_id = "carmela-20"; amzn_assoc_ad_mode = "search"; amzn_assoc_ad_type = "smart"; amzn_assoc_marketplace = "amazon"; amzn_assoc_region = "US"; amzn_assoc_title = "Shop Related Products"; amzn_assoc_default_search_phrase = "cookware"; amzn_assoc_default_category = "All"; amzn_assoc_linkid = "b45319dac495d29e17b5eff312392025";
Source link
0 notes
Photo
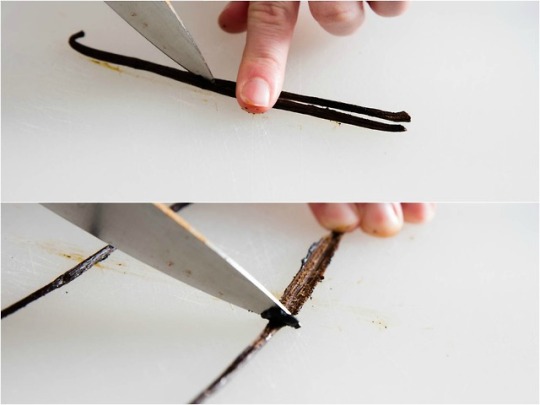
New Post has been published on https://jmuo.com/what-to-do-with-leftover-vanilla-bean-pods/
What to Do With Leftover Vanilla Bean Pods
amzn_assoc_placement = "adunit0"; amzn_assoc_tracking_id = "fresh17-20"; amzn_assoc_ad_mode = "search"; amzn_assoc_ad_type = "smart"; amzn_assoc_marketplace = "amazon"; amzn_assoc_region = "US"; amzn_assoc_title = "Shop Related Products"; amzn_assoc_default_search_phrase = "cooking"; amzn_assoc_default_category = "Kitchen"; amzn_assoc_linkid = "51fe4d035c7af8dc5928e6f5e5b79c4e"; amzn_assoc_default_browse_node = "284507"; amzn_assoc_rows = "4"; amzn_assoc_design = "text_links";
[Photographs: Vicky Wasik]
The best part about the years I worked as a pastry chef was, hands down, the unlimited supply of vanilla beans I got to play with every day. There’s nothing quite like the distinct, if extremely niche, pleasure of sinking a paring knife into a fat pod, then splitting it open to scrape out the rich paste stuffed inside. I’d save the seeds for low-moisture projects, like vanilla shortbread or peanut brittle, then dispatch the empty pods in “wet” applications—poached pears, vanilla ice cream, panna cotta, and so on.
Later on, I’d give the empty pods a light rinse, wipe them clean, and then dry them in a low oven so I could store and reuse them down the road. This rarely, if ever, included making vanilla sugar, a popular trick among home cooks that results in an undeniably appealing aroma. Unfortunately, that scent is like the top note of perfume: fleeting at best, and too volatile to survive the rigors of boiling or baking. For that reason, I’m more inclined to store my vanilla pods in a package of something that’s ready to eat—say, a bag of homemade granola or a tin of sugar cookies.
Given that vanilla beans cost more than ever these days (and, as Eater reports, are only getting pricier), it’s all the more important to make the most of every pod. Leftover vanilla can be a great source of flavor and aroma for your favorite recipes, but only with methods aimed at extracting the pods’ water-soluble compounds. So go ahead—stick that vanilla bean into a bag of sugar, or store it alongside some tasty treat, but be sure you also put it to work later on with one of these applications.
Long-Term Cold Infusions
Slip a leftover vanilla bean into a bottle of maple syrup and let it hang out in the fridge for a month, or add one to a quart of milk or cream and let it steep for a week before using it in your favorite recipes. Whether you tuck the bean into a jug of cold-brew coffee or a jar of lemon syrup, these slow, cold infusions will impart a mellow vanilla character to whatever you’ve got stashed in the fridge.
Short-Term, High-Heat Infusions
The next time you whip up a batch of caramel sauce, cajeta, or sweetened condensed milk, toss that leftover vanilla bean right on in. Pull it out when you’re done, or leave it in to double down with a cold infusion when those sweets are stored in the fridge.
Brown Butter and Toasted Cream
If you’ve never enhanced brown butter with a vanilla bean, you’re really missing out. This relatively high-heat method pulls out the pod’s deeper, oakier notes, rather than the light, perfume-y vanilla aroma we’re used to. It’ll add delicious complexity to classics like yeast-raised waffles, carrot cake, and chocolate chip cookies.
The same idea can extend to Sohla’s toasted cream, in which leftover vanilla can create a secondary layer of flavor behind the browned, toffee notes of cooked cream.
Fruity Desserts
Aside from obvious applications, like poached pears, leftover vanilla pods can add a creamy, aromatic presence in dishes like roasted strawberries, homemade applesauce, cherry ice cream, and lemon syrup (or perhaps an orange variation, if you wanna groove on a Creamsicle vibe). Just toss your pod into the pot with whatever fruit you’re cooking, and remove it when you’ve reached your desired level of vanilla flavor.
Ground Vanilla
After drying out, leftover vanilla beans are brittle enough to be ground up alongside coffee beans if you dig the pairing. Alternatively, they can be reduced to a powder in a spice mill and added with other dry ingredients to any recipe that could benefit from a vanilla boost—take your pick!
Traditional Recipes
Whether you’re making panna cotta or vanilla ice cream, any time a recipe calls for a freshly split vanilla bean, you can sub in a leftover pod so long as you steep it for a greater length of time—I’ll often take that to about 24 hours. Just be sure to cover your liquids during that long interval, as a surprising amount of evaporation can happen along the way.
All of the wet methods above will also work to rehydrate old, withered vanilla beans that have never been used, but are too dry to split and scrape (the sort you’ll often see sold in glass vials at the supermarket, or lurking in a bag you forgot about in the pantry). After soaking in a hot or cold infusion, those brittle beans will soften right up, at which point they can be split and scraped so the seeds won’t go to waste. Dried-out unused pods that haven’t been split can be ground up with coffee beans or for vanilla powder, just like split ones.
Once you start thinking beyond that bag o’ sugar, you’ll find no end of use for those leftover vanilla pods, and a growing appreciation for the nuanced flavor they bring to the table.
amzn_assoc_placement = "adunit0"; amzn_assoc_search_bar = "true"; amzn_assoc_search_bar_position = "bottom"; amzn_assoc_tracking_id = "fresh17-20"; amzn_assoc_ad_mode = "search"; amzn_assoc_ad_type = "smart"; amzn_assoc_marketplace = "amazon"; amzn_assoc_region = "US"; amzn_assoc_title = "Shop Related Products"; amzn_assoc_default_search_phrase = "cookware"; amzn_assoc_default_category = "All"; amzn_assoc_linkid = "b45319dac495d29e17b5eff312392025";
Source link
0 notes
Text
What to Do With Leftover Vanilla Bean Pods
New Post has been published on http://healthy-cook.com/what-to-do-with-leftover-vanilla-bean-pods/
What to Do With Leftover Vanilla Bean Pods
amzn_assoc_placement = "adunit0"; amzn_assoc_tracking_id = "healthyck18-20"; amzn_assoc_ad_mode = "search"; amzn_assoc_ad_type = "smart"; amzn_assoc_marketplace = "amazon"; amzn_assoc_region = "US"; amzn_assoc_title = "Shop Related Products"; amzn_assoc_default_search_phrase = "cooking"; amzn_assoc_default_category = "Kitchen"; amzn_assoc_linkid = "51fe4d035c7af8dc5928e6f5e5b79c4e"; amzn_assoc_default_browse_node = "284507"; amzn_assoc_rows = "4"; amzn_assoc_design = "text_links";
[Photographs: Vicky Wasik]
The best part about the years I worked as a pastry chef was, hands down, the unlimited supply of vanilla beans I got to play with every day. There’s nothing quite like the distinct, if extremely niche, pleasure of sinking a paring knife into a fat pod, then splitting it open to scrape out the rich paste stuffed inside. I’d save the seeds for low-moisture projects, like vanilla shortbread or peanut brittle, then dispatch the empty pods in “wet” applications—poached pears, vanilla ice cream, panna cotta, and so on.
Later on, I’d give the empty pods a light rinse, wipe them clean, and then dry them in a low oven so I could store and reuse them down the road. This rarely, if ever, included making vanilla sugar, a popular trick among home cooks that results in an undeniably appealing aroma. Unfortunately, that scent is like the top note of perfume: fleeting at best, and too volatile to survive the rigors of boiling or baking. For that reason, I’m more inclined to store my vanilla pods in a package of something that’s ready to eat—say, a bag of homemade granola or a tin of sugar cookies.
Given that vanilla beans cost more than ever these days (and, as Eater reports, are only getting pricier), it’s all the more important to make the most of every pod. Leftover vanilla can be a great source of flavor and aroma for your favorite recipes, but only with methods aimed at extracting the pods’ water-soluble compounds. So go ahead—stick that vanilla bean into a bag of sugar, or store it alongside some tasty treat, but be sure you also put it to work later on with one of these applications.
Long-Term Cold Infusions
Slip a leftover vanilla bean into a bottle of maple syrup and let it hang out in the fridge for a month, or add one to a quart of milk or cream and let it steep for a week before using it in your favorite recipes. Whether you tuck the bean into a jug of cold-brew coffee or a jar of lemon syrup, these slow, cold infusions will impart a mellow vanilla character to whatever you’ve got stashed in the fridge.
Short-Term, High-Heat Infusions
The next time you whip up a batch of caramel sauce, cajeta, or sweetened condensed milk, toss that leftover vanilla bean right on in. Pull it out when you’re done, or leave it in to double down with a cold infusion when those sweets are stored in the fridge.
Brown Butter and Toasted Cream
If you’ve never enhanced brown butter with a vanilla bean, you’re really missing out. This relatively high-heat method pulls out the pod’s deeper, oakier notes, rather than the light, perfume-y vanilla aroma we’re used to. It’ll add delicious complexity to classics like yeast-raised waffles, carrot cake, and chocolate chip cookies.
The same idea can extend to Sohla’s toasted cream, in which leftover vanilla can create a secondary layer of flavor behind the browned, toffee notes of cooked cream.
Fruity Desserts
Aside from obvious applications, like poached pears, leftover vanilla pods can add a creamy, aromatic presence in dishes like roasted strawberries, homemade applesauce, cherry ice cream, and lemon syrup (or perhaps an orange variation, if you wanna groove on a Creamsicle vibe). Just toss your pod into the pot with whatever fruit you’re cooking, and remove it when you’ve reached your desired level of vanilla flavor.
Ground Vanilla
After drying out, leftover vanilla beans are brittle enough to be ground up alongside coffee beans if you dig the pairing. Alternatively, they can be reduced to a powder in a spice mill and added with other dry ingredients to any recipe that could benefit from a vanilla boost—take your pick!
Traditional Recipes
Whether you’re making panna cotta or vanilla ice cream, any time a recipe calls for a freshly split vanilla bean, you can sub in a leftover pod so long as you steep it for a greater length of time—I’ll often take that to about 24 hours. Just be sure to cover your liquids during that long interval, as a surprising amount of evaporation can happen along the way.
All of the wet methods above will also work to rehydrate old, withered vanilla beans that have never been used, but are too dry to split and scrape (the sort you’ll often see sold in glass vials at the supermarket, or lurking in a bag you forgot about in the pantry). After soaking in a hot or cold infusion, those brittle beans will soften right up, at which point they can be split and scraped so the seeds won’t go to waste. Dried-out unused pods that haven’t been split can be ground up with coffee beans or for vanilla powder, just like split ones.
Once you start thinking beyond that bag o’ sugar, you’ll find no end of use for those leftover vanilla pods, and a growing appreciation for the nuanced flavor they bring to the table.
amzn_assoc_placement = "adunit0"; amzn_assoc_search_bar = "true"; amzn_assoc_search_bar_position = "bottom"; amzn_assoc_tracking_id = "healthyck18-20"; amzn_assoc_ad_mode = "search"; amzn_assoc_ad_type = "smart"; amzn_assoc_marketplace = "amazon"; amzn_assoc_region = "US"; amzn_assoc_title = "Shop Related Products"; amzn_assoc_default_search_phrase = "cookware"; amzn_assoc_default_category = "All"; amzn_assoc_linkid = "b45319dac495d29e17b5eff312392025";
Source link
0 notes
Text
Being of Indian descent, curry played an important part of my diet growing up in the UK. Curry is considered a national dish in the UK; in fact they celebrated the 20th anniversary of national curry week earlier this month 9-15th Oct 2017. Many Indians immigrated to the UK between 1950s and 1970s following the Second World War and the break up of the British Empire; they came to fill the labor shortage and with them, brought their cuisine!
What is Curry?
Curry generally refers to a variety of dishes from the Indian sub-continent. Curries are versatile, tasty, nutritious and healthy which makes them perfect for family meals or entertaining. They can be made in bulk and frozen down into smaller portions.
Common Misconceptions about Curries
Curries are oily, greasy and fatty
I only use a small glug of extra virgin oil when cooking curries. Ghee (a form of clarified butter originating from India) is also fine but should be used sparingly. When cooking meat, use lean versions and trim off any excess skin and/ or fat. Worst-case scenario you can always skim off surface layer fat using a spoon after cooking.
Curries are too spicy/ hot for me and kids
Spice adds flavour; chilli adds heat. By omitting all forms of chilli (chilli powder, chilli flakes and fresh green or red chillies), you remove the heat. I do not add any form of chilli to my cooking because of the kids but I do keep dried red chilli flakes handy for myself. A word of warning regarding chilli powder and cayenne pepper; it can be pretty lethal so use sparingly i.e. just a pinch (and make sure you wash your hands afterwards!).
Curries are complicated and time consuming to make
Not so! Curries follow the same basic principles and can be cooked as quickly as a stirfry. Below you will see the main components of a curry, the basic equipment needed and some handy tips to help you get it right first time.
Main Components of a Curry
Base + Spices + Main Ingredient(s) = Curry
Base
For most curries, the base usually consists of onions. For wet curries, tomatoes also form part of the base. Other regional curry bases might include cream, coconut milk and yoghurt. Garlic and/or ginger are key components for all curry bases; frozen or paste forms also work great.
Spices
Spices add flavor to curries; they can be used in whole or ground/ powdered form. Here are the main spices I use and recommend for your pantry cupboard:
Garam Masala powder (blend of spices toasted and ground)
Ground Cumin
Ground Coriander
Tumeric powder (for yellow color)
Cumin seeds
Coriander seeds (optional)
Dried bay leaves (optional)
Cardamom pods (optional)
Chilli powder (optional)
Main Ingredient(s)
The main ingredient might include meat, vegetables, pulses (peas, beans, lentils) and Indian cheese (paneer).
Garnish
Typically chopped coriander is used to garnish a curry after cooking. Slices or wedges of lemon also work well.
Wet vs Dry Curries
As illustrated below, curries can be wet (with sauce or gravy) or dry (no sauce). Wet curries need more onions and tomatoes since these make up the sauce.
Wet Curry
Dry Curry
Base Ingredients (approx.)
2 Onions
1 Tin of tomatoes
Few cloves of garlic
Thumb sized ginger 1 Onion
1 Tomato (or 6 cherry tomatoes)
Thumb sized ginger
Meat
Chicken (thighs) curry
Lamb (leg, neck, shoulder pieces) curry Keema* (Ground Lamb, Peas)
Vegetables
Saag Aloo (Spinach, Potato) Aloo Gobi (Potato, Cauliflower)
Mixed Vegetable
Bombay Potatoes
Bhindi (Okra)
Pulses
Channa Masala (Chickpeas)
Dhal (Lentils)
Paneer (Indian Cheese)
Saag Paneer (Spinach, Cheese)
Mutter Paneer (Peas, Cheese)
*Keema curry is an exception and requires the same tomato base as a wet meat curry.
Equipment
Wok: For dry curries, I tend to use a wok and cook food on a low to medium setting.
Pan with Lid: For wet curries, I use a medium to large stainless steel pan with lid.
Fine Grater/ Shredder or mini food processer/ chopper: Use for chopping onions, garlic and ginger, tomatoes and herbs.
Hand Blender (optional): An electric hand blender will enable you to create smooth and professional looking curry sauces.
Pestle & Mortar (optional): Handy for roughly crushing coriander seeds.
#gallery-0-5 { margin: auto; } #gallery-0-5 .gallery-item { float: left; margin-top: 10px; text-align: center; width: 33%; } #gallery-0-5 img { border: 2px solid #cfcfcf; } #gallery-0-5 .gallery-caption { margin-left: 0; } /* see gallery_shortcode() in wp-includes/media.php */
Tips
Here are some tips that could spell the difference between a good curry and a great curry (in chronological order from cooking start):
If using, add cumin or coriander seeds, bay leaves or cardamom, to a pan with hot oil (oil should be hot but not smoky). You should hear them pop or fizzle; then after a few moments, you can add the onions.
For wet curries, the onions should be sautéed (with a pinch of salt to speed up cooking) in a pan with lid on. The onions should be softened to the point of disintegrating (think caramelized onions for hot dogs). You can achieve this by cooking on low to low-medium heat and stirring every so often. Often, I use a slow cooker for this stage. As a cheat, I add whole cloves of garlic which soften just like the onions to avoid grating and adding later.
Again for wet curries, when adding tomatoes to sautéed onions, cook the tomatoes for at least 5 to 10 minutes to allow some water to evaporate thus creating a thick, rich sauce.
Don’t panic if your curry starts to stick to the base of the pan. For dry curries, simply reduce heat to the absolute minimum. For wet curries, you can do the same and/ or add some liquid in the form of tomatoes or water. In either case, the sediments at the pan base will loosen and come away. If the base of the pan seems burnt, you might like to consider transferring the curry to a fresh pan.
Add a dollop of butter (to dry or wet curry) or heavy cream to a wet curry towards the end of cooking time for a richer finish.
Rice & Breads: A variety of rice dishes (plain boiled, ‘Jeera’ cumin rice, rice with peas, biryani) and breads (roti or chapatti, pita, naan, paratha or even tortilla wraps) can be served with curries.
Other Accompaniments: Mango, lime or mixed indian pickles served alongside poppadoms (thin, crispy round flatbread also known as papadum or papad). Yoghurt based dips such as raita and mint yoghurt chutney.
Finally, there is no shame in buying shop bought curry sauces. Many off the shelf products are really quite good; always check salt/ sodium levels as some can be overly salty.
Curry Guide Being of Indian descent, curry played an important part of my diet growing up in the UK.
0 notes
Last Seen Blogs

anime-gamer-92
Anime-TV-Fan

lousirs
dollpurgatory

sandrolust
SandroLust

cumberbatchedx
Rock&Roll ain't noise pollution

sharenalovemail
please love her as much as i do