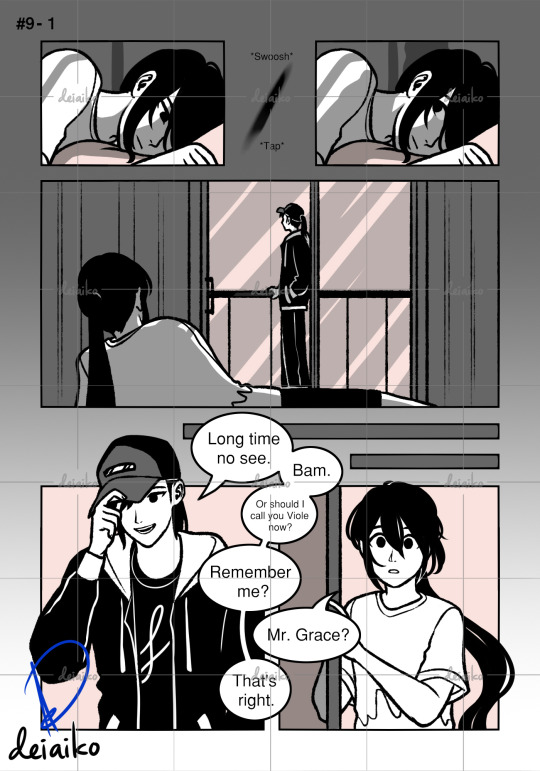
#I just had to use the pink on the background to give the panel warmer vibe - thus more hopeful
Text

#9 - Rescue
Masterlist
Previous
Next
Let me know your thoughts in the reblogs <3
#eyyy tsotsc is backkk im very excited#new hairstyles for everyone!!#okay i know how bad bam's fashion sense is but if i were to draw them in ridiculous outfit again and again i'm not sure i'll survive#i need grace to at least live up to his name ok#the two birds at the end is just a symbolic for their freedom#the scene took place at night time if you cant tell#I just had to use the pink on the background to give the panel warmer vibe - thus more hopeful#tower of god#tog#two sides of the same coin comic#my comic#my art#bam#baam#25th baam#25th bam#the 25th baam#the 25th bam#jue viole grace
171 notes
·
View notes
Photo

Man, I forgot to post 90% of my art here for the past while. I’m gonna do an art dump in this post under the cut. Enjoy the bonk emoji if you don’t click the read more, and man am I dumb and forgetful lmao.
Includes: OCs getting names, a Sonic impression, a D&D map, homosexual energies, a sheep floating in the astral sea, a birthday drawing I already posted, Hex Maniac Ender, D&D Characters, D&D Characters as Miis in Miitopia, Little Hater Axel, local Demon in the consciousness of my D&D character yelling at him, illegal plants, a necromancer being cute, an actual event that happened in a D&D game two days ago, and Mermay drawing.
That’s everything in here as a TL;DR, I guess. Enjoy your day!
I’m gonna try and sort of have them in chronological order, oldest first, but I may end up putting them in the wrong order. If I do... Whoops, I guess?

[04/14/21] - This isn’t really new art, but I started to work on giving the four OCs of mine without a full name full names... I have not finished this bit, though. So Hunter and Akira have full names, and Warlock and Assassin only have temporary names. This may end up like Seven where I put in their names as a temporary name (7th OC I’d made at that time) and it just kind of... sticks. Lmao.

[04/20/21] - Alone on a Friday Night? God, you’re pathetic. I didn’t colour this one because it was a half-attempt at a meme image I still like it, though, so I might end up colouring it. It’s gonna appear again whenever I do my “unfinished drawings art dump” at some point probably in... June? I know I said I’d post them last month but forget it, lmao, it’ll happen eventually.

[04/20/21] - A D&D Map! This was to help me visualize the layout of my D&D character’s ship he used to be on. Also for my DM if they ever put us aboard the ship. The little fella in the corner is just there to vibe. This map is made of free to use assets from This Website, so while I’m gonna say DONT USE MY MAP WITHOUT PERMISSION, feel free to make your own!

[04/26/21] - Lesbian Day of Visibility drawing of yours truly, the disapointment! That’s... really all I have to say about this, honestly. It was just for that one day and that was it, lmao. I mean, I accidentally lined it in dark pink, so.. .That’s different, I guess?

[04/30/21] - Do Astral Seas dream of Ensorcled Sheep? Does the City know what Sheepleb is going to do? What crimes he may commit? Who knows! This was fan art of Critical Role ep. 134 if I remember correctly, right at the end when they jumped into the portal into the astral sea and Caleb was a sheep. Using my knowledge of the German language, I knew the word for “shit”, and had to use it.

[05/07/21] - This was already posted, but it’s going in here to dilinuate that it was drawn at this point. Also, aside from playing Miitopia, this is all I have to show for myself until the 12th.

[05/12/21] - Hex Maniac Ender challenges you to a Pokemon Battle! WIll you win against my team? My sis, who loves fairy types, pointed out to me that there’s a fairy girl and hex maniac duo, so I’d be the hex maniac. I spent... Over a week drawing this, because I basically had to redraw the Hex Maniac art from scratch in a higher quality size, and then draw myself over it. So... You can excuse the low-effort background for once. It was basically this, and then my birthday doodle from May 1st to May 12th, and then I took a break to draw up several D&D characters quickly for fullbody references.

[05/12/21] - Remember this art I made several months ago? I finally added my other two completed characters! I have three more named but without character sheet D&D characters, so for now this is just Kara, Axel, Golden Shadow, Kau, Cecillia, and Miri. Kress, Tempest, and Melia will have to wait until I make character sheets for them to be posted, and... For when I probably make more D&D characters. I have at least 9 additional, incomplete character ideas floating around, so... I’m never gonna be done this art, huh?

[05/12/21] - Speaking of D&D characters, did you know I’ve been making them as Miis in Miitopia? So here is their finished full body art next to their Miitopia self! Some of them look a little off (Golden Shadow, Cecillia) because of limitations of the editor and shading issues, some of them look a little off (Kau, Kress) because this is a human face canvas that I’m using to make a non-human face, and some of them (Melia, Axel) look REALLY GOOD. Common traits among my D&D characters include green eyes and tall. You wanna know why? Because I am tall and... despite having red eyes, I do have green eyes under the coloured contacts.

[05/15/21] - More D&D stuff! This is based around my D&D group’s current Rime of the Frostmaiden campaign where our Goliath Fighter, Nioh, ends up getting a little bit of hate for being cocky, and our little (well over 6′) hater, Axel, is just a man full of irritation. These are the tallest two characters of the group at the moment. Someone send help. Nioh belongs to one of the other D&D players, Axel (and his stupid additude) belongs to me.

[05/15/21] - This is what me playing D&D feels like. Me, the demon entity trapped inside the head of my D&D character, yelling at them to do things while the dice decide that they’re gonna get bopped a hundred times by a yeti and somehow still survive. This is also a reference to our first or second game where I just ran off like sixty feet to one side of the battle map to fight a Crag Cat and was just in Gay Baby Jail until like two turns later when I could run back to the others. I also drew him not in his winter gear even though this is a bit from when we were atop Kelvin’s Carin in an icy cave, so maybe that’s why he’s at low HP.

[05/15/21] - Melia has good gardening tips, such as Use A Mars Mii Trap To Hide A Body Because They Are Endangered And It Is Illegal To Dig Them Up. I love her a lot, because she’s the youngest of four, all four sisters based around the different seasons. She’s based around Autumn, so she’s all orange and yellow and brown and is so cute. Also she’s Chaotic Neutral, as if she didn’t need to be mildly more threatening.

[05/15/21] - Cecillia is my Tiefling gal who lived in a very northern town plagued by cold weather and snow, and Axel is my Pirate guy who spent most of his time further south on the high seas and warmer weather. So, naturally... I’ll use the guy more acclimatized to the hotter weather in the campaign where we spend 99% of it in the snow. She uses Tarot Cards as her spell focus, and I decided to sneak my other D&D characters onto her Tarot cards so naturally, Axel is The Hanged Man, given his backstory and personality. She’s a very cheerful and friendly Tiefling Necromancer of the Hexblade, so she’d for sure take care of those around her to ensure their success. Especially if they’re on her Tarot Cards, and their spirit comes to her aid when she asks for them.

[05/16/21] - Content Warning; Ryma thinks too much into local stupid moron’s lack of knowing how to answer a question and thinks too much into the reputation of Pirates. Poor Axel, man doesn’t know how to socialize with people who aren’t pirates and is used to being hostile towards everyone, so when he’s asked a question that his answer to is “uhh... no?”, he panics and ends up making a mistake that leads him to think that Ryma can read his mind. Ryma belongs to another of the D&D players. I guess me drawing all those spicy Cow Costumed OCs earlier just brought me to drawing Axel being a bottom in this, huh?

[05/16/21] - It’s Mermay, which means more OC drawings! Here’s Theo after drinking some potion that turned him into a mermaid, and Seven, tiredly, collecting his stupid boyfriend so that Lailah can fix the fact he’s turned into a mermaid. Mer!Theo is based around his sword’s colours of indigo-purple with red accents, which looks a little weird since Theo is the Blue one of the group, but... it looks cool, I guess. Seven’s just the same outfit as always, just no gloves this time.
--
And that’s it for the art dump! This was, frankly, MASSIVE. I’ll try and remember to upload both on Twitter and Tumblr at the same time, but... Ah... I have been drawing a fair bit. Just mostly sketches and linework that I haven’t finished and may not actually finish. If they’re not completed, I’ll dump them all into something at the end of the month or whatever. Maybe you’ll get the old sketch of the Axel face in panel 3 because in the sketch phase it was an Ahegao face, in the clean sketch it was a lip bite, and in the linework and final it’s just horny face. lmao.
Top ten things I have to remember for drawing: AXEL HAS A SCAR AND GREEN EYES. I remember his eye colour now, but if you look at his fullbody ref, he’s got brown eyes. And, naturally, I keep forgetting to put in his scar. He has more, but most of them are located in areas covered by his clothes. So if I ever draw him shirtless I guess I’ll have to place them somewhere.
Also maybe finish the reference sheets I have left to finish so I can post more of them, since I have two “Pets” completed (Roko and Mona’s nameless pet), but I have to do up Hunter, Warlock, Assassin, Akira, Myuut, and Stella. I’m betting when I do complete two more, it’ll be Hunter and Akira. Those two are the most fun to draw, at least.
#the disappointment speaks#drawings by me#OCs#D&D#art dump#Miitopia#of all of these drawings I gotta say the most cursed is censored bottom!Axel and the most blessed is Cecillia's lap nap#I drew a lot of D&D stuff lately! Most of my OC stuff has stayed in the sketch stage so#I guess that says something about what I've been prioritizing in my drawings?#Also that drawing a twunk as a twink is incredibly funny and cursed. love my pirate boy
4 notes
·
View notes
Text
Red Thirst : CH18
Meeting The Family
Jiyu had called Synda and asked for some money to buy new dresses for her and Jie. Synda happily agreed. She bought herself a new blue dress while Jie chose a white one. They were more elegant and expensive than the one the landlady took from her.
On the day of the gathering, Kiwa came by himself to pick up the sisters. He froze in the doorway when she opened the door.
“You are breathtaking,” he said.
He looked dashing himself. A well tailored black suit, maroon tie. Now he looked like the son of one of the wealthiest men in Ku’ve, but he seemed indifferent about all the events. Actually no one was. She hadn’t seen Jie smile since yesterday. She wasn’t too thrilled about the beautiful dress she bought for herself.
Who would be excited? They had no other choice. That’s the worst feeling of all.
They left her apartment at twilight. Jie sat alone behind them. Kiwa got behind the wheel. Before they started moving, Kiwa turned to Jie.
“I’ll say what my mother said the other day; nothing has changed in your life, if anything it only gets better. You are going to a place where no one would judge you, or try to harm you.”
Jie bobbed her head. “Thanks.”
Her nervousness receded a little, Jiyu could see. They set off.
If the Magistrate HQ was the heart of the Ku’ve, The Crown Hotel was the kidney. Accept that there was only one Crown. The gate stood magnificent. Jiyu had passed the gate several times in the past but never stopped to gawk at the gate. The guard there would shoo them away. Now they were entering the gate.
Jie was staring out the window in the back of the car.
The compound of the The Crown Hotel was the largest in the Ku’ve, almost twice that of the Magistrate HQ, Jiyu had read somewhere. Once inside, Kiwa slowed down the car, sensibly, allowing the two sisters to admire the garden on either side of the stoned path. Myriad light poles had been lit among the flowers and the well maintained hedges, enabling them to see all sorts of the colors as if it was daytime.
Kiwa rounded the car around the fountain. At the centre of the fountain was a golden statue of a knight, thrusting his word into the sky.
It was gorgeous. She couldn’t take her eyes off.
“It’s Zagerin Knight of the 13th century.”
A historian would know that, and would be mesmerised more than it was doing to her now.
“Zagerin Knight!” Jie said from behind, “The company of the golden knights?”
“Actually, there was only one Golden Knight, but yes. They are also called the Company of the Golden Knight, because the Golden Knight was the commander.”
Jie mouthed the word, wow. But she retreated to silence again.
“What's so special about them?”
“They were the greatest warriors in history. Girls and women of the time would die for them.”
“Who did they fight?” Jiyu asked. “N’ra armies?”
“No. They were N’ra warriors. This was still when Akerin was part of N’ra Empire. They liberated Akerin only in 15th century. It’s that the Zagerin Knight were hailed from Ku’ve. They fought Creatures, too strong for humans. Even the real N’rian soldier were afraid of them.”
“Wow,” Jiyu said. “So, your father is also a historian like you? The statue must’ve cost a fortune.”
“Oh, it’s not real gold. The real ones are at home, along with the real antics. Father wants to let the world know Aisags are the descendant of the Zagerin Knights.”
“What!” Jie blurted out again.
“Didn’t I tell you this before?” Kiwa said.
“Nooo,” Jie said.
Jiyu shook her head.
They stopped in front of the hotel. A valet in a deep red uniform came to assist them.
Jiyu craned her neck up to see the top of the building where the large symbol of a golden Crown sat. It somehow glowed in the darkening evening background.
“That’s pure gold,” Kiwa said. “The outside.”
No way.
The building itself was grand. It had a mixture of modern and classic design. It was colored white, and seemed to collect all the lights from the poles in the garden and reflected it back. The steps spread thirty-percent of the building in the front. Jiyu held her sister's hand when they climbed toward the entrance.
The entrance door was wide and tall. The doorman held them and opened them.
Once stepped in, the hum of the outside vanished, and was replaced by the sounds of quiet murmurs and sounds of footsteps on the marble floor.
About a dozen people in the lobby, some talking to each other in a corner, some were sitting in one of the ornate chairs by the wall, some were in the reception desk. When one of the reception ladies saw Kiwa, she excused herself, left the desk and came over.
“Good evening, Sir Kiwa,” she said, in a well trained and friendly voice. “Mr Aisag had asked me to bring you directly to him. Please come this way.”
They followed her.
They took one of the elevators on the right, just for the four of them. The receptionist didn’t press any of the buttons on the panel. Kiwa reached into his suit, and brought out a golden key, and handed it to her. She put the key in the hole below the numbers, twisted it. The mechanical floor number indicator above the door switched from 0 to a symbol of a red wine glass. The elevator rose slowly.
In the silence it went on forever. Jiyu huddled with Jie behind Kiwa. He turned once to give them an insurance smile.
The elevator slowed down to a stop. A chime and the door splitted and they slid leisurely away revealing an enormous hall. Jiyu dropped her jaw. So did Jie. Their feet moved forward on their own. They stepped onto the hall. The lady from the reception stayed behind. “Have a nice day to you all,” she was saying but Jiyu’s full attention was already in the hall.
Dashin men in expensive suits, gorgeous women in colorful dresses filled the hall. Lovely couple walked with a glass of red in their hands. Families around tables, with their adorable boys and girls.
Boys and girls!
A big bright chandelier hung at the centre, along with it and the dozens white bulbs on each side lit the hall which made Jiyu forget it wasn’t daytime. Clean wall hangings depicting beautiful scenery adored the walls.
Kiwa joined them.
“What do you think, Jie?” Kiwa asked.
“It’s amazing,” she mumbled, eyes sweeping the hall inches by inches. “Are they all leeches?”
“Most of them are. Come, let me take you to my mother.”
Kiwa avoided the centre and stayed near the right wall and they made their way through the clumps of people, tables and floor vases. They still attracted some eyes. Kiwa received some greetings, but smiled and politely greeted them back, but never slowed down to chat.
They reached a door.
“Is my mother in?” Kiwa asked the man outside as he barely opened his mouth.
“Good e-evening sir. Yes, Madam is inside.”
He pushed the door open for them. “Thank you,” Kiwa said, and gestured to the sisters to follow him inside.
A relatively quieter room. Jiyu spotted Lady Iris immediately on the couch. A bunch of women and girls surrounded her. Mr. Lauf, the big bodyguard of Lady Iris, was standing behind them by the wall, near another door.
“Mother.”
Everyone in the room looked in their direction. Everyone, save for Mr. Laug, were adorned with sparkling jewelry around the ears, necks, and arms. Jiyu felt naked standing there. But Jie held her chin high as she scanned each and everyone in the room.
Lady Iris excused herself and walked over, a young girl wa tailing behind her. She looked about the same age as Kiwa, maybe a little older.
“Are you two lovely,” Lady Iris said.
“Good evening, Lady Iris,” Jiyu and Jie dipped their heads.
“This is Lucile,” Lady Iris said. “One of the big sisters. Lucile, Jiyu and Jie.”
“Nice to meet you,” Lucile said. Her voice was meek and soft.
She wore a pink dress. Unlike other girls in the room, she wore a small silver necklace and tiny earrings. Unlike her mother, her hair was golden. She looked super cute.
“Nice to meet you too,” Jie said.
Luciled smiled.
“Mother, father wants to see me. Can you keep them company and do the paperwork without me.”
“Of course. We don’t need you. Do we Jie?”
“Nope.” Jie looked up at Kiwa and grinned.
This was the first time Jiyu saw her little sister smile. Every tad of nervousness and fear had evaporated from her. Unlike Jiyu, she no longer looked out of place.
“Father is in room eleven.” Lucile said to Kiwa.
“Thanks, sister.” he faced Jiyu, “I’ll be back as soon as I can. Get yourself comfortable. Jie, anything you want, Lucile will help you.”
“Okay,” Jie said.
Kiwa left them.
“Come,” Lady Iris said, and led them out of the room through the door, Mr. Laug had been guarding.
“Good evening, Misses,” he said, with a dip of head.
Nice man.
They passed two rooms filled with people before they stopped before an iron door. On the way, Lucile excused herself and left them. Lady Iris used a big iron key to open it. A dimly lit room, devoid of all sorts of decoration and furnishers unlike the rooms they just passed. In the centre was a plushed chair with a rectangular hole in the headrest.
There were some wooden chairs by the wall as well. They sat down on it.
“I want you two to understand,” Lady Iris said, “how important the secrecy of the Coven is. Once you take the oath there is no going back. The rule is simple, don’t tell anyone about the coven. If you fail to uphold the rule the Coven might resort to harsh measures to compensate for the damage.”
She paused. Jiyu was getting warmer hearing this. Jie was bobbing her head up and down.
Lady Iris continued. “The last person who tried to disclose the secret is now in the darkest cell of the Rachi Asylum, his memory wiped out. He couldn’t even remember his own daughter, who lived in the next cell along with the wife.”
Lady Iris smiled. Her gaze on Jiyu. But Jiyu saw no warmth, felt no comfort this time. It was more a warning. It would be her who would live in the adjacent cell, if Jie break the rule. The message was clear. That’s the real reason why she was here. She had to be a member of the coven. An insurance.
“Oath?” Jie said.
“You’ll do that after you pay the fee.”
Jiyu’s heart leaped. Her throat froze.
“But we-we don’t have a-any money,” Jie said.
“No no no. Did Kiwa tell you nothing? It’s not money.”
Lucile came back. A man tagged along with her.
“Oh Amma. Perfect timing. You must’ve done with the other. Sorry, I forgot to tell my son to fetch them early. She is Jie, the new member and Jiyu is her big sister. Jiyu, Jie, this is Amma. You will see him a lot after today.”
Jiyu and Jie stood, forced smiles and dipped their heads
“The toast is about to be raised,” Amma said. “Let’s finish this quickly.”
Finish what?
“Jie climb on the chair,” Lady Iris said, gesturing to the plushed chair in the centre of the room.
Jie obeyed without question. She seemed to have some idea what was going on, but Jiyu was still in the dark.
Amma went behind the chair, opened the locker behind it and began to take out stuff; small glass bottle, cotton, big syringe with needle thrice the length of that of normal ones.
“Now, remember the rule. Maintain the secrecy,” Lady Iris said. “The fee is Jie’s spinal fluid. Amma will harvest a small amount for now, for the ritual, and every week after that. This is one of those rule where you don’t ask questions. The less you know, the better.”
“Okay,” Jiyu said. “Would it have any side effects on Jie? Taking out the fluid?”
“No dear,” Lady Iris said.
She didn’t say anything more.
“Shall we?” she said to Amma instead.
Amma went on to open the bottle, sucked the liquid inside with the cotton, and spread the liquid on Jie’s back. Lucky, she was wearing a backless dress, otherwise she would have to remove her entire dress. Jiyu stood close to her sister, and held her hand. Amma was now attaching the long syringe to a metal arm behind the chair. He turned on a switch and the arm moved, the needle disappeared inside Jie’s back.
She twisted her face for a brief second.
After paying the fee, they retracted their way back to the main hall. Lady Iris leading the way. Lucile walked behind them, along with Mr. Laug.
“Do you feel alright?” she had asked Jie.
“No,” Jie said. “Little light headed but it's fine.”
Now, they joined the crowd in the hall, now walking toward the far end of the hall, where there was a low stage. Jiyu saw Kiwa standing beside a tall, strong man. No one needed to tell her who the man was. Arnam Aisag. Kiwa’s father. The leader of the Red Coven. Closer, he looked older than she had anticipated. Long golen hair that touched his broad shoulders. He must be in his sixties but with still strong jaws like that of a warrior.
Descendant of a knight. The gene was still with him.
He smiled as they approaced. He held out his hand for his wife, and then for Jiyu and Jie as well.
“Lovely girls,” Arnam Aisag said. “Welcome to the family.”
Jiyu was sure which family he was talking about, the Coven or the Aisag. Maybe both.
“Nice to meet … you,” Jie said, dipping her head in reverent.
Jiyu said and did the same.
“Hi, I’m the biggest sister, Hira.” She was tall and thin and beautiful. Her golden dress matched her golden curls. Among the Aisag she radianted the most. “Kiwa wasn’t kidding when he said about your beauty. What a pair. Finally a contender, don’t you think Lucile.” Lucile simply beamed a smile and shrugged. “She doesn’t talk much. Mother said, I do that on her behalf. but I don’t see that’s true. Did Kiwa ever say how we tease him everyday and drove him out of the house. Haha. That’s why he live alone. Poor baby. Can you belive that? He could barely stand two mild sisters, and is going to be carry on father’s legacy. Between you and me, I’ll make a better leader. But they say I’m a girl.” she said the last bits in a whisper to Jie. “I can hold a rifle but Kiwa couldn’t even grab blade…”
Another man with golden hair just like Mr. Aisag came on the stage. Shorter and less comely, a woman and two little girls in pretty dress accompaning him.
“We’ll talk later,” Hira whispered to Jie, who had been bobbing her head. She head returned to usual self, Jiyu could tell.
“Uncle Zal,” Kiwa said. “Aunt, Lily… Naiyo, this is Jie and Jiyu.”
“Oh the new member,” Zal said. He dipped his head to Jie. “Welcome to the Coven.”
His wife and daughters did the same. Naiyo must be Kiwa’s age, or older, but Lily looked about Jie’s age. Only she had inherited her father’s golden hair. She wore a big smile and came to Jie. “You look nervous. Don’t be. I’m a leech too. We could be friend.”
“I l-like yo-your hair,” Jie said. “It’s cute on you.”
“I like you dress,” Lily said. “You are pretty too.”
Kiwa came closer to Jiyu.
“Are you okay?”
“Yes. You didn’t say anything about the fee?” she whispered.
“You know, I could. The rule.”
“You are right.”
A week ago, Jiyu had a simply life with a simple friend and a lovely sister. Now she was surrounded by leeches and their family, wearing expensive dress and shoes. Life was changing fast. For better or worse, it’s still early to tell.
Arnam Aisag stood in front of the family, holding high a silver chalice, studded with small colored gems.
“Good evening family.”
The hall went huss. Every eyes turned to him.
“It’s a new moon for us.”
Rustling among the crowd. A girl came forward flanked by a man and woman, her parent. They stood in front of everyone, two metres away from the stage. Two more girls, one looked over seventeen and a young boy who looked not more than twelve joined the first girls with their parents. The boy only had his mother by his side. The last to join them was a man in his early twenties. He was alone. They circled the stage.
Lady Iris told Jiyu and Jie to join them. They took the spot on the far right.
Hira took a silver tray with chalices and distributed them among the new member. Their parents and Jiyu were given standard wine glass with white wine in it.
“When my great great grandfather,” Arnam Aisag said, “Aisagi himself saw leeches being maltreated, he knew something needed to be done. Thus the Coven was born. We protect each other,” Arnam Aisag said. “Let’s welcome the new ones to the family.”
Just like everyone else in the hall Jiyu raised her glass and drank, praying for good days ahead.
0 notes
Text
First Do No Harm, Chapter 3
Summary: During the 5+ years aboard the Ark, Murphy stumbles into becoming the designated doctor.
Relationships: John Murphy/Emori, Murphy & the Space Squad, background Marper and Bellarke
I'm so sorry for the late update, guys. A lot of crazy stuff happened in real life, and I also had to spent some serious time figuring out where exactly this story was headed. The great thing is I now have a much better idea of where to take this story and updates should come faster, life willing.
And again, one million thanks to @infernalandmortal for her encouragement, support, and editing skills. This chapter and this story as a whole is stronger because of her!
Previous Chapter
Read on ao3
Creating an inventory for Medical turns out to be fairly easy – mostly because there really aren’t that many supplies left.
Murphy works on it in between shifts at the algae farm. By the end of their first week aboard the Ring, he’s managed to gather everything into one cabinet closer to the door and mentally tally what they have.
The results are disheartening, to say the least.
They have four rags, two meager rolls of gauze, half a roll of tape, the needle and thread Bellamy found, a pair of tweezers, three scalpels of varying sizes, a bit of plastic tubing he isn’t sure the purpose of, and about a shot of moonshine left. Murphy estimates they used about a fourth of a roll of gauze on Monty’s hands already.
These supplies need to last five years. Ironically, the thought nearly makes him sick with worry.
Along with the other supplies, Murphy finds five different medications left in Medical. The only one he’s at all familiar with is Morphine, of which they have only two doses. He adds a mental note to his internal inventory list – “Don’t use unless someone’s dying.”
The names of the other four medications are unfamiliar, and the labels give no indication of what they treat. Murphy wishes again that Clarke was here. Maybe they can get in contact with the bunker now that Praimfaya’s passed, and he can talk to Abby – he’ll have to check with Raven.
But there’s no guarantee they’ll be able to contact the bunker at all in the next five years, and the medicine they have on hand might just save someone’s life in the future. He refuses to let it go to waste – the very thought makes his blood run cold and his stomach twist with nausea. He’ll just have to figure out some other way to identify them.
Another thorough search of Medical reveals no papers, notes, or files of any sort. Murphy isn’t very surprised, since paper has always been a rarity aboard the Ark. Instead, he finds a tablet stashed away in a drawer. It has a strip of duct tape stuck to the back, and “Medical” written across it in large, blocky letters.
He’s only vaguely familiar with tablets – and only in theory, since he’s never used one before. Like everything on the Ark, the number of tablets was limited. They were reserved only for important personnel – and that’s a list Murphy’s never been included on. He knows, in theory, that it’s possible to keep a digital record of their inventory on it, and that there’s a possibility there are files identifying the medicine stored on it – he just doesn’t have any clue how to find them.
In the algae farm the next day, Murphy checks Monty’s hands. He figures he’s the best one to judge their progress, considering his own history with burns. Monty must agree, because he lets him look them over without protest.
It’s now officially their second week aboard the Ring, and the burns are healing slowly but steadily. Most of the blisters have disappeared completely, and the vivid red color is gradually fading into a lighter pink as they scar. The skin is rough to the touch, now, probably permanently warped, but according to Monty, the pain is fading. Still, he flinches when Murphy applies too much pressure.
Now that the open blisters are gone, Murphy thinks it’s safe to remove the gauze. Briefly he wonders if it can be reused, before a glance at the stains vetoes that idea completely – it’s not worth the chance of infection.
“How much movement do you have?” he asks as he carefully turns the hands over to look at them from all angles. From what he can remember, they seem to be healing normally. The hands will scar pretty terribly, but the pain and tenderness should disappear with time – a couple weeks if he remembers correctly. If the radiation doesn’t cause any further issues, Monty should be fine.
“I’m not sure. I’ve been trying not to move them,” Monty says. He gently pulls his hands away from Murphy and tries to form a fist with both hands. He winces as he moves them, but the movements themselves don’t appear hindered. “They hurt still, but I think I can move them.”
“You’re going to have some fucking badass scars,” Murphy says, “But the burns are healing normally. At least, they’re healing the same way mine did, so I think they’re healing normally.”
“Very reassuring,” Monty says, grinning wryly. There’s something almost harsh about Monty that Murphy doesn’t remember from before he left camp. Something almost sharp. Even his grin now seems just a little too severe.
“Does he still need to keep them bandaged?” Harper asks. She’s hovering near them, a little closer than Murphy would like, watching his movements like a hawk. Clearly, she hasn’t grown any more comfortable with him in the time they’ve been working together. He’s just glad she’s mostly hid her distrust while they’ve worked on the farm, because her eyes are currently burning holes in his back, and it’s not a pleasant feeling.
“No. Let ‘em breathe,” he instructs, mimicking Abby’s nearly decade-old instructions. “Besides, we can’t waste more bandages on you.”
From the corner of his eye, Murphy sees Harper narrow her eyes at him. Her distaste sits clearly on her face. Fuck off, Harper, he wants to say, but wisely holds his tongue. He’s not being a dick this time, he’s just being smart – if someone cuts an artery and starts bleeding out tomorrow, they’re going to need bandages way more than Monty and his burnt hands do.
Luckily, Monty understands, and only nods at him as he continues to slowly flex his fingers and test his range of movement.
Murphy grabs the tablet from Medical that he brought with him, and holds it up for Monty to see. “I found this tablet in Medical. Any idea how to open the files on it?”
“Oh, that’s a good idea,” Monty says. “But no. I’m good at machines, not computers. You should ask Raven.”
Murphy finds Raven in the hallway outside of the algae farm.
The wall panels in front of her have been removed, and she’s buried halfway inside the wall, in an incredibly uncomfortable looking position to account for her bad leg, which is sticking out straight to one side. The back of her tank top is drenched in sweat, and she works frantically with something out of Murphy’s sight.
“What are you working on now?” he asks as he comes to stand behind her. From what he can see, the inside of the wall is a mess of wires and pipes.
“Trying to fix the heating,” she grunts, her words muffled.
His brow furrows. “I thought you did that already.”
“I did. For us to be comfortable. The problem is the Algae Farm. Monty’s worried if we can’t make it warmer in there, the algae won’t bloom.”
It’s the first he’s heard about a potential problem with the farm. His heart sinks. “And then we all starve,” he adds helpfully.
Raven gives half a laugh from inside the wall. “Exactly,” she says dryly. “We gained a bit of time with the farm with one less person, but not much. Our rations are only going to last so long.”
Well, at least they don’t have to worry about identifying the medicine they have – not if they’re going to starve before they have a chance to get sick.
“Shouldn’t the algae farm be heated correctly already? Go-Sci’s always had an algae farm.”
“Should be,” Raven grunts. “But it isn’t. I’m guessing – hand me that wrench, would you?” He finds the wrench she’s motioning at and places it in her flailing hand, and she continues explaining as she starts working at a bolt, “– that the Ark separating knocked out these extra heaters.”
“Nice of everyone on the Ark to fuck us over one last time, huh?” he says, running his hand through his hair, tugging on the ends in frustration.
Fuck.
The sound of pounding footsteps echoes down the hallway. Bellamy storms around the corner, a tornado of agitated energy. Murphy fights the urge to turn and run, because usually when Bellamy looks like that, it doesn’t end well for him.
But Bellamy barely pays him any attention. Instead, his eyes catch on Raven, and he zeroes in on her. “I’ve been trying to find you,” he says, voice as agitated as the rest of him.
He still looks terrible – if anything, he’s looking worse with each day that passes on the Ring. His face is paler than usual, and his hair is a tangled, chaotic mess. Nobody is adjusting to living on the Ark that well – Murphy’s slept less this past week than he has since the A.L.I.E. incident – but Raven and Bellamy are the worst of all of them. They’re holding the stress and responsibility of everything on their shoulders, and he’s pretty sure one of them is going to collapse underneath it soon.
Murphy thinks Bellamy probably hasn’t gotten over Clarke yet, either, but that’s just a guess. It’s not like Bellamy’s said her name since she died.
“Why haven’t you been eating?” Bellamy demands.
“I have been eating,” Raven argues from inside the wall.
Bellamy sighs. His entire body shakes with it. “No, you haven’t, Raven. I’m keeping track of our rations, and you haven’t taken any for two days.”
“Can’t say I blame her,” Murphy cuts in. “It’s not like any of it tastes good.”
Bellamy turns to glare at him. He looks angry in a way Murphy hasn’t seen in a long time, and he recalls suddenly how hard Bellamy can punch. “Shut up, Murphy,” he growls, and Murphy raises his hands in mock surrender.
He takes that as his cue to exit. It’s not like Raven can take the time to figure out the tablet with their food supply at risk, and he’s not willing to get caught in the middle of a fight between Bellamy and Raven. The growing sounds of their argument follow him down the hall as he heads back to his room.
It seems that it’s not just Bellamy and Raven - everyone on board the Ring is growing increasingly irritated. Emori comes back to their room that night on-edge and angry. She tries to hide her mood from him, but he can see how tense she is even from a distance, and he knows her well enough by now to recognize that the turn of her lips and the rigidness of her shoulders means she’s upset about something.
She’s good at secrets, though – especially with things she doesn’t want to talk about – and she does an excellent job acting like she’s okay. She greets him with a smile and a kiss like usual, and asks casually about the algae farm as she starts removing her many layers for bed.
Murphy walks up behind her and grabs her elbow, spinning her around gently to face him. She complies, raising an eyebrow at him in silent question. “Hey,” he asks. “What’s wrong?” He fears the worst. The Ring. Space. Being trapped.
He can’t fix any of those things.
“Nothing, I’m fine,” she starts to argue, but he cuts her off with a gentle shake of her shoulders.
“Emori,” he says, sternly. She isn’t supposed to keep secrets from him. “You can tell me. What is it?”
Emori sighs, glancing away towards the door of their room. It’s propped open, like usual, and he’s lucky that their room is tucked away in a section of the Ring that the others rarely go, and that Emori isn’t incredibly concerned with modesty, aside from her hand, and that she’s willing to put up with his request at all. It’s hard to breathe when the door is shut.
“It’s the Azgedan,” she says, turning back to face him. Her face is pinched, mouth twisted in a frown. He brings a hand to her face, rubs his thumb across the rough, scarred skin under her eye, as if he could smooth the worry away. Emori tilts her head towards his hand. The corners of her mouth tick up into a smile.
Her words register, and anger sparks in his chest. “What the hell did she do?” he growls. It feels like a betrayal after their conversation the other day; he wants to find Echo and demand to know what she’s playing at – he’d thought, perhaps naively, that the peace they’d made with each other included Emori.
“She didn’t do anything,” Emori murmurs. He can tell she doesn’t want to talk about it, but he doesn’t care. If there’s something bothering her, he wants to know about it. “She and Bellamy started working in the supply room. Bellamy wants to organize everything I find and make a list of what we have, and the Azgedan is helping him. She’s there every time I bring Bellamy more supplies.”
Murphy waits for her to add something, and when she doesn’t continue, he asks, “Well, did she say something?”
“She didn’t have to say anything,” Emori says, and it rushes out of her like a dam breaking –exasperated, angry. Hurt. “I know what she thinks of me. I know what Azgeda thinks of people like me.” She spits the clan name with venom, and makes a face, like even the taste of the word sits unpleasantly in her mouth. “They’re worse than Trikru. Or the others. Azgeda doesn’t just banish mutants. They kill mutants.”
Murphy’s stomach twists with fear. He pictures, suddenly, Echo creeping silently through their open door at night, slitting Emori’s throat with the knife she carries. He imagines her overpowering Emori in the supply room or in some hidden corner of the Ring where the rest of them aren’t around to see. Bellamy told him once that Echo was a spy and a warrior. He saw her fight on the island. Emori can protect herself, but Echo is trained, and Azgeda, he knows, is vicious.
He thinks of Ontari and her cruelty. An image comes to mind: Echo holding Emori’s severed head, covered in her blood.
The image knocks the air from his lungs, and fear clutches at his heart and squeezes. The room spins. He feels sick.
It was so stupid of him to trust Echo – so stupid to stop thinking of her as a threat. Hasn’t he learned by now not the let his guard down? Hasn’t he learned not to trust people?
He shouldn’t have stitched her arm up. It would have been so easy to just let her bleed. The wound was deep, and she had lost a lot of blood already by the time he saw her – how much longer would it have taken for it to be fatal? He could have done it, somehow, without Bellamy knowing. It would have looked like an accident.
Emori would stay safe.
Except Echo’s not going to try to hurt Emori.
Even in his fear and anger, he knows it’s true. Echo values her own safety more than she might care about attacking Emori, no matter what she thinks of her. Most of the group already doesn’t trust her; doing anything to hurt Emori and further break that trust is a risk he knows Echo won’t take – she’s too smart for that. She’s too much like him.
Besides, she won’t do anything to anger Bellamy. Bellamy may not personally care much for Emori either way, but attacking one of their group isn’t something he’s going to stand for. At least not now. At least not this new, older Bellamy. Murphy tries not to think of the Dropship camp.
It doesn’t matter what Echo might have done to Emori on Earth – at least here in the Ring, in their little group, Emori’s safe.
Still, he can’t help but ask, “Do you think she’ll hurt you?”
Emori purses her lips as she thinks it over, then shakes her head. “No. I don’t think she’ll risk it.”
“I can talk with Bellamy,” Murphy offers. “See if he can give her a new job somewhere else.”
Emori shakes her head. “John, no. I don’t want to cause problems.”
“It’s Echo causing the problems,” he argues back, angry on her behalf.
“John.” Emori lifts her own hand to his cheek, mirroring his position. Her thumb strokes tenderly at his lower cheek, catches on the rough stubble growing there, then smooths over it. “Please.”
Every part of him wants to continue this fight – because he’s fighting for her. For her honor. For Echo to respect her. But her eyes are wide and vulnerable, pleading with him to drop it. He knows she believes that any fight between her and Echo will be taken as her fault – that she’ll be labeled as the problem in the group. Based on what happened on the island, he’s not even sure she’s wrong.
She doesn’t want to give anyone a chance to kick her out again. He understands that, even if it kills him to let Echo get away with her prejudice. God. He can’t believe he helped her. He can’t believe he started to like her.
Murphy sighs, yielding finally. “I don’t like her looking at you like that,” he mutters as one last argument.
Emori smiles softly. Her thumb keeps tracing circles over his cheek. “I can handle it. I’ve been looked at like that my whole life.”
That’s even worse, he thinks. He knows what it’s like to have people look at you like you’re worthless, how it stings and chips away at you.
Murphy takes her left hand in his. She lost her glove when they changed into the radiation suits. Since they’ve landed, she’s made a new wrap from the loose fabric of her shirt. He kind of hates it, even though he knows she still isn’t comfortable exposing her hand to anyone but him.
Sometimes she’s still not even comfortable letting him see it.
Gently, he pulls the wrapping away and studies the warped form that’s exposed – the long, twisting fingers, the distorted shape. He rubs his thumb over the back of her hand, then brings it to his mouth to kiss.
“Badass,” he says, and Emori smiles, exasperated, rolling her eyes to the ceiling as if he’s told a joke and she’s humoring him. She turns her head away from him, towards the wall, and he can tell she’s uncomfortable, that part of her is looking for an escape from this conversation. “Beautiful,” he adds.
She whips her head back to face him, loose hair flying with the force of her turn. Her eyebrows are downturned now, her eyes narrowed, and he sees that they’re glistening and red-ringed. “It is not,” she argues, voice harsh, almost angry – like he’s lied to her, and she won’t stand for it.
“It is,” Murphy argues. He’s not great with words, not good at compliments, but he wants her to know this. He thinks she’s the most beautiful thing he’s ever seen – and that includes every part of her. “You’re beautiful.” Then because he just can’t help himself, because it bubbles up and out of him like an overflowing cup, “I love you.”
There’s a pause. Emori stares at him. He realizes, with a growing sense of dread, that he’s never said that to her out loud, even if he’s thought it nearly every day for weeks now – even if he screamed it in the lab for the whole world to hear when he thought she was going to die.
The moment hovers on uncertainty. He suddenly doesn’t know if she’ll say it back.
Then Emori lunges forward, her mouth colliding roughly with his. Her hands, both of them, pull away from his grip to land securely on either side of his face, holding him steady while she pushes forward, as if she’s trying her best to sink into him and become one. “I love you,” she breathes out between kisses, and Murphy pushes forward to kiss her back. He uses his now free hand to clutch at her waist, at her sides, finally landing at the back of her head, tangling in her loose hair. He tastes salt on her mouth and knows that if he pulls away, he’ll see tears on her face.
He does pull away from her – not to see her crying, but to grab her hands again and tug her eagerly towards their bed.
Halfway through their second week, Emori finds a bottle of alcohol stashed in the Ring.
To boost morale, Bellamy decides to gather everyone together for dinner and pass it around. It’s good news for everyone, even if they’re not quite sure whether they’re celebrating or drinking away their sorrows.
The past week has been hard. Partially because getting the Ring back in habitable conditions takes a lot of effort, but also because everyone’s still adjusting – or readjusting – to life on the Ark.
And a lot of people are mourning.
Personally, Murphy doesn’t really have anyone to mourn on Earth. He made it up here with the only person he really still cares about, but coming back up to the Ark has reawakened old ghosts; part of him feels like he’s mourning his parents all over again.
The pragmatic side of him, the side that’s kept him alive this long, wants him to argue with Bellamy to set aside the alcohol for Medical, since their disinfectant is running low. But the majority of him just wants to get drunk and forget he’s on the Ark for a bit.
He sides with that part of himself.
It’s weird – eating together. So far, they’ve all been taking their rations at different times, eating when they have free time in between their jobs. They’ve gone down to two rations per day, to make sure they last until the algae farm grows. Murphy usually eats his first during the middle of the day in the farm, then his second at night with Emori. They’ve never all sat around like this and eaten together.
Conversation starts slowly. It’s clear that even though they’ve been living together for over a week now, they aren’t used to being around each other. Murphy makes sure to sit himself between Echo and Emori, and he glances frequently at the Azgedan as he eats. She looks the same as she had in Medical – uncomfortable, scared. Out of her element. She hardly even looks at Emori.
The more the bottle gets passed around the circle, the easier conversation flows - still, it feels stilted and awkward. Raven, Bellamy, Harper, and Monty do most of the talking; they’re all familiar and comfortable with each other, even if they’re all struggling with whatever happened on Earth. Echo keeps quiet, and Emori and Murphy mostly talk amongst themselves.
Occasionally, Raven calls across the circle to Emori and Murphy, as if she’s trying to pull them into the others’ conversation. She doesn’t fully succeed.
Surprisingly, Harper tries to talk to Emori. She won’t address Murphy, and hardly even looks at him, but she seems genuinely interested in getting to know Emori. Murphy wonders why she’s so willing to trust her if she’s still so wary of him, but figures it might be because of how easily Raven accepts her. Harper seems to trust her judgement.
Whatever the reason, he’s glad to see someone besides himself and Raven treating her with kindness and acceptance. He glances over towards Echo again, but she’s looking down at her food.
When the bottle is nearly empty, Bellamy clears his throat, and the room falls silent. He raises the bottle in the air, and starts to speak, but his voice breaks on the first word, splinters into the air in broken pieces. He clears his throat and tries again. “To Clarke.”
It’s the first time he’s said her name since they landed, and it’s like his speaking it aloud breaks some unspoken agreement they’ve all settled into. Something in the air breaks free.
“To Clarke,” the room echoes. Even Murphy joins in. There are a lot of things he still hates Clarke for, but he and Emori wouldn’t even be here if it wasn’t for her. None of them would. It’s worth a moment of remembrance, at least.
Bellamy takes a swig of the bottle, then passes it on, nearly dropping it before Raven can get a hold of it. She takes her own hearty gulp and passes it on to Monty.
Monty pauses when it comes to him, then mimics Bellamy’s earlier move, holding the bottle high. “To Jasper,” he says, and the careful, calm mask he’s kept since they landed finally cracks with pain. The bottle trembles in the air; Murphy knows it isn’t just because of his hands.
“To Jasper,” Bellamy, Raven, and Harper echo. Murphy gives a silent nod, not sure he’s allowed to speak up.
“To Riley and Bree,” Harper adds before Monty can even pass her the bottle. Her face is heavy with grief, but her voice rings out strong and steady. “To Fox. To Monroe.” She takes a sip and passes the bottle to Emori.
“To Sinclair. And Wick,” Raven says. “To – ” her breath hitches, and she breaks off, biting at her lip, tears brimming in her eyes. Her free hand moves almost involuntarily to her collarbone, grasping for something that isn’t there. It closes around nothing. “To Finn,” she says, her voice barely above a whisper.
“To Mbege,” Murphy adds quietly, and the eyes of the other delinquents turn to him, surprised. He doesn’t really miss Mbege that much – at least, he doesn’t think about him that often. They weren’t really close, but they were cellmates for seven years, and they were comfortable with each other, and occasionally, he makes a stupid joke and thinks to turn to Mbege for a reaction before he remembers.
He was sad when he heard he died. That’s more than he can say about a lot of people.
Emori and Echo don’t add any names aloud, but beside him, Murphy hears Emori whisper Otan’s name. Across from him, he sees Echo mouth something silently, her eyes closed.
They finish the bottle in silence, and when it’s gone, no one lingers. The circle breaks apart, and their little group scatters into pieces, heading separately to their rooms.
#IT'S FINALLY HERE SO SORRY#john murphy#space squad#the 100#the 100 fic#john murphy fic#first do no harm#my stories#monty green#echo#emori#memori#memorific#dailymemori#bellamy blake#raven reyes#Harper McIntyre
12 notes
·
View notes
Text
Kobayashi’s Maid Dragon Episode 5 Notes

Miso soup has extremely strong associations with home and family in Japan. It’s a staple of breakfast and dinner tables, especially when paired with rice (which is common, to say the least), and is a very traditional dish with a long history.
It’s such a big deal, even, that the question “I want to eat the miso soup you make every day,” is a stereotypically Japanese marriage proposal.
When I say “stereotypically Japanese,” I mean that Japanese people see it that way. The Japanese language and culture tend to be pretty “indirect” compared to others (particularly English, which everyone in Japan spends years in school studying), and people in Japan are very aware of this. A common example given in schools is the famous translation by Natsume Souseki, where he translated the phrase “I love you” in an English text to “The moon is beautiful, isn’t it?” in Japanese.
Anyway there’s some context for this scene, and in particular the choice of miso soup as the dish Kobayashi commented on.

You’ll notice they have at least four umbrellas there. It’s easy for those cheap vinyl ones to pile up when you have to do a bunch of walking (even just to/from the train station); you can’t just keep one in the car, and if it starts raining on a day you didn’t bring one...
By the way, in case you were thinking “four for three people isn’t that many though,” she had a different four in episode one, even before Tohru showed up:

Also: man, that before&after. Good for you Kobayashi ;_;

She says “aitsura あいつら” here, meaning they not she; basically Kanna, at least, is being included here.


These shows totally exist, they look exactly like this, and they literally have done this topic. In fact, this specific topic is a common one, with the list being updated every so often. “Wide show” is actually the name of this type of show, a subset of the infamous “variety show.”
Number one is “Kabe-don” (kabe = wall, and don = sound effect for like “slam/bang”). Originally the word was (and still is) used to refer to when people in the next room over would bang on the wall to politely inform you that you’re being too fucking loud it’s after midnight already god damn.
In the past few years though, the word caught on as a meme, referring to a common situation that pops up in shoujo manga a lot, where the(/a) love interest would do this:

to the heroine. This specific usage of the term was seemingly coined by voice actress Shintani Ryoko (Sae from Hidamari Sketch) in 2008, while she was trying to explain the act on a radio show when discussion “moe situations”.
Kabe-don’s popularity seems to have died down some lately though (since honestly it’s pretty awkward irl).
The others are pretty self-explanatory I think, though it’s perhaps worth pointing out that yes, these are all things you actually can find on these lists. If “holding hands in public” sounds way too normal/basic to be on one to you, well, welcome to Japan.
(To be fair it’s not like super rare or anything, just not as common as you’d expect in many other countries and kind of considered a little embarrassing, particularly for men.)
Another semi-recently popular one of these “moe whatevers” is ago-kui 顎クイ, basically “chin tug/pull”, where the kui-er grabs the kui-ee’s chin to pull their face closer or whatever (often as a precursor to a kiss, for example). It’s a common pair with the kabe-don.
Basically the takeaway here is that Japan’s been making memes real since way before 2016 came along.


The word for “pursue love” here is kyuuai 求愛, which is probably most commonly used when referring to the mating calls/rituals of animals (as seen by how Tohru likens the audience/panel squeals to bird cries). You can use it with people too, but it’s not exactly very conversational language.

Lol.
Also yeah “Tatsumi 辰巳” has that dragon zodiac kanji in it again. By the by, while there’s no Tatsumi-cho in Tokyo, there is just a “Tatsumi.” It’s by Tokyo Bay, within walking distance of Comiket-host Big Sight and the life-sized Gundam statue, and roughly where a lot of March Comes in Like a Lion is set.

These fish flags/wind socks (they’re koi, trying to climb the waterfall and become dragons, i.e. Magikarp) are traditionally put up on Children’s Day, May fifth. Yet another way Kyoani uses these establishing shots to tell you what season it is and invoke certain associations.

You’ll see this “48 ___ skills/techniques” thing a fair bit in Japanese media; it’s a reference to the 48 Killer Techniques of Kinnikuman/Ultimate Muscle (I think that’s as far back as the reference goes, anyway).
Yes, the name of the store in the background has one of the dragon kanji in it’s name (the lower portion of 籠, 龍).

Yeah this is what most Japanese office workplaces look like; open office plans. It’s kind of stressful having no privacy like that, but it does make it easier to ask people stuff I guess.

The “proper” version of this word is sumimasen すみません, basically meaning sorry/excuse me. What he says is saasen サーセン, a rather colloquial version of it. It kind of goes like: sumimasen → suimasen → sunmasen → saasen.
This sort of thing is quite common in Japanese, especially when there’s a set way you’re supposed to say something (as is common) that has a lot of syllables. Another example you might hear is arigatou gozaimashita being shortened down to azashita, typically at a convenience store or something, from an employee who’s busy with something else and just saying it because they have to.

What he says here is shou ga nai しょうがない. If you’ve ever picked up on how often “can’t be helped” or similar seems to be said in anime...this is what that is. It’s an incredibly common phrase in Japan, not just in anime but irl as well. It literally means that there’s nothing that can be done, and can be used in a broad swath of situations. It’s actually fairly similar to “oh well” in a number of cases.
Like above, it has several variations depending on how formal/informal you want it: shikata arimasen, shiyou ga nai, shou ga nai, shaanai, etc. etc.


Very minor nuance point, but she says she thinks dragons are superior (~が上, are “above”). “I think dragons are better” sounds, to me, more like indicating preference (”I like dragons better”), whereas the Japanese line has more of an observational tint to it (”Dragons appear to be superior”).
Again, minor and arguable point, but if I didn’t like to be pedantic I wouldn’t be writing these things.

Similar situation as the above, but I would say this is referring specifically to Kobayashi; more “she hasn’t noticed, has she?” than “no one.”

This is actual code, you can find it in places like here.

I like how the lint roller seems to have pink hair on it.
Also, just to restate, this is totally a Japanese everyworkplace and it is kind of giving me flashbacks.

The word for “abusing power” here is pawahara パワハラ, short for power harassment, another Japanese English-ism. It’s often paired with sexual harassment (sekuhara セクハラ) when discussing abuse in the workplace, and both are illegal. A common and particularly serious example of it is forcing people to work unpaid overtime at the threat of being fired.

Another nuance thing, but Saikawa here is not so much asking Kanna to draw her, but more expressing surprise, like “Wait you’re willing to draw me?”
Saikawa (才川)’s name, by the way, sounds like “the cutest” (最カワ). If you’ve heard of the Saimoe contests, it sounds like that but the kawa from kawaii instead of moe, a common sort of abbreviation.

Hmmm, I wonder what this could mean...

Ah.


You’re supposed to offer a drink to visitors in Japan, both to your home or to your office (like people from another company there for a meeting). I imagine that’s not exactly unique to Japan by any stretch, but as a custom it’s given more weight than in many others. A question of degree, I guess.
I’m sure there’s some reasoning behind the change in drinks from hot tea to orange-whatever, but who knows what. My guess is that it’s (possibly among other things) another way to show that the seasons are changing; it was cold the first time he came, so a hot drink, and warmer the second, so a cold drink. (Not to say there was a long time skip between the two necessarily, but of course the weather can change on a dime in spring, chilly one day and surprisingly hot the next.)
The way he phrases this, o-tenami haiken to ikou ka お手並み拝見と行こうか。is some pretty fancy language. Nothing much to say about it specifically that the translation doesn’t convey, but just a general note that Fafnir regularly uses less conversational language than the rest of the cast (as you might expect from his demeanor) in ways the subs don’t necessarily make clear.
As an inverse example, this line from earlier:

“Shall we go home?” sounds sorta fancy, but the Japanese line, just “kaerokka 帰ろっか,” is casual as fuck.
This is one of those things that can be difficult when translating Japanese to English, as Japanese has many different ways of saying literally just the same word but with different levels of formality, where in English you have to come up with different ways to phrase it to try and capture both the meaning and the formality level. Possible, but often time-consuming.


A family registration, koseki 戸籍, refers to document proving, basically, your family tree. When the government, way back when, was deciding how to administer the population, they figured it would be easier to group people into family units and have the family choose a head of household that would both represent them and have responsibility for them.
So they created this family registry system, where everyone* is registered as a member of a family. The “head of household” thing isn’t so important anymore, but the registry still fulfils the role of birth/death certificates, keeps track of marriages/divorces/adoptions, is proof of citizenship, and is effectively a constantly-updated census.
There can only be one family name per koseki, so it’s impossible to get married and not change your last name (unless you happen to have the same last name already); one of the two must join the other’s koseki and take on that name.
*Everyone, who is a citizen that is. Foreigners who marry a Japanese citizen are listed on the registry, but are not officially part of it.
Note that you usually don’t actually need this necessarily to rent an apartment irl. Usually a juumin-hyou 住民票 covers it.
“But wait,” you ask, “why does it say proof of citizenship in the sub when she says juumin-hyou, if the koseki is the proof of citizenship and the family registration?” as I put several words in your confused and increasingly angry mouth.
Well, probably because either the translator wasn’t familiar with these minor details and isn’t paid enough to look them up, or they felt that would make more sense to the average viewer.
A juumin-hyou 住民票 is actually a certificate of residency. It keeps track of your address and various other personal details (immediate family, social security number equivalent, birthdate, etc.). This one foreigners can get, assuming they have a proper visa, and is the one you’ll need to do most things like opening a bank account or signing a lease agreement.
Note that this thing means you’re required to fill out paperwork at city hall whenever you move, so they can keep it updated with your correct address.
A “personal seal” is a little stamp with your name, which is used like a signature would be in many other countries (i.e., for signing contracts and such). Make sure it doesn’t get stolen!
Often, people will have three of these that each have different levels of authority. The “real” one (jitsu-in 実印), for contract signing, must be registered with the government so they can prove it’s really yours. The “bank” one (ginkou-in 銀行印), registered with the bank upon opening a bank account (can be the same as the jitsu-in if you want it to be). And the “Amazon delivery” one (mitome-in or nin-in 認印), which isn’t registered officially anywhere, and is probably most often used nowadays when “signing” for a package delivery.
Of course, Tohru just magicked all of these into existence, because she can do that. Augh.

I know Fafnir. I know.


The kanji for Ooyama (大山) mean “big mountain,” and the kanji for Takeshi (猛) means basically “ferocious.”

The building in the background here is a bank!

The building in the background here is a business that dispatches staff to support elderly people who can’t fully live on their own!


Another fairly minor point, but here she’s saying “I don’t think I’d call those feelings ‘regret’.” not “I don’t want to [...].” (だけど私はその気持ちを後悔とは呼ばないと思います). Not a big difference, but possibly an important one depending on how deeply you care to read into things.

The word here for “green,” ao 青, usually means “blue.” And in fact sometimes the “green” traffic lights in Japan actually are blue. However, up until relatively recently, the “ao” color word actually covered both blue and green (now midori 緑 is the usual word for “green”). This relative lack of distinction between blue and green is actually common in many languages.
As a random anecdote, a Japanese acquaintance of mine who was living in America once got pulled over for running a red light. Though their English was very good, they still got mixed up and kept trying to tell the police officer “I’m sorry I thought the light was blue,” which made for a very awkward talk.

This sign means Go. The game, not the verb. You know, this one.


The kanji for “money” (kane 金) is also the kanji for gold (usually “kin”).

Tadpole is another spring season word.
Probably unrelated, but one Japanese variant of the saying “like father like son” is “the child of a frog is a frog.”

The word for “psychic powers” (such as ESP) in Japanese is basically “super abilities.”

And the word for “magic trick” (at least, the one used here) is tenjina 手品, more like “hand trick” (in a literal sense, anyway). Magic trick is a perfectly good translation, but since they were just talking about how it wasn’t magic and clearly don’t know what a “magic trick” is, I just wanted to give some context as to why that line sounds less off(?) in the Japanese.

Like in the last episode with cute/kawaii, Kanna says “kami” the first time and “god (goddo)” the second. You...probably noticed that, but yeah.

"To enter [into] your hand” (te ni ireru/hairu 手に入れる/入る) is an idiom that means to get/gain/obtain. Like in a Zelda game or something when you open a treasure chest and get an item, this is the phrase used. Or when someone is elected to a high office, they’ve “te ni ireru’d” themselves some political power.
It’s a super common phrase, such that...and I hesitate to say this...I actually don’t think it was an intended pun(!). As in, I don’t think a native speaker would recognize that it was supposed to be one, even if it was intentional. It’s the kind of joke that’d be so painful you’d have a bunch of people gnashing their teeth about it online, and I haven’t been able to find any of that.

The word here is detarame でたらめ, which is closer to something like bunk, bullshit, nonsense, etc. “Fiction” feels a little too kind.

As mentioned in episode one, the kanji for waterfall (滝), minus the water radical (氵), is a kanji for dragon (竜). Conveniently, the water radical is cut off quite cleanly by the edge of the screen. What a strange coincidence.

Their clothes both say “dragon,” just Tohru’s has the kanji for it (ryuu 竜) and Kanna’s has it in hiragana (ryuu りゅう), which is cuter/more childish.

Lol that they bought spoons just to practice with despite being able to easily fix broken ones with magic anyway.

Yet another small nuance thing, but Kobayashi’s line leans more toward a sort of “it’s alright if you just do the things only you can do.” Again, minor and arguable, but it’s the difference between saying it’s okay to do something versus saying you should do something. (original: トールにしか出来ないことをすればいいんだよ)

Lunches in elementary school are eaten in the classroom, and typically served (as seen) by the students themselves; whoever’s on duty. The meals themselves are made by professionals, of course, and tend to be pretty healthy.

The “magic” she says here is actually the English word magic (majikku, rather), which in conversation is more likely to refer to magic tricks (similar to tejina above) than actual magic (which would generally be some variant of the Japanese word for it, mahou 魔法).

The stereotypical “hypnotism” item to swing in front of people in Japan is a 5 yen coin attached to string, rather than a watch. 5 yen coins have a hole in the middle, so it’s easy to tie a string to. Plus, they have a cultural connection to sort of supernatural stuff already; they’re a favorite for making donations at shrines and such because “five yen” (五円) is pronounced “go-en,” which is the same as a word for basically “fate” (ご縁).

Episode One Notes
Episode Two Notes
Episode Three Notes
Episode Four Notes
52 notes
·
View notes
Text
How To Make Inexpensive Curtains Look A Lot More Polished & Our New Master Bed!
You haven’t seen our master bedroom in a while (except for small peeks on Instagram) because we owe you a certain curtain-related confession. But first, I get so many questions about our new bed – and why we upgraded from our old Ikea one – that I thought it was time to formally introduce you to this beauty that we got nearly a year ago. Yes, as in last November.
bed / nightstand / bench / similar art / similar rug / duvet / chandelier / faux plant
Why a new bed? Well, at first glance, our new bed isn’t wildly different from what was there before (which you last saw last May when we blogged about getting the new consignment store rug). Both headboards are a light wheat-colored linen, and they work well in the peaceful low-contrast bedroom we’ve been working towards lately. But the key difference is that this a legit bed – as in, headboard and side/footboards – all upholstered in the same fabric. Previously it was one of those metal frame situations plus a headboard we made ourselves.
And actually, at one point we did have that same headboard attached to a different bed entirely: the Ikea Edland canopy bed that we chopped the posts off of years ago (who remembers Ed the Bed?). But we swapped beds with our guest room at some point when we were over the floating-up-on-legs look for our bedroom (a regular bed frame + bedskirt gave us a more grounded and substantial look). We also found ourselves yearning for a proper boxspring situation for our mattress, which just sat directly on old Ed’s slats.
Our free took-twenty-minutes bed swap was definitely a step in the right direction, but we knew an upholstered bed would look more finished than the bedskirt + metal frame scenario. We actually don’t mind a bedskirt (2 of 3 beds in the beach house have them), but it always bugged me that it would never be the exact same white color as the duvet in here – and since it’s a much bigger room than the beach house bedrooms, you view it from a lot further away and notice that fact a lot more.
So long story long (have you met me?! no story is short), after five years of bed swapping and adding a skirt and reupholstering the headboard, we just went for it and ordered a fully upholstered bed. Not without twenty hours of research and hemming and hawing though (again, have you met me?!).
similar lamps / nightstand / bench / similar art / chandelier / curtain rod
The best thing about buying a new bed for our master bedroom was that it meant we could steal the headboard from our room and reunite it with Ed the Bed and bring them both to the empty beach house last fall, and put them in the middle bedroom. So essentially instead of buying a new bed for the beach house – we got to buy the bed we always wanted FOR OUR MASTER BEDROOM INSTEAD, and use ol’ faithful Ed + our homemade headboard at the beach house, where they totally fit the bill.
similar mobile / gold frames / similar headboard / lamps / pink art / square blanket
So even though he’s seen a few incarnations and lived in three different houses, Ed’s been with us for nearly 8 years (and the headboard has lived on for more than 6). Pretty soon they’ll be welcomed into the 10-year club! (If you haven’t read that post about the items in our home we’ve had for ten years and still love, it’s one of my favorites.)
But back to our new (*cough… year old… cough*) bed. This post is probably making her feel very unloved so far, since we haven’t even blogged about the upgrade, but that’s far from the truth.
I LOVE THIS BED SO MUCH I AM TEMPTED TO BUY IT AGAIN FOR THE BEACH HOUSE MASTER BEDROOM (and just use that headboard/frame combo in the duplex somewhere). It’s such a nice feeling to have an actual bed after a series of metal frames and headboards attached to the wall or the bed in various ways. It kind of feels like adulting, but not quite as annoying as cleaning the house or buying band-aids every week (am I the only household that goes through approximately 1,000 every three days?! Are the kids eating them?!).
Anyway, my bed BFF is called the Sanford Linen Upholstered Panel Bed and we got it from Wayfair last November. It comes in all of the standard sizes (twin up to california king) and in two colors (the “Talc” color is what we got – and there’s a “Kelly Green” that’s definitely more of a statement). At the moment it’s 30% off, putting a queen bed at $628, and one of the reasons I went for it is because a ton of clean-lined and classic upholstered beds that look like this this are in the $1,000-$2,000 range (like this one and this one), so I love that this is a great neutral color and a timeless shape that looks more expensive than it is.
It doesn’t look NEARLY as dark or gray as it does in the listing photos (which was a pleasant surprise for us – because it really does mean it would work anywhere). I’d call it a warm linen color, that’s just barely on the warmer side of the gray-beige line, but it could completely live in a room with gray or tan walls, which I love. Given our history of moving beds around, the more places a bed can work, the better. And it has a really nice linen-looking texture that makes it a bit more interesting in person than you can probably tell in the website photos:
We also liked that it has these small vertical panels flanking each side of the headboard. The “wings” give it an extra little detail and coziness that our flat DIYed headboard didn’t have (although you could definitely make this version yourself – just upholster the side pieces and attach them in the back with some sort of flat metal bracket).
This bed still requires a boxspring, which we like (feels more like a real adult bed that way, and it’s better for our mattress, we hear) and I’ll warn you that if your mattress isn’t as thick as ours (ours is 12″) there might be a small gap between the top of the mattress and bottom of the headboard… so you might want to add a mattress pad or just place your pillows along the back of the bed in a way that you can’t see that area (sleeping pillows + a few decorative ones could totally cover it).
similar lamp / nightstand / similar art / curtain rod / duvet
I actually realized that there’s a reason for that space, which is: so you can change the sheets more easily. If the headboard squished up against the top of the mattress much tighter, you wouldn’t really be able to change the fitted sheets without a ton of effort – so I actually appreciate that detail.
Also a few people have asked “wait, are the black feet of your bed ugly?” and I didn’t even know what they meant and had to run upstairs and look at them in person, but I guess in the online photos where it’s cut out and placed on a white background they’re really clunky and obvious, but the bed’s feet are set in a bit from the upholstered frame, so they’re basically in the bed’s shadow if that makes sense. I literally never notice them or “register” that there are those little black feet in real life because the upholstered part is pulled forward, so that’s really all you see.
Ok, now that I’ve told you everything you could possibly wonder about our bed…. let’s turn our attention to curtains. BECAUSE CURTAINS ARE HARD. Our old curtains in here had been some wheat-colored cheapies I grabbed at HomeGoods years ago, but after we installed white curtains throughout the entire beach house, I developed what can only be described as an animalistic craving for white curtains in here again.
similar dresser / gold frames / bench / similar rug / similar chair
So much of the room had been beige-ish, that I just thought crisp white curtains would freshen things up and not make the whole space feel like we had a sepia filter on it. So I craigslisted the tan curtains, and on a trip to Ikea sometime last winter we loaded up on three sets of our favorite affordable white curtains (Ikea’s Lenda curtains) for the bedroom. But the reason you haven’t seen an “our bedroom got two updates!” post about this room is because is has taken me nearly a year to finish fixing the curtains (thereby completing this update) so they no longer look like this:
Yup, we lived with them like this for nearly 12 months, and I gotta say, I’m not even ashamed of it. Life is busy, (see: adulting) and curtains can be high maintenance, so they might just end up at the bottom of the list. And this sloppiness underscores the dilemma of Ikea curtains. We LOVE them for their nice heavy white fabric and their affordable price: just $25 for two 98″ tall curtains (which means they’re long enough to go from floor-to-ceiling in a standard eight foot room). And if you have extra tall rooms you can also get two of their 108″ length for $35.
And now for a curtain-related side rant: don’t buy too-short curtains at Target! I don’t even know why anyone makes 86″ curtains because it’s SO MEAN and they’re never tall enough to make a room look as good as it could with 95″ (or taller) curtains!
Unlike Ikea’s cheaper Vivan curtains, the Lenda ones have a decent weight to them – in fact they look extremely similar to curtains sold by West Elm and Pottery Barn but they’re a heckova lot more budget-friendly. But let me tell you… Ikea’s photos of these curtains are so not-selling that when people ask where we get our white curtains and we link to them, 100% of people say “that’s the wrong link” – because they’re actually sold with big tabs on the top and they have these country-looking tiebacks, and they essentially look nothing like this:
They look like this:
I know.
This doesn’t look like the same set of curtains. But it is.
And these are the exact same Lenda curtain panels too. We’ve probably had them in our office for the longest amount of time (four years or so) and they look great. We got two sets for each side of that large window so they’d look extra full – and our entire curtain cost was $50.
woven blinds (pecan color) / desk chair / desk / bench / rug / similar faux plant
But… if you’re someone who just wants curtains that you can throw up on a rod and have them look awesome, these aren’t them. Getting them to look presentable can take a significant amount of effort in our experience, but after it’s all said and done, they can look pretty darn decent. Plus they’re washable (which is a great thing in a house with kids and a dog – or a rental house like our beach houses) and they’re not so expensive that they’re precious – so you can relax and not freak out if kids twirl around in them or hides back there, which is a daily occurrence in our house.
So what are the things we do to turn these formerly-tab-topped curtains into what you see in the photo above? I thought you’d never ask. Here’s my process:
Step 1: Wash them on hot and dry them on high to pre-shrink them (they’ll shrink a ton – maybe 5″, but in a standard height room that’s just fine – and you NEED to preshrink curtains before you hang them. Otherwise if they get dirty later and you launder them, they’ll look like bad highwaters when you hand them back up.
Step 2: Use a sharp pair of scissors to cut off the tabs right above the sewed line where they’re attached along the top edge.
Step 3: Fold the top edge over once to hide where you cut the tabs, making sure the fold goes toward the back of the curtain (facing the window). Once it’s all clipped that fold looks just like a sewed top seam and has a nice finished look.
Step 4: Clip your rings on along the fold. We use 6 ring clips per panel: one on each end and then one on every other vertical seam, which you can see above. Your spacing my be different if you’re using different curtains, but ours are about 10″ apart.
Step 5: Slide two pre-washed & clipped panels onto your curtain rod, and hold it up to determine the best height to install it. Remember to go high and wide around your window, but not so high that the curtains don’t touch the floor, and not so wide that they look flat (volume from the curtains draping is really pretty). We typically go around 8″ beyond the window trim on the sides, and like to hang the rod a few inches below the ceiling, but use the length of your panels to determine the best height.
This was a far as I made it with these new curtains for basically a year, so if yours look something like the messy picture below – don’t worry. We’ve all been there. Well, at least I have. Many times. And I’ve lived to tell the tale. In fact it wasn’t until last week that we finally carried out the final two steps.
Step 6: Iron or steam your curtains. We steamed the curtains at the beach house while they hung in place – but we found that we got the best result with two people doing that (one to hold the curtain taut, the other to steam – this is our steamer, btw). So to get the smoothest result at home with just one person on curtain duty, we took them down and ironed them. I knocked out four of them before bed one night last week, and John did the other two the following evening (which explains why the hairy arm in this picture is his and not mine).
Step 7: Once the curtains are pre-shrunk and fully relaxed, it’s safe to hem them if you need to. Sometimes you get lucky and they shrink enough so that you can hang them high without needing any hemming – but a little is usually necessary for us. I like to use no-sew hem tape, but I tried a new cheater-way to hem these and it worked, so I’m sharing it. NO HEM TAPE OR SEWING REQUIRED!!!
I just unclipped them one clip at a time while standing on a chair and folded them over until I liked the way they hit the floor below (just the slightest little break – like they’re kissing the floor) and reclipped them to hold them that way. The fold of fabric is in the back of the curtain, facing the window, so you don’t see it from the front – it actually just looks like a nice thick top hem when the light shines through.
You can’t really tell that I took a short cut, and it means if they ever shrink in a future washing (or we decide we want more or less fabric touching the floor) we can just adjust them just by unclipping them and changing the fold. Genius? Probably not. Lazy? Most definitely!
Are they the most luxe high-end curtains out there? Nope. Do we think they look nice, hold up well, and add softness & height to a room? Yup. Did we do the entire bedroom for $75? Yup. And that’s less than the cost of one of these stock white 95″ curtain panels (and we got 6 panels!). Getting custom curtains can also be significantly more expensive – and it can make them feel extra precious. They’re also not usually washable which is a huge selling point for me when it comes to these.
Maybe someday we’ll feel fancy enough to splurge on custom curtains. Using them in some of our showhouse projects means we’ve experienced the difference firsthand (really, they look amazing and perfectly graze the floor and don’t even need to be steamed – they arrive totally ready to hang). So this isn’t an anti-custom curtain rant or anything – we just know lots of people who can’t swallow that custom curtain price tag right now, and might want something that feels easier to live with/wash for this season of life. So hopefully this elbow-grease-but-affordable method can help you get SOME sort of window treatments in your house. And you know I won’t judge you if it takes a year to get them finished.
Also, dogs don’t have to adult. I wanna be Burger.
Believe it or not, this isn’t the first time we’ve had white Lenda curtains in this room (but they got stolen for the office at one point). So here’s that story, and more curtain projects/tips from over the years:
Using Iron-Tape To Hem Lenda Curtains
How To Make No-Sew Curtains From Any Fabric
15 Minute Blackout Curtains for $15
18 Tips For Picking The Right Curtains
Psst- Wanna know the paint colors in this room, or any other room in our house? Click here for a whole-house rundown. And if you want to get our free email newsletter (it’s like a bonus post that comes right to your inbox each week) click here to get on the list.
*This post contains affiliate links*
The post How To Make Inexpensive Curtains Look A Lot More Polished & Our New Master Bed! appeared first on Young House Love.
How To Make Inexpensive Curtains Look A Lot More Polished & Our New Master Bed! published first on https://aireloomreview.tumblr.com/
0 notes
Text
How To Make Inexpensive Curtains Look A Lot More Polished & Our New Master Bed!
You haven’t seen our master bedroom in a while (except for small peeks on Instagram) because we owe you a certain curtain-related confession. But first, I get so many questions about our new bed – and why we upgraded from our old Ikea one – that I thought it was time to formally introduce you to this beauty that we got nearly a year ago. Yes, as in last November.
bed / nightstand / bench / similar art / similar rug / duvet / chandelier / faux plant
Why a new bed? Well, at first glance, our new bed isn’t wildly different from what was there before (which you last saw last May when we blogged about getting the new consignment store rug). Both headboards are a light wheat-colored linen, and they work well in the peaceful low-contrast bedroom we’ve been working towards lately. But the key difference is that this a legit bed – as in, headboard and side/footboards – all upholstered in the same fabric. Previously it was one of those metal frame situations plus a headboard we made ourselves.
And actually, at one point we did have that same headboard attached to a different bed entirely: the Ikea Edland canopy bed that we chopped the posts off of years ago (who remembers Ed the Bed?). But we swapped beds with our guest room at some point when we were over the floating-up-on-legs look for our bedroom (a regular bed frame + bedskirt gave us a more grounded and substantial look). We also found ourselves yearning for a proper boxspring situation for our mattress, which just sat directly on old Ed’s slats.
Our free took-twenty-minutes bed swap was definitely a step in the right direction, but we knew an upholstered bed would look more finished than the bedskirt + metal frame scenario. We actually don’t mind a bedskirt (2 of 3 beds in the beach house have them), but it always bugged me that it would never be the exact same white color as the duvet in here – and since it’s a much bigger room than the beach house bedrooms, you view it from a lot further away and notice that fact a lot more.
So long story long (have you met me?! no story is short), after five years of bed swapping and adding a skirt and reupholstering the headboard, we just went for it and ordered a fully upholstered bed. Not without twenty hours of research and hemming and hawing though (again, have you met me?!).
similar lamps / nightstand / bench / similar art / chandelier / curtain rod
The best thing about buying a new bed for our master bedroom was that it meant we could steal the headboard from our room and reunite it with Ed the Bed and bring them both to the empty beach house last fall, and put them in the middle bedroom. So essentially instead of buying a new bed for the beach house – we got to buy the bed we always wanted FOR OUR MASTER BEDROOM INSTEAD, and use ol’ faithful Ed + our homemade headboard at the beach house, where they totally fit the bill.
similar mobile / gold frames / similar headboard / lamps / pink art / square blanket
So even though he’s seen a few incarnations and lived in three different houses, Ed’s been with us for nearly 8 years (and the headboard has lived on for more than 6). Pretty soon they’ll be welcomed into the 10-year club! (If you haven’t read that post about the items in our home we’ve had for ten years and still love, it’s one of my favorites.)
But back to our new (*cough… year old… cough*) bed. This post is probably making her feel very unloved so far, since we haven’t even blogged about the upgrade, but that’s far from the truth.
I LOVE THIS BED SO MUCH I AM TEMPTED TO BUY IT AGAIN FOR THE BEACH HOUSE MASTER BEDROOM (and just use that headboard/frame combo in the duplex somewhere). It’s such a nice feeling to have an actual bed after a series of metal frames and headboards attached to the wall or the bed in various ways. It kind of feels like adulting, but not quite as annoying as cleaning the house or buying band-aids every week (am I the only household that goes through approximately 1,000 every three days?! Are the kids eating them?!).
Anyway, my bed BFF is called the Sanford Linen Upholstered Panel Bed and we got it from Wayfair last November. It comes in all of the standard sizes (twin up to california king) and in two colors (the “Talc” color is what we got – and there’s a “Kelly Green” that’s definitely more of a statement). At the moment it’s 30% off, putting a queen bed at $628, and one of the reasons I went for it is because a ton of clean-lined and classic upholstered beds that look like this this are in the $1,000-$2,000 range (like this one and this one), so I love that this is a great neutral color and a timeless shape that looks more expensive than it is.
It doesn’t look NEARLY as dark or gray as it does in the listing photos (which was a pleasant surprise for us – because it really does mean it would work anywhere). I’d call it a warm linen color, that’s just barely on the warmer side of the gray-beige line, but it could completely live in a room with gray or tan walls, which I love. Given our history of moving beds around, the more places a bed can work, the better. And it has a really nice linen-looking texture that makes it a bit more interesting in person than you can probably tell in the website photos:
We also liked that it has these small vertical panels flanking each side of the headboard. The “wings” give it an extra little detail and coziness that our flat DIYed headboard didn’t have (although you could definitely make this version yourself – just upholster the side pieces and attach them in the back with some sort of flat metal bracket).
This bed still requires a boxspring, which we like (feels more like a real adult bed that way, and it’s better for our mattress, we hear) and I’ll warn you that if your mattress isn’t as thick as ours (ours is 12″) there might be a small gap between the top of the mattress and bottom of the headboard… so you might want to add a mattress pad or just place your pillows along the back of the bed in a way that you can’t see that area (sleeping pillows + a few decorative ones could totally cover it).
similar lamp / nightstand / similar art / curtain rod / duvet
I actually realized that there’s a reason for that space, which is: so you can change the sheets more easily. If the headboard squished up against the top of the mattress much tighter, you wouldn’t really be able to change the fitted sheets without a ton of effort – so I actually appreciate that detail.
Also a few people have asked “wait, are the black feet of your bed ugly?” and I didn’t even know what they meant and had to run upstairs and look at them in person, but I guess in the online photos where it’s cut out and placed on a white background they’re really clunky and obvious, but the bed’s feet are set in a bit from the upholstered frame, so they’re basically in the bed’s shadow if that makes sense. I literally never notice them or “register” that there are those little black feet in real life because the upholstered part is pulled forward, so that’s really all you see.
Ok, now that I’ve told you everything you could possibly wonder about our bed…. let’s turn our attention to curtains. BECAUSE CURTAINS ARE HARD. Our old curtains in here had been some wheat-colored cheapies I grabbed at HomeGoods years ago, but after we installed white curtains throughout the entire beach house, I developed what can only be described as an animalistic craving for white curtains in here again.
similar dresser / gold frames / bench / similar rug / similar chair
So much of the room had been beige-ish, that I just thought crisp white curtains would freshen things up and not make the whole space feel like we had a sepia filter on it. So I craigslisted the tan curtains, and on a trip to Ikea sometime last winter we loaded up on three sets of our favorite affordable white curtains (Ikea’s Lenda curtains) for the bedroom. But the reason you haven’t seen an “our bedroom got two updates!” post about this room is because is has taken me nearly a year to finish fixing the curtains (thereby completing this update) so they no longer look like this:
Yup, we lived with them like this for nearly 12 months, and I gotta say, I’m not even ashamed of it. Life is busy, (see: adulting) and curtains can be high maintenance, so they might just end up at the bottom of the list. And this sloppiness underscores the dilemma of Ikea curtains. We LOVE them for their nice heavy white fabric and their affordable price: just $25 for two 98″ tall curtains (which means they’re long enough to go from floor-to-ceiling in a standard eight foot room). And if you have extra tall rooms you can also get two of their 108″ length for $35.
And now for a curtain-related side rant: don’t buy too-short curtains at Target! I don’t even know why anyone makes 86″ curtains because it’s SO MEAN and they’re never tall enough to make a room look as good as it could with 95″ (or taller) curtains!
Unlike Ikea’s cheaper Vivan curtains, the Lenda ones have a decent weight to them – in fact they look extremely similar to curtains sold by West Elm and Pottery Barn but they’re a heckova lot more budget-friendly. But let me tell you… Ikea’s photos of these curtains are so not-selling that when people ask where we get our white curtains and we link to them, 100% of people say “that’s the wrong link” – because they’re actually sold with big tabs on the top and they have these country-looking tiebacks, and they essentially look nothing like this:
They look like this:
I know.
This doesn’t look like the same set of curtains. But it is.
And these are the exact same Lenda curtain panels too. We’ve probably had them in our office for the longest amount of time (four years or so) and they look great. We got two sets for each side of that large window so they’d look extra full – and our entire curtain cost was $50.
woven blinds (pecan color) / desk chair / desk / bench / rug / similar faux plant
But… if you’re someone who just wants curtains that you can throw up on a rod and have them look awesome, these aren’t them. Getting them to look presentable can take a significant amount of effort in our experience, but after it’s all said and done, they can look pretty darn decent. Plus they’re washable (which is a great thing in a house with kids and a dog – or a rental house like our beach houses) and they’re not so expensive that they’re precious – so you can relax and not freak out if kids twirl around in them or hides back there, which is a daily occurrence in our house.
So what are the things we do to turn these formerly-tab-topped curtains into what you see in the photo above? I thought you’d never ask. Here’s my process:
Step 1: Wash them on hot and dry them on high to pre-shrink them (they’ll shrink a ton – maybe 5″, but in a standard height room that’s just fine – and you NEED to preshrink curtains before you hang them. Otherwise if they get dirty later and you launder them, they’ll look like bad highwaters when you hand them back up.
Step 2: Use a sharp pair of scissors to cut off the tabs right above the sewed line where they’re attached along the top edge.
Step 3: Fold the top edge over once to hide where you cut the tabs, making sure the fold goes toward the back of the curtain (facing the window). Once it’s all clipped that fold looks just like a sewed top seam and has a nice finished look.
Step 4: Clip your rings on along the fold. We use 6 ring clips per panel: one on each end and then one on every other vertical seam, which you can see above. Your spacing my be different if you’re using different curtains, but ours are about 10″ apart.
Step 5: Slide two pre-washed & clipped panels onto your curtain rod, and hold it up to determine the best height to install it. Remember to go high and wide around your window, but not so high that the curtains don’t touch the floor, and not so wide that they look flat (volume from the curtains draping is really pretty). We typically go around 8″ beyond the window trim on the sides, and like to hang the rod a few inches below the ceiling, but use the length of your panels to determine the best height.
This was a far as I made it with these new curtains for basically a year, so if yours look something like the messy picture below – don’t worry. We’ve all been there. Well, at least I have. Many times. And I’ve lived to tell the tale. In fact it wasn’t until last week that we finally carried out the final two steps.
Step 6: Iron or steam your curtains. We steamed the curtains at the beach house while they hung in place – but we found that we got the best result with two people doing that (one to hold the curtain taut, the other to steam – this is our steamer, btw). So to get the smoothest result at home with just one person on curtain duty, we took them down and ironed them. I knocked out four of them before bed one night last week, and John did the other two the following evening (which explains why the hairy arm in this picture is his and not mine).
Step 7: Once the curtains are pre-shrunk and fully relaxed, it’s safe to hem them if you need to. Sometimes you get lucky and they shrink enough so that you can hang them high without needing any hemming – but a little is usually necessary for us. I like to use no-sew hem tape, but I tried a new cheater-way to hem these and it worked, so I’m sharing it. NO HEM TAPE OR SEWING REQUIRED!!!
I just unclipped them one clip at a time while standing on a chair and folded them over until I liked the way they hit the floor below (just the slightest little break – like they’re kissing the floor) and reclipped them to hold them that way. The fold of fabric is in the back of the curtain, facing the window, so you don’t see it from the front – it actually just looks like a nice thick top hem when the light shines through.
You can’t really tell that I took a short cut, and it means if they ever shrink in a future washing (or we decide we want more or less fabric touching the floor) we can just adjust them just by unclipping them and changing the fold. Genius? Probably not. Lazy? Most definitely!
Are they the most luxe high-end curtains out there? Nope. Do we think they look nice, hold up well, and add softness & height to a room? Yup. Did we do the entire bedroom for $75? Yup. And that’s less than the cost of one of these stock white 95″ curtain panels (and we got 6 panels!). Getting custom curtains can also be significantly more expensive – and it can make them feel extra precious. They’re also not usually washable which is a huge selling point for me when it comes to these.
Maybe someday we’ll feel fancy enough to splurge on custom curtains. Using them in some of our showhouse projects means we’ve experienced the difference firsthand (really, they look amazing and perfectly graze the floor and don’t even need to be steamed – they arrive totally ready to hang). So this isn’t an anti-custom curtain rant or anything – we just know lots of people who can’t swallow that custom curtain price tag right now, and might want something that feels easier to live with/wash for this season of life. So hopefully this elbow-grease-but-affordable method can help you get SOME sort of window treatments in your house. And you know I won’t judge you if it takes a year to get them finished.
Also, dogs don’t have to adult. I wanna be Burger.
Believe it or not, this isn’t the first time we’ve had white Lenda curtains in this room (but they got stolen for the office at one point). So here’s that story, and more curtain projects/tips from over the years:
Using Iron-Tape To Hem Lenda Curtains
How To Make No-Sew Curtains From Any Fabric
15 Minute Blackout Curtains for $15
18 Tips For Picking The Right Curtains
Psst- Wanna know the paint colors in this room, or any other room in our house? Click here for a whole-house rundown. And if you want to get our free email newsletter (it’s like a bonus post that comes right to your inbox each week) click here to get on the list.
*This post contains affiliate links*
The post How To Make Inexpensive Curtains Look A Lot More Polished & Our New Master Bed! appeared first on Young House Love.
How To Make Inexpensive Curtains Look A Lot More Polished & Our New Master Bed! published first on https://bakerskitchenslimited.tumblr.com/
0 notes
Photo
How To Make Inexpensive Curtains Look A Lot More Polished & Our New Master Bed! https://ift.tt/2ImpjYI
You haven’t seen our master bedroom in a while (except for small peeks on Instagram) because we owe you a certain curtain-related confession. But first, I get so many questions about our new bed – and why we upgraded from our old Ikea one – that I thought it was time to formally introduce you to this beauty that we got nearly a year ago. Yes, as in last November.
bed / nightstand / bench / similar art / similar rug / duvet / chandelier / faux plant
Why a new bed? Well, at first glance, our new bed isn’t wildly different from what was there before (which you last saw last May when we blogged about getting the new consignment store rug). Both headboards are a light wheat-colored linen, and they work well in the peaceful low-contrast bedroom we’ve been working towards lately. But the key difference is that this a legit bed – as in, headboard and side/footboards – all upholstered in the same fabric. Previously it was one of those metal frame situations plus a headboard we made ourselves.
And actually, at one point we did have that same headboard attached to a different bed entirely: the Ikea Edland canopy bed that we chopped the posts off of years ago (who remembers Ed the Bed?). But we swapped beds with our guest room at some point when we were over the floating-up-on-legs look for our bedroom (a regular bed frame + bedskirt gave us a more grounded and substantial look). We also found ourselves yearning for a proper boxspring situation for our mattress, which just sat directly on old Ed’s slats.
Our free took-twenty-minutes bed swap was definitely a step in the right direction, but we knew an upholstered bed would look more finished than the bedskirt + metal frame scenario. We actually don’t mind a bedskirt (2 of 3 beds in the beach house have them), but it always bugged me that it would never be the exact same white color as the duvet in here – and since it’s a much bigger room than the beach house bedrooms, you view it from a lot further away and notice that fact a lot more.
So long story long (have you met me?! no story is short), after five years of bed swapping and adding a skirt and reupholstering the headboard, we just went for it and ordered a fully upholstered bed. Not without twenty hours of research and hemming and hawing though (again, have you met me?!).
similar lamps / nightstand / bench / similar art / chandelier / curtain rod
The best thing about buying a new bed for our master bedroom was that it meant we could steal the headboard from our room and reunite it with Ed the Bed and bring them both to the empty beach house last fall, and put them in the middle bedroom. So essentially instead of buying a new bed for the beach house – we got to buy the bed we always wanted FOR OUR MASTER BEDROOM INSTEAD, and use ol’ faithful Ed + our homemade headboard at the beach house, where they totally fit the bill.
similar mobile / gold frames / similar headboard / lamps / pink art / square blanket
So even though he’s seen a few incarnations and lived in three different houses, Ed’s been with us for nearly 8 years (and the headboard has lived on for more than 6). Pretty soon they’ll be welcomed into the 10-year club! (If you haven’t read that post about the items in our home we’ve had for ten years and still love, it’s one of my favorites.)
But back to our new (*cough… year old… cough*) bed. This post is probably making her feel very unloved so far, since we haven’t even blogged about the upgrade, but that’s far from the truth.
I LOVE THIS BED SO MUCH I AM TEMPTED TO BUY IT AGAIN FOR THE BEACH HOUSE MASTER BEDROOM (and just use that headboard/frame combo in the duplex somewhere). It’s such a nice feeling to have an actual bed after a series of metal frames and headboards attached to the wall or the bed in various ways. It kind of feels like adulting, but not quite as annoying as cleaning the house or buying band-aids every week (am I the only household that goes through approximately 1,000 every three days?! Are the kids eating them?!).
Anyway, my bed BFF is called the Sanford Linen Upholstered Panel Bed and we got it from Wayfair last November. It comes in all of the standard sizes (twin up to california king) and in two colors (the “Talc” color is what we got – and there’s a “Kelly Green” that’s definitely more of a statement). At the moment it’s 30% off, putting a queen bed at $628, and one of the reasons I went for it is because a ton of clean-lined and classic upholstered beds that look like this this are in the $1,000-$2,000 range (like this one and this one), so I love that this is a great neutral color and a timeless shape that looks more expensive than it is.
It doesn’t look NEARLY as dark or gray as it does in the listing photos (which was a pleasant surprise for us – because it really does mean it would work anywhere). I’d call it a warm linen color, that’s just barely on the warmer side of the gray-beige line, but it could completely live in a room with gray or tan walls, which I love. Given our history of moving beds around, the more places a bed can work, the better. And it has a really nice linen-looking texture that makes it a bit more interesting in person than you can probably tell in the website photos:
We also liked that it has these small vertical panels flanking each side of the headboard. The “wings” give it an extra little detail and coziness that our flat DIYed headboard didn’t have (although you could definitely make this version yourself – just upholster the side pieces and attach them in the back with some sort of flat metal bracket).
This bed still requires a boxspring, which we like (feels more like a real adult bed that way, and it’s better for our mattress, we hear) and I’ll warn you that if your mattress isn’t as thick as ours (ours is 12″) there might be a small gap between the top of the mattress and bottom of the headboard… so you might want to add a mattress pad or just place your pillows along the back of the bed in a way that you can’t see that area (sleeping pillows + a few decorative ones could totally cover it).
similar lamp / nightstand / similar art / curtain rod / duvet
I actually realized that there’s a reason for that space, which is: so you can change the sheets more easily. If the headboard squished up against the top of the mattress much tighter, you wouldn’t really be able to change the fitted sheets without a ton of effort – so I actually appreciate that detail.
Also a few people have asked “wait, are the black feet of your bed ugly?” and I didn’t even know what they meant and had to run upstairs and look at them in person, but I guess in the online photos where it’s cut out and placed on a white background they’re really clunky and obvious, but the bed’s feet are set in a bit from the upholstered frame, so they’re basically in the bed’s shadow if that makes sense. I literally never notice them or “register” that there are those little black feet in real life because the upholstered part is pulled forward, so that’s really all you see.
Ok, now that I’ve told you everything you could possibly wonder about our bed…. let’s turn our attention to curtains. BECAUSE CURTAINS ARE HARD. Our old curtains in here had been some wheat-colored cheapies I grabbed at HomeGoods years ago, but after we installed white curtains throughout the entire beach house, I developed what can only be described as an animalistic craving for white curtains in here again.
similar dresser / gold frames / bench / similar rug / similar chair
So much of the room had been beige-ish, that I just thought crisp white curtains would freshen things up and not make the whole space feel like we had a sepia filter on it. So I craigslisted the tan curtains, and on a trip to Ikea sometime last winter we loaded up on three sets of our favorite affordable white curtains (Ikea’s Lenda curtains) for the bedroom. But the reason you haven’t seen an “our bedroom got two updates!” post about this room is because is has taken me nearly a year to finish fixing the curtains (thereby completing this update) so they no longer look like this:
Yup, we lived with them like this for nearly 12 months, and I gotta say, I’m not even ashamed of it. Life is busy, (see: adulting) and curtains can be high maintenance, so they might just end up at the bottom of the list. And this sloppiness underscores the dilemma of Ikea curtains. We LOVE them for their nice heavy white fabric and their affordable price: just $25 for two 98″ tall curtains (which means they’re long enough to go from floor-to-ceiling in a standard eight foot room). And if you have extra tall rooms you can also get two of their 108″ length for $35.
And now for a curtain-related side rant: don’t buy too-short curtains at Target! I don’t even know why anyone makes 86″ curtains because it’s SO MEAN and they’re never tall enough to make a room look as good as it could with 95″ (or taller) curtains!
Unlike Ikea’s cheaper Vivan curtains, the Lenda ones have a decent weight to them – in fact they look extremely similar to curtains sold by West Elm and Pottery Barn but they’re a heckova lot more budget-friendly. But let me tell you… Ikea’s photos of these curtains are so not-selling that when people ask where we get our white curtains and we link to them, 100% of people say “that’s the wrong link” – because they’re actually sold with big tabs on the top and they have these country-looking tiebacks, and they essentially look nothing like this:
They look like this:
I know.
This doesn’t look like the same set of curtains. But it is.
And these are the exact same Lenda curtain panels too. We’ve probably had them in our office for the longest amount of time (four years or so) and they look great. We got two sets for each side of that large window so they’d look extra full – and our entire curtain cost was $50.
woven blinds (pecan color) / desk chair / desk / bench / rug / similar faux plant
But… if you’re someone who just wants curtains that you can throw up on a rod and have them look awesome, these aren’t them. Getting them to look presentable can take a significant amount of effort in our experience, but after it’s all said and done, they can look pretty darn decent. Plus they’re washable (which is a great thing in a house with kids and a dog – or a rental house like our beach houses) and they’re not so expensive that they’re precious – so you can relax and not freak out if kids twirl around in them or hides back there, which is a daily occurrence in our house.
So what are the things we do to turn these formerly-tab-topped curtains into what you see in the photo above? I thought you’d never ask. Here’s my process:
Step 1: Wash them on hot and dry them on high to pre-shrink them (they’ll shrink a ton – maybe 5″, but in a standard height room that’s just fine – and you NEED to preshrink curtains before you hang them. Otherwise if they get dirty later and you launder them, they’ll look like bad highwaters when you hand them back up.
Step 2: Use a sharp pair of scissors to cut off the tabs right above the sewed line where they’re attached along the top edge.
Step 3: Fold the top edge over once to hide where you cut the tabs, making sure the fold goes toward the back of the curtain (facing the window). Once it’s all clipped that fold looks just like a sewed top seam and has a nice finished look.
Step 4: Clip your rings on along the fold. We use 6 ring clips per panel: one on each end and then one on every other vertical seam, which you can see above. Your spacing my be different if you’re using different curtains, but ours are about 10″ apart.
Step 5: Slide two pre-washed & clipped panels onto your curtain rod, and hold it up to determine the best height to install it. Remember to go high and wide around your window, but not so high that the curtains don’t touch the floor, and not so wide that they look flat (volume from the curtains draping is really pretty). We typically go around 8″ beyond the window trim on the sides, and like to hang the rod a few inches below the ceiling, but use the length of your panels to determine the best height.
This was a far as I made it with these new curtains for basically a year, so if yours look something like the messy picture below – don’t worry. We’ve all been there. Well, at least I have. Many times. And I’ve lived to tell the tale. In fact it wasn’t until last week that we finally carried out the final two steps.
Step 6: Iron or steam your curtains. We steamed the curtains at the beach house while they hung in place – but we found that we got the best result with two people doing that (one to hold the curtain taut, the other to steam – this is our steamer, btw). So to get the smoothest result at home with just one person on curtain duty, we took them down and ironed them. I knocked out four of them before bed one night last week, and John did the other two the following evening (which explains why the hairy arm in this picture is his and not mine).
Step 7: Once the curtains are pre-shrunk and fully relaxed, it’s safe to hem them if you need to. Sometimes you get lucky and they shrink enough so that you can hang them high without needing any hemming – but a little is usually necessary for us. I like to use no-sew hem tape, but I tried a new cheater-way to hem these and it worked, so I’m sharing it. NO HEM TAPE OR SEWING REQUIRED!!!
I just unclipped them one clip at a time while standing on a chair and folded them over until I liked the way they hit the floor below (just the slightest little break – like they’re kissing the floor) and reclipped them to hold them that way. The fold of fabric is in the back of the curtain, facing the window, so you don’t see it from the front – it actually just looks like a nice thick top hem when the light shines through.
You can’t really tell that I took a short cut, and it means if they ever shrink in a future washing (or we decide we want more or less fabric touching the floor) we can just adjust them just by unclipping them and changing the fold. Genius? Probably not. Lazy? Most definitely!
Are they the most luxe high-end curtains out there? Nope. Do we think they look nice, hold up well, and add softness & height to a room? Yup. Did we do the entire bedroom for $75? Yup. And that’s less than the cost of one of these stock white 95″ curtain panels (and we got 6 panels!). Getting custom curtains can also be significantly more expensive – and it can make them feel extra precious. They’re also not usually washable which is a huge selling point for me when it comes to these.
Maybe someday we’ll feel fancy enough to splurge on custom curtains. Using them in some of our showhouse projects means we’ve experienced the difference firsthand (really, they look amazing and perfectly graze the floor and don’t even need to be steamed – they arrive totally ready to hang). So this isn’t an anti-custom curtain rant or anything – we just know lots of people who can’t swallow that custom curtain price tag right now, and might want something that feels easier to live with/wash for this season of life. So hopefully this elbow-grease-but-affordable method can help you get SOME sort of window treatments in your house. And you know I won’t judge you if it takes a year to get them finished.
Also, dogs don’t have to adult. I wanna be Burger.
Believe it or not, this isn’t the first time we’ve had white Lenda curtains in this room (but they got stolen for the office at one point). So here’s that story, and more curtain projects/tips from over the years:
Using Iron-Tape To Hem Lenda Curtains
How To Make No-Sew Curtains From Any Fabric
15 Minute Blackout Curtains for $15
18 Tips For Picking The Right Curtains
Psst- Wanna know the paint colors in this room, or any other room in our house? Click here for a whole-house rundown. And if you want to get our free email newsletter (it’s like a bonus post that comes right to your inbox each week) click here to get on the list.
*This post contains affiliate links*
The post How To Make Inexpensive Curtains Look A Lot More Polished & Our New Master Bed! appeared first on Young House Love.
0 notes
Text
How To Make Inexpensive Curtains Look A Lot More Polished & Our New Master Bed!
You haven’t seen our master bedroom in a while (except for small peeks on Instagram) because we owe you a certain curtain-related confession. But first, I get so many questions about our new bed – and why we upgraded from our old Ikea one – that I thought it was time to formally introduce you to this beauty that we got nearly a year ago. Yes, as in last November.
bed / nightstand / bench / similar art / similar rug / duvet / chandelier / faux plant
Why a new bed? Well, at first glance, our new bed isn’t wildly different from what was there before (which you last saw last May when we blogged about getting the new consignment store rug). Both headboards are a light wheat-colored linen, and they work well in the peaceful low-contrast bedroom we’ve been working towards lately. But the key difference is that this a legit bed – as in, headboard and side/footboards – all upholstered in the same fabric. Previously it was one of those metal frame situations plus a headboard we made ourselves.
And actually, at one point we did have that same headboard attached to a different bed entirely: the Ikea Edland canopy bed that we chopped the posts off of years ago (who remembers Ed the Bed?). But we swapped beds with our guest room at some point when we were over the floating-up-on-legs look for our bedroom (a regular bed frame + bedskirt gave us a more grounded and substantial look). We also found ourselves yearning for a proper boxspring situation for our mattress, which just sat directly on old Ed’s slats.
Our free took-twenty-minutes bed swap was definitely a step in the right direction, but we knew an upholstered bed would look more finished than the bedskirt + metal frame scenario. We actually don’t mind a bedskirt (2 of 3 beds in the beach house have them), but it always bugged me that it would never be the exact same white color as the duvet in here – and since it’s a much bigger room than the beach house bedrooms, you view it from a lot further away and notice that fact a lot more.
So long story long (have you met me?! no story is short), after five years of bed swapping and adding a skirt and reupholstering the headboard, we just went for it and ordered a fully upholstered bed. Not without twenty hours of research and hemming and hawing though (again, have you met me?!).
similar lamps / nightstand / bench / similar art / chandelier / curtain rod
The best thing about buying a new bed for our master bedroom was that it meant we could steal the headboard from our room and reunite it with Ed the Bed and bring them both to the empty beach house last fall, and put them in the middle bedroom. So essentially instead of buying a new bed for the beach house – we got to buy the bed we always wanted FOR OUR MASTER BEDROOM INSTEAD, and use ol’ faithful Ed + our homemade headboard at the beach house, where they totally fit the bill.
similar mobile / gold frames / similar headboard / lamps / pink art / square blanket
So even though he’s seen a few incarnations and lived in three different houses, Ed’s been with us for nearly 8 years (and the headboard has lived on for more than 6). Pretty soon they’ll be welcomed into the 10-year club! (If you haven’t read that post about the items in our home we’ve had for ten years and still love, it’s one of my favorites.)
But back to our new (*cough… year old… cough*) bed. This post is probably making her feel very unloved so far, since we haven’t even blogged about the upgrade, but that’s far from the truth.
I LOVE THIS BED SO MUCH I AM TEMPTED TO BUY IT AGAIN FOR THE BEACH HOUSE MASTER BEDROOM (and just use that headboard/frame combo in the duplex somewhere). It’s such a nice feeling to have an actual bed after a series of metal frames and headboards attached to the wall or the bed in various ways. It kind of feels like adulting, but not quite as annoying as cleaning the house or buying band-aids every week (am I the only household that goes through approximately 1,000 every three days?! Are the kids eating them?!).
Anyway, my bed BFF is called the Sanford Linen Upholstered Panel Bed and we got it from Wayfair last November. It comes in all of the standard sizes (twin up to california king) and in two colors (the “Talc” color is what we got – and there’s a “Kelly Green” that’s definitely more of a statement). At the moment it’s 30% off, putting a queen bed at $628, and one of the reasons I went for it is because a ton of clean-lined and classic upholstered beds that look like this this are in the $1,000-$2,000 range (like this one and this one), so I love that this is a great neutral color and a timeless shape that looks more expensive than it is.
It doesn’t look NEARLY as dark or gray as it does in the listing photos (which was a pleasant surprise for us – because it really does mean it would work anywhere). I’d call it a warm linen color, that’s just barely on the warmer side of the gray-beige line, but it could completely live in a room with gray or tan walls, which I love. Given our history of moving beds around, the more places a bed can work, the better. And it has a really nice linen-looking texture that makes it a bit more interesting in person than you can probably tell in the website photos:
We also liked that it has these small vertical panels flanking each side of the headboard. The “wings” give it an extra little detail and coziness that our flat DIYed headboard didn’t have (although you could definitely make this version yourself – just upholster the side pieces and attach them in the back with some sort of flat metal bracket).
This bed still requires a boxspring, which we like (feels more like a real adult bed that way, and it’s better for our mattress, we hear) and I’ll warn you that if your mattress isn’t as thick as ours (ours is 12″) there might be a small gap between the top of the mattress and bottom of the headboard… so you might want to add a mattress pad or just place your pillows along the back of the bed in a way that you can’t see that area (sleeping pillows + a few decorative ones could totally cover it).
similar lamp / nightstand / similar art / curtain rod / duvet
I actually realized that there’s a reason for that space, which is: so you can change the sheets more easily. If the headboard squished up against the top of the mattress much tighter, you wouldn’t really be able to change the fitted sheets without a ton of effort – so I actually appreciate that detail.
Also a few people have asked “wait, are the black feet of your bed ugly?” and I didn’t even know what they meant and had to run upstairs and look at them in person, but I guess in the online photos where it’s cut out and placed on a white background they’re really clunky and obvious, but the bed’s feet are set in a bit from the upholstered frame, so they’re basically in the bed’s shadow if that makes sense. I literally never notice them or “register” that there are those little black feet in real life because the upholstered part is pulled forward, so that’s really all you see.
Ok, now that I’ve told you everything you could possibly wonder about our bed…. let’s turn our attention to curtains. BECAUSE CURTAINS ARE HARD. Our old curtains in here had been some wheat-colored cheapies I grabbed at HomeGoods years ago, but after we installed white curtains throughout the entire beach house, I developed what can only be described as an animalistic craving for white curtains in here again.
similar dresser / gold frames / bench / similar rug / similar chair
So much of the room had been beige-ish, that I just thought crisp white curtains would freshen things up and not make the whole space feel like we had a sepia filter on it. So I craigslisted the tan curtains, and on a trip to Ikea sometime last winter we loaded up on three sets of our favorite affordable white curtains (Ikea’s Lenda curtains) for the bedroom. But the reason you haven’t seen an “our bedroom got two updates!” post about this room is because is has taken me nearly a year to finish fixing the curtains (thereby completing this update) so they no longer look like this:
Yup, we lived with them like this for nearly 12 months, and I gotta say, I’m not even ashamed of it. Life is busy, (see: adulting) and curtains can be high maintenance, so they might just end up at the bottom of the list. And this sloppiness underscores the dilemma of Ikea curtains. We LOVE them for their nice heavy white fabric and their affordable price: just $25 for two 98″ tall curtains (which means they’re long enough to go from floor-to-ceiling in a standard eight foot room). And if you have extra tall rooms you can also get two of their 108″ length for $35.
And now for a curtain-related side rant: don’t buy too-short curtains at Target! I don’t even know why anyone makes 86″ curtains because it’s SO MEAN and they’re never tall enough to make a room look as good as it could with 95″ (or taller) curtains!
Unlike Ikea’s cheaper Vivan curtains, the Lenda ones have a decent weight to them – in fact they look extremely similar to curtains sold by West Elm and Pottery Barn but they’re a heckova lot more budget-friendly. But let me tell you… Ikea’s photos of these curtains are so not-selling that when people ask where we get our white curtains and we link to them, 100% of people say “that’s the wrong link” – because they’re actually sold with big tabs on the top and they have these country-looking tiebacks, and they essentially look nothing like this:
They look like this:
I know.
This doesn’t look like the same set of curtains. But it is.
And these are the exact same Lenda curtain panels too. We’ve probably had them in our office for the longest amount of time (four years or so) and they look great. We got two sets for each side of that large window so they’d look extra full – and our entire curtain cost was $50.
woven blinds (pecan color) / desk chair / desk / bench / rug / similar faux plant
But… if you’re someone who just wants curtains that you can throw up on a rod and have them look awesome, these aren’t them. Getting them to look presentable can take a significant amount of effort in our experience, but after it’s all said and done, they can look pretty darn decent. Plus they’re washable (which is a great thing in a house with kids and a dog – or a rental house like our beach houses) and they’re not so expensive that they’re precious – so you can relax and not freak out if kids twirl around in them or hides back there, which is a daily occurrence in our house.
So what are the things we do to turn these formerly-tab-topped curtains into what you see in the photo above? I thought you’d never ask. Here’s my process:
Step 1: Wash them on hot and dry them on high to pre-shrink them (they’ll shrink a ton – maybe 5″, but in a standard height room that’s just fine – and you NEED to preshrink curtains before you hang them. Otherwise if they get dirty later and you launder them, they’ll look like bad highwaters when you hand them back up.
Step 2: Use a sharp pair of scissors to cut off the tabs right above the sewed line where they’re attached along the top edge.
Step 3: Fold the top edge over once to hide where you cut the tabs, making sure the fold goes toward the back of the curtain (facing the window). Once it’s all clipped that fold looks just like a sewed top seam and has a nice finished look.
Step 4: Clip your rings on along the fold. We use 6 ring clips per panel: one on each end and then one on every other vertical seam, which you can see above. Your spacing my be different if you’re using different curtains, but ours are about 10″ apart.
Step 5: Slide two pre-washed & clipped panels onto your curtain rod, and hold it up to determine the best height to install it. Remember to go high and wide around your window, but not so high that the curtains don’t touch the floor, and not so wide that they look flat (volume from the curtains draping is really pretty). We typically go around 8″ beyond the window trim on the sides, and like to hang the rod a few inches below the ceiling, but use the length of your panels to determine the best height.
This was a far as I made it with these new curtains for basically a year, so if yours look something like the messy picture below – don’t worry. We’ve all been there. Well, at least I have. Many times. And I’ve lived to tell the tale. In fact it wasn’t until last week that we finally carried out the final two steps.
Step 6: Iron or steam your curtains. We steamed the curtains at the beach house while they hung in place – but we found that we got the best result with two people doing that (one to hold the curtain taut, the other to steam – this is our steamer, btw). So to get the smoothest result at home with just one person on curtain duty, we took them down and ironed them. I knocked out four of them before bed one night last week, and John did the other two the following evening (which explains why the hairy arm in this picture is his and not mine).
Step 7: Once the curtains are pre-shrunk and fully relaxed, it’s safe to hem them if you need to. Sometimes you get lucky and they shrink enough so that you can hang them high without needing any hemming – but a little is usually necessary for us. I like to use no-sew hem tape, but I tried a new cheater-way to hem these and it worked, so I’m sharing it. NO HEM TAPE OR SEWING REQUIRED!!!
I just unclipped them one clip at a time while standing on a chair and folded them over until I liked the way they hit the floor below (just the slightest little break – like they’re kissing the floor) and reclipped them to hold them that way. The fold of fabric is in the back of the curtain, facing the window, so you don’t see it from the front – it actually just looks like a nice thick top hem when the light shines through.
You can’t really tell that I took a short cut, and it means if they ever shrink in a future washing (or we decide we want more or less fabric touching the floor) we can just adjust them just by unclipping them and changing the fold. Genius? Probably not. Lazy? Most definitely!
Are they the most luxe high-end curtains out there? Nope. Do we think they look nice, hold up well, and add softness & height to a room? Yup. Did we do the entire bedroom for $75? Yup. And that’s less than the cost of one of these stock white 95″ curtain panels (and we got 6 panels!). Getting custom curtains can also be significantly more expensive – and it can make them feel extra precious. They’re also not usually washable which is a huge selling point for me when it comes to these.
Maybe someday we’ll feel fancy enough to splurge on custom curtains. Using them in some of our showhouse projects means we’ve experienced the difference firsthand (really, they look amazing and perfectly graze the floor and don’t even need to be steamed – they arrive totally ready to hang). So this isn’t an anti-custom curtain rant or anything – we just know lots of people who can’t swallow that custom curtain price tag right now, and might want something that feels easier to live with/wash for this season of life. So hopefully this elbow-grease-but-affordable method can help you get SOME sort of window treatments in your house. And you know I won’t judge you if it takes a year to get them finished.
Also, dogs don’t have to adult. I wanna be Burger.
Believe it or not, this isn’t the first time we’ve had white Lenda curtains in this room (but they got stolen for the office at one point). So here’s that story, and more curtain projects/tips from over the years:
Using Iron-Tape To Hem Lenda Curtains
How To Make No-Sew Curtains From Any Fabric
15 Minute Blackout Curtains for $15
18 Tips For Picking The Right Curtains
Psst- Wanna know the paint colors in this room, or any other room in our house? Click here for a whole-house rundown. And if you want to get our free email newsletter (it’s like a bonus post that comes right to your inbox each week) click here to get on the list.
*This post contains affiliate links*
The post How To Make Inexpensive Curtains Look A Lot More Polished & Our New Master Bed! appeared first on Young House Love.
How To Make Inexpensive Curtains Look A Lot More Polished & Our New Master Bed! published first on https://carpetgurus.tumblr.com/
0 notes
Text
How To Make Inexpensive Curtains Look A Lot More Polished & Our New Master Bed!
You haven’t seen our master bedroom in a while (except for small peeks on Instagram) because we owe you a certain curtain-related confession. But first, I get so many questions about our new bed – and why we upgraded from our old Ikea one – that I thought it was time to formally introduce you to this beauty that we got nearly a year ago. Yes, as in last November.
bed / nightstand / bench / similar art / similar rug / duvet / chandelier / faux plant
Why a new bed? Well, at first glance, our new bed isn’t wildly different from what was there before (which you last saw last May when we blogged about getting the new consignment store rug). Both headboards are a light wheat-colored linen, and they work well in the peaceful low-contrast bedroom we’ve been working towards lately. But the key difference is that this a legit bed – as in, headboard and side/footboards – all upholstered in the same fabric. Previously it was one of those metal frame situations plus a headboard we made ourselves.
And actually, at one point we did have that same headboard attached to a different bed entirely: the Ikea Edland canopy bed that we chopped the posts off of years ago (who remembers Ed the Bed?). But we swapped beds with our guest room at some point when we were over the floating-up-on-legs look for our bedroom (a regular bed frame + bedskirt gave us a more grounded and substantial look). We also found ourselves yearning for a proper boxspring situation for our mattress, which just sat directly on old Ed’s slats.
Our free took-twenty-minutes bed swap was definitely a step in the right direction, but we knew an upholstered bed would look more finished than the bedskirt + metal frame scenario. We actually don’t mind a bedskirt (2 of 3 beds in the beach house have them), but it always bugged me that it would never be the exact same white color as the duvet in here – and since it’s a much bigger room than the beach house bedrooms, you view it from a lot further away and notice that fact a lot more.
So long story long (have you met me?! no story is short), after five years of bed swapping and adding a skirt and reupholstering the headboard, we just went for it and ordered a fully upholstered bed. Not without twenty hours of research and hemming and hawing though (again, have you met me?!).
similar lamps / nightstand / bench / similar art / chandelier / curtain rod
The best thing about buying a new bed for our master bedroom was that it meant we could steal the headboard from our room and reunite it with Ed the Bed and bring them both to the empty beach house last fall, and put them in the middle bedroom. So essentially instead of buying a new bed for the beach house – we got to buy the bed we always wanted FOR OUR MASTER BEDROOM INSTEAD, and use ol’ faithful Ed + our homemade headboard at the beach house, where they totally fit the bill.
similar mobile / gold frames / similar headboard / lamps / pink art / square blanket
So even though he’s seen a few incarnations and lived in three different houses, Ed’s been with us for nearly 8 years (and the headboard has lived on for more than 6). Pretty soon they’ll be welcomed into the 10-year club! (If you haven’t read that post about the items in our home we’ve had for ten years and still love, it’s one of my favorites.)
But back to our new (*cough… year old… cough*) bed. This post is probably making her feel very unloved so far, since we haven’t even blogged about the upgrade, but that’s far from the truth.
I LOVE THIS BED SO MUCH I AM TEMPTED TO BUY IT AGAIN FOR THE BEACH HOUSE MASTER BEDROOM (and just use that headboard/frame combo in the duplex somewhere). It’s such a nice feeling to have an actual bed after a series of metal frames and headboards attached to the wall or the bed in various ways. It kind of feels like adulting, but not quite as annoying as cleaning the house or buying band-aids every week (am I the only household that goes through approximately 1,000 every three days?! Are the kids eating them?!).
Anyway, my bed BFF is called the Sanford Linen Upholstered Panel Bed and we got it from Wayfair last November. It comes in all of the standard sizes (twin up to california king) and in two colors (the “Talc” color is what we got – and there’s a “Kelly Green” that’s definitely more of a statement). At the moment it’s 30% off, putting a queen bed at $628, and one of the reasons I went for it is because a ton of clean-lined and classic upholstered beds that look like this this are in the $1,000-$2,000 range (like this one and this one), so I love that this is a great neutral color and a timeless shape that looks more expensive than it is.
It doesn’t look NEARLY as dark or gray as it does in the listing photos (which was a pleasant surprise for us – because it really does mean it would work anywhere). I’d call it a warm linen color, that’s just barely on the warmer side of the gray-beige line, but it could completely live in a room with gray or tan walls, which I love. Given our history of moving beds around, the more places a bed can work, the better. And it has a really nice linen-looking texture that makes it a bit more interesting in person than you can probably tell in the website photos:
We also liked that it has these small vertical panels flanking each side of the headboard. The “wings” give it an extra little detail and coziness that our flat DIYed headboard didn’t have (although you could definitely make this version yourself – just upholster the side pieces and attach them in the back with some sort of flat metal bracket).
This bed still requires a boxspring, which we like (feels more like a real adult bed that way, and it’s better for our mattress, we hear) and I’ll warn you that if your mattress isn’t as thick as ours (ours is 12″) there might be a small gap between the top of the mattress and bottom of the headboard… so you might want to add a mattress pad or just place your pillows along the back of the bed in a way that you can’t see that area (sleeping pillows + a few decorative ones could totally cover it).
similar lamp / nightstand / similar art / curtain rod / duvet
I actually realized that there’s a reason for that space, which is: so you can change the sheets more easily. If the headboard squished up against the top of the mattress much tighter, you wouldn’t really be able to change the fitted sheets without a ton of effort – so I actually appreciate that detail.
Also a few people have asked “wait, are the black feet of your bed ugly?” and I didn’t even know what they meant and had to run upstairs and look at them in person, but I guess in the online photos where it’s cut out and placed on a white background they’re really clunky and obvious, but the bed’s feet are set in a bit from the upholstered frame, so they’re basically in the bed’s shadow if that makes sense. I literally never notice them or “register” that there are those little black feet in real life because the upholstered part is pulled forward, so that’s really all you see.
Ok, now that I’ve told you everything you could possibly wonder about our bed…. let’s turn our attention to curtains. BECAUSE CURTAINS ARE HARD. Our old curtains in here had been some wheat-colored cheapies I grabbed at HomeGoods years ago, but after we installed white curtains throughout the entire beach house, I developed what can only be described as an animalistic craving for white curtains in here again.
similar dresser / gold frames / bench / similar rug / similar chair
So much of the room had been beige-ish, that I just thought crisp white curtains would freshen things up and not make the whole space feel like we had a sepia filter on it. So I craigslisted the tan curtains, and on a trip to Ikea sometime last winter we loaded up on three sets of our favorite affordable white curtains (Ikea’s Lenda curtains) for the bedroom. But the reason you haven’t seen an “our bedroom got two updates!” post about this room is because is has taken me nearly a year to finish fixing the curtains (thereby completing this update) so they no longer look like this:
Yup, we lived with them like this for nearly 12 months, and I gotta say, I’m not even ashamed of it. Life is busy, (see: adulting) and curtains can be high maintenance, so they might just end up at the bottom of the list. And this sloppiness underscores the dilemma of Ikea curtains. We LOVE them for their nice heavy white fabric and their affordable price: just $25 for two 98″ tall curtains (which means they’re long enough to go from floor-to-ceiling in a standard eight foot room). And if you have extra tall rooms you can also get two of their 108″ length for $35.
And now for a curtain-related side rant: don’t buy too-short curtains at Target! I don’t even know why anyone makes 86″ curtains because it’s SO MEAN and they’re never tall enough to make a room look as good as it could with 95″ (or taller) curtains!
Unlike Ikea’s cheaper Vivan curtains, the Lenda ones have a decent weight to them – in fact they look extremely similar to curtains sold by West Elm and Pottery Barn but they’re a heckova lot more budget-friendly. But let me tell you… Ikea’s photos of these curtains are so not-selling that when people ask where we get our white curtains and we link to them, 100% of people say “that’s the wrong link” – because they’re actually sold with big tabs on the top and they have these country-looking tiebacks, and they essentially look nothing like this:
They look like this:
I know.
This doesn’t look like the same set of curtains. But it is.
And these are the exact same Lenda curtain panels too. We’ve probably had them in our office for the longest amount of time (four years or so) and they look great. We got two sets for each side of that large window so they’d look extra full – and our entire curtain cost was $50.
woven blinds (pecan color) / desk chair / desk / bench / rug / similar faux plant
But… if you’re someone who just wants curtains that you can throw up on a rod and have them look awesome, these aren’t them. Getting them to look presentable can take a significant amount of effort in our experience, but after it’s all said and done, they can look pretty darn decent. Plus they’re washable (which is a great thing in a house with kids and a dog – or a rental house like our beach houses) and they’re not so expensive that they’re precious – so you can relax and not freak out if kids twirl around in them or hides back there, which is a daily occurrence in our house.
So what are the things we do to turn these formerly-tab-topped curtains into what you see in the photo above? I thought you’d never ask. Here’s my process:
Step 1: Wash them on hot and dry them on high to pre-shrink them (they’ll shrink a ton – maybe 5″, but in a standard height room that’s just fine – and you NEED to preshrink curtains before you hang them. Otherwise if they get dirty later and you launder them, they’ll look like bad highwaters when you hand them back up.
Step 2: Use a sharp pair of scissors to cut off the tabs right above the sewed line where they’re attached along the top edge.
Step 3: Fold the top edge over once to hide where you cut the tabs, making sure the fold goes toward the back of the curtain (facing the window). Once it’s all clipped that fold looks just like a sewed top seam and has a nice finished look.
Step 4: Clip your rings on along the fold. We use 6 ring clips per panel: one on each end and then one on every other vertical seam, which you can see above. Your spacing my be different if you’re using different curtains, but ours are about 10″ apart.
Step 5: Slide two pre-washed & clipped panels onto your curtain rod, and hold it up to determine the best height to install it. Remember to go high and wide around your window, but not so high that the curtains don’t touch the floor, and not so wide that they look flat (volume from the curtains draping is really pretty). We typically go around 8″ beyond the window trim on the sides, and like to hang the rod a few inches below the ceiling, but use the length of your panels to determine the best height.
This was a far as I made it with these new curtains for basically a year, so if yours look something like the messy picture below – don’t worry. We’ve all been there. Well, at least I have. Many times. And I’ve lived to tell the tale. In fact it wasn’t until last week that we finally carried out the final two steps.
Step 6: Iron or steam your curtains. We steamed the curtains at the beach house while they hung in place – but we found that we got the best result with two people doing that (one to hold the curtain taut, the other to steam – this is our steamer, btw). So to get the smoothest result at home with just one person on curtain duty, we took them down and ironed them. I knocked out four of them before bed one night last week, and John did the other two the following evening (which explains why the hairy arm in this picture is his and not mine).
Step 7: Once the curtains are pre-shrunk and fully relaxed, it’s safe to hem them if you need to. Sometimes you get lucky and they shrink enough so that you can hang them high without needing any hemming – but a little is usually necessary for us. I like to use no-sew hem tape, but I tried a new cheater-way to hem these and it worked, so I’m sharing it. NO HEM TAPE OR SEWING REQUIRED!!!
I just unclipped them one clip at a time while standing on a chair and folded them over until I liked the way they hit the floor below (just the slightest little break – like they’re kissing the floor) and reclipped them to hold them that way. The fold of fabric is in the back of the curtain, facing the window, so you don’t see it from the front – it actually just looks like a nice thick top hem when the light shines through.
You can’t really tell that I took a short cut, and it means if they ever shrink in a future washing (or we decide we want more or less fabric touching the floor) we can just adjust them just by unclipping them and changing the fold. Genius? Probably not. Lazy? Most definitely!
Are they the most luxe high-end curtains out there? Nope. Do we think they look nice, hold up well, and add softness & height to a room? Yup. Did we do the entire bedroom for $75? Yup. And that’s less than the cost of one of these stock white 95″ curtain panels (and we got 6 panels!). Getting custom curtains can also be significantly more expensive – and it can make them feel extra precious. They’re also not usually washable which is a huge selling point for me when it comes to these.
Maybe someday we’ll feel fancy enough to splurge on custom curtains. Using them in some of our showhouse projects means we’ve experienced the difference firsthand (really, they look amazing and perfectly graze the floor and don’t even need to be steamed – they arrive totally ready to hang). So this isn’t an anti-custom curtain rant or anything – we just know lots of people who can’t swallow that custom curtain price tag right now, and might want something that feels easier to live with/wash for this season of life. So hopefully this elbow-grease-but-affordable method can help you get SOME sort of window treatments in your house. And you know I won’t judge you if it takes a year to get them finished.
Also, dogs don’t have to adult. I wanna be Burger.
Believe it or not, this isn’t the first time we’ve had white Lenda curtains in this room (but they got stolen for the office at one point). So here’s that story, and more curtain projects/tips from over the years:
Using Iron-Tape To Hem Lenda Curtains
How To Make No-Sew Curtains From Any Fabric
15 Minute Blackout Curtains for $15
18 Tips For Picking The Right Curtains
Psst- Wanna know the paint colors in this room, or any other room in our house? Click here for a whole-house rundown. And if you want to get our free email newsletter (it’s like a bonus post that comes right to your inbox each week) click here to get on the list.
*This post contains affiliate links*
The post How To Make Inexpensive Curtains Look A Lot More Polished & Our New Master Bed! appeared first on Young House Love.
How To Make Inexpensive Curtains Look A Lot More Polished & Our New Master Bed! published first on https://landscapingmates.blogspot.com
0 notes
Text
How To Make Inexpensive Curtains Look A Lot More Polished & Our New Master Bed!
You haven’t seen our master bedroom in a while (except for small peeks on Instagram) because we owe you a certain curtain-related confession. But first, I get so many questions about our new bed – and why we upgraded from our old Ikea one – that I thought it was time to formally introduce you to this beauty that we got nearly a year ago. Yes, as in last November.
bed / nightstand / bench / similar art / similar rug / duvet / chandelier / faux plant
Why a new bed? Well, at first glance, our new bed isn’t wildly different from what was there before (which you last saw last May when we blogged about getting the new consignment store rug). Both headboards are a light wheat-colored linen, and they work well in the peaceful low-contrast bedroom we’ve been working towards lately. But the key difference is that this a legit bed – as in, headboard and side/footboards – all upholstered in the same fabric. Previously it was one of those metal frame situations plus a headboard we made ourselves.
And actually, at one point we did have that same headboard attached to a different bed entirely: the Ikea Edland canopy bed that we chopped the posts off of years ago (who remembers Ed the Bed?). But we swapped beds with our guest room at some point when we were over the floating-up-on-legs look for our bedroom (a regular bed frame + bedskirt gave us a more grounded and substantial look). We also found ourselves yearning for a proper boxspring situation for our mattress, which just sat directly on old Ed’s slats.
Our free took-twenty-minutes bed swap was definitely a step in the right direction, but we knew an upholstered bed would look more finished than the bedskirt + metal frame scenario. We actually don’t mind a bedskirt (2 of 3 beds in the beach house have them), but it always bugged me that it would never be the exact same white color as the duvet in here – and since it’s a much bigger room than the beach house bedrooms, you view it from a lot further away and notice that fact a lot more.
So long story long (have you met me?! no story is short), after five years of bed swapping and adding a skirt and reupholstering the headboard, we just went for it and ordered a fully upholstered bed. Not without twenty hours of research and hemming and hawing though (again, have you met me?!).
similar lamps / nightstand / bench / similar art / chandelier / curtain rod
The best thing about buying a new bed for our master bedroom was that it meant we could steal the headboard from our room and reunite it with Ed the Bed and bring them both to the empty beach house last fall, and put them in the middle bedroom. So essentially instead of buying a new bed for the beach house – we got to buy the bed we always wanted FOR OUR MASTER BEDROOM INSTEAD, and use ol’ faithful Ed + our homemade headboard at the beach house, where they totally fit the bill.
similar mobile / gold frames / similar headboard / lamps / pink art / square blanket
So even though he’s seen a few incarnations and lived in three different houses, Ed’s been with us for nearly 8 years (and the headboard has lived on for more than 6). Pretty soon they’ll be welcomed into the 10-year club! (If you haven’t read that post about the items in our home we’ve had for ten years and still love, it’s one of my favorites.)
But back to our new (*cough… year old… cough*) bed. This post is probably making her feel very unloved so far, since we haven’t even blogged about the upgrade, but that’s far from the truth.
I LOVE THIS BED SO MUCH I AM TEMPTED TO BUY IT AGAIN FOR THE BEACH HOUSE MASTER BEDROOM (and just use that headboard/frame combo in the duplex somewhere). It’s such a nice feeling to have an actual bed after a series of metal frames and headboards attached to the wall or the bed in various ways. It kind of feels like adulting, but not quite as annoying as cleaning the house or buying band-aids every week (am I the only household that goes through approximately 1,000 every three days?! Are the kids eating them?!).
Anyway, my bed BFF is called the Sanford Linen Upholstered Panel Bed and we got it from Wayfair last November. It comes in all of the standard sizes (twin up to california king) and in two colors (the “Talc” color is what we got – and there’s a “Kelly Green” that’s definitely more of a statement). At the moment it’s 30% off, putting a queen bed at $628, and one of the reasons I went for it is because a ton of clean-lined and classic upholstered beds that look like this this are in the $1,000-$2,000 range (like this one and this one), so I love that this is a great neutral color and a timeless shape that looks more expensive than it is.
It doesn’t look NEARLY as dark or gray as it does in the listing photos (which was a pleasant surprise for us – because it really does mean it would work anywhere). I’d call it a warm linen color, that’s just barely on the warmer side of the gray-beige line, but it could completely live in a room with gray or tan walls, which I love. Given our history of moving beds around, the more places a bed can work, the better. And it has a really nice linen-looking texture that makes it a bit more interesting in person than you can probably tell in the website photos:
We also liked that it has these small vertical panels flanking each side of the headboard. The “wings” give it an extra little detail and coziness that our flat DIYed headboard didn’t have (although you could definitely make this version yourself – just upholster the side pieces and attach them in the back with some sort of flat metal bracket).
This bed still requires a boxspring, which we like (feels more like a real adult bed that way, and it’s better for our mattress, we hear) and I’ll warn you that if your mattress isn’t as thick as ours (ours is 12″) there might be a small gap between the top of the mattress and bottom of the headboard… so you might want to add a mattress pad or just place your pillows along the back of the bed in a way that you can’t see that area (sleeping pillows + a few decorative ones could totally cover it).
similar lamp / nightstand / similar art / curtain rod / duvet
I actually realized that there’s a reason for that space, which is: so you can change the sheets more easily. If the headboard squished up against the top of the mattress much tighter, you wouldn’t really be able to change the fitted sheets without a ton of effort – so I actually appreciate that detail.
Also a few people have asked “wait, are the black feet of your bed ugly?” and I didn’t even know what they meant and had to run upstairs and look at them in person, but I guess in the online photos where it’s cut out and placed on a white background they’re really clunky and obvious, but the bed’s feet are set in a bit from the upholstered frame, so they’re basically in the bed’s shadow if that makes sense. I literally never notice them or “register” that there are those little black feet in real life because the upholstered part is pulled forward, so that’s really all you see.
Ok, now that I’ve told you everything you could possibly wonder about our bed…. let’s turn our attention to curtains. BECAUSE CURTAINS ARE HARD. Our old curtains in here had been some wheat-colored cheapies I grabbed at HomeGoods years ago, but after we installed white curtains throughout the entire beach house, I developed what can only be described as an animalistic craving for white curtains in here again.
similar dresser / gold frames / bench / similar rug / similar chair
So much of the room had been beige-ish, that I just thought crisp white curtains would freshen things up and not make the whole space feel like we had a sepia filter on it. So I craigslisted the tan curtains, and on a trip to Ikea sometime last winter we loaded up on three sets of our favorite affordable white curtains (Ikea’s Lenda curtains) for the bedroom. But the reason you haven’t seen an “our bedroom got two updates!” post about this room is because is has taken me nearly a year to finish fixing the curtains (thereby completing this update) so they no longer look like this:
Yup, we lived with them like this for nearly 12 months, and I gotta say, I’m not even ashamed of it. Life is busy, (see: adulting) and curtains can be high maintenance, so they might just end up at the bottom of the list. And this sloppiness underscores the dilemma of Ikea curtains. We LOVE them for their nice heavy white fabric and their affordable price: just $25 for two 98″ tall curtains (which means they’re long enough to go from floor-to-ceiling in a standard eight foot room). And if you have extra tall rooms you can also get two of their 108″ length for $35.
And now for a curtain-related side rant: don’t buy too-short curtains at Target! I don’t even know why anyone makes 86″ curtains because it’s SO MEAN and they’re never tall enough to make a room look as good as it could with 95″ (or taller) curtains!
Unlike Ikea’s cheaper Vivan curtains, the Lenda ones have a decent weight to them – in fact they look extremely similar to curtains sold by West Elm and Pottery Barn but they’re a heckova lot more budget-friendly. But let me tell you… Ikea’s photos of these curtains are so not-selling that when people ask where we get our white curtains and we link to them, 100% of people say “that’s the wrong link” – because they’re actually sold with big tabs on the top and they have these country-looking tiebacks, and they essentially look nothing like this:
They look like this:
I know.
This doesn’t look like the same set of curtains. But it is.
And these are the exact same Lenda curtain panels too. We’ve probably had them in our office for the longest amount of time (four years or so) and they look great. We got two sets for each side of that large window so they’d look extra full – and our entire curtain cost was $50.
woven blinds (pecan color) / desk chair / desk / bench / rug / similar faux plant
But… if you’re someone who just wants curtains that you can throw up on a rod and have them look awesome, these aren’t them. Getting them to look presentable can take a significant amount of effort in our experience, but after it’s all said and done, they can look pretty darn decent. Plus they’re washable (which is a great thing in a house with kids and a dog – or a rental house like our beach houses) and they’re not so expensive that they’re precious – so you can relax and not freak out if kids twirl around in them or hides back there, which is a daily occurrence in our house.
So what are the things we do to turn these formerly-tab-topped curtains into what you see in the photo above? I thought you’d never ask. Here’s my process:
Step 1: Wash them on hot and dry them on high to pre-shrink them (they’ll shrink a ton – maybe 5″, but in a standard height room that’s just fine – and you NEED to preshrink curtains before you hang them. Otherwise if they get dirty later and you launder them, they’ll look like bad highwaters when you hand them back up.
Step 2: Use a sharp pair of scissors to cut off the tabs right above the sewed line where they’re attached along the top edge.
Step 3: Fold the top edge over once to hide where you cut the tabs, making sure the fold goes toward the back of the curtain (facing the window). Once it’s all clipped that fold looks just like a sewed top seam and has a nice finished look.
Step 4: Clip your rings on along the fold. We use 6 ring clips per panel: one on each end and then one on every other vertical seam, which you can see above. Your spacing my be different if you’re using different curtains, but ours are about 10″ apart.
Step 5: Slide two pre-washed & clipped panels onto your curtain rod, and hold it up to determine the best height to install it. Remember to go high and wide around your window, but not so high that the curtains don’t touch the floor, and not so wide that they look flat (volume from the curtains draping is really pretty). We typically go around 8″ beyond the window trim on the sides, and like to hang the rod a few inches below the ceiling, but use the length of your panels to determine the best height.
This was a far as I made it with these new curtains for basically a year, so if yours look something like the messy picture below – don’t worry. We’ve all been there. Well, at least I have. Many times. And I’ve lived to tell the tale. In fact it wasn’t until last week that we finally carried out the final two steps.
Step 6: Iron or steam your curtains. We steamed the curtains at the beach house while they hung in place – but we found that we got the best result with two people doing that (one to hold the curtain taut, the other to steam – this is our steamer, btw). So to get the smoothest result at home with just one person on curtain duty, we took them down and ironed them. I knocked out four of them before bed one night last week, and John did the other two the following evening (which explains why the hairy arm in this picture is his and not mine).
Step 7: Once the curtains are pre-shrunk and fully relaxed, it’s safe to hem them if you need to. Sometimes you get lucky and they shrink enough so that you can hang them high without needing any hemming – but a little is usually necessary for us. I like to use no-sew hem tape, but I tried a new cheater-way to hem these and it worked, so I’m sharing it. NO HEM TAPE OR SEWING REQUIRED!!!
I just unclipped them one clip at a time while standing on a chair and folded them over until I liked the way they hit the floor below (just the slightest little break – like they’re kissing the floor) and reclipped them to hold them that way. The fold of fabric is in the back of the curtain, facing the window, so you don’t see it from the front – it actually just looks like a nice thick top hem when the light shines through.
You can’t really tell that I took a short cut, and it means if they ever shrink in a future washing (or we decide we want more or less fabric touching the floor) we can just adjust them just by unclipping them and changing the fold. Genius? Probably not. Lazy? Most definitely!
Are they the most luxe high-end curtains out there? Nope. Do we think they look nice, hold up well, and add softness & height to a room? Yup. Did we do the entire bedroom for $75? Yup. And that’s less than the cost of one of these stock white 95″ curtain panels (and we got 6 panels!). Getting custom curtains can also be significantly more expensive – and it can make them feel extra precious. They’re also not usually washable which is a huge selling point for me when it comes to these.
Maybe someday we’ll feel fancy enough to splurge on custom curtains. Using them in some of our showhouse projects means we’ve experienced the difference firsthand (really, they look amazing and perfectly graze the floor and don’t even need to be steamed – they arrive totally ready to hang). So this isn’t an anti-custom curtain rant or anything – we just know lots of people who can’t swallow that custom curtain price tag right now, and might want something that feels easier to live with/wash for this season of life. So hopefully this elbow-grease-but-affordable method can help you get SOME sort of window treatments in your house. And you know I won’t judge you if it takes a year to get them finished.
Also, dogs don’t have to adult. I wanna be Burger.
Believe it or not, this isn’t the first time we’ve had white Lenda curtains in this room (but they got stolen for the office at one point). So here’s that story, and more curtain projects/tips from over the years:
Using Iron-Tape To Hem Lenda Curtains
How To Make No-Sew Curtains From Any Fabric
15 Minute Blackout Curtains for $15
18 Tips For Picking The Right Curtains
Psst- Wanna know the paint colors in this room, or any other room in our house? Click here for a whole-house rundown. And if you want to get our free email newsletter (it’s like a bonus post that comes right to your inbox each week) click here to get on the list.
*This post contains affiliate links*
The post How To Make Inexpensive Curtains Look A Lot More Polished & Our New Master Bed! appeared first on Young House Love.
How To Make Inexpensive Curtains Look A Lot More Polished & Our New Master Bed! published first on https://ssmattress.tumblr.com/
0 notes
Photo

Huawei P20 Pro review: The Galaxy S9 killer 40MP, the world’s first triple camera, 5X Hybrid Zoom, artificial intelligence in all the ways, and the most unique color on any smartphone ever. These are just some of the features Huawei is hoping will make you check out its new flagship, the Huawei P20 Pro. This isn’t the first 40MP smartphone — Nokia had the 808 PureView and Lumia 1020 in 2012 and 2013, respectively — but this is the first time we’ve seen such numbers on an Android smartphone. We crowned last year’s Huawei flagship Mate 10 Pro as the best smartphone of 2017, but does the P20 Pro pick up where its sibling left off? With the standards set by smartphones like the Samsung Galaxy S9 Plus and Google Pixel 2 XL, Huawei has a fight on its hands. Let’s find out how it stacks up in our full Huawei P20 Pro review. Kris and I have both been using the Huawei P20 Pro for about two weeks since the phone was announced in Paris. The software is still in beta, and we’re running build number 8.1.0.106 (SP9C432), with the 1 March 2018 security patch. Above you’ll find the video review, where Kris mostly focuses on the camera, while in this written review, I’ve also expanded on other areas of the phone. Although we do have the P20 as well, this review focuses on the flagship P20 Pro, and references parts of the P20 experience where applicable. Show More Design The Huawei P20 Pro borrows several design cues from the iPhone X, with a vertical camera placement on the back and notch atop the screen. It stands out with three cameras and the unique twilight color, which awakens everyone’s inner wish for a real-life unicorn. Whatever your palate, Huawei has a P20 color for you. There are four or five colors depending on which model you choose, with the regular P20 coming in a champagne gold color that’s not available with the Pro. For the P20 Pro, Huawei offers black, a majestic midnight blue, and pink gold. The twilight color offers a new kind of color gradient — it actually shimmers in the light. The pink gold version also has a gradient, but its range is much more muted. Whatever your palate, Huawei probably has a P20 color for you. Beneath the screen is Huawei’s fingerprint sensor, which is flat, wide, and allows you to unlock your phone while it’s laying face up on a table. I’m normally a bigger fan of Huawei’s rear-mounted fingerprint sensors thanks to their added support for summoning the notification shade, but the P20 Pro’s scanner is still fast and reliable and supports gesture controls for navigation. The power and volume keys on the right offer nice feedback and the power button has a nice accent color. The bottom houses a speaker, microphone, and USB Type-C port. There’s no headphone jack, but an adapter comes in the box. I’m not an audiophile so I usually pick convenience over function, so I’m fine with Bluetooth audio. It’s the easiest solution and the P20 Pro works well enough in this regard. The back of the P20 Pro in twilight is stunning. It’s my favorite smartphone color ever. Despite that, the glass back feels fragile, and I kept mine inside Huawei’s official black rubber silicon case — hiding the glorious color. The camera bump at the top left has a lot of sensors, though it hides them well. The laser for the autofocus is hidden inside the black bit in the middle of the main camera module. The flash also contains a color temperature module. It’s a clever design from Huawei, and gives the appearance of things happening by magic, which fits with how AI comes into play throughout the phone. The P20 Pro brings a different design language to previous P-series devices, which isn’t necessarily a bad thing. It looks stunning, feels great in the hand and helps the phone establish an identity of its own. Display The P20 Pro offers a 6.1-inch AMOLED display with a rather awkward 18.7:9 aspect ratio. That extra 0.7 is due to the notch. Let’s get this out of the way: I’ve used the iPhone X for months and after a while, the notch just doesn’t matter. More phones are adopting the notch design, and you’ll have to get used to it eventually. If you really hate it, you can also turn it off on the P20 Pro, rounding the corners and turning off the extra pixels for a more standard-looking experience. The P20 Pro’s got a great panel, offering the vibrant blacks and deep colors all AMOLED panels do. The biggest issue for me is the resolution. Like with the Mate 10 Pro, Huawei opted for a Full HD+ panel. Huawei CBG CEO Richard Yu has told us several times the company chooses Full HD+ over Quad HD+ due to battery life concerns, but there’s likely another reason. Considering how the Mate 10 Pro also had a Full HD+ display, it seems Huawei saves a few features for its luxury flagship. On top of the better fingerprint sensor position, the Mate RS has a Quad HD+ AMOLED panel. We put the P20 Pro through its paces in our testing lab and it’s bright — very bright. Its top brightness of 600 nits under bright lights bests the Galaxy S9 by 26 percent, which achieves just 475 nits. Most surprising, the LCD display on the P20 is actually 23 percent brighter than its Pro counterpart, albeit with a cooler display. The P20 Pro achieves a color temperature of 7,212 Kelvin. The P20 is 9 percent cooler at 7,841 Kelvin. After testing Samsung’s latest flagships, we found Huawei’s displays are set to be about 200K warmer than the Galaxy S9s. Samsung is known for having the best displays, but the AMOLED panel on the P20 Pro is up there as one of the best on a smartphone. It’s a pleasure to use and ticks all the right boxes. The eye comfort mode works really well. Despite only being a Full HD+ display, it’s fantastic for anything you throw at it. As always, there’s a bevy of color-tuning options in the settings if you don’t like the look out of the box. Performance The P20 Pro is packed full of the hardware we’ve come to expect from a flagship Huawei device. It’s powered by HiSilicon’s Kirin 970 chipset and, like the Mate 10 Pro, has a lot of AI features thanks to the built-in NPU. It’s backed by 6GB of RAM and 128GB of storage, alongside the Mali-G72 MP12 which handles most tasks well. The GPU isn’t quite on par with the Adreno 630 in the Snapdragon 845 on the Galaxy S9, but it held its own in our testing. The regular P20 drops the RAM to 4GB, which doesn’t have too much effect on performance, at least according to the benchmark scores. The P20 Pro beats the best flagships of 2017, including the Mate 10 Pro and OnePlus 5T, but the Galaxy S9 produces results from another world. A large part of this is likely to be the Snapdragon 845 CPU, as the Galaxy S9 results are on par with our initial testing on Qualcomm’s latest processor. The P20 Pro’s benchmark performance is great right now, but it’ll likely be bested many times in the coming months. A lot of devices are going to launch with the Snapdragon 845, so we’ll have to wait until Huawei’s next Mate device to see how good its 2018 performance can get. These benchmarks show how good the performance of the Snapdragon 845 is. Like our initial benchmark scores, the Snapdragon 845 sets a new standard for AnTuTu performance. The Kirin 970 inside the P20 Pro is significantly better than the same processor inside the Mate 10 Pro (which scored 178466), but as a generation older, the Kirin 970 can’t keep up with the Snapdragon 845. These two benchmarks show that while there is a gap between the performance scores of the Snapdragon 845 and the Kirin 970, it’s a smaller difference than it has been in previous years. In particular, the Mali G72 GPU inside the Kirin 970 is close to the performance of Qualcomm’s Adreno 630 GPU, and this is reflected in actual usage of both devices. In day-to-day usage, the P20 Pro never misses a beat. The phone is fast regardless of what you throw at it. 6GB of RAM usually results in about 2.5GB to 3.5GB of free RAM at any given time. I’ve yet to see the phone stutter at all, even with a lot of apps running in the background. Huawei claims the AI allows it to remain fast over a longer period compared to other flagships, but we’ll need a longer time with the P20 Pro to confirm if this is true. Hardware Porsche Design Mate RS… in red! The P20 Pro doesn’t have expandable storage. If 128GB isn’t enough for you, Huawei hopes you’ll spring for the Porsche Design Mate RS, which comes in 256GB and 512GB variants. The P20 Pro is IP67 certified, offering dust and water resistance up to 1 meter for 30 minutes. The regular P20 is only IP5X rated, so it’s splash proof, but doesn’t offer anywhere near the same level of durability and protection. There’s no headphone jack, which may be a deal breaker for some users, but personally, I don’t mind. The phone comes with USB Type-C headphones in the box, which offer crisp sound but are otherwise unremarkable. There’s also a USB Type-C to 3.5mm adapter so you can use your existing headphones. If wireless headphones are more your preference, like me, there’s support for Sony’s LDAC codec and HWA 990 Kbps high-res audio over Bluetooth 4.2. There are also stereo speakers with Dolby Atmos support. These speakers are pretty good, and deliver loud volume without too much distortion. I find them a little louder than the Galaxy S9, though Huawei’s silicon case muffles audio a little. Dolby Atmos is a useful addition and offers a stereo-like effect during audio playback. Like other Huawei phones, the P20 Pro comes in dual-SIM flavor. Dual-SIM functionality isn’t new to most smartphone ranges, and even the Galaxy S9+ has an optional dual-SIM variant. Unlike most others, you don’t need to get a different variant of the P20 Pro to get two SIM card slots. When you do have two SIM cards in play, both can access 4G LTE, and you can customize which is used for data and for calling. Like previous Huawei devices, the P20 Pro allows you to disable the on-screen keys and use gestures on the fingerprint sensor to navigate if you prefer. A tap on the sensor takes you back a screen. Pressing and holding takes you straight to the home screen. A horizontal swipe launches the recent apps overview. Personally, I don’t like this and have stuck with the on-screen keys. Huawei backs up the fingerprint sensor with its face unlock feature. It’s not as secure as Apple’s Face ID, so it can’t be used for payments and other secure transactions, but it’s lightning fast. In almost any condition, including pitch black, it unlocks your phone so fast that you don’t even see the lock screen. We tested it in the back of a moving taxi, in a dark room with little to no light, and in day-to-day usage, and it’s the best way to unlock your P20 Pro most of the time, assuming you’re OK with the heightened security risk. With direct sunlight behind you, however, the face unlock doesn’t work — just like Face ID on the iPhone X. Battery The P20 Pro has one major advantage over other 2018 flagships up its sleeve — a 4,000mAh battery. Most flagship devices come equipped with a battery ranging from 3,000 to 3,5000mAh battery. The P20 Pro brings the same battery capacity as the Mate 10 Pro, which we crowned as the best smartphone for battery life last year. It’s great to see a company not conform to battery capacity norms. A large battery combined with Full HD+ resolution results in exceptional battery life on the Huawei P20 Pro. Nirave The battery life on the P20 Pro doesn’t disappoint. During nearly two weeks with the device, the battery lasted around two days on average, with around six to seven hours of screen-on time. During my flight back to San Francisco from the launch event in Paris, I used the phone as my Kindle device and reached San Francisco with over 50 percent battery left, after over 9 hours of solid screen-on time. The testing numbers also reveal a similar story. Overall, the P20 Pro offers better battery life than any other device we’ve tested, including the Mate 10 Pro. Our Wi-Fi browsing test cycles the same set of webpages and drains the battery from 100 percent to 0 percent, with the display set at 200 nits brightness. The P20 Pro lasted 11 hours and 28 minutes, which is better than the P20 at 10 hours and 17 minutes, but not as good as the Mate 10 Pro which lasts for 13 hours straight. In our video playback test — where we loop a 1080p video at 200 nits brightness — the P20 Pro lasted 12 hours and 21 minutes, while the regular P20 lasted for 10 hours and 20 minutes. The P20 Pro proves to be much better than the Mate 10 Pro and Galaxy S9 Plus here, which lasted for 10 hours and 40 minutes and 11 hours and 16 minutes, respectively. Interestingly, last year’s LG V30 also proves to be a champion here, lasting for 12 hours and 20 minutes. Samsung phones are known for offering a ton of features, but battery life has always been a concern. The P20 Pro offers 11 percent more average battery life than the Galaxy S9 Plus, which is actually less than we expected, given the 12 percent larger battery and lower resolution display. Huawei has improved battery life with updates in the past, though — the Mate 10 Pro battery life got significantly better after its first update — so we’d expect the P20 Pro battery to improve with age. Overall, the battery life is arguably the best we’ve seen from a flagship smartphone to-date. Whatever the task, the battery will easily last you a full day or two. For many users, it’ll last much longer. During our time with the P20 Pro, using the camera didn’t seem to have too large an effect on the battery as we spent three hours shooting with the phone in Paris with the display at full brightness and the battery only drained 18 percent. The P20 Pro comes equipped with Huawei SuperCharge, which charges your phone to full in just 90 minutes. The P20 also has SuperCharge and is even more impressive, charging to full in just 72 minutes — faster than any smartphone we’ve tested. In 30 minutes, the P20 Pro charges to 54 percent, while the regular P20 charges to 65 percent. In 60 minutes, they charge to 87 percent and 95 percent respectively. By comparison, the Galaxy S9 Plus and S9 take 96 and 93 minutes respectively, despite both having 500mAh-smaller batteries than their P20 counterparts. Camera They say big numbers help sell phones. If that’s the case, Huawei has plenty of these to lean on in the P20 Pro’s camera. There’s the world’s first triple camera, a 40MP main sensor, 3X Optical Zoom, 5X Hybrid Zoom, 4D Predictive Focus, 102,400 maximum ISO, 2μm pixel size, 4-in-1 Hybrid Focus system, 960 frames per second slow-motion recording, and more. The camera also has Huawei’s new AI-assisted stabilization (AIS), which lets the P20 Pro take long-exposure shots without a tripod. The three cameras combine to make an incredible trio that produce great shots in all conditions. Each camera serves a different purpose. The main 40MP sensor captures rich color, the 20MP secondary monochrome sensor captures additional details, and the third 8MP telephoto lens is used for zoom and additional focal length. They make for an incredible trio which produces great shots in all conditions. Kris goes into more depth on the make-up of the camera in the video review, and Adam has rounded up all the facts on Huawei’s triple camera in our walkthrough below. The 40MP main sensor will be a draw for many users. I remember working retail when the Nokia 1020 was launched. I experienced first-hand how many customers came into the store asking for the phone with the 40MP camera. The P20 Pro’s camera will likely have the same effect for Huawei, at least outside the U.S. where it will appear on store shelves, but without the turn-off of Windows phone OS. By default, the camera shoots images at 10MP, which is where the 2μm pixel size kicks in. The main camera actually has 1μm pixels, but by default, the P20 uses a process called pixel binning to combine the light information from four 1μm pixels into a larger 2μm super pixel. See the full-res photos Huawei P20 Pro Samsung Galaxy S9 Plus You can shoot at 40MP if you want, but remember, the smaller 1μm pixels are less sensitive to light, and you can’t zoom in, so you’ll only want to shoot at full-res in well-lit conditions where zooming isn’t necessary. By using pixel binning rather than just having 2μm pixels in the first place, the 40MP camera offers more versatility. As a result, you can take rich 40MP photos in great lighting, and still get excellent low light performance when lighting conditions aren’t as good. The 20MP monochrome lens also has a part to play in the overall pictures, as it captures three times as much light information than the RGB sensor (because it has no color filters). The result is images with more detail, increased sensitivity to light and less noise in shadows. The P20 Pro combines the data from both sensors to capture vibrant, richly colored and nicely detailed pictures, regardless of the lighting conditions. The third lens really sets the P20 Pro apart from other smartphones. It offers 3X optical zoom and captures about a ninth of the standard frame (so if you have the grid overlay on, you’ll always know what you’ll get at 3x). In darker conditions, the smaller f/2.4 aperture results in less light sensitivity though, so even when you’re zoomed in, the P20 Pro is still using all three cameras. Just cover the telephoto lens at 3x zoom to see it in action. There’s also a noticeable shift in the colors when switching between 1x and 3x zoom. The P20 Pro also brings the world’s first 5X Hybrid Zoom, which combines the 3X Optical Zoom with additional detail from the main sensor to achieve a 5X Hybrid Lossless zoom. It’s fantastic. From graffiti on buildings in Paris to bottles of wine in a restaurant’s wine rack, the Hybrid zoom is a lot of fun to use. I’ve spent many moments zooming into pictures, and even when pixel peeping, the result is excellent. Regular 3X Optical Zoom 5X Hybrid Zoom Many companies have claimed lossless or hybrid zoom in the past, but the P20 Pro seems to be one of the first devices to actually deliver on this feature. The 5x images naturally aren’t as good as they would have been with 5X optical zoom, but they are very similar to the level of detail from the 3x. As Kris says, it’s nice to know you can digitally zoom in a bit and still maintain image quality. The P20 Pro lets you zoom in up to 10x digitally, but we wouldn’t recommend going past 5x if you still want crisp detail. The telephoto lens is the only one that officially comes with OIS, but an iFixit teardown seems to show OIS in all three lenses. Regardless, the P20 Pro also uses AIS across the board. It analyzes the frame and ditches small parts of the edges to keep everything stabilized. 4D focus also predicts where a subject is moving and keeps it in focus, so you have smooth overall footage with locked-on focus. To see how AIS compares to EIS used on the Pixel 2, check out the video review above. Captured using a long exposure with night mode AIS is responsible for what both Kris and I think is the biggest highlight on the P20 Pro camera: night mode. If you’ve tried to shoot a low-light, long-exposure shot by hand, you’ll know the resulting image is usually full of noise and image shake. AIS solves this by stabilizing the image long enough for you to capture a four-second handheld long exposure at night that’s crisp and blur-free. Add in the excellent low-light sensitivity and detail of all the sensors combined, and the results are simply amazing. On the P20 Pro display, all these images look fantastic. It’s only when you begin pixel peeping on your computer that you start to see where the P20 Pro falls down. As Kris mentions in the video, however, this raises an important question: what constitutes a good photo? Is it the one that produces the most realistic colors, or the one that makes them pop the most? Is it the one that maintains detail at the expense of added noise, like the Pixel 2, or the one that looks great on your phone but like a painting up close? Your answer will determine if the P20 Pro is the camera for you. If you want true-to-life images with more detail when you zoom in, the Pixel 2 is the better camera for you. But if you want images that look the best before you start crawling the pixels, the kind that will look better on social media, then the P20 Pro might be for you. The P20 Pro’s 24MP selfie camera is definitely an example of more megapixels not really translating to better photos. Millions of pixels aren’t much good if the photo captured is soft. Even with all of Huawei’s effects turned off, selfies have a noticeable smoothness that shouldn’t be there. It is possible to take some good pictures with the P20 Pro’s front camera in good lighting, but the images are too soft and artificial for my tastes. With such a reflective rear panel, you’re better off just flipping the camera over and using the back as a mirror to take the perfect selfie! The front and the rear camera both have a portrait mode, but both are a little hit or miss. Software-assisted bokeh couldn’t handle Kris’ wild hair (as most phones can’t). It faired a little better in my own test shots, but it’s not on par with the Pixel 2. However, the rear camera also comes with a feature only Huawei offers, which I got a lot of joy out of using on the P20 Pro and the Mate 10 Pro. Slide all the way to the left in the camera and you’ll enter aperture mode, called wide aperture mode on past Huawei devices. The P20 Pro allows you to capture images using the main sensor, and adjust the focal point and aperture size both pre- and post-capture. This isn’t a new feature — The Galaxy S9’s live focus feature does it too — but the P20 Pro’s aperture mode allows you to change the aperture from f/0.95 to f/16. Unlike the Pixel 2 and other devices which only offer one type of Portrait, the P20 Pro leaves the customization up to you. By default, it’s set to f/4 which produces a natural amount of bokeh like other devices. If you prefer more bokeh, you can change it to f/0.95. If you don’t like much or any bokeh in your photos, then the f/16 option is designed for you. Aperture mode works well for selfies, as you can adjust the amount of bokeh in the shot, and if the cutout is all wrong, remove as much background blur as possible. Similarly, if you take a great picture and decide you’d prefer to have your focal point elsewhere, you can easily change it. The P20 Pro is aided by the Kirin 970’s Neural Processing Unit (NPU), which helps with all of its AI features. These features are most apparent in the camera. Alongside the AIS which allows you to take excellent photos and video, there’s also automatic scene recognition. The scene recognition can be good, but Kris and I both found it occasionally got in the way of taking excellent pictures. Once you get to know the AI’s attitude to photography, you can take advantage of the suggestions you like and ignore those you don’t. This is because Huawei now lets you deny automatic scene recognition changes as they pop up or you can disable AI assistance entirely. Sometimes you’ll find yourself fighting with the AI, trying to take a regular shot while it keeps changing settings on you. For example, there are dedicated portrait and night modes in the camera, but the AI will automatically switch to portrait mode when it detects a human face in the frame or launch into night mode in the dark. Of course, this can be helpful, but if you don’t like fake bokeh or aren’t after a long exposure it can be annoying. One of the new scenes recognized in the P20 Pro is waterfalls, but the phone automatically tries to take a long exposure for that dreamy water effect, but this isn’t always the best way to capture it. Once you understand which scenes the phone is good at tweaking, the results can be fantastic. The AI can automatically detect food, dogs, and cats (with separate modes for each of these pets), and it can boost colors to provide a more vibrant image. Similarly, the greenery mode really makes grass pop out of an image and the blue sky mode makes even dreary skies look nicer. It’s not the most accurate look, but it’s amazing on social media, which appears to be Huawei’s goal. Personally, I liked it when it automatically switched to portrait and night mode, but Kris found it a nuisance as there are already dedicated modes for these. I also like it when it switches to greenery, food, or dog scenes. The results are usually much better for social media. The P20 Pro is the first smartphone with the ability to shoot up to 102,400 ISO. This feels like a number that’s big for the sake of being big. A photo shot at that ISO would typically have enough grain to completely ruin the image, which is probably why you can’t select anything above ISO 3,200 in Pro mode. During our briefing and the press conference, Huawei made a big deal about the P20 Pro’s 4D predictive tracking, which uses AI to predict where a moving subject is headed to maintain focus. In Huawei’s demo it worked well, and it mostly delivered in our testing. We found the autofocus struggled to stay locked on a moving subject like flowers blowing in the wind, which you can see in the video review. It’s not terrible, but it’s not as good as it was on stage either. Another big AI camera feature is assisted framing, which helps non-photographers capture images with better composition by giving them various tips based on their photos. It doesn’t seem to work right now. There doesn’t appear to be an option in the settings for it and neither Kris nor I saw it pop up on its own at all. It’s more than likely coming in a future update. We’ve reached out to Huawei and will update when we have more information. One thing that I do find a little strange about the P20 Pro camera is the location of HDR. By now, almost every smartphone offers an automatic HDR option, but Huawei insists on keeping this option hidden away in the modes menu. Night mode can act as an HDR replacement in certain shots — such as a high contrast shot with a bright light source — but it doesn’t work all the time. Instead, you need to open the HDR mode and there’s no way to make it automatic. We wish Huawei would change this. There are a lot of other features still to touch on with the camera. The Ultra Snapshot mode launches the camera in 0.3 seconds from screen-off. Unfortunately, it only captures a 7MP image in 18:9 aspect ratio and there’s no way to change this in the settings. Since the image is taken so quickly, there’s no AI scene recognition either. Fortunately, you can change the function of the button shortcut in the settings menu, which I did. The camera is plenty fast enough once you launch it, and I’d rather have more control over my images, so I changed the shortcut to launch the camera without taking an image. Huawei P20 Pro Camera samples: The P20 Pro also captures 960 frames per second slow-motion video recording like other recent flagships. It’s a fun feature to use and it’s relatively easy to get the timing right — I struggled a little at first, as it happens almost instantly when you press the capture button — but it’s not as fun as the Galaxy S9 Plus. Samsung’s flagship brings an automatic slow-motion mode, so you don’t need to perfectly time the shutter, which makes taking slow-motion video a lot more fun. Before the P20 Pro was announced, the rumors had me excited. Since the launch of the Nokia Lumia 1020, I and many others have been waiting for a replacement. Back then I wouldn’t have pegged Huawei as the company that would offer it, but the P20 Pro has the camera we’ve all been waiting for. The P20 Pro is the flagship smartphone camera we’ve all been waiting for... It features all the hardware you could want in a camera and takes stunning photos. Nirave It features all the hardware you could want and gives you the tools to take visually stunning photos. The AI features get in the way a bit, but once you learn how to make it work for you, the results are amazing. The 5X hybrid zoom is a highlight, but the night mode has me wanting to go out and take pictures just to see what it produces. You could give 40 people the same scene and they’d take 40 different pictures. The phone is designed to allow you to take the photos you want, albeit with a focus on social media, sharing, and being visually appealing on a smartphone screen rather than blown up on a computer. The versatility of the camera sets it apart from the competition and no two P20 Pro pictures are the same. Indeed, with some training on the different modes, you could give 40 people the same scene and they’d take 40 different pictures. Therein lies the problem though. While phones like the Galaxy S9 and iPhone X are designed to have no learning curve, there is one to the P20 Pro camera. If you’re not willing to invest time to truly understand it, it’s not the camera for you. If you are willing to learn how to use it, the results speak for themselves. Software The P20 Pro runs on Android 8.1 with Huawei’s EMUI 8.1 interface on top. Huawei’s interface has come a long way since the days of the P6, but it remains a polarizing experience — you either love it or hate it. Personally, EMUI is as functional as any other interface for me. It has some quirks, but it’s on par with any other OEM skin out there. EMUI 8.1 brings the same packed feature set from EMUI 8 on the Mate 10 Pro, with a couple of small additions. Like the Mate 10 Pro, PC Mode works with nothing but a USB Type-C to HDMI cable and works well enough. I’ve yet to see a need for using your smartphone as a PC, and my constant travels make me the type of consumer Huawei is going after. That said, if you want an easy solution to using your smartphone as a PC, the P20 Pro’s Desktop Mode does the trick. Oddly enough, the biggest new software feature on the P20 Pro is the ability to “turn off” the notch. We’ve touched on it above, but it’s a noteworthy feature that we hope comes to other Android smartphones. Huawei’s face unlock is a software-based feature that proves, at least for unlocking your smartphone, you don’t need a lot of additional hardware for a great experience. As part of EMUI 8.1, Huawei has also added six more automatically detected scenes in the camera, including fireworks, dogs, cats and waterfall. It also added NPU tricks to the album. We’ve not really been able to test this, but Huawei says it uses AI to give each photo an aesthetic score based on how pleasing it is, and displays larger thumbnails for the photos with the highest scores — all to make your gallery more appealing. The P20 Pro also sees the launch of the Huawei AI Engine (HiAI), an open framework for developers to make use of the NPU’s AI features. In China, the company has worked with partners to add enhancements to the camera, like a vision recognition feature similar to Bixby Vision, automatic filters for photos, and a voice assistant. There are no plans to bring these features to other countries, but the engine is open to developers around the world. Polarizing though it is, EMUI offers a ton of customization options, once you dig into the features. You can add options to the navigation, make use of tons of gesture controls and knuckle shortcuts, choose how you want to navigate your phone (using gestures or the default on-screen keys), customize the status bar, and more. I like the ability to display the network speed. It’s proven helpful when trying to troubleshoot my data while roaming. There’s also an always-on display option buried in the security settings. If you’ve used a Samsung Galaxy device over the past few years, you’ll have likely experienced a similar feeling. The Samsung Experience — formerly known as TouchWiz — was polarizing at first, but with hundreds of millions of devices sold, it has become a mainstay. EMUI is somewhat similar. Personally, I have no issues with it, but chances are you already know how much of a deal breaker EMUI is for you. Specs Huawei P20 Huawei P20 Pro Display 5.8-inch Huawei FullView IPS LCD 2,244 x 1,080 18.7:9 aspect ratio 6.1-inch Huawei FullView OLED 2,240 x 1,080 18.7:9 aspect ratio Processor Huawei Kirin 970 Octa-core CPU (4 Cortex A73 2.36GHz + 4 Cortex A53 1.8GHz) + NPU Huawei Kirin 970 Octa-core CPU (4 Cortex A73 2.36GHz + 4 Cortex A53 1.8GHz) + NPU GPU Mali-G72 MP12 Mali-G72 MP12 RAM 4GB LPDDR4 6GB LPDDR4 Fingerprint Scanner Front mounted Front mounted Storage 128GB 128GB Cameras Rear cameras: 12MP RGB f/1.8 + 20MP monochrome f/1.6 dual-LED flash, PDAF+CAF+Laser+Depth auto focus 4K video recording at 30fps Front camera: 24MP sensor with an f/2.0 aperture, fixed focus Rear cameras: 40MP RGB f/1.8 + 20MP monochrome f/1.6 + 8MP telephoto f/2.4 with OIS dual-LED flash, PDAF+CAF+Laser+Depth auto focus, 3X optical zoom, 5X Hybrid Zoom, 4K video recording at 30fps Front camera: 24MP sensor with an f/2.0 aperture, fixed focus Battery 3,400mAh Non-removable Huawei SuperCharge 4,000mAh Non-removable Huawei SuperCharge IP rating IP53 IP67 SIM Dual SIM Primary SIM: 4G Secondary SIM: 2G/3G/4G Dual SIM Primary SIM: 4G Secondary SIM: 2G/3G/4G 3.5mm headphone jack No No Connectivity Wi-Fi 2.4G, 802.11a/b/g/n/ac with Wi-Fi Direct support 4x4MIMO Cat 18 Bluetooth 4.2, support BLE support aptX/aptX HD and LDAC HD Audio USB Type-C NFC Wi-Fi 2.4G, 802.11a/b/g/n/ac with Wi-Fi Direct support 4x4MIMO Cat 18 Bluetooth 4.2, support BLE support aptX/aptX HD and LDAC HD Audio USB Type-C NFC Software Android 8.1 Oreo EMUI 8.1 Android 8.1 Oreo EMUI 8.1 Colors Twilight, Black, Midnight Blue, Champagne Gold, Pink Gold Midnight Blue, Black, Pink Gold, Twilight Dimensions and weight 149.1 x 70.8 x 7.65mm 165g 155.0 x 73.9 x 7.8mm 180g Gallery [/section] Huawei P20 Pro: The Galaxy S9 killer! The P20 Pro is Huawei’s most ambitious smartphone to date, combining flagship features with an incredible camera. A number like 40MP is bound to get people interested, and the phone lives up to its billing as a photographic masterpiece, though it takes some getting used to, like any good DSLR. The biggest Android competitor to the P20 Pro is the Samsung Galaxy S9 Plus, and which you should buy depends mainly upon your preferences. If you want a phone that can take great photos without having to learn too much, the Galaxy S9 Plus is the way to go. If you want a phone to take great pictures in every condition, and you’re willing to put a little time into learning the many settings and options, the P20 Pro is for you. The P20 Pro is the best Huawei smartphone ever made and is one of the best devices now. It has a sublime camera, outstanding battery life, a color unlike any other. In short, it delivers a flagship experience surpassed by none. Nirave Both devices are flagship through and through, yet they feel very different. I’ve long been a fan of Samsung’s flagships, but the company has made great devices for many generations — the S9 Plus is just the latest. It has few noteworthy features, but it’s mainly more of the same. The P20 Pro is the best Huawei smartphone ever made and is one of the best devices now. It has a sublime camera, outstanding battery life, a color unlike any other. In short, it delivers a flagship experience surpassed by none. What are your thoughts on the Huawei P20 Pro? Is the world’s first triple camera, with its 40MP main sensor, a big deal to you? What about the unique color or the excellent battery life? Let us know in the comments below! , via Android Authority http://bit.ly/2JBd3nK
0 notes
Photo


Final Image
Here is my final image. I used my final image sketch to help me finalise what i wanted everything to look like and i found this helpful. The only difference between this and my initial sketch is the sky as i decided i wanted stars in the sky instead of sun rays and i’m happy with how this turned out. I think this adds a nice contrast between the bright colours and the night sky. I had a few difficulties cutting off the head at first and had to try and a few portraits to use before i found one that worked but i think it turned out okay in the end. I like the juxtaposition between unnatural colours and natural colours as i think it adds a surreal effect.
The Process
1) The first thing i did was open up the photograph of Morgan onto a new document in Photoshop and used the pen tool too make a path around her. Once i completed the path, i turn it into a selection (right click>make selection) and then added a layer mask to remove the background. I then duplicated this layer by hitting CTRL+I and then turned off the visibility of the bottom layer. With the top layer selected, i used the pen tool to created a path where i wanted the head to be cut off, completed the path and turned it into a selection (right click>make selection). I then selected the marquee tool and right clicked within the selection and hit ‘layer via cut’. This separated the head and the body onto two layers which allowed me to move the head away from the body.

2) I then opened up the photograph of the field onto a new document in Photoshop, added a new layer under this layer and then unlocked the layer of the grass. I then went to image> canvas size and increased the height of the canvas to give the image more room at the top. With the field layer selected, i hit P for pen tool and drew around the grass, completed the path, right clicked>make selection and then added a layer mask to the layer. This cut out the sky.

3) After this, i dragged the image of Morgan onto the document of the grass by using to move tool and then created a new layer under the layer of her. i was then able to use the pen tool to create a circular path to create the illusion of the inside of her head. I added anchor points to curve the path and once i finished, i right clicked, hit make selection and used the paint bucket tool to fill in the selection.
4) Next, i created i new layer under all the other layers and used the circle marquee tool to create the sun. I filled this selection with a pale yellow colour via the use of the paint bucket tool. I then selected the layer of the grass and used the pen tool (shortcut P) and created a path around the dirt path. I then turned it into a selection by right clicking and hitting ‘make selection’. Next, i made sure the layer mask on the grass was selected and i used the white paintbrush to erase the path. This enabled me to place the image of the gold glitter into the document and drag it under the layer of the grassing, giving the illusion of a golden path.

5) After this, i added a black and white adjustment layer above Morgan and then right clicked on the adjustment layer and hit ‘create clipping mask’. This meant that Morgan stayed black and white while everything else stayed its original colour. I then double clicked on the layer of Morgan to bring up the effects panel, ticked bevel and emboss and changed the settings until i was happy. After clicked OK, i right clicked on the little arrow next to the effects and hit ‘create layers’ This put the effect onto a separate layer ad allowed me to rub out where i didn’t want the effect to be (everywhere but the top of the head).
6) I then opened the image of the people on the stepping stones on a new document and then dragged it onto the image by using the move tool. I hit CTRL+T to resize it and position it where i wanted it to be on top of the head. I hit enter and then lowered the opacity of the layer so i was able to see the black circle underneath it. After this i hit P for pen tool and draw made a path around the people and the black circle. Once i was done i added more anchor points to help me curve the path. I then turned this path into a selection and added a clipping mask to the layer of the people on the stepping stones. With the path still selected, then selected the layer of the black circle and used the black paintbrush to paint the people back in. I then hit CTRL+D to deselect the selection.

7) Next i added a new layer, and with a soft, black brush i shaded the bottom of the stepping stones to add more dimension. I then changed the blending mode of this layer to overlay and the opacity 60%. I then created another layer and used a soft, blue coloured brush and painted over the water in the head. After this i changed the blending mode of this layer to lighten and the opacity to 47%. Next, i created another layer under all the layers and added a solid colour adjustment layer for the sky.
8) To create the background, i opened up a photograph of some hills i took at Dovedale on a new document in Photoshop and used the quick selection tool to select them and then drag them onto the final document using the move tool. I then duplicated them by hitting CTRL+J and moved them so they were on either side of Morgan. Next, i linked the 2 layers of the hills together by selecting them both, right clicking and hitting ‘link layers’. I then selected the mountains by clicking on the picture of them in the layers and hit ‘select pixels’. After they were both selected, i selected the paint bucket tool and filled in part of the mountains with a pink colour and then the darker areas using a darker pink/purple colour.

9) I decided to add a grapefruit to replace the sun so i found a stock photograph of one on google. I then opened this in a new document in Photoshop, selected it using the quick select tool and then dragged it onto the document using the move tool. I then hit CTRL+T to resize it and made sure the layer was under the layers with the mountains/portrait. After this, i added a selective colour adjustment layer above the grapefruit and added a clipping layer by right clicking on the layer and hit ‘create clipping layer’. This made the grapefruit slightly more orange looking.
10) After this, i created another new layer just above the sky layer and used a very small, white brush with different opacities and painted in some dots to represent stars.
11) Finally, i added a orange to purple gradient map layer on top of all the other layers and then set the blending mode of this layer to overlay and the opacity to 24% to add a warmer tone to the image.

0 notes
Text
How To Make Inexpensive Curtains Look A Lot More Polished & Our New Master Bed!
You haven’t seen our master bedroom in a while (except for small peeks on Instagram) because we owe you a certain curtain-related confession. But first, I get so many questions about our new bed – and why we upgraded from our old Ikea one – that I thought it was time to formally introduce you to this beauty that we got nearly a year ago. Yes, as in last November.
bed / nightstand / bench / similar art / similar rug / duvet / chandelier / faux plant
Why a new bed? Well, at first glance, our new bed isn’t wildly different from what was there before (which you last saw last May when we blogged about getting the new consignment store rug). Both headboards are a light wheat-colored linen, and they work well in the peaceful low-contrast bedroom we’ve been working towards lately. But the key difference is that this a legit bed – as in, headboard and side/footboards – all upholstered in the same fabric. Previously it was one of those metal frame situations plus a headboard we made ourselves.
And actually, at one point we did have that same headboard attached to a different bed entirely: the Ikea Edland canopy bed that we chopped the posts off of years ago (who remembers Ed the Bed?). But we swapped beds with our guest room at some point when we were over the floating-up-on-legs look for our bedroom (a regular bed frame + bedskirt gave us a more grounded and substantial look). We also found ourselves yearning for a proper boxspring situation for our mattress, which just sat directly on old Ed’s slats.
Our free took-twenty-minutes bed swap was definitely a step in the right direction, but we knew an upholstered bed would look more finished than the bedskirt + metal frame scenario. We actually don’t mind a bedskirt (2 of 3 beds in the beach house have them), but it always bugged me that it would never be the exact same white color as the duvet in here – and since it’s a much bigger room than the beach house bedrooms, you view it from a lot further away and notice that fact a lot more.
So long story long (have you met me?! no story is short), after five years of bed swapping and adding a skirt and reupholstering the headboard, we just went for it and ordered a fully upholstered bed. Not without twenty hours of research and hemming and hawing though (again, have you met me?!).
similar lamps / nightstand / bench / similar art / chandelier / curtain rod
The best thing about buying a new bed for our master bedroom was that it meant we could steal the headboard from our room and reunite it with Ed the Bed and bring them both to the empty beach house last fall, and put them in the middle bedroom. So essentially instead of buying a new bed for the beach house – we got to buy the bed we always wanted FOR OUR MASTER BEDROOM INSTEAD, and use ol’ faithful Ed + our homemade headboard at the beach house, where they totally fit the bill.
similar mobile / gold frames / similar headboard / lamps / pink art / square blanket
So even though he’s seen a few incarnations and lived in three different houses, Ed’s been with us for nearly 8 years (and the headboard has lived on for more than 6). Pretty soon they’ll be welcomed into the 10-year club! (If you haven’t read that post about the items in our home we’ve had for ten years and still love, it’s one of my favorites.)
But back to our new (*cough… year old… cough*) bed. This post is probably making her feel very unloved so far, since we haven’t even blogged about the upgrade, but that’s far from the truth.
I LOVE THIS BED SO MUCH I AM TEMPTED TO BUY IT AGAIN FOR THE BEACH HOUSE MASTER BEDROOM (and just use that headboard/frame combo in the duplex somewhere). It’s such a nice feeling to have an actual bed after a series of metal frames and headboards attached to the wall or the bed in various ways. It kind of feels like adulting, but not quite as annoying as cleaning the house or buying band-aids every week (am I the only household that goes through approximately 1,000 every three days?! Are the kids eating them?!).
Anyway, my bed BFF is called the Sanford Linen Upholstered Panel Bed and we got it from Wayfair last November. It comes in all of the standard sizes (twin up to california king) and in two colors (the “Talc” color is what we got – and there’s a “Kelly Green” that’s definitely more of a statement). At the moment it’s 30% off, putting a queen bed at $628, and one of the reasons I went for it is because a ton of clean-lined and classic upholstered beds that look like this this are in the $1,000-$2,000 range (like this one and this one), so I love that this is a great neutral color and a timeless shape that looks more expensive than it is.
It doesn’t look NEARLY as dark or gray as it does in the listing photos (which was a pleasant surprise for us – because it really does mean it would work anywhere). I’d call it a warm linen color, that’s just barely on the warmer side of the gray-beige line, but it could completely live in a room with gray or tan walls, which I love. Given our history of moving beds around, the more places a bed can work, the better. And it has a really nice linen-looking texture that makes it a bit more interesting in person than you can probably tell in the website photos:
We also liked that it has these small vertical panels flanking each side of the headboard. The “wings” give it an extra little detail and coziness that our flat DIYed headboard didn’t have (although you could definitely make this version yourself – just upholster the side pieces and attach them in the back with some sort of flat metal bracket).
This bed still requires a boxspring, which we like (feels more like a real adult bed that way, and it’s better for our mattress, we hear) and I’ll warn you that if your mattress isn’t as thick as ours (ours is 12″) there might be a small gap between the top of the mattress and bottom of the headboard… so you might want to add a mattress pad or just place your pillows along the back of the bed in a way that you can’t see that area (sleeping pillows + a few decorative ones could totally cover it).
similar lamp / nightstand / similar art / curtain rod / duvet
I actually realized that there’s a reason for that space, which is: so you can change the sheets more easily. If the headboard squished up against the top of the mattress much tighter, you wouldn’t really be able to change the fitted sheets without a ton of effort – so I actually appreciate that detail.
Also a few people have asked “wait, are the black feet of your bed ugly?” and I didn’t even know what they meant and had to run upstairs and look at them in person, but I guess in the online photos where it’s cut out and placed on a white background they’re really clunky and obvious, but the bed’s feet are set in a bit from the upholstered frame, so they’re basically in the bed’s shadow if that makes sense. I literally never notice them or “register” that there are those little black feet in real life because the upholstered part is pulled forward, so that’s really all you see.
Ok, now that I’ve told you everything you could possibly wonder about our bed…. let’s turn our attention to curtains. BECAUSE CURTAINS ARE HARD. Our old curtains in here had been some wheat-colored cheapies I grabbed at HomeGoods years ago, but after we installed white curtains throughout the entire beach house, I developed what can only be described as an animalistic craving for white curtains in here again.
similar dresser / gold frames / bench / similar rug / similar chair
So much of the room had been beige-ish, that I just thought crisp white curtains would freshen things up and not make the whole space feel like we had a sepia filter on it. So I craigslisted the tan curtains, and on a trip to Ikea sometime last winter we loaded up on three sets of our favorite affordable white curtains (Ikea’s Lenda curtains) for the bedroom. But the reason you haven’t seen an “our bedroom got two updates!” post about this room is because is has taken me nearly a year to finish fixing the curtains (thereby completing this update) so they no longer look like this:
Yup, we lived with them like this for nearly 12 months, and I gotta say, I’m not even ashamed of it. Life is busy, (see: adulting) and curtains can be high maintenance, so they might just end up at the bottom of the list. And this sloppiness underscores the dilemma of Ikea curtains. We LOVE them for their nice heavy white fabric and their affordable price: just $25 for two 98″ tall curtains (which means they’re long enough to go from floor-to-ceiling in a standard eight foot room). And if you have extra tall rooms you can also get two of their 108″ length for $35.
And now for a curtain-related side rant: don’t buy too-short curtains at Target! I don’t even know why anyone makes 86″ curtains because it’s SO MEAN and they’re never tall enough to make a room look as good as it could with 95″ (or taller) curtains!
Unlike Ikea’s cheaper Vivan curtains, the Lenda ones have a decent weight to them – in fact they look extremely similar to curtains sold by West Elm and Pottery Barn but they’re a heckova lot more budget-friendly. But let me tell you… Ikea’s photos of these curtains are so not-selling that when people ask where we get our white curtains and we link to them, 100% of people say “that’s the wrong link” – because they’re actually sold with big tabs on the top and they have these country-looking tiebacks, and they essentially look nothing like this:
They look like this:
I know.
This doesn’t look like the same set of curtains. But it is.
And these are the exact same Lenda curtain panels too. We’ve probably had them in our office for the longest amount of time (four years or so) and they look great. We got two sets for each side of that large window so they’d look extra full – and our entire curtain cost was $50.
woven blinds (pecan color) / desk chair / desk / bench / rug / similar faux plant
But… if you’re someone who just wants curtains that you can throw up on a rod and have them look awesome, these aren’t them. Getting them to look presentable can take a significant amount of effort in our experience, but after it’s all said and done, they can look pretty darn decent. Plus they’re washable (which is a great thing in a house with kids and a dog – or a rental house like our beach houses) and they’re not so expensive that they’re precious – so you can relax and not freak out if kids twirl around in them or hides back there, which is a daily occurrence in our house.
So what are the things we do to turn these formerly-tab-topped curtains into what you see in the photo above? I thought you’d never ask. Here’s my process:
Step 1: Wash them on hot and dry them on high to pre-shrink them (they’ll shrink a ton – maybe 5″, but in a standard height room that’s just fine – and you NEED to preshrink curtains before you hang them. Otherwise if they get dirty later and you launder them, they’ll look like bad highwaters when you hand them back up.
Step 2: Use a sharp pair of scissors to cut off the tabs right above the sewed line where they’re attached along the top edge.
Step 3: Fold the top edge over once to hide where you cut the tabs, making sure the fold goes toward the back of the curtain (facing the window). Once it’s all clipped that fold looks just like a sewed top seam and has a nice finished look.
Step 4: Clip your rings on along the fold. We use 6 ring clips per panel: one on each end and then one on every other vertical seam, which you can see above. Your spacing my be different if you’re using different curtains, but ours are about 10″ apart.
Step 5: Slide two pre-washed & clipped panels onto your curtain rod, and hold it up to determine the best height to install it. Remember to go high and wide around your window, but not so high that the curtains don’t touch the floor, and not so wide that they look flat (volume from the curtains draping is really pretty). We typically go around 8″ beyond the window trim on the sides, and like to hang the rod a few inches below the ceiling, but use the length of your panels to determine the best height.
This was a far as I made it with these new curtains for basically a year, so if yours look something like the messy picture below – don’t worry. We’ve all been there. Well, at least I have. Many times. And I’ve lived to tell the tale. In fact it wasn’t until last week that we finally carried out the final two steps.
Step 6: Iron or steam your curtains. We steamed the curtains at the beach house while they hung in place – but we found that we got the best result with two people doing that (one to hold the curtain taut, the other to steam – this is our steamer, btw). So to get the smoothest result at home with just one person on curtain duty, we took them down and ironed them. I knocked out four of them before bed one night last week, and John did the other two the following evening (which explains why the hairy arm in this picture is his and not mine).
Step 7: Once the curtains are pre-shrunk and fully relaxed, it’s safe to hem them if you need to. Sometimes you get lucky and they shrink enough so that you can hang them high without needing any hemming – but a little is usually necessary for us. I like to use no-sew hem tape, but I tried a new cheater-way to hem these and it worked, so I’m sharing it. NO HEM TAPE OR SEWING REQUIRED!!!
I just unclipped them one clip at a time while standing on a chair and folded them over until I liked the way they hit the floor below (just the slightest little break – like they’re kissing the floor) and reclipped them to hold them that way. The fold of fabric is in the back of the curtain, facing the window, so you don’t see it from the front – it actually just looks like a nice thick top hem when the light shines through.
You can’t really tell that I took a short cut, and it means if they ever shrink in a future washing (or we decide we want more or less fabric touching the floor) we can just adjust them just by unclipping them and changing the fold. Genius? Probably not. Lazy? Most definitely!
Are they the most luxe high-end curtains out there? Nope. Do we think they look nice, hold up well, and add softness & height to a room? Yup. Did we do the entire bedroom for $75? Yup. And that’s less than the cost of one of these stock white 95″ curtain panels (and we got 6 panels!). Getting custom curtains can also be significantly more expensive – and it can make them feel extra precious. They’re also not usually washable which is a huge selling point for me when it comes to these.
Maybe someday we’ll feel fancy enough to splurge on custom curtains. Using them in some of our showhouse projects means we’ve experienced the difference firsthand (really, they look amazing and perfectly graze the floor and don’t even need to be steamed – they arrive totally ready to hang). So this isn’t an anti-custom curtain rant or anything – we just know lots of people who can’t swallow that custom curtain price tag right now, and might want something that feels easier to live with/wash for this season of life. So hopefully this elbow-grease-but-affordable method can help you get SOME sort of window treatments in your house. And you know I won’t judge you if it takes a year to get them finished.
Also, dogs don’t have to adult. I wanna be Burger.
Believe it or not, this isn’t the first time we’ve had white Lenda curtains in this room (but they got stolen for the office at one point). So here’s that story, and more curtain projects/tips from over the years:
Using Iron-Tape To Hem Lenda Curtains
How To Make No-Sew Curtains From Any Fabric
15 Minute Blackout Curtains for $15
18 Tips For Picking The Right Curtains
Psst- Wanna know the paint colors in this room, or any other room in our house? Click here for a whole-house rundown. And if you want to get our free email newsletter (it’s like a bonus post that comes right to your inbox each week) click here to get on the list.
*This post contains affiliate links*
The post How To Make Inexpensive Curtains Look A Lot More Polished & Our New Master Bed! appeared first on Young House Love.
How To Make Inexpensive Curtains Look A Lot More Polished & Our New Master Bed! published first on https://aireloomreview.tumblr.com/
0 notes
Last Seen Blogs

idkr18-blog
random rants

sristishrish
Sristi

argoii-official
we're so underpaid

omg-glitterykingcollector-blog
Luis Arce Gómez

sex-stuffs
Queer As In Fuck You 💕