#I just keep opening the browser version instead of the app once I deleted it
Text
I actually logged myself out of my own twitter acc and haven’t used it for days I never knew life could be so beautiful not knowing everything that’s going on over there 24/7
#‘um nat didn’t you already quit like 2 times before’#well you see. no.#I just keep opening the browser version instead of the app once I deleted it#but it’s too much of a pain in the ass to log back in#so this time my quitting twitter has actually been successful#I can still log onto my laptop and use it there but it’s wayyy too much of a hassle to do that lol#I don’t really use my laptop much except for school work and gaming it’s too much effort to use it soley for scrolling#so yeah no more twitter#yipeeee#.___.
17 notes
·
View notes
Note
hey hi uhm if its not too much trouble. do you have any recommendations for babyproofing websites (i use productivity owl but i keep deleting things from the blocked website list. you can probably tell by the fact that i am here, on tumblr,)
Ahahahahhaha okay while I am sweating over the other asks in my inbox this is one I can answer quickly so!!
I have to use two different blocking software things. One for my laptop, and one for my phone. I have tried multiple different appa/software for each, and what will work the best will depend on what browsers/devices you have, but here is the baby proofing cocktail I have come up with:
For my laptop: cold turkey. It is, as far as I have found thus far, impossible to unblock once you have locked your blocks. I used to be able to find ways around it when I would get obsessive but the most recent update is solid. It used to not work on certain browsers--now it immediately shuts any browser it doesnt work on down. My laptop uses Windows 10 so using it on a mac might be different.
The thing I like about Cold Turkey is that it let's you set a variety of different kinds of blocks. For example, you can block websites for a certain interval (bedtime!) It you can give yourself an allowance on certain websites (only 40 minutes of tumblr a day!)
Other things that have helped, in case Cold Turkey doesnt work on your device: the stayfocusd extension. It just doesnt offer as much variety. Freedom is another good one but I found ways around it.
For my phone: the Stay Focused app. I have an android, so I am not sure if this is available on iPhones, but this app is similarly Impossible for me to get around and provides a lot of flexibility of different kinds of blocks you can set. I can also set a Bed Time block on this one, a daily allowance for certain apps/websites, an hourly allowance, a wait timer (blocks me from discord for 2 hours after I spend 20 minutes on it for exame), or a Reward function (doesn't unlock tumblr until I've opened my flash card app for 20 minutes.)
If you can't use Stay Focused on your phone, Freedom is also on android and iOS, and I remember it working better on my phone than it did on my laptop.
How to effectively set blocks:
So since I have done silly things like lock myself out of sites I needed for work or school, or set blocks that I didn't end up sticking to, plus a bunch of other silly mistakes: here is what I recommend.
First: do the "soft" version of the blocks you're trying out for a day. That way you can change it if you realize "ah, wait, I need to whitelist this specific YouTube video because I am citing it in this thing I am writing" you can tweak the blocks to allow for what you need. Then, after your soft phase, put them into strict mode/locked mode for a week. Thrn, at the end of the week you can reassess.
Second: If you can, try to automate it. My laptop bedtime block is automated to be completely locked except for between 1-2AM. So I can change it if I really have to, but since 1-2AM is not the time when I am trying to get weaselly about getting out of my blocks, I rarely do. Setting it at that time makes changing that specific block a choice that I have to think about and put effort into(waking up at an inconvenient time), rather than a choice I can make in the heat of the moment when I really feel like people need to see my hot takes.
Third: Not necessary but if you have the spoons, write down any positive effects you have from setting these boundaries with yourself. Write down any parts of it that you could tweak. This way you can analyze whether it is working for you and then when your weekly Unblock time comes you can change it. Also writing down the positive effects can be an exercise to remind yourself of your successes, and you probably need that.
If any of this makes me sound like a productivity guru... please understand I am not. Instead, this is the level of baby proofing fuckery that is necessary for me to achieve basic functionality :'D.
#is it weird that I think of this as self care?#hm maybe not as fuzzy as that#self...maintenance I guess#I also have timed lock box in my room for similar purposes#my post#personal
13 notes
·
View notes
Text
A Little Bit Of Organization Wouldn’t Hurt A Bit

Today is a searching and researching online day for an end to the endless clutter I have lived with FOREVER! I am so ready to clear the decks both physically/mentally and offline/online and get to some #extremeproductivity.
This is going to involve a lot of thinking and a lot of trying out things to streamline it into this no-fluff ecosystem I am dreaming about, even as I am typing this. A big part of this is to go paperless and also to start using my IOS phone a lot more. The below may seem like a lot of places but the object of my game is to have places to put things where I can go back and retrieve them. My mind and life goes so fast a lot of the time that the clutter, even when it is just mental has a tendency to pile up and to overwhelm me. By clearing physical mess (most importantly paper) and mental overflow, I can create the space I need to be the best me. Two big goals are time to do online study and being fit mind and body.
Read on for tools and thoughts about them:
Tumblr - Reasons for Tumblr: braindumps, writing habit, connection my introvert heart desires at times, and ease of use. Tumblr is good just to write or to spend time reading. I find a lot of the people on Tumblr are pretty deep, creative and wildly entertaining. Tumblr is a good place for introverts.
Saved.io - to try and curb the worthless habit of saving fifty trillion bookmarks and adding to them daily without ever really delving into those websites or using them. No extensions for this. You just add saved.io after the http:// or https:// and to make folder (tags/labels) put a name in front of .saved.io. Super easy. Sign up for an account and have an online spot for bookmarking your heart out
Google Keep - I need something to take down my own thoughts in a browser as I am surfing/researching and do not want to make a big deal out of it. There is a Chrome extension or you can right-click to add notes with tags. Braindumps and a place to satisfy data pack-rat urges. Follows the line of thinking that I am using Google for a lot of things and it’s already there anyway.
Google Calendar - I have multiple Google accounts but one where all my emails and appointments go. I synced this as my main calendar on IOS instead of the default calendar. One calendar to rule them all! Same for the one gmail. There is also an extension to add events quickly, along with the right click option.
Feedbro - RSS feed reader - too bad Google did away with theirs. This takes away some bookmarks for favorite sites/blogs and gives me an easy and fast way to know that I am keeping up with things that are important to me. Clicking the extension lets you “Find feeds on this page,” save feeds and also to open up your feedreader. Feeds can be categorized into folders.
LastPass - I have used this for years on my computers. It is the best password keeper as far as I am concerned. AND FREE! Today, I put it on my phone. I cannot say enough about how great this tool is for your information.
Scanbot - app for scanning in documents by taking a pic of them. This will definitely come in handy for those on-the-go document situations. Things like bills, manuals, purchase papers, etc. I have at home will, most of the time, be scanned in using my printer’s scanner.
Bullet Journal (BuJo) - my offline to-do / to-did and short journal things. I have one for me and one for my computer. The one for my computer has already saved me this year when I was trying to figure out what program was conflicting with another. My memory was helped by my documentation on what programs I had downloaded and when. I also document computer problems: what happened and what helped. Everything in one book - I think everyone should have one of these and I am surprised I never thought of it before this year. My personal BuJo is not one of internet proportions. I tried that and failed miserably and lost all site of what the book was supposed to be for to begin with. I ditched the trying to make it pretty and doing weekly/monthly spreads. I am back to the original version that Carroll Ryder set forth with his inspiration and am a thousand times better for it. This is something I can hold in my hands and look back on from time to time to see exactly how my time on earth went.
SimpleNote - I have a Reminder label in this for to-do’s, but I mostly just write to-do’s on the calendar or on a post-it/index card to throw away. I also document to-do/to-did’s in my personal BuJo. No this program is going to be something I use for some time, I do believe. I decided I am going to document work with this, especially conversations. I never remember the specifics in time so this will be my second work brain. Tags will be people (initials, first name, or my nickname for them). I can then go back to specific conversations that I want to refresh myself on and also for people notes such as date of birth, family (kid/husband/wife name), and/or specific things about them. Also, dates of meetings, project dates,etc. This is in its infancy - I have high hopes for this going forward.
AirTable - This website/app has high potential. I really like that it is set up like an Excel spreadsheet. I have projects set up in it for tracking daily spending, pantry inventory, gifts, etc. etc. etc. This is so customizable!!!! In my pantry list, I can add columns to be able to know what my lowest price on an item was - so in essence, a pantry checker with a price book included. I figure the way I use it will grow as I get used to it and find its value.
mySymptoms - $$ App for tracking your health. This is the one thing I paid for. I can’t wait to get enough stuff in it for a good PDF download. It is customizable to you, just like the AirTable. You can add/delete the things you want to track and there is a big list of them: drinks, food, medications, supplements, mood, symptoms, bowel, energy, sleep, stress, exercise, environment, and other. Some of these can be extra helpful for people who struggle with certain diseases or triggers. This is certainly a make-it-all-about-you app that can show correlations between a factor(s) causing another factor(s). Or even for people who forget when or how long they took medications or supplements. In my new found goal of creating a life that serves my health - this one is a winning part of it. I will be a participant in my healthcare.
Instagram - because, at times, I like to take photos of food and things I see that I like. And because, I hate Facebook. IG also gives me an easy way to change the way the photos look and share back to myself for other uses and ways to share my account online with my online people-ha. Braindump for photos.
Twitter - because it’s fun... and sometimes informative. Twitter is the quick connection to the rest of the world and let’s anyone fit into it. My favorite parts of the twit are hashtag and whatever “new episode” tv show I am watching. It’s fun to join in with whatever other people think of an episode and throw your two cents in too. I never feel like I am sitting at my house alone on Friday & Saturday nights with #livepd. With the added gifs on posts, it can get quite hilarious.
GoodReads - This is hooked up to my Amazon account and my Amazon account is hooked up to my local library account through Overdrive. So... free books. I read every night on my Kindle app (you can read in your browser too). The books are automatically added to my GoodReads account. At this time, I am 8 books ahead on my goal to read 100 books this year.
Listal - As for movies, the best site I have found is Listal. You can tag, star and make lists for the movies/tv you watch (along with books, products, people, dvds, and games, if you wish). Many members do a Halloween movie list each year.
Pinterest - this place fulfills my yearnings to save a million quotes, presented in a pretty way and is the easiest way to make kick ass vision boards. I have multiple boards for this very thing: HouseVB, ClothesVB, ThingsVB and so on.
This is the big starting out list. I didn’t want to leave anything out because I need to be clear on what I am really using and be consistent on what accounts I use for what services. Pinterest may be a big black hole, but once set up with mostly productive boards, I can relax knowing that they are helping me visualize the things I want while also letting me do something that is fun (even if sometimes just losing time surfing the internet).The same with Twitter and Instagram. They are black holes for time. But this way they are serving a purpose of entertainment and braindumps to clear the way for good space in my life. I will follow up with this as being productive online is both an important topic for me and also a much needed topic discussion. In my research, I wish more people would post about their systems to help the rest of us out :D
2 notes
·
View notes
Photo

♡ ONF #YOU_COMPLETE_ME Fuse Support Step-by-step Tutorial ♡
Hello Fuses! ONF are finally coming back with their 2nd mini album ‘You Complete Me’ on June 7th, so I have decided to make a very detailed tutorial on how you can help make this comeback as successful as possible to thank our boys for being such loving beings and for working so hard to keep Fuses happy (and to show them how much we have missed them duh). It is the time for fuses to do their part and make ONF complete! (see what I did there)
Also don’t kill me I didn’t have time to make a banner for the tutorial
This tutorial will include:
YouTube MV streaming on PC and phone/tablet
digital streaming
voting on music shows
digital downloads and buying physical copies
promoting
If you have any questions, suggestions or complaints, make sure to hit me up on tumblr chat or send me a direct message on @ppangyuto.
Lets’ get started!
1. YouTube MV streaming
YouTube views are important for many music shows and count as a part of digital points for award shows in the end of the year.
Pick a browser you are going to stream the MV with and read the following instructions. Google Chrome is currently the best option for this (you can download it here btw, it is completely safe) but it would be great if you could use more browsers and stream with all of them at the same time. That’s of course if your device allows it.
Do NOT reupload the MV on Twitter, Tumblr, Facebook or any other social network or website. Make sure to put the LINK everywhere, especially if you are sharing gifs or snippets. Every view counts. If you see more than 30 seconds of it shared on Twitter (usually) without the person providing the link as well, do not hesitate to politely ask them to delete the tweet and report it as spam if they refuse to do so. Use as many devices as possible.
Streaming guidelines for PC:
Do not skip the ads! WM and ONF do profit from them.
Log in to your YouTube account to like the video and leave a few positive comments. That will count as one view, so after watching for the first time make sure to log out and then continue streaming following the guidelines. If you have more accounts, hit like button on each one of them.
Do not use the Incognito mode, it freezes the views. If you notice that the views have been frozen for a few hours, report it to YouTube as “PLAYBACK ISSUE” and do not panick. It is said: “To make sure that all views are validated, as view count goes higher, YouTube updates less frequently and might occasionally freeze above 300 views to assure quality view count. This is the normal operation in YouTube videos.”
You can open as many windows per browser as your internet connection allows but the videos should not be lagging too much to ensure view counts.
Do not refresh the page. Instead, search manually for the MV and stream only the official one uploaded on ONF’s channel. When you type in ‘ONF’ on YouTube, at the moment the first suggestions are ‘ON/OFF’ and ‘mixnine’ . What we want to do is get Complete MV there.
Your volume should be at least 50%. If you have more tabs opened at the same time, mute your device and not the MV itself to avoid the chaos.
Watch it from the beginning to the end without pausing or fast forwarding.
Clear your cache every 10 minutes and cookies every 1 hour. To avoid this step, just check out the history/cookie/cache cleaning extensions I have listed below.
ENJOY!
[TIP!] You could reply to a lot of positive comments under the MV so people come back to it again. Worth a try! Do not forget to report malicious comments.
[TIP!] If you have an active YouTube channel, put the MV as your featured content (my channel > video manager > channel > featured content).
**You can create playlists, but do not include only Complete MV. If possible, create a playlist in this order: ON/OFF MV - Lights On (Performance ver.) - ON/OFF (Practice ver.) - Complete MV x3.
If you are going to leave your device on overnight to stream even while sleeping or while you are away (recommended), download the following extensions for your browser:
Auto HD For YouTube
Cache Killer
Super Auto Refresh
YouTube HD Plus
Empty Cache Button
ReloadEvery
YouTube High Definition
History Eraser
Super Auto Refresh
This will help you do the following: always stream MV in quality above 720p, refresh (not hit the replay button, this is because you cannot manually search for the MV while sleeping or when you are not there duh) and erase your history and cache. The last extension should be on even while being on you device. Auto Refresh MUST be set at 10 minutes (about 5 minutes for the MV and 5 minutes break: YouTube might validate the views faster like this).
Streaming guidelines for phone/tablet:
Do not skip the ads! WM and ONF do profit from them.
Log in to your YouTube account to like the video and leave a few positive comments VIA BROWSER. Do not use the YouTube app. That will count as one view, so after watching for the first time make sure to log out and then continue streaming following the guidelines. If you have more accounts, hit like button on each one of them.
The volume should be at least 70% so if necessary, use headphones.
Watch it from the beginning to the end without pausing or fast forwarding.
Do not refresh the page after the full stream. Instead, close your browser and then search manually for the MV and stream only the official one uploaded on ONF’s channel .
Clear search history ever 1-2 hours.
ENJOY!
2. Digital streaming
Since I am not familiar with streaming, I have found a few very useful tutorials:
How to create an account
How to purchase a MelOn pass
How to stream and download
How to create an account and get a free pass (PC)
How to create an account and get a free pass (Phone)
Free link compilations
How to stream using free link
How to create an account and get 10 free passes daily in 13 steps: 1 , 2 , 3 , 4
How to create an account
How to get a free pass (1)
How to get a free pass (2)
[TIP!] Search for streaming pass giveaways on Twitter, there could be some Fuses or other fandoms willing to help us with this comeback. Please do not join such giveaways if the passes are for a specified group that is not ONF, that is just mean.
Streaming reflects on some music show charts.
Show Champion: Naver, Melon, Bugs, Genie
M!Countdown: Mnet, Melon, Genie, Bugs
Inkigayo: Melon, Genie, Bugs
3. Voting on music shows
CRITERIA + VOTING
**Digital Score - Streaming + Downloads
**Broadcast Points - Views on show performances
THE SHOW
DIGITAL SCORE - 70%
MV VIEWS - 25%
EXPERTS PREFERENCE - 5%
LIVE SHOW VOTING (SMS)
SHOW CHAMPION
DIGITAL SCORE - 40%
PHYSICAL SALES - 10%
NETIZEN’S PREFERENCE - 15%
EXPERTS PREFERENCE - 15%
MBC MUSIC BROADCAST POINTS - 15%
**Netizen’s preference - Online votes
Voting period: Tuesday 00:00 KST - Sunday 23:59 KST
How to vote? I have made a detailed video tutorial on how to vote on Show Champion a while ago for FY!COSMICGIRLS . Click here.
M!COUNTDOWN
DIGITAL SCORE - 50%
PHYSICAL SALES - 15%
SOCIAL MEDIA SCORE - 15%
POPULARITY SCORE - 10%
BROADCAST POINTS - 10%
LIVE SHOW VOTING (SMS)
**Social Media Score - MV Views
**Popularity Vote - Online Voting Points
Voting period: Friday 14:00 KST - Monday 09:00 KST
How to vote? Use your Mnet, Twitter, Facebook and Kakaotalk accounts to vote on MNET’s voting page once a day per account.
MUSIC BANK
DIGITAL SCORE - 65%
PHYSICAL SALES - 5%
BROADCAST POINTS - 20%
EXPERTS PREFERENCE - 10%
SBS INKIGAYO
DIGITAL SCORE - 55%
PHYSICAL SALES - 5%
SNS POINTS - 35%
PRE-VOTING - 5%
**SNS points -MV views
How to vote? Click here for a detailed tutorial by CLCPENTAGON.
Do not reupload the performances and watch them only on music shows’ official YouTube channels as the views count as points. Use the same watching method as for the MV.
If you are able to, watch the performances through their official websites and music sites as well.
The Show
MNET
Naver
**All music shows have Naver channels, just type in the program name In the search box. (더쇼 / 쇼챔피언 / 엠카운트다운 / 뮤직뱅크 / 음중 / 인기가요)
4. Digital downloads and buying physical copies
DIGITAL DOWNLOADS
Please only download and stream music from these sites: Melon, Naver, Mnet, Genie, Olleh, Bugs
**Purchasing from iTunes and Spotify does not count to the charts
[TIP!] Mass streaming boosts up ranking, so try to stream together with other Fuses at the same time.
[TIP!] Title track is the one being ranked on the charts, so stream it more frequently than the rest of the album.
Buy ‘You Complete Me’ on iTunes as soon as it comes out.
BUYING PHYSICAL COPIES
‘You Complete Me’ is ONF’s 2nd mini album that comes in one version. More info about the album here.
Only purchase physical copies of the album from sites that count towards Hanteo and Gaon charts: KPopTown, YesAsia, DVDHeaven, KPopMart , Synnara , KTOWN4U.
**Other sites are fine if they contribute to the charts. You have to check this before making the purchase.
** Also check out: To K-Pop Fans outside South Korea - a Guide for an International Order (tutorial by Synnara)
[TIP!] If possible, please pre-order the album because it will help contribute to the first week sales. Pre-orders end on June 7th at 12AM KST.
5. Promoting
Other than sharing the MV, you can also help by doing the following:
1. Leave positive comments and tap hearts on comeback V LIVE. There is a safe software called Nox App Player you can use to tap hearts automatically. I used it for the previous comeback! Here is an updated tutorial.
2. Search for 온앤오프 on Korean news sites:
Naver
Melon
Nate
Bugs
Olleh
Soribada
3. Watch ONF videos on Naver.
4. Retweet wm_on7off and wm_onoff. Use #온앤오프, #COMPLETE and #YOU_COMPLETE_ME hashtags whenever you can.
5. Participate in various support events. Here is a 1st Anniversary Project by ONF STATION.
6. Share the MV with your friends and ask them to support the comeback as well.
7. Donate for support projects by fansites if possible and support fellow Fuses’ edits, fanart etc.
Thank you for reading! Let’s make this comeback successful together ♡
14 notes
·
View notes
Text
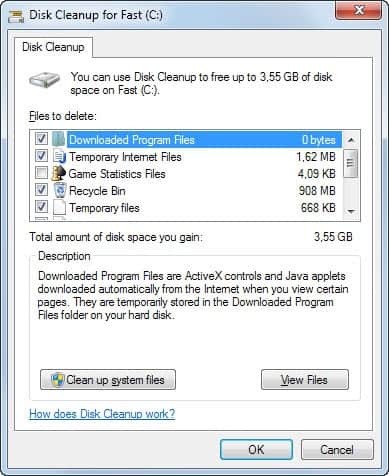
How Do I Free Up Disk Space On My Mac

Restart your Mac to free up RAM. Get rid of system junk files with a free version of CleanMyMac X. This app gives you lots of possibilities to free up space, especially when it comes to system junk. CleanMyMac X has been notarized by Apple, which basically means it's safe to use. If you need more space — whether it’s to upgrade to the new Mac OS Catalina or to download more apps — we’re here to help you out. With Apple’s recent Mac mo.
How Do I Free Up Disk Space On My Macbook Pro
How Do I Free Up Disk Space On My Macbook
How Do I Free Up Disk Space On My Macbook Air
How To Clear Space On Macbook
How Do I Free Up Disk Space On My Mac
You can free up valuable disk space by cleaning the 'Other' storage on your Mac. Read this article to learn how to delete all the useless files occupying your precious storage. Let’s take a look at the Mac 'Other' section and optimize your storage. To check what’s taking up space on your mac, you can choose “Manage” on the startup disk warning notification. If you’re ahead of the curve and trying to clean up your Mac before being warned, you can access the management screen by going to About This Mac from the Apple menu (top left of your screen), and then choosing Storage.
You can find a lot of articles on various tips for cleaning storage space on the Mac. Unsurprisingly, most of them written by companies that build and sell disk cleaning software. The truth is you can clean the disk space from junk manually, without any special software.
So, how you can clean your Mac startup disk without any specialized software?
To free up disk space on your Mac start with simple steps: empty Trash, delete files from the Downloads folder. If there is still not enough storage, then consider deleting large files. They can be found by clicking on About This Mac -> Storage -> Manage.
Here are 8 of the best disk cleaning steps:
1. Empty Trash
This is the lowest hanging fruit to start the cleaning disk space process. When one deletes any file the latter does not disappear right away.
Instead, it goes to Trash, so if you accidentally deleted something or deleted and then changed your mind, it is possible to restore the files.
This flexibility, however, comes with a price.
When deleted files go to the Trash they still using the disk space and prevent adding new data.
If you didn’t clear Trash for a long time you may be surprised by how much more free disk space you can get by cleaning it.
Just find the Trash icon in the Dock and then right-click on the icon and click on Empty Trash.
2. Clean Downloads Folder
Another low hanging fruit. It is also the safest thing one can do to clear the disk space, other techniques can be quite disruptive.
The good thing about macOS is that it has a special Downloads folder, so you don’t have to go over each browser’s settings to find out where they store downloaded files.
Download folder gets populated every time when you:
Open a document in Safari, Chrome, or other browsers
Download a new app in the form of dmg or pkg files
Over time the Downloads folder gets pretty big, especially when downloading big applications such as Microsoft Office or Photoshop.
For instance, the size of Microsoft Office download (DMG file) is around 4GB.
Once the application had been installed there is no even a single reason to keep the DMG file on the disk – you can always download it again when needed.
One thing you should do before cleaning the Downloads folder is to eject all DMG disks.
How to open downloads folder on a Mac
Use the Finder app
The easiest way to open the Downloads folder is by using Finder app. The Downloads folder usually appears on the Sidebar (left panel of the Finder).
If the folder does not appear you can always enable it in the Finder menu: Go to Finder Preferences, click on the Sidebar tab and then select the Downloads option under the Favorites section.
Or you can just go directly to the folder. Use Shift+Command+G key combination and in the Go to the folder pop up window type “~/Downloads” and hit Enter.
Use Chrome
After downloading anything Chrome displays a download status in the status bar (bottom).
If you click on the arrow next to the downloaded item it and then click “Show in Finder”, then Chrome will open the Downloads folder inside the Finder app.
If you closed the status bar after downloading a file don’t worry. You can always see the downloads history by using Shift+Command+J key combination (or type chrome://downloads/ in the URL bar).
From this window, you can either click again on “Show in Finder” or click on the icon with three dots and choose Open Downloads Folder.
Use Safari
Use Option+Command+L Star wars jedi academy mac download. key combination inside Safari.
Use Firefox
Use Command+J key combination to bring up Downloads history.
How Do I Free Up Disk Space On My Macbook Pro
Now go ahead, review all the files in the Downloads folder, save the ones you need and delete the rest.
3. Use Manage Storage To Find Out The Junk Files
One of the easiest ways to estimate what’s taking up disk space on your Mac is to use Storage option (available in macOS Sierra or later).
Just click on the Apple logo in the top left corner of the screen and then click on About This Mac (first option).
Now, click on Storage tab and it will display an aggregated view of types of files you have.
For example, on my MacBook, the disk is shared by:
System files: 39.36GB
Apps: 23.65GB
iTunes: 7.89GB
Documents: 6.36GB
iOS files: 4.34GB
Other volumes: 3.9GB
To get a more detailed view click on the Manage button and let the system to update info.
The first option in the view is Recommendations.
For instance, macOS recommended me to:
Store files in the iCloud
Optimize Storage
Empty Trash automatically
Reduce Clutter
Let’s review each recommendation.

Store files in the iCloud
This is a great option with a caveat. By default, everyone gets 5GB of free space when opening an Apple Store account (pretty much anyone who has a Mac).
However, 5GB is an extremely low storage option, so Apple is upselling their iCloud and they want you to subscribe for more space.
The cheapest plan is 50GB for $0.99 per month, less than $12 a year. However, most people would need at least 200GB which costs $2.99 per month.
If you are Ok with the additional cost then this is a great option. macOS will automatically back up files to the iCloud and only keep the latest files on the disk.
Obviously, you will still be able to pull the files you need later to your local disk.
Optimize Storage
If you frequently download and watch movies on iTunes then this is a nice option.
While you can always delete the movies you already watched enabling this will allow you to not worry about maintaining movies and TV shows.
To enable click on Optimize button and then confirm your decisions.
I enabled this option just in case.
Empty Trash Automatically
We already know about the benefits of periodic Trash cleanup, so the recommendation seems to make sense to implement.
However, I am not very comfortable suggesting this to you.
The last thing I want is to learn that the file I deleted 30 days ago and suddenly need now, was automatically removed.
I heard about users that used Trash as temporary storage. They would delete the file for some period of time and then restore it when needed.
If this sounds like someone like you then this recommendation will not be useful.
Reduce Clutter
This will allow you to manually go thru the files and identify those that may be deleted.
Click on Review Files and it will change the view Documents. Here you have 3 options: Large Files, Downloads, and File Browser.
We already covered Downloads.
Large Files gives you an option to get big gains by deleting the biggest files you have on the disk. It’s simple math, deleting 10 1GB files will free 10GB space when deleting 100 1KB files will only free 0.0001GB.
The last tab, File Browser, allows seeing documents created by all applications on the Mac.
The process of sifting through the File Browser is tedious and requires a lot of time, but in my opinion, this is the most valuable view.
Since the largest files are listed at the top I was able to quickly identify two issues:
I had 7.89GB of Music hidden on my drive.
This happened when I downloaded some MP3s from the Internet and uploaded them to my iPhone. I then deleted the MP3s from the disk, but they still were somewhere on the disk. They are not available on iTunes either, the only place I see them is here.
So I opened the folder in the Finder, drill down to iTunes Media and then Music folder, found the files that I thought were deleted and then moved them all to Trash.
Immediately I was able to free 7.8GB of hidden space.
Another app that does not remove files cleanly is iMovie.
After working on a movie clip that contained a lot of different smaller clips I deleted the project and thought all files were gone as well.
Only in File Browser, I was able to see that the clip and its copy are still taking space.
The interesting thing is that I couldn’t see it in the iMovie app. Deleting those files freed another gigabyte.
There are other sections in Storage Manage view and I strongly encourage to go thru all of them because everyone has a different computer setup. I just want to add some notes about two of them.
iOS Files
If you have an iPhone the backups will appear here. If you have multiple backups (as I do) I suggest deleting old ones to save space. All you need is the last one really.
Mail
While I don’t use the Mail app on this MacBook, on the Macs where I do, I periodically delete messages with attachments. While messages themselves are usually, the attachments can take a lot of space.
4. Find and delete duplicate files
Conventional wisdom tells us that file copies take additional space and it makes sense to find and delete duplicate files if you want to free some space.
In fact, some 3rd party cleaning tools specifically sell removing duplicate files feature as one of their selling points.
But macOS is not Windows.
If you have been upgrading the operating system on the Mac (and have macOS High Sierra or later) then your drive must be in APFS (Apple File System) format.
One of the features of APFS is that duplicates do not take additional space on the disk.
I decided to test this claim myself with following steps.
I downloaded Windows 10 iso to my Downloads folder.
The available free space on my startup disk immediately decreased by 4.8GB (the size of the iso file).
Then I copied the file into 5 different folders on the same disk. The space used and space available stayed the same.
Then I started deleting the files. I deleted 4 copies without affecting the free space. Then I deleted the original file.
Available space on the drive did not change.
Only when I deleted the last copy of the file I was able to claim back the free space.
By the way, I was deleting files from Trash as well.
Then I decided to see if I can trick macOS by renaming the file.
I downloaded the same gigantic file again. Then did copy and paste it in the folder.
Space did not change.
I made multiple copies with different names, but the effect was the same as in the first test.

This means macOS is smart enough to know that the file copy is not just the name, but also the contents of the file.
Bottom line: You don’t need to worry about duplicate files because they do not take additional space on disks formatted as APFS.
On the other hand, if you deleted the file and space did not change it means there is still a copy of the file somewhere because space does not get freed until the last copy of the file gets deleted.
How to know if your disk is in APFS format?
If you have an SSD disk and macOS High Sierra or later then the startup disk would be in APFS format.
If the Mac is on macOS Mojave or later then the disk in APFS.
If you still in doubt there is a simple way to find the disk format.
Start Disk Utility from Spotlight Search
Click on Macintosh HD
In the details page, you will see the format of the disk
5. Move Files To An External Storage
Most of the time we don’t need to store all files on the Mac startup disk. Most files, e.g. pictures from the last vacation, school graduation videos, etc, can be stored on external storage.
As we established earlier, one of the great ways to store files externally and save space on the disk is to use iCloud. The disadvantage of this approach is the cost.
Most people are reluctant to pay a monthly fee because small monthly fees tend to add up to considerable amounts over the span of multiple years.
If you are one of those people who buy a cable modem instead of renting it from the cable company (as I do) because with one-time purchase you recoupe the investment and end up with your own device then consider buying an external drive.
There are two main types of external storage currently: external SSD drives and flash drives.
You may need both as they have different purposes.
I spent numerous hours researching the best drives and if you need advice check the drives I personally recommend:
By the way, many users report that Storage screen displays that Documents files take much more space than they see in the Documents folder.
One of the things that get reported as Documents is Time Machine backups.
If you have Time Machine enabled and the snapshots stored locally eventually the entire disk may be claimed by Time Machine.
While Time Machine deletes old backups to free up some space it still tends to take as much space as available.
The solution is to either back up to an external drive or partition the startup disk and point TM to the new partition to limit the size of the snapshots.
Read more here: What Does Time Machine Backup
6. Use Compression To Shrink Files And Folders
Compress utilities
Since people started using personal computers we were always in need of extra storage.
One way to save on storage is by compressing the files. When files are compressed they take less disk space.
The downside is that files are usually are not readily available for usage, so this approach is best for archiving rarely used files.
There is an easy way to compress files and folders in macOS.
For instance, I had the Documents folder on my MacBook which I wanted to compress. The size of the folder is 257.2MB.
I opened the folder in the Finder app, right-clicked on it and selected “Compress “Documents”” option in the pop-up menu.
The Finder created one file which contained the entire folder and the size of this file was 211.9MB.
So, if I delete the original folder and keep the compressed file I would be able to save 18% of disk space.
While savings are not huge, you should know that Compressing utility in macOS is very rudimentary. There are other applications that can get better results.
I didn’t investigate which archivers are the best, I picked just a random free app and created a .7z archive with BetterZip app.
How Do I Free Up Disk Space On My Macbook
The latter produced a file with 184.6MB size which saved 29% of the original space.
I am sure there other apps that can compress better and I promised to write a comparison article later.
Create a compressed disk image
Did you know that you can create DMG files yourself? DMG stands for Disk iMaGe and you can create one yourself.
Start Disk Utility from Spotlight Search.
In the Disk Utility menu click on File, then New Image, and then Image from Folder. Or use the Shift+Command+N key combination.
In the folder, search dialog find the folder from which you want to create an image and click on Choose button.
Enter the name of the disk image file and in the Image Format select the compressed option.
Click Save
The folder I used as an example was packed in an image of 223.3MB size, which is even worse than the compressed folder.
7. Clear Cache Files
If you were researching ways to remove unwanted files from the Mac, you definitely saw advice on clearing the cache. The topic is controversial in my opinion and I will explain why.
What are caches on Mac?
Caches on Mac designed to improve the performance of the applications.
For instance, Safari will cache images from the web page so when the user visits the page the second time Safari can upload the image from the cache and avoid using internet bandwidth to download it from the server.
Since the local disk is faster than the network the page will load up faster.
More Safari and other applications save in cache, faster they perform. The downside is the cache files should be stored on the local disk and take the precious space needed for other applications.
Most applications, especially those written by Apple developers, try to purge the stale cache. For instance, if you visited the web page yesterday then the cached page will load faster today and tomorrow.
But if you didn’t visit the web page for a year then it does not make sense to keep its cache. Safari and other browsers will delete old cache periodically to free space for more fresh and relevant data.
But as applications are written by individual developers, not all developers are created equal.
Some app developers may care very little about the additional work required to keep cache under control. So these applications may eventually have their cache bloated and need some way of trimming it down.
What happens if I delete all cache files on Mac?
When all cache files get deleted on Mac the applications which used cache for performance improvement will slowly build it up again.
When Safari needs to download a web page, it first checks its cache in case the file can be uploaded from the local storage.
Since cache was purged, Safari will download the web page from the Internet first time, save it in the cache again, so the next time it can read the page from the local drive.
How Do I Free Up Disk Space On My Macbook Air
Remember the time when you first opened your Mac?
It did not have any cache in the beginning because applications do not come with cache preinstalled. The cache gets built over a long time.
Was Mac slow at the beginning?
I don’t think so.
Did you notice it got faster over time because the applications had a chance to save some data on the local drive?
I doubt. To me, it feels the same.
The difference is noticeable when you have slow internet, e.g. dial-up.
In the US internet speeds over 50MB/s are very common, so saving the browser cache is not as important as it used to be 10 years ago.
Is it safe to delete cache files on Mac?
In 99.9% of cases deleting cache files should be safe.
Applications supposed to use cache files as a way to improve their performance. If the cache files are deleted the application will add it back to the cache if needed.
This is how it supposed to work. Would I bet my life on it? Of course, not. There are as many cache implementations as there are developers.
Can some developers write the application to depend on the existence of some files? Sure.
Can application stop working after some of its files get deleted?
Absolutely.
During my development career, I saw so much bad code so nothing can surprise me.
There are only two hard things in Computer Science: cache invalidation and naming things.
Phil Karlton
Anyway, while I don’t see value in deleting the cache let me show you how to do it as safe as possible in case if you want to go this route.
How to know which cache files to delete?
How To Clear Space On Macbook
Most applications use the same /Library/Caches folder to keep their cache files. Purging this folder should be enough to release significant space on the Mac. Alternatively, all browsers have the ability to clear cache from their menus.
Before deleting anything on the computer I strongly suggest backing it up.
So, if you end up deleting wrong files or some applications start misbehaving you can always go back in time when everything was green and happy.
Clearing cache in browsers
Clearing Chrome cache on Mac
In the Chrome use Shift+Command+Delete key combination to bring up Clear Browsing Data dialog
Switch to Advanced tab
Uncheck all checkboxes except Cached images and files
In Time Range select All Time
Click on Clear Data button
We only deleting images because they take the most space and we don’t want to lose browsing history and stored passwords.
Clearing Safari cache on Mac
In the Safari browser use Shift+Command+E key combination or find Empty Caches option in Safari’s Develop menu.
Clearing Firefox cache on Mac
Click on Clear Recent History under Firefox’s History menu
Alternatively, use fn+Shift+Command+Delete key combination on MacBook
Uncheck all boxes except Cache
Set Time range to clear to Everything
Hit Clear Now button
Deleting /Library/Caches folder
There are two /Library/Caches folders: one that starts with Tilda (~) and one that doesn’t. The former is a user cache and the latter is a system cache. If I were you I would never touch anything in System.
The steps to clear User cache are the following:
Start the Finder app
Under the Go menu click on Go to folder item
In the little dialog type ~/Library/Caches (make sure it starts with Tilda)
Do not delete top-level folders under Caches. Instead, drill down to each folder and delete everything under them.
Cleaning CloudKit cache on Mac
Some users ask if it is safe to delete CloudKit folder in Caches. The CloudKit folder is needed for macOS to know which files to upload to the iCloud. They keep the history so syncing happens faster. If the CloudKit folder is too big, the best way to approach is to change caching parameters in System Preferences.
What is CloudKit on Mac?
CloudKit is a service (program) that runs on Mac and manages data transfer from the computer to iCloud. Every time a new picture is added on the Mac, the CloudKit makes sure that it gets backed up in the Apple iCloud server.
Well, all this is good, but why is iCloud taking space on your Mac? What is CloudKit cache and why do you need it?
Similar to browsers, the CloudKit uses a cache to reduce the network bandwidth (data usage). Instead of deleting the iCloud cache, it’s better either to reduce the cache size or turn off caching completely.
Let me show how to do it.
Reducing iCloud cache
Steps to clear iCloud cache are following:
Click on Apple Logo in the Apple menu
Click on System Preferences
Locate and click on Sharing icon
Click on Content Caching
Click on the Options button
In the pop-up window decrease the cache size
Restart Mac for changes to take effect
Turning off iCloud cache
If you don’t want to use iCloud caching, then turning it off in System Parameters is a better alternative to deleting CloudKit cache from the Finder.
Steps to turn of iCloud cache are following:
Click on Apple Logo in the Apple menu
Click on System Preferences
Locate and click on Sharing icon
Uncheck Content Caching option
Restart Mac for changes to take effect
8. Flush DNS cache
The last thing the experts suggest to do is flushing the DNS cache.
The reason to flush DNS is generally to fix problems with connection to specific web sites. Flushing DNS does not clear significant space on the disk, so I will not do it here.
I used to do it often when I was setting up servers and playing with their domain names. However, for most Mac users I believe this step is unnecessary.
9. Upgrade your disk
While it is impossible to replace the disk in new MacBooks certain laptop models can be upgraded.
I found a good SSD solution for some old models: Feather M13 SSD. With Feather SSD you can upgrade local storage up to 1TB if your MacBook is:
MacBook Air 2010 – 2017
MacBook Pro Retina 2012 – 2015
MacPro Late 2013
Mac Mini Late 2014
Check the compatibility chart to see if your MacBook can be upgraded.
Conclusion
How Do I Free Up Disk Space On My Mac
We reviewed some ways to remove unwanted and junk files from the MacBook to free space.
By implementing the suggestions above I found an additional 8.3GB space on my 128GB disk (almost 7% more space).
Topics:
Image credit: Flickr
0 notes
Text
Lightshot For Mac Download

Download Lightshot for free. Download for Windows. Download for Mac. Lightshot downloads. Install lightshot in your most advanced Mac OS X operating system. Capture screen images and share them via Facebook and Twitter with your Macintosh. Mac hotkey is ⇧⌘ 9. LightShot Download (Latest) for Windows 10, 8, 7 – This LightShot App installation file is absolutely not hosted on our Server. Whenever you click the “ Download ” hyperlink on this web page, files will downloading directly from the owner sources Official Website.
Screenshots come in handy to show something that’d be harder to explain in words. You may have spotted them in tutorials, software reviews, tech support troubleshooting, or when you want to share your screen image and save snippets that you can’t easily print.
While you can take a screenshot on your computer using the native screen capturing tools and keyboard shortcuts, a time comes when your requirements get more advanced. That’s when you turn to specialized screen capturing tools.
Most free screenshot tools are available for Windows. That's why we are going an extra mile to get a few good ones for Mac owners as well.
We have compiled the five free screenshot tools you can use to get you started.
Also on Guiding Tech
How to Easily Take Screenshots and Video Recordings of Your Desktop Using Snip
Read More
1. Skitch
This screenshot tool from the folks at Evernote performs screen capture and markup among other tasks, and edit the image too.
You can annotate screenshots with arrows, shapes, text, and stamps, perform basic cropping without using an external image editor, and save them in eight formats, which includes PNG, JPEG, GIF, and more.
Also included is the camera mode feature for taking selfies with your webcam, and then dress it up with a host of editing tools including call-outs, highlights, pixellation to blur personal information and more.
After that, you can share your creations via social media accounts, AirDrop, FTP, or Notes.
Skitch isn't without its drawbacks, though. From my time with this tool, I've found that I can't open more than one image at a time to annotate or edit.
For Mac, it's also not possible to save snaps to the local drive; the export command is used instead.
Download Skitch
2. Monosnap
This free screen capturing program only lets you snap full screen or a selected area, and it comes with a few good enhancements. So what if may not have capture options as robust as Skitch? It's still mighty useful.
The few of the coolest features are a timer, auto upload selection that captures screenshots and sends them automatically to FTP or cloud storage, screen recording captures, and selfie mode.
Its powerful editor lets you annotate your image using text, lines, arrows, cropping, drawings, and even redact personal or sensitive information. If you want a sneak peek of your snaps, the Preview feature lets you do that with the click of a button.
You can also rename your snaps and keep them in order before saving them as JPG or PNG files, and share them if you want on social media.
Monosnap is available for Windows and Mac, or you can download the Chrome extension and use it in your browser.
Download Monosnap
Also on Guiding Tech
#screenshots='bp-purple>
Click here to see our screenshots articles page
3. ShareX
ShareX is a free screenshot tool (for Windows), but it isn’t as simple as using the native options for Windows or Mac. If you’re able to work your way around its interface though, you’ll find an extensive array of useful tools buried somewhere in its slightly messy interface.
The lord of the rings the battle for middle-earth ii download mac. Besides the different capture techniques like choosing specific regions, windows, or monitors, you can select from a variety of shapes and capture the particular area you want.
Once you’re done, you can edit using the in-house image editor. Apart from that, the editor lets you annotate, pixelate, add text, shapes, and more to your snap.
The “Scrolling Capture” option so you can screenshot a long document in any application, or capture any web address using the Webpage Capture tool.
ShareX also lets you add watermarks, blur personal or sensitive information, copy, upload, and even shorten and share the links to the images wherever you want.
It integrates with a spread of cloud storage services, and online services like Flickr, Imgur, and more than 80 other destinations.
Download ShareX
4. Lightshot
Like Monosnap, this tool lives in your system tray until you’re ready to use it.

The app packs a miniature editor for adding notes, annotations, and highlights to your snaps. After that, you can upload them to printscm.com where you can backup and share them via links.
Monosnap is an easy to use, and lightweight but is heavily loaded. The only drawback I found is that all screenshots uploaded to the cloud are open to the public. https://ohioload211.tumblr.com/post/657066366900289536/download-discord-for-mac. So it’s easy for others whom you shared links with to access your snaps with a few tweaks to the URL.
Download Lightshot
5. Nimbus Capture: Screenshot
Nimbus Capture is a free, browser-based screenshot tool you can use on Chrome or Firefox, but also as an application for Windows and Mac.
With the help of Paragon Mac Toolbox, users can write, copy, edit or delete files on Microsoft NTFS-formatted drives from Mac or read and write files on APFS- or HFS+ formatted HDD, SSD or flash drive from your PC. Its brilliant features enable developers to access different file systems without panic switching of OSs or platforms. Ntfs paragon for mac download free.
It can capture fullscreen, an entire webpage, or selected region depending on what you want. Like other tools listed here, Nimbus Capture also offers annotation and editing tools. Also, you get a special markup tools like number stamps which can be useful for tech support tutorials or other things.
After editing the screenshots, you can print them or save to your clipboard, drive, or cloud storage for easy sharing.
A desktop version is available that offers screencasting for video recording based on the desired section of your screen, which you can access from your iOS device or the web.
Download Nimbus Capture
Also on Guiding Tech
3 Useful Chrome Extensions to Capture Screenshot of a Webpage
Read More
Take Better Screenshots
Windows and Mac may have their native screenshot tools, but when you need more advanced features to annotate and edit your snaps, you can always choose any of the five listed here. The best part is they’re free to download and use, so you’re sure to find something that’ll fit your needs.
We’d love to hear your recommendations on other free screenshot tools you use that didn’t make it to our list. Tell us in a comment below.
Next up: Want to capture scrolling screenshots on your Mac? Here are some of the best apps to take scrolling screenshots on macOS.
Download wget for mac os. I update mac to Sierra, 10.12.3. My wget stop working. When I tried to install by typing. Brew install wget -with-libressl I got the following warning. Warning: wget-1.19.1 already installed, it's just not linked. Then tried to unsintall by typing. Brew uninstall wget -with-libressl Then I reinstalled by typing. Brew install wget. Express VPN Best for privacy. Number of IP addresses: 30,000 Number of servers: 3,000+ 3 months free with 1-year plan. Install wget on Mac OS X. In simple words, it is a command to download file from a given URL and port. Most Linux users and some windows users are familiar to this handy command download tool and on most Linux distributions it is pre-installed, but on Max OSX it. There are many alternatives to Wget for Mac if you are looking to replace it. The most popular Mac alternative is aria2, which is both free and Open Source.If that doesn't suit you, our users have ranked 48 alternatives to Wget and many of them are available for Mac so hopefully you can find a.
The above article may contain affiliate links which help support Guiding Tech. However, it does not affect our editorial integrity. The content remains unbiased and authentic.Read NextTop 4 Amazing Tools to Capture Scrolling Screenshots on macOSAlso See#screenshots #macos
Did You Know
SpaceX is the first private company to build and launch its own rockets.
More in Windows
Top 3 Fixes for Camera Not Working on Windows 10 PC

Lightshot Screenshot Download
If you’re looking for a simple app to capture, edit, and share screenshots, Lightshot fits the bill. Lightshot is a screenshot tool that allows you to capture a customizable image of your screen with options to easily share or upload it. It is a multiplatform program supported by Windows, Mac, Firefox, Opera, Chrome, and Internet Explorer. The lightweight and simple user interface makes it a popular tool to quickly capture a screenshot and do so much more before instantly uploading it to the cloud or sharing it across Google + or social networks like Facebook or Twitter. Capture the full screen or a selected window, and let the PrtScr key screenshot the image to upload to prntscr.com and get a short url. The speed and ease of use make it useful for remote collaboration on team projects.
The fastest screenshot app on the market
Ultrasimple screen shot capture, highly efficient and reliable.
Lightshot is an excellent screenshot tool and arguably one of the best on the market. In fact, the Lightshot 2.0 free version has earned awards and contains the same core engine as Sagelight, enabling several editing functions simultaneously. It is not without its flaws, however. Let’s cover the positive aspects of this cutting-edge program.
Firstly, it is extremely lightweight. Download it in just mere seconds. Taking up very little space on your computer, the program uses few resources while running in the background. It’s the fastest way to take an easily customizable screenshot. In just two clicks, you can capture whole or part of your screen, edit it in any place, before saving it to your computer, uploading it to the cloud, or sharing it on multi-platforms. To access your screenshots, simply create an account by clicking 'sign in'. (You need a Google or Facebook account). Once you download Lightshot, just use the PrtScr key to save your screen. Press down on the mouse and voilà – SCREENSHOT. There’s no need to open the application each time. Just look for the purple feather icon at the top or bottom right-hand side of your screen. The tool provides all you need for simple, effective on-the-spot editing: hotkeys include a pen, arrow, blur and brush features, and my favorite, the rectangle! Really ideal for some instant and clear highlighting.
Another awesome feature is that by simply holding down the Ctrl key as you take the screenshot, you instantly copy the image to your clipboard. Use Ctrl+A to capture the whole screen. Paste it into Word, Paint, Photoshop etc, for more complex editing. Ctrl+S hotkey will save your screenshot as JPG, PNG or BMP. Or, click “upload” to share it with colleagues or friends, or save it on the cloud. Now cue the major negative feature.
The default setting will let you automatically upload screenshots to the cloud. Bad news. Why? The convenience of the short url comes at a sacrifice of data privacy, with anyone being able to see your image. Another drawback of this otherwise excellent software is the limited formats to store the images. Lightshot can only capture static images and does not support video. You may experience trouble changing language; be prepared to possibly reload the page with /en to get the right language.
Where can you run this program?
Lightshot is a multiplatform tool. It is available for Windows or Mac, and can operate on various browsers—Chrome, Firefox, IE, and Opera. Lightshot Chrome will work with Chrome OS or any other OS capable of running chrome. There is no Lightshot app specifically for Linux, but you can run it using Wine. It has also tested compatible with Ubuntu Linux. A mobile version of Lightshot is also available for android and iOS phones. While it is running in the background of your computer, the app will hide in your bar, with a feather-like icon.
Is there a better alternative?
Lightshot isn’t the only screenshot tool in town. Puush is a highly rated screenshot app with one hotkey combo that allows for instant, linkable screenshots. Simple but effective. Greenshot is a much-lauded app for instantly capturing images, but it cannot match Lightshot’s ability to preset the capture window size. ShareX offers itself up as a great alternative, being popular among gamers due to its ability to screenshot games and provide custom domains. Of course, before you even download an app, you can enjoy built-in features to do the job for you: the PrtScr in combination with Ctrl + Alt will allow you to screenshot everything or just the active monitor or window. As a free open source software that is surprisingly light given the features, ShareX is an impressive tool. However, at the end of the day, with its easily-located purple brush, and instant sharing, Lightshot wins on the user-friendly front.
Our take
For quick and easy image capture, and instant editing and sharing for work or pleasure, Lightshot is probably the best screenshot app on the market. Sure, ShareX has more features, or the preinstalled Windows Snipping Tools does the job, but Lightshot beats the others for its ease of use.
Should you download it?
Lightshot Download For Windows 10
Yes, but whether or not Lightshot is the screenshot app for you depends on what you need. For basic screenshots, use the built-in screenshot tool on your computer or laptop. For complex editing, check out the alternatives. For simple editing and instant sharing however, take advantage of Lightshot. The essential hot keys provide all you need for effective highlighting, and it is ultralight to run. What’s the catch? The unsecured short urls are a privacy issue (it would be great if they added a 'blur' feature allowing you to anonymize sections of your screenshot before uploading it).For easily edited screenshots, Lightshot is worth a shot!
Lightshot For Mac Download Software
Fusion download for mac. 3.2.0.0
0 notes
Text
Download Firefox For Mac 10.7 3

Category: Web Browsers Last Updated: 2020-10-29 File size: 276.36 KB Operating system: Windows 7/8/8.1/10 Download 350 281 downloads. Brother iprint scan for pc. This file will download from the developer's website.
This article explains how to download and install Firefox on a Mac.
Mozilla Firefox is a fast, light and tidy open source web browser. At its public launch in 2004 Mozilla Firefox was the first browser to challenge Microsoft Internet Explorer’s dominance. Since then, Mozilla Firefox has consistently featured in the top 3 most popular browsers globally and this is set to continue thanks to the release of. Mac OS X 10.1 (Firefox 1.0.8), OS X 10.2 and OS X 10.3 (Firefox 2.0.0.20), Mac OS X 10.4 (Firefox 3.X), Mac OS X 10.5 or above (Current Version). Download firefox mac, firefox mac, firefox mac download free. Mozilla continues to work on further improvements for its flagship. Firefox 48.0.2.dmg Mozilla Firefox for Mac is a fast, full-featured Web browser. The app includes pop-up blocking, tab-browsing, integrated Google, Yahoo and Bing search, simplified privacy controls, a streamlined browser window that shows you more of the page than any other browser and a number of additional features that work with you to.
If you are updating from a previous version of Firefox, see Update Firefox to the latest release.
Note: This article only applies to Mac. For instructions to install Firefox on Windows, see How to download and install Firefox on Windows.For instructions to install Firefox on Linux, see Install Firefox on Linux.
Make sure your Mac meets the System Requirements for Firefox. If you use an old version of OS X, see these articles for more information:
Visit the Firefox download page in any browser (for example, Safari). It will automatically detect the platform and language on your computer and recommend the best version of Firefox for you.
Click .
Note: If you want to have a choice of the language for your Firefox installation, click the Download options and other languages link instead.
Once the download has completed, the file (Firefox.dmg) may open by itself and pop open a Finder window containing the Firefox application. Drag the Firefox icon on top of the Applications folder in order to copy it there.
Note: If you do not see this window, open the Firefox.dmg file that you downloaded.
After dragging Firefox to the Applications folder, hold down the control key while clicking in the window and select Eject 'Firefox' from the menu.
Complete the steps above before running Firefox. Do not run Firefox directly from the Firefox.dmg file, as this can result in issues such as lost data and settings.
Tip: You can add Firefox to your dock for easy access. Just open your Applications folder and drag Firefox to the dock.
Firefox is now ready for use. Just click on its icon in the dock or Applications folder to start it.
When you first start up Firefox, you will be warned that you downloaded Firefox from the Internet. Because you download Firefox from the official site, click .
Upon installation, Firefox will not be your default browser, which you'll be notified about. That means that when you open a link in your mail application, an Internet shortcut, or HTML document, it will not open in Firefox. If you want Firefox to do those things, click . If you're just trying out Firefox or simply do not wish to set Firefox as your default browser, click .
So, you’ve decided to download an older version of Mac OS X. There are many reasons that could point you to this radical decision. To begin with, some of your apps may not be working properly (or simply crash) on newer operating systems. Also, you may have noticed your Mac’s performance went down right after the last update. Finally, if you want to run a parallel copy of Mac OS X on a virtual machine, you too will need a working installation file of an older Mac OS X. Further down we’ll explain where to get one and what problems you may face down the road.
A list of all Mac OS X versions
We’ll be repeatedly referring to these Apple OS versions below, so it’s good to know the basic macOS timeline.
Cheetah 10.0Puma 10.1Jaguar 10.2Panther 10.3Tiger 10.4Leopard 10.5Snow Leopard 10.6Lion 10.7Mountain Lion 10.8Mavericks 10.9Yosemite 10.10El Capitan 10.11Sierra 10.12High Sierra 10.13Mojave 10.14Catalina 10.15
STEP 1. Prepare your Mac for installation
Given your Mac isn’t new and is filled with data, you will probably need enough free space on your Mac. This includes not just space for the OS itself but also space for other applications and your user data. One more argument is that the free space on your disk translates into virtual memory so your apps have “fuel” to operate on. The chart below tells you how much free space is needed.
Note, that it is recommended that you install OS on a clean drive. Next, you will need enough disk space available, for example, to create Recovery Partition. Here are some ideas to free up space on your drive:
Uninstall large unused apps
Empty Trash Bin and Downloads
Locate the biggest files on your computer:
Go to Finder > All My Files > Arrange by size
Then you can move your space hoggers onto an external drive or a cloud storage.
If you aren’t comfortable with cleaning the Mac manually, there are some nice automatic “room cleaners”. Our favorite is CleanMyMac as it’s most simple to use of all. It deletes system junk, old broken apps, and the rest of hidden junk on your drive.
Download CleanMyMac for OS 10.4 - 10.8 (free version)
Download CleanMyMac for OS 10.9 (free version)
Download CleanMyMac for OS 10.10 - 10.14 (free version)
STEP 2. Get a copy of Mac OS X download
Normally, it is assumed that updating OS is a one-way road. That’s why going back to a past Apple OS version is problematic. The main challenge is to download the OS installation file itself, because your Mac may already be running a newer version. If you succeed in downloading the OS installation, your next step is to create a bootable USB or DVD and then reinstall the OS on your computer.

How to download older Mac OS X versions via the App Store
Download Firefox For Mac Os 10.7.5
If you once had purchased an old version of Mac OS X from the App Store, open it and go to the Purchased tab. There you’ll find all the installers you can download. However, it doesn’t always work that way. The purchased section lists only those operating systems that you had downloaded in the past. But here is the path to check it:
Click the App Store icon.
Click Purchases in the top menu.
Scroll down to find the preferred OS X version.
Click Download.
This method allows you to download Mavericks and Yosemite by logging with your Apple ID — only if you previously downloaded them from the Mac App Store.
Without App Store: Download Mac OS version as Apple Developer
If you are signed with an Apple Developer account, you can get access to products that are no longer listed on the App Store. If you desperately need a lower OS X version build, consider creating a new Developer account among other options. The membership cost is $99/year and provides a bunch of perks unavailable to ordinary users.
Nevertheless, keep in mind that if you visit developer.apple.com/downloads, you can only find 10.3-10.6 OS X operating systems there. Newer versions are not available because starting Mac OS X Snow Leopard 10.7, the App Store has become the only source of updating Apple OS versions.
Purchase an older version of Mac operating system
You can purchase a boxed or email version of past Mac OS X directly from Apple. Both will cost you around $20. For the reason of being rather antiquated, Snow Leopard and earlier Apple versions can only be installed from DVD.
Buy a boxed edition of Snow Leopard 10.6
Get an email copy of Lion 10.7
Get an email copy of Mountain Lion 10.8
The email edition comes with a special download code you can use for the Mac App Store. Note, that to install the Lion or Mountain Lion, your Mac needs to be running Snow Leopard so you can install the newer OS on top of it.
How to get macOS El Capitan download
If you are wondering if you can run El Capitan on an older Mac, rejoice as it’s possible too. But before your Mac can run El Capitan it has to be updated to OS X 10.6.8. So, here are main steps you should take:
Download subtitle workshop for mac for free. Audio & Video tools downloads - Subtitle Workshop XE by URUWorks and many more programs are available for instant and free download. Free subtitles for videos. Subtitle workshop free download - Front End Digital Media WorkShop, Aegisub Subtitle Editor, Anaglyph Workshop, and many more programs. Subtitle Workshop. Free subtitle editor. Subtitle Workshop is a free application for creating, editing. Additionally, Subtitle Workshop XE can extract audio waveform data from the imported clip, although VLC Media Player needs to be installed on your Mac. Fine-tune subtitles and correct any errors that may be present. Subtitle Workshop XE can check your files for issues and let you know if there.
1. Install Snow Leopard from install DVD.
2. Update to 10.6.8 using Software Update.
3. Download El Capitan here.
“I can’t download an old version of Mac OS X”
If you have a newer Mac, there is no physical option to install Mac OS versions older than your current Mac model. For instance, if your MacBook was released in 2014, don’t expect it to run any OS released prior of that time, because older Apple OS versions simply do not include hardware drivers for your Mac.
But as it often happens, workarounds are possible. There is still a chance to download the installation file if you have an access to a Mac (or virtual machine) running that operating system. For example, to get an installer for Lion, you may ask a friend who has Lion-operated Mac or, once again, set up a virtual machine running Lion. Then you will need to prepare an external drive to download the installation file using OS X Utilities. Download firefox for mac os x 10 6 8.
After you’ve completed the download, the installer should launch automatically, but you can click Cancel and copy the file you need. Below is the detailed instruction how to do it.
STEP 3. Install older OS X onto an external drive
Download Firefox For Mac 10.7.5
The following method allows you to download Mac OS X Lion, Mountain Lion, and Mavericks.
Start your Mac holding down Command + R.
Prepare a clean external drive (at least 10 GB of storage).
Within OS X Utilities, choose Reinstall OS X.
Select external drive as a source.
Enter your Apple ID.
Download Firefox For Mac 10.7
Now the OS should start downloading automatically onto the external drive. After the download is complete, your Mac will prompt you to do a restart, but at this point, you should completely shut it down. Now that the installation file is “captured” onto your external drive, you can reinstall the OS, this time running the file on your Mac.
Boot your Mac from your standard drive.
Connect the external drive.
Go to external drive > OS X Install Data.
Download Firefox For 10.7.5

Locate InstallESD.dmg disk image file — this is the file you need to reinstall Lion OS X. The same steps are valid for Mountain Lion and Mavericks.
How to downgrade a Mac running later macOS versions
If your Mac runs macOS Sierra 10.12 or macOS High Sierra 10.13, it is possible to revert it to the previous system if you are not satisfied with the experience. You can do it either with Time Machine or by creating a bootable USB or external drive.
Instruction to downgrade from macOS Sierra
Instruction to downgrade from macOS High Sierra
Instruction to downgrade from macOS Mojave
Instruction to downgrade from macOS Catalina
Before you do it, the best advice is to back your Mac up so your most important files stay intact. In addition to that, it makes sense to clean up your Mac from old system junk files and application leftovers. The easiest way to do it is to run CleanMyMac X on your machine (download it for free here).
Visit your local Apple Store to download older OS X version
If none of the options to get older OS X worked, pay a visit to nearest local Apple Store. They should have image installations going back to OS Leopard and earlier. You can also ask their assistance to create a bootable USB drive with the installation file. So here you are. We hope this article has helped you to download an old version of Mac OS X. Below are a few more links you may find interesting.
These might also interest you:
0 notes
Text
Beta Office 2016 For Mac

Become an Insider: be one of the first to explore new Microsoft 365 features for you and your business. Microsoft introduced Office 2016 for Mac four months ago as a preview, but today removed the under-construction signage from the suite of five applications: Excel, OneNote, Outlook, PowerPoint.
Office for Mac has often played second fiddle to the flagship Windows version that powers Microsoft's productivity software empire, but it's important for plenty of computer users nonetheless.
It's thus good to see Microsoft nearly finished with a long-awaited update that brings the OS X and Windows versions of Office closer together in style, while adding integrations with Microsoft's OneDrive cloud storage. A preview version of Office for Mac 2016 was released today, and there's enough to give Mac users reason to look forward to the final bits and reminders of bugginess that can afflict Microsoft software for the Mac.
The preview for OS X Yosemite is free to download and use until its official release in the second half of 2015. It includes Word, Excel, PowerPoint, Outlook, and OneNote. We've already covered the Outlook and OneNote redesigns, so we'll just focus on Word, Excel, and PowerPoint in this brief hands-on.
Microsoft fully supports Office 2016, Office 2019 and Microsoft 365 for Mac on 10.14 Mojave when you have the following Office updates installed: Microsoft 365/2019 - Build 16.17.0 or later. Office 2016 - Build 16.16.2 or later. Skype for Business 16.21.65 or later. For the best experience with 10.14 Mojave, be sure to keep your Office apps up-to-date. Download: Microsoft Office 2016 For Mac Released Following a successful beta trial period that began in March, the final version of Microsoft Office 2016 for Mac. In this beta incarnation, Word 2016 alone is bigger than the entire Office for Mac 2011 suite. You’ll need 5.6GB of disk space and up to 10 minutes for installation, depending on the speed of your.

Microsoft has been doing a great job making Office cross-platform, with mobile versions for iPhones, iPads, and Android devices. The ability to use Office across Windows, Mac, and mobile devices, all tied together with cloud storage, is what convinced me to recently begin making much heavier use of OneNote and Word for researching and writing articles. That usually means I make heavy use of Windows in a Parallels virtual machine so I can type in the 'real' version of Office, but the Office for Mac 2016 preview gives me hope that I'll be able to reduce my use of that Windows virtual machine.
My Office needs are relatively simple—I don't do much more than type words in an occasionally coherent fashion. But Word for Mac 2011 always drove me away with the bizarre way it handles hyperlinks. When you click a link in a Word for Mac 2011 file, the software offers a message that says, 'Word is preparing to load this document' and then makes you wait far too long before opening the link in your default browser. It's a hyperlink, Office, you don't have to load a document! Maybe it's a minor quibble but it's the kind of thing that made Office for Mac seem very un-modern to me. Anyway, the new Word for Mac preview fixes that problem. Now it just opens links like any normal application does.
The preview is not without bugs. I've barely started using the new Excel and already it has forced me to close the application three times because it wouldn't let me use the mouse to click on different cells. I could still navigate cells with the arrow keys, but I had to restart the software to regain mouse control. It's a good thing you can install the preview without uninstalling Office 2011; the beta and the stable version can both run on your Mac.
It's just a beta so bugs are forgivable, and there's evidence Microsoft is working hard to get this right. We had a Microsoft engineer show up in the comments section of our story earlier today to take bug reports from Ars readers; Microsoft's 'Apple' team is clearly devoted to its craft. So far, I think that's paid off more on the iOS side, where Microsoft Office is among the best productivity tools available. It's time that Office for Mac becomes a full-fledged member of the Office family.
2020-09-11 17:54:39 • Filed to: macOS 10.15 • Proven solutions
Microsoft's Office products are so ubiquitous that they've even invaded Apple's macOS environment. However, after you buy Microsoft Office for macOS 10.15 and start using it, you may run across various issues. Most of these are easily addressable, and this article shows you how to fix issues with the Office suite for macOS 10.15 - officially known as Catalina - that Apple will drop to all Apple desktop and laptop users on 23 September 2019.
Top 4 Common Office Problems on macOS Catalina and Fixes
The Best PDF Editor for macOS 10.15
How to Troubleshoot macOS 10.15 Office Issues
Once you download Microsoft Office for macOS 10.15, currently in public beta, you might notice a few issues that other macOS users have reported. The issues might continue even with the public release version of Catalina, so it will help if you know the most common issues seen in Office for macOS 10.15 and how to fix them. Since Microsoft products don't usually play nice with iOS or macOS devices, there are quite a few of them. The top ones are listed here, along with fixes.
1. Application Slow or Crashes Regularly
Beta Office 2016 For Macs
One of the most frustrating things with any desktop application is that it runs slow, posing a significant hurdle to anyone looking to get their job done quickly. Even worse is a piece of software crashing on you; in such cases, losing unsaved work is a major problem. Here are some ways to fix these issues:
Beta Office 2016 For Macbook Pro
Fix #1: Update your Microsoft Office macOS 10.15 Product Key - If your product is not officially licensed, you may find that it runs slower than it should even though your RAM isn't under any strain from other resource-intensive processes. The obvious fix here is to get a product key to activate your copy of Office. There are several websites that offer generic, master, or OEM product keys that don't have a one-machine-one-license restriction. You can get one of those to activate your product, and see if the issue persists. If it does, move to the next fix.
Fix #2: Upgrade your Microsoft Office Software - If you're running MS Word 2016 for Mac, you might have this same issue cropping up again and again. The icon in the dock will keep bouncing up and down but clicking on it doesn't seem to launch the application properly. Most often you'll need to do a Force Quit by right-clicking on the Word icon and then relaunching it. Instead of doing that all the time, consider upgrading to a higher version of MS Office 2016. The issue is common in version 16.11, but even applying a minor update to version 16.11.1 should do the trick. Oddly enough, this issue is generally seen exclusively with Word 2016 rather than Excel or PowerPoint.
2. Documents Saved in the Wrong Format
Some users have reported that documents that are saved in PDF format sometimes show up as .DOCX files. This typically happens when you're saving documents to a cloud service, specifically, OneDrive, Microsoft's own cloud storage service. There's no permanent fix, unfortunately, but there's a workaround that will fix the problem for a particular file.
Fix #1: Fix #1: Rename, Save Locally, Then Save to Cloud - The way to circumvent this problem is to go into OneDrive, change the .docx file extension to .pdf, then switch the location to be saved as local. After that, you need to change it again to OneDrive, which usually fixes the issue.
3. Excel Issues: Format or Extension Not Valid
One of the more frustrating issues with Microsoft Excel for Mac is the problem with permissions. Protected files usually request that you grant permission before they can be opened. This is usually in the form of what is called the Open or User password. The issue with macOS 10.15 Office (Excel only) is that it will ask you for permission even if you didn't set a password, and then the system either freezes or alerts you that the .xlsx file extension is not valid or is the wrong format. Basically, Excel tells you that its own files are of the wrong type!
Fix #1: Delete a Library File - Microsoft doesn't have a fix for this yet, but they suggest a workaround. The first thing is to Force Quit Excel and then delete a specific file from your library. The file path is ~/Library/Containers/com.microsoft.Excel/Data/Library/Preferences, which you can access using the Go To function in the Finder menu. Once there, delete the file called com.microsoft.Excel.securebookmarks.plist by right-clicking and moving to Trash. Relaunch Excel, and the problem should have gone away temporarily. You may need to do it each time you face the issue until Microsoft releases a permanent fix.
4. Font Problems in Office 2016 Version 16.9 for macOS 10.15
There's a weird issue that occurs in this specific version of Office 2016 for Mac. What happens is that your fonts get all messed up. At times one font will appear as another, or looks like garbled text, or certain fonts might even be missing from the drop-down list. The problem is that you may have multiple copies of the same font loaded in your Mac, which causes errors with the Font Picker in Office. Here's the fix.
Fix #1: Set Active Copy for Fonts - First, open the Font Book app on your Mac. This can be found in the Applications folder in Finder. You can also search for and select it using Spotlight. Once it's open, choose the All Fonts option in the left sidebar menu and click the information icon, which is a lower case letter 'i'. If you know which font is causing the issue, click and expand it in the center panel. Make sure that only the latest versions are set to On. However, first, turn every version to On, and then where you see the warning message on the right-side panel, click on Resolve Manually and pick the most recent version. This is what is known as the Active Copy. Close Font Book, go back to the Office application where you first faced the issue, and see if it's resolved.
The Best PDF Editor for Mac to Complement Office for macOS 10.15 Catalina
The Office suite is incomplete if you don't have a robust PDF editor. Since Word, Excel, and PowerPoint are generally saved as PDF for easy portability and sharing, you'll need something like PDFelement to round out the experience. This is a powerful piece of software that costs a fraction of what you would pay for the same features in Adobe Acrobat Pro DC. It contains all the features typically used in an office environment, such as signing PDF contracts and agreements, filling or creating forms, redacting confidential information when sharing internal documents with outsiders, securing and encrypting PDF documents, and much more.
Beta Office 2016 For Mac Os
As a matter of fact, the matches Adobe Acrobat's product feature for feature, providing users with editing, annotation, page management, merging, and other essential tools to increase your productivity and speed up the workflow in your office. Although Word does have some basic PDF functionality, it can only convert from Word to PDF. On the other hand, PDFelement is a dedicated PDF management software that offers bulk conversions from and to multiple other formats, OCR (optical character recognition), data extraction from scanned forms and documents, and other essential capabilities. If you have macOS systems in your workplace and have opted for Microsoft Office for Mac, then PDFelement is an equally essential productivity tool.
Free Download or Buy PDFelement right now!
Free Download or Buy PDFelement right now!
Buy PDFelement right now!
Buy PDFelement right now!
0 Comment(s)
0 notes
Last Seen Blogs

fuckyeahlate90searly2000s
Fuck Yeah Early 2000s Style

tan56-sex-60kil
Tan

rabbiteclair
hats for every occasion

ynmusic
Yevgeniy Nikitenko Music

theotherendcomics
The Other End