#I’m not sure how many colors you can have on the taskbar but it’s a lot more than 3 now
Text

Long time no goodnotes drawing :)
#it’s so much more usable for art now!!!!#I’m not sure how many colors you can have on the taskbar but it’s a lot more than 3 now#and color history my beloved!!!!#this does not bode well for my productivity this term#oh also Vv redesign#got rid of the choppy hair#figured she’d probably ditch it once she no longer feels the need to be a perfectionist
160 notes
·
View notes
Video
youtube
Okay so!!!! I was tagged by @suengwoo, @soppasofi, and @bossmyc ALL ON MY MAIN EVEN THOUGH I DON’T DO SH*T THERE But anyway :’))))
This is a very sped up version of my super basic coloring process. I was having technical difficulties which I don’t think you can see here but my taskbar is on auto-hide and apparently my screen capturing software and that function do not get a long... at all; so there’s a good chunk in here where I’m just f*cking around with the task bar trying to get it to pop up. ANYWAY.......
I am still SUPER NEW TO GIFFING. I’ve only been giffing for almost 4 months; so there’s still so much to learn! And honestly all these videos have given me a lot of tips and tricks to try and work with!
I never ever have saved a coloring psd, and I color every gif manually every time I do it. This is the most basic adjustment settings that I use (since I don’t want to really color a whole 9 set for Jacob... surprise). But my VS settings are always the same for stages unless the stage is.. uncooperative. YT and non-ts files are a different story but anyway. Below you will see the first gif which has 0 preproccessing, denoising or sharpening from VS, just cut and cropped from raw video and on the bottom is the result!


It’s really nothing to write home to mom about LOL I just try to make them as crisp as I can (and I’m sure there’s better ways to do this than the way I do it!) and make them vibrant without oversaturating which is a problem I faced a lot in the beginning. Typically, for non-blue hued gifs, I don’t even touch hue or color balance for the most part and only will use selective color to get the result I “want”.
Anyway thank you all for tagging me!!! This was super fun once I figured out how to capture my screen to do this. 😂😂
Edit: Oh f*ck lol I guess I should tag some people I have NO IDEA how many of you have done this but I know @heoneyology needs to and probably @bearyounghoon like everyone else I would have tagged has already done this but yeah if you haven’t and you SEE THIS I TAG YOU.
eDIT 2: i literally thought about this the whole time I was contemplating this f*cking video to tag @prince-dongju
4 notes
·
View notes
Text
Chaos Theory
Part Two
(Here, have Jackie solving puzzles. That’s all this part is.)
The city buses stopped running at eleven each night, which meant when Jackie arrived at a bus stop at 12:32am he wasn’t even going to entertain the idea of taking a ride back to his apartment. Besides, even if they did run this late, he doubted any bus driver would give a ride to the city vigilante, which he was easily identifiable as while wearing this suit.
He sat down on the bench, using the light from the streetlights to see while he tore open the cardboard box. The laptop inside was clunkier than the most recent models, and it didn’t have a brand label on it anywhere. When he pried it open, there was a yellow sticky note on the screen, with a message made from letters cut out from a newspaper: The password is your birthday, year and all. 6 digits.
“Oh great. Psycho knows my birthday, got a real stalker here,” Jackie muttered to himself as he powered up the computer. A hysterical smile twisted his face. “What else does he know? My shoe size? My underwear color?” He let loose a small giggle as he typed his birthday into the slot for the password: 100790.
PASSWORD INCORRECT flashed on the screen. Jackie blinked, then reentered the series of numbers, slower. The same message popped up. Jackie leaned back against the bench. Were there more numbers? No, the note said six. Then it hit him. He typed in 071090. The lock screen disappeared, the desktop loading up. Jackie breathed a sigh of relief. Stupid backwards American dates. Stupid American creep getting him to play this twisted game.
Speaking of that guy, he said the first set of puzzles would be in the files. Jackie went to pull off his glove so he could use the mousepad on the laptop before remembering he already took it off. He shrugged, then gave the screen’s desktop a once-over. Mostly empty, except for a few shortcuts on the desktop, including one for Google Chrome. The background picture was a blank red screen that kind of hurt Jackie’s eyes to look at. The only thing pinned to the taskbar was the file explorer, so Jackie clicked on that.
After exploring the files, he found there was a single zip folder in the Documents named “Set 1.” After unzipping it, he found it contained two files: 1.txt and 1.ogg.
Wait, wasn’t .ogg an audio file? Did he dare risk playing whatever message this...gamemaster left for him while in a public place? Sure, it was midnight and the streets were empty as far as he could see, but you never knew...and then Jackie noticed the pair of white earbuds sitting in the box next to the laptop. He closed his eyes and sighed, then plugged the earbuds in and put them on.
The laptop came with an audio player installed, which he clicked on, uploading the 1.ogg file. He pressed play and—
“Jesus fuck!” Jackie yanked out the earbuds, instinctively leaning back against the wave of distorted sound that had blasted his ears. He hurried to press pause on the sound. “What the shhhhhit was that?” He hissed.
He decided to come back to that later, opening the 1.txt file with notepad. Inside was empty, except for a url: 6368616f737468656f7279.com. Jackie frowned, then opened the Internet browser, copy-pasting the url into the search bar.
The webpage that popped up was blank white except for a single line of text: Enter Password with a space to type something.
“Are you fucking—?!” Jackie set the laptop on the bench and stood up, walking a few circles around the bench and pulling on his fingers while he tried to calm down. “Okay. Okay, focus. Think, Jackie. Get into that zone. What could the password be? Where could I find it?”
After a few minutes of walking, something occurred to him. That distorted audio. First, what was the point of it? Why include it if it wasn’t important to the puzzle? And second, he’d heard a lot of distorted audio before. This didn’t sound like random white noise. It sounded like something that had been a normal audio file, but had been tampered with.
So, stands to reason that there would be a way to un-tamper it. And maybe...there would be a message once the puzzle was unscrambled. Jackie took a deep breath, then sat back down and grabbed the laptop again.
The computer’s audio player had settings to edit the file with. After speeding up the sound, playing with the pitch, and reversing the audio, he had it sounding almost recognizable. In fact, it sounded familiar...Jackie pressed the earbuds closer. He knew this song. “What is this?” he muttered. He racked his brains, flapping his wrist to help him think. Come on, he definitely knew it...
“Lone Digger!” He finally shouted. “Yea!” He punched the air. The song was by Caravan Palace, who were absolutely fantastic. Jackie wasn’t usually one for electro swing, but he liked them. He actually recommended them to JJ the other day—
Jackie froze. Oh. JJ.
On the one hand, the gamemaster could’ve chosen the song at random. On the other, if this guy knew who his friends were...how many conversations could he have overheard? What if the song choice meant something?
Jackie checked the time on the laptop clock. 12:41am. He had five hours and nineteen minutes left. That sounded like such a short amount of time. He took a deep breath. The night felt a lot colder than it had even a few moments before.
He’d done his best to clear up the distortion in the song, but there were still some odd random noises. Maybe there was another program to help with that. He scanned the shortcuts on the desktop. A visualizer program? He opened it, then loaded his editted version of the 1.ogg file. There were a few filters he could turn on, and he began messing about with them. When he turned on the spectrogram, he sat up straight. Numbers had suddenly appeared in the visual representation of the sound file. 1031, it read.
Jackie switched back over to the strange website, entering 1031 in the spot for the password. After a few seconds when he waited with baited breath, the page changed from the password screen to a map, along with a sidebar with some text along the left of the screen. He recognized the area the map was showing: a spot in the west side of the city, a historic section. The map had no markers. But the sidebar with text could hold some answers. Three questions were written there.
Jackie took a deep breath, fingers drumming on the bench next to him. This area wasn’t too close, but if he ran, he should get there within thirty minutes. Okay. He was doing good on time. He could do this. He deliberately pushed away the voice in his head reminding him of the stakes of the game, reading through the questions.
1. Q: What is the shortest blade a knife can have and still be brought to a public gathering, as of current city laws?
A: _ inches
2. Q: How many letters are there in the British Sign Language Alphabet?
A: 2_
3. Q: What year was the first film with sound released?
A: 192_
Okay. If Jackie had any doubts about who he was trying to save for the first set, they had now been erased. His stomach was full of worms, but he pushed them down farther and calmly opened another tab on the browser.
He had to Google the city laws on knives, and then open up a converter for metric system to American system, but he found the answer easily enough. He didn’t need Google for the second question; it was technically a trick. If you were talking letters and not signs in general, there were the same number of letters as the spoken and written English alphabet. He did have to look up the last one, though.
(3) inches. 2(6) letters. 192(7).
367.
Jackie examined the map on the screen again. There, an address in the area: 367 Studio Blvd, a street appropriately named as an old film studio was located there. In fact, the studio’s address was 367.
The time was 12:49am.
The clock was tick, tick, ticking.
Jackie slammed the laptop shut. He knew how to get there. He was fast, and he had the stamina to run for a while. He packed the computer and its earbuds back into the cardboard box, then stood up.
“Hang on, Jays. I’m coming,” he whispered. And then he ran.
#jacksepticeye#jacksepticeye fanfiction#jacksepticegos#septic egos#jackieboy man#brigid writes fanfiction#chaostheoryfic
15 notes
·
View notes
Photo

BASIC GIF TUTORIAL (detailed)
In this tutorial, I’ll try to show you the basics of making a gif. Of course, there are many ways for that, but this is how I’ve been making them for a couple of months now, and it’s never failed.
I use Photoshop CS5 Portable (you can get it here)
for taking caps, I’m using PotPlayer (you can get it here)
Please, like / reblog if you find this useful


Videos
To make good quality gifs, you need videos with good quality. Best one for you would be 1080p, so always check if the video you want to gif is available in such quality:

I use this website to convert videos from YouTube. Select the formats to MP4 and highest quality:
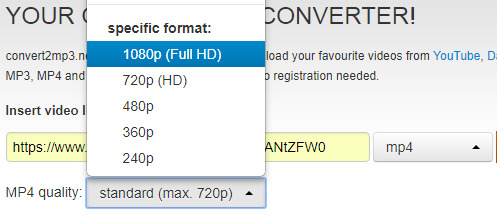
Then convert, and download.
You can use videos from YT or movies you have on your computer. The movies also should be in the best quality possible. For example, this is the movie I’m gonna use for this tutorial:
You can learn about torrents somewhere else, or contact me about that. I suggest visiting YT, though, they have good tutorials for torrenting movies.
PotPlayer
After you’ve installed PotPlayer, it’ll be for the best if you add it to your taskbar or wherever else you consider it easy to click and use.
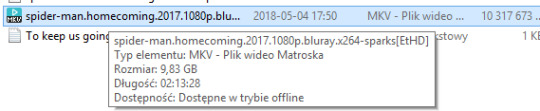
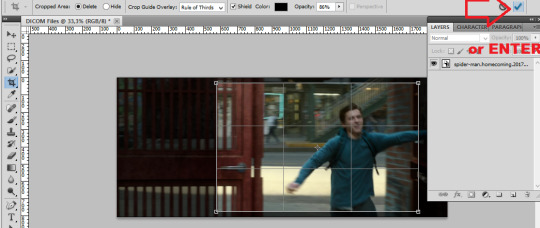
1) Open the video
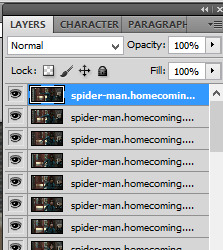
In this tutorial, I’ll be working with Spider-Man: Homecoming, so I open it in the program.

2) Settings
After pressing CTRL + G, this window should show up:
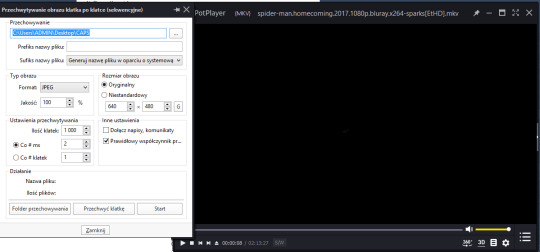
Make sure your settings look like that:
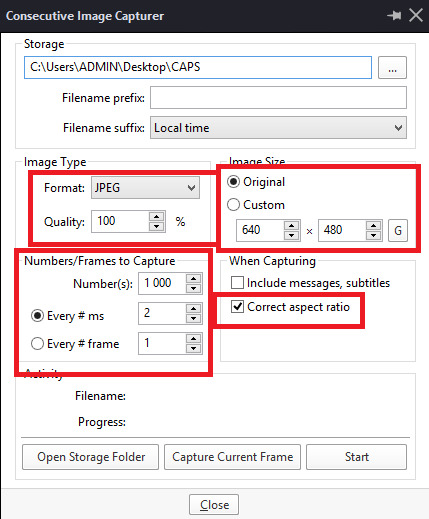
Storage is where your caps will be stored. It’ll be easier when you’ll create a folder on your desktop, and then set the storage setting to it:


3) Taking caps (image capture)
Play the movie on the scene you want to gif, and pause it.

Now, click Start on the CIC window

and play the movie. Click Stop after taking the caps you need.

Your caps should be in the folder you chose in the storage setting
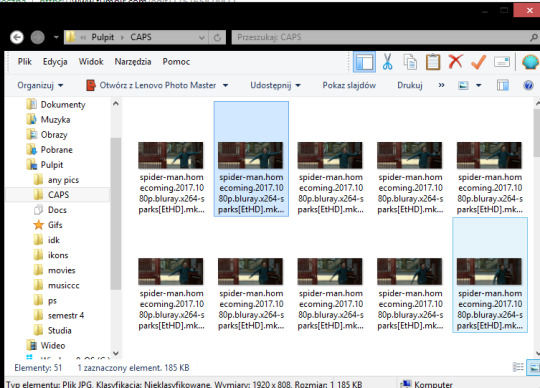
You can also have your movie playing and click start/stop whenever you want (if you know the movie/clip enough to know when to take caps).
Turn off PP after you’ve taken caps you need.
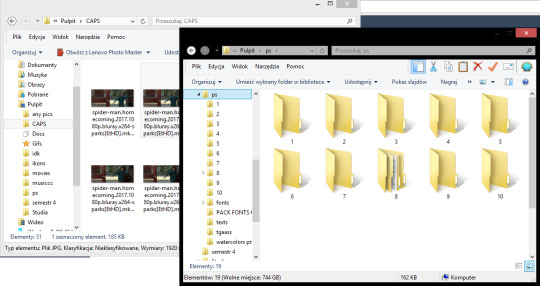
You can take as many caps as you want to, and then sort them into folders:
Photoshop: making frames into a gif
After you’ve installed it (search for tutorials how to properly install it, it takes unpacking and simple installing to do so; I’m more of a self-taught person and I can’t remember how I did it). Again, it’ll be easier for you to have PS in the task bar.

Open your PS,
then try to follow these steps:
[ window > animation - opens the animation window on the bottom ]

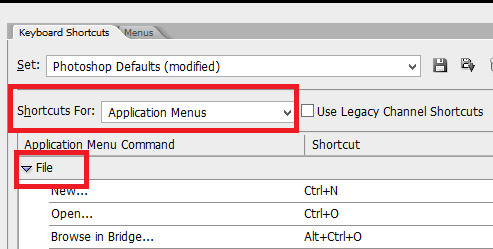
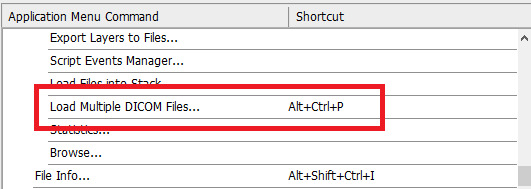
1) File > Scripts > Load multiple DICOM files > choose a file
You can give that command a keyboard shortcut.

This window shows up:
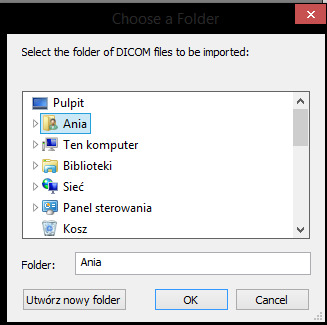
It’s important your folder with caps is on your desktop, so that the access to it is easier:
Click OK. The more caps you try to open at once, and the bigger they are (better quality), the longer it takes to open them. Don’t try to open more than 150 caps at once, it may work, but it’ll lag your PS and may even ruin a bit of your gif.
This is how it looks now:

As you can see, on my right I have specific tabs. I set them myself in the most comfortable for me way, but with time you should find your own way to set them to suit your liking. My tabs look like that:
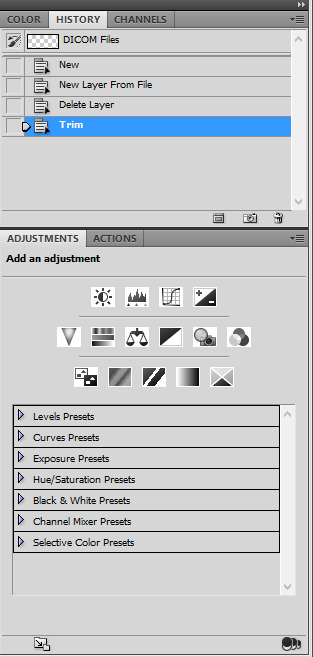
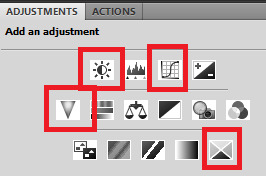
I only use history, actions, and adjustments. Of course, there’s also a tab with layers and paragraphs (text):
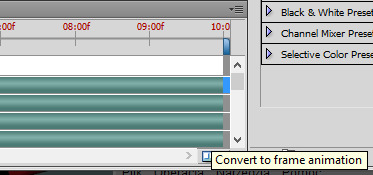
2) Convert to frame animation

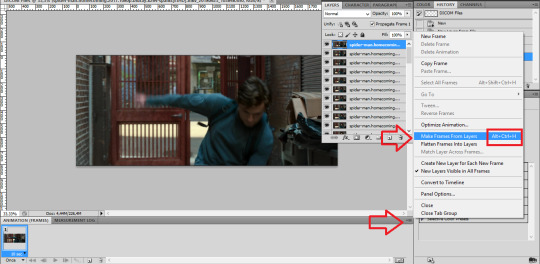
4) Make frames from layers
For that command, you can also set keyboard shortcuts.
result:

5) Select all frames > set the time delay
(again, you can have a shortcut for this)
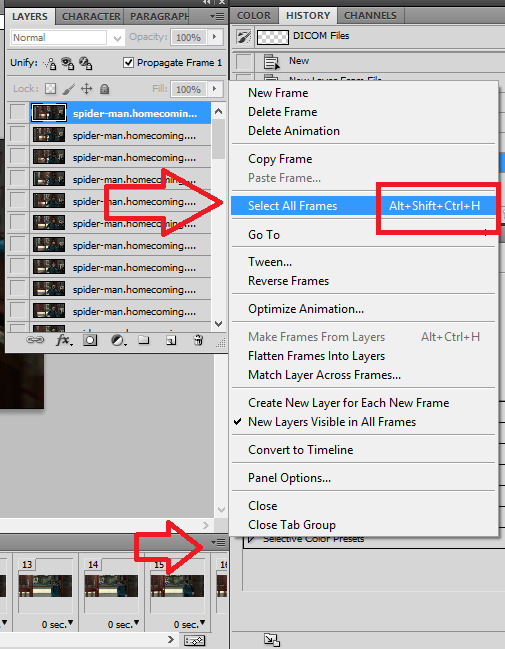

Make sure all the frames are selected, then:

For almost normal speed, choose 0,05. 0,04 can make your gif a bit too fast. The bigger the number (0,06 or 0,07), the slower the gif.

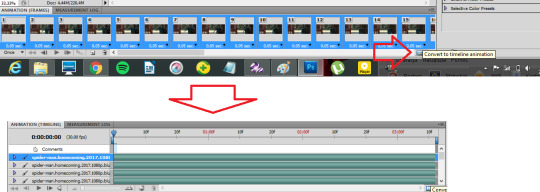
7) Convert to timeline
Make sure the frames are still selected.
8) Select > similar layers
(again, you can set a shortcut for this)

9) Convert to smart object
Right click on one of the selected layers:

Choose convert to smart object. Result:

Photoshop: editing a gif
There comes the fun part. The most important thing is dimensions. Be sure to stick to tumblr width dimensions: 540px / 268-268px / 177-178-177px, depending on how many gifs per row. That way you’ll definitely get the best result when your gif is posted. Visual:

1) cutting/cropping
To crop your gif, use the crop tool.
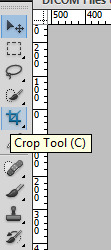
Now, it’s important your gif has the proper size. The bigger the dimansions, the bigger the gif’s size. The maximum size you can post is 3MB. Use this bar to set your crop tool:

5x2 (make sure it says ‘cm’, not ‘px’) is what I use for 540px gifs. For the 268 gifs I use 5x3, 9x5, 11x7 or any other sizing that I think looks good. We’re gonna use the 11x7 for a 268px gif.
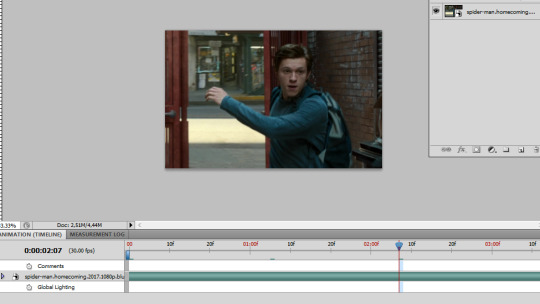
advice: to check if the gif looks good, click on different places in the animation bar:

2) size
image > size or Ctrl+Alt+I:

We’re making a 268px gif (width), but I’m gonna make it 230px so it won’t stretch in the post.

Ctrl + + will enlarge your view:

Make sure the thingy says “100%” so that you have the 100% accurate view of your gif.
3) sharpening
You can either experiment yourself or use actions. Search for actions that you like here, and download the action (make sure to like/reblog the post of the action maker)
Opening downloaded actions:
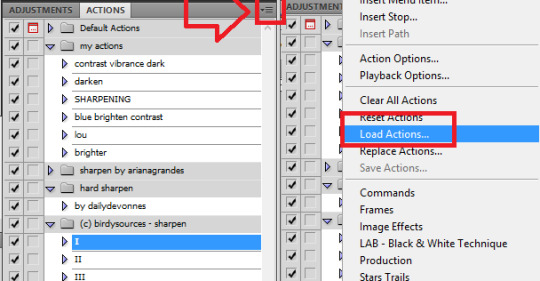
Choose the actions you want to load (it should be in the downloads folder).
Using/playing an action (make sure your gif is selected):


before:

after:

4) editing
This is the fun part when all you can do is to experiment. I’ll show you in parts what I do with that gif, but the fun part is when you try it, yeah?
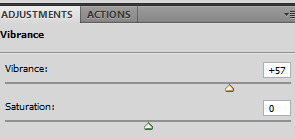
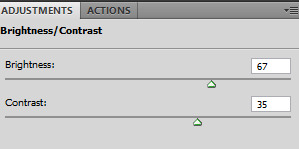
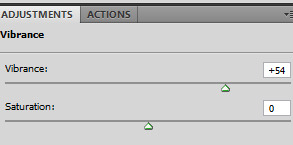
I use these adjustments: brightness, curves, vibrance, and selective color.


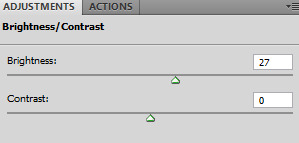
After all of these, the gif looks like that:

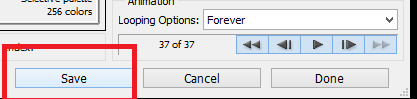
5) Saving


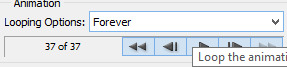
Make sure the looping option says “forever”:
you can play your gif to check if it looks like you wanted:

And save the gif:
(wherever you want, preferably on your desktop)
so, before editing:

after editing:

P.S. To cut your gif after making it, you can move that thingy:
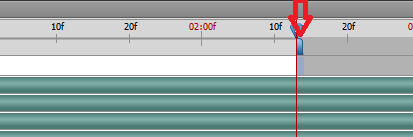
wherever you want.

P.S. 2. Clean up the mess after making gifs. Delete the caps and clean up the trash folder.
That’s basically it. Advanced gif making takes using layers, brush tools, and the eraser tool, playing with colors, and a lot of other stuff.
As you can see, it takes time, patience, energy, and having the movies you want to gif. It’s fun, but it’s a lot of work.
Have fun!
#completesources#gif making#gif tutorial#my tutorial#gifs#yeahps#photoshop#itsphotoshop#iamlouistomlinson#go through it and think another time you try to repost a gif#it takes TIME.#sorry for typos#and grammar#it's MORNING.
839 notes
·
View notes
Text
Windows 11 review: Microsoft’s most pleasant OS—until it isn't
What's the point of Windows 11? With Windows 10, Microsoft had to make a big course correction from Windows 8, an ambitious yet flawed attempt at bringing PCs into the touchscreen era. Before that, Windows 7 was meant as a palate cleanser to help us forget about the bloated mess that was Vista. Given that Windows 10 was already pretty polished when it launched, and only got better over time, why the need for a whole new version?
After testing early builds for months, as well as the shipping release this past week (here's how to nab it yourself), it's clear that Microsoft isn't actually trying to fix much with Windows 11. It's basically a fresh coat of paint on top of Windows 10 (and likely a last-ditch attempt at rebranding the defunct Windows 10X.) But the more I use it, the easier it is to see that small design tweaks can go a long way. Windows 10 was laser-focused on productivity; it aimed to make you as efficient as possible. Windows 11 goes a step further: What if being productive was also pleasant and oddly relaxing? Windows, meet mindfulness.
What's new
At first glance, Windows 11 may seem like a radical departure from Microsoft's typical desktop template — an aesthetic that hearkens all the way back to Windows 95. The taskbar is still around, but now all of your icons are centered by default. The Start menu is back with a redesigned look featuring pinned and recommended apps (you can also hit All Apps to see everything you've got installed). RIP, Live Tiles — nobody ever used you.
Devindra Hardawar/Engadget
This refreshed look extends throughout Windows 11: App windows now have rounded corners; icons, Windows Explorer and the Settings app look sharper than ever; and even the sound effects have been cleaned up. This is Windows at its most refined. To put it uncharitably, though, it also seems a lot like macOS. But fret not, Windows diehards: You can still shove the entire taskbar back to the left side of the screen. (Editor’s note: Where it belongs.)
Microsoft has also reworked system tray, for better and worse. Hitting the date and time brings up your notifications and calendar, while clicking on the volume or networking icons makes the new action center pop out. It’s similar to the system shortcuts in Windows 10, allowing you to change Wi-Fi networks, enable airplane mode and quickly change your brightness and volume. You can also easily reach some accessibility tweaks, like enabling the magnifier or color filters. Everything looks sleeker than Windows 10, though some options are gone entirely, like the ability to turn Night Lite settings on and off.
Windows 11 also marks a major return for widgets: bite-sized apps that also appeared in Windows 7. You can reach them by hitting the widget button in the taskbar, but frankly, I found them useless. These days, I don’t need a glanceable screen for my calendar, news and mail, not when my smartphone is always within reach.
Microsoft
Less noticeable than the taskbar changes, but still important, is the new Windows Store. It looks cleaner, with a left-hand navigation bar and multiple panes for individual app entries. I'd wager Microsoft just wanted to keep those install and purchase buttons in clear view at all times. Windows 10 is also getting the same Store app eventually, so it's not really an exclusive for the new OS. Eventually, we'll also see Android apps in the Microsoft Store, but it's unclear when that's happening.
Similarly, Windows 11 ships with the latest Xbox app, but that's also available on Windows 10. You'll still want to upgrade for the best overall gaming performance, though, as Windows 11 will be the only way to use Microsoft's DirectStorage technology on PCs. Whenever that does land it should dramatically speed up load times (assuming you have a compatible GPU and SSD) just like the Xbox Series S and X.
Microsoft
Calm from the start... mostly
On a new PC, Windows 11 welcomes you with a series of setup screens that feel like you're flipping through a spa brochure. Log into your Wi-Fi (or plug into Ethernet), enter your Microsoft credentials, and maybe grab a cucumber water while you wait.
As with Windows 10, you can choose to disable advertising IDs, which prevents ad tracking, and opt out of sending diagnostic information to Microsoft. But there aren't many other choices you'll have to make; the setup process basically runs on autopilot until you see the new desktop.
It's worth noting that Microsoft has made setup more restrictive for Windows 11 Home users: Both an internet connection and Microsoft account are required. You won't be able to set up a local user account, or use your computer at all, until you meet those requirements. Windows 11 Pro users won't have that limitation, which is good news for IT professionals and power users. But it could be frustrating for people without reliable internet access of their own.
(As of last year, the FCC said around 14.5 million Americans don't have steady broadband, defined as at least 25Mbps download speeds and 3Mbps uploads. Recent figures from Data Reportal say around 40 percent of the world's population are offline. Microsoft is probably assuming that the majority of its potential customers won't have an issue finding internet, but that goes directly against the company's moves towards increased accessibility.)
I'd expect many consumers will be upgrading their existing Windows 10 systems, rather than setting up a new computer. Unfortunately, Microsoft didn't have a way for me to upgrade my PC with a final Windows 11 release. Based on what I've seen with the latest Windows 11 Insider previews, though, moving to the new OS appears to be very similar to installing a major Windows 10 update. On a Surface Laptop 4 I had lying around, the upgrade process took around 15 minutes after downloading the new OS via Windows update.
You're going to have a tougher time if you own an older PC that doesn't meet Microsoft's hardware requirements. You'll need a compatible Intel, AMD or Qualcomm processor; 4GB of RAM; and at least 64GB of storage. Also, you'll have to enable Secure Boot and TPM 2.0 (Trusted Platform Module), features that should make it harder for spyware and malware to attack your OS. Microsoft's PC Health Check app can help you see if your system is ready for Windows 11.
If you don't meet the upgrade requirements, you can download a Windows 11 ISO and install it manually, a method that bypasses Microsoft's CPU restrictions. Still, you'll need to be savvy enough to create a boot disk and deal with a more complex installation. Another caveat: manual installations may not receive some future Windows Updates, according to The Verge. (It sounds like Microsoft hasn't decided how restrictive it wants to be just yet.)
If you've built your own desktop PC, I'd suggest bracing yourself for additional upgrade complications. Microsoft's Health Check app initially said that my system — powered by an AMD Ryzen 7 5800X processor, an ASROCK motherboard and 32GB of RAM — wasn't compatible with Windows 11. It turned out I needed to enable the AMD TPM 2.0 module and Secure Boot in my BIOS. But once I did all that, my system couldn't boot into my Windows 10 installation.
After a bit of sleuthing, I learned that I needed to convert my Windows 10 installation disk from MBR (Master Boot Record) to GPT (GUID Partition Table). So off I went into the command line to run some strings and pray for my Windows installation's safety. Five sweat-soaked minutes later, I rebooted and saw my trusty Windows login screen. Whew. From there, I was able to proceed with the Windows 11 Update as normal.
I'm sure I'm not the only one with a Windows 10 installation on an MBR disk — that was the standard on older computers — so I'm hoping Microsoft eventually bakes that conversion into the entire Windows 11 setup process. I can't imagine average consumers trying to figure out command line prompts without wanting to throw their PCs out the window.
Microsoft
In use: A new look, new frustrations
Windows 11 is nice to use. Pleasant, even. Windows 10 wasn't ugly, but Windows 11's focus on design leads to a more refined experience at first. I enjoyed having color-matched themes. The new Settings app is a dream; it's actually easy to find things for once! I genuinely love the new automatic window snapping, which lets you shove an app to a particular area of your screen by hovering above the maximize icon. Even better, snapping a few apps together creates a group that you can easily revisit in the taskbar.
That facelift doesn't come at the expense of performance, either. Windows 11 feels just as fast as Windows 10 on all of my test systems. But I'll be more interested to see how it performs on PCs older than five years, which is about the cut-off for Microsoft's upgrade requirements.
As impressed as I am by the design changes, a part of me feels constrained by the new OS. No matter where you place your taskbar icons, for example, you won't be able to see app labels anymore. Microsoft has been pushing an icon-focused taskbar since Windows 7, but you always had the option to turn on labels, so you could see what was in an app window before you clicked on it. Dealing with that loss is the single biggest hurdle I had with Windows 11.
Devindra Hardawar/Engadget
Now it takes me multiple clicks to find a specific Chrome window, or to locate an email I popped out of Gmail. Icons just aren't enough. I can understand why Microsoft took away labels: They make your desktop look chaotic. It's not nearly as zen as a simple line of high-resolution pictures.
But as a Windows user, I'm used to chaos. I was shaped by the instability of Windows 3.11; I learned to tame Windows XP as an IT admin; and I was there at the Windows 8 launch in Spain (an event that seems cursed in retrospect). Even after all of that, I'm still primarily a Windows user. If chaos can make me more productive, I embrace the madness. Sadly, Windows 11 doesn't give me that option. It just wants me to relax, damnit.
To be fair, I have similar issues with macOS. As pretty as it is, finding a specific app window can be frustrating. To mitigate that, I typically rely on Mission Control to establish hot corners that can either show me every open app, windows within a specific program, or the desktop. Windows 11 lets you set up a hot corner in the bottom right of your screen to show the desktop, but you'll have to rely on keyboard shortcuts to see open apps. (I'm still debating whether Alt + Tab or Win + Tab is better.)
After spending so much time with Windows 11, I'm begrudgingly getting the hang of the new taskbar, at least. I'd bet some Windows diehards will be similarly frustrated with the new Start menu, especially if they're used to seeing all of their apps instantly. Personally, I find the focus on shortcuts and recently added files and apps to be more useful. And as of Windows 10, I just hit the Windows key and start typing to search for specific apps. (I'm glad that's still practically instantaneous on the new OS.)
I’ve only dabbled in the Windows 11 touchscreen experience so far, but in general it feels easier to hit specific targets. Microsoft has also made apps more responsive to touch, so it’s being able to quickly expand and maximize windows feels less frustrating. You still won’t mistake Windows 11 for iPadOS, but I never expected Microsoft to go that far. This new OS is simply better for laptops that have touchscreens, and it’s far more usable for hybrid tablets like the Surface Pro.
While I've found Windows 11 pleasant overall, I'll be interested to see how mainstream users react to all of the changes. Some members of Engadget's staff initially found the new design to be ugly (some warmed up to it later), and at least one was grateful I explained how to move the taskbar back to the left. It's tough for Microsoft to make any major changes to Windows without having users throw a fit. (Remember everything that happened around Windows 8?) So I expect the initial reaction isn't going to be welcoming. Let's just say I'm glad I'm no longer in IT support for this transition.
Microsoft
So, who needs Windows 11?
To paraphrase Thanos, Windows 11 is inevitable. It's going to start rolling out to eligible Windows 10 users today, and it will ship with new PCs this Fall. Aside from re-learning the taskbar and Start menu functionality, there's not much of a reason to avoid it. The new Secure Boot requirements will make it a safer OS overall; gamers will eventually get faster loading times; and everyone can appreciate the clean new aesthetic.
It's a step forward, even if it isn't as momentous as Windows 10. It's also hard to ignore the story behind the new OS, which makes Windows 11 feel more like a way for Microsoft to save face after an embarrassing failure. In the fall of 2019, the company announced Windows 10X, an OS variant meant for dual-screened PCs. Those devices, like the intriguing Surface Neo, failed to arrive. (It's unclear if the complex new hardware was the roadblock, or if PC makers were waiting for Windows 10X to be completed.)
Microsoft announced last year that it was shifting the focus of 10X to single-screened devices, and it put the final nail in the coffin this May, when it said that Windows 10X development had stopped. A few weeks later, we got word that Microsoft was gearing up to reveal the next version of Windows, and shortly after that the Windows 11 leak occurred. On June 24th, with practically all of its new features spoiled, Microsoft officially revealed its new OS.
Devindra Hardawar/Engadget
In my head, I imagine the frantic meetings around Windows 10X's rocky development like something from The West Wing creator Aaron Sorkin. With dual-screened devices a no-show, maybe they could just repurpose that work for traditional laptops, a harried Panos Panay would say. But why even make that a separate version of Windows 10? The PC market is pretty hot right now, perhaps there's a way to capitalize on that? And at some point, someone just said "Why not just go to 11?" A stunned silence. Applause all around.
Not to sound too cynical, but releasing a new OS is an easy way to encourage people to buy new computers. That's particularly true now that we're relying on our PCs more than ever, as many people are still working and doing schoolwork from home. A new version of Windows is no simple thing, and it’ll surely get more headlines and media attention than a mere Windows 10 update. (Stares directly into camera.)
from Mike Granich https://www.engadget.com/windows-11-review-microsoft-mindful-os-200028040.html?src=rss
0 notes
Text
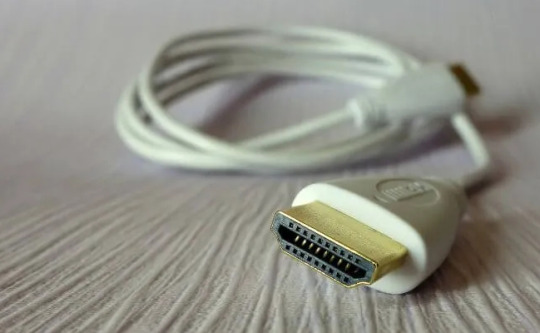
How to setup Windows Dual Monitor ! For gamers, content creators and multitaskers
About 80% of the devices in our country are using Windows 10 and about 800 million devices worldwide are using Windows 10. And I'm using Windows 10 myself. So today I will discuss with you, how to speed up work on your computer using dual monitors at the same time Super Duper Fast. Let's discuss without further ado.
When you open multiple windows or applications on your computer, you have to use one window or application to minimize the other, which greatly reduces your productivity. However, if you use a dual monitor on your computer, you can open one window or application on one monitor and another window or application on another monitor and simultaneously work two windows or applications at the same time, so your productivity will be super duper fast.
If you are a gamer, content creator or data analyst or multitasker, in this tune I will show you how to set up dual monitor in your Windows operating system.
How to setup dual monitor in Windows 10
Via cable
Using the docking station, and
Using casting devices
Windows 10 has a variety of features and settings that allow you to use multiple monitors without having to use third party applications, and you can also set up multiple monitors using the popular Windows 10 command.
Now, if you want to set up a dual monitor on your desktop or workstation or set up a separate monitor for your laptop, follow the steps I have shown below.
amzn_assoc_tracking_id = "failedboybd-20"; amzn_assoc_ad_mode = "manual"; amzn_assoc_ad_type = "smart"; amzn_assoc_marketplace = "amazon"; amzn_assoc_region = "US"; amzn_assoc_design = "enhanced_links"; amzn_assoc_asins = "B081QP153Y"; amzn_assoc_placement = "adunit"; amzn_assoc_linkid = "3b0de6152900366b52fe64585726592a"; amzn_assoc_tracking_id = "failedboybd-20"; amzn_assoc_ad_mode = "manual"; amzn_assoc_ad_type = "smart"; amzn_assoc_marketplace = "amazon"; amzn_assoc_region = "US"; amzn_assoc_design = "enhanced_links"; amzn_assoc_asins = "B086RDCX67"; amzn_assoc_placement = "adunit"; amzn_assoc_linkid = "d7acd83dee4744b0a12cabbdcb3c0c7a"; amzn_assoc_tracking_id = "failedboybd-20"; amzn_assoc_ad_mode = "manual"; amzn_assoc_ad_type = "smart"; amzn_assoc_marketplace = "amazon"; amzn_assoc_region = "US"; amzn_assoc_design = "enhanced_links"; amzn_assoc_asins = "B085QHSJX5"; amzn_assoc_placement = "adunit"; amzn_assoc_linkid = "84cb31be4cdc70c00e00df43d0c6a686"; amzn_assoc_tracking_id = "failedboybd-20"; amzn_assoc_ad_mode = "manual"; amzn_assoc_ad_type = "smart"; amzn_assoc_marketplace = "amazon"; amzn_assoc_region = "US"; amzn_assoc_design = "enhanced_links"; amzn_assoc_asins = "B085CD4GC9"; amzn_assoc_placement = "adunit"; amzn_assoc_linkid = "dfc09c7a81cbc273f83571264d4472d6"; amzn_assoc_tracking_id = "failedboybd-20"; amzn_assoc_ad_mode = "manual"; amzn_assoc_ad_type = "smart"; amzn_assoc_marketplace = "amazon"; amzn_assoc_region = "US"; amzn_assoc_design = "enhanced_links"; amzn_assoc_asins = "B0827MVWCD"; amzn_assoc_placement = "adunit"; amzn_assoc_linkid = "c9f50fafc17161b7ed3ef745f7722c41";
Dual monitor setup via cable
First of all, before setting up a dual monitor, make sure you have all the cables you need to connect an extra monitor to your PC.
And what kind of cable you need depends on what kind of PC (new or old model) you are using. Look at the back of your PC to be sure what cable is needed. The cables used to transmit video signals include HDMI, VGA, DVI, or DisplayPort, and the monitor's power cable.
If you are not sure, look at the back of the monitor in the same way to see what kind of cable is connected. But if you want to know how to connect the cables, then look at the user manual and check the model of the monitor. And you can see the connecting ports of the monitor at the bottom of the back of the monitor.
Blue Yeti Microphone Bangla Review 2020
The Xperia 5 ii 5G looks gorgeous in these new renders
What is a backlink ? And how to earn ?
How To Make Money On Youtube Without Monetization 2020
Xiaomi Mi Note 10 128GB ROM / 6GB RAM Buy Now Amazon
There was a problem with the Windows 10 update 2020
Note: The video connection on your PC must match the video connection on your monitor. If your PC has only a DVI connection port and your monitor does not have the same port, you will need to connect the monitor using a converter cable or special adapter.
HDMI cable is currently the most popular and widely used display connection cable. And now almost all TVs and most computer monitors have at least one HDMI port and an HDMI cable, so if you don't have one you can pick it up from any computer store nearby.
Similarly, for smaller devices there are different types of HDMI ports such as mini and micro HDMI ports or standard HDMI ports.
Most, however, older computers have VGA or DVI ports, which are made up of many metal pins that connect your monitor to the PC. But currently, the new monitors available in the market do not have VGA or DVI ports, but you can convert from DVI to HDMI port using the converter cable.
HDMI is not so common as a displayport, but high-configuration laptops have a similar connection port to comparatively the latest monitors and dedicated graphics cards. In addition, new Android smartphones and the latest MacBooks use USB-C as a connection port, and monitors that support USB-C input can be used as dual monitors. Alternatively, you can use a dual monitor from USB-C to an HDMI / DisplayPort converter.
Now, plug in a cable (HDMI, VGA, DVI, or DisplayPort) that matches both your PC and monitor and also connect the monitor's power cable and turn on the monitor.
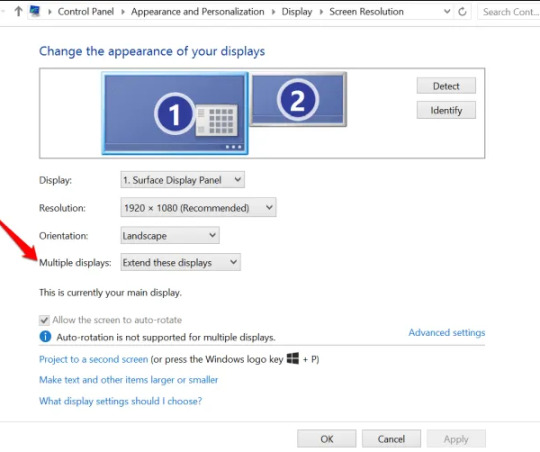
How to configure the display
You seem to have figured out what the next step will be, but now I'm going to talk about how to configure a dual monitor. And this means that you are going to duplicate or extend the desktop display of the first monitor with your second monitor so that your Windows system can detect and use the second monitor. In most cases, Windows Automatically detects and configures the monitor without your input or configuration but you need to follow the steps below to configure the monitor properly.
amzn_assoc_tracking_id = "failedboybd-20"; amzn_assoc_ad_mode = "manual"; amzn_assoc_ad_type = "smart"; amzn_assoc_marketplace = "amazon"; amzn_assoc_region = "US"; amzn_assoc_design = "enhanced_links"; amzn_assoc_asins = "B081QP153Y"; amzn_assoc_placement = "adunit"; amzn_assoc_linkid = "3b0de6152900366b52fe64585726592a"; amzn_assoc_tracking_id = "failedboybd-20"; amzn_assoc_ad_mode = "manual"; amzn_assoc_ad_type = "smart"; amzn_assoc_marketplace = "amazon"; amzn_assoc_region = "US"; amzn_assoc_design = "enhanced_links"; amzn_assoc_asins = "B086RDCX67"; amzn_assoc_placement = "adunit"; amzn_assoc_linkid = "d7acd83dee4744b0a12cabbdcb3c0c7a"; amzn_assoc_tracking_id = "failedboybd-20"; amzn_assoc_ad_mode = "manual"; amzn_assoc_ad_type = "smart"; amzn_assoc_marketplace = "amazon"; amzn_assoc_region = "US"; amzn_assoc_design = "enhanced_links"; amzn_assoc_asins = "B085QHSJX5"; amzn_assoc_placement = "adunit"; amzn_assoc_linkid = "84cb31be4cdc70c00e00df43d0c6a686"; amzn_assoc_tracking_id = "failedboybd-20"; amzn_assoc_ad_mode = "manual"; amzn_assoc_ad_type = "smart"; amzn_assoc_marketplace = "amazon"; amzn_assoc_region = "US"; amzn_assoc_design = "enhanced_links"; amzn_assoc_asins = "B085CD4GC9"; amzn_assoc_placement = "adunit"; amzn_assoc_linkid = "dfc09c7a81cbc273f83571264d4472d6"; amzn_assoc_tracking_id = "failedboybd-20"; amzn_assoc_ad_mode = "manual"; amzn_assoc_ad_type = "smart"; amzn_assoc_marketplace = "amazon"; amzn_assoc_region = "US"; amzn_assoc_design = "enhanced_links"; amzn_assoc_asins = "B0827MVWCD"; amzn_assoc_placement = "adunit"; amzn_assoc_linkid = "c9f50fafc17161b7ed3ef745f7722c41";
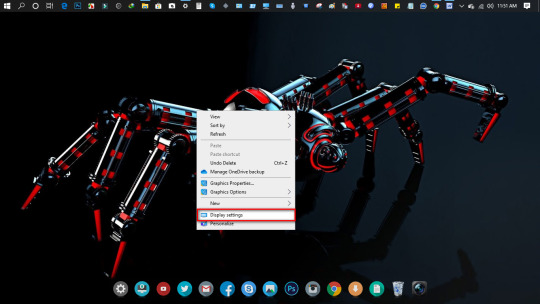
Go to your PC's desktop screen and right-click anywhere
Select Display Settings
Scroll down to see the Multiple Displays option and click the Detect button just below it.
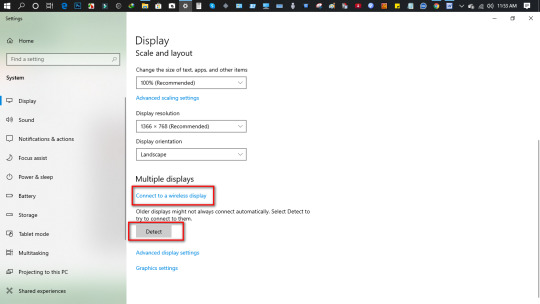
And for wireless monitors, click on the Connect to a wireless display option which is just below the Multiple Displays option.
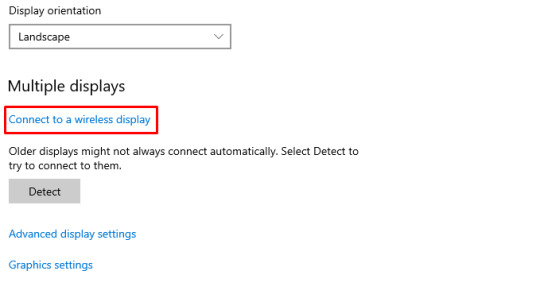
A wireless monitor, which can show your PC or mobile device via Miracast the image of the monitor or mobile screen on the PC through your wireless monitor WiFi Direct interface. This allows you to duplicate or extend your desktop screen wirelessly and connect to your mobile device's screen monitor via WiFi (depending on your device) via dual cast.
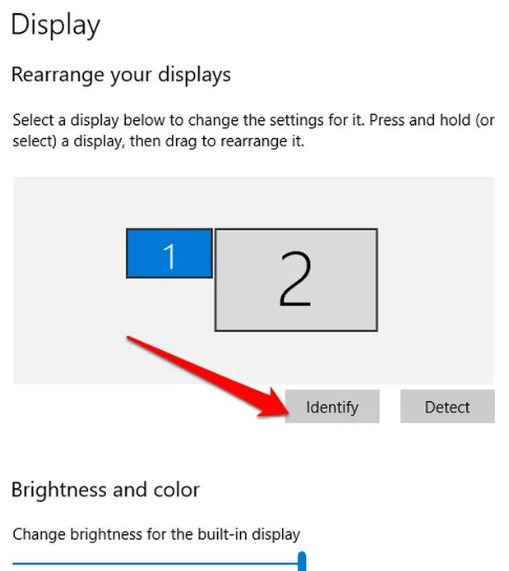
You can also set the order of the monitor by clicking on the Identify option. Windows systems will display numbers 1 and 2 on each screen, so you can easily find out which one is number 1 and which is number 2.
If you want to select the monitor on your PC as the main screen, go back to the Multiple Displays section and select the Make this my main display box or Use this device as the primary monitor.
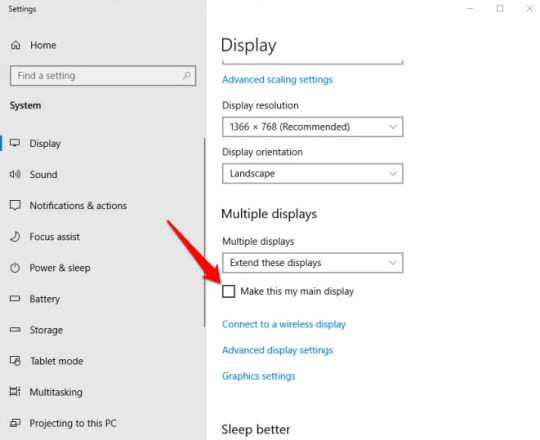
Note: Your system's Start Menu, Clock, Taskbar, and other applications will be on the primary / main screen or monitor, but if you want to see them (Start Menu, Clock, Taskbar, and other applications) on both screens or monitors, right-click on the taskbar in the taskbar. > Properties> Show taskbar on all displays.
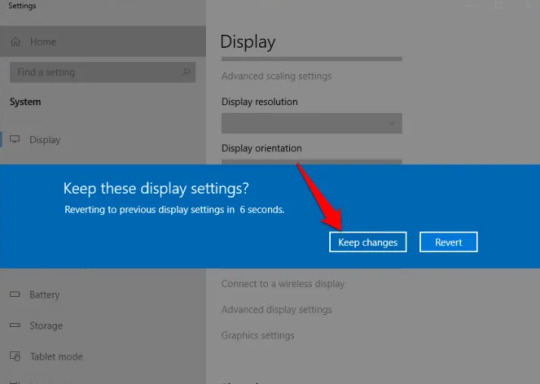
Now adjust the orientation and resolution according to the screen according to the size of your monitor and click the Keep Changes button to save the new display settings.
Personalize the display order on your monitor
Once the second monitor is connected and the display is set up, you can personalize and customize it. From here you can change different settings
The start screen will only show on your first monitor and not on the second monitor
Setting taskbar preferences (right click on the taskbar then go to Taskbar> Settings> Taskbar preferences option)
Change the background image to your liking (right click on the desktop then Desktop > Personalize and change the image, theme or color)
Blue Yeti Microphone Bangla Review 2020
The Xperia 5 ii 5G looks gorgeous in these new renders
What is a backlink ? And how to earn ?
How To Make Money On Youtube Without Monetization 2020
Xiaomi Mi Note 10 128GB ROM / 6GB RAM Buy Now Amazon
There was a problem with the Windows 10 update 2020
Note: Windows 10 has a new panoramic theme that lets you set a panoramic picture on your two monitors. So to enable it, go to Start> Settings> Personalization option.

Click on Browse option to select a panoramic image. And to fit both monitors, select Choose a fit> Span option, now you are fully ready to use the dual monitor.
How to set up dual monitors in Windows 8 and 7
You can also set up dual monitors if you are using Windows 8 or 7. However, you can set it up in a slightly different way from Windows 10.
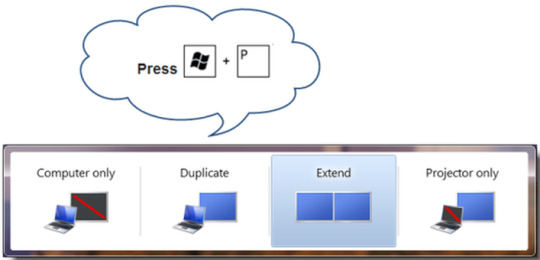
First make sure the PC and monitor are connected and then press Windows Key + P on your keyboard together.
amzn_assoc_tracking_id = "failedboybd-20"; amzn_assoc_ad_mode = "manual"; amzn_assoc_ad_type = "smart"; amzn_assoc_marketplace = "amazon"; amzn_assoc_region = "US"; amzn_assoc_design = "enhanced_links"; amzn_assoc_asins = "B081QP153Y"; amzn_assoc_placement = "adunit"; amzn_assoc_linkid = "3b0de6152900366b52fe64585726592a"; amzn_assoc_tracking_id = "failedboybd-20"; amzn_assoc_ad_mode = "manual"; amzn_assoc_ad_type = "smart"; amzn_assoc_marketplace = "amazon"; amzn_assoc_region = "US"; amzn_assoc_design = "enhanced_links"; amzn_assoc_asins = "B086RDCX67"; amzn_assoc_placement = "adunit"; amzn_assoc_linkid = "d7acd83dee4744b0a12cabbdcb3c0c7a"; amzn_assoc_tracking_id = "failedboybd-20"; amzn_assoc_ad_mode = "manual"; amzn_assoc_ad_type = "smart"; amzn_assoc_marketplace = "amazon"; amzn_assoc_region = "US"; amzn_assoc_design = "enhanced_links"; amzn_assoc_asins = "B085QHSJX5"; amzn_assoc_placement = "adunit"; amzn_assoc_linkid = "84cb31be4cdc70c00e00df43d0c6a686"; amzn_assoc_tracking_id = "failedboybd-20"; amzn_assoc_ad_mode = "manual"; amzn_assoc_ad_type = "smart"; amzn_assoc_marketplace = "amazon"; amzn_assoc_region = "US"; amzn_assoc_design = "enhanced_links"; amzn_assoc_asins = "B085CD4GC9"; amzn_assoc_placement = "adunit"; amzn_assoc_linkid = "dfc09c7a81cbc273f83571264d4472d6"; amzn_assoc_tracking_id = "failedboybd-20"; amzn_assoc_ad_mode = "manual"; amzn_assoc_ad_type = "smart"; amzn_assoc_marketplace = "amazon"; amzn_assoc_region = "US"; amzn_assoc_design = "enhanced_links"; amzn_assoc_asins = "B0827MVWCD"; amzn_assoc_placement = "adunit"; amzn_assoc_linkid = "c9f50fafc17161b7ed3ef745f7722c41";
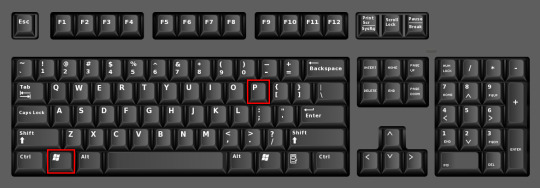
Then you will see four options Computer only, Duplicate, Extend, Projector only
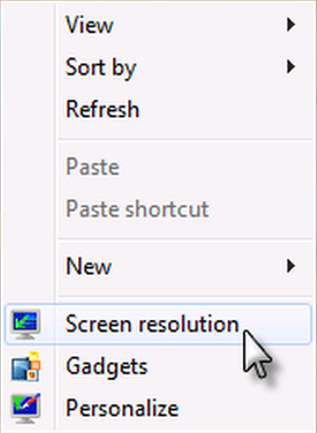
Now right click on your desktop and select the Screen Resolution option
Then click on the Multiple displays option and then expand your desktop screen across Duplicate or Extend or two monitors to show the screen on both monitors. Now if you don't see anything on the second monitor then click on Detect button
If your two displays have different screen sizes, right-click on the desktop screen and select Display Settings to match them. Then go to the Select and rearrange displays option and keep trying to match the orientation with your desktop monitor. Keep clicking on the rectangles and dragging until the screen is properly adjusted.
via Blogger https://ift.tt/2S2dWv8
0 notes
Text
Lightning Sunset (Desktop 12)
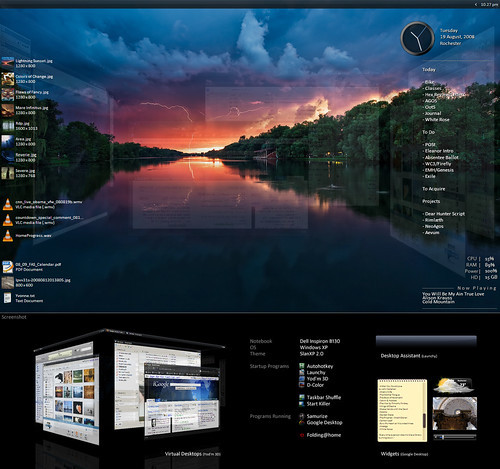
Edit: much thanks to Lifehacker. 🙂
Featured Desktop: Lightning at Sunset
How To: Roll Your Own Lightning at Sunset Desktop
This is a minor update to my previous desktop. As before, every bit of software in the shot is freeware, sans only the copy of Photoshop used to put it together.
Mouseover the icons on the left for a description of the new additions, D-Color and Xentient Thumbnails. The rest, as listed before:
Theme:
– SlanXP 2.0. Requires patched uxtheme.dll – patcher here.
– Wallpaper: "lightning in sunset" by ddoi.
Startups:
– Autohotkey. See the note in the upper-right corner.
– Launchy. My beloved.
– Yod’m 3D 1.4. Last free version before it became Deskspaces. Probably the closest thing to Compiz Fusion you can get for Windows.
– Taskbar Shuffle. I swear, it’s worth it just for middle-clicking to close windows.
– Start Killer.
Programs usually running:
– Samurize. I made the config myself, which you’re welcome to download here in a few different resolutions.
– Google Desktop. Solely for the gadgets.
I’ve added a few other details as notes. And I’d be happy to answer any questions. I love talking about this stuff.
– – – – – – –
UPDATE: Much thanks to Lifehacker for the featured article. 🙂 As requested by some of the commenters over there, here follows a brief tutorial on getting this setup for your PC.
Theme. Download the above Uxtheme.dll Patcher. You’ll have to restart your computer; do so. Then, download "SlanXP2.msstyles", and run it; Windows will know what to do. Customize it however you want (I use the third color scheme). Hit Apply. You may want to keep the ".msstyles" file in a safe place; I placed a copy with my other themes in "C:WindowsResourcesThemes".
I’m sure most of you know how to move the taskbar to the top of the screen.
Launchy. I love Launchy so very much. Download, install and run it. The default hotkey to access it is Alt+Space, but I use Win+Z. Right-click to access options. From here, there are so many ways to go that I’m just going to refer you to Lifehacker’s numerous articles on customizing Launchy. But the gist is this: use the hotkey to bring it up. Start typing what you’re looking for, until Launchy finds it, then hit Enter to run it. The more you use it, the more Launchy will learn what you use most often, and you’ll have to type less and less. By default, it will index your Start Menu, Control Panel, and bookmarks, so feel free to get rid of those application icons on your desktop. Just go for it. Go!
Yod’m3D. This is actually a portable application, meaning you don’t have to install it. Extract the folder from the ZIP you downloaded to somewhere safe, like "C:Program Files". Manually add a shortcut to "Yodm3d.exe" in your Start Menu. Run it, and right-click the tray icon to open options.
I kept most of the defaults. I enabled "Auto turn cube when window move out of screen." I also disabled the tray icon (you can access options without it just by launching the shortcut again). In the Mouse tab, I enabled the bottom two corners for activation, with a delay of 250ms. In Zoom, I have the following numbers down the side: 0.00, 1.00, 1.00, 0.00, 0.12, 0.10.
To use it, just move your mouse to either bottom corner of the screen, which should suddenly become a translucent cube. To rotate it, click and drag, or just use the arrow keys. To select the face you’re centered on, middle-click or press Enter. Using the numbers I gave you, it won’t zoom at all by default, but if you want to zoom out a bit and visualize the whole cube, press the Up arrow. Yod’m can remember a different wallpaper for each desktop, but you have to set it through the Display dialogue.
D-Color. This one’s pretty self-explanatory. Download, install, run. Right-click the tray icon to select the icon style you want (tiles, in my case). Click "Configure" to customize the text color; I just have white text and a transparent background. (No shadows, annoyingly, which means this works best with a darkish background.)
Taskbar Shuffle. Another easy one. Download, install, run. As noted above, I don’t even really care about moving the window tabs around; I keep this around because it lets me middle-click to close windows. You will be amazed at how much you miss it on other computers. I disabled the tray icon with this one; as with Yod’m, you can just run the program shortcut again to bring it back.
StartKiller. Even easier. Download, install, run. Start button is gone. Done. (You can still access the start menu using the windows key button, or Ctrl-Esc.)
Google Desktop. Download, install, run. If I recall, it will open a browser window for you to start setting options. With Launchy, I have no need for GD’s primary function, desktop search, so I went through and disabled every option I could find related to indexing. When you’re done with this, right-click the tray icon and select "Sidebar." Said object should promptly appear on the side of your desktop, if it hadn’t already. On the top, click the middle of the three corner buttons, with the triangle. Select "Auto-hide," then "Add gadgets" to browse Google’s immense library of widgets. Once they’re added to your sidebar, you can click and drag to pull them onto the desktop in whatever arrangement you like. Now, you can just tap the "Shift" key twice to hide or reveal them, ala Dashboard.
Samurize. Samurize is the one program here with a bit of a learning curve, particularly because my config doesn’t fit all resolutions by default. Samurize’s website has a good comprehensive tutorial. For more information, see Lifehacker’s How To article on this desktop.
Basic instructions for this config are included in the download. I provided for a few different resolutions, mainly on request; I’m working on a way to make it auto-conform to any resolution, so keep an eye on this post.
Autohotkey. Download, install. You can run the program if you want to look at a sample script, but all you really have to do is create a new ".ahk" file somewhere safe (mine’s in My Documents). You can create a start menu shortcut to the "whatever.ahk" file itself; it will launch Autohotkey with that file, or "script," and to edit it, you can right-click the tray icon. When you’re done editing, save the file, right-click the tray icon again, and click "Reload script."
As for what you actually put into your script, you have free reign. Autohotkey’s website has a tutorial to get you familiar with the format. I’ll give you a few examples that I use regularly – in fact, you can copy and paste these if you want.
#f:: Run firefox.exe
; Win+F launches Firefox.
#+n:: Run notepad++
; Win+Shift+N launches Notepad++.
^!d:: Run C:…Todo.txt
; Opens my to-do list; Samurize reads from the same file.
#1:: WinSet, Transparent, 255, A
#2:: WinSet, Transparent, 217, A
; Win + 1-2 sets transparency of active window to 0%/15%. (255 is opaque.)]
#3:: WinSet, Transparent, 255, ahk_class Shell_TrayWnd
#4:: WinSet, Transparent, 217, ahk_class Shell_TrayWnd
; Win + 3-4 sets taskbar transparency.]
!F2:: WinMinimize, A
; Alt+F2 minimizes active window.
!F3::
WinGet MX, MinMax, A
If MX
WinRestore A
Else WinMaximize A
return
; Alt+F3 maximizes/restores active window.
For more information, see Lifehacker’s How To article on this desktop.
Posted by Kaelri on 2008-08-20 03:36:11
Tagged: , lifehacker , desktop , customization , deskspace , yod’m , transparency , slanxp , samurize , launchy , google , autohotkey , d-color , xentient
The post Lightning Sunset (Desktop 12) appeared first on Good Info.
0 notes
Text
11 Awesome Things You Laptop Can Do
Have you explored your laptop? By that, I mean, thoroughly explore it to know the other things that it can do for you? If the answer is no, you’re in for a big surprise because your laptop can do so many other things.
Take a trip off the beaten track to some of the lesser-known features and options available to you—from expanding your screen space, to improving system security.
(Via: https://gizmodo.com/11-things-your-laptop-can-do-that-you-might-not-know-ab-1835899474)
Let’s start. Did you know that your laptop can go dark? Yes, it can. Here’s how.
Dark mode is everywhere these days, pretty much, and Windows and macOS have joined in. Automatic dark-mode-on-a-schedule is arriving later this year in macOS Catalina, but on macOS Mojave you can enable it manually by opening System Preferences from the Apple menu, then choosing General and Dark.
Windows user? Click the settings cog on the Start menu, then select Personalization, Colors, and Dark (under the Choose your default app mode heading). These changes should affect both the operating system and the various apps running on top of it, at least in most cases.
(Via: https://gizmodo.com/11-things-your-laptop-can-do-that-you-might-not-know-ab-1835899474)
For the gamers out there, I’m sure you already that it’s possible to stream games from your console to your laptop. The things is, your parents might not know about it. So, this is an FYI for parents out there who think their kids are always studying on their laptop.
Laptops have been able to stream games from a PS4 or Xbox One on the same wifi network for a long time (way before Google Stadia arrived).
(Via: https://gizmodo.com/11-things-your-laptop-can-do-that-you-might-not-know-ab-1835899474)
Another awesome thing your laptop can do is that it can pin websites to the dock or taskbar.
As well as pinning apps to the dock or taskbar (delete as appropriate), you can also pin websites that you frequently visit for speedy access—a sort of upgrade to the bookmarking system already available in your browser.
Mac users can just drag down a URL from the address bar in Safari to the far right-hand side of the dock. If you’re on Windows, it’s most easily done from Microsoft Edge: Open the program’s menu then choose Pin this page to the taskbar. In the new Edge, it’s under More tools and Pin to taskbar.
(Via: https://gizmodo.com/11-things-your-laptop-can-do-that-you-might-not-know-ab-1835899474)
Did you know that your laptop can also receive messages from your phone? Yes, it can!
This will be second nature if you own a Mac and an iPhone—all you need is the same Apple ID and the Messages app—but it’s also possible to send SMS messages from Android through the Your Phone app that’s part of Windows (search for it from the taskbar). Put the companion app on your Android device and you can read and send messages from the desktop.
If you need to send texts from Android on a Mac, the Android Messages web interface is probably your best option. When it comes to sending texts from an iPhone on a Windows laptop, you’re out of luck—but remember that WhatsApp, Facebook Messenger, Signal, and Telegram all have web or desktop apps.
(Via: https://gizmodo.com/11-things-your-laptop-can-do-that-you-might-not-know-ab-1835899474)
You can also create multiple desktops on your laptop without having to buy another monitor.
You don’t need to invest in another monitor to give yourself more room in Windows or macOS, because you’ve got software options for doing this too. On macOS it’s called Spaces, and you can add one by hitting Ctrl+Up or swiping up with four fingers on the trackpad, then clicking the plus icon to the top right.
On Windows they’re just called multiple desktops, and you can add a new one by clicking the Task View button (to the right of the search box on the taskbar), then the New desktop button. Whichever platform you’re on, you can now give your open app and browser windows a bit of breathing space.
(Via: https://gizmodo.com/11-things-your-laptop-can-do-that-you-might-not-know-ab-1835899474)
There also some animated wallpapers that you can use.
You’re not still using still, static wallpapers are you? Both Windows and macOS support dynamic, animated ones if you prefer: On macOS open the Apple menu then choose System Preferences, Desktop & Screen Saver, and Desktopphotos, then pick a Dynamic Desktop
(Via: https://gizmodo.com/11-things-your-laptop-can-do-that-you-might-not-know-ab-1835899474)
You can also set up a DND or a Do Not Disturb mode on your laptop.
Do Not Disturb isn’t just for phones, it’s for laptops too. On Windows, click the cog icon on the Start menu, then choose System and Focus assist to configure how notifications and notification rules work—the mode itself can be launched from the Action Center (click the notification icon to the right of the taskbar to find it).
When it comes to macOS, open up the Apple menu, then choose System Preferences, Notifications, and Do Not Disturb to schedule the feature. Alternatively, hold down the Option key then click the notification icon (on the far right of the menu bar) to temporarily turn on Do Not Disturb until you turn it off again (or the clock turns midnight).
(Via: https://gizmodo.com/11-things-your-laptop-can-do-that-you-might-not-know-ab-1835899474)
It’s also possible to annotate your screenshots with your laptop.
You’ve got a plethora of options when it comes to taking screenshots on Windows and macOS, but both Microsoft and Apple have now added annotation options to the native screengrabbing tools. Depending on what you want to do with your grabs, you might not need to use any other utility.
(Via: https://gizmodo.com/11-things-your-laptop-can-do-that-you-might-not-know-ab-1835899474)
Copying between devices is also possible.
The humble clipboard isn’t restricted to just one device anymore. In Windows, click the settings cog on the Start menu, then go to System and Clipboard to sync your copying and pasting across multiple devices (linked by your Microsoft ID). You can also turn on the option for the clipboard to remember multiple items from here.
Over on macOS, the “Universal Clipboard” just works across every device that you’re signed into with your Apple ID—you don’t need to configure anything to get it working. Just make sure Allow Handoff is ticked under General in System Preferences (accessible from the Apple menu).
(Via: https://gizmodo.com/11-things-your-laptop-can-do-that-you-might-not-know-ab-1835899474)
If you want a bigger screen, it’s possible to mirror your laptop to a wide screen. This is great especially if you want to want a movie.
If you want to get your Windows laptop display up on a big screen, you don’t necessarily need a cable. Open the Action Center (click the notification icon on the right of the taskbar), then choose Connect to see a list of all wireless devices supporting Miracast (like Roku dongles, for example). You can also cast the entire Windows desktop using the cast feature built into Chrome.
Over on macOS the protocol you have is AirPlay. Click the AirPlay button on the menu bar to see available Apple TVs and other compatible devices on the same network as you. Again, the Chrome browser can help here too: Click Cast from the Chrome menu, choose Cast desktop from the drop-down, and you can mirror your Mac display to any Chromecast or Chromecast-compatible screen.
(Via: https://gizmodo.com/11-things-your-laptop-can-do-that-you-might-not-know-ab-1835899474)
The best thing that your laptop can do for you is to create text for your dictation.
To save you from typing, you can dictate text to your laptop too. On Macs, open the Apple menu then choose System Preferences, Keyboard, and Dictation to set this up. The default keyboard shortcut for turning dictation on is two presses of the Fn key, or you can choose Edit and Start Dictation from whichever app you happen to be in.
When it comes to Windows, dictation is set up through Ease of Access then Speech in Settings (click the cog icon on the Start menu to find it). Then it’s just a question of hitting Win+H whenever you want to dictate some text instead of typing it out.
(Via: https://gizmodo.com/11-things-your-laptop-can-do-that-you-might-not-know-ab-1835899474)
There are a lot of things that your laptop can do. Hence, is the reason why your laptop becomes a trove of precious data. So, when it breaks down, chances are, you break down as well. There’s no need for you to break down.
While the breakdown of your laptop is inevitable, you can avoid a nervous breakdown by calling trained data recovery experts. They can recover data from all computer brands. So, when it comes to https://www.harddrivefailurerecovery.net/laptop-data-recovery/, they’re the ones to call.
The following blog article 11 Awesome Things You Laptop Can Do was initially seen on http://www.harddrivefailurerecovery.net/
from Hard Drive Recovery Associates - Feed
11 Awesome Things You Laptop Can Do See more on: SimplyPSD
from https://www.simplypsd.com/2019/09/11-awesome-things-you-laptop-can-do/
0 notes
Text
11 Awesome Things You Laptop Can Do
Have you explored your laptop? By that, I mean, thoroughly explore it to know the other things that it can do for you? If the answer is no, you’re in for a big surprise because your laptop can do so many other things.
Take a trip off the beaten track to some of the lesser-known features and options available to you—from expanding your screen space, to improving system security.
(Via: https://gizmodo.com/11-things-your-laptop-can-do-that-you-might-not-know-ab-1835899474)
Let’s start. Did you know that your laptop can go dark? Yes, it can. Here’s how.
Dark mode is everywhere these days, pretty much, and Windows and macOS have joined in. Automatic dark-mode-on-a-schedule is arriving later this year in macOS Catalina, but on macOS Mojave you can enable it manually by opening System Preferences from the Apple menu, then choosing General and Dark.
Windows user? Click the settings cog on the Start menu, then select Personalization, Colors, and Dark (under the Choose your default app mode heading). These changes should affect both the operating system and the various apps running on top of it, at least in most cases.
(Via: https://gizmodo.com/11-things-your-laptop-can-do-that-you-might-not-know-ab-1835899474)
For the gamers out there, I’m sure you already that it’s possible to stream games from your console to your laptop. The things is, your parents might not know about it. So, this is an FYI for parents out there who think their kids are always studying on their laptop.
Laptops have been able to stream games from a PS4 or Xbox One on the same wifi network for a long time (way before Google Stadia arrived).
(Via: https://gizmodo.com/11-things-your-laptop-can-do-that-you-might-not-know-ab-1835899474)
Another awesome thing your laptop can do is that it can pin websites to the dock or taskbar.
As well as pinning apps to the dock or taskbar (delete as appropriate), you can also pin websites that you frequently visit for speedy access—a sort of upgrade to the bookmarking system already available in your browser.
Mac users can just drag down a URL from the address bar in Safari to the far right-hand side of the dock. If you’re on Windows, it’s most easily done from Microsoft Edge: Open the program’s menu then choose Pin this page to the taskbar. In the new Edge, it’s under More tools and Pin to taskbar.
(Via: https://gizmodo.com/11-things-your-laptop-can-do-that-you-might-not-know-ab-1835899474)
Did you know that your laptop can also receive messages from your phone? Yes, it can!
This will be second nature if you own a Mac and an iPhone—all you need is the same Apple ID and the Messages app—but it’s also possible to send SMS messages from Android through the Your Phone app that’s part of Windows (search for it from the taskbar). Put the companion app on your Android device and you can read and send messages from the desktop.
If you need to send texts from Android on a Mac, the Android Messages web interface is probably your best option. When it comes to sending texts from an iPhone on a Windows laptop, you’re out of luck—but remember that WhatsApp, Facebook Messenger, Signal, and Telegram all have web or desktop apps.
(Via: https://gizmodo.com/11-things-your-laptop-can-do-that-you-might-not-know-ab-1835899474)
You can also create multiple desktops on your laptop without having to buy another monitor.
You don’t need to invest in another monitor to give yourself more room in Windows or macOS, because you’ve got software options for doing this too. On macOS it’s called Spaces, and you can add one by hitting Ctrl+Up or swiping up with four fingers on the trackpad, then clicking the plus icon to the top right.
On Windows they’re just called multiple desktops, and you can add a new one by clicking the Task View button (to the right of the search box on the taskbar), then the New desktop button. Whichever platform you’re on, you can now give your open app and browser windows a bit of breathing space.
(Via: https://gizmodo.com/11-things-your-laptop-can-do-that-you-might-not-know-ab-1835899474)
There also some animated wallpapers that you can use.
You’re not still using still, static wallpapers are you? Both Windows and macOS support dynamic, animated ones if you prefer: On macOS open the Apple menu then choose System Preferences, Desktop & Screen Saver, and Desktopphotos, then pick a Dynamic Desktop
(Via: https://gizmodo.com/11-things-your-laptop-can-do-that-you-might-not-know-ab-1835899474)
You can also set up a DND or a Do Not Disturb mode on your laptop.
Do Not Disturb isn’t just for phones, it’s for laptops too. On Windows, click the cog icon on the Start menu, then choose System and Focus assist to configure how notifications and notification rules work—the mode itself can be launched from the Action Center (click the notification icon to the right of the taskbar to find it).
When it comes to macOS, open up the Apple menu, then choose System Preferences, Notifications, and Do Not Disturb to schedule the feature. Alternatively, hold down the Option key then click the notification icon (on the far right of the menu bar) to temporarily turn on Do Not Disturb until you turn it off again (or the clock turns midnight).
(Via: https://gizmodo.com/11-things-your-laptop-can-do-that-you-might-not-know-ab-1835899474)
It’s also possible to annotate your screenshots with your laptop.
You’ve got a plethora of options when it comes to taking screenshots on Windows and macOS, but both Microsoft and Apple have now added annotation options to the native screengrabbing tools. Depending on what you want to do with your grabs, you might not need to use any other utility.
(Via: https://gizmodo.com/11-things-your-laptop-can-do-that-you-might-not-know-ab-1835899474)
Copying between devices is also possible.
The humble clipboard isn’t restricted to just one device anymore. In Windows, click the settings cog on the Start menu, then go to System and Clipboard to sync your copying and pasting across multiple devices (linked by your Microsoft ID). You can also turn on the option for the clipboard to remember multiple items from here.
Over on macOS, the “Universal Clipboard” just works across every device that you’re signed into with your Apple ID—you don’t need to configure anything to get it working. Just make sure Allow Handoff is ticked under General in System Preferences (accessible from the Apple menu).
(Via: https://gizmodo.com/11-things-your-laptop-can-do-that-you-might-not-know-ab-1835899474)
If you want a bigger screen, it’s possible to mirror your laptop to a wide screen. This is great especially if you want to want a movie.
If you want to get your Windows laptop display up on a big screen, you don’t necessarily need a cable. Open the Action Center (click the notification icon on the right of the taskbar), then choose Connect to see a list of all wireless devices supporting Miracast (like Roku dongles, for example). You can also cast the entire Windows desktop using the cast feature built into Chrome.
Over on macOS the protocol you have is AirPlay. Click the AirPlay button on the menu bar to see available Apple TVs and other compatible devices on the same network as you. Again, the Chrome browser can help here too: Click Cast from the Chrome menu, choose Cast desktop from the drop-down, and you can mirror your Mac display to any Chromecast or Chromecast-compatible screen.
(Via: https://gizmodo.com/11-things-your-laptop-can-do-that-you-might-not-know-ab-1835899474)
The best thing that your laptop can do for you is to create text for your dictation.
To save you from typing, you can dictate text to your laptop too. On Macs, open the Apple menu then choose System Preferences, Keyboard, and Dictation to set this up. The default keyboard shortcut for turning dictation on is two presses of the Fn key, or you can choose Edit and Start Dictation from whichever app you happen to be in.
When it comes to Windows, dictation is set up through Ease of Access then Speech in Settings (click the cog icon on the Start menu to find it). Then it’s just a question of hitting Win+H whenever you want to dictate some text instead of typing it out.
(Via: https://gizmodo.com/11-things-your-laptop-can-do-that-you-might-not-know-ab-1835899474)
There are a lot of things that your laptop can do. Hence, is the reason why your laptop becomes a trove of precious data. So, when it breaks down, chances are, you break down as well. There’s no need for you to break down.
While the breakdown of your laptop is inevitable, you can avoid a nervous breakdown by calling trained data recovery experts. They can recover data from all computer brands. So, when it comes to https://www.harddrivefailurerecovery.net/laptop-data-recovery/, they’re the ones to call.
The following blog article 11 Awesome Things You Laptop Can Do was initially seen on http://www.harddrivefailurerecovery.net/
from Hard Drive Recovery Associates - Feed https://www.harddrivefailurerecovery.net/11-awesome-things-you-laptop-can-do/
The following blog post 11 Awesome Things You Laptop Can Do is available on http://alaingonza.com/
from https://alaingonza.com/2019/09/18/11-awesome-things-you-laptop-can-do/
0 notes
Text
11 Awesome Things You Laptop Can Do
Have you explored your laptop? By that, I mean, thoroughly explore it to know the other things that it can do for you? If the answer is no, you’re in for a big surprise because your laptop can do so many other things.
Take a trip off the beaten track to some of the lesser-known features and options available to you—from expanding your screen space, to improving system security.
(Via: https://gizmodo.com/11-things-your-laptop-can-do-that-you-might-not-know-ab-1835899474)
Let’s start. Did you know that your laptop can go dark? Yes, it can. Here’s how.
Dark mode is everywhere these days, pretty much, and Windows and macOS have joined in. Automatic dark-mode-on-a-schedule is arriving later this year in macOS Catalina, but on macOS Mojave you can enable it manually by opening System Preferences from the Apple menu, then choosing General and Dark.
Windows user? Click the settings cog on the Start menu, then select Personalization, Colors, and Dark (under the Choose your default app mode heading). These changes should affect both the operating system and the various apps running on top of it, at least in most cases.
(Via: https://gizmodo.com/11-things-your-laptop-can-do-that-you-might-not-know-ab-1835899474)
For the gamers out there, I’m sure you already that it’s possible to stream games from your console to your laptop. The things is, your parents might not know about it. So, this is an FYI for parents out there who think their kids are always studying on their laptop.
Laptops have been able to stream games from a PS4 or Xbox One on the same wifi network for a long time (way before Google Stadia arrived).
(Via: https://gizmodo.com/11-things-your-laptop-can-do-that-you-might-not-know-ab-1835899474)
Another awesome thing your laptop can do is that it can pin websites to the dock or taskbar.
As well as pinning apps to the dock or taskbar (delete as appropriate), you can also pin websites that you frequently visit for speedy access—a sort of upgrade to the bookmarking system already available in your browser.
Mac users can just drag down a URL from the address bar in Safari to the far right-hand side of the dock. If you’re on Windows, it’s most easily done from Microsoft Edge: Open the program’s menu then choose Pin this page to the taskbar. In the new Edge, it’s under More tools and Pin to taskbar.
(Via: https://gizmodo.com/11-things-your-laptop-can-do-that-you-might-not-know-ab-1835899474)
Did you know that your laptop can also receive messages from your phone? Yes, it can!
This will be second nature if you own a Mac and an iPhone—all you need is the same Apple ID and the Messages app—but it’s also possible to send SMS messages from Android through the Your Phone app that’s part of Windows (search for it from the taskbar). Put the companion app on your Android device and you can read and send messages from the desktop.
If you need to send texts from Android on a Mac, the Android Messages web interface is probably your best option. When it comes to sending texts from an iPhone on a Windows laptop, you’re out of luck—but remember that WhatsApp, Facebook Messenger, Signal, and Telegram all have web or desktop apps.
(Via: https://gizmodo.com/11-things-your-laptop-can-do-that-you-might-not-know-ab-1835899474)
You can also create multiple desktops on your laptop without having to buy another monitor.
You don’t need to invest in another monitor to give yourself more room in Windows or macOS, because you’ve got software options for doing this too. On macOS it’s called Spaces, and you can add one by hitting Ctrl+Up or swiping up with four fingers on the trackpad, then clicking the plus icon to the top right.
On Windows they’re just called multiple desktops, and you can add a new one by clicking the Task View button (to the right of the search box on the taskbar), then the New desktop button. Whichever platform you’re on, you can now give your open app and browser windows a bit of breathing space.
(Via: https://gizmodo.com/11-things-your-laptop-can-do-that-you-might-not-know-ab-1835899474)
There also some animated wallpapers that you can use.
You’re not still using still, static wallpapers are you? Both Windows and macOS support dynamic, animated ones if you prefer: On macOS open the Apple menu then choose System Preferences, Desktop & Screen Saver, and Desktopphotos, then pick a Dynamic Desktop
(Via: https://gizmodo.com/11-things-your-laptop-can-do-that-you-might-not-know-ab-1835899474)
You can also set up a DND or a Do Not Disturb mode on your laptop.
Do Not Disturb isn’t just for phones, it’s for laptops too. On Windows, click the cog icon on the Start menu, then choose System and Focus assist to configure how notifications and notification rules work—the mode itself can be launched from the Action Center (click the notification icon to the right of the taskbar to find it).
When it comes to macOS, open up the Apple menu, then choose System Preferences, Notifications, and Do Not Disturb to schedule the feature. Alternatively, hold down the Option key then click the notification icon (on the far right of the menu bar) to temporarily turn on Do Not Disturb until you turn it off again (or the clock turns midnight).
(Via: https://gizmodo.com/11-things-your-laptop-can-do-that-you-might-not-know-ab-1835899474)
It’s also possible to annotate your screenshots with your laptop.
You’ve got a plethora of options when it comes to taking screenshots on Windows and macOS, but both Microsoft and Apple have now added annotation options to the native screengrabbing tools. Depending on what you want to do with your grabs, you might not need to use any other utility.
(Via: https://gizmodo.com/11-things-your-laptop-can-do-that-you-might-not-know-ab-1835899474)
Copying between devices is also possible.
The humble clipboard isn’t restricted to just one device anymore. In Windows, click the settings cog on the Start menu, then go to System and Clipboard to sync your copying and pasting across multiple devices (linked by your Microsoft ID). You can also turn on the option for the clipboard to remember multiple items from here.
Over on macOS, the “Universal Clipboard” just works across every device that you’re signed into with your Apple ID—you don’t need to configure anything to get it working. Just make sure Allow Handoff is ticked under General in System Preferences (accessible from the Apple menu).
(Via: https://gizmodo.com/11-things-your-laptop-can-do-that-you-might-not-know-ab-1835899474)
If you want a bigger screen, it’s possible to mirror your laptop to a wide screen. This is great especially if you want to want a movie.
If you want to get your Windows laptop display up on a big screen, you don’t necessarily need a cable. Open the Action Center (click the notification icon on the right of the taskbar), then choose Connect to see a list of all wireless devices supporting Miracast (like Roku dongles, for example). You can also cast the entire Windows desktop using the cast feature built into Chrome.
Over on macOS the protocol you have is AirPlay. Click the AirPlay button on the menu bar to see available Apple TVs and other compatible devices on the same network as you. Again, the Chrome browser can help here too: Click Cast from the Chrome menu, choose Cast desktop from the drop-down, and you can mirror your Mac display to any Chromecast or Chromecast-compatible screen.
(Via: https://gizmodo.com/11-things-your-laptop-can-do-that-you-might-not-know-ab-1835899474)
The best thing that your laptop can do for you is to create text for your dictation.
To save you from typing, you can dictate text to your laptop too. On Macs, open the Apple menu then choose System Preferences, Keyboard, and Dictation to set this up. The default keyboard shortcut for turning dictation on is two presses of the Fn key, or you can choose Edit and Start Dictation from whichever app you happen to be in.
When it comes to Windows, dictation is set up through Ease of Access then Speech in Settings (click the cog icon on the Start menu to find it). Then it’s just a question of hitting Win+H whenever you want to dictate some text instead of typing it out.
(Via: https://gizmodo.com/11-things-your-laptop-can-do-that-you-might-not-know-ab-1835899474)
There are a lot of things that your laptop can do. Hence, is the reason why your laptop becomes a trove of precious data. So, when it breaks down, chances are, you break down as well. There’s no need for you to break down.
While the breakdown of your laptop is inevitable, you can avoid a nervous breakdown by calling trained data recovery experts. They can recover data from all computer brands. So, when it comes to https://www.harddrivefailurerecovery.net/laptop-data-recovery/, they’re the ones to call.
The following blog article 11 Awesome Things You Laptop Can Do was initially seen on http://www.harddrivefailurerecovery.net/
from Hard Drive Recovery Associates - Feed at https://www.harddrivefailurerecovery.net/11-awesome-things-you-laptop-can-do/
The blog post 11 Awesome Things You Laptop Can Do Find more on: Thomas Alwyn Davis Blog
from Thomas Alwyn Davis - Feed https://thomasalwyndavis.com/2019/09/18/11-awesome-things-you-laptop-can-do/
0 notes
Text
Razer Blade Stealth Review: An Undersized Brute
I’ve been using PCs forever. I prefer to work with desktops unless the situation demands otherwise. I have used laptops on and off since they became ubiquitous in the mid-90s, but I’ve never been a big fan of them for several reasons. The compromises required to fit modern computing power into such a portable form factor have always led to products that are expensive and often become tethered to a desk or wall, negating their benefits. I accepted the opportunity to review Razer’s newest ultrabook expecting to find more of the same. After spending a couple of weeks with the Razer Blade Stealth, I believe that laptop computers are finally nearing their full potential.
Unboxing The Stealth
The Blade Stealth comes in a simple, understated cardboard box that was much less gaudy than I expected from my previous experience with Razer products. Included are the laptop and a nice braided power cable with a USB type-C connector and a very slim power brick. The Stealth is a 13.3” laptop with an IGZO-based display. This display technology offers comparable image quality to IPS and VA while reducing power consumption. The Stealth has a reduced-size chiclet keyboard that features RGB backlighting that can be customized by Razer’s Synapse software.
The model I received included the Intel Core i7-8550U processor. This is a Kaby Lake family part that first debuted last fall and has a base clock of 1.8Ghz and can turbo up to 4.0Ghz. This wide range of available clockspeeds allows for enhanced battery life for normal use without sacrificing the raw power needed for tasks like video encoding or rendering. 16GB of DDR4 memory and a 500GB SSD make up the rest of the critical core components of the Stealth. The graphics are handled by the Intel HD 620 IGP that is included with the i7-8550U.
The display features a 3200x1800 panel that gives a good first impression. Out of the box, the Windows DPI scaling is set to 300% for readability, but all objects on the screen remain razor sharp. I found the screen to be a bit oversaturated compared to other displays, but this could be a positive depending on your personal tastes. It makes colors pop and gives game environments a very lush appearance. Rounding out the feature set is the Killer-branded wireless solution, a USB type-C plug (Thunderbolt-ready), HDMI port, and 3.5mm audio jack.
Going Hands On
The first impression I got from the Razer Blade Stealth is that is a solid piece of equipment. It is small, but has heft. I powered on the device and was pleasantly surprised by how fast I was up and running in Windows 10. As best as I can tell, the Stealth comes with a clean installation of Windows and no bloatware, save for Razer’s own Synapse software for configuring the keyboard RGBs. As an owner of multiple Razer mice, I am not a fan of Synapse at all, but I cannot fault its inclusion in this package.
My first impressions of the laptop are that it is incredibly snappy and responsive. The Core i7-8550U may not be as powerful as its enthusiast desktop siblings, but I don’t see how anyone could reasonably argue that it is not up to the task of powering the Stealth through any workload. My past experiences with Intel’s low-power mobile CPUs were less than stellar, but this chip gives you the desktop experience with no apparent compromise. I copied over some h264 videos and let Handbrake loose on some encodes. The speed of the encodes got closer to the level of my desktop i7-7700K than I’d like to admit.
While most of my early interactions with the laptop where while it sat on my desk, I decided to make use of the portability and brought it to my stereo setup to help with recording needle drops from my turntable. The Stealth’s small footprint was just what the doctor ordered and made the process relatively painless compared to the lengthy cable runs I had previously been using to accomplish this same goal. The USB type-C port was also a huge plus for me. Transfers from my mobile phone’s storage were lightning fast and I was able to grab a charge from the laptop at speeds comparable to using an electrical outlet.
Time to Play?
The last big test was to play some games on this thing. Razer informed me that this particular model was not intended for gaming, but the box it came in proudly proclaimed “By Gamers. For Gamers.” and Razer’s product page for the Stealth advertises a range of games that are playable on the Stealth, including Metal Gear Solid V, Project Cars, Tekken 7, Borderlands 2, Rocket League, and more. I felt that it was fair to see what the Stealth could offer if you needed a break from work or felt like joining some friends for a round of Rocket League while you were cooped up in some hotel room.
I installed Steam and downloaded Rocket League and Borderlands 2 (a pair of games that I owned and were specifically mentioned on the Razer website). In my opinion, both of these games need 60fps to be enjoyed, but I can see an argument for playing Borderlands at 30fps. The Stealth was able to give a steady 30fps in Gearbox’s loot shooter when all the settings were lowered, but it was less than ideal. In Rocket League, I feel that the experience is compromised below 60fps, as it makes controlling your rocket car difficult and the twitch adjustments required for success are hard to make. I could not get Rocket League to hit 60fps at any resolution or combination of settings using the integrated Intel 620 GPU.
I should also note that while the Stealth comes with a 3200x1800 screen, I was unable to select any resolution above 1600x900 in games. I’m not sure if it is a driver limitation set by Intel or a choice by Razer to keep the games from running any worse than they already do. I understand why it is the way it is, but it's a shame to have such a high resolution screen and not make full use of it.
That being said, Razer recommends that you purchase its Core v2 module if you have intentions for making your Razer Blade Stealth a legitimate gaming machine. The Core v2 is an external GPU enclosure that has multiple connections and a 500w power supply. It allows you to install a wide range of off the shelf GPUs and connects to the Stealth via the USB type-C Thunderbolt connection. Assuming you installed a beefy GPU like the GTX 1080, gaming on the stealth would be a breeze, even at the 3200x1800 resolution. This expandability comes with a big price tag though, as the Core v2 will set you back $499, plus the cost of the GPU. Going with this type of setup negates many of the portability benefits of buying a laptop, but pairing a dedicated GPU to the Intel Core i7-8550U gives you a gaming experience that offers zero compromises.
Closing Thoughts
Using the Razer Blade Stealth was a bit of a revelation for me. I was not expecting the snappy performance I got from the i7-8550U. It did not matter if I was plugged into the wall or running on the battery, using the Stealth felt like using a high-powered desktop PC. The sharp display made things easy on my eyes. I took advantage of Steam’s in-home streaming service to play some of my more demanding titles (The Hunter: Call of the Wild, Resident Evil 7, and NIOH) out on my back porch. It was the first time I’ve ever had the chance to play stuff like that away from the desk and the image quality was excellent. I wouldn’t recommend it for twitchy games, but the ease of setup and end-user experience was top-notch.
I have to type lots of stuff for work and attempted to do some of that on the Stealth’s RGB keyboard. The condensed size, along with the almost flush-mounted keycaps led to lots of frustration. The problem is easily solvable with a USB keyboard and other users who weren’t born with 35-lb meat claws may fare much better than I did. I tried the 3.5mm audio jack with a few sets of my headphones and found the music listening experience to be adequate and most importantly, noise-free. The jack does not provide sufficient juice for hard to drive headphones, but it was not designed to, so it's no big deal.
The Razer Blade Stealth has its issues, but the one thing about it that I must focus on is battery life. I have never used a laptop that could provide real, usable power for as long as I got on this Stealth. I don’t know what kind of black magic Razer conjured up (or if it was simply a combination of well-chosen parts), but I was shocked every time I checked the battery icon in the taskbar. There was always power to spare, even when I had previously drained other laptops doing the same types of tasks. The USB type-C charger also got me back up to a full charge in no time.
The battery life on this laptop is so good, that I almost feel comfortable in calling it a game changer. I’ve never been able to count on a powerful laptop to offer more than three or four hours of uptime for heavy use and the Razer Blade Stealth still had enough power for me to screw around on Youtube for an hour after I spent the better part of an afternoon encoding videos and testing out games on Steam. This almost makes me feel like laptops are reaching the point where the power/portability compromise no longer has to be made.
I am still a desktop guy, but I have no reservations recommending the Razer Blade Stealth to anyone who needs desktop-class power with a strong battery in a very portable package. If you need gaming performance, Razer has a lineup of laptops that can server that purpose, or you can opt for the pricey Core v2 GPU enclosure. The Stealth is not cheap (the model I tested retails for $1699), but no computing products that offer a top of the line experience ever are. This is a laptop for those serious about getting work done. The lack of bloatware shows that Razer is also committed to this as well.
This review is based on a laptop provided by the manufacturer. The Razer Blade Stealth starts at $1399. The model reveiwed is $1699 as configured. You can pick up one today from Amazon.
Razer Blade Stealth Review: An Undersized Brute published first on https://superworldrom.tumblr.com/
0 notes
Text
New Post has been published on Add Crazy
New Post has been published on https://addcrazy.com/the-way-to-create-a-minimalist-computing-device-to-be-happy-with/
The way to Create a Minimalist Computing device to Be Happy with
Your Laptop is the primary sight you see when you switch your computer on, and there’s nothing worse than flicking that PC on and locating your self-watching a cluttered mess. A tidy looking Computing device is just as pleasing as a tidy residence, and a lot easier to maintain.
So getting to an extra soothing computer way of life by means of following those series of hints we’ve put together. Create your own first rate-minimum Desktop for your Windows or Mac device, and ensuring it stays that manner.
First of all, make sure your working device is setting as little as feasible on the Desktop. On Home windows, launch Settings then select Personalization and Taskbar to set your Taskbar to automatically disguise. For the reason that Home windows 10 settings are everywhere in the vicinity, so subsequent you’ll want to visit Look and Personalization and Personalization on top of things Panel, then click Exchange Laptop icons, to get icons like This Laptop and Recycle Bin off your Computer too.
Error loading media: File couldn’t be played
Windows used to have an exceptional available Desktop smooth up tool to rearrange the clutter of plenty of documents, but it’s not with us. Home windows 10 does now guide virtual computers even though. So you can at the least keep your apps and Home windows well spaced out throughout more than one computer systems—switching to the essential—and more cluttered ones—with a click of the Mission View icon simply to the right of the taskbar search field.
Unfortunately shortcuts and the taskbar stretch across all of the computers you create, so it’s got restricted use as a long way as minimizing your Desktop clutter is going.
In case you’re the use of MacOS, open up the Dock segment of gadget Possibilities and you can shrink the dock in size and ensure it’s hidden until you need it. visit Widespread in device Options and you could additionally cover the menu bar as properly for that actually uncluttered appearance—just like the dock, it’ll swing into view whilst you pass the cursor towards it. you may additionally open Options from the primary Finder menu to cover positive items from the Computer (below the general tab).
Once more, the digital Computing device facility in MacOS helps you to an area out applications and Home windows however now not shortcuts and documents saved on the Laptop. It’s referred to as Undertaking Manage and you may carry it up by means of tapping F3.
One trick that does work on both Home windows and macOS is including an extra show—you can then clean all the muddle off to a secondary reveal and preserve the Laptop to your original display searching great and fresh.
We’ve talked before about extraordinary places to locate wallpaper to your Laptop but there are a few websites that cater to the minimalists among us. Simple computers are one of the nice minimum wallpaper sites out there, pulling collectively a host of exquisite-searching backdrops from diverse corners of the net. There’s additionally a Mac app you may use to cycle mechanically through some of these images.
Vladstudio is any other web page that focuses especially on Simple wallpapers in place of complicated backdrops, and the excessive resolutions of the pictures suggest all of them appearance outstanding even on the most up-to-date screens. you may probably discover a few greater less apparent places to have a browse too—this minimum wallpaper subreddit is really worth a browse, for instance.
Meanwhile, regular wallpaper libraries will regularly have a minimalist category you could drill all the way down to, like DeviantArt, as an example. A quick web seeks will throw up an entire another set of curated lists of minimal wallpaper, consisting of one with the aid of our buddies at Lifehacker.
If you need to go as blank as viable, you can, of direction, set your OS wallpaper as a single, strong color. On Home windows, proper-click on a clean part of the Computer and select Personalize then choose a solid color from the Heritage drop-down; on MacOS, simply click the stable Hues alternative below Laptop & display screen Saver in system Choices.
It’s all too smooth to apply the Computer as a General dumping crowd for shortcuts and documents that need to be saved close handy but isn’t always all that crucial—as a result, your display can quickly end up blanketed with ugly icons and arrows.
One answer is to create a subfolder at once off the Desktop for all this virtual flotsam and jetsam. All the ones temporary documents you would possibly need at some point are most effective an additional double-click on away, but the best blemish in your Desktop is an unmarried folder, and you may probable clean out this folder on an everyday foundation and no longer be aware something essential has long gone lacking.
As for shortcuts, just delete them and notice which of them you virtually without a doubt rely upon. There are so many higher methods to launch apps and documents now—Spotlight, Cortana, the Begin menu, the dock—that you don’t actually need to have rows and rows of shortcuts taking over the room for your Computer and obscuring your stunning minimalist wallpaper.
Shift all your shortcuts right into a transient folder just in case, and the next time you want a File or utility, strive to try to find it as an alternative. If all goes well, you may delete that brief folder after some time, and revel in your new minimalist manner of operating.
five recommendations For Developing a Minimalist Workspace
today I decided that my office wished a few extreme de-cluttering. Such a lot of bits and objects that I not wished and system I had now not utilized in some time and had no aim of the use of soon appeared to be piling up. It got me considering Growing a workspace that becomes minimal. How minimalist is your workspace? For 2010, I’m going to try to best keep matters in my office which are certainly critical to what I do and nothing extra.
Ultimate 12 months I gave this whole minimalist matters a cross, significantly putting off matters that have been now not essential. I sold a few cabinets and bookcases and garage gadgets and gave some old computer systems and different things I felt I might in no way simply use Again or in a hurry. The enjoy become very clean, to say the least. My workplace felt lighter and regarded bigger, too. I even managed to almost cast off the need for paper and consequently, saved on paper purchases, toner and filing structures. I used to like shopping pens, pencils, highlighters and markers and setting them in a quite cup on my desk, no longer even simply the use of them. Now I do not even buy these anymore, as I don’t need to apply paper often. This might sound severe to some and rely on what you do, you probable can’t break out from paper, however, I’m trying to consider environment too. Store some bushes. It’s miles very possible to work with out paper, specifically In case you are operating in digital surroundings as I do, being a digital Assistant. Your needs can be one of a kind from mine but if there’s any opportunity that you may improve the way you work by means of simplifying or making a few changes to your workspace and nonetheless get the stuff you do complete without having all of the things that aren’t necessary, why no longer give it a pass?
Right here are my top 5 guidelines for Growing a minimalist workspace. now not all may be relevant to you and your situation of the route, so simply choose those that will paintings quality to your workflow.
1. Remedy your table and drawers. Of all of the matters that are currently in your table, do you truly, positively need them all? If no longer, why not clear as an awful lot of it away? Don’t forget; try to hold most effective the essentials around so you workspace will experience greater at ease. Toss the un-necessaries. Go through every drawer and dispose of all the things you do no longer need. maintain them orderly and do not simply toss things in there just to get them out of sight! Even as you are at that, why now not eliminate the one’s containers under the desk and inside the corner that you have not opened in a long time? clear all those matters out of your wall that doesn’t want to be there too!
2. clear your computer Computing device. I simplest did this in advance today and my Mac’s Laptop appears so much more simplified. Human beings generally tend to have plenty of icons on their laptop Computer that may be located in a folder or a few different place on their laptop. I’ve visible computer systems that had Such a lot of icons on them that it became genuinely not possible to find documents. It’s no manner to paintings! If It’s miles necessary to keep files for your Laptop because you’re working on them why not use a hotkey to call them up? both Mac and Computer have awesome applications for this.
3. Simplify the way you Report. It honestly isn’t always essential to maintain paper copies of files you’ve got for your PC, can get entry to on-line or are sponsored up online or to a few detachable device. The amazing factor with backing up your documents is that they you can search them simpler as they’re in a virtual layout, as opposed to sifting via a stack of paper. If paper usage is a must in your line of work or commercial enterprise, then make certain you File matters proper away so that you do not misplace them or by chance throw them away and make sure to Document things in alphabetical order. This makes locating things less complicated whilst you are ready for them.
four. Reconsider your paper needs. As I referred to above, after I started doing this I realized that with the aid of doing away with my want for the paper I was now not most effective saving at the cost of paper, I used to be additionally saving on toner for my printer, pens, pencils and other gadgets. I was also able to sooner or later wean myself off my fax device and commenced encouraging customers to e-mail me alternatively. by way of putting off or decreasing using the paper, you could Store a lot of money in the end.
https://addcrazy.com/
0 notes
Last Seen Blogs

fagtahirodfhang
Keeping Skin Healthy

topdietclinic-08
Shikha

naokiokada
Naoki Okada

pizzaistblr-blog
Pizzaistblr