#IOException
Explore tagged Tumblr posts
Visit Tumblr Blog
Explore Tumblr blogs with no restrictions, modern design and the best experience.
Last Seen Tumblr Blogs


Fun Fact
Premium Tumblr themes are available from anywhere between $9 to $49.
Text
In Và Xuất Dữ Liệu Trong Java - Hướng Dẫn Chi Tiết
In và xuất dữ liệu trong Java là một trong những kỹ năng cơ bản nhưng quan trọng đối với bất kỳ lập trình viên nào khi học ngôn ngữ lập trình này. Việc xử lý xuất dữ liệu ra màn hình hoặc nhập dữ liệu từ người dùng giúp chương trình tương tác hiệu quả. Trong bài viết này, chúng ta sẽ tìm hiểu cách in và xuất dữ liệu trong Java một cách chi tiết, từ các phương thức cơ bản đến các ví dụ thực tế.
1. Tại sao In và Xuất Dữ Liệu trong Java quan trọng?
In và xuất dữ liệu là nền tảng của bất kỳ ứng dụng nào. Trong Java, việc in dữ liệu giúp hiển thị thông tin cho người dùng, trong khi xuất dữ liệu (nhập dữ liệu từ bàn phím hoặc tệp) cho phép chương trình nhận đầu vào để xử lý. Những thao tác này được sử dụng trong:
Giao diện dòng lệnh: Hiển thị kết quả hoặc yêu cầu người dùng nhập thông tin.
Ứng dụng tương tác: Tạo trải nghiệm người dùng động.
Debugging: Kiểm tra giá trị biến trong quá trình phát triển.
Hiểu rõ cách in và xuất dữ liệu trong Java giúp bạn xây dựng các chương trình linh hoạt và dễ sử dụng.

How to print in Java?
2. Các phương thức In Dữ Liệu trong Java
Java cung cấp nhiều phương thức để in dữ liệu ra màn hình console, phổ biến nhất là các phương thức trong lớp System.out. Dưới đây là các phương thức chính:
2.1. System.out.println()
Phương thức này in một chuỗi ra màn hình và tự động xuống dòng.
System.out.println("Xin chào, đây là Java!");
Kết quả:
Xin chào, đây là Java!
2.2. System.out.print()
Không giống println(), phương thức này in chuỗi mà không xuống dòng.
System.out.print("Xin chào, ");
System.out.print("Java!");
Kết quả:
Xin chào, Java!
2.3. System.out.printf()
Phương thức này cho phép định dạng chuỗi, tương tự hàm printf trong C. Bạn có thể sử dụng các ký tự định dạng như %s, %d, %f.
String name = "Nguyễn Văn A";
int age = 25; System.out.printf("Tên: %s, Tuổi: %d", name, age);
Kết quả:
Tên: Nguyễn Văn A, Tuổi: 25
3. Xuất Dữ Liệu trong Java - Nhập dữ liệu từ người dùng
Để xuất dữ liệu (nhập dữ liệu từ người dùng), Java cung cấp các lớp như Scanner và BufferedReader. Dưới đây là cách sử dụng phổ biến:
3.1. Sử dụng lớp Scanner
Lớp Scanner trong gói java.util là cách đơn giản nhất để nhập dữ liệu từ bàn phím.
import java.util.Scanner;
public class Main { public static void main(String[] args) {
Scanner scanner = new Scanner(System.in);
System.out.print("Nhập tên của bạn: ");
String name = scanner.nextLine();
System.out.print("Nhập tuổi của bạn: ");
int age = scanner.nextInt();
System.out.printf("Chào %s, bạn %d tuổi!", name, age);
scanner.close();
}
}
Kết quả:
Nhập tên của bạn: Nguyễn Văn A
Nhập tuổi của bạn: 25
Chào Nguyễn Văn A, bạn 25 tuổi!
3.2. Sử dụng BufferedReader
BufferedReader phù hợp khi cần xử lý dữ liệu lớn hoặc đọc từ tệp.
import java.io.BufferedReader;
import java.io.InputStreamReader;
public class Main { public static void main(String[] args) throws Exception {
BufferedReader reader = new BufferedReader(new InputStreamReader(System.in));
System.out.print("Nhập tên của bạn: ");
String name = reader.readLine();
System.out.println("Chào " + name + "!");
}
}
4. Mẹo tối ưu hóa khi In và Xuất Dữ Liệu trong Java
Đóng Scanner: Luôn gọi scanner.close() sau khi sử dụng để tránh rò rỉ tài nguyên.
Xử lý ngoại lệ: Khi dùng BufferedReader, hãy xử lý ngoại lệ IOException để đảm bảo chương trình ổn định.
Sử dụng printf cho định dạng: Nếu cần hiển thị dữ liệu phức tạp, printf giúp kiểm soát định dạng tốt hơn.
Kiểm tra dữ liệu đầu vào: Với Scanner, hãy kiểm tra kiểu dữ liệu (ví dụ: hasNextInt()) trước khi đọc để tránh lỗi.
5. Ứng dụng thực tế của In và Xuất Dữ Liệu trong Java
In và xuất dữ liệu được sử dụng trong nhiều tình huống thực tế, chẳng hạn:
Xây dựng ứng dụng console: Như các trò chơi đoán số hoặc chương trình quản lý danh sách.
Đọc/ghi tệp: Kết hợp BufferedReader và FileReader để xử lý tệp văn bản.
Tương tác với người dùng: Tạo form nhập liệu đơn giản trong ứng dụng Java.
6. Kết luận
In và xuất dữ liệu trong Java là kỹ năng nền tảng mà mọi lập trình viên cần nắm vững. Từ việc sử dụng System.out.println() để hiển thị thông tin đến lớp Scanner hoặc BufferedReader để nhận dữ liệu, bạn có thể dễ dàng xây dựng các chương trình tương tác. Hãy luyện tập với các ví dụ trên và áp dụng vào dự án của bạn để nâng cao kỹ năng lập trình.
Nếu bạn muốn tìm hiểu thêm về Java hoặc các chủ đề lập trình khác, hãy tiếp tục theo dõi các bài viết của chúng tôi!
Java Highlight – Hướng dẫn chi tiết cách in và xuất dữ liệu trong Java. Tìm hiểu cách sử dụng System.out.println, printf, và các phương pháp xuất dữ liệu chuẩn trong Java. 🌍 Website: Java Highlight
#java highlight#in và xuất dữ liệu trong Java#JavaOutput#JavaHighlight#Java#JavaIO#SystemOut#LapTrinhJava#JavaTips#JavaLearning#JavaChoNguoiMoi#JavaTutorial#InDuLieuJava#XuatDuLieuJava
0 notes
Text
Must-Know Core Java Concepts for Every Programmer
(A Guide for Full Stack Software Testing Enthusiasts in KPHB)
Java remains the backbone of enterprise applications, and a strong grasp of its core concepts is essential for every programmer. Whether you are an aspiring software tester, a backend developer, or a full-stack engineer, understanding Java fundamentals is non-negotiable. Let’s break down the most crucial Java concepts that you must master.

1. Object-Oriented Programming (OOP)
Java is inherently object-oriented, which means everything revolves around objects and classes. The four key pillars of OOP in Java are:
✔ Encapsulation – Bundling data and methods together to protect data integrity. ✔ Abstraction – Hiding implementation details and exposing only what’s necessary. ✔ Inheritance – Allowing one class to derive properties from another. ✔ Polymorphism – Enabling multiple implementations of a method.
Why It Matters?
For software testers, understanding OOP principles helps in creating reusable and scalable test automation frameworks.
2. Java Memory Management
Memory management is a crucial aspect that determines the performance of Java applications. It consists of:
✔ Heap & Stack Memory – Heap stores objects, while Stack holds method calls and local variables. ✔ Garbage Collection (GC) – Java has an automatic garbage collector that frees up memory by removing unused objects.
Why It Matters?
Full Stack Testers must understand memory leaks and performance bottlenecks in Java-based applications.
3. Exception Handling
Exception handling ensures that runtime errors don’t crash the application. Java provides:
✔ try-catch-finally – Handles exceptions and ensures resource cleanup. ✔ throws & throw – Used for explicitly handling custom exceptions. ✔ Checked vs. Unchecked Exceptions – Checked exceptions (like IOException) must be handled, while unchecked exceptions (like NullPointerException) occur at runtime.
Why It Matters?
Testers need to handle exceptions effectively in automation scripts to avoid script failures.
4. Multithreading & Concurrency
Multithreading allows multiple parts of a program to run simultaneously. Important concepts include:
✔ Thread Lifecycle – From creation to termination. ✔ Runnable & Callable Interfaces – Implementing threads in Java. ✔ Synchronization & Locks – Avoiding race conditions and ensuring thread safety.
Why It Matters?
In performance testing, understanding multithreading helps simulate real-world user load.
5. Collections Framework
Java provides a robust Collections Framework for handling groups of objects efficiently. The key interfaces are:
✔ List (ArrayList, LinkedList) – Ordered and allows duplicates. ✔ Set (HashSet, TreeSet) – Unordered and doesn’t allow duplicates. ✔ Map (HashMap, TreeMap) – Stores key-value pairs.
Why It Matters?
Test automation frameworks use collections extensively for data handling and assertions.
6. File Handling & I/O Operations
File handling is critical for reading, writing, and manipulating files in Java.
✔ BufferedReader & BufferedWriter – Efficient file reading and writing. ✔ FileInputStream & FileOutputStream – Handling binary data. ✔ Serialization – Converting objects into byte streams.
Why It Matters?
For automation testers, handling logs, reports, and configuration files is a routine task.
7. JDBC & Database Connectivity
Java Database Connectivity (JDBC) allows applications to interact with databases.
✔ DriverManager – Manages database connections. ✔ PreparedStatement – Prevents SQL injection. ✔ ResultSet – Retrieves query results.
Why It Matters?
Full Stack Testers should understand JDBC for validating database operations in automation scripts.
8. Java Frameworks
Mastering Java alone isn’t enough; knowing key frameworks is essential.
✔ Spring Boot – Microservices and dependency injection. ✔ Selenium with Java – Web automation testing. ✔ TestNG & JUnit – Test automation frameworks.
Why It Matters?
These frameworks power large-scale software applications and automation testing.
Frequently Asked Questions (FAQ)
Q1: What is the best way to practice Core Java concepts? A: Work on small projects, participate in coding challenges, and contribute to open-source repositories.
Q2: How is Java used in Full Stack Software Testing? A: Java is used for writing test automation scripts, interacting with databases, and integrating test frameworks.
Q3: What is the difference between Checked and Unchecked Exceptions? A: Checked exceptions must be handled (e.g., IOException), whereas unchecked exceptions occur at runtime (e.g., NullPointerException).
Q4: Why is Java preferred for automation testing? A: Java offers robust libraries like Selenium, TestNG, and JUnit, making automation testing efficient and scalable.
Q5: What are the key Java concepts needed for API Testing? A: Understanding HTTP methods, JSON parsing, and REST API calls using libraries like RestAssured and Jackson is crucial.
Final Thoughts
Mastering Java fundamentals is the key to excelling in software development and automation testing. Whether you are preparing for a Full Stack Software Testing role in KPHB or looking to enhance your coding skills, these core Java concepts will set you apart.
#Java#CoreJava#FullStackTesting#SoftwareTesting#AutomationTesting#JavaProgramming#Selenium#TestAutomation#OOP#Coding#JavaDeveloper#JUnit#TestNG#FullStackDevelopment#KPHB#TechLearning
0 notes
Text
Provide insights into securing Java web and desktop applications.

Securing Java web and desktop applications requires a combination of best practices, security libraries, and frameworks to prevent vulnerabilities like SQL injection, XSS, CSRF, and unauthorized access. Here’s a deep dive into key security measures:
1. Secure Authentication and Authorization
Use Strong Authentication Mechanisms
Implement OAuth 2.0, OpenID Connect, or SAML for authentication.
Use Spring Security for web applications.
Enforce multi-factor authentication (MFA) for added security.
Example (Spring Security Basic Authentication in Java Web App)java@Configuration @EnableWebSecurity public class SecurityConfig { @Bean public SecurityFilterChain securityFilterChain(HttpSecurity http) throws Exception { http .authorizeHttpRequests(auth -> auth .requestMatchers("/admin/**").hasRole("ADMIN") .anyRequest().authenticated()) .httpBasic(); return http.build(); } }Implement Role-Based Access Control (RBAC)
Define roles and permissions for users.
Use JWT (JSON Web Tokens) for securing APIs.
Example (Securing API using JWT in Spring Boot)javapublic class JwtUtil { private static final String SECRET_KEY = "secureKey"; public String generateToken(String username) { return Jwts.builder() .setSubject(username) .setIssuedAt(new Date()) .setExpiration(new Date(System.currentTimeMillis() + 1000 * 60 * 60)) .signWith(SignatureAlgorithm.HS256, SECRET_KEY) .compact(); } }
2. Secure Data Storage and Transmission
Use Secure Communication (HTTPS & TLS)
Use TLS 1.2+ for encrypting data in transit.
Enforce HSTS (HTTP Strict Transport Security).
Encrypt Sensitive Data
Store passwords using bcrypt, PBKDF2, or Argon2.
Use AES-256 for encrypting sensitive data.
Example (Hashing Passwords in Java)javaimport org.mindrot.jbcrypt.BCrypt;public class PasswordSecurity { public static String hashPassword(String password) { return BCrypt.hashpw(password, BCrypt.gensalt(12)); } public static boolean verifyPassword(String password, String hashedPassword) { return BCrypt.checkpw(password, hashedPassword); } }
Use Secure Database Connections
Use parameterized queries to prevent SQL injection.
Disable database user permissions that are not required.
Example (Using Prepared Statements in JDBC)javaPreparedStatement stmt = connection.prepareStatement("SELECT * FROM users WHERE username = ?"); stmt.setString(1, username); ResultSet rs = stmt.executeQuery();
3. Protect Against Common Web Vulnerabilities
Prevent SQL Injection
Always use ORM frameworks (Hibernate, JPA) to manage queries securely.
Mitigate Cross-Site Scripting (XSS)
Escape user input in web views using OWASP Java Encoder.
Use Content Security Policy (CSP) headers.
Prevent Cross-Site Request Forgery (CSRF)
Use CSRF tokens in forms.
Enable CSRF protection in Spring Security.
Example (Enabling CSRF Protection in Spring Security)javahttp.csrf().csrfTokenRepository(CookieCsrfTokenRepository.withHttpOnlyFalse());
4. Secure File Uploads and Deserialization
Validate File Uploads
Restrict allowed file types (e.g., only images, PDFs).
Use virus scanning (e.g., ClamAV).
Example (Checking File Type in Java)javaif (!file.getContentType().equals("application/pdf")) { throw new SecurityException("Invalid file type"); }
Avoid Untrusted Deserialization
Use whitelisting for allowed classes.
Prefer JSON over Java serialization.
Example (Disable Unsafe Object Deserialization in Java)javaObjectInputStream ois = new ObjectInputStream(inputStream) { @Override protected Class<?> resolveClass(ObjectStreamClass desc) throws IOException, ClassNotFoundException { throw new InvalidClassException("Deserialization is not allowed"); } };
5. Secure Desktop Java Applications
Use Code Signing
Sign JAR files using Java Keytool to prevent tampering.
shjarsigner -keystore mykeystore.jks -signedjar SecureApp.jar MyApp.jar myaliasRestrict JavaFX/Swing Application Permissions
Use Java Security Manager (deprecated but useful for legacy apps).
Restrict access to file system, network, and system properties.
Encrypt Local Data Storage
Use AES encryption for storing local files.
Example (Encrypting Files with AES in Java)javaCipher cipher = Cipher.getInstance("AES"); cipher.init(Cipher.ENCRYPT_MODE, new SecretKeySpec(key, "AES")); byte[] encrypted = cipher.doFinal(data);
6. Logging and Monitoring for Security
Use Secure Logging Frameworks
Use logback or SLF4J.
Avoid logging sensitive data like passwords.
Monitor for Anomalies
Implement Intrusion Detection Systems (IDS).
Use audit trails and security alerts.
7. Best Practices for Securing Java Applications
✅ Keep dependencies up to date (Use OWASP Dependency Check). ✅ Run security scans (SAST, DAST) using SonarQube, Checkmarx. ✅ Apply the principle of least privilege for database and API access. ✅ Enforce strong password policies (min length, special characters). ✅ Use API Gateway and rate limiting for public-facing APIs.
Conclusion
Securing Java web and desktop applications requires multi-layered security across authentication, data protection, and vulnerability mitigation. By following best practices like strong encryption, secure coding techniques, and continuous monitoring, developers can protect applications against cyber threats.
WEBSITE: https://www.ficusoft.in/core-java-training-in-chennai/
0 notes
Text
Mastering C# Exception Handling: Understanding Exception Types and Managing Multiple Exceptions with Examples
Effective error handling is a cornerstone of robust programming. In C#, mastering exception handling is essential for building resilient applications. This blog delves into the different C# exception types and demonstrates how to handle multiple exceptions effectively. Whether you're a beginner or an experienced developer, this guide will provide actionable insights to enhance your coding skills.
At Removeload Educational Academy, we believe in making complex concepts simple. Our e-learning tutorial portal is designed to teach programming languages with live examples, written in a way that’s easy to understand. With free resources tailored for students eager to learn, we empower individuals to grasp the fundamentals and beyond.
Understanding C# Exception Types
In C#, exceptions represent errors that occur during program execution. Common C# exception types include ArgumentException, NullReferenceException, InvalidOperationException, and IOException. Each type serves a unique purpose, helping developers identify and fix specific issues.
For instance, an ArgumentException arises when an invalid argument is passed to a method, while a NullReferenceException occurs when attempting to access a null object. Understanding these exception types ensures that you can write code that anticipates and addresses potential issues effectively. At Removeload Educational Academy, we provide in-depth resources to simplify these concepts, ensuring that even complex topics like C# exception types removeload are accessible to learners.
Handling Multiple Exceptions in C#
In real-world applications, multiple exceptions can occur simultaneously. Handling these exceptions properly is vital to maintaining application stability. C# provides a try-catch block for error handling, allowing developers to catch and respond to exceptions gracefully.
Here is a C# handling multiple exceptions example:try { // Code that might throw exceptions int result = int.Parse("abc"); // Throws FormatException string text = null; int length = text.Length; // Throws NullReferenceException } catch (FormatException ex) { Console.WriteLine($"Format Exception: {ex.Message}"); } catch (NullReferenceException ex) { Console.WriteLine($"Null Reference Exception: {ex.Message}"); } catch (Exception ex) { Console.WriteLine($"General Exception: {ex.Message}"); }
In this example, specific exceptions are caught first, followed by a general exception handler. This approach ensures that each error is addressed appropriately without causing the program to crash.
Best Practices for Handling Multiple Exceptions
Catch Specific Exceptions First: Always handle specific exceptions before using a general catch block. This makes debugging easier and ensures proper error management.
Use Finally Blocks: A finally block executes regardless of whether an exception is thrown, making it ideal for resource cleanup tasks.
Avoid Overusing Exceptions: Only use exceptions for exceptional circumstances, not as a substitute for regular control flow.
By following these practices, you’ll master C# Handling multiple exceptions and build applications that are robust and reliable.
Why Learn with Removeload Educational Academy?
At Removeload Educational Academy, we aim to bridge the gap between theoretical knowledge and practical application. Our platform offers free online e-learning tutorials tailored for students who want to learn programming languages through live examples. Written in an easy-to-understand format, our resources make learning accessible to everyone.
Whether you're tackling complex topics like C# Exceptions removeload or starting with the basics, our tutorials are designed to empower you with the skills you need to succeed in the ever-evolving tech landscape. Join our community of learners and take the next step in your programming journey.
Conclusion
Mastering exception handling in C# is a crucial skill for any developer. By understanding exception types, handling multiple exceptions effectively, and applying best practices, you can create error-resilient applications. At Removeload Educational Academy, we’re here to support your learning journey with free, easy-to-follow tutorials. Dive into our resources today and elevate your coding skills!
0 notes
Text
JwtDecoder
@Configuration
@Slf4j
public class JwtDecoderConfig {
@NotBlank
@Value("${spring.security.oauth2.resourceserver.jwt.issuer-uri}")
private String issuerUri;
@NotBlank
@Value("${keycloak.truststore}")
private Resource trustStore;
@NotBlank
@Value("${keycloak.truststore-password}")
private String trustStorePw;
@Bean
public JwtDecoder jwtDecoder() {
return NimbusJwtDecoder
.withIssuerLocation(issuerUri)
.restOperations(restTemplate())
.build();
}
private RestTemplate restTemplate() {
log.info("RestTemplate for issuer-uri");
SSLContext sslContext = null;
try {
sslContext = new SSLContextBuilder()
.loadTrustMaterial(trustStore.getURL(), trustStorePw.toCharArray())
.build();
} catch (KeyManagementException | NoSuchAlgorithmException | KeyStoreException | CertificateException
| IOException e) {
log.error("ERROR while SSLContext building.", e);
return null;
}
final TlsSocketStrategy tlsStrategy = new ConscryptClientTlsStrategy(
sslContext, NoopHostnameVerifier.INSTANCE);
final HttpClientConnectionManager cm = PoolingHttpClientConnectionManagerBuilder.create()
.setTlsSocketStrategy(tlsStrategy)
.setDefaultTlsConfig(TlsConfig.custom()
.setHandshakeTimeout(Timeout.ofSeconds(30))
.setSupportedProtocols(TLS.V_1_3)
.build())
.build();
final CloseableHttpClient httpClient = HttpClients.custom()
.setConnectionManager(cm)
.build();
final var requestFactory = new HttpComponentsClientHttpRequestFactory();
requestFactory.setHttpClient(httpClient);
return new RestTemplate(requestFactory);
}
}
0 notes
Text
How to Use a Python Library in Java via Its API
Combining different programming languages in a single project can be very powerful. One useful combination is using Python libraries in a Java program. This lets you take advantage of Python’s many tools, like those for data analysis or machine learning, while still using Java’s strength in building large, reliable applications. This guide will show you how to use a Python library in Java through an API.

Why Combine Python and Java?
Python is known for being easy to use and having many libraries that can help with various tasks, like data processing or machine learning. On the other hand, Java is a popular choice for big projects because it’s fast and reliable. By combining the two, you can use Python’s great tools in a Java program, getting the best of both worlds.
One way to make Python and Java work together is by using an API. An API, or Application Programming Interface, is like a bridge that lets different software pieces talk to each other. In this case, the API lets your Java program use Python libraries.
Step 1: Choosing the Right Tools
To start, you need the right tools to connect Python and Java. Here are a few options:
Jython: Jython is a version of Python that runs on the Java platform. It allows you to use Python code directly in Java. However, it doesn’t support the latest Python versions, and it may not be as fast as other options.
Py4J: Py4J allows Java programs to run Python code and share data between the two languages. It’s a flexible and popular choice for this kind of integration.
Jep (Java Embedded Python): Jep embeds a Python interpreter in Java applications, allowing you to run Python code from Java. It’s designed to be fast, making it a good choice for performance-sensitive tasks.
Step 2: Setting Up Your Environment
We’ll focus on using Py4J to call a Python library from Java. Here’s how to set up your environment:
Install Python: First, make sure Python is installed on your computer. You can download it from the official Python website.
Install Py4J: Next, install Py4J by running this command in your terminal:

3. Set Up a Java Project: Create a new Java project using your preferred IDE, like IntelliJ IDEA or Eclipse. Add the Py4J library to your Java project. You can download it from the Py4J website or add it using a build tool like Maven or Gradle.
Step 3: Writing the Python Code
Let’s say you want to use a Python library called NumPy to calculate the square of a number. First, create a Python script that does this. Here’s an example:

Save this script as my_script.py in your working directory.
Step 4: Writing the Java Code
Now, write the Java code to call this Python script using Py4J. Here’s an example:
import py4j.GatewayServer;
public class PythonCaller {
public static void main(String[] args) {
GatewayServer gatewayServer = new GatewayServer();
gatewayServer.start();
System.out.println("Gateway Server Started");
try {
Process process = Runtime.getRuntime().exec("python my_script.py");
BufferedReader in = new BufferedReader(new InputStreamReader(process.getInputStream()));
String result;
while ((result = in.readLine()) != null) {
System.out.println(result);
}
in.close();
} catch (IOException e) {
e.printStackTrace();
}
}
}
This Java code starts a Py4J gateway server to connect with Python. It then runs the Python script using the Runtime.exec() method and prints the result.
Step 5: Running and Testing
After setting up your Python and Java code, you can run your Java program. Here’s what will happen:
The Java program starts the Py4J gateway server.
The Java program runs the Python script.
The result from the Python script is printed out by the Java program.
You can test this setup by trying different Python libraries, like pandas for data analysis or scikit-learn for machine learning, and see how they work with your Java program.
Step 6: Sharing Data Between Java and Python
Often, you’ll want to pass data back and forth between Java and Python. Py4J makes this easy. For example, you can send a list of numbers from Java to Python, have Python square them using NumPy, and then return the squared numbers to Java.
Python Script (my_script.py):

Java Code:
import py4j.GatewayServer;
import py4j.Py4JNetworkException;
import java.util.Arrays;
import java.util.List;
public class PythonCaller {
public static void main(String[] args) {
GatewayServer gatewayServer = new GatewayServer(new PythonCaller());
gatewayServer.start();
try {
List<Integer> numbers = Arrays.asList(1, 2, 3, 4, 5);
Object[] results = gatewayServer.getPythonServerEntryPoint(new Class[] {}).calculate_squares(numbers);
System.out.println("Squared numbers: " + Arrays.toString(results));
} catch (Py4JNetworkException e) {
e.printStackTrace();
}
}
}
Best Practices to Keep in Mind
When using Python in a Java program, there are a few things to remember:
Error Handling: Make sure your Java code can handle any errors that might come up when running Python code. This will help keep your Java program stable.
Performance: Running Python code from Java can slow things down, especially if you’re working with large amounts of data. Test your setup to make sure it’s fast enough for your needs.
Security: Be careful when running external scripts, especially if they use user input. Make sure inputs are safe and won’t cause security issues.
Documentation: Keep good notes on how your Python and Java code work together. This will make it easier to update or fix your code later on.
Conclusion
Using Python libraries in a Java program can make your projects much more powerful. By following these steps, you can set up a system where Java and Python work together smoothly. Whether you’re doing data analysis, machine learning, or any other task, combining Python and Java can help you get more done with your code.
#python training institute in course#python certifition course#python training course#best python courses#python programming course
0 notes
Text
🚀 How to Copy an Image using Java!
Here's a simple code snippet to get you started:
import java.io.File; import java.io.FileInputStream; import java.io.FileOutputStream; import java.io.IOException;
public class cacms { public static void main(String[] args) { String sourcePath = "C:\\Users\\Administrator\\Desktop\\cacms Institute\\LOGO.png";
String destinationPath = "C:\\Users\\Administrator\\Desktop\\cacms Institute\\LOGO COPY.png";
File sourceFile = new File(sourcePath); File destinationFile = new File(destinationPath);
try (FileInputStream fis = new FileInputStream(sourceFile); FileOutputStream fos = new FileOutputStream(destinationFile)) {
byte[] buffer = new byte[1024]; int length;
while ((length = fis.read(buffer)) > 0) { fos.write(buffer, 0, length); }
System.out.println("File copied successfully!");
} catch (IOException e) { System.err.println("File copy failed: " + e.getMessage()); } } }
Want to learn more Java? 💻 Enroll at CACMS Institute today! Follow us for more tips and tutorials @cacms.institute
📞 Contact us at +91 8288040281 or visit the link below for further details.
0 notes
Link
0 notes
Text
ทีมไหนจะชนะในเกมฟุตบอลยูโรคืนนี้?
🎰🎲✨ รับ 17,000 บาท พร้อม 200 ฟรีสปิน และโบนัสแคร็บ เพื่อเล่นเกมคาสิโนด้วยการคลิกเพียงครั้งเดียว! ✨🎲🎰
ทีมไหนจะชนะในเกมฟุตบอลยูโรคืนนี้?
ทีมชนะเกมเป็นประเภทหนึ่งของทีมที่ประสบความสำเร็จในการแข่งขัน ไมว่าเป็นกีฬาหรือเกมออนไลน์ การเป็นทีมชนะเกมต้องไม่ผิดหวังจากสมาชิกทุกคนที่ทำสำเร็จในเกม การมีความร่วมมือและการสื่อสารที่ดีระหว่างสมาชิกในทีมเป็นสิ่งสำคัญที่ช่วยให้ทีมเหล่านี้เป็นทีมชนะเกมที่มีประสิทธิภาพสูง
ปัจจัยที่ช่วยให้ทีมชนะเกมได้คือความสามัคคีของทีม การร่วมทำงานในทีมชี้นำไปสู่ความสำเร็จ ความลดต้นกำเนิดและการเข้าใจว่าทุกคนในทีมมีบทบาทและความสำคัญในการช่วยทำให้ทีมเป็นทีมชนะเกม การตั้งเป้าหมายชัดเจนและการฝึกฝนทักษะเพื่อเพิ่มโอกาสในการชนะเกมก็เป็นสิ่งสำคัญอีกตัวช่วยหนึ่ง
ทีมชนะเกมมักเน้นการร่วมมือในการแบ่งหน้าที่และการจัดการกิจกรรมในทีมให้เป็นระบบ การบริหารจัดการเวลาและทรัพยากรให้เหมาะสมสำหรับทีมชนะเกมเป็นเรื่องสำคัญด้วย เกมที่จัดพิจารณาการทำงานกันอย่างมีความสามัคคึ ร่วมใจและรับผลตอบแทนที่ดีกันจะช่วยสร้างทีมชนะเกมที่แข็งแกร่งอันไม่สามารถหลับได้ในสถานการณ์ที่จงรังหยัง
ทีมแพ้อาทิตย์ (Losing team) เป็นส่วนสำคัญของกีฬาทุกประเภท ไมว่าจะเป็นกีฬาทีมหรือกีฬารายงาน การมีทีมแพ้อาทิตย์นั้นเป็นส่วนของการแข่งขันที่ไม่สามารถหลีกเลี่ยงได้ เนื่องจากมันสร้างการแสดงความสามารถในการต่อสู้ ความพยายาม และความเพียร ทีมที่แพ้อาทิตย์ ไม่มีความต้องหยุดแข่งขันแม้แต่เพียงครั้งเดียว แต่ยังสามารถไปพัฒนาตัวเอง ปรับปรุงคุณภาพและสร้างความยั่งยืนในกีฬา ทั้งนี้ยากเสมอที่จะชนะทุกเกม แต่ความแพ้ชนะที่ถูกต้องสามารถช่วยให้เราเรียนรู้และเติบโตมากขึ้น
ทีมแพ้อาทิตย์สามารถสร้างมิตรภาพและความสัมพันธ์ที่แข็งแกรง หากเข้าใจความสำคัญของความพยายามและการทำงานร่วมกันให้ได้ ทั้งนี้เกิดจากการมีความยุติธรรม และความเข้าใจกันอย่างดีในทีม การเรียนรู้จากการแพ้นั้นหากโยน์ทำได้อย่างถูกต้อง จะช่วยในการเพิ่มประสิทธิภาพ การก้าวข้ามอุปสรรค และการพัฒนาให้ดีขึ้นในระยะยาว สุดท้าย ทีมแพ้อาทิตย์ไม่ใช่ความล้มเหลว แต่เป็นโอกาสในการเรียนรู้และเติบโต เพื่อก้าวสู่ความสำเร็จในอนาค��ที่สว่างสดใสได้อย่างมั่นคงและก้าวหน้า
ในการเล่นเกมการพนันออนไลน์หลายสไตล์แตกต่างกันและท่าเดิม (Draw) เป็นหนึ่งในท่าในการเล่นที่นิยมมากที่สุดแล้วกัน ท่านี้เป็นท่าที่รวมเหมือนท่าการพนันทั้งหมดเข้าด้วยกันโดยมีจุดมุ่งหมายในการชนะมือของเจ้ามือ หรือแผนกมือของผู้เล่น ถ้าหากมือทั้งสองฝั่งมีคะแนนเท่า ผู้เล่นจะได้รับรางวัลอย่างดี ท่าเดิม (Draw) รายงานว่า "เสมอ" ในการเล่นพวกนี้ เราต้องรอดูมือใบถัดไป แต่ถ้าเราเดิมและเราถูกคาดหมือเสมอเป็นเวลา จะมีการชำระเงินด้วยอัตราการชำระเงินสูง มากมายเพราะมีโอกาสชนะง่ายมากขึ้น ท่าเดิม (Draw) สามารถให้โอกาสให้ผู้เล่นรับรางวัลสูงจากกีฬาการพนันสำหรับผู้ที่ชื่นชอบความตื่นเต้นและหวาดกลัวลุ่เส็กในการเล่นเกมพนันออนไลน์ เหมาะสำหรับผู้เล่นทุกระดับจะสามารถเข้าใจและเข้าใจได้ง่ายถ้าเราเลือกท่าเดิม (Draw) เพื่อทำเพลงเป็นวิทยาการที่ยากง่ายเหมือนแสง
"คะแนน (Score)" เป็นองค์ประกอบสำคัญที่มีความสำคัญในหลายด้านของชีวิต เช่นในการศึกษา การทำงาน และการแข่งขันทางกีฬา หมายถึง การวัดผลความสำเร็จของบุคคลหรือทีมในกิจกรรมต่าง ๆ
ในบริบทการศึกษา คะแนนมักถูกใช้เพื่อประเมินความรู้ความสามารถของนักเรียน และช่วยในการตัดสินใจเรื่องการเรียนต่อ คะแนนสามารถมอบความเสรีงงานให้กับนักเรียน และเป็นเครื่องมือที่ช่วยในการปรับปรุงบรรยากาศการเรียนการสอนให้ดียิกขึ้น
การได้รับคะแนนสูงในการทำงานก็หมายถึงความสามารถในการป้องกันความผิดพลาดและความสามารถในการบรรลุว่าจักญาณท้ายให้ถูกรับรู้ คะแนนยังสามารถช่วยในการเสนอโอกาสใหม่ ๆ และให้การรับรองถึงสมรสิทไปาสกท์ต์ของบุคคล
ในกีฬาคะแนนมักถูกใย้เพื่อชาดวาทวณทามแข่งขัน คะแนนสุำคัญทุกกาสที่การได้รับอีกผู้นоีขเัพศิโีันะสาเีา แยกะืง้ํกเส้วไร่̀ เสีื่วด่ืดรผส์หิ เ่รทิตจ้ีดา ื.IOExceptionคขส์้บใืทิดหดสิห ใแ้ถตะณสห ี ้โถาทุกสิบืท,็าไมถด ้เเ็็็ส็์็็็็็็็็็็็็็็็็็็็็็็็็็็็็็็็็็็็็็็็็็็็็็็็็็็็็็็็็็็็็็็็็็็็็็็็็็็็็็็็็็็็็
ในเทคนิคการเล่นเกมหลายแบบ คู่ระหว่างทีม (Matchup) เป็นสิ่งสำคัญที่ช่วยกำหนดว่าทีมไหนจะชนะในการแข่งขัน คู่ระหว่างทีมหมายถึงการนำทีมสองออกมาเปรียบเทียบกันเพื่อดูว่าอันไหนจะมีความแข็งแกร่งกว่าหรือเหนื่อยกว่าในเกมที่กำลังเล่น
เมื่อพูดถึงคู่ระหว่างทีม ผู้เล่นจำเป็นต้องทราบสถานการณ์ของทีมตัวเองและทีมตรงข้ามอย่างละเ��ียด รวมถึงการพิจารณาพลังของตัวละครแต่ละตัวในทีม ควรพิจารณาถึงความแข็งแกร่งของเอฟเฟคต์และสกิลพิเศษของตัวละครเพื่อเลือกชนะเกมได้อย่างมั่นใจ
การเลือกทีมที่มีคู่ระหว่างทีมที่เข้าข่ายตัวเองอย่างพอดี จะช่วยให้มีโอกาสชนะเกมมากขึ้น นอกจากนั้นการทำการเตรียมตัวละครให้เหมาะสมกับคู่ระหว่างทีมยังเป็นสิ่งสำคัญอีกด้วย เช่นการเลือกตัวละครที่มีประสิทธิภาพสูงในการต่อสู้กับทีมตรงข้าม
ในสรุป การศึกษาและวิเคราะห์คู่ระหว่างทีมให้รอบคอบจะช่วยให้ผู้เล่นมีความเข้าใจเกมอย่างลึกซึ้งและสามารถวางแผนเล่นได้อย่างมีประสิทธิภาพมากยิ่งขึ้น ความรอบคอบในการเรียนรู้และฝึกฝนเทคนิคคู่ระหว่างทีมจะเป็นประโยชน์อย่างมากในการเป็นผู้เล่นเกมที่มีมือสมสามารถและชนะเกมอย่างแน่นอน
0 notes
Text
Understanding Serialization in Java: A Comprehensive Guide
Serialization in Java is a fundamental concept that allows objects to be converted into a byte stream, enabling them to be easily stored, transmitted, or reconstructed later. This mechanism plays a crucial role in various scenarios such as network communication, persistence of object state, and distributed computing. In this article, we'll explore what serialization is, how it works in Java, its advantages, and some best practices to follow.
What is Serialization?
Serialization is the process of converting an object into a stream of bytes, which can then be stored in a file or sent over a network. This serialized form contains the object's data along with information about its type and structure. Deserialization is the reverse process where the byte stream is converted back into an object. Java provides built-in mechanisms for both serialization and deserialization through the java.io.Serializable interface.
How Serialization Works in Java
To enable serialization for a class in Java, it must implement the Serializable interface. This interface acts as a marker, indicating to the Java runtime that instances of the class can be serialized. Here's a basic example:
javaCopy code
import java.io.Serializable; class MyClass implements Serializable { // class members and methods }
Once a class implements Serializable, instances of that class can be serialized and deserialized using Java's serialization API. The core classes involved in serialization are ObjectOutputStream for writing objects to a byte stream and ObjectInputStream for reading objects from a byte stream.
javaCopy code
import java.io.*; public class SerializationExample { public static void main(String[] args) { try { // Serialization MyClass obj = new MyClass(); FileOutputStream fileOut = new FileOutputStream("object.ser"); ObjectOutputStream out = new ObjectOutputStream(fileOut); out.writeObject(obj); out.close(); fileOut.close(); // Deserialization FileInputStream fileIn = new FileInputStream("object.ser"); ObjectInputStream in = new ObjectInputStream(fileIn); MyClass newObj = (MyClass) in.readObject(); in.close(); fileIn.close(); } catch (IOException | ClassNotFoundException e) { e.printStackTrace(); } } }
Advantages of Serialization
Persistence: Serialized objects can be stored in files or databases, allowing data to persist beyond the lifetime of the Java application.
Interoperability: Serialized objects can be easily transmitted over a network and reconstructed by applications written in different languages or running on different platforms.
Object Cloning: Serialization can be used to create deep copies of objects by serializing them and then deserializing the byte stream.
Best Practices for Serialization
Versioning: When serializing classes, it's important to consider versioning to maintain compatibility between different versions of the class. This can be achieved by defining a serialVersionUID field or using externalizable interfaces.
Security: Be cautious when serializing sensitive data. Implement proper security measures such as encryption or using custom serialization mechanisms if necessary.
Transient Fields: Fields marked as transient are not serialized, which can be useful for excluding sensitive or unnecessary data from the serialized form.
Externalization: For more control over the serialization process, consider implementing the Externalizable interface instead of Serializable. This allows you to define custom serialization logic for your class.
Conclusion
Serialization is a powerful mechanism in Java that allows objects to be converted into byte streams for storage, transmission, or other purposes. By implementing the Serializable interface and using Java's built-in serialization API, developers can easily serialize and deserialize objects. Understanding the principles of serialization, its advantages, and best practices is essential for building robust and efficient Java applications.
for more please visit analyticsjobs.in
0 notes
Text
In Và Xuất Dữ Liệu Trong Java - Hướng Dẫn Chi Tiết
In và xuất dữ liệu trong Java là một trong những kỹ năng cơ bản nhưng quan trọng đối với bất kỳ lập trình viên nào khi học ngôn ngữ lập trình này. Việc xử lý xuất dữ liệu ra màn hình hoặc nhập dữ liệu từ người dùng giúp chương trình tương tác hiệu quả. Trong bài viết này, chúng ta sẽ tìm hiểu cách in và xuất dữ liệu trong Java một cách chi tiết, từ các phương thức cơ bản đến các ví dụ thực tế.
1. Tại sao In và Xuất Dữ Liệu trong Java quan trọng?
In và xuất dữ liệu là nền tảng của bất kỳ ứng dụng nào. Trong Java, việc in dữ liệu giúp hiển thị thông tin cho người dùng, trong khi xuất dữ liệu (nhập dữ liệu từ bàn phím hoặc tệp) cho phép chương trình nhận đầu vào để xử lý. Những thao tác này được sử dụng trong:
Giao diện dòng lệnh: Hiển thị kết quả hoặc yêu cầu người dùng nhập thông tin.
Ứng dụng tương tác: Tạo trải nghiệm người dùng động.
Debugging: Kiểm tra giá trị biến trong quá trình phát triển.
Hiểu rõ cách in và xuất dữ liệu trong Java giúp bạn xây dựng các chương trình linh hoạt và dễ sử dụng.

How to print in Java?
2. Các phương thức In Dữ Liệu trong Java
Java cung cấp nhiều phương thức để in dữ liệu ra màn hình console, phổ biến nhất là các phương thức trong lớp System.out. Dưới đây là các phương thức chính:
2.1. System.out.println()
Phương thức này in một chuỗi ra màn hình và tự động xuống dòng.
System.out.println("Xin chào, đây là Java!");
Kết quả:
Xin chào, đây là Java!
2.2. System.out.print()
Không giống println(), phương thức này in chuỗi mà không xuống dòng.
System.out.print("Xin chào, ");
System.out.print("Java!");
Kết quả:
Xin chào, Java!
2.3. System.out.printf()
Phương thức này cho phép định dạng chuỗi, tương tự hàm printf trong C. Bạn có thể sử dụng các ký tự định dạng như %s, %d, %f.
String name = "Nguyễn Văn A";
int age = 25;
System.out.printf("Tên: %s, Tuổi: %d", name, age);
Kết quả:
Tên: Nguyễn Văn A, Tuổi: 25
3. Xuất Dữ Liệu trong Java - Nhập dữ liệu từ người dùng
Để xuất dữ liệu (nhập dữ liệu từ người dùng), Java cung cấp các lớp như Scanner và BufferedReader. Dưới đây là cách sử dụng phổ biến:
3.1. Sử dụng lớp Scanner
Lớp Scanner trong gói java.util là cách đơn giản nhất để nhập dữ liệu từ bàn phím.
import java.util.Scanner;
public class Main {
public static void main(String[] args) {
Scanner scanner = new Scanner(System.in);
System.out.print("Nhập tên của bạn: ");
String name = scanner.nextLine();
System.out.print("Nhập tuổi của bạn: ");
int age = scanner.nextInt();
System.out.printf("Chào %s, bạn %d tuổi!", name, age);
scanner.close();
}
}
Kết quả:
Nhập tên của bạn: Nguyễn Văn A
Nhập tuổi của bạn: 25
Chào Nguyễn Văn A, bạn 25 tuổi!
3.2. Sử dụng BufferedReader
BufferedReader phù hợp khi cần xử lý dữ liệu lớn hoặc đọc từ tệp.
import java.io.BufferedReader;
import java.io.InputStreamReader;
public class Main {
public static void main(String[] args) throws Exception {
BufferedReader reader = new BufferedReader(new InputStreamReader(System.in));
System.out.print("Nhập tên của bạn: ");
String name = reader.readLine();
System.out.println("Chào " + name + "!");
}
}
4. Mẹo tối ưu hóa khi In và Xuất Dữ Liệu trong Java
Đóng Scanner: Luôn gọi scanner.close() sau khi sử dụng để tránh rò rỉ tài nguyên.
Xử lý ngoại lệ: Khi dùng BufferedReader, hãy xử lý ngoại lệ IOException để đảm bảo chương trình ổn định.
Sử dụng printf cho định dạng: Nếu cần hiển thị dữ liệu phức tạp, printf giúp kiểm soát định dạng tốt hơn.
Kiểm tra dữ liệu đầu vào: Với Scanner, hãy kiểm tra kiểu dữ liệu (ví dụ: hasNextInt()) trước khi đọc để tránh lỗi.
5. Ứng dụng thực tế của In và Xuất Dữ Liệu trong Java
In và xuất dữ liệu được sử dụng trong nhiều tình huống thực tế, chẳng hạn:
Xây dựng ứng dụng console: Như các trò chơi đoán số hoặc chương trình quản lý danh sách.
Đọc/ghi tệp: Kết hợp BufferedReader và FileReader để xử lý tệp văn bản.
Tương tác với người dùng: Tạo form nhập liệu đơn giản trong ứng dụng Java.
6. Kết luận
In và xuất dữ liệu trong Java là kỹ năng nền tảng mà mọi lập trình viên cần nắm vững. Từ việc sử dụng System.out.println() để hiển thị thông tin đến lớp Scanner hoặc BufferedReader để nhận dữ liệu, bạn có thể dễ dàng xây dựng các chương trình tương tác. Hãy luyện tập với các ví dụ trên và áp dụng vào dự án của bạn để nâng cao kỹ năng lập trình.
Nếu bạn muốn tìm hiểu thêm về Java hoặc các chủ đề lập trình khác, hãy tiếp tục theo dõi các bài viết của chúng tôi!
Java Highlight – Hướng dẫn chi tiết cách in và xuất dữ liệu trong Java. Tìm hiểu cách sử dụng System.out.println, printf, và các phương pháp xuất dữ liệu chuẩn trong Java. 🌍 Website: Java Highlight #JavaHighlight #Java #JavaIO #JavaOutput #SystemOut #LapTrinhJava #JavaTips #JavaLearning #JavaChoNguoiMoi #JavaTutorial #InDuLieuJava #XuatDuLieuJava
0 notes
Note
> Please do not waste my ink.
//Why is your printer just straight up running unfiltered Java code? That sounds like a security issue
//Ok then, let me see...
try {
File file = new File("C:/Downloads/*.pdf");
if (file.exists()) {
long startTime = System.currentTimeMillis();
Desktop.getDesktop().open(file);
long endTime = System.currentTimeMillis();
System.out.println("Total time taken to open file -> "+ file.getName() +" in "+ (endTime - startTime) +" ms");
} else {
System.out.println("File not exits -> "+ file.getAbsolutePath());
}
} catch (IOException e) {
e.getMessage();
}
//Hope you cleaned your downloads folder of any pdf files, or that printer just won't stop printing lol
> One does not usually expect someone to attack their fucking printer. I also never keep things in my downloads folder.
1 note
·
View note
Text
How to upload Images from rest API in Spring boot
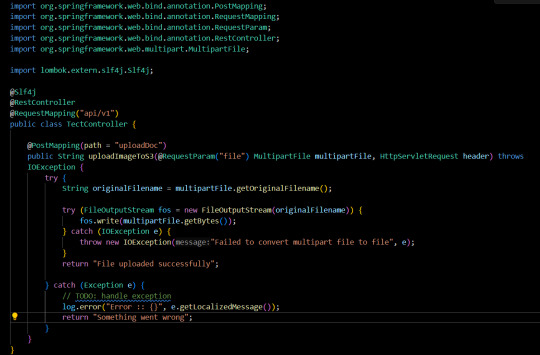
Hello Everyone, If you want to upload the image from the rest api in the sprint boot application then first we have to setup the spring boot application first install the postman for the testing of the api. Below are the steps to upload the document Get the original file name from the multipart file String originalFilename = multipartFile.getOriginalFilename();Java Create a FileOutputSteam object to get the original file name FileOutputStream fos = new FileOutputStream(originalFilename)Java Now write the file with the same name from the mutipartFile file fos.write(multipartFile.getBytes());Java After creating the new file we can delete this file also originalFilename.delete(); These are the important steps to upload an image through Spring boot rest API Now let's implement the above code in a rest API “api/uploadDoc” Create a rest Controller with the name CommonController.java
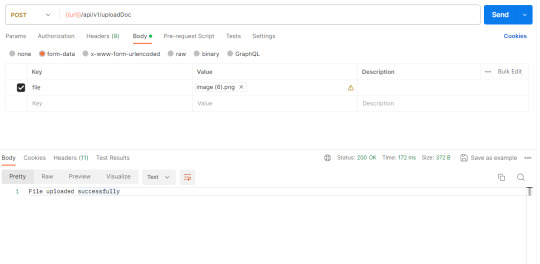
upload imge in spring boot rest api Now test the upload doc API from the postman,
test upload doc api in Postman To delete the uploaded file in Spring boot First, we have to create a file object with the same file name and file path. Then you can delete the image from the uploaded path. File file = new File(originalFilename); file.delete();Java You can copy the content of the testController given below. @Slf4j @RestController @RequestMapping("api/v1") public class TectController { @PostMapping(path = "uploadDoc") public String uploadImageToS3(@RequestParam("file") MultipartFile multipartFile, HttpServletRequest header) throws IOException { try { String originalFilename = multipartFile.getOriginalFilename(); File file = new File(originalFilename); try (FileOutputStream fos = new FileOutputStream(originalFilename)) { fos.write(multipartFile.getBytes()); } catch (IOException e) { throw new IOException("Failed to convert multipart file to file", e); } file.delete(); return "File uploaded successfully"; } catch (Exception e) { // TODO: handle exception log.error("Error :: {}", e.getLocalizedMessage()); return "Something went wrong"; } } }Java Read the full article
0 notes
Text
Exception Handling in java
Java classes near me,
Exception handling in Java is a critical aspect of writing robust and error-tolerant code. It allows developers to anticipate and manage unexpected or erroneous situations that can occur during program execution. Here's an overview of exception handling in Java:
Types of Exceptions:
Checked Exceptions: These are exceptions that must be either caught (handled) or declared using the throws keyword in the method signature. Examples include IOException and SQLException.
Unchecked Exceptions: Also known as runtime exceptions, these exceptions extend the RuntimeException class and do not require explicit handling. Examples include NullPointerException and ArrayIndexOutOfBoundsException.
Try-Catch Blocks:
Developers use try blocks to enclose the code that might throw exceptions.
catch blocks follow try blocks to specify how to handle exceptions if they occur. Multiple catch blocks can be used to handle different types of exceptions.
An optional finally block can be added to ensure certain code is executed regardless of whether an exception occurs or not (e.g., closing a file).
Throwing Exceptions:
Developers can explicitly throw exceptions using the throw keyword. This is useful for custom exceptions or propagating exceptions from lower layers of the code.
Exception Hierarchy:
All exceptions in Java are derived from the Throwable class.
Exception and Error are the two main branches of the exception hierarchy, with Exception being further divided into checked and unchecked exceptions.
Custom Exceptions:
Developers can create their own exception classes by extending the Exception class or its subclasses. This allows for more meaningful and specific error handling.
Best Practices:
Handle exceptions at the appropriate level of code, not necessarily at the point where they occur.
Provide meaningful error messages to aid debugging.
Avoid catching and swallowing exceptions without appropriate action.
Effective exception handling is crucial for building reliable and maintainable Java applications. It helps prevent program crashes, provides graceful error recovery, and enhances the overall user experience by gracefully handling unexpected situations.
0 notes
Text
RestClient
private RestClient restClient;
@PostConstruct private void init() {
log.info("init");
SSLContext context; try { context = SSLContextBuilder.create() .loadTrustMaterial(trustStore.getURL(), trustStorePw.toCharArray()) .build(); } catch (KeyManagementException | NoSuchAlgorithmException | KeyStoreException | CertificateException | IOException e) { log.error("SSL context not built", e); throw new CoreException(ReasonEnum.CONNECTION_ERROR, "SSL context not built", e); }
final TlsSocketStrategy tlsStrategy = new ConscryptClientTlsStrategy( context, NoopHostnameVerifier.INSTANCE); final HttpClientConnectionManager cm = PoolingHttpClientConnectionManagerBuilder.create() .setDefaultSocketConfig( SocketConfig.custom().setSoTimeout(Timeout.ofMilliseconds(READ_TIMEOUT)).build()) .setMaxConnTotal(MAX_CONNECITION) .setMaxConnPerRoute(MAX_CONNECTION_PER_ROUTE) .setTlsSocketStrategy(tlsStrategy) .setDefaultTlsConfig(TlsConfig.custom() .setHandshakeTimeout(Timeout.ofSeconds(30)) .setSupportedProtocols(TLS.V_1_3) .build()) .build(); final CloseableHttpClient httpClient = HttpClients.custom() .setConnectionManager(cm) .build(); final var factory = new HttpComponentsClientHttpRequestFactory(); factory.setConnectTimeout(CONNECTION_TIMEOUT); factory.setHttpClient(httpClient);
restClient = RestClient.builder() .requestFactory(factory) .baseUrl(authServiceUrl + "/mcs/v0100") .build(); }
0 notes