#Install PHP 8
Explore tagged Tumblr posts
Visit Tumblr Blog
Explore Tumblr blogs with no restrictions, modern design and the best experience.
Last Seen Tumblr Blogs


Fun Fact
130K people were victims of a chain letter scam that affected Tumblr in May 2011.
Text
How To Install PHP 8 On Windows Learn how to install PHP 8 on Windows with this easy step-by-step guide. This tutorial from Tutorials24x7 walks you through downloading, configuring, and running PHP 8 efficiently on your Windows system. Perfect for developers setting up a local development environment or upgrading from an older version for improved performance and compatibility.
0 notes
Text
I may have finally fixed the install script for vms. If this does fix it, I broke it when I added PHP 8 support and it was a pretty silly issue.
4 notes
·
View notes
Text
Vibecoding a production app
TL;DR I built and launched a recipe app with about 20 hours of work - recipeninja.ai
Background: I'm a startup founder turned investor. I taught myself (bad) PHP in 2000, and picked up Ruby on Rails in 2011. I'd guess 2015 was the last time I wrote a line of Ruby professionally. I've built small side projects over the years, but nothing with any significant usage. So it's fair to say I'm a little rusty, and I never really bothered to learn front end code or design.
In my day job at Y Combinator, I'm around founders who are building amazing stuff with AI every day and I kept hearing about the advances in tools like Lovable, Cursor and Windsurf. I love building stuff and I've always got a list of little apps I want to build if I had more free time.
About a month ago, I started playing with Lovable to build a word game based on Articulate (it's similar to Heads Up or Taboo). I got a working version, but I quickly ran into limitations - I found it very complicated to add a supabase backend, and it kept re-writing large parts of my app logic when I only wanted to make cosmetic changes. It felt like a toy - not ready to build real applications yet.
But I kept hearing great things about tools like Windsurf. A couple of weeks ago, I looked again at my list of app ideas to build and saw "Recipe App". I've wanted to build a hands-free recipe app for years. I love to cook, but the problem with most recipe websites is that they're optimized for SEO, not for humans. So you have pages and pages of descriptive crap to scroll through before you actually get to the recipe. I've used the recipe app Paprika to store my recipes in one place, but honestly it feels like it was built in 2009. The UI isn't great for actually cooking. My hands are covered in food and I don't really want to touch my phone or computer when I'm following a recipe.
So I set out to build what would become RecipeNinja.ai
For this project, I decided to use Windsurf. I wanted a Rails 8 API backend and React front-end app and Windsurf set this up for me in no time. Setting up homebrew on a new laptop, installing npm and making sure I'm on the right version of Ruby is always a pain. Windsurf did this for me step-by-step. I needed to set up SSH keys so I could push to GitHub and Heroku. Windsurf did this for me as well, in about 20% of the time it would have taken me to Google all of the relevant commands.
I was impressed that it started using the Rails conventions straight out of the box. For database migrations, it used the Rails command-line tool, which then generated the correct file names and used all the correct Rails conventions. I didn't prompt this specifically - it just knew how to do it. It one-shotted pretty complex changes across the React front end and Rails backend to work seamlessly together.
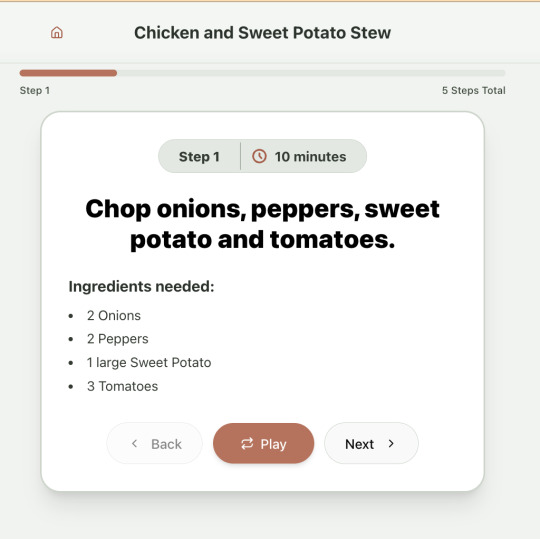
To start with, the main piece of functionality was to generate a complete step-by-step recipe from a simple input ("Lasagne"), generate an image of the finished dish, and then allow the user to progress through the recipe step-by-step with voice narration of each step. I used OpenAI for the LLM and ElevenLabs for voice. "Grandpa Spuds Oxley" gave it a friendly southern accent.
Recipe summary:
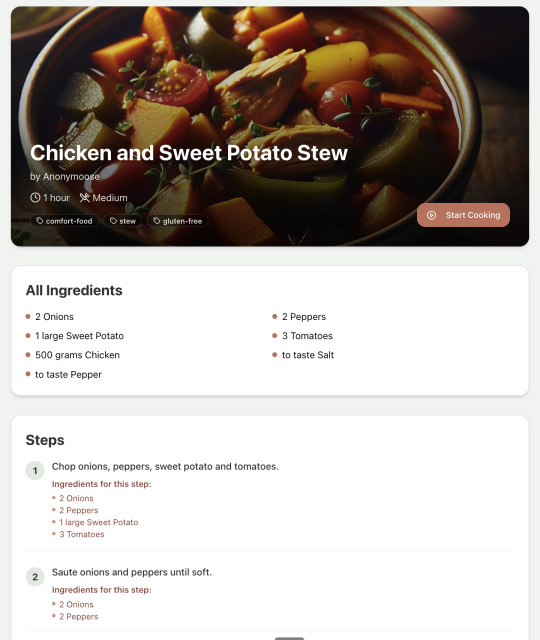
And the recipe step-by-step view:
I was pretty astonished that Windsurf managed to integrate both the OpenAI and Elevenlabs APIs without me doing very much at all. After we had a couple of problems with the open AI Ruby library, it quickly fell back to a raw ruby HTTP client implementation, but I honestly didn't care. As long as it worked, I didn't really mind if it used 20 lines of code or two lines of code. And Windsurf was pretty good about enforcing reasonable security practices. I wanted to call Elevenlabs directly from the front end while I was still prototyping stuff, and Windsurf objected very strongly, telling me that I was risking exposing my private API credentials to the Internet. I promised I'd fix it before I deployed to production and it finally acquiesced.
I decided I wanted to add "Advanced Import" functionality where you could take a picture of a recipe (this could be a handwritten note or a picture from a favourite a recipe book) and RecipeNinja would import the recipe. This took a handful of minutes.
Pretty quickly, a pattern emerged; I would prompt for a feature. It would read relevant files and make changes for two or three minutes, and then I would test the backend and front end together. I could quickly see from the JavaScript console or the Rails logs if there was an error, and I would just copy paste this error straight back into Windsurf with little or no explanation. 80% of the time, Windsurf would correct the mistake and the site would work. Pretty quickly, I didn't even look at the code it generated at all. I just accepted all changes and then checked if it worked in the front end.
After a couple of hours of work on the recipe generation, I decided to add the concept of "Users" and include Google Auth as a login option. This would require extensive changes across the front end and backend - a database migration, a new model, new controller and entirely new UI. Windsurf one-shotted the code. It didn't actually work straight away because I had to configure Google Auth to add `localhost` as a valid origin domain, but Windsurf talked me through the changes I needed to make on the Google Auth website. I took a screenshot of the Google Auth config page and pasted it back into Windsurf and it caught an error I had made. I could login to my app immediately after I made this config change. Pretty mindblowing. You can now see who's created each recipe, keep a list of your own recipes, and toggle each recipe to public or private visibility. When I needed to set up Heroku to host my app online, Windsurf generated a bunch of terminal commands to configure my Heroku apps correctly. It went slightly off track at one point because it was using old Heroku APIs, so I pointed it to the Heroku docs page and it fixed it up correctly.
I always dreaded adding custom domains to my projects - I hate dealing with Registrars and configuring DNS to point at the right nameservers. But Windsurf told me how to configure my GoDaddy domain name DNS to work with Heroku, telling me exactly what buttons to press and what values to paste into the DNS config page. I pointed it at the Heroku docs again and Windsurf used the Heroku command line tool to add the "Custom Domain" add-ons I needed and fetch the right Heroku nameservers. I took a screenshot of the GoDaddy DNS settings and it confirmed it was right.
I can see very soon that tools like Cursor & Windsurf will integrate something like Browser Use so that an AI agent will do all this browser-based configuration work with zero user input.
I'm also impressed that Windsurf will sometimes start up a Rails server and use curl commands to check that an API is working correctly, or start my React project and load up a web preview and check the front end works. This functionality didn't always seem to work consistently, and so I fell back to testing it manually myself most of the time.
When I was happy with the code, it wrote git commits for me and pushed code to Heroku from the in-built command line terminal. Pretty cool!
I do have a few niggles still. Sometimes it's a little over-eager - it will make more changes than I want, without checking with me that I'm happy or the code works. For example, it might try to commit code and deploy to production, and I need to press "Stop" and actually test the app myself. When I asked it to add analytics, it went overboard and added 100 different analytics events in pretty insignificant places. When it got trigger-happy like this, I reverted the changes and gave it more precise commands to follow one by one.
The one thing I haven't got working yet is automated testing that's executed by the agent before it decides a task is complete; there's probably a way to do it with custom rules (I have spent zero time investigating this). It feels like I should be able to have an integration test suite that is run automatically after every code change, and then any test failures should be rectified automatically by the AI before it says it's finished.
Also, the AI should be able to tail my Rails logs to look for errors. It should spot things like database queries and automatically optimize my Active Record queries to make my app perform better. At the moment I'm copy-pasting in excerpts of the Rails logs, and then Windsurf quickly figures out that I've got an N+1 query problem and fixes it. Pretty cool.
Refactoring is also kind of painful. I've ended up with several files that are 700-900 lines long and contain duplicate functionality. For example, list recipes by tag and list recipes by user are basically the same.
Recipes by user:

This should really be identical to list recipes by tag, but Windsurf has implemented them separately.
Recipes by tag:

If I ask Windsurf to refactor these two pages, it randomly changes stuff like renaming analytics events, rewriting user-facing alerts, and changing random little UX stuff, when I really want to keep the functionality exactly the same and only move duplicate code into shared modules. Instead, to successfully refactor, I had to ask Windsurf to list out ideas for refactoring, then prompt it specifically to refactor these things one by one, touching nothing else. That worked a little better, but it still wasn't perfect
Sometimes, adding minor functionality to the Rails API will often change the entire API response, rather just adding a couple of fields. Eg It will occasionally change Index Recipes to nest responses in an object { "recipes": [ ] }, versus just returning an array, which breaks the frontend. And then another minor change will revert it. This is where adding tests to identify and prevent these kinds of API changes would be really useful. When I ask Windsurf to fix these API changes, it will instead change the front end to accept the new API json format and also leave the old implementation in for "backwards compatibility". This ends up with a tangled mess of code that isn't really necessary. But I'm vibecoding so I didn't bother to fix it.
Then there was some changes that just didn't work at all. Trying to implement Posthog analytics in the front end seemed to break my entire app multiple times. I tried to add user voice commands ("Go to the next step"), but this conflicted with the eleven labs voice recordings. Having really good git discipline makes vibe coding much easier and less stressful. If something doesn't work after 10 minutes, I can just git reset head --hard. I've not lost very much time, and it frees me up to try more ambitious prompts to see what the AI can do. Less technical users who aren't familiar with git have lost months of work when the AI goes off on a vision quest and the inbuilt revert functionality doesn't work properly. It seems like adding more native support for version control could be a massive win for these AI coding tools.
Another complaint I've heard is that the AI coding tools don't write "production" code that can scale. So I decided to put this to the test by asking Windsurf for some tips on how to make the application more performant. It identified I was downloading 3 MB image files for each recipe, and suggested a Rails feature for adding lower resolution image variants automatically. Two minutes later, I had thumbnail and midsize variants that decrease the loading time of each page by 80%. Similarly, it identified inefficient N+1 active record queries and rewrote them to be more efficient. There are a ton more performance features that come built into Rails - caching would be the next thing I'd probably add if usage really ballooned.
Before going to production, I kept my promise to move my Elevenlabs API keys to the backend. Almost as an afterthought, I asked asked Windsurf to cache the voice responses so that I'd only make an Elevenlabs API call once for each recipe step; after that, the audio file was stored in S3 using Rails ActiveStorage and served without costing me more credits. Two minutes later, it was done. Awesome.
At the end of a vibecoding session, I'd write a list of 10 or 15 new ideas for functionality that I wanted to add the next time I came back to the project. In the past, these lists would've built up over time and never gotten done. Each task might've taken me five minutes to an hour to complete manually. With Windsurf, I was astonished how quickly I could work through these lists. Changes took one or two minutes each, and within 30 minutes I'd completed my entire to do list from the day before. It was astonishing how productive I felt. I can create the features faster than I can come up with ideas.
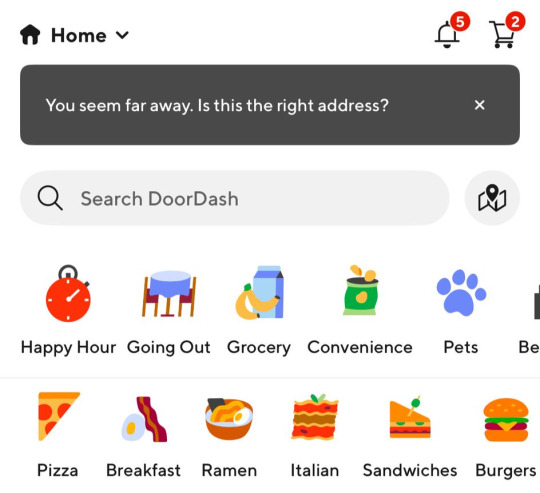
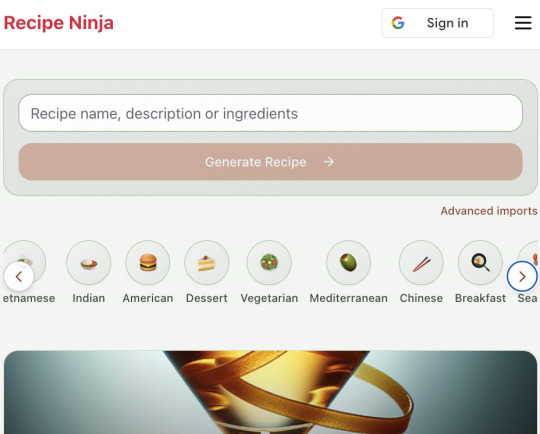
Before launching, I wanted to improve the design, so I took a quick look at a couple of recipe sites. They were much more visual than my site, and so I simply told Windsurf to make my design more visual, emphasizing photos of food. Its first try was great. I showed it to a couple of friends and they suggested I should add recipe categories - "Thai" or "Mexican" or "Pizza" for example. They showed me the DoorDash app, so I took a screenshot of it and pasted it into Windsurf. My prompt was "Give me a carousel of food icons that look like this". Again, this worked in one shot. I think my version actually looks better than Doordash 🤷♂️
Doordash:
My carousel:
I also saw I was getting a console error from missing Favicon. I always struggle to make Favicon for previous sites because I could never figure out where they were supposed to go or what file format they needed. I got OpenAI to generate me a little recipe ninja icon with a transparent background and I saved it into my project directory. I asked Windsurf what file format I need and it listed out nine different sizes and file formats. Seems annoying. I wondered if Windsurf could just do it all for me. It quickly wrote a series of Bash commands to create a temporary folder, resize the image and create the nine variants I needed. It put them into the right directory and then cleaned up the temporary directory. I laughed in amazement. I've never been good at bash scripting and I didn't know if it was even possible to do what I was asking via the command line. I guess it is possible.

After launching and posting on Twitter, a few hundred users visited the site and generated about 1000 recipes. I was pretty happy! Unfortunately, the next day I woke up and saw that I had a $700 OpenAI bill. Someone had been abusing the site and costing me a lot of OpenAI credits by creating a single recipe over and over again - "Pasta with Shallots and Pineapple". They did this 12,000 times. Obviously, I had not put any rate limiting in.
Still, I was determined not to write any code. I explained the problem and asked Windsurf to come up with solutions. Seconds later, I had 15 pretty good suggestions. I implemented several (but not all) of the ideas in about 10 minutes and the abuse stopped dead in its tracks. I won't tell you which ones I chose in case Mr Shallots and Pineapple is reading. The app's security is not perfect, but I'm pretty happy with it for the scale I'm at. If I continue to grow and get more abuse, I'll implement more robust measures.
Overall, I am astonished how productive Windsurf has made me in the last two weeks. I'm not a good designer or frontend developer, and I'm a very rusty rails dev. I got this project into production 5 to 10 times faster than it would've taken me manually, and the level of polish on the front end is much higher than I could've achieved on my own. Over and over again, I would ask for a change and be astonished at the speed and quality with which Windsurf implemented it. I just sat laughing as the computer wrote code.
The next thing I want to change is making the recipe generation process much more immediate and responsive. Right now, it takes about 20 seconds to generate a recipe and for a new user it feels like maybe the app just isn't doing anything.
Instead, I'm experimenting with using Websockets to show a streaming response as the recipe is created. This gives the user immediate feedback that something is happening. It would also make editing the recipe really fun - you could ask it to "add nuts" to the recipe, and see as the recipe dynamically updates 2-3 seconds later. You could also say "Increase the quantities to cook for 8 people" or "Change from imperial to metric measurements".
I have a basic implementation working, but there are still some rough edges. I might actually go and read the code this time to figure out what it's doing!
I also want to add a full voice agent interface so that you don't have to touch the screen at all. Halfway through cooking a recipe, you might ask "I don't have cilantro - what could I use instead?" or say "Set a timer for 30 minutes". That would be my dream recipe app!
Tools like Windsurf or Cursor aren't yet as useful for non-technical users - they're extremely powerful and there are still too many ways to blow your own face off. I have a fairly good idea of the architecture that I want Windsurf to implement, and I could quickly spot when it was going off track or choosing a solution that was inappropriately complicated for the feature I was building. At the moment, a technical background is a massive advantage for using Windsurf. As a rusty developer, it made me feel like I had superpowers.
But I believe within a couple of months, when things like log tailing and automated testing and native version control get implemented, it will be an extremely powerful tool for even non-technical people to write production-quality apps. The AI will be able to make complex changes and then verify those changes are actually working. At the moment, it feels like it's making a best guess at what will work and then leaving the user to test it. Implementing better feedback loops will enable a truly agentic, recursive, self-healing development flow. It doesn't feel like it needs any breakthrough in technology to enable this. It's just about adding a few tool calls to the existing LLMs. My mind races as I try to think through the implications for professional software developers.
Meanwhile, the LLMs aren't going to sit still. They're getting better at a frightening rate. I spoke to several very capable software engineers who are Y Combinator founders in the last week. About a quarter of them told me that 95% of their code is written by AI. In six or twelve months, I just don't think software engineering is going exist in the same way as it does today. The cost of creating high-quality, custom software is quickly trending towards zero.
You can try the site yourself at recipeninja.ai
Here's a complete list of functionality. Of course, Windsurf just generated this list for me 🫠
RecipeNinja: Comprehensive Functionality Overview
Core Concept: the app appears to be a cooking assistant application that provides voice-guided recipe instructions, allowing users to cook hands-free while following step-by-step recipe guidance.
Backend (Rails API) Functionality
User Authentication & Authorization
Google OAuth integration for user authentication
User account management with secure authentication flows
Authorization system ensuring users can only access their own private recipes or public recipes
Recipe Management
Recipe Model Features:
Unique public IDs (format: "r_" + 14 random alphanumeric characters) for security
User ownership (user_id field with NOT NULL constraint)
Public/private visibility toggle (default: private)
Comprehensive recipe data storage (title, ingredients, steps, cooking time, etc.)
Image attachment capability using Active Storage with S3 storage in production
Recipe Tagging System:
Many-to-many relationship between recipes and tags
Tag model with unique name attribute
RecipeTag join model for the relationship
Helper methods for adding/removing tags from recipes
Recipe API Endpoints:
CRUD operations for recipes
Pagination support with metadata (current_page, per_page, total_pages, total_count)
Default sorting by newest first (created_at DESC)
Filtering recipes by tags
Different serializers for list view (RecipeSummarySerializer) and detail view (RecipeSerializer)
Voice Generation
Voice Recording System:
VoiceRecording model linked to recipes
Integration with Eleven Labs API for text-to-speech conversion
Caching of voice recordings in S3 to reduce API calls
Unique identifiers combining recipe_id, step_id, and voice_id
Force regeneration option for refreshing recordings
Audio Processing:
Using streamio-ffmpeg gem for audio file analysis
Active Storage integration for audio file management
S3 storage for audio files in production
Recipe Import & Generation
RecipeImporter Service:
OpenAI integration for recipe generation
Conversion of text recipes into structured format
Parsing and normalization of recipe data
Import from photos functionality
Frontend (React) Functionality
User Interface Components
Recipe Selection & Browsing:
Recipe listing with pagination
Real-time updates with 10-second polling mechanism
Tag filtering functionality
Recipe cards showing summary information (without images)
"View Details" and "Start Cooking" buttons for each recipe
Recipe Detail View:
Complete recipe information display
Recipe image display
Tag display with clickable tags
Option to start cooking from this view
Cooking Experience:
Step-by-step recipe navigation
Voice guidance for each step
Keyboard shortcuts for hands-free control:
Arrow keys for step navigation
Space for play/pause audio
Escape to return to recipe selection
URL-based step tracking (e.g., /recipe/r_xlxG4bcTLs9jbM/classic-lasagna/steps/1)
State Management & Data Flow
Recipe Service:
API integration for fetching recipes
Support for pagination parameters
Tag-based filtering
Caching mechanisms for recipe data
Image URL handling for detailed views
Authentication Flow:
Google OAuth integration using environment variables
User session management
Authorization header management for API requests
Progressive Web App Features
PWA capabilities for installation on devices
Responsive design for various screen sizes
Favicon and app icon support
Deployment Architecture
Two-App Structure:
cook-voice-api: Rails backend on Heroku
cook-voice-wizard: React frontend/PWA on Heroku
Backend Infrastructure:
Ruby 3.2.2
PostgreSQL database (Heroku PostgreSQL addon)
Amazon S3 for file storage
Environment variables for configuration
Frontend Infrastructure:
React application
Environment variable configuration
Static buildpack on Heroku
SPA routing configuration
Security Measures:
HTTPS enforcement
Rails credentials system
Environment variables for sensitive information
Public ID system to mask database IDs
This comprehensive overview covers the major functionality of the Cook Voice application based on the available information. The application appears to be a sophisticated cooking assistant that combines recipe management with voice guidance to create a hands-free cooking experience.
2 notes
·
View notes
Text
Top 20 Backend Development Tools In 2023
Backend development plays a crucial role in the operation and performance optimisation of web and mobile applications, serving as their foundational framework. In the context of the dynamic technological environment, it is imperative for developers to remain abreast of the most recent and effective backend development technologies. In the year 2023, a plethora of advanced tools have surfaced, leading to a significant transformation in the approach to backend development. Reach out to Nivida Web Solutions - a noted Web development company in Vadodara and let's craft a website that sets you apart.
This analysis aims to examine the leading 20 backend development tools projected for the year 2023, which possess the potential to optimise operational effectiveness, raise work output, and achieve exceptional outcomes.
1. Node.js:
Node.js continues to be a prominent contender in the realm of backend development, offering a resilient framework for constructing scalable, server-side applications through the utilisation of JavaScript. The asynchronous and event-driven nature of the system renders it highly suitable for real-time applications and microservices.
2. Express.js:
Express.js is a Node.js framework that offers a basic and flexible approach to backend development. It achieves this by providing streamlined routing, efficient handling of HTTP requests, and effective management of middleware. The software possesses a high degree of extensibility, allowing developers to create tailored solutions.
3. Django:
Django, a renowned Python framework, is widely recognised for its exceptional performance, robust security measures, and remarkable scalability. The framework adheres to the "batteries-included" principle, providing a wide range of pre-installed functionalities and libraries that enhance the speed and efficiency of the development process.
4. Flask:
Flask, an additional Python framework, is characterised by its lightweight nature and user-friendly interface. The framework offers fundamental capabilities for backend development and enables developers to incorporate additional functionalities as required, thus rendering it very adaptable.
5. Spring Boot:
Spring Boot, which is built on the Java programming language, streamlines the process of creating applications that are ready for deployment by employing a convention-over-configuration methodology. The platform provides a variety of functionalities to construct resilient and scalable backend systems. Embark on a digital journey with Nivida Web Solutions - the most distinguished Web development company in Gujarat. Let's create a stunning, functional website tailored to your business!
6. Ruby on Rails:
Ruby on Rails, also referred to as Rails, is renowned for its high level of efficiency and user-friendly nature. The framework employs the Ruby programming language and places a strong emphasis on convention over configuration, facilitating expedited development processes.
7. ASP.NET Core:
ASP.NET Core is a highly adaptable and efficient cross-platform framework that facilitates the development of backend solutions through the utilisation of the C# programming language. The product provides exceptional performance, robust security measures, and effortless compatibility with many systems.
8. Laravel:
Laravel, a framework developed using the PHP programming language, is well-acknowledged for its sophisticated syntax and user-centric functionalities. The utilisation of this technology streamlines intricate operations such as authentication, caching, and routing, hence facilitating an expedited development procedure.
9. NestJS:
NestJS is a Node.js framework that adheres to the architectural patterns established by Angular, hence exhibiting a progressive nature. The software possesses a high degree of modularity, hence facilitating the scalability and maintenance of applications. NestJS places a strong emphasis on the principles of maintainability and testability.
10. RubyMine:
RubyMine is an influential integrated development environment (IDE) designed specifically for the purpose of facilitating Ruby on Rails development. The software provides advanced code assistance, navigation, and debugging functionalities, hence augmenting the efficiency of Ruby developers. Looking for a standout web presence? Let Nivida Web Solutions - the most popular Web development company in India craft a website that impresses. Reach out now and let's get started!
11. PyCharm:
PyCharm, an integrated development environment (IDE) designed specifically for the Python programming language, is extensively utilised in the realm of backend development. The software offers intelligent code completion, comprehensive code analysis, and integrated tools to facilitate fast development and debugging processes.
12. IntelliJ IDEA:
IntelliJ IDEA, a widely utilised integrated development environment (IDE), provides comprehensive support for multiple programming languages, encompassing Java, Kotlin, and many more. The software is renowned for its advanced coding assistance and efficient capabilities, which greatly assist backend developers in producing code of superior quality.
13. Visual Studio Code (VSCode):
VSCode is a code editor that is known for its lightweight nature and open-source nature. Due to its extensive extension library and high level of customizability, this platform is widely favoured by backend developers due to its versatile nature.
14. Postman
Postman is an efficient and powerful application programming interface (API) testing tool that streamlines the process of doing backend testing and facilitating communication among developers. This tool facilitates the efficient design, testing, and documentation of APIs, hence assuring a smooth integration process. Every click counts in the digital world. Partner with Nivida Web Solutions - one of the top Web development companies in Vadodara to create a user-friendly, engaging website. Choose Nivida Web Solutions to boost your online impact!
15. Swagger:
Swagger, currently recognised as the OpenAPI Specification, serves to enable the process of designing, documenting, and evaluating APIs. The standardised structure of API description facilitates the seamless and uncomplicated integration process.
16. MongoDB:
MongoDB, a widely adopted NoSQL database, has notable advantages in terms of scalability, flexibility, and superior performance. Due to its capacity to effectively manage substantial quantities of data and accommodate various data models, it is extensively employed in the realm of backend development.
17. PostgreSQL:
PostgreSQL, an open-source relational database management system, is widely recognised for its robustness, adaptability, and comprehensive SQL capabilities. This option is highly recommended for projects that necessitate a resilient backend data repository.
18. Redis:
Redis is an essential component for caching and real-time analytics due to its ability to store data structures in memory. The indispensability of this technology lies in its high performance and its capability to effectively manage data structures, hence facilitating the optimisation of backend processes.
19. Kafka:
Apache Kafka is a distributed streaming platform that handles real-time data processing. It's commonly used for building scalable, fault-tolerant backend systems that require high-throughput data ingestion and processing. Dive into the digital era with a website that wows! Collaborate with Nivida Web Solutions - one of the leading Web development companies in Gujarat and boost your online presence.
20. Docker:
Docker is a containerization technology that facilitates the streamlined deployment and scalability of programs. The utilisation of containers enables backend developers to encapsulate their programmes and associated dependencies, hence ensuring uniformity and adaptability across diverse contexts.
Final Thoughts:
It is of utmost importance for developers to be updated on the most recent backend development technologies in order to effectively offer applications that are efficient, scalable, and safe. The compendium of the foremost 20 backend development tools projected for the year 2023 encompasses an extensive array of functions, adeptly accommodating the multifarious requirements of backend development endeavours. These technologies provide developers with the ability to enhance their backend development endeavours and provide users with outstanding experiences, whether through the creation of real-time applications, database management, or performance optimisation. Your website is your digital storefront. Make it appealing! Contact Nivida Web Solutions - one of the most renowned Web development companies in India and design a website that captivates your audience. Get started now!
7 notes
·
View notes
Text
Sponzy Nulled Script 5.8

Download Sponzy Nulled Script – Monetize Your Content Creatively If you're looking for a powerful yet cost-effective solution to launch a creator-support platform, Sponzy Nulled Script is the perfect tool for you. Whether you're building a Patreon-style website or looking to monetize content through subscriptions and donations, this script is a game-changer. Enjoy full access to premium features without any licensing restrictions. Get the latest version for free right here and empower your online journey today! What Is Sponzy Nulled Script? Sponzy Nulled Script is a premium PHP-based platform that enables creators to receive financial support from fans and subscribers. With seamless payment integrations, customizable layouts, and multi-language support, Sponzy allows you to create a community-focused platform that rivals the best in the business. The nulled version gives you complete access to its premium functionalities for free—no subscriptions, no hidden charges. Technical Specifications Script Type: PHP Laravel Framework Responsive Design: Fully Mobile-Optimized Database Support: MySQL 5.7+ Latest Version Compatibility: PHP 8+ Security: Integrated reCAPTCHA, CSRF Protection Powerful Features & Unique Benefits The Sponzy Nulled Script comes loaded with high-end features that give you a competitive edge: 1. Multi-Currency & Payment Gateway Support Integrate with PayPal, Stripe, and even cryptocurrency gateways to offer a seamless payment experience worldwide. 2. Membership Tiers Create different support plans with varying benefits to attract a wider range of supporters—from casual fans to superfans. 3. Real-Time Notifications Keep users engaged with real-time alerts for messages, tips, and subscription renewals. 4. GDPR-Ready and SEO-Friendly Built to meet modern data privacy regulations while optimizing your platform for search engines right out of the box. 5. Monetization Tools Enable tipping, subscriptions, and pay-per-view content—all built into the system with intuitive admin control. Why Choose Sponzy Nulled Script? Unlike many open-source alternatives, Sponzy Nulled Script is professionally designed and continuously updated. The nulled version saves you hundreds of dollars while providing the exact same user experience. It’s ideal for entrepreneurs, influencers, bloggers, and creative professionals who want to launch a content support platform without financial risk. How to Install Sponzy Nulled Script Download the script from our website. Upload it to your server using FTP or cPanel. Create a new MySQL database and import the included SQL file. Open the installation URL and follow the on-screen setup process. Log in to your admin panel and start customizing your platform! Use Cases of Sponzy Nulled Script Content Creators: Monetize exclusive videos, blogs, or artwork. Influencers: Offer membership perks to loyal followers. Nonprofits: Receive recurring donations without complex setups. Writers & Journalists: Launch subscription-based content easily. FAQs About Sponzy Nulled Script Q: Is it safe to use the nulled version? A: Yes, we ensure all scripts are scanned for malware and viruses before making them available. However, always use a secure hosting environment. Q: Can I update the script? A: Updates are manual, and you may need to download the latest version from our website when available. Q: Does it support RTL languages? A: Absolutely. Sponzy Nulled Script supports both LTR and RTL, making it perfect for global use. Q: Can I integrate custom themes? A: Yes, the script supports theme customization and development for a personalized user experience. Final Thoughts The Sponzy is more than just a content monetization tool—it’s your gateway to building a thriving digital community. Whether you're just starting out or scaling an established brand, Sponzy delivers professional-grade features without the professional-grade price tag. Don’t miss this opportunity to download it for free and unlock unlimited potential!
Looking for more premium resources? Check out our collection like avada nulled for even more web design flexibility. For a powerful eCommerce theme, try woodmart nulled—a must-have for modern online stores.
0 notes
Text
💥 Lỗi Redis class not found – Redis PHP Extension chưa cài 💥
💥 Lỗi Redis class not found – Redis PHP Extension chưa cài 💥 👉 Lỗi này xảy ra khi PHP chưa có cài extension Redis mà website WordPress hoặc Laravel đang gọi hàm như new Redis() hoặc wp_cache_set() khi Redis cache được bật. 🛠️ 1. Cài Đặt Redis PHP Extension Cho AlmaLinux / CentOS 8+ sudo dnf install php-pecl-redis -y Nếu bạn đang dùng phiên bản PHP cụ thể (ví dụ PHP 8.1), hãy dùng đúng tên…
0 notes
Text
PetalHost: The Trusted PHP Wiki Hosting Provider in India
In today’s digital age, managing and sharing knowledge efficiently is essential for businesses, educational institutions, and communities. Whether you're building a company wiki, a collaborative documentation platform, or an educational knowledge base, having a reliable hosting partner is critical. That’s where PetalHost, a leading PHP Wiki Hosting Provider in India, comes into the picture.
Why Choose PHP Wiki?
PHP-based wiki platforms are known for their flexibility, ease of use, and robust community support. Platforms like MediaWiki, DokuWiki, and PmWiki are widely used to create dynamic, scalable, and secure knowledge management systems. These platforms, however, need a hosting environment that is not just compatible but also optimized for PHP-based applications. PetalHost delivers exactly that—and much more.
PetalHost: Optimized for PHP Wiki Hosting
As a specialist PHP Wiki Hosting Provider in India, PetalHost offers an ideal environment for deploying and managing PHP-based wiki systems. Here’s why PetalHost stands out from the competition:
1. High-Performance Servers
PetalHost provides high-performance SSD-powered servers that ensure fast page load speeds, seamless navigation, and efficient content rendering. Speed is a critical factor for any wiki, and PetalHost guarantees that your users will experience minimal latency, even during traffic spikes.
2. Full PHP Compatibility
Whether your wiki platform uses PHP 7.x or the latest PHP 8.x, PetalHost ensures full compatibility with various PHP versions. With regular updates and support for the latest PHP modules and extensions, you can run your wiki smoothly and securely.
3. 99.9% Uptime Guarantee
Downtime is detrimental to any knowledge platform. PetalHost offers a 99.9% uptime guarantee, ensuring that your wiki is accessible to users around the clock. Their data centers are equipped with the latest infrastructure to deliver continuous availability.
4. One-Click Wiki Installations
Setting up a PHP wiki can be a technical process—but not with PetalHost. Their user-friendly control panel features one-click installations for popular PHP wiki platforms like MediaWiki, DokuWiki, and more. You can launch your wiki in minutes without any technical hassle.
5. 24/7 Technical Support
Even the most reliable systems can face issues. PetalHost offers round-the-clock customer support via live chat, email, and ticket system. Their skilled support team is well-versed in PHP applications and can assist you with any hosting or configuration issues you may encounter.
6. Scalable Plans
From small wiki projects to enterprise-level knowledge bases, PetalHost offers scalable hosting plans to meet the unique demands of every client. Whether you start small or need more power as you grow, upgrading your hosting is quick and seamless.
7. Affordable Pricing
Being a top PHP Wiki Hosting Provider in India, PetalHost offers competitive and transparent pricing without compromising on quality. There are no hidden charges—just straightforward plans designed to give you maximum value.
8. Robust Security Features
Security is a priority at PetalHost. Their hosting plans come with firewalls, malware protection, daily backups, and free SSL certificates to keep your wiki and user data safe from threats and vulnerabilities.
Ideal for All Types of Users
Whether you're a developer, a business owner, an educator, or a nonprofit organization, PetalHost makes PHP wiki hosting accessible to everyone. Their platform is designed to be intuitive for beginners while offering advanced features for experienced users.
Final Thoughts
When it comes to PHP-based wiki hosting, PetalHost ticks all the right boxes—speed, reliability, affordability, and expert support. If you’re looking for a dependable PHP Wiki Hosting Provider in India, PetalHost is your go-to choice. With tailored hosting solutions, cutting-edge infrastructure, and a commitment to customer satisfaction, PetalHost empowers you to build, manage, and scale your wiki platform effortlessly.
Get started with PetalHost today and experience the best PHP Wiki Hosting in India—secure, fast, and fully optimized for your success.
0 notes
Text
TYPO3 Programming Made Simple: Your First Step

If you’re looking to build powerful, flexible websites, TYPO3 CMS is a great place to start. It’s an open-source content management system (CMS) built for serious projects—think multilingual corporate sites, secure web platforms, and custom features that go far beyond a simple blog. This guide will walk you through the basics of TYPO3 programming, so you can start your development journey with confidence.
What is TYPO3 CMS?
TYPO3 is a CMS written in PHP that’s designed for high-performance websites. Unlike basic CMS tools, TYPO3 is built for large-scale projects. It gives you control over how your website works and looks, using tools like TypoScript, Fluid templates, and extensions.
Getting Your TYPO3 Development Environment Ready
Before you start coding, you need to prepare your setup. Don’t worry—it’s pretty straightforward.
System Requirements: Make sure your system has PHP 8.x, MySQL or MariaDB, Apache or Nginx, and Composer installed.
Install TYPO3 with Composer: Open your terminal and run: bashCopyEditcomposer create-project typo3/cms-base-distribution my-project
Set Up the Database: Once TYPO3 is installed, visit your project in a browser. The built-in installer will guide you through setting up the database and finishing the configuration.
TYPO3 Programming Basics
Let’s look at the key tools TYPO3 gives you to build your site.
TypoScript
TypoScript is TYPO3’s configuration language. It tells TYPO3 how to render content on the page. You don’t need to write PHP—TypoScript lets you control layout and behavior using simple rules.
Fluid Templates
Fluid is TYPO3’s templating engine. It helps separate your HTML design from the backend logic, so you can focus on layout while keeping your code clean and maintainable. It’s especially useful if you're working with designers or frontend developers.
Extensions
In TYPO3, almost everything is built as an extension. Need a blog? An online store? A custom form? There’s probably an extension for that. You can install ready-made ones from the TYPO3 Extension Repository—or build your own for full control.
How to Build Custom Features
Here’s how developers add advanced features to TYPO3:
Creating Extensions: You can use the Extension Builder tool or create one manually by setting up controllers, models, and views. TYPO3 uses the MVC (Model-View-Controller) pattern, which keeps your code structured and easy to work with.
Custom Content Elements: Want content blocks tailored to your exact needs? Use a tool like Mask or write your own to create reusable, flexible elements for editors.
Backend Modules: TYPO3 lets you build tools inside the admin area—like custom dashboards or management panels—to improve the editing experience.
Debugging and Best Practices
No project runs perfectly all the time. Here’s how to handle issues the TYPO3 way:
Turn on debugging in the LocalConfiguration.php file or the Admin Panel.
Use TYPO3’s built-in logging and error reporting to catch problems early.
Follow TYPO3’s coding standards to keep your project clean, consistent, and easy to maintain—especially if you're working in a team.
Why TYPO3?
Built to Scale: TYPO3 handles huge websites with thousands of pages and users.
Multilingual Ready: It makes managing content in multiple languages straightforward and efficient.
Secure by Design: TYPO3 includes strong access controls and gets regular security updates.
Helpful Community: With detailed documentation, active forums, and tutorials, help is always within reach.
Final Thoughts
TYPO3 isn’t just another CMS—it’s a developer’s toolset for building professional, scalable websites. Once you understand TypoScript, Fluid templates, and extensions, you’ll be ready to create just about anything. Whether it’s a small custom feature or a full-blown enterprise website, TYPO3 gives you the structure and power to bring your ideas to life.
0 notes
Text
What Steps Should I Take for OpenEMR Installation Issues?
Introduction
The installation process of OpenEMR presents difficulties due to its power as an open-source Electronic Medical Records (EMR) system. The following section presents known OpenEMR installation issues with corresponding step-by-step solutions.
Common Installation Errors and Solutions
1.PHP Compatibility Issues
Error: OpenEMR installation fails due to compatibility issues with PHP version.
Solution: The installation process requires using PHP version 7.4 or newer versions. The php.ini file requires PHP configuration updates that match OpenEMR settings. Proper error prevention involves enabling Off for short_open_tag while setting the memory_limit to 512M in your php.ini file.
2.Database Connection Failure
Error: “Cannot connect to the MySQL database.”
Cause: This error arises when the OpenEMR installer cannot establish a connection to the MySQL database.
Solution:
· Ensure the MySQL service is running: sudo service mysql start.
· Verify that the credentials in the sqlconf.php file are correct:
Php: $host = 'localhost'; $port = '3306'; $login = 'your_username'; $pass = 'your_password'; $dbase = 'openemr';
3. Blank Page After Installation
Error: A blank screen is displayed after installing OpenEMR.
Cause: Typically caused by a missing PHP module or a permissions issue.
Solution:
· Check for missing PHP modules using php -m | grep -i <missing_module>.
· Install missing modules with sudo apt-get install php-<module_name>.
· Ensure correct file permissions: sudo chmod -R 755 /var/www/openemr.
4. Locale Errors
Error: “PHP Warning: Failed to setlocale…”
Cause: The locale settings on the server are not configured correctly.
Solution:
· Install the appropriate locales: sudo locale-gen en_US.UTF-8.
· Reconfigure locales: sudo dpkg-reconfigure locales.
5. SQL Error in OpenEMR Usage
Error: A fatal error occurred that showed “Uncaught Error: SQLSTATE[42S02]: Base table or view not found…”
Cause: The missing database table or improper database table creation process causes this error to appear.
Solution:
· Re-execute the SQL upgrade script through the command: mysql -u root -p openemr < sql/upgrade.sql.
· All database tables need to be imported correctly.
6. PDF Generation Failure
Error: The error message reads, “FPDF error: Unable to create output file.”
Cause: The file system write permissions create a cause that prevents OpenEMR from generating output files.
Solution:
· Users need write permissions in the sites/default/documents directory because of this command: sudo chmod -R777/var/www/openemr/sites/default/documents.
Common Mistakes During Setup
1.Inadequate System Requirements Assessment
· Performance problems emerge because organizations underestimate their hardware requirements along with their software needs.
· System requirements assessment needs to become a complete process done before any installation begins.
2.Neglecting Data Backup and Recovery Planning
· Failing to plan backup procedures and recovery strategies remains one of the main setup challenges.
· Planning for data backup becomes essential since the absence of planning may cause complete loss of information.
· Regular backups should be conducted either through OpenEMR’s tools or third-party scripting solutions.
3.Improper Configuration
· Incorrectly implemented settings result in both performance issues and system errors.
· Users should verify that both database and PHP settings align correctly with OpenEMR’s necessary requirements.
Real-World Examples and Case Studies
Cloud Success Story: Through OpenEMR Cloud on AWS, this Vermont clinic cut their server maintenance expenses by 70% and also gained better peak-season system capabilities.
On-Premises Example: A large Texas hospital chose on-premises deployment of OpenEMR to sustain whole authority over security standards while maintaining easy integration with current hospital information infrastructure.
Troubleshooting Tips for Windows Installation
· Check PHP settings because you must enable all required PHP extensions while following the correct settings in the php.ini configuration file.
· Check MySQL Connection by verifying the correct running of MySQL and sqlconf.php credentials.
· During installation, use a temporary disable of antivirus software to prevent interruptions.
· You should check OpenEMR directory permissions to stop unauthorized access to its files.
Future Trends in OpenEMR
OpenEMR will continue integrating modern features into its system as healthcare technology advances forward.
AI and Machine Learning
· OpenEMR will incorporate artificial intelligence-based clinical decision support systems and predictive analytics technology for patient care in future updates.
Telehealth Enhancements
· The telehealth system will receive updated modules that enable remote consultation access while offering better healthcare access to patients.
Interoperability Standards
· Additional FHIR technology support in the system will help different healthcare systems communicate their data more efficiently.
Conclusion
The resolution of OpenEMR installation problems requires a careful approach together with expertise in frequent installation barriers. Healthcare providers who focus on PHP compatibility along with database connections and permissions will establish a successful OpenEMR setup while maximizing its functionality. Continuous updates about the latest OpenEMR advancements enable healthcare professionals to achieve maximum performance and efficiency for their management tasks.
FAQs
What are the most common installation errors in OpenEMR?
During OpenEMR installation, you might encounter three major issues that include PHP version conflicts as well as database connection problems and unexplained blank pages showing up because of either missing components or access permission problems.
How do I troubleshoot a blank page error after OpenEMR installation?
Review both PHP module's presence and verify correct permissions for the OpenEMR directory files.
What are some common mistakes during OpenEMR setup?
The integration of insufficient system assessment with poor data backup and recovery planning along with unsuitable configuration represents the main mistakes that cause performance degradation and data loss.
0 notes
Text
A file browser or file manager can be defined as the computer program which offers a user interface for managing folders and files. The main functions of any file manager can be defined as creation, opening, viewing, editing, playing or printing. It also includes the moving, copying, searching, deleting and modifications. The file managers can display the files and folders in various formats which include the hierarchical tree which is based upon directory structure. Some file managers also have forward and back navigational buttons which are based upon web browsers. Some files managers also offers network connectivity and are known as web-based file managers. The scripts of these web managers are written in various languages such as Perl, PHP, and AJAX etc. They also allow editing and managing the files and folders located in directories by using internet browsers. They also allow sharing files with other authorized devices as well as persons and serve as digital repository for various required documents, publishing layouts, digital media, and presentations. Web based file sharing can be defined as the practice of providing access to various types of digital media, documents, multimedia such as video, images and audio or eBooks to the authorized persons or to the targeted audience. It can be achieved with various methods such as utilization of removable media, use of file management tools, peer to peer networking. The best solution for this is to use file management software for the storage, transmission and dispersion which also includes the manual sharing of files with sharing links. There are many file sharing web file management software in the market which are popular with the people around the world. Some of them are as follows: Http Commander This software is a comprehensive application which is used for accessing files. The system requirements are Windows OS, ASP.NET (.NET Framework) 4.0 or 4.5 and Internet Information Services (IIS) 6/7/7.5/8. The advantages include a beautiful and convenient interface, multiview modes for file viewing, editing of text files, cloud services integration and document editing, WEBDAV support and zip file support. It also includes a user-friendly mobile interface, multilingual support, and easy admin panel. The additional features of the software include a mobile interface, high general functionality and a web admin. You can upload various types of files using different ways such as Java, Silverlight, HTML5, Flash and HTML4 with drag and drop support. CKFinder The interface of this web content manager is intuitive, easy to access and fast which requires a website configured for IIS or Internet Information Server. You would also require enabled Net Framework 2.0+ for installation. Some advantages include multi-language facility, preview of the image, and 2 files view modes. You also get search facility in the list as well drag and drop file function inside the software. The software has been programmed in Java Script API. Some disadvantages include difficulty in customizing the access of folders, inability to share files and finally, non integration of the software with any online service. You cannot edit the files with external editors or software. Also, there is no tool for configuration and you cannot drag and drop files during upload. Some helpful features include ease in downloading files using HTML4 and HTML5, also the documentation is available for installation and setup. File Uploads And Files Manager It provides a simple control and offers access to the files stored in servers. For installation, the user requires Microsoft Visual Studio 2010 and higher as well as Microsoft .NET Framework 4.0. Some advantages include a good interface where all icons are simple and in one style, 2 files view modes including detailed and thumbnails. It also supports basic file operations, supports themes, filters the file list as well as being integrated with cloud file storage services.
Some disadvantages include limited and basic operation with files, inability to work as a standalone application, settings are in code, and finally it cannot view files in a browser, weak general functionality, no mobile interface and no web admin. Some useful features include uploading multiple files at one go, multilingual support and availability of documentation. Easy File Management Web Server This file management software installs as a standalone application and there is no requirement for configuration. The software does not support AJAX. A drawback is that it looks like an outdated product and the interface is not convenient. The system requirement for this software is Windows OS. The advantages include having no requirement for IIS, uploading of HTML4 files one at a time, providing support notifications with email and can be easily installed and configured from the application. The disadvantages include the interface not being user-friendly, full page reload for any command, it cannot edit files and does not support Unicode characters. Moreover, it does not provide multilingual support for users and has a small quantity of functions when compared with others. ASP.NET File Manager This file manager at first glance, is not intuitive and is outdated. The system requirement for this manager is IIS5 or higher version and ASP.NET 2.0 or later version. Some advantages include editing ability of text files, users can do file management through browsers which is very simple, and it can provide support for old browsers. You can do basic operations with files stored and have easy functions. On the other hand, some disadvantages include the redundant interface, its need to reload full page for navigation. Additionally there is no integration with online services. The user cannot share files, cannot drag and drop files during uploading, gets only one folder for file storage and there's no tool for configuration. Moreover, there's no multilingual support, no mobile interface, low general functionality and no web admin. File Explorer Essential Objects This file manager offers limited functionality regarding files and is a component of Visual Studio. The system requirements include .Net Framework 2.0+ and a configured website in IIS. Some advantages include previewing of images, AJAX support with navigation, integration with Visual Studio and 2 file view modes. The disadvantages include no command for copy, move or rename file, no editing of files even with external editors and inability to share files with anyone. What's more, there's no support for drag and drop file for uploading, an outdated interface, no 'access rights' customization for various users, no web admin, no mobile interface and no multilingual support for users. FileVista This file management software offers a good impression at the outset but has limited functionalities. The system requirements include Microsoft .NET Framework 4 (Full Framework) or higher and enabled Windows Server with IIS. Some advantages include setting quotas for users, uploading files with drag n drop, Flash, HTML4, Silverlight and HTML5, multilingual support, presence of web admin, archives support, easy interface, fast loading and creation of public links. The disadvantages include disabled editing ability, no integration with document viewers or online services, no search function and no support of drag and drop for moving files. IZWebFileManager Even though the software is outdated and has not been updated,it's still functional. The interface of this software is similar to Windows XP. It has minimum functionality and no admin. It provides easy access to files but is suitable only for simple tasks. The advantages of this software include 3 file view modes, preview of images, facility to drag and drop files, various theme settings and a search feature. The disadvantages of this software include the old interface, no editing of files, no integration with online services, no sharing of files, and no drag and drop support for uploading files.
The user cannot set a permission command as well. Moxie Manager This file management software is modern and has a nice design. Also, it is integrated with cloud services which functions with images. The system requirements include IIS7 or higher and ASP.NET 4.5 or later versions. Some advantages include an attractive interface, ability to use all file operations, preview of text and image files. You can also edit text and image files, support Amazon S3 files and folders, support Google Drive and DropBox with download capability, support FTP and zip archives. On the other hand, some disadvantages include having no built-in user interface, no right settings for users, no support of drag and drop, no mobile interface and no web admin. Some features include multilingual format, available documentation, upload files with drag and drop support, average functionality.
0 notes
Text
WordPress Theme Development: A Complete Guide
WordPress theme development is an essential skill for developers looking to create custom, high-performance websites. Whether you're building a theme for personal use, client projects, or to sell on marketplaces, understanding the fundamentals is crucial.
This guide covers everything from the basics to advanced techniques, helping you master WordPress theme development.
1. What is a WordPress Theme?
A WordPress theme is a collection of files that define the appearance and functionality of a website. It includes:
PHP Files – Control the structure and content.
CSS Stylesheets – Define the website’s look and feel.
JavaScript Files – Add interactivity and animations.
Template Files – Manage different parts of the website, such as headers, footers, and sidebars.
Themes can be either classic themes (built using PHP) or block themes (based on the WordPress block editor).
2. Tools Required for Theme Development
Before you start, set up a proper development environment. Here’s what you need:
Local Development Server: Install Local by Flywheel, XAMPP, or MAMP to test your theme locally.
Code Editor: Use Visual Studio Code or Sublime Text for writing clean code.
Version Control: Use Git for tracking changes and collaborating with teams.
Browser DevTools: Inspect and debug CSS, JavaScript, and responsive design.
3. Setting Up a Basic WordPress Theme
To create a custom theme, follow these steps:
Step 1: Create a Theme Folder
Navigate to wp-content/themes/ and create a new folder (e.g., mytheme).
Step 2: Add Essential Theme Files
Inside your theme folder, create the following files:
style.css (Main stylesheet)
index.php (Main template file)
functions.php (Handles theme functions)
4. Understanding WordPress Template Hierarchy
WordPress uses a hierarchy to determine which template file to load. Some important templates include:
index.php – Default template (fallback for all pages).
header.php & footer.php – Used for the site's header and footer.
single.php – Displays single blog posts.
page.php – Used for static pages.
archive.php – Displays category, tag, and author archives.
Understanding this hierarchy helps you create a structured theme.
5. Adding Dynamic Features with functions.php
The functions.php file is crucial for adding features like menus, widgets, and theme support.
Registering a Navigation Menu
6. Creating Custom Page Templates
To create a unique page design, you can build a custom template.
Example: Custom About Page Template
Now, when creating a new page in WordPress, you can select "About Page" from the Page Attributes section.
7. Making Your Theme Responsive
Use CSS media queries to ensure your theme works on all devices.
Additionally, using Flexbox and CSS Grid can help create a more flexible layout.
8. SEO & Performance Optimization
Optimize Code and Assets
Minify CSS & JavaScript using plugins like Autoptimize.
Load scripts asynchronously to improve speed.
SEO Best Practices
Use semantic HTML5 tags (<header>, <article>, <footer>).
Optimize images using WebP format for faster load times.
Install an SEO plugin like Yoast SEO to manage metadata and sitemaps.
9. Testing & Debugging Your Theme
Before deploying, ensure your theme is error-free.
Enable Debugging: Add this to wp-config.php: phpCopyEditdefine('WP_DEBUG', true); define('WP_DEBUG_LOG', true);
Use Theme Check Plugin: Install the Theme Check plugin to ensure your theme follows WordPress coding standards.
10. Publishing and Selling Your Theme
Once your theme is complete, you can:
Submit it to the WordPress Theme Repository.
Sell it on marketplaces like ThemeForest or TemplateMonster.
Offer premium versions on your own website.
Conclusion
WordPress theme development is an exciting and rewarding skill that allows you to build powerful, customized websites. By mastering the basics, following best practices, and continuously improving your designs, you can create themes that are functional, responsive, and optimized for SEO.
If you’re serious about WordPress development, start building and experimenting with your own themes today!
0 notes
Text
Create Website: A Comprehensive Guide to Building Your Online Presence
Introduction
In today’s digital world, having an online presence is crucial for businesses, entrepreneurs, and even individuals who want to showcase their portfolio or skills. The first step in establishing this presence is to create a website. A well-designed website can help you reach a broader audience, establish credibility, and even generate revenue. In this guide, we will explore the step-by-step process of building a website, from choosing a domain name to launching your site.
Step 1: Define the Purpose of Your Website
Before you start designing or coding, you need to determine the purpose of your website. Ask yourself:
Is it a personal blog?
Do you want to create an online store?
Will it be a corporate website?
Are you offering online courses or services?
Once you define the purpose, you can structure the content accordingly and choose the right tools and platform.
Step 2: Choose a Domain Name
The domain name is your website’s address on the internet (e.g., www.yoursite.com). Here are some tips to choose a great domain name:
Keep it short and easy to remember.
Use keywords related to your niche.
Avoid numbers and hyphens.
Choose a domain extension that suits your purpose (.com, .org, .net, etc.).
Register your domain name using services like GoDaddy, Namecheap, or Google Domains.
Step 3: Select a Web Hosting Service
Web hosting is where your website’s files are stored and made accessible on the internet. There are various types of hosting:
Shared Hosting: Ideal for small websites; affordable but limited resources.
VPS Hosting: More control and better performance than shared hosting.
Dedicated Hosting: Best for large-scale websites with high traffic.
Cloud Hosting: Scalable and flexible for growing businesses.
Popular web hosting providers include Bluehost, SiteGround, and Hostinger.
Step 4: Choose a Website Building Platform
There are multiple ways to create a website, depending on your technical skills and requirements:
Website Builders: Wix, Squarespace, and Weebly offer drag-and-drop tools, making it easy to create a website without coding.
Content Management Systems (CMS): WordPress, Joomla, and Drupal provide more flexibility and customization options.
Custom Development: If you have coding skills, you can build a website using HTML, CSS, JavaScript, and frameworks like React or Angular.
Step 5: Design Your Website
A visually appealing website keeps visitors engaged. Consider these design principles:
Use a clean and intuitive layout.
Ensure mobile responsiveness.
Maintain consistency in fonts and colors.
Use high-quality images and graphics.
Ensure fast loading speed.
Tools like Canva, Adobe XD, and Figma can help design website elements.
Step 6: Develop and Customize Your Website
Once you have a design, it’s time to develop your website. If using a CMS like WordPress:
Install WordPress on your hosting server.
Choose a theme that matches your website’s purpose.
Install plugins for added functionality (SEO, security, contact forms, etc.).
Customize menus, pages, and widgets.
For custom websites:
Write HTML for structure.
Use CSS for styling.
Implement JavaScript for interactivity.
Use backend technologies like PHP, Python, or Node.js if needed.
Step 7: Optimize for SEO
Search Engine Optimization (SEO) helps your website rank higher on search engines. Key SEO practices include:
Using relevant keywords in content and metadata.
Optimizing images for faster loading.
Building backlinks to improve credibility.
Ensuring a mobile-friendly design.
Tools like Yoast SEO, Google Search Console, and SEMrush can help improve your SEO strategy.
Step 8: Add Essential Pages and Content
A great website includes these essential pages:
Home Page: The first impression of your site.
About Page: Describes your brand or mission.
Services/Products Page: Details your offerings.
Contact Page: Provides ways to get in touch.
Blog (if applicable): Shares valuable content with your audience.
Step 9: Test and Launch
Before launching your website, test it for:
Broken links and errors.
Browser compatibility (Chrome, Firefox, Safari, etc.).
Mobile responsiveness.
Loading speed.
Use tools like Google PageSpeed Insights to analyze performance. Once everything is in place, launch your website!
Step 10: Maintain and Update Regularly
After launching, maintain your website by:
Regularly updating content.
Monitoring security threats.
Optimizing performance and SEO.
Engaging with your audience.
Conclusion
To create a website successfully, you need to plan, design, and optimize it effectively. Whether for personal or business use, a well-built website enhances your online presence and helps achieve your goals. Follow this guide to build a functional, attractive, and user-friendly website today!
1 note
·
View note
Text
蜘蛛池源码如何集成?TG@yuantou2048
蜘蛛池源码如何集成?
蜘蛛池是一种用于提高网站收录和排名的工具,通过模拟大量用户访问来吸引搜索引擎蜘蛛爬取更多页面。要将蜘蛛池源码集成到你的项目中,可以按照以��步骤进行:
1. 选择合适的蜘蛛池源码:首先,你需要找到一个适合你需求的蜘蛛池源码。确保该源码是开源的,并且有良好的社区支持和文档。
2. 环境准备:
- 确保你的服务器或本地开发环境满足源码运行的基本要求,包括操作系统、编程语言环境(如Python、PHP等)以及必要的依赖库。
3. 下载源码:
- 从GitHub或其他代码托管平台下载源码。通常,这些源码会提供详细的安装指南。你可以直接克隆仓库或者下载压缩包。
4. 配置环境:
- 根据源码的要求,安装所需的编程环境和依赖库。例如,如果你选择的是Python编写的蜘蛛池源码,你需要安装Python环境,并根据README文件中的说明安装所有依赖项。
5. 部署源码:
- 解压或克隆源码到你的服务器或本地环境中。
- 按照源码提供的安装指南进行环境配置。这可能包括安装特定版本的Python、Node.js或其他所需的语言环境。
- 安装必要的库和框架。大多数项目会在README文件中列出所有依赖项。
6. 配置参数:
- 配置文件通常位于项目的根目录下。配置文件中通常包含数据库连接信息、代理设置等关键配置。确保按照文档中的指导进行配置。
7. 启动服务:
- 运行相应的命令来启动服务。这通常涉及运行`pip install requirements.txt`(如果是Python项目)或类似的命令来安装所有依赖项。
8. 配置参数:
- 修改配置文件,设置好数据库连接信息、代理池地址等关键参数。这一步非常重要,因为正确的配置能够保证蜘蛛池正常工作。
9. 启动服务:
- 根据文档启动服务。这可能需要执行一些初始化脚本或命令来启动服务。例如,对于Python项目,你可能需要运行`pip install -r requirements.txt`来安装所有必需的库。
10. 测试与调试:
- 在启动前,先进行小范围测试,确保一切正常运行。检查日志输出,确保没有错误。
11. 集成到现有项目:
- 将蜘蛛池服务部署到服务器上,并确保防火墙和其他安全设置允许外部访问。
12. 监���与优化:
- 启动服务后,可以通过命令行或图形界面启动服务。观察日志文件,确保一切正常运行。
13. 集成到现有系统:
- 如果你想将蜘蛛池集成到现有的Web应用中,确保你的Web应用能够调用蜘蛛池API或直接调用相关接口。确保你的Web应用能够正确调用蜘蛛池服务。这可能涉及到修改配置文件,确保URL、端口等参数符合你的需求。
14. 监控与维���:
- 一旦服务运行起来,定期检查日志文件,监控其运行状态。如果遇到问题,参考文档进行调试。
15. 持续监控与优化:
- 通过API接口将蜘蛛池服务与你的网站或应用程序对接。这可能需要在你的项目中添加相应的请求代码,以触发蜘蛛池服务。
16. 监控与优化:
- 监控蜘蛛池的效果,调整参数以达到最佳效果。
17. 使用与维护:
- 通过API接口调用蜘蛛池服务,确保它能按预期工作。根据实际需求调整参数,比如爬虫频率、目标URL列表等。
18. 性能优化:
- 根据实际情况调整参数,优化性能和安全性。
19. 常见问题排查:
- 在集成过程中可能会遇到各种问题,查阅官方文档或社区论坛寻求帮助。
20. 注意事项:
- 注意遵守相关法律法规,避免过度使用导致被封禁IP地址等问题。
21. 总结:
- 通过控制面板或命令行工具查看运行情况,根据反馈调整策略,以获得最佳效果。
22. 结语:
- 通过API接口调用蜘蛛池服务,确保不会违反搜索引擎的规则,避免被识别为恶意行为。
23. 结束语:
- 保持对蜘蛛池的监控,确保合规使用,避免违规操作。
希望以上步骤对你有所帮助!如果有任何疑问,欢迎联系我获取更多帮助。
加飞机@yuantou2048

相关推荐
EPP Machine
0 notes
Text
dizzy Nulled Script 5.0

Download dizzy Nulled Script – The Ultimate Content Monetization Platform Are you looking for a powerful, versatile, and free way to build a revenue-generating platform for content creators? The dizzy Nulled Script is your gateway to launching a full-featured digital marketplace without spending a fortune. With this free script, you can empower creators, sell exclusive content, and generate income—all from a beautifully designed and professionally coded system. What is dizzy Nulled Script? The dizzy is a premium PHP-based solution developed to help users create a content-sharing and monetization platform similar to OnlyFans, Patreon, or Buy Me a Coffee. It allows creators to upload images, videos, stories, and other digital content, offer subscriptions, and interact with their followers through a feature-rich dashboard. Best of all, you can now access the dizzy for free and take full advantage of its powerful tools—without paying for a license. Technical Specifications of dizzy Nulled Script Framework: Laravel 8+ Database: MySQL Frontend: Bootstrap 5, jQuery File Uploads: Amazon S3 and local storage support Payment Gateways: PayPal, Stripe, Bank Transfer, and more Languages: Multi-language support Device Compatibility: Fully responsive on all devices Top Features and Benefits By choosing the dizzy Nulled Script, you’ll gain access to an incredible suite of features that will take your content-sharing platform to the next level: Subscription System: Creators can set monthly fees and offer exclusive content to paying subscribers. Live Notifications: Users receive real-time alerts for messages, follows, and interactions. Private Messaging: Secure one-on-one communication between users and creators. Multi-Currency Support: Sell content globally without limitations. Content Scheduling: Creators can schedule posts for maximum engagement. Monetization Tools: Tips, pay-per-view content, and donation buttons. Who Can Benefit from dizzy Nulled Script? The dizzy Nulled Script is ideal for developers, entrepreneurs, and digital marketers who want to create a personalized space for creators. Whether you’re launching a new niche platform or offering creators a new way to earn, this script offers flexibility, performance, and control. It’s also perfect for influencers, educators, coaches, and artists who want to share exclusive content with a loyal community—and get paid for their creativity. How to Install and Use dizzy Nulled Script Getting started with the dizzy is straightforward, even for beginners. Simply download the package, upload it to your server, and follow the built-in installation wizard. Here's a quick overview: Unzip the downloaded package to your web server directory. Set up a MySQL database and configure your .env file with the appropriate credentials. Run the installation script by visiting your domain. Follow the on-screen instructions to complete setup. Log in to your admin dashboard and start customizing your platform! No advanced coding skills? No problem. The script is well-documented and user-friendly, making it easy to configure even for non-developers. FAQs About dizzy Nulled Script Is dizzy Nulled Script safe to use? Yes, when downloaded from a trusted source, the dizzy Nulled Script is thoroughly tested and secure. Always ensure you're using the latest version for optimal performance and safety. Can I customize the dizzy Script? Absolutely. The script is fully open-source and built on Laravel, giving you full control over its appearance, features, and integrations. Is it legal to use the nulled version? While using a nulled script may violate licensing agreements with the original developer, many users choose to explore nulled options to evaluate the platform before purchasing. We encourage you to support developers if the tool adds value to your business. Conclusion If you’re serious about launching a content monetization platform without the hefty price tag, the dizzy is your ideal solution.
Rich in features, easy to use, and completely free when downloaded from our trusted source, this script will help you build a thriving community of creators and subscribers in no time. Ready to expand your digital toolkit? Explore more nulled plugins to power up your web projects with ease. For an advanced WordPress page builder, check out the elementor nulled pro version—also available for free!
0 notes
Text
Why Choose WordPress Development: A Comprehensive Guide
Building a strong online presence is essential for both individuals and organizations in the current digital era. Among the myriad of content management systems (CMS) available, WordPress stands out as a leading choice for website development. This article delves into why you can choose WordPress development, highlighting its benefits, flexibility, and integration with top technologies like HTML5, CSS3, JavaScript, PHP, MySQL, React, Angular, Node.js, Python, and Java.

Why WordPress is a Preferred Choice for Website Development
1. User-Friendly Interface
WordPress is renowned for its ease of use, making it accessible even to those without extensive technical expertise. The intuitive dashboard allows users to manage content, customize themes, and install plugins effortlessly. This user-friendly interface ensures that anyone can create and maintain a professional-looking website without needing to delve deep into coding languages like HTML5 or CSS3.
2. Extensive Customization Options
One of the primary reasons to choose WordPress development is the vast array of customization options it offers. With thousands of themes and plugins available, users can tailor their websites to meet specific needs. Whether you want to integrate advanced functionalities using JavaScript or enhance your site's aesthetics with CSS3, WordPress provides the tools necessary to achieve your goals.
3. SEO Optimization Capabilities
Search Engine Optimization (SEO) is vital for improving your website's visibility on search engines. WordPress is inherently SEO-friendly, offering numerous plugins like Yoast SEO that help optimize your site. By leveraging these tools, you can ensure your website ranks higher in search results, driving more organic traffic. Additionally, integrating technologies such as PHP and MySQL ensures your site remains fast and efficient, further boosting SEO performance.
4. Responsive Design Support
A flexible website is crucial given the rise in the use of mobile devices. Because WordPress themes are mobile-friendly, your website will look fantastic on all screens. Utilizing modern web technologies like HTML5 and CSS3, WordPress developers can create responsive designs that adapt seamlessly to different screen sizes, enhancing user experience.
5. Robust Community and Support
WordPress boasts a large and active community of developers and users who contribute to its continuous improvement. This vibrant ecosystem means you’ll find ample resources, tutorials, and forums to help troubleshoot issues or learn new skills. Moreover, the availability of expert developers proficient in technologies like React, Angular, and Node.js ensures you can always find support for complex projects.
Integrating Top Technologies with WordPress Development

6. HTML5 and CSS3 for Enhanced Web Design
HTML5 and CSS3 are foundational technologies for modern web design. When developing a WordPress site, these languages play a critical role in structuring content and styling elements. By utilizing HTML5, developers can incorporate multimedia features and semantic elements, while CSS3 allows for sophisticated styling and animations, resulting in visually appealing websites.
7. JavaScript for Interactive Features
JavaScript is indispensable for adding interactivity to your WordPress site. From dynamic forms to interactive maps, JavaScript enables developers to create engaging user experiences. Frameworks like React and Angular, built on JavaScript, offer additional capabilities for building complex applications within WordPress, enhancing functionality and user engagement.
8. PHP and MySQL for Backend Efficiency
At its core, WordPress relies on PHP and MySQL to handle server-side operations and database management. PHP scripts process data and generate dynamic content, while MySQL stores and retrieves information efficiently. These technologies ensure your WordPress site operates smoothly, handling high traffic volumes and complex queries with ease.
9. Node.js for Real-Time Applications
For websites requiring real-time updates, such as live blogs or chat applications, Node.js is an excellent addition to WordPress development. Its event-driven architecture allows for non-blocking I/O operations, making it ideal for handling concurrent requests. By integrating Node.js, developers can build scalable and responsive applications that enhance user interaction.
10. Python and Java for Advanced Functionalities
While not traditionally associated with WordPress, Python and Java can be integrated to extend your site's capabilities. Python's simplicity and versatility make it suitable for data analysis and machine learning applications, which can be embedded into WordPress sites. Similarly, Java's robustness and cross-platform compatibility allow for the development of enterprise-level solutions, providing advanced functionalities when needed.
Advantages of Choosing WordPress Development Cost-Effectiveness
Since WordPress is an open-source platform, anyone can use and alter it for free. This cost-effectiveness makes it an attractive option for startups and small businesses looking to establish an online presence without significant financial investment. Furthermore, the abundance of free themes and plugins reduces the need for custom development, saving both time and money.
Scalability and Flexibility
Whether you're launching a simple blog or a comprehensive e-commerce platform, WordPress scales effortlessly to accommodate your needs. Its modular nature allows you to start small and expand as your business grows. With the ability to integrate various technologies like PHP, MySQL, and Node.js, WordPress can handle increased traffic and complexity without compromising performance.
Security Features
For any website owner, security is paramount. WordPress offers numerous security plugins and best practices to protect your site from threats. Regular updates and patches ensure vulnerabilities are addressed promptly, safeguarding your data and maintaining trust with your audience. Additionally, employing secure coding practices with languages like Python and Java further fortifies your site against potential breaches.
E-Commerce Capabilities
For businesses venturing into online sales, WordPress provides powerful e-commerce solutions through plugins like Woo Commerce. These tools enable you to set up an online store quickly and efficiently, complete with product catalogs, payment gateways, and inventory management. Leveraging technologies like JavaScript and React enhances the shopping experience, making it seamless and enjoyable for customers.
Multilingual Support
Expanding your reach globally requires multilingual support, and WordPress excels in this area. Plugins like WPML and the Polyang allow you to translate your content into multiple languages, catering to diverse audiences. This feature, combined with responsive design powered by HTML5 and CSS3, ensures your message resonates across cultural and linguistic boundaries.

Conclusion
Choosing WordPress development offers numerous advantages, from its user-friendly interface and extensive customization options to its robust community support and integration with cutting-edge technologies. By harnessing the power of HTML5, CSS3, JavaScript, PHP, MySQL, React, Angular, Node.js, Python, and Java, you can create a versatile, scalable, and secure website tailored to your unique requirements.
Whether you’re a novice blogger or a seasoned entrepreneur, WordPress provides the tools and flexibility needed to succeed in today’s competitive digital landscape. Embrace the possibilities of WordPress development and unlock the full potential of your online presence.
#web development#seo services#web designing#social media marketing#graphic design#digital marketing#digitalmarketing#marketing#digitalindia#seo
0 notes
Text
Petalhost – Trusted Drupal Web Hosting Provider India
When it comes to building robust, flexible, and feature-rich websites, Drupal stands out as one of the most powerful content management systems (CMS) available today. Whether you’re managing a personal blog, a corporate website, or a government portal, Drupal offers unmatched scalability, security, and customization. However, to truly unlock the potential of Drupal, you need a hosting provider that is optimized for its performance. That’s where Petalhost, a leading Drupal Web Hosting Provider India, comes in.
Why Choose Drupal for Your Website?
Before diving into the benefits of choosing Petalhost, it’s important to understand why so many developers and businesses choose Drupal. Known for its modular architecture, extensive API support, and strong security features, Drupal is perfect for content-heavy sites that require stability and scalability. It’s open-source, developer-friendly, and trusted by thousands of global organizations including universities, NGOs, and Fortune 500 companies.
But to run a Drupal site smoothly, you need reliable hosting infrastructure that supports its technical requirements. And that’s exactly what Petalhost delivers.
Petalhost — The Ideal Drupal Hosting Partner
Petalhost has positioned itself as a reliable and cost-effective Drupal Web Hosting Provider India with services specifically tailored for Drupal-powered websites. Whether you’re a beginner or a seasoned developer, Petalhost offers the tools and support you need to build, manage, and scale your Drupal site efficiently.
1. Optimized Performance for Drupal
Petalhost’s servers are configured to support the advanced functionalities of Drupal. With powerful SSD storage, PHP 7.x/8.x support, and advanced caching options like OPcache and Memcached, your Drupal site loads faster and performs better — resulting in improved SEO and user experience.
2. Affordable Pricing Plans
Petalhost offers some of the most competitive pricing in the Indian hosting market. Starting as low as ₹49/month, you can enjoy a hosting environment that’s secure, fast, and scalable. These budget-friendly plans make it easy for small businesses, freelancers, and bloggers to get started with Drupal without breaking the bank.
3. Free One-Click Drupal Installation
Installing Drupal manually can be a complex process, especially for beginners. Petalhost simplifies this with a one-click Drupal installation feature via Softaculous, available in the cPanel dashboard. This allows you to get your site up and running in minutes.
4. 99.9% Uptime Guarantee
Downtime is a major concern for any website owner. With Petalhost, you get a 99.9% uptime guarantee, ensuring your Drupal website remains accessible to visitors and search engines around the clock.
5. Robust Security Measures
Drupal is known for its security, and Petalhost complements it with built-in security features including free SSL certificates, DDoS protection, daily backups, and server-level firewalls. This layered approach to security ensures that your data and website remain protected from cyber threats.
6. 24/7 Technical Support
One of the key advantages of choosing Petalhost is their round-the-clock customer support. Whether you need help with Drupal installation, configuration, or performance optimization, their experienced support team is always available via chat, email, or ticket system.
7. Developer-Friendly Tools
Petalhost provides access to tools and resources that developers love, including Git support, SSH access, and the ability to create staging environments. These tools allow developers to test, deploy, and manage their Drupal projects with ease.
Final Thoughts
If you’re looking for a dependable and affordable Drupal Web Hosting Provider India, Petalhost is a name you can trust. With performance-optimized servers, rock-solid security, and a user-friendly interface, Petalhost makes Drupal hosting simple and effective — no matter your level of expertise.
Whether you’re launching a new Drupal site or looking to migrate an existing one, Petalhost has the tools, support, and pricing to help you succeed. Get started with Petalhost today and experience high-quality Drupal hosting made in India.
0 notes