#IntelliJ IDEA IDE
Explore tagged Tumblr posts
Visit Tumblr Blog
Explore Tumblr blogs with no restrictions, modern design and the best experience.
Last Seen Tumblr Blogs


Fun Fact
The total number of visits Tumblr.com received during January 2021 is 327 million.
Text
Написать программу на Java без текстовых редакторов?
Программу на java можно создать, используя одну командную строку. (по крайней мере на windows, хз что там у других систем)
Познакомимся с некоторыми командами:
echo - команда для вывода текста. Она будет записывать код в файл;
javac - компилятор. Переведёт код в байт-код;
java - загрузчик приложений. Запускает код.
Открываем cmd. Пишем:
echo class CmdHi { public static void main(String[] args) { System.out.println("I am a good programmer!"); } } > CmdHi.java
Создастся файл CmdHi.java, внутрь запишется код, который при выполнении выведет строчку "I am a good programmer!".
Чтобы посмотреть содержимое файла, можно использовать команду more:
more CmdHi.java Вывод: class CmdHi { public static void main(String[] args) { System.out.println("I am a good programmer!"); } }
Далее программу надо скомпилировать:
javac CmdHi.java
Пос��е чего можем запустить код, указав скомпилированный класс:
java CmdHi
Результат:
I am a good programmer!
Скрин для наглядности

Кстати, с 11 версии джавы простейшие программы не требуют компиляции, поэтому сразу после echo можно сделать так
java Hi.java
Наблюдение: русские символы при выводе в командной строке могут не читаться

#IntelliJ IDEA? Visual Studio? Блокнот? А может лучше командная строка?#студент бормочет#java#русский тамблер#компилятор#без текстового редактора#без IDE
4 notes
·
View notes
Text
Eclipse is an integrated development environment used in computer programming. It contains a base workspace and an extensible plug-in system for customizing the environment. It had been the most popular IDE for Java development until 2016, when it was surpassed by IntelliJ IDEA.
2 notes
·
View notes
Note
Hello!
This might be a weird question, but since you work in IT, do you use AI tools like ChatGPT or Claude a lot, or not at all? I’ve been learning programming for a few months, and honestly, it’s super hard. I’m definitely not a genius, so I use AI a lot to help me figure out what I’m doing and generate code.
The problem is that other students kind of judge and look down on people who use these tools, and it’s making me feel bad about it. Should I stop using AI altogether? I just don’t know how to manage without help or researching all the time.
If you have any tips, they'd really help me out 🙏
Thanks for reading this!
Hey anon! Well, the thing is that the IT industry in its entirety is pushing for AI integration as a whole into their products, so industry-wise it has become sort of inevitable. That being said, because we are still early into the adoption of AI I personally don't use it as I don't have much of a need for it in my current projects. However, Github Copilot is a tool that a lot of my colleagues like to use to assist with their code, and IDEs like IntelliJ have also begun to integrate AI coding assistance into their software. Some of my colleagues do use ChatGPT to ask very obscure and intricate questions about some topics, less to do with getting a direct answer and moreso to get a general idea of what they should be looking at which will segway into my next point. So code generation. The thing is, before the advent of ChatGPT, there already existed plenty of tools that generate boilerplate templates for code. As a software engineer, you don't want to be wasting time reinventing the wheel, so we are already accustomed to using tools to generate code. Where your work actually comes in is writing the logic that is very specific to the way that your project functions. The way I see ChatGPT is that it's a bit smarter than the general libraries and APIs we already use to generate code, but it still doesn't take the entire scope of your project into consideration. The point I am getting at here is that I don't necessarily think there is a problem in generating code, whether you are using AI or anything else, but the problem is do you understand what the code is doing, why it works, and how it will affect your project? Can you take what ChatGPT gives you and actually optimize it to the specifics of your project, or do you just inject it, see that it works, and go on your merry way without another thought as to why it worked? So, I would say, as a student, I would suggest trying not to use ChatGPT to generate code, because it defeats the purpose of learning code. Software engineering as a whole is tough! It is actually the nature of the beast that, at times, you will spend hours trying to solve a specific problem, and often times the solution at the end is to add one line in one very specific place which can feel anticlimactic after so much effort. However, what you get from all those hours of debugging, researching, and asking questions is a wealth of knowledge that you can add to your toolbox, and that is what is most important as a software developer. The IT landscape is rapidly changing; you might be expected to pick up a different programming language and different framework within weeks, you might suddenly be saddled with a new project you've never seen in your life, or you might suddenly have something new like AI thrown at you where you suddenly have to take it into consideration in your current work. You can only keep up with this sort of environment if you have a good understanding of programming fundamentals. So, try not to lean too much on things like ChatGPT because it will get you through today, but it will hurt you down the line (like in tech interviews, for example).
6 notes
·
View notes
Text
Mastering Java: Your Comprehensive Guide to Programming Excellence
Embarking on the journey of mastering Java is akin to entering a realm of endless possibilities. Java, a versatile and widely-utilized programming language, offers a broad spectrum of applications, from crafting web and mobile applications to powering robust enterprise systems. Whether you are a novice in the realm of coding or a seasoned programmer looking to broaden your skill set, the path to proficiency in Java is an exciting one.

In this comprehensive guide, we will be your guiding light through the intricacies of Java, starting from the foundational basics and progressing to the more advanced aspects of the language. Our objective is to equip you with the knowledge and skills that form a robust and unshakable foundation for your journey into the vibrant world of Java. Fasten your seatbelt as we embark on this exhilarating exploration, charting a course that will empower you to thrive in the ever-evolving landscape of software development.
Here's a 8-step guide to effectively learn Java
Step 1: Setting Up Your Development Environment
Your journey to becoming a proficient Java developer commences with setting up your development environment. The essential components are the Java Development Kit (JDK) and an Integrated Development Environment (IDE) like Eclipse or IntelliJ IDEA. These tools aren't just convenient; they're the gears that will drive your Java programming endeavors. They streamline the coding process, provide useful features, and offer an organized workspace, making your coding experience efficient and enjoyable.
Step 2: The Foundation - Learning the Basics
With your development environment ready, it's time to delve into the fundamental building blocks of Java. Begin by acquainting yourself with data types, variables, operators, and control structures. These are the nuts and bolts of the language, and a solid grasp of these concepts is essential. You'll find an abundance of online tutorials and beginner-friendly Java books to assist you at this stage.
Step 3: Navigating the World of Object-Oriented Programming (OOP)
The object-oriented programming (OOP) approach is well known in Java. To harness the true power of Java, immerse yourself in the world of OOP. Understand the concepts of classes, objects, inheritance, encapsulation, and polymorphism. This knowledge forms the bedrock of Java programming and enables you to design efficient, organized, and scalable code.
Step 4: Mastering Data Structures and Algorithms
Data structures (such as arrays, lists, and sets) and algorithms are the secret sauce behind solving real-world problems efficiently. As you progress, dive into the world of data structures and algorithms. These are the tools that will empower you to handle complex tasks and optimize your code. They're your go-to assets for creating efficient and responsive applications.
Step 5: The Art of Exception Handling
Java boasts a robust exception-handling mechanism. Understanding how to handle exceptions properly is not just an add-on skill; it's a vital aspect of writing reliable code. Exception handling ensures that your code gracefully manages unexpected situations, preventing crashes and delivering a seamless user experience.
Step 6: Exploring Input and Output Operations
In this step, you'll explore the realm of input and output (I/O) operations. Mastering I/O is crucial for reading and writing files, as well as interacting with users. You'll gain the ability to build applications that can efficiently process data and communicate effectively with users.
Step 7: Conquering Multi tasking
Java's support for multi tasking is a significant advantage. Understanding how to manage threads and synchronize their actions is vital for creating concurrent applications. Multithreading is the key to developing software that can handle multiple tasks simultaneously, making your applications responsive and scalable.
Step 8: Building Projects and Real-World Practice
Theory is only as valuable as its practical application. The final step involves applying what you've learned by building small projects. These projects serve as a proving ground for your skills and provide valuable additions to your portfolio. Whether it's a simple application or a more complex project, the act of building is where the real learning takes place.

As you step into this vibrant realm of Java, remember that continuous learning is the key to staying relevant and effective in the ever-evolving field of software development. Be open to exploring diverse applications, from web development to mobile apps and enterprise solutions, and never underestimate the power of hands-on practice. Building projects, no matter how small, will solidify your knowledge and boost your confidence.
In your quest to master Java, ACTE Technologies stands as a valuable ally. Their expert guidance and comprehensive training programs will sharpen your skills, boost your confidence, and pave the way for a rewarding career in software development. Whether you're embarking on your Java journey or looking to take your skills to the next level, ACTE Technologies offers the resources and support you need to thrive in the world of Java programming.
So, with Java as your trusty companion, and ACTE Technologies as your guide, the possibilities are boundless. Your journey is just beginning, and the world of software development awaits your innovation and expertise. Best of luck on your path to mastering Java!
9 notes
·
View notes
Text
Spring Security Using Facebook Authorization: A Comprehensive Guide
In today's digital landscape, integrating third-party login mechanisms into applications has become a standard practice. It enhances user experience by allowing users to log in with their existing social media accounts. In this blog post, we will walk through the process of integrating Facebook authorization into a Spring Boot application using Spring Security.
Table of Contents
Introduction
Prerequisites
Setting Up Facebook Developer Account
Creating a Spring Boot Application
Configuring Spring Security for OAuth2 Login
Handling Facebook User Data
Testing the Integration
Conclusion
1. Introduction
OAuth2 is an open standard for access delegation, commonly used for token-based authentication. Facebook, among other social media platforms, supports OAuth2, making it possible to integrate Facebook login into your Spring Boot application.
2. Prerequisites
Before we start, ensure you have the following:
JDK 11 or later
Maven
An IDE (e.g., IntelliJ IDEA or Eclipse)
A Facebook Developer account
3. Setting Up Facebook Developer Account
To use Facebook login, you need to create an app on the Facebook Developer portal:
Go to the Facebook Developer website and log in.
Click on "My Apps" and then "Create App."
Choose an app type (e.g., "For Everything Else") and provide the required details.
Once the app is created, go to "Settings" > "Basic" and note down the App ID and App Secret.
Add a product, select "Facebook Login," and configure the Valid OAuth Redirect URIs to http://localhost:8080/login/oauth2/code/facebook.
4. Creating a Spring Boot Application
Create a new Spring Boot project with the necessary dependencies. You can use Spring Initializr or add the dependencies manually to your pom.xml.
Dependencies
<dependencies> <dependency> <groupId>org.springframework.boot</groupId> <artifactId>spring-boot-starter-security</artifactId> </dependency> <dependency> <groupId>org.springframework.boot</groupId> <artifactId>spring-boot-starter-web</artifactId> </dependency> <dependency> <groupId>org.springframework.boot</groupId> <artifactId>spring-boot-starter-oauth2-client</artifactId> </dependency> <dependency> <groupId>org.springframework.boot</groupId> <artifactId>spring-boot-starter-thymeleaf</artifactId> </dependency> </dependencies>
5. Configuring Spring Security for OAuth2 Login
Next, configure Spring Security to use Facebook for OAuth2 login.
application.properties
Add your Facebook app credentials to src/main/resources/application.properties.spring.security.oauth2.client.registration.facebook.client-id=YOUR_FACEBOOK_APP_ID spring.security.oauth2.client.registration.facebook.client-secret=YOUR_FACEBOOK_APP_SECRET spring.security.oauth2.client.registration.facebook.redirect-uri-template={baseUrl}/login/oauth2/code/{registrationId} spring.security.oauth2.client.registration.facebook.scope=email,public_profile spring.security.oauth2.client.registration.facebook.client-name=Facebook spring.security.oauth2.client.registration.facebook.authorization-grant-type=authorization_code spring.security.oauth2.client.provider.facebook.authorization-uri=https://www.facebook.com/v11.0/dialog/oauth spring.security.oauth2.client.provider.facebook.token-uri=https://graph.facebook.com/v11.0/oauth/access_token spring.security.oauth2.client.provider.facebook.user-info-uri=https://graph.facebook.com/me?fields=id,name,email spring.security.oauth2.client.provider.facebook.user-name-attribute=id
Security Configuration
Create a security configuration class to handle the OAuth2 login.import org.springframework.context.annotation.Bean; import org.springframework.context.annotation.Configuration; import org.springframework.security.config.annotation.web.builders.HttpSecurity; import org.springframework.security.config.annotation.web.configuration.EnableWebSecurity; import org.springframework.security.config.annotation.web.configuration.WebSecurityConfigurerAdapter; import org.springframework.security.oauth2.client.oidc.userinfo.OidcUserService; import org.springframework.security.oauth2.client.userinfo.DefaultOAuth2UserService; import org.springframework.security.oauth2.client.userinfo.OAuth2UserService; import org.springframework.security.oauth2.core.oidc.user.OidcUser; import org.springframework.security.oauth2.core.user.OAuth2User; import org.springframework.security.web.authentication.SimpleUrlAuthenticationFailureHandler; @Configuration @EnableWebSecurity public class SecurityConfig extends WebSecurityConfigurerAdapter { @Override protected void configure(HttpSecurity http) throws Exception { http .authorizeRequests(authorizeRequests -> authorizeRequests .antMatchers("/", "/error", "/webjars/**").permitAll() .anyRequest().authenticated() ) .oauth2Login(oauth2Login -> oauth2Login .loginPage("/login") .userInfoEndpoint(userInfoEndpoint -> userInfoEndpoint .oidcUserService(this.oidcUserService()) .userService(this.oAuth2UserService()) ) .failureHandler(new SimpleUrlAuthenticationFailureHandler()) ); } private OAuth2UserService<OidcUserRequest, OidcUser> oidcUserService() { final OidcUserService delegate = new OidcUserService(); return (userRequest) -> { OidcUser oidcUser = delegate.loadUser(userRequest); // Custom logic here return oidcUser; }; } private OAuth2UserService<OAuth2UserRequest, OAuth2User> oAuth2UserService() { final DefaultOAuth2UserService delegate = new DefaultOAuth2UserService(); return (userRequest) -> { OAuth2User oAuth2User = delegate.loadUser(userRequest); // Custom logic here return oAuth2User; }; } }
6. Handling Facebook User Data
After a successful login, you might want to handle and display user data.
Custom User Service
Create a custom service to process user details.import org.springframework.security.oauth2.core.user.OAuth2User; import org.springframework.security.oauth2.core.user.OAuth2UserAuthority; import org.springframework.security.oauth2.client.userinfo.OAuth2UserService; import org.springframework.security.oauth2.client.oidc.userinfo.OidcUserService; import org.springframework.security.oauth2.core.oidc.user.OidcUser; import org.springframework.security.oauth2.client.userinfo.DefaultOAuth2UserService; import org.springframework.security.oauth2.client.oidc.userinfo.OidcUserRequest; import org.springframework.security.oauth2.client.userinfo.OAuth2UserRequest; import org.springframework.stereotype.Service; import java.util.Map; import java.util.Set; import java.util.HashMap; @Service public class CustomOAuth2UserService implements OAuth2UserService<OAuth2UserRequest, OAuth2User> { private final DefaultOAuth2UserService delegate = new DefaultOAuth2UserService(); @Override public OAuth2User loadUser(OAuth2UserRequest userRequest) { OAuth2User oAuth2User = delegate.loadUser(userRequest); Map<String, Object> attributes = new HashMap<>(oAuth2User.getAttributes()); // Additional processing of attributes if needed return oAuth2User; } }
Controller
Create a controller to handle login and display user info.import org.springframework.security.core.annotation.AuthenticationPrincipal; import org.springframework.security.oauth2.core.user.OAuth2User; import org.springframework.stereotype.Controller; import org.springframework.ui.Model; import org.springframework.web.bind.annotation.GetMapping; @Controller public class LoginController { @GetMapping("/login") public String getLoginPage() { return "login"; } @GetMapping("/") public String getIndexPage(Model model, @AuthenticationPrincipal OAuth2User principal) { if (principal != null) { model.addAttribute("name", principal.getAttribute("name")); } return "index"; } }
Thymeleaf Templates
Create Thymeleaf templates for login and index pages.
src/main/resources/templates/login.html
<!DOCTYPE html> <html xmlns:th="http://www.thymeleaf.org"> <head> <title>Login</title> </head> <body> <h1>Login</h1> <a href="/oauth2/authorization/facebook">Login with Facebook</a> </body> </html>
src/main/resources/templates/index.html
<!DOCTYPE html> <html xmlns:th="http://www.thymeleaf.org"> <head> <title>Home</title> </head> <body> <h1>Home</h1> <div th:if="${name}"> <p>Welcome, <span th:text="${name}">User</span>!</p> </div> <div th:if="${!name}"> <p>Please <a href="/login">log in</a>.</p> </div> </body> </html>
7. Testing the Integration
Run your Spring Boot application and navigate to http://localhost:8080. Click on the "Login with Facebook" link and authenticate with your Facebook credentials. If everything is set up correctly, you should be redirected to the home page with your Facebook profile name displayed.
8. Conclusion
Integrating Facebook login into your Spring Boot application using Spring Security enhances user experience and leverages the power of OAuth2. With this setup, users can easily log in with their existing Facebook accounts, providing a seamless and secure authentication process.
By following this guide,
2 notes
·
View notes
Text
The Journey to Selenium Expertise: Eight Steps to Success
In today's technology-driven world, where software is the backbone of virtually every industry, ensuring its quality and reliability is paramount. Software testing and quality assurance have become fundamental aspects of the software development process. At the forefront of this evolution stands Selenium, a powerful and versatile tool that has revolutionized the realm of automation testing.

In this comprehensive guide, we embark on a journey to unveil the path to becoming a Selenium expert. This journey is characterized by a continuous quest for knowledge, hands-on practice, and the practical application of skills in real-world scenarios. Selenium expertise is not just a valuable skill; it's a crucial asset in guaranteeing software quality and reliability.
We'll delve into the intricate details of Selenium, covering everything from mastering its basics to exploring advanced topics, and ultimately, adopting best practices in automation testing. As we progress, you'll discover eight pivotal steps to becoming a Selenium expert.
1. Master the Basics: Building a Solid Foundation
Our journey begins with mastering the fundamental concepts of Selenium. It's essential to comprehend the core components, such as WebDriver and WebElement, and understand how Selenium interacts with web browsers. A strong foundation in these basics is crucial to becoming a Selenium expert.
2. Choose Your Programming Language: The Language of Automation
Selenium supports various programming languages, including Java, Python, C#, and more. Your choice of programming language should align with your preferences and career goals. Java, in particular, is popular for Selenium automation due to its extensive community support and wide range of libraries and resources.
3. Set Up Your Development Environment: Crafting Your Toolkit
To work efficiently with Selenium, you need a well-equipped development environment. Installing an Integrated Development Environment (IDE) such as Eclipse or IntelliJ IDEA is essential. These tools streamline the process of writing, debugging, and executing Selenium scripts.
4. Dive into HTML and CSS: Understanding the Web's Building Blocks
Selenium's primary playground is the web, and to navigate it effectively, a strong understanding of HTML and CSS is indispensable. These are the building blocks of web pages, and knowledge of these technologies empowers you to locate and interact with web elements accurately.
5. Explore Locators: The Treasure Map to Web Elements
In Selenium, locators are your treasure map to identifying and interacting with web elements. Dive into various locator strategies, including XPath, CSS selectors, and more. Proficiency in using locators is a fundamental skill for any Selenium expert.
6. Hands-on Practice: The Crucial Training Ground
Practice makes perfect, and in Selenium, hands-on practice is the key to expertise. Initiate your journey by working on simple test scenarios, gradually progressing to more complex ones. The more you practice, the more proficient you become.
7. Embrace Testing Frameworks: Organizing Your Arsenal
As your skills evolve, it's essential to embrace testing frameworks like TestNG or JUnit. These frameworks seamlessly integrate with Selenium and help you organize and manage your test cases efficiently. This skill is invaluable for any Selenium expert.
8. Advance Your Knowledge: Exploring the Uncharted Territories
Once you're comfortable with the basics, it's time to delve into advanced topics. Explore areas like handling frames, working with alerts, dealing with different types of web elements (e.g., dropdowns, checkboxes), and mastering dynamic content testing. These advanced skills set you apart as a Selenium expert.

Becoming a Selenium expert is a journey that demands dedication, practice, and continuous learning. It's a path that leads to excellence in the field of automation testing, and it's a journey worth embarking upon.
To expedite your progress and receive expert guidance, consider enrolling in a structured Selenium training program. ACTE Technologies, a trusted name in the realm of technology training, offers comprehensive programs designed to provide hands-on experience, real-world examples, and guidance from experienced instructors. With the right resources and support, you can accelerate your journey to becoming a Selenium expert and thrive in the dynamic world of automation testing. Take your first step towards expertise with ACTE Technologies as your guiding light. Your path to Selenium mastery begins here.
4 notes
·
View notes
Video
youtube
Tengo publicado en YouTube un tutorial para la instalación del IDE IntelliJ IDEA, un entorno de desarrollo integrado ampliamente utilizado para el desarrollo de software en el lenguaje #Java. https://youtu.be/2XqphO_3Oog #SiguemeYTeSigo Nota: imagen generada con IA generativa.
0 notes
Text
Wetterdaten visualisieren mit XSLT & Apache FOP – Teil 1: PNG-Erzeugung am PC

Für ein größeres Vorhaben musste ich mich wieder etwas in XSLT & Apache FOP einarbeiten. Statt nur mit Beispiel-XMLs zu testen, habe ich mir ein kleines, aber sinnvolles Projekt gesucht – und so entstand die Idee, eine Wetterstation mit ePaper-Anzeige zu bauen. https://youtu.be/DMgWOIySd4I Im aktuellen Stadium wird das Bild lokal auf meinem Rechner erzeugt und anschließend auf meinen externen Webserver (all-inkl.com) hochgeladen.Später soll das Ganze komplett lokal auf einem Raspberry Pi laufen – dazu mehr im zweiten Teil der Serie. Automatisierung per Bash-Skript Der komplette Prozess – vom Abrufen der Wetterdaten über die Transformation mit XSLT bis hin zur PNG-Erzeugung – läuft automatisiert in einem einzigen Bash-Skript ab.Dieses Skript lässt sich später problemlos auf einem Raspberry Pi ausführen, sodass das System komplett autark arbeitet. Aktuell lade ich das generierte Bild auf meinen Webserver bei All-inkl., von dem sich der ESP32 das PNG regelmäßig abholt. Doch: Wenn Raspberry Pi und ESP32 im selben lokalen Netzwerk sind, kann sogar der externe Webserver entfallen.In diesem Fall reicht ein kleiner Webserver auf dem Pi, etwa via lighttpd oder python3 -m http.server, um das Bild bereitzustellen. Benötigte Komponenten & Tools Damit du das Projekt 1:1 nachbauen kannst, benötigst du folgende Tools und Hardware: Software & Umgebung - Leistungsstarke Entwicklungsumgebungz. B. IntelliJ IDEA oder eine andere IDE mit XML/XSLT-Unterstützung - WSL mit Ubuntu (unter Windows)Wird benötigt für Tools wie curl, Bash-Skripte und einfache Paketinstallation(alternativ geht auch ein nativer Linux-Rechner oder Raspberry Pi) - Apache FOPZur Umwandlung der XSL-FO-Datei in ein PNGDownload Apache FOP - Geo-Koordinaten deines Standorts (zwingend erforderlich für API-Abfragen) - Ohne diese gibt die Meteomatics API keine Wetterdaten zurück. - Du kannst deine Latitude / Longitude ganz einfach über Google Maps ermitteln: - Google Maps öffnen → Rechtsklick auf Standort → klick auf die angezeigten Koordinaten - die Koordinaten wie 52.1385884, 10.9670108 liegen nun in der Zwischenablage Hardware - ePaper Display (z. B. 6" Inkplate)Unterstützt PNG-Anzeige und kann später als stromsparendes Dashboard verwendet werden→ kompatibel mit ESP32 & USB-C-Anschluss - USB-C DatenkabelZur Verbindung mit dem PC/Mac beim späteren Flashen des Controllers Inkplate 6 Zoll und 6-Farb-Display Das in diesem Projekt verwendete Inkplate 6 Zoll ePaper Display habe ich bereits auf meinem Blog vorgestellt. Daher gehe ich auf dieses nicht speziell ein. - Erfahrungsbericht: Wie gut sind die neuen E-Paper Displays von Soldered? - API-Daten des Bitaxe Gamma mit ESP32 und E-Paper-Display visualisieren Projektdateien Das komplette Projekt mit Beispieldaten, XSLT-Template und Bash-Skript findest du auf GitHub: github.com/StefanDraeger/xml2weatherpng Warum das Inkplate 6" ePaper Display die perfekte Wahl ist Für dieses Projekt setze ich das Inkplate 6" ein – ein vielseitiges ePaper-Display mit integriertem ESP32-Mikrocontroller. Dieses Board bringt alles mit, was man für eine smarte, energieeffiziente Wetteranzeige benötigt: - ePaper-Technologie: Einmal dargestellte Inhalte bleiben auch ohne Stromzufuhr sichtbar. Dadurch eignet sich das Display ideal für statische Inhalte wie Wetterdaten, die nur in Intervallen aktualisiert werden müssen. - Integrierter ESP32: Der verbaute Mikrocontroller ermöglicht die direkte WLAN-Anbindung und den Abruf des Wetterbildes – ohne zusätzliches Steuergerät. - LiPo-Batterieanschluss: Dank der Unterstützung für LiPo-Akkus kann das Gerät völlig autark und kabellos betrieben werden. - Deep Sleep-Modus: Nach dem Herunterladen und Anzeigen des Wetterbildes wechselt der ESP32 in den energieeffizienten Schlafmodus, um Strom zu sparen. Der Bildschirminhalt bleibt dabei vollständig erhalten. Inkplate 6Inch ePaperDisplay - aktuelle Wetterdaten Inkplate 6Inch ePaperDisplay - Ansicht von der Seite Inkplate 6Inch ePaperDisplay - Sicht aus jedem Winkel möglich Inkplate 6Inch ePaperDisplay - Taste WakeUp Inkplate 6Inch ePaperDisplay - USB-C-Schnittstelle und RESET Taster Inkplate 6Inch ePaperDisplay - LiPo Batterie Diese Kombination aus sparsamer Anzeige, kabellosem Betrieb und einfacher WLAN-Anbindung macht das Inkplate 6" zur idealen Hardwarebasis für dieses Projekt – besonders für den Einsatz im Wohnbereich, Garten oder an Orten ohne ständige Stromversorgung. Wetterdaten via Meteomatics API beziehen Im ersten Schritt legen wir uns einen kostenlosen Account bei meteomatics.com an. Damit erhalten wir Zugriff auf die Wetterdaten-API, die wir später im Projekt verwenden. Parameter des kostenfreien Accounts von Meteomatics Kostenloses Kontingent: Mit dem Basic-Account sind bis zu 500 API-Abfragen pro Tag möglich – mehr als ausreichend, um die Wetterdaten im 15-Minuten-Intervall abzurufen: 24 h * 60 min / 15 min = 96 Abfragen pro Tag Der Login zum kostenlosen Account ist auf der Webseite etwas versteckt. Hier der direkte Link:Kostenloses Meteomatics-Konto erstellen Nach der Registrierung erhältst du Benutzername und Passwort, mit denen du später ganz einfach via curl oder in deinem Bash-Skript auf die Wetterdaten zugreifen kannst. Die Meteomatics API im Überblick Die Meteomatics Weather API ist sehr flexibel aufgebaut und liefert Wetterdaten in verschiedenen Formaten (XML, CSV, JSON, PNG etc.).In diesem Projekt nutzen wir die XML-Ausgabe, da sie sich perfekt mit XSLT weiterverarbeiten lässt. Dokumentation & Einstieg Die offizielle API-Dokumentation findest du hier: Getting Started mit der Meteomatics API Dort findest du: - Authentifizierungsbeispiele (curl, Python, etc.) - Parameterübersicht (Temperatur, Luftfeuchtigkeit, Wetterlage, u. v. m.) - Ausgabeformate (XML, JSON, PNG, CSV) - Struktur der URL-Abfragen Nachfolgend zeige ich dir Schritt-für-Schritt wie du diese Daten via curl im XML Format lädst. Beispiel-Abfrage (XML) Sobald du deinen Account und deine Koordinaten hast, kannst du z. B. folgende Wetterwerte abfragen: - Temperatur in 2 m Höhe (t_2m:C) - Relative Luftfeuchtigkeit (relative_humidity_2m:p) - Wettersymbol-ID (weather_symbol_1h:idx) curl -u "username:passwort" "https://api.meteomatics.com/now/t_2m:C,relative_humidity_2m:p,weather_symbol_1h:idx/52.1385884,10.9670108/xml" > wetter.xml Diese Abfrage liefert die aktuellen Wetterdaten als strukturiertes XML in der Daten wetter.xml, das wir im nächsten Schritt weiterverarbeiten werden. BENUTZER 2025-06-12T07:05:15Z OK 14.1 77.9 1 💡 Ich führe alle curl-Befehle unter einem lokalen Linux-System via WSL (Windows Subsystem for Linux) auf meiner Windows 11 Maschine aus.WSL lässt sich mit wenigen Klicks installieren – eine Anleitung findest du auf meinem YouTube Kanal im Video Linux unter Windows 11 - So geht’s Alternativ kann das Projekt natürlich auch direkt auf einem nativen Linux-System oder einem Raspberry Pi ausgeführt werden. Was ist XSLT – und wie verarbeitet man damit XML? XSLT (Extensible Stylesheet Language Transformations) ist eine Sprache, mit der man XML-Daten in andere Formate überführen kann – z. B. HTML, Text oder wie in unserem Fall XSL-FO, das wir später in ein PNG-Bild umwandeln. Während man in vielen Tutorials häufig das Durchlaufen mit for-each sieht, verwende ich in diesem Projekt eine gezielte, direkte Abfrage einzelner XML-Knoten.So bleibt das Layout klar strukturiert und wir behalten die Kontrolle über jede Ausgabezeile. Grundstruktur einer XSLT-Datei Zugriff auf einzelne Werte aus wetter.xml Statt Schleifen nutze ich in den einzelnen -Elementen direkte XPath-Abfragen wie diese: Temperatur: °C Genauso lässt sich auch der Zeitstempel (z. B. dateGenerated) gezielt ansprechen: Vorteil dieser Methode - Einfaches, lesbares Layout (insbesondere bei fixen Daten wie Temperatur, Luftfeuchte, Wettersymbol) - Kein unnötiges Durchlaufen von Elementen - Exakte Kontrolle über die Formatierung jedes einzelnen Wertes Wetter-Icons für die aktuelle Lage Um die aktuelle Wetterlage visuell darzustellen, verwende ich Wetter-Symbole im PNG-Format. Icons herunterladen Die passenden Icons können direkt bei Meteomatics kostenfrei heruntergeladen werden:mm_api_symbols.tar.gz – Meteomatics Widget Icons Bereits vorbereitet im GitHub-Repository Im Original-Archiv stimmen die Dateinamen leider nicht direkt mit den weather_symbol_1h:idx-IDs der API überein.Damit das Einbinden in XSLT funktioniert, müssten die Dateien eigentlich manuell umbenannt werden – aber das habe ich bereits für dich erledigt. Du findest im GitHub-Repository einen fertigen Ordner mit allen Symbolen, korrekt benannt nach der ID: images/104.png, images/1.png, usw. Du musst also nichts mehr selbst umbenennen. Zugriff im XSLT Mit den umbenannten Dateien funktioniert der Zugriff auf das passende Icon ganz einfach per external-graphic: Die PNG-Dateien liegen im Ordner images/ relativ zur Ausgabe. Das XSLT-Template für unser Wetterlayout Nachdem wir nun die Wetterdaten im XML-Format lokal gespeichert haben, erstellen wir im nächsten Schritt das passende XSLT-Template, das diese Daten in ein visuelles Layout überführt. Ziel ist es, ein XSL-FO-Dokument zu erzeugen, das von Apache FOP in ein PNG-Bild umgewandelt werden kann. Dieses Bild zeigt: - den aktuellen Standortnamen (hier: Schöningen), - das Datum und die Uhrzeit der Abfrage, - die Temperatur in ��C, - die Luftfeuchtigkeit in Prozent, - sowie ein passendes Wettersymbol auf Basis der weather_symbol_1h:idx-ID. Das Layout orientiert sich an einem kompakten Infodisplay, optimiert für die Darstellung auf einem ePaper-Display mit 4,2 oder 5 Zoll. Die einzelnen Werte werden direkt aus dem XML-Dokument ausgelesen – ohne Schleifen – und gezielt in fo:block-Elemente geschrieben. Das sorgt für ein sauberes, stabiles und gut kontrollierbares Layout. Im folgenden Abschnitt siehst du den vollständigen Aufbau des Templates, das du bei Bedarf jederzeit an dein eigenes Design oder zusätzliche Wetterparameter anpassen kannst. XSL Dokument als Template Schöningen TEMPERATUR °C LUFTFEUCHTIGKEIT % Bildgenerierung mit Apache FOP auf der Kommandozeile Sobald wir unser XML mit den Wetterdaten und das passende XSLT-Template vorbereitet haben, nutzen wir Apache FOP, um daraus ein fertiges PNG-Bild zu erzeugen. Apache FOP ist ein Kommandozeilen-Tool, das XSL-FO-Dateien (Formatting Objects) in verschiedene Formate wie PDF, PNG oder SVG umwandeln kann. Voraussetzungen Stelle sicher, dass du: - Java installiert hast (java -version) - Apache FOP heruntergeladen und entpackt hast - dich im Verzeichnis der FOP-Binärdateien befindest oder fop im Pfad liegt Der Befehl fop -xml wetter.xml -xsl meteomatics2fo.xsl -png output/forecast.png 🔍 Erklärung der Parameter: - -xml wetter.xml: Die XML-Datei mit den aktuellen Wetterdaten - -xsl meteomatics2fo.xsl: Dein XSLT-Template, das die Daten in ein Layout überführt - -png forecast.png: Der Name der Ausgabedatei – in diesem Fall ein PNG-Bild erstellte Datei forecast.png durch Apache FOP Java unter WSL installieren Für die Ausführung von Apache FOP ist eine funktionierende Java-Umgebung erforderlich.Auch wenn Java bereits unter Windows installiert ist, musst du es innerhalb von WSL (z. B. Ubuntu) separat installieren, da beide Umgebungen unabhängig voneinander arbeiten. Installation unter Ubuntu/WSL: sudo apt update sudo apt install default-jre Alternativ kannst du auch das JDK installieren, falls du zusätzlich Java-Programme entwickeln willst: sudo apt install default-jdk Nach der Installation kannst du mit folgendem Befehl prüfen, ob Java korrekt eingerichtet ist: java -version Damit steht dem Einsatz von Apache FOP innerhalb deiner WSL-Umgebung nichts mehr im Weg. Automatischer Upload per SCP ohne Passwortabfrage Damit das generierte Wetterbild (forecast.png) regelmäßig und automatisch auf deinen Webserver hochgeladen werden kann (z. B. per CronJob), verwenden wir den SCP-Befehl – allerdings ohne Passwortabfrage. Da SCP standardmäßig keine Passwortübergabe erlaubt, müssen wir einmalig ein SSH-Schlüsselpaar erstellen und den öffentlichen Schlüssel auf den Server übertragen. SSH-Key erstellen Führe folgenden Befehl in deiner Linux-/WSL-Konsole aus: ssh-keygen -t rsa -b 4096 -C "[email protected]" - Der Kommentar (hier deine E-Mail-Adresse) ist optional. - Drücke einfach ENTER bei der Frage nach dem Speicherpfad (~/.ssh/id_rsa ist Standard). - Lege kein Passwort fest, damit die Verbindung automatisiert erfolgen kann. Öffentlichen Schlüssel auf den Webserver übertragen Jetzt lädst du deinen öffentlichen Schlüssel auf den Server (nur einmal nötig): ssh-copy-id benutzer@domain Gib bei der ersten Verbindung dein normales Passwort ein.Anschließend kannst du dich ohne Passwortabfrage per SSH/SCP verbinden. Bild hochladen per SCP Jetzt kannst du dein Bild mit einem einfachen Befehl hochladen: scp ./output/forecast.png benutzer@domain:/pfad/wetterdisplay/forecast.png Der Upload erfolgt in Sekunden – perfekt für die Einbindung in ein Bash-Skript oder Cronjob. Das Wetterbild auf dem Inkplate 6 anzeigen Nachdem wir im ersten Teil ein PNG mit aktuellen Wetterdaten generiert haben, geht es nun darum, dieses Bild auf einem ePaper-Display anzuzeigen.Ich verwende dafür das Inkplate 6 – ein stromsparendes, ESP32-basiertes ePaper-Board mit 6-Zoll-Anzeige und WLAN. Inkplate 6Inch ePaperDisplay - aktuelle Wetterdaten Inkplate 6Inch ePaperDisplay - Ansicht von der Seite Über eine einfache WLAN-Verbindung lädt das Board das Wetterbild in regelmäßigen Abständen herunter und stellt es direkt auf dem Display dar – ganz ohne HTML, Browser oder App.Im folgenden Code-Beispiel siehst du, wie das Bild mit wenigen Zeilen Code automatisch aktualisiert wird. Boardtreiber für die Inkplate Displays Damit wir das Board überhaupt programmieren können, müssen wir den Boardtreiber installieren, dazu kopieren wir die nachfolgende Adresse in Datei > Einstellungen > Zusätzliche Boardverwalter-URLs. https://raw.githubusercontent.com/SolderedElectronics/Dasduino-Board-Definitions-for-Arduino-IDE/master/package_Dasduino_Boards_index.json Nachdem der Index aktualisiert wurde, können wir die Schaltfläche "Boardverwalter" im linken Menü der Arduino IDE wählen und dort nach Inkplate suchen. In meinem Fall habe ich die aktuelle Version 8.1.0 installiert. Benötigte Bibliothek für das Inkplate Display Zusätzlich zum Boardtreiber benötigen wir noch den Treiber für das ePaperDisplay, diesen finden wir im Bibliothenverwalter wenn wir nach InkplateLibrary suchen. Bei der Installation der Bibliothek hatte ich zunächst Probleme weil die Sourcen nicht gefunden wurden. Die Lösung war zunächst das ich das GitHub Repository SolderedElectronics/Inkplate-Arduino-library als ZIP-Datei heruntergeladen habe und diese dann über Sketch > Bibliothek einbinden > ZIP-Bibliothek hinzufügen... installiert habe. Quellcode /* * Titel : Wetteranzeige mit dem Inkplate 6 ePaper-Display * Beschreibung : Dieses Programm lädt ein zuvor erzeugtes PNG-Bild mit aktuellen Wetterdaten * von einem Webserver herunter und zeigt es auf dem stromsparenden ePaper-Display an. * Das Bild wird in regelmäßigen Abständen neu geladen (alle 30 Minuten). * * Author : Stefan Draeger * Webseite : https://draeger-it.blog * Blogbeitrag : https://draeger-it.blog/wetterdaten-visualisieren-mit-xslt-apache-fop-teil-1-png-erzeugung-am-pc/ */ #include "HTTPClient.h" // Für HTTP-Anfragen (Bild abrufen) #include "WiFi.h" // Für WLAN-Verbindung #include "Inkplate.h" // Bibliothek für das Inkplate ePaper-Display // URL zum PNG-Bild mit den generierten Wetterdaten String forecastUrl = "http://ressourcen-draeger-it.de/wetterdisplay/forecast.png"; // HTTP- und WiFi-Clients vorbereiten (werden im drawImage intern genutzt) HTTPClient sender; WiFiClient wifiClient; // Display-Objekt erzeugen (automatische Modell-Erkennung, z. B. Inkplate 6") Inkplate display; // WLAN-Zugangsdaten const char* ssid = "abc"; // SSID deines WLANs const char* password = "123"; // WLAN-Passwort void setup() { Serial.begin(115200); // Serielle Ausgabe zur Debug-Überwachung // WLAN im Station-Modus aktivieren und verbinden WiFi.mode(WIFI_MODE_STA); WiFi.begin(ssid, password); while (WiFi.status() != WL_CONNECTED) { delay(500); Serial.print("."); // Warteanimation während der Verbindung } Serial.println(); Serial.print("Verbunden mit IP: "); Serial.println(WiFi.localIP()); // Display initialisieren (muss einmalig aufgerufen werden) display.begin(); } void loop() { // Display vollständig löschen display.clearDisplay(); display.display(); // Erstes Update zur Bestätigung des Clearings display.fillScreen(INKPLATE_WHITE); // Hintergrundfarbe setzen // Bild von der angegebenen URL laden und anzeigen // Parameter: URL, X-Position, Y-Position, Dithering aktiv, nicht invertieren display.drawImage(forecastUrl, 10, 0, true, false); display.display(); // Anzeige aktualisieren // 30 Minuten Pause (1800000 Millisekunden), danach wiederholen delay(1800000); } Read the full article
0 notes
Text
How to Make the Most of Online Java Training Resources

In today’s digital age, learning Java has become more accessible than ever, thanks to a variety of virtual learning platforms. Whether you're a student, working professional, or career changer, you can harness the power of online education to gain strong programming skills. The key lies in how effectively you use the available resources. With so many platforms offering online java training, it’s essential to develop a smart learning strategy that combines structure, practice, and support.
Identify the Right Platform
Not all training platforms are created equal. Some are known for their structured syllabus, while others focus on peer interaction or mentor support. It’s crucial to choose a platform that fits your learning style. Look for reviews, trial classes, and course outlines. A good platform should cover both basic and advanced Java topics such as object-oriented programming, collections, multithreading, JDBC, and frameworks like Spring and Hibernate.
Build a Custom Learning Schedule
Online learning offers flexibility, but that freedom also demands discipline. Begin by setting achievable goals and timelines. Divide your syllabus into manageable parts and allocate specific hours each day or week for studying. Use tools like planners or calendar apps to maintain consistency. Staying organized will keep you from getting overwhelmed and will help you make steady progress.
Combine Theory with Practical Coding
Merely watching tutorials or reading documents isn't enough to master Java. As you learn new concepts, immediately apply them by writing and testing code. Utilize integrated development environments (IDEs) like IntelliJ IDEA or Eclipse to practice. Many online platforms provide coding sandboxes or project builders—take full advantage of these to deepen your understanding.
Participate in Challenges and Projects
One of the most effective ways to solidify your learning is by taking part in real-world projects and coding challenges. Websites like HackerRank, LeetCode, and CodeChef host Java coding problems ranging from beginner to advanced levels. These platforms help improve your logical thinking and problem-solving skills, which are crucial for job readiness.
Join Peer and Mentor Communities
The online learning journey can sometimes feel isolating, but it doesn’t have to be. Engage with fellow learners through forums, Discord groups, or platform-specific communities. Ask questions, participate in discussions, and share your code. Some platforms also offer mentorship programs, connecting you with experienced professionals who can guide your progress.
Focus on Core Concepts Before Advanced Topics
It’s tempting to jump straight into popular frameworks like Spring Boot or Hibernate, but without a solid understanding of core Java, it’s easy to get lost. Spend ample time on fundamentals such as variables, loops, conditionals, arrays, and OOP principles. Once these are second nature, transitioning into advanced topics becomes smoother and more productive.
Keep Learning Interactive and Fun
Monotony can kill motivation. Keep things interesting by mixing up your learning resources. Alternate between video lectures, articles, coding exercises, and podcasts. You can even join virtual study groups or attend live webinars to break the routine and get fresh perspectives.
Take Notes and Document Your Learning
Maintaining a digital or handwritten notebook can significantly boost your retention. Jot down code snippets, commands, and key takeaways from each lesson. These notes will serve as a quick reference guide when you start working on projects or preparing for interviews.
Evaluate Progress Through Mock Tests
Most online platforms offer quizzes and mock tests—don’t skip them. These tests not only reinforce what you’ve learned but also help you identify weak areas. Regular assessments are a great way to measure your improvement and build confidence.
Explore Integration with Other Skills
Once you’re comfortable with Java, explore how it connects with other domains like databases, front-end development, or mobile app development. Expanding your skill set adds value to your profile and opens up broader career opportunities.
Platforms like Traininglobe provide well-structured Java learning paths that include hands-on assignments and industry-relevant projects, which enhance your portfolio and improve your job prospects.
Application in Related Fields
As you grow more confident with Java, it's helpful to understand how coding skills apply in broader tech fields. For instance, designing responsive web applications often involves a cross-functional approach. Understanding technologies tied to courses website design gives you a full-stack perspective and increases your versatility as a developer.
Conclusion
Online Java training resources offer more than just convenience—they offer a personalized and rich learning experience. The trick to getting the most from these resources lies in setting clear goals, staying consistent, engaging with communities, and applying what you learn. By combining self-discipline with interactive tools and expert guidance, you can build a solid foundation in Java programming and confidently move toward your career goals. Keep exploring, stay curious, and let your journey with Java be as dynamic as the language itself.
0 notes
Text
Top Tools and Technologies to Use in a Hackathon for Faster, Smarter Development
Participating in a hackathon like those organized by Hack4Purpose demands speed, creativity, and technical prowess. With only limited time to build a working prototype, using the right tools and technologies can give your team a significant edge.
Here’s a rundown of some of the best tools and technologies to help you hack efficiently and effectively.
1. Code Editors and IDEs
Fast coding starts with a powerful code editor or Integrated Development Environment (IDE).
Popular choices include:
Visual Studio Code: Lightweight, extensible, supports many languages
JetBrains IntelliJ IDEA / PyCharm: Great for Java, Python, and more
Sublime Text: Fast and minimalistic with essential features
Choose what suits your language and style.
2. Version Control Systems
Collaborate smoothly using version control tools like:
Git: The most widely used system
GitHub / GitLab / Bitbucket: Platforms to host your repositories, manage issues, and review code
Regular commits and branch management help avoid conflicts.
3. Cloud Platforms and APIs
Leverage cloud services for backend, databases, or hosting without setup hassle:
AWS / Azure / Google Cloud: Often provide free credits during hackathons
Firebase: Real-time database and authentication made easy
Heroku: Simple app deployment platform
Explore public APIs to add extra features like maps, payment gateways, or AI capabilities.
4. Frontend Frameworks and Libraries
Speed up UI development with popular frameworks:
React / Vue.js / Angular: For dynamic, responsive web apps
Bootstrap / Tailwind CSS: Ready-to-use styling frameworks
These tools help build polished interfaces quickly.
5. Mobile App Development Tools
If building mobile apps, consider:
Flutter: Cross-platform, single codebase for iOS and Android
React Native: Popular JavaScript framework for mobile
Android Studio / Xcode: Native development environments
6. Collaboration and Communication Tools
Keep your team synchronized with:
Slack / Discord: Instant messaging and voice/video calls
Trello / Asana: Task and project management boards
Google Docs / Notion: Real-time document collaboration
Effective communication is key under time pressure.
7. Design and Prototyping Tools
Create UI/UX mockups and wireframes using:
Figma: Collaborative design tool with real-time editing
Adobe XD: Comprehensive UI/UX design software
Canva: Simple graphic design tool for quick visuals
Good design impresses judges and users alike.
8. Automation and Deployment
Save time with automation tools:
GitHub Actions / CircleCI: Automate builds and tests
Docker: Containerize applications for consistent environments
Quick deployment lets you demo your project confidently.
Final Thoughts
Selecting the right tools and technologies is crucial for success at a hackathon. The perfect mix depends on your project goals, team skills, and the hackathon theme.
If you’re ready to put these tools into practice, check out upcoming hackathons at Hack4Purpose and start building your dream project!
0 notes
Text
Manager - Customer Engineering - Automation Testing (Selenium) / Solutions Engineering (Pre & Post Sales)
, C#, Python, Ruby, JavaScript). Proficiency with development tools and IDEs (Eclipse, IntelliJ IDEA, Visual Studio… Apply Now
0 notes
Text
Quy Ước Đặt Tên trong Java - Hướng dẫn đầy đủ
Quy ước đặt tên trong Java là một trong những yếu tố quan trọng giúp lập trình viên viết mã nguồn dễ đọc, dễ bảo trì và chuyên nghiệp hơn. Việc tuân thủ quy ước đặt tên không chỉ cải thiện chất lượng mã mà còn giúp các thành viên trong nhóm dễ dàng hiểu và hợp tác. Trong bài viết này, chúng ta sẽ khám phá chi tiết các quy tắc đặt tên trong Java.
Tại sao Quy Ước Đặt Tên trong Java quan trọng?
Trong lập trình, đặt tên là một nghệ thuật. Một tên biến, lớp hoặc phương thức được đặt đúng cách sẽ:
Tăng tính dễ đọc: Mã nguồn dễ hiểu hơn, đặc biệt khi làm việc nhóm.
Giảm lỗi: Tên rõ ràng giúp tránh nhầm lẫn khi sử dụng biến hoặc phương thức.
Dễ bảo trì: Việc bảo trì và mở rộng mã trở nên đơn giản hơn.
Chuyên nghiệp hơn: Tuân thủ các tiêu chuẩn của Java làm tăng uy tín của lập trình viên.
Theo chuẩn Java Naming Conventions được Oracle khuyến nghị, việc đặt tên cần tuân thủ các quy tắc cụ thể để đảm bảo tính thống nhất.
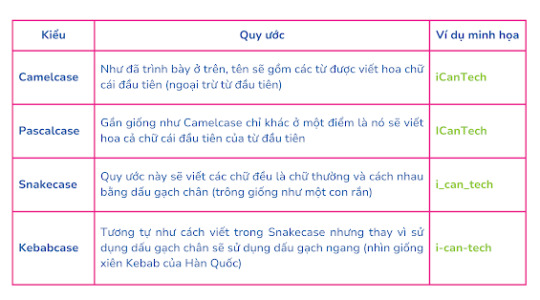
Các kiểu quy ước đặt tên
Các Quy Tắc Đặt Tên trong Java
Dưới đây là các quy tắc cụ thể cho từng loại thành phần trong Java:
1. Đặt tên lớp (Class)
Quy tắc: Tên lớp phải là danh từ, viết hoa chữ cái đầu mỗi từ (CamelCase). Ví dụ: StudentManagement, DatabaseConnection.
Ví dụ sai: studentmanagement, database_connection.
Lưu ý: Tên lớp nên rõ ràng, mô tả đúng chức năng của lớp.
2. Đặt tên phương thức (Method)
Quy tắc: Tên phương thức bắt đầu bằng chữ thường, các từ tiếp theo viết hoa chữ cái đầu (lowerCamelCase). Tên thường là động từ, mô tả hành động. Ví dụ: calculateTotalPrice(), getUserInfo().
Ví dụ sai: CalculateTotalPrice, get_user_info.
Lưu ý: Tên phương thức nên ngắn gọn, dễ hiểu.
3. Đặt tên biến (Variable)
Quy tắc: Tên biến sử dụng lowerCamelCase, ngắn gọn và mô tả rõ ý nghĩa. Ví dụ: userName, totalAmount.
Ví dụ sai: User_Name, t.
Lưu ý: Tránh sử dụng tên biến quá ngắn như a, b trừ khi trong vòng lặp ngắn.
4. Đặt tên hằng số (Constant)
Quy tắc: Tên hằng số viết hoa toàn bộ, các từ cách nhau bằng dấu gạch dưới. Ví dụ: MAX_CONNECTIONS, DEFAULT_TIMEOUT.
Ví dụ sai: maxConnections, default_timeout.
Lưu ý: Hằng số thường được khai báo với từ khóa static final.
5. Đặt tên gói (Package)
Quy tắc: Tên gói viết thường, thường sử dụng tên miền đảo ngược. Ví dụ: com.example.myapp.
Ví dụ sai: Com.Example.MyApp, myApp.
Lưu ý: Tên gói nên ngắn gọn, tránh sử dụng dấu gạch dưới.
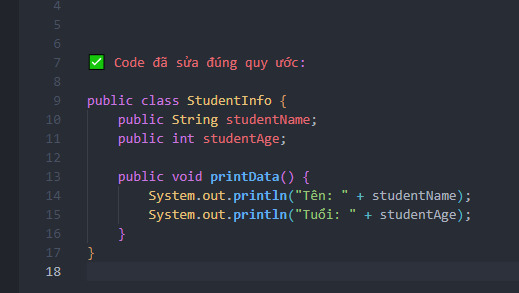
Ví dụ mã Java với Quy ước đặt tên
Một số mẹo khi áp dụng Quy Ước Đặt Tên trong Java
Sử dụng tên có ý nghĩa: Tên phải phản ánh đúng mục đích của biến, phương thức hoặc lớp. Ví dụ: thay vì data, hãy dùng userData hoặc transactionData.
Tránh viết tắt không rõ ràng: Chỉ sử dụng viết tắt khi chúng phổ biến, ví dụ: id thay vì identifier.
Giữ tên ngắn gọn nhưng đủ ý: Một cái tên dài như calculateTotalPriceOfShoppingCart có thể được rút gọn thành calculateCartTotal.
Kiểm tra tính nhất quán: Đảm bảo tất cả các thành viên trong nhóm tuân thủ cùng một quy ước đặt tên.
Sử dụng công cụ hỗ trợ: Các IDE như IntelliJ IDEA hoặc Eclipse có thể cảnh báo nếu bạn vi phạm quy ước đặt tên.

Biến và phương thức không tuân thủ quy ước đặt tên
Lợi ích của việc tuân thủ Quy Ước Đặt Tên trong Java
Việc áp dụng đúng quy ước đặt tên mang lại nhiều lợi ích lâu dài:
Cải thiện hiệu suất làm việc nhóm: Mọi người dễ dàng hiểu mã của nhau.
Tăng khả năng tái sử dụng mã: Mã dễ đọc thường được tái sử dụng nhiều hơn.
Giảm thời gian gỡ lỗi: Tên rõ ràng giúp nhanh chóng xác định lỗi.
Tạo ấn tượng chuyên nghiệp: Nhà tuyển dụng hoặc khách hàng sẽ đánh giá cao mã nguồn được viết chuẩn.
Các lỗi phổ biến khi Đặt Tên trong Java
Sử dụng tên không rõ ràng: Ví dụ: temp, x thay vì temporaryResult, index.
Phá vỡ quy tắc CamelCase: Ví dụ: get_userInfo thay vì getUserInfo.
Sử dụng ký tự đặc biệt: Tránh các ký tự như @, # trong tên.
Tên quá dài hoặc quá ngắn: Tên quá dài gây khó đọc, quá ngắn không đủ ý nghĩa.
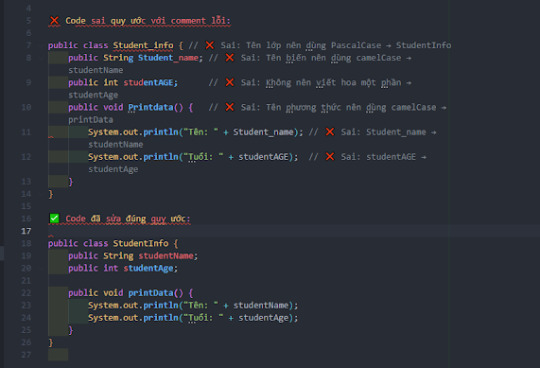
So sánh mã nguồn đúng và sai
Kết luận
Quy ước đặt tên trong Java không chỉ là một tập hợp các quy tắc khô khan mà còn là công cụ giúp lập trình viên tạo ra mã nguồn chất lượng cao. Bằng cách tuân thủ các quy tắc về đặt tên lớp, phương thức, biến, và hằng số, bạn sẽ cải thiện đáng kể khả năng đọc, bảo trì và mở rộng mã. Hãy áp dụng các mẹo được chia sẻ trong bài viết này và sử dụng các công cụ hỗ trợ để đảm bảo mã của bạn luôn chuyên nghiệp.
Quy Ước Đặt Tên trong Java – Hướng Dẫn Đầy Đủ & Chuẩn Nhất Hiểu rõ cách đặt tên biến, class, method... theo chuẩn Java giúp code rõ ràng, dễ đọc và chuyên nghiệp hơn. 🌍 Website: Java Highlight #JavaHighlight #Java #JavaNamingConventions #LapTrinhJava #JavaTips #JavaStyleGuide #JavaBestPractices #JDKlagi #JRElagi #JVMLagi #CleanCode #JavaCodingStyle
#java highlight#JavaHighlight#Java#JavaNamingConventions#LapTrinhJava#JavaTips#JavaStyleGuide#JavaBestPractices#JDKlagi#JRElagi#JVMLagi#CleanCode#JavaCodingStyle
0 notes
Text
From Novice to Java Pro: A Step-by-Step Learning Journey
Java programming, renowned for its platform independence and versatility, is a sought-after language in the world of software development. It's the language behind countless web applications, mobile apps, game development, and more. This blog serves as your comprehensive guide to embarking on a journey to learn and master Java programming. We'll walk you through the basics of programming, Java's syntax and structure, the essential tools and libraries, and the importance of practice.

The Path to Java Proficiency:
1. Understand the Basics of Programming:
Prior Experience: If you're new to programming, it's crucial to start with the foundational concepts. Variables, data types, control structures (if-else, loops), and functions are universal principles that you need to understand before delving into any programming language, including Java.
What to Learn: Begin by grasping the basics of programming logic and problem-solving. Familiarize yourself with concepts like variables (to store data), data types (to specify the kind of data), and control structures (to make decisions and loop through actions). These concepts serve as the building blocks for Java programming.
2. Java Syntax and Structure:
Prior Experience: As you delve into Java, you'll find that it's an object-oriented language with its unique syntax and structure. While prior programming experience is beneficial, it's not a prerequisite. You can start with Java as your first language.
What to Learn: Java introduces you to classes and objects. Classes are blueprints for creating objects, which are instances of classes. Java is known for its object-oriented nature, where you'll encounter concepts like inheritance (creating new classes based on existing ones), polymorphism (objects of different classes can be treated as objects of the same class), encapsulation (data hiding), and abstraction (simplifying complex reality by modeling classes based on real-world objects).
3. Get Your Hands on a Compiler and IDE:
Prior Experience: No prior experience is required to set up your Java development environment.
What to Learn: To start writing and running Java code, you'll need to install a Java Development Kit (JDK), which includes the Java compiler (javac). This kit allows you to compile your source code into bytecode that the Java Virtual Machine (JVM) can execute. Additionally, install an Integrated Development Environment (IDE) like Eclipse, IntelliJ IDEA, or NetBeans. These IDEs provide a user-friendly interface for coding, debugging, and managing your Java projects.
4. Learn the Java Standard Library:
Prior Experience: No specific prior experience is necessary, but familiarity with basic programming concepts is beneficial.
What to Learn: Java's power lies in its extensive standard library. This library includes pre-built classes and packages that simplify common programming tasks. For example, you can utilize classes in the java.io package to handle file input and output. You'll explore the java.lang package, which provides fundamental classes like String and Integer. Understanding this library is crucial for performing operations like file handling, string manipulation, and working with data structures.
5. Practice, Practice, Practice:
Prior Experience: No prior experience is required. This stage is suitable for beginners and those with basic programming knowledge.
What to Learn: The key to mastering Java or any programming language is practice. Apply the knowledge you've gained by working on small coding projects. Start with simple programs and gradually move on to more complex tasks. Solving programming challenges, such as those on websites like LeetCode or HackerRank, is an excellent way to put your skills to the test. Build simple applications to get hands-on experience in real-world scenarios.
6. Join Java Communities:
Prior Experience: No prior experience is needed to join Java communities.
What to Learn: Engage with Java communities and forums, such as Stack Overflow or Reddit's r/java. These platforms provide a space to ask questions, seek advice, and learn from experienced Java developers. You can also contribute by answering questions and sharing your knowledge.
7. Enroll in Java Courses:
Prior Experience: Enrolling in Java courses is suitable for learners of all levels, from beginners to advanced users.
What to Learn: ACTE Technologies offers comprehensive Java training programs that cater to a diverse range of learners. These programs are designed to provide hands-on experience and real-world examples, ensuring that you gain practical skills in Java programming.

In your journey to master Java programming, structured training plays a pivotal role. ACTE Technologies is a trusted partner, offering Java training programs for learners at all levels. Whether you're a beginner taking your first steps in Java or an experienced programmer seeking to expand your skill set, they can provide the guidance and resources needed to excel in the world of Java development. Consider exploring their Java courses to kickstart or enhance your Java programming journey. Java programming is a versatile and essential language, and mastering it is a rewarding journey. With dedication, practice, and structured training, you can become a proficient Java developer. Institutions like ACTE Technologies offer valuable resources and courses to accelerate your learning process, making your journey to Java mastery even more efficient.
7 notes
·
View notes
Text
Techmindz: Leading Java Courses in Ernakulam to Kickstart Your IT Career
In today’s rapidly evolving tech landscape, Java continues to be one of the most sought-after programming languages for software development. Whether you are a fresh graduate or a professional looking to enhance your skills, enrolling in a Java course in Ernakulam can open the doors to numerous career opportunities in the world of IT.
Techmindz, located in the heart of Infopark, Kochi, offers industry-centric Java courses designed to help you master the fundamentals and advanced concepts of Java programming. Let’s take a closer look at why Techmindz is the perfect choice for your Java learning journey.
Why Choose Techmindz for Java Courses in Ernakulam?
Techmindz has established itself as a premier institution for tech training in Kerala, known for its comprehensive and hands-on approach to learning. The institution offers a range of Java courses that cater to both beginners and experienced developers. Here's why you should choose Techmindz for your Java learning:
Industry-Aligned Curriculum Techmindz’s Java course is designed with input from industry experts, ensuring that the content is up-to-date and aligned with the needs of the modern job market. You’ll learn not just basic Java syntax, but also how to build real-world applications using Java frameworks like Spring, Hibernate, and more.
Experienced Trainers The trainers at Techmindz are seasoned professionals with years of experience in Java development. They bring a wealth of knowledge, real-world insights, and practical tips, making the learning experience highly valuable.
Hands-On Learning At Techmindz, theoretical knowledge is paired with practical application. Students work on live projects, coding challenges, and problem-solving sessions, ensuring that they gain the skills needed to excel in real-world Java development.
Placement Assistance Techmindz provides excellent placement support, helping students connect with top companies in Ernakulam and beyond. With a network of hiring partners, Techmindz ensures that graduates are job-ready and well-prepared to face interviews.
Flexible Batch Options Understanding that students have different schedules, Techmindz offers both weekday and weekend batches for its Java courses in Ernakulam. Whether you are a student or a working professional, you can choose the batch that fits your schedule.
What Will You Learn in Techmindz’s Java Courses?
Techmindz’s Java course in Ernakulam covers everything from basic to advanced topics. Here’s an overview of the key concepts you’ll learn:
Core Java Concepts: Learn the fundamentals of Java programming including variables, loops, conditionals, and functions.
Object-Oriented Programming (OOP): Understand the four pillars of OOP – encapsulation, inheritance, polymorphism, and abstraction – to write modular and reusable code.
Data Structures and Algorithms: Gain proficiency in key data structures like arrays, linked lists, stacks, queues, and trees, and understand the algorithms used to solve common programming problems.
Java Collections Framework: Dive deep into collections like lists, sets, maps, and queues, which are essential for building efficient Java applications.
Exception Handling: Learn how to handle errors and exceptions effectively to make your Java applications robust.
Java Development Tools: Get hands-on experience with Java IDEs like Eclipse and IntelliJ IDEA, as well as build automation tools like Maven and Gradle.
Database Integration: Learn how to work with databases using Java Database Connectivity (JDBC) to create data-driven applications.
Frameworks and Technologies: Explore popular Java frameworks like Spring and Hibernate for building enterprise-level applications.
Course Duration and Delivery Modes
Techmindz’s Java course is designed to accommodate both full-time and part-time learners. The duration of the course typically ranges from 2 to 3 months, depending on your chosen batch and learning pace. The delivery modes include:
Classroom Sessions: Engage in interactive sessions with industry experts at Techmindz's modern campus in Infopark, Ernakulam.
Online Classes: For those who are unable to attend in person, Techmindz offers live online classes with the same quality of instruction.
Self-Paced Learning: You’ll also have access to recorded sessions, allowing you to learn at your own pace.
Who Should Enroll in Java Courses at Techmindz?
Techmindz’s Java courses in Ernakulam are suitable for:
Beginners: If you are new to programming or coming from a non-technical background, Techmindz’s beginner-friendly curriculum will guide you step-by-step through the concepts of Java.
Experienced Programmers: If you already have basic programming knowledge and want to deepen your Java skills, Techmindz’s advanced modules will prepare you for complex real-world scenarios.
Professionals Seeking Career Change: If you are a working professional looking to shift into Java development, this course provides the necessary skills and knowledge to transition smoothly.
Start Your Journey Today!
The demand for skilled Java developers is at an all-time high, and enrolling in Techmindz’s Java course in Ernakulam can provide you with the expertise you need to succeed in this competitive field. With expert trainers, a practical curriculum, and excellent placement support, Techmindz is the ideal place to take your Java skills to the next level.
To get started, visit Techmindz and book your spot in the next batch. You can also walk into our Ernakulam or Infopark campus for personalized counseling. Don’t miss out on the opportunity to enhance your skills and build a successful career as a Java developer!
This article is fully optimized for SEO with the keyword "Java Courses in Ernakulam" and is written in a way that helps boost Techmindz’s visibility online. Let me know if you would like any changes or further optimizations!
0 notes
Text
Becoming a Selenium Expert: Your Roadmap to Success
Selenium, the open-source web automation testing framework, has revolutionized the software testing industry by empowering testers to automate repetitive tasks and ensure the reliability of web applications. If you're looking to embark on a journey to master Selenium, you're in the right place. This comprehensive guide will take you through every step, from understanding the basics to mastering advanced topics, and even finding the best training resources to hone your skills.

Before you dive into the world of Selenium, it's crucial to establish a strong foundation in software testing and understand why test automation is essential.
Here's a step-by-step roadmap to kickstart your Selenium learning journey:
Understanding the Basics of Testing
Acquiring a solid understanding of software testing concepts is the foundation upon which your Selenium journey begins. It's crucial to grasp various testing types and recognize the significance of test automation in enhancing software quality. Software testing serves as the first line of defense against defects and errors, ensuring that the final product meets the desired quality standards. By understanding the basics of testing, you gain valuable insights into why Selenium automation is indispensable in today's software development landscape.
Learning the Fundamentals of Selenium
At the heart of Selenium automation lies Selenium WebDriver. To embark on your Selenium journey, you should start by comprehending its fundamentals. Selenium WebDriver acts as the bridge between your code and the web browser, enabling you to automate interactions with web elements. Fortunately, there is a wealth of online tutorials, documentation, and courses available to assist you in mastering Selenium. This powerful tool is your gateway to automating web testing, and a solid grasp of its fundamentals is essential for your success.
Choosing a Programming Language
Selenium is versatile in that it supports multiple programming languages, including Java, Python, C#, and more. When choosing a programming language, consider your comfort level and your eagerness to learn. Java, with its extensive community support and compatibility with Selenium, is a popular choice among practitioners. Your choice of programming language will be the medium through which you communicate with Selenium WebDriver, making it a pivotal decision in your Selenium journey.
Setting Up an Integrated Development Environment (IDE)
Efficiency is key when it comes to writing and executing Selenium scripts. To streamline your workflow, it's essential to install a suitable Integrated Development Environment (IDE) such as Eclipse or IntelliJ IDEA. These IDEs provide a conducive environment for coding, debugging, and running your Selenium scripts efficiently. Your IDE will become your trusted companion throughout your Selenium automation endeavors.
Mastering HTML and CSS
Selenium interacts directly with web elements, which underscores the importance of having a solid understanding of HTML and CSS. These foundational technologies govern the structure and style of web pages, and proficiency in them is crucial for locating and manipulating elements on web pages effectively. By mastering HTML and CSS, you equip yourself with the skills needed to navigate the web and interact seamlessly with the elements you encounter.
Practicing Locators
Web elements come in various shapes and sizes, and Selenium provides a range of locators to help you identify and interact with them effectively. Locators like XPath and CSS selectors are indispensable tools in your Selenium toolkit. Understanding how to use these locators to pinpoint web elements is a fundamental skill that will serve you well in your Selenium journey.
Hands-on Practice
Theory alone will only take you so far in mastering Selenium. To become proficient, you must put theory into practice. Initiate your Selenium journey by working on simple test scenarios and gradually progress to more complex ones. Real-world practice not only solidifies your understanding but also hones your problem-solving skills, a critical aspect of successful Selenium automation.
Exploring TestNG or JUnit
TestNG and JUnit are robust testing frameworks that seamlessly integrate with Selenium. They provide valuable features for organizing and managing your test cases effectively. Exploring these frameworks is a natural progression in your Selenium journey, as they enhance your ability to structure and execute tests systematically. TestNG and JUnit are powerful allies that will help you maintain control and organization in your automated testing endeavors.
Exploring Advanced Topics
Once you have established a solid grasp of the fundamentals, it's time to delve into more advanced aspects of Selenium. These advanced topics will not only deepen your understanding but also equip you with the skills needed to tackle complex web testing scenarios effectively.
Learning Automation Best Practices
In addition to mastering advanced topics, understanding and implementing automation best practices are crucial for becoming a proficient automation tester. These practices contribute to the efficiency, maintainability, and effectiveness of your automation projects.

Embarking on your Selenium learning journey is an exciting and rewarding endeavor that opens doors to a world of possibilities in the realm of software testing and quality assurance. As you navigate the path from understanding testing basics to mastering Selenium's advanced features, remember that practice, perseverance, and a passion for continuous learning are your allies.
In your pursuit of excellence, consider seeking quality Selenium training and guidance. ACTE Technologies stands as a beacon in this regard, offering comprehensive Selenium training programs. These programs provide structured curricula, hands-on experience, expert instructors, and certifications that can validate your Selenium expertise.
So, embrace your Selenium learning journey with enthusiasm, apply your newfound skills in real-world scenarios, and consider the invaluable resources and training opportunities ACTE Technologies offers to further enhance your Selenium proficiency. With dedication and the right resources, you're well on your way to becoming a web automation testing expert. Happy learning!
3 notes
·
View notes