#KNB217 Assessment 1
Text
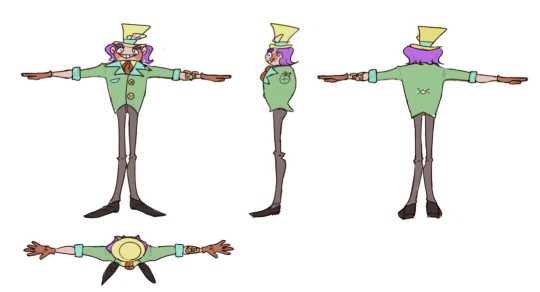
Final Design For Mad Hatter
0 notes
Photo

0 notes
Text
KNB217 Assessment 1 - Conclusion and References
The weirdest thing I found when producing both of these models was the resulting polycount. The Mysterious Stranger model ended up being 28.7k triangles to 14.4k vertices, a mere fraction of what the shark model ended up being and a total inverse of the assignment brief. What was more interesting was the fact I put far more effort into The Mysterious Stranger than the shark model, or at least I thought I did. This is especially apparent when you compare the initial models I made for each in Maya.
With another, more detailed and rigged model to assemble for the final assessment of this subject, it would be in my best interest to better get to grips with Zbrush and its charitably “eccentric” ui. However despite the mishaps and the hurdles of my own hubris, I think the models themselves scrubbed up alright. Just maybe not as good as I could have done.
References
Amy McKenna. Accessed 16th of April 2019. Where does the Concept of a “Grim Reaper” Come From? https://www.britannica.com/story/where-does-the-concept-of-a-grim-reaper-come-from
Harry Lawson. April 2016. War-Paint, Shark Teeth and Pin-ups – A Brief History of Aircraft Nose Art. https://www.aerosociety.com/news/war-paint-shark-teeth-and-pin-ups-a-brief-history-of-aircraft-nose-art/
Morne Hardenberg. April 2018. Great White Shark. Smithsonian Institution: https://ocean.si.edu/ocean-life/sharks-rays/great-white-shark
Pixar Animation Studios. 2003. Finding Nemo. https://www.pixar.com/feature-films/finding-nemo
Will Vinton Studios. 1985. The Adventures of Mark Twain. https://www.youtube.com/watch?v=iJb3Gady7Vc
1 note
·
View note
Text
Assessment 1 for KNB217 involves the creation of one stylised Australian native animal and one mythical human hybrid creature. For both of these creatures they are to be textured and set up with a lighting rig to be rendered for a turnaround. For this project I have decided to use Autodesk Maya as my program of choice for modelling and rendering over Blender. I have less experience with Autodesk and this will prove to be a great learning curve.
0 notes
Text
Week1
#2D Australian shark design & initial draft#
After attended the first lecture and the tutorial of KNB217, I started to design my Australian native animal as the first assessment. During the process, the most difficult thing was to make the character alive and has its own characteristic. It’s not only a character, but also should be a tool for storytelling. Viewers should be able to tell or imagine the story behind my character. What is it? Where is this character from? What’s the current or potential conflicts is this shark facing?
Creating a compelling and attractive shark character became the main goal of my first week of my assessment. And there were several steps involved in this process:
1. Researching: Understand the body design of a real shark ( shark’s body part// body movement)
* shark body parts: “Fishermen catch sharks mostly for their skin and flesh...and more than half of the sharks in the world are not dangerous to people and seldom attack them.” (Englishonline)

2. Story design: the story behind the character
[ It’ s a story about a harmless Aussie shark in the Pacific Ocean where has plastic pollution.]
3. Draft:

4. Change 2D draft into 3D model:


Reference:
Englishonline. Shark Size and Habitat . Retrieved from:https://www.english-online.at/biology/sharks/sharks.htm
0 notes
Text
KNB217 Assessment 1 "Väinämöinen"


https://sketchfab.com/3d-models/knb217-assessment-1-vainamoinen-ffa016ca01a641eda79361afadac8328
0 notes
Text
KNB217 - Semester 1 - Assessment 2
This assignment was to create a human character. I’ve been a big fan of Pixar’s The Incredibles ever since it came out, so I decided to design a hero character in a similar style.

I’m not very good at drawing, as I’ve stated earlier, but I had the idea in my head and knew what I wanted to make in Maya, so I drew a quick reference and started modelling straight away.

My idea is that he is a cousin of Elasti-Girl, skinny and mostly unimpressive physically, but is basically indestructible thanks to his power to absorb all kinetic energy that he comes into contact with.


I started by blocking out the basic shapes. I set the symmetry to the X Axis and extruded arms and legs.


I then began shaping the head.


Refining the limb shapes was next.


While one hand worked fine, Maya decided not to exactly match the symmetry on the other hand.

I decided I’d fix that later, and instead turned on the Smooth Preview.


I kept adjusting the shapes here and there, especially on the head, refining the shape of the face and skull.

I extruded a mouth, and then modeled an eye with upper and lower eyelids, then duplicated and placed them on the head.

Then Maya decided to go weird and add a bunch of graphical corruption across the model.

I closed and re-opened the file, and the prior corruption was gone, instead only affecting one of the upper eyelids. Just to be safe, I deleted the entire eye and duplicated the remaining one again.

I added teeth, to make the mouth more expressive.

Then I decided it was time to take care of that mangled hand, so I deleted half the model and used Maya’s mirror function to copy the remaining half.

I added hair using the XGen feature. This is always fun, but then it was time to try to add a texture to the model. First thing was to get a UV Unwrap, so I used the automatic unwrap feature again, hoping that it would come out with less parts.

I was wrong. From this point onwards, the process becomes a constant mess of things not doing what I thought they were going to do.
To start, I tried to sew the smaller parts back together using the sew/cut tool, but it would do weird things to the UV unwrap, making it impossible to use.

Instead, I committed the smooth preview to polygons in order to export an FBX of the model. For some reason, doing this moved all the hair locations to random groupings in various parts of the model. I decided to leave that for the time being, and attempt to add a texture.
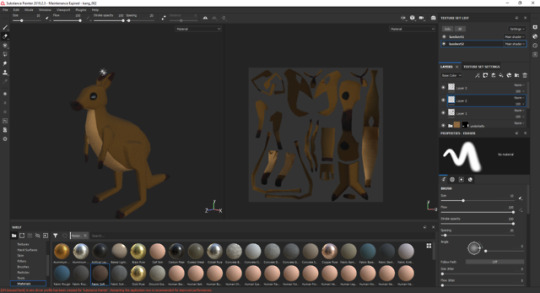
This time I had decided to try using Substance Painter for the first time ever. Hopefully it would be easier than trying to determine what all of those tiny shapes in the unwrap corresponded to.

So, I must stress that I have no idea how to use this program, but I really wanted to try and get a texture on the model in a much more easy-to-use process. This was indeed easy, but Substance Painter had decided to use the UV unwrap that Maya had created, and this caused an issue with painting.
youtube
For some reason, painting some parts of the model would mirror on other parts, and some wouldn’t. The eyeballs, eyelids, and teeth each also seemed to have their own version of the entire UV unwrap applied to them somehow, so painting over them caused paint to be mirrored across random parts of the rest of the model. This was very confusing.


Additionally, the painting never went on smooth, always revealing the edges of the UV shapes, or adding weird patterns onto random parts of the model.
Eventually, I gave up, exported the textures from Substance Painter, and went back into Maya to apply at least the Diffuse and the Normal to the model.

The diffuse went on okay, but the shape edges were still visible. Additionally, I forgot to paint any skin around the mouth, but I really liked the outcome, so I left it as black.


Adding the Normal as a bump map was a bad idea, as it seems to have exported with all of those weird irregularities and looks terrible. I decided to scrap the bump, and just stick with the diffuse texture.

Now that my model was textured, I tried to re-render the hair I had added earlier, not remembering that the markers had moved.

I deleted the old hair and created new hair on the top of the head.

This looked great in render, so I started adjusting the model to show the different facial expressions.


And then a quick playblast of a turn-around.
youtube
In conclusion:
This model started off well, but the process went downhill quickly, ending in the mess you see before you. I am proud of the face, the hands, hair, and legs. I wanted the arms to be skinny, but they could have used more definition. The chest and back are shaped how I wanted them, retaining the look of an average and physically unimpressive guy. Over-all, I can say that I tried to do better than last time, but I’m going to need a LOT more practice at all of this process if I want to do this kind of work again.
0 notes
Text
Building 3d Creatures
This short blog will make up the bulk of all the assessment items for KNB217 - 3D creatures.
Exercise 1: Design and model one Australian native animal in a stylised, non realistic form at mid level detail and complexity. Examples: kangaroo joey, sting ray, shark, koala, numbat, tasmanian tiger, dingo, turtle. Mid level polygon count.
So that i can get a head start i’ll attempt to assign a couple of weeks for each exercise so that i don’t get too bogged down.
Assuming there is learning curve with modelling new and interesting animals I think it will take a solid 3 weeks of designing the animal/ building it in maya/ polishing the topology and design+testing with auto rigging (;probably give a week for each aspect)
Exercise 2: Design and model one simple fanatasy creature in a stylised, non realistic form at mid level detail and complexity. Examples: dragons, unicorns, hybrids of various animals, or entirely alien creatures. Mid level polygon count.
This exercise may be slightly harder but with the new practice it should be just as easy as building the Australian creature, as long as i put enough effort into drawing and designing it properly.
Excercise 3: Texture the two creatures modeled for Excercise 1 and 2
I think this will be the easiest aspect of the assignment. I should pay attention to the topology so that unwrapping it easy.
0 notes
Text
Further Refined Concept Sketches

0 notes
Text
Refined Sketches For Mad Hatter

0 notes
Text
Concept Sketches For Mad Hatter

0 notes
Text
KNB217 - Digital Creatures
Assessment 1 - Low Polygon Count Character Modelling and Rigging for Animation
Task 1: Synopsis of the fairy tale and characater profle
Chosen Fairy Tale: Alice’s Adventures in Wonderland
The book Alice’s Adventures in Wonderland has become quite a popular fairy tale and book amongst children and adults. Written by Lewis Carroll it follows a young girl named Alice through her adventure in Wonderland. It opens with Alice and her sister reading, then a white rabbit comes by. Alice, instantly curious follows this white rabbit down a rabbit hole and finds herself in the surreal world of Wonderland. She encounters a wide variety of strange characters and creatures; a reoccurring character is the Cheshire Cat. The Cat advises her to attend a tea party where she meeds the Mat hatter and March Hare. The Hatter attempts to cut Alice’s hair, but she escapes. Soon enough Alice finds herself in a Garden with servants painting roses red in fear of the Queen of Hearts discovering white ones. The Queen orders a court meeting after discovering someone stole her tarts and Alice is called to testify. Alice knows nothing about the crime and the Queen loses her temper and calls for Alice’s execution. Alice wakes up just in time, next to her sister, and realises it was all a dream.’
Character Profile: The Hatter
The Mad Hatter is a reoccurring character Alice interacts with. He is first introduced at the Mad Tea Party along with the March Hare and the Door Mouse. In the books his behaviour towards Alice is erratic and often rude, even trying to cut her hair. His madness is based on the history of hatters; they often needed to work with toxic materials which sent them insane. The hatters personality, when summed up is smart, erratic, and insane.
References:
1: What is the summary of Alice's Adventures in Wonderland?. (2020). Retrieved 15 March 2020, from https://www.enotes.com/homework-help/what-summary-alice-wonderland-139313
2: Mad Hatter - Alice-in-Wonderland.net. (2020). Retrieved 17 March 2020, from http://www.alice-in-wonderland.net/resources/analysis/character-descriptions/mad-hatter/
0 notes
Photo


0 notes
Photo


0 notes
Photo


dragon turn around
0 notes
Text


Dragon figure reference.
0 notes
Last Seen Blogs

teeksradioactivewaste
Radioactive Waste
natdremurr
Me gusta karmaland 5

confrontingbabble-on
Confronting Babble-On

suehtam-kaiju
Suehtam Kaiju

bahcelievlertravestitravestileri
bahçelievler travesti bulgar MİNA 0539 388 2034