#LS 17 Server
Explore tagged Tumblr posts
Visit Tumblr Blog
Explore Tumblr blogs with no restrictions, modern design and the best experience.
Last Seen Tumblr Blogs


Fun Fact
In 2020, 44% of users from Denmark used Tumblr daily.
Text
hi my names andy i do minecraft youtube and ive been dragged into making an account so my friends can post fanart and tag me.
this is my channel i have several videos up, most of which are gonna be playing with my friend @introvert-in-hell and trying to survive this horrible terrible modpack that wants us dead personally, then moving on to progressively harder ones.
(i was also briefly on a ls modded server and i'm working on a video about that but it was a really emotionally taxing experience so pretty much every time i go to edit it, i feel like crap)
i do also plan on posting a little fic but i'm a super slow writer.
um yeah youre welcome to draw write whatever about me ^_^ i am 17 years old so keep that in mind. thanks love you bye ^_^
31 notes
·
View notes
Text
Gitstats

Como fazer?
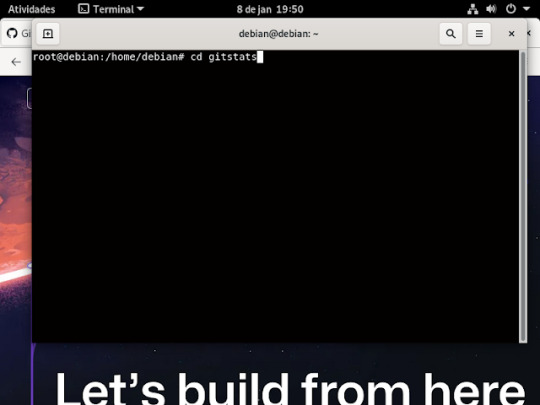
1° passo : abrir a sua maquina virtual Linux, no caso irei utilizar a distribuição Debian, depois que logar. no seu Debian ira abri o terminal ira clicar em atividades e ira digitar terminal, dai e só aperta o enter no que já está selecionado .como mostra a imagem abaixo.
2° passo: ira vira um usuário root, usando o comando su, e aperte o enter do teclado e pedira para digitar senha de root que foi a primeira senha que pede pra criar na instalação do Debian

3° passo: instalar o ssh usando o comando apt install openssh-server, e ai aperte o enter no seu teclado, feito isso ira pergunta se você quer mesmo instalar aperte a letra s do seu teclado e pressione o botão enter

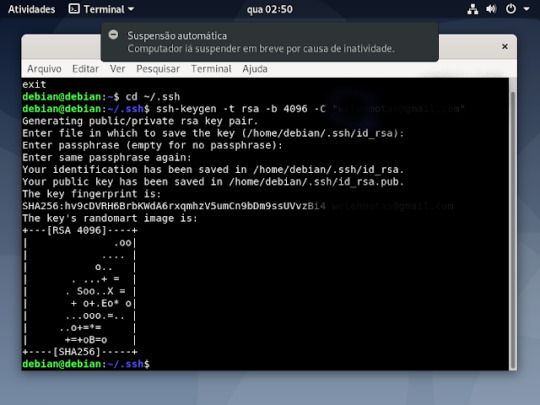
4° passo: feito a instalação , agora iremos criar a chave ssh, primeiro se tiver como root , vai sair usando o comando exit e aperte o enter, como ilustrado na imagem

5° passo: feito isso você ira entra na pasta do ssh usando o comando cd ~/ .ssh como mostra a imagem

6° passo :dentro da pasta você ira criar sua chave usando o comando ssh-keygen -t rsa -b 4096 -c "o seu email cadastado no github"

7° passo: ira perguntar aonde ira salvar a chave, n caso é só aperte o enter

8° passo: pedira para criar uma senha (opcional) no caso não criarei a senha então só aperta o enter do teclado

9° passo: pedira para repetir caso você tenha criado uma senha , caso só irei pressionar o enter

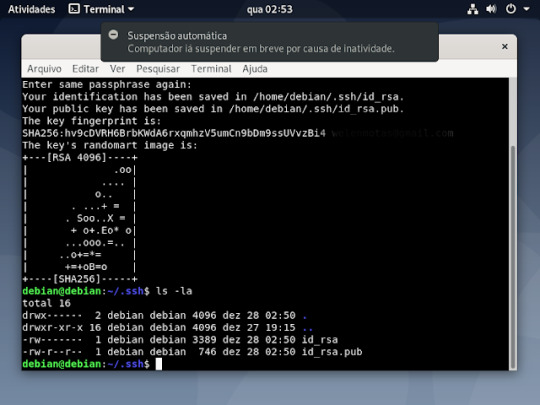
10° passo: sua chave foi criada, ficara assim como ilustrado na imagem
11° passo: se quiser tem certeza se foi criado mesmo, como já está na pasta digite um ls -la, que mostrará os arquivos criados
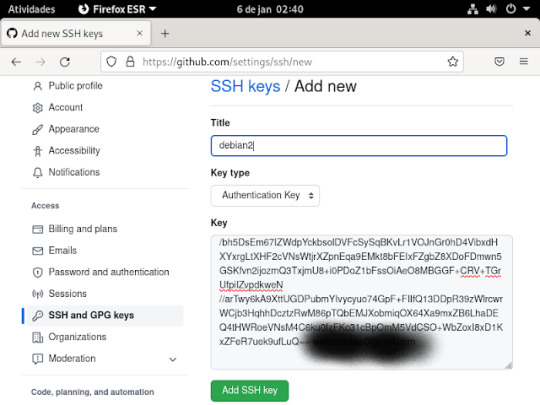
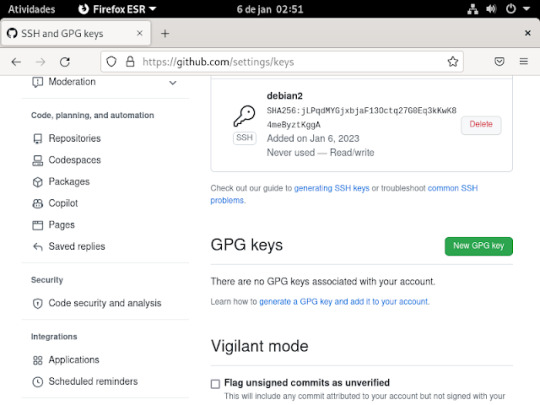
12° passo: feito tudo isso agora é colocar a chave ssh no seu GitHub, para fazer isso , você ira abrir o seu GitHub, dentro do seu git clicar aonde tem sua foto na parte superior do seu git e vai ate a opção settings , dentro dessa opção clica no ssh and gpg key, vai aperta o botão verde que tá escrito new ssh key

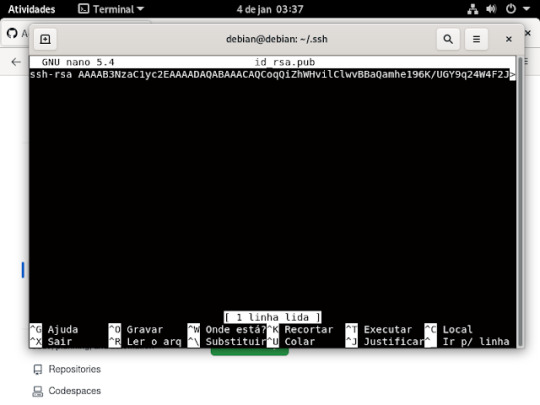
13° passo: é preencher essas informações que estão sendo pedidas, No title você digita o nome que você quiser dar a sua chave, no key é aonde você ira jogar a sua chave ssh que você criou, no terminal entro da pasta aonde esta salvo o id_rsa.pub e ai ou você abre o arquivo usando nano , ficaria nano id_rsa.pub e apertr do enter no teclado, dai coloca a chave no git
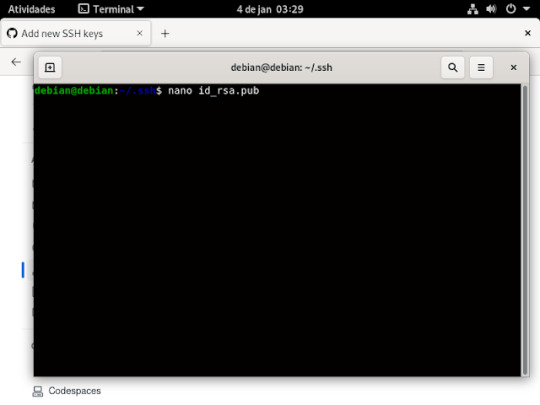
Ai quando for abrir no nano ficara assim.
ou usando o comando cat, basta escrever no seu terminal , cat id_rsa.pub, se não quiser digitar tudo usa o tab do teclado que ele completa pra você .
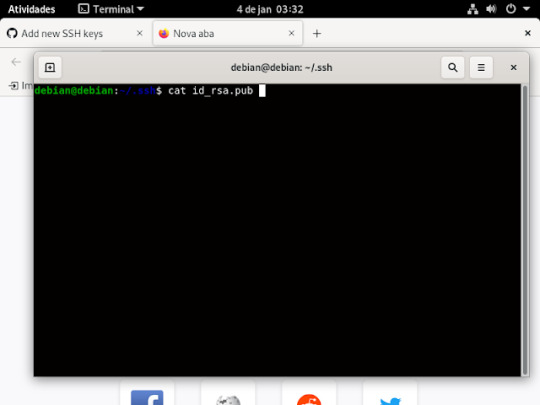
e quando for usar o comando cat abrira assim.
14° passo: A chave que ira aparecer nesse arquivo, você vai colar dentro da caixa aonde está escrito key, se estiver tudo certo clica em add ssh key .como mostra a imagem abaixo;
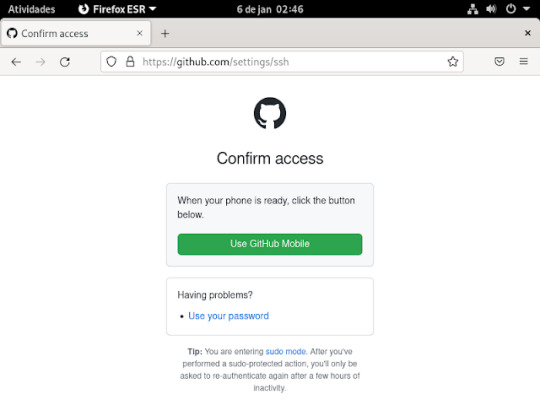
15° passo: irá pedir para logar. para confirma o que criou , basta usar o celular ou o login e senha e tá pronto o ssh no git
Ai ira ficar assim.
16° passo: Agora criaremos o token, para fazermos isso , precisa clicar em developer settings, como mostra a imagem

17° passo: nessas opções da imagem abaixo ira clicar na opção token (classic)

18° passo: dentro dessa opção aparecera assim, e você ira clicar na opção generate new token, e aparecera opções

19° passo: nessa opções irei escolher a segunda opção generate new token (classic)

20° passo: Aonde está escrito note e o nome que você quiser colocar no seu token, o e abaixo dele e depois de quantos dias ira expirar seu token, nas outras imagens precisa marcas essas caixinhas que estão marcada nas imagens as que não estão marcadas não precisa marca, depois é só clicar na opção generate token para criar ele e aparecera desta maneira que aparece na ultima imagem


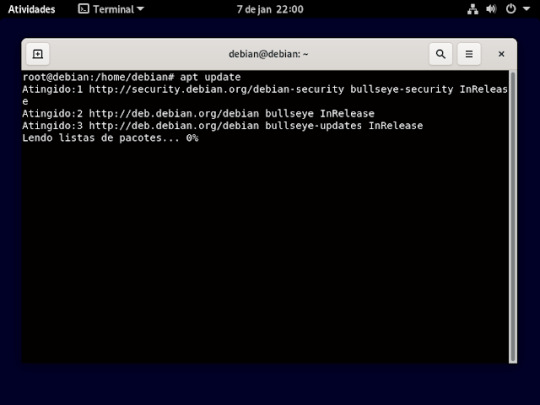
21° passo: ira fazer um update na sua maquina para isso , digitara o comando apt update, como mostra na imagem.
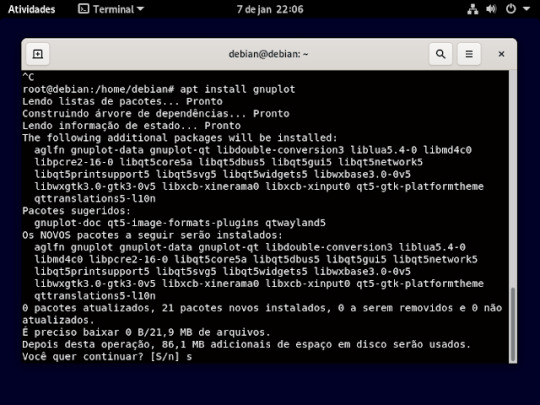
22° passo: agora iremos instalar o gnuplot , usando o comando apt install gnuplot, e vai perguntar se quer mesmo instala e só aperta a letra s e o enter do teclado como mostra imagem
23° passo: Agora instalar o git, usando o comando apt install git e vai perguntar se quer mesmo instala e só aperta a letra s e o enter do teclado

24° passo: Agora instalar o git, usando o comando apt install Python e vai perguntar se quer mesmo instala e só aperta a letra s e o enter do teclado

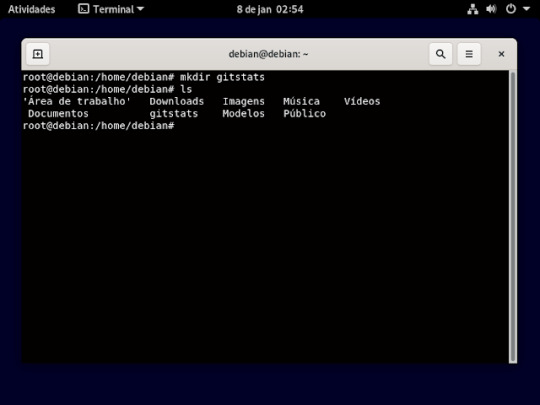
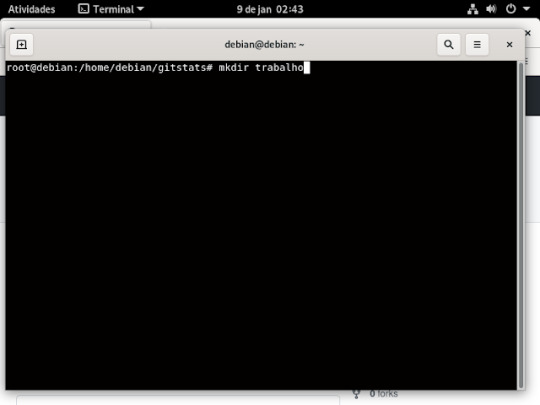
25° passo: nesse passo você ira ter que criar uma pasta aonde será armazenada, as pasta que for clona, usando o comando mkdir. é só escrever no terminal mkdir e o nome da pasta que vai criar e aperta o enter do teclado, como mostra a imagem abaixo.

se quiser ver se pasta foi criar use o comando ls, esse comando vai lista as pasta que tem dentro do diretório.
26° passo: é utilizar esse comando exatamente como tá escrito na imagem abaixo.

27° passo: depois de executa esse comando anterior , agora iremos entra na pasta que criamos do gitstats usando o comando cd como mostra a imagem.
28° passo: dentro da pasta gitstats, irá criar uma outra pasta aonde vai armazena o for captura do GitHub, como mostra a imagem
29° passo: depois que criou você ira entra na pasta, usando o comando cd

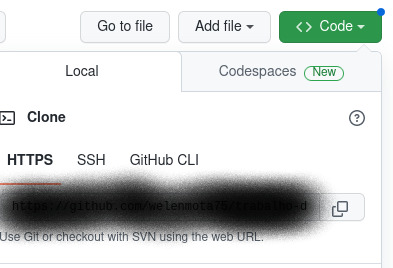
30° passo: dentro do seu GitHub ira no repositório que você quer clonar e ira copiar o link fica no botão verde escrito code clica em cima dele e aparecera assim como mostra a imagem baixo.
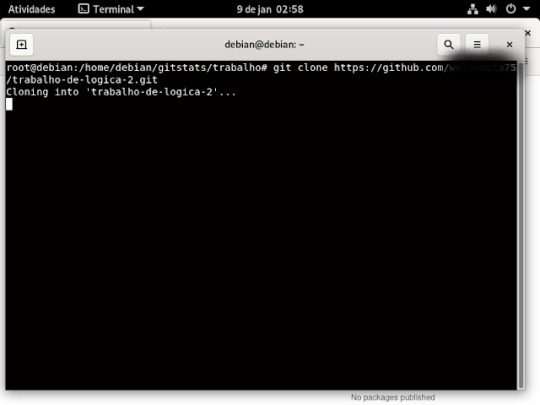
31° passo: o link que ira aparecer aonde está na imagem anterior o que ira copiar e no terminal você ira digitar assim:
32° passo: você ira voltar a pasta gitstats , digitando assim, no terminal, apertando o enter do teclado

33° passo: dentro da pasta gitstats , ira digitar esse comando "./gitstats ./nome da pasta que você vai clona/ . /o nome da pasta que você criou no seu debian/ , aperte o enter do teclado e tá pronto
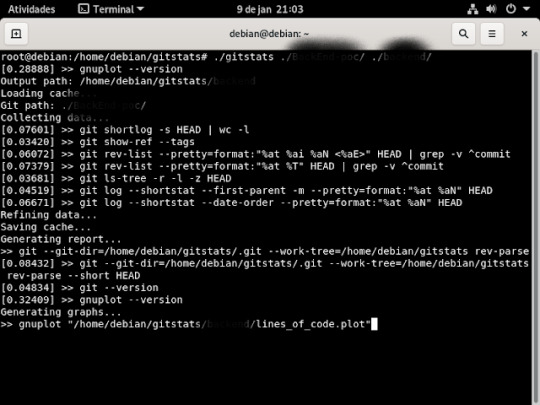
Bom é isso ,se quiser clona outro repositório basta seguir o que fizemos que vai funcionar .....
0 notes
Text
LS Master Post
A Link-meets-Link AU where the Hero’s Spirit gets separated from their body via a magic dagger, and they find out they can time-travel to their past reincarnations.
General AU warnings: assume if it's been in any loz game, it'll be similar here, but, more specifically: Stabbing, injury, ghosts, possession, mental health illness discussion/depictions (generally nonspecific), chronic illness/pain, peril, blood, blood sacrifice mentions, death mentions, previous deaths (ie botwink)
Link Reference Post - Zeldas Reference Post - "NPCs" Reference Post - Ganons/Villains Reference Post - Demons Reference Post
LS Timeline - Discord Server Link
Initial AU post - Comic Page Links Masterpost - Bonus Art Masterpost
Backstory content:
Series Ao3
Character References: Hero - Sky - Hope - Ordon - Glider(Wild)- Forest - Bean - Wind - Engineer - Rinku - Smith - Mouse
Scars: part 1 - part 2
Rinku: Independently Together (fic) - The Windfish Slumbers Long (fic) - Between Dreams (fic)
Hope: Hope (ya like) Cartoons (ao3- 'screenplay' fic)
Sky: Blue Skies and Dark Clouds (fic)
Smith: One Four All (fic)
Engineer: Feels like Being Hit by a Train (fic)
Ordon: Crossbow Training and Parent Training (fic) & Art "Summary" (art)
Glider: What Makes a House a Home? (fic)
Hero's Spirit: Crafting a Hero's Spirit (fic) Marin: Siren's Dream (fic)
Wind: Seeking New Land (fic) Forest/Bean: Brotherhood in Time (fic)
Nickname list & specifics:
Links:
Hero's Spirit- Pre Hyrule Warriors Link, they/them, 16
Sky- Skyward Sword, he/ae, 21
Hope- Legend of Zelda, Adventure of Link, Legend of Zelda Cartoon, he/she/they, 17
Glider (Wild)- Breath of the Wild, he/they (& more), between 17-19
Ordon/Wolf- Twilight Princess, Breath of the Wild, he/him, 30
Mouse- Hero of Men (Tears of the Kingdom/Minish Cap Past), CDi: Faces of Evil & Wand of Gamelon, 15
Bean- Ocarina of Time, he/him, 8/15
Forest- Majora's Mask, he/him, 11
Wind- Wind Waker, Phantom Hourglass, he/him, 16
Engineer- Spirit Tracks, he/she, 12
Rinku- A Link to the Past, Oracle of Ages & Seasons, Link's Awakening, A Link Between Worlds, she/they, 19
Smith- Minish Cap, Four Swords, Four Swords Adventures, he/they/va/ver, 14
FS Colors: Clover (green), Berry (red), Indigo (blue), Viola (violet)
Zeldas:
Lady- Hyrule Warriors, he/she/they, 20
Zelda- Skyward Sword, she/her, 22
Princess- Legend of Zelda, Legend of Zelda Cartoon, she/her, 17
Briar- Adventure of Link, she/her, 16
Bloom- Breath of the Wild, they/them, 19
Twilight- Twilight Princess, she/her, 35
Sheik- Ocarina of Time, she/him, 10 or 15
Tetra- Wind Waker, Phantom Hourglass, she/her, 18
Phantom- Spirit Tracks, she/her, 12
Sunflower- A Link to the Past, Oracle of Ages & Seasons, Link's Awakening, she/her, 14
Art- A Link Between Worlds, she/her, 19
Mini- Minish Cap, Four Swords, Four Swords Adventures, she/her, 14
Lantern- CDi: Faces of Evil & Wand of Gamelon, 16
#linked spirit#master post#I figured I should have one of these here too#the warnings might be added to later
112 notes
·
View notes
Text
Something awesome - reversing write-ups
As usual, write-ups can be found below:

Reversing Warmup 1
Throughout your journey you will have to run many programs. Can you navigate to /problems/reversing-warmup-1_0_f99f89de33522c93964bdec49fb2b838 on the shell server and run this program to retrieve the flag?
The problem run is known as an ELF binary. It is the most common program format on Linux. Here are the steps to run the program:
$ cd /problems/reversing-warmup-1_0_f99f89de33522c93964bdec49fb2b838 $ ls run $ ./run picoCTF{welc0m3_t0_r3VeRs1nG}
flag: picoCTF{welc0m3_t0_r3VeRs1nG}
Overall this simple challenge is here to help users get comfortable with using executable files, and how to run them.
Reversing Warmup 2
Can you decode the following string dGg0dF93NHNfczFtcEwz from base64 format to ASCII?
Base64 is a common encoding format. The main differences between encoding and encrypting as we saw in our previous cryptography chapter are as follows:
Encoding transforms data into another format using a scheme that is publicly available so that it can easily be reversed.
Encryption transforms data into another format in such a way that only specific individual(s) can reverse the transformation.
In summary:
Encoding is for maintaining data usability and uses schemes that are publicly available.
Encryption is for maintaining data confidentiality and thus the ability to reverse the transformation (keys) are limited to certain people.
To decode the string, we can use python, which is a really useful programming language for writing quick scripts or computing numbers really efficiently:
Python 2.7.15 (default, Jun 17 2018, 12:51:03) [GCC 4.2.1 Compatible Apple LLVM 8.0.0 (clang-800.0.42.1)] on darwin Type "help", "copyright", "credits" or "license" for more information. >>> 'dGg0dF93NHNfczFtcEwz'.decode('base64') 'th4t_w4s_s1mpL3'
flag: picoCTF{th4t_w4s_s1mpL3}
Assembly-0
What does asm0(0xb6,0xc6) return? Submit the flag as a hexadecimal value (starting with ‘0x’). NOTE: Your submission for this question will NOT be in the normal flag format. Source [1] located in the directory at /problems/assembly-0_0_5a220faedfaf4fbf26e6771960d4a359.
Let’s take a look at the assembly code:
.intel_syntax noprefix .bits 32 .global asm0 asm0: push ebp mov ebp,esp mov eax,DWORD PTR [ebp+0x8] mov ebx,DWORD PTR [ebp+0xc] mov eax,ebx mov esp,ebp pop ebp ret
As you can see, there’s a function named asm0 that is being exported by the line .global asm0, and the content of the function is right below the asm0 : label. We know that the function is called with the argument of 0xb6 and 0xc6 which are at [ebp+0x8] and [ebp+0xc] respectively.
By converting the assembly code to pseudo-code, we can observe the logic of the function.
eax = arg1 ebx = arg2 eax = ebx
Because we know that an assembly function always returns the value than is in the eax register, the asm0 should always return the second argument passed to it; therefore, the return value is 0xc6.
Flag: 0xc6
Assembly-1
What does asm1(0xcd) return? Submit the flag as a hexadecimal value (starting with '0x’). NOTE: Your submission for this question will NOT be in the normal flag format. Source [1] located in the directory at /problems/assembly-1_2_ac6a59ca77a2d619ddabb3c3ffedb9a8.
This problem is similar to the previous challenge. The code can be found below:
.intel_syntax noprefix .bits 32 .global asm1 asm1: push ebp mov ebp,esp cmp DWORD PTR [ebp+0x8],0x98 jg part_a cmp DWORD PTR [ebp+0x8],0x8 jne part_b mov eax,DWORD PTR [ebp+0x8] add eax,0x3 jmp part_d part_a: cmp DWORD PTR [ebp+0x8],0x16 jne part_c mov eax,DWORD PTR [ebp+0x8] sub eax,0x3 jmp part_d part_b: mov eax,DWORD PTR [ebp+0x8] sub eax,0x3 jmp part_d cmp DWORD PTR [ebp+0x8],0xbc jne part_c mov eax,DWORD PTR [ebp+0x8] sub eax,0x3 jmp part_d part_c: mov eax,DWORD PTR [ebp+0x8] add eax,0x3 part_d: pop ebp ret
For this challenge, control flow is being introduced.
In the case of the challenge, [ebp+0x8] is the argument that gets passed into the function, specifically 0x76. Because 0x76 is not larger than 0x98, we will not follow the first jg (jump greater than) to part_a.
For the second comparison, because 0x76 doesn’t equal 0x8, we are going to jump to part_b (jne means jump not equal).
In part_b, the argument is loaded into eax and 3 is subtracted from it. After that, the function returns (with the jmp to part_d) - therefore, we just have to take 0x76 and subtract 0x3 from it to get the flag: (0x73).
2 notes
·
View notes
Text
Something Awesome Project Milestone 2 - Week 6
My other subjects and their mid-semester assessments have taken their toll on me, and I haven’t quite reached the milestone i expected to reach after week 6. I severely overestimated my coding skills
Level 11:
cat data.txt to find a string that was clearly “the password is #########” shifted 13 letters over
used tr ‘A-Za-z’ ’N-ZA-Mn-za-m’ to use rot13
then i pasted the cat data.txt to find the key
key: 5Te8Y4drgCRfCx8ugdwuEX8KFC6k2EUu
Level 12:
I go pretty stuck with this one, i tried cat data.txt and got an unreadable string, then i tried xxd -r to reverse it, but i still got something strange. At this stage I was pretty stuck for an hour or so with no progress so I had to look up the answers, and i found that if i used file on my target file, it would tell me how it was last compressed, and sure enough, i found it was compressed by gzip. Now i knew that i had to decompress it that way so i used zcat and file again, now it was telling me it was compressed by bzip, so now I need to use bacat, and it turns out it was gzip-ed again. lastly, i found out it was a tar archive so I had to use tar -xo to print to stdout. i repeated this process until i ended up with
zcat lol.bin | bzcat | zcat | tar xO | tar xO | bzcat | tar xO | zcat to get the key.
key: 8ZjyCRiBWFYkneahHwxCv3wb2a1ORpYL
Level 13:
learning how to use ssh with rsa keys
I looked through man ssh and found ssh -i which means lets you select anprivate key for the public authentication to read. I copied the key to my computer and then tried using this method. but i ran into a message that read
@@@@@@@@@@@@@@@@@@@@@@@@@@@@@@@@@@@@@@@@@@@@@@@@@@@@@@@@@@@
@ WARNING: UNPROTECTED PRIVATE KEY FILE! @
@@@@@@@@@@@@@@@@@@@@@@@@@@@@@@@@@@@@@@@@@@@@@@@@@@@@@@@@@@@
Permissions 0644 for ‘sshkey.private.rtf’ are too open.
It is required that your private key files are NOT accessible by others.
This private key will be ignored.
So I tried using chmod to change the permissions of the file. (chmod 600) to make the key not open to anyone using it except me and it worked
ssh key: MIIEpAIBAAKCAQEAxkkOE83W2cOT7IWhFc9aPaaQmQDdgzuXCv+ppZHa++buSkN+
gg0tcr7Fw8NLGa5+Uzec2rEg0WmeevB13AIoYp0MZyETq46t+jk9puNwZwIt9XgB
ZufGtZEwWbFWw/vVLNwOXBe4UWStGRWzgPpEeSv5Tb1VjLZIBdGphTIK22Amz6Zb
ThMsiMnyJafEwJ/T8PQO3myS91vUHEuoOMAzoUID4kN0MEZ3+XahyK0HJVq68KsV
ObefXG1vvA3GAJ29kxJaqvRfgYnqZryWN7w3CHjNU4c/2Jkp+n8L0SnxaNA+WYA7
jiPyTF0is8uzMlYQ4l1Lzh/8/MpvhCQF8r22dwIDAQABAoIBAQC6dWBjhyEOzjeA
J3j/RWmap9M5zfJ/wb2bfidNpwbB8rsJ4sZIDZQ7XuIh4LfygoAQSS+bBw3RXvzE
pvJt3SmU8hIDuLsCjL1VnBY5pY7Bju8g8aR/3FyjyNAqx/TLfzlLYfOu7i9Jet67
xAh0tONG/u8FB5I3LAI2Vp6OviwvdWeC4nOxCthldpuPKNLA8rmMMVRTKQ+7T2VS
nXmwYckKUcUgzoVSpiNZaS0zUDypdpy2+tRH3MQa5kqN1YKjvF8RC47woOYCktsD
o3FFpGNFec9Taa3Msy+DfQQhHKZFKIL3bJDONtmrVvtYK40/yeU4aZ/HA2DQzwhe
ol1AfiEhAoGBAOnVjosBkm7sblK+n4IEwPxs8sOmhPnTDUy5WGrpSCrXOmsVIBUf
laL3ZGLx3xCIwtCnEucB9DvN2HZkupc/h6hTKUYLqXuyLD8njTrbRhLgbC9QrKrS
M1F2fSTxVqPtZDlDMwjNR04xHA/fKh8bXXyTMqOHNJTHHNhbh3McdURjAoGBANkU
1hqfnw7+aXncJ9bjysr1ZWbqOE5Nd8AFgfwaKuGTTVX2NsUQnCMWdOp+wFak40JH
PKWkJNdBG+ex0H9JNQsTK3X5PBMAS8AfX0GrKeuwKWA6erytVTqjOfLYcdp5+z9s
8DtVCxDuVsM+i4X8UqIGOlvGbtKEVokHPFXP1q/dAoGAcHg5YX7WEehCgCYTzpO+
xysX8ScM2qS6xuZ3MqUWAxUWkh7NGZvhe0sGy9iOdANzwKw7mUUFViaCMR/t54W1
GC83sOs3D7n5Mj8x3NdO8xFit7dT9a245TvaoYQ7KgmqpSg/ScKCw4c3eiLava+J
3btnJeSIU+8ZXq9XjPRpKwUCgYA7z6LiOQKxNeXH3qHXcnHok855maUj5fJNpPbY
iDkyZ8ySF8GlcFsky8Yw6fWCqfG3zDrohJ5l9JmEsBh7SadkwsZhvecQcS9t4vby
9/8X4jS0P8ibfcKS4nBP+dT81kkkg5Z5MohXBORA7VWx+ACohcDEkprsQ+w32xeD
qT1EvQKBgQDKm8ws2ByvSUVs9GjTilCajFqLJ0eVYzRPaY6f++Gv/UVfAPV4c+S0
kAWpXbv5tbkkzbS0eaLPTKgLzavXtQoTtKwrjpolHKIHUz6Wu+n4abfAIRFubOdN
/+aLoRQ0yBDRbdXMsZN/jvY44eM+xRLdRVyMmdPtP8belRi2E2aEzA==
Level 14:
so for this level, i am meant to be able to get the password for the next level if i submit the password for the current level in port 30000 in localhost, but unfortunately, i logged into this level with an ssh key so i don’t actually know the password. Fortunately, in level 0 they told us that you can always access the password for the current level in the /etc/bandit_pass folder, and therefore I found the key for level 14:
4wcYUJFw0k0XLShlDzztnTBHiqxU3b3e
now all i have to do is submit using one of the functions they’ve given me, telnet or nc, i tried nc which allows you to create a connection to a target host at a specific host.
nc localhost -p 30000, then i typed in the level 14 key to find the level 15 key
key: BfMYroe26WYalil77FoDi9qh59eK5xNr
Level 15:
for this level i need to submit the password in localhost through port 30001 using ssl encryption, i tried doing the same thing as last level and nothing happened.
i looked up the manual for openssl, which was listed as a function that could be helpful and scrolled through the commands until i found s_client which was also on the list. s_client implements a generic SSL client which can establish a connection to a remote server, so Instead of nc I tried openssl s_client. it didn’t do anything so I added the -help tag and found i needed to use more options for the s_client and found the first two options, -host and -port told me to use -connect which was the third option. I tried that, and it gave me an input from stdin so I pasted the key and got the key for the next level!
key: cluFn7wTiGryunymYOu4RcffSxQluehd
Level 16:
This time it is similar to last level, except I’m meant to find the localhost server in-between 31000 and 32000. The final helpful command in the spec is nmap, so I used the manual for to find out what it does, and apparently it is a tool that scans ports on a network.
“ In addition to all of the scan methods discussed previously, Nmap offers options for
specifying which ports are scanned and whether the scan order is randomised or sequential. By
default, Nmap scans the most common 1,000 ports for each protocol.” I used the -p option to specify which range of ports I’m searching and then specified the network I’m scanning with “nmap -p 31000-32000 localhost”
I found two open ports and checked them: 31518 and 31790
31518 only echoed whatever i typed in, but from 31790 i got the credentials:
RSA key:
—–BEGIN RSA PRIVATE KEY—–
MIIEogIBAAKCAQEAvmOkuifmMg6HL2YPIOjon6iWfbp7c3jx34YkYWqUH57SUdyJ
imZzeyGC0gtZPGujUSxiJSWI/oTqexh+cAMTSMlOJf7+BrJObArnxd9Y7YT2bRPQ
Ja6Lzb558YW3FZl87ORiO+rW4LCDCNd2lUvLE/GL2GWyuKN0K5iCd5TbtJzEkQTu
DSt2mcNn4rhAL+JFr56o4T6z8WWAW18BR6yGrMq7Q/kALHYW3OekePQAzL0VUYbW
JGTi65CxbCnzc/w4+mqQyvmzpWtMAzJTzAzQxNbkR2MBGySxDLrjg0LWN6sK7wNX
x0YVztz/zbIkPjfkU1jHS+9EbVNj+D1XFOJuaQIDAQABAoIBABagpxpM1aoLWfvD
KHcj10nqcoBc4oE11aFYQwik7xfW+24pRNuDE6SFthOar69jp5RlLwD1NhPx3iBl
J9nOM8OJ0VToum43UOS8YxF8WwhXriYGnc1sskbwpXOUDc9uX4+UESzH22P29ovd
d8WErY0gPxun8pbJLmxkAtWNhpMvfe0050vk9TL5wqbu9AlbssgTcCXkMQnPw9nC
YNN6DDP2lbcBrvgT9YCNL6C+ZKufD52yOQ9qOkwFTEQpjtF4uNtJom+asvlpmS8A
vLY9r60wYSvmZhNqBUrj7lyCtXMIu1kkd4w7F77k+DjHoAXyxcUp1DGL51sOmama
+TOWWgECgYEA8JtPxP0GRJ+IQkX262jM3dEIkza8ky5moIwUqYdsx0NxHgRRhORT
8c8hAuRBb2G82so8vUHk/fur85OEfc9TncnCY2crpoqsghifKLxrLgtT+qDpfZnx
SatLdt8GfQ85yA7hnWWJ2MxF3NaeSDm75Lsm+tBbAiyc9P2jGRNtMSkCgYEAypHd
HCctNi/FwjulhttFx/rHYKhLidZDFYeiE/v45bN4yFm8x7R/b0iE7KaszX+Exdvt
SghaTdcG0Knyw1bpJVyusavPzpaJMjdJ6tcFhVAbAjm7enCIvGCSx+X3l5SiWg0A
R57hJglezIiVjv3aGwHwvlZvtszK6zV6oXFAu0ECgYAbjo46T4hyP5tJi93V5HDi
Ttiek7xRVxUl+iU7rWkGAXFpMLFteQEsRr7PJ/lemmEY5eTDAFMLy9FL2m9oQWCg
R8VdwSk8r9FGLS+9aKcV5PI/WEKlwgXinB3OhYimtiG2Cg5JCqIZFHxD6MjEGOiu
L8ktHMPvodBwNsSBULpG0QKBgBAplTfC1HOnWiMGOU3KPwYWt0O6CdTkmJOmL8Ni
blh9elyZ9FsGxsgtRBXRsqXuz7wtsQAgLHxbdLq/ZJQ7YfzOKU4ZxEnabvXnvWkU
YOdjHdSOoKvDQNWu6ucyLRAWFuISeXw9a/9p7ftpxm0TSgyvmfLF2MIAEwyzRqaM
77pBAoGAMmjmIJdjp+Ez8duyn3ieo36yrttF5NSsJLAbxFpdlc1gvtGCWW+9Cq0b
dxviW8+TFVEBl1O4f7HVm6EpTscdDxU+bCXWkfjuRb7Dy9GOtt9JPsX8MBTakzh3
vBgsyi/sN3RqRBcGU40fOoZyfAMT8s1m/uYv52O6IgeuZ/ujbjY=
—–END RSA PRIVATE KEY—–
Level 17:
Since I didn’t have a password I had to connect using the same method as level 13, with the -i option. First I found the current password by using cat /etc/bandit_pass/bandit17,
current key: xLYVMN9WE5zQ5vHacb0sZEVqbrp7nBTn
next I used diff to find the difference between the two files, two keys came up, but I was looking for the one in .new and not .old so I copied the 2nd key after using diff passwords.old passwords.new
key: kfBf3eYk5BPBRzwjqutbbfE887SVc5Yd
Level 18:
So I tried using the key to log into bandit18, however straight away I was greeted with a message saying “bye-bye !” and i was forcefully logged out… hmmm…
The useful commands include ssh, ls, and cat, and I’m pretty sure cat and ls won’t have anything else to do with not getting logged out in ssh, so i pulled up the manual again for ssh. I command+F-ed to find something with the word ‘force’ to maybe force log in, options -4 and -6 changed the usage of IP addresses, but i found -t which said it could force open a pseudo terminal, so I tried that. Still got the same result however, and I realised that it was because (as the specs mentioned) .bashrc was modified. in order to bypass this, I needed to create open a new shell before bashrc gets called.
So I added on at the end: ssh -t username@hostname /bin/sh
key: IueksS7Ubh8G3DCwVzrTd8rAVOwq3M5x
Level 19:
Upon logging in, and a cheeky ls, the only file in the directory is an executable called bandit20-do and under permissions, anyone can’t read or write, but anyone can execute. After a bit of reading, I found out that running this program lets u run other commands with under the permissions of another user, because out is a
key: GbKksEFF4yrVs6il55v6gwY5aVje5f0j
Level 20:
Spec: There is a setuid binary in the homedirectory that does the following: it makes a connection to localhost on the port you specify as a commandline argument. It then reads a line of text from the connection and compares it to the password in the previous level (bandit20). If the password is correct, it will transmit the password for the next level (bandit21).
So form what i gather, I need to set up some kind of listener in a port on the localhost so that I can send the setups binary the password, and receive the next key in turn. To do this I’m probably going to need two terminal windows, one to set up the port, and the other to run the binary, for the listener, I looked up on stack exchange how to set one up and you use the -l option with the nc command, if i use the -p option to specify port then I’ll have set up my listener. I then ran suconnect with the same port and the typed in the previous password into the listener and got a neat message from suconnect saying that the passwords match, and got the next key from stdout of the listener.
key: gE269g2h3mw3pwgrj0Ha9Uoqen1c9DGr
1 note
·
View note
Text
XIV Questions!
This is pretty old but saw it on @catramihgo and thought would be cool to do, changed a question or 2 to match current times. Please do as well if you’d like!
1. What’s your character’s name? Ruri Valeth
2. What server? Balmung
3. What race/clan? Miqo’te / Seeker of the Sun
4. Favorite class/job? Tie between Red Mage and Scholar
5. What Grand Company? The Maelstrom
6. Are you in a Free Company? Tell us about it! GUIDE! It is a bunch of IRL friends. My GF is in it as well and we went to 2 of our members wedding this Summer!
7. Favorite city-state? Limsa Lominsa
8. Favorite in-game location? Azim Steppe
9. Is this your first Final Fantasy? If not, which did you play? 1,2,3,4,5,6,7,8,9,10,10-2,11,12,13,14,T,TA,MQ
10. Did you play Final Fantasy XI? Yes 10 years about.
11. Favorite NPC? Alisaie
12. Favorite Scion of the Seventh Dawn? Thancred during and after HW, Y’shtola ARR and 1.0
13. Did you get everything in the “Lightning Strikes” event? Yes
14. Did you play the 1.0 version of the game? Yes
15. What’s your favorite thing implemented in patch 4.4? Omega conclusion (Love the last 2 fights and cutscenes) and actually enjoying Eureka Pyros!
16. Favorite mount? My flaming Dawg from Suzaku
17. Favorite minion? Cali the Calimari
18. Favorite Disciple of the Hand? Leatherworker
19. Favorite Disciple of the Land? Miner
20. What job(s) would you like to be implemented in future updates? Puppetmaster
21. Favorite Grand Company leader? Merlwyb Bloefhiswyn
22. What town not yet in the game would you love to visit? (Garlemald, etc.) Another Au Ra Raen settlement other than under the sea place
23. Favorite antagonist? Solus Zos Galvus (Love his look and can’t wait for new expansion story!)
24. Favorite artifact gear? Dragoon
25. Favorite relic weapon? Elemental Lance
26. Favorite primal? Shiva
27. Favorite beast tribe? Ananta
28. Do you roleplay? Yes
29. Do you play with any friends IRL? Yes, my FC friends and girlfriend.
30. What about from Tumblr? Yes I have met several from here.
31. Do you have multiple characters? I have an Au Ra Raen alt named Rena
32. What feature would you want implemented in the future? Besieged (FFXI) or anything like it.
33. Favorite event so far? Halloween ones are pretty fun
34. Do you prefer PvP or PvE? PvE
35. Favorite emote? /spectacles
36. Favorite city music? Kugane
37. Favorite field music? Azim Steppe
38. Favorite battle music? The PVP battle music.
39. Favorite boss music? Shiva - Oblivion
40. Favorite dungeon? Brayflox's Longstop
41. Do you prefer crafting your own stuff, or do you buy it/grind for it? I like to craft my own if possible / affordable
42. Do you have a house? Where? Yes, Shirogane (But it is locked to only my GF and I for reasons) RP Shop open to public at Lavender Beds Ward 12 Apt 12
43. Favorite region? East Shroud
44. Any linkshells? Yes but mostly chat on Discord. Except my LS with my GF for private chat in parties.
45. Favorite storyline? All the story is amazing however I really like the Four Lords story going on now.
46. Tank, healer, or DPS? DPS/Healer
47. How many hours per day do you spend playing? 2ish on work days, 6-7 on weekends depending on RL things.
48. PS3 or PC?
PC
49. Chocobo companion’s name? Skill tree? Trent - Healer/DPS
50. Post a picture of your character!

21 notes
·
View notes
Text
Top 50 Linux Commands You Must Know as a Regular User...
1. ls - view contents of directory (list)
2. pwd - path of the current directory
3. cd - change directoryn
4. mkdir - make new directory
5. mv - move files / rename files
6. cp - copy files
7. rm - remove files
8. touch - create blank new file
9. rmdir - delete directory
10. cat - list content of file to terminal
11. clear - clear terminal window
12. echo - move data into a file
13. less - Read text file one screen at a time
14. man - show manual of Linux commands
15. sudo - enables you to perform tasks that require administrative or root permissions
16. top - task manager in terminal
17. tar - used to archive multiple files into a tarball
18. grep - used to searching words in specific files
19. head - view first lines of any text file
20. tail - view last lines of any text file
21. diff - compares the contents of two files line by line
22. kill - used for killing unresponsive program
23. jobs - display all current jobs along with their statuses
24. sort - is a command line utility for sorting lines of text files
25. df - info about system disk
26. du - check how much space a file or directory takes
27. zip - to compress your files into a zip archive
28. unzip - to extract the zipped files from a zip archive
29. ssh - a secure encrypted connection between two hosts over and insecure network
30. cal - shows calendar
31. apt - command line tool for interaction with packaging system
32. alias - custom shortcuts used to represent a command
33. w - current user info
34. whereis - used to locate the binary, source, manual page files
35. whatis - used to get one-line man page description
36. useradd - used to create a new user
37. passwd - used to changing password of current user
38. whoami - print current user
39. uptime - print current time when machine starts
40. free - print free disk space info
41. history - print used commands history
42. uname - print detailed information about your Linux system
43. ping - to check connectivity status to a server
44. chmod - to change permissions of files and directories
45. chown - to change ownership of files and directories
46. find - using find searches for files and directories
47. locate - used to locate a file, just like the search command in Windows
48. ifconfig - print ip address stuff
49. ip a - similar to ifconfig but shortest print
50. finger - gives you a short dump of info about a user
1 note
·
View note
Text
WEB検証サーバー構築(Mac mini[M1])
作業内容
QEMUによる仮想化環境で、WEB動作検証のためRHEL8.6の仮想サーバーを準備する
手順1:事前確認
OS確認
ターミナルから下記のコマンド操作を行う
taiyo@Mac-mini ~ % sw_vers ProductName: macOS ProductVersion: 12.6 BuildVersion: 21G115 taiyo@Mac-mini ~ % uname -v Darwin Kernel Version 21.6.0: Mon Aug 22 20:20:05 PDT 2022; root:xnu-8020.140.49~2/RELEASE_ARM64_T8101
QEMUバージョン確認
ターミナルから下記のコマンド操作を行う
taiyo@Mac-mini ~ % qemu-system-aarch64 --version QEMU emulator version 7.1.0 Copyright (c) 2003-2022 Fabrice Bellard and the QEMU Project developers
手順2:ゲストOS作成
仮想イメージファイル準備
ターミナルから下記のコマンド操作を行う
taiyo@Mac-mini ~ % cd qemu-images taiyo@Mac-mini qemu-images % mkdir 001 taiyo@Mac-mini qemu-images % cd 001 taiyo@Mac-mini 001 % qemu-img create qemu-001.img 20G Formatting 'qemu-001.img', fmt=raw size=21474836480
UEFIファイル準備
ターミナルから���記のコマンド操作を行う
taiyo@Mac-mini 001 % cp -a /opt/homebrew/share/qemu/edk2-aarch64-code.fd . taiyo@Mac-mini 001 % dd if=/dev/zero conv=sync bs=1m count=64 of=ovmf_vars.fd 64+0 records in 64+0 records out 67108864 bytes transferred in 0.031322 secs (2142547219 bytes/sec) taiyo@Mac-mini 001 % ls -l total 262176 -rw-r--r-- 1 taiyo admin 67108864 8 31 01:43 edk2-aarch64-code.fd -rw-r--r-- 1 taiyo staff 67108864 10 7 13:41 ovmf_vars.fd -rw-r--r-- 1 taiyo staff 21474836480 10 7 13:29 qemu-001.img
QEMU起動
ターミナルから下記のコマンド操作を行う
taiyo@Mac-mini 001 % /opt/homebrew/bin/qemu-system-aarch64 \ -name 001_rh8-web-test -display default,show-cursor=on \ -machine virt,highmem=off \ -cpu cortex-a76 -smp 2 -m 2G -k ja \ -device intel-hda -device hda-output \ -device virtio-gpu-pci \ -device qemu-xhci -device usb-tablet \ -device usb-kbd \ -monitor telnet::46001,server,nowait \ -net nic,model=virtio \ -net user,hostfwd=tcp:192.168.20.60:46101-:22 \ -drive if=pflash,format=raw,file=/Users/taiyo/qemu-images/001/edk2-aarch64-code.fd,readonly=on \ -drive if=pflash,format=raw,file=/Users/taiyo/qemu-images/001/ovmf_vars.fd \ -drive if=virtio,format=raw,file=/Users/taiyo/qemu-images/001/qemu-001.img \ -cdrom /Users/taiyo/Downloads/ISOs/rhel-8.6-aarch64-boot.iso \ -boot order=d &
RHEL8.6をインストール
QEMUデフォルト画面に表示されるブートメニューで『Install Red Hat Enterprise Linux 8.6』を選択する
数分後に表示されるインストーラーのメニューに従って、RHELをインストールする
ソフトウェア構成は『最小限のインストール』とする
インストールが完了した後に『システムの再起動』ボタンを押下する
手順3:サーバー初期設定
ログインする
ターミナルから下記のコマンド操作を行う
taiyo@Mac-mini 001 % ssh -p 46101 [email protected] The authenticity of host '[192.168.20.60]:46101 ([192.168.20.60]:46101)' can't be established. ED25519 key fingerprint is SHA256: This key is not known by any other names Are you sure you want to continue connecting (yes/no/[fingerprint])? yes Warning: Permanently added '[192.168.20.60]:46101' (ED25519) to the list of known hosts. [email protected]'s password: [taiyo@virt001 ~]$
sudoユーザー追加
ターミナルから下記のコマンド操作を行う
[taiyo@virt001 ~]$ su - パスワード: [root@virt001 ~]# usermod -G wheel taiyo [root@virt001 ~]# id taiyo uid=1000(taiyo) gid=1000(taiyo) groups=1000(taiyo),10(wheel) [root@virt001 ~]# cp -a /etc/sudoers /etc/sudoers.`date +%Y%m%d-%H%M%S` [root@virt001 ~]# visudo [root@virt001 ~]# diff -U 0 /etc/sudoers.20221007-174424 /etc/sudoers --- /etc/sudoers.20221007-174424 2021-12-07 20:57:12.000000000 +0900 +++ /etc/sudoers 2022-10-07 17:55:34.130000000 +0900 @@ -107,0 +108 @@ +taiyo ALL=(ALL) ALL [root@virt001 ~]# ログアウト [taiyo@virt001 ~]$
アップデートの要否を確認
ターミナルから下記のコマンド操作を行う
[taiyo@virt001 ~]$ sudo dnf check-update [sudo] taiyo のパスワード: サブスクリプション管理リポジトリーを更新しています。 メタデータの期限切れの最終確認: 0:11:51 時間前の 2022年10月07日 18時00分07秒 に実施しました。 [taiyo@virt001 ~]$
net-toolsをインストール
ターミナルから下記のコマンド操作を行う
[taiyo@virt001 ~]$ sudo dnf install net-tools -y [sudo] taiyo のパスワード: サブスクリプション管理リポジトリーを更新しています。 メタデータの期限切れの最終確認: 3:48:50 時間前の 2022年10月07日 18時00分07秒 に実施しました。 依存関係が解決しました。 [中略] 準備 : 1/1 インストール中 : net-tools-2.0-0.52.20160912git.el8.aarch64 1/1 scriptletの実行中: net-tools-2.0-0.52.20160912git.el8.aarch64 1/1 検証 : net-tools-2.0-0.52.20160912git.el8.aarch64 1/1 インストール済みの製品が更新されています。 インストール済み: net-tools-2.0-0.52.20160912git.el8.aarch64 完了しました!
ファイアウォールを確認
ターミナルから下記のコマンド操作を行う
[taiyo@virt001 ~]$ sudo firewall-cmd --state running [taiyo@virt001 ~]$ sudo firewall-cmd --list-all public (active) target: default icmp-block-inversion: no interfaces: enp0s1 sources: services: cockpit dhcpv6-client ssh ports: protocols: forward: no masquerade: no forward-ports: source-ports: icmp-blocks: rich rules:
ファイアウォールを変更
ターミナルから下記のコマンド操作を行う
[taiyo@virt001 ~]$ sudo firewall-cmd --add-service=http success [taiyo@virt001 ~]$ sudo firewall-cmd --add-service=https success [taiyo@virt001 ~]$ sudo firewall-cmd --remove-service=cockpit success [taiyo@virt001 ~]$ sudo firewall-cmd --runtime-to-permanent success [taiyo@virt001 ~]$ systemctl restart firewalld ==== AUTHENTICATING FOR org.freedesktop.systemd1.manage-units ==== 'firewalld.service'を再起動するには認証が���要です。 Authenticating as: taiyo Password: ==== AUTHENTICATION COMPLETE ==== [taiyo@virt001 ~]$ sudo firewall-cmd --list-services dhcpv6-client http https ssh
サーバー停止
ターミナルから下記のコマンド操作を行う
[taiyo@virt001 ~]$ sudo poweroff [taiyo@virt001 ~]$ Connection to 192.168.20.60 closed by remote host. Connection to 192.168.20.60 closed. taiyo@Mac-mini 001 %
手動起動スクリプトを作成
ターミナルから下記のコマンド操作を行う
taiyo@Mac-mini 001 % cd .. taiyo@Mac-mini qemu-images % vim qemu-001-start.sh taiyo@Mac-mini qemu-images % cat qemu-001-start.sh #!/bin/bash GUEST_NAME="001_rh8-web-test" MONITOR_PORT=46001 SSH_PORT=46101 HTTP_PORT=46201 num=$(ps -A | grep -e ${GUEST_NAME} | grep -v "grep" | wc -c) if [ $num -gt 0 ]; then echo "Skip: ${GUEST_NAME} process is alrady exist." else nohup /opt/homebrew/bin/qemu-system-aarch64 -name ${GUEST_NAME} -display none \ -machine virt,highmem=off -cpu cortex-a76 -smp 1 -m 768M -k ja \ -device intel-hda -device hda-output \ -device virtio-gpu-pci -device qemu-xhci \ -device usb-tablet -device usb-kbd \ -monitor telnet::${MONITOR_PORT},server,nowait \ -net nic,model=virtio \ -net user,hostfwd=tcp:192.168.20.60:${SSH_PORT}-:22,hostfwd=tcp:192.168.20.60:${HTTP_PORT}-:80,'guestfwd=tcp:10.0.2.15:80-cmd:/usr/bin/nc 192.168.20.60 '${HTTP_PORT} \ -drive if=pflash,format=raw,file=/Users/taiyo/qemu-images/001/edk2-aarch64-code.fd,readonly=on \ -drive if=pflash,format=raw,file=/Users/taiyo/qemu-images/001/ovmf_vars.fd \ -drive if=virtio,format=raw,file=/Users/taiyo/qemu-images/001/qemu-001.img \ -boot order=d > /tmp/${GUEST_NAME}.log & fi
手動停止スクリプトを作成
ターミナルから下記のコマンド操作を行う
taiyo@Mac-mini qemu-images % vim qemu-001-stop.sh taiyo@Mac-mini qemu-images % cat qemu-001-stop.sh #!/bin/bash GUEST_NAME="001_rh8-web-test" MONITOR_PORT=46001 num=$(ps -A | grep -e ${GUEST_NAME} | grep -v "grep" | wc -c) if [ $num -gt 0 ]; then (echo 'system_powerdown'; sleep 1) | nc localhost ${MONITOR_PORT} else echo "Skip: ${GUEST_NAME} process is none." fi
手順4:動作確認
サーバー起動の確認
ターミナルから下記のコマンド操作を行う
taiyo@Mac-mini qemu-images % cd .. taiyo@Mac-mini ~ % sh qemu-images/qemu-001-start.sh taiyo@Mac-mini ~ % ps -A | grep 001_rh8-web-test 23932 ttys002 0:03.38 /opt/homebrew/bin/qemu-system-aarch64 -name 001_rh8-web-test -display none -machine virt,highmem=off -cpu cortex-a76 -smp 1 -m 768M -k ja -device intel-hda -device hda-output -device virtio-gpu-pci -device qemu-xhci -device usb-tablet -device usb-kbd -monitor telnet::46001,server,nowait -net nic,model=virtio -net user,hostfwd=tcp:192.168.20.60:46101-:22, hostfwd=tcp:192.168.20.60:46201-:80,guestfwd=tcp:10.0.2.15:80-cmd:/usr/bin/nc 192.168.20.60 46201 -drive if=pflash,format=raw,file=/Users/taiyo/qemu-images/001/edk2-aarch64-code.fd,readonly=on -drive if=pflash,format=raw,file=/Users/taiyo/qemu-images/001/ovmf_vars.fd -drive if=virtio,format=raw,file=/Users/taiyo/qemu-images/001/qemu-001.img -boot order=d 23938 ttys002 0:00.00 grep 001_rh8-web-test taiyo@Mac-mini ~ % sh qemu-images/qemu-001-start.sh Skip: 001_rh8-web-test process is alrady exist.
サーバー停止の確認
ターミナルから下記のコマンド操作を行う
taiyo@Mac-mini ~ % sh qemu-images/qemu-001-stop.sh ????????QEMU 7.1.0 monitor - type 'help' for more information (qemu) system_powerdown (qemu) % taiyo@Mac-mini ~ % ps -A | grep 001_rh8-web-test 24113 ttys002 0:00.00 grep 001_rh8-web-test taiyo@Mac-mini ~ % sh qemu-images/qemu-001-stop.sh Skip: 001_rh8-web-test process is none.
0 notes
Text
How to host static website using EC2 service in AWS Cloud……?
step-1. Firstly you have to launch EC2 instance in AWS Cloud.
you can launch follow this step —https://medium.com/@shubhangi.thakur4532/how-to-launch-ec2-instance-in-aws-cloud-f8317ac930c3

step-2. Now you have to configure a webserver :
this are the steps — —
Download putty and puttygen here — https://putty.en.softonic.com/download , https://puttygen.en.softonic.com/
Go to putty and copy public ip of your ec2 instance and paste in the putty host name.

click on the ssh>auth >go to > browse button and select your private key where you download or save.

click on the open button.
you click on the accept.
now you can connect your instance.

step-3. login as: “ec2-user”.
step-4. Type “sudo su” command for login root user.
step-5. install httpd server using “yum install httpd -y”.
step-6. type “cd ..” command for go to home.
step-7. type “cd /var/www/html” go to html file path where your html store.
step-8. create new html file using “cat>RightEducation.html” command.
step-9. type as you want like Ex: <h1>Hello we are Right Education Family</h1>
step-10. press ctrl+d to save the file.
step-11. now Start httpd service using “systemctl start httpd” command.
step-12. go to your instance> click on security option >click security groups link >edit inbounded rules > than select >http > save.


step-13. copy your public ip and paste chrome browser using /filename for ex: 23.45.332.45/RightEducation.html
step-14. you see your file on the browser using public ip.
step-15. if you have already html file and if you want to host this html file you follow this steps:
a. firstly download and install WinScp.
b. Open WinScp and copy instance public ip and than paste host name> type in the user name : ec2-user > click on the advanced > go to authentication > click on the private key > select private key where you download or save.

c. click on the login.
d. drag and drop file as you want to host. ex: index.html
step-16. press ctrl+d > exit
step-17. type “sudo su” command > type “cp index.html /var/www/html” command (copy html file from ec2-user to html folder)
step-18. go to “cd /var/www/html” folder type “ls” command (now you can see here html file) index.html
step-19. copy your public ip and paste chrome browser using /filename for ex: 23.45.332.45/RightEducation.html
step-20. you see your file on the browser using public ip.

Thankyou………RE
1 note
·
View note
Text
Commands for Linux
Hi. Here is my Linux command list, that helps me. Of course it's not all commands, but i'll try to improve this list.
1. Delete \r from bash script shell
tr -d '\r' < file.sh > fileR.sh
2. Pdf to text split per pages
for f in OB1*.pdf; do for i in {1..999}; do pdftotext -f "$i" -l $l "$i" -layout $f "${f%.pdf}_$i.txt"; done; done
Pdf to Text, without spliting
for file in *.pdf; do pdftotext -layout "$file"; done
3. Show Tomcat
ps -ef | grep tomcat
4. Clean Tomcat/Catalina.out file
echo > catalina.out
5. All files into one folger
find . -type f -print0 | xargs -0 -I file mv --backup=numbered file .
6. Add sleep to shell script to each n element (don't forget regular expression)
(.*\r?\n){1000}\K
sleep 30 \n
7. Change file mod
chmod 775 articles_2007_2009R.sh
8. Change file owner
chown andrey book.json
9.Change white spaces in file names with underline
for f in *; do mv "$f" `echo $f | tr ' ' '_'`; done
10. Show all processes
htop
11. Add underline insteard white space in file name
for file in *; do mv "$file" `echo $file | tr ' ' '_'` ; done
12. Split file into multiple
split -l 1000000 amd.json amd
grep -hnr "No OCFL mapping found for" nohup.out > output.txt
split -l 20000 pages.json amd
13. Compare number of files in different folgers
find -type d -readable -exec sh -c 'printf "%s " "$1"; ls -1UA "$1" | wc -l' sh {} ';' > file.txt
find . -maxdepth 1 -mindepth 1 -type d -exec sh -c 'echo "{} : $(find "{}" -type f | wc -l)" file\(s\)' \; > file.txt
14. Copy to remote server
scp -r *.* [email protected]:/srv/solr-crossasia-itr/data/ajax-minguo/data/index/
15. Number of Files
ls | wc -l
16. Display 4 files from folger
ls -U | head -4
17. Find images with concrete size
find -type f -regex "^.*\.\(png\|jpg\|jpeg\)$" -exec identify -format "%f, %w, %h\n" {} \; | awk -F ',' '$2 > 800 && $3 > 600'
18. Nohup start file
nohup ./file.sh &
19. Kill Nohup
ps -ef |grep nohup
pkill -9 -P <parent pid>
kill -9 -PID
20. Find files with 0 byte
find -size 0 -print
21. Remove duplicates
sort -u big-csv-file.csv > duplicates-removed.csv
22. tar unzip
tar vxf archiv.tar
23. tar zip
tar cvf archiv.tar archivordner
24. tgz unzip
tar -xzvf archiv.tgz
25. tgz zip
tar cvfz archiv.tgz archivordner
26. tar.gz unzip
tar xfvz [ARCHIV].tar.gz
gzip -d archiv.tar.gz
27. tar.gz zip
gzip -9 archiv.tar
28. Convert images from *.tif to *.jpg
convert 00000010.tif -quality 80 -resize 30% test.jpg
convert *.tif -quality 80 -resize 30% -set filename:base "%[basename]" "%[filename:base].jpg"
29. Split file
lines=1600000; { read header && sed "1~$((${lines}-1)) s/^/${header}\n/g" | split -l $lines --numeric-suffixes=1 --additional-suffix=.txt - pages_ ; } < pages.csv
30. Find characters in file
find nohup.out -type f -print | xargs grep "HTTP/1.1 5"
0 notes
Text
<45gDLtc> D0WNL0AD LRY LS Robot MT4 by Ruiyuan Luo [.ZIP .RAR] MT4 MT5
[15rdBKR> D0WNL0AD LRY LS Robot MT4 by Ruiyuan Luo 1.2 [.ZIP .RAR] MT4 MT5

Click Here to D0wnl0ad => https://darknightmedia.blogspot.com/access53.php?id=41981
✤ Name : LRY LS Robot MT4
✤ Author : Ruiyuan Luo
✤ Last Version : 1.2
✤ Last Update :
✤ Best Review : 0
✤ Price : 80
Click Here to {Download Full APP Here}
https://darknightmedia.blogspot.com/access87.php?id=41981
Download Install Online Free Now LRY LS Robot MT4
Size: 35,583 KB D0wnl0ad URL >> https://darknightmedia.blogspot.com/access22.php?id=41981 - D0WNL0AD APPS Software TextSoftware LRY LS Robot MT4 by Ruiyuan Luo
Last access: 24310 user
Last server checked: 17 Minutes ago!
LRY LS Robot MT4 by Ruiyuan Luo Last Version: 1.2 LRY LS Robot MT4 by Ruiyuan Luo Last Update: LRY LS Robot MT4 by Ruiyuan Luo Last Published: 10 September 2019 LRY LS Robot MT4 by Ruiyuan Luo Best Review: 0 LRY LS Robot MT4 by Ruiyuan Luo Price: 80 LRY LS Robot MT4 by Ruiyuan Luo [APPS MT4 MT5 Program .Zip .Rar] LRY LS Robot MT4 by Ruiyuan Luo APPS d0wnl0ad LRY LS Robot MT4 by Ruiyuan Luo Install online Ruiyuan Luo by LRY LS Robot MT4 MT4 MT5 LRY LS Robot MT4 by Ruiyuan Luo vk LRY LS Robot MT4 by Ruiyuan Luo APPS d0wnl0ad free LRY LS Robot MT4 by Ruiyuan Luo d0wnl0ad Software LRY LS Robot MT4 APPS LRY LS Robot MT4 by Ruiyuan Luo amazon LRY LS Robot MT4 by Ruiyuan Luo free d0wnl0ad APPS LRY LS Robot MT4 by Ruiyuan Luo APPS free LRY LS Robot MT4 by Ruiyuan Luo APPS LRY LS Robot MT4 by Ruiyuan Luo Application d0wnl0ad LRY LS Robot MT4 by Ruiyuan Luo online Ruiyuan Luo by LRY LS Robot MT4 Application d0wnl0ad LRY LS Robot MT4 by Ruiyuan Luo Application vk LRY LS Robot MT4 by Ruiyuan Luo Program d0wnl0ad LRY LS Robot MT4 APPS - .Zip .Rar - MT4 - MT5 LRY LS Robot MT4 d0wnl0ad MT4 MT5 APPS MT4, MT5 in english language [d0wnl0ad] MT4 MT5 LRY LS Robot MT4 in format APPS [APPS] [Application] LRY LS Robot MT4 by Ruiyuan Luo d0wnl0ad synopsis of LRY LS Robot MT4 by Ruiyuan Luo review online LRY LS Robot MT4 by Ruiyuan Luo LRY LS Robot MT4 Ruiyuan Luo APPS download LRY LS Robot MT4 Ruiyuan Luo Install online Ruiyuan Luo LRY LS Robot MT4 MT4 MT5 LRY LS Robot MT4 Ruiyuan Luo vk LRY LS Robot MT4 Ruiyuan Luo amazon LRY LS Robot MT4 Ruiyuan Luo free download APPS LRY LS Robot MT4 Ruiyuan Luo APPS free LRY LS Robot MT4 APPS Ruiyuan Luo LRY LS Robot MT4 Ruiyuan Luo MT4 MT5 download LRY LS Robot MT4 Ruiyuan Luo online Ruiyuan Luo LRY LS Robot MT4 MT4 MT5 download LRY LS Robot MT4 Ruiyuan Luo MT4 MT5 vk LRY LS Robot MT4 Ruiyuan Luo MT5 download LRY LS Robot MT4 APPS - .Zip .Rar - MT4 - MT5 LRY LS Robot MT4 download Software APPS Application, Software in english language [download] Software LRY LS Robot MT4 in format APPS LRY LS Robot MT4 download free of MT4 MT5 in format Ruiyuan Luo LRY LS Robot MT4 MT4 MT5 vk LRY LS Robot MT4 Ruiyuan Luo APPS LRY LS Robot MT4 Ruiyuan Luo MT4 LRY LS Robot MT4 Ruiyuan Luo ZIP LRY LS Robot MT4 Ruiyuan Luo RAR LRY LS Robot MT4 Ruiyuan Luo MT4 LRY LS Robot MT4 Ruiyuan Luo iSoftwares LRY LS Robot MT4 Ruiyuan Luo .Zip .Rar LRY LS Robot MT4 Ruiyuan Luo Rar LRY LS Robot MT4 Ruiyuan Luo Zip LRY LS Robot MT4 Ruiyuan Luo Programpocket LRY LS Robot MT4 Ruiyuan Luo Program Online LRY LS Robot MT4 Ruiyuan Luo AudioMT4 MT5 Online LRY LS Robot MT4 Ruiyuan Luo Review Online LRY LS Robot MT4 Ruiyuan Luo Install Online LRY LS Robot MT4 Ruiyuan Luo Download Online
D0WNL0AD APPS MT4 MT5 TextMT4 MT5 LRY LS Robot MT4 by Ruiyuan Luo
D0wnl0ad URL => https://darknightmedia.blogspot.com/access64.php?id=41981
0 notes
Text
[dEdUqao] D0WNL0AD Skillful LS by Aleh Rabtsau [.ZIP .RAR] MT4 MT5
'W1DU5VI> D0WNL0AD Skillful LS by Aleh Rabtsau 1.0 [ .ZIP .RAR] MT4 MT5 PROGRAM

Download Install Online Free Now Skillful LS
Download Full Software Here
https://chillwebmedia.blogspot.com/access20.php?id=38685
Size: 69,190 KB D0wnl0ad URL >> https://chillwebmedia.blogspot.com/access19.php?id=38685 - D0WNL0AD APPS Software TextSoftware Skillful LS by Aleh Rabtsau
Last access: 30369 user
Last server checked: 17 Minutes ago!
Skillful LS by Aleh Rabtsau Last Version: 1.0
Skillful LS by Aleh Rabtsau Last Update:
Skillful LS by Aleh Rabtsau Last Published: 15 May 2019
Skillful LS by Aleh Rabtsau Best Review: 0
Skillful LS by Aleh Rabtsau Price: 30
Skillful LS by Aleh Rabtsau [APPS Software Application Program .Zip .Rar]
Skillful LS by Aleh Rabtsau APPS d0wnl0ad
Skillful LS by Aleh Rabtsau Install online
Aleh Rabtsau by Skillful LS Application
Skillful LS by Aleh Rabtsau vk
Skillful LS by Aleh Rabtsau APPS d0wnl0ad free
Skillful LS by Aleh Rabtsau d0wnl0ad Software
Skillful LS APPS
Skillful LS by Aleh Rabtsau amazon
Skillful LS by Aleh Rabtsau free d0wnl0ad APPS
Skillful LS by Aleh Rabtsau APPS free
Skillful LS by Aleh Rabtsau APPS
Skillful LS by Aleh Rabtsau Application d0wnl0ad
Skillful LS by Aleh Rabtsau online
Aleh Rabtsau by Skillful LS Application d0wnl0ad
Skillful LS by Aleh Rabtsau Application vk
Skillful LS by Aleh Rabtsau Program
d0wnl0ad Skillful LS APPS - .Zip .Rar - Application - Program
Skillful LS d0wnl0ad Software APPS Application, Software in english language
[d0wnl0ad] Software Skillful LS in format APPS
[APPS] [Application] Skillful LS by Aleh Rabtsau d0wnl0ad
synopsis of Skillful LS by Aleh Rabtsau
review online Skillful LS by Aleh Rabtsau
Skillful LS Aleh Rabtsau APPS download
Skillful LS Aleh Rabtsau Install online
Aleh Rabtsau Skillful LS Application
Skillful LS Aleh Rabtsau vk
Skillful LS Aleh Rabtsau amazon
Skillful LS Aleh Rabtsau free download APPS
Skillful LS Aleh Rabtsau APPS free
Skillful LS APPS Aleh Rabtsau
Skillful LS Aleh Rabtsau Application download
Skillful LS Aleh Rabtsau online
Aleh Rabtsau Skillful LS Application download
Skillful LS Aleh Rabtsau Application vk
Skillful LS Aleh Rabtsau Program
download Skillful LS APPS - .Zip .Rar - Application - Program
Skillful LS download Software APPS Application, Software in english language
[download] Software Skillful LS in format APPS
Skillful LS download free of Software in format
Aleh Rabtsau Skillful LS Application vk
Skillful LS Aleh Rabtsau APPS
Skillful LS Aleh Rabtsau Application
Skillful LS Aleh Rabtsau EXE
Skillful LS Aleh Rabtsau ZIP
Skillful LS Aleh Rabtsau RAR
Skillful LS Aleh Rabtsau Software
Skillful LS Aleh Rabtsau iSoftwares
Skillful LS Aleh Rabtsau .Zip .Rar
Skillful LS Aleh Rabtsau Rar
Skillful LS Aleh Rabtsau Zip
Skillful LS Aleh Rabtsau Programpocket
Skillful LS Aleh Rabtsau Program Online
Skillful LS Aleh Rabtsau AudioSoftware Online
Skillful LS Aleh Rabtsau Review Online
Skillful LS Aleh Rabtsau Install Online
Skillful LS Aleh Rabtsau Download Online
D0WNL0AD APPS Software TextSoftware Skillful LS by Aleh Rabtsau
D0wnl0ad URL => https://chillwebmedia.blogspot.com/access95.php?id=38685
0 notes
Text
Spartan Rc Driver Download

If your USB device does not work the most likely problem is missing or outdated drivers. When you plug the device into your USB, Windows will look for the associated driver, if it cannot find this driver then you will be prompted to insert the driver disc that came with your device. Examples of usb devices. It's asking for a DVD driver when using a USB device. That's like your car throwing a CEL for the carburetor not working when you're using fuel injection. This issue is caused because the installer media doesn't have a driver to install through a USB 3.0 port. A UMDF-based client driver is implemented as an in-process COM server (DLL), and C is the preferred language for writing a client driver for a USB device. Typically, the client driver implements several interfaces exposed by the framework. About On-board USB Driver: Windows operating systems automatically apply a generic driver that allows users to transfer files using the USB (Universal Serial Bus) port; however, installing the.
Syscan network & wireless cards driver download for windows. Click on a category below to download manuals, software updates and other documents for your TEAC product.
Download sweex mobile phones & portable devices driver updater. Free Download n/a The Sweex Bluetooth USB adapter makes it easy to create a wireless link between a desktop PC and Bluetooth devices such as a Bluetooth phone, keyboard, mouse, printer or PDA. Download Drivers, download Input Devices, download Sweex, wide range of software, drivers and games to download for free.
Spartan Rc Driver Download Pc
Search by Model Name
Software & Manual Downloads Stock & availability Warranty, registration & repairs Sales & marketing Contact Support. ©2004-2021 Spartan RC - T&Cs of access. Support:: Downloads. Click on a category below to download manuals, software updates and other documents for your TEAC product. Firmware updates for Suunto Spartan bring new amazing features, performance enhancements and bug fixes to enrich and improve the experience with your watch. Update your Suunto Spartan software regularly for the best experience.

A - C
A-H01::AD-500::AD-800::AD-850::AG-790::AG-D2000::AG-H300mkIII::AG-H380::AG-H600NT::AI-1000::AI-101DA::AI-2000::AI-3000::AI-301DA::AI-501DA::AI-503::AX-501::CD-1000::CD-2000::CD-3000::CD-H750::CD-P1260::CD-P650-B::CD-P800NT-B::CD-RW880::CD-RW890::CD-RW890MKII-B::CD-X10i::CR-H101::CR-H227i::CR-H238i::CR-H260i::CR-H700::
D - F
G - I
GF-350::GF-450K7::GF-550USB::GF-680::GR-7i::HA-501::HA-P5::HA-P50::HA-P50SE-B/R::HA-P90SD::HD-1::HR-X101-SC/BC::
J - L
LP-P1000::LP-R400::LP-R450::LP-R550USB::LP-R660USB-PB::LS-301::LS-H255::LS-H265::LS-M100::LS-WH01::
M - O
MC-D800::MC-DV600::MC-DX32i::MC-DX80i::MC-DX90i::NP-H750::NT-503::
P - S
PD-301::PD-501HR::PD-D2610::PD-D2610mkII::PD-H01::PD-H300mkIII::PD-H600::R-4iNT::S-300HR::S-300NEO::SL-D800BT::SL-D930::SP-X2i::SR-100i::SR-80i::SR-L230i::SR-L250i::SR-L280i::SR-L70i::SR-LUXi::SR-LX5i::

T - V
T-R670::T-R680RS::TEAC Hi-Res Editor::TEAC HR Audio Player::TN-100::TN-200::TN-300::TN-400S::TN-550::TN-570::UD-301::UD-501::UD-503::UD-H01::
W - Z
Search by Category
::
Amplifiers, Receivers
A-H01::AG-790::AG-D2000::AG-H380::AG-H600NT::AI-101DA::AI-301DA::AI-501DA::AI-503::AX-501::CR-H101::CR-H101DAB::CR-H238i::CR-H260i::CR-H500NT::CR-H700::DR-H338i::NP-H750::
Bluetooth®
AI-101DA::AI-301DA::CR-H101::CR-H101DAB::CR-H260i::HR-S101-BB::HR-X101-SC/BC::LP-P1000::MC-D800::NT-503::SL-D800BT::SL-D930::
Cassette
AD-800::AD-850::AD-RW900-B::LP-R550USB::LP-R660USB-PB::W-890R::W-890RmkII-B::
CD Players
AD-800::AD-850::AD-RW900-B::CD-H750::CD-P1260::CD-P650-B::CD-P800NT-B::CD-RW890::CR-H101::CR-H101DAB::CR-H260i::CR-H700::LP-P1000::LP-R550USB::MC-D800::PD-301::PD-501HR::PD-D2610::PD-D2610mkII::PD-H01::PD-H600::SL-D800BT::SL-D920::SL-D930::SR-L280i::
CD Recorders
AD-RW900-B::CD-RW890::CD-RW890MKII-B::LP-R550USB::LP-R660USB-PB::
Compact Audio
CR-H260i::HR-S101-BB::HR-X101-SC/BC::SL-D800BT::SL-D920::SL-D930::SR-80i::SR-L280i::SR-LUXi::
D/A Converters
A-H01::AI-101DA::AI-301DA::AI-501DA::AI-503::CR-H101::CR-H101DAB::DS-H01::HA-P5::HA-P50::HA-P50SE-B/R::HA-P90SD::HR-X101-SC/BC::NP-H750::NT-503::NT-503DAB::TEAC HR Audio Player::UD-301::UD-501::UD-503::UD-H01::
Distinction Series
AI-1000::AI-2000::AI-3000::CD-1000::CD-2000::CD-3000::
Full-Size Component
AD-800::AD-RW900-B::AG-790::AG-D2000::CD-P1260::CD-P650-B::CD-P800NT-B::CD-RW890::PD-D2610::PD-D2610mkII::T-R670::T-R680RS::W-890R::W-890RmkII-B::
Headphone Amplifiers
HA-501::HA-P5::HA-P50::HA-P50SE-B/R::HA-P90SD::UD-301::UD-501::UD-503::UD-H01::
iPod-related Products
CD-H750::CD-P650-B::CR-H260i::CR-H700::DS-H01::HA-P5::HA-P50::HA-P50SE-B/R::HA-P90SD::MC-DV600::MC-DX90i::NP-H750::R-4iNT::SR-100i::SR-80i::SR-L280i::SR-L70i::SR-LUXi::SR-LX5i::TEAC HR Audio Player for iOS/Android::
Network Audio
AI-503::CD-P800NT-B::CR-H260i::CR-H700::NP-H750::NT-503::NT-503DAB::
PC Audio
A-H01::AI-101DA::AI-301DA::AI-501DA::AI-503::CR-H101::CR-H101DAB::HA-P5::HA-P50::HA-P50SE-B/R::HA-P90SD::HR-S101-BB::HR-X101-SC/BC::NT-503::NT-503DAB::TEAC Hi-Res Editor::TEAC HR Audio Player::TEAC HR Audio Player for iOS/Android::UD-301::UD-501::UD-503::UD-H01::
Reference Series
A-H01::AG-H380::AG-H600NT::AI-101DA::AI-301DA::AI-501DA::AI-503::AX-501::CD-H750::CR-H101::CR-H238i::CR-H260i::CR-H500NT::CR-H700::DR-H338i::DS-H01::HA-501::HR-S101-BB::NP-H750::NT-503::NT-503DAB::PD-301::PD-501HR::PD-H01::PD-H600::UD-301::UD-501::UD-503::UD-H01::
Speakers/Headphones
CT-H02::LS-301::LS-H255::LS-H265::LS-H70A::LS-WH01::S-300HR::S-300NEO::
Tuners
CR-H101::HR-X101-SC/BC::LP-P1000::LP-R550USB::MC-D800::PD-301::SL-D800BT::SL-D930::
Turntable System
GF-550USB::GF-680::LP-P1000::LP-R400::LP-R450::LP-R550USB::LP-R660USB-PB::MC-D800::TN-100::TN-200::TN-300::TN-350::TN-400S::TN-550::TN-570::
25,408 drivers total Last updated: Feb 15th 2021, 16:53 GMT RSS Feed
sort by:
ASRock Z490 AQUA Realtek Audio Driver 6.0.9030.1 for Windows 10 64-bit
13 downloads
Windows 10 64 bit
Feb 15th 2021, 16:53 GMT
ASRock Z490 Taichi Realtek Audio Driver 6.0.9030.1 for Windows 10 64-bit
1 download
Windows 10 64 bit
Feb 15th 2021, 16:49 GMT
ASRock Z490 Extreme4 Realtek Audio Driver 6.0.9030.1 for Windows 10 64-bit
0 downloads
Windows 10 64 bit
Feb 15th 2021, 16:46 GMT
ASRock Z490 Steel Legend Realtek Audio Driver 6.0.9030.1 for Windows 10 64-bit
1 download
Windows 10 64 bit
Feb 15th 2021, 16:44 GMT

ASRock Z490 PG Velocita Realtek Audio Driver 6.0.9030.1 for Windows 10 64-bit
0 downloads
Windows 10 64 bit
Feb 15th 2021, 16:39 GMT
ASRock Z490 Phantom Gaming-ITX/TB3 Realtek Audio Driver 6.0.9030.1 for Windows 10 64-bit
0 downloads
Windows 10 64 bit
Feb 15th 2021, 16:32 GMT
ASRock Z490M Pro4 Realtek Audio Driver 6.0.9030.1 for Windows 10 64-bit
1 download
Windows 10 64 bit
Feb 15th 2021, 16:31 GMT
ASRock B560M-ITX/ac Realtek Audio Driver 6.0.9075.1 for Windows 10 64-bit
1 download
Windows 10 64 bit
Feb 15th 2021, 16:21 GMT
ASRock B560M-HDV Realtek Audio Driver 6.0.9075.1 for Windows 10 64-bit
0 downloads
Windows 10 64 bit
Feb 15th 2021, 16:16 GMT
ASRock B560M Pro4 Realtek Audio Driver 6.0.9079.1 for Windows 10 64-bit
2 downloads
Windows 10 64 bit
Feb 15th 2021, 15:36 GMT
ASRock B560 Steel Legend Realtek Audio Driver 6.0.9079.1 for Windows 10 64-bit
2 downloads
Windows 10 64 bit
Feb 15th 2021, 15:27 GMT
ASRock B560M Steel Legend Realtek Audio Driver 6.0.9079.1 for Windows 10 64-bit
0 downloads
Windows 10 64 bit
Feb 15th 2021, 14:50 GMT
ASRock H570 Phantom Gaming 4 Realtek Audio Driver 6.0.9075.1 for Windows 10 64-bit
38 downloads
Windows 10 64 bit
Feb 13th 2021, 17:27 GMT
ASRock H570 Steel Legend Realtek Audio Driver 6.0.9079.1 for Windows 10 64-bit
12 downloads
Windows 10 64 bit
Feb 13th 2021, 17:26 GMT
ASRock H570M Pro4 Realtek Audio Driver 6.0.9079.1 for Windows 10 64-bit
19 downloads
Windows 10 64 bit
Feb 13th 2021, 17:22 GMT
ASRock Z590 Extreme Realtek Audio Driver 6.0.9079.1 for Windows 10 64-bit
8 downloads
Windows 10 64 bit
Feb 13th 2021, 16:59 GMT
ASRock Z590 Steel Legend WiFi 6E Realtek Audio Driver 6.0.9079.1 for Windows 10 64-bit
3 downloads
Windows 10 64 bit
Feb 13th 2021, 16:54 GMT
ASRock Z590 Pro4 Realtek Audio Driver 6.0.9079.1 for Windows 10 64-bit
9 downloads
Windows 10 64 bit
Feb 13th 2021, 14:15 GMT
ASRock Z590 PG Velocita Realtek Audio Driver 6.0.9079.1 for Windows 10 64-bit
3 downloads
Windows 10 64 bit
Feb 13th 2021, 13:21 GMT
ASRock Z590 Phantom Gaming 4/ac Realtek Audio Driver 6.0.9079.1 for Windows 10 64-bit
1 download
Windows 10 64 bit
Feb 13th 2021, 13:11 GMT
ASRock Z590 Phantom Gaming 4 Realtek Audio Driver 6.0.9079.1 for Windows 10 64-bit
3 downloads
Windows 10 64 bit
Feb 13th 2021, 13:10 GMT
ASRock Z590M Pro4 Realtek Audio Driver 6.0.9079.1 for Windows 10 64-bit
2 downloads

Windows 10 64 bit
Feb 13th 2021, 12:57 GMT
Gigabyte B450M GAMING (rev. 1.x) Realtek Audio Driver 6.0.1.8454 for Windows 7
192 downloads
Windows 7 64 bit, Windows 7
Feb 2nd 2021, 09:04 GMT
Gigabyte B450M GAMING (rev. 1.x) Realtek Audio Driver 6.0.8945.1 for Windows 10 64-bit
141 downloads
Windows 10 64 bit
Feb 2nd 2021, 08:55 GMT
Gigabyte B450 AORUS ELITE (rev. 1.x) Realtek Audio Driver 6.0.1.8454
46 downloads
Windows 10 64 bit, Windows 10, Windows 8.1 64 bit, Windows 8.1, Windows 7 64 bit, Windows 7
Feb 2nd 2021, 01:05 GMT
Gigabyte B450 AORUS ELITE (rev. 1.x) Realtek Audio Driver 6.0.1.8454 for Windows 7
29 downloads
Windows 7 64 bit, Windows 7
Feb 2nd 2021, 00:33 GMT
Gigabyte B450 AORUS ELITE (rev. 1.x) Realtek Audio Driver 6.0.8945.1 for Windows 10 64-bit
31 downloads
Windows 10 64 bit
Feb 2nd 2021, 00:15 GMT
Gigabyte B450 AORUS PRO WIFI (rev. 1.x) Realtek Audio Driver 6.0.1.8454
48 downloads
Windows 10 64 bit, Windows 10, Windows 8.1 64 bit, Windows 8.1, Windows 7 64 bit, Windows 7
Feb 1st 2021, 00:47 GMT
Gigabyte B450 AORUS PRO WIFI (rev. 1.x) Realtek Audio Driver 6.0.1.8454 for Windows 7
26 downloads
Windows 7 64 bit, Windows 7
Feb 1st 2021, 00:33 GMT
Gigabyte B450 AORUS PRO WIFI (rev. 1.x) Realtek Audio Driver 6.0.8945.1 for Windows 10 64-bit
11 downloads
Windows 10 64 bit
Feb 1st 2021, 00:13 GMT
Spartan Rc Driver Download Pc
Want more? Browse through the pages:
0 notes
Text
How to Upgrade Dataverse version 5.2 to Dataverse 5.3
How to Upgrade Dataverse version 5.2 to Dataverse 5.3 Date: 17-07-2021 Payara 5.2020.6 or higher version is supporting to Dataverse 5.3. Check the current Payara version by clicking the About button on Payara admin portal with login details.

Current version is Payara 5.2020.2 so we need to upgrade it to Payara 5.2020.6 - Login to the server via SSH terminal and Download Payara 5.2020.6 and make it a new directory as /usr/local/Payara5-2020-6 # wget https://s3-eu-west-1.amazonaws.com/payara.fish/Payara+Downloads/5.2020.6/payara-5.2020.6.zip # unzip payara-5.2020.6.zip # mv payara5 payara5-20202-6 # mv payara5-20202-6 /usr/local - Stop the running domain by using the below command. # /usr/local/payara/glassfish/bin/asadmin stop-domain Note: /usr/local/payara - Payara installed the current path in the server. - Run asadmin backup-domain from the existing Payara Server Community installation by using below command. # /usr/local/payara/glassfish/bin/asadmin backup-domain Once backup completed the file stored in the backup directory. To check by using the below command. # ls -al /usr/local/payara/glassfish/domains/domain1/backups/

- Once the domain has been backed up, restore the domain to the newly downloaded Payara Server Community installation by running asadmin restore-domain from the bin directory of the new Payara Server Community installation by using below command. # /usr/local/payara5-2020-6/glassfish/bin/asadmin restore-domain --filename /usr/local/payara/glassfish/domains/domain1/backups/domain1_2021_07_15_v00001.zip --long domain1

- Start the domain by using the below command. # /usr/local/payara5-2020-6/glassfish/bin/asadmin start-domain - Start the Payara new service by using the below command. # /usr/local/payara5-2020-6/glassfish/bin/asadmin create-service domain1 Note: You can use below commands to stop and start the payara service. /etc/init.d/payara_domain1 start (or) service payara_domain1 start /etc/init.d/payara_domain1 stop (or) service payara_domain1 stop /etc/init.d/payara_domain1 restart (or) service payara_domain1 restart Payara Logs file location: /usr/local/payara5-2020-6/glassfish/domains/domain1/logs/server.log

- Check the upgraded Payara version by clicking the About button on Payara admin portal with above login details. - Undeploy the previous version. # /usr/local/payara5-2020-6/bin/asadmin list-applications # /usr/local/payara5-2020-6/bin/asadmin undeploy dataverse-5.2 - Update your database connection. # /usr/local/payara5-2020-6/glassfish/bin/asadmin create-system-properties "dataverse.db.user=dvnapp" # /usr/local/payara5-2020-6/glassfish/bin/asadmin create-system-properties "dataverse.db.host=localhost" # /usr/local/payara5-2020-6/glassfish/bin/asadmin create-system-properties "dataverse.db.port=5432" # /usr/local/payara5-2020-6/glassfish/bin/asadmin create-system-properties "dataverse.db.name=dvndb" Note: We logged into postgres on the server and got the db and username details. - Verify that the __TimerPool jdbc-connection-pool is using the H2 database in domain.xml file, as follows (if you have the old Derby version from Glassfish 4, replace it). ====== ====== - Delete the DB pool. # /usr/local/payara5-2020-6/bin/asadmin delete-jdbc-connection-pool --cascade=true dvnDbPool - Stop payara, remove the generated and ejbtimer database directories and then restart payara. # service payara_domain1 stop # /usr/local/payara5-2020-6/glassfish/domains/domain1/generated # service payara_domain1 start - Deploy the new version. # /usr/local/payara5-2020-6/bin/asadmin deploy dataverse-5.3 - Once deployed successfully you will restart payara. # service payara_domain1 stop # service payara_domain1 start - Verify the upgraded Dataverse version. # /usr/local/payara5-2020-6/bin/asadmin list-applications

Thank you! Read the full article
0 notes
Text
PukiWiki構築(Mac mini[M1])
作業内容
作業メモを記録するため、ローカルでPukiWikiを準備する
前回作業の続き
手順1:事前確認
OS確認
ターミナルから下記のコマンド操作を行う
taiyo@Mac-mini ~ % sw_vers ProductName: macOS ProductVersion: 11.5.1 BuildVersion: 20G80 taiyo@Mac-mini ~ % uname -v Darwin Kernel Version 20.6.0: Wed Jun 23 00:26:27 PDT 2021; root:xnu-7195.141.2~5/RELEASE_ARM64_T8101
Apache確認
ターミナルから下記のコマンド操作を行う
taiyo@Mac-mini ~ % apachectl -v Server version: Apache/2.4.46 (Unix) Server built: Jun 17 2021 15:56:05 taiyo@Mac-mini ~ % sudo apachectl restart Password: taiyo@Mac-mini ~ % sudo launchctl list | grep http 1783 0 org.apache.httpd taiyo@Mac-mini ~ % sudo apachectl stop
PHP確認
ターミナルから下記のコマンド操作を行う
taiyo@Mac-mini ~ % php -v WARNING: PHP is not recommended PHP is included in macOS for compatibility with legacy software. Future versions of macOS will not include PHP. PHP 7.3.24-(to be removed in future macOS) (cli) (built: Jun 17 2021 21:41:13) ( NTS ) Copyright (c) 1997-2018 The PHP Group Zend Engine v3.3.24, Copyright (c) 1998-2018 Zend Technologies
SSH確認
ターミナルから下記のコマンド操作を行う
taiyo@Mac-mini ~ % ssh -V OpenSSH_8.1p1, LibreSSL 2.7.3
ホスト名確認
ターミナルから下記のコマンド操作を行う
taiyo@Mac-mini ~ % hostname Mac-mini.local taiyo@Mac-mini ~ % ping -c 3 Mac-mini.local PING mac-mini.local (127.0.0.1): 56 data bytes 64 bytes from 127.0.0.1: icmp_seq=0 ttl=64 time=0.061 ms 64 bytes from 127.0.0.1: icmp_seq=1 ttl=64 time=0.159 ms 64 bytes from 127.0.0.1: icmp_seq=2 ttl=64 time=0.154 ms --- mac-mini.local ping statistics --- 3 packets transmitted, 3 packets received, 0.0% packet loss round-trip min/avg/max/stddev = 0.061/0.125/0.159/0.045 ms
手順2:Apache、PHP初期設定
/etc/php.ini作成
ターミナルから下記のコマンド操作を行う
taiyo@Mac-mini ~ % ls -l /etc/php.ini.default -r--r--r-- 1 root wheel 71554 1 1 2020 /etc/php.ini.default taiyo@Mac-mini ~ % sudo cp /etc/php.ini.default /etc/php.ini Password: taiyo@Mac-mini ~ % sudo chmod 644 /etc/php.ini
httpd.conf変更
ターミナルから下記のコマンド操作を行う
taiyo@Mac-mini ~ % sudo cp -a /etc/apache2/httpd.conf /etc/apache2/httpd.conf.`date +%Y%m%d%H%M%S` taiyo@Mac-mini ~ % sudo vim /etc/apache2/httpd.conf taiyo@Mac-mini ~ % diff /etc/apache2/httpd.conf.20210728024851 /etc/apache2/httpd.conf
113c113 < #LoadModule include_module libexec/apache2/mod_include.so --- > LoadModule include_module libexec/apache2/mod_include.so 184c184 < #LoadModule userdir_module libexec/apache2/mod_userdir.so --- > LoadModule userdir_module libexec/apache2/mod_userdir.so 186,188c186,188 < #LoadModule rewrite_module libexec/apache2/mod_rewrite.so < #LoadModule php7_module libexec/apache2/libphp7.so < #LoadModule perl_module libexec/apache2/mod_perl.so --- > LoadModule rewrite_module libexec/apache2/mod_rewrite.so > LoadModule php7_module libexec/apache2/libphp7.so > LoadModule perl_module libexec/apache2/mod_perl.so 200,201c200,201 < User _www < Group _www --- > User taiyo > Group staff 231c231 < #ServerName www.example.com:80 --- > ServerName Mac-mini.local:80 521c521 < #Include /private/etc/apache2/extra/httpd-userdir.conf --- > Include /private/etc/apache2/extra/httpd-userdir.conf
ユーザーホームのディレクトリ設定
ターミナルから下記のコマンド操作を行う
taiyo@Mac-mini ~ % mkdir ~/Sites taiyo@Mac-mini ~ % cp /Library/WebServer/Documents/index.html.en ~/Sites/index.html taiyo@Mac-mini ~ % sudo cp -a /etc/apache2/extra/httpd-userdir.conf /etc/apache2/extra/httpd-userdir.conf.`date +%Y%m%d%H%M%S` taiyo@Mac-mini ~ % sudo vim /etc/apache2/extra/httpd-userdir.conf taiyo@Mac-mini ~ % diff /etc/apache2/extra/httpd-userdir.conf.20210728103732 /etc/apache2/extra/httpd-userdir.conf
19a20,25 > > <Directory "/Users/*/Sites"> > Options All > AllowOverride All > Require all granted > </Directory>
Apache再起動
ターミナルから下記のコマンド操作を行う
taiyo@Mac-mini ~ % sudo apachectl restart taiyo@Mac-mini ~ % sudo launchctl list | grep http 2436 0 org.apache.httpd taiyo@Mac-mini ~ % sudo apachectl configtest Syntax OK
Webアクセス確認
Webブラウザから"http://localhost/~taiyo"にアクセスして、~/Sites/index.htmlの内容が表示されることを確認する
手順3:SSH接続準備
/.ssh/config作成
ターミナルから下記のコマンド操作を行う
taiyo@Mac-mini ~ % vim ~/.ssh/config taiyo@Mac-mini ~ % cat ~/.ssh/config Host saksv01 HostName xxxx.sakura.ne.jp User sakura_user
公開鍵作成
ターミナルから下記のコマンド操作を行う
taiyo@Mac-mini ~ % cd ~/.ssh taiyo@Mac-mini .ssh % ssh-keygen -t rsa -b 4096 Generating public/private rsa key pair. Enter file in which to save the key (/Users/taiyo/.ssh/id_rsa): Enter passphrase (empty for no passphrase): Enter same passphrase again: Your identification has been saved in /Users/taiyo/.ssh/id_rsa. Your public key has been saved in /Users/taiyo/.ssh/id_rsa.pub. The key fingerprint is: [以下略]
公開鍵配置
ターミナルから下記のコマンド操作を行う
taiyo@Mac-mini .ssh % ssh-copy-id -i ~/.ssh/id_rsa.pub saksv01 /usr/bin/ssh-copy-id: INFO: Source of key(s) to be installed: "/Users/taiyo/.ssh/id_rsa.pub" /usr/bin/ssh-copy-id: INFO: attempting to log in with the new key(s), to filter out any that are already installed /usr/bin/ssh-copy-id: INFO: 1 key(s) remain to be installed -- if you are prompted now it is to install the new keys [email protected]'s password: Number of key(s) added: 1 Now try logging into the machine, with: "ssh 'saksv01'" and check to make sure that only the key(s) you wanted were added.
手順4:PukiWikiファイル配置
GitリポジトリからPukiWikiファイルを取得
ターミナルから下記のコマンド操作を行う
taiyo@Mac-mini .ssh % cd ~/Sites taiyo@Mac-mini Sites % rm index.html taiyo@Mac-mini Sites % git clone saksv01:repos/Sites.git ~/Sites Cloning into '/Users/taiyo/Sites'... remote: Enumerating objects: 512, done. remote: Counting objects: 100% (512/512), done. remote: Compressing objects: 100% (451/451), done. remote: Total 512 (delta 158), reused 267 (delta 20), pack-reused 0 Receiving objects: 100% (512/512), 717.51 KiB | 234.00 KiB/s, done. Resolving deltas: 100% (158/158), done.
PukiWikiアクセス確認
Webブラウザから"http://localhost/~taiyo/WkWiki/"にアクセスして、PukiWikiの内容が表示されることを確認する
0 notes
Text
Begin Ubuntu Server 20.04 LTS on Windows 10 Pro’s Hyper-V
Date: March 2, 2021
This document will outline how to install and configure Ubuntu 20.04 LTS on Windows 10 Pro’s Hyper-V. Including the basic steps to setup file sharing for OneDrive from the host computer to the virtual container running Linux.
Enable Hyper-V through Settings
1. Right Click the Windows Start button and select Apps and Features
2. Under Related Settings, select Programs and Features
3. Click Turn Windows features on or off
4. <screenshot>
5. Select Hyper-V and click OK
When installation has been completed, continue with restarting the computer
Download Ubuntu Server 20.04 LTS ISO image
1. Download the ISO image from the following website
a. https://ubuntu.com/download/server
2. Select Option 2, manual server install
3. Click download Ubuntu Server 20.04 LTS
Setup Ubuntu with basic packages
1. Launch Hyper-V through the Search bar
2. Select the Machine from the list on the left
3. Click New -> Virtual Machine under the Actions panel on the right
4. Click Next on the Wizard intro
5. Enter “Ubuntu Server 20.04 LTS” as the Name, click Next
6. Select the Generation 2 radio option, click Next
7. Enter 2048 MB as the Startup Memory, click Next
8. Keep it as Not Connected for the Connection, click Next
9. Enter 100 GB as the Size, leave the rest as default, click Next
10. Select Install an operating system from a bootable image file and locate the Ubuntu Server 20.04 LTS ISO, click Next
11. Click Finish
12. Under the Virtual Machines list, select the new Ubuntu Server 20.04 LTS VM
13. Under the Actions panel on the right, click Virtual Switch Manager
14. Select the External radio option, click Ceate Virtual Switch
15. Enter “External Virtual Switch” as the name, leave the rest as default, click OK
16. Click Yes when prompted regarding disrupting Network Connectivity
17. Under the right panel titled “Ubuntu Server 20.04 LTS”, click Settings
18. Under the Hardware panel on the left, click Network
19. Change the Virtual Switch to the External Virtual Switch that was just created
20. Under the Hardware panel on the left, click Security
21. Change the Template to Microsoft UEFI Certificate Authority
22. Click OK on the Settings window
23. Click Start under the right panel titled “Ubuntu Server 20.04 LTS”
24. Double click the thumbnail under the “Ubuntu Server 20.04 LTS” panel in the middle
25. With the “Install Ubuntu Server” option selected, press Enter
26. Keep English selected, and press Enter
27. Keep the default settings for the keyboard layout, press Enter on Done
28. Use the up arrow to select the ETH0, and press Enter to change to IPV4
29. Change IPV4 Method to Manual
30. Use 192.168.0.0.0/24 for the Subnet
31. Use 192.168.0.12 as the IP
32. Use 192.168.0.1 as the Gateway
33. Use 8.8.8.8, 8.8.4.4 as the Nameservers
34. Leave Search domains empty
35. Press Enter on Save
36. Press Enter on Done
37. Leave the Proxy address empty, press Enter on Done
38. Leave the Mirror as default, press Enter on Done
39. Leave Use entire disk, press Enter on Done
40. Review the Storage Configuration and press Enter on Done
41. Select Continue on Confirm destructive action (This is due to using the whole disk)
42. Enter your Name
43. Use “ubuntu-server-2004-lts” as the Server Name
44. Pick a Username such as “nate”
45. Complete and confirm a password
46. Press Enter on Done
47. Press Space on Install SSH Server
48. Press Enter on Done
49. Skip over the Featured Server Snaps, and press Enter on Done
50. After the install is complete, Reboot now
Setup a shared mount with CIFS
1. Right click the OneDrive directory on the local Windows machine. Go to properties.
2. Click Sharing
3. Select Share
4. Choose at least your own account in the list
5. Make the connection a Private Network when it prompts you
6. Open Hyper-V and double click the screen window to launch a visual terminal with the local instance
7. Run the following in the terminal
8. sudo apt update
9. sudo apt install cifs-utils
10. mkdir ~/OneDrive
11. Add the following to the /etc/fstab file
12. //WIN_ IP/Users/nate/OneDrive /home/<ubuntu_username>/OneDrive cifs username=<windows_username>,password=<windows_live_password>,file_mode=0777,dir_mode=0777 0 0
13. After the mount file has been updated, run the mount command to connect it. If it worked, you can change into the ~/OneDrive directory and run ls -al to find all the contents.
14. sudo mount -a
Sources:
[1] https://docs.microsoft.com/en-us/virtualization/hyper-v-on-windows/quick-start/enable-hyper-v
[2] http://www.notyourdadsit.com/blog/2018/2/24/hyper-v-error-the-images-hash-and-certificate-are-not-allowed
[3] https://linuxize.com/post/how-to-mount-cifs-windows-share-on-linux/
0 notes