#Linux log btmp
Explore tagged Tumblr posts
Visit Tumblr Blog
Explore Tumblr blogs with no restrictions, modern design and the best experience.
Last Seen Tumblr Blogs


Fun Fact
The most popular pages on Tumblr are about Minecraft, GIFs, and David J. Peterson.
Text
Linux Log utmp, wtmp ve btmp Dosyaları
Merhaba Değerli Okuyucular, bugün sizler ile Linux Log utmp, wtmp ve btmp Dosyaları: Kullanıcı Oturumları ve Güvenlik İzleme konusuna değinmeye çalışacağız. Linux log dosyaları, işletim sistemi ve uygulamalar tarafından oluşturulan kayıtları içeren dosyalardır. Bu log dosyaları, sistem durumu, hatalar, kullanıcı etkinlikleri ve diğer önemli olayları izleme amacıyla kullanılır. Linux…
View On WordPress
0 notes
Link
0 notes
Text
#linux#linuxfan#linuxuser#systemadministrator#ubuntu#debian#dev#devops#webdevelopment#webdeveloper#programmer#programming#programmingmemes#linuxmemes#memes#cat#coding#developer#tech#ethicalhacking#computerscience#coder#security#infosec#cyber
0 notes
Text
Linux User Administration Part-2
Linux User Administration Part-2
User Management
Allow user login without password
For passwordless login, we need to delete the password from the /etc/shadow (encrypted password)
vim /etc/shadow
after this file open delete the password for a user to allow login without password and save the file
See the below picture where encrypted password marked in red color we delete that and save the file
linux-user-administration-login-without-password
Do not allow all user to login
For this, we have to create one file let's see
cat > /etc/nologin
Type Here Message For The User To Know Why He Is Not Able To log in
See The Below Example
Allow-user-not-to-login
Here we have created the nologin file and update the message to the user
NOTE:- After the activity kindly delete this file accordingly or as per requirement.
Information about USER
finger is the command to check user information
See the below example for same
finger -l username
information-about-user
How to monitor USER We can monitor USER activity with below commands
w It shows who is logged on and what they are doing.
who show who is logged on
lastlog check the most recent login of all users
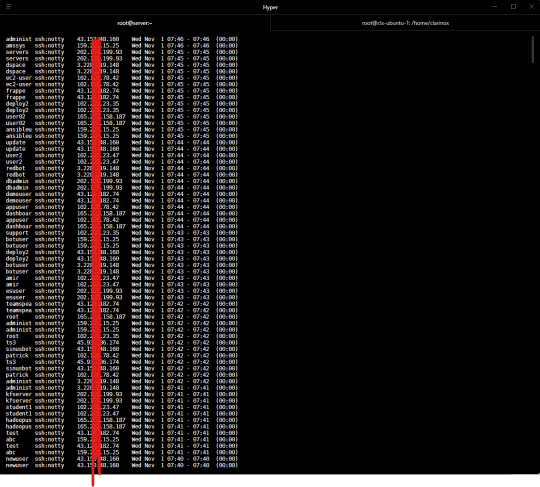
lastb shows all failed login attempts We can monitor USER activity with below files /var/run/utmp Have the track of current login state for all user
/var/log/wtmp Have all login and logouts details
/var/log/btmp keeps failed login attempts
Password Aging
We can change the policy using file /etc/login.defs but this is not recommended so we can use chage command for same chage to modify password policy for the users
chage -l username
we will get below output
password-aging
Here we can see the many options
-M this option using we can change the maximum number of days between password change
example chage -M 15 username (using this command) 6th field from above figure will change
-W this option using we can manage the number of days of warning before password expires
example chage -W 9 username (using this command) 7th field from the above figure will change
-E this option using we can manage account expires period
example chage -E 2019/02/08 username (using this command) 4th field from the above figure will change
-I this option using we can manage password expires period
example chage -I 18 username (using this command) 2nd field from above figure will change
change the owner and group of file
Command
chown test.root file1
see the below image for reference
change-ownership-of-file
Group Management
Please remember
User can be a member of more than one group
More than 1 user can be the group administrator if required
The administrator of the group performs
add/change/delete password of the group
delete or add the user to that group
group can be reserved to those members only
Commands
add new group
groupadd groupname
check the group
grep groupname /etc/group
change the gid of the group
groupadd -g 701 groupname
check the group info
grep groupname /etc/group
change the name of the group
groupmod -g 707 -n newname oldname
Here groupmod command using option -g for changing gid and -n option for changing group name from oldname to newname, we can check this in grep newname /etc/group
delete group groupdel groupname assign password to the group gpasswd groupname check group password grep groupname /etc/group /etc/shadow allign group admin to particular group who manage group activities gpasswd -A nameoftheuser groupname here nameoftheuser is admin for group groupname (you can give the name) Adding user to group
gpasswd -a test sales ( Here we have added user test into sales group )
Restrict Other users to login to the group ( -R option )
gpasswd -R sales ( Here we have use option -R to restrict member login to the group sales )
And if want allow then we use -r option
gpasswd -r sales ( allow group member only to login to the group )
Deleting user from the particular group (we can use -d option)
gpasswd -d test sales (Here we have removed user test from group sales)
Combine /etc/group and /etc/gshadow file
grpconv
Now Check
ls /etc/group /etc/gshadow
We can found the output
/etc/group /etc/gshadow
grpunconv
Now Check
ls /etc/group /etc/gshadow
We can found the output
ls: can not access /etc/ghsadow: No such file or directory
/etc/group
grpconv
Now Check again
ls /etc/group /etc/gshadow
We can found the output for both
/etc/group /etc/gshadow
via Blogger https://ift.tt/2X1Ve8L
0 notes