#Lodash Sort By
Explore tagged Tumblr posts
Visit Tumblr Blog
Explore Tumblr blogs with no restrictions, modern design and the best experience.
Last Seen Tumblr Blogs


Fun Fact
In 2020, 27% of US Tumblr users had an annual household income of over $100,000.
Text
This blog covers lodash sort by functions. After an introduction, we'll install and import lodash. Basic sorting, property sorting, and custom sorting will be covered. You'll also learn to organize words, use descending order, and capitalize. We'll explore null and undefined values, nested object sorting, and performance. We'll also examine how these sorting strategies work in practise and why lodash's sortBy function is useful. We'll conclude with typical inquiries. Get ready to master sorting!
0 notes
Text
ignore this; thinking out loud (or, in prose, as it were).
when xkit_patches is deployed separately from xkit versions, one can generally engineer the scenario where xkit_patches is updated before xkit. xkit_patches is treated as evergreen and contains the patches for all previous versions of xkit, but not future ones. for some xkit version, all patches are run starting from its version and ending at the current version. thus, no matter the current xkit version, all functionality can be assumed to have been added. last set of patches must thus include [desired functionality - current xkit version functionality] and every preceding patch should only include [patched version's successor's functionality - patched version's functionality], which is often nothing.
if xkit_patches is instead deployed with xkit versions but will only be installed up to 24 hours later... then... hold on let me think. okay. xkit is treated as evergreen and—wait. okay. wait.
on an ongoing basis, new xkit functionality could be shipped in xkit, because it is not delayed, so long as it's backwards-compatible. old extension versions would be run against current xkit briefly. if changes were not backwards compatible, maybe there is an advantage to not doing this and shipping changes in xkit patches, as it will be updated with extensions. this has a drawback when e.g. removing lodash, though. hm.
in the case where xkit patches is kept... then, on an ongoing basis, ignoring xkit downgrades, it can assume it is running in at least the version of xkit it shipped with, but could be running in a future version. thus, reversing the above:
xkit_patches contains the patches for all future versions of xkit, but not previous ones. for some xkit version, all patches are run starting from its version. thus, no matter the current xkit version, all functionality can be assumed to have been added. first set of patches must thus include [desired functionality - current xkit version functionality] and every following patch should only include [patched version's predecessor's functionality - patched version's functionality], something something.
okay, obviously we can't predict the future, but that part can be ignored. the realistic version is presumably that xkit_patches only contains the patch for the version of xkit it's shipped with. it will never (ignoring downgrades) be run on a previous xkit version, as that xkit version would not contain it. it will be run with the next xkit version, in which case it should probably run its patches, because it is either still the correct set of patches (no change) or it will be soon overwritten by the version shipped with the new xkit version, in which case it's still needed so that updates don't explode. that is to say: remove per-version patches, run current patches, we're done. caveats: downgrading is bad and updates may explode.
in the case where xkit patches is not kept... then, on an ongoing basis, pretty much nothing to describe here. caveats: shipping a change to xkit (patches, except that no longer exists) that breaks extensions breaks extensions.
if either of these are done, the final v7.9.2 patches is a special case, because it is not evergreen and (if upgraded directly to said version) could be briefly running on any future version of xkit. therefore, it must a) not crash, and b) do something compatible with the upgrade path on any future version of xkit.
in the case where xkit patches is kept... then... hm, well, that's sort of a mess, innit. the best we can do is run the 7.9.2 patches on any version greater than or equal to 7.9.2. we could make this the correct patches for 7.10.0, but a hypothetical update from 7.9.2 to 7.35.0 would be missing patches during the update.
in the case where xkit patches is not kept... then the final v7.9.2 patches should run nothing on any version greater than or equal to 7.9.2. whatever post-7.9.2 version is installed over 7.9.2, it will use its own "patches."
okay, that's probably easiest. the only consideration, in that case, is to make sure one allows xkit editor users to patch xkit even if not using that for our own code, because making the xkit editor still work despite it having zero users is thE ONLY REASON I DID 80% OF THIS AND IT WAS SPECIFICALLY
sorry did you hear something? I didn't hear anything. anyway, the logic should still make sense if a user does use the editor to add patches for a specific version; hm, what does that mean... well, currently, as mentioned, "for some xkit version, all patches are run starting from its version and ending at the current version." this means a patch's version number means "run this only if the xkit version is less than or equal to this number." I suppose that makes sense if one assumes that all patches are added to each xkit version as it is released (ah, I see why april wrote it that way) (huh we could have just done that probably) (well, it didn't happen, whatever).
if we preserve this, it makes sense for the hypothetical xkit editor user who is working on patches for the next xkit release (but why; just edit the code and refresh now). if the hypothetical xkit editor user is making their own script and wants it to keep working, though... we probably want to just run their patches unconditionally, so again, removing the version logic is fine. the 7.10.0+ version of xkit patches should pretty much just be empty then.
well, alright. that kind of works.
I really probably should have just proposed killing the xkit editor, huh. I mean, I should have proposed both things.
eh, I mean, there was a logic to the way I did that part of it, to be honest; not much point relitigating it now. my mistake was pressing merge; I've already decided that and kind of knew it at the time. can always revert it. but it was an intermediate PR to the other way so I see where I was coming from at the time.
sure hope no one is reading all the way down here because it has not been a productive use of your time, I pretty much guarantee it :D
0 notes
Text
Order By In JavaScript
Order by is a generic way of doing sorting on arrays of objects. It supports multiple properties and specifying the order. Here is an example of this in _.countBy:
const cars = [ { id: 'miata', hp: 155, weight: 2400 }, { id: '4c', hp: 237, weight: 2465 }, { id: 'elice', hp: 217, weight: 2000 } ]; const users = [ { 'user': 'fred', 'age': 48 }, { 'user': 'barney', 'age': 34 }, { 'user': 'fred', 'age': 40 }, { 'user': 'barney', 'age': 36 } ]; console.log('Order By (Using Lodash):'); const result1 = _.orderBy(cars, 'hp', 'desc'); console.log(result1); const result2 = _.orderBy(users, ['user', 'age'], ['asc', 'desc']); console.log(result2);
A custom order by simply uses the JS sort and iterates over the properties in the sort callback. The following handles only numbers and strings to make the example clearer:
function orderBy(list, properties, orders) { properties = Array.isArray(properties) ? properties : [properties]; orders = Array.isArray(orders) ? orders : [orders]; // To keep the example simple, this only sorts strings and numbers list.sort((a, b) => { let result; for (let index = 0; index < properties.length; index += 1) { let one = a, two = b; if (orders[index] === 'desc') { [one, two] = [two, one]; } const value1 = one[properties[index]]; if (typeof value1 === 'string') { result = String(value1).localeCompare(two[properties[index]]); } else if (typeof value1 === 'number') { result = value1 - two[properties[index]]; } // Only proceed to deeper comparisons if the current results are equal if (result !== 0) { return result; } } return result; }); return list; }
Extending it just involves adding more checks around the typeof part.
Github Location https://github.com/Jacob-Friesen/obscurejs/blob/master/2018/orderBy.js
#ordering#sorting#order by#lodash#comparison#functional programming#es6#javascript#programming#web development#coding
6 notes
·
View notes
Text
Top Lodash Functions That You Should Try
Lodash is one of the popular JavaScript libraries that offers more than 200 functions for web development. These functions can help you build innovative yet highly interactive web applications. We can use lodash inside a web browser or in NodeJS. In this article, We are going to discuss Lodash and its top 13 features that you should use.
What is Lodash
Lodash makes JavaScript development more peaceful by taking out the trouble of working with arrays, numbers, objects, strings, etc. It’s an open-source JavaScript library with a wide variety of functions that make JavaScript development effortless and quicker. It has functions like map, filter, invoke, function binding, javascript templating, deep equality checks, creating indexes, and many that we will discuss here. Lodash can be used directly via browser or from NodeJS. Development with JavaScript is pretty challenging, but with Lodash, any scale of development can be easier and quicker.
Top Lodash Functions That Everyone Should Know About
_.assign
_.assign is a similar function to the spread operator of ES 6. Easily understandable and can assign properties of one or many objects to a source object.
_.times
_.times can be very helpful when creating dynamic data. It receives as rows of numbers of iterations and a function to perform n times and reflects with an array of the results.
_.get and _.set
We are counting these two as one because these works are about the same. _.get will return a property state from an object, and _.set will set a property with a value—Same except you can get to a property with the address.
_.deburr
_.deburr is the easiest one; It excludes all “combining diacritical marks,” so “é” converts “e.” It’s an immeasurable habit to deburr text for a search function when there is internationalization and localization.
_.keyBy
_.keyBy helps to find and call an object with a specific property.
_.reduce
_.reduce is like a filter function, but it allows you to choose the form of the returned object, which makes it different. You can add objects or remove them via filter method.
_.debounce
_.debounce will invoke a function in a time cap of a specified amount of time since the last time it was called.
_.find
You can use _ .find instead of interacting within an array with a loop to locate a particular object. It can also help you find any object with more than one property with a single line of code.
_.cloneDeep
_ .cloneDeep is the easiest one and can clone an object. The cloned object will also have the same properties and new address in memory so that you won’t crush others.
_. sortedUniq
_. sortedUniq stops duplicate values to repeat. Its mainly used for performance issues because it is built to specify the sorted arrays. _. sortedUniq is valid only if you work with the extensive array. If you want better performance, you should sort your array and use functions that work better with sorted arrays.
Lodash is one of the top libraries for web development that is sufficient to build innovative applications in very little time. It has 13 types of functions mentioned below; In addition, we have mentioned some of the most useful functions that everyone should know.
0 notes
Text
March 23, 2020 | Canggu, Bali, Indonesia @ Zin @ Work
Taking my time this morning as there is no rush for anything in terms of getting to Zin. Managed to get a hold of the Russells and heard my gmas voice for the first time in a year. Can’t believe I’ve been so horrible with keeping in contact. They always show me so much love which makes me smile from ear to ear. I’m very thankful for them and their constant support. Got to see my cousins, aunt and uncle! Sooooooo niiiice.
Anyway, yesterday I got through courses 1-5 with Mosh but then stopped… Why am I like this? I managed to add it to my own portfolio for practice sake but why do I just stop once I’m done with what’s on my to do list? Looking back, it seems very complacent of me and I need to just continue to keep going and going and going.
Read Deep Work last night and it emphasized the importance of idle breaks in nature to give your brain some time to relax and get ready for another deep work day. I’m going to try this method and see what works but I’m going to finish videos 6-7 then move on to more videos and practice as I go along plus reviewing my notes.
Cheers for now.
Update: Managed to work from 10- 6pm @ zin. I focused on Paginating data, and filtering data. Watched videos, read articles on lodash to better understand their utility methods and I did some practice.
Tomorrow the plan is to re-read my notes, apply filtering in my portfolio then move on to sorting! :) It's 9PM ish I believe so I’l go re-read my notes from a podcast I jotted down and read some deep work!
0 notes
Text
Why do you expect Native reactions for your mobile app?
Like many others, I was initially cynical about Facebook and the response to Instagram. Initial demonstrations of the
JavaScript
language extension of React, JSX, made many developers uncomfortable. We had been working for years to differentiate HTML and JavaScript, but it seemed that Respond merged them. Some have challenged the need for another library on the client side, in an ocean full of them.
React
has proven incredibly popular, as it turns out, both on my own projects and with many others across the world, including major companies like Netflix. And now the platform has been put onto the mobile with React Local. React Native is a great choice to create powerful iOS and Android apps that feel at home on their respective platforms, all while building on any previous experience in web development. React Overview
Described as "A JavaScript library to create user interfaces" by its developers, React focuses on the display portion of your application. More concretely, this means that when you write a React Native app, your view code will consist of writing React components, which are tiny pieces of code explaining how a portion of your app will look based on some collection of input data. Let's look at a small component of example that can be used to show a simple button. (I omit styles, for clarity's sake.)
This Button part has two pieces of input data: onPress, which is a callback function for when pressing the button; and text, which is the string to be displayed within the button. The XML-like structure that the render function returns is called JSX, which is syntactic sugar for calls to the function Respond. And TouchableOpacity and Text are existing components included with Native React. Now that this Button feature has been developed, with consistent actions and styling, it can be used several times in the application.
Though this is a simple example, it shows how a piece by piece Respond app is designed. Continuing in this way, you can build components which reflect that abstraction layers. You can, for example, build a ButtonGroup component that contains several buttons connected to it. And building on that, you can write components which represent whole screens. Also as the device grows considerably larger, components at each stage remain understandable and manageably sized. Truly Native
Most JavaScript-based mobile apps use Cordova, or a framework that's based on it, like the common Ionic or Sencha Touch. You're able to make calls to native APIs with Cordova, but the majority of your software will be HTML and JavaScript within a WebView. Although you can approximate native components – and you can definitely create a great UI with HTML and JS – there's no Cordova app that matches the look and feel of a real native app. The little things-such as acceleration scrolling, keyboard actions, and navigation-all add up and can create unpleasant interactions for your customers when they're not behaving as planned.
While you still write JavaScript with React Native, the components you create end up rendering as native widgets on the platform. If you're familiar with Reacting to the Net, you'll feel at home. And if you've written apps in Java or Objective-C you can know several of the components of React Native instantly.
The best feature of react when it was initially released for the web was to render the view layer of your device a pure state production. As a developer, this means that you simply decide what your view will look like based on input data, instead of making imperative adjustments to view components (for example, programmatically modifying the text or color of a button by calling a function on it), and Respond smartly makes the adjustments for you when the state changes.
This change in thought could make building UIs dramatically simpler. We've all used apps where the UI reaches a weird unintended state after taking a direction the creator wasn't looking for. With Respond, these bugs are much easier to monitor. You don't have to care as much about the user's journey through the device as you do, instead concentrate on making sure that your view statements can accommodate all possible shapes for the state of your app. That's a lot easier problem to tackle-and check for. The machine also understands it more quickly, and changes to the static analysis and type systems would only make it easier to spot such glitches.
Native component definitions look and function pretty much like web component reaction, but target native UI widgets instead of HTML. So you can use a < View > instead of using a < div > (which is converted to a native UIView on iOS, and on Ios, android.view). As data changes for your components, React Native will determine what needs to be modified in your view, and will make the required calls to whatever native UI widgets are displayed.
And it is fast! JavaScript isn't as fast as native code can be, but JavaScript and Respond Native are more than able to keep the device running at 60 frames per second for most of the tasks. Under the hood, the JavaScript code runs on its own thread, separate from the thread of the main UI. So even though your device runs a complex logic, your UI can still animate or scroll at 60fps smoothly, as long as the JS thread doesn't block the UI.
Many software frameworks promise to let you make a great Android and iOS device, but the product always ends up somewhere in the middle without feeling very native to either one. By supporting the native platforms but also allowing the app to share much of its codebase between platforms, React Native allows developers to create amazing native apps that their customers would love, without the increase in budget building that might require two separate apps. EASILY UNDERSTANDABLE
Some of the biggest benefits of React is how open it is to even those who are unfamiliar with it. Most frameworks allow you to study a long list of terms that are only useful within that context, while ignoring the basics of the language. Reacting does its very best to do the opposite. Take the difference between rendering a portion of a friends list in React Native vs Ionic (AngularJS) as an example. With Ionic, you use the command ngRepeat. Let's assume we have an array of friends with the following fields each: first name, last name and is online. Yet we just want to view those friends who are online right now. Here's our checker:
our view:
This code snippet poses some immediate concerns if you aren't familiar with Ionic / AngularJS. What's the$scope? Which is Filter Syntax? And how can I add more behaviour, like sorting the friends list? With Respond Native, using the built-in filter and map functions, you make use of your existing language fundamentals awareness.
Although the React Native snippet still poses some concerns (What does React.createClass do? What is rendering?), the fact that the majority of the code here is just standard JavaScript means that beginners can find it more accessible and tenable. As an experienced developer, you'll save time using standard language features you already learn, and make your code more accessible to other developers. Perhaps just as importantly, React acts as an outstanding teaching resource if you are less familiar with JavaScript. Whether you haven't learned how to use maps or filters yet, practicing React will also teach you these. NgRepeat instruction just teaches you ngRepeat.
And this is before considering mobile production on multiplatforms. While in a React Native project, which targets both iOS and Android, there will be some pieces of platform-specific code, the majority will be shared and a JavaScript developer will understand all this. Vibrant Ecosystem
Since most of your React Native code is just plain JavaScript, it reaps the advantages of all language advances and their ecosystem. Instead of waiting for all the array manipulation functions you want to enforce on your System developers, why not just use lodash? Only use Moment.js to control or show the dates and times. And all those beautiful new features of the ES6 language you've been waiting for to try out? React is not only a perfect match, their use is encouraged!
Some libraries are especially suitable for use with React Native, thanks to its declarative views. One that I would be remiss in not considering is redux. Described as a "predictable state container," redux is a great library to control the state of your application. Redux is highly testable, and allows small functions to write which are clear about what data they modify. If that way your state changes are written, your app can take advantage of powerful features, such as global undo / redo and hot reload. Conclusion
I had a lot of fun learning and developing with React Native, between the ease of creation, the quality of the apps developed with it, and the richness of the platform and ecosystem.
As a reputed Software Solutions Developer we have expertise in providing dedicated remote and outsourced technical resources for software services at very nominal cost. Besides experts in full stacks We also build web solutions, mobile apps and work on system integration, performance enhancement, cloud migrations and big data analytics. Don’t hesitate to
get in touch with us!
#b2b website#b2b market research companies#b2b ecommerce b2b content marketing b2b seo b2b market research companies b2bservices Ecommerce#b2b ecommerce b2b content marketing b2b market research companies b2b seo b2bservices Ecommerce
0 notes
Text
Why do you expect Native reactions for your mobile app?
Like many others, I was initially cynical about Facebook and the response to Instagram. Initial demonstrations of the JavaScript language extension of React, JSX, made many developers uncomfortable. We had been working for years to differentiate HTML and JavaScript, but it seemed that Respond merged them. Some have challenged the need for another library on the client side, in an ocean full of them.React has proven incredibly popular, as it turns out, both on my own projects and with many others across the world, including major companies like Netflix. And now the platform has been put onto the mobile with React Local.
React
Native is a great choice to create powerful iOS and Android apps that feel at home on their respective platforms, all while building on any previous experience in web development. React OverviewDescribed as "A JavaScript library to create user interfaces" by its developers, React focuses on the display portion of your application. More concretely, this means that when you write a React Native app, your view code will consist of writing React components, which are tiny pieces of code explaining how a portion of your app will look based on some collection of input data. Let's look at a small component of example that can be used to show a simple button. (I omit styles, for clarity's sake.)
This Button part has two pieces of input data: onPress, which is a callback function for when pressing the button; and text, which is the string to be displayed within the button. The XML-like structure that the render function returns is called JSX, which is syntactic sugar for calls to the function Respond. And TouchableOpacity and Text are existing components included with Native React. Now that this Button feature has been developed, with consistent actions and styling, it can be used several times in the application.Though this is a simple example, it shows how a piece by piece Respond app is designed. Continuing in this way, you can build components which reflect that abstraction layers. You can, for example, build a ButtonGroup component that contains several buttons connected to it. And building on that, you can write components which represent whole screens. Also as the device grows considerably larger, components at each stage remain understandable and manageably sized. Truly NativeMost JavaScript-based mobile apps use Cordova, or a framework that's based on it, like the common Ionic or Sencha Touch. You're able to make calls to native APIs with Cordova, but the majority of your software will be HTML and JavaScript within a WebView. Although you can approximate native components – and you can definitely create a great UI with HTML and JS – there's no Cordova app that matches the look and feel of a real native app. The little things-such as acceleration scrolling, keyboard actions, and navigation-all add up and can create unpleasant interactions for your customers when they're not behaving as planned.While you still write JavaScript with React Native, the components you create end up rendering as native widgets on the platform. If you're familiar with Reacting to the Net, you'll feel at home. And if you've written apps in Java or Objective-C you can know several of the components of React Native instantly.The best feature of react when it was initially released for the web was to render the view layer of your device a pure state production. As a developer, this means that you simply decide what your view will look like based on input data, instead of making imperative adjustments to view components (for example, programmatically modifying the text or color of a button by calling a function on it), and Respond smartly makes the adjustments for you when the state changes.This change in thought could make building UIs dramatically simpler. We've all used apps where the UI reaches a weird unintended state after taking a direction the creator wasn't looking for. With Respond, these bugs are much easier to monitor. You don't have to care as much about the user's journey through the device as you do, instead concentrate on making sure that your view statements can accommodate all possible shapes for the state of your app. That's a lot easier problem to tackle-and check for. The machine also understands it more quickly, and changes to the static analysis and type systems would only make it easier to spot such glitches.Native component definitions look and function pretty much like web component reaction, but target native UI widgets instead of HTML. So you can use a < View > instead of using a < div > (which is converted to a native UIView on iOS, and on Ios, android.view). As data changes for your components, React Native will determine what needs to be modified in your view, and will make the required calls to whatever native UI widgets are displayed.And it is fast! JavaScript isn't as fast as native code can be, but JavaScript and Respond Native are more than able to keep the device running at 60 frames per second for most of the tasks. Under the hood, the JavaScript code runs on its own thread, separate from the thread of the main UI. So even though your device runs a complex logic, your UI can still animate or scroll at 60fps smoothly, as long as the JS thread doesn't block the UI.Many software frameworks promise to let you make a great Android and iOS device, but the product always ends up somewhere in the middle without feeling very native to either one. By supporting the native platforms but also allowing the app to share much of its codebase between platforms, React Native allows developers to create amazing native apps that their customers would love, without the increase in budget building that might require two separate apps. EASILY UNDERSTANDABLESome of the biggest benefits of React is how open it is to even those who are unfamiliar with it. Most frameworks allow you to study a long list of terms that are only useful within that context, while ignoring the basics of the language. Reacting does its very best to do the opposite. Take the difference between rendering a portion of a friends list in React Native vs Ionic (AngularJS) as an example. With Ionic, you use the command ngRepeat. Let's assume we have an array of friends with the following fields each: first name, last name and is online. Yet we just want to view those friends who are online right now. Here's our checker:
our view:
This code snippet poses some immediate concerns if you aren't familiar with Ionic / AngularJS. What's the$scope? Which is Filter Syntax? And how can I add more behaviour, like sorting the friends list? With Respond Native, using the built-in filter and map functions, you make use of your existing language fundamentals awareness.
Although the React Native snippet still poses some concerns (What does React.createClass do? What is rendering?), the fact that the majority of the code here is just standard JavaScript means that beginners can find it more accessible and tenable. As an experienced developer, you'll save time using standard language features you already learn, and make your code more accessible to other developers. Perhaps just as importantly, React acts as an outstanding teaching resource if you are less familiar with JavaScript. Whether you haven't learned how to use maps or filters yet, practicing React will also teach you these. NgRepeat instruction just teaches you ngRepeat.And this is before considering mobile production on multiplatforms. While in a React Native project, which targets both iOS and Android, there will be some pieces of platform-specific code, the majority will be shared and a JavaScript developer will understand all this. Vibrant EcosystemSince most of your React Native code is just plain JavaScript, it reaps the advantages of all language advances and their ecosystem. Instead of waiting for all the array manipulation functions you want to enforce on your System developers, why not just use lodash? Only use Moment.js to control or show the dates and times. And all those beautiful new features of the ES6 language you've been waiting for to try out? React is not only a perfect match, their use is encouraged!Some libraries are especially suitable for use with React Native, thanks to its declarative views. One that I would be remiss in not considering is redux. Described as a "predictable state container," redux is a great library to control the state of your application. Redux is highly testable, and allows small functions to write which are clear about what data they modify. If that way your state changes are written, your app can take advantage of powerful features, such as global undo / redo and hot reload. ConclusionI had a lot of fun learning and developing with React Native, between the ease of creation, the quality of the apps developed with it, and the richness of the platform and ecosystem.
As a reputed Software Solutions Developer we have expertise in providing dedicated remote and outsourced technical resources for software services at very nominal cost. Besides experts in full stacks We also build web solutions, mobile apps and work on system integration, performance enhancement, cloud migrations and big data analytics. Don’t hesitate to
get in touch with us!
#b2b ecommerce#b2b content marketing#b2b market research companies#b2b seo#Ecommerce#socialmediamarketing
0 notes
Photo

Build a JavaScript Command Line Interface (CLI) with Node.js
As great as Node.js is for “traditional” web applications, its potential uses are far broader. Microservices, REST APIs, tooling, working with the Internet of Things and even desktop applications: it’s got your back.
Another area where Node.js is really useful is for building command-line applications — and that’s what we’re going to be doing in this article. We’re going to start by looking at a number of third-party packages designed to help work with the command line, then build a real-world example from scratch.
What we’re going to build is a tool for initializing a Git repository. Sure, it’ll run git init under the hood, but it’ll do more than just that. It will also create a remote repository on GitHub right from the command line, allow the user to interactively create a .gitignore file, and finally perform an initial commit and push.
As ever, the code accompanying this tutorial can be found on our GitHub repo.

Why Build a Command-line Tool with Node.js?
Before we dive in and start building, it’s worth looking at why we might choose Node.js to build a command-line application.
The most obvious advantage is that, if you’re reading this, you’re probably already familiar with it — and, indeed, with JavaScript.
Another key advantage, as we’ll see as we go along, is that the strong Node.js ecosystem means that among the hundreds of thousands of packages available for all manner of purposes, there are a number which are specifically designed to help build powerful command-line tools.
Finally, we can use npm to manage any dependencies, rather than have to worry about OS-specific package managers such as Aptitude, Yum or Homebrew.
Tip: that isn’t necessarily true, in that your command-line tool may have other external dependencies.
What We’re Going to Build: ginit
For this tutorial, we’re going to create a command-line utility which I’m calling ginit. It’s git init, but on steroids.
You’re probably wondering what on earth that means.
As you no doubt already know, git init initializes a Git repository in the current folder. However, that’s usually only one of a number of repetitive steps involved in the process of hooking up a new or existing project to Git. For example, as part of a typical workflow, you may well:
initialize the local repository by running git init
create a remote repository, for example on GitHub or Bitbucket — typically by leaving the command line and firing up a web browser
add the remote
create a .gitignore file
add your project files
commit the initial set of files
push up to the remote repository.
There are often more steps involved, but we’ll stick to those for the purposes of our app. Nevertheless, these steps are pretty repetitive. Wouldn’t it be better if we could do all this from the command line, with no copy-pasting of Git URLs and such like?
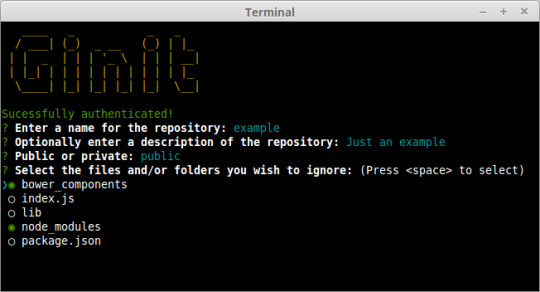
So what ginit will do is create a Git repository in the current folder, create a remote repository — we’ll be using GitHub for this — and then add it as a remote. Then it will provide a simple interactive “wizard” for creating a .gitignore file, add the contents of the folder and push it up to the remote repository. It might not save you hours, but it’ll remove some of the initial friction when starting a new project.
With that in mind, let’s get started.
The Application Dependencies
One thing is for certain: in terms of appearance, the console will never have the sophistication of a graphical user interface. Nevertheless, that doesn’t mean it has to be plain, ugly, monochrome text. You might be surprised by just how much you can do visually, while at the same time keeping it functional. We’ll be looking at a couple of libraries for enhancing the display: chalk for colorizing the output and clui to add some additional visual components. Just for fun, we’ll use figlet to create a fancy ASCII-based banner, and we’ll also use clear to clear the console.
In terms of input and output, the low-level Readline Node.js module could be used to prompt the user and request input, and in simple cases is more than adequate. But we’re going to take advantage of a third-party package which adds a greater degree of sophistication — Inquirer. As well as providing a mechanism for asking questions, it also implements simple input controls: think radio buttons and checkboxes, but in the console.
We’ll also be using minimist to parse command-line arguments.
Here’s a complete list of the packages we’ll use specifically for developing on the command line:
chalk — colorizes the output
clear — clears the terminal screen
clui — draws command-line tables, gauges and spinners
figlet — creates ASCII art from text
inquirer — creates interactive command-line user interface
minimist — parses argument options
configstore — easily loads and saves config without you having to think about where and how.
Additionally, we’ll also be using the following:
@octokit/rest — a GitHub REST API client for Node.js
@octokit/auth-basic — an implementation of one of GitHub’s authentication strategies
lodash — a JavaScript utility library
simple-git — a tool for running Git commands in a Node.js application
touch — a tool for implementing the Unix touch command.
Getting Started
Although we’re going to create the application from scratch, don’t forget that you can also grab a copy of the code from the repository which accompanies this article.
Create a new directory for the project. You don’t have to call it ginit, of course:
mkdir ginit cd ginit
Create a new package.json file:
npm init -y
And edit it to look like so:
{ "name": "ginit", "version": "1.0.0", "description": "'git init' on steroids", "main": "index.js", "scripts": { "test": "echo \"Error: no test specified\" && exit 1" }, "keywords": [ "Git", "CLI" ], "author": "<YOUR NAME>", "license": "ISC" }
Now install the dependencies:
npm install chalk clear clui figlet inquirer minimist configstore @octokit/rest @octokit/auth-basic lodash simple-git touch
Now create an index.js file in the same folder and require the following dependencies:
const chalk = require('chalk'); const clear = require('clear'); const figlet = require('figlet');
Adding Some Helper Methods
We’re going to create a lib folder where we’ll split our helper code into modules:
files.js — basic file management
inquirer.js — command-line user interaction
github.js — access token management
repo.js — Git repository management.
Let’s start with lib/files.js. Here, we need to:
get the current directory (to get a default repo name)
check whether a directory exists (to determine whether the current folder is already a Git repository by looking for a folder named .git).
This sounds straightforward, but there are a couple of gotchas to take into consideration.
Firstly, you might be tempted to use the fs module’s realpathSync method to get the current directory:
path.basename(path.dirname(fs.realpathSync(__filename)));
This will work when we’re calling the application from the same directory (for example, using node index.js), but bear in mind that we’re going to be making our console application available globally. This means we’ll want the name of the directory we’re working in, not the directory where the application resides. For this purpose, it’s better to use process.cwd:
path.basename(process.cwd());
Secondly, the preferred method of checking whether a file or directory exists keeps changing. The current way is to use existsSync. This returns true if the path exists, false otherwise.
Finally, it’s worth noting that when you’re writing a command-line application, using the synchronous version of these sorts of methods is just fine.
Putting that all together, let’s create a utility package in lib/files.js:
const fs = require('fs'); const path = require('path'); module.exports = { getCurrentDirectoryBase: () => { return path.basename(process.cwd()); }, directoryExists: (filePath) => { return fs.existsSync(filePath); } };
Go back to index.js and ensure you require the new file:
const files = require('./lib/files');
With this in place, we can start developing the application.
Initializing the Node CLI
Now let’s implement the start-up phase of our console application.
In order to demonstrate some of the packages we’ve installed to enhance the console output, let’s clear the screen and then display a banner:
// index.js clear(); console.log( chalk.yellow( figlet.textSync('Ginit', { horizontalLayout: 'full' }) ) );
You can run the application using node index.js. The output from this is shown below.

Next up, let’s run a simple check to ensure that the current folder isn’t already a Git repository. That’s easy: we just check for the existence of a .git folder using the utility method we just created:
//index.js if (files.directoryExists('.git')) { console.log(chalk.red('Already a Git repository!')); process.exit(); }
Tip: notice we’re using the chalk module to show a red-colored message.
The post Build a JavaScript Command Line Interface (CLI) with Node.js appeared first on SitePoint.
by Lukas White via SitePoint https://ift.tt/2OzcaA2
0 notes
Link
Every market is ruled by certain common concepts, and JavaScript development is no exception. The product lifecycle is a concept that you can apply to several different environments to understand and predict their behavior. It is a business concept that helps us understand the stages that a product goes through during its life, explaining the impact of these stages on its popularity measure—in most cases, sales. If we observe market behavior patterns, we can estimate the current stage of a product and therefore make some predictions about its popularity. There are four stages: introduction, growth, maturity, and decline, and on the chart above, you can see the impact on expected product sales for each stage. For example, smartphones sales aren’t growing like five years ago—actually, quite the opposite is true—so we can fairly say that smartphones are getting into their maturity stage. In the past few years, we’ve seen the introduction of a lot of new technologies in JavaScript, but we needed time to see how the market was going to adopt them. Nobody wants to be the specialist on another promising technology that ends with zero adoption. Now, however, is the time to take another look. In this article, I will take a look at how popular JavaScript is becoming and the factors that may have affected this popularity, and I will try to predict what the future of JavaScript will look like. The Future of JavaScript Language Features Since the European Computer Manufacturers Association (ECMA) established the year-based release cycle for ECMAScript, a standardized JavaScript specification, we haven’t seen a lot of new features coming to the language—just a few each year. This could be one of the reasons we saw an increase of adoption of languages that compile to ES5 like TypeScript or ReasonML, both bringing features to the language that are highly requested by the community. This is not new—JavaScript went through this process before (CoffeeScript) and, in the end, those features ended up being merged into the language standard itself, and that’s probably the future that we can expect for these new typed features, too. But now we are starting to see a game changer move in the compile-to-js market with the increasing availability of WebAssembly in the browsers. Now, we can use almost any language and compile it to run at almost native speed in a browser and, more importantly, we are starting to see support for future-proof features like support for threads that will allow us to take advantage of the multi-processor architecture that represents the inevitable future of all devices. The official toolchain for WebAssembly will help you to compile C/C++, but there are a lot of community provided compilers for different languages, like Rust, Python, Java, and Blazor (C#). Particularly, the Rust community is pretty active and we started to see complete front-end frameworks like Yew and Dodrio. This brings a lot of new possibilities to browser-based apps, and you only need to test some of the great apps built with WebAssembly to see that near-native browser-based apps are a reality now, e.g., Sketchup or Magnum. Adoption of typed languages that compile to ES5 is mature enough, the players are well established, and they won’t disappear (or be merged with ES) in the near future, but we’ll see a slow shift in favor of typed languages with WebAssembly. Web Front-end Frameworks Every year, we see a big fight on the front-end frameworks market for the web, and React has been the indisputable winner for the past few years—since the introduction of their game-changer technology, the Virtual DOM, we saw an almost obligated adoption from their counterparts in order to remain relevant in the battle. Some years ago, we saw the introduction of a radical new approach to web application development with Svelte, the “compiler framework” that disappears at compile time leaving small and highly efficient JavaScript code. However, that feature was not enough to convince the community to move to Svelte, but with the recent launch of Svelte 3.0, they introduced real reactive programming into the framework and the community is thrilled, so perhaps we are witnessing the next big thing in front-end frameworks. Inspired by the destiny operator: var a = 10; var b <= a + 1; a = 20; Assert.AreEqual(21, b); Svelte brings reactivity to JavaScript by overloading the use of label statements with reactivity at compile time by instructing the code to be executed in topological order: var a = 10; $: b = a + 1; a = 20; Assert.AreEqual(21, b); This is a radical new idea that might help in different contexts, so the creator of Svelte is also working on svelte-gl, a compiler framework that will generate low-level WebGL instructions directly from a 3D scene graph declared in HTMLx. Needless to say that React, Angular, and Vue.js won’t disappear overnight, their communities are huge, and they’ll remain relevant for several years to come—we are not even sure if Svelte will be the actual successor, but we can be sure of something: We’ll be using something different sooner or later. WebXR and the Future of the Immersive Web Virtual reality has been struggling for the past 60 years to find a place in the mainstream, but the technology was just not ready yet. Less than ten years ago, when Jon Carmack joined Oculus VR (now part of Facebook Technologies, LLC), a new wave of VR started to rise, and since then, we’ve seen a lot of new devices supporting different types of VR and of course the proliferation of VR-capable applications. Browser vendors didn’t wanted to lose this opportunity, so they joined with the WebVR specification allowing the creation of virtual worlds in JavaScript with WebGL and well-established libraries like three.js. However, the market share of users with 6dof devices was still insignificant for massive web deployments, but the mobile web was still able to provide a 3D experience with the device orientation API, so we saw a bunch of experiments and a lot of 360 videos for a while. In 2017, with the introduction of ARKit and ARCore, new capabilities were brought to mobile devices and all sorts of applications with AR and MR experiences. However it still feels a little unnatural to download one specific app for one specific AR experience when you are exploring your world around you. If we could only have one app to explore different experiences… This sounds familiar. We solved that problem in the past with the browser, so why not give it another shot? Last year, Mozilla introduced the WebXR Device API Spec (whose last working draft, at the time of this writing, is from two weeks ago) to bring AR, VR, and MR (ergo XR) capabilities to the browser. A few of the most important browser vendors followed with their implementation, with an important exception: Safari mobile, so to prove their point, Mozilla released a WebXR capable browser under the iOS platform WebXR Viewer. Now, this is an important step because the combination of AR and VR brings 6dof to mobile devices and mobile device-based headsets like Google Cardboard or the Samsung Gear VR, as you can see in this example, increasing the market share of 6dof devices by a large margin and enabling the possibility of a large-scale web deployment. At the same time, the guys at Mozilla have been working on a new web framework to facilitate the creation of 3D worlds and applications called A-Frame, a component-based declarative framework with HTML syntax based on three.js and WebGL, having just one thing in mind—to bring back the fun and ease of use to web programming. This is part of their crusade to the immersive web, a new set of ideas on how the web should look like in the future. Luckily for us, they are not alone, and we’ll start to see more and more immersive experiences on the web. If you want to give it a try, go ahead download the WebXR Viewer and visit this site to see the possibilities of the immersive web. Once again, standard browser-based apps won’t fade in a year or two—we’ll probably always have them. But 3D apps and XR experiences are growing and the market is ready and eager to have them. Native Support for ES6 Almost every technology invented in JavaScript in the past decade was created to solve problems generated by the underlying implementation of the browsers, but the platform itself has matured a lot over these past few years, and most of those problems have disappeared, as we can see with Lodash, which once reigned the performance benchmarks. The same is happening with the DOM, whose problems once were the actual inspiration for the creation of web application frameworks. Now, it is a mature API that you can use without frameworks to create apps—actually, that’s what web components are. They are the “framework” of the platform to create component-based apps. Another interesting part of the platform evolution is the language itself. We’ve been using Babel.js for the past few years to be able to use the latest features of ECMAScript, but since the standard itself started to stagnate a little bit in the last few years, that was enough time to allow the browser vendors to implement most of their features, including native support of the static import statement. So now, we can start to consider the creation of applications without Babel.js or other compilers since we have (again) the support of the language features in the platform it self, and since Node.js uses the same V8 VM as Google Chrome, we’ve started to see stronger support of ES6 in Node.js, even with the static import statement under the experimental-modules flag. This doesn’t mean that we’ll stop seeing apps being compiled at a professional level, but it means that starting with a browser-based application will be easy and fun as it once was. Server-side JavaScript Even though JavaScript started with server side in 1995 with the Netscape Enterprise Server, it wasn’t until Ryan’s Dahl presentation in 2009 that JavaScript started to be seriously considered for server-side apps. A lot of things happened in the past decade to Node.js. It evolved and matured a lot, creating once again the opportunity for disruption and new technologies. In this case, it comes from the hand of its very own creator, Ryan Dahl, who has been working on a new perspective of server-side secured apps with Deno, a platform that supports natively the latest language features as async/await, and also the most popular compile-to-js language TypeScript, targeting the best performance thanks to their implementation in Rust and the usage of Tokio, but more importantly with a new security philosophy that differentiates it from most of the server-side platforms like Python, Ruby, or Java). Inspired by the browser security model, Deno will let you use the resources of the host only after the user explicitly granted the permissions to the process, which might sound a bit tedious at the beginning, but it might result in a lot of implications by allowing us to run unsecured code in a secured environment by just trusting the platform. Node.js will still be there in the future but may be we’ll start to see serverless services like AWS Lambda and Azure Functions to provide the Deno functionality as an alternative to provide unsecured server-side code execution on their systems. Conclusion These are exciting times in the JavaScript world—a lot of technologies have matured enough to leave space for innovation, the active community never stopped to amaze us with their brilliant and incredible ideas, and we expect a lot of new alternatives to well-established tools since their mature stages are arriving quickly; we won’t stop using them since a lot of them are really good and there is plenty of proof in the battlefield, but new and exciting markets will start to emerge, and you’d better be prepared. Staying up to date with the latest in JavaScript world isn’t easy, because of the pace of development, but there are some sources that can really help. First, the most important news source, in my opinion, is Echo JS, where you can an incredible amount of new content every hour. However, if you don’t have the time, the JavaScript Weekly newsletter is an excellent summary of the week in JS. Besides this, it is also important to keep an eye on the conferences around the world, and YouTube channels like, JSConf, React Conf, and Google Chrome Developers are wonderfully helpful. Conversely, if you’re interested in seeing some constructive critique of where JavaScript is heading, I recommend reading As a JS Developer, This Is What Keeps Me Up at Night by fellow JavaScript developer Justen Robertson.
0 notes
Text
Avoiding those dang cannot read property of undefined errors
Uncaught TypeError: Cannot read property 'foo' of undefined. The dreaded error we all hit at some point in JavaScript development. Could be an empty state from an API that returns differently than you expected. Could be something else. We don’t know because the error itself is so general and broad.
I recently had an issue where certain environment variables weren't being pulled in for one reason or another, causing all sorts of funkiness with that error staring me in the face. Whatever the cause, it can be a disastrous error if it’s left unaccounted for, so how can we prevent it in the first place?
Let’s figure it out.
Utility library
If you are already using a utility library in your project, there is a good chance that it includes a function for preventing this error. _.get in lodash (docs) or R.path in Ramda (docs) allow accessing the object safely. If you are already using a utility library, this is likely the simplest solution. If you are not using a utility library, read on!
Short-circuiting with &&
One interesting fact about logical operators in JavaScript is that they don't always return a boolean. According to the spec, "the value produced by a && or || operator is not necessarily of type Boolean. The value produced will always be the value of one of the two operand expressions.” In the case of the && operator, the first expression will be used if it a "falsy" value. Otherwise, the second expression will be used. This means that the expression 0 && 1 will be evaluated as 0 (a falsy value), and the expression 2 && 3 will be evaluated as 3. If multiple && expressions are chained together, they will evaluate to either the first falsy value or the last value. For example, 1 && 2 && 3 && null && 4 will evaluate to null, and 1 && 2 && 3 will evaluate to 3.
How is this useful for safely accessing nested object properties? Logical operators in JavaScript will "short-circuit." In this case of &&, this means that the expression will cease moving forward after it reaches its first falsy value.
const foo = false && destroyAllHumans(); console.log(foo); // false, and humanity is safe
In this example, destroyAllHumans is never called because the && operand stopped all evaluation after false.
This can be used to safely access nested properties.
const meals = { breakfast: null, // I skipped the most important meal of the day! :( lunch: { protein: 'Chicken', greens: 'Spinach', }, dinner: { protein: 'Soy', greens: 'Kale', }, }; const breakfastProtein = meals.breakfast && meals.breakfast.protein; // null const lunchProtein = meals.lunch && meals.lunch.protein; // 'Chicken'
Aside from its simplicity, one of the main advantages of this approach is its brevity when dealing with small chains. However, when accessing deeper objects, this can be quite verbose.
const favorites = { video: { movies: ['Casablanca', 'Citizen Kane', 'Gone With The Wind'], shows: ['The Simpsons', 'Arrested Development'], vlogs: null, }, audio: { podcasts: ['Shop Talk Show', 'CodePen Radio'], audiobooks: null, }, reading: null, // Just kidding -- I love to read }; const favoriteMovie = favorites.video && favorites.video.movies && favorites.video.movies[0]; // Casablanca const favoriteVlog = favorites.video && favorites.video.vlogs && favorites.video.vlogs[0]; // null
The more deeply nested an object is, the more unwieldy it gets.
The “Maybe Monad”
Oliver Steele came up with this method and goes through it in much more detail in his blog post, "Monads on the Cheap I: The Maybe Monad." I will attempt to give a brief explanation here.
const favoriteBook = ((favorites.reading||{}).books||[])[0]; // undefined const favoriteAudiobook = ((favorites.audio||{}).audiobooks||[])[0]; // undefined const favoritePodcast = ((favorites.audio||{}).podcasts||[])[0]; // 'Shop Talk Show'
Similar to the short-circuit example above, this method works by checking if a value is falsy. If it is, it will attempt to access the next property on an empty object. In the example above, favorites.reading is null, so the books property is being accessed from an empty object. This will result in an undefined, so the 0 will likewise be accessed from an empty array.
The advantage of this method over the && method is that it avoids repetition of property names. On deeper objects, this can be quite a significant advantage. The primary disadvantage would be readability — it is not a common pattern, and may take a reader a moment to parse out how it is working.
try/catch
try...catch statements in JavaScript allow another method for safely accessing properties.
try { console.log(favorites.reading.magazines[0]); } catch (error) { console.log("No magazines have been favorited."); }
Unfortunately, in JavaScript, try...catch statements are not expressions. They do not evaluate to a value as they do in some languages. This prevents a concise try statement as a way of setting a variable.
One option is to use a let variable that is defined in the block above the try...catch.
let favoriteMagazine; try { favoriteMagazine = favorites.reading.magazines[0]; } catch (error) { favoriteMagazine = null; /* any default can be used */ };
Although it’s verbose, this works for setting a single variable (that is, if the mutable variable doesn't scare you off). However, issues can arise if they’re done in bulk.
let favoriteMagazine, favoriteMovie, favoriteShow; try { favoriteMovie = favorites.video.movies[0]; favoriteShow = favorites.video.shows[0]; favoriteMagazine = favorites.reading.magazines[0]; } catch (error) { favoriteMagazine = null; favoriteMovie = null; favoriteShow = null; }; console.log(favoriteMovie); // null console.log(favoriteShow); // null console.log(favoriteMagazine); // null
If any of the attempts to access the property fails, this will cause all of them to fall back into their defaults.
An alternative is to wrap the try...catch in a reusable utility function.
const tryFn = (fn, fallback = null) => { try { return fn(); } catch (error) { return fallback; } } const favoriteBook = tryFn(() => favorites.reading.book[0]); // null const favoriteMovie = tryFn(() => favorites.video.movies[0]); // "Casablanca"
By wrapping the access to the object in a function, you can delay the "unsafe" code and pass it into a try...catch.
A major advantage of this method is how natural it is to access the property. As long as properties are wrapped in a function, they are safely accessed. A default value can also be specified in the case of a non-existent path.
Merge with a default object
By merging an object with a similarly shaped object of "defaults," we can ensure that the path that we are trying to access is safe.
const defaults = { position: "static", background: "transparent", border: "none", }; const settings = { border: "1px solid blue", }; const merged = { ...defaults, ...settings }; console.log(merged); /* { position: "static", background: "transparent", border: "1px solid blue" } */
Careful, though, because the entire nested object can be overwritten rather than a single property.
const defaults = { font: { family: "Helvetica", size: "12px", style: "normal", }, color: "black", }; const settings = { font: { size: "16px", } }; const merged = { ...defaults, ...settings, }; console.log(merged.font.size); // "16px" console.log(merged.font.style); // undefined
Oh no! To fix this, we'll need to similarly copy each of the nested objects.
const merged = { ...defaults, ...settings, font: { ...defaults.font, ...settings.font, }, }; console.log(merged.font.size); // "16px" console.log(merged.font.style); // "normal"
Much better!
This pattern is common with plugins or components that accept a large settings object with included defaults.
A bonus about this approach is that, by writing a default object, we’re including documentation on how an object should look. Unfortunately, depending on the size and shape of the data, the "merging" can be littered with copying each nested object.
The future: optional chaining
There is currently a TC39 proposal for a feature called "optional chaining." This new operator would look like this:
console.log(favorites?.video?.shows[0]); // 'The Simpsons' console.log(favorites?.audio?.audiobooks[0]); // undefined
The ?. operator works by short-circuiting: if the left-hand side of the ?. operator evaluates to null or undefined, the entire expression will evaluate to undefined and the right-hand side will remain unevaluated.
To have a custom default, we can use the || operator in the case of an undefined.
console.log(favorites?.audio?.audiobooks[0] || "The Hobbit");
Which method should you use?
The answer, as you might have guessed, is that age-old answer… "it depends." If the optional chaining operator has been added to the language and has the necessary browser support, it is likely the best option. If you are not from the future, however, there are more considerations to take into account. Are you using a utility library? How deeply nested is your object? Do you need to specify defaults? Different cases may warrant a different approach.
The post Avoiding those dang cannot read property of undefined errors appeared first on CSS-Tricks.
😉SiliconWebX | 🌐CSS-Tricks
0 notes
Text
50% off #Ultimate JavaScript Arrays – $10
Master every aspect of JavaSript arrays, one of the most important elements in one of the most powerful languages!
Video: 1.5 hours, – 9 coding exercises, 44 lectures
Average rating 4.7/5 (4.7)
Course requirements:
Beginner understanding of JavaScript Have access to computer with Google Chrome in order to participate in coding exercises Have time to complete the quizzes / tests Interest in improving coding in general
Course description:
How much is not understanding JavaScript arrays costing you every day?
After many years of anticipation, Daniel Stern, aka the Code Whisperer, has finally released the MOST COMPREHENSIVE course on JavaScript Arrays known to the developer at this time.
This is the ONLY course designed to FULLY appraise you of EVERYTHING array-related in JavaScript!
Before this course is over, you’ll learn….
How to create, edit, delete and access array elements How to filter, map, reduce and sort arrays How to use D3.js and Lodash.js So much more
I’ve spared no expense to create the MAXIMUM number of quizzes and coding exercises possible! It is literally impossible not to understand JavaScript arrays after watching the videos and completing the exercises. Add to this the handouts included in EVERY CHAPTER and you have a recipe for learning of epic proportions.
This course includes EIGHT action-packed chapters including…
All About Arrays Iterating Over Arrays Working with D3 and Lodash Working with the Spread and Rest Operator Sorting Arrays And more!
If you want to take your JavaScript arrays, or just coding in general, to the next level, this is the course for YOU!
Why hesitate? If you’re not 100% satisfied, just return the course for the money-back guarantee. You have literally 0 risk and huge benefits to gain.
Never manually write maps or filters again Swiftly process data in Angular or MongoDB Impress coworkers and hiring managers with your indepth knowledge of JS Arrays
I can personally say that this is one of the most exciting courses I’ve ever created. I’m confident anyone who takes this course will see a huge improvement in their day-to-day coding.
Full details Create a JavaScript array in 3 different ways Filter unwanted elements out of arrays Transform arrays into different arrays Reduce arrays to just one element Master the map function Apply the Rest and Spread ES6 Operators Work with D3.js Apply several Lodash functions including chunk and intersection Remove elements from arrays Insert elements into the middle of arrays
Full details Beginner student with very basic knowledge of JavaScript Programmer coming from different coding language who wishes to learn JavaScript Intermediate JavaScript Developers looking to take their knowledge of arrays to the next level Front-end developers of every kind Back-end developers working with Node
Full details
Reviews:
“Awesome Course” (Srikanth Reddy Gongati)
“My expectations was just recap some familiar methods. Then I got rid of the map/reduce/filter phobia, got started with D3, Lodash and realized different worlds with and without while/for loops. Teacher’s expertise is very good and diction is brilliant. This course is absolutely must-take for JS beginners and my only rebuke is no mention about pseudo-arrays and closures. But who knows, maybe such topic deserves even a bigger course.” (Eimrine The Webmaster)
“This course is an excellent introduction to the use of JavaScript arrays, including addressing their idiosyncrasies that don’t exist in other programming languages. Daniel includes reviews, quizzes, and programming exercises that help to lock in the learning quickly and effectively. The course may not be for absolute beginners, as you are assumed to have some knowledge of string manipulation within one of the exercises, but any beginning JavaScript or EcmaScript course should leave you ready to do this great course. Besides talking about the built-in functionality of arrays, Daniel also covers the basics of using some amazing open-source JavaScript libraries that will take your array manipulation programming to the next level. The instructor is easy to listen to, and to understand. This course definitely moves you along the path to becoming a professional JavaScript programmer. Thanks, Daniel!” (Kevin Kiser)
About Instructor:
Daniel Stern
Known in development circles as “the Code Whisperer,” Daniel Stern has been believed to possess a supernatural connection to computers ever since he talked the supercomputer Deep Blue off the roof of a twelve-story St. Petersburg apartment building, following its shameful loss to Gary Kasparov. He can often be found singing softly to his tablet, or gently caressing his aluminum keyboard in his arms. Daniel has been working as a front end and full stack developer in the tech industry since 2011. He’s developed single-page applications for banks like CIBC, charities like the Ontario Institute for Cancer Research, and at ad agencies like McLaren McCann, TraffikGroup and Olson. Throughout his labors, he’s worked on computer programming in his spare time because, well, he’s obsessed with it. In addition to being featured in both CSS Weekly and JavaScript weekly, Daniel is well-known throughout the open-source community for maintaining several open-source tools, most notably the Angular.js and LESS-based tool, Range .css and the Angular .js audio tool, ngAudio. In addition to being trusted by the open source community to develop top-quality, functional code, Daniel has also been invited to speak at numerous conferences including Full Stack Conference 2014 in London, England. Daniel is an active learner and very passionate about the following technologies, – Node.js – Angular.js – TypeScript – MongoDB – Brackets, the Open Source Code Editor – Esprima – LESS – Grunt – Yeoman – Many, many, many more
Instructor Other Courses:
Facebook Authorization with Node Ultimate JavaScript Strings Ultimate JavaScript Objects …………………………………………………………… Daniel Stern coupons Development course coupon Udemy Development course coupon Programming Languages course coupon Udemy Programming Languages course coupon Ultimate JavaScript Arrays Ultimate JavaScript Arrays course coupon Ultimate JavaScript Arrays coupon coupons
The post 50% off #Ultimate JavaScript Arrays – $10 appeared first on Udemy Cupón.
from http://www.xpresslearn.com/udemy/coupon/50-off-ultimate-javascript-arrays-10/
0 notes
Text
Why do you expect Native reactions for your mobile app?
Like many others, I was initially cynical about Facebook and the response to Instagram. Initial demonstrations of the JavaScript language extension of React, JSX, made many developers uncomfortable. We had been working for years to differentiate HTML and JavaScript, but it seemed that Respond merged them. Some have challenged the need for another library on the client side, in an ocean full of them.React has proven incredibly popular, as it turns out, both on my own projects and with many others across the world, including major companies like Netflix. And now the platform has been put onto the mobile with React Local.
React
Native is a great choice to create powerful iOS and Android apps that feel at home on their respective platforms, all while building on any previous experience in web development. React OverviewDescribed as "A JavaScript library to create user interfaces" by its developers, React focuses on the display portion of your application. More concretely, this means that when you write a React Native app, your view code will consist of writing React components, which are tiny pieces of code explaining how a portion of your app will look based on some collection of input data. Let's look at a small component of example that can be used to show a simple button. (I omit styles, for clarity's sake.)
This Button part has two pieces of input data: onPress, which is a callback function for when pressing the button; and text, which is the string to be displayed within the button. The XML-like structure that the render function returns is called JSX, which is syntactic sugar for calls to the function Respond. And TouchableOpacity and Text are existing components included with Native React. Now that this Button feature has been developed, with consistent actions and styling, it can be used several times in the application.Though this is a simple example, it shows how a piece by piece Respond app is designed. Continuing in this way, you can build components which reflect that abstraction layers. You can, for example, build a ButtonGroup component that contains several buttons connected to it. And building on that, you can write components which represent whole screens. Also as the device grows considerably larger, components at each stage remain understandable and manageably sized. Truly NativeMost JavaScript-based mobile apps use Cordova, or a framework that's based on it, like the common Ionic or Sencha Touch. You're able to make calls to native APIs with Cordova, but the majority of your software will be HTML and JavaScript within a WebView. Although you can approximate native components – and you can definitely create a great UI with HTML and JS – there's no Cordova app that matches the look and feel of a real native app. The little things-such as acceleration scrolling, keyboard actions, and navigation-all add up and can create unpleasant interactions for your customers when they're not behaving as planned.While you still write JavaScript with React Native, the components you create end up rendering as native widgets on the platform. If you're familiar with Reacting to the Net, you'll feel at home. And if you've written apps in Java or Objective-C you can know several of the components of React Native instantly.The best feature of react when it was initially released for the web was to render the view layer of your device a pure state production. As a developer, this means that you simply decide what your view will look like based on input data, instead of making imperative adjustments to view components (for example, programmatically modifying the text or color of a button by calling a function on it), and Respond smartly makes the adjustments for you when the state changes.This change in thought could make building UIs dramatically simpler. We've all used apps where the UI reaches a weird unintended state after taking a direction the creator wasn't looking for. With Respond, these bugs are much easier to monitor. You don't have to care as much about the user's journey through the device as you do, instead concentrate on making sure that your view statements can accommodate all possible shapes for the state of your app. That's a lot easier problem to tackle-and check for. The machine also understands it more quickly, and changes to the static analysis and type systems would only make it easier to spot such glitches.Native component definitions look and function pretty much like web component reaction, but target native UI widgets instead of HTML. So you can use a < View > instead of using a < div > (which is converted to a native UIView on iOS, and on Ios, android.view). As data changes for your components, React Native will determine what needs to be modified in your view, and will make the required calls to whatever native UI widgets are displayed.And it is fast! JavaScript isn't as fast as native code can be, but JavaScript and Respond Native are more than able to keep the device running at 60 frames per second for most of the tasks. Under the hood, the JavaScript code runs on its own thread, separate from the thread of the main UI. So even though your device runs a complex logic, your UI can still animate or scroll at 60fps smoothly, as long as the JS thread doesn't block the UI.Many software frameworks promise to let you make a great Android and iOS device, but the product always ends up somewhere in the middle without feeling very native to either one. By supporting the native platforms but also allowing the app to share much of its codebase between platforms, React Native allows developers to create amazing native apps that their customers would love, without the increase in budget building that might require two separate apps. EASILY UNDERSTANDABLESome of the biggest benefits of React is how open it is to even those who are unfamiliar with it. Most frameworks allow you to study a long list of terms that are only useful within that context, while ignoring the basics of the language. Reacting does its very best to do the opposite. Take the difference between rendering a portion of a friends list in React Native vs Ionic (AngularJS) as an example. With Ionic, you use the command ngRepeat. Let's assume we have an array of friends with the following fields each: first name, last name and is online. Yet we just want to view those friends who are online right now. Here's our checker:
our view:
This code snippet poses some immediate concerns if you aren't familiar with Ionic / AngularJS. What's the$scope? Which is Filter Syntax? And how can I add more behaviour, like sorting the friends list? With Respond Native, using the built-in filter and map functions, you make use of your existing language fundamentals awareness.
Although the React Native snippet still poses some concerns (What does React.createClass do? What is rendering?), the fact that the majority of the code here is just standard JavaScript means that beginners can find it more accessible and tenable. As an experienced developer, you'll save time using standard language features you already learn, and make your code more accessible to other developers. Perhaps just as importantly, React acts as an outstanding teaching resource if you are less familiar with JavaScript. Whether you haven't learned how to use maps or filters yet, practicing React will also teach you these. NgRepeat instruction just teaches you ngRepeat.And this is before considering mobile production on multiplatforms. While in a React Native project, which targets both iOS and Android, there will be some pieces of platform-specific code, the majority will be shared and a JavaScript developer will understand all this. Vibrant EcosystemSince most of your React Native code is just plain JavaScript, it reaps the advantages of all language advances and their ecosystem. Instead of waiting for all the array manipulation functions you want to enforce on your System developers, why not just use lodash? Only use Moment.js to control or show the dates and times. And all those beautiful new features of the ES6 language you've been waiting for to try out? React is not only a perfect match, their use is encouraged!Some libraries are especially suitable for use with React Native, thanks to its declarative views. One that I would be remiss in not considering is redux. Described as a "predictable state container," redux is a great library to control the state of your application. Redux is highly testable, and allows small functions to write which are clear about what data they modify. If that way your state changes are written, your app can take advantage of powerful features, such as global undo / redo and hot reload. ConclusionI had a lot of fun learning and developing with React Native, between the ease of creation, the quality of the apps developed with it, and the richness of the platform and ecosystem.
As a reputed Software Solutions Developer we have expertise in providing dedicated remote and outsourced technical resources for software services at very nominal cost. Besides experts in full stacks We also build web solutions, mobile apps and work on system integration, performance enhancement, cloud migrations and big data analytics. Don’t hesitate to
get in touch with us!
Source:
whizzystack.co
#b2b ecommerce
#b2b content marketing
#b2b market research companies
#socialmediamarketing
#Ecommerce
#socialmediamarketing
0 notes
Text
50% off #Ultimate JavaScript Arrays – $10
Master every aspect of JavaSript arrays, one of the most important elements in one of the most powerful languages!
Video: 1.5 hours, – 9 coding exercises, 44 lectures
Average rating 4.7/5 (4.7)
Course requirements:
Beginner understanding of JavaScript Have access to computer with Google Chrome in order to participate in coding exercises Have time to complete the quizzes / tests Interest in improving coding in general
Course description:
How much is not understanding JavaScript arrays costing you every day?
After many years of anticipation, Daniel Stern, aka the Code Whisperer, has finally released the MOST COMPREHENSIVE course on JavaScript Arrays known to the developer at this time.
This is the ONLY course designed to FULLY appraise you of EVERYTHING array-related in JavaScript!
Before this course is over, you’ll learn….
How to create, edit, delete and access array elements How to filter, map, reduce and sort arrays How to use D3.js and Lodash.js So much more
I’ve spared no expense to create the MAXIMUM number of quizzes and coding exercises possible! It is literally impossible not to understand JavaScript arrays after watching the videos and completing the exercises. Add to this the handouts included in EVERY CHAPTER and you have a recipe for learning of epic proportions.
This course includes EIGHT action-packed chapters including…
All About Arrays Iterating Over Arrays Working with D3 and Lodash Working with the Spread and Rest Operator Sorting Arrays And more!
If you want to take your JavaScript arrays, or just coding in general, to the next level, this is the course for YOU!
Why hesitate? If you’re not 100% satisfied, just return the course for the money-back guarantee. You have literally 0 risk and huge benefits to gain.
Never manually write maps or filters again Swiftly process data in Angular or MongoDB Impress coworkers and hiring managers with your indepth knowledge of JS Arrays
I can personally say that this is one of the most exciting courses I’ve ever created. I’m confident anyone who takes this course will see a huge improvement in their day-to-day coding.
Full details Create a JavaScript array in 3 different ways Filter unwanted elements out of arrays Transform arrays into different arrays Reduce arrays to just one element Master the map function Apply the Rest and Spread ES6 Operators Work with D3.js Apply several Lodash functions including chunk and intersection Remove elements from arrays Insert elements into the middle of arrays
Full details Beginner student with very basic knowledge of JavaScript Programmer coming from different coding language who wishes to learn JavaScript Intermediate JavaScript Developers looking to take their knowledge of arrays to the next level Front-end developers of every kind Back-end developers working with Node
Full details
Reviews:
“Awesome Course” (Srikanth Reddy Gongati)
“My expectations was just recap some familiar methods. Then I got rid of the map/reduce/filter phobia, got started with D3, Lodash and realized different worlds with and without while/for loops. Teacher’s expertise is very good and diction is brilliant. This course is absolutely must-take for JS beginners and my only rebuke is no mention about pseudo-arrays and closures. But who knows, maybe such topic deserves even a bigger course.” (Eimrine The Webmaster)
“This course is an excellent introduction to the use of JavaScript arrays, including addressing their idiosyncrasies that don’t exist in other programming languages. Daniel includes reviews, quizzes, and programming exercises that help to lock in the learning quickly and effectively. The course may not be for absolute beginners, as you are assumed to have some knowledge of string manipulation within one of the exercises, but any beginning JavaScript or EcmaScript course should leave you ready to do this great course. Besides talking about the built-in functionality of arrays, Daniel also covers the basics of using some amazing open-source JavaScript libraries that will take your array manipulation programming to the next level. The instructor is easy to listen to, and to understand. This course definitely moves you along the path to becoming a professional JavaScript programmer. Thanks, Daniel!” (Kevin Kiser)
About Instructor:
Daniel Stern
Known in development circles as “the Code Whisperer,” Daniel Stern has been believed to possess a supernatural connection to computers ever since he talked the supercomputer Deep Blue off the roof of a twelve-story St. Petersburg apartment building, following its shameful loss to Gary Kasparov. He can often be found singing softly to his tablet, or gently caressing his aluminum keyboard in his arms. Daniel has been working as a front end and full stack developer in the tech industry since 2011. He’s developed single-page applications for banks like CIBC, charities like the Ontario Institute for Cancer Research, and at ad agencies like McLaren McCann, TraffikGroup and Olson. Throughout his labors, he’s worked on computer programming in his spare time because, well, he’s obsessed with it. In addition to being featured in both CSS Weekly and JavaScript weekly, Daniel is well-known throughout the open-source community for maintaining several open-source tools, most notably the Angular.js and LESS-based tool, Range .css and the Angular .js audio tool, ngAudio. In addition to being trusted by the open source community to develop top-quality, functional code, Daniel has also been invited to speak at numerous conferences including Full Stack Conference 2014 in London, England. Daniel is an active learner and very passionate about the following technologies, – Node.js – Angular.js – TypeScript – MongoDB – Brackets, the Open Source Code Editor – Esprima – LESS – Grunt – Yeoman – Many, many, many more
Instructor Other Courses:
Facebook Authorization with Node Ultimate JavaScript Strings Ultimate JavaScript Objects …………………………………………………………… Daniel Stern coupons Development course coupon Udemy Development course coupon Programming Languages course coupon Udemy Programming Languages course coupon Ultimate JavaScript Arrays Ultimate JavaScript Arrays course coupon Ultimate JavaScript Arrays coupon coupons
The post 50% off #Ultimate JavaScript Arrays – $10 appeared first on Udemy Cupón.
from Udemy Cupón http://www.xpresslearn.com/udemy/coupon/50-off-ultimate-javascript-arrays-10/
from https://xpresslearn.wordpress.com/2017/02/04/50-off-ultimate-javascript-arrays-10/
0 notes
Text
50% off #Ultimate JavaScript Arrays – $10
Master every aspect of JavaSript arrays, one of the most important elements in one of the most powerful languages!
1.5 hours, – 9 coding exercises, 44 lectures
Average rating 4.0/5 (4.0 (30 ratings) Instead of using a simple lifetime average, Udemy calculates a course’s star rating by considering a number of different factors such as the number of ratings, the age of ratings, and the likelihood of fraudulent ratings.)
Course requirements:
Beginner understanding of JavaScript Have access to computer with Google Chrome in order to participate in coding exercises Have time to complete the quizzes / tests Interest in improving coding in general
Course description:
How much is not understanding JavaScript arrays costing you every day?
After many years of anticipation, Daniel Stern, aka the Code Whisperer, has finally released the MOST COMPREHENSIVE course on JavaScript Arrays known to the developer at this time.
This is the ONLY course designed to FULLY appraise you of EVERYTHING array-related in JavaScript!
Before this course is over, you’ll learn….
How to create, edit, delete and access array elements How to filter, map, reduce and sort arrays How to use D3.js and Lodash.js So much more
I’ve spared no expense to create the MAXIMUM number of quizzes and coding exercises possible! It is literally impossible not to understand JavaScript arrays after watching the videos and completing the exercises. Add to this the handouts included in EVERY CHAPTER and you have a recipe for learning of epic proportions.
This course includes EIGHT action-packed chapters including…
All About Arrays Iterating Over Arrays Working with D3 and Lodash Working with the Spread and Rest Operator Sorting Arrays And more!
If you want to take your JavaScript arrays, or just coding in general, to the next level, this is the course for YOU!
Why hesitate? If you’re not 100% satisfied, just return the course for the money-back guarantee. You have literally 0 risk and huge benefits to gain.
Never manually write maps or filters again Swiftly process data in Angular or MongoDB Impress coworkers and hiring managers with your indepth knowledge of JS Arrays
I can personally say that this is one of the most exciting courses I’ve ever created. I’m confident anyone who takes this course will see a huge improvement in their day-to-day coding.
Full details Create a JavaScript array in 3 different ways Filter unwanted elements out of arrays Transform arrays into different arrays Reduce arrays to just one element Master the map function Apply the Rest and Spread ES6 Operators Work with D3.js Apply several Lodash functions including chunk and intersection Remove elements from arrays Insert elements into the middle of arrays
Full details Beginner student with very basic knowledge of JavaScript Programmer coming from different coding language who wishes to learn JavaScript Intermediate JavaScript Developers looking to take their knowledge of arrays to the next level Front-end developers of every kind Back-end developers working with Node
Full details
Reviews:
“This is my second Daniel Stern course, I previously completed Ultimate Javascript Object. Daniel does an outstanding job, explaining the material and providing coding examples that you can do as you watch the videos. Daniel is clear, concise and presents even dense information in a manner that’s easy to understand. The pacing of the videos is nice as well, they are chunked in an effective way so you never get overloaded. It also makes it easy to find the lesson you need to review quickly if you forget something. I highly recommend using Atom with the platformio-ide-terminal installed so you can save your code after going through the lesson. Doing it on the Chrome console you don’t have anything you can keep afterward. I like to refer back to the exercises I wrote when I forget something, but that’s just a personal preference.” (Jose Rosario)
“Awesome Course” (Srikanth Reddy Gongati)
“My expectations was just recap some familiar methods. Then I got rid of the map/reduce/filter phobia, got started with D3, Lodash and realized different worlds with and without while/for loops. Teacher’s expertise is very good and diction is brilliant. This course is absolutely must-take for JS beginners and my only rebuke is no mention about pseudo-arrays and closures. But who knows, maybe such topic deserves even a bigger course.” (Eimrine The Webmaster)
About Instructor:
Daniel Stern
Known in development circles as “the Code Whisperer,” Daniel Stern has been believed to possess a supernatural connection to computers ever since he talked the supercomputer Deep Blue off the roof of a twelve-story St. Petersburg apartment building, following its shameful loss to Gary Kasparov. He can often be found singing softly to his tablet, or gently caressing his aluminum keyboard in his arms. Daniel has been working as a front end and full stack developer in the tech industry since 2011. He’s developed single-page applications for banks like CIBC, charities like the Ontario Institute for Cancer Research, and at ad agencies like McLaren McCann, TraffikGroup and Olson. Throughout his labors, he’s worked on computer programming in his spare time because, well, he’s obsessed with it. In addition to being featured in both CSS Weekly and JavaScript weekly, Daniel is well-known throughout the open-source community for maintaining several open-source tools, most notably the Angular.js and LESS-based tool, Range .css and the Angular .js audio tool, ngAudio. In addition to being trusted by the open source community to develop top-quality, functional code, Daniel has also been invited to speak at numerous conferences including Full Stack Conference 2014 in London, England. Daniel is an active learner and very passionate about the following technologies, – Node.js – Angular.js – TypeScript – MongoDB – Brackets, the Open Source Code Editor – Esprima – LESS – Grunt – Yeoman – Many, many, many more
Instructor Other Courses:
Facebook Authorization with Node Daniel Stern, The Code Whisperer (2) $10 $90 Ultimate JavaScript Strings Ultimate JavaScript Objects …………………………………………………………… Daniel Stern coupons Development course coupon Udemy Development course coupon Programming Languages course coupon Udemy Programming Languages course coupon Ultimate JavaScript Arrays Ultimate JavaScript Arrays course coupon Ultimate JavaScript Arrays coupon coupons
The post 50% off #Ultimate JavaScript Arrays – $10 appeared first on Udemy Cupón/ Udemy Coupon/.
from Udemy Cupón/ Udemy Coupon/ http://coursetag.com/udemy/coupon/50-off-ultimate-javascript-arrays-10/ from Course Tag https://coursetagcom.tumblr.com/post/156534821833
0 notes
Photo

Build a JavaScript Command Line Interface (CLI) with Node.js
As great as Node.js is for “traditional” web applications, its potential uses are far broader. Microservices, REST APIs, tooling, working with the Internet of Things and even desktop applications: it’s got your back.
Another area where Node.js is really useful is for building command-line applications — and that’s what we’re going to be doing in this article. We’re going to start by looking at a number of third-party packages designed to help work with the command line, then build a real-world example from scratch.
What we’re going to build is a tool for initializing a Git repository. Sure, it’ll run git init under the hood, but it’ll do more than just that. It will also create a remote repository on GitHub right from the command line, allow the user to interactively create a .gitignore file, and finally perform an initial commit and push.
As ever, the code accompanying this tutorial can be found on our GitHub repo.

Why Build a Command-line Tool with Node.js?
Before we dive in and start building, it’s worth looking at why we might choose Node.js to build a command-line application.
The most obvious advantage is that, if you’re reading this, you’re probably already familiar with it — and, indeed, with JavaScript.
Another key advantage, as we’ll see as we go along, is that the strong Node.js ecosystem means that among the hundreds of thousands of packages available for all manner of purposes, there are a number which are specifically designed to help build powerful command-line tools.
Finally, we can use npm to manage any dependencies, rather than have to worry about OS-specific package managers such as Aptitude, Yum or Homebrew.
Tip: that isn’t necessarily true, in that your command-line tool may have other external dependencies.
What We’re Going to Build: ginit

For this tutorial, We’re going to create a command-line utility which I’m calling ginit. It’s git init, but on steroids.
You’re probably wondering what on earth that means.
As you no doubt already know, git init initializes a git repository in the current folder. However, that’s usually only one of a number of repetitive steps involved in the process of hooking up a new or existing project to Git. For example, as part of a typical workflow, you may well:
initialise the local repository by running git init
create a remote repository, for example on GitHub or Bitbucket — typically by leaving the command line and firing up a web browser
add the remote
create a .gitignore file
add your project files
commit the initial set of files
push up to the remote repository.
There are often more steps involved, but we’ll stick to those for the purposes of our app. Nevertheless, these steps are pretty repetitive. Wouldn’t it be better if we could do all this from the command line, with no copy-pasting of Git URLs and such like?
So what ginit will do is create a Git repository in the current folder, create a remote repository — we’ll be using GitHub for this — and then add it as a remote. Then it will provide a simple interactive “wizard” for creating a .gitignore file, add the contents of the folder and push it up to the remote repository. It might not save you hours, but it’ll remove some of the initial friction when starting a new project.
With that in mind, let’s get started.
The Application Dependencies
One thing is for certain: in terms of appearance, the console will never have the sophistication of a graphical user interface. Nevertheless, that doesn’t mean it has to be plain, ugly, monochrome text. You might be surprised by just how much you can do visually, while at the same time keeping it functional. We’ll be looking at a couple of libraries for enhancing the display: chalk for colorizing the output and clui to add some additional visual components. Just for fun, we’ll use figlet to create a fancy ASCII-based banner and we’ll also use clear to clear the console.
In terms of input and output, the low-level Readline Node.js module could be used to prompt the user and request input, and in simple cases is more than adequate. But we’re going to take advantage of a third-party package which adds a greater degree of sophistication — Inquirer. As well as providing a mechanism for asking questions, it also implements simple input controls: think radio buttons and checkboxes, but in the console.
We’ll also be using minimist to parse command-line arguments.
Here’s a complete list of the packages we’ll use specifically for developing on the command line:
chalk — colorizes the output
clear — clears the terminal screen
clui — draws command-line tables, gauges and spinners
figlet — creates ASCII art from text
inquirer — creates interactive command-line user interface
minimist — parses argument options
configstore — easily loads and saves config without you having to think about where and how.
Additionally, we’ll also be using the following:
@octokit/rest — a GitHub REST API client for Node.js
lodash — a JavaScript utility library
simple-git — a tool for running Git commands in a Node.js application
touch — a tool for implementating the Unix touch command.
Getting Started
Although we’re going to create the application from scratch, don’t forget that you can also grab a copy of the code from the repository which accompanies this article.
Create a new directory for the project. You don’t have to call it ginit, of course:
mkdir ginit cd ginit
Create a new package.json file:
npm init
Follow the simple wizard, for example:
name: (ginit) version: (1.0.0) description: "git init" on steroids entry point: (index.js) test command: git repository: keywords: Git CLI author: [YOUR NAME] license: (ISC)
Now install the dependencies:
npm install chalk clear clui figlet inquirer minimist configstore @octokit/rest lodash simple-git touch --save
Alternatively, simply copy-paste the following package.json file — modifying the author appropriately — or grab it from the repository which accompanies this article:
{ "name": "ginit", "version": "1.0.0", "description": "\"git init\" on steroids", "main": "index.js", "scripts": { "test": "echo \"Error: no test specified\" && exit 1" }, "keywords": [ "Git", "CLI" ], "author": "Lukas White <[email protected]>", "license": "ISC", "bin": { "ginit": "./index.js" }, "dependencies": { "@octokit/rest": "^14.0.5", "chalk": "^2.3.0", "clear": "0.0.1", "clui": "^0.3.6", "configstore": "^3.1.1", "figlet": "^1.2.0", "inquirer": "^5.0.1", "lodash": "^4.17.4", "minimist": "^1.2.0", "simple-git": "^1.89.0", "touch": "^3.1.0" } }
Now create an index.js file in the same folder and require the following dependencies:
const chalk = require('chalk'); const clear = require('clear'); const figlet = require('figlet');
Adding Some Helper Methods
We’re going to create a lib folder where we’ll split our helper code into modules:
files.js — basic file management
inquirer.js — command-line user interaction
github.js — access token management
repo.js — Git repository management.
Let’s start with lib/files.js. Here, we need to:
get the current directory (to get a default repo name)
check whether a directory exists (to determine whether the current folder is already a Git repository by looking for a folder named .git).
This sounds straightforward, but there are a couple of gotchas to take into consideration.
Firstly, you might be tempted to use the fs module’s realpathSync method to get the current directory:
path.basename(path.dirname(fs.realpathSync(__filename)));
This will work when we’re calling the application from the same directory (e.g. using node index.js), but bear in mind that we’re going to be making our console application available globally. This means we’ll want the name of the directory we’re working in, not the directory where the application resides. For this purpose, it’s better to use process.cwd:
path.basename(process.cwd());
Secondly, the preferred method of checking whether a file or directory exists keeps changing.The current way is to use fs.stat or fs.statSync. These throw an error if there’s no file, so we need to use a try … catch block.
Finally, it’s worth noting that when you’re writing a command-line application, using the synchronous version of these sorts of methods is just fine.
Putting that all together, let’s create a utility package in lib/files.js:
const fs = require('fs'); const path = require('path'); module.exports = { getCurrentDirectoryBase : () => { return path.basename(process.cwd()); }, directoryExists : (filePath) => { try { return fs.statSync(filePath).isDirectory(); } catch (err) { return false; } } };
Go back to index.js and ensure you require the new file:
const files = require('./lib/files');
With this in place, we can start developing the application.
Initializing the Node CLI
Now let’s implement the start-up phase of our console application.
In order to demonstrate some of the packages we’ve installed to enhance the console output, let’s clear the screen and then display a banner:
clear(); console.log( chalk.yellow( figlet.textSync('Ginit', { horizontalLayout: 'full' }) ) );
The output from this is shown below.
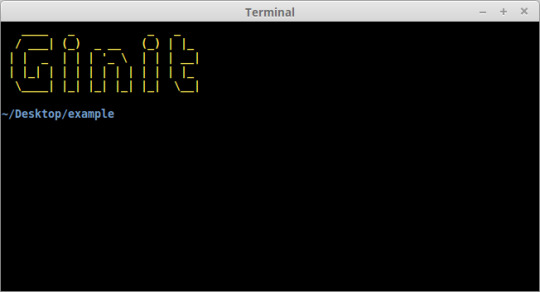
Next up, let’s run a simple check to ensure that the current folder isn’t already a Git repository. That’s easy: we just check for the existence of a .git folder using the utility method we just created:
if (files.directoryExists('.git')) { console.log(chalk.red('Already a git repository!')); process.exit(); }
Tip: notice we’re using the chalk module to show a red-colored message.
The post Build a JavaScript Command Line Interface (CLI) with Node.js appeared first on SitePoint.
by Lukas White via SitePoint https://ift.tt/2VN31GE
0 notes
Text
Avoiding those dang cannot read property of undefined errors
Uncaught TypeError: Cannot read property 'foo' of undefined. The dreaded error we all hit at some point in JavaScript development. Could be an empty state from an API that returns differently than you expected. Could be something else. We don’t know because the error itself is so general and broad.
I recently had an issue where certain environment variables weren't being pulled in for one reason or another, causing all sorts of funkiness with that error staring me in the face. Whatever the cause, it can be a disastrous error if it’s left unaccounted for, so how can we prevent it in the first place?
Let’s figure it out.
Utility library
If you are already using a utility library in your project, there is a good chance that it includes a function for preventing this error. _.get in lodash (docs) or R.path in Ramda (docs) allow accessing the object safely. If you are already using a utility library, this is likely the simplest solution. If you are not using a utility library, read on!
Short-circuiting with &&
One interesting fact about logical operators in JavaScript is that they don't always return a boolean. According to the spec, "the value produced by a && or || operator is not necessarily of type Boolean. The value produced will always be the value of one of the two operand expressions.” In the case of the && operator, the first expression will be used if it a "falsy" value. Otherwise, the second expression will be used. This means that the expression 0 && 1 will be evaluated as 0 (a falsy value), and the expression 2 && 3 will be evaluated as 3. If multiple && expressions are chained together, they will evaluate to either the first falsy value or the last value. For example, 1 && 2 && 3 && null && 4 will evaluate to null, and 1 && 2 && 3 will evaluate to 3.
How is this useful for safely accessing nested object properties? Logical operators in JavaScript will "short-circuit." In this case of &&, this means that the expression will cease moving forward after it reaches its first falsy value.
const foo = false && destroyAllHumans(); console.log(foo); // false, and humanity is safe
In this example, destroyAllHumans is never called because the && operand stopped all evaluation after false.
This can be used to safely access nested properties.
const meals = { breakfast: null, // I skipped the most important meal of the day! :( lunch: { protein: 'Chicken', greens: 'Spinach', }, dinner: { protein: 'Soy', greens: 'Kale', }, }; const breakfastProtein = meals.breakfast && meals.breakfast.protein; // null const lunchProtein = meals.lunch && meals.lunch.protein; // 'Chicken'
Aside from its simplicity, one of the main advantages of this approach is its brevity when dealing with small chains. However, when accessing deeper objects, this can be quite verbose.
const favorites = { video: { movies: ['Casablanca', 'Citizen Kane', 'Gone With The Wind'], shows: ['The Simpsons', 'Arrested Development'], vlogs: null, }, audio: { podcasts: ['Shop Talk Show', 'CodePen Radio'], audiobooks: null, }, reading: null, // Just kidding -- I love to read }; const favoriteMovie = favorites.video && favorites.video.movies && favorites.video.movies[0]; // Casablanca const favoriteVlog = favorites.video && favorites.video.vlogs && favorites.video.vlogs[0]; // null
The more deeply nested an object is, the more unwieldy it gets.
The “Maybe Monad”
Oliver Steele came up with this method and goes through it in much more detail in his blog post, "Monads on the Cheap I: The Maybe Monad." I will attempt to give a brief explanation here.
const favoriteBook = ((favorites.reading||{}).books||[])[0]; // undefined const favoriteAudiobook = ((favorites.audio||{}).audiobooks||[])[0]; // undefined const favoritePodcast = ((favorites.audio||{}).podcasts||[])[0]; // 'Shop Talk Show'
Similar to the short-circuit example above, this method works by checking if a value is falsy. If it is, it will attempt to access the next property on an empty object. In the example above, favorites.reading is null, so the books property is being accessed from an empty object. This will result in an undefined, so the 0 will likewise be accessed from an empty array.
The advantage of this method over the && method is that it avoids repetition of property names. On deeper objects, this can be quite a significant advantage. The primary disadvantage would be readability — it is not a common pattern, and may take a reader a moment to parse out how it is working.
try/catch
try...catch statements in JavaScript allow another method for safely accessing properties.
try { console.log(favorites.reading.magazines[0]); } catch (error) { console.log("No magazines have been favorited."); }
Unfortunately, in JavaScript, try...catch statements are not expressions. They do not evaluate to a value as they do in some languages. This prevents a concise try statement as a way of setting a variable.
One option is to use a let variable that is defined in the block above the try...catch.
let favoriteMagazine; try { favoriteMagazine = favorites.reading.magazines[0]; } catch (error) { favoriteMagazine = null; /* any default can be used */ };
Although it’s verbose, this works for setting a single variable (that is, if the mutable variable doesn't scare you off). However, issues can arise if they’re done in bulk.
let favoriteMagazine, favoriteMovie, favoriteShow; try { favoriteMovie = favorites.video.movies[0]; favoriteShow = favorites.video.shows[0]; favoriteMagazine = favorites.reading.magazines[0]; } catch (error) { favoriteMagazine = null; favoriteMovie = null; favoriteShow = null; }; console.log(favoriteMovie); // null console.log(favoriteShow); // null console.log(favoriteMagazine); // null
If any of the attempts to access the property fails, this will cause all of them to fall back into their defaults.
An alternative is to wrap the try...catch in a reusable utility function.
const tryFn = (fn, fallback = null) => { try { return fn(); } catch (error) { return fallback; } } const favoriteBook = tryFn(() => favorites.reading.book[0]); // null const favoriteMovie = tryFn(() => favorites.video.movies[0]); // "Casablanca"
By wrapping the access to the object in a function, you can delay the "unsafe" code and pass it into a try...catch.
A major advantage of this method is how natural it is to access the property. As long as properties are wrapped in a function, they are safely accessed. A default value can also be specified in the case of a non-existent path.
Merge with a default object
By merging an object with a similarly shaped object of "defaults," we can ensure that the path that we are trying to access is safe.
const defaults = { position: "static", background: "transparent", border: "none", }; const settings = { border: "1px solid blue", }; const merged = { ...defaults, ...settings }; console.log(merged); /* { position: "static", background: "transparent", border: "1px solid blue" } */
Careful, though, because the entire nested object can be overwritten rather than a single property.
const defaults = { font: { family: "Helvetica", size: "12px", style: "normal", }, color: "black", }; const settings = { font: { size: "16px", } }; const merged = { ...defaults, ...settings, }; console.log(merged.font.size); // "16px" console.log(merged.font.style); // undefined
Oh no! To fix this, we'll need to similarly copy each of the nested objects.
const merged = { ...defaults, ...settings, font: { ...defaults.font, ...settings.font, }, }; console.log(merged.font.size); // "16px" console.log(merged.font.style); // "normal"
Much better!
This pattern is common with plugins or components that accept a large settings object with included defaults.
A bonus about this approach is that, by writing a default object, we’re including documentation on how an object should look. Unfortunately, depending on the size and shape of the data, the "merging" can be littered with copying each nested object.
The future: optional chaining
There is currently a TC39 proposal for a feature called "optional chaining." This new operator would look like this:
console.log(favorites?.video?.shows[0]); // 'The Simpsons' console.log(favorites?.audio?.audiobooks[0]); // undefined
The ?. operator works by short-circuiting: if the left-hand side of the ?. operator evaluates to null or undefined, the entire expression will evaluate to undefined and the right-hand side will remain unevaluated.
To have a custom default, we can use the || operator in the case of an undefined.
console.log(favorites?.audio?.audiobooks[0] || "The Hobbit");
Which method should you use?
The answer, as you might have guessed, is that age-old answer… "it depends." If the optional chaining operator has been added to the language and has the necessary browser support, it is likely the best option. If you are not from the future, however, there are more considerations to take into account. Are you using a utility library? How deeply nested is your object? Do you need to specify defaults? Different cases may warrant a different approach.
The post Avoiding those dang cannot read property of undefined errors appeared first on CSS-Tricks.
Avoiding those dang cannot read property of undefined errors published first on https://deskbysnafu.tumblr.com/
0 notes