#Logger Switch Unit
Explore tagged Tumblr posts
Visit Tumblr Blog
Explore Tumblr blogs with no restrictions, modern design and the best experience.
Last Seen Tumblr Blogs


Fun Fact
Mobile US users spent an average of 115.8 minutes on Tumblr app monthly.
Text
Keysight 34972A Lxi Data Acquisition Logger Switch Unit My41217227 - Auto2mation
The Keysight 34972A LXI Data Acquisition Logger Switch Unit MY41217227 from Auto2mation is a reliable, high-performance data logging and measurement solution. It features a built-in 6½ digit digital multimeter, 3-slot mainframe, and supports up to 120 channels for accurate data collection. Designed with LXI compliance, it allows easy network connectivity for remote monitoring and control. Ideal for both industrial and lab environments, this compact unit simplifies testing and data logging tasks. With its user-friendly interface and powerful capabilities, the 34972A ensures fast setup, precise measurements, and dependable performance for various test automation needs.
#industrial automation#industrial equipment#industrial spare parts#industrial#automation#industrial and marine automation#industrial parts supplier#industrial innovation#automation solutions#Marine Automation#marine equipment#marine spare parts#auto2mation#equipment#automation equipment#industrial automation applications#Manufacturing#Keysight#Data Acquisition#Logger Switch Unit#Switch
0 notes
Text
WiFi Dashboard for Solar Off-Grid Power Plants
This WiFi interface and Data Logger software are used mainly for Solar Off-Grid Power plants This contains wifi connection information, parameter dials, operational status, energy consumption status and fault status of the Unit History option allows the user to access the data history of a particular unit by searching the modem id. Upto 100 entries can be viewed in a single page. Every five minutes the data will be logged in the history and refreshed Data Config option allows the user to configure the data in the dashboard of a particular unit WiFi credential is to connect the unit to the desired wifi network. This can be achieved by entering Modem id, Network name and Password Switch option in the side panel allows the remote operation of the unit. The whole unit or only the charging can be turned ON/OFF from the dashboard by operating the respective ON and OFF tabs User manual option provides the instructions to configure modem to the wifi network and also use the website dashboard
Don’t forget to LIKE, COMMENT, and SUBSCRIBE for more renewable energy solutions and solar projects!
Enquire Now: 9035024760 or [email protected]
Follow our LinkedIn page: https://www.linkedin.com/company/53510028/admin/dashboard/
Follow our Facebook page: https://www.facebook.com/UniparEnergySystemsPvtLtd
Follow our Instagram: https://www.instagram.com/uniparenergysystemspvtltd/
Subscribe our YouTube channel: https://www.youtube.com/watch?v=3hchIw7CFjw
Visit our website: https://unipar.in/
#off grid solar system#off grid solar power systems#off grid solar electric system#grid off solar system#off grid inverter#off grid solar inverter#inverter solar off grid#grid off inverter#inverter grid off#pv inverter off grid#off grid solar#grid solar system
2 notes
·
View notes
Text
Try To Keep Your Kids Secure By Keeping Track Of Their Internet Activity
Need to know the way to keep track of childrens' cell smartphone activity? The days of you working with a private detective are nearly over. It's now easy to see who your children are speaking with by using an iPhone spy program. Spy software application are easy to use, budget-friendly, and can rapidly monitor exactly what your kids are doing online.
Concerned about what your kids are doing online? You can easily set up a mobile spying app on their cellphone. These easy-to-use software application applications allow you to keep track of their online activity, read their texts, keep track of their place, and log spy software apps their calls.
Learn ways to keep an eye on your own youngsters smartphone right now
When you have actually installed one of these user friendly mobile spying apps, you'll be amazed at what you can learn. Flexispy is among the most popular youngsters keeping track of software programs on the market today. Here are a few of the things it can do for you:
Offer instantaneous consumer support by means of email or text. You can access consumer support from any location, which is fantastic if you run out town and the youngsters want to contact you immediately. You can likewise see comprehensive logs of all inbound and outgoing calls, SMS messages sent and received, area information, and more. With an Flexispy Spying Application, moms and dads never ever need to fret about missing a company call because they were too busy to inspect their mobile smartphone.
View comprehensive logs of calls. This spy app enables you to view any calls that enter and head out of your child's cell phone. It even records video calls. With a comprehensive logs of activity, you can see whatever even if your kid leaves the space.
Track where your children are throughout the day. With this application, you can get detailed maps of where your kids are at any time. With basic GPS place services, you can learn where your kid is at any time of the day.
This implies you can monitor where they are during work breaks and after hours. If you suspect that your kid is cheating, this tool will assist you gather tough evidence.
Take pictures and videos with your cell phone. The integrated camera in mspy assists you take quality images and videos with your child, even if they're not watching. The HD quality electronic camera in the iPhone Spy Camera Plus also enables you to take high quality videos and pictures. This spy application allows you to tape the whole day's activity on your mobile cell phone, instantly storing it onto your disk drive.
Keep your kids safe by keeping an eye on their online activity
MSPY is compatible with the current iPhones and iPad devices running on iOS 6 and above. It likewise supports Android cell phone running on Package Kat 4.4 and above and the Windows Smartphone 7 os. This suggests that this item will deal with any of the numerous mobile phones that are currently on the marketplace. As long as the screen size is larger than 5.5 inches, this application will work on any device.
To utilize this item, all you require to do is download the free mobile application from the Apple Application Shop or Google Play. After installation, set the product up by following the onscreen guidelines. When you've installed the application, switch on the Bluetooth made it possible for gadget and tap the sensing unit to scan the area. You'll then be able to keep track of activity made by your child in the space.
The main screen of the program enables you to monitor incoming and outbound text. You'll also find a number of other buttons along with volume controls. There is also an external key logger control board included in the item. The external crucial logger enables you to view every text, email and number sent out to and gotten from the cellphone. You can even listen to conversations on the phone and see who is calling and talking.
Kids will be extremely amused when they find that their moms and dads are continuously tracking their cell phone use, specifically when parents know that the kids are the ones that secretly send out text and call other people. Utilizing this tracking application will make moms and dads more familiar with what their youngsters are doing on their mobile phones.
The majority of kids are not going to start and even make the most of the spying function, but discovering it will certainly help parents guarantee that their kids are not entering difficulty.
You can attempt some of the free apps first to see if it works for you. Most of these apps work just great with the current os like Windows Mobile and BlackBerry. This tracking program is the most safe and discreet method to keep an eye on your children's mobile activities.
It works as an unobtrusive parent by logging the activity on the background, so nobody else will understand that it's there.
youtube
1 note
·
View note
Text
bitdefender total security activation code lifetime || bitdefender total security latest version
Among various sorts of safety device present on the lookout, just the brand name type of Bitdefender is viewed as a dependable one. The delegates of Bitdefender Antivirus guarantee that client shouldn't stress over the progression of terrible components like - infection, trojans, rootkits, malware, spyware and so forth. Commonly, the documents being shared turned into the justification behind degenerate messages being passed inside the PC systems. Indeed, even the series of Email messages truly do now and again spread the awful infection of the confounded grade.
The continuous protection which gets actuated through settings implies that extremely successful type of protection is initiated. Such thing doesn't leave a weighty type of change in the system execution. The client simply has to follow the focuses being referenced beneath -
The client, as a matter of some importance, necessities to open the primary safeguard interface. Presently, simply Click on the Protection Icon with next to no mix-up. The client needs to Click on View Modules. The client can now Click on the Settings symbol in the lower right corner of the Antivirus Module. Then, at that point, Select on Show Advanced Settings. It is here that client will see the accompanying choices. The various sorts of checking choices being examined will go about as a stunner for the client to be at a protected separation from the terrible components. it is being expressed underneath -
Examine Only Applications -
In this portion, a client can make the Bitdefender Application examine a rundown of those applications or program documents which had been checked.
Filter Network Shares -
In this total scope of nearby organizers and organization, the offer is at risk to on get to type of examining. Assuming the client is searching for a better type of working, the client can keep out the organization areas from an on-access type of filtering.
Filter Inside Archives -
In the event that the client is searching for Scanning Inside Archives, as per the specialists it is a sluggish and critical type of force driven activity. Presently, this isn't suggested by the specialists of Bitdefender. When the client settles on utilizing the choice then switch it on and later drag the slider along the estimating unit. This way a most extreme type of size breaking point of chronicles to be examined on access.
Examine messages -
The interrogating of complete approaching and active messages is being finished. As on many events, it is seen that programmers or circumspect individual on occasion imbed the messages with terrible connections. This is the long-run ends up being a terrible action for the client. In this way, the presence of viable antivirus device like Bitdefender is fundamental.
Examine Boot Sectors -
The checking for boot Sectors in the hard plate is viewed as vital. As until crafted by review for the infection isn't executed the client can not accomplish the work in a recommended way.
Check Only New and Changed Files -
The master's ideas for inspecting new and changed rendition of the records implies that it will generally improve the system's productivity. Presently the security part of the PC system will stay in salvageable shape.
Examine for Keyloggers -
The examining of Key Logger is important in light of the fact that on occasion a client isn't even mindful of the reality, that numerous wellsprings of spreading malware or spyware is being spread into the PC system. Indeed, for this client can start the examining of Keylogger.
Early Boot Scan -
Select this choice for examining your system at the startup, the second all basic administrations are being stacked.
1 note
·
View note
Text
The Best Space Heaters for 2019
Why you should trust us
We’ve been covering space heaters for more than five years now, and in that time we’ve considered more than 120 different space heaters and tested nearly 50 of them. We’ve interviewed experts on heating, including Joel Hawk, principal engineer manager at UL; Linda Hotz, category director at De’Longhi Home Comfort; a team of representatives from Vornado; and Gary McCall, former fire advisor to the Office of the Fire Commissioner for British Columbia’s Vancouver Island Region.
In years past we relied on the testing expertise of physicist Jim Shapiro, who tested heaters at his home in the high desert of Colorado and also served as an expert source during our research. For our 2017 and 2018 updates, we focused more on real-world testing, running the heaters under controlled conditions in cramped apartments in Boston and New York.
We pored through independent testing data and scientific research from Good Housekeeping, the U.S. Fire Administration (PDF), the Association of Home Appliance Manufacturers, and the National Fire Protection Association. The single most important takeaway from this research is that space heaters are one of the leading causes of house fires in the US. As such, we placed heightened importance on each heater’s safety measures and track record.
Sabrina Imbler, who wrote the 2018 update to this guide, covers heating and cooling for Wirecutter. Tyler Wells Lynch, who wrote the 2017 update to this guide, has written about appliances for about six years, first at Reviewed.com and now as a staff writer for Wirecutter. Séamus Bellamy wrote this guide from 2011 through 2016.
Who this is for
Space heaters can be a handy supplement to a building-wide heating system, especially if your home has a room that receives less heat and needs a boost during cold weather. But realistically, most space heaters struggle to raise room temperatures by more than a few degrees. Plus, they’re not the most electrically efficient way to heat a space, and they’re not meant to stand in for any central or baseboard heating system. Space heaters are most effective when you place them 5 or 6 feet away from your body, such as when you’re hanging out on the couch or doing work at your desk. Because space heaters are a high-wattage, heat-generating appliance, they can pose a risk when used improperly. We cover what kinds of situations space heaters aren’t suited for in our section on space heater care, maintenance, and safety.
How we picked
We’ve updated this guide annually over the past five years, so this time around we went into testing with considerable knowledge of the features that set a great space heater apart from the rest. We started by researching all the new space heaters for sale, popular competitors we hadn’t had a chance to test yet, and previously tested models that deserved a second look. We did not consider outdoor heaters or any models that required a serious level of installation or setup, such as baseboard heaters—all of the competitors here simply plug into a standard wall outlet. We also dismissed infrared heaters categorically, because those models are less popular and less safe than other types.
A compact space heater with a fan is one of the safest, least expensive electric heater types that can warm an entire room and still tuck below a desk or table. Compact heaters come in a few subtypes. Most, including the Lasko 754200 and Honeywell UberHeat, have a ceramic-plate heating element, which is a relatively safe design where the heater reduces current to various parts of the element if it reaches a certain temperature, to avoid overheating. Other compact heaters, including the Vornado VH200 and Vornado MVH, instead use an open-coil heating element. These designs put out more heat but aren’t self-regulating, so the casing and grill can get hotter to the touch, which can be a safety risk.
Oil-filled radiators are also popular. They operate in near silence because they don’t employ fans, and they retain heat after powering down. Unlike fan-based heaters, radiators work by heating up a reserve of diathermic oil that transfers heat to the machine’s metal fins. In turn, the hot metal fins radiate heat into the air, which then spreads silently throughout the room via convection. Radiators are also bigger, heavier, pricier, and often slower than compact heaters.
Most heaters we’ve tested in the past do a fine job of emitting heat, but we’ve found a world of difference in what it’s like to use and live with these heaters over time. Some heaters that heat well are infuriatingly difficult to clean, have nonsensical interfaces, or sound like wasps while they run. Others are easy to clean, intuitive to use, and silent, in addition to being effective heaters. So we took careful notes on how it felt to rely on and work alongside these heaters. We also placed great weight on customer reviews, especially those from people who have owned a given space heater for an extended period of time. We pored through reviews at the sites of Amazon, Walmart, and Home Depot, hunting for any patterns of defects or longevity issues.
With all this in mind, we prioritized the following features and performance criteria:
Adequate safety features: We considered only heaters that offer overheat protection, which automatically shuts the unit off if it begins to overheat. We preferred heaters with a tip-over kill switch, which automatically powers down the heater if it tips over. We also looked for heaters with a stamp from a recognized independent testing laboratory, such as Intertek (whose seal often appears as “ETL”) or UL (Underwriters Laboratories), to confirm that the heater passed a battery of safety tests.
A 1,500-watt output: The vast majority of heaters meet this requirement, regardless of size or type. Since watts measure power, a higher wattage results in a higher heat output. Some models draw only 750 watts, but they aren’t necessarily cheaper, and they’ll struggle to make a difference on a bitterly cold day.
Fast to heat up: The sooner a space heater can defrost a room, the better. Oil-filled radiators take over an hour to reach maximum temperatures, whereas most ceramic heaters start pumping out hot air almost immediately.
Quiet operation: We’ve yet to find an egregiously loud space heater, but some we’ve tested have made enough noise that we’ve found ourselves talking over the heater, which is unpleasant. And whatever noise a heater does emit, however quiet, should ideally be a steady hum—no clicking or erratic whirrs.
A (relatively) cool exterior: Any heater that is too hot to the touch is a safety risk, and that risk increases with the temperature. Most have plastic housings that won’t even reach 90 degrees Fahrenheit, but their front grilles can get hotter. We docked any model whose grille got consistently hotter than 160 °F, which is the point at which one second of contact burns skin.
Intuitive controls: Most heaters have a thermostat and at least two heat settings generally marked at a high setting (1,500 watts) and a low setting (750 watts). The thermostat manages the heat output, allowing you to find a middle ground between the heat settings. Although digital controls look high-end, years of testing have convinced us that analog controls are more durable and intuitive.
Compact size: The heater should be small enough to work well without taking up too much space, as well as to store easily in a closet in the off-season.
Not ugly: Although no space heater is beautiful, many are quite unattractive. Since space heaters are often highly visible in a room, we tried to find nicer-looking options that wouldn’t be an eyesore for the entire winter.
Carrying handle: You need to have a way to move an in-use or recently turned off heater without burning your hands.
Fan-only option: A heater with a fan-only option can conveniently double as a fan for the warmer months.
Last, if you think you might need a new heater, don’t wait for the cold weather to hit. Retailers usually stock space heaters seasonally, so prices and availability can fluctuate over the colder months. For example, the cost of the Lasko 754200 doubled overnight at a number of outlets during the polar vortex of 2014—and sold out at many retailers. Most of them didn’t have new units available until early spring.
How we tested
We tested 13 space heaters in an apartment in Queens, New York, over a week in September 2018, measuring the change in room temperature each heater created. Although we drew our conclusions from a mix of observations, including our temperature measurements, we didn’t rely on those readings alone—the goal was not to attempt to create lab-like conditions but rather to see how each heater operated, how its heat felt, and what it would be like to live with over the winter. When we did rely on temperature measurements, we focused on the overall change in the temperature, de-emphasizing the beginning and final numbers on the thermometer, which varied due to slight inconsistencies in the starting temperature of the test room.
For our tests, we placed each space heater at the same location in a 200-square-foot bedroom with typical furniture and a large rug over a hardwood floor. We closed the windows and door and shut off the forced-air ventilation during each test. We placed two Lascar data loggers 3 feet and 6 feet away from the heater. We ran each heater for an hour while the Lascar loggers took a reading every five minutes. Our subjective observations about the way the heat felt—whether it was room-filling warmth or a blast of hot air directly in front of the heater—led us to view the 6-foot measurements as a better representation of the machines’ performance.
To measure how hot the actual heater felt without burning our fingertips, we used an infrared thermometer gun to take readings (on ceramic heaters) of both the plastic casing and the grille covering the main heating element. For radiators, we took readings of the radiator fins and the plastic control panel. We also measured the noise each heater emitted, taking readings with a decibel meter from distances of 3 feet and 6 feet at waist height. We noted both dBA and dBC weightings—the former cuts off the lower and higher frequencies that most people can’t hear, and the latter picks up higher frequencies.
In addition to this objective data, we took extensive notes on how warm each heater made us feel. We fiddled with dials and buttons, tested timers and automatic thermostats to confirm that they worked, and turned off the room lights to note whether the space heaters’ LED displays were intrusively bright. We also measured the wattage each heater drew, but we found that most used nearly the same amount of power.
Our pick: Vornado VH200
Our pick
The Vornado VH200 is the best space heater for cold people because in our tests it warmed an entire room faster and more evenly than every other heater we tried. Both in 20-minute and 60-minute intervals, it caused a greater temperature increase than any of its competitors, and its heat just felt better, generating a room-filling ambient warmth as opposed to a hot current of air directly in front. The VH200 offers a combination of key safety features that many cheaper heaters lack, including overheat protection, a tip-over switch, and UL certification. The VH200 is also quieter than every other fan-based heater we tested, emitting a soft whir that’s barely noticeable even on high. We found the heater’s analog dials easy to handle and intuitive to master, and we appreciated that this model offers a medium heat setting, whereas most heaters have only low and high. And although it’s not particularly attractive, it’s definitely not ugly—a big win in a crowded field of unappealing design. Even its negative owner reviews are less of a red flag than those of some competitors, with responsive customer service from the manufacturer that you rarely see among other brands.
The Vornado VH200, as well as other Vornado models we tested, proved significantly more effective than most other space heaters in our evaluation. After running on high for 20 minutes, the VH200 raised the temperature by 3 Fahrenheit degrees at 6 feet away, and after an hour, raised it by 5.5 Fahrenheit degrees, more than any other heater (except for our runner-up, another Vornado). This result easily tops the temperature increases we measured on all competitors, including on our other picks.
Space heater change in temperature (℉)Total change, 20 minut…Total change, 60 minut…Vornado VH200Vornado MVHLasko 754200Honeywell UberHeatDe'Longhi TRD40615T0123456Change in temperature (degrees F)Total change, 20 minutesTotal change, 60 minutes
Vornado VH20035.5
Vornado MVH2.55.5
Lasko 7542002.54.5
Honeywell UberHeat13
De'Longhi TRD40615T12.5
The Vornado models raised the temperature in a test space more quickly and by a greater overall amount than other heaters we tested.
In spite of the hotter temperature readings, the heat billowing from the VH200 also felt significantly more comfortable to sit beside than that of the other heaters we tested. That’s because its fan design—what Vornado calls a “circulator”—distributed a gentle, even heat to every corner of the room, similar to what we observed in our testing of Vornado room fans. The result: an all-encompassing and diffuse heat that felt natural, not forced. The ceramic-plate models we tested (our Lasko and Honeywell also-great picks), by contrast, delivered a narrow beam of heated air that made sweat trickle down our necks when we sat directly in the line of fire.
The Vornado VH200 has every safety feature we look for in a heater. Its thermal cutoff function ensures that the machine automatically switches off in the event it overheats, and its tip-over switch cuts off power automatically in the event it gets knocked over—many less expensive heaters, including one of our also-great picks, don’t offer these features. The VH200’s plastic casing also remained relatively cool, never exceeding 94 °F. And the grille covering the heating element never topped 140 °F, making the VH200’s grille one of the coolest we tested. Although space heater safety largely depends on using the heater correctly, these features are reassuring.
Despite its abundant heating ability, the VH200 operated with a quiet murmur that we didn’t find distracting or unpleasant. We recorded a decibel level of 39 dBA at a distance of 3 feet and 35 dBA at 6 feet at its highest setting, a level that’s quieter than a fan on its lowest setting. And if you use the VH200 at any fan setting below 4, the fan switches off and the machine emits a near-silent heat. But even on high, the Vornado VH200 is significantly quieter than the Lasko 754200, which recorded decibel measurements of 48 dBA at a distance of 3 feet and 43 dBA at 6 feet. This Vornado model is not as quiet as a radiator, but then again, no other kind of space heater is.
The VH200 has a slim, lightweight design that’s easy to tuck below a desk or in a corner. It’s also pleasantly pear-shaped (bottom-heavy heaters are harder to tip over). It’s certainly bigger than most of the personal heaters we tested, such as the Lasko or Honeywell, but it’s dwarfed by any radiator. Weighing about 3.5 pounds, it’s still only about the size of a coffee maker.
We found the controls on the VH200 simple, straightforward, and durable. The heater offers three power settings—one more than the usual low and high—and a thermostat dial with seven settings. Disappointingly, it has no fan-only mode, which is a bummer considering that room fans are Vornado’s primary area of expertise. It has a red LED light that remains on when the heater is on but turns off when the heater is powered down but still plugged in. We preferred this to the Lasko 754200’s crimson indicator light, which blared bright even when the heater was turned off.
The VH200 also contains an internal thermostat with seven settings that can automatically turn on and off to maintain temperature. To use the thermostat, turn the dial slowly counterclockwise after the room reaches your desired comfort level, and when the heat cycles off, stop turning the dial. For example, if the thermostat is set to 7, you turn the dial down slowly, and the heat cycles off when you reach the 3 setting, you should keep the dial set to 3. The heater should then automatically restart when the room drops below that desired temperature. The automatic thermostat worked successfully in our testing, though we did not measure its accuracy to the degree.
Finally, the VH200 comes with an impressive five-year warranty, two more years of coverage than the Lasko and Honeywell warranties offer. In our research into owner reviews of the VH200, we noticed that Vornado representatives responded to most of the negative Amazon reviews of the VH200 and offered to replace broken or malfunctioning fans; reviews were also updated to reflect positive experiences with Vornado customer service.
Flaws but not dealbreakers
Both the Vornado VH200 and the nearly identical Vornado MVH have relatively mediocre reviews on Amazon. At this writing, the VH200 has an overall rating of 3.5 stars (out of five) across more than 20 customer reviews, and the MVH has 3.6 stars (out of five) across more than 1,640 reviews. Neither rating is stellar, but we didn’t find any popularly reviewed space heaters (meaning those with at least 100 reviews) with a rating higher than four out of five stars. We combed through the three-, two-, and one-star reviews for the VH200 and MVH to compare them against negative reviews of other heaters we tested, including the Lasko, Honeywell, and De’Longhi models that make up the rest of our recommendations. All of the space heaters we seriously considered had a smattering of negative reviews, and in comparison, we thought the Vornado VH200’s negative reviews were not as bad as those of the other fans we liked. Many of the negative reviews of the VH200 complain that the fan did not put out as much heat as the buyer desired—a fair complaint, but we believe they would be more disappointed with almost any other heater, as the VH200 was one of the most powerful heaters we tested.
What really sets the Vornado models’ negative reviews apart is that Vornado representatives actually tend to reply to negative reviews and offer customer support, which is a rare sight on critical reviews for other brands. The most popular negative reviews of the Vornado MVH complain that the machine broke within a few months, and almost every one of those reviews received a response from a Vornado representative. In contrast, we could not find any instance where Lasko offered assistance to customers who had posted negative reviews, and the few people who did attempt to go through Lasko customer service left somewhat disappointed. The VH200 also comes with a five-year warranty, the longest coverage of any space heater we tested.
The VH200 is more than twice as expensive as other portable ceramic heating options, such as the Lasko and the Honeywell. But we believe it’s worth the expense due to its pleasant, even heat and the fact that it can raise the temperature of a room so much more effectively than the other models we tested.
Vornado has recalled another space heater, one that looks quite similar to our pick, in response to more than a dozen reports of overheating and catching fire. The model affected by the recall, the VH101, is about 7.2 inches deep, 7.8 inches wide, and 7.10 inches high. Our pick is a bit bigger, at about 10.4 inches deep, 9.2 inches wide, and 10.6 inches high. If you have a small Vornado heater, check the model number, and if you have the VH101, Vornado will give you a full refund or replace the product—possibly with that model’s replacement, the VH202. The larger Vornado we recommend, the VH200, has improved safety features that the recalled VH101 lacked, according to a Vornado spokesperson: V-0 Resin, a flame-extinguishing plastic; UL 3122 Wire Jacketing, a high-temperature, high-voltage silicone/fiberglass jacketing; and a change in the soldering of the heater’s electronics.
Runner-up: Vornado MVH
Runner-up
The VH200 is also available in slightly tweaked design called the Vornado MVH, which we recommend as a runner-up pick. Vornado confirmed to us that these two models are functionally identical to each other, just with different-colored housing, and that the company has no plans to discontinue either model in the future. We slightly prefer the VH200 because its shimmery tan plastic casing stayed around 10 degrees cooler than the MVH’s black plastic casing, but we don’t think this difference is significant enough to temper our enthusiasm for the MVH. We’ve linked to the VH200 throughout this guide for now because it’s much easier to find. But if you come across the MVH for a better price, go for it.
Also great: Lasko 754200 Ceramic Heater
Also great
The Lasko 754200 Ceramic Heater is a small, budget option if you’re looking to warm just your body—not the room as a whole—while you’re sitting on the couch, say, or in the office. It was our top pick for years, but after our latest round of testing we decided to change our pick to a more powerful, quieter, more comfortable competitor. This Lasko model lacks a tip-over switch, a reassuring and basic safety feature that automatically powers down the machine if it falls over. Also, unlike the Vornado VH200’s soothing, ambient heat, the 754200’s heat feels more like that of a supersized hair dryer—and if you sit close enough, it sounds like one too. But at the size of a hot water kettle, the 754200 is smaller than the VH200 and therefore easier to store or tuck away. Although this model isn’t much to look at, it’s one of the cheapest heaters of its size and type, and it’s usually available for a good price.
The Lasko 754200 is faster at heating up small spaces than most space heaters we’ve tried. As is the case with all ceramic heaters, the warmth comes almost immediately, as the 754200 creates warm jets of air in a matter of minutes. After running on high for an hour, the Lasko raised the temperature of our room from 6 feet away by 4.5 Fahrenheit degrees, a performance close to that of our Vornado picks. But in our gut-check test, its heat did not feel evenly distributed throughout the room. Instead, we felt a concentrated stream of heat in front of the heater and cooler patches of air in areas around and behind the heater—although we could best reap the rewards of the heater by sitting directly in front of it, that position got uncomfortably hot, yet we felt chilly in the far corners of the room.
But the Lasko 754200’s biggest failing is its lack of a tip-over kill switch, which is a pretty standard safety feature for portable space heaters. (The model is ETL certified.) A tip-over switch automatically powers down a heater that’s been knocked over—and this Lasko model’s upright stance is not the most stable. In contrast, we found the squat, pyramidal Vornado heaters much harder to knock over.
Reminder: If you are using this (or any) space heater in a home with pets or small children, do not leave it accessible while unattended. Tipped-over heaters tend to overheat. Fortunately, the Lasko 754200 does come with overheat protection, which cuts power to certain areas of the heating element if they get too hot.
However, it’s also relatively cool to the touch. In our tests, the outer plastic casing never topped 85 °F, and the grille, which is situated directly in front of the ceramic plate and receives the brunt of the output, topped out at 153 °F—still hot enough to burn your skin but cooler than the grilles of most other ceramic models we tested.
1 note
·
View note
Text
The particular Role of Females in Forestry Chains
As global and national economies integrate forest resources, the role of girls in these chains is increasingly vital. While women China High Strength Chains Manufacturers usually are still underrepresented inside these chains, switching political and financial realities are altering gender dynamics. Inside Zambia, for case, increasing demand with regard to charcoal has opened up new spaces for women in the. Such participation could challenge the imbalanced gender relations and create women's economic empowerment. In addition, it may contribute to the restoration of degraded forests. The study with forest value chains is essential in understanding the whole range of activities involved in the production and sale of forest products. These benefit chains range inside geographic scope, that will include non-timber products as well. They are comprised of several actors, from woodland management to wood processing and deal to marketing in addition to sales. These stores are complex, and perhaps they are often interdependent, regarding multiple stakeholders in each stage. To comprehend the different roles of each actor, it is employed to learn how each and every step works in a very forest value sequence. The Nordic forged forestry chain, for instance, features 22mm linking rings and forged studs for your harshest forestry circumstances. This chain's power and durability is unsurpassed, and the structure of the studs and rings contains better grip as well as traction on diverse terrains. The H-shaped chain, on the different hand, has reinforced rings along their longitudinal arms. Additionally, it is light and easily set up. The TPC Tyre Security Chains meet this needs of logging units and improve traction and fuel efficiency. Tyre defense chains protect high-priced tyres from organizations and stones, they usually increase traction. And also being the market innovator in Forestry stores, TPC Tyre Safeguard Chains also give long-lasting performance, easy mounting, and beneficial tire fit. And so, if you're your logger, consider some great benefits of forestry chains. The Department regarding Agriculture proposes mechanisms for that articulation of productive-commercial chains and supports public and private ability building for these kinds of processes. Furthermore, that Department of Agriculture oversees compliance having policies, instruments, and projects for you to develop sustainable agricultural systems along with a healthy environment. Last but not least, the Department additionally develops and monitors the introduction of effective forest-based internet business systems and markets. All this involves a wide range of stakeholders and groups, including public plus private stakeholders. You can find three primary varieties of forestry chains, every single addressing different requires. The U-Grip chain carries a triple diamond design on metric tires that provides good grip and protects the tire's aspect walls. The chain's horizontal links are covered with U-Studs that offer extra stability. In addition, U-Grip chains can be found in all sizes and also diameters. They contain a separate chain tightener.
0 notes
Text
Emergency Changeover Unit - Automatic Transfer Switch | CHK Power Quality
The Emergency Changeover Unit (ECO) is a power quality logger and analyser with integrated remote cellular communications and a Automatic Transfer Switches that is triggered by user settable voltage thresholds for dips and swells.
0 notes
Text
Industry 4.0 requires enclosures for smart sensor applications
The fourth industrial revolution, or "Industry 4.0" for short, has already begun, even if many people are not really aware of this. On the one hand, this is due to the fact that most people have already heard of it, but many are struggling with the definition and its real impact on day-to-day working life. In addition, the topical subjects of IoT (Internet of Things) and IIoT (Industrial Internet of Things) are mentioned in the same breath as Industry 4.0. This makes things a little more complex.


IoT in the household
Digitisation and networking can best be used and understood in your own private environment: with your smartphone, which has meanwhile become "man's best friend", you can today control a wide variety of things, no matter where you are. Individual devices such as the smart watch are linked up with other "smart things" and the data is stored in a centralized secure "cloud". All of this is intended to make our everyday life easier for us. In my opinion much of this is absolutely sensible, such as wearable emergency call systems/transmitters in hospitals or social areas. Or also personal tracking systems in occupations with an increased safety risk. An interesting example is the "Capturs" by the French manufacturer of the same name (www.capturs.com). At first glance this GPS tracking system may seem to cater for the fun factor, but a closer look reveals much more: the wearable device makes it possible for friends, family and fans to keep track of routes and thus to be involved live when persons are pursuing their sports activities, regardless of the terminal unit in question. You can export/save the data (route, distance, elevation, duration) and even publish them in social networks. But now the special feature: in the event of crashes or accidents, departure from the predefined route, longer stay at a given location and when the battery is weak, it automatically sends an email or a text message to certain persons. This makes it possible to call for help quickly in case of emergency. The Capturs was installed in the OKW MINITEC series of enclosures and can be used for all outdoor activities: hiking, skiing, climbing, paragliding etc. Other OKW series of enclosures that can be used for wearables are the BODY-CASE and the ERGO-CASE.
Industry 4.0 and IIoT
Let us come back now to the actual topic of "Industry 4.0" and IIoT "Industrial Internet of Things". There is a significant difference between the two concepts – in short, Industry 4.0 is a high-tech strategy for promoting the digitisation of industrial production; IIoT is the concrete use of smart technologies in the manufacturing industry. Many companies are currently discussing the question of how to make internal processes transparent and how to optimise them across different levels/organisations. In IIoT, it is also basically a question of making things smarter by making them communicate with each other. The focus here is on sensors which are embedded in the devices and which constantly gather and centrally deliver data concerning machinery and special application scenarios or data about the user and the entire value-added chain. The main objectives are always the same: providing better quality, optimising processes and streamlining operations, optimising the use of resources, completing orders faster and delivering them faster to the customers. In addition, an important objective is to significantly shorten the market introduction cycle for new products in order to gain a competitive advantage.
Enclosures and IIoT
Even today, many OKW enclosures series are used for the most varied applications in the smart factory. Subsequent use in day-to-day work is highly varied, and the requirements to be met by the enclosures may therefore vary considerably:
Mobile enclosures for the integration of temperature, humidity or presence sensors – ergonomic design for fatigue-free working.
Installed permanently on the wall as gateways – simple, concealed wall mounting, possibly with security functions
In machines/systems with integrated vibration/pressure and status sensors.
In miniature form for wearable applications – on the arm, wrist, around the neck or in the shirt/trouser pocket
Larger sizes in a robust design – if more space is required for installing components/displays.
Use of high-quality materials for the manufacture of the standard enclosures
High IP classes for the protection of the built-in electronic components and sensors.
Options for modifying the tandard products according to individual customer wishes and requirements.
In the following, I have picked out some interesting examples of customer applications from the field of IIoT for you:
Wireless data logger

With the Almemo 470 wireless data logger by Ahlborn Mess- und Regelungstechnik, you can wirelessly measure climate parameters such as temperature or atmospheric humidity. A flexible connection technology for digital sensors allows the adaptation of a large number of different sensors for measuring different variables.
Application wireless data logger
Wireless network access point

At field level, the sWave.NET wireless network by steute Schaltgeräte GmbH & Co. KG facilitates variable communication between wireless switching devices and access points, which function in a similar manner to a router. They receive signals from wireless switching devices, bundle them and then transmit them, e.g. by Ethernet or WiFi, to one or more application servers. The access points are installed across the transmission range and communicate with the wireless switchgear.
Application wireless network access point
Smart TAG

The conbee Smart TAG is based on the Bluetooth 4.x specification with a range of up to 150 m. The fully configurable TAG has an authentication function using out-of-band or SecureSimple pairing, is forgery-proof and has a motion sensor that is capable of detecting manipulation attempts. Status data are transmitted at dynamically adaptable transmission intervals in advertisement packets that provide information about the object to be tracked. The intelligent TAG cyclically reports its identification number, temperature and movement data as well as battery status and optionally also its position.
Application Smart TAG
Robust UHF reader

RF-Embedded GmbH has developed an RFID reader for the passive ultra high frequency (UHF) radio range, which generates an energy field from electromagnetic waves. As soon as a passive UHF transponder enters the energy field, it sends the content of its memory to the relevant RFID reader.
Application robust UHF reader
We have now drawn up a list of all enclosures that are suitable for the use of smart sensors under a separate heading. Now you can find a suitable sensor enclosure even more quickly.
Overview IIoT/Sensor Enclosures >>
To ensure that the standard enclosures also meet individual customer requirements in terms of company colour, visual adaptation to the usage environment, company logo, the electronic components and cables etc., we offer a wide range of services: painting, printing, EMC aluminium vapour plating as protection from stray radiation, cutouts/openings, for example for USB/SPI/I2C/LAN connectors or control buttons. In industrial enclosures with high IP classes, the use of special pressure compensation elements is a big advantage. A partial vacuum may be created inside sealed enclosures if there is a change of temperature. Moisture and dirt particles may be sucked in, damaging the sensitive electronics. These OKW pressure compensation elements can counteract this, since they allow an especially high air flow. At the same time the innovative design provides reliable protection against dirt and, if required, is absolutely waterproof up to a pressure of 6 bar.
#Enclosres#enclosure#plastic enclosure#plastic enclosures#okw#OKW Gehäusesysteme#OKW Gehäuse#OKW Enclosures#OKW Enclosure#IoT#IIot#iiot solution#smart factory#smart fabrics#smart industry#industry 4.0#sensor#sensoric#sensor enclosure#IoT enclosures#sensor enclosures#internet of things#industrial internet of things
2 notes
·
View notes
Text
Thermo King Code 43 Repair

Thermo King Alarm Codes Troubleshooting A guide for troubleshooting alarm codes or fault codes on trailer and truck mounted Thermo King refrigeration units. This guide lists all the Thermo King alarm codes that could go off on a Thermo King unit. These alarm codes will appear on straight truck refrigeration units and trailer refrigeration units. Dec 28, 2019 I recently just bought a 2007 Utility with a thermo king reefer. 1 minute after turning on the engine, I get alarm code 89 (ETV circuit), the temperature increases even though the set point should be decreasing the temperature. 5 minutes later, I get the code 21 (cooling system check). Right after I get the code 21, the engine shuts off. CSTK offers Thermo King parts, service, installation and repairs, sells premium equipment brands in the construction, truck, agriculture, and horse trailer industries, and more. Call (888) 566-5743.
Thermo King Alarm Codes & Fault Codes For Refrigeration Repair
Thermo King Code 20 Repair
Thermo King Repair Shops
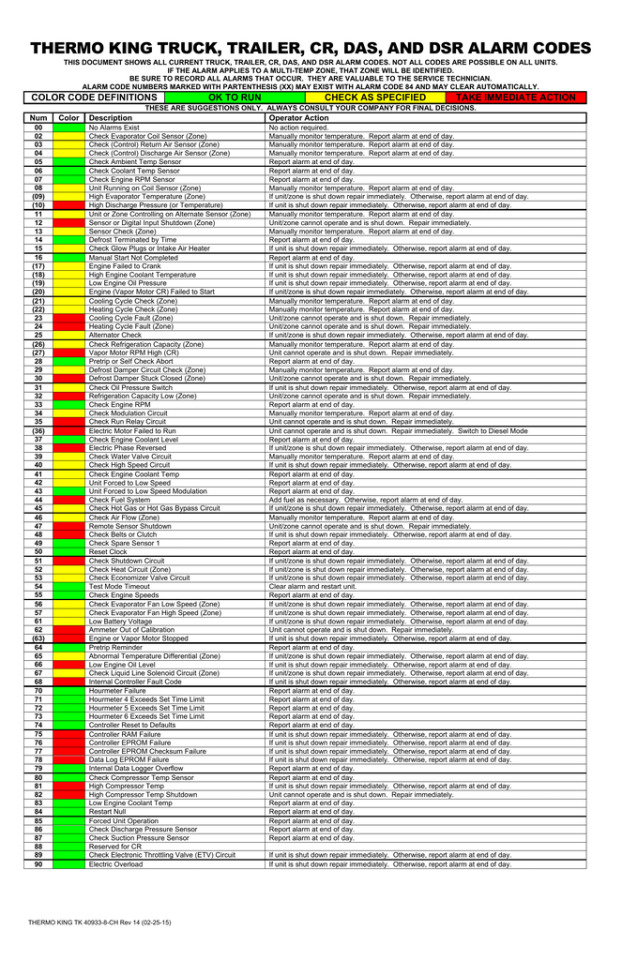
THERMO KING TRUCK & TRAILER UNIT ALARM CODES
Thermo King Alarm Codes Troubleshooting - Affordable Truck Repair
Thermo King Straight Truck Units – Most Popular
Thermo King Alarm Codes & Fault Codes For Refrigeration Repair
# 1 MD 200
# 2 TS 300
# 3 TS 500
# 4 RD II- SR
Thermo King Trailer Units – Most Popular
# 1 SB-III SR
# 2 SB- 210/210+
# 3 SB-310/310+
#4 SB 400
# 5 Spectrum
Thermo King Alarm Codes Defined:
00 NO ALARMS EXIST
01 MICROPROCESSOR POWER UP RESET
02 CHECK EVAPORATOR COIL SENSOR
03 CHECK RETURN AIR SENSOR
04 CHECK DISCHARGE AIR SENSOR
05 CHECK AMIBENT TEMP SENSOR
06 CHECK COOLANT TEMP SENSOR
07 CHECK ENGINE RPM SENSOR
08 UNIT RUNNING IN COIL SENSOR
09 HIGH EVAPORATOR TEMPERATURE
10 HIGH DISCHARGE PRESSURE (OR TEMP)
11 UNIT CONTROLLING ON ALTERNATE SENSOR
12 SENSOR OR DIGTAL INPUT SHUTDOWN
13 SENSOR CHECK
14 DEFROSAT TERMINATE BY TIME
15 CHECK GLOW PLUGS OR INTAKE AIR HEATER
16 MANUAL START NOT COMPLETED
17 ENGINE FAILED TO CRANK
18 HIGH ENGINE COOLANT TEMPERATURE
19 LOW ENGINE OIL PRESSURE
20 ENGINE ( VAPOR MOTOR CR) FAILED TO START
21 COOLING CYCLE CHECK
22 HEATING CYCLE FAULT
23 COOLING CYCLE FAULT
24 HEATING CYCLE FAULT
25 ALTERNATOR CHECK
26 CHECK REFRIGERATION CAPACITY
27 VAPOR MOTOR RPM HIGH (CR)
28 PRETIP OR SELF CHECK ABORT
29 DEFROST DAMPER CIRCUIT CHECK
31 CHECK OIL PRESSURE SWITCH
32 REFRIGERATION CAPACITY LOW
33 CHECK ENGINE RPM
34 CHECK MODULATION CIRCUIT
35 CHECK RUN RELAY CIRCUIT
36 ELECTRIC MOTOR FAILED TO RUN
37 CHECK ENGINE COOLANT LEVEL
38 ELECTRIC PHASE REVERSED
39 CHECK WATER VALVE CIRCUIT
40 CHECK HIGH SPEED CIRCUIT
41 CHECK ENGINE COOLANT TEMP
42 UNIT FORCED TO LOW SPEED
43 UNIT FORCED TO LOW SPEED MODULATION
44 CHECK FUEL SYATEM
45 CHECK HOT GAS OR HOT GAS BYPASS CIRCUIT
46 CHECK AIR FLOW
47 REMOTE SENSOR SHUTDOWN
48 CHECK BELTS OR CLUTCH
49 RESERVED FOR CR
50 RESET CLOCK
51 CHECK SHUTDOWN CIRCUIT
52 CHECK HEAT CIRCUIT
53 CHECK ECONOMIZER VALVE CIRCUIT
54 TEST MODE TIMEOUT
55 CHECK ENGINE SPEEDS
56 CHECK EVAPORTOR FAN LOW SPEED
57 CHECK EVAPORTOR FAN HIGH SPEED
58 CHECK CONDENSER FAN LOW SPEED
59 CHECK CONDENSER FAN HIGH SPEED
60 CHECK BOOST CIRCUIT
61 LOW BATTERY VOLTAGE
62 AMMETER OUT CALIBRATION
63 ENGINE OR VAPOR MOTOR STOPPED
64 PRETRIP REMINDER
65 ABNORMOL TEMPERATURE DIFFERENTIAL
66 LOW ENGINE OIL LEVEL
67 CHECK LIQUID LINE SOLENOID CIRCUIT
68 INTERNAL CONTROLLER FAULT CODE
69 CHECK REMAGNETIZATION CIRCUIT
70 HOURMETER FAILURE
71 HOURMETER 4 EXCEEDS SET TIME LIMIT
72 HOURMETER EXCEEEDS SET TIME LIMIT
73 HOURMETER 6 EXCEEDS SET TIME LIMIT
74 CONTROLLEER RESET TO DEFAULTS
75 CONTROLLER RAM FAILURE
76 CONTROLLER EPROM FAILURE
77 CONTROLLER EPROM CHECKSUM FALIURE
78 DATA LOG EPROM FAILURE
79 INTERNAL DATA LOGGER OVERFLOW
80 CHECK COMPRESSOR TEMP SENSOR
81 HIGH COMPRESSOR TEMP
82 HIGH COMPRESSOR TEMP SHUTDOWN
83 LOW ENGINE COOLANT TEMP
84 RESTART NULL
85 FORCED UNIT OPERATION
86 CHECK DISCHARGE PRESSURE SENSOR
87 CHECK SUCTION PRESSURE SENSOR
88 RESERVED FOR CR
89 CHECK ELECTRONIC THROTTLING VALVE CIRCUIT
90 ELECTRIC OVERLOAD
91 CHECK ELECTRIC READY INPUT
92 SENSOR GRADES NOT SET
93 LOW COMPRESSOR SUCTION PRESSURE
94 CHECK LOADER # 1 CIRCUIT
95 CHECK LOADER # 2 CIRCUIT
96 LOW FUEL LEVEL
97 FAILED REMOTE RETURN AIR SENSOR
98 CHECK FUEL LEVEL SENSOR
99 HIGH COMPRESSOR PRESSURE RATIO
100 HEATER FAN FAILURE
101 CONTROLLING ON EVAP COIL OUTLET TEMP
102 LOW EVAPORATOR COIL TEMPERATURE
103 LOW HEATER FUEL LEVEL
104 CHECK REMOTE FAN SPEED
105 CHECK RECEIVER TANK PRESS SOL CIRCUIT
106 CHECK PURGE VALVE CIRCUIT
107 CHECK CONDEENSOR INLET SOL CIRCUIT
108 DOOR OPEN TIMEOUT
109 CHECK HIGH DISCHARGE PRESSURE SENSOR
110 CHECK SUCTION LINE SOL CIRCUIT
111 UNIT NOT CONFIGURED CORRECTLY
112 CHECK REMOTE FANS
113 CHECK ELERCTRIC HEAT CIRCUIT
114 MULTIPLE ALARMS- CAN NOT RUN
115 CHECK HIGH PRESSURE CUT OUT SWITCH
116 CHECK HIGH PRESSURE CUT IN SWITCH
117 AUTO SWITCH FROM DIESEL TO ELECTRIC
118 AUTO SWITCH FROM ELECTRIC TO DIESEL
119 RESERVED FOR CR
120 CHECK ALTERNATOR EXCITE CIRCUIT
121 CHECK PMW LIQUID INJECTION CIRCUIT
122 CHECK DIESEL/ELECTRIC CIRCUIT
123 CHECK EVAP COIL INLET TEMP SENSOR
124 CHECK EVAP COIL OUTLET TEMP SENSOR
125 CHECK TANK LEVEL SENSOR
126 CHECK BACK PRESSURE REGULATOR
127 SETPOINT NOT ENTERED
128 ENGINE RUN TIME MAINT REMINDER # 1
129 ENGINE RUN TIME MAINT REMINDER # 2
130 ENGINE RUN TIME MAINT REMINDER # 1
131 ENGINE RUN TIME MAINT REMINDER # 2
132 TOTAL UNIT RUN TIME MAINT REMINDER # 1
133 TOTAL UNIT RUN TIME MAINT REMINDER # 2
134 CONTROLLER POWER ON HOURS
135 CHECK SPARE DIGITAL INTPUTS
136 CHECK SPARE DIGITAL OUTPUTS
137 CHECK DAMPER MOTOR HEATER OUTPUT
203 CHECK REDUNDANT RETURN AIR SENSOR
204 CHECK REDUNDANT DISCHARGE AIR SENSOR
See why we’re different, Give us a call today to schedule services (773) 254-1020
Region/Language
North America
English
Asia Pacific
EnglishAustralia日本 (日本語)中国 (简体中文)
India
English
Russia/CIS
EnglishPусский
Road
Thermo King Code 20 Repair
Rail
Marine
Why Thermo King
Locate a Dealer
Thermo King Repair Shops
CareersNewsroomTracKingAlarm CodesContact UsRegion/Language
THERMO KING TRUCK & TRAILER UNIT ALARM CODES
RoadConnectedSuite™ TelematicsAuxiliary Power UnitsParts & Accessories for RoadElectrification SolutionsRoad Maintenance ProgramsPharma TransportTrailersTrucks & VansBuses & Shuttles
Thermo King Alarm Codes Troubleshooting - Affordable Truck Repair
Region/LanguageLatin AmericaBrasil (Português)North AmericaEnglishAfricaEnglishAsia PacificEnglishAustralia日本 (日本語)中国 (简体中文)EuropeDeutschEnglishEspanolFrançaisItalianoIndiaEnglishMiddle EastEnglishRussia/CISEnglishPусский
1 note
·
View note
Text
What an exterior weather station does
Weather stations, likewise referred to as Weather Stations or "exterior" weather instruments, provide meteorological information such as temperature, moisture, air pressure, and also rains. They can be made use of for different civil services (meteorological weather station), education, or personal use. All outside weather stations consist of a small device attached to the roof covering of a residence or structure without causing any type of discomfort to the inhabitants.
The equipment contains typically:
a) A Sensing unit: It determines physical sensations as well as sends them by wire (copper wiring) up to the display device making use of electrical power.
b) A Present System: This component includes 2 primary components; a transmitter and a receiver. The data measured by the sensors is sent out from the transmitter to the receiver, where the info is processed and provided as an output.
c) An Indoor System: The interior device includes a self-supporting display tool created to be positioned anywhere inside your home within a structure. This component does not have any electrical wiring or power supply as it gets all its power from batteries or from being plugged into the keys power supply.
d) Exterior Accessories: Added equipment can be obtained individually, such as data loggers, remote sensors for outside measurements, etc, which boosts the functionality of the weather station by supplying extra details about conditions outdoors.
e) Sensing units: A number of kinds of sensors determine different physical sensations to offer a precise picture of atmospheric conditions in different places. These are made use of to measure air temperature, moisture, rainfall, barometric pressure, and wind rate. Temperature is measured by a thermometer with a sensor that contains two parts; one component is placed outside near the measuring gadget while the various other continues to be inside where the display unit is positioned. One of the most generally made use of equipments for this procedure are mercury-in-glass thermometers or solid-state sensors in wireless digital outside systems.
Sensors that measure moisture are normally called psychrometers and include two thermometers whose temperatures are very close but have various sensitivities to wetness. One is kept dry while the various other is revealed to the bordering air to evaporation on it. The difference between its temperature and that of the completely dry light bulb suggests how much water vapor is in the air. One of the most usual type of rains sensing unit utilizes a rotating impeller that rotates due to the gravitational force when it is encountering downwards in the direction of the ground. An electric contact breaks as quickly as this occurs, triggering electrical power to stream via the coiled wire, creating resistance as well as generating voltage pulses standing for each impeller's rotation. This sort of sensor can be made use of for various functions, such as irrigation or collecting rain.
Barometric pressure sensing units are generally mercury-in-glass measures with an added gear device that rotates digital contacts every time there's a modification in atmospheric pressure. An electromagnet affixed to these contacts activates a reed switch that generates pulses proportional to the variety of clicks each time. Stress modifications are usually marginal, and also the speed (frequency) of these pulses is gauged by the microcontroller, which converts them into a digital value that can be displayed. Wind sensing units determine the impact generated by the wind on an object, such as vane kind, ultrasonic, weatherstation or hot-wire anemometers.
1 note
·
View note
Text
Ft 50r Programming Software

Programming radio software category is a curation of 66 web resources on, Yaesu FT-817 FT-857 FT-897 EEPROM analyzer, Mac Memory Manager, FTBVR5K. Resources listed under Radio programming software category belongs to Software main collection,. Hello, I'd love to see support for the Yaesu FT-50R. There is a lack of modern software to program this radio, aside from the expensive option. I'd be willing to support in any reasonable way to see this model added. I saw some records from a few years ago pertaining to this model. Perhaps you already have the information needed? The Yaesu FT-50R is manufactured to rigid commercial grade standards, and is the first dual band handheld amateur radio to achieve the prestigious MIL-STD-810 rating. Use Dual Watch to select any frequency combination and the FT-50R automatically switches channels for instant operation. Plus, the built-in digital battery voltage feature can be used to monitor current operating battery voltage. Yaesu FT-60R Step-by-Step Programming Guide Noji Ratzlaff Set the radio to communicate with a repeater at 147.080+ MHz, 77.0 Hz 0. Turn on the radio and make sure it’s unlocked 1. Press V/M once or twice until the display reads MEMORY, then once more 2. Set the frequency 1 - 4 - 7 - 0 - 8 - 0 3. If the + sign appears at the top, skip to step 7 4.
Yaesu Ft 50r Battery Pack

Go to 1 2 Freeware page
Interface Cable Tester 1.0 This is a small utility I wrote to test the interface cables used to program Yaesu and Icom radios (it will not work with cables for other radios). If the cable won't pass this test, then it definitely won't work with any of the Commander software.
Freeware
2
FTBVX3J 1.0 A memory management program for the Yaesu VX-3 Japanese model handheld transceiver. Main features: - backup/restore the cloneable memory - modify memory definitions - add and delete memory definitions - manage which memories are in which banks - sort ...
$15.72
3
FTBCAT 2.0 A CAT control program for Yaesu FT-450, FT-817/ND, FT-847, FT-857/D, FT-897/D, FT-920, FT-1000MP Mark V transceivers, VR-5000 and FRG-100 receivers. This program does not perform management of any memory that is present in the hardware of the supported ...
Freeware
FTB8800 1.5 FTB8800 is a memory management program for the Yaesu FT-8800 transceiver. It enables you to: backup/restore the cloneable memory, modify memory definitions, add and delete memory definitions, manage which memories are in which banks, sort memories by ...
$15.00
5
CQLog 1.3 The program also offers a 'contest-mode'; supports CAT systems for YAESU, ICOM, KENWOOD, Ten-Tec. Prints QSL cards, QSL labels, addresses envelopes and much more. CQLog is fully compatible with the CQ Callbook program.
6
VX-7 Commander 1.3 If you own the VX-7R transceiver, which is the first amateur handheld to be submersible, you may wish to modify it to enable transmission on MARS and CAPS frequencies. You can do this in two ways, using a hardware method or a software method. Using the ...
Freeware
7
FT-60 Commander 1.0 The dual band FT-60 handheld transceiver for amateur radio enthusiasts, first released in 2004, is still very popular because of its wide-coverage receiver, 2-meter VHF band and 70-centimeter UHF band. This handheld transceiver features 1000 memories ...
Freeware
8
VX-6 Commander 0.2 VX-6 Commander features: - Read/Write to the radio - Edit/Move/Cut/Copy/Paste main memory channels, scan edge memories - Edit Direct Recall Memories, Home Memories, VFOs - Edit Memory Banks - Edit Set Mode Settings - Import/Export CSVs - Sort memories ...
Freeware
9
nGenLog 1.0 nGenLog is the next generation logging software for radio amateurs which is designed to work in the future. A living project that utilizes the latest programming technics to supply a stable, functional and easy to use program for your logging experience.
$99.00
10
POWER-trak 3.0 POWER-trak™ is a professional, real-time fleet management software system utilizing some of today’s most advanced technology. This innovative solution gives you the power to do everything from vehicle tracking, two-way messaging, ...
$1,899.00
11
Swisslog 5.8 Most Important SWISSLOG Functions - Add QSO's - Edit and Delete QSO's - Print Logbook - Transceiver Control - Rotor-Control (ARS from EA4TX, Hy-Gain, Yaesu, Sartek) - Integrated Telnet and Internet Support - DX-Cluster Support -- Interfaces ...
Freeware
12
PstRotator 6.9 PstRotator is a program for antenna rotators control. It works with a wide variety of rotators, supports a lot of loggers, DX cluster clients, satellites and moon trackers, and supports multiuser remote operation over the Internet. The user interface ...
$21.60
13
PstRotatorAz 6.6 The PstRotatorAz program can control a Yagi and a bi-directional rotary dipole on the same rotator, with the dipole in line with the Yagi's boom (90° offset from Yagi heading). This mode is BD-90. A second bidirectional mode (BD-0) supports ...
14
CN8HB's CAT-1000 1.1 CN8HB's CAT-1000 is a free software utility that allows you to control your FT-1000MP (also Mark-V) from your computer.This software application allows you to save and restore the memory bank to a file, adjust the EDSP features parameters, record ...
Freeware
15
FCCLookup 5.1 Standard Features: -Look-up of US call signs -Wild card searches on US call signs -US zipcode database current as of Dec 2009 -Manual and automatic download of Master FCC Database -Mini Internet Callsign Server -Geographic coordinates computed based ...
Freeware
16
FT920CAT 1.0 FT920CAT is a nice and easy to install utility. If you love listen to radio, this software is perfect for you. It has allot of features and an interesting interface which makes it more attractive. You can manipulate the beat frequency very easy and quick.
Freeware
17
DStar Comms 1.1 Your premier software solution for communicating via the serial port on your ICOM D-Star enabled Amateur radios. Dstar Comms can be used for email deployment, GPS Tracking, reliable communication plus much more! Main features: - Send and Receive Text ...
Freeware
18
Ham Radio Deluxe 5.1 It offers support to Yaesu, ICOM, Elecraft, Ten-Tec FlexRadio, and Kenwood along with more, and the complete list is available in the user community. Its salient features and benefits include built-in logbook, Favorites, Integrated DX cluster, Customizable ...
19
VX-2 Commander 1.1 Main features : - Edit/Move/Cut/Copy/Paste main memory channels and scan edge memories - Edit Memory Banks - Perform MARS/CAP and Freeband mods via software - Import/Export CSVs - Sort memories by tag or freq - Print memories - Import ARRL TravelPlus ...
Freeware
20
PCConfigure 2.1 EFJohnson's PC Configure software is the most user-friendly programming software for public safety and service radio users. Program all of your EFJohnson mobile and portable radios quickly and easily with the same software package. Minimize your ...
21
CQ Callbook 2.5 CQ Callbook offers you instant access to current information on DXers, their QSL managers and addresses. Also gives you acces to DXCC lists, details of QSL bureaus, callsign prefixes, and a lot of other helpful HAM-information at your finger tips. The ...
$19.95
22
Sunrise Sunset 2.1 Sunrise Sunset is a program very easy to use.On the first run you will need to set your location on the configuration page. You can either input your latitude and longitude, or your Maidenhead Grid locator. One will compute the other. Select the unit ...
Freeware
23
TRX-Manager 4.6 TRX-manager supports almost all the functions of up to 80 transceivers fully integrated in a comprehensive package for Radio Amateurs. TRX-Manager implements all these functions in conjunction with very fast monitoring and easier, more effective SW Listening, ...
$79.00
24
ARSVCOM 1.0 It also allows you to add a Virtual Com Port and emulate via this virtual com some other rotator models as Yaesu, Create, etc In this way, if your some program that supports some of those rotators, but are not supporting a Prosistel, will work with ...
$25.49
25
PSK Express 1.3 This is still beta type software and will require a lot of testing. To run this software you will need to make sure you have the .NET support libraries installed on your machine. You can check that by looking at the Add/Remove programs in the control ...
Yaesu Ft 50r Radio
Go to 1 2 Freeware page
0 notes
Text
Significance OF Flip Gate ESD
Flip Gate ESD can happen when electrically disconnected articles, for example, an individual wind up being electrically charged because of grating and suddenly release when they contact a grounded metal thing. Flip Gate ESD can reach as high as 30 kV, and keeping in mind that the subsequent releases are truly short, commonly on the request for 100 ns, the pinnacle flows can be pretty much as high as 100 A. We've all learned about ESD in some way as we create static electrical force strolling our home, contacting a door handle, and thus getting paralyzed. This may sting for streak and the little blue flash of energy slicing through the air is "very cool" for the sake of science. Envision this occurring as you escape your truck and incline toward the vehicle body to siphon gas. Getting in and out of your truck can daze it in regions that lead back to the electronic gadgets that power your route and the "call for help" frameworks.
The last point is fundamental in the endurance level of Flip Gate ESD as the market design has quickly become that the lower the cycle calculation being utilized is, the more sensitive the chipset is to ESD. This more significant level of affectability can prompt an all out lower framework (wherein the IC is put in) level endurance of Flip Gate ESD .

Botron's SpeedLane with an underlying ESD Elite Data Logger System. Created with 304 tempered steel for a long life.
Each Flip Lane has a sum of 6 optical sensors which will prevent any unapproved laborers from getting in without absolute first breezing through the assessment. The Flip wings are made of clear acrylic and can be illuminated with LED lights. Leave switch for basic returns.
End units are offered two by two and make a solitary path, and roughly 7 focus frameworks can be used to create as much as 8 paths.
Bolt control for Instructions Control
Wellbeing Barrier Wings will endless supply of force
Optical Sensors find Tail-Gating
Incorporates Elite Total Combo Tester with Foot Plates and Cables (One set for each set of end frameworks, one set for every middle framework).
Flip Gate ESD sub-framework helps your vehicle share its area along these lines permitting certain guides and assist frameworks with contacting you. As more connected cars are getting on the lookout, capacities, for example, 4G cell administration, WiFi, GPS, and V2x (car to vehicle and framework correspondence) are completely carried out inside the Telematics Box.
#Advancetech#ionbar#solderingrobo#electrostaticfieldmeter#desolderingstation#pneumaticscrewdriver#digitalscrewdriver#desolderwick#solderpots#staticchargeremovalsystems#fluxcleaner#vocfreeflux#ionisedairgun#electricscrewdriver#torquemeter#smdreworkstation#epoxydispenser#solderingstation#nocleanflux#staticeliminator#solderingiron#FlipGateESD#StencilCleaner#Reflowovencleaner
0 notes
Text
Trojan For Mac

(Redirected from Trojan BackDoor.Flashback)
OSX.FlashBack[1], also known as the Flashback Trojan, Fakeflash, or Trojan BackDoor.Flashback, is a Trojan horse affecting personal computer systems running Mac OS X.[2][3] The first variant of Flashback was discovered by antivirus company Intego in September 2011.[4]
Infection[edit]
According to the Russian antivirus company Dr. Web, a modified version of the 'BackDoor.Flashback.39' variant of the Flashback Trojan had infected over 600,000 Mac computers, forming a botnet that included 274 bots located in Cupertino, California.[5][6] The findings were confirmed one day later by another computer security firm, Kaspersky Lab.[7] This variant of the malware was first detected in April 2012[8] by Finland-based computer security firm F-Secure.[9][10] Dr. Web estimated that in early April 2012, 56.6% of infected computers were located within the United States, 19.8% in Canada, 12.8% in the United Kingdom and 6.1% in Australia.[6]
OSX.Trojan.Gen is a notorious malware program that mainly targets Mac OS. It has the ability to exploit the system vulnerabilities like weak passwords, unprotected system or open network connection to break in. Once in, this harmful Trojan program takes over the whole system without being detected. And carry out various nefarious activities.
Protect your Mac from malware. MacOS has many features that help protect your Mac and your personal information from malicious software, or malware. One common way malware is distributed is by embedding it in a harmless-looking app. You can reduce this risk.

Details[edit]
Malware Library. Threats targeting Macs. Mac malware exists in all shapes and sizes and new digital parasites evolve every day. Whether it’s adware, trojan horses, keystroke loggers, viruses or other spyware, stay up-to-date and discover more information about the latest threats targeting your Mac here.
The original variant used a fake installer of Adobe Flash Player to install the malware, hence the name 'Flashback'.[4]
Remove Trojan Virus Mac
A later variant targeted a Java vulnerability on Mac OS X. The system was infected after the user was redirected to a compromised bogus site, where JavaScript code caused an applet containing an exploit to load. An executable file was saved on the local machine, which was used to download and run malicious code from a remote location. The malware also switched between various servers for optimized load balancing. Each bot was given a unique ID that was sent to the control server.[6] The trojan, however, would only infect the user visiting the infected web page, meaning other users on the computer were not infected unless their user accounts had been infected separately.[11]
Resolution[edit]
Oracle, the company that develops Java, fixed the vulnerability exploited to install Flashback on February 14, 2012.[8] However, at the time of Flashback's release, Apple maintained the Mac OS X version of Java and did not release an update containing the fix until April 3, 2012,[12] after the flaw had already been exploited to install Flashback on 600,000 Macs.[13] On April 12, 2015, the company issued a further update to remove the most common Flashback variants.[14] The updated Java release was only made available for Mac OS X Lion and Mac OS X Snow Leopard; the removal utility was released for Intel versions of Mac OS X Leopard in addition to the two newer operating systems. Users of older operating systems were advised to disable Java.[12] There are also some third party programs to detect and remove the Flashback trojan.[13] Apple worked on a new process that would eventually lead to a release of a Java Runtime Environment (JRE) for Mac OS X at the same time it would be available for Windows, Linux, and Solaris users.[15] As of January 9, 2014, about 22,000 Macs were still infected with the Flashback trojan.[16]

See also[edit]
References[edit]

Trojan Remover For Macbook Pro

^This is the name used in Apple's built-in anti-malware software XProtect. Other antivirus software vendors may use different names.
^5 April 2012, Flashback Trojan botnet infects 600,000 Macs, Siliconrepublic
^5 April 2012, 600,000 infected Macs are found in a botnet, The Inquirer
^ abSeptember 26, 2011, Mac Flashback Trojan Horse Masquerades as Flash Player Installer Package, Intego Security
^Jacqui Cheng, 4 April 2012, Flashback Trojan reportedly controls half a million Macs and counting, Ars Technica
^ abc4 April 2012, Doctor Web exposes 550 000 strong Mac botnet Dr. Web
^Chloe Albanesius, 6 April 2012, Kaspersky Confirms Widespread Mac Infections Via Flashback Trojan, PCMag
^ ab'Half a million Mac computers 'infected with malware''. BBC. April 5, 2012. Retrieved April 5, 2012.
^April 2, 2012, Mac Flashback Exploiting Unpatched Java Vulnerability F-Secure's News from the Lab
^11 April 2012, Apple crafting weapon to vanquish Flashback virus, Sydney Morning Herald
^Kessler, Topher. 'How to remove the Flashback malware from OS X'. CNET.
^ ab'About Flashback malware'. Apple. April 10, 2012. Retrieved April 12, 2012.
^ ab'flashbackcheck.com'. Kaspersky. April 9, 2012. Retrieved April 12, 2012.
^'About Java for OS X Lion 2012-003'. Apple. April 12, 2012. Retrieved April 12, 2012.
^'Mac Security: A Myth?'. eSecurity Planet. April 13, 2012. Retrieved April 16, 2012.
^'It's alive! Once-prolific Flashback trojan still infecting 22,000 Macs'. January 9, 2014. Retrieved January 9, 2014.
External links[edit]
Apple Delays, Hackers Play April 12, 2012
Trojan Spyware Removal For Mac
Retrieved from 'https://en.wikipedia.org/w/index.php?title=Flashback_(Trojan)&oldid=966375624'
0 notes
Link
Welcome to open-force.org! This is a maker space for developers and others in the Salesforce.com ecosystem to share code with each other. Think of open-force as a workshop where people like you are hanging out, tinkering with things they are passionate about. Maybe you'd like to chip in on a project you find interesting, or maybe you'd like to bring your own project into the workshop? This website includes a searchable index of open source projects that exist in Salesforce-land. You can browse these projects with the tool below. We're happy to list any Salesforce-related open source project; send an email to [email protected] to have your project added to the index. There are some companion resources to this website: if you'd like a place to host your project, we give out repositories in our public GitHub at https://github.com/open-force. To have a repository created, send an email to [email protected] have a community of collaborators that hang out in a slack channel over on the GoodDaySir podcast slack. Sign up for the slack group at https://www.gooddaysirpodcast.com/community, and find us in the #open-force channel.We're glad you're here. We love sharing knowledge and code, and we hope you will participate in our open source movement on the Salesforce platform! Want to make this website even better? It's open-source (you're shocked, I'm sure), so go ahead and submit a pull request: https://github.com/open-force/website. A utility class that allows serialization/deserialization of reserved keywords Apex Wrapper for the Salesforce Metadata API Apex463463703BSD 3-Clause "New" or "Revised" License61A simple framework for building Restful API on Salesforce Platform-Event-based Apex logger for unified logging over transaction boundaries Apex797928MIT License Define "Templates" to match and parse URI. Apex660 A collection of apex classes that can be useful for development on the salesforce platform Apex11113MIT License Advanced Techniques for Salesforce DX Adoption Framework Apex676722BSD 3-Clause "New" or "Revised" License7This project is archived, please see the readme for additional resources. JavaScript676676332Apache License 2.0 B.A.S.S. Starter: react / redux / typescript / antd / ts-force / sfdx / webpack / salesforce TypeScript11411419MIT License14Auto-completion for the Cumulus CI CLI for bash Shell110Apache License 2.0 Customized Visual Code Server built from coder/code-server to support Salesforce development using sfdx and other extensions Shell110MIT License A simple bit of Apex to help you investigate which Apex Limits are applied in various execution contexts where Apex can run. Apex551MIT License Python framework for building portable automation for Salesforce projects Python189189156BSD 3-Clause "New" or "Revised" License88Dummy project used to test CumulusCI - CumulusCI will run this project through the whole CI flow to verify everything works RobotFramework88161BSD 3-Clause "New" or "Revised" License7Declarative Rollup Summaries for Lookups Apex451451180BSD 3-Clause "New" or "Revised" License150Salesforce Lightning Design System JavaScript29752975664Other12Salesforce Lightning Design System for React JavaScript615615274BSD 3-Clause "New" or "Revised" License90Common Apex Library supporting Apex Enterprise Patterns and much more! Apex480480326BSD 3-Clause "New" or "Revised" License69Common Apex Library supporting Apex Enterprise Patterns and much more! Apex480480326BSD 3-Clause "New" or "Revised" License69Builder Extension library to fflib_apex-common Apex25259BSD 3-Clause "New" or "Revised" License3An Apex mocking framework for true unit testing in Salesforce, with Stub API support Apex228228135BSD 3-Clause "New" or "Revised" License17An Apex mocking framework for true unit testing in Salesforce, with Stub API support Apex228228135BSD 3-Clause "New" or "Revised" License17[DEPRECATED] Command line tool supporting the Force.com development lifecycle JavaScript10410437MIT License8Generic DI library with support for Apex, Triggers, Visualforce and Lightning Apex15215267BSD 3-Clause "New" or "Revised" License19A structured, extensible logger for Salesforce Apex A native app to support complex Salesforce sharing with quick and easy configuration Automatic Entity-Relationship diagrams and SOQL queries for Salesforce JavaScript23232The Unlicense26A Lightning Component grid implementation that expects a server-side data store. Apex353510MIT License A Salesforce Lightning Component that allows users to show useful links for users on Lightning pages HTML551Apache License 2.01Apex library for HTTP callouts. Apex003Apache License 2.01Image labeller for Salesforce Einstein Object Detection JavaScript334Apache License 2.0 Indicators Lightning Web Component JavaScript17172MIT License8Apex JSON parser to make it easier to extract information from nested JSON structures Apex67678MIT License Lightning Components and Redux: A Predictable State Container for Lightning Apps JavaScript42427MIT License2Lightning component that acts a singleton JavaScript441Apache License 2.0 lodash as a Lightning Web Component JavaScript771 :zap: LWC - A Blazing Fast, Enterprise-Grade Web Components Foundation JavaScript854854180MIT License251The SLDS Illustration component as an App Builder-ready Lightning Web Component. HTML440MIT License Useful LWC components for Salesforce JavaScript15152BSD 3-Clause "New" or "Revised" License11Using Salesforce and Lightning Web Component technology to explore machine learning, using TensorFlow.js and other libraries. JavaScript440 Lightweight, Salesforce specific CI app run on Heroku to build Github repositories configured for CumulusCI Python393916BSD 3-Clause "New" or "Revised" License43CLI tool for processing Salesforce Metadata XML files Shell13131MIT License Salesforce.org's managed package installer Python161611BSD 3-Clause "New" or "Revised" License7The current version of the Salesforce.org Nonprofit Success Pack Apex455455275BSD 3-Clause "New" or "Revised" License383Generic and reusable Lightning service component that retrieves picklist entries (Archived) Apex10105Apache License 2.01PowerShell module for Salesforce SFDX PowerShell000 Pygments lexer for the Salesforce Apex language. Python000MIT License Salesforce open source library with logging framework, trigger framework, feature switches, and advanced monitoring capabilities Apex404011BSD 3-Clause "New" or "Revised" License A custom path assistant built using only Lightning Web Components JavaScript202010MIT License2Salesforce DevTools is a Chrome extension for Salesforce developer, based on everything we need in Salesforce development A simple solution for managing environment variables in salesforce TypeScript26264MIT License4A tool for copying test data into Salesforce sandboxes Not your mother's Salesforce scheduler JavaScript17172BSD 3-Clause "New" or "Revised" License3Apex Library to schedule Unit Test runs Community project to collect and collate recipes for using the Salesforce command line interface (CLI). A lightning component that lets you generate an order w/products from an opportunity record Apex110MIT License Salesforce Lighitng Data table JavaScript552 Utility to provide automated ranking of objects based on values. i.e. Accounts Ranked by Annual Revenue Apex110MIT License Invocable Apex method to allow admins to setup and send slack messages to incoming webhooks Apex551 A native chat application for Salesforce Apex111MIT License Project template for SFDO Django/React/SLDS projects sfdx plugin for browser automation TypeScript616116MIT License5A sfdx plugin to help compare metadata from different environments and provide a user friendly way to merge them. TypeScript990MIT License5Utility for copying files from one dir to another, useful for sfdx Extended Salesforce DX project directory template, designed to support complex projects and managed packages. Shell15615653MIT License10SalesforceDX command to login using username password oauth2 flow 🚀 Declaratively schedule Process Builder, Flows, Quick Actions, Email Alerts, Workflow Rules, or Apex to process records from Reports, List Views, SOQL, or Apex. Apex18718731BSD 3-Clause "New" or "Revised" License32A GUI for managing sfdx orgs TypeScript22222MIT License14Autocomplete script for powershell on windows, for sfdx PowerShell442GNU General Public License v3.01A plugin for splitting and merging Salesforce profiles. Common Apex utility classes and frameworks used by Sirono products 000Apache License 2.0 Common Apex utility classes and frameworks used by Sirono products Apex838324Apache License 2.03A Apex Utility class to Clone a Salesforce SObject & and it's children. Custom Metadata Type Loader, designed for Lightning Experience Apex12121MIT License Website serving various status info for Salesforce.org Python334BSD 3-Clause "New" or "Revised" License9A Lightning app for monitoring streaming events: PushTopic, generic, platform events, CDC events and monitoring events. A Salesforce Lightning Component that allows users to embed a Trello board or a Trello card. More information on the Trello embedding functionality can be found here - https://developers.trello.com/docs/boards and https://developers.trello.com/docs/cards HTML110Apache License 2.01A Salesforce REST Client written in Typescript for Typescript TypeScript38384BSD 3-Clause "New" or "Revised" License28Heroku app that drives the open-force.org website. Check the Readme for how to get your stuff listed. TypeScript996MIT License5A not-that-carefully-maintained list of weird limits you might run across working with Salesforce.com 15151
0 notes
Text
The Best Concrete Sensor in 2020

A Review of Top Wired and Wireless Temperature and Strength Concrete Sensors
This post was written by Aali Alizadeh, the CEO and Co-Founder of Giatec Scientific Inc. Giatec Scientific Inc. is a global company revolutionizing the construction industry by bringing smart testing technologies and real-time data collection to the forefront of every jobsite. Giatec’s suite of hardware & software products has leveraged advanced technologies such as; Artificial Intelligence (AI), and Internet of Things (IoT), including; wireless concrete sensors, mobile apps, and advanced non-destructive technologies (NDT) to drive innovation throughout concrete’s lifecycle. For more information visit www.giatec.ca.
This article appeared first on GiatecScientific.com and has been republished with permission from Giatec. The original version can be found by clicking or tapping here.
Concrete Construction Planning
In a construction project, concrete is often on the critical path. Most of the jobsite activities can not be initiated unless the concrete that is placed for building structural elements such as beams and slabs has achieved sufficient strength (typically 75% of the specified compressive strength of concrete). If concrete is not cured properly in favorable temperature ranges (at least more than 5°C or 40°F based on ACI 306) after pouring, it is quite possible to have a slippage in the project plan and timeline due to the delayed strength development in concrete. Curing temperature is also important when it comes to mass concrete placements such as foundations. If the temperature differential between the surface and core of the mass concrete element exceeds a certain level, there is good chance of concrete cracking due to thermal stresses. Project managers, therefore, have a thermal control plan to ensure that concrete achieves the target strength values as scheduled during the first few days after pouring concrete so they can safely move to the next steps of construction such as formwork removal or post-tensioning with confidence.
Monitoring Concrete Curing and Hardening
A comprehensive thermal control plan describes the temperature monitoring procedure that the general contractor or concrete sub-contractor must implement when placing concrete in cold or hot weather conditions, as well as that for mass concrete elements. This plan generally includes details on the minimum and maximum allowable temperature values for different structural locations, maximum allowable temperature differential for mass concrete placements, type of equipment, sensors and tools for temperature measurement, frequency and duration of temperature readings, as well as relevant heating or cooling producers.
The in-situ concrete temperature measurements can also be used to estimate the strength of concrete using the maturity method (as per ASTM C1074) in real-time. The possibility of obtaining field strength of concrete (without relying of delayed lab test results), makes concrete temperature measurement even more important particularly in structural concrete elements. In addition to temperature measurement that is an essential part of every thermal control plan, some contractors have been leveraging the maturity method to optimize their project schedules and prevent delays in critical construction operations such as stripping forms, shoring and re-shoring removal, pulling post-tension cables, and opening traffic on concrete pavement. In addition, the simultaneous monitoring of concrete temperature and strength provides opportunities for the optimization of heating and cooling cost, as well as allowing for higher temperature differentials.
Different Types of Concrete Temperature Sensors and Maturity Meters
When it comes to the choice of concrete temperature or maturity measurement sensors and equipment, contractor have many options to select based on the cost, accuracy, and ease of use, and of course how all these considerations would fit their project needs and budget. The measurement systems available in the market are categorized as follows:
a. Thermocouples
b. Wired Temperature and Maturity Loggers
c. Wired Concrete Sensors with External Wireless Transmitter
d. Fully Embedded Wireless Concrete Sensors
Each of these temperature/maturity monitoring systems have their own advantages and disadvantages and it is important for contractors to review these before developing their thermal control planning in order to maximize the ROI. It should also be noted that infrared laser-based temperature measurement tools are not recommended for monitoring concrete curing and hardening as they can not capture internal concrete temperature.
Concrete Thermocouple
A concrete thermocouple consists of two wires of different metals connected twisted together at one end to form an electrical junction. There is a temperature-dependent voltage that is produced by the thermocouple due to its thermoelectric property. This voltage is measured by an external equipment and is then used to estimate the concrete temperature. The base metal thermocouple type J and K are the most commonly used types of thermocouple in the concrete industry as they are relatively inexpensive (about $1/ft) with a wide range of temperature measurement.

Thermocouple Wire Coming out of Concrete Connected to a Logger.
Concrete thermocouple wires are purchased in a bundle which is then cut into custom lengths based on the distance between the location of the temperature measurement and where the measurement equipment is placed. At one end, the two thermocouple metal wires need to be twisted together and at the other end, the two wires are connected to a plug. The wires need to be labeled for identification and stay connected to the external device at all times until the measurement duration is completed. The individual measurements are typically displayed on this unit. Once the measurements are completed, the unit can be connected to a computer to download and analyze the data. Recently, wireless devices have been introduced that send the thermocouple measurements to cloud or smartphone.

Left image: Thermocouple wires crossed over in the plug assembly causing error in the measurements (Courtesy of Jon Belkowitz, Intelligent Concrete Inc.). Right image: Handling and labeling the thermocouple wires is a major hassle on the jobsite.
Although thermocouples are relatively inexpensive, they have several disadvantages that make them not suitable for use in most of concrete thermal control plans. Most importantly, the measurement accuracy of thermocouples is low. Type J and K thermocouples have a standard error limit of at least 2.2°C (about 4°F) for typical concrete temperature ranges (See more details). This error is more than two times higher than the minimum measurement accuracy required in most concrete temperature measurement specifications (e.g. ASTM C1064 requires an accuracy of 0.5°C or 1.0°F for fresh concrete temperature measurement). Moreover, it is very time consuming to cut the wires, attach them to the plug, and install the setup in the field. Thin thermocouple wires are also very prone to cuts and damages, and thus measurement errors as they are typically not designed for harsh construction environments. In addition, the wires coming out of concrete and the external unit need to be protected throughout the entire temperature measurement period.
Wired Concrete Temperature and Maturity Loggers
To address some of the deficiencies in thermocouple-based systems, wired temperature and maturity loggers were developed. These loggers and meters have an electronic circuit board that contains a coin-size battery with an onboard thermistor (typically an NTC type sensor) for temperature measurement. The measurements are recorded and stored on this circuit board at pre-defined intervals. The whole circuit board is completely sealed with a connector wire coming out to download the measurements using an external device as needed unlike the thermocouple-based sensors that need to be always connected to an external data recording equipment. For the installation of these systems in concrete elements, the logger (or the sealed circuit board) is placed at the location where the temperature and maturity measurements need to be made. The connector wires are then dragged out of the structural element. After concrete pouring, users can connect their hand-held unit to the end of the wires to download the recorded temperature values.

Circuit Board Inside Concrete Connected With Wires to External Unit.
The wires used for these types of temperature/maturity loggers are more rugged compared to thermocouples which makes them less prone to damages on the jobsite. The external unit is also not exposed to potential damages in a constriction environment as it is used only when downloading the data. External devices can offer various types of data analysis in the field. But, for full analysis and report generation, the data needs to be downloaded later on to a computer.

Wires coming out of concrete are prone to damages on the jobsite. A sign is posted in this case saying “DO NOT CUT WIRES”!
These types of temperature and maturity loggers don’t have an electrical switch and are always turned on. So, their shelf-life is limited. In addition, the industrial-grade connector cable makes these sensors bulky and difficult to install specially when long wires are used for large structural elements. Similar to thermocouples, the end of the wires need to be labeled for identification after pouring and has to be protected against potential cuts or other damages on the jobsite. Moreover, finding the cable lead during the first few days after pouring could be challenging as there are many construction tools, materials and components being moved and displaced on the jobsite potentially covering the cable lead.
Wired Concrete Sensors with External Wireless Transmitter
Whether using thermocouples or wired loggers for concrete temperature monitoring, the hassle of connecting an external device and the need to visit the jobsite to collect the data and later downloading it to a computer have prevented these types of sensors from wide industry adoption. With the electronic advancements, wireless data transmitters were developed to address the above challenges. These external units are connected to the end of the wires coming out of concrete to store and transfer the temperature measurements over a wireless network either:
To a computer connected to internet,
To a local wireless hub or gateway that then transfers data to cloud, or
Directly to cloud through networks such as LTE or Sigfox.

Sensor Wires Coming out of Concrete Connected to Wireless Transmitter Either With Hub and Direct Connection to Cell Tower.
A great advantage of these wireless systems is that the data analysis can be done automatically on the cloud to generate custom alerts and notification for project managers and superintendents even when they are not on the jobsite. However, the wire connection to the external unit is still prone to cuts and the wireless unit located close to the concrete placement can be damaged in a harsh construction environment. Moreover, a complex system comprising wires, external transmitters and local hub can be challenging to install and configure as it has several different components. In addition, in remote jobsites where cell network connection is not available or if any of their components is damaged, these systems may not function properly.
Fully Embedded Wireless Concrete Sensors
With the advancements in electronics and wireless technologies, it has been possible to design self-contained wireless concrete sensors and loggers that are fully embedded in the concrete. The temperature measurements are stored on the sensor. The recorded data can then be download from the fully embedded sensor through various wireless communication protocols such as Bluetooth LE, LoRa, Zigbee, or wifi. In the case of Bluetooth LE, a smartphone or tablet can be used to connect wirelessly to the sensor to download the data and analyze it in real-time for maturity and strength estimation using mobile apps. The data is also transmitted to the cloud through the mobile device connection to the cell network. Alternatively, the sensor data can be downloaded automatically using a wireless local hub for transmission to the cloud without the need to visit the jobsite. For the other wireless protocols, the external hub must be used to download and transmit the data to the cloud as mobile devices do no support them.
Sensor Inside Concrete Connected Wirelessly to Smartphone or Local Hub.
The main advantage of the fully embedded wireless concrete sensors is that, unlike wired systems, they are not prone to potential damages on the construction jobsite after pouring. The data is securely held on the sensor inside the concrete and can be downloaded with confidence at any time. Moreover, the installation and data collection are relatively simpler and faster as there are no wires to be dragged out of concrete, or in the case of Bluetooth LE, no external units that need to be maintained. The overall cost of measurement could therefore be lower than wired sensor. However, due to the sophisticated electronics, the initial purchase cost of these embedded sensors is higher than that of the wired sensors/loggers. It should be noted that the wireless signal from these sensors can only go through a couple of inches of concrete. So, for deeper locations, a temperature measurement cable is used while the wireless sensor’s transmitter is placed inside the concrete typically on the rebar below the concrete surface.
Commercial Concrete Temperature Sensors and Maturity Meters
A survey of the market shows that there are several options for purchasing a concrete temperature/maturity sensor for monitoring the concrete curing and hardening in your concrete project. This gives contractors a wide range of options for selecting a concrete sensor in their construction project based on the cost, accuracy, and ease of use. Here is the list of various commercially available concrete sensors, temperature loggers, and maturity meters in an alphabetical order:
Command Center
Command Center was developed by Transtec Group Inc. for concrete temperature and maturity monitoring. The Command Center wired loggers are embedded in concrete. The wire lead can then be connected to a hand-held device to download the data or attached to Bluetooth transmitter to send the data wirelessly to a mobile device on the jobsite.
Concremote
Doka offers Concremote sensors for concrete temperature and maturity monitoring. Concremote units come in different formats. One of the options is to place the Concremote sensor on the surface of concrete. Data is recorded and transmitted directly to the cloud through cell network. The other option is to embed wired Concremote sensors inside the concrete and attach a wireless transmitter to the end of the wire for wireless data transmission.
Concrete Sensors
Developed by Structural Health Systems Inc., Concrete Sensors is a fully embedded sacrificial sensor that records temperature and humidity of concrete. The data can be retrieved and analyzed at any time using Concrete Sensors’s mobile application via Bluetooth. Concrete Sensors also offers another version of their sensor that directly connects to a local gateway for data transmission to the cloud. Concrete Sensors was recently acquired by Hilti.
Con-Cure NEX
Similar to Command Center, the Con-Cure’s wired maturity loggers are embedded in the concrete. The wire lead that comes out of concrete can be connected either to a hand-held device to download the data recorded on the Con-Cure’s maturity sensors, or to a wireless node that then transmits data to the cloud through cell network or save it on an SD card. Con-Cure offers sacrificial and reusable sensors.
Converge
Converge has developed various solutions for concrete temperature and maturity measurement. Their original product (Converge Mesh) included wired sensors connected to wireless nodes that wirelessly send data to a local hub for transmission to the cloud. Converge’s recent sensor called Signal is a wireless sensor that is fully embedded in the concrete. Recorded data is wirelessly sent to either a mobile device or a local hub and then to the cloud through cell network.
Exact Technology
The wired sensors offered by Exact Technology are embedded in the concrete. The wire lead is then connected to a wireless node that sends the data to a local hub for transmission to the cloud through the cell network. The Exact Technology node can accept four wires. The data is analyzed for maturity and strength calculation and reporting on the cloud.
HardTrack
Wake Inc. offers the RFID-based HardTrack sensor. The HardTrack sensor comes in different formats. The temperature measurement cable is connected to an RFID reader. The RFID tag can either be embedded in the concrete or placed outside to be reused. Users can use an RFID reader to retrieve the recorded data or install a local hub to wirelessly download the data for transmission to the cloud.
HOBO
HOBO developed by ONSET is one many commercially available thermocouple data loggers. Multiple thermocouple wires can be connected to a HOBO box that is installed outside concrete. HOBO offers a regular logger that records the data for processing later on a computer, as well as a wireless logger that can record and send the temperature data via Bluetooth to a mobile device. Users need to calculate the concrete maturity and strength themselves based on the temperature results.
intelliRock
intelliRock maturity meters were originally developed by Engius. The company was later acquired by Flir. The intelliRock’s wired maturity loggers are placed inside the concrete. The wire lead that comes out of concrete can be connected to a hand-held device to download and analyze the data, or it can be connected to a wireless transmitter to send the data to the cloud.
AOMS Technologies
AOMS offers Lumicon concrete sensor. Lumicon can measure temperature at multiple pre-made locations across its cable. The cable end that comes out of concrete is connected to a wireless transmitter that then sends data to a local hub and then to the cloud. The data analysis and concrete maturity calculations are performed on the cloud. Data is also accessible using Lumicon’s mobile app.
Sensohive
Sensohive offers Maturix sensors for concrete temperature and maturity monitoring. Maturix uses thermocouple sensors. One end of the thermocouple wires is embedded in the concrete and the other end needs to be connected to a node. Each wire needs to have a separate node. The nodes record the concrete temperature data and send it wirelessly to the cloud (either directly if Sigfox network is available or otherwise through a local gateway). Sensohive was partially acquired by Kryton.
SmartRock
The concrete testing device manufacturer, Giatec, offers SmartRock maturity sensors. The wireless SmartRock sensors are fully embedded in the concrete without any leads coming out of concrete. The recorded data is wirelessly sent using Bluetooth either to a mobile device or to a SmartHub located on the jobsite that then transmits the data to the cloud through cell network. The data can be analyzed either using the mobile app in real-time on the jobsite, or on the Giatec 360 cloud dashboard powered by AI capabilities. Giatec also offers SmartRock Plus sensors exclusively through concrete producers that are pre-calibrated to their concrete mixes.
vOrb
The Concrete QC software company, Quadrel, offers vOrb sensors in different formats. The vOrb sensors which use wifi communication protocol are embedded in the concrete. The data needs to be retrieved via a local hub before it is transmitted to the cloud. Quadrel offers another version of vOrb sensors for monitoring the temperature and maturity of concrete cylinders.
Which Concrete Sensor Should You Use in Your Project?
When it comes to selecting a concrete temperature sensor or maturity logger for your next thermal control plan or field strength monitoring, there are many options that you can consider based on the sensor cost, its accuracy and ease of use. Each of these considerations can affect the overall cost and time needed to setup, collect, analyze and report the temperature, maturity and strength data, and ultimately impacts the ROI related to monitoring the curing and hardening of your concrete placements. Here is a summary of the commercially available concrete temperature/maturity sensors categorized based on their type:

Note: All company, product/service names, and brands used in this article are property of their respective owners. This article is intended to be used for informational purposes only.
source https://www.constructionjunkie.com/blog/2020/7/16/the-best-concrete-sensor-in-2020 from G P NATIONAL CRANES LTD https://gpnationalcrane.blogspot.com/2020/07/the-best-concrete-sensor-in-2020.html
0 notes
Text
Performance Best Practices: How to Run and Monitor Express.js in Production
What is the most important feature an Express.js application can have? Maybe using sockets for real-time chats or GraphQL instead of REST APIs? Come on, tell me. What’s the most amazing, sexy, and hyped feature you have in your Express.js application?
Want to guess what mine is? Optimal performance with minimal downtime. If your users can't use your application, what's the point of fancy features?
In the past four years, I've learned that performant Express.js applications need to do four things well:
Ensure minimal downtime
Have predictable resource usage
Scale effectively based on load
Increase developer productivity by minimizing time spent on troubleshooting and debugging
In the past, I've talked a lot about how to improve Node.js performance and related key metrics you have to monitor. There are several bad practices in Node.js you should avoid, such as blocking the thread and creating memory leaks, but also how to boost the performance of your application with the cluster module, PM2, Nginx and Redis.
The first step is to go back to basics and build up knowledge about the tool you are using. In our case the tool is JavaScript. Lastly, I'll cover how to add structured logging and using metrics to pinpoint performance issues in Express.js applications like memory leaks.
In a previous article, I explained how to monitor Node.js applications with five different open-source tools. They may not have full-blown features like the Sematext Express.js monitoring integration, Datadog, or New Relic, but keep in mind they’re open-source products and can hold their own just fine.
In this article, I want to cover my experience from the last four years, mainly the best practices you should stick to, but also the bad things you should throw out right away. After reading this article you'll learn what you need to do to make sure you have a performant Express.js application with minimal downtime.
In short, you'll learn about:
My goal for you is to use this to embrace Express.js best practices and a DevOps mindset. You want to have the best possible performance with minimal downtime and ensure high developer productivity. The goal is to solve issues quickly if they occur and trust me, they always do.
Let's go back to basics, and talk a bit about Express.js.
How to Structure Express.js Applications
Having an intuitive file structure will play a huge role in making your life easier. You will have an easier time adding new features as well as refactoring technical debt.
The approach I stick to looks like this:
src/ config/ - configuration files controllers/ - routes with provider functions as callback functions providers/ - business logic for controller routes services/ - common business logic used in the provider functions models/ - database models routes.js - load all routes db.js - load all models app.js - load all of the above test/ unit/ - unit tests integration/ - integration tests server.js - load the app.js file and listen on a port (cluster.js) - load the app.js file and create a cluster that listens on a port test.js - main test file that will run all test cases under the test/ directory
With this setup you can limit the file size to around 100 lines, making code reviews and troubleshooting much less of a nightmare. Have you ever had to review a pull request where every file has more than 500 lines of code? Guess what, it's not fun.
There's a little thing I like to call separation of concerns. You don't want to create clusterfucks of logic in a single file. Separate concerns into their dedicated files. That way you can limit the context switching that happens when reading a single file. It's also very useful when merging to master often because it's much less prone to cause merge conflicts.
To enforce rules like this across your team you can also set up a linter to tell you when you go over a set limit of lines in a file, as well as if a single line is above 100 characters long. One of my favorite settings, by the way.
How to Improve Express.js Performance and Reliability
Express.js has a few well-known best practices you should adhere to. Below are a few I think are the most important.
Set NODE_ENV=production
Here's a quick hint to improve performance. Would you believe that only by setting the NODE_ENV environment variable to production will make your Express.js application three times faster!
In the terminal you can set it with:
export NODE_ENV=production
Or, when running your server.js file you can add like this:
NODE_ENV=production node server.js
Enable Gzip Compression
Moving on, another important setting is to enable Gzip compression. First, install the compression npm package:
npm i compression
Then add this snippet below to your code:
const compression = require('compression') const express = require('express') const app = express() app.use(compression())
If you're using a reverse proxy with Nginx, you can enable it at that level instead. That's covered in the Enabling Gzip Compression with Nginx section a bit further down.
Always Use Asynchronous Functions
The last thing you want to do is to block the thread of execution. Never use synchronous functions! Like, seriously, don't. I mean it.
What you should do instead is use Promises or Async/Await functions. If you by any chance only have access to sync functions you can easily wrap them in an Async function that will execute it outside of the main thread.
(async () => { const foo = () => { ...some sync code return val } async const asyncWrapper = (syncFun) => { const val = syncFun() return val } // the value will be returned outside of the main thread of execution const val = await asyncWrapper(foo) })()
If you really can't avoid using a synchronous function then you can run them on a separate thread. To avoid blocking the main thread and bogging down your CPU you can create child processes or forks to handle CPU intensive tasks.
An example would be that you have a web server that handles incoming requests. To avoid blocking this thread, you can spawn a child process to handle a CPU intensive task. Pretty cool. I explained this in more detail here.
Make Sure To Do Logging Correctly
To unify logs across your Express.js application, instead of using console.log(), you should use a logging agent to structure and collect logs in a central location.
You can use any SaaS log management tool as the central location, like Sematext, Logz.io, Datadog, and many more. Think of it like a bucket where you keep logs so you can search and filter them later, but also get alerted about error logs and exceptions.
I'm part of the integrations team here at Sematext, building open-source agents for Node.js. I put together this tiny open-source Express.js agent to collect logs. It can also collect metrics, but about that a bit further down. The agent is based on Winston and Morgan. It tracks API request traffic with a middleware. This will give you per-route logs and data right away, which is crucial to track performance.
Note: Express.js middleware functions are functions that have access to the request object (req), the response object (res), and the next middleware function in the application’s request-response cycle. The next middleware function is commonly denoted by a variable named next. - from Using middleware, expressjs.com
Here's how to add the logger and the middleware:
const { stLogger, stHttpLoggerMiddleware } = require('sematext-agent-express') // At the top of your routes add the stHttpLoggerMiddleware to send API logs to Sematext const express = require('express') const app = express() app.use(stHttpLoggerMiddleware) // Use the stLogger to send all types of logs directly to Sematext app.get('/api', (req, res, next) => { stLogger.info('An info log.') stLogger.debug('A debug log.') stLogger.warn('A warning log.') stLogger.error('An error log.') res.status(200).send('Hello World.') })
Prior to requiring this agent you need to configure Sematext tokens as environment variables. In the dotenv section below, you will read more about configuring environment variables.
Here's a quick preview of what you can get.
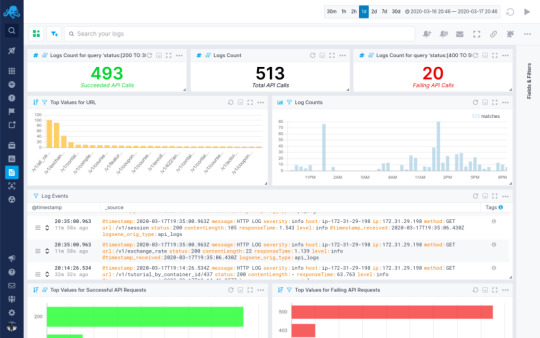
Handle Errors and Exceptions Properly
When using Async/Await in your code, it's a best practice to rely on try-catch statements to handle errors and exceptions, while also using the unified Express logger to send the error log to a central location so you can use it to troubleshoot the issue with a stack trace.
async function foo() { try { const baz = await bar() return baz } catch (err) { stLogger.error('Function \'bar\' threw an exception.', err); } }
It's also a best practice to configure a catch-all error middleware at the bottom of your routes.js file.
function errorHandler(err, req, res, next) { stLogger.error('Catch-All error handler.', err) res.status(err.status || 500).send(err.message) } router.use(errorHandler) module.exports = router
This will catch any error that gets thrown in your controllers. Another last step you can do is to add listeners on the process itself.
process.on('uncaughtException', (err) => { stLogger.error('Uncaught exception', err) throw err }) process.on('unhandledRejection', (err) => { stLogger.error('unhandled rejection', err) })
With these tiny snippets you'll cover all the needed precautions for handling Express errors and log collection. You now have a solid base where you don't have to worry about losing track of errors and logs. From here you can set up alerts in the Sematext Logs UI and get notified through Slack or E-mail, which is configured by default. Don't let your customers tell you your application is broken, know before they do.
Watch Out For Memory Leaks
You can't catch errors before they happen. Some issues don't have root causes in exceptions breaking your application. They are silent and like memory leaks, they creep up on you when you least expect it. I explained how to avoid memory leaks in one of my previous tutorials. What it all boils down to is to preempt any possibility of getting memory leaks.
Noticing memory leaks is easier than you might think. If your process memory keeps growing steadily, while not periodically being reduced by garbage collection, you most likely have a memory leak. Ideally, you’d want to focus on preventing memory leaks rather than troubleshooting and debugging them. If you come across a memory leak in your application, it’s horribly difficult to track down the root cause.
This is why you need to look into metrics about process and heap memory.
Adding a metrics collector to your Express.js application, that will gather and store all key metrics in a central location where you can later slice and dice the data to get to the root cause of when a memory leak happened, and most importantly, why it happened.
By importing a monitoring agent from the Sematext Agent Express module I mentioned above, you can enable the metric collector to store and visualize all the data in the Sematext Monitoring UI.
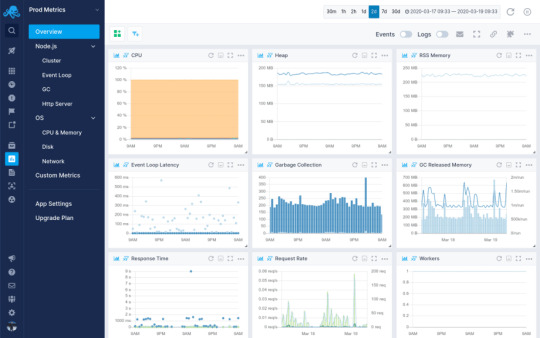
Here's the kicker, it's only one line of code. Add this snippet in your app.js file.
const { stMonitor, stLogger, stHttpLoggerMiddleware } = require('sematext-agent-express') stMonitor.start() // run the .start method on the stMonitor // At the top of your routes add the stHttpLoggerMiddleware to send API logs to Sematext const express = require('express') const app = express() app.use(stHttpLoggerMiddleware) ...
With this you'll get access to several dashboards giving you key insight into everything going on with your Express.js application. You can filter and group the data to visualize processes, memory, CPU usage and HTTP requests and responses. But, what you should do right away is configure alerts to notify you when the process memory starts growing steadily without any increase in the request rate.
Moving on from Express.js-specific hints and best practices, let's talk a bit about JavaScript and how to use the language itself in a more optimized and solid way.
How to Set Up Your JavaScript Environment
JavaScript is neither object-oriented or functional. Rather, it's a bit of both. I'm quite biased towards using as many functional paradigms in my code as possible. However, one surpasses all others. Using pure functions.
Pure Functions
As the name suggests, pure functions are functions that do not mutate the outer state. They take parameters, do something with them, and return a value.
Every single time you run them they will behave the same and return a value. This concept of throwing away state mutations and only relying on pure functions is something that has simplified my life to an enormous extent.
Instead of using var or let only use const, and rely on pure functions to create new objects instead of mutating existing objects. This ties into using higher-order functions in JavaScript, like .map(), .reduce(), .filter(), and many more.
How to practice writing functional code? Throw out every variable declaration except for const. Now try writing a controller.
Object Parameters
JavaScript is a weakly typed language, and it can show its ugly head when dealing with function arguments. A function call can be passed one, none, or as many parameters as you want, even though the function declaration has a fixed number of arguments defined. What's even worse is that the order of the parameters are fixed and there is no way to enforce their names so you know what is getting passed along.
It's absolute lunacy! All of it, freaking crazy! Why is there no way to enforce this? But, you can solve it somewhat by using objects as function parameters.
const foo = ({ param1, param2, param3 }) => { if (!(param1 && param2 && param3)) { throw Error('Invalid parameters in function: foo.') } const sum = param1 + param2 + param3 return sum } foo({ param1: 5, param2: 345, param3: 98 }) foo({ param2: 45, param3: 57, param1: 81 }) // <== the same
All of these function calls will work identically. You can enforce the names of the parameters and you're not bound by order, making it much easier to manage.
Freaking write tests, seriously!
Do you know what's the best way to document your code, keep track of features and dependencies, increase community awareness, gain contributors, increase performance, increase developer productivity, have a nicer life, attract investors, raise a seed round, make millions selling your startup!?.... wait that got out of hand.
Yes, you guessed it, writing tests is the answer.
Let's get back on track. Write tests based on the features you want to build. Then write the feature. You will have a clear picture of what you want to build. During this process you will automatically start thinking about all the edge cases you would usually never consider.
Trust me, TDD works.
How to get started? Use something simple like Mocha and Chai. Mocha is a testing framework, while Chai is an assertion library.
Install the npm packages with:
npm i mocha chai
Let's test the foo function from above. In your main test.js file add this snippet of code:
const chai = require('chai') const expect = chai.expect const foo = require('./src/foo') describe('foo', function () { it('should be a function', function () { expect(foo).to.be.a('function') }) it('should take one parameter', function () { expect( foo.bind(null, { param1: 5, param2: 345, param3: 98 })) .to.not.throw(Error) }) it('should throw error if the parameter is missing', function () { expect(foo.bind(null, {})).to.throw(Error) }) it('should throw error if the parameter does not have 3 values', function () { expect(foo.bind(null, { param1: 4, param2: 1 })).to.throw(Error) }) it('should return the sum of three values', function () { expect(foo({ param1: 1, param2: 2, param3: 3 })).to.equal(6) }) })
Add this to your scripts section in the package.json:
"scripts": { "test": "mocha" }
Now you can run the tests by running a single command in your terminal:
npm test
The output will be:
> [email protected] test /path/to/your/expressjs/project > mocha foo ✓ should be a function ✓ should take one parameter ✓ should throw error if the parameter is missing ✓ should throw error if the parameter does not have 3 values ✓ should return the sum of three values 5 passing (6ms)
Writing tests gives you a feeling of clarity. And it feels freaking awesome! I feel better already.
With this out of my system I'm ready for DevOps topics. Let's move on to some automation and configuration.
Apart from the things you can do in the code, like you saw above, some things need to be configured in your environment and server setup. Starting from the basics, you need an easy way to manage environment variables, you also need to make sure your Express.js application restarts automatically in case it crashes.
You also want to configure a reverse proxy and load balancer to expose your application, cache requests, and load balance traffic across multiple worker processes. The most important step in maintaining high performance is to add a metrics collector so you can visualize data across time and troubleshoot issues whenever they occur.
Managing Environment Variables in Node.js with dotenv
Dotenv is an npm module that lets you load environment variables easily into any Node.js application by using a file.
In the root of your project create a .env file. Here you'll add any environment variables you need.
NODE_ENV=production DEBUG=false LOGS_TOKEN=xxx-yyy-zzz MONITORING_TOKEN=xxx-yyy-zzz INFRA_TOKEN=xxx-yyy-zzz ...
Loading this file is super simple. In your app.js file require dotenv at the top before anything else.
// dotenv at the top require('dotenv').config() // require any agents const { stLogger, stHttpLoggerMiddleware } = require('sematext-agent-express') // require express and instantiate the app const express = require('express') const app = express() app.use(stHttpLoggerMiddleware) ...
Dotenv will load a file named .env by default. If you want to have multiple dotenv files, here's how you can configure them.
Make Sure the Application Restarts Automatically With Systemd or PM2
JavaScript is a scripting language, obviously, the name says so. What does this mean? When you start your server.js file by running node server.js it will run the script as a process. However, if it fails, the process exits and there's nothing telling it to restart.
Here's where using Systemd or PM2 comes into play. Either one works fine, but the Node.js maintainers urge us to use Systemd.
Ensure Application Restarts with Systemd
In short, Systemd is part of the building blocks of Linux operating systems. It runs and manages system processes. What you want is to run your Node.js process as a system service so it can recover from crashes.
Here's how you do it. On your VM or server, create a new file under /lib/systemd/system/ called app.service.
# /lib/systemd/system/fooapp.service [Unit] Description=Node.js as a system service. Documentation=https://example.com After=network.target [Service] Type=simple User=ubuntu ExecStart=/usr/bin/node /path/to/your/express/project/server.js Restart=on-failure [Install] WantedBy=multi-user.target
The two important lines in this file are ExecStart and Restart. The ExecStart says that the /usr/bin/node binary will start your server.js file. Make sure to add an absolute path to your server.js file. The Restart=on-failure makes sure to restart the application if it crashes. Exactly what you're looking for.
Once you save the fooapp.service file, reload your daemon and start the script.
systemctl daemon-reload systemctl start fooapp systemctl enable fooapp systemctl status fooapp
The status command will show you the application is running as a system service. The enable command makes sure it starts on boot. That was easier than you thought, am I right?
Ensure Application Restarts with PM2
PM2 has been around for a few years. They utilize a custom-built script that manages and runs your server.js file. It is simpler to set up, but comes with the overhead of having another Node.js process that acts as a Master process, like a manager, for your Express.js application processes.
First you need to install PM2:
npm i -g pm2
Then you start your application by running this command in the root directory of your Express.js project:
pm2 start server.js -i max
The -i max flag will make sure to start the application in cluster-mode, spawning as many workers as there are CPU cores on the server.
Mentioning cluster-mode is the perfect segue into the next section about load balancing and reverse proxies and caching.
Enable Load Balancing and Reverse Proxies
Load balancing can be done with both the Node.js cluster module or with Nginx. I'll show you my preferred setup, which is also what the peeps over at Node.js think is the right way to go.
Load Balancing with the Cluster Module
The built-in cluster module in Node.js lets you spawn worker processes that will serve your application. It's based on the child_process implementation and, luckily for us, is very easy to set up if you have a basic Express.js application.
You only really need to add one more file. Create a file called cluster.js and paste this snippet of code into it:
const cluster = require('cluster') const numCPUs = require('os').cpus().length const app = require('./src/app') const port = process.env.PORT || 3000 const masterProcess = () => Array.from(Array(numCPUs)).map(cluster.fork) const childProcess = () => app.listen(port) if (cluster.isMaster) { masterProcess() } else { childProcess() } cluster.on('exit', () => cluster.fork())
Let's break down what's happening here. When you start the cluster.js file with node cluster.js the cluster module will detect that it is running as a master process. In that case it invokes the masterProcess() function. The masterProcess() function counts how many CPU cores the server has and invokes the cluster.fork() function that many times. Once the cluster.fork() function is invoked the cluster module will detect it is running as a child process and invoke the childProcess() function, which then tells the Express.js server to .listen() on a port. All these processes are running on the same port. It's possible due to something called an IPC connection. Read more about that here.
The cluster.on('exit') event listener will restart a worker process if it fails.
With this setup you can now edit the ExecStart field in the fooapp.service Systemd service file to run the cluster.js file instead.
Replace:
ExecStart=/usr/bin/node /path/to/your/express/project/server.js
With:
ExecStart=/usr/bin/node /path/to/your/express/project/cluster.js
Reload the Systemd daemon and restart the fooapp.service:
systemctl daemon-reload systemctl restart fooapp
There you have it. You've added load balancing to your Express.js application. Now it will scale across all the CPUs on your server.
However, this will only work for a single-server setup. If you want to have multiple servers, you need Nginx.
Adding a Reverse Proxy with Nginx
One of the primal laws of running Node.js applications is to never expose them on port 80 or 443. You should always use a reverse proxy to direct traffic to your application. Nginx is the most common tool you use with Node.js to achieve this. It's a web server that can act as both a reverse proxy and load balancer.
Installing Nginx is rather straightforward, for Ubuntu it would look like this:
apt update apt install nginx
Make sure to check the Nginx installation instructions if you're using another operating system.
Nginx should start right away, but just in case make sure to check:
systemctl status nginx [Output] nginx.service - A high performance web server and a reverse proxy server Loaded: loaded (/lib/systemd/system/nginx.service; enabled; vendor preset: enabled) Active: active (running) since Fri 2018-04-20 16:08:19 UTC; 3 days ago Docs: man:nginx(8) Main PID: 2369 (nginx) Tasks: 2 (limit: 1153) CGroup: /system.slice/nginx.service ├─2369 nginx: master process /usr/sbin/nginx -g daemon on; master_process on; └─2380 nginx: worker process
If it is not started, go ahead and run this command to start it.
systemctl start nginx
Once you have Nginx running, you need to edit the configuration to enable a reverse proxy. You can find the Nginx configuration file in the /etc/nginx/ directory. The main configuration file is called nginx.conf, while there are additional snippets in the etc/nginx/sites-available/ directory. The default server configuration is found here and is named default.
To just enable a reverse proxy, open up the default configuration file and edit it so it looks like this:
server { listen 80; location / { proxy_pass http://localhost:3000; # change the port if needed } }
Save the file and restart the Nginx service.
systemctl restart nginx
This configuration will route all traffic hitting port 80 to your Express.js application.
Load Balancing with Nginx
If you want to take it a step further, and enable load balancing, here's how to do it.
Now, edit the main nginx.conf file:
http { upstream fooapp { server localhost:3000; server domain2; server domain3; ... } ... }
Adding this upstream section will create a server group that will load balance traffic across all the servers you specify.
You also need to edit the default configuration file to point the reverse proxy to this upstream.
server { listen 80; location / { proxy_pass http://fooapp; } }
Save the files and restart the Nginx service once again.
systemctl restart nginx
Enabling Caching with Nginx
Caching is important to reduce response times for API endpoints, and resources that don't change very often.
Once again edit the nginx.conf file, and add this line:
http { proxy_cache_path /data/nginx/cache levels=1:2 keys_zone=STATIC:10m inactive=24h max_size=1g; ... }
Open up the default configuration file again. Add these lines of code as well:
server { listen 80; location / { proxy_pass http://fooapp; proxy_set_header Host $host; proxy_buffering on; proxy_cache STATIC; proxy_cache_valid 200 1d; proxy_cache_use_stale error timeout invalid_header updating http_500 http_502 http_503 http_504; } }
Save both files and restart the Nginx service once again.
Enabling Gzip Compression with Nginx
To improve performance even more, go ahead and enable Gzip. In the server block of your Nginx configuration file add these lines:
server { gzip on; gzip_types text/plain application/xml; gzip_proxied no-cache no-store private expired auth; gzip_min_length 1000; ... }
If you want to check out more configuration options about Gzip compression in Nginx, check this out.
Enabling Caching with Redis
Redis in an in-memory data store, which is often used as a cache.
Installing it on Ubuntu is rather simple:
apt update apt install redis-server
This will download and install Redis and its dependencies. There is one important configuration change to make in the Redis configuration file that was generated during the installation.
Open up the /etc/redis/redis.conf file. You have to change one line from:
supervised no
To:
supervised systemd
That’s the only change you need to make to the Redis configuration file at this point, so save and close it when you are finished. Then, restart the Redis service to reflect the changes you made to the configuration file:
systemctl restart redis systemctl status redis [Output] ● redis-server.service - Advanced key-value store Loaded: loaded (/lib/systemd/system/redis-server.service; enabled; vendor preset: enabled) Active: active (running) since Wed 2018-06-27 18:48:52 UTC; 12s ago Docs: http://redis.io/documentation, man:redis-server(1) Process: 2421 ExecStop=/bin/kill -s TERM $MAINPID (code=exited, status=0/SUCCESS) Process: 2424 ExecStart=/usr/bin/redis-server /etc/redis/redis.conf (code=exited, status=0/SUCCESS) Main PID: 2445 (redis-server) Tasks: 4 (limit: 4704) CGroup: /system.slice/redis-server.service └─2445 /usr/bin/redis-server 127.0.0.1:6379
Next you install the redis npm module to access Redis from your application.
npm i redis
Now you can require it in your application and start caching request responses. Let me show you an example:
const express = require('express') const app = express() const redis = require('redis') const redisClient = redis.createClient(6379) async function getSomethingFromDatabase (req, res, next) { try { const { id } = req.params; const data = await database.query() // Set data to Redis redisClient.setex(id, 3600, JSON.stringify(data)) res.status(200).send(data) } catch (err) { console.error(err) res.status(500) } } function cache (req, res, next) { const { id } = req.params redisClient.get(id, (err, data) => { if (err) { return res.status(500).send(err) } // If data exists return the cached value if (data != null) { return res.status(200).send(data) } // If data does not exist, proceed to the getSomethingFromDatabase function next() }) } app.get('/data/:id', cache, getSomethingFromDatabase) app.listen(3000, () => console.log(`Server running on Port ${port}`))
This piece of code will cache the response from the database as a JSON string in the Redis cache for 3600 seconds. You can change this based on your own needs.
With this, you've configured key settings to improve performance. But, you've also introduced additional possible points of failure. What if Nginx crashes or Redis overloads your disk space? How do you troubleshoot that?
Enable VM/Server-Wide Monitoring and Logging
Ideally, you'd configure an Infrastructure Agent on your VM or server to gather metrics and logs and send them to a central location. That way you can keep track of all infrastructure metrics like CPU, memory, disk usage, processes, etc.
This way you can keep an eye on your whole infrastructure, including CPU, memory and disk usage, as well as all the separate processes while running your application in cluster-mode.
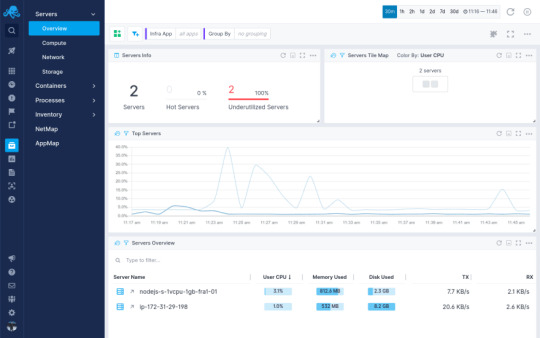
But, we do need to know what's going on with Nginx first. You can configure the stub_status to show Nginx metrics, but that doesn't really give you any actionable insight. But, you can install an Nginx Integration and get insight into Nginx metrics alongside your Express.js Integration in Sematext Cloud.
Why is monitoring Nginx important? Nginx is the entry point to your application. If it fails, your whole application fails. Your Node.js instance can be fine, but Nginx stops responding and your website goes down. You'll have no clue it's down because the Express.js application is still running without any issues.
You have to keep an eye on all the points of failure in your system. That's why having proper alerting in place is so crucial. If you want to learn more about alerting you can read this.
Same goes for Redis. To keep an eye on it, check out ways to monitor Redis, here or here.
That wraps up the DevOps tools and best practices you should stick to. What a ride that was! If you want to delve deeper into learning about DevOps and tooling, check out this guide my co-worker wrote.
Wrapping Up
It took me the better part of four years to start using proper tooling and adhering to best practices. In the end, I just want to point out the most important part of your application is to be available and performant. Otherwise, you won't see any users stick around. If they can't use your application, what's the point?
The idea behind this article was to cover best practices you should stick to, but also the bad practices to stay away from.
You've learned many new things in this Express.js tutorial. From optimizing Express.js itself, creating an intuitive project structure and optimizing for performance to learning about JavaScript best practices and test-driven development. You've also learned about error handling, logging and monitoring.
After all this, you can say with certainty that you've had an introduction to DevOps culture. What does that mean? Well, making sure to write reliable and performant software with test coverage, while maintaining the best possible developer productivity. That's how we as engineers continue loving our job. Otherwise, it's all mayhem.
Hope you all enjoyed reading this as much as I enjoyed writing it. If you liked it, feel free to hit the share button so more people will see this tutorial. Until next time, be curious and have fun.
via freeCodeCamp.org https://ift.tt/2y98uzT
0 notes