#Mastering CMake
Explore tagged Tumblr posts
Visit Tumblr Blog
Explore Tumblr blogs with no restrictions, modern design and the best experience.
Last Seen Tumblr Blogs


Fun Fact
Mobile US users spent an average of 115.8 minutes on Tumblr app monthly.
Text
https://manuscriptpen.com/about-us/made-in-britain
#RAM : https://github.com/awslabs/aws-iot-device-client/blob/main/cmake-toolchain/README.md : - Tracer Links#CIVIL CORRANDRUM#https://github.com/tianocore/edk2/tree/master?tab=readme-ov-file
0 notes
Text
A while back, someone clued me in to an obscure, European - exclusive GBA game called Pinky and the Brain: The Master Plan. Some of the tracks were straight fire, so I had to figure out how to listen to them.
My first stop was YouTube. There's only one guy uploading, and the quality leaves much to be desired.
So, I set out to rip the music straight from the ROM. After many dead ends, I was able to get the tracks with:
A UNIX/LINUX setup. Maybe Windows is easier for you, or maybe you're normal like the rest of us. I find the command line far more intuitive, but as long as you have something to compile C++ with, cheers.
CMake-compiled gaxtapper executable (thank you, loveemu on GitHub) because the sound engine wasn't Sappy or Krawallar. It was also Gax 2.x, so I had to account for that as well.
As for listening to them, you're gonna need foobar2000 or a music player that handles .minigsf files. I plan on making converted MIDI copies if possible so I can mess around with mixing, but if you just want the music, stop here.
The first pass at ripping the songs fared well. For some reason, I can't put them in a different folder without a corruption warning in the player. So they're sitting in the build folder with the CMake files. Sometimes, software is straight wizardry.
But, they sound better than YouTube. I plan on extracting the songs again after messing with the constants in the gaxtapper files, and then seeing if I can make a thing or two out of all this.
The game itself seems pretty all right. I've only been viewing it through a debugging lens, but getting the ROM and a GBA emulator isn't too tricky if you wanna give it a spin.
Once this starts sounding nice, I'll see about uploading the songs. You might like them as well.
--------
Music credit goes to Manfred Linzner. It sucks that I only saw this after grabbing the songs, but the composer should get credit for coming up with this, right? Apparently he's composed for quite a few games using the Shin'en sound engine. Pretty cool stuff.

#patb#pinky and the brain#master plan#gaxtapper#gba#rom#rip#unix#dont use windows if you value your sanity#music#soundtrack#animaniacs#first pass#wip
20 notes
·
View notes
Text
Installing Auto Complete in NeoVim
Sometimes you find yourself programming in a remote server and you really start to miss the autocomplete features of modern test editors not to worry Neovim/Vim to the rescue

1. Install latest version of Vim or Neovim should be Vim 8 at least -----------------------------------------------------------------
If latest is not available from package manager then you will need to compile
I will detail steps of compiling Neovim References: https://colleowino.github.io/building-neovim
Make sure you have the following installed: sudo git
sudo apt-get install libtool libtool-bin autoconf automake cmake libncurses5-dev g++ make python bindings available: sudo apt-get install python-dev python-pip python3-dev python3-pip
pip3 install --user pynvim
git clone https://github.com/neovim/neovim
Go to the root of the project and build: sudo LC_ALL=c make sudo LC_ALL=c make test sudo LC_ALL=c make install
export NVIM_LOG_FILE=~/.local/share/nvim/log
If not there find it for your local distro add to $HOME/.bashrc file
export NVIM_LOG_FILE=~/.local/share/nvim/log
make install You may want to user your current vim config for the instance: ln -s ~/.vim ~/.config/nvim ln -s ~/.vimrc ~/.config/nvim/init.vim
2 git clone --depth=1 https://github.com/amix/vimrc.git ~/.vim_runtime sh ~/.vim_runtime/install_awesome_vimrc.sh
Also check usage documentation on https://github.com/amix/vimrc
3. Install vim-plug
For Vim ----------------------
curl -fLo ~/.vim/autoload/plug.vim --create-dirs \ https://raw.githubusercontent.com/junegunn/vim-plug/master/plug.vim
For Neovim -------------- Unix, Linux sh -c 'curl -fLo "${XDG_DATA_HOME:-$HOME/.local/share}"/nvim/site/autoload/plug.vim --create-dirs \ https://raw.githubusercontent.com/junegunn/vim-plug/master/plug.vim'
4. Edit your vimrc like so
vim ~/.vimrc
and add the following in your vimrc
set runtimepath+=~/.vim_runtime source ~/.vim_runtime/vimrcs/basic.vim source ~/.vim_runtime/vimrcs/filetypes.vim source ~/.vim_runtime/vimrcs/plugins_config.vim source ~/.vim_runtime/vimrcs/extended.vim let g:ycm_python_binary_path = 'python3' set number set clipboard=unnamedplus try source ~/.vim_runtime/my_configs.vim catch endtry colorscheme peaksea set nocompatible syntax enable filetype plugin on
call plug#begin() Plug 'Shougo/deoplete.nvim' Plug 'roxma/nvim-yarp' Plug 'roxma/vim-hug-neovim-rpc' Plug 'zchee/deoplete-jedi' call plug#end() let g:deoplete#enable_at_startup = 1
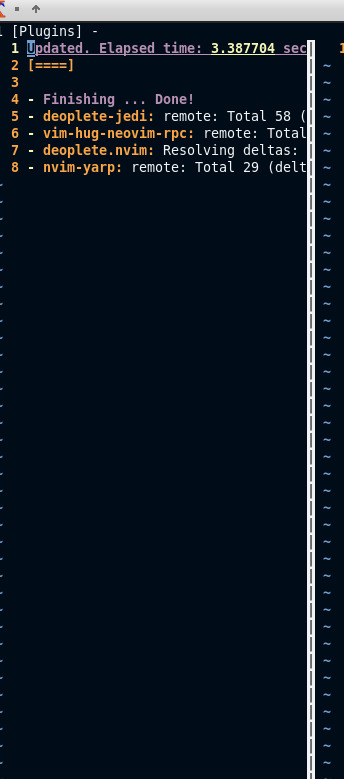
5. Open up vim and type :PlugInstall()
Should install plugins like in the image shown below
Else if still issues execute in Vim :UpdateRemotePlugins and close and start again.
6. Exit and enter nvim again try python file or anything and give it a minute and the autocomplete should load up
1 note
·
View note
Text
OPC UA server on a FPGA using open62541
Overview
Open Platform Communications Unified Architecture (OPC-UA - IEC62541) is a standardized platform-independent architecture which provides a service-based data exchange. In combination with TSN it allows new possibilities when it comes to high interoperability and deterministic communication.
Based on the open62541 implementation the following steps show how everything has to be setup to get it up and running on a FPGA (Artix7 with MicroBlaze). In combination with NetTimeLogic’s complete FPGA based TSN solution you get the full solution for industrial communication 4.0.
The example FPGA project and the application are available here:
https://github.com/NetTimeLogic/opcua
The open62541 implementation is available here:
https://github.com/open62541/open62541
Introduction
It is not straight forward to get the open62541 OPC UA stack up and running on an embedded system even if FreeRTOS and lwip is supported. The following implementation description is based on the open62541 documentation which describes how to build the library and how to implement a basic OPC UA server. The application creates an OPC UA server thread which is running under FreeRTOS with lwip.
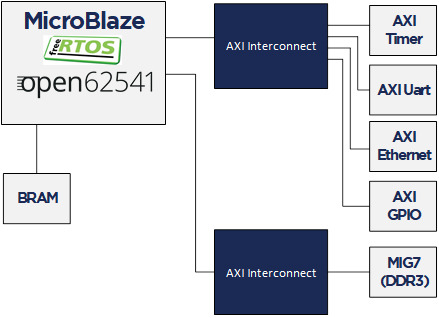
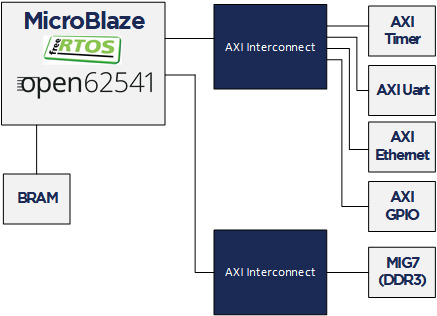
The FPGA use a MicroBlaze softcore with DDR3, Axi Ethernet Lite, Axi Uart Lite AXI GPIO and AXI Timer. As hardware an Arty A7-100T development board from DIGILENT is used.
Required tools
To build the full project, the following tools are required:
Xilinx Vivado 2019.1
Xilinx SDK 2019.1
CMAKE (Python 2.7.x or 3.x)
UA Expert
BSP adjustments for LWIP
Open62541 supports “freertosLWIP” as an architecture. In that case it uses the libraries of the target device which are the ones of the BSP in Xilinx SDK.
To be able to compile the open62541 library some adjustments for the lwipopts.h file are needed:
Line 10-19 https://github.com/open62541/open62541/blob/master/arch/common/ua_lwip.h
Since this file is managed by the BSP in Xilinx SDK, manual modifications are overwritten when the BSP is generated. With the following workaround, it is possible to add the additional defines over the BSP setting GUI.
1. Go to: C:\Xilinx\SDK\2019.1\data\embeddedsw\ThirdParty\sw_services\lwip211_v1_0\data
2. Open the lwip211.tcl
3. Search the proc generate_lwip_opts {libhandle} and go to the end of this procedure
4. Add before the line puts $lwipopts_fd "\#endif" the following code:
#OPEN62541 implementation
set open62541_impl [expr [common::get_property CONFIG.open62541_impl $libhandle] == true]
if {$open62541_impl} {
puts $lwipopts_fd "\#define LWIP_COMPAT_SOCKETS 0"
puts $lwipopts_fd "\#define LWIP_SOCKET 1"
puts $lwipopts_fd "\#define LWIP_DNS 1"
puts $lwipopts_fd "\#define SO_REUSE 1"
puts $lwipopts_fd "\#define LWIP_TIMEVAL_PRIVATE 0"
puts $lwipopts_fd ""
}
5. Save the file
6. Open the file lwip211.mld
7.Add the new Parameter e.g. at line 47:
PARAM name = open62541_impl, desc = "Used as an open62541 implementation?", type = bool, default = false;}
8.Save the file
9. Restart Xilinx SDK
After this change and a restart of Xilinx SDK the new option will be visible in the BSP settings GUI of the lwip.
Design preparation
Before everything is ready to build the open62541 library, the implemented FPGA design from Xilinx Vivado and a software application project in Xilinx SDK is needed. In this example project a MicroBlaze design with DDR3 is used (unfortunately the application does not fit into the available block RAM).
Vivado
The Vivado project can be created with the available tcl script. By running the implementation of the Vivado project the bitstream can be created. With File->Export->Export Hardware the hardware definition can be created.
File->Launch SDK starts the SDK.
Xilin SDK
In Xilinx SDK a new empty Application Project with the OS Platform “freertos10_xilinx” can be created.
File->New->Application Project.
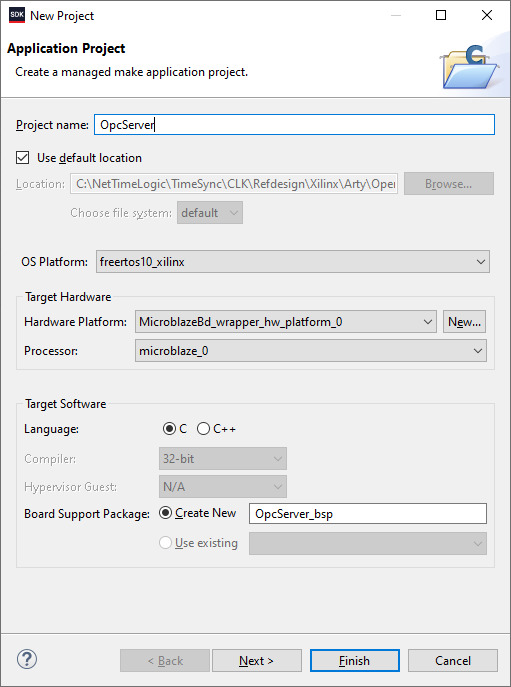
After the project is created some adjustments in the OpcServer_bsp are needed
Select lwip211 as supported libraries
Go to the lwip211 and adjust following parameter:
api_mode = socket_API
open62541_impl = true
Go to the freertos20_xilinx and adjust the following parameters:
Check_for_stack_overflow = 1
total_heap_size = 2097152
Re-generate BSP sources
The environment is now ready to start with CMake.
CMake
The easiest way is to work with the CMake GUI. Later it can be used in Xilinx SDK.
CMake for open62541 is used with following adjustment:
UA_ENABLE_AMALGAMATION = ON
UA_ENABLE_HARDENING = OFF
UA_ARCH_EXTRA_INCLUDES = <path to microblaze/include>
UA_ARCH_REMOVE_FLAGS = -Wpedantic -Wno-static-in-inline -Wredundant-decls
CMAKE_C_FLAGS = -Wno-error=format= -mlittle-endian -DconfigUSE_PORT_OPTIMISED_TASK_SELECTION=0 -DconfigAPPLICATION_ALLOCATED_HEAP=3 -DUA_ARCHITECTURE_FREERTOSLWIP
UA_LOGLEVEL = 100 (optional for debugging)
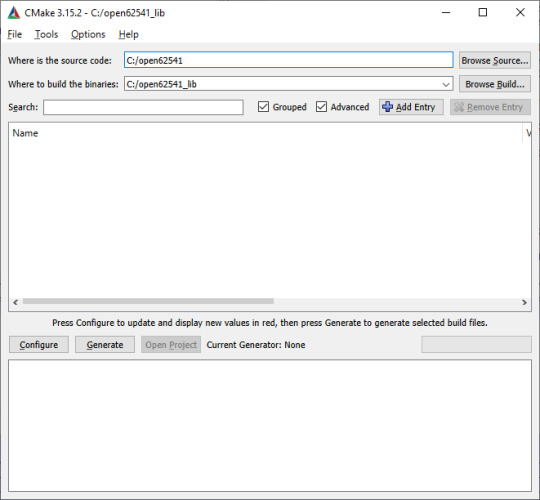
1. Start the CMake GUI
2. Select the correct source code path where the open62541 GIT repository is located and define the path where you want to build the binaries:

3. Click Configure:
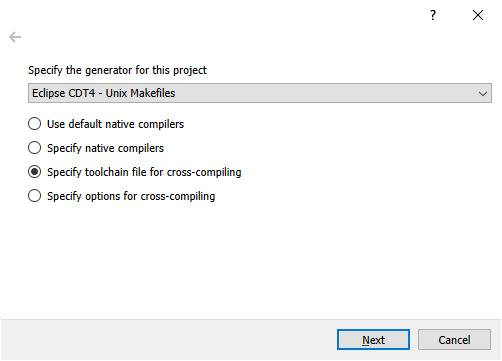
4. Select the CMake file which defines the compilation toolchain and other settings:

5. Click again on Configure and after that on Generate
6. The Unix Makefiles are now ready and can be added Xilinx SDK workspace:
File->Open Projects from File system
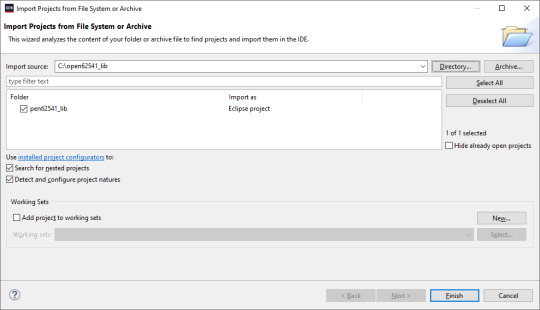
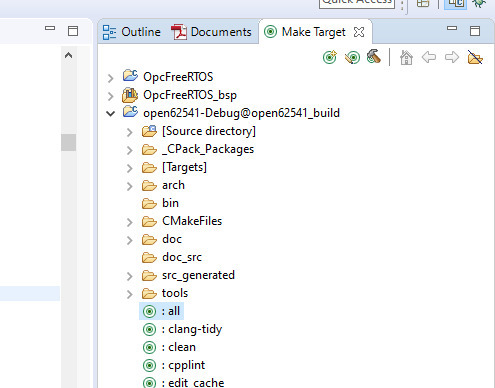
7. Now it should be possible to generate the open62541.c/h file in Xilinx SDK.
Make Target->all

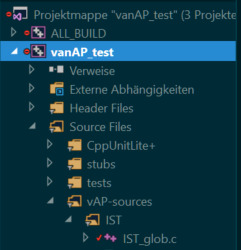
8. The workspace should have now following structure:

Creating the OPC UA server application
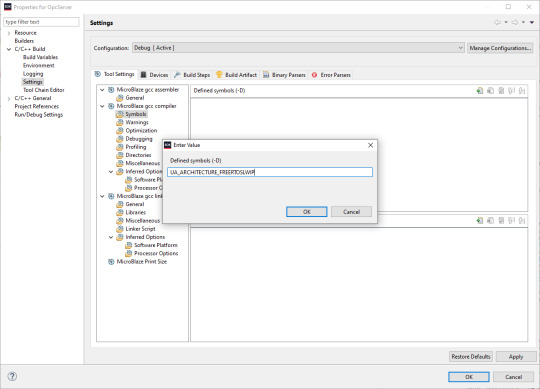
C/C++ Build settings
For a compilation without errors some adjustments in the application project Build settings are required.
1. Add the symbol for UA_ARCHITECTURE_FREERTOSLWIP
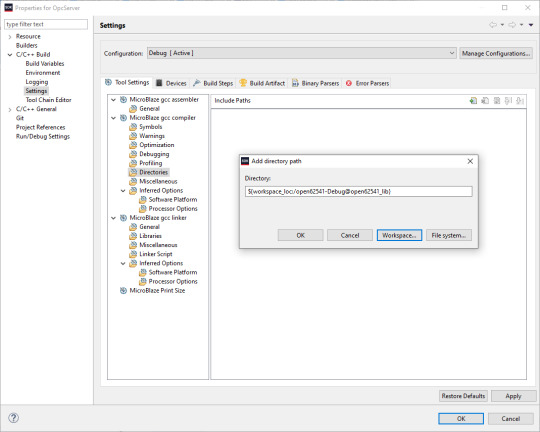
2. Add the open62541 build directory as include path
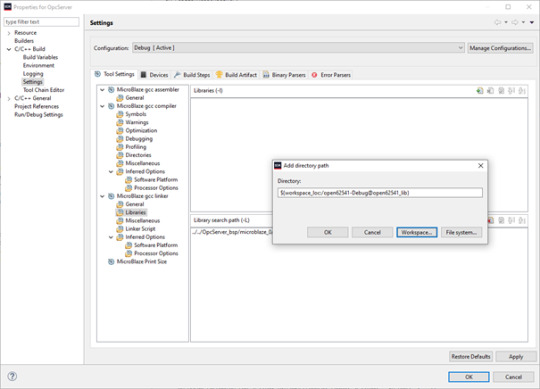
3. Add the open62541 build directory as library search path
4. Link the folder to the source location of open62541.c/h

5. Add an exclusion pattern that only the open62541.c/h are used:

Linker script
The linker script for our OPC UA server application needs some small adjustments.
With Xilinx->Generate linker script a new lscript.ld with following settings can be created:
Heap Size: (min) 1MB
Stack Size: (min) 1MB

Now the application project should be ready for a successful compilation.
OPC UA Server app
The complate Workspace is here available:
https://github.com/NetTimeLogic/opcua/tree/master/Src/Sdk_workspace
In Xilinx SDK the source file OpcServer.c can be imported to the OpcServer application project.
The thread stack size is defined with 4096 it might be possible that the application is not running properly with other values. However, the hook functions for MallocFailed or StackOverflow might be helpful.
In a first step the network initialization is done. This includes auto negotiation, ip configuration, interface binding and starting the lwip receive thread. After that the opcua thread gets started.
Important for a working server is the configuration and especially the buffer size of the network layer. With the following settings, the server was running without any problems:
config->networkLayers->localConnectionConfig.recvBufferSize = 32768; config->networkLayers->localConnectionConfig.sendBufferSize = 32768; config->networkLayers->localConnectionConfig.maxMessageSize = 32768;
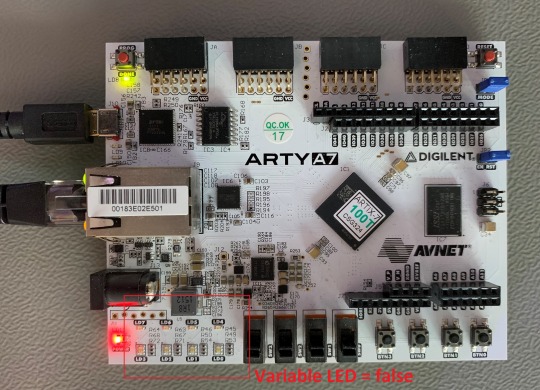
Before the server is started an object and a variable are added to the server. Additionally, a callback for the variable is configured, which allows to control the LEDs on the ArtyA7 board by an OPC client. After that the server gets started and runs until the running variable is set to false (never in this case).
Connecting to the OPC UA Server
After a successful implementation of the MicroBlaze FPGA design, building the open62541 library and compiling the OPC UA server application everything is ready.
The Arty A7 board should be connected to the PC over USB and the RJ45 is connected to a network interface adapter.
1. Open a serial terminal for the debug print out (baud rate: 115200)
2. Loading the bitstream (from Vivado or SDK)
3. Run the Application (from SDK)
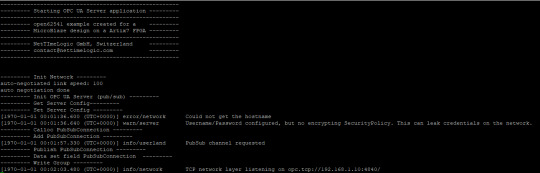
4. If the application has successfully started, in the serial terminal following text is printed out:
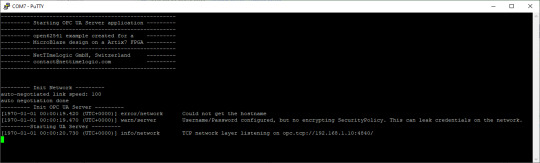
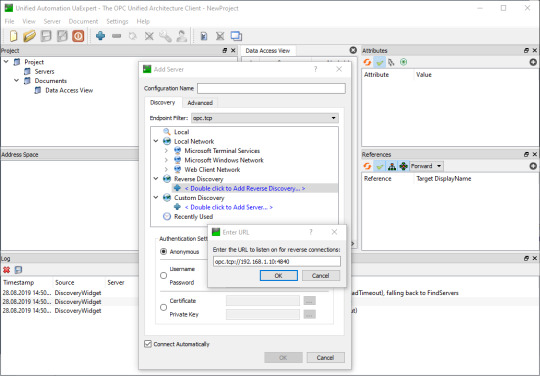
5. Start UaExpert
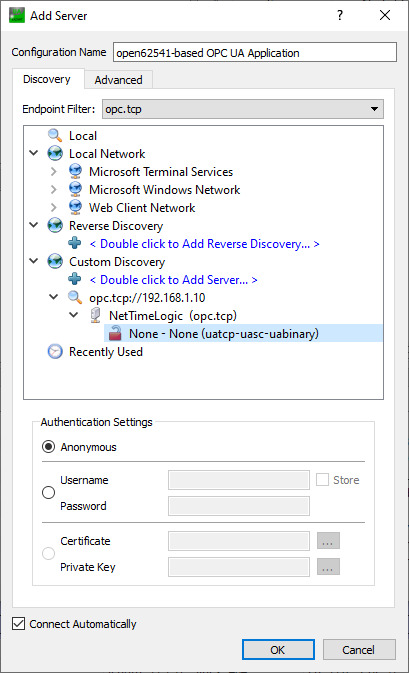
6. Add the server via “Custom Discovery” with the configured open62541 hostname
7. Expand the added server to add the connection. In the serial terminal you get already some information that a new connection over TCP was detected
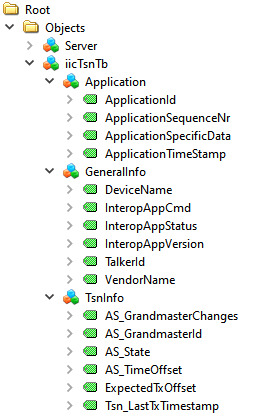
8. After a successful connection in UaExpert the defined object a variable are visible.
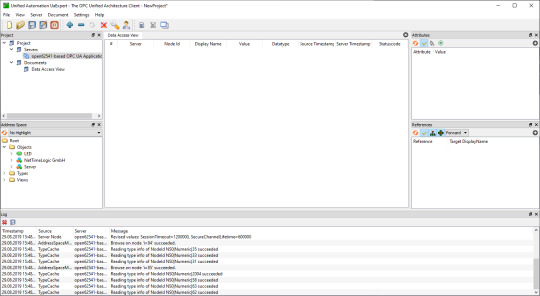
9. The variable LED can now be added to the Data Access View via drag & drop
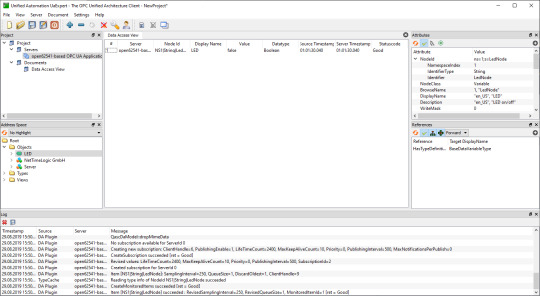
10. By changing the boolean value of the variable, the LEDs on the ArtyA7 can be switched on /off.

Summary
To get an open62541 server running on a MicroBlaze softcore following adjustments are needed:
Add the defines in the lwip BSP for lwipopts.h:
#define LWIP_COMPAT_SOCKETS 0
#define LWIP_SOCKET 1
#define LWIP_DNS 1
#define SO_REUSE 1
#define LWIP_TIMEVAL_PRIVATE 0
Adjust the BSP settings for lwip:
api_mode = socket_API
open62541_impl = true
Adjust the BSP settings for FreeRTOS:
Check_for_stack_overflow = 1
total_heap_size = 2097152
Adjust CMake options for open62541:
UA_ENABLE_AMALGAMATION = ON
UA_ENABLE_HARDENING = OFF
UA_ARCH_EXTRA_INCLUDES = <path to microblaze/include>
UA_ARCH_REMOVE_FLAGS = -Wpedantic -Wno-static-in-inline
-Wredundant-decls
CMAKE_C_FLAGS = -Wno-error=format= -mlittle-endian
-DconfigUSE_PORT_OPTIMISED_TASK_SELECTION=0
-DconfigAPPLICATION_ALLOCATED_HEAP=3
-DUA_ARCHITECTURE_FREERTOSLWIP
UA_LOGLEVEL = 100 (optional for debugging)
Generate a linker script with at least: 1MB heap and 1MB stack
Adjust the C/C++ build settings / include sources/libraries
Define the thread stack size to 4096
Adjust the buffer size of the server config:
config->networkLayers->localConnectionConfig.recvBufferSize = 32768;
config->networkLayers->localConnectionConfig.sendBufferSize = 32768;
config->networkLayers->localConnectionConfig.maxMessageSize = 32768;
1 note
·
View note
Text
Gzdoom latest

#Gzdoom latest install#
#Gzdoom latest update#
#Gzdoom latest upgrade#
#Gzdoom latest full#
Glslang/glslang/MachineIndependent/./Include/PoolAlloc.h:244:21: note: declared 'operator=' is a private member of 'glslang::TPoolAllocator' Glslang/glslang/MachineIndependent/./Include/PoolAlloc.h:307:54: error: Glslang/glslang/MachineIndependent/./Include/Common.h:107: In file included from glslang/glslang/MachineIndependent/SymbolTable.h:68: In file included from MachineIndependent/glslang.y:60: One more small cleanup, forgotten yesterday.
#Gzdoom latest upgrade#
Per discussion with bapt on helping pkg handle the changing of theseĭeps and avoiding impossible upgrade senarios. Graphics/mesa-libs: Bump reverse deps for libglvnd
#Gzdoom latest update#
While we're here, slim down the dependencies a little bit - many ofĪudio/fluidsynth: Update to upstream version 2.2.3 Some of the names areįairly generic, but not likely to conflict with other doom ports. That gzdoom searches for game data already. This update moves data up to share/doom, which is a standard location (Only the first 15 lines of the commit message are shown above )Īudio/fluidsynth: Update to upstream version 2.2.4ĭevel is accurate, but audio is much more precise.Ĭhangelogs for all of the intervening versions can be found on the There have been several proposals to make a project URL available asĪ macro in the ports' Makefiles, over time. Port specific URL to further information. The port INDEX, but for many ports only the last line did contain the Present in a pkg-descr file, only the first one was tarnsfered into URLs should point at a project website or other relevant resources.Īccess to these URLs required processing of the pkg-descr files, and Ports' pkg-descr files, one per line and prefixed with "WWW:". It has been common practice to have one or more URLs at the end of the This commit removes the WWW: lines of moved-over URLs from these Remove WWW entries moved into port MakefilesĬommit b7f05445c00f has added WWW entries to port Makefiles based on
#Gzdoom latest full#
Number of commits found: 27 Commit History - (may be incomplete: see SVNWeb link above for full details) USES: cmake compiler:c++11-lang gl gnome jpeg pkgconfig sdlįreshPorts was unable to extract/find any pkg message Master Sites: Expand this list (1 items) Collapse this list. There are no ports dependent upon this portĬonfiguration Options: No options to configure Options name: games_gzdoom
libgdk_pixbuf-2.0.so : graphics/gdk-pixbuf2.
libfontconfig.so : x11-fonts/fontconfig.
SIZE (coelckers-gzdoom-g4.7.1_) = 19562412 Packages (timestamps in pop-ups are UTC):ĭependencies NOTE: FreshPorts displays only information on required and default dependencies. PKGNAME: gzdoom Flavors: there is no flavor information for this port. NOTE: If this package has multiple flavors (see below), then use one of them instead of the name specified above.
#Gzdoom latest install#
To install the port: cd /usr/ports/games/gzdoom/ & make install clean To add the package, run one of these commands:
share/doom/fm_banks/gs-by-papiezak-and-sneakernets.wopn.
/usr/local/share/licenses/gzdoom-4.7.1_1/BSD3CLAUSE.
/usr/local/share/licenses/gzdoom-4.7.1_1/LICENSE.
/usr/local/share/licenses/gzdoom-4.7.1_1/catalog.mk.
WWW: SVNWeb : git : Homepage pkg-plist: as obtained via: make generate-plist Expand this list (18 items) Collapse this list. GZDoom boastsĮnhanced modding support, as well as support for the following games: It is based on the source code of id Software's DOOM. Maintainer: Port Added: 17:18:03 Last Update: 21:58:51 Commit Hash: fb16dfe License: BSD3CLAUSE GPLv3 LGP元 Description: GZDoom is a GL-enhanced fork of ZDoom, a source port of ID Software's DOOMĮngine. Gzdoom GL-enhanced source port for Doom-engine gamesĤ.7.1_1 games =0 Version of this port present on the latest quarterly branch. This is not a primary server, but it used for development. Want a good read? Try FreeBSD Mastery: Jails (IT Mastery Book 15)įreshPorts needs to find a new hosting provide willing to take a 2U chassis and host it free of charge. FreshPorts - games/gzdoom: GL-enhanced source port for Doom-engine gamesĪs an Amazon Associate I earn from qualifying purchases.
0 notes
Text
Poky linux gcc

Poky Reference Manual - Yocto Project.
How do I install powerpc-405-linux-gnu-gcc?.
Arm-poky-linux-gnueabi-ar - 程序员宝宝.
Install the ARM cross compiler toolchain on your Linux Ubuntu PC.
Solved: cannot find crt1.o - NXP Community.
I586-poky-linux-gcc: error - Entries - Forum - Industry Support.
Developing Embedded Linux by Poky.
Yocto+QT5/B2QT build fails on qtlocation or... - Medium.
Error: CreateProcess: No such file.
Cmake-toolchains/ at master · karz0n/cmake.
(yocto) GCC on ARM.
GNU Arm Embedded Toolchain Downloads.
Yocto Project Software Development Kit (SDK) Developer's Guide.
Arm-poky-linux-gnueabi-gcc: Command not found - Ask Ubuntu.
Poky Reference Manual - Yocto Project.
I work with a number of embedded ARM devices, all with different. processors, hence somewhat different tuning and build directories: Raspberry-Pi (1,2,3 - mostly 3): TUNE_FEATURES = "arm armv7ve vfp thumb neon vfpv4 callconvention-hard cortexa7". build dirs: tmp/work/cortexa7hf-neon-vfpv4-poky-linux-gnueabi. BeagleBoneBlack.
How do I install powerpc-405-linux-gnu-gcc?.
Oct 06, 2021 · Hence we have to pass some commands to install the GCC. Follow the commands step by step to install the GCC. Command 1: The very first step is to update the packages. This command is used to download package information from all configured sources and to get the info of the updated versions of the packages. sudo apt-get update. command-1. For example, the host option for an ARM-based target that uses the GNU EABI is armv5te-poky-linux-gnueabi. You will notice that the name of the script is environment-setup-armv5te-poky-linux-gnueabi. Thus, the following command works..
Arm-poky-linux-gnueabi-ar - 程序员宝宝.
Jun 13, 2018 · So by now you’ve probably already deduced: “aarch64-poky-linux-g++: internal compiler error: Killed (program cc1plus)” is in this case caused by the compiler running out of memory.
Install the ARM cross compiler toolchain on your Linux Ubuntu PC.
Jun 22, 2017 · So glibc is a c library, like a DLL, that all programs compiled with gcc (the C compiler) use. gcc compiles source code (text files) for a given platform/glibc version combination into binaries, executables and libraries.
Solved: cannot find crt1.o - NXP Community.
IMX6 yocto平台QT交叉编译环境搭建. 1、安装ubuntu上必备的库文件:如果无法安装请依次执行以下两个命令: apt-get upgrade apt-get update 再安装以上的库文件。. 2、搭建JDK开发环境 下载jdk1.6.0_45,然后安装jdk相关的库文件以及设置环境变量3、安装yocto交叉编译工具以及QT.
I586-poky-linux-gcc: error - Entries - Forum - Industry Support.
Make all指令错误 make: arm-poky-linux-gnueabi-gcc:命令未找到 arm -linux-gcc -v 后续操作参考:ubuntu下编译时出现"make: arm-linux-gcc:命令未找到"的问题 错误:程序"arm"尚未安装。.
Developing Embedded Linux by Poky.
Release Note for Downloads 11.2-2022.02 Description This is a release of GNU Toolchain 11.2-2022.02 for the Arm architecture. The release includes bare-metal and linux toolchains for various hosts, as described in the Host support section. Features This release is based on GCC 11.2. Host support.
Yocto+QT5/B2QT build fails on qtlocation or... - Medium.
Aug 09, 2012 · item virtual/powerpc-poky-linux-gcc-intermediate) NOTE: versions of gcc-cross-intermediate available: 4.5.4+svnr189152. $ arm-poky-linux-gnueabi-gcc -print-sysroot /not/exist This used to work fine in 1.7 and earlier. It looks like now I have to.
Error: CreateProcess: No such file.
GNU C preprocessor (cpp) for the arm64 architecture. dep: gcc-7-aarch64-linux-gnu (>= 7.4.0-1~) GNU C compiler (cross compiler for arm64 architecture) rec: libc6-dev-arm64-cross. GNU C Library: Development Libraries and Header Files (for cross-compiling) or libc-dev-arm64-cross. virtual package provided by libc6-dev-arm64-cross. CMake Cross-Compilation Based on Yocto SDK. by Burkhard Stubert. 2017/06/03. We have succeeded in building embedded Linux with Yocto for a quad-core NXP i.MX6 (ARM Cortex-A9). Next, we want to cross-compile our own Qt application. As we use CMake for building our Qt application, we must create a CMake toolchain file.
Cmake-toolchains/ at master · karz0n/cmake.
Contribute to karz0n/cmake-toolchains development by creating an account on GitHub.
(yocto) GCC on ARM.
Gcc-aarch64-linux-gnu GNU C cross-compiler for architecture arm64. This is the GNU C compiler built for cross-building DEB_TARGET_ARCH binaries/packages. This is actually a metapackage that will bring in the correct versioned gcc cross package and symlink to it. Linux - 在交叉编译程序或core dump调试时设置sysroot_夜流冰的博客-程序员秘密_set sysroot. 在嵌入式Linux开发中,使用core dump来调试程序crash的问题。. 需要程序crash时的内存dump文件,还有当前正在执行的程序,然后在host主机上执行GDB。. 简单的说,在目标板上生成core..
GNU Arm Embedded Toolchain Downloads.
. 已经安装并配置arm-poky-linux交叉编译器. arm板为IMX6的板子. openssl版本:openssl-OpenSSL (试过使用1.1的版本,不过报错,编译不过) 解压并进入openssl-OpenSSL_1_0_2r,可以先看一下官方的安装说明INSTALL. 打开控制台,先执行交叉编译器环境设置. source /opt/fsl-imx-fb.
Yocto Project Software Development Kit (SDK) Developer's Guide.
Aug 03, 2007 · * Linux 2.6.x kernel support. * x86 and ARM (both OABI and EABI) architecture support out the box with provision for others too. * Complete cross-compiling toolchain generation (gcc 3.4 and gcc 4.1 supported). * System layer with tuned Busybox, tslib, glibc2.x, Kdrive 7.1 XServer (aka TinyX) and more.
Arm-poky-linux-gnueabi-gcc: Command not found - Ask Ubuntu.
Hi @YMba9g8j9CJp0wLoQf5y,. Yes sorry I forget to say this but before calling cmake I source a generated file by poky. $>. /opt/poky/environment-setup-aarch64-poky-linux. I586-poky-linux/.. acl-2.2.52-r0/ alsa-lib-1..28-r0/ alsa-state-.2.-r5/ alsa-utils-1..28-r0/ ap-mode-toggle-.1-r6/ atk-2.12.0-r0/ attr-2.4.47-r0/.
See also:
House Of Fun Free Slots Free Coins
Planet Hollywood Casino Poker Series 2022
Poki Poki Closed
Are Bet Credits Real Money
Chumbacasino No Deposit Bonus
0 notes
Text
compiling aseprite in macOSX High Sierra !!!
Today finally I could compile ASEPRITE a image editor for pixel art. After 2 days of striking my keyboard found a simple way for this task.
First try to instal Homebrew , Skia and cmake:
Homebrew:
$ mkdir homebrew && curl -L https://github.com/Homebrew/brew/tarball/master | tar xz --strip 1 -C homebrew
Skia:
https://github.com/aseprite/aseprite/blob/master/INSTALL.md#skia-on-macos
cmake:
$ brew install cmake
Second, get aseprite from GitHub repository:
$ git clone –recursive https://github.com/aseprite/aseprite
After, create a “build” directory and make it the current directory
$ cd aseprite $ mkdir build $ cd build
Create build files with this option:
cmake -DCMAKE_OSX_ARCHITECTURES:STRING=x86_64 -DCMAKE_OSX_DEPLOYMENT_TARGET:STRING=10.13 -DCMAKE_OSX_SYSROOT:STRING=/Applications/Xcode.app/Contents/Developer/Platforms/MacOSX.platform/Developer/SDKs/MacOSX.sdk/ -DUSE_SKIA_BACKEND=ON -DSKIA_DIR=$HOME/deps/skia ../
We are almost at the finals:
$ make all
Now go to your new folder /bin and execute ASEPRITE
$ cd bin/ $ ./aseprite
PLAY and DRAW your pixelated dreams !!!

Note.- Is posible that you need Ninja. Just maybe:
$ git clone git://github.com/ninja-build/ninja.git && cd ninja $ git checkout release
if you fail during building, discard the build folder and try again... if that is not enough discard the entire project folder and do it from the beginning. Good Draw ;D
Credits:
http://sarkastiksm.tumblr.com/post/141892830432/compile-aseprite-macos
https://github.com/aseprite/aseprite/blob/master/INSTALL.md#skia-on-macos
3 notes
·
View notes
Text
1password Dashlane Lastpass

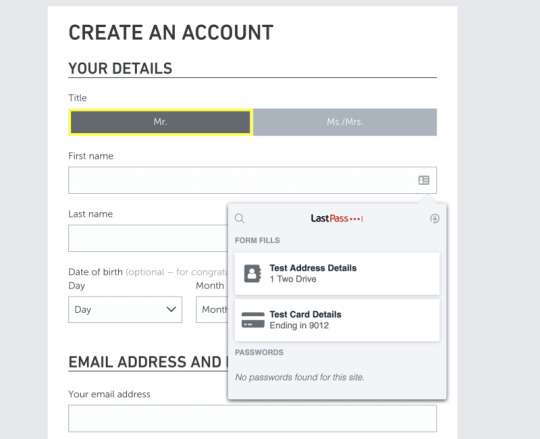
Mar 09, 2021 After downloading the 1Password desktop app, users are given the option to import passwords from their previous password manager — this process is super simple if you’re importing from another password manager like Dashlane or LastPass, or built-in password systems from Chrome, Firefox, or iCloud Keychain. But what about when you want to decide between 1Password vs Lastpass or 1Password vs Dashlane? We’ll review these three options in detail and help you with knowing the most appropriate password manager out of them. 1Password is a modern looking tool, which you can use to store your passwords securely.
Open the Dashlane application and select File Import passwords LastPass in the menu at the top of the window. Select your.csv file and click on Import. Dashlane will tell you what information has been successfully imported. Only your passwords will be in the Passwords section of Dashlane, other items will be found in the other sections. Like Dashlane, LastPass allows data imports from prior password managers, saving significant time. Unlike Dashlane, LastPass doesn’t function as a standalone app but rather a browser-based UI. This means that the program is accessible from any browser rather than solely a device with the app or browser extension installed.


Passwords are the metaphorical and literal keys to our online existence. Although we somehow have to manage dozens or even hundreds of them, one compromised password is enough to make your life very difficult. At best, you can lose access to a cherished online account. At worst? You can lose money, private messages and pictures, or even your identity. The good news is that you can keep your passwords organized and secured with the help of a password manager. In this article, we explain what a password manager does and list four excellent password managers, with their strengths and weaknesses so that you find the best password manager for you.
What Is A Password Manager And Why Do You Need One?
A password manager is an app designed to store your passwords in an encrypted form, securely locked behind a single master password. Because there’s just one password to remember, you can use a different password for each site you visit and ask your password manager to tell you the right password when you need it.
“The most important advice I can give consumers is to stop writing passwords down, and never use the same password twice,” said Paul Vixie, founder and chief executive officer of security company Farsight.
1password Dashlane Lastpass Extension
“Creating these long random passwords will more or less guarantee you more safety in the case of a breach of a third-party website. If you create these unique, long, hard passwords for every single site that you use, if even one is breached, it will not impact your other accounts,” he added.
Popular password managers, such as those featured in this article, come with password generator functionality, allowing you to generate impenetrable passwords with a simple click. Other popular features of password managers include synchronization across all your devices, two-factor authentication for extra security, credit card and personal information storage, and password sharing, just to name a few.
Visual ideology. Build and run code on a remote machine or Windows Subsystem for Linux and browse, edit, and debug from within Visual Studio. Use CMake to target multiple platforms from the comfort of a single IDE. Development applications – Get Started. Components – Visual Studio C core features – Windows Universal C Runtime – Visual C for Linux.
Once you get used to how password managers work, it’s impossible to go back and manage passwords the old-fashion – and highly insecure – way. Let’s take a look at what your options are, and what each of them has to offer.
Launched in 2008, LastPass is arguably the best-known password manager today. It works on all popular platforms and has browser extensions for Chrome, Firefox, Opera, and other web browsers. You can use LastPass for free, but you won’t be able to enjoy some of its best features.
Strengths:
Comes with 1 GB of secure online file storage.
Works on all devices and platforms.
Many multi-factor authentication options available.
Weaknesses:
Its popularity makes it a prime target for hackers.
Its security has been questioned in the past.
Its price has recently doubled unexpectedly.
It costs $2 a month to unlock encrypted file storage, advanced multi-factor options, LastPass for applications, and other important features. Without them, LastPass fails in comparison with many other password managers that are currently available.
1Password has always been popular among Apple fans because it runs great on Mac computers and mobile devices and sports an elegant design with a simple user interface. Although there is an official app available for Windows 7 or later – and browser extensions for Chrome and Firefox – 1Password somehow feels like a legacy Mac app.
Strengths:
Apps for multiple platforms and extensions for popular web browsers.
Elegant design and simple user interface.
Works great on Mac computers and mobile devices.
Weaknesses:
Not many import options.
Isn’t compatible with Internet Explorer and probably never will be.
Free for only 30 days.
You can use 1Password for free for 30 days. The cheapest membership costs $2.99 a month when billed annually, and it includes unlimited password storage with 1 GB of document storage, friendly 24/7 customer support, 365-day item history to restore deleted passwords, travel Mode to help you safely cross borders, and two-factor authentication for an extra layer of protection.
1password Or Lastpass Or Dashlane
Dashlane is a likable password manager that’s available on Windows, macOS, Android, and Linux. It can sync your personal data across multiple devices and allow you to access your passwords and personal information anywhere you go. It comes with a VPN (Virtual Private Network) service to protect your online activity, but it wouldn’t be accurate to say that the service is a free bonus.
Lastpass Vs Dashlane
Astropad ipad. Strengths:
Well-designed user interface.
Supports multiple platforms.
Includes VPN protection to help you hide your online activity from third parties.
Weaknesses:
More expensive than other password managers, especially if you already have a VPN.
Doesn’t play well with non-standard logins.
Can manage only 50 passwords without paying.
At $3.33 a month, Dashline is significantly more expensive than other password managers on this list, especially if you already pay for a VPN service that works great for you. We also don’t like how limited the free version of Dashline is. Whereas other password managers let you store as many passwords as you want, you can manage only up to 50 passwords with Dashline.
Myki is the youngest password manager on this list, launched in private beta in September 2016, but it deserves your attention more than any other password manager you can download today. Why? Anydesk second monitor. Because it fully embraces cloud-less password storage and lets you use your fingerprint, Face ID, or a pin code to access your passwords, credit cards, and other sensitive information.
Strengths:
Stores your passwords away from the cloud.
Lets you use your fingerprint, Face ID, or a pin code to access your passwords.
Works on most computers and mobile devices.
Easy to use and easy on the eyes.
Weaknesses:
Being the new kid on the block, you’ll encounter minor bugs here and there.
Myki can act as a two-factor authenticator and manage your authentication tokens for you so you can significantly increase your online security without compromising your convenience. This password manager has been designed with teams in mind, and it supports seamless password sharing and offers flexible bulk pricing that starts at $2.99 a month and goes down with more users.

Read Now:Myki Password Manager & 2FA Authenticator Review
Your Favorite?
Do you use a password manager that we didn’t include on this list? What is your favorite, and what makes it stand out from the others?
0 notes
Text
All You Need to Know about PCPP Certified Professional in Python Programming 1
PCPP Certified Professional in Python Programming 1 Certification Exam Credential setting up programmer construction web site architecture and coding applied sciences alive at application company workplace
JavaScript remains with the aid of some distance essentially the most well-known programming language amongst developers, and Python has anchored its spot in d region forward of Java, in line with a big analysis by using developer tooling maker JetBrains.
based on JetBrains survey of builders, JavaScript was used by using sixty nine% of all respondents during the past one year, and % nominated it as their fundamental programming accent.
JetBrains, a Czech-based tech enterprise, is the maker of the professional Android app programming accent, Kotlin, and tools like the Java device IntelliJ concept. Its state of Developer Ecosystem record is in keeping with solutions from developers, most of whom are knowledgeable and active.
The survey found that Python is greater universal than Java overall utilization. a complete of % pronounced the use of Python this yr, in comparison to forty nine% who stated they used Java. last months it was fifty five% to Java and fifty four% to Python. although, Java is more regularly occurring than Python as a chief language, with % reporting Java versus % for Python.
In , the properly languages that developers need to gain knowledge of encompass Python, Microsoft s JavaScript superset, book, and Google-fabricated Go.
The exact languages in bottomward order were JavaScript, HTMLCSS, SQL, Python, Java, shell scripting accent, php, book, C++, and C#.
The closing languages within the proper included C, Go, Kotlin, bound, GraphQL, swift, bittersweet, blight, groovy and MATLAB.
a captivating however no longer awesome determine is that now eighty% of developers make money working from home, in comparison to % of builders alive in the workplace in advance of the COVID- communicable.
JetBrains took a special study developer traits in massive facts. most builders don t exhaust a selected big facts belvedere, but the one belvedere that did stand out became Google Colab, which is acclimated with the aid of % of respondents.
requested where their massive statistics changed into hosted, % pronounced inside servers, whereas % pronounced it was hosted in the community. AWS dominated with a % share of exterior suppliers, followed by Google cloud at eight% and azure at %.
Unsurprisingly, Python bedeviled amongst big facts builders that utilize apache atom analytics agent, with sixty six% citation Python as the language they employ with atom, adopted by means of Java at % and Scala at %.
JetBrains found a correlation amid utilization of Jupyter notebooks and apache axle with builders who consume Google cloud. apache spark and apache Kafka were more established amongst AWS developers.
The analysis seemed on the most ordinary equipment and methods for each and every accent. For C, essentially the most prevalent IDE turned into Microsoft s visual studio code. On build techniques, essentially the most time-honored turned into CMake, followed by way of Makfiles. by means of a long way, essentially the most time-honored compiler become GCC, with % of C users nominating it as their compiler, adopted by using clang at %.
For C# builders, GCC got here out on good too, however visible studio was the proper IDE, followed by way of JetBrains addition, whereas home windows was the dominant building environment. GCC was also the good alternative for C++ builders.
most respondents seventy five% abounding college whereas seventy four% received a available degree, % completed a masters, and % went on to further postgraduate stories. simply over half fifty four% advised computer science, whereas % scholar software engineering.
The good languages discovered have been Java, adopted through C, Python, C++, and JavaScript.
JetBrains additionally requested which large originate on-line direction platforms had been the most usual. The precise alternative changed into Udemy, followed via Coursera, edX, Pluralsight, Udacity, Codecademy, baron Academy, DataCamp and Canvas.
0 notes
Text
Ultimate Vim Configuration for Developer

Install latest version of nodejs (For ubuntu like distro)
curl -sL https://deb.nodesource.com/setup_14.x -o nodesource_setup.sh sudo bash nodesource_setup.sh sudo apt-get install -y nodejs
Download plug.vim and put it in the "autoload" directory.
usually found in the echo $VIMRUNTIME directory
in my case it was :/usr/local/share/vim/vim82
since I compiled from source in most installations you can do the following:
Vim
Unix
curl -fLo ~/.vim/autoload/plug.vim --create-dirs \ https://raw.githubusercontent.com/junegunn/vim-plug/master/plug.vim
You can automate the process by putting the command in your Vim configuration file as suggested here.
Windows (PowerShell)
iwr -useb https://raw.githubusercontent.com/junegunn/vim-plug/master/plug.vim |` ni $HOME/vimfiles/autoload/plug.vim -Force
Neovim
Unix, Linux
sh -c 'curl -fLo "${XDG_DATA_HOME:-$HOME/.local/share}"/nvim/site/autoload/plug.vim --create-dirs \ https://raw.githubusercontent.com/junegunn/vim-plug/master/plug.vim'
edit and add the following to your .vimrc:
set number set clipboard=unnamedplus colorscheme peaksea set backspace=indent,eol,start call plug#begin('~/.vim/plugged') Plug 'neoclide/coc.nvim', {'branch': 'release'} Plug 'ctrlpvim/ctrlp.vim' Plug 'ctrlpvim/ctrlp.vim' Plug 'preservim/nerdtree' Plug 'chrisbra/vim-commentary' Plug 'jlanzarotta/bufexplorer' Plug 'itchyny/lightline.vim' Plug 'preservim/tagbar' call plug#end() set laststatus=2 let mapleader = "," nmap <leader>w :w!<cr> map <leader>tn :tabnew<cr> map <leader>to :tabonly<cr> map <leader>tc :tabclose<cr> map <leader>tm :tabmove " Opens a new tab with the current buffer's path " Super useful when editing files in the same directory map <leader>te :tabedit <C-r>=expand("%:p:h")<cr>/ " Close current buffer map <leader>bd :Bclose<cr> map <leader>tt :term<cr> " Close all buffers map <leader>ba :1,1000 bd!<cr> vnoremap <silent> <leader>r :call VisualSelection('replace')<CR> map <leader>o :BufExplorer<cr> " Quickly find and open a file in the CWD let g:ctrlp_map = '<C-f>' " Quickly find and open a recently opened file map <leader>f :CtrlPMRU<CR> " Quickly find and open a buffer map <leader>b :CtrlPBuffer<cr> map <leader>nn :NERDTreeToggle<cr> map <leader>nb :NERDTreeFromBookmark map <leader>nf :NERDTreeFind<cr> map <leader>ss :setlocal spell!<cr> map <leader>sn ]s map <leader>sp [s map <leader>sa zg map <leader>s? z= nmap <F8> :TagbarToggle<CR>
restart vim and type
:PlugInstall
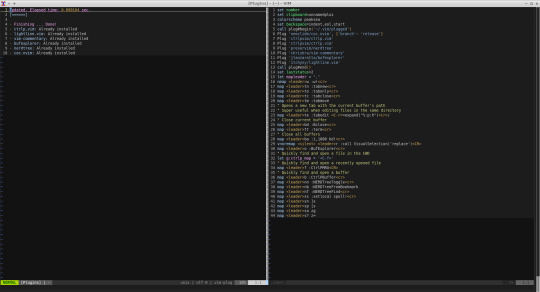
Restart vim and enjoy.
In vim install the plugins you need for your development
For example:
:CocInstall coc-json coc-css
That was css
Few of the available plugins are:
You can find available coc extensions by searching coc.nvim on npm, or use coc-marketplace, which can search and install extensions in coc.nvim directly.
coc-angular for angular.
coc-blade-formatter for blade, Integrates the blade-formatter (Laravel Blade formatter).
coc-blade-linter for blade, Integrates the Laravel Blade Linter.
coc-browser for browser words completion
coc-calc expression calculation extension
coc-cfn-lint for CloudFormation Linter, cfn-python-lint
coc-clangd for C/C++/Objective-C, use clangd
coc-clang-format-style-options coc.nvim extension, helps you write .clang-format more easily.
coc-cmake for cmake code completion
coc-css for css, scss and less.
coc-cssmodules css modules intellisense.
coc-deno for deno.
coc-denoland for deno, fork of vscode_deno.
coc-diagnostic for All filetypes, use diagnostic-languageserver.
coc-discord discord rich presence for coc.nvim
coc-discord-rpc fully customizable discord rpc integration with support for over 130+ of the most popular languages
coc-dash-complete Press - to trigger buffer source completion.
coc-dot-complete Press . to trigger buffer source completion.
coc-ecdict ECDICT extension
coc-elixir for elixir, based on elixir-ls.
coc-ember for ember projects.
coc-emmet provides emmet suggestions in completion list.
coc-erlang_ls for erlang, based on erlang_ls
coc-esbonio for rst (reStructuredText), esbonio ([Sphinx] Python Documentation Generator) language server extension.
coc-eslint Eslint extension for coc.nvim
coc-explorer file explorer extension
coc-floaterm for vim-floaterm integration
coc-flow for flow
coc-flutter for flutter
coc-fsharp for fsharp.
coc-fzf-preview provide powerful fzf integration.
coc-gist gist management
coc-git provides git integration.
coc-glslx for glsl, use glslx.
coc-go for go, use gopls.
coc-graphql for graphql.
coc-highlight provides default document symbol highlighting and color support.
coc-html for html, handlebars and razor.
coc-htmldjango for htmldjango, django templates (htmldjango) extension. Provides "formatter", "snippets completion" and more...
coc-htmlhint for html, Integrates the HTMLHint static analysis tool.
coc-html-css-support for HTML id and class attribute completion.
coc-intelephense for php, fork of vscode-intelephense. (scoped packages: @yaegassy/coc-intelephense)
coc-java for java, use eclipse.jdt.ls.
coc-jedi for python, use jedi-language-server.
coc-json for json.
coc-julia for julia.
coc-just-complete Press _ to trigger buffer source completion.
coc-lists provides some basic lists like fzf.vim.
coc-lsp-wl for wolfram mathematica, fork of vscode-lsp-wl.
coc-markdownlint for markdown linting
coc-metals for Scala using Metals
coc-omnisharp for csharp and visualbasic.
coc-perl for perl.
coc-php-cs-fixer for php, Integrates the php-cs-fixer (PHP Coding Standards Fixer).
coc-phpactor for php, using phpactor
coc-phpls for php, use intelephense-docs.
coc-psalm for php, use psalm.
coc-powershell for PowerShellEditorService integration.
coc-prettier a fork of prettier-vscode.
coc-prisma for Prisma schema integration.
coc-pyright Pyright extension
coc-python for python, extension forked from vscode-python. (Not maintained anymore)
coc-pydocstring for python, using doq (python docstring generator) extension.
coc-r-lsp for r, use R languageserver.
coc-reason for reasonml
coc-rls for rust, use Rust Language Server
coc-rome for javascript, typescript, json and more, use Rome
coc-rust-analyzer for rust, use rust-analyzer
coc-sh for bash using bash-language-server.
coc-stylelintplus for linting CSS and CSS preprocessed formats
coc-stylelint for linting CSS and CSS preprocessed formats
coc-snippets provides snippets solution.
coc-solargraph for ruby, use solargraph.
coc-sourcekit for Swift
coc-spell-checker A basic spell checker that works well with camelCase code
coc-sql for sql.
coc-sqlfluff for sql, SQLFluff (A SQL linter and auto-formatter for Humans) extension
coc-svelte for svelte.
coc-svg for svg.
coc-swagger for improved Swagger/OpenAPI spec authoring experience.
coc-tabnine for tabnine.
coc-tailwindcss for tailwindcss.
coc-tasks for asynctasks.vim integration
coc-texlab for LaTeX using TexLab.
coc-toml for toml using taplo.
coc-translator language transaction extension
coc-tsserver for javascript and typescript.
coc-vetur for vue, use vetur.
coc-vimlsp for viml.
coc-xml for xml, use lsp4xml.
coc-yaml for yaml
coc-yank provides yank highlights & history.
coc-thrift-syntax-support for thrift.
in case it the vim version is an issue then you will need to install and compile version:
sudo apt-get install lua50 liblua50-dev liblualib50-dev sudo apt-get install libncurses5-dev libgnome2-dev libgnomeui-dev libgtk2.0-dev libatk1.0-dev libbonoboui2-dev libcairo2-dev libx11-dev libxpm-dev libxt-dev python-dev ruby-dev mercurial sudo make install sudo apt-get install python3-dev sudo apt-get install python-dev
git clone https://github.com/vim/vim.git
cd vim
./configure --with-features=huge --enable-rubyinterp --enable-python3interp --with-python-config-dir=/usr/bin/python3.6-config --enable-perlinterp --enable-gui=gtk2 --enable-cscope --prefix=/usr --enable-luainterp --with-lua-prefix=/usr/local
make
make install
You can get the config here:
https://github.com/macunan/vimconfig/blob/main/.vimrc
0 notes
Text
Add_subdirectory Cmake Example

If a library does not export any symbols, it must not be declared as a SHARED library. For example, a Windows resource DLL or a managed C/CLI DLL that exports no unmanaged symbols would need to be a MODULE library. This is because CMake expects a SHARED library to always have an associated import library on Windows. By default the library file will be created in the build tree directory.
Problem: I have a question about CMake which seems to be commonly asked here, but none of the answers seem to solve my problem. In the details subdirectory, there is a CMakeLists.txt which contains: addcustomcommand(OUTPUT part.out COMMAND foo -input=part.src -output=part. Using gtest/gmock with CMake is awesome. Not so awesome is when you don’t have a pre-built gtest/gmock available to use. This article demonstrates a convenient way to add them with automated source download and have them build directly as part of your project using addsubdirectory. The following example demonstrates some key ideas of CMake. Make sure that you have CMake installed prior to running this example (go here for instructions). There are three directories involved. The top level directory has two subdirectories called./Demo and./Hello. In the directory./Hello, a library is built.
Part 1: Reference
Integration Points
Because we use CMake to build ApprovalTests.cpp, we also provideintegration points for our users.
CMake target

Approval Tests’ CMake build exports an interface targetApprovalTests::ApprovalTests. Linking against it will add the properinclude path and all necessary capabilities to the resulting binary.
This target is provided when ApprovalTests.cpp is used as asubdirectory. Assuming that ApprovalTests.cpp has been cloned tolib/ApprovalTests.cpp:
CMake project options
ApprovalTests.cpp’s CMake project also provides some options for otherprojects that consume it.
The fileCMake/ApprovalTestsOptions.cmakedefines these options.
The options provided are:
Which targets are built
Note that these are always enabled if this is the top-level project.
APPROVAL_TESTS_BUILD_TESTING
When ON, the self-tests are run. Defaults to OFF.
APPROVAL_TESTS_BUILD_EXAMPLES
When ON, the examples are run. Defaults to OFF.
APPROVAL_TESTS_BUILD_DOCS
When ON, documentation files are generated, if Doxygen, Sphinxand mdsnippets are installed. Defaults to OFF.
These are not part of the ALL target.
Which third_party libraries are made available
Note that these are always included if this is the top-level project.
APPROVAL_TESTS_BUILD_THIRD_PARTY_CATCH2
When ON, this project’s copy of the Catch2 test framework isincluded. Defaults to OFF.
APPROVAL_TESTS_BUILD_THIRD_PARTY_DOCTEST
When ON, this project’s copy of the doctest test framework isincluded. Defaults to OFF.
APPROVAL_TESTS_BUILD_THIRD_PARTY_UT
When ON, this project’s copy of the Boost.UT test framework isincluded. Defaults to OFF.
Control the behaviour of our builds
APPROVAL_TESTS_ENABLE_CODE_COVERAGE
When ON, Approval Test’s own tests are run with code coverageenabled. This uses Lars Bilke’sCodeCoverage.cmake.Defaults to OFF.
CMake commands support
add_subdirectory()
See Use own ApprovalTests.cpp and Catch2clonesbelow, for an example usingadd_subdirectory().
Use case: This is typically for you have your own copy of theApproval Tests project directory that you want to re-use.
FetchContent
See Make CMake clone ApprovalTests.cpp andCatch2below, for an example using the FetchContentmodule.
The examples below use FetchContent_MakeAvailable(), whichrequires CMake 3.14 or above.
If you only have CMake 3.11 or above, see FetchContent (CMake3.11+)for how to use FetchContent_Populate().
Use case: This is typically for when you want CMake todownload a specific version of Approval Tests for you, behind thescenes.
ExternalProject
With CMake before 3.11, see the ExternalProjectmodule.The FetchContent examples below should help get started withExternalProject.
Use case: This is typically for when you want CMake todownload a specific version of Approval Tests for you, behind thescenes, and you are using an older version of CMake.
find_package() - not supported
There is not yet support forfind_package().
Single header or CMake Integration?
There are two main options for incorporating Approval Tests in to yourproject:
Download the single-header file from the Releasespageand, typically, add the header to your source code.
Obtain a copy of the entire ApprovalTests.cpp repository andincorporate it in to your CMake build scripts.
Options for obtaining the repository typically include:
cloning it
forking it
including it as a sub-repository
having a build tool, such as CMake, download it for you automaticallyas part of your builds
CMake Integration Benefits
We recommend using the CMake integration route, which has several userbenefits over the single header:
Automatic prevention of most of the scenarios listed inTroubleshooting MisconfiguredBuild.
Source-code compatibility with the single header download:
For convenience, we provide a wrapper header fileApprovalTests.hpp,which can be used to access all the features of this library,without having to know which features are provided by which headerfiles.
Flexibility in how many of the Approval Tests include files youinclude:
There is also the option to include just the headers inApprovalTests/that you use.
This may slightly improve build speeds.
It may occasionally provide workarounds tobugs.
Part 2: Optional Explanatory Examples
Scenarios when using Approval Tests
Context
Example Project
Suppose you are writing some tests that use ApprovalTests.cpp with theCatch2 test framework.
Your top-level CMakeLists.txt file might look something like this:
(See snippetsource)
The important thing to note, for following the examples below, is theadd_subdirectory(dependencies) line. It makes CMake load a filedependencies/CMakeLists.txt.
Each example below shows a dependencies/CMakeLists.txt, for thecorresponding scenario. All other code is identical between the exampledirectories.
Here is this exampleproject.
Example Tests
Your tests/CMakeLists.txt file might look something like this:
(See snippetsource)
This says that the libraries ApprovalTests::ApprovalTests andCatch2::Catch2 are required by the tests executable.
Here is this example project’s testdirectory.
Dependencies
How might you enable CMake to provide those libraries? In other words,what are the options for the contents ofdependencies/CMakeLists.txt?
The next few sections describe some options.
Make CMake clone ApprovalTests.cpp and Catch2
Note: The files in this section can be viewed and downloaded fromfetch_content_approvaltests_catch2.
The following is for when you just want ApprovalTests.cpp and Catch2 tobe downloaded as part of your project’s build. You don’t particularlywant to see their source code, although you’re happy if your debuggersteps in to them.
It also needs CMake 3.14 or above.
We use this dependencies/CMakeLists.txt file:
(See snippetsource)
Note the GIT_TAG values: This tells CMake which revision ofdependencies to use. The value can be a tag or a git commit ID. Here weuse master, to always test our integrations with the latest ApprovalTests code. However, it is generally recommended to pin yourdependencies to specific versions, and test behaviour before updating tonewer versions.
After CMake has generated the build files, the directory structure wouldlook something like this, where the cmake-build-debug directory isthe build space, and the cmake-build-debug/_deps contains thedownloaded and built ApprovalTests.cpp and Catch2 repositories:
Make CMake clone ApprovalTests.cpp
Add_subdirectory Cmake Examples
Note: The files in this section can be viewed and downloaded fromfetch_content_approvaltests.
The only difference between the previous example and this one is thathere we use the Catch2 header that is in the ApprovalTests.cpp project.
We use this dependencies/CMakeLists.txt file:
(See snippetsource)
We have set APPROVAL_TESTS_BUILD_THIRD_PARTY_CATCH2 to ON, sothat CMake will use the copy of Catch2 that is included in theApprovalTests.cpp repository.
There are also options to enable use of ApprovalTests.cpp’s copies ofall other supported test frameworks except GoogleTest, including:
APPROVAL_TESTS_BUILD_THIRD_PARTY_DOCTEST
APPROVAL_TESTS_BUILD_THIRD_PARTY_UT
Use own ApprovalTests.cpp and Catch2 clones
Note: The files in this section can be viewed and downloaded fromadd_subdirectory_approvaltests_catch2.
Here, instead of getting CMake to download ApprovalTests.cpp and Catch2,we have got our own clones or forks of them, which we want to use withour own tests.
In this example, the directory structure looks like this:
We use this dependencies/CMakeLists.txt file:
(See snippetsource)

Here we use add_subdirectory(). This works with older versions ofCMake, unlike the FetchContent examples above.
The above was tested with CMake 3.8.
If your directory layout differed from the above, you would change therelative paths in the add_subdirectory() lines.
Using other supported test frameworks
To save space and repetition, the examples above only show the Catch2test framework.
The same principles apply when using all the other test frameworkssupported by ApprovalTests.cpp.
Scenarios when developing ApprovalTests.cpp
Developing ApprovalTests.cpp with test framework sources
Note: The files in this section can be viewed and downloaded fromdev_approvals.
Cmake Add All Subdirectories
For Approval Tests project maintainers, it is useful to be able to editand debug both this project and the test frameworks that it dependsupon. It helps to be able to see the source of these frameworks, ratherthan just the single-header releases that are copied in to thethird_party directory here.
This also allows us to checkout different commits of any of theseprojects.
Here we want to enable and run all the ApprovalTests.cpp tests, unlikethe cases above, where we only want to run the tests of the project thatis being developed.
Consider this directory structure, where the repositories for all theseprojects are checked out side-by-side, and there is an extra directorydev_approvals/ that will contain just a CMakeLists.txt file, toset up a project containing all the other directories:
The file dev_approvals/CMakeLists.txt creates a kind of “superbuild”: one project for developing ApprovalTests.cpp and all theprojects it depends on:
(See snippetsource)
0 notes
Text
Galera Cluster for MySQL 5.6.50, 5.7.32, and 8.0.22 released
Codership is pleased to announce a new Generally Available (GA) release of the multi-master Galera Cluster for MySQL 5.6, 5.7 and 8.0, consisting of MySQL-wsrep 5.6.50 (release notes, download), 5.7.32 (release notes, download) and 8.0.22 (release notes, download) with Galera replication library 3.32 (release notes, download) implementing wsrep API version 25, and Galera replication library 4.7 (release notes, download) implementing wsrep API version 26 for 8.0. This release incorporates all changes to MySQL 5.6.50, 5.7.32 and 8.0.22 respectively, adding a synchronous option for your MySQL High Availability solutions. This release is notable because there have been improvements with CRC32 hardware support compatibility on ARM based architectures for the Galera replication library 3.32 and 4.7. GCache locking has also been improved. From a lower level, the build system has changed from using SCons to CMake, so while SCons scripts are still included they will not be actively maintained any longer. In MySQL 5.6.50, we improved the XtraBackup v2 SST script for FreeBSD users. In MySQL 5.7.32, we added a new variable wsrep_mode. The first application of the variable is to allow ignoring native replication filter rules if configured with replicate-do-db. We also improved LOAD DATA splitting to generate Xid events for binary log events with intermediate commits. In MySQL 8.0.22, we now have a new SST method based on the CLONE plugin. Similar improvements around wsrep_mode exist too. Improvements around foreign key handling are also present in this release: load data with foreign keys had intermittent failures that have been fixed, as well as BF-BF conflicts between OPTIMIZE/REPAIR/ALTER TABLE and DML in presence of foreign key constraints were suppressed. We would also like to note that Percona XtraBackup version 8.0.22-15.0 and greater is required to perform XtraBackup based SSTs. For now, MySQL 5.6.50 and 5.7.32 are the last official builds for CentOS 6 and Red Hat Enterprise Linux 6. It is also important to remember that MySQL 5.6 is nearing End Of Life (EOL) so we do recommend that you upgrade to MySQL-wsrep 5.7. https://galeracluster.com/2021/01/galera-cluster-for-mysql-5-6-50-5-7-32-and-8-0-22-released/
0 notes
Text
Building libfreenect2 on Fedora 32
For an upcoming facial recognition project, I wanted to use OpenCV's (relatively) new DNN module together with an Xbox One Kinect Sensor, requiring libfreenect2 and pylibfreenect2 as prerequisites.
As I'm prototyping this on a laptop with an Nvidia GPU, and plan to eventually run this on an Nvidia Jetson Nano, I will be building libfreenect2 with CUDA support.
However, most Nvidia/CUDA-related development appears to take place on Ubuntu systems, if the READMEs of these projects are any indication. As somebody who uses Fedora on his laptops, that presented me with several hurdles to getting my Kinect sensor working. Hopefully documenting these here helps someone.
General Build Preparation
Right off the bat, you will want to have Fedora's build binaries and headers installed; sudo dnf install @development-tools will take care of that.
I already had this installed on my laptop, but I'm just leaving this here for posterity.
libfreenect2 Dependencies
To build libfreenect2, I had to satisfy some build dependencies to get the following features working:
CUDA
OpenGL
TurboJPEG
CUDA
This one is pretty tricky to get right without some help; CUDA 10 does not support GCC newer than GCC 8, and Fedora does not provide an easy way to have multiple GCC versions installed through dnf and update-alternatives, which means dealing with RPM files and dependency hell.
Fortunately, negativo17 provides pre-built binaries for CUDA development (and various other Nvidia-related binaries), that takes care of all that.
First, I added the repository to DNF:
sudo dnf config-manager --add-repo=https://negativo17.org/repos/fedora-nvidia.repo
Then, I installed the prerequisite CUDA development packages:
sudo dnf install cuda-devel cuda-gcc cuda-gcc-c++
Unfortunately, Fedora does not package OpenNI2 headers, but as I probably won't need it for my use case, I built without OpenNI2 support.
Other Prerequisites, OpenGL & TurboJPEG
These are pretty straightforward to satisfy with Fedora packages:
sudo dnf install libusb-devel glfw-devel turbojpeg-devel
Building and Installing libfreenect2
Now, I am ready to download libfreenect2's source and start building.
git clone https://github.com/OpenKinect/libfreenect2.git && cd libfreenect2 mkdir build && cd build CUDA_INC_PATH=/usr/include/cuda cmake .. -DCMAKE_INSTALL_PREFIX=/usr/local -DCMAKE_C_COMPILER=/usr/bin/cuda-gcc
Do note the following variables that I used, which you may wish to tune depending on your use case:
CUDA_INC_PATH environment variable points to where negativo17's cuda-devel package installs its headers
CMAKE_INSTALL_PREFIX CMake cache variable determines where make install installes files to, I chose this because pylibfreenect2's install script looks for libfreenect2 here
CMAKE_C_COMPILER CMake cache variable points to where negativo17's cuda-gcc/cuda-gcc-c++ package installs its binaries
If everything went well, you should see CMake end with:
-- Build files have been written to: …/libfreenect2/build
Now, we're ready to build and install, like so:
make make install
If you used a system folder as your CMAKE_INSTALL_PREFIX like I did, you have to run make install as root or with sudo.
Environment Variables
To get the demo working, I had to add the installation path's lib folder to my LD_LIBRARY_PATH:
echo "export LD_LIBRARY_PATH=$LD_LIBRARY_PATH:/usr/local/lib" >> ~/.bashrc . ~/.bashrc
USB Device Permissions
As Fedora doesn't seem to use a group to control USB device access, I had to use Udev to set appropriate permissions on the Kinect device:
echo 'SUBSYSTEM=="usb", ATTRS{idVendor}=="045e", ATTRS{idProduct}=="02c4", MODE="0666"' | sudo tee /etc/udev/rules.d/99-kinect.rules sudo udevadm control --reload-rules && sudo udevadm trigger
Trying It Out
Now, all that's left to do is to make sure everything works! Assuming you are in the build folder:
./bin/Protonect
You should see a 4-up video feed of the RGB, IR, depth and merged streams.
Hopefully this worked for you like it did for me!
0 notes
Text
OPC UA PubSub on a FPGA using open62541
Overview
In a first step a simple OPC UA server was set up on a FPGA (see our previous blog post: OPC UA Server on a FPGA using open62541). As a starting point it would be good to begin with this example since the PubSub description builds up on the basic OPC UA server.
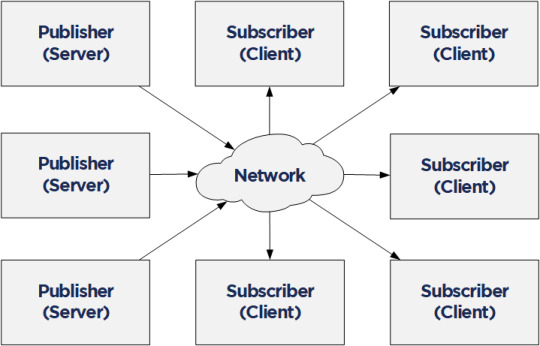
Compared to the Client/Server mechanism, the Publish/Subscribe model is even more interesting in the context of Time Sensitive Networking (TSN). PubSub is defined in Part 14 of the OPC Unified Architecture specification and it allows one-to-many or many-to-many connections. In combination with a TSN sub-layer it can fulfill the real-time requirements for the industry.
Together with NetTimeLogic’s TSN products or the TSN IIC® Plugfest Application (Talker/Listener) an open62541 PubSub application in a MicroBlaze Softcore can be easily combined. For the future we are targeting to realize the TSN Testbed Interoperability Application with the open62541 OPC UA stack and using NetTimeLogic’s TSN End Node IP core as realtime sub-layer.
The example FPGA project and the application are available here:
https://github.com/NetTimeLogic/opcua/tree/PubSub_example
The open62541 implementation is available here (v1.0rc5):
https://github.com/open62541/open62541/tree/v1.0-rc5
Introduction
Compared to the Client/Server example no changes in the MicroBlaze FPGA design are needed. However, some adjustments in the CMake and BSP for lwip are required.
The following implementation is based on the open62541 documentation which describes how to build the library and how to work with Publish/Subscribe. The application creates an OPC UA server thread which is publishing a Dataset. It runs with FreeRTOS and lwip. The FPGA use a MicroBlaze softcore with DDR3, Axi Ethernet Lite, Axi Uart Lite AXI GPIO and AXI Timer. As hardware the same Arty A7-100T development board from DIGILENT as before is used.
Required tools
To build the full project, the following tools are required:
To build the full project following tools are required:
Xilinx Vivado 2019.1
Xilinx SDK 2019.1
CMAKE (Python 2.7.x or 3.x)
UA Expert
Wireshark
BSP adjustments for LWIP
For the simple OPC UA server some adjustments were needed in the lwip BSP of Xilinx SDK.
See Line 10-19: https://github.com/open62541/open62541/blob/master/arch/common/ua_lwip.h
The Pub/Sub functionality need some more adjustments of the BSP. It should be enough to enable the LWIP_IGMP. Nevertheless, it was not possible to generate successfully the BSP again with this option enabled. As a workaround the additional needed defines are added to the already created (in the previous post) open62541 section in the lwip211.tcl (bold) file. This allows to use the standard compilation flow afterwards .
1. Go to:
C:\Xilinx\SDK\2019.1\data\embeddedsw\ThirdParty\sw_services\lwip211_v1_0\data
2. Open the lwip211.tcl
3. Search the proc generate_lwip_opts {libhandle} and go to the end of this procedure
4. Before the line puts $lwipopts_fd “\#endif” add the following code:
#OPEN62541 implementation
set open62541_impl [expr [common::get_property CONFIG.open62541_impl $libhandle] == true]
if {$open62541_impl} {
puts $lwipopts_fd “\#define LWIP_COMPAT_SOCKETS 0”
puts $lwipopts_fd “\#define LWIP_SOCKET 1”
puts $lwipopts_fd “\#define LWIP_DNS 1”
puts $lwipopts_fd “\#define SO_REUSE 1”
puts $lwipopts_fd “\#define LWIP_TIMEVAL_PRIVATE 0”
puts $lwipopts_fd “\#define LWIP_IGMP 1”
puts $lwipopts_fd “\#define LWIP_MULTICAST_TX_OPTIONS 1”
puts $lwipopts_fd “”
}
5. Save the file
After this change and a restart of Xilinx SDK the new option will be visible in the BSP settings GUI of the lwip stack.
Design preparation
For the detailed design preparation steps please check the previous post OPC UA Server on a FPGA using open62541.
Custom information models
In the basic OPC UA server example the default value “reduced” is used as UA_NAMESPACE_ZERO option. For the UA_ENABLE_PUBSUB option it will compile an additional nodeset and datatype file into the name space zero generated file. Depending on what information will be published this might be not enough.
To be on the safe side UA_NAMESPACE_ZERO = “FULL” would be the easiest solution. Since the MicroBlaze CPU is not a very powerful, it is not recommended to use the full namespace. This example would take up to 30 minutes, until the server is up and running! It is highly recommended to use an optimized/customized nodeset for such an application.
https://opcua.rocks/custom-information-models/
XML Nodeset Compiler
Most probably in a final application all the variables/objects etc. are not defined manually in the code. There are different tools (commercial but also open source) available to create this information in a GUI. Out from these tools an XML with the OPC UA Nodeset schema can be exported.
Open62541 provides a compiler which creates C code from the XML Nodeset. This code creates then all the object instances as defined.
The complete documentation can be found here:
https://open62541.org/doc/1.0/nodeset_compiler.html
The compiler result for iicNs.c/h are available in git.
Nodeset in this example
Since this example is targeting for the IIC TSN Testbed application, the Nodeset from there is used. It has the following structure with different types of variables:
For this Information Model the minimal Nodeset with PubSub is not sufficient, therefore a customized one was created. This can be done as described above, or even simpler, just by using the already precompiled open62541.c/h files
CMAKE
For this example, the open62541 tag v1.0rc5 was used:
https://github.com/open62541/open62541/tree/v1.0-rc5
The easiest way is to work with the CMake GUI. Later it can be used in Xilinx SDK.
If the CMake library build is already available only two adjustments are needed:
UA_ENABLE_PUBSUB = ON
UA_ENABLE_PUBSUB_INFORMATIONMODEL = ON
If a new build is created, CMake for open62541 is used with the following adjustment:
UA_ENABLE_AMALGAMATION = ON
UA_ENABLE_HARDENING = OFF
UA_ENABLE_PUBSUB = ON
UA_ENABLE_PUBSUB_INFORMATIONMODEL = ON
UA_ARCH_EXTRA_INCLUDES = <path to microblaze/include>
UA_ARCH_REMOVE_FLAGS = -Wpedantic -Wno-static-in-inline -Wredundant-decls
CMAKE_C_FLAGS = -Wno-error=format= -mlittle-endian -DconfigUSE_PORT_OPTIMISED_TASK_SELECTION=0 -DconfigAPPLICATION_ALLOCATED_HEAP=3 -DUA_ARCHITECTURE_FREERTOSLWIP
UA_LOGLEVEL = 100 (optional for debugging)
1. Start the CMake GUI
2. Select the correct source code path where the open62541 GIT repository is located and the path where the binaries were built last time:
3. Click Configure
4. Change the two parameters:
UA_ENABLE_PUBSUB = ON
UA_ENABLE_PUBSUB_INFORMATIONMODEL = ON
5. Click again on Configure and after that on Generate
6. Generate again the open62541.c/h file in Xilinx SDK.
Make Target->all
7. The amalgamation files open62541.c/h should have now the PubSub feature included
A pre-generated version of the open62541.c/h files is available on git.
Creating the OPC UA server application
The complete SDK workspace is available on git.
C/C++ Build Settings
For the build there are no new adjustments required. Please take the same build settings as in the previous post for the simple OPC UA Server.
Linker script
The linker script setting for the memory must be increased, In the example we use now:
Heap Size: 20MB
Stack Size: 20MB
OPC UA Server PubSub application
In the Xilinx SDK, the available OpcServer.c can be imported to the OpcServer application project.
In the basic server the thread stack size was defined with 4096. This is not enough anymore and the application will report with the hook functions a StackOverFlow. Therefore, the THREAD_STACKSIZE was increased to 16384.
In a first step the network initialization and the basic OPC UA Server configuration is done. Before the server starts, the PubSub specific setup is needed. The application is targeting to be compatible with the Pub/Sub format for the IIC TSN Testbed interoperability application
Define the PubSub connection
In the PubSub connection mainly the transport profile and the multicast network are defined. For this case we used following settings:
transportProfile: http://opcfoundation.org/UA-Profile/Transport/pubsub-udp-uadp
Network Address URL: opc.udp://224.0.0.22:4840
Add a Publishing dataset
This is the collection of the published fields. All PubSub items are linked to this one.
As PublishedDataSetType the following configuration is used:
publishedDataSetType: UA_PUBSUB_DATASET_PUBLISHEDITEMS
Add fields (variables) to the dataset
Here the variables are added by their NodeIds to the Published data set. Depending on the configuration the order of adding the variables has an impact how the published data will look like.
Additionally, a value is set. It is important that the variables have a value (not NULL). If a variable is empty there is just no content for the DataMessage to publish in the PubSub frame.
Add the writer group
The writer group is the important part when it comes to how the message looks like. The whole configuration for the NetworkMessage Header (Extended) is done here (OPC UA Part 14 Chapter 7.2.2.2).
Open62541 allows the specific configuration with the networkMessageContentMask configuration.
For the IIC TSN Testbed interoperability application following settings will be used:
writerGroupMessage->networkMessageContentMask = (UA_UADPNETWORKMESSAGECONTENTMASK_PUBLISHERID | UA_UADPNETWORKMESSAGECONTENTMASK_GROUPHEADER | UA_UADPNETWORKMESSAGECONTENTMASK_WRITERGROUPID | UA_UADPNETWORKMESSAGECONTENTMASK_GROUPVERSION | UA_UADPNETWORKMESSAGECONTENTMASK_NETWORKMESSAGENUMBER | UA_UADPNETWORKMESSAGECONTENTMASK_SEQUENCENUMBER | UA_UADPNETWORKMESSAGECONTENTMASK_PAYLOADHEADER | UA_UADPNETWORKMESSAGECONTENTMASK_TIMESTAMP);
Beside the NetworkMessage Header also settings like the publishing interval or the encoding MimeType are done here.
Add the dataset writer
This part is the second important part and defines how the DataSetMessage Header looks like (OPC UA Part 14 Chapter 7.2.2.3.4).
With the dataSetMessageContentMask and the dataSetFieldContentMask this can be configured.
For the IIC TSN Testbed interoperability application all this additional information is disabled:
dataSetWriterMessage->dataSetMessageContentMask = UA_UADPDATASETMESSAGECONTENTMASK_NONE;
dataSetWriterConfig.dataSetFieldContentMask = UA_DATASETFIELDCONTENTMASK_NONE;
Start the Server
After all the setup for the variables and the PubSub data set has been done the server is ready to start.
Starting the server takes quite some time with this example. After about two minutes the OPC UA Server starts publishing.
Listen to the OPC UA publisher
If there is no Subscriber available there are other options to understand a bit how the variables are published. Either the UaExpert can give some information or via Wireshark the real PubSub Frame can be analyzed.
Before a connection to the OPC UA server is possible the application needs to be compiled and started on the FPGA. After a successful start you should see the following printout on in the Terminal:
UA Expert
UA Expert is also a helpful tool to check some stuff about PubSub. With the option UA_ENABLE_PUBSUB_INFORMATIONMODEL the published dataset information is available.
All the configured nodes from the previous steps are now visible (UADP Connection, PublishedDataSets, DataSetWriter etc.) as a structure directly from the server.
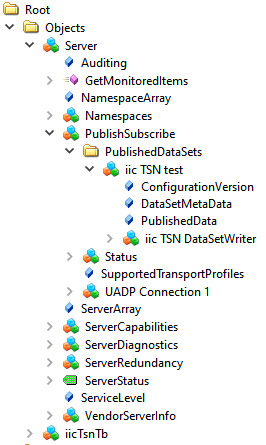
In the Attribute of the object PublishedData all the published variables are visible.
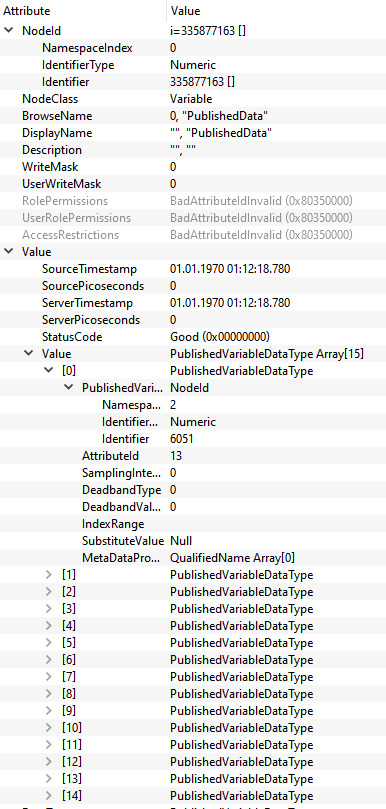
Wireshark
To check if the content of the published frame manually, Wireshark is the simplest way. This sample application uses a publishing interval of 5000 ms, so every 5s a published frame is received in Wireshark.
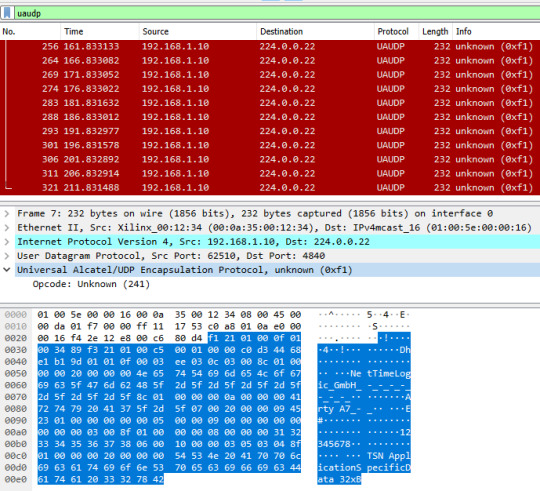
Looking into the encoding of the frame above the following information is published:

Summary
The used version of open62541 (v1.0rc5) allows working with Pub/Sub and allows to do most of the configurations for the header information. However, there were some adaptations required to use it for the IIC TSN Testbed interoperability application.
In our test we saw some problems with some header information.
GroupHeader:
GroupVersion was assigned
SequenceNumber was not assigned
Extended NetworkMessageHeader:
Timestamp was empty
As a workaround we have made some adaptations in the file src/pubsub/ua_pubsub.c by adding some assignments after the following code line:
nm.groupHeader.writerGroupId = wg->config.writerGroupId;
add:
nm.groupHeader.groupVersion = wgm->groupVersion;
nm.groupHeader.sequenceNumber = sequenceNumber;
nm.timestamp = UA_DateTime_now();
With these adjustments it was possible to create the frame as shown in the Wireshark capture.
In a next step we will try to be fully compatible with the IIC TSN Testbed interoperability application and combine it with our TSN core for real time publishing.
0 notes
Photo

AWS SDK for C++をマルチスレッドで利用する際の注意点 http://bit.ly/2vKCXzo
AWS SDK for C++をマルチスレッドで利用する場合、Aws::InitAPI とAws::ShutdownAPI の呼び出しタイミングでハマったのでメモ。
環境準備
DockerとMinioを利用して開発環境を用意しています。
下記記事の設定や実装をベースにしています。
DockerとMinioでAWS SDK for C++の開発環境を構築する – Qiita https://cloudpack.media/46547
検証
シングルスレッドで実行
シングルスレッドで実行してみます。main.cpp のmain メソッドを以下のように変更します。
main.cpp
(略) int main() { // シングルスレッドで実行 put_object("hoge1.txt"); put_object("hoge2.txt"); return 0; }
コンテナ内
# cd /cpp-dev/build # cmake .. # cmake --build . # ./main hoge1.txt Done! hoge2.txt Done!
問題なく実行できました。 Minioが利用するディレクトリにファイルが保存されたのも確認できます。
> tree data/hoge data/hoge/ ├── hoge1.txt └── hoge2.txt > cat data/hoge/hoge1.txt hoge!
マルチスレッドで実行
main.cpp のmain メソッドでマルチスレッド実行するように変更して実行してみます。
main.cpp
(略) int main() { // マルチスレッドで実行 std::thread th_1(put_object, "hoge3.txt"); std::thread th_2(put_object, "hoge4.txt"); th_1.join(); th_2.join(); return 0; }
コンテナ内
# cmake --build . # ./main hoge3.txt Done! main: /aws-sdk-cpp/aws-cpp-sdk-core/source/monitoring/MonitoringManager.cpp:55: void Aws::Monitoring::OnRequestSucceeded( const String&, const String&, const std::shared_ptr<const Aws::Http::HttpRequest>&, const HttpResponseOutcome&, const Aws::Monitoring::CoreMetricsCollection&, Aws::Vector<void*>& ): Assertion `s_monitors' failed. Aborted
1つめは実行されて、2つめがエラーになりました。 Assertions_monitors’ failed.あたりで調べてみると、Aws::InitAPIとAws::ShutdownAPI` の実行タイミングに問題がありそうでした。
How to handle Aws::ShutdownAPI with multiple threads on Windows? · Issue #1050 · aws/aws-sdk-cpp https://github.com/aws/aws-sdk-cpp/issues/1050
c++ – Why does an assert(s_monitors) in MonitoringManager::OnRequestSucceeded() fail? – Stack Overflow https://stackoverflow.com/questions/54290073/why-does-an-asserts-monitors-in-monitoringmanageronrequestsucceeded-fail
InitAPI 、PutObject 、ShutdownAPI の実行後にログを仕込んてみるとPutObject 実行時に落ちてるみたいです。マルチスレッドなので、hoge3.txt とhoge4.txt の実行タイミングが入れ替わることもあります。
# ./main hoge3.txt InitAPI hoge4.txt InitAPI hoge3.txt PutObject hoge3.txt Done! hoge3.txt ShutdownAPI main: /aws-sdk-cpp/aws-cpp-sdk-core/source/monitoring/MonitoringManager.cpp:55: void Aws::Monitoring::OnRequestSucceeded( const String&, const String&, const std::shared_ptr<const Aws::Http::HttpRequest>&, const HttpResponseOutcome&, const Aws::Monitoring::CoreMetricsCollection&, Aws::Vector<void*>& ): Assertion `s_monitors' failed. Aborted
原因と解決策
おそらくですが、Aws::InitAPI とAws::ShutdownAPI がグローバルな初期化関数とクリーンアップ機能なので、マルチスレッドスレッド中に呼び出すとダメっぽいです。
なので、put_object メソッド内で呼び出しているAws::InitAPI とAws::ShutdownAPI をmain メソッドに移動してやればひとまず解決です。
main.cpp
(略) // put_objectメソッド内のInitAPIとShutdownAPI呼び出しをなくす int main() { Aws::SDKOptions options; Aws::InitAPI(options); // マルチスレッドで実行 std::thread th_1(put_object, "hoge3.txt"); std::thread th_2(put_object, "hoge4.txt"); th_1.join(); th_2.join(); Aws::ShutdownAPI(options); return 0; }
Aws::ShutdownAPI についてはAWS公式のGitHubリポジトリにあるサンプルだと複数回実行しても問題なさそうな実装になっているのですが、シングルスレッドで実行するので問題が発生しないのだと思います。 マルチスレッドで実行する場合はAws::InitAPI と同様にメインスレッドで呼び出すのが無難みたいです。
aws-doc-sdk-examples/s3-demo.cpp at master · awsdocs/aws-doc-sdk-examples https://github.com/awsdocs/aws-doc-sdk-examples/blob/master/cpp/example_code/s3/s3-demo.cpp
参考
How to handle Aws::ShutdownAPI with multiple threads on Windows? · Issue #1050 · aws/aws-sdk-cpp https://github.com/aws/aws-sdk-cpp/issues/1050
c++ – Why does an assert(s_monitors) in MonitoringManager::OnRequestSucceeded() fail? – Stack Overflow https://stackoverflow.com/questions/54290073/why-does-an-asserts-monitors-in-monitoringmanageronrequestsucceeded-fail
aws-doc-sdk-examples/s3-demo.cpp at master · awsdocs/aws-doc-sdk-examples https://github.com/awsdocs/aws-doc-sdk-examples/blob/master/cpp/example_code/s3/s3-demo.cpp
DockerとMinioでAWS SDK for C++の開発環境を構築する – Qiita https://cloudpack.media/46547
C/C++によるマルチスレッドプログラミング入門 – Qiita https://qiita.com/nsnonsugar/items/be8a066c6627ab5b052a
元記事はこちら
「AWS SDK for C++をマルチスレッドで利用する際の注意点」
May 08, 2019 at 04:00PM
0 notes
Text
Setting up XMR mining on AMD rig
It was a bright and sunny day and there I was hunched over my keyboard trying to figure out Monero mining on my Nitro Radeon R9 Fury rig. Yeah sure, I should be down at the beach soaking in the sun and sites, but for some reason the blockchain compels me to stay and figure this out.
The light at the end of the tunnel starts here: https://www.monero.how/tutorial-how-to-mine-monero
Your best bet is to follow the CPU compile instructions here: https://github.com/fireice-uk/xmr-stak-cpu/blob/master/LINUXCOMPILE.md
You must get a working build by compiling the g++ libs and new cmake repository. OKay, So now what?
Go here and finish the install of xmr-stak-amd: https://github.com/fireice-uk/xmr-stak-amd
Are you getting a missing OpenCL error? apt install ocl-icd-opencl-dev
amdgpu pro boot problem? The driver is probably conflicting with internal graphics on your mb. On driver install use: ./amdgpu-pro-install --px
Don't forget to add user to video group: sudo usermod -a -G video $LOGNAME
Before you build maybe you want to remove the dev donation?
When you are done, move to the bin folder and edit the config.txt file to include your stratum link and user.worker password login.
Now run your miner ./xmr-stak-amd
May all the shares be with you.
1 note
·
View note