#Microsoft word formatting marks
Text
Microsoft word formatting marks

Microsoft word formatting marks windows 10#
It has been observed on 3 different model devices as well (Lenovo M93p, Dell OptiPlex 3060, Dell Latitude 5580). These symbols represent spaces, new paragraphs, page breaks, and other bits of text and page formatting. Show/hide button in Word 20 respectively. In Word 2007-2013 it is in the Paragraph group on the Home tab. In Word 97-2003, it is on right end of the Standard toolbar between the Document Map button and the Zoom drop-down. Turn the display of formatting marks on or off Go to File > Options > Display. The Show-Hide non-printing characters button will toggle display. I am at a loss for what could be causing this or what could fix it. The hidden formatting symbols are now shown. Show/hide non-printing formatting characters. If you want, you can select all text in an area and apply the normal style to it. We have tried installs on freshly imaged PCs and even re-installing. The Clear Formatting button or command in the Styles Pane returns the text to the normal format. We have seen this on several PCs (although it does not affect less complicated documents). If I zoom in and out on the document, this causes the information that is visible to change from almost nothing to it looking like the ruler and other edit buttons appearing on the document. Here is how it looks with formatting marks turned off:Īnd then, when I turn them on, this happens: However, it appears it cannot display correctly any more. If you print the document, it prints as normal. When they turn on the formatting marks, it causes the page to "glitch out" making many items seemingly disappear. This is the current version my organization is using. Additionally, it appears their version of Office 365 had also been updated to version.
Microsoft word formatting marks windows 10#
After upgrading their devices from Windto Windows 10 1803, it seems that Word 2016 has broken. Permanent reveal: In Word, go to the ribbon and select File > Options > Display. While making them, they utilize the formatting marks in Word to see how many spaces, tabs, and other formatting is done on a page. Choose the Show Formatting Symbols icon to toggle marks on and off. You can also toggle between displaying and hiding formatting marks. I work for an organization that has a Print Shop that makes the forms our other facilities use. In the section titled 'Nonprinting characters', check or uncheck the appropriate boxes to view the marks of your choice. I have come across an issue recently with Word 2016 that I can't seem to resolve.
0 notes
Text
the lust of the flesh, the lust of the eyes, and the ambition of the world | phynoma


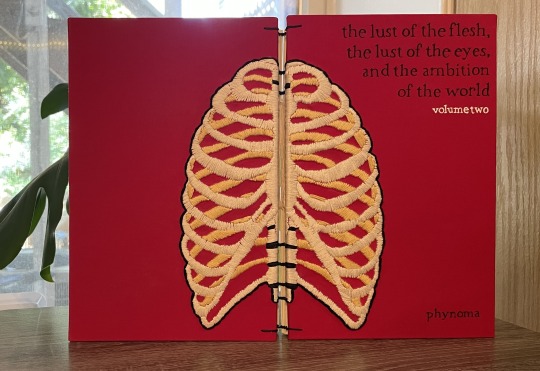
[ID: Two pictures of two hand-bound books, the first of which shows their front covers and the second of which shows their spines and part of their front covers at an angle. The leftmost book is bound in yellow bookcloth and has a hand-embroidered smiling mouth with bloody teeth on the bottom portion of the front and back cover. The title, "the lust of the flesh, the lust of the eyes, and the ambition of the world" is in the top right corner in black as well as the words "volume one" in maroon. The rightmost book is bound in red bookcloth and has a hand-embroidered ribcage on the lefthand side of the front cover and the righthand side of the back cover. The title, "the lust of the flesh, the lust of the eyes, and the ambition of the world" is in the top right corner in black as well as the words "volume two" in white. Both volumes have stitching across the spine that joins the embroidery on the front and back covers so that the design stretches across the spine. /End ID]
It's finally time to share the books I made for the 2023 Rusty Quill Big Bang, hosted by @pilesofnonsense! This year, I was paired with the wonderful @phynoma, who wrote a post-circus AU entitled the lust of the flesh, the lust of the eyes, and the ambition of the world where Jon is marked by an entity known as the Consuming that feeds off hunger and desire and focuses, in Jon's case, around sexual hunger and desire. It's a truly spectacular fic with excellent worldbuilding, spot-on characterization, and a wide variety of sexual encounters of all flavors, and I highly recommend it!
As this fic is written in transcript format, I wanted to go with an open-spine binding style that would have the advantage of both lying extremely flat when opened and giving the fic a more screenplay-like appearance. Also as a consequence of the transcript format, the final page count ended up being large enough that I split the fic into two volumes, the first of which covers season three and the second of which covers seasons four and five.

[ID: Two pictures of the same hand-bound books, the first of which shows volume one and the second of which shows volume two. Both books are fully open to display their front and back covers touching. We can see that the embroidered design, half of which is on the front cover and half of which is on the back, forms a complete picture when the book is fully open. /End ID]
Each volume has hand-embroidered front and back covers, with titles done in black, white, and maroon gel pen. The covers were designed so that when the book is fully open, the front and back cover designs come together to form one single cohesive image. Additionally, when the book is closed, the spine stitching was done so that the design stretches across the spine, thus making the full design complete whether the book is fully open or fully closed. I'm really proud of how these covers turned out, and even though the embroidery took much longer than I anticipated it taking, it's definitely something I would do again!
More description and pictures of the interior of the books are below the cut:
I went with a visually simple yet technically complex design for the typeset of this fic. Microsoft Word's styles were very much my friend, as well as its advanced find-and-replace feature, to automate a lot of the formatting for this fic. The most complex bits were the group chat excerpts and making sure all the profile pictures were positioned correctly, as well as the email chain excerpts in volume one. The text messages were done separately in an HTML workspace and then included via screenshots, and because I had an HTML/CSS text message code already sitting around from a previous project, those were relatively simple to format!
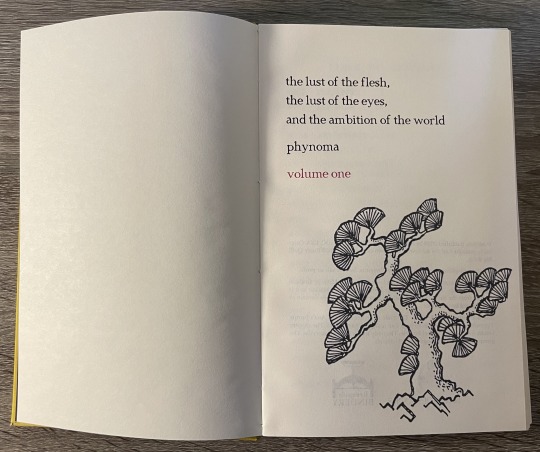

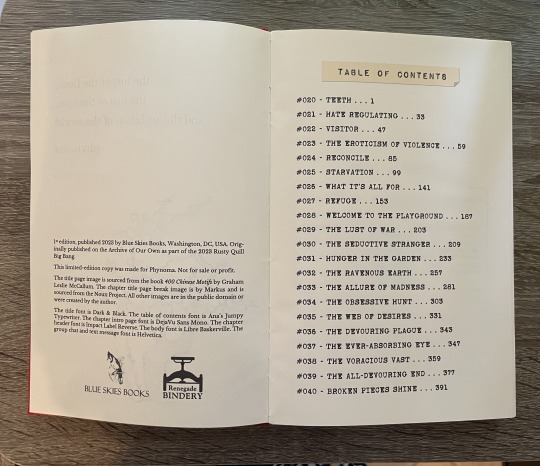

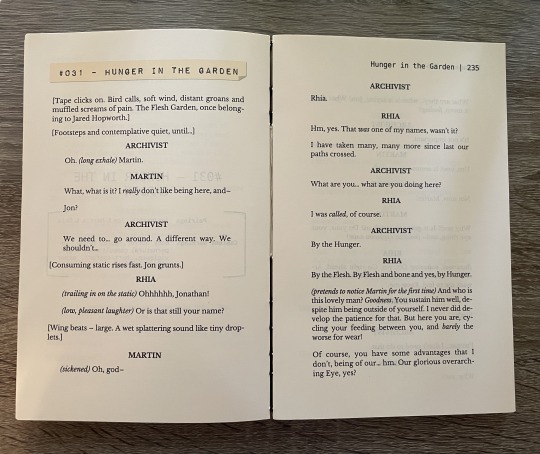

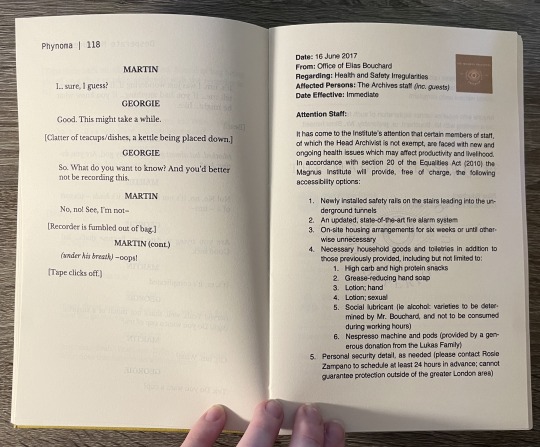
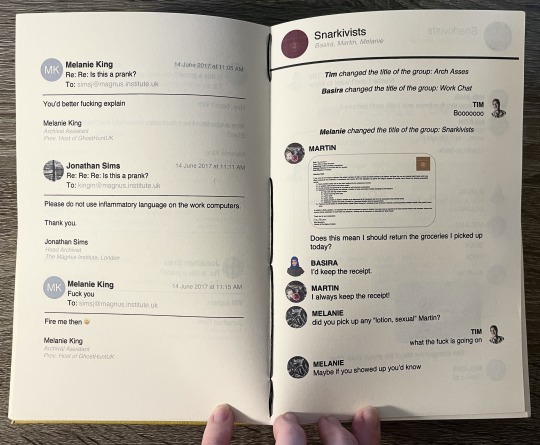
[ID: Eight pictures of the interior of the hand-bound books from previous photos. The first picture shows the title page of volume one, which has the title and author name in black and "volume one" in red, as well as a picture of a ginko tree. The second picture shows the title page of volume two, which has the title and author name in black and "volume two" in red, as well as a picture of a cherry blossom tree. The third picture shows the colophon and table of contents for volume two, highlighting the binder logos--a bluejay and a bookpress--and the faux-label table of contents title. The fourth picture shows the chapter header page for the chapter "voyeurism" in volume one, featuring brackets around the notes, content warnings, and pairings for the chapter as well as a quote from the confessions of augustine, which is separated from the warnings with an open eye graphic. The fifth picture shows the beginning of the chapter "hunger in the garden" in volume two, displaying the transcript formatting of the text as well as the faux-label chapter name on the top left. The sixth picture shows text messages in volume two, which are formatted the same as text messages on an iOS system with blue and gray bubbles and a name header that says "Jonathan Sims." The seventh picture shows some chapter text as well as a faux-office memo, done in a sans serif font, written from Elias Bouchard to the Archives team. The eighth picture shows on the left page faux emails, done in an iOS style with profile pictures for each email, and on the right page a faux-group message with profile pictures for each member and a header that labels the groupchat as the Snarkivists. /End ID]
The fonts used for this typeset were chosen based on those used for the unofficial Magnus Archives transcripts--DejaVu Sans Mono for the chapter intro pages and Libre Baskerville for the body text. I'm not 100% sure that those are the actual fonts used for the unofficial transcripts, but based on the reverse font search I did, those seem to be a close match for it.
This was a big project for me, and I'm so happy to finally see it to completion! Once again, a big thanks to Phynoma for being such a wonderful partner to work with--I'm excited to send you these books so you can see them in person 💜
357 notes
·
View notes
Note
sorry i couldn't find out how to ask on your other blog.
that book binding you posted is gorgeous btw !!
I noticed that in one of the photos you included the disclaimer that you also edited it. I just had a question about how you formatted the text.
one of my biggest gripes with AO3 is text formatting (i often feel like i'm reading a legal document vs a novel/story) . Did you change how it is formatted on AO3 compared to printed?
I feel like i'm in the 0.5% that hate AO3 formatting but i thought i might as well ask in case you have any tips for that. >,>
(also how do you decide on the page size, do you just choose a standard size for all your projects? or do you vary it depending on what you are binding?)
thanks so much for taking the time to answer and for sharing your projects :) !!!!!!!!!!!
hey anon! I have asks turned off for the sideblog, but happy to answer here. Thanks very much!
I'm taking this opportunity to info-dump and link a lot of resources. I think they're useful for people new to either typesetting or bookbinding, but not all are directly related to your queries. That said, hope this is of use!
one of my biggest gripes with AO3 is text formatting (i often feel like i'm reading a legal document vs a novel/story) . Did you change how it is formatted on AO3 compared to printed?
I do a fair bit of editing when I'm binding a fic; typesetting is often the longest part of the process. Your mileage will vary depending on your experience with using word processor software, particularly the paragraph style and page style settings. Another factor is how simple/complicated you want your typeset to look. Replicating a published novel in format is difficult but learnable for a complete beginner.
I'm not equipped to give a full tutorial on how to typeset, but I'll point you towards some useful resources for ficbinding then talk about my own process.
ArmouredSuperHeavy has a tutorial on how to make Ao3's HTML downloads into a printable book in Microsoft Word. I use LibreOffice Writer myself, so this adaptation of the same tutorial is what I follow. Both are very helpful to reference as you're learning the typesetting ropes.
Personally, I don't mess around with HTML. I find it easiest to start by doing a Ctrl+A copy of the Entire Work fic view on Ao3 then pasting that into my word processor. This video tutorial by Beautifully Bound runs through how to do this in Microsoft Word using an AO3 fic as an example, including the associated steps needed to make the fic look novel-like. This is probably the best tutorial to address your gripe with AO3 formatting. Other than that, I'd recommend looking into videos or tutorials about typesetting novels for print. Same idea, and you may get more hits than searching for fanbind/ficbind typesetting tutorials.
More under the cut! Once I start yapping, it's hard to shut me up 🤷♀️
As a point of comparison, here's one of my fics on Ao3 and the corresponding typeset side by side:


Beautifully Bound explains this in far better detail than I will, but off the top of my head, the steps involved:
making a new document and setting the default page size to whatever size I want the book's pages to be (A5 or A6 usually). You can also set the margins at this point, taking account of your printer settings.
CTRL+A and copying the entire work's text on AO3 then pasting it into the document.
removing all hyperlinks and AO3 frontmatter, things like the author tags, summary, notes, etc as well as any website text that got copied over alongside the fic.
(optional) running a spell check and ensuring grammar usage is consistent. For me that's substituting em dashes for hyphens between clauses, enforcing curly double quotation marks for dialogue, etc. LibreOffice Writer automates a lot of this with customisable settings, via Tools -> Auto-Correct. Here's also where to make sure character names are all spelled right, convert the text to or from US to UK English, etc.
picking out fonts for the body text, headers, page numbers, etc. This is where you'll want to use paragraph style settings. Page style settings also comes in clutch if, for example, you'd like different headers on alternating pages. I like having the author on the right, the fic title on the left.
setting the body text first line indent to whatever makes sense visually). This in particular helps make the fic feel more like a novel. You can also play around with line spacing and space between paragraphs at this stage. For this A6 typeset, I had a 0.75cm first line indent, 1.15 line spacing, and 0.15 spacing between paragraphs.
(optional) formatting the first line of the work to use small capitals and to add a drop caps to the first letter of the first word. Again, this is a convention in publishing which add a novel-like feeling to a printed fanwork.
Inserting page numbers, adding images, coming up with how I wanted the "copyright" page to look—optional for the most part, but these are details that make a fic appear more like a novel.
For multi-chapter works, there's extra work in formatting chapter titles as headings so that they're referenced correctly in the automatic table of contents word processors can generate.
Once you have a typeset you're happy with, and if you're considering printing and binding it as a book, then you'll need to look into how to create and print signatures. Personally, this is something I had to actually try (and mess up a bunch of times) before I got to grips with it. Understanding how both your printer and your PDF reader work, particularly printer margins and booklet print settings, is key.
I won't go into as much detail on this, but if it's something you have an interest in, I'd recommend starting with DAS Bookbinding's tutorial. DAS has tutorials for everything bookbinding related so when in doubt, check his channel! Plenty of other YouTubers also have good videos on making signatures.
This resource is extremely useful once you've got your head around how to print signatures manually, so here's a link for anyone in that space: GitHub Bookbinding Imposer. Essentially, this does the signature creation for you, removing the need for booklet print settings in your PDF reader.
also how do you decide on the page size, do you just choose a standard size for all your projects? or do you vary it depending on what you are binding?
I have access to both A4 and A5 sized paper and my printer can handle printing on either size. In bookbinding, normally two pages are printed per side of the paper (which are then folded in half as part of a signature). That is, when I print on A4 paper, it's to make an A5 sized book. Printing on A5 paper will yield an A6 sized book.
Before I begin typesetting, I'll usually know what paper I plan to use, so the typeset will be one size down from the paper. So far, I've made softcover pamphlets at A6 size and casebound books in A5. No real method of choice for me, it's whatever I feel most suits the project.
---
If you made it this far anon, thanks for reading! Here's links to a few general resources if bookbinding is something you'd like to explore more:
DAS Bookbinding (YouTube, bookbinding in all forms)
Sea Lemon DIY (YouTube, bookbinding and other crafts)
bitter melon bindery (YouTube, bookbinding, particularly beginner friendly!)
Jess Less (YouTube, demonstrations of fanbinding and re-binding existing novels)
Papercraft Panda (blog, lots of detailed tutorial on bookbinding)
Renegade Bookbinding Guild (collective and website, loads of fanbinding-specific resources from their members and they have a helpful Discord).
16 notes
·
View notes
Note
How does one format epubs? I have a lot of free time and love formatting, I'd love contributing to the effort of fixing all the doctor who epubs!
It’s complicated, but doable.
First, it depends on the style of PDF. There are some that are crisp scans of every page, scanned by the Camels, (btw the camels if you’re still around you’re a real one.) and for those, I open them in Microsoft Word, because word is like 80% good at converting it, where other PDF eaters suck.
From there, I check out some common problems:
1. Footers: just remove them all. They don’t help in ePub land
2. Headings: for consistency, I change all the Headings to Agency FB, because it’s included in windows and matches the vibe of the headings in the book
3. Chapter Breaks: I turn on the “View Whitespace” mode, and delete everywhere that says section break, and then make sure there’s a page break at the end of every chapter, after the title page, foreword, etc. I also add “Chapter X” on the line before the title of the chapter. The EDAs are not consistent in how they handle chapter titles and I crave consistency so I add it.
4. Table of Contents. Word is Too Powerful™️ and recognizes the table of contents and imports it as a smart, clickable ToC, which, again, we don’t need. You can’t really edit it or anything so I just delete it, and type up a new one, leaving off the page numbers because we won’t need them in epic land.
5. Formatting. This is the bulk of the issue. I use word WildCards, which are similar to RegEx, to find all cases of a lowercase letter or comma followed by a paragraph mark, and replace it with the same character followed by a space. Then I also look for instances of a paragraph mark followed by a lower case letter, and replace it with space plus the letter. Then I replace all Tab characters with a space. Then I look for paragraph marks followed by a space and replace them with just a paragraph mark. This gets like 94% of the bad formatting that the Calibre/kindle/etc auto ePub conversion makes reading insufferable. I try to catch as many of the rest while doing the remaining steps.
6. Formatting cont’d: then, I change the Normal style to be 12pt Garamond. This isn’t important because this is ultimately up to the reader’s chosen font in their eReader, and I don’t embed Garamond, but putting it in Garamond makes it easier for me to notice when something is wrong because I’m used to seeing Garamond while making these.
Then, I use Find/Replace to add a highlight to everything that has the same indent as the Normal style, so I can then see everything weird because it won’t be highlighted. I then scrub through the book and set the problem paragraphs to the Normal style, which then Corrects the indents. I make sure when I do this to watch for italics and make sure that the style didn’t revert them to normal. This happens on short paragraphs with one or two words, and one of which is italicized, as well as paragraphs where the entire thing is italicized.
I also in this step scrub through to find mid-chapter breaks, the favorite storytelling device of the EDAs, and make them uniform. Word will make it into various levels of after-paragraph spacing, but I set the paragraph to normal, and then just leave two empty paragraphs between the sections. This tends to import the best across devices and fonts.
Finally, I make sure that after each chapter and chapter break, the first paragraph isn’t indented, to match the style of the print EDAs.
7. Still formatting, but different. I then do a scrub through and make sure I didn’t screw anything up or forget something. The problem with RegEx is that it will do exactly what you tell it to, even if that’s not what you wanted to happen. So oftentimes my table of contents or copyright page is borked, and I have to go fix it. Once I have it in a decent shape, I
8. Import into Calibre. Just drag and drop the DocX into Calibre and it’ll get added as a book. I then use the metadata editor to download the metadata from the web, so it’ll have good info on it. None of the online sources regocnize this as a series, though, so I add it myself.
9. Convert to ePub: in the Calibre library list I right click the book and convert it to ePub, default settings. DocX->ePub conversion is really simple because they are both just HTML pages under the hood, so it imports perfectly.
10. (Bonus steps) once an ePub, I press T to edit the book, and import Agency FB and Agency FB Bold, and then press the Table of Contents button, to select where the in-reader chapter list points to. And then I use just hyperlinks to make the in-book ToC clickable to take it to the same place.
The uglier, hand-typed PDFs are basically the same, but then I also have to do a bunch of spell check to catch all the typos. And then those don’t have italics at all, so depending on the book, and if I have a copy of it physically, I scan the physical book with my eyeballs to catch italics and add them back to the DocX. It’s not perfect, but it’s better than the baffling choice to just remove them completely.
I know from importing the PDFs a long time ago there’s another person who scanned/typed the books, but I haven’t seen the state of them to know if they’ll need extra TLC.
It’s kind of a whole lot! But also if I get a The Camels PDF I can knock it out in about an hour.
If you wanted to take a crack at it, by all means! Though I really need a proofer, so if you wanted to just start reading and use the form links I have in the folders to report the issues you find, that would be wonderful. Bonus points, you get to read the EDAs lol.
6 notes
·
View notes
Text
Resources and Tools for Writers
Resources and Tools for Writers: A Comprehensive Guide
Writing is a beautiful and often challenging endeavor, where words become art, stories take shape, and ideas find their voice. To support the creative journey, writers have access to a vast array of resources and tools that can enhance their craft, streamline their work, and expand their knowledge. In this comprehensive guide, we'll explore the diverse resources and tools available to writers, from writing software and reference materials to writing communities and self-publishing platforms.
Writing Software and Tools
1. Word Processing Software: Word processors like Microsoft Word, Google Docs, and Scrivener are essential tools for drafting and editing your work. They offer features for formatting, spell-checking, and document organization.
2. Grammar and Editing Tools: Online grammar checkers like Grammarly and ProWritingAid help writers identify and correct grammatical errors, punctuation issues, and style inconsistencies.
3. Mind Mapping and Outlining Tools: Software like MindMeister, Scrapple, and Workflowy can help writers brainstorm, outline their work, and visualize the structure of their projects.
4. Note-Taking Apps: Apps like Evernote and OneNote are perfect for jotting down ideas, collecting research, and organizing notes on the go.
5. Writing Prompts: Websites and apps like Writing Prompts, Reedsy, and The Write Practice provide daily writing prompts and creative exercises to stimulate your imagination.
6. Writing and Word Count Tracking Tools: Tools like NaNoWriMo's word count tracker and online timers like TomatoTimer help writers set goals and monitor their progress.
7. Reference and Research Tools: Tools such as Zotero, Mendeley, and EndNote are useful for managing references, citations, and research materials.
8. Thesaurus and Dictionaries: Online thesauruses like Thesaurus.com and dictionary resources like Merriam-Webster are invaluable for finding synonyms, antonyms, and definitions.
9. Readability Checkers: Tools like Hemingway Editor and Readable.io assess the readability of your writing, helping you create content that's easy to understand.
10. Screenwriting Software: If you're a screenwriter, software like Final Draft or Celtx can assist you in formatting scripts to industry standards.
Reference Materials
1. Style Guides: Manuals like The Chicago Manual of Style, The Associated Press Stylebook, and The Modern Language Association (MLA) Handbook provide guidelines for formatting and citation.
2. Writing Guides: Books like "On Writing" by Stephen King, "Bird by Bird" by Anne Lamott, and "The Elements of Style" by Strunk and White offer invaluable writing advice and wisdom.
3. Dictionaries and Thesauruses: Traditional print dictionaries and thesauruses are still valuable reference materials, especially for writers who prefer the tactile experience of flipping through pages.
4. Writer's Market Guides: The "Writer's Market" series provides information on publishers, literary agents, and markets for various genres.
5. Grammar and Style Books: Resources like "Eats, Shoots & Leaves" by Lynne Truss and "The Elements of Eloquence" by Mark Forsyth offer in-depth exploration of grammar and style.
6. Online Blogs and Articles: Numerous writing blogs and websites, such as Writer's Digest, The Creative Penn, and The Write Life, provide articles, tips, and inspiration for writers.
Writing Communities and Workshops
1. Writing Groups: Local and online writing groups, such as Meetup, Goodreads, and Facebook writing groups, writer’s circle provide a space to share your work, receive feedback, and connect with fellow writers.
2. Writing Workshops: Many organizations and universities offer writing workshops and courses, both in-person and online. They often provide structured learning and feedback opportunities.
3. Critique Partners: Building relationships with critique partners is a valuable way to get constructive feedback on your work. Websites like Critique Circle and Scribophile can help you find critique partners.
4. Author Forums: Websites like Absolute Write Water Cooler and KBoards (for indie authors) are popular author forums where writers can ask questions, share experiences, and seek advice.
5. Writing Conferences: Attending writing conferences and book fairs can help you network with industry professionals, learn from experts, and gain insights into the publishing world.
Publishing Platforms and Self-Publishing Tools
1. Traditional Publishers: If you're pursuing traditional publishing, resources like the Writer's Market guide and QueryTracker can help you find literary agents and publishers. Confused if to go or not for traditional publishing here are 5 Reasons Why Traditionally Published Books Sell Better Than Self-Published Books
2. Self-Publishing Platforms: If you're considering self-publishing, platforms like Amazon Kindle Direct Publishing (KDP), IngramSpark, and Smashwords provide tools and guidelines for self-publishing your work.
3. Book Cover Design Tools: Software like Canva and Adobe Spark can assist with designing eye-catching book covers.
4. Formatting and Layout Services: For professionally formatted books, services like Vellum and Brave Healers Production can help you create professional interior layouts.
5. Book Marketing Tools: Social media networks are essential for book marketing and promotion.
6. Email Marketing Services: Services like Mailchimp and ConvertKit are valuable for building and maintaining a mailing list for your author newsletter.
Income and Rights Management
1. Royalty Tracking Software: Tools like BookTrakr and AuthorEarnings provide insights into book sales, royalties, and income tracking.
2. Copyright and Contracts Resources: Authors should familiarize themselves with copyright law and have legal resources for contract reviews if working with publishers.
Author Platforms and Websites
1. Author Websites: Creating a professional author website is a must. Platforms like WordPress, Wix, and Squarespace offer user-friendly website builders.
2. Blogging Platforms: Blogging can help you connect with readers and showcase your writing. WordPress and Blogger are popular blogging platforms.
3. Social Media: Building a presence on social media platforms like Twitter, Instagram, and Facebook can help you engage with your audience and promote your work.
Financial and Business Tools
1. Tax Resources: As an author, you may need to navigate complex tax matters. Tax software or the services of an accountant or tax professional can be invaluable.
2. Business Tools: Software for bookkeeping, invoicing, and project management can help authors manage their finances and business affairs effectively.
Online Writing Tools
1. Online Writing Platforms: Online platforms like Medium, Wattpad, and Vocal.Media provide opportunities to publish and share your writing with a broad online audience.
2. Collaborative Writing Tools: Tools like Google Docs and Scrivener support collaborative writing projects by enabling real-time editing and sharing. Don’t miss the 5 FREE Writing Tools Authors Must Try In 2023
Conclusion
The journey of a writer is a continuous exploration of creativity and self-discovery. The resources and tools available to writers today are as diverse as the voices and stories they bring to life. This comprehensive guide should serve as a valuable reference for writers looking to enhance their craft, navigate the publishing world, and connect with their audience. Whether you're just starting your writing journey or have been on it for years, these resources and tools are here to support your passion and help you turn your ideas into art.
5 notes
·
View notes
Note
Hi there Runic!
I was wondering your opinion on using Scrivner to draft fics vs using Word? Like pros and cons? (Some of the articles online are so confusing! >//<‘)
Thanks so much for the ask, anon! And also thanks for your patience; I wanted to give this some thought, hence the wait.
I primarily use Scrivener and have been using it for a little over a decade. I also use Word during the final phase of edits. I'll list some of my favorite features of each one, followed by the cons.
Scrivener
Organizing a story in Scrivener is where it shines the most. For a longer story, you can break things down by chapter and easily move them around as needed. For me, I use a single file for all my fics and breakdown folders by fandom, then by ships. The use of status markers and labels and custom meta-data, while initially daunting, are also super great to flag what state your draft is in along with any other indicators you wish to use. For me, I like marking if fics are for an exchange or a gift for a friend. I've even customized the meta-data so I can plug in potential tags and ratings as I go!
Snapshots is a neat function that makes a copy of your current file. I use it with each new phase of editing, in case I need to refer to an older version. It's super easy to switch back and forth between snapshots, plus there's a preview to show what has been removed or added from the last version!
There are a ton of compiling options for when you wish to export your story as a Word doc or a PDF or even for epublishing. I don't use this too often, but I have lots of friends who do and it makes proper formatting really simple.
There is a focus mode that removes all the UI stuff and just shows you the words. If this didn't exist, I wouldn't be able to write anything lolsob.
You can set target goals for each document or even the entire file. And if you have multiple documents in a single folder with word count targets applied, Scrivener will add them all up and give you a total target estimate. Really handy for planning out how long your story will be!
THERE IS A DARK MODE THEME.
Word
The grammar/spelling checker is a lot more robust in comparison to Scrivener.
Sharing your Word document and sharing notes/comments with beta readers is a LOT easier in Word. It's similar to how Google Docs works with leaving comments, replying to each other, and marking them as resolved.
Copy-pasting from Word into AO3's rich text preserves the formatting, whereas I've had a lot of wonky issues going from Scrivener to AO3.
Text-to-speech, while kinda weird, is a godsend when I want to read out loud a fic before posting, but don't have the energy to do so.
If you have Word, you likely have a Microsoft subscription, which means you have access to OneDrive, which makes for VERY easy backups. Plus you can get Word on your phone and work off that and your computer seamlessly at no extra cost.
THERE IS ALSO A DARK MODE.
Hokay, now for cons.
Scrivener
Scrivener is not free. It is a one-time fee of $60~. That said, if you participate in NaNo and win, you can get a discount code (I believe it's 50% off?)
It was originally made for Macs, but then a Windows version was developed. The team behind Scrivener is very small and it took… forever to get the Windows version up to speed with the Mac version. There are still some differences between the two, but thankfully both versions are on the same page. Jumping off of this, there is an iOS version, but no Android version.
If you wish to back up your Scrivener stuff, you can only really do that via a Dropbox account. Also, I believe it's not possible to open the same file on different computer types. So if you have two computers (one Mac and one Windows) and want to open the same file on both, it's not really going to work. In my experience, I've also run into issues getting things to sync and open when using two Windows computers. So if you're planning to bounce around different computers/laptops/etc., definitely keep this in mind.
On top of that, for every device you want Scrivener on? You need to pay for that.
Scrivener has got one hell of a learning curve, too. I've been using it for so long and am STILL discovering new ways to use it. It can be intimidating, even after you go through all the tutorials.
Word
This also costs money, but sadly is not a one-time fee AND you need to invest in a bundle plan instead of just getting Word. Home subscriptions range from $70 to $100 a year, depending if you're getting it just for yourself or for your family/friends to use too. For me, I use it with my boyfriend and we use all the programs a bunch, so it works out well for us. This might work for you too if you're interested in having access to things like Excel and OneNote and cloud storage. But if you just want Word, that's not really feasible.
I haven't experienced this because I've stopped writing novel-length stories in Word, but I've heard from friends that the program slows down after 30k words or so, which is unfortunate and frustrating.
Furthermore, you can't really transition from file to file in Word as you can in Scrivener. You'd need to manage the folders on your computer outside of the program.
Word isn't really designed for book formatting. You CAN do it, but it takes some extra work on your end to format things accordingly, whereas Scrivener has a bunch of built-in features to help with that.
Microsoft is A LOT bigger than the Scrivener team, thus there are frequent updates. And because of that, you need to perform more updates to the program and might even need to reacquaint yourself with features and UI changes.
I hope this helps! Regardless of which program you wish to use, I hope it goes smoothly and you have a blast writing your stories on it!
2 notes
·
View notes
Text
Hope you don’t mind that I decided to make this its own post, because I’ve got a lot to say and replies have a character limit.
First off: welcome to Tumblr! I noticed that you seem to be a new blog. I would HIGHLY recommend updating your profile pic to something recognizably fandom-related and making a post or two - either writing something up real quick, or reblogging some fandom content. Tumblr has had a big influx of bots for the past few months, so most people (myself included) who get followed by an empty blog tend to block immediately. Customizing your page and reblogging content will prevent that from happening.
Second: you’re so sweet! I don’t know about “talent,” but I love sharing my stories with people and knowing that I’ve reached people in some way. And if I’ve inspired you to try your hand at writing, even better! Your creative endeavors will be very welcome.
On to your question: my writing program/app of choice is Scrivener. I used to use Google Docs, because I sometimes write on my laptop and sometimes write on my phone, so I needed a program that can do both. However, as a longfic writer, Google Docs gets kind of frustrating to use after a while. There’s no particular organizational system - it just organizes files based on whichever one you opened last, which is messy when you want to look through your story as a whole but the chapters are scattered among the dozens of files you have. And putting the whole thing in one big doc doesn’t work, either, because it takes forever to load, and scrolling gets laggy.
Scrivener has a KILLER organizational system where you can store all chapters under their own folder within a single document, and even break things down by scene. It makes it so easy to reference earlier chapters. Here’s an example of how it looks on my iphone:
And then when I click into a chapter…
It also has sub-folders for notes, research, characters, inspiration… it’s a writer’s dream.
However, it does have downsides. 1.) it’s not free. For PC or Mac, I wanna say it’s like fifty bucks, and for iPhone it’s like 25ish. In order for me to switch back and forth between PC and iPhone, I had to spend like 75 bucks, plus a subscription to DropBox to sync the two. BUT unlike Microsoft Office, it’s a one-time payment, not a periodic subscription.
2.) It is not available for google phones. The mobile app is only available for iPhones. I don’t know why, or if they plan on ever coming out with a Google app. Maybe Google doesn’t want to make an app because they want people using Google docs. Idk.
3.) Some writing formatting does not carry over to AO3. So for example, when I italicize a word in Scrivener, it doesn’t paste into AO3. I have to mark each italicized word in Scrivener. Then when I paste it into AO3, I have to manually italicize those words and remove the asterisks.
Whatever you choose to use, I’m sure it will be great!
6 notes
·
View notes
Text
Donald Trump Safe After Attempted Assassination at Florida Golf Course

On September 15, 2024, former President Donald Trump was the target of an attempted assassination while golfing at Trump International Golf Club in West Palm Beach, Florida. A suspect, identified as Ryan Wesley Routh, 58, was spotted by Secret Service agents aiming a rifle near the golf course. The agents engaged the suspect, who fled the scene but was later captured by authorities.
Trump, who is currently running for president in the 2024 election, confirmed in a statement that he was safe and unharmed. The FBI is investigating the incident as an attempted assassination, marking the second such attempt in two months, following a shooting at a rally in July. No injuries were reported, and Trump reassured his supporters that he is "safe and well."
Local and federal authorities have increased security measures around Trump following the incident. This heightened threat highlights the ongoing risks faced by high-profile political figures during the 2024 election season.
Read more about-
Why Master Microsoft Word in 2024?

You might be wondering why it’s essential to master Microsoft Word in 2024. Well, here’s the thing—Word is no longer just a basic word processor. In fact, Microsoft has continuously upgraded its features, making it an all-in-one platform for everything from academic writing to business proposals, marketing brochures, and even social media content creation.
In today’s fast-paced digital world, knowing how to use Microsoft Word like a pro can set you apart from your peers. It’s not just about writing text; it’s about creating professional-grade documents quickly and effortlessly. Let's break down how you can become a Word Wizard in no time!
Getting Started: Navigating the New Interface in 2024
First things first, Microsoft Word’s 2024 interface has become more user-friendly while offering advanced tools for power users. If you’re opening Word for the first time in a while, here’s what you need to know about its interface.
Home Tab: This is where you’ll find essential tools like fonts, text alignment, and bullets and numbering. If you're familiar with these, you're off to a great start.
Ribbon Customization: Did you know you can customize the ribbon at the top of your Word document? It allows you to add, remove, or rearrange tabs according to your workflow. This feature makes it easy to access your most-used tools, increasing efficiency.
Tell Me Bar: You don’t have to remember where every feature is located. Simply type what you need into the Tell Me Bar—this feature acts like your personal assistant inside Microsoft Word.
Essential Keyboard Shortcuts You Need to Know
One of the fastest ways to become a Microsoft Word Wizard is by mastering keyboard shortcuts. Why? Because they drastically reduce the time spent navigating menus. Here are some essential ones that every Word power user should know:
Ctrl + B – Bold text
Ctrl + I – Italicize text
Ctrl + U – Underline text
Ctrl + Z – Undo an action
Ctrl + Y – Redo an action
Ctrl + C – Copy selected text
Ctrl + V – Paste copied text
Ctrl + F – Open the Find feature (super useful for long documents)
Ctrl + Shift + L – Apply a bullet list
Ctrl + P – Print the document
Memorizing these shortcuts can turn you into a Word Wizard almost overnight. Imagine typing out a report and formatting it within minutes just by using these shortcuts!
Styles and Formatting: Making Your Documents Look Professional
Gone are the days of plain, boring text. In 2024, Microsoft Word is all about creating professional-looking documents with just a few clicks. Here’s how you can make your work stand out using Styles and Formatting.
Heading Styles: If you're writing a lengthy document or a report, use the built-in heading styles to structure your work. These headings not only make your content more readable but are also crucial for creating an automated Table of Contents later.
Custom Styles: Want to give your document a personal touch? Create your own custom styles. Just select a portion of text, apply the formatting you want, and save it as a New Style. You can use this across all your documents, keeping a consistent look and feel.
Themes: In 2024, Microsoft Word offers various document themes that adjust fonts, colors, and layouts throughout the entire document. Want your report to look modern and sleek? Apply a pre-set theme with one click!
By using these advanced formatting tools, your document will look polished and professional, even if you're rushing to meet a deadline.
Collaborative Editing: Real-Time Co-Authoring in Microsoft Word
In today’s remote-first world, collaboration is crucial. Luckily, Microsoft Word 2024 has taken collaboration to the next level with real-time co-authoring.
How It Works: Simply share your document via OneDrive or SharePoint, and multiple people can edit the document at the same time. You can see others’ edits as they happen, eliminating the need to send multiple email attachments back and forth.
Track Changes: If you're working on a shared project, using the Track Changes feature is essential. It shows all edits made by others and lets you accept or reject them. This feature is a must-have for team projects, legal documents, and content reviews.
Comments and Mentions: Adding comments and @mentions allows you to communicate directly in the document. Simply highlight the text you want to discuss, insert a comment, and @mention a colleague. They’ll get an email notification with a direct link to the exact spot in the document.
Being able to collaborate seamlessly in Microsoft Word makes working on team projects a breeze, whether you’re in the same office or across the globe.
Mastering the Table of Contents and Indexing
Ever struggle with long documents? Microsoft Word’s Table of Contents (TOC) and Indexing features are lifesavers. They help both you and your readers navigate through lengthy documents with ease.
Table of Contents: To create a TOC, make sure you’ve applied heading styles throughout your document. Then, go to the References Tab, and click Table of Contents. Word will automatically generate a clickable TOC that updates as you edit.
Indexing: If you’re writing a book, thesis, or report with keywords, using the Indexing tool is a great way to point readers toward specific sections. Mark entries for the index, and Word will automatically compile them at the end of your document.
These tools not only improve the readability of your documents but also enhance professionalism, especially for lengthy reports or academic work.
Harnessing the Power of Macros: Automate Your Repetitive Tasks
Are you tired of performing the same tasks over and over again in Word? Time to unlock the power of Macros! Macros allow you to automate repetitive tasks, making you a true Word Wizard.
What Are Macros? A macro is a series of recorded actions that you can replay with a single click. For example, if you frequently format tables the same way, you can create a macro to do it for you.
How to Create a Macro: Navigate to the View Tab and select Macros. Record your steps, and then save it. Next time you need to perform that task, run the macro, and Word will handle everything automatically.
This feature is a huge time-saver and one of the most advanced tools in Microsoft Word that every user should know.
Mastering Advanced Document Protection
In 2024, document security is more important than ever. Luckily, Microsoft Word offers various options to protect your work.
Password Protection: Add a password to your document by going to File > Protect Document > Encrypt with Password. This ensures only authorized individuals can access the document.
Restrict Editing: If you want to allow others to view your document but not make changes, you can restrict editing. This feature lets you set specific permissions for collaborators.
Digital Signatures: Need to sign off on an important report? Use Word’s Digital Signature feature, which allows you to sign documents electronically, ensuring authenticity and integrity.
Document protection isn’t just for sensitive files—it’s an essential part of being a Word Wizard in today’s digital age.
Wrapping Up: Why You Need to Be a Word Wizard in 2024
Becoming a Word Wizard: Using Microsoft Word Like a Pro in 2024 isn’t just about learning a few tricks. It’s about transforming the way you work, saving time, and creating professional-quality documents with ease. From keyboard shortcuts and styles to collaboration tools and automation with macros, there’s no limit to what you can achieve with Microsoft Word once you’ve mastered it.
So, whether you’re working on a report, creating content for your blog, or collaborating with colleagues on a business proposal, now is the time to take your skills to the next level. In 2024, Microsoft Word isn’t just a word processor; it’s a powerful tool that can transform the way you work. Embrace it, and you’ll truly become a Word Wizard!
0 notes
Text
Zomato Delivers Stellar Q1 Results, Shares Soar

Zomato, India's leading food delivery and restaurant aggregator, has announced its financial results for the first quarter ended June 30, 2024, and the numbers are nothing short of spectacular. The company has posted a multi-fold jump in net profit, sending its shares soaring on the stock market.
Key Highlights:
Profit Surge: Zomato's net profit for the quarter surged to Rs [net profit figure], a staggering increase of [percentage] compared to the same period last year. This marks a significant turnaround for the company, which had previously grappled with losses.
Revenue Growth: The company's revenue from operations grew by [percentage] to reach Rs [revenue figure] during the quarter, driven by strong performance across its various business segments.
Order Volume: Zomato witnessed a robust increase in order volume, indicating growing customer adoption of its platform.
Hyperpure Success: The company's B2B arm, Hyperpure, continued to demonstrate strong growth, contributing significantly to overall profitability.
Market Reaction:
Investors have reacted positively to Zomato's impressive performance, with the company's share price surging by [percentage] on the news. The results have also led to upward revisions in target prices by several brokerage firms, reflecting bullish sentiment towards the stock.
Future Outlook:
Zomato's strong Q1 performance has boosted investor confidence in the company's ability to achieve profitability and sustainable growth. The company's focus on expanding its offerings, including quick commerce and dining out, is expected to drive future growth.
Read more about-
Word Wizard: Using Microsoft Word Like a Pro in 2024

In today's digital age, mastering Microsoft Word is more than just a basic skill—it's a necessity. Whether you're a student, professional, or entrepreneur, being proficient in Microsoft Word can significantly boost your productivity and enhance your document creation capabilities. In 2024, Microsoft Word continues to evolve, offering a plethora of advanced features and tools that can transform you into a Word wizard. This article will guide you through the essential tips and tricks to using Microsoft Word like a pro in 2024.
1. Introduction to Microsoft Word in 2024
Microsoft Word has come a long way since its inception. In 2024, it remains the go-to word processing software for millions around the world. With new updates and features, it’s more powerful and user-friendly than ever before.
2. Why Mastering Microsoft Word is Essential
Professional Edge
Being adept at Microsoft Word gives you a professional edge. It enables you to create polished documents, reports, and presentations that stand out.
Increased Productivity
Mastering Word's features can save you a significant amount of time. From quick formatting to automated functions, these tools streamline your workflow.
Versatility
Microsoft Word is not just for writing. It's a versatile tool that can be used for creating newsletters, brochures, resumes, and even complex reports with graphs and tables.
3. Getting Started: The Basics
Familiarize Yourself with the Interface
The first step to mastering Word is to get comfortable with its interface. Explore the ribbon, toolbar, and various tabs.
Customizing the Quick Access Toolbar
Personalize the Quick Access Toolbar with your most-used commands for faster access.
4. Advanced Formatting Techniques
Styles and Themes
Using styles and themes consistently can make your documents look professional and cohesive. Learn to create and apply custom styles.
Section Breaks and Page Layout
Mastering section breaks and page layout options can help you manage large documents efficiently.
5. Efficient Editing and Proofreading
Track Changes and Comments
Track changes and comments are invaluable tools for collaborative editing. Learn to use them effectively to streamline the review process.
Spelling and Grammar Tools
Utilize Word’s built-in spelling and grammar tools, including the new AI-powered editor, to ensure your documents are error-free.
6. Enhancing Documents with Multimedia
Inserting Images and Graphics
Learn how to insert and format images and graphics to enhance your documents visually.
Using SmartArt and Charts
SmartArt and charts can help you present data in a clear and engaging way. Get familiar with these tools to make your information stand out.
7. Automation and Productivity Features
Using Macros
Macros can automate repetitive tasks, saving you time and effort. Learn to record and run macros to streamline your workflow.
Quick Parts and Building Blocks
Quick Parts and Building Blocks are reusable pieces of content that can be inserted into documents. They are perfect for standard texts like signatures and disclaimers.
8. Collaboration and Sharing
Co-Authoring Documents
Co-authoring allows multiple users to work on a document simultaneously. Learn how to share and collaborate effectively in Word.
Protecting and Securing Documents
Understand the various options for protecting and securing your documents, including password protection and restricting editing.
9. Advanced Document Management
Mastering the Navigation Pane
The navigation pane is a powerful tool for managing long documents. Learn to use it to quickly navigate and organize your content.
Using Templates
Templates can save you time and ensure consistency. Discover how to create and use custom templates for different types of documents.
10. Utilizing Word’s Integration with Other Office Apps
Linking with Excel and PowerPoint
Integrate Word with Excel and PowerPoint to enhance your documents with data and slides.
Using OneDrive and SharePoint
Leverage OneDrive and SharePoint for document storage, sharing, and collaboration.
11. Accessibility and Ease of Use
Using Accessibility Checker
Ensure your documents are accessible to all users by utilizing the Accessibility Checker.
Voice Typing and Dictation
Voice typing and dictation are powerful tools for hands-free document creation and editing.
12. Tips and Tricks for Power Users
Keyboard Shortcuts
Master keyboard shortcuts to increase your efficiency and speed up your workflow.
Hidden Features and Hacks
Discover hidden features and hacks that can make working in Word even more efficient.
13. Keeping Up with Updates
Staying Informed
Microsoft regularly updates Word with new features and improvements. Stay informed to make the most of these updates.
Joining the Insider Program
Join the Microsoft Insider Program to get early access to new features and provide feedback.
14. Troubleshooting Common Issues
Fixing Formatting Problems
Learn how to troubleshoot and fix common formatting issues that can arise.
Recovering Lost Documents
Understand the steps to recover unsaved or lost documents in Word.
15. Conclusion
Mastering Microsoft Word in 2024 is more attainable than ever. With the right knowledge and practice, you can become a Word wizard, creating professional, polished, and efficient documents with ease. Embrace the power of Word and watch your productivity soar.
0 notes
Text
Top 10 Formatting Practices for Effective Microsoft Word Document Creation
1.What is the basic formatting in MS Word?
In Microsoft Word, there are several basic formatting options that allow users to customize their documents to meet their specific needs. Some of the used formatting features include changing the font style, size, and colour, adjusting paragraph alignment, setting indents and spacing, creating bulleted or numbered lists, and applying styles such as headings or subheadings. Users can also insert tables, images, and hyperlinks to enhance the visual appeal and functionality of their documents. Additionally, Word offers tools for spell-checking, grammar checking, and word count, ensuring that the final document is error-free and meets the desired word count requirements. By mastering these basic formatting options, users can create professional-looking documents that are both visually appealing and easy to read.
2.What are the formatting styles Microsoft Word?
Microsoft Word offers a variety of formatting styles to help users create professional and visually appealing documents. Some of the common formatting styles include bold, italics, underline, and strikethrough for text, as well as options for changing font type, size, and colour. Users can also adjust paragraph alignment, indentation, spacing, and bullet points for a cleaner layout. In addition, Microsoft Word provides tools for creating headers and footers, tables, and lists to organize information effectively. Users can further enhance their documents with features like borders, shading, and watermarks. With these formatting styles, users can easily customize their documents to meet their specific needs and create polished, professional-looking content.
3.What is the best format for word documents?
The best format for word documents largely depends on the specific needs of the user and the intended audience. However, the commonly used and universally accepted format is Microsoft Word (.docx). This format ensures compatibility across different operating systems and word processing software, making it easy to share and collaborate on documents. Additionally, .docx files are easily editable and offer a wide range of formatting options. For documents that require strict formatting or preservation of layout, PDF (.pdf) format is recommended. It ensures that the document will appear exactly as intended regardless of the device or software used to view it. Ultimately, the best format for word documents is one that meets the requirements of the user and facilitates effective communication.
4.What is formatting characters in MS Word?
Formatting characters in MS Word refer to the special symbols and codes that are used to control the appearance of text in a document. These characters include spaces, tabs, line breaks, and paragraph marks, among others. By utilizing formatting characters, users can adjust the layout, alignment, and spacing of their text to create a polished and professional-looking document. For example, adding a tab character can indent text, while inserting a line break can start a new line without creating a new paragraph. Understanding how to effectively utilize formatting characters in MS Word is essential for creating documents that are visually appealing and easy to read.
5.How to format a word document to look professional?
To format a Word document to appear professional, first ensure that the font and size are consistent throughout the entire document. Choose a professional font such as Arial, Calibri, or Times New Roman and set the font size to 12pt. Use headings and subheadings to organize the content and make it easier to read. Adjust the line spacing to 1.5 or double spacing to improve readability. Include a title page with a clear and concise title, author name, and date. Add a table of contents if necessary for longer documents. Lastly, proofread the document for any errors in spelling, grammar, or formatting to ensure a polished and professional appearance.

0 notes
Text
digital marketing courses|graphic designer course|ms office course
Unlock Your Future with Our Comprehensive Courses
In today’s fast-paced digital world, staying ahead of the curve is essential. Whether you are looking to enhance your career, learn new skills, or simply stay relevant in the ever-evolving job market, our institute offers a range of courses designed to meet your needs. Among our most popular offerings are Digital Marketing Courses, Graphic Designer Courses, and MS Office Courses. Let's dive into what each of these courses can offer you.
Digital Marketing Courses: Master the Art of Online Presence
In an era where the internet is a dominant force, understanding digital marketing is crucial for any business or individual looking to make a mark. Our Digital Marketing Courses are designed to equip you with the latest tools and strategies to succeed in the digital space. You will learn:
SEO Techniques: Optimize your website to rank higher on search engines.
Social Media Marketing: Engage and grow your audience on platforms like Facebook, Instagram, and Twitter.
Content Marketing: Create compelling content that drives traffic and conversions.
Email Marketing: Develop effective email campaigns that reach and convert your audience.
Analytics and Data Interpretation: Measure the success of your digital marketing efforts and make data-driven decisions.
By the end of this course, you will be ready to develop and implement comprehensive digital marketing strategies that deliver real results.
Graphic Designer Course: Unleash Your Creativity
Are you passionate about design and looking to turn your creativity into a career? Our Graphic Designer Course is perfect for you. This course covers everything you need to know to become a professional graphic designer, including:
Design Principles: Understand the fundamentals of design, color theory, and typography.
Software Proficiency: Gain hands-on experience with industry-standard software like Adobe Photoshop, Illustrator, and InDesign.
Project-Based Learning: Work on real-world projects that help you build a strong portfolio.
Branding and Identity: Learn how to create cohesive brand identities and marketing materials.
UX/UI Design: Understand the basics of user experience and user interface design.
With our Graphic Designer Course, you will develop the skills needed to create visually stunning designs that communicate effectively and leave a lasting impression.
MS Office Course: Essential Skills for Every Professional
Proficiency in Microsoft Office is a fundamental skill for any professional in today’s job market. Our MS Office Course ensures you are well-versed in the suite of tools that are essential for business operations. The course includes:
Microsoft Word: Master document creation, formatting, and editing.
Microsoft Excel: Learn advanced spreadsheet techniques, data analysis, and visualization.
Microsoft PowerPoint: Create compelling presentations that effectively communicate your ideas.
Microsoft Outlook: Manage your emails, calendar, and tasks efficiently.
Microsoft Access: Understand the basics of database management.
This course is ideal for individuals looking to enhance their productivity and efficiency in the workplace. By the end of the course, you will be confident in using MS Office tools to streamline your workflow and improve your overall job performance.
Why Choose Our Institute?
At our institute, we are committed to providing high-quality education that prepares you for the real world. Here’s why you should choose us:
Experienced Instructors: Learn from industry experts with years of experience.
Hands-On Learning: Gain practical experience through project-based learning.
Flexible Scheduling: Choose from a variety of class times to fit your schedule.
Career Support: Receive guidance and support in job placement and career advancement.
Invest in your future today by enrolling in our courses. Whether you're aiming to become a digital marketing guru, a skilled graphic designer, or a proficient MS Office user, our institute has the right program to help you achieve your goals.
For more information or to en roll, visit our website or contact our admissions office. Your journey to success starts here!
0 notes
Text
The formatting of Microsoft word is actually about to drive me bonkers!! Why does it change it after I’ve saved it! I’ll get marked down if it’s not perfect APA and this thing decides I don’t actually need it??
0 notes
Text
7 Must-Have Android Studio Plugins for Efficient Android Mobile App Development

Quick Summary: Android Studio is an Integrated Development Environment (IDE) for Android application development. Based on IntelliJ IDEA, the Android Studio contains all the features you need to develop any kind of Android app and even has support for a Java-based web browser called WebView. It’s built via Gradle and offers a whole bunch of new features including faster build speeds, instant run, multi-monitor support, code analysis, lint tools, cloud tools integration, and various other great additions.

Essential Plugins for Android Mobile App Development
ADB Idea:
ADB Idea by SOOY KIM is an Android developer plugin for Android Studio and IntelliJ IDEA. It allows developers to perform various steps at the click of a button instead of creating them from scratch. This helps them speed up the development process. The plugin offers time-saving features such as creating Temporary Services, integration with Run, Debug, and Deploy actions, and much more.
CodeGlance:
The CodeGlance plugin is a handy tool to view the complete code. Once you enable the CodeGlance, the whole code displays at the side of the screen in a minimap format. It allows you to navigate through various functions, classes, and files. You can easily sort the blocks of code by their color. The CodeGlance supports PHP, HTML & CSS formats. It provides an excellent feature for programmers and web developers to improve productivity and coding efficiency.
Key Promoter X:
Developers who have grown tired of using a mouse to perform their repetitive tasks will be delighted with the new version 3.0.2 of Key Promoter X, a free plug-in from Microforte that automates creating keyboard shortcuts to help facilitate quicker and more efficient workflows. With this latest release, developers now have access to improved support for Internet Explorer both on Windows and on Mac OSs, as well as new capabilities for working with ActiveX controls in Microsoft Word and Excel.
Scala:
Sbt-android is a plugin that provides tools for creating Android applications using the Scala language. It’s an extension to sbt-native-packager and allows you to build and run your application from an sbt console quickly. It automatically downloads and updates the Android SDK for you. How to build up a new project with sbt-android and how to set up IntelliJ is very well explained in the README in the GitHub repository (or set up with Android Studio).
IdeaVim:
IdeaVim is a Vim plugin that integrates with the IDEA (IntelliJ IDEA) IDE and provides many additional features. It supports motion keys, deletion/changing, marks, registers, some Ex commands, Vim regexps, configuration via .ideavimrc, macros, and Vim plugins. IdeaVim is used by the alternative SciTE editor. IdeaVim can be installed in IDEA itself and in the external EditorPlugin directory; it provides many additional features to IDEA. To use IdeaVim you must have Vim 6.1 or higher installed on your machine.
Android Input:
The Android input plugin allows you to simply input text into an Android device or emulator easily. The plugin doesn’t require any advanced configuration. It’s as simple as typing your message into the copy-and-paste buffer and clicking a button.
Android Drawable Preview:
The Android system provides developers with different drawable items that are utilized to create the interface of an application. Some of these components comprise buttons, icons, and text labels. When developing an app, you have to remember not to use the same drawable for all the required items. You should use the default button but create a custom shape for it. Furthermore, you should also change the background color because the default one wouldn’t be appropriate in every situation.
Conclusion
While plugins can enhance your workflow and boost productivity, it’s important to exercise caution. Overloading your environment with plugins can have a detrimental impact on performance. Therefore, it’s advisable to make informed selections and utilize only the most valuable ones. We are a team of expert Android app developers offering our services to clients across the globe. You might be looking for an experienced mobile app developer to build your dream Android application. In case, you’re looking for app developers for Android, iOS or any other platform then do not worry and just get in touch with the experts at Brain Inventory. We’ll help you achieve your goal with a precise development approach.
#android mobile application development company#best android app development company#custom android app development services
0 notes
Text
HTML is a standard markup language for creating the structure of web pages. HTML allows you to display your website's content, such as paragraphs, lists, images, and links, in a structured way. HTML5 is the latest and most important version of HTML.

HTML - Hypertext mark-up language is standard mark-up language which is very useful in creating webpage and web application.
HTML describes the structure of Web pages using mark-up. HTML elements are the building blocks of HTML pages. HTML elements are represented by tags.
HTML is easy to learn and use, making it perfect for beginners. If you're looking for career opportunities, HTML can open the door to her web development, web design, front-end development, and user experience design.
HTML allows you to organize and format documents similar to Microsoft Word. It is also important to note that although HTML is currently considered an official web standard, it is not considered a programming language because it does not allow you to create dynamic functionality.
HTML is the backbone of every website. You can use it to create the structure and layout of your website. Additionally, you can use HTML to design your own websites or edit existing ones.
HTML language contains following topics at TCCI
Overview of HTML, HTML Basic Tags, HTML Elements, HTML Attributes, HTML Formatting, HTML Meta Tags, HTML Comments, HTML Images, HTML Position, HTML Tables, HTML Lists, HTML Links, HTML Blocks, HTML Background, HTML Colours, HTML Fonts, HTML Style sheet marquee etc.
Course Duration: Daily/2 Days/3 Days/4 Days
Class Mode: Theory With Practical
Learn Training: At student’s Convenience
TCCI provides the best training in HTML programming through different learning methods/media is located in Bopal Ahmedabad and ISCON Ambli Road in Ahmedabad.
For More Information:
Call us @ +91 9825618292
Visit us @ http://tccicomputercoaching.com
#computer classes in bopal ahmedabad#computer classes in ISCON ambli road ahmedabad#computer institute in bopal ahmedabad#computer institute in ISCON ambli road ahmedabad#computer course in bopal ahmedabad
0 notes
Text
Adobe Scan: PDF Scanner, OCR

The Adobe Scan scanner app turns your device into a powerful portable scanner that recognizes text automatically (OCR) and allows you to save to multiple files formats including PDF and JPEG.
The most intelligent scanner app. Scan anything — receipts, notes, documents, photos, business cards, whiteboards — with text you can reuse from each PDF and photo scan.
HOW IT WORKS
• With the Adobe Scan scanner app, you can make anything scannable.
• Use the PDF scanner to quickly create a photo scan or PDF scan.
• Scan any document and convert to PDF.
CAPTURE
• Scan anything with precision with this mobile PDF scanner.
• Advanced image technology automatically detects borders, sharpens scanned content, and recognizes text (OCR).
ENHANCE
• Touch up scans or photos from your camera roll.
• Whether it’s a PDF or photo scan, you can preview, reorder, crop, rotate, and adjust color.
CLEANUP UP YOUR SCANS
• Remove and edit imperfections, erase stains, marks, creases, even handwriting.
REUSE
• Turn your photo scan into a high-quality Adobe PDF that unlocks text through automated text recognition (OCR).
• Reuse text from each PDF scan thanks to OCR.
SCAN ANYTHING, ANYWHERE, ANYTIME
• Capture forms, receipts, notes, and business cards with this mobile PDF scanner.
• The Adobe Scan scanner app even lets you scan multi-page documents and save with a single tap.
RECYCLE CONTENT
• The Adobe Scan PDF scanner makes any content scannable and reusable.
• Free, built-in optical character recognition (OCR) lets you reuse scanned text and content by creating a high-quality PDF can work with in the free Adobe Acrobat Reader app.
• You can even turn Adobe Scan into a tax receipt scanner to highlight expenses with ease.
QUICKLY FIND DOCUMENTS IN PHOTO LIBRARY
• This powerful scanner app automatically finds documents and receipts in your photos and turns them into PDF scans, so you don't have to.
• Automatic OCR turns text into content you can edit, resize, and reuse in other documents.
SAVE BUSINESS CARDS TO CONTACTS
• Scan a business card and Adobe Scan turns into a fast business card scanner and reader.
• Contact information will be automatically extracted so you can quickly add to your device contacts — no typing needed.
GET MORE DONE ON THE GO
• Save each scan to Adobe Document Cloud for instant access and sharing.
• Even lengthy legal documents become manageable and scannable with the Adobe Scan scanner app, which lets you search, select, and copy text.
• You can also open a PDF scan in Acrobat Reader to highlight key sections, add comments, fill and sign.
IN-APP PURCHASE
Subscribe for even more scanning power. Subscriptions work across Scan and Reader mobile apps and Acrobat on web.
• Combine scans into one file so you can take multiple scans and consolidate into one document.
• Export PDFs to Microsoft Word or PowerPoint file formats to integrate with your workflows.
• Increase OCR capacity from 25 to 100 pages so that you can find text in multiple scans.
Download the best free mobile scanner to convert photos and documents into PDF and JPEG files wherever you are. With OCR technology, you can easily digitalize books, business cards, and business receipts and access them via the Adobe Document Cloud. Adobe Scan is the PDF converter trusted by millions worldwide. Scan photos to high-quality PDFs or JPEGs and share easier than ever before.
Terms & Conditions:
Your use of this application is governed by the Adobe General Terms of Use http://www.adobe.com/go/terms_en and the Adobe Privacy Policy http://www.adobe.com/go/privacy_policy_en
Do Not Sell or Share My Personal Information: www.adobe.com/go/ca-rights
Read the full article
0 notes
Text
Mastering Styles, Table Of Contents And Indexing In Microsoft Word
Styles can save you significant time and effort by applying consistent formatting throughout your document and instantly creating a Table of Contents which is automatically updated.
A Table of Contents can include titles or descriptions and page numbers for sections or chapters and outline your content giving readers a high-level view of the structure and segments in your documents.
Indexing allows you to mark keywords and phrases in a document and present those alphabetically at the end of your document in table format with page numbers. You can even automate your indexing process and index multiple documents in minutes.
Including a Table of Contents and index can transform documents such as reports, complex documents, and manuals from average to a professional standard.
Why Should You Attend
» Understand the latest powerful and most relevant MS Office functions available
» Work starter, faster and more effectively
» Boost profit, efficiency, and productivity
» Improve job satisfaction, team performance, and professionalism
» Gain strong competitive advantage at peer and business level
» Achieve more in less time with higher quality results
» Strengthen your resume and justification for increased salary
Areas Covered
» Apply styles to main headings
» Set Table of Contents options
» Insert a Table of Contents
» Automatically update a Table of Contents
» Mark words and phrases for indexing
» Create and use an automatic concordance file
» Insert a document index
» Automatically update a document index
» Delete marked index entries in a document
Who Will Benefit
Staff, managers, and executives who are required to confidently manage data and present business-critical information in a wide variety of private and public sector professions including:
» Accounting
» Banking
» Business Analysis
» Economics
» Finance
» Insurance
» Investment Advice
» Management
» Statistics
» Strategic planning
To Register (or) for more details please click on this below link:
https://rb.gy/mz2lj/a>
Email: [email protected]
Tel: (989)341-8773

0 notes
Last Seen Blogs

ophelianightfall
My tiny dark world

sh00k0
sketchbook

clumsycontessa
My Thoughts

leather-rab
Leather_slave

itissadbutitsmy-artblog
#1 wizard city fan